Dream Of Mirror Online

Dream Of Mirror Online

Not enough ratings
Cʟᴀss: ʙʟᴀᴅᴇᴍᴀsᴛᴇʀ
By Metsushiro
Stats, skills and builds
   
Award
Favorite
Favorited
Unfavorite
BLADEMASTER
Default gear 🔪 Saber : significantly boost p.atk 🥋 Light armor : provides p.def and p.atk Common roles 🤺 Attack speed (solo or duo) 🧙🏽‍♂️ Skill spam (duo) 🪢 Puller (team of 4+)


ᴜɴʟᴏᴄᴋɪɴɢ ʙʟᴀᴅᴇᴍᴀsᴛᴇʀ
A simple duel with the Blademaster Careers Advisor makes this class one of the easiest ones to get. Eversun City, Dojo 162 177


ɴᴏᴛᴀʙʟᴇ sᴋɪʟʟs
ᴇǫᴜɪᴘ ʟɪɢʜᴛ ᴀʀᴍᴏʀ
This passive skill is often used on other jobs to provide more p.def


🤺 Attack speed
An attack speed player can be a primary source of dps in a duo, or solo. This person should be able to attack very fast and have a relatively decent cooldown on self-buffs. To view our current speed, open the sᴛᴀᴛᴜs ᴡɪɴᴅᴏᴡ [ᴄᴛʀʟ+ᴀ] ➝ sᴛᴀᴛᴜs. The maximum atk speed is 20!


ᴄᴏᴍʙᴀᴛ
Self-buff with p.atk and atk speed first. Then we debuff the enemy with [ʜᴀɪʀ ʀᴀɪsɪɴɢ ʜɪss] and attack them as quickly as possible.


sᴋɪʟʟs
ɢʀᴏᴡʟɪɴɢ ᴛɪɢᴇʀ ᴸᵛ ¹
Instantly lose aggro from one enemy

ʜᴀɪʀ ʀᴀɪsɪɴɢ ʜɪss
Reduce enemy p.def

ʜᴏᴡʟɪɴɢ ᴡᴏʟꜰ
Increase atk speed

ᴅʀᴀɢᴏɴ's ᴄᴀʟʟ
Increase p.atk. Doesn't stack with [ʜᴏᴡʟɪɴɢ ᴡᴏʟꜰ]

ʙᴜʀɴɪɴɢ ʀᴀɢᴇ
Increases p.atk

ᴀʟʟ ᴏᴜᴛ ᴀssᴀᴜʟᴛ
Increases p.atk. Doesn't stack with [ʙᴜʀɴɪɴɢ ʀᴀɢᴇ]

ʟᴀsʜ ᴏᴜᴛ
Increase atk speed

ᴛɪɢᴇʀ ᴀɴᴅ ᴅʀᴀɢᴏɴ sʟᴀʏɪɴɢ
Increase p.atk

ᴇǫᴜɪᴘ sᴀʙᴇʀ
Get if ᴀsᴘᴅ on other jobs


sᴋɪʟʟ ᴄᴏᴍᴘᴀʀɪsᴏɴ
ᴅʀᴀɢᴏɴ's ᴄᴀʟʟ vs ʜᴏᴡʟɪɴɢ ᴡᴏʟꜰ
While [ʜᴏᴡʟɪɴɢ ᴡᴏʟꜰ] is very helpful in the beginning of our journey, we will have max atk speed without it later. At such time, we could use [ᴅʀᴀɢᴏɴ's ᴄᴀʟʟ] to increase our dmg instead.

ᴀʟʟ ᴏᴜᴛ ᴀssᴀᴜʟᴛ vs ʙᴜʀɴɪɴɢ ʀᴀɢᴇ
The convenience of [ʙᴜʀɴɪɴɢ ʀᴀɢᴇ] provides a faster cooldown, for a smaller atk buff. Meanwhile, [ᴀʟʟ ᴏᴜᴛ ᴀssᴀᴜʟᴛ] offers a much bigger atk buff at the cost of a longer cooldown.

Ideally, we'd use [ᴀʟʟ ᴏᴜᴛ ᴀssᴀᴜʟᴛ] first and then [ʙᴜʀɴɪɴɢ ʀᴀɢᴇ] whenever the other one isn't available. That being said, it's possible to reduce the cooldown of [ᴀʟʟ ᴏᴜᴛ ᴀssᴀᴜʟᴛ] by allocating more points into agility - enough so, that [ʙᴜʀɴɪɴɢ ʀᴀɢᴇ] will no longer be required.

ʟᴀsʜ ᴏᴜᴛ vs ᴀɪᴍ (ʜᴜɴᴛᴇʀ)
While [ʟᴀsʜ ᴏᴜᴛ] offers a quick cooldown at level 7, it only adds +4 speed (at any level). On the other hand, [ᴀɪᴍ] can provide up to +12 speed. It has a longer cooldown, but this can be negated by allocating points into agility - to a point we wouldn't need [ʟᴀsʜ ᴏᴜᴛ].


ʀᴇᴄᴏᴍᴍᴇɴᴅᴀᴛɪᴏɴs
Stats
Agi - Decrease skill cooldown Dex - Increase chance to land a crit Phy - Increase ʜᴘ recovery and block rate Pow - Increase p.dmg

Common builds
• full pow • 28 dex, then full pow • 28 dex, then allocate 2 pow + 1 phy at each level • allocate 2 pow + 1 dex at each level • allocate 2 pow + 1 phy at each level

Gear
Armor - Clothing (body+pants) and dancewear (shoes+gloves). Increases our atk speed by 20%. Weapons - Saber

Optional consumables
ᴍᴀɢɪᴄᴀʟ ᴄᴀʀʀᴏᴛ Increase p.atk. RNG drop from boxes sold by Gilda Silva (Eversun City 168 219) ᴀᴛᴛᴀᴄᴋ sᴘᴇᴇᴅ ᴘɪʟʟ Increase atk speed ʀᴇɢᴇɴᴇʀᴀᴛɪᴏɴ ᴘɪʟʟ Increase ʜᴘ recovery rate ᴀsᴘᴅ sᴀᴅᴅʟᴇ Increase atk speed ʀᴇᴄᴏᴠᴇʀʏ sᴀᴅᴅʟᴇ Increase ᴍᴘ and ʜᴘ recovery rate • Pills and saddles are purchased from guild merchants, cash shop and from the Shady Dealer in Eversun City 281 142


sᴋɪʟʟ ᴄᴏᴍʙɪɴᴀᴛɪᴏɴs
Combining Blademaster with buffs from Witch Doctor or Hunter is a very efficient method to increase our atk speed and p.atk. If our ʜᴘ is unstable, we could swap one of those for Doctor skills.

ʜᴜɴᴛᴇʀ + ᴡɪᴛᴄʜ ᴅᴏᴄᴛᴏʀ
ʰᵘⁿᵗᵉʳ ˢᵏᶦˡˡˢ ⁻⁻ ᵃᶦᵐ ⁻ ʳᵉᵃᵈʸ ᶠᵒʳ ᵃᶜᵗᶦᵒⁿ ⁺ ʷᶦᵗᶜʰ ᵈᵒᶜᵗᵒʳ ˢᵏᶦˡˡˢ ⁻⁻ ᵇˡᵒᵒᵈ ᵇᵒᶦˡ ⁻ ᵐᵃʳᵗᶦᵃˡ ʰᵉˣ ⁻ ʷᶦᵗʰᵉʳᵉᵈ ᵉᵃʳᵗʰ
ᵖᵃˢˢᶦᵛᵉˢ ⁻⁻ ᵉᵠᵘᶦᵖ ᶜˡᵒᵗʰᶦⁿᵍ ⁽ᵗʰᶦᵉᶠ⁾ ⁺ ᵉᵠᵘᶦᵖ ᵈᵃⁿᶜᵉʷᵉᵃʳ ⁽ᵈᵃⁿᶜᵉʳ⁾
ᶜᵒⁿˢᵘᵐᵃᵇˡᵉˢ ⁻⁻ ᵈᵉᵇᵘᵍᵍᶦⁿᵍ ᵏⁿᶦᶠᵉ ⁽ᶠᵒʳ ʷᶦᵗʰᵉʳᵉᵈ ᵉᵃʳᵗʰ⁾

ᴅᴏᴄᴛᴏʀ
ᶠᶦʳˢᵗ ᵃᶦᵈ ⁻ ʳᵉᵍᵉⁿᵉʳᵃᵗᶦᵒⁿ


🧙🏽‍♂️ Skill spam
Unfortunately, skill spamming on Blademaster is extremely taxing on our ᴍᴘ and renders this otherwise very fun build, quite difficult. For this reason, we recommend it only for duo or small teams of 3.

The main goal for our agility threshold is to be able to cycle through skills without having to wait for any cooldowns. We should remember that 103 agility is the maximum value we can benefit from.


ᴄᴏᴍʙᴀᴛ
We'll buff ourselves with some p.atk, and debuff the enemy with [ʜᴀɪʀ ʀᴀɪsɪɴɢ ʜɪss]. Then swap back and forth between two weapons to spam all of our skills to defeat enemies.


sᴋɪʟʟs
ɢʀᴏᴡʟɪɴɢ ᴛɪɢᴇʀ ᴸᵛ ¹
Lose aggro from one enemy

ʜᴀɪʀ ʀᴀɪsɪɴɢ ʜɪss
Reduce enemy defense

ɢʀɪᴢᴢʟɪɴɢ ʙᴇᴀʀ
Very strong skill

ʙᴇʀsᴇʀᴋᴇʀ ʙʟᴏᴡ
Very strong skill

ᴍɪɴᴅʟᴇss sʟᴀᴜɢʜᴛᴇʀ
Strong skill

ʙᴜʀɴɪɴɢ ʀᴀɢᴇ
Increase attack

ᴄᴏɴᴄᴇɴᴛʀᴀᴛɪᴏɴ
Increase accuracy of skills

ᴇǫᴜɪᴘ sᴀʙᴇʀ
Get if using this build on other jobs


sᴋɪʟʟ ᴄᴏᴍᴘᴀʀɪsᴏɴ
ʙᴜʀɴɪɴɢ ʀᴀɢᴇ vs ꜰʀᴏɢ ꜰᴏʀᴄᴇ (ᴅᴏᴄᴛᴏʀ)
Overall, [ʙᴜʀɴɪɴɢ ʀᴀɢᴇ] is better. By providing higher base rate and %. Sadly, [ꜰʀᴏɢ ꜰᴏʀᴄᴇ] overwrites the buff, so we'll need to ask our Doctor not to use it.

ᴄᴏɴᴄᴇɴᴛʀᴀᴛɪᴏɴ vs sᴏɴɢ ᴏꜰ ᴄᴏɴᴄᴇɴᴛʀᴀᴛɪᴏɴ (ᴍᴜsɪᴄɪᴀɴ)
[ᴄᴏɴᴄᴇɴᴛʀᴀᴛɪᴏɴ] is not needed if our partner is using their song. That being said, m.acc is very important for a few of our subbed skills that tend to miss target exceptionally easily. We should ensure the buff is active before using them.


ʀᴇᴄᴏᴍᴍᴇɴᴅᴀᴛɪᴏɴs
Stats
Agi - Decrease skill cooldown Dex - Increase accuracy Pow - Increase p.dmg

Common builds
• 58 agi, then full pow • 103 agi, then full pow • 58 agi, 28 dex, then full pow • allocate 2 agi + 1 pow at each level

Gear
Armor - Light armor Weapons - Saber and, depending on the skills we've brought: bow or dagger Consumables - Iron arrows (if using bow) and ᴍᴘ potions of choice

Optional consumables
ʏᴜʟᴇ ʟᴏɢ Fully recovers ᴍᴘ and ʜᴘ. Obtained from Trader Girl, cash shop and christmas events ᴍᴀɢɪᴄᴀʟ ᴅᴀɪᴋᴏɴ Fully recovers ᴍᴘ. RNG drop from boxes sold by Gilda Silva (Eversun City 168 219) ᴍᴀɢɪᴄ ʀᴇᴄᴏᴠᴇʀʏ ᴘɪʟʟ Increase ᴍᴘ recovery rate. Purchased from guild merchant, cash shop or Shady Dealer (Eversun City 281 142) ʀᴇᴄᴏᴠᴇʀʏ sᴀᴅᴅʟᴇ Increase ᴍᴘ and ʜᴘ recovery rate. Purchased from guild merchant, cash shop or Shady Dealer (Eversun City 281 142)


sᴋɪʟʟ ᴄᴏᴍʙɪɴᴀᴛɪᴏɴs
Hunter and Thief are often used in combination with this build to provide us with even more skills to spam -- along with ᴍᴘ recovery. Once our skill cooldown becomes better, we should be able to use only blademaster/hunter or blademaster/thief; and use the freed slot for more ᴍᴘ recovery skills.

ʜᴜɴᴛᴇʀ + ᴛʜɪᴇꜰ
ʰᵘⁿᵗᵉʳ ˢᵏᶦˡˡˢ ⁻⁻ ᵃᵈᵈᶦᵗᶦᵛᵉ ᵃʳʳᵒʷ ⁻ ᵃˢˢᵃˢˢᶦⁿˢ ᵃʳʳᵒʷ ⁻ ᵗʷᵒ ᵇᶦʳᵈˢ ᵒⁿᵉ ˢᵗᵒⁿᵉ ⁻ ᵈᵉᵐᵒⁿˢˡᵃʸᵉʳ ᵃʳʳᵒʷ ⁻ ᵉᵠᵘᶦᵖ ᵇᵒʷ ⁺ ᶦʳᵒⁿ ᵃʳʳᵒʷˢ
ᵗʰᶦᵉᶠ ˢᵏᶦˡˡˢ ⁻⁻ ˢᵘᵖᵉʳ ˢᵗᵃᵇ ⁻ ˢᵗᵉᵃˡᵗʰʸ ˢᵗᵃᵇ ⁻ ᶜᵒⁿᵗʳᵒˡ ᵇʳᵉᵃᵗʰᶦⁿᵍ ⁻ ʳʰʸᵗʰᵐ ᵒᶠ ˡᶦᶠᵉ ⁻ ᵉᵠᵘᶦᵖ ᵈᵃᵍᵍᵉʳ


ᴛʜɪᴇꜰ
ˢᵘᵖᵉʳ ˢᵗᵃᵇ ⁻ ˢᵗᵉᵃˡᵗʰʸ ˢᵗᵃᵇ ⁻ ᶜᵒⁿᵗʳᵒˡ ᵇʳᵉᵃᵗʰᶦⁿᵍ ⁻ ʳʰʸᵗʰᵐ ᵒᶠ ˡᶦᶠᵉ ⁻ ᵇᵒˡᵗ ᶠʳᵒᵐ ᵗʰᵉ ᵇˡᵒᵘˢᵉ ⁽ˢᵏᶦˡˡ⁾ ⁻ ᵛᵉᶦˡᵉᵈ ᵛᵒˡˡᵉʸ ⁻ ᵉᵠᵘᶦᵖ ᵈᵃᵍᵍᵉʳ
ᶜᵒⁿˢᵘᵐᵃᵇˡᵉˢ ⁻⁻ ᵇᵒˡᵗ ᶠʳᵒᵐ ᵗʰᵉ ᵇˡᵒᵘˢᵉ ⁽ᶦᵗᵉᵐ⁾


🪢 Puller
A puller is a team member who pulls all the monsters and brings them to the team for them to kill. This person should be quick, able to hold aggro and, ideally, have a method to sustain their health. Being a puller requires arrows.

ɪʀᴏɴ ᴀʀʀᴏᴡs
Purchased from drugstore


ᴄᴏᴍʙᴀᴛ
Stand near the team to receive buffs from doctor and long songs from musician. Once the tank has used defense buffs, we can begin pulling enemies. Simply shoot an arrow at the monster, and the next monster, and the next... until we have a large gathering. Bring this gathering to the team by running in circles around teammates until the tank uses [ᴡɪᴄᴋᴇᴅ ᴡɪɴᴅᴍɪʟʟ] to take the aggro from us. We can resume pulling more enemies once the doctor, musician and tank have renewed our buffs.

1. The more we pull, the more exp everybody gets. 2. Stay within team exp distance when possible to ensure we get our exp share.


sᴋɪʟʟs
Seeing as pulling doesn't require any particular skills, we can use whatever seems convenient

sɴᴇᴀᴋ ᴀᴛᴛᴀᴄᴋ
Our "run away" emergency

ɢʀᴏᴡʟɪɴɢ ᴛɪɢᴇʀ ᴸᵛ ¹
Lose aggro from one monster. Requires [sᴀʙᴇʀ] to be equipped


ʀᴇᴄᴏᴍᴍᴇɴᴅᴀᴛɪᴏɴs
Stats
Agi - Increase dodge rate Dur - Increase p.def Phy - Increase block rate and ʜᴘ recovery

Common builds
• full phy • allocate 2 agi + 1 phy at each level • allocate 1 dur + 1 agi + 1 phy at each level • allocate 2 dur + 1 agi at each level

Gear
Armor - Light armor Weapons - Beginner's bow Consumables - Iron arrows


sᴋɪʟʟ ᴄᴏᴍʙɪɴᴀᴛɪᴏɴs
Doctor, Mercenary and Thief are often combined together for convenience. These help with movement speed, taunting and for healing ourselves. Note there is only enough skill slots to bring 2 of these options...

ᴅᴏᴄᴛᴏʀ
ᶠᶦʳˢᵗ ᵃᶦᵈ ⁻ ʳᵉᵍᵉⁿᵉʳᵃᵗᶦᵒⁿ ⁻ ᵈᵉᵗᵒˣ ⁻ ᵉᵠᵘᶦᵖ ˢʸʳᶦⁿᵍᵉ ⁽ᵗᵒ ᵘˢᵉ ᵈᵉᵗᵒˣ⁾

ᴍᴇʀᴄᴇɴᴀʀʏ
ᵗᵃᵘⁿᵗ ⁻ ᵐᵒᶜᵏ ᵐᵒⁿˢᵗᵉʳˢ

ᴛʜɪᴇꜰ
ᶠᵃˢᵗ ᵍᵉᵗᵃʷᵃʸ ⁻ ᵖˡᵃʸ ᵈᵉᵃᵈ


Resources
¹ ˢᶜʳᵉᵉⁿˢʰᵒᵗˢ ᵗᵃᵏᵉⁿ ᶦⁿ⁻ᵍᵃᵐᵉ ᵃⁿᵈ ᵉᵈᶦᵗᵉᵈ ᵇʸ ᵐᵉ
² ˢᵏᶦˡˡ ᵃⁿᵈ ᶦᵗᵉᵐ ᶦᶜᵒⁿˢ ᶠʳᵒᵐ ᵈᵒᵐᵒ⁻ᶠᵃⁿᵈᵒᵐ[domo.fandom.com]
³ ˢᵐᵃˡˡ ᵘᵖᵖᵉʳᶜᵃˢᵉ ᵃⁿᵈ ˢᵘᵖᵉʳˢᶜʳᶦᵖᵗ ᶠᵒⁿᵗ ᶠʳᵒᵐ ˢᵐᵃˡˡᵗᵉˣᵗ[smalltext.io]
ˢʸᵐᵇᵒˡ • ᶠʳᵒᵐ ᶠˢʸᵐᵇᵒˡˢ[fsymbols.com]


If this guide was useful,
Please consider giving it a 👍🏽like, ⭐fav or 🎖️award
♡ ♡ ♡


4 Comments
Metsushiro  [author] 23 Feb, 2024 @ 9:37pm 
:UltimateStar: UPDATE
+ added default gear
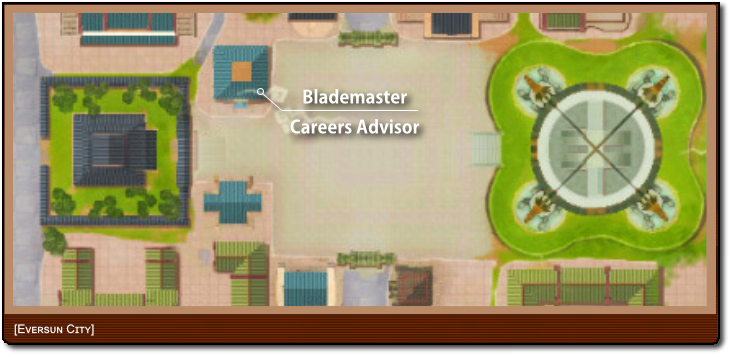
+ made smaller picture for career advisor location to better streamline scrolling
+ added skill combinations
+ added skill comparisons
+ simplified information
+ reworded and reformatted everything
+ added resources
- removed unnecessary pictures
+ added "class selection" at the bottom to facilitate navigation
Metsushiro  [author] 12 May, 2020 @ 9:35am 
:luckclover: UPDATE
+ Tweaked info for skill spam build: added thief as a suggestion for extra skills and notes about how to improve accuracy. Also tweaked notes about armor and weapons. Added a memo for soloers.
Metsushiro  [author] 7 May, 2020 @ 2:38pm 
:luckclover: UPDATE
+ Added how to fight sections to each builds
+ Added how to unlock blademaster
+ Tweaked info on where to get certain consumables
Metsushiro  [author] 13 Apr, 2020 @ 5:35pm 
:luckclover: UPDATE
+ Reviewed, reformatted and re-wrote the entire guide
+ Added notes about armor, weapons and consumables for survivability
+ Added more stat build recommendations and explanations of what stats do
+ Suggested subs now have a more detailed explanation