Left 4 Dead 2

Left 4 Dead 2

Ocen: 176
How to use the Size Proportion Trick
Autorstwa: MSF
Having issues trying to figure out how to make the proportion trick work? Follow along to discover the steps on making a complete survivor mod! This trick also applies to any other Source game, although GMOD is a bit more tricky.
5
   
Przyznaj nagrodę
Ulubione
Ulubione
Usuń z ulubionych
Getting Started
Before we begin, I'm going to assume that you have already made a survivor mod in the past and that you know the basic knowledge on making one. мяFunreal made a great guide for creating a Survivor mod, and I recommend checking it out here! It even goes over the Proportion Trick!
https://gtm.steamproxy.vip/sharedfiles/filedetails/?id=2225904754
Also, if you want more detail from the person who discovered this trick, check out the guide they made for Gmod!
https://gtm.steamproxy.vip/sharedfiles/filedetails/?id=2308084980

Video!
After years and years, I finally made a simple video showing how the Proportion Trick is done in L4D2!

https://youtu.be/hYJh80F5R74

There used to be links here for files, but they have all become outdated.
Placing the Files & Setting up the .qc File
Tweaking the QC file for most Source Engine games (Not Garry's Mod)
Open your QC file and scroll down near the bottom. Try to find code named $Sequence and $IncludeModel. Once there, you'll need to copy and paste the following code under the $IncludeModel lines of your QC file:

$include "NAME_$DeclareSequence.qci"
$sequence reference "reference" fps 1
$animation "a_proportions" "NAME.smd" subtract "reference" 0
$sequence "proportions" "a_proportions" predelta autoplay


Check MrFunreal's guide on obtaining the QCI files.

Now before you save and quit, there's still a little thing you have to do! See the big NAME in both the $include line and $animation line? You need to rename them to the correct name. The $include line's name should be the same name of the survivor you're replacing, IE "Nick_$DeclareSequence.qci"
The name in the $animation line is the name of your reference model; the model that you created for the mod. IE "asgore_ref.smd"

Here's an example of one:

$IncludeModel "survivors/anim_NamVet.mdl"
$IncludeModel "survivors/gestures_namvet.mdl"

$include "Bill_$DeclareSequence.qci"
$sequence reference "reference" fps 1
$animation "a_proportions" "asgore_ref.smd" subtract "reference" 0
$sequence "proportions" "a_proportions" predelta autoplay

Note the names and location. For this example, this is a mod for Bill and he's being replaced by an Asgore model.

Save and close it; you're done with the .qc file.
For Garry's Mod
When you're making a playermodel in Garry's Mod, you'll want to use Dr. Kleiner as a base. Just mod like you would a L4D character, but when it comes to the QC, you don't need to use $DeclareSequence. Also, it's important that the $sequence ragdoll uses your new model, not Kleiner's.

That's pretty much it.
Messing with the .vrd File
NOTE: This step is only if you have weightpainted the helper bones in your custom model! (Wrists, Elbows, Shoulders, Biceps, Ulnas, Quads...)

What is a helper bone?

Helper bones are used to prevent a model from twisting their limbs in a strange way. For example, if you were to take a model's hand bone and rotate it on its X axes, it will most likely look all warped and bad. Helper bones are used to twist with the main bone to reduce that warping. Here's a few screenshots on what helper bones accomplish:

Before


After


So, what is Not considered a helper bone? Spine bones, thigh bones, calf bones, feet & toe bones, neck & head bones, clavicle bones, upperarm bones, forearm bones, and hand bones are not helper bones.

Somewhere with the survivor's files will be a file named survivor_gambler.vrd, or whatever code-name is used. This is the tedious part... Open that up and you'll see a bunch of numbers, along with some names for the survivor's bones. You'll also see <helper> <basepos> and <trigger>. What you need to do first is make the last three digits in every <trigger> line a 0. For an example:

<trigger> 90.000004 89.999986 -0.000005 -0.000005 -0.000001 -0.000003 0 5.604151 0 0.000004

This needs to change, as the last three digits aren't all 0s.

<trigger> 90.000004 89.999986 -0.000005 -0.000005 -0.000001 -0.000003 0 0 0 0

Note that there are a total of 10 numbers on both of them. Make sure that there's no more, no less.

You might see that there are 4 instead of 3 0s. This is because, if we count from right-to-left, the 4th zero was already a zero, and you don't mess with the numbers after the 3rd. Yes, you're going to have to do this to every single <trigger> line. It'll take some time, about 5 minutes, so I recommend playing some music in the background.

That being said, you don't have to do every single <trigger> line if you didn't weight paint all the helper bones; only do the <trigger> lines that are under the names of the helper bones that you've weight painted!

What does this do? Well, the last 3 numbers are the bones' positional values. If you needed to use the Proportion Trick, you've probably needed to move the helper bones too. "But why am I making the values 0 0 0? Shouldn't it be the new position values instead?" You can indeed make all the <trigger> lines use your new values at the end. However, most helper bones don't actually move, and it would be faster do just make them 0 0 0 and add your new values differently.

Once you have replaced the last three digits with three 0s, next, you'll need to erase the 0 0 0 in the <basepos> lines (Again, you only need to work on the helper bones that you've weighted.) This won't take that long. Once they have been deleted, it's time to use the values of your new character's bones.
Open up your modded survivor in Notepad++. You'll see nothing but numbers and bone names. Now, back to the vrd file. Scroll up to the top and read the first bone name in the <helper> line. For me, it's Bip01_L_Knee. So, I'm looking for the Left Knee bone. Open your modded survivor again and look for the name Bip01_L_Knee. Once you find it, take a look at the number to the left of it. For me, it's 6. Your's can be different, as it depends on what survivor you're looking at. Once you found that number, scroll down until you see numbers. You'll see a single number then a bunch of numbers next to it. The number that you have for your left knee is what you're looking for down there.

Since mine is 6, I'm going to look for the line that starts with the number 6. Once you found your number, copy the first three numbers to the right of your knee's number. IE

6 16.434479 0.019288 -0.000011 0.000000 0.000000 0.042268

The number that's in bold is what I would copy for my knee's new values. Now that you copied the numbers, open the vrd file back up and paste it into the <basepos> of the <helper> that has the left knee. It should look something like this now:

<helper> Bip01_L_Knee Bip01_L_Thigh Bip01_L_Thigh Bip01_L_Calf
<basepos> 16.434479 0.019288 -0.000011
<trigger> 90.000004 0 0 0 0 0 0 0 0 0
<trigger> 90.000004 0 0 89.999991 0 0 45.000004 0 0 0

Note that all the last three numbers in the <trigger> lines are all 0s and that the <basepos> has the same number from the model's left knee.

Now do the same process for the rest of the bones (that have been weight painted), and you'll be set with this step!
What is the Reference.smd File?
The reference.smd file is basically the skeleton of the original model posed with the same rotations as your new custom one. IE, if you have a mod that replaces Coach, you'll need to import his model, delete his mesh, rotate his bones exactly the same way as your new model has the bones rotated and only rotated. You cannot move/re-position the bones.

My knowledge on how this works is lacking, but this file is required in order for the Size Proportion Trick to work. Without it, the trick will have nothing to base its animations off of.
The "Base Skeleton"
Creating the Base Skeleton
All we need to do now is create the reference.smd file! The reference file is basically an animation of the original Survivor we're replacing that has only the same rotational values as our new character. However, before we can create the reference, we'll need to create something I like to call, "Base_Skeleton." This file can be used for the Perl script, and it can be used without the script.

First, open up Blender. Next, select import .smd files and import the original survivor that you want to replace. (Nick, Zoey, Coach...) Select their mesh/model and delete it. You should only have the skeleton. Select the skeleton and go into Pose Mode. Now press A and have all bones selected. Now press I (that's an "i") and select LocRotate. This will create keyframes for the location and rotation of all the bones in the Survivor's skeleton. This makes it possible for you to export the skeleton.

Once you've finished Keyframing the bones, export the skeleton. It'll create its own folder called anims. Open the new folder and rename the exported .smd file to *Survivor name*_base. For example, if this is for Ellis, you would name it ellis_base. Honestly, you can name it whatever you want it to be. You just have to be consistent with the name for the tutorial. For future reference, I will be calling this file the base_skeleton. Move the base_skeleton where the rest of the files are, (.qc file's location.)
Making the Reference
What I used to think was something you could not do if you already went too far ahead is now something that's easy and simple!

Just like when making the reference file with Perl, we'll need to make a base_skeleton. Follow the steps above and once the base_skeleton's been exported from Blender, come back down here.

Open Blender and open a Save you have, (or just import your custom model.) Select your model's skeleton and Import the base_skeleton.smd file. (Make sure that Bone Append Mode is set to Append to Target)

Your model will look distorted, but that's okay! Go into Pose Mode and select every bone with A and press Alt R

Your character's arms and legs should re-pose themselves back to how you posed them, but the position/location of the bones should stay the same. This is what the reference file is!

Now, press i and select LocRotate (make sure all bones are selected!)

Export the animation as reference.smd and you've just made the reference file!
Fixing the Model Holding the Weapons
IMPORTANT
This step is only used for the Survivor models only! Special Infected, Common Infected, and even models from different games do NOT require this step!

It's safe to compile the mod and test it out in HLMV, but you might notice something off... The weapons held are in the wrong place. (Either floating away from the hands or clipping inside the wrists.) Under the Render tab, you can check the Enable IK to fix the left hand kinda, but that won't make much of a difference until you fix the right hand. So how do we fix it? Simple. Open Blender again and import the reference file you created. Select the skeleton and set to Pose Mode. Somewhere at the right hand is a bone named ValveBiped.weapon_bone. Don't get it mixed up with ValveBiped.weapon_bone_Clip! Once you select it, click that little bone icon on the right side of the screen and look at the Location bars. Set them all to 0, then right-click on the Location numbers and pick Replace Keyframes. While this is a way to fix the weapon issue, it's more time consuming and unnecessary when compared to just opening the files in Notepad++.

Open your modded survivor, your reference file, and your base_skeleton and look for a bone called ValveBiped.weapon_bone. When you find that name, look to the number on the left of it. Here's my ValveBiped.weapon_bone in a custom Coach model, as an example:

68 "ValveBiped.weapon_bone" 12

My number is 68. The number can be different for you. It can also be different between the reference file and base_skeleton file, so be sure to check those out as well. Now, for my "ValveBiped.weapon_bone" the number was 68. So, I will scroll and see nothing but numbers. I will be looking for a specific line of numbers that start with 68. For me, it looks like this:

68 2.856947 -1.536175 -0.973780 -1.501147 -0.272558 -1.578261

What I will do now is replace the first three numbers that come after 68 with 0s. These 3 numbers are the position of the bone, and it needs to be reset at 0 to fix the weapons. So, my line of numbers should look like this:

68 0 0 0 -1.501147 -0.272558 -1.578261

Save the file, and do the same process for the reference file and the base_skeleton file. The reason we do this for the base_skeleton file is so that when we use the code, it won't re-create the weapon issue if we need to redo the reference file.

Re-compile and test it in HLMV. This usually fixes the issue, and enabling the IK will make the model hold double-handed weapons correctly. However, the problem may have improved but the issue still exists. If that's the case, then you'll have to open the modded survivor's reference file in Blender and adjust the bone yourself with a guess. But, there's a catch...

When posing the "ValveBiped.weapon_bone" it will move the weapons in-game backwards. If you move the bone away from the hand, the weapon will move closer. If you move it up, it'll move down. You have to think backwards in order to get it in the right spot. Once you got it in the right spot, you did it! Oh, and don't worry about the IK thing. It's automatically enabled in the game.

One more thing! The ValveBiped.L_weapon_bone only affects two-handed melee weapons! This bone will not adjust how your new Survivor will grip guns or hold the 2nd pistol.
Check for Broken Animations
Compile your mod and test it out in-game.

If you ever encounter animation bugs for a Survivor mod you made with the Size Proportion Trick, first check if the animations bug out if you are playing on Official Servers or not. If your animations are only breaking when you are playing on a Valve Server, then the placement of the Size Proportion Trick is incorrect in the QC file; make sure it's below all the other $Sequence and $Include lines. If it's still glitching, or that it was broken even when playing offline, check if you forgot to delete the $DeclareSequence "TeenAngst" (Or which ever name) and the $DeclareSequence "ragdoll" in the QCI file. If it's still glitching, than the QCI file is outdated and you need to go through the process of collecting the new QCI in the following section. The next section will be going over on how to get the Boomer's QCI, but the process is the same with the Survivors'.
Obtaining your own QCI file for Other charcters/Fixes
Let's say that you want to make a mod for the Boomer that uses the Size proportion trick. To do this, you'll need $DeclareSequence for its animations, just like the Survivors. However, when you decompile the Boomer and get his QCI file, it only has the ragdoll animation, something we usually delete. So, what do we do?

To get the qci file, you're going to need Crowbar and the animation files of the Boomer. First, open up L4D2's VPK which stores all the files used in the game. Go through:

models>infected

There will be two files; anim_boomer.ani & anim_boomer.mdl
Select both of them and export them to a folder where you can easily get to/find.

With the files exported, go to Crowbar's Decompile tab. Where there's a bunch of options/check boxes for you to mess with, you'll want to make sure that $DeclareSequence QCI file is checked.

It is important that "$DeclareSequence QCI file" is checked, otherwise you will not receive the qci file!

Browse the anim_boomer.mdl file for Crowbar to decompile. To save time, you can disable/uncheck "Bone animation SMD files" since we only want the QCI file. Be sure to enable this option after you've decompiled the Boomer animations!

Once decompiled, you'll see that there are two files created; a QC file and a QCI file. If you left "Bone animation SMD files" checked, the decompile process would take a little longer, and there would be more files. Of course, we're only interested in the anim_boomer_DeclareSequence.qci file. Check the QCI file to see if there's any $DeclareSequence lines that calls for "Boomer" or "ragdoll". If it does, delete them, just like you would with a Survivor's. If not, then you now have your QCI file ready for the Size Proportion trick!

This process is the exact same for the other SI, Survivors, and other characters in different Source games.
Using Different Survivor Animations with the Proportion Trick
Let's say that you have a character whose body language fits well with how Ellis animates. You already have made the mod replacing Ellis with working proportions, but now you want to make your character go over a L4D1 character - let's say Louis. So in a matter of speaking, you'll want to make a Louis mod that uses Ellis' animations and has the Size Proportion Trick applied.

Video
I've made a video that quickly demonstrates the use of this!
https://youtu.be/V6CKmtJZC5g
Getting the Files
In ZeqMacaw's, "Modding the Body Animations By Swapping with Another Survivor's Animations,"[sites.google.com] you can find a guide that goes over on replacing a Survivor's animation. It has a download link for the Animation Swap Pack, which will be required.

As ZeqMacaw states, "The server says to each client player, 'play Nick's reload shotgun animation', and each client knows this simply by receiving the number '3', meaning 'play the third animation'. If Nick is replaced by a custom woman using Zoey's animations, then the client will play Zoey's 'third animation', which is not the 'reload shotgun' animation."

You cannot just tell your QC file to use the mechanic (Ellis) animations, otherwise the animations will glitch up. All survivors' animations are jumbled up and only a few have their animations in the same number. So what does Zeq's files even do? They reorganize the animations to match replaced Survivor's numbers, fixing this issue. Okay, so how do we start this?

Let's first obtain Louis' QC file, since he's the one getting replaced in this example. If you're making a mod for a different Survivor with Ellis or someone else, get the QC file of the person you're replacing, not the person with the animations.
Next would be to drag your already-made files from your Ellis mod into the same location where you put the Louis QC file. Now it's time to figure out which file from Zeq's download should we use.

Zeq has named the files in a specific way to help other modders pick the correct file, IE "Anims_RigToFrancis_ReplaceCoach.qci"
Let's go over what this file here means.

The "RigToFrancis" part is telling that this file is using Francis' animations. The "ReplaceCoach" is stating that the character will replace Coach.
So in short, this specific file is a mod for Coach that uses Francis' animations. With that in mind, we need to find one where it replaces Louis and uses Ellis' animation. So which file is that?

"Anims_RigToEllis_ReplaceLouis.qci"
Here's our file! Copy it and put it in the same location as your QC file.

Editing the Files

Now that everything's in place, it's time to edit the files. Let's first open the Anims_RigToEllis_ReplaceLouis.qci file.
The file itself gives out instructions on what to do with the QC file. As the file states, it wants you to delete all $declaresequence, $sequence, and $includemodel lines in your QC file. Open it up and do that. Since this QC file is from Louis, it will have two $weightlists. I'd delete them, as Ellis does not have 'em. I'd also delete the $jigglebone lines, as they're using bones that don't exist in Ellis' model.

Now comes the important part for the proportion trick: remember when you had to include the following?

$include "(Survivor Name)_$DeclareSequence.qci"
$sequence reference "reference" fps 1
$animation "a_proportions" "(Custom model name).smd" subtract "reference" 0
$sequence "proportions" "a_proportions" predelta autoplay


Just like before, but there's one thing we'll be changing. That $include line. Replace the file used in that line with the Anims_RigToEllis_ReplaceLouis.qci file. Your lines should now look like this:

$include "Anims_RigToEllis_ReplaceLouis.qci"
$sequence reference "reference" fps 1
$animation "a_proportions" "(Custom model name).smd" subtract "reference" 0
$sequence "proportions" "a_proportions" predelta autoplay


And of course, the (Custom model name) needs to be the name of the Ellis model. Now the only thing left in the QC file are the Hitboxes and attachments. Since this is Louis' QC, it will be using Louis' hitboxes and attachments. If you've already made your Ellis mod with their own hitboxes and attachments, you can copy them over.
However
For the Attachments, you cannot just copy the whole list from Ellis and replace everything from Louis. That can cause issues. The ordering of the attachments are important. Copy the lines individually. You'll mainly want the following:
eyes, mouth, pistol, primary, medkit, melee, pills, grenade, molotov, bleedout
If an attachment doesn't exist for Louis, add it at the bottom of the list.

Finishing up with the QCI File
Last but not least is editing the QCI file itself. Its final instruction is to replace two "survivor_manager_reference" lines with Ellis' mechanic and ragdoll animations. You can see that the first line used in the QCI file that isn't commented out (doesn't use //'s) is
$sequence CustomLouis "survivor_manager_reference" fps 30.00

We need to change the survivor_manager_reference and name it to the file that's used for the $Sequence Mechanic, IE "survivor_mechanic_anim_@mechanic". If you have your mechanic animation inside a folder, like "survivor_mechanic_anim", add a / and then the name of the file, IE: "survivor_mechanic_anim/mechanic".

So now your line should look something like this:
$sequence CustomLouis "survivor_mechanic_anim_@mechanic" fps 30.00
Now there's one last line that requires the same attention, the $sequence ragdoll line. For most survivors, it's right after the first line. However, Louis and Francis have their ragdoll further down. You might see that the ragdoll line is second in the QCI, but it's commented out (it has //, meaning that it will be ignored.)

Scroll down until you see
$sequence ragdoll "survivor_manager_reference" ACT_DIERAGDOLL 1 fps 30.00
Replace that survivor_manager_reference with Ellis' ragdoll animation, not the Mechanic animation.

$sequence ragdoll "survivor_mechanic_anim_@ragdoll" ACT_DIERAGDOLL 1 fps 30.00

Save and compile!
Hey, my Character's Thighs and Feet and/or Arms are Twisting!
This problem is coming from your model's skeleton. The thigh bones and the calf bones are tilted and twisted incorrectly.

Open Blender and load your model. Select the skeleton and on the right side of Blender, click the little stick figure which is called "Data" and under the "Display" check the "Axes" box. This will add an X Y Z to every bone in your model's skeleton.


Select one of your thigh bones in Edit Mode. What you need to do is rotate the bone so that the X arrow matches the dashed lines that connect to the Calf bone. You'll need to check the front and side views to make sure that the X arrow is not sticking out of place.
For front/back views, use Ctrl + R to rotate the bone. Side views can use R.
Always go from thigh to calf, not calf to thigh. Make sure that the skeleton you are editing has both the model and physics model you have so that both models' skeletons match.

Do this to any other skeleton/model your character uses, such as Bodygroups and the physics model.


Once you've finished that, you'll need to recreate the reference file so that it too has the thigh and calf bones fixed, and recreate the ragdoll.smd / proportions.smd animation file.

If your character has improvements but only the ankles are twisted after doing this, then do the same process to the two feet bones; have the X axes follow the dashed line that goes towards the toes. Usually you won't have to do this, but sometimes you might have to.

If your arms are messed up, do the same process with the UpperArm bones and the Forearm bones. Through my own personal trial & error, it's - most of the time - best not to do this on the Clavicle bones. You may have an easier time adjusting the X axes to the dashed line by using the front and top perspectives instead of the side perspective.

Still Not Working?
If it is still not working, then I would follow Lol3#IC's comment, thanks to JazzMcNade.
1. Grab your reference mesh skeleton.
2. Delete everything but the skeleton itself.
3. Make sure you put ONE keyframe at frame 0 or 1 idk if it matters.
4. in the .qc make sure you comment any $includemodel, any $collisionjoints, and $sequence
5. Add this $sequence line:
$sequence "ragdoll" {
YOUR EXPORTED REF MESH SKELE HERE.smd
activity "ACT_DIERAGDOLL" 1}

6. In Crowbar, compile with the qc and make sure DefineBones is checked, and Create QCI File is checked.
7. Put "$include DefineBones.qci" in the .qc file
8. Uncomment everything I said to comment, and delete the sequence statement above ^^^^
9. -In Crowbar, be sure to uncheck Define Bones- Compile and congrats, the annoying twisted bones is fixed.
Need More Help?
I'm unable to solve everyone's questions sadly. However, there's a Steam Group that's all about modding and this community holds people who have more experience than I have. I am of course talking about the Dead 4 Mods Steam Group

Although the name is L4D-oriented, they're really anything Source-related. So if you have Gmod issues, TF2, HL2, etc., you can ask for some help/advice there.

It's best to join their Discord group as users are more active there. The Discord link will be in the previous Steam Group link. (Discord link not provided here as that link changes often.)
Komentarzy: 529
λNTICITIZEN_1 12 grudnia 2024 o 9:46 
hey axel thanks for the links but the dropbox link is dead
Miguelillo948 24 września 2023 o 3:18 
could not load file 'reference'
TheTwilightDancer 18 września 2023 o 4:30 
https://gtm.steamproxy.vip/sharedfiles/filedetails/?id=2964345988 I want to try it out on this model for GMod, but I don't want to replace/reproportion the skeleton, only to scale it and apply the new scale in game. I wanna make the model a little bigger in game. Player resizer mods don't work on the jigglebones so I'm trying this option.

This is a model I edited and released as a new PM/NPC/Ragdoll so I never touched the reference and proportion files that were already there before. I'm also new to Blender, is this just a matter of scaling the reference and/or proportion files that I already have? I was thinking of scaling him up to 120%, for the PM, NPC and Ragdolls.
Jo 22 maja 2023 o 1:52 
https://www.youtube.com/watch?v=4MRCIBr2DK8
For anyone having audio sync issue on the Proportiontrick video, i made my own edit to mitigate this.
Mikucirno 30 kwietnia 2023 o 2:48 
i tried the one for gmod but it resets to default proportions when the player ragdolls
Jy Wye the Deadweight 5 lutego 2023 o 1:08 
I tried to port my Roblox avatar using this trick but it doesn't work. Did I miss something? I have reference, ragdoll, custom physic model and proportion file, exported from Blender.
bobby 5 grudnia 2022 o 23:07 
Does this trick also work for viewmodels?
Pebbles 5 września 2022 o 2:18 
I've attempted to apply the trick but when i pull it up into mdlviewer the bones are stretched,
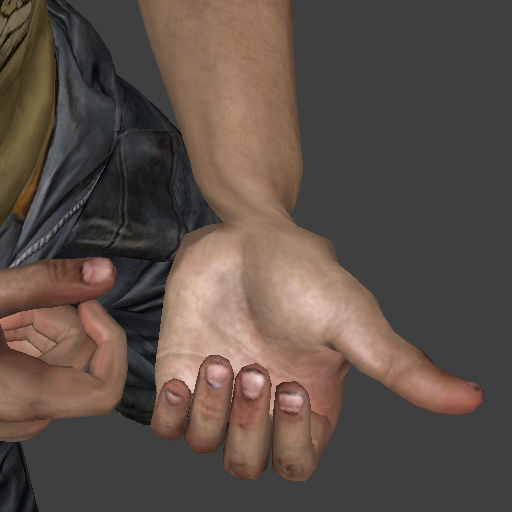
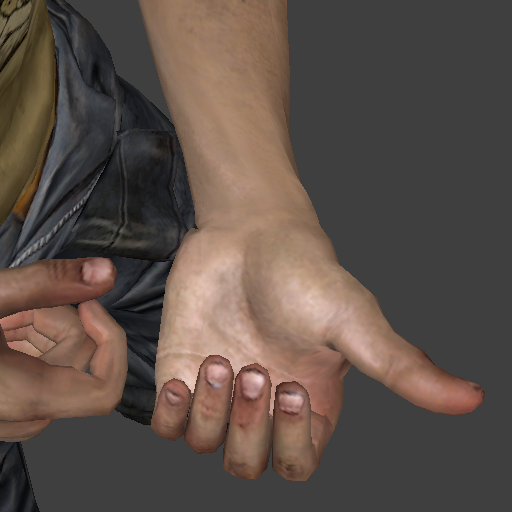
I've double and triple checked that everything was fine with the model rig and weighting,
it only seems to be affecting the right side of my models body and only the arm and leg
does mirroring the bones in blender mess up the rigging?
Because I believe the issue pertains to the bones that i've mirrored, altho when i view it in blender everything seems to be okay.