Terraria

Terraria

Not enough ratings
Terraria Boss Ideas 11 [41-60]
By Okami Tomato
Not really sure what to put here, as most people by now know what this is about :P

There's been a lot less time between the last instalment and this one, though that's because I had some inspiration in some areas and also the desire to make up for the 3 months of radio silence with something substantial.

As usual this is not a guide and is simply a place to put ideas in a clear and concise way, and also the theming is now moreso mod-themed than something for vanilla Terraria

Anyways, onto the bosses :)
2
   
Award
Favorite
Favorited
Unfavorite
[Prior Notes]
So, I have only a few things to say before the start of this one.

1. Humanoid Bosses
So, the previous page had a fairly large amount of humanoid bosses; 9 separate boss fights in total. Now back in Boss Ideas 8 this was a bit of a problem as people didn't like the human bosses so much but this time people seemed to be alright with it for... 'various reasons'
However for those that weren't too fond of them this page has tried to heavily limit the amount of humanoid bosses, going for more monsters and just generally weird things to balance things out a little more (though there still may be 1 or 2)


2. University
University is still generally slowing things down due to some issues, though fortunately things haven't been as slow as I was expecting. Furthermore I have work during the summer, which means progress sadly won't be speeding up all that much even once summer comes around.


3. Boss Quantity
So there have been quite a lot of bosses in Boss Ideas 11 so far, now reaching what is technically half of Boss Ideas 5. This seemed a little concerning to me considering the generally underwhelming quality of a lot of the bosses in 5, though I had overlooked the main detail of the 'quality vs quantity' approach.

Admittedly, Boss Ideas 5 had been more quantity-focused than quality-focused, hence why there were so many blander bosses or weird concepts or bad sprites, and why most have either been revised and remade or completely dropped since. However, this page has generally been more quality-conscious, with new bosses always having something to do and having actual time put into their sprites, so hopefully the vast majority will be generally considered 'good'


Anyways (actually) onto the boss stuff now
[Debuffs]
The debuff list, as seen in the previous pages, updated again

Suppressing Slime
Effect: Wing flight time and acceleration reduced by around 25%
Tootip: Your wings are all slimy and gross
Sources: Slimera (Summon)

Golden Flames
Effect: Deals 25 damage per second and reduces damage by 10%
Tooltip: Magical golden flames scorch you
Sources: Skye, Reverence

Greed's Curse
Effect: Reduces movement speed by 10% and wing flight time by 20%. Additionally deals 20 damage per second. If the player is hit by another attack that would inflict this debuff while still under its effects, the player will be inflicted with Greed's Curse II for 2 seconds
Tooltip: Greed's curse haunts you
Sources: Greed King

Greed's Curse II
Effect: Player is turned into a gold statue and left immobile until the effect expires
Tooltip: You have been turned to gold by Greed's curse!
Sources: Greed King*

Chaos Ember
Effect: Deals 30 damage per second to the player, and increases their damage vulnerability by 10%
Tooltip: Unnatural flames scorch you...
Sources: Levialous - Half-Complete, Oblivion, Levialous - Broken

Unstable Magic
Effect: Deals 20 damage per second
Tooltip: You are surrounded by pure magic
Sources: Amazon (Rematch), Eudeus, Stardust Magus, Geresso, Solar Scourge

Purifying Flame
Effect: Deals DPS based on the player's current health compared to their max health
Tooltip: Purified by the flames...
Sources: Reverence

Heavy Gravity
Effect: Reduces flight speed by 33% and max flight time by roughly 60%
Tooltip: Your wings feel heavy
Sources: Arachking (Summon), Taboo (Summon), Crimtaminator (Summon)
41 - Dragon of Old

Appearance: A giant... snail? It has a pair of fake wings taped onto the back of its shell, but is otherwise just a giant snail.

Summon: Use the Snail Shell. It can be used anywhere that isn't a desert or the snow biome.

Fought: Pre-Hardmode
Specification: Pre-King Slime
Special: No
Progression: No

Stats:
Health: 2,000 (3,250) (4,144)
Attack:
-20 (35) (Melee)
-15 (28) (Slime) (Inflicts Slowness - 100%)
Defence: 8

Attacks:
The Dragon of Old mostly moves slowly towards then player when not attacking. It cannot jump and thus relies on some of its attacks to reach high-up players
-It may hide in its shell and throw itself at the player in a fashion similar to the Giant Snail and Giant Tortoise enemies
-It may hide in its shell and become immobile. In this state it cannot be damaged (and in Expert Mode any projectiles will be deflected back at the player)
-It may launch 3 slimeballs at that player that are affected by gravity

Defeat: Explodes into gibs

Drops:
Drops a snail staff that summons snail minions, a bow that replaces regular arrows with slug-like projectile, and a sword made from a fragment of its shell. In Expert it also drops the Giant Snail Shell; an item that reduces movement speed but grants some defence and damage resistance

Lore:
A giant race of snails somehow mistaken for dragons hundreds of years ago. Someone seems to have been taping cardboard wings to their back as of recent, though the culprit wasn't caught.

Hints:
-Any 2-block elevation is enough to stop the boss almost entirely as it is entirely reliant on its leap attack to get up
--Thus, arenas with lots of platforms make the fight trivial
-The fight is generally very easy anyways and doesn't require much, if any, proper pre-planning.

Extra Info:
-The Dragon of Old is based on the depictions of knights fighting giant snails. While strange, as of writing this the reason that the depictions showed giant snails is unknown, but still funny.
-Phanta has now made the Dragon of Old a theme:
https://soundcloud.com/phantasmental/dragon-of-old
[Added: 28/4/21]
[Updated: 15/5/21]
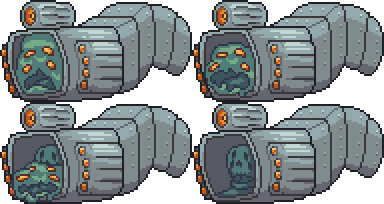
42 - Sea Crawler

Appearance: A large, vaguely cephalopod-like creature with green skin. Yellow luminescent protrusions cover its body, with one of the more rounded ones being where an eye might normally be.

Summon: Use the Squid Bait in the ocean. The boss will eventually leave if taken out of this biome for too long.

Fought: Pre-Hardmode
Specification: Post-EoW
Special: No
Progression: No

Stats:
Health: 4,000 (6,250) (7,969)
Attack:
-36 (70) (Melee)
-25 (42) (Ink Blasts)
Defence:
-20 (Face)
-5 (Back)

Attacks:
The Sea Crawler usually faces the player, floating to the left or right of them. When attacking it won't be able to track the player until after the attack ends
-It may charge at the player, taking a short rest at the end of the charge
-It may launch a barrage of inaccurate ink shots at the player that are affected by gravity
-It may swim around the player in a big 360-degree loop, stopping to then fire an arc of 3 ink shots at the player that aren't affected by gravity
The Sea Crawler's face has higher defence than its back. Projectiles hitting its back will deal noticeably more damage, so many of the Crawler's attacks have it stop moving for a while afterward. Piercing projectiles only count the part of the Crawler's body they hit first when calculating damage.

Defeat: Explodes into gibs

Drops:
Mostly squid-themed items including a spear, bow and a magic staff. Can also drop Luminescent Dye that makes the player's items glow yellow when equipped, and some fishing-related items such as fish, jellyfish and junk items. In Expert Mode it will also drop the Seaweed-Coated Egg which summons a mini Sea Crawler as a light pet.

Lore:
A fabled sea monster rarely spotted in the night by sailors who are often frightened away by its unearthly glow. In reality it is a giant squid with bioluminescence; still interesting but a lot less deadly.

Hints:
-Homing weapons will try to home-in on its back as opposed to its face when possible, so they can make the fight a lot faster if the player has access to something that homes
-Summoner minions that try to melee enemies can often hit both the face and back within the same attack cycle; making minions generally very effective for this fight
-The fight can be farmed for various types of fish in order to craft Cooked Fish for buffs if the player doesn't want to fish themselves.
--Unfortunately it does not drop rare fish, accessories/tools, or crates.

Extra Info:
-The initial idea of the Sea Crawler came from a conversation with a friend about bioluminescent creatures
-There were plans for a Hardmode version of the fight that could occur while it was raining, but it was scrapped due to Duke Fishron's existence.
-The Sea Crawler has a theme now, made by Phanta:
https://soundcloud.com/phantasmental/sea-crawler
[Added: 28/4/21]
[Updated: 15/5/21]
43 - Reanimator

Appearance: A large, buff zombie covered in scars, blood, and stitches. Is left arm is significantly larger than the other. A small, black and white worm-like creature is seen sticking out of its back.

Summon: Use the Zombie Hand at night. The Reanimator will leave quickly if daytime approaches.

Fought: Pre-Hardmode
Specification: Post-Skeletron
Special: Returning Concept
Progression: No

Stats:
Health: 3,000 (4,444) (5,662)
Attack:
-55 (88) (Melee) (Inflicts Poisoned - 33 (67)%)
-45 (74) (Zombie Hands) (Inflicts Poisoned - 33 (67)%)
-30 (50) (Blood Orbs)
Defence: 10

Attacks:
Phase 1:
The Reanimator shuffles towards the player when not attacking at a speed slightly faster than a standard Zombie.
-It can throw down similar-looking worms to the one in its back. Wherever they land Zombies will spawn and rise from the ground to attack the player
-It may perform a lunge attack towards the player. The speed and potential range of the lunge depends on how far the player is from the Reanimator
-It may slam its large hand into the ground, causing zombified hands to rise from the ground around it
-It may spew several blood orb projectiles upwards that are affected by gravity; falling down over the next few seconds over a wide area
Once defeated it will roar and fall to the ground. It will then begin to shake and eventually roar and get back up.

Phase 2:
The worms have replaced its now-lost head and the boss has become faster and been revived to full health. It will now move faster as it loses health and gains an increased jump height.
-Retains all Phase 1 attacks
-Can now launch a stream of blood orb projectiles towards the player. The stream is inaccurate and, after it begins firing, will sweep roughly 50 degrees before stopping.
-The 'revive' attack now has the ability to spawn 3 special types of Zombie:
--'Tanky' zombies have double health but move slower
--'Speedy' zombies move faster but have less health
--'Hunter' zombies use Archer AI and use bows
Defeating this phase ends the fight

Defeat: Bursts into gibs, launching several black worms out in varying directions that quickly squirm away. Any zombies it spawned will not despawn with it, however.

Drops:
Mostly zombie-themed items including the Reanimator's massive arm, a partially-rotten bow, and a summoner staff that summons mini zombies. In Expert Mode it drops the Reanimator; an item that reduces the player's max health by 20% but will revive them after a few seconds after they die at the spot they died. Note that this revival will not stop bosses despawning, however.

Lore:
A host to a swarm of Revitalisers that caused this Zombie's body to swell up in size due to lack of space. Having lost their host it is only a matter of time until they find a new host to pester the living in.

Hints:
-Zombie Banners actually work on all of the Reanimator's minions, so having a few around the arena can help significantly
-Piercing weapons, or any means of AoE damage, can be very helpful since the Reanimator will try to spawn minions very often
-An arena consisting of platforms over a pit of lava can make the fight significantly easier as his Revitalisers cannot spawn minions on semi-solids and thus will fall into the lava and spawn the zombies there; leading to them dying almost immediately

Extra Info:
-The black worms seen in the fight are actually Revitalisers; a worm-like entity last seen in Boss Ideas 5 (though executed poorly)
-Phanta has also now kindly made the Reanimator a theme:
https://soundcloud.com/phantasmental/reanimator
[Added: 28/4/21]
[Updated: 8/6/21]
44 - Constellation

Appearance: A blue and gold mechanical snake. It has a constant stream of what seems like golden fire emanating from its last segment.

Summon: Use the Fragmented Star Chart at night. Constellation does not despawn during the day; though its Guiding Star becomes almost invisible and both the Star and Constellation will speed up considerably.

Fought: Pre-Hardmode
Specification: Post-Skeletron
Special: No
Progression: No

Stats:
Health:
-22,000 (31,750) (40,481) (Constellation)
-0 (0) (0) (Guiding Star)
Attack:
-60 (90) (Head Melee)
-44 (75) (Body Melee)
-30 (50) (Guiding Star Melee, Lasers, Star Projectiles)
Defence: 15 +20% Damage Resistance

Attacks:
The Guiding Star dictates Constellation's path. The Guiding Star will move in whatever pattern it desires and, once the star disappears, Constellation will follow its path. Once it reaches the end of the path Constellation disappears and the Guiding Star re-appears and makes a new path. It continues this cycle the entire fight.
-Constellation may launch a barrage of lasers at the player over 2-3 seconds from its head
-Constellation may summon star projectiles from each of its segments that decelerate as they travel; eventually lingering in-place before disappearing. They are aimed randomly. (Each segment summons 2 in Expert Mode instead of just 1)
-Constellation may summon star projectiles from each of its segments that accelerate as they travel. They are initially all aimed at the player.
As Constellation loses health both it and the Guiding Star will gradually speed up (and speed up at a faster rate in Expert)

Defeat: Constellation itself explodes into gibs, while the Guiding Star disappears into a cluster of light blue particles

Drops:
Several blue and gold weapons including a yo-yo that shoots stars, a sword that launches stars, a magic staff that launches lasers and a gun that shoots lasers. In Expert Mode it will also drop the Star Map that allows the player to set waypoints on the map and, using a Potion of Return, teleport directly to them.

Lore:
A solar-charged star-scouter said to be floating around aimlessly in space. It follows an item called the Guiding Star, though the significance of the 'star' is unknown.

Hints:
-Piercing and AoE weapons, as to be expected, are very useful for this boss due to its many segments
-Watching where the Guiding Star moves will tell the player the exact path that Constellation will take; making predicting its movements very easy.
-Staying still while the Guiding Star is active, especially earlier-on in the fight, can both grant some time for extra health and mana regeneration and also help in determining it's, and thus Constellation's, path.

Extra Info:
-The initial concept behind the fight was 'guiding stars', such as the North Star; which are often used as a point of reference in the night sky for navigation
-Constellation's colour scheme is fairly similar to the Stardust Magus; who is also a star-themed boss
-Go check out Phanta's new theme for Constellation:
https://soundcloud.com/phantasmental/constellation
[Added: 28/4/21]
[Updated: 8/6/21]
45 - Buff Rat

Appearance: A large, buff, anthropomorphised rat wearing brown trousers and brown fingerless gloves.

Summon: Use the Strong Cheese anywhere in the world.

Fought: Pre-Hardmode
Specification: Post-Skeletron
Special: Pseudo-Joke Boss
Progression: No

Stats:
Health: 7,850 (12,000) (15,300)
Attack:
-50 (83) (Melee)
-45 (74) (Rat Swarm, Thrown Rocks/Rat Clusters)
Defence: 8

Attacks:
Buff Rat will simply walk menacingly towards the player when not attacking, though it attacks so frequently that this is often hard to notice without it interrupting its own walk cycle.
-It may call upon an army of rats that spawn from the fight and left and simply run and jump around; possibly dealing contact damage if the player is caught on a platform with them
-It may perform a lunge towards the player, landing with a downwards punch. The speed of the lunge is based on player distance, like with the Reanimator.
-It may pick up and throw objects at the player; either a large rock or a cluster of rats. Does this up to 4 times in succession
-It may dig into the ground, only to erupt from the ground beneath the player
-It may spin around, arms out, with enough speed to become airborne and chase the player. After a few seconds it will stop spinning and will be left briefly dizzy and unable to attack (It does not become dizzy in Expert Mode)
Throughout the fight small rats will begin appearing near the player and Buff Rat. They are purely aesthetic and cannot hurt the player nor be attacked.

Defeat: Gets knocked over, and then scampers away on all fours along with any other rats that may still be present watching the fight.

Drops:
A summoner staff that summons rats, and a book on exercise that increases 'true' melee damage. In Expert Mode it will also drop the Rat Gloves that allow the player to perform powerful punches instead of using a weapon. Drops 'Cheese Tokens' instead of money that can be exchanged for 1 silver coin each.

Lore:
A rat that found an exercise book intended for humans and managed to copy the step-by-step visual instructions. A cheesy origin, but this is the result.

Hints:
-The 'rat swarm' cannot be damaged by the player, canonically due to the sheer density of rats making the player's attempts at thinning the numbers ineffective
--The attack is best avoided by having high-up, disconnected platforms that the rats can't simply spawn on or jump up to.
--Grappling onto the bottom of a solid platform can also work
-Buff Rat doesn't carry a general weakness aside from the brief moment of being dizzy at the end of its Normal Mode spin attack: The fight generally just requires proper planning and resource management

Extra Info:
-Buff Rat was originally a joke mod boss concept for Valentine; the same person whom the Slime Lady/Jelly was made for. Buff Rat then went on to become a returning joke for a while before its eventual inclusion here
-Buff Rat's otherwise-mundane exercise routine despite its unparalleled strength among its peers is, sadly, not a One Punch Man reference.
-Buff Rat is one of few bosses that doesn't directly actually drop any coins; instead dropping Cheese Tokens whose only use is being sold for money
-Buff Rat now has a theme, made by Phanta:
https://soundcloud.com/phantasmental/buff-rat
[Added: 28/4/21]
[Updated: 8/6/21]
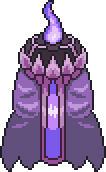
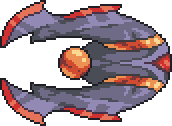
46 - Phantom Herald

Appearance: A large purple cloak with a brim of purple spikes around the collar. Aside from some additional supports just inside the collar, the only thing that seems to inhabit the cloak is a single ball of shadowflame

Summon: Use the Shadow Patch at night. The Phantom Herald will disappear during the daytime after launching a single burst of 16 shadowflame fireballs.

Fought: Hardmode
Specification: Post-Mechanicals
Special: No
Progression: Later Bosses

Stats:
Health: 27,000 (38,850) (49,534)
Attack:
-48 (85) (Melee)
-46 (82) (Shadowflame Fireball)
-55 (95) (Torch Melee)
Defence: 12

[All attacks can inflict Shadowflame - 33 (67)%]
[All attacks can inflict Darkness - 50 (100)%]

Attacks:
Usually floats around, teleporting whenever the player gets too close, it goes to use an attack, or if it takes too much damage staying in one spot.
-It may launch a stream of shadowflame fireballs at the player
-It may summon shadowflame fireballs in random positions near to itself and make them all accelerate towards the player
-It may create a ring of shadowflame fireballs around itself that follows it even when teleporting. Every time the player attacks the Phantom Herald one of the fireballs will be launched at the player automatically. The barrier persists for as long as it takes the player to destroy it or the Phantom Herald to make a new one
-It may summon several fireballs in a row beneath the player and make them accelerate upwards. The fireballs are evenly spaced-out, though the gaps become tighter as it loses health
-It may summon up to 2 giant 'torches' that float in-place; darkening the screen and making the Herald's fireballs larger. One is spawned at 66 (75)% health and the other at 33 (50)% health

Defeat: The shadowflame that makes up the Herald's head explodes and the cloak bursts into gibs. The torches will also explode into gibs; removing the darkness effect from the player's screen

Drops:
Shadowflame-themed weapons including a tome, a sword, and a flamethrower. In Expert Mode it can also drop the Shadowflame Cloak that sometimes allows the player's attacks to inflict Shadowflame and deal extra damage

Lore:
An entity made of shadowflame to serve an unknown master. It is unknown if it had any sort of sentience, or whether it was a mindless drone

Hints:
-Most of the Herald's attacks are composed of singular fireballs, meaning they can mostly be out-maneuvered with careful movement or dashes
-The Herald's fireballs actually glow through the darkness debuff inflicted by his attacks and the torches, making them stand out even when both torches are active

Extra Info:
-The Phantom Herald was originally intended to be more humanoid. However, the initial designs ended up looking more like the Fragile Magus and Ebony Flame, so were ultimately scrapped
-The 'unknown master' in its description is actually a later boss on this page (and thus in this format likely won't really be all that 'unknown' for very long)
-Phanta has now also made Phantom Herald a cool theme as well, go check it out: https://soundcloud.com/phantasmental/phantom-herald
[Added: 28/4/21]
[Updated: 20/6/21]
47 - Mothma'am
Phanta has made her a theme, go check it out: https://soundcloud.com/phantasmental/mothgirl


Appearance: A humanoid moth with an appearance and colour scheme reminiscent of Mothron.

Summon: Use the Moth Wing during a solar eclipse. The boss will not despawn the following night, but will if it reaches morning. Raiding the temple for Solar Tablets can make getting eclipses easier.

Fought: Hardmode
Specification: Post-Plantera
Special: No
Progression: No

Stats:
Health: 40,450 (52,800) (67,320)
Attack:
-55 (85) (Melee)
-48 (78) (Swords)
-30 (50) (Moth Dust) (Inflicts Slowness - 100%, Inflicts Confused - 50 (100)%)
Defence: 12

Attacks:
Mothma'am usually flies above or generally near to the player. If below the player she will almost always begin flying upwards and may delay her own attack pattern upon doing so
-She may create a row of 8 (8-12 depending on health) green sword-like projectiles near herself and launch them at the player in 1 of 2 ways:
--She may throw them all at once
--She may start from one end an work her way across over the next second
-She may create lingering dust clouds around herself that deal minor damage but can inflict debuffs on contact
-She may summon a sword and dash at the player up to 4 times in succession
--She has a chance of also throwing the sword at the player after the 4th dash, but this is random
-She may fly above the player, summon a sword, and drop downward rapidly
(In Expert Mode she will gain attack speed as she loses health)

Defeat: Creates a massive amount of orange particles and a few clouds of dust around herself and then slowly flies away clumsily. The lingering dust can still damage and debuff the player.

Drops:
Can drop a sword, spear, bow, gun, magic tome and summoner staff all themed around moths. All of these weapons can actually be upgraded with Broken Hero Swords. In Expert Mode she will also drop the Eclipse Moth Powder; which can be used to upgrade the Moth Wings.

Lore:
Somehow related to the giant Mothron, as indicated by her appearance. Their connections outside of the appearance and moth-like biology are loose at best, and it is even debatable whether the two have met considering Mothron's generally violent disposition towards humanoid entities.

Hints:
-Much like with the Phantom Herald, many of Mothma'am's attacks consist of only a few small projectiles. Dashes are optimal for the boss, though circling her is an issue due to her tendency to try to stay above the player
-Her tendency to stay above the player is potentially exploitable, as she may interrupt her attack cycle and thus stall her next attack for a few seconds. However, this requires the player to gain a lot of vertical height consistently, which is still somewhat hard to do without killing the Empress of Light in Expert Mode first.

Extra Info:
-Mothma'am's name is a pun on the Mothman; a famous urban legend of a large moth-like creature deemed a bad omen by some
-As with Buff Rat, Mothma'am was also made for Valentine back when she planned to make a mod. It has only since resurfaced in the 'unused ideas' page (and here, obviously :P)
[Added: 28/4/21]
[Updated: 27/7/21]
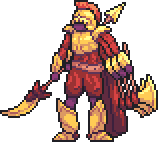
48 - Arachking
Phanta has made him a theme, go check it out!: https://soundcloud.com/phantasmental/arachking


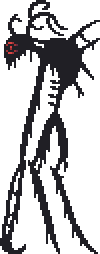
Appearance: A large, 6-armed purple-skinned humanoid. He seems to be wearing a gold and red Roman-style helmet, a golden breastplate with pauldrons, and golden wrist guards with a red suit underneath. He is seen carrying a vast assortment of weapons including 3 axes, a spear, and an additional vaguely sword-like weapon in his right hands.

Summon: Must be 'challenged' in the Webbed Arena; a strange underground structure that spawns near the centre of the world in a spider's nest. He can only be challenged once a day. Leaving the arena will be considered a 'forfeit' and end the fight also
Heavy Gravity is in effect for the entire fight; limiting the effectiveness of wings

Fought: Hardmode
Specification: Post-Golem
Special: Returning Boss
Progression: No

Stats:
Health: 57,000 (82,000) (104,550)
Attack:
-80 (140) (Melee, Shockwave)
-73 (126) (Axes, Swords, Spears)
-64 (110) (Hook, Chains)
Defence: 40

Attacks:
The arena will have several platforms within, with the Arachking jumping between them and the ground when not attacking. He is typically a very aggressive boss, however, so he doesn't stand around often

Phase 1:
-He may throw his 3 axes at the player. They are affected by gravity.
-He may slam his sword into the ground, creating shockwaves along the ground that can destroy the arena's platforms. The platforms regenerate after a short time, however
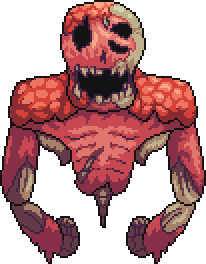
-He may launch several grappling hook-like projectiles at the player that get caught in the arena walls. Up to 5 can be active before he retracts them all. Hitting the chains also damages the player
-He may jump into the air and throw his spear at the player. The spear will likely get lodged in a platform or the arena floor or walls where it will radiate energy; dealing contact damage until it returns to the Arachking.
At half health Arachking will enter a pseudo-2nd phase, indicated by a battle cry
Phase 2:
-Arachking retains all his previous attacks
-Black Recluse spiders may enter the arena infrequently
Arachking's movement and attack speed will gradually begin to increase. This happens both as he loses health, and also as time passes. The cap maxes out at roughly 160 (200)% of his original attack speed

Defeat: Falls to one knee and drops his weapons. Will drop some items as he jumps off-screen.

Drops:
Can drop his hook-type weapon that acts as a grappling hook, his spear as a melee weapon and his axes as infinite-use throwable ranged weapons. Can also drop a set of armour based on his own with a 33% chance per armour piece. in Expert Mode he will also drop the Signet Ring that reduces shop item prices, makes spiders friendly to the player, and grants mild stat buffs.

Lore:
Former king of a spider-like though humanoid race, though his power and status gradually faded over time. He became a gladiator in an attempt to regain his status of power, though ended up enjoying participating that he gave up his attempt to reclaim his kingdom. He still retains some of his items from his royal days.

Hints:
-The arena is fairly large, but still somewhat restricting as it is still a space that the player cannot build in or destroy to alter. Taking time to practice maneuvering around before challenging the Arachking may be recommended.
-Wings are generally less effective in this fight than normal, so items such as grappling hooks become a lot more useful
-If the player is becoming overwhelmed they can choose to teleport out of the arena. While this will end the fight immediately it may save the player from a death which is especially important in Hardcore runs

Extra Info:
-The Arachking has only appeared once before; as a boss in an event all the way back in Boss Ideas 1 under the name 'Araking'. The name change was due to... 'cultural shifts' since then and because Arachking looks more intimidating despite being pronounced the same way
-The Arachking was presumed to have actually been eaten by the other spiders after his defeat at the hands of the player in Boss Ideas 1, though this fight deconfirms that
-Phanta has additionally made a theme for the webbed arena itself, which you can check out here:
https://soundcloud.com/phantasmental/webbed-arena
[Added: 28/4/21]
[Updated: 27/7/21]
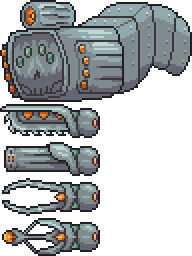
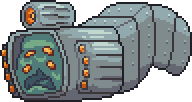
49 - Fear Machine
Phanta's theme for Fear Machine is here: https://soundcloud.com/phantasmental/fear-machine


Appearance: A large, almost caterpillar-like machine with a long, segmented body. It has a skull-like mask, a cannon welded to its head, and a missile launcher at either side of the largest body segment. It has 4 robotic limbs similar in design to Skeletron Prime's

Summon: Use the Suspicious-Looking Key Card at night. The boss will simply continue to fire the deathray at the player during the day while gaining insane defence and mobility and thus cannot realistically be defeated

Fought: Hardmode
Specification: Post-Golem
Special: Returning Boss
Progression: No

Stats:
Health:
-24,850 (42,000) (53,500) (Body)
-16,500 (23,600) (30,090) (Saw)
-14,000 (21,000) (26,775) (Cannon)
-15,250 (22,300) (28,433) (Vice)
-13,000 (20,000) (25,500) (Laser)
Attack:
-85 (146) (Body Melee)
-78 (130) (Saw)
-74 (124) (Cannon, Missiles)
-65 (112) (Vice)
-68 (115) (Laser, Body Lasers)
-100 (150) (Deathray)
Defence:
-35
--9999 (Daytime)

Attacks:
Phase 1:
The body is invulnerable, forcing the player to attack and destroy the arms. The body will still attack the player in this phase and usually tries to stay roughly horizontal to the player. The limbs attack 1 at a time, but do so in fairly quick succession
Body:
-It may launch a flurry of 4-8 lasers from its body towards the player
-It may launch several homing missiles at the player. As they travel their homing properties begin gradually fading
-It may spin-up the laser on its head, align itself with the player, and fire a giant horizontal deathray for a few seconds
Saw:
-May be swung at the player in a wide arc
-Aligns itself with the player and performs a horizontal thrust before retracting back to the Machine
Cannon:
-May fire a rapid stream of bullets towards the player for around 1 second
-May launch several explosives in an inaccurate cluster that are affected by gravity
Vice:
-May rapidly 'jab' itself towards the player for a couple of seconds
-May back away from the player before thrusting towards them. Doesn't need to be aligned with the player in the same way the Saw's thrust attack does.
Laser:
-May shoot an arc of 3 lasers at the player
-May launch a large energy orb that has a mild homing effect as it travels
Upon 'destroying' limbs they will look broken and stop firing; simply lagging behind the Machine. Once all 4 are broken the Machine will enter its 2nd phase; breaking off its mask.

Phase 2:
The body is now vulnerable and the limbs are invulnerable, but will become active again. Attack pattern now becomes a cycle of a limb attacking, then the body and a limb attacking, which repeats for the rest of the fight
All 4 limbs and the body gain new attacks:
-The Saw may now spin up and slowly move towards the player while launching sparks in random directions
-The Cannon may launch explosives towards the player. Once they are close enough or begin moving past the player it will shoot it; causing it to explode prematurely
-The Vice may lunge towards the player. If it hits the player it will 'grab' them; immobilising them so the body can ram into the player, then lets the player go
-The Laser may shoot lasers randomly in a 180-degree radius in front of it
-The Body may now charge at the player at high speed
As it loses health the Fear Machine's body will begin to 'melt' away gradually; revealing a mechanical skull within.


Defeat: Explodes into gibs, its limbs included

Drops:
A ranged cannon, a magic laser, a chainsaw-like melee weapon and a summoner that summons defence drones that look like the Vice limbs

Lore:
The original machine was destroyed long ago, but the metal it was made of emanated an otherworldly hatred people sought to harness. Re-built and destroyed many times, the wreckage was unrecognisable went last recovered; leading to a complete design overhaul and biomechanical implementation

Hints:
-For the first phase piercing and homing weapons are highly useful. Piercing weapons can hit several limbs in a single attack, whereas homing is helpful due to the limbs' fast movements and small hitboxes
-It is suggested the player tries to destroy the limbs they find most threatening; leaving a single limb alive before Phase 2. They can then use this time to heal and wait for Potion Sickness before triggering its more frantic and generally harder 2nd phase

Extra Info:
-The boss has 3 primary references:
--The Fear Machine boss that had previously appeared in Boss Ideas 2 and 5. This is technically the most up-to-date design
--Skeletron Prime, who was also the boss that the Fear Machine was based on (and technically was just an upgraded version of)
--Nightmare, hence the melting green face, rectangular segmented body, and the large drum (which was a gravity manipulator for Nightmare, but inspired Fear Machine's deathray)
[Added: 28/4/21]
[Updated: 28/7/21]
50 - Hathy and Anna
Phanta has also kindly made the duo a theme: (Well, 2)
https://soundcloud.com/phantasmental/hathy-and-anna
https://soundcloud.com/phantasmental/hana


Appearance: Pink and blue mages representing health and mana, respectively.

Summon: Use the Intertwined Crystal. It can be used anywhere and at any time; with the boss only despawning if the player gets too far away or dies.

Fought: Hardmode
Specification: Post-Golem
Special: Returning Boss
Progression: No

Stats:
Health:
-35,000 (55,500) (70,763) (Hathy)
-30,000 (49,000) (62,475) (Anna)
-40,000 (62,000) (79,050) (Hana)
Attack:
-64 (100) (Hathy Melee, Anna Melee)
-72 (122) (Hathy Projectiles, Anna Projectiles)
-80 (140) (Hana Melee, Hathy Projectiles)
Defence: 40

[Hathy's attacks may inflict Potion Sickness - 20 (50)%]
[Anna's attacks may inflict Mana Sickness - 20 (50)%]
[Hana's attacks may inflict Potion Sickness - 33 (67)%, Mana Sickness - 33 (67)%]

Attacks:
Phase 1:
Hathy and Anna both attack one at a time and have their own attacks. They usually try to stay at the opposite sides of the player to each each other.
Hathy:
-She may summon several heart-shaped projectiles that slowly rain down from the sky over a wide area
-She may surround herself with a pink, heart-shaped aura and dash at the player
-She may launch an arc of 5 heart-shaped projectiles at the player. They all move in a wavy motion instead of straight
Anna:
-She may rain down several star-shaped projectiles rapidly over a confined area
-She may surround herself with a blue, star-shaped aura and dash at the player
-She may launch a burst of 10 shots that rotate in a spiral as they disperse
Defeating one of them will cause that one to simply float near to the other and stop attacking, with the still-active member of the duo attacking faster to compensate.
When both are out of health they will seemingly 'fuse' together, transitioning into Phase 2

Phase 2:
The two of them are now fused into 'Hana'. Hana retains both Hathy and Anna's attacks and has 2 variants of each of them that she can use:
-She can use one of Hathy's attacks and one of Anna's attacks at the same time
-She can use a single attack, but enhances it with more projectiles that often move faster

Defeat: The duo split and become pink and blue glowing 'wisps' that fly upward in a double helix motion

Drops:
A pink bow and sword, a blue magic staff and summoner staff, and a consumable that increases the player's max health and mana permanently. Drops Super Healing and Super Mana Potions despite being a Pre-Moon Lord boss. Can drop each of their respective outfits with the same % chance as masks normally have. In Expert Mode they drop an accessory that summons mini versions of Hathy and Anna that can recover the player's health and mana depending on how much of either they are missing.

Lore:
Two enchanted entities personifying health and mana; crucial aspects of Terrarians' wellbeing. It is unknown whether Hana is a simple fusion or their original state of being.

Hints:
-Defeating the one the player finds hardest first will allow them to focus more on the one they deem 'easiest', which they can then choose to use to stall out Potion Sickness
-Hathy and Anna are capable of inflicting Potion and Mana Sickness onto the player. While the debuffs are brief, this can make taking hits from Hathy while at low health or taking hits from Anna as a mage potentially disastrous

Extra Info:
-Hathy and Anna were part of Boss Ideas 5 and were selected for the remaking process by a rather-unflattering random number generation as most of Boss Ideas 5 were at one point planned to be specifically remade. After the duo were chosen this plan was put on hold due to the quantity of bosses in Boss Ideas 5
-Hana did not exist in the original fight, though the duo initially splitting from a Mana Regeneration Band may mean that Hana technically still existed then but was never seen (considering a Mana Regeneration Band is a purple band created by crafting together the pink Band of Regeneration and blue Band of Starpower)
-Hathy and Anna's hair are vaguely in the shape of a heart and a star, respectively
--Hana's is roughly somewhere between the two.
-Hathy, Anna and Hana's colour schemes are actually linked. Hathy and Anna have flipped Red and Blue values, while Hana's colours are roughly in the centre of the two
-Hathy and Anna are some of the only non-potion sources of Potion Sickness and Mana Sickness
[Added: 28/4/21]
51 - Aetherus

Appearance: A robot with a vaguely bear trap-like design. It has an orange glass orb at its centre and a few transparent glass pipes between the main body and its 'jaws'. It has several 'tethers' that look similar to Aetherus' main body, although smaller.

Summon: Use the Nether Reactor. The sky turns a dark red throughout the fight.

Fought: Post-Moon Lord
Specification: Post-Moon Lord
Special: No
Progression: No

Stats:
Health:
-36,500 x6 (53,400 x6) (68,085 x6) (Tethers)
-0 (0) (0) (Body)
Attack:
-180 (310) (Melee)
-140 (240) (Crimson Fireballs) (Inflicts On Fire! - 100%)
-110 (195) (Spectral Bullets)
-120 (207) (Crimson Flamethrower) (Inflicts On Fire! - 100%)
Defence: 60

Attacks:
Chases the player in a Plantera-like motion; using its tendril-like Tethers for mobility. It is not limited by solid blocks as its Tethers can create temporary additional blocks to grip onto if the player is too far away to otherwise reach. Aetherus' body cannot be harmed (and in Expert Mode can actually destroy projectiles on contact)
-It may attempt to ram the player by temporarily becoming faster for a few seconds
-It may move away from the player and launch fireballs towards them. The fireballs explode into Inferno Fork-like flames upon reaching the player
-It may stop chasing the player only to fire a stream of spectral bullets at the player over the next few seconds; rotating to track the player but not moving
-It may move in a wide circle around the player, launching several streams of spectral bullets at them. Each stream usually has between 4-6 bullets each and are spaced out by roughly half a second each
The player has to attack and destroy its Tethers in order to defeat it. Each Tether, when broken, affects its attacks and makes Aetherus' body slightly more transparent.
-1 Tether Broken: Gains a new attack where it breathes a flamethrower-like stream of flames at the player while also releasing fireballs that bounce off of walls similar to Golem's
-2 Tethers Broken: Gains a new attack where it chases the player, launching explosive fireballs at them. Does not replace the regular 'ram' attack as this one is slower.
-3 Tethers Broken: Gains a new attack where it stops very briefly before launching 10 explosive fireballs in a 'burst'; exploding based on the distance between Aetherus and the player.
-4 Tethers Broken: Gains a final new attack where it moves around the player in a wide circle while launching explosive fireballs at the player. After completing the full circle it charges at the player.
Finally, with 5 Tethers broken it will become immobilised and will continue to either use the 'spectral bullet stream' attack or a variant that utilises explosive fireballs. It does this until the final Tether is broken

Defeat: With all 6 Tethers destroyed Aetherus simply fades away completely, letting out a strangely human shriek as it does so.

Drops:
Drops Infernal Essence, a crafting material, primarily. It can drop a spear, a magic staff or a gun all with designs similar to its own. In Expert Mode it drops the Infernal Orb which causes the player to sometimes release orange ghostly homing projectiles that explode upon hitting enemies when a weapon is selected in the hotbar, with the chance increasing when damaged or at low health and the damage depending on the player's current active weapon.

Lore:
A machine originally designed for exploration of a presumed 'spirit realm'. After making the journey to another dimension the machine seemed to retain some of its otherworldly energy. People attempted to harness this energy to their detriment as Aetherus went berserk. With its tethers broken the energy it harnessed dragged it back to the other dimension where it shall likely stay.

Hints:
-Piercing weapons are somewhat helpful in this fight since there is potential for the player to be able to hit more than one tendril at once, but due to the tethers connecting to blocks it is hard to do so consistently
--AoE can also be helpful as it doesn't require as much positioning to hit multiple tendrils at once, though it is dependent on the arena and Aetherus' RNG for it to be effective
-The player can choose to weaken all the tethers at the same time in order to minimise time spent having to get acclimatised to its new attacks. The effectiveness of this depends moreso on whether the player wants to broaden Aetherus' movepool or only face the initial moves it started with, however.
-In Expert Mode, Aetherus' body is capable of blocking shots, so homing projectiles may be helpful as they will not intentionally target Aetherus and might be able to make it around his body to hit tendrils behind him

Extra Info:
-Aetherus actually seems to take inspiration from DOOM; primarily the 'Argent Energy' also being an otherworldly energy source and the means of harnessing it being dangerous
-Aetherus seems to be a 'reverse' of Plantera. It is a mechanical boss that utilises fire which can only be damaged by destroying its tethers, while Plantera is an organic boss that utilises plants which is attacked more directly while its tendrils are invulnerable.
[Added: 28/4/21]
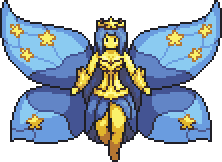
52 - Empress of Night

Appearance: Effectively a 'mirror' to the Empress of Light; being a yellow-skinned moth-like fairy encompassing the nighttime as made apparent by its star motif.

Summon: Capturing or killing a Lunar Moth will summon EoN. Releasing a caught Lunar Moth provides a 5-second window where it can be re-captured without summoning EoN. It is best to fight her during the daytime as her nighttime variant has a massively increased amount of damage resistance; thus prolonging the fight. If she remains active until 4:30 she will yawn and leave; despawning shortly after

Fought: Post-Moon Lord
Specification: Post-Moon Lord
Special: No
Progression: No

Stats:
Health: 150,000 (254,000) (323,850)
Attack:
-130 (220) (Melee)
-160 (270) (Stars, Stardust Projectiles)
-180 (310) (Dash, Giant Falling Star)
-145 (248) (Falling Star Trail)
Defence:
-45
--+50% Damage Resistance (Nighttime only)

Attacks:
Phase 1:
The Empress of Night's movement is much the same as the Empress of Light's; trying to fly overhead when possible.
-She may summon several stars that fall from the sky; accelerating as they travel
-She may perform a horizontal dash attack similar to Empress of Light's
-She may perform a short horizontal dash while above the player, summoning several stardust projectiles. These will accelerate towards the player and have a gradually-fading homing effect
-May release a 'burst of 8 stars around herself. She will do this 4-6 times in succession; with each subsequent 'burst' having a random degree of offset to stop the stars lining up with each other
-She may summon several larger stars to fall from the sky that leave damaging trails of smaller stars that fade after a while
At half health she will enter her 2nd phase; with her wings beginning to glow a vivid blue
Phase 2:
-Retains all her Phase 1 attacks, though both 'falling star' attacks and the 'stardust projectile' attack summon more projectiles
-Summons stars that are launched in the direction the player was headed. They are fast and also leave small damaging stars as that travel that despawn after a short time
-She may release a burst of 15 stardust projectiles around herself
-She may disappear and re-appear beneath the player; dashing upwards. An upside-down 'v' shape of stars also rise up with her during the dash

Defeat: Flinches and disappears into a cloud of blue and yellow particles

Drops:
Normally drops a spear, magic tome, gun and a summoner staff all themed around stars. She can also drop a set of wings based on her own, an accessory that summons a pixie that can sometimes block smaller projectiles aimed at the player with a cooldown, and in Expert Mode drops a charm that increases stats during nighttime, provides a glow around the player, and increases flight speed and duration slightly.
If all damage is dealt to her during the nighttime and she is defeated, she will additionally drop a bow that launches stars.

Lore:
Believed to be a younger sibling of the Empress of Light, and not officially ruler of anything, the Empress of Night is far more calm that her bad-tempered sister. It is believed that both empresses hold far greater power when in their natural element.

Hints:
-The Empress of Night has a lot of attacks that are similar to the Empress of Light's. Practicing EoL's fight will also make this fight easier
--Similarly, many tactics that work for EoL have a chance of working here as well
-When trying to get the special bow obtained by defeating her during the night the player should invest in the most DPS they can due to her massively increased damage resistance and the reduced time in which the player has to defeat her.
-Unlike EoL, the Empress of Night's attack pattern is not in a specific order, so there is no point trying to look for attack patterns during the fight

Extra Info:
-The Empress of Night was originally designed only a few hours after the Empress of Light's official reveal and was planned to be part of a group of designs based on the 'soul' items. The Empresses of Sight and Flight were also made but haven't appeared yet.
-The Empress of Night's lore description makes reference to both hers and EoL's alternate forms when fought during the night and day, respectively
--The Lore entry also states the Empress of Night isn't, actually, an empress.
[Added: 28/4/21]
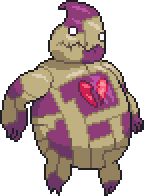
53 - Taboo

Appearance: A large, purple and brown creature that appears to be stitched together. Most of its body is the same purple and brown patchwork aside from its white eyes and a pink broken heart symbol on its chest. It has a zig-zagging mouth that is more distinct and deep than the other stitch lines.

Summon: Use the Patchwork Book at night. The boss will actually kill the player if it reaches daytime by summoning a red, health-draining aura around the player that is only removed on death or if the player manages to kill Taboo before the player dies.
Heavy Gravity is in effect the entire fight; limiting the player's vertical mobility

Fought: Post-Moon Lord
Specification: Post-Moon Lord
Special: No
Progression: No

Stats:
Health: 245,000 (392,500) (500,438)
Attack:
-220 (368) (Melee)
-160 (270) (Shadow Sphere, Shadow Maws)
-175 (288) (Shadow Skull)
-300 (480) (Death Rune)
Defence: 20

[All of Taboo's attacks can inflict Shadowflame - 100%]

Attacks:
Phase 1:
Taboo primarily floats near to the player; trying to keep a distance of around 10-15 blocks. It attacks slowly, but many of its attacks hit hard.
-It may open its mouth and release a cluster of shadow spheres towards the player. They move in wavy motions as opposed to straight lines
-It may open its mouth and release a cluster of shadow spheres towards the player. These spheres move in straight lines and have a homing effect for the first 2 seconds they are active
-It may open its mouth and release a massive shadowy skull that accelerates rapidly as it travels
At 76 (82)% health it will laugh at the player and enter its 2nd phase
Phase 2:
Its movements remain the same, but it increases its attack roster
-It retains all of its Phase 1 attacks
-It may summon shadowy jaws called 'shadow maws' that chase the player for a few seconds before disappearing
-It may summon shadow maws that act like Giant Cursed Skulls instead of chasing the player; launching shadow spheres at the player infrequently. After the 3rd shot they will vanish
-It may disappear before re-appearing above the player and dropping down
At 34 (41)% health it will enter its 3rd phase, signalled by another laugh
Phase 3:
Retains all previous attacks, but now slowly floats towards the player sometimes; alternating between chasing and distancing itself.
-Has all its Phase 1 and 2 attacks
-It may build up energy and move towards the player slowly. After a few seconds it will release shadow spheres from itself in random directions. The amount summoned is based on the damage it has taken while building energy; being anywhere from 8-75 spheres. These spheres may either disperse in straight lines, wavy lines, or may rarely have homing properties briefly
-It may open its mouth and release 2-5 strange, red symbols referred to as 'Death Runes'. These move in random directions as they travel and are capable of making sharp turns or adjusting their movement speed at any time until they vanish
Once Taboo is below 30% health he can begin spawning the symbols randomly even when performing other attacks. At 18% health he will spawn these extra symbols more frequently.

Defeat: Taboo's stitches visibly begin to loosen, causing him to fall apart. He will eventually collapse into pieces of cloth and releases 8 more death runes upon being defeated.

Drops:
Can drop a magic item that looks like a doll, a magic tome, a summoner staff and a sword. Also drops Cursed Fabric which can be used to craft a few different items. In Expert Mode he will drop an item called "IOU Nothin'!" which has the tooltip "You think I'm just going to give you my best items because you beat me in a harder fight? You're jokin'!"

Lore:
A large, cursed patchwork doll. Many hexes were placed upon it many years ago, which eventually manifest in a monstrous way.

Hints:
-Taboo attacks slowly but hits very hard, so prioritising dodging and DPS is recommended as tank isn't as viable for this fight
-Much of the fight can be easier to handle by watching which attack Taboo is wanting to use, dodging it, and then counter-attacking. This is especially crucial for its 'counter-attack' attack in Phase 3

Extra Info:
-The largest inspiration for Taboo was Oogie Boogie from a Nightmare Before Christmas; hence his rounded design with a hood-like head and cloth body
--It is also why his 'IOU' item's tooltip has the words "You're Jokin'" at the end, once again in reference to Oogie Boogie's song
--Other inspirations include the Pokemon Gengar due to its purple colouration, rounded body, and dangerous nature
[Added: 28/4/21]
54 - Illuminaris

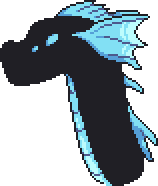
Appearance: A massive dragon with a both that is either entirely matt black of obscured by some force. Its eyes, underbelly, fins and head and back spines all glow a bright blue.

Summon: Use the Luminous Scale. The sky turns dark throughout the fight and will return to normal only after Illuminaris despawns or dies

Fought: Post-Moon Lord
Specification: Post-Blacklight
Special: No
Progression: No

Stats:
Health: 700,000 (1,045,000) (1,332,375)
Attack:
-312 (440) (Melee)
-330 (468) (Deathray)
-290 (412) (Energy Spheres)
Defence: 80

Attacks:
Illuminaris will appear from the darkness to attack the player, then disappear again afterwards. It will usually appear close to the player, anywhere between 20-30 blocks away, and doesn't really move outside of these disappearances
-It may release a giant, luminescent deathray towards the player. It sweeps based on the direction the player moves to avoid it for a while before Illuminaris stops firing the laser
-It may roar, summoning several energy spheres randomly beneath the player that rise upwards
-It may roar, summoning small volatile energy spheres in random locations. After a short while they all explode in unison
-It may release a stream of energy spheres from its mouth at the player. They explode upon reaching the player's position
As Illuminaris loses health its attacks begin to become more hectic and harder to dodge
-Its deathray sweeps faster, but does not last as long before it expires
-Its 'rising energy sphere' attack summons more energy spheres
-Its 'volatile energy sphere' attack summons more energy spheres
-Its 'energy sphere stream' attack summons more energy spheres and they are launched faster

Defeat: Creates a flash of light and then explodes into light blue particles. The background will return to normal afterwards

Drops:
A sword, flail, bow, flamethrower, magic staff and a summoner whip which all use bridge blue colours. Will also drop Luminescent Dragon Scales that can be used as a crafting material. In Expert Mode it can drop the Luminous Mane that creates a powerful aura of blue light around the player that illuminates the surrounding area and deals damage to nearby enemies, as well as providing a damage buff.

Lore:
A mystical dragon rumoured to have been just a myth long ago due to tales of its encounters ranging wildly in scope and appearance.

Hints:
-Unlike other bosses, Illuminaris' attack speed doesn't increase through the fight, nor does it gain more attacks. Thus the player can spend some time learning its attacks while it has high health before it has to deal with the more challenging upgrades as it loses health
-Dash accessories are very helpful for this fight, as is burst mobility in-general
--The player can use this by remaining still at the beginning of an attack and either move to dodge if it is either the rising or volatile energy sphere attacks or dash out of the way of the energy sphere stream or deathray attacks

Extra Info:
-Illuminaris was one of the first bosses designed for this part of Boss Ideas 11, though was one of the later ones to actually receive a fleshed-out fight
-Illuminaris is one of few bosses to not actually have a phase transition nor gain an attack speed increase as it loses health
--Despite this, it still becomes gradually harder to fight due to its 4 attacks becoming gradually more deadly as it loses health due to more projectiles or faster projectile movements
[Added: 28/4/21]
55 - Solar Scourge

Appearance: A large, flaming serpentine creature with golden plating around each of its segments. Its head has 2 large mandible-like extensions and its tail is larger than its other segments; almost twice the size of them

Summon: Use the Sol Beacon. The sky will turn a yellowish orange throughout the fight until the Solar Scourge is either defeated or despawns. It can follow the player if they try to flee by accelerating.
The player is inflicted with Heavy Gravity throughout the fight

Fought: Post-Moon Lord
Specification: Post-Blacklight
Special: Returning Boss
Progression: No

Stats:
Health: 1,885,000 (3,000,850) (3,826,084)
Attack:
-375 (515) (Head Melee, Clone Head Melee) (Inflicts Unstable Magic - 50 (100)%)
-300 (430) (Body Melee, Clone Body Melee) (Inflicts Unstable Magic - 33 (50)%)
-274 (390) (Solar Spark, Solar Spear)
-280 (400) (Miniature Sun, Clone Explosion, Sunlight) (Inflicts Unstable Magic - 25 (40)%)
-265 (378) (Fireball)
Defence:
-100 (Head)
-145 +33% Damage Resistance (Body)
--+50% Damage Resistance per segment pierced (Body)
--+33% Damage Resistance (Radiant Boost)

Attacks:
Phase 1:
The Solar Scourge will burrow through the ground, as most worm bosses do. It can fly temporarily if it needs to reach the player, though the effect wears off 2 seconds after being deemed unnecessary
-It may launch a barrage of sparks towards that player that are affected by gravity and linger on the ground briefly after landing
-It may launch spears upwards from various segments that split into 3 at the apex of their ascent before beginning to fall
-It may release several mines called 'miniature suns' from its segments that linger in-place for a long time. Eventually they will explode on their own; though this often takes a fairly long time
-It may release 1-3 fireballs from all of its segments in random directions. They are launched in rapid succession, starting from either the head or tail
-It may launch fireballs at the player from all of its segments, starting from the head
-He may release a ball of light from his head that creates 8 deathrays called 'sunbeams' in the cardinal and ordinal directions after a short delay
-It may activate its 'Radiant Boost'; glowing orange, gaining additional damage resistance, and moving faster for a short time. For 4 seconds after the boost fades the Scourge moves slower and cannot attack
At 40 (55)% health it will enter Phase 2
Phase 2:
Says dialogue along the lines of 'Now I'm really getting fired up!' to signal the transition
The Solar Scourge will gain flight in this phase, attempting to ram the player frequently. Despite the Scourge's own mobility increase Heavy Gravity is still in effect in this phase
-Solar Scourge retains all previous attacks from Phase 1
-He also now has the ability to create fiery 'clones' of himself. These are smaller versions of Solar Scourge and simply act like Wyverns; attempting to do nothing but ram into the player. After a while they will explode regardless of player input.

Defeat: The Solar Scourge releases a burst of flames that crack his armour and cause his fiery body to dim. He will then say something akin to "Ah, well played, I yield." before burrowing down into the ground and disappearing. It drops its items from its nearest segment upon speaking.

Drops:
Flame-Forged Plating and Solar Flares; used to make armour, weapons, and a vanity set that resembles the Solar Scourge. He will also drop the Solar Drill that acts as a stronger and faster version of the Drill Containment Unit. He can drop a sword that creates streams of fiery explosions, a cannon that launches miniature suns at enemies, and a summoner staff that summons mini fire mages dressed similar to the Solar Scourge. Rarely he may drop the Solar Breaker; a pair of wings that grant increased movement speed and have incredible speed but a low flight time. In Expert Mode he will also drop the Solar Mandible; an accessory that makes the player's critical hits inflict Daybroken on enemies, creates an explosion if you take damage, and grants additional defence and damage.

Lore:
A colossal flaming serpent who feasts on solar energy. Having lived for many years, it has grown wise but tired. Has a fondness for a particular magus, whom he considers his dearest friend.

Hints:
-Piercing and AoE weapons are, as ever, effective for fighting this boss. However, its piercing resistance heavily limits the increased effectiveness of these types of weapons, so a weapon that simply has more raw DPS may be better
--Minion contact damage is exempt from the piercing resistance, so summons can often be very helpful for this fight
-Using Phase 1 to learn his attacks is recommended, as he only gains one new primary attack in Phase 2

Extra Info:
-The Solar Scourge appeared previously in Boss Ideas 2 and is, despite the name, unrelated to Boss Ideas 7's Solar Flare Wyrm
--Or Boss Ideas 4 & 10's Scourge for that matter
-The 'particular magus' mentioned in his lore description is the Stardust Magus; who has been a close friend of the Solar Scourge since their initial conception all the way back in Boss Ideas 2
[Added: 28/4/21]
56 - Phantasm

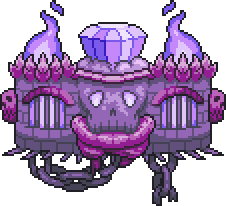
Appearance: A large, purple fortification of brick. It has a skull-like pattern at the front with a large gem lodged within it. Its body has gates that are both barred shut and shadowflame torches burning above them. Large chains hang beneath it

Summon: Use the Phantasmal Shackle at night. The game will not be able to progress past 4:30 AM while the boss is active.

Fought: Post-Moon Lord
Specification: Post-Skye, Post-Phantom Herald
Special: Returning Boss
Progression: No

Stats:
Health:
-80,000 (115,000) (146,625) (Claws x2)
-100,000 (165,000) (210,375) (Torches x2)
-750,000 (1,100,000) (1,402,500) (Body)
-250,000 (350,000) (446,250) (Crystal)
-3,500 (5,500) (7,013) (Shadowflame Phantom)
-5,000 (7,500) (9,563) (Shadowflame Skull)
Attack:
-385 (521) (Melee) (Inflicts Shadowflame - 20 (40)%)
-278 (428) (Shadowflame Fireballs) (Inflicts Shadowflame - 33 (50)%)
-315 (472) (Shadowflame Phantom) (Inflicts Shadowflame - 50 (80)%)
-285 (433) (Shadow Skull Melee) (Inflicts Shadowflame - 50 (80)%)
Defence:
-100 (Crystal, Torches, Shadowflame Phantom)
-130 (Body, Claws, Shadowflame Skull)

Attacks:
Phase 1:
Phantasm will float in the air, only following the player slowly if they move too far away from it. Phantasm's body is invulnerable, forcing the player to attack the two torches and the two skull-like claws at its sides
The claws, torches and body have their own attacks each, though will usually avoid overlapping attacks. However, with the number of things attacking, this still means the player is constantly bombarded with attacks
Claws:
-Lunge towards the player rapidly and retract quickly after the attempt. Unlike Golem's punches these cannot be interrupted by being attacked
-Lunge towards the player more slowly but can also release fireballs aimed towards the player whilst retracting. Unlike Golem's punches these cannot be interrupted by being attacked
Torches:
-It can release a burst of between 8-13 shadowflame fireballs in all directions
-It can launch several fireballs skyward. They begin raining down from the sky slowly after a short delay
Body:
-It can open one of the two gates and release 1-2 Shadowflame Phantoms. These Phantoms act like stronger versions of the Goblin Summoner's Shadowflame Apparitions
-It can teleport to reposition itself. It may do this more often if the player is further away
Defeating the Torches or Claws will put them out of commission for the rest of the phase. Once both Torches and both Claws are defeated the fight will transition into Phase 2
Phase 2:
Phantasm's body is now vulnerable and the Torches and Claws are invulnerable, but become active again with limited ability
-The Claws only retain their faster lunge attack, though have a short delay before retracting
-The Torches only retain the fireball geyser attack, though have a longer wind-up before attacking
The Body, however, gets stronger in this phase:
-Retains the ability to summon Shadowflame Phantoms, but will summon 2-3 at a time
-Retains the ability to teleport, releasing a burst of 6 fireballs every teleport
-May launch a massive cluster of shadowflame fireballs towards the player that decelerate after a few seconds
-It may create pseudo bullet-hells of horizontally-moving fireballs, signalled by the skull in its body laughing
-Its skull may roar, releasing shadowflame fireballs in all directions randomly for a few seconds. The longer the attack occurs the more fireballs are spawned every second
-Its skull may roar, releasing 1-3 Shadow Skulls. These orbit the player from a distance and may launch shadowflame fireballs at the player infrequently
Once the body runs out of health the crystal will break away and leave the stony body to crumble away as it falls; entering its 3rd phase
Phase 3:
The Crystal moves rapidly; dashing about and teleporting very frequently.
-The Crystal has all the attacks of the Torches and Body; with any attacks that utilised the skull showing a reflection of it within the crystal itself
As the Crystal loses health the screen will slowly begin to darken

Defeat: The Crystal cracks down the middle and shatters into a purple pillar of light. The remnants of the Crystal simply shatter into gibs

Drops:
A series of shadowflame-infused weapons including swords, spears, tomes, magic and summoner staffs, bows, guns and a summoner whip. Drops Shadowflame Crystal Pieces that can be used as a material to craft and upgrade some additional weapons and items. In Expert Mode it can also drop the Soul Sanctuary; a mount that has an active effect that reduces the player's movement speed and ability to attack but grants massive buffs to defence and reduces enemy aggression; though it does not work against bosses not yet defeated on the current world

Lore:
An unearthly stronghold brimming with shadowflame. Those that try to harness its powers are often entranced and eventually forced to do its bidding; gradually losing their sense of self and becoming mere wisps of shadowflame themselves that Phantasm will gradually absorb.

Hints:
-Piercing is helpful for the first phase due to the numerous hitboxes it has, as are AoE effects
-Teleportation items are very helpful for this fight. It is very chaotic with various parts of the boss performing various attacks at once that may overlap and potentially trap an unprepared player; thus a means of getting away from danger is very helpful
-The Soul Sanctuary item dropped by Expert Mode Phantasm can be very useful for farming difficult bosses the player has already defeated; as it provides a massive amount of damage resistance when triggered that can be used to heal.

Extra Info:
-Phantasm is not a new enemy, and is in fact a redesign of the Phantasmaw from Boss Ideas 6 & 7; with the general plan being to make it more distinct to separate itself from the constant comparisons to Calamity's Ravager.
-As evidenced by its spawn conditions the Phantasm is the Phantom Herald's supposed master
[Added: 28/4/21]
57 - The Watcher

Appearance: A colossal monstrous entity shrouded in darkness. The only obvious details that can be made out are its numerous glowing white eyes, though its silhouette also displays numerous curved teeth.

Summon: Use the Thousand Eyes. The background turns a dark grey and the Watcher will appear

Fought: Post-Behemoth
Specification: Post-Behemoth
Special: Tier 1 Superboss
Progression: No

Stats:
Health: 6,785,000 (9,750,000) (12,431,250)
Attack:
-0 (0) (Melee)
-620 (872) (Energy Spheres)
-720 (1000) (Cosmic Fireballs)
Defence: 100

Attacks:
Phase 1:
The Watcher will typically float close to the player. Fortunately, as it stays in the background, it is incapable of dealing contact damage.
-It may roar, summoning bullet-hells of horizontally and vertically-travelling energy spheres
-It may roar, releasing a countless barrage of energy spheres from its mouth in random directions
-It may roar and release bursts of projectiles from all of its eyes. Each eye can release between 3-5 bursts, and each burst can contain 3-7 projectiles each launched in random directions
At 67 (75)% health the Watcher will enter its 2nd phase; roaring to signal the transition

Phase 2:
The background will become space-y, like the Watcher itself does. It moves in the same way but greatly increases the size of its attack pool
-It retains all phase 1 attacks
-It may roar, releasing massive cosmic fireballs from its eyes that all explode into anywhere from 10-30 energy spheres each after a short time
-It may roar and launch a stream of cosmic fireballs directly towards the player. These all explode into 5-8 energy spheres each; all launched in random directions
-It can roar, summoning countless energy spheres randomly around the arena that fly in random directions
As it loses health the Watcher's attack speed will slightly increase, as will the size of its projectiles

Defeat: Roars, disappears into a flash of light. The background returns to normal afterwards

Drops:
Can drop a flamethrower that launches flame similar in appearance to his cosmic fireballs, a magic tome that rapidly launches energy spheres, and a magic staff that can launch explosive cosmic fireballs. Also has a chance of dropping the Continuum Eye; which grants piercing effects to all projectiles but still lets them activate certain effects such as explosions. In Expert Mode it will drop the Neutron Boots that, when the player is falling straight downwards and not attacking or using items, allow them to become briefly invulnerable and deal colossal damage to anything they hit. The effect has a cooldown, however.

Lore:
An otherworldly entity that has only partially slipped through into our dimension; watching silently from the shadows unless disturbed. Your efforts seem to have forced it to retreat back into its home dimension before it could escape.

Hints:
-It is best to bring weapons that simply have a high single-target DPS to this fight due to the Watcher's distinct lack of minions and segments, and having such a large hitbox that homing is also not necessary for the fight
-Despite the Watcher not dealing contact damage, it is not recommended to let him get too close. The attacks he spawns from his mouth are dangerous as soon as they spawn and may unfairly hit a player as soon as they spawn if the player is too close to its mouth

Extra Info:
-The Watcher shares some similarities with Reflux; both being large space-dwelling entities with colossal mouths and a purple colour scheme
--Despite this, the two of them are not related at all from a lore perspective due to being from completely different dimensions from one another and likely being different species due to the differences in facial structure and, most apparently, number of eyes
[Added: 29/4/21]
58 - Resonance

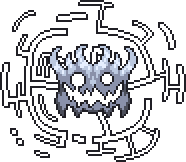
Appearance: A strange, spiky, vaguely crown-like creature with white eyes and a jagged mouth. It has strange white symbols/wings on its back that have disconnected pieces, though retain their shape.

Summon: Use the Resonant Shard. The time and location are unimportant and have no bearing on the fight.

Fought: Post-Behemoth
Specification: Post-Behemoth
Special: Tier 1 Superboss
Progression: No

Stats:
Health: 3,345,000 (5,075,000) (6,470,625)
Attack:
-650 (900) (Melee)
-600 (850) (Resonant Spears)
-580 (814) (Energy Spheres)
-635 (886) (Energy Pulse)
Defence: 105

Attacks:
Phase 1:
Resonance is almost always moving; dashing and teleporting around constantly and remaining stationary almost never. It doesn't attempt to melee the player despite its agility, though.
-It may perform a horizontal dash, summoning several bursts of spear-like projectiles. Each burst consists of 8 spears launched in the cardinal and ordinal directions
-It may summon several energy spheres around itself in random locations. Each of these launches 3 spears at the player before exploding
-It may launch a volley of 5-7 energy spheres at the player. Each of these explodes into bursts of 6 spears each; with each burst having a random degree of offset
-It may charge up energy briefly and create a large, damaging pulse of energy all around itself
Once reduced to 50 (60)% health it transitions into its 2nd phase; with its symbols/wings shifting through rainbows of colour as they move and the sky gaining a slight colour shift to match

Phase 2:
Resonance becomes even faster in this phase and increases its attack speed considerably
-It retains all of its Phase 1 attacks
-It may align with the player and perform a horizontal dash, spawning several energy pulses as it does so. These pulses actually get smaller the less health Resonance has remaining, but the dash also becomes faster in this case
-It may dash at the player; creating several bursts of 6 projectiles as it does so. Unlike the energy sphere attack each burst of 6 here are always launched at the same angles
-It may invert the screen colours for a few seconds. More of a mild hindrance than an attack, however
-It may dash downward and then upward shortly after. While flying up it creates a wide arc of 20-25 spears
As Resonance loses health its symbol/wings begin to shudder and appear to become less stable. Its attack speed and movement speed gradually increase further once below 20 (40)% health.

Defeat: Resonance's symbols/wings shatter like glass while Resonance itself looks stunned. Resonance then releases a beam of light upward before seemingly beginning to melt; eventually melting away into nothing.

Drops:
Mostly sound or rainbow-themed weapons including a gun, bow, throwing knives, and a magic staff. Drops Resonant Prisms that can be used as a material to upgrade some weapons. In Expert Mode it also drops the Darkened Prism that allows the player to charge up and fire a large deathray-like laser by dealing damage consistently.

Lore:
An unstable energy construct with only a partially-formed body. Its energies are still running wild and have yet to settle, leading to its otherworldly appearance and hyperactive nature.

Hints:
-Due to its hitbox only being its body and its constant movement, fast-moving homing projectiles are strongly recommended for this fight
-Spending a bit of time to learn the Phase 2 attacks shortly after its transition may be helpful, as it gives time to learn its attack pattern before it speeds up
-Teleportation items are the best way to consistently dodge its energy pulse attacks. It this is not viable the simple solution is trying to keep away from Resonance as much as possible

Extra Info:
-Resonance's symbol/wings bear a striking resemblance to the cover for Pendulum's In Silico album
--This becomes even more apparent once it reaches its 2nd phase; where it begins to shift through rainbow colours
[Added: 29/4/21]
59 - Crimtaminator

Appearance: A massive, fleshy abomination that, while whats left of its body appears human, strictly isn't human. Part of its skeleton is exposed and large chunks of smoothed Crimstone coat its shoulders and part of its scalp. It has two long, thin arms at its sides that curve hang down beneath its body

Summon: Use the Otherworldly Skull at night. The Crimtaminator, despite its name, can be fought in a Corruption world without any issues. If it reaches daytime the sky will remain dark until it is defeated
The player is inflicted with Heavy Gravity throughout the fight; limiting their mobility

Fought: Post-Behemoth
Specification: Post-Behemoth
Special: Tier 1 Superboss
Progression: No

Stats:
Health:
-5,454,000 (8,252,000) (10,521,300) (Crimtaminator)
-78,500 (134,600) (171,615) (Worm)
-45,850 (78,000) (99,450) (Vile Creeper)
Attack:
-700 (965) (Melee, Deathray)
-615 (868) (Blood, Crimson Orb, Fleshy Spikes)
-550 (767) (Ichor Orbs, Ichor Streams) (Inflicts Ichor - 50 (100)%)
-600 (850) (Crimson Orb)
-635 (886) (Worm, Flesh Ball)
Defence: 100 +15% Damage Resistance

Attacks:
The Crimtaminator will usually try to float near the player, often times overhead or diagonally to them. It may sometimes charge at the player; with contact with any parts of its body dealing melee damage.
-It may fly directly above the player and rain down several blood-like droplets for a few seconds
-It may spew yellow orbs upward that are affected by gravity and fall quickly. Upon hitting a block or the player they explode into 3 streams of Ichor; all launched upward in an arc
-It may roar and release jagged fleshy chunks with spikes protruding from them. They are mostly released from its main torso area and they are released in random directions; gradually decelerating, falling to the ground, and disappearing
-It may fly away from the player, then swoop down at them in a wide curve
-It may charge up and release a large, sweeping deathray from its right (sprite's left) eye socket
-It may release several arcs of crimson orb-like projectiles from its left (sprite's right) eye socket towards the player; up to 8 arcs of 5 projectiles each. More blood droplets rain down from the eye as it does so
Upon reaching 55 (70)% health its arms and part of the Crimstone on its shoulders break away from its body and burn up
Phase 2:
Moves faster, but generally keeps the same movement patterns
-Retains all of its Phase 1 attacks
-It may release more 'fleshy spikes' from its body in an inaccurate flurry of shots towards the player. Like before they will eventually decelerate until they stop and then drop out of the sky; though they are initially launched faster and thus travel farther
-It may release a worm-like monster from its mouth that acts like a Wyvern; flying around while trying to ram the player. Only 1 (2) may be alive at a time
-It may release a giant fleshy ball from its mouth, called a 'Vile Creeper'. It follows the player, charging at them when close by or launching fleshy spikes at the player from a distance. Only 2 (3) may be alive at a time
(In Expert Mode the Crimtaminator will enter a 3rd phase at 25% health)
Phase 3: [Expert Exclusive]
Most of its body crumbles away and some of the Crimstone on its head does as well; all burning away as they fall like its arms did.
The Crimtaminator moves significantly faster than before
-Retains all Phase 1 and 2 attacks and abilities; though attacks more frequently
-It may create a 'burst' of 3 deathrays. After a brief moment it will rotate them either clockwise or anticlockwise by roughly 100 degrees

Defeat: What remains of the Crimtaminator's body will break away and burn up. Something that looks human can be seen inside, though it quickly flees before the player gets to see any more than a silhouette.

Drops:
Will drop an endless ichor arrow quiver and an endless ichor bullet pouch. Drops Creeping Flesh; a material used for upgrading various weapons. Can drop a vanity outfit complete with leg vanity that hides the player's legs; with a mask as an unrelated separate drop. In Expert he will drop a small version of the Vile Creeper enemy that can launch streams of Ichor or fleshy spike projectiles at enemies as a magic weapon

Lore:
A colossal behemoth of a creature; born from the organic matter that makes up much of the Crimson wastelands. Something of this size doesn't often mutate naturally in its home environment, but when it does it brings destruction in its wake.

Hints:
-The Crimtaminator is primarily a damage sponge, so the player should prepare for a long battle with plenty of ammo, mana potions, and especially health potions
-The Crimtaminator is very similar to the Watcher in terms of weapon choice; being a mostly slow boss with a single hitbox weapons that simply pack high DPS can make the fight easier, as can any means of lowering its defences to deal additional damage

Extra Info:
-The Crimtaminator is, in effect, a counterpart to Boss Ideas 10's Ebony Flame. Both of them are respective of a particular 'World Evil' biome, both a Tier 1 superbosses, and both have a similar list of drops after the fight
--Additionally, in Expert Mode, they both share a 3-phase structure where they primarily build in abilities they already possess
--Their fight styles are also opposites; with Ebony being a fast but frailer boss and the Crimtaminator being slow but bulky
[Added: 29/4/21]
60 - Levialous - Broken

Appearance: The twisted remains of Levialous' true self after the defeat of his Half-Complete form. His armour is entirely broken; revealing a slender, matt black form beneath. His body appear to be melting in some places and other parts appear almost skeletal, especially around the lower torso. It has a single marking on its face that looks like a red eye

Summon: Use the Broken Caller. The sky will turn red throughout the fight, complete with dark grey clouds that seem to move far more rapidly than normal.
Levialous will begin not with his usual dialogue but instead an inhuman shriek that lasts for a few seconds. After shrieking he will become vulnerable and begin the fight

Fought: Post-Behemoth
Specification: Post-Hyperion Slime
Special: Tier 2 Superboss
Progression: No

Stats:
Health: 5,150,000 (7,840,000) (9,996,000)
Attack:
-1200 (1500) (Melee)
-1250 (1600) (Red Explosions, Deathray, Tendrils)
-1000 (1285) (Explosion Fragments, Homing Projectile)
-900 (1115) (Homing Projectile Explosion, Spears)
Defence: 44 +44% Damage Resistance

[All of Levialous' attacks inflict Chaos Ember - 50 (100)%]

Attacks:
Phase 1:
Levialous is highly agile and extremely aggressive towards the player, taking no breaks between his attacks. He will often teleport between his attacks. All his attacks are based on, but not directly ports of, his other forms' abilities
-Levialous can create a red explosion around himself that releases burst of 10 spear-like projectiles, this then triggers randomly-placed subsequent explosions that all release 4 their own 'spears' in cardinal directions
-He may create an arc of 5 projectiles that have homing properties. As they chase the player they create a continuous chain of explosions. They also create larger explosions when they expire
-He can shoot spear projectiles around himself in a spiral-like pattern. 4 streams of spears are created in the spiral. The spiral can either be a clockwise or anticlockwise rotation
-He can rapidly launch arcs of spears at the player. Each arc has a random number of between 7-12 projectiles each, and the number of arcs shot is between 10-16
-He may teleport close to the player and charge at them, ending the charge with another arc of 3 homing projectiles aimed towards the player
-He may surround the player with a massive ring of spears. These then, after a mild delay, begin to accelerate towards the ring's centre in a spiral pattern
-He may rapidly summon bursts of spears. Each burst has between 12-22 projectiles each and may have random degrees of offset
Once taken down to 40 (50)% health he will shriek again, entering Phase 2
Phase 2:
Hunches over and becomes, somehow, even more aggressive with his even faster attack speed
-He retains all of his Phase 1 attacks
-He may launch a deathray at the player that sweeps in the direction they are moving. They he stops and launches another at the other side of the player, also sweeping towards them, and finally a 3rd from the other side of the player from the 2nd
-He may summon portals nearby at random angles. After a brief moment shadowy tendrils protrude from them and violently lash about. They become more numerous as Levialous loses health
-He may create a burst of 40-45 spears; with an additional 4 homing projectiles launched in the cardinal directions
-He may fling an inaccurate flurry of spears towards the player, with a few homing projectiles amongst them
-He may summon 2 long rows of spear projectiles, one horizontal to the player and the other vertical, which then move horizontally and vertically towards the player respectively. They are evenly spaced (except in Expert, where they are random)
As Levialous loses health in this phase its attack speed will gradually increase further. The change is overall only a mild difference, though this is because of Levialous' already-immense attack speed

Defeat: Screeches wearily and then collapses to the ground, melting down into a black puddle of ooze that gradually fades away

Drops:
Chaos Remnant; a material used to make a vanity set and a small selection of weapons. In Expert Mode it also drops the Eye of Apollyon; which is an accessory that grants the player a massive damage buff but halves their HP and damage resistance in the process

Lore:
What remains after Levialous' armour was broken in the midst of his 'apotheosis metamorphosis'. He has lost his stability, his potential for strength, and worst of all his sense of self.

Hints:
-Levialous is extremely aggressive and deals colossal damage, but is actually very frail for a Tier 2 superboss. A glass cannon build may be best due to it allowing you to end the fight faster, thus putting you at less risk, whereas a tank build may be overwhelmed by Levialous' pure damage output
-Teleports, dashes, and any other mobility buffs are strongly recommended for both dodging the attacks and moving away from Levialous himself due to the sheer amount of projectiles he creates
-Running away from Levialous is not recommended as there is a high chance for him to 'notice' this and simply teleport in front of the player; effectively telefragging them

Extra Info:
-All of Levialous' attacks here are enhanced versions of his attacks from his Incomplete and Half-Complete forms
-The eye marking on Levialous' head appears to be similar to both the symbol seen on the original Boss Ideas 6 page's logo, as well as the Royal Seers from Boss Ideas 8. The symbol's meaning is still undisclosed.
-The lore entry for this form of Levialous states that Levialous effectively went feral after his loss in the Semi-Complete fight; hence the shrieking, the lack of dialogue, and perhaps the hunched stance of Phase 2
[Added: 29/4/21]
[Updated: 14/5/21]
[Final Notes]
Well, there's another 20 bosses, not sure what else to say that hasn't already been said, really, other than that I hope you enjoyed the designs and weren't too annoyed by my ramblings :P

The page went on a bit of a hiatus for about a month, hence the lack of communication until recently. However, I've managed to get everything sorted and ready as ever

I'm unsure at the moment whether to continue with No. 11 into 61-80, or whether to hold off until I improve my sprites again and begin working on Boss Ideas 12. Guess it depends on if I can make longer-lasting major improvements to my spriting, I guess :P

Anyways feel free to check out the previous two parts of this; with Bosses 1-40
https://gtm.steamproxy.vip/sharedfiles/filedetails/?id=2399643812
https://gtm.steamproxy.vip/sharedfiles/filedetails/?id=2271455483
Alternatively, there's the Tomato Event from Boss Ideas 10 that ended up being quite fun to make if you haven't seen it already
https://gtm.steamproxy.vip/sharedfiles/filedetails/?id=2220451686

Special thanks again to Phanta for being willing to make some of the bosses themes again
Also a big thanks to all of you guys taking a look at these pages, it means a lot to me :)

Anyways, that's all from me for now. Hope to see you guys in the next thing I post, whatever that is :)
18 Comments
breadzaa 26 Oct, 2021 @ 9:25pm 
all of them are really cool
acornhappy 15 Jun, 2021 @ 11:22am 
but its just an ider
acornhappy 15 Jun, 2021 @ 11:22am 
a boss ider cold a a portal worm a flying worm that creates portes and shoots wird unpredictible scail shots
Okami Tomato  [author] 15 Jun, 2021 @ 2:22am 
Honestly, most of the work is still just done in MS Paint

I now get to use Aesprite for removing backgrounds, scaling and animation when I do/did animated sprites, but MS Paint is actually still the main thing I use
Miso 14 Jun, 2021 @ 6:52pm 
btw what do you use to draw
Okami Tomato  [author] 14 Jun, 2021 @ 11:27am 
Yeah these are made with a mod in-mind nowadays

Lets me have things like actual lore and characters and such that wouldn't fit vanilla terraria
cat w big ass lettuce head 14 Jun, 2021 @ 8:39am 
this doesnt fit with vanilla terraria too much but would be a neat mod tho
Miso 13 Jun, 2021 @ 4:26pm 
ima try to make drawings now
Okami Tomato  [author] 13 Jun, 2021 @ 3:44am 
Well, if I ever make a proper mod for Boss Ideas, might end up doing that :)
-|Eli|- 12 Jun, 2021 @ 4:16pm 
levialous has gotta be put in as well as hathy and anna
:slimehappy: