Terraria

Terraria

71 ratings
Terraria Boss Ideas 11 [1-20]
By Okami Tomato
Been a while, hasn't it?

So, Boss Ideas 11 has found itself in a weird state. It's been months since 10, and there's been no hints at all of this one being created. Not only that, but production only started in very late October, and unlike the others wasn't started after the previous was finished like what usually happens.

As usual, this isn't a guide and is just a place to store ideas, and the ideas are based more on mod content than something for the vanilla game

Anyways, onto the bosses :)
3
2
   
Award
Favorite
Favorited
Unfavorite
[Prior Notes]
So, admittedly, I am very busy outside of Boss Ideas stuff at this point in time. Uni work is piling up, Technological Terror is now officially out, and so I have a lot less free time.

Therefore, I've had to do something I did in the Boss Ideas 6 remake and not animate some of the sprites, at least for the moment.
Animation takes time, and seeing as it's been this long without any updates has made me feel a little guilty, so the options were either nor animating sprites and having this done sooner or animating them and adding an indeterminate amount of time to the design process. I chose the former.

Also, with Uni work, updates to these pages will for the moment be less frequent. Bosses and stuff will still be added, and as with Boss Ideas 10 I'm aiming for at least 2 parts to this instalment, but I can't work out reliably how long it'd take to add new bosses.

Also, Boss Ideas 8 now exists in the 'main canon' (Boss Ideas 4, 5, 7, 9, 10) due to the return of a certain other character

Furthermore, the progression points are still following those of Boss Ideas 10 due to the two pages being linked. (Therefore things like 'Post-Blacklight' actually more often than not refer to 'Cosmic Blacklight')

Anyways, that's really all the news I have at the moment, so onto the bosses for real this time :D
[Debuffs]
As with Boss Ideas 10, here is an isolated debuff section to house all the unique debuff effects

Suppressing Slime
Effect: Wing flight time and acceleration reduced by around 25%
Tootip: Your wings are all slimy and gross
Sources: Slimera (Summon)

Golden Flames
Effect: Deals 25 damage per second and reduces damage by 10%
Tooltip: Magic, golden flames scorch you
Sources: Skye

Greed's Curse
Effect: Reduces movement speed by 10% and wing flight time by 20%. Additionally deals 20 damage per second. If the player is hit by another attack that would inflict this debuff while still under its effects, the player will be inflicted with Greed's Curse II for 2 seconds
Tooltip: Greed's curse haunts you
Sources: Greed King

Greed's Curse II
Effect: Player is turned into a gold statue and left immobile until the effect expires
Tooltip: You have been turned to gold by Greed's curse!
Sources: Greed King*

Chaos Ember
Effect: Deals 30 damage per second to the player, and increases their damage vulnerability by 10%
Tooltip: Unnatural flames scorch you...
Sources: Levialous - Half-Complete
01 - Icy Serpent


Appearance: A limbless, vaguely Wyvern like snake. Its head is similar to a Wyvern's, though with a larger nose, protruding tooth, and blue colouration.

Summon: Use the Ice Scale in the snow biome. Taking it out of its desired biome will increase its movement speed, and secretly does even moreso in the underworld. The boss can also be despawned by getting too far away or dying, as with most bosses.

Fought: Pre-Hardmode
Specification: Post-EoW/BoC
Special: No
Progression: No

Stats:
Health: 12,500 (20,000) (25,500)
Attack:
-50 (80) (Head Melee)
-30 (44) (Body Melee)
-20 (30) (Frost Bolt/ Icicles) (Inflicts Frostbite - 0 (50)%)
Defence:
-5 (Head)
-14 (Body)

Attacks:
The Ice Serpent's attack cycle is relatively simple. It will spend the majority of the fight flying in a sideways-figure-8 motion a little distance above the player. It only has 3 attacks.
-It may, while turning around, swoop down and attempt to ram the player once before returning to its normal flight pattern
-It may drop icicles as it flies above the player. These linger in-place briefly before falling straight downwards. (In Expert this may briefly inflict Frostburn)
-It may rapidly fire frost bolt projectiles from its head. These projectiles have no particularly special properties. After firing 4-6 (8) in rapid succession it will cease. (In Expert this may briefly inflict Frostburn)
As of 50 (85)% health it will gradually speed up its attack frequency, and also the rate in which it summons projectiles. (In Expert the increases are more noticeable, even earlier-on).

Defeat: Explodes into gibs as most bosses do

Drops:
May drop the Frost Lance; which is a throwing spear that may inflict Frostburn, a tome that shoots projectiles that act similar to the Water Bolt's, but sacrifice all but 1 ricochet for faster projectile speed and Frostburn, and finally a summoner weapon that acts like a significantly weaker Stardust Dragon staff. Also capable of dropping Frost Cores in Hardmode.
In Expert it will also drop the Snowstorm; an upgrade to the Snowball Cannon

Lore:
It spent many years burrowing through the tundra's snow and ice, and thus to preserve heat has opted out of attributes such as limbs and discernible ears. Its sense of smell is, however, very keen and it can smell prey from a great distance. Deceptively capable of flight.

Hints:
-Like most worm bosses, the Ice Serpent is very weak to most forms of piercing weapons.
-An arena with many levels of platforms may be helpful for dodging its charge attacks, especially at low health where it is more likely to do many in relative succession
-Due to its stats, it may be recommended to face Queen Bee and/or Skeletron first if the player doesn't feel equipped to fight it.
--Much of the dungeon's loot; like Water Bolts, the Aqua Sceptre, and even the Bone Glove itself are useful for this fight due to their decent power and ability to pierce.

Extra Info:
-This boss may have been partially based on the Frost Wyvern of Boss Ideas 1. It, too, is an ice-themed serpentine Wyvern-like enemy with a cluster of icicles underneath its chin.
-Despite being the first boss on the page it was not only the 12th to be designed, but also the 12th to be sprited.
[Added: 30/10/20]
02 - Dragon Harpy

Appearance: A large, harpy-like boss with long green hair. It has seemingly-humanoid legs, unlike the smaller harpies. Its wings are red and green, with small protrusions at the top that appear to be claws.

Summon: Use the Dragon Feather during the day. It is made of Feathers and Souls of Flight; easiest to get from sky enemies like Harpies and Wyverns. The boss won't despawn at night, despite the spawn conditions, and will only despawn if the player moves too far away or dies, as with most bosses.

Fought: Hardmode
Specification: Post-WoF
Special: No
Progression: Later Bosses

Stats:
Health: 20,000 (26,500) (33,788)
Attack:
-60 (110) (Melee)
-40 (75) (Feathers)
-50 (88) (Air Cutters)
Defence: 8

Attacks:
Phase 1:
The Dragon Harpy will usually try to fly above the player, but not to any particular side. Its attacks can usually be signalled based on its movements
-It may swoop down to be horizontally-aligned with the player before charging
-It may dash away from the player and upwards diagonally, then stop. She will then flap her wings, summoning several crescent-shaped projectiles aimed at the player that accelerate forwards as they travel. Afterwards it will begin moving again
-It may dash to a random location nearby and launch an arc of 3 (5) feathers at the player. It may do this up to 3 times in succession
(Once down to 50% health it will enter an Expert-Exclusive 2nd phase)
Phase 2: [Expert-Exclusive]
The Harpy will dash at the player 5 times and attack, similar to Fishron. It retains all Phase 1 attacks, but gains a new one as well
-It may fly in a loop. During the loop it will spawn air cutters, aimed at the player, and at the end of the loop it will launch a barrage of inaccurate feathers at the player
At 10% health she will enter the final phase.
Phase 2 (3):
At 10% health on any difficulty she will enter her last phase. She will continuously attack in this phase with little downtime, but the downtime she does have will be spent aligning herself with the player.
She will abandon most of her attacks, aside from her horizontal charge attack, which she will use continuously until defeated.

Defeat: Flaps around in a panic, then falls out of the sky. It will fall down, though not as a gib, but in the background layer and thus will disappear behind blocks. Drops loot upon beginning to fall.

Drops:
Can drop a tome that launches feathers, a bow that launches a rapid barrage of feather-like arrows, and a sword that causes feathers to fall from the sky towards the cursor when swung. She may drop the Harpy Talon which increases armour penetration by 10 and increases both movement speed and damage by 10%.
In Expert Mode she can drop a set of Dragon Wings, similar in appearance to her own, which are a moderately-powerful set of wings.

Lore:
-A half-Harpy half-Dragon creature that spends its days souring through the sky. She was outcast from her kind due to her partly-dragon heritage, but similarly does not feel like she fits in amongst dragon-kind, either.

Hints:
-The Dragon Harpy is a fairly mobile boss, so fast-moving projectiles are highly recommended
-If the player is struggling with the mechanical bosses, she could be challenged first instead so the player can access better gear to face them with. Applies most notably to melee; as her sword drop is capable of firing lots of projectiles.
--The same applies if the player has trouble with her; as the player can use mechanical-tier gear to fight her with if their gear doesn't otherwise seem adequate
-She isn't immune to most debuffs, so any debuffs the player may want to use (Such as Frost Armour's frostburn, Ichor, Cursed Flames, Shadowflame, etc.) are likely going to work

Extra Info:
-According to some old files, her name was originally Harper. In-game, and in her description, however, she is just referred to as the 'Dragon Harpy'
--Also, according to some old lore, her father was half-dragon, which would actually make her quarter dragon. Her description is therefore technically incorrect.
-In her original design, her legs were also more bird-like to match actual harpies. This didn't translate as well to the sprite, however, due to some small spriting complications so she was given human legs instead
[Added: 31/10/20]
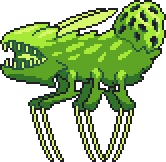
03 - Acidic Chimera

Appearance: Uhh...
A bright green luminescent creature. It has a large mouth but no other facial features, a set of slim wings, and 6 spindly yet surprisingly sturdy legs. It also has a 'clump' where its tail should be, full of holes. It looks unnatural.

Summon: Throw the Acidic Egg into lava. Despite this condition, it doesn't have any specifications as to where it directly needs to be summoned. The boss will despawn if the player dies or gets too far away, as with most bosses.

Fought: Hardmode
Specification: Post-Golem
Special: No
Progression: No

Stats:
Health:
-65,000 (94,500) (120,488) (Chimera)
-145 (200) (255) (Acidic Aberration - Flying)
-180 (250) (320) (Acidic Aberration - Grounded)
Attack:
-70 (105) (Melee)
-100 (160) (Stomp)
-60 (90) (Acid Globule)
-58 (87) (Aberration Melee)
Defence:
-32 (Chimera)
--20 (Chimera, Recoiling)
-20 (Aberration)

[All of this boss' attacks inflict Acidic Venom - 25 (~33)%]
[All of this boss' attacks inflict Cursed Inferno - 25 (~33)%]
[All of this boss' attacks inflict Ichor - 25 (~33)%]
[It will only ever inflict at most 1 debuff per attack]

Attacks:
The Chimera will usually chase the player by skittering at them, or by jumping if the player is too high or far to catch with running. After a few seconds of pursuit, it will use one of its other attacks.
-It may shake its tail 'hive', summoning several grounded Acidic Aberrations. These simply chase the player like the Chimera does and have no special attacks or properties. (In Expert killing these Aberrations will cause them to explode into smaller acid globules.)
-It may jump up above the player, retract its legs, and begin falling. Upon hitting the player or landing it will thrust its needle-like legs downward. This 'stomp' attack deals massive damage if the player hits its legs during the attack.
-It may launch a cluster of acid globules from its mouth that are affected by gravity.
-It may shake its tail 'hive' and launch acid globules in random directions over the course of a few seconds.
Every 33 (25)% health lost will cause the Chimera to hop back in recoil and shudder. Afterwards, it will screech, and begin attacking. Its attack cycle changes a little each time it does this:
-Its movement speed will increase, and the distance away from the player before it decided to leap is reduced, even though the leap itself doesn't change
-There is a slightly increased chance that the Acidic Aberrations spawned will be flying variants instead of the grounded ones. These fly after the player at high speeds (and explode into globules on death).
-The 'stomp' attack is faster
-The acid globules from its mouth have a higher velocity, and more are spawned
-The acid globules from its tail are spawned more plentifully

Defeat: Explodes into gibs. (Also releases a final cluster of acid globules as it dies.)

Drops:
Primarily drops Acidic Scales, a material used to create some weapons and armour. May also drop the luminescent lure; a high-level fishing rod, as well as a magic tome and a gun. May also drop a summoner staff that summons Aberrations that spit acid at enemies.
In Expert Mode it drops the Acid-Drenched Hive; which releases acid globules when attacked and increases the strength of some DoT debuffs.

Lore:
-A hideous creature of an unknown but presumed unnatural origin. It seems highly protective of Acidic Eggs, even though they aren't actually eggs. Probably best that it was destroyed.

Hints:
-It is likely best to keep reasonably close to the boss, as its lunges are more dangerous than its general running state
-Dashes or any other sort of quick burst mobility may prove effective at dodging its stomp attack
-The Ankh Charm sadly does not provide immunity to its debuffs, nor does water help with cursed inferno. Therefore, general health regen buffs are the best counter to its debuffs aside from the Nurse.

Extra Info:
-The Acidic Chimera's sprite was intentionally designed to look ugly as to further sell the idea of it being an unfinished/unnatural creature
-Originally, it was intended to have its own defence-reducing debuff that also dealt damage-over-time. This was changed due to it otherwise requiring the creation of a debuff that only 1 boss could use.
--It also didn't used to inflict Ichor either, and instead dealt Venom and Cursed Inferno at the same time. This was later changed to the 'roulette' debuffs; randomly giving one of its 3 debuffs to the player per hit
[Added: 31/10/20]
04 - Slimera

Appearance: A large, purple slime monster. Unlike most slimes, it has somewhat-distinct arms and legs. A small, metallic core is seen at its centre, presumably controlling it.

Summon: Throw the Plasma Gel into water, honey, or lava. The boss will have slight variations based on which substance it was thrown into, affecting its stats and buffs. The boss will despawn if the player dies or gets too far away, as with most bosses.
The player will be debuffed with the Suppressing Slime debuff throughout the fight, limiting flight capabilities.
-The Honey variant will additionally have honey particles dripping from it, and will have an orange body instead
-The Lava variant will have fire particles emanating from it, and will have a red body instead

Fought: Hardmode
Specification: Post-Golem
Special: Unique variants based on summon method
Progression: No

Stats:
[Water-Summon Variant - Normal]
Health: 45,000 (67,450) (85,999)
Attack:
-78 (118) (Melee)
-64 (100) (Slimeball)
-70 (109) (Shockwave)
-85 (130) (Rapid-Bounce)
Defence: 16

[All of this boss' attacks inflict Slowness - 33 (100)%]
[All of this boss' attacks inflict Silenced - 25 (50)%]

[Honey-Summon Variant - Defensive]
Health: 53,250 (72,000) (91,800)
-Regenerates 20 (40) health per second
Attack:
-78 (118) (Melee)
-64 (100) (Slimeball)
-70 (109) (Shockwave)
-85 (130) (Rapid-Bounce)
Defence: 22

[All of this boss' attacks inflict Slowness - 50 (100)%]
[All of this boss' attacks inflict Dazed - 50 (100)%]

[Lava-Summon Variant - Offensive]
Health: 38,500 (60,000) (76,500)
Attack:
-92 (142) (Melee)
-72 (112) (Slimeball)
-80 (122) (Shockwave)
-100 (160) (Rapid-Bounce)
Defence: 10

[All of this boss' attacks inflict Burning - 80 (100)%]
[All of this boss' attacks inflict Slowness - 25 (75)%]

Attacks:
Regardless of what variant of the boss is spawned, the attacks will be the same.
Phase 1:
The Slimera will slowly walk towards the player when not attacking. It can swim through blocks or liquids to reach the player, as well as increase its jump height to reach the player if they're airborne. It attacks with increasing frequency as its health gets lower. It can also, like King Slime, teleport if the player is too far away to catch.
-It may swing its arms, launching a cluster of slimeballs towards the player
-It may swing its arms in a whip-like motion, creating a shockwave near itself
-It may throw several slimeballs upwards that are affected by gravity, falling down after a few seconds
-It may morph into a ball and begin bouncing at the player. It can adjust its max height independently each jump to catch the player, and even alter its horizontal mobility even mid-jump. After a few bounces it will regrow its limbs
Once below 50 (70)% health it will gain a couple of new attacks on top of its old ones. Both of these deal increased damage compared to its regular melee attacks, possible due to its speed
-It can morph into a ball and begin rapidly bouncing around. It will initially launch itself at the player, but is affected by gravity and can ricochet off of blocks
-It can morph into a ball and begin rapidly bouncing up and down towards the player. It can bounce off ceilings, or rebound downward mid-air if there isn't a ceiling
Once down to 10 (8)% health it will transition to its 2nd phase
Phase 2:
Its slime body explodes, leaving only its vulnerable core. The core simply dashes at the player continuously until defeated.

Defeat: The remaining core will explode into fiery gibs.

Drops:
It is capable of dropping Melded Slime; used to make a few weapons and an armour set, as well as a hand-like flail that can grab enemies to deal continuous damage, or a summoner staff that summons far stronger versions of the Slime Staff's minions
Its Water Variant will drop the Water Lash, a high-speed and autoswinging whip with a long range.
Its Honey Variant will drop the Honeycomb, a gun whose alt-fire will launch a honey rocket that inflicts the Honey buff on the player if it hits an enemy.
Its Lava Variant will drop the Magma Slime Glove, a magic weapon that throws burning slime at enemies, dealing damage with both the initial hit and by clinging to enemies for a few seconds afterwards.
In Expert Mode it will drop the Slime Data Core, which will create a slime shield around the player that will absorbs some damage when hit, but needs a while to recharge after being hit.

Lore:
-A mechanical core filled with vast quantities of data. Its body, made of slime, has the data from various creatures, allowing it to copy various actions otherwise impossible for a simple slime to accomplish.

Hints:
-Many rows of platforms and a long arena go a long way towards helping the player dodge. A 'smooth' arena with few bits of weirdly-shaped geometry will also help make the rapid-bounce attacks easier to predict and follow
-The 'Honey' variant attacks slower, but is more durable, and the 'Lava' variant hits harder but overall has less health. Fighting the 'Water' variant is the most simple version, and is recommended if solely trying to defeat the boss in the most standard way.

Extra Info:
-Its spawning method, point in progression, as well as mention of Chimera in the boss' name link it to the Acidic Chimera seen previously
-The Slimera has a fairly broad range of special items dropped only under specific circumstances, totalling at 4 across both Expert Mode and its various forms
[Added: 1/11/20]
05 - Solstice

Appearance: A golden ring-like pokemon with spikes jutting out of its ring. A single shining light is in its centre. Its appearance is somewhat reminiscent of another boss from before...

Summon: Use the Lunar Beacon anywhere in the world. The sky will turn a golden yellow colour while the boss is active. 4 Solstice are spawned at once. While the boss has Post-Moon Lord stats, all of its materials are Pre-Moon Lord, but include Solar and Nebula fragments

Fought: Hardmode, Technically Post-Moon Lord
Specification: Post-Cultist, Post-Solar & Nebula Pillar
Special: No
Progression: Later Bosses

Stats:
Health: 48,500 (70,000)
Attack:
-84 (127) (Melee)
-80 (120) (Blinding Light)
-92 (140) (Spear of Light)
-130 (200) (Crushing Blow)
Defence: 35
--Piercing Projectiles lose 50 (75)% damage per Solstice pierced

Attacks:
All 4 Solstice will usually take on one of two states, based on their attacks:
-They may stay in 'uniform motion', with them forming a rotating ring and staying together. This is most often broken when one tries to use a melee attack, or if one is defeated
-They may fly independently of each other. This will usually not last for very long before they all return to uniform motion
Each Solstice has the same attacks, and will attack in-turn as opposed to chaotically.
-They may rapidly dash at the player, similar to EoC's chain dash
-They may appear above or below the player and dash horizontally, launching an arc of Blinding Light projectiles as it travels. The result leaves the projectiles in the arc highly spaced-out or closer together and intersecting, based on what side the dash starts from.
-They may release a burst of blinding light projectiles in 8 (10) directions
-It may create an arc of Spears of Light aimed at the player, consisting of 3 (5) spears. These accelerate as they travel and pass through blocks, as well as having a very mild homing effect
-They may summon several balls of light near the player that, after a brief moment, converge inward and explode. The light balls don't deal damage, but the explosion deals very high damage.
-(In Expert Mode, they have an additional attack where they will all move to random positions reasonably close to the player and all fire deathray-like lasers in the cardinal directions. It does the same damage as their Crushing Blow attack)
Every time a Solstice is defeated, there will be changes to their general attack pattern:
-The attack speed of the remaining Solstice will increase; +33% (+40%) when 3 remain, +100 (+135)% when 2 remain, and finally +300 (+500)% when only 1 remains.
-The distance of the chain dashes will increase slightly
-More projectiles are summoned in both the blinding light dash and the spear of light attacks
-The 'heavy blow' light balls converge faster

Defeat: Solstice shatter into gibs, but also create bursts of light when defeated

Drops:
Lunar Fragments; a material that can be used as a material, but mostly requiring Luminite as well. Solstice can also drop a sword that launches light discs, a summoner whip, and a magic tome that launches arcs of homing light.
In Expert Mode they will also drop the Lunar Essence; which summons 2 mini-Solstice to defend the player like summons by dashing at enemies and shooting homing light energy at them.

Lore:
Former guardians of a powerful celestial construct. Seemingly lost, they endlessly wander in search of any traces of their former master, wherever these traces may lead them.

Hints:
-Trying to lower their health bars evenly to defeat all 4 at the same time is often the best way to go about beating the boss, as it means the player will have less time to spend fighting their individual buffed phases
--This is even more apparent in Expert Mode, where their attack speed buffs are even more prominent than usual

Extra Info:
-It can be assumed, both due to design and some of their drops, that these enemies are related to Lunar, last seen in Boss Ideas 10. The distinct golden spiked ring design, and that their drops specifically have the word 'Lunar' in them, make this most clear.
--Additionally, if looking at Lunar's incarnation from Boss Ideas 5, the Solstice can be seen as a sort of successor to Lunar's original minions, which were also a collection of 4 smaller entities related to the lunar pillars.
[Added: 2/11/20]
06 - Blacklight

Appearance: Blacklight, returning again with a form closer to its original design. Its wings are now composed of shattered glass, and there is now a crack in the mirror where the shadows used to be near the centre.

Summon: Use the Otherworldly Mirror Fragment. The item is very similar in design to Solstice's, but uses Vortex and Stardust Fragments instead of Solar and Nebula. Additionally, the summon also requires Luminite; making Blacklight strictly Post-Moon Lord. Blacklight will despawn only if the player dies and can quickly teleport to them if they try to flee.

Fought: Post-Moon Lord
Specification: Post-Moon Lord
Special: Returning Boss
Progression: Later Bosses

Stats:
Health:
-138,500 (229,500) (292,613) (Blacklight)
-6,500 (12,000) (17,500) (Clones)
Attack:
-160 (270) (Melee, Clone Melee)
-170 (282) (Fragment)
-175 (288) (Shadow Lance)
-200 (332) (Phantasmal Disc)
Defence:
-45 (Blacklight, Clones)
--+60% Damage Resistance (Blacklight, Phase 4) [Expert-Exclusive]

Attacks:
Phase 1:
Blacklight will mostly try remaining around 10 blocks above the player at all times, though will often stop moving in order to attack.
-It may summon several mirror fragments randomly around itself over a great radius. These slowly move towards the player after being summoned, and will all explode after around 5 seconds of existence. Both the fragment and explosion deal damage.
-It may teleport near the player from a random angle and, after a short delay, charge at the player before teleporting back to its regular position
-It may rapidly launch its fragments towards the player. These chase the player and explode, similar to the other variant, but are much faster though have a slightly weaker homing effect
At 65 (75)% health it will disappear, and 2 Blacklights will emerge
Phase 1.5:
The player will have to defeat the Blacklight 'clones'. They move only via teleporting to random locations near the player in-between attacks, and their attacks are weakened versions of Blacklight's.
Defeating them both will cause the real Blacklight to appear again, and begin the real phase 2
Phase 2:
Blacklight will move and act much the same way he did in Phase 1, but has new attacks at his disposal
-It may release 3 rapid 'bursts' of Shadow Lances, each consisting of 9 (12) lances. 8 will be launched in the '+' and 'x' directions, and the final 1 (4) roughly towards the player.
-It may summon large discs of light. These will try to keep pace with the player, but will try to stay close as opposed to outright trying to hit the player. Occasionally they will dash at the player once before going back to just following from a distance again. After a while they disappear on their own.
-It may launch a rapid barrage of shadow lances at the player. As opposed to the rapid-fire barrage being aimed directly at the player, the general shape of the string of projectiles is a sine wave
At 30 (40)% health Blacklight will disappear again and leave 3 (4) clones behind.
Phase 2.5:
Similar to before, the Clones will teleport near the player and use weakened versions of all of Blacklight's attacks. Furthermore, defeating clones will speed up the attacks of the remaining clones.
Defeating all the clones will cause Blacklight to re-appear
Phase 3:
Blacklight will begin a cycle where it uses the charge attack twice in a row before using one of its other attacks. The attacks it can choose after charging will never consist of the same attack twice, or of the charge attack itself.
(In Expert Mode, Blacklight will summon more clones at 12% health)
Phase 3.5: [Expert-Exclusive]
Blacklight will summon 5 clones. They will act virtually the same as before, gaining attack speed as they are gradually defeated. Blacklight, as expected, re-appears after they are all defeated.
Phase 4: [Expert-Exclusive]
Blacklight continues a cycle similar to 3's, though will not charge. Instead it will teleport 3 times around the player and then attack. It still cannot use its charge attack or the same attack twice in a row.
Additionally, its attack speed will gradually increase as it loses the last of its health.

Defeat: Spreads its wings wide, and then shatters into pieces. It leaves a small cluster of black particles where it shatters which fades after a few seconds.

Drops:
A throwing knife-like melee weapon that can be thrown like Vampire Knives but has a homing effect instead of health regen, a mirror that summons fragments that home-in and explode on foes, and a summoner staff that uses 3 summoner slots to summon a mini Blacklight minion. Can additionally drop its wings, or a Shining Mirror that allows the player to teleport home, to the oceans, the underworld, or to any active pylons when placed.
In Expert Mode it will drop the Binding Seal, which reduces the player's offensive stats at high health, but increases them at low health. It also cannot be removed unless the player has full health. Also drops 10-12 Aetherium Ore.

Lore:
-A powerful, mirror-like entity tasked with guardian an ancient force. It ended up corrupted by its captor, and had to be destroyed before it could unleash Havoc.

Hints:
-Dashes may prove helpful in dodging the charge attacks, especially in Phase 3 where they become far more commonplace
-Piercing weapons, as ever, are useful for defeating the Blacklight Clones he spawns.

Extra Info:
-Blacklight has, ironically, grown weaker with every incarnation. Its first one back in Boss Ideas 7 was a very late Post-Moon Lord boss, its Boss Ideas 10 'Cosmic' appearance was only a little after Moon Lord, and here Blacklight is directly Post-Moon Lord.
-Blacklight's fight is essentially an amalgamation of elements from its previous fights, though polished into something (hopefully) better.
-Much like Blacklight's Boss Ideas 7 appearance, this Blacklight was once again sprited by DarkPuppey :)
-Weirdly, the Lore entry capitalises the word Havoc.
-Blacklight has a total of 171,000 health in Normal Mode when including his Clones
--In Expert Mode, this jumps up to 361,500 due to the extra phases and Clones summoned, a whole 190,500 more than Normal Mode: over double.
---Furthermore, this increases to 485,113 in Master Mode with the extra health boost, about 123,613 more health than in Expert and 314,113 more than Normal Mode
---Even then, this is also technically inaccurate due to the damage reduction in Expert's extra phase
[Added: 4/11/20]
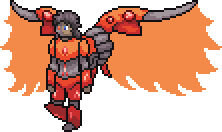
07 - Zazabaan

Appearance: A man with dark brown or black hair wearing a reddish orange suit apparently made of Adamantite. He has two colossal wings made of some sort of fiery substance as well as a series of smaller jets to remain airborne. He also has a strange metallic mask covering half of his face.

Summon: Use the Adamantite Fusion Engine. Two large electrified barriers will spawn 165 (120) blocks to the left and right of the player and seem to span the entire vertical length of the world. Attempting to leave these barriers will not only inflict a more powerful version of Electrified on the player, but also begin a countdown that only ends upon re-entry that, if it reaches 0, will kill the player immediately. Zazabaan does not despawn unless the player dies, and will teleport if needed to chase them if they somehow flee far enough away.

Fought: Post-Moon Lord
Specification: Post-Blacklight
Special: Returning Boss
Progression: No

Stats:
Health:
-400,000 (525,500) (670,013) (Zazabaan)
-288,000 (400,000) (510,000) (Serpentine)
-300,000 (500,000) (637,500) (Hydra)
Attack:
-325 (462) (Zazabaan Melee & Deathrays, Serpentine Melee, Hydra Meteors & Head Melee)
-300 (428) (Zazabaan Bullets, Serpentine Bullets, Hydra Fire Death Blossom)
-315 (448) (Zazabaan Missiles & Flames, Serpentine Missiles, Hydra Fireball)
-320 (455) (Zazabaan Mines, Serpentine Flamethrower, Hydra Flamethrower & Fire Ring)
-350 (500) (Zazabaan Railgun)
Defence: 120

Attacks:
Phase 1:
Zazabaan will usually fly vertically-aligned to the player, but at a distance. He launches attacks frequently, going back to his vertical alignment after finishing certain attacks.
-Zazabaan may shoot a powerful horizontally-travelling blast from his railgun. (In expert this also creates several lingering explosions along the shot's path.) He usually does this 3-4 times in succession.
-He may change his railgun into a sword and dash at the player 4 times in rapid succession. Afterwards, he will return to his regular alignment.
-He may launch streams of bullets at the player in 1-second bursts. These volleys are separated by a 0.5 (0.35) second cooldown.
-Zazabaan may dispatch 7 (9) missiles behind himself in '<' formation, that after a short delay all launch themselves directly at the player.
Once Zazabaan is down to 60% health he will call in a large, snake-like robot, climbing inside, and entering Phase 2.
Phase 2:
The Serpentine mech is now the target, and Zazabaan who is now piloting it is immune. The Serpentine has a different selection of attacks.
-It may vertically-align itself with the player and perform a fast horizontal charge
-It may become immobile while firing a long stream of bullets directly towards the player for a few seconds
-It may release several missiles that, for a few seconds after launch, have homing properties. After a few seconds of travel they will accelerate, but lose their ability to turn. (They accelerate gradually since launch in Expert mode)
-It may chase the player while spewing a large flamethrower from its mouth. (In Expert it also produces cinders that are affected by gravity that deal the same damage as the flamethrower itself)
Once the Serpentine mech is defeated, it will explode and Zazabaan will emerge, entering the 3rd phase.
Phase 3:
Zazabaan enters this phase with 80 (85)% health, more than he had at the end of Phase 1. Zazabaan's attack pattern is similar to the previous phase, but he gains a new attack and is generally more aggressive.
-He may release a large cluster of mines that disperse over a vast distance. These mines linger in-place and act as an area-denial hazard. After a lengthy time passes they will eventually despawn.
Down to 30 (25)% health Zazabaan will call forth a larger and more intimidating machine, called Hydra, and will begin to pilot it.
Phase 4:
Hydra will chase the player, usually alternating between flying quickly and staying above the player, or flying slower but directly towards the player. Only its 3 heads deal contact damage, so the rest of its body deals no damage on contact.
-It may create a large ring of fire from one its mouths which is launched at the player directly at very high speed
-It may release a barrage of fireballs from one of its mouths. These fireballs will chase the player until they eventually explode.
-It may release a lengthy stream of flames from one of its 2 outer heads towards the player. This attack is only performed when players are nearby. (In Expert this attack drops cinders, similar to Serpentine's flamethrower attack.)
-It may look upwards and roar, causing numerous meteor-like fireballs to rain down from the sky over the course of a few seconds.
-It may open its core, which then releases gradually-accelerating fireballs out rapidly in random directions for a few seconds. There are a massive amount of these fireballs spawned, and the amount only increases as its health is depleted.
Defeating the Hydra will cause Zazabaan to emerge for the final phase
Phase 5:
Zazabaan will begin this phase on 50 (60)% health
Zazabaan's movement and attacks are the same as before, with the addition of 2 new final additions to his attack pool. His attacks are also significantly faster and his actions more aggressive.
-He may launch a large fireball that explodes after a short time. After exploding it will release smaller fireballs out in random directions, as well as some additional homing fireballs similar to Hydra's
-He may release either an 'x' or '+' of deathray-like lasers (Or both an 'x' and '+' at the same time for a total of 8 lasers). He may also rotate these lasers 90 degrees either clockwise or anti-clockwise.

Defeat:
Zazabaan will flinch, and several explosions from his wings will almost entirely break them. Zazabaan will admit defeat before rapidly flying away. The barriers around the arena will also fade.

Drops:
A sword that launches volatile sword-shaped projectiles, a spear that launches explosions, a rocket launcher, gun, crossbow, magic tome, a summoner staff that summons a mini-Serpentine and a sentry staff that summons a mini-Hydra. Can also drop a replica of his wings.
In Expert he will give the Refined Adamantite Core, which provides a large variety of stat boosts, a dash, knockback immunity, and immunity to some debuffs. He may also rarely drop a replica of his railgun, which is a slow-firing ranger weapon that deals extremely high damage.

Lore:
-A well-known mercenary and mechanic, Zazabaan has made a reputation for himself due to the sheer power of his machines. He has worked with many clients in the past, but most ended up as various sorts of warmongering tyrants.
07 - Zazabaan (Continued)
Hints:
-Bear in mind that the barriers at the sides of the arena are spawned based on where the summoning item is used. Building walls to stop yourself running into them may be helpful, as would creating an arena and using the summoning item at the centre.
-Many of Zazabaan's attacks have varying methods of avoiding them, but each has a 'tell' based on Zazabaan's motions that reveal what attack he plans to use. If possible, looking out for these 'tells' may make evading his attacks easier
-Serpentine can be dodged significantly easier by keeping your distance as much as possible. Many of his attacks either lack range or lose special effects at long ranges, and he has no attacks that are disconnected from himself.

Extra Info:
-Zazabaan's lore description is actually a double-reference, referencing both the 'New World's Tyrant' (The more technical title for 'King' from Boss Ideas 8) and the Tyrant from Technological Terror, both of whom are indeed 'warmongering tyrants'.
-Zazabaan's healing factor during the 2 'mech' phases actually mean he has a lot more health than it would seem at first glance.
--Only looking at raw stats, it would seem the whole fight has 988,000 (1,425,500) (1,817,513) health spanning Zazabaan and his mechs
---However, in reality, it is closer to 1,148,000 (1,740,800) (2,219,521) when factoring in his healing, which totals to 40% health regained in Normal Mode and 60% health regained in Expert and Master Mode.
[Added: 21/11/20]
08 - Levialous - Incomplete

Appearance: A large, vaguely-humanoid blue creature with antler-like growths sprouting from the top of its head. It has a strange, black cape that seems to absorb all light that hits it, leaving it completely black. It also, notably, lacks any visible facial features despite having room for a face.

Summon: Found alone on a strange sky island that spawns at the dungeon side of the world after Moon Lord is defeated. Can be 'challenged' by the player, respawning the next night if the player fails to defeat them. When challenged it will only despawn if the player dies, and can teleport after them if they try and flee.

Fought: Post-Moon Lord
Specification: Post-Moon Lord
Special: Unusual Boss
Progression: Yes

Stats:
Health: 230,000 (365,000) (465,375)
Attack:
-185 (310) (Melee)
-175 (295) (Explosions)
-160 (277) (Spears)
Defence: 50

[All attacks have a chance to inflict Moon Bite - 20 (100)%]

Attacks:
Levialous will usually appear somewhere, attack, and then teleport elsewhere. His attacks often involve lots of projectiles
-He may create a large silvery explosion around himself, which triggers smaller explosions to occur in random locations close to where the initial explosion was.
-He may launch 2-3 homing projectiles at the player. These projectiles chase the player, causing explosions every half-second until they despawn.
-He may shoot spear-like projectiles around himself in a spiral-like pattern. 2 are fired at a time, at opposite ends of the spiral, and the spiral can either be clockwise or anticlockwise.
-He may launch 3-5 arcs of spear projectiles at the player. Each arc has 1 more spear than the last, and the first arc always has 4.
-He may teleport very close to the player and charge at them
At 60 (70)% health he will add 2 new attacks to his arsenal
-He may summon groups of spears near the player. The groups have 4 spears in total when summoned, and will either be in a '+' or 'x'-shaped pattern. After a short time these spears will accelerate towards the centre of their cross, which is where the player also was when the spears were summoned.
-He may rapidly summon 'bursts' of spears. These always consist of 12 spears launched out in all directions evenly-spaced from each other, but the offset angle is shifted slightly for each subsequent 'burst' to make each following burst rotate slightly when compared to the last.

Defeat:
Levialous will land on the ground, and can be interacted with. Speaking to him will make him say the player's strength is 'impressive' before he leaves. He will not re-appear on the sky island after this.

Drops:
Will only drop the Chaos Caller in Normal Mode, which is an infinitely-usable consumable that summons a Blood Moon-like event that enhances all nighttime enemies, adds new ones, and allows Blood Moon enemies to spawn even if a Blood Moon wasn't scheduled to happen. His mask is a guaranteed drop, but his trophy isn't.
In Expert Mode he will also drop is cloak as a vanity item. His trophy is a guaranteed drop, as is his mask, in Expert Mode.

Lore:
-A mysterious individual of unknown origins that seems to have just shown up fairly quietly and, now, he leaves with as much mystery as with which he entered.

Hints:
-Most of the projectiles in his attacks are fairly slow-moving, leaving Levialous' fight as one based more on precision than speed.
--However, his melee attack is contrary in this regard to his other moves, as it is sudden and quickly-executed and doesn't involve any projectiles
-Despite the fact that Levialous can be fought directly Post-Moon Lord, it may be better to wait a short while before facing him as his stats are higher than average for an early Post-Moon Lord boss.

Extra Info:
-Levialous can normally only be defeated once per world, making his items unique. The Chaos Caller in particular is very important, and if lost will require the player to have to travel to another world to replace it.
-The detail that his cloak does not have any shading seems to call back to the Chaotic Entities, such as Terminus and Mimi, as they also featured prominent use of a non-reflective black in their palettes as well.
-Levialous' name appears to have the world Leviathan in it, but the origin of the 'ous' at the end is harder to pinpoint.
[Added: 21/11/20]
09 - Sungazer

Appearance: A presumably humanoid character with robes akin to the solar cultist item set, though much larger. 2 sashes hang over its shoulders that match the same gold-like colour seen on the robes. It has a shield and 2 wings that look very similar in appearance to the solar wings and shield.

Summon: Use the Solar Tablet during the day. The boss will despawn if the player dies or gets too far away, and if taken to nighttime will gain an additional 33% damage resistance and will begin glowing.

Fought: Post-Moon Lord
Specification: Post-Blacklight
Special: Returning Boss
Progression: Later Bosses

Stats:
Health: 675,000 (950,000)
Attack:
-270 (383) (Melee)
-260 (372) (Fireball)
-290 (417) (Large Fireball, Flame Javelins, Flame Ring)
-300 (430) (Fire Dragon, Flame Pillar, Flame Pulse)
Defence: 55 +15% Damage Resistance

[All of this boss' attacks can inflict On Fire! - 100 (0)%]
[All of this boss' attacks can inflict Daybroken - 0 (100)%]

Attacks:
Phase 1:
The Sungazer will usually dash at the player a few times in succession, trying to ram them with his shield, before using a ranged attack. The number of charges can range from 3-8 (4-6).
-He may launch fireballs at the player in succession. Each one of these fireballs will split into 3 after a short time, with the 2 additional ones being at slightly varying angles to the first
-He may launch an arc of 5 fireballs at the player. These, after around a second, will gain homing properties and will begin accelerating
-He may summon and throw large fireballs at the player roughly every 2 (1.2) seconds. These, after hitting the player or block, or after a certain amount of time passes, explode into 10 evenly-spaced fireballs that are launched outward in all directions.
At 67 (75)% health he will enter phase 2.
Phase 2:
The Sungazer's charges will have an increased amount of horizontal distance, and will usually only charge 3-6 (3-5) times before attacking. He retains all previous attacks, though the first fireball attack has been altered
-When the fireballs in the first attack go to split, the 2 extra resulting fireballs will instead be launched 90 degrees to the left and fight of the fireballs instead
-He may summon a ring of fire around himself, similar to the inferno potion's, then charge at the player. At the end of the charge the ring will explode, launching a cluster of fireballs out randomly.
-He may summon a large fireball above his head which after a short time will release 'flame javelins'. The javelins are launched diagonally towards the ground, 10 degrees apart from each other, and can pass through blocks.
At 33 (45)% health he will enter phase 3.
Phase 3:
Sungazer's charges range between 3-5 charges, and they cover a lot more ground per charge. The time between charges are increased, but he can fly closer to the player to align himself easier briefly between charges. The first fireball attack, once again, is altered slightly alongside his new attacks.
-The fireballs, when splitting, launch the extra 2 fireballs 120 degrees to the left and right of the initial fireball, essentially creating a triangle.
-He may launch a Wyvern-like fire dragon at the player. It moves very fast, and after a short time will loop back to the Sungazer and despawn
-He may summon a large vertical pillar of flames around himself. The pillar will actually linger even when he goes to use a new attack, usually disappearing mid-way through the next attack (or, in Expert, the next set of charges after the next attack ends).
-He may create a large 'pulse' of flames around himself. This travels out for a moderate distance before disappearing and has no gaps for the player to pass through, forcing them to either move out the way or use a Rod of Discord to teleport through it.

Defeat:
Explodes into a large ball of fire, dissipating into a large collection of cinders. The cinders do not deal damage to the player and are purely aesthetic.

Drops:
Upgrades to the Daybreak and Solar Eruption, a gun that launches large fireball-like projectiles, and a magic staff that launches homing fireballs at enemies. May also drop his shield, that provides defensive buffs and allows player attacks to inflict Daybroken, and his wings that act like upgraded Solar Wings. May also drop his robes if he drops his mask.
In Expert Mode he will drop an accessory that provides the player with a fire dragon minion that attacks enemies with fireballs and can inflict Daybroken. Additionally, the accessory also provides an additional buff to damage and crit chance.

Lore:
-A mysterious member of an anonymous cult-like organisation, dedicated to worship to an unknown solar entity. The depictions suggest some sort of winged celestial being, humanoid in appearance, but does not give a name.

Hints:
-Keeping away from the Sungazer is generally a good idea, as many of his attacks are far more dangerous at close-range and lose effectiveness at a distance.
-In Expert Mode, the Sungazer's attacks will actually inflict Daybroken against the player, making even small attacks highly dangerous
-Using a Rod of Discord or some other sort of teleportation mechanic, the player can actually teleport through his 'pulse' attack. This can give them a few seconds to freely attack the Sungazer, as he stays motionless until the pulse disappears.

Extra Info:
-The Sungazer originally appeared in Boss Ideas 1, and then again in Boss Ideas 5. The Sungazer, as well as Skye, were also at one point planned to appear in Boss Ideas 10 but were cut as to keep human bosses to a minimum.
-The 'Winged Celestial Being' that the Sungazers apparently worship is just Skye, but their lore entry suggests a lack of understanding from the Sungazers
[Added: 21/11/20]
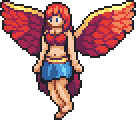
10 - Half-Harpy, Skye

Appearance: A harpy with red and gold wings and red hair. Despite being a harpy, she has arms and hands separate from her wings, which is apparently due to only technically being 'half-harpy'.

Summon: Use the Sky-Soarer's Emblem. The Emblem will also only work if the Sungazer has also already been defeated. The boss will despawn if the player dies or somehow manages to get far away, the latter being deceptively difficult due to her high speed.

Fought: Post-Moon Lord
Specification: Post-Blacklight, Post-Sungazer
Special: Returning Boss
Progression: Later Bosses

Stats:
Health: 800,000 (1,100,000) (1,402,500)
Attack:
-360 (543) (Melee**, Cyclones, Stormcloud, Lightning, Wind Pillar, Tornado)
-315 (494) (Feathers, Rain, Fireballs*)
-400 (600) (Gold Fireball*, Deathrays*, Flame Pillar*)
Defence: 40

[*Can inflict Golden Flames - 33 (50)%]
[**Can inflict Golden Flames - 50 (100)% - Phase 2 only]

Attacks:
Phase 1:
Skye will usually keep place with the player, flying near to them but not trying to ram into them. Most of her attacks in this phase are wind-based.
-She may dash at the player 3 times in succession, with the third dash also summoning an 'arrow' of feathers in the direction of the final dash
-She may launch a stream of feathers at the player for a few seconds. She will move towards the player while firing these
-She may summon large cyclone-like blasts of wind that chase the player at high speed. After a while they will despawn.
-She may fly in a loop, summoning a storm cloud. She may also then move to another location to summon another one. Depending on the colour, it will do one of three things:
--A white cloud will rain downwards like a Nimbus Rod
--A light grey cloud will shoot lightning bolts similar to LC's in random directions
--A dark grey cloud acts near identical to LC's lightning orb; launching lightning at the player before disappearing
-She may summon storm winds that push the player to the left or right. They usually fade after the next attack ends.
-She may summon a total of 8 large horizontal columns of wind, 2 at a time. They start around 50 blocks away from her in either direction, and each subsequent 2 are summoned 10 blocks closer at either side.
-She may summon 4-5 'tornadoes' near herself. These act similar to the Sand Elemental's projectiles; lingering in-place after being summoned and dealing damage on contact
Once down to 40 (35)% health she will enter Phase 2
Phase 2:
Skye will rapidly heal back to 70 (85)% health, and will gain a flaming aura. She retains all of her previous attacks, but adds a new assortment of fire ones to her arsenal.
Additionally, if the player gets too far away from her now, they will be inflicted with Daybroken until they are close enough again. Fortunately, the distance for this is quite far.
-She may dash at the player while surrounded by a ball of fire. The ball of fire around her does contact damage
-She may fly in a loop, summoning several fireballs. These fireballs will accelerate towards the player's location when they were summoned.
-She may summon a horizontal 'bullet-hell' of fireballs, travelling left and right across the screen over a wide area.
-She may summon several lightning bolts from the sky that fall from random locations
-She may launch several fireballs at the player. After random intervals they will burst into 4 fireballs each, a '+' shape angled based on the initial fireball's angle
-She may summon a large vertical pillar of flames. This will linger for a long time after being summoned, and more than 1 can be active at a time
-She may throw a large golden fireball that stops moving after a short time. After it stops moving it will summon 1-3 evenly-spaced deathrays that rotate either clockwise or anti-clockwise anywhere from 90 to 360 degrees before the fireball and lasers disappear. The speed they rotate is based on difficulty and the number of deathrays

Defeat:
Skye's aura will fizzle away, and she will look notably tired. She will suddenly dash upwards, leaving a few small feathers to fall to the ground.

Drops:
A magic tome, magic staff, sword, throw-able spear, bow, gun, and a summoner staff. May also drop an outfit based on her appearance, as well as sometimes wings as well.
In Expert Mode she can drop the Solar Flare Emblem that provides mobility bonuses, especially to wings, allows the player's attacks to inflict Golden Flames when hitting an enemy and also create additional fireball projectiles for some weapons. She may also, more rarely, drop a charm that provides the same stat buffs, but also summons 3 'Harpy Helpers' to assist the player.

Lore:
-Royalty amongst harpies, and one of the most powerful ever recorded. Her father is unknown, but is presumed the reason as to why she has human arms alongside her harpy wings.

Hints:
-Mobility is critical for this fight. Skye is exceptionally fast and attacks rapidly also with many sorts of projectiles.
--Dashes and teleports are, as ever, strongly recommended. Teleports are especially helpful for being able to still manoeuvre around the flame pillars, tornadoes, wind pillars, deathrays, and lightning bolts
-Taking time to learn all of her Phase 1 attacks before progressing onto Phase 2 may be recommended, as in Phase 2 she retains all previous attacks and then adds more, and becomes more aggressive.

Extra Info:
-Skye, like Sungazer, was planned to re-appear in Boss Ideas 10. However, there have also been plans for returns in both Boss Ideas 7 and 9 before then.
-As with a few other returning bosses, much of her attack pool is fashioned based on her previous appearances, most prominently her Boss Ideas 1 incarnation
-The three 'Harpy Helpers' are based on previous harpy or harpy-themed bosses. One is a small version of Skye herself, another the Dragon Harpy, and the third looks similar to Aegis.
[Added: 21/11/20]
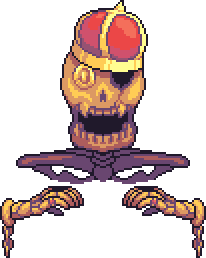
11 - Tenebris


Appearance: A strange black liquid. An almost eye-like creature sometimes emerges from the liquid.

Summon: Throw an item known as the Phantom Matter out of the world, done by digging to the very bottom of the world. The boss will not despawn unless the player dies.
Fought: Post-Moon Lord
Specification: Post-Blacklight
Special: Secret Boss
Progression: No

Stats:
Health:
-450,000 (785,000) (1,000,875) (Tenebris)
-45,000 (78,500) (100,088) (Hands)
-90,000 (180,000) (229,500) (Eyes)
Attack:
-550 (800) (Sludge Melee)
-310 (444) (Tenebris Melee, Eye Melee)
-325 (470) (Hand Melee)
-280 (400) (Projectiles)
Defence:
-40 (Tenebris, Eyes)
-75 (Hands)

Attacks:
Phase 1:
The sludge-like body of the boss spans seemingly the entire horizontal length of the world, and will creep up to consume the lower half of the underworld within a few seconds. Tenebris itself does not emerge from the body, but instead 3 of its Eye minions will instead, as will 3 Hands.
-Eyes will charge at the player, wait a few seconds, and fire 3 diamond-shaped projectiles at the player
-Hands will simply align with the player and charge. They do not have any projectiles.
Defeating all 6 of the minions will start the 2nd, and main, phase
Phase 2:
The sludge will slowly begin rising, and will do so throughout the rest of the fight.
Tenebris will sometimes emerge from the sludge to shoot at the player
-He may shoot 4 projectiles in an arc towards the player
-He may fire 5 projectiles in succession, similar to the Eye minions
-He may summon an Eye minion
After attacking, Tenebris will disappear back into the sludge for a few seconds, remaining invulnerable until they re-emerge. They usually emerge near the player.
Additionally, as Tenebris loses health, Hand projectiles may freely spawn from the sludge rarely, and the speed in which the sludge climbs will gradually increase

Defeat:
Tenebris lets out a shriek and its visible eye explodes into gibs. Afterwards, the Sludge will rapidly sink downwards again until it disappears. All its Eye and Hand minions despawn when Tenebris is defeated.

Drops:
A flail, a magic tome, and a summoner tome.
In Expert Mode it will also drop the Chaos Mould; which visually makes the player look similar to one of the Chaotic Entities. It has no other obvious function.

Lore:
-A worrying amount of Chaos Energy, dwelling in a liquid form beneath the underworld... the sheer amount alone is very concerning, and it wouldn't normally congeal like this unless something tried to summon lots of it for something...

Hints:
-As this boss can very easily kill NPCs living underground, it is recommended to move them to the surface or sky, even temporarily, to ensure Tenebris doesn't kill them.
-Tenebris' sludge deals immense damage on contact, sometimes enough to instantly kill the player, so having lots of platforms around where you plan to fight him is recommended, as is flight and a strong grappling hook
--Teleporting may also be useful in a pinch in this regard

Extra Info:
-The lore description suggests that Tenebris' body is made of Chaos Energy, though this is the only time where it is seen with actual shading as opposed to being matt black.
--Additionally, the idea that someone wanted to summon it all may reference Terminus' goal in Boss Ideas 7, which was to summon lots of Chaos Energy in order to resurrect the Chaos Doppelganger, but failed
[Added: 22/11/20]
12 - HIVE


Appearance: A large, bronze-coloured worm. It has large, bulky body segments with various strange holes bored into all of them, and its front segment has two large mandibles with what seems like an eye between them.

Summon: Use the Bronze Bee Beacon anywhere in the world. HIVE will only despawn if the player dies, as it is easily capable of pursuing them across the map at high speeds if they try to flee.

Fought: Post-Moon Lord
Specification: Post-Moon Lord
Special: No
Progression: Later Bosses

Stats:
Health:
-565,000 (800,000) (1,020,000) (HIVE)
-50,000 x65 (75,000 x75) (95,625 x75) (HIVE Plating)
-100 (175) (250) (HIVE Drones)
Attack:
-275 (450) (HIVE Head Melee)
-200 (350) (HIVE Body Melee, HIVE Drone)
-175 (320) (HIVE Spear)
Defence:
-45 (HIVE and Drones)
-60 (Plating)

Attacks:
HIVE itself starts off with all 65 (75) of its segments being covered in defensive plating, which stops it from taking damage. HIVE will mostly burrow, but is capable of flight temporarily if it deems the player out of range.
-HIVE will summon Drones from the holes in its body. They are a little larger than the large Bees that can spawn from Hive Blocks, and act much the same way. Segments with their plating broken will summon more of these at a time
-HIVE can launch spear-like projectiles from its segments in a variety of different ways:
--A barrage of lasers randomly from all its segments
--1 laser per segment fired in rapid succession directly at the player, starting from the head and working down to the tail
--2 lasers per shot, with one starting firing from the head and the other from the tail. The twin streams are aimed directly at the player, and stop upon reaching the middle segment.
Breaking any of its plating will allow the player to directly damage HIVE itself. However, attacking HIVE directly will cause it to temporarily speed up, and increases the likelihood it will spawn Drones soon.
Breaking the plating, aside from destroying 1 to provide at least 1 segment with which to hurt HIVE, is not necessary to finish the fight.

Defeat:
Explodes into gibs and releases lots of Drones. Any plating still unbroken when he is defeated will shatter immediately.

Drops:
A series of vaguely bee-themed items, like a sword, spear, magic tome, magic 'gun', bow, and a gun. All of these have some sort of ability to spawn Drones. The drones they spawn act much like player-spawned bees, but are significantly faster and break upon hitting an enemy (and thus do not activate invulnerability frames).
In Expert Mode it will also drop the Reinforced Shell; which grants the player increased defence and also some additional damage reduction based on how long ago the player last took damage (more time between hits = more damage reduction).

Lore:
-A large mechanical beehive. It has a vague similarity to another bee-themed mechanical worm seen long ago, but these similarities may be coincidence. Its creator is unspecified.

Hints:
-Piercing weapons are amazing for this fight, as they can not only help deal with the Drones it summons but also pierce armour and body segments.
-High-damage weapons may also be good for dealing with the Drones, and also targeting specific plates on its body even if it lacks piercing or splash damage

Extra Info:
-The 'bee-themed mechanical worm' the description speaks of is likely Vesper from Boss Ideas 5. Even though Vesper was more wasp-themed than bee-themed, Vesper had some similar design aspects such as a single eye between two mandibles and a theme centred around yellow-striped stinging insects.
-HIVE's gimmick was actually decided by the Technological Terror Discord server, as some of the members dubbed it 'bee worm' or 'hive worm' due to the amount of holes in its casing.
[Added: 22/11/20]
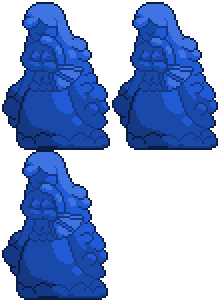
13 - Jelly

Appearance: A lady made of blue slime carrying a fan.

Summon: Use the Plate of Jelly anywhere in the world. It is made using fancy dishes (brought from the Travelling Merchant), Gel, and Bottled Honey

Fought: Pre-Hardmode
Specification: Pre-Boss, Technically Queen Bee-tier
Special: Pseudo-Meme Boss
Progression: No

Stats:
Health:
-4,690 (6,900) (8,798) (Jelly)
-200 (400) (600) (Gel Guards)
Attack:
-44 (70) (Melee) (Inflicts Slowness - 25 (33)%)
-30 (48) (Slimeball)
-36 (57) (Gel Guard Melee) (Inflicts Slowness - 25 (33)%)
Defence: 0

Attacks:
Jelly will spend much of her time hopping towards the player, as expected of a slime. Every 5th bounce will be replaced with a special attack. She can teleport if the player is deemed unreachable at any time, not just on the 5th cycle.
-She may perform a high-jump, similar to King Slime's, though its height is partially based on the player's
-She may disappear and re-appear above the player. After a short time she'll fall down, trying to squash the player
-She may perform a triple-jump, jumping at the player 3 times in rapid succession, with each subsequent jump covering more ground and moving at higher speed
-She may launch a cluster of 4 slime balls at the player that are affected by gravity and can bounce off of blocks
-She may summon several slimeballs from the sky that land either above her or the player.
As she takes damage she will summon Blue and Spiked Slimes (Only Spiked Slimes on Expert) and gradually begin to move faster.
At half health she will summon 2 Gel Guards to assist her which act mostly like regular slimes but jump faster and have very high knockback resistance.

Defeat: Falls over, and then disappears in a similar manner to how it teleports. Leaves its loot when it disappears.

Drops:
An abundance of Gel and 'Sweet Gel', used to make a few items including an armour set. Can drop a sword, a flail, whip, summoner staff that summons minions similar to her Gel Guards, and a magic staff. Also drops Healing Potions and Mana Potions.
In Expert Mode she will also drop her fan, which increases melee attack speed and movement speed.

Lore:
Unrelated to the King or Queen slime, but still seems to hold some sort of importance, at least to a few slimes. The reasoning for her almost-human appearance is undetermined.

Hints:
-Jelly is similar to King Slime, though much more complex and statistically stronger. Most things that work for King Slime will work for her as well, minus using ropes.
-Jelly makes a decent source of Healing and Mana Potions in Pre-Hardmode
-While she is intended to be Post-Queen Bee in terms of difficulty, none of her materials are strictly even post-boss at all.

Extra Info:
-Jelly was originally made for Valentine in the Technological Terror Discord as a joke boss, though was registered alongside Boss Ideas' bosses in the 'lost ideas' page.
--Jelly is also, therefore, the oldest sprite on the page (Excluding her minions, which are a little older)
[Added: 2/11/20]
14 - The Chlorophage

Appearance: A green spherical biomechanical entity encased in a robotic shell. The shell is grey and open at the front, and the sphere itself has a series of hexagonal patterns on it, and several squirming green tendrils beneath it. Hexagonal lights cross its surface constantly.

Summon: Can be found in one of two ways. It can either be found in the underground jungle with its tendrils buried in the ground, and can then be attacked to start the fight, or it can be manually summoned using the Glowing Chlorophyte Chunk. The boss will despawn if the player dies or gets too far away and if taken to the surface will enrage, increasing its damage, defence, movement speed, and increases the speed of its leaf projectiles.

Fought: Hardmode
Specification: Post-Plantera
Special: No
Progression: No

Stats:
Health: 37,500 (50,000) (63,750)
Attack:
-55 (85) (Melee, Crystals)
-48 (78) (Leaves)
-80 (125) (Solar-Beam)
Defence: 20

Attacks:
Phase 1:
Chlorophage usually floats towards the player, or may dash horizontally at seemingly-irregular intervals. Its attacks are usually nature-themed.
-It may create crystals around itself similar to Chlorophyte's Armour's set bonus. They shoot leaf-like projectiles at the player and disappear.
-It may launch several leaf-like projectiles out in random directions
-It may launch 3 leaf-like projectiles in an arc at the player. It often does this several times in succession.
At 50 (65)% health it will enter its 2nd phase
Phase 2:
The Chlorophage speeds up in this phase, and will gain new attacks alongside buffing its former ones.
-The leaf crystals from its first attacks now spawn 3 leaves in an arc before disappearing
-The 2nd attack spawns more leaf projectiles in the burst
-The arc of leaves from the 3rd attack now consists of 5 leaves
-It may become immobile before launching a powerful deathray-like beam at the player. The trajectory of the beam does not sweep.
-It may fly over the player's head and try to fire a deathray-like beam downward. It also slowly moves while firing this beam, trying to stay above the player while performing it

Defeat:
Explodes into gibs

Drops:
Several chlorophyte-themed weapons, including a flail, magic staff, summoner staff, and bow. Can also drop a large quantity of Chlorophyte Ore.
In Expert Mode it drops the Chlorophyte Core, which provides the player with increased movement speed and an increased mana and ammo conservation chance. Also grants a leaf crystal above the player's head, even without the Chlorophyte Armour, but when wearing said armour will increase the existing crystal's damage.

Lore:
A biomechanical monster created to leech Chlorophyte from the depths of the jungle. It seeks it out, and upon finding a chunk of the ore will stab its tendrils into the ground and absorb it into its body. Its creator is unspecified, and the reason as to why someone would want all this Chlorophyte is uncertain.

Hints:
-Moving left or right constantly during its downward deathray attack will allow you to dodge it quite effectively
-Many of the Chlorophage's projectiles can actually be blocked by blocks, at least in Phase 1, so use terrain to your advantage
-There is no point bringing the boss to the surface. There are no extra rewards for defeating its enraged form, and the fight at the surface is more dangerous in virtually every aspect.

Extra Info:
-Despite saying that the Chlorophage absorbs Chlorophyte from the ground, it cannot actually do so in-game.
-The Solar-Beam is named after a Pokemon move, which is fittingly a grass-type move portrayed as a large laser-like beam from the sky in many of the games
-The Chlorophage was originally made for the Technological Terror mod, but as of now is currently undetermined as to whether it will appear in the mod or not. Therefore, I thought it could still see use even if it doesn't get in :)
[Added: 22/11/20]
15 - Cinder Siren


Appearance: The Cinder Siren, seen back in Boss Ideas 3. Her general design hasn't changed much since then, aside from her previous hair accessory being replaced with something vaguely flower-like with a veil flowing from it.
The Siren's Worms have had some more noteworthy changes, however, aside from general design updates. The Worms are red, with notably visible scales, with black spikes protruding throughout its body. It has segmented mandibles and a mouth with several layers of teeth surrounding it.

Summon: Create a Lavaproof Doll and throw it into lava. The boss will despawn if the player dies or despawns, but can otherwise be taken anywhere without any issues.

Fought: Hardmode
Specification: Post-Golem
Special: Returning Boss
Progression: No

Stats:
Health:
-55,000 (77,850) (99,259) (Siren)
-10,000 (16,500) (21,038) (Worms)
Attack:
-65 (118) (Siren Melee, Lava Ball, Eruptions) (Inflicts On Fire! - 33 (67)%)
-58 (100) (Fireball, Cinder Spears, Worm Body Melee) (Inflicts On Fire! - 25 (50)%)
-80 (150) (Worm Head Melee) (Inflicts On Fire! - 100%)
Defence:
-25 (Siren)
-50 +20% Damage Resistance (Worms)

Attacks:
Phase 1:
The Cinder Siren will usually try to fly above the player, attacking from above where possible. She is capable of flying at very high speeds and accelerating rapidly, so is often very good at staying above the player.
-She may throw several balls of lava upwards, which will all fall down at the same time, evenly-spaced out.
-She may launch several fireballs upwards that slowly rain down from the sky at varying angles.
-She may launch several spear-like fireballs directly at the player, usually between 4-6
-She may launch an arc of 5 cinder spears at the player, followed by another arc of 4
When the Siren is at 70 (75)% health, she will enter her 2nd phase
Phase 2:
The Siren's movement patterns do not change, but she will gain a new attack and summon one of her Cinder Worm minions.
Cinder Worms, while they are primarily just fast-moving worm enemies, do have a unique property. If they are killed by the player, they will resurrect themselves after around 10 (8) seconds from the ground beneath the player.
-The Siren's one new attack has it launch a fireball onto the ground, which causes several eruptions of fire to begin erupting from the ground in succession. Each subsequent group of eruptions will be slightly further apart than the last.
When the Siren is at 30 (45)% health she will enter Phase 3
Phase 3:
The Siren's movements remain the same, but she will summon another Cinder Worm and will gain one final new attack
-She may begin singing, launching several cinder spears out in random directions until she stops. The amount she summons is based on how much health she has, though she notably already begins by summoning lots of them and only increases the number as she loses health

Defeat:
She will flinch and then dive downward, passing through any blocks until she despawns. Any worms active at the time will also flee once the Siren is defeated.

Drops:
A summoner staff that summons a small cinder worm, a whip, magic tome, magic staff, bow, and a spear. She can also drop an accessory based on her hairpin, which increases the player's defence, damage reduction, and player attacks may inflict On Fire! to some enemies.
In Expert Mode, she drops an item that allows the player to become a mini Cinder Siren, complete with On Fire! immunity and lava immunity, a gills effect, the ability to swim in all liquid types, and additionally some extra defence when active.

Lore:
-A siren who, unlike her ocean-dwelling brethren, found herself capable of surviving in the intense heat of the cavern's magma. However, she found herself unable to find her way back to her home and thus ended up dwelling in the caves, with only a collection of loyal worms for company.

Hints:
-The Siren's attacks often come from the air, so staying closer to the ground is recommended for Phase 1
--However, be mindful that after that point the worms begin spawning as of Phase 2
-Having a few high-up platforms far from the ground can help make the worms less of a threat, and also solves the issue of the Siren's frequently-sky-based attacks
-Fighting the worms is usually a futile effort, as they respawn very quickly after being killed
-The Siren can be fought anywhere, as long as the player can put lava there via a lava bucket. Fighting it at the surface by taking lava up in a bucket is recommended as opposed to fighting it underground, unless you have a large enough arena prepared

Extra Info:
-The Cinder Siren originally appeared in Boss Ideas 3 and essentially started out as a mild resprite of the Siren, though was obviously changed drastically in this remake
-Aside from bringing over the theme of having worm minions, the Siren does not actually follow the returning boss trend of having aspects of the fight taken from her original battle. The entire attack pool and phase changes were completely remade for this fight.
[Added: 22/11/20]
16 - Charlotte

Appearance: Charlotte, returning from previous Boss Ideas instalments. She also has a large, black spider with magenta legs and fangs, as well as magenta triangular markings on its back.

Summon: Use the Spider Queen's Circlet at night. Charlotte and the Strider will both spawn at the same time. The boss will despawn if the player dies or moves too far away. It will also despawn if it reaches daytime.

Fought: Hardmode
Specification: Post-Plantera
Special: Returning Boss*
Progression: No

Stats:
Health:
-25,000 (48,500) (61,838) (Charlotte)
-27,500 (51,500) (65,663) (Strider)
-40,000 (62,800) (80,070) (Spider Queen)
Attack:
-50 (80) (Charlotte Melee)
-48 (77) (Shuriken, Chain Knife) (Inflicts Poisoned - 33 (50)%)
-55 (88) (Strider Melee, Spider Fangs) (Inflicts Venom - 25 (33)%)
-40 (70) (Web Shot) (Inflicts Webbed - 50 (100)%)
-70 (110) (Queen Melee) (Inflicts Venom - 50 (100)%)
Defence:
-16 (Charlotte)
-36 (Strider, Spider Queen)

Attacks:
Phase 1:
Charlotte and the Strider will attack the player together, both using different means of attacking.
Charlotte will move around the arena rapidly, and will stop to attack on either the ground or will hold into walls.
-She may lunge at the player with a small sword, dealing melee damage
-She may throw anywhere from 3-6 shuriken at the player in an arc. The shuriken inflict Poisoned and will temporarily remain stuck in blocks upon hitting them, acting as temporary area-denial
-She may throw 1-3 chain knife-like projectiles at the player.
The Strider will chase the player directly, launching various types of projectile, and is also capable of making web walls that do not hinder the player, but do allow for it to climb and Charlotte to hang onto them for mobility.
-Strider may launch 3-4 web shot projectiles at the player directly in succession. They will briefly inflict Webbed if they hit the player
-It may stay still and launch an inaccurate, almost shotgun-like blast of spider fang projectiles towards the player.
-It may launch 2 back-to-back arcs of spider fangs at the player. The arc consists of 4 (5) spider fang projectiles
Defeating either of the duo will not remove them from the fight, but it will slow down their attack speed. Defeating both will progress the fight.
Phase 2:
The Spider Queen will emerge: a colossal spider far larger than Charlotte or the Strider that is entirely restricted to wall-based movement but can also ignore blocks. Like the Strider it can also create webs in order to stop its movement being restricted.
The Strider and Charlotte remain active, but the player needs to focus their attacks on the Spider Queen still.
-The Queen may launch 3 rapid-fire arcs of web shots at the player, each consisting of 3 projectiles each
-The Queen may back up slightly before charging at the player.
-The Queen may release 20 spider fangs out in a burst in random directions
-The Queen may release an arc of 7 spider fang shots at the player
-The Queen may summon 2-3 Black Recluses to fight for few

Defeat:
Defeating the Spider Queen causes it to explode into gibs, while Charlotte and the Strider flee.

Drops:
An upgrade to the Venom Staff, a bow that shoots spider fangs, a magic tome that summons webs that can slow enemies, a summoner staff, a sword, and a material that can be combined with the Master Ninja gear to give it an ammo conservation effect and increased crit chance.
In Expert Mode it drops an accessory that allows the player to transform into a spider: allowing the player to climb walls and some of their attacks to inflict Venom

Lore:
-A princess, a queen, and a servant. Charlotte herself, while humanoid, is spider enough to still be included amongst the other spiders. The other spiders haven't attempted to eat her as of yet.

Hints:
-Despite their being several targets, piercing weapons aren't very useful. Charlotte is very mobile and often doesn't align with the Strider for long, and Phase 2 only has 1 target the player can damage
-Homing attacks do quite well against Charlotte, as she moves quite rapidly when not attacking
-The Ankh shield does pretty good for providing Poisoned immunity, but the Venom and Webbed debuffs are not blocked; limiting the overall effectiveness of the immunity provided.

Extra Info:
-Charlotte has appeared in Boss Ideas 1, 5, and 7, though each fight has been under different circumstances up to this point.
--However, Charlotte's old ninja-inspired attacks still remain which are seen across almost all of her boss fights
-The black and magenta spider, called the Strider, may be a reference to the Royal Striders seen in Boss Ideas 1. However, in terms of visual design, it seems very different and so may not be related.
[Added: 22/11/20]
17 - Blacksteel

Appearance: Blacklight itself starts as a blue sphere, much as its original incarnation did. Instead of being surrounded by its metal chunks, it is now surrounded by a series of thin metallic blades that orbit its body.

Summon: Use the Charm of Steel anywhere in the world. The Charm's ingredients only consist of 3 blades similar in appearance to Blacksteel's own, gained from a trio of powerful metallic enemies. The boss will only despawn if the player dies, and will teleport after fleeing players.

Fought: Post-Moon Lord
Specification: Post-Moon lord
Special: Returning Boss
Progression: No

Stats:
Health: 178,000 (300,000) (382,500)
Attack:
-150 (252) (Blacklight Melee - Phase 1)
-190 (310) (Blacklight Blades, Blacklight Melee - Phase 1)
-175 (288) (Energy Blades)
Defence:
-30 (Phase 1)
-65 +30% Damage Resistance (Phase 2)

[All of this boss' attacks may inflict Frostburn - 20 (40)%]

Attacks:
Phase 1:
Blacklight will usually chase the player, infrequently dashing at them, utilising his various blades to attack the player
-He may launch 7-10 of them at the player in succession, which quickly return to him
-He may release a 'burst' of blades that fly out, remain in place briefly, and then return to him. The 'burst' consists of 12 blades, all evenly-spaced-out (as well as 1 more directly at the player)
-He may teleport near the player, delay a second, and then dash at the player with his blades in a '<' formation
-He may release 4 (6) blades, 2 (3) to either side of itself. They will curve around, eventually crossing paths a few blocks in front of Blacksteel, before continuing straight forward. After a while of travelling forward they return to Blacksteel
-He may dash horizontally, releasing all its blades diagonally, almost vertically, slanted at the angle Blacksteel is travelling. At the end of the charge all the blades return to him again
At 50% health Blacksteel will enter its 2nd phase
Phase 2:
Blacksteel will fuse with its blades into a silver and blue sword. All its attacks become significantly faster, and instead of using its physical blades will create energy blades in their place.
It retains all previous attacks, but will charge at the player more frequently and gains a couple new attacks
-It may slash in the direction of the player, creating a vast amount of energy blades as it swings.
-It may appear over the player's head and dash downward, releasing energy blades horizontally that return to Blacksteel at the end of the charge

Defeat:
Blacksteel will un-fuse and its blades will fall to the ground. Its spherical body will dart upward, creating a streak of blue light and releasing a cluster of blue particles.

Drops:
A magic staff that summons energy blades, an upgrade to the blade staff, a flail based on its phase 1 appearance, a ranger weapon that launches returning blades, and a sword based off of his phase 2 appearance
In Expert Mode it drops an accessory that grants the player 4 small blades, based on Blacksteel's, to defend the player. Additionally, it may drop blade-like wings.

Lore:
-An orb of otherworldly energy, said to contain the soul of a powerful warrior of aeons passed. It uses its powerful magic to control an assortment of sharpened blades which it can control over a great distance with little effort

Hints:
-Due to the boss' small size and decently high mobility, homing weapons are very good for this boss
-All of the boss' shots boomerang back to it at the end of every attack, so getting close to the boss at any time is not recommended

Extra Info:
-Blacksteel originally appeared in Boss Ideas 7 with an army of mechanical worms at its disposal. Due to Energykid liking the boss, it was overhauled and brought back with a palette near-identical to its original
-There was at one point a plan to allow Blacksteel to deflect projectiles using its blades, though this was decided against due to how many blades it can have active at any time. However, the general concept of it using its blades for all its projectiles did happen
[Added: 22/11/20]
18 - Festering Mimic

Appearance: A large, partially-rotten mimic. It seems to have become infested with insects and its hinge seems to have broken, causing its mouth to slant at an angle. Its body is cracked, metal bands warped, and teeth twisted and ingrown.

Summon: Interact with a Rotten Chest. The Rotten Chests can be found rarely underground, like other Mimics, though only spawns after at least one mech boss is defeated. Unlike other mimics, the Rotten Chest is completely passive until right-clicked by the player and will spawn and act like a regular chest. The boss will despawn if the player dies or gets too far away, though the chests themselves act like placed furniture items when they spawn.

Fought: Hardmode
Specification: Post-Mechanical
Special: No Summoning Item, Naturally-Spawning*
Progression: No

Stats:
Health:
-20,500 (31,250) (39,844) (Mimic)
-60 (120) (180) (Bug)
Attack:
-85 (140) (Melee)
-60 (100) (Sludge Ball, Grenades)
-70 (120) (Bugs)
Defence: 20

Attacks:
Phase 1:
The Mimic will slowly hop towards the player when not using one of its other attacks. Attacking it at any time in this state has a chance to spawn one of its three bug minions.
Flying bugs act similar to Corites, trying to fly above the player before dashing at them, Crawling bugs act like Srollers, curling into a ball to fling themselves at the player frequently, and Spiky bugs simply just crawl after the player without any unique functions.
It shares some attacks with the Biome Mimics, while also having a series of unique attacks at its disposal. It can also chase players similar to Biome Mimics if they get too far away.
-It may perform a Biome Mimic's attack of trying to land on the player from above. Upon landing it will usually spawn 1 or 2 bugs.
-It may perform an attack similar to a Biome Mimic's triple jump, but can only perform 2 jumps before stopping
-It may spew several globs of sludge in a large arc over its head. They are affected by gravity and shortly fall to the ground.
-It may spew 3-4 bugs from its mouth.
After using one of these attacks, it will often slam down its mouth, jamming it shut briefly. It will remain immobile for a couple of seconds until it frees its jaw again and continues attacking.
At 33 (50)% health it will enrage and enter its 2nd phase
Phase 2:
The Mimic is faster and more aggressive than before. Notably, it also no longer stops briefly after attacking and instead frees its mouth forcefully, dealing 100 (50) damage to itself every time. Some of its previous attacks have changed slightly
-The double-jump from before has been upgraded to a triple-jump
-It may release bugs from its mouth when performing the sludge attack
-It always releases 4 (5) bugs from its mouth during the bug-spawning attack
-Its first new attack has it capable of closing its mouth, similar to the other Biome Mimics. In this state it is invulnerable, and attacking it will always spawn a bug.
-Its other new attack has it release several grenade-like projectiles from its mouth. There are 4 variants:
--Regular grenades, that act as grenades normally do
--Gunk grenades, which act like sticky grenades
--Broken grenades, which only explode on contact with the player and otherwise fizzle out
--Dud grenades, which are not dangerous

Defeat:
Explodes into gibs, releasing a large amount of bugs as it does so

Drops:
A sword, flail, bow, tome, magic staff, summoner staff, and gun are all mimic-themed or aged. Like other mimics, will also drop greater health and mana potions.
In Expert Mode it may also drop an accessory that summons bugs based on the Mimic's own bugs both at random intervals and also after taking damage. The accessory also reduces the player's defence slightly, but in exchange increases their mobility and does so even more after taking damage.

Lore:
-An old mimic that has ages poorly, becoming overrun with rot and parasites. Despite its dilapidated condition, it still tries to trick foolish creatures near before it devours them whole.

Hints:
-Many of the tactics used for fighting Biome Mimics can be applied to the Festering Mimic also, as its properties are very similar
-Piercing or AoE weapons, or other sorts of weapons with high damage, may be recommended in order to help deal with his various minions. Weapons like the Star Cannon, Optic Staff, and Onyx Blaster for example
-It is recommended that the player does not attempt to fight Festering Mimics without some sort of arena. Fortunately, as they only attack when interacted with first, the player can build a quick make-shift arena around them in order to give themselves more room.

Extra Info:
-The 'Spiky bug' that the Mimic spawns has spines on its back with an appearance very similar to the Mimic's teeth.
-The Festering Mimic's damage, at least in Normal Mode (85), is directly between a regular Mimic (80) and a Biome Mimic (90)
-Due to the boss being able to damage itself in Phase 2, it is actually capable of having the Festering Mimic accidentally kill itself from its own recoil damage when at very low health.
[Added: 21/11/20]
19 - Greed King

Appearance: A large, golden skeleton. It has a large crown atop its head, and a large gold coin in its uncovered eye. It also has two large golden hands with broken chains hanging from both of them.

Summon: The player must reach the Greed Temple, a large underground structure beneath the jungle-side ocean. It can only be entered Post-Moon Lord, and the player needs to navigate through its corridors, traps, and powerful enemies until they drop into the Greed Room.
The Greed Room's floor is covered in unbreakable coins, and is mostly a moderately-sized empty room with a black background. A chest is present in the middle of the Greed Room that will give the player items if they deposit gold coins into it (ever right click is 1 more gold coin). However, putting in a Greed's Gambit will summon the boss and seal the player in the Greed Room.
Trying to leave the room will turn the player into gold and kill them, and dying will despawn the boss.

Fought: Post-Moon Lord
Specification: Post-Blacklight
Special: Unique Summon Mechanic
Progression: Later Bosses

Stats:
Health: 1,200,000 (1,765,000) (2,250,375)
Attack:
-330 (468) (Hand Melee, Coin Wave, Greed's Curse)
-305 (432) (Coins, Mirror Melee)
Defence: 100

[All of this boss' attacks inflict Greed's Curse - 100%]
[All of this boss' attacks will cause the player to drop 10 (20)% of the coins they are carrying]

Attacks:
Phase 1:
Most of the Greed King's attacks will be centred around his hands, while his head lingers in the background. The head is still the target, as the hands are invulnerable.
-A hand may appear directly above the player and slam down, creating a short-ranged shock wave from the coins below
-A hand may appear above the player and slam down faster than with the previous attack. However, this one will not create a wave of coins upon hitting the floor
-A hand may crush something in its grip, launching several coins out in varying random directions that are affected by gravity
-Both hands may appear at the same time, slamming the ground, causing several coins to rain from the ceiling for a few seconds
-Both hands may appear. They will take it in turns to launch arcs of 3 coin projectiles at the player each, stopping after a total of 6-10 arcs of coins are launched.
At 50% health, the Greed King will roar from the background, entering Phase 2
Phase 2:
The Greed King will no longer keep its head immobile, and will move it slightly based on the player's position in the Greed Room. It retains all Phase 1 attacks, but gains new ones launched by the head itself
-It may launch a flurry of Greed's Curse projectiles, starting from one wall and ending directly beneath himself. The Curse projectiles have no unique properties to note
-It may fire two streams of Curse projectiles, both starting from above him. One stream goes clockwise and the other anti-clockwise, both only stopping about 165 degrees after beginning to rotate, leaving only a small space beneath him safe
-It may summon several mirrors around the arena and launch a string of 5 Curse projectiles at them. The projectiles will ricochet off of the mirrors. The mirrors are laid out in such a way that the string of projectiles will hit all the mirrors in the room. After the string of projectiles hits the last mirror they all disappear.
-It may summon mirrors spanning both walls and launch Curse projectiles at the walls at random angles. The mirrors cause the projectiles to ricochet chaotically, and only disappear after every projectile has either despawned or hit at least 1 mirror.
As the Greed King's health lowers his attack speed will get gradually faster

Defeat:
The Greed King's hands will explode into gibs, and the head will let out a roar before disappearing into a flash of golden light. The chest in the middle of the room can be interacted with again once Greed is defeated, and the player is free to leave the room free of consequences.

Drops:
All of the Greed King's drops inflict Midas, and are money or gold-themed. A magic tome that launches golden skulls, a magic staff that inflicts Ichor and Midas, a bow and a sword. Also drops an accessory that causes all enemies to be inflicted with Midas when attacked, and another that summons a golden hand to attack enemies whenever the player is damaged, dealing severe damage. It also drops a vast amount of coins, as expected.
In Expert Mode it can additionally drop a golden skull that turns a large amount of the player's projectiles into gold coins, though can retain some of their original functions (e.g. missiles still explode in coin form). The coins inflict Midas on a critical hit, and the skull generally increases player damage but reduces their damage reduction.

Lore:
-A former king, lost to his own greed. As he gained wealth, he desired more and more, until the wealth itself claimed him. His castle sank into the sea, and his fortunes disappeared with him.

Hints:
-Despite certain attacks seeming more dangerous on the ground, a lot of his attacks are actually a lot easier to avoid due to either coming from above or from the sides.
-Staying close to the Greed King's head, especially in Phase 2, may allow you to see what attack he's planning as soon as be begins attacking.
--The mirrors, if summoned, also give away the attack from almost anywhere in the Greed Room
-The initial mirror attack can be dodged by looking what ways the mirrors are facing, and moving to a position they do not pass through, or by flying close to a mirror the Greed's Curse projectiles have already deflected off of, as they never deflect off the same mirror twice

Extra Info:
-Despite similarities, the Greed King was ironically not inspired by TBoI's Ultra Greed, Dark Souls' Wolnir, or AA's Worm King Greed.
--It was actually inspired by Skeletron's Bestiary entry, the general concept of King Midas (and greed as a whole), and a boss that uses an arena in its attacks (hence the waves or coins and the mirrors)
-Most of the Greed King's body is obscured by the background of his arena, though some of the upper body that is visible suggests that the Greed King may indeed be a complete skeleton as opposed to just a skull and hands like Skeletron
[Added: 23/11/20]
20 - Levialous - Half-Complete

Appearance: A larger, apparently more-complete version of Levialous. Its armour-like shell is now a reddish orange colour, and is significantly bulkier. It also now has a visible, hulking arm at his right side, dragging on the ground. Its cape has instead morphed into various tendrils, and some similar-looking tendrils are protruding from around its neck from under its head.

Summon: Use the Chaos Caller at night. The Chaos Caller, however, will only work under certain conditions. The player must have defeated Blacklight, Skye and the Greed King before the Caller will work, and it will only work at midnight. Additionally, to get the Caller in the first place, Levialous' incomplete form must also be defeated previously.
The time will be set to midnight throughout the entire fight. Levialous will only despawn if the player dies, as it will teleport to chase fleeing players and nighttime does not progress during the fight.
Levialous will also begin the fight with dialogue, most notably stating that he is there to "finish what Terminus started."

Fought: Post-Moon Lord
Specification: Post-Blacklight, Post-Skye, Post-Greed King, Post-Levialous - Incomplete
Special: Pseudo-Final Boss
Progression: Later Bosses

Stats:
Health: 1,750,000 (2,200,000) (2,805,000)
Attack:
-385 (580) (Melee)
-370 (560) (Explosions)
-360 (548) (Spears, Cloak Lashes, Chaos Sphere)
-420 (635) (Deathray)
Defence: 100 +10% Damage Resistance

[All of Levialous' attacks inflict Chaos Ember - 50 (100)%]

Attacks:
Phase 1:
All of his Phase 1 attacks and movements are based on his original fight. All attacks used are enhanced versions of his Incomplete form's attacks.
-His 'explosion' attack's initial explosion around himself is larger and is executed faster. The resultant explosions are also more numerous and are summoned over a wider area
-His 'explosive homing projectile' attack will always summon 3 (4) homing projectiles. They do not last quite as long as before, but travel significantly faster
-The 'spear spiral' attack now has a 3rd stream of spears being launched as opposed to 2. The attack is otherwise mostly the same
-The 'spear arc' attack's first arc always consists of 5 projectiles. He will throw 3-4 total arcs at the player in rapid succession. These spears also accelerate as they travel
-His 'charge' attack's teleport is faster, and the time between the teleport and charge is shorter
-The 'surrounding spear' attack summons less groups of spears around the player, but each one will consist of 8 spears in total in '+' and 'x' formation.
-The 'spear burst' attack summons anywhere from 13-18 spears per burst, and they are no longer evenly-spaced apart from each other.
Once down to 60% health Levialous will look skyward and let out a roar, entering Phase 2
Phase 2:
Levialous' movements are the same, but he entirely ditches all of his Phase 1 attacks in favour of new ones. He will also notably gain a 'pulsing' visual effect that pulses faster as he loses health.
-It may fire a sweeping deathray at the player. Once it is finished, he will fire a second one sweeping in the opposite direction.
-It may summon several portals near the player, with tendrils similar to those its cloak has become lashing at the player from them. It summons these portals rapidly over a few seconds.
-It may very rapidly release large 'bursts' of spear projectiles in all directions. Each consists of anywhere from 20-40 (30-45) spear projectiles
-It may slam its arm downwards, creating a pseudo-arc of spears as the arm swings, and one of the homing exploding projectiles at the end of the swing
-It may launch a series of Chaos Sphere projectiles at the player. These, after a random time, explode into bursts of spears launched in random directions. (A homing exploding projectile is also summoned alongside them).
-It may create several small explosions in random locations near itself, similar to the aftermath of Phase 1's explosion attack. This will happen up to 3 (4) times in succession, with the area that the explosions can spawn in updating as the player moves
-It may appear above or to the side of the player, dashing at them momentarily. Afterwards, a swarm of spear projectiles, moving in the same direction as Levialous, will pass by
-It may summon a wall of spears, usually evenly-spaced out (though not evenly spaced in Expert). It can be vertical or horizontal.
As Levialous loses health, his pulsing effect becomes faster and more noticeable. Additionally, his teleports in-between attacks become more sporadic.

Defeat:
Levialous lets out a roar, hunches over, and shakes. The pulsing effect will rapidly fade and once it does he will quickly look upward, erupting into a pillar of shadows. Levialous will seemingly be destroyed by this, not even leaving any gibs behind.

Drops:
A sword, spear, flail, magic staff, magic tome, bow, gun, rocket launcher, sentry staff and summoner staff, all themed around Levialous. Will additionally drop an accessory that grants the player the ability to inflict Chaos Ember on some attacks, and sometimes cause their projectile attacks to become larger, faster and stronger.
In Expert Mode it additionally drops Shade Wings; wings based on his tendril-like cloak, as well as a Phantom Charm, which does not seem to do anything aside from possibly reviving the player to 10% health 10% of the time.

Lore:
-Levialous, slowly approaching their completed state. If it had not have been for you defeating him now, he would have grown unfathomably powerful and perhaps threatened all of Terraria.

Hints:
-While the idea that practising Levialous' first phase by rematching the incomplete form sounds like a good idea, defeating Levialous's incomplete form means it will not respawn, and thus cannot be practised against
--However, due to the similarities, any methods of dodging his attacks may still apply for Phase 1
-Dodges, dashes and teleports are, as with most late-game bosses, recommended

Extra Info:
-Unlike Levialous's incomplete form, where the palette was a photo-negative version of the Solstice's, the palette for this form of Levialous is entirely custom and is not just an edited palette.
-Levialous' (currently) signature debuff, Chaos Ember, seems to draw a parallel to the Chaotic Ember debuff seen in Boss Ideas 7
-Levialous' mention of "what Terminus started" is both one of the only mentions of a boss outside of their exclusive fight, and also a reference to the Chaos Emperor Terminus fight, which canonically only occurred because Terminus was trying to resurrect the Chaos Doppelganger
[Added: 23/11/20]
[Final Notes]
Boss Ideas 11, no longer a myth :P

Sorry this took so long, and sorry that I gave little indication or inkling towards its existence. Uni work has kept me very busy, along with other things, so time has been scarce to say the least.

As some of the progression points and the layout may reveal, this is essentially a continuation of Boss Ideas 10. It still follows the main 'Chaos' lore, regardless, but much of its progression is intended to be balanced around 10's for consistency's sake.

Also, as with 10, this one will likely end after 40 bosses, perhaps having some sort of extra bonus at the end, but that isn't decided. I will also be partnering this with an 'extended lore' document, which is essentially a smaller version of the unfinished lore document but scaled down to only look at the Boss Ideas 11 boss roster as opposed to trying to cram the entire overarching lore in.

The 'Extended Lore' page, for anyone interested:
https://gtm.steamproxy.vip/sharedfiles/filedetails/?id=2294361887

Anyways, shout-out time:
-DarkPuppey, both for spriting Blacklight again and because of his gold palette he used for Lunar
-Lemon Zest, for helping with some of the improvements to the Cinder Siren and her Worm minions
-Valentine, for being the inspiration for Jelly's existence
-EnergyKid, for inspiring me to remake and bring back Blacklight
-The Boss Ideas Discord, for being patient with me
-The Technological Terror Discord, for motivation, inspiration, and generally being really cool
-And You, for viewing this page and supporting me :)

Anyways, I hope you enjoyed. If you have any ideas feel free to leave them in the comments. They may even make it into the next part of Boss Ideas 11, you never know :P

Anyways, see you next time :)
41 Comments
Okami Tomato  [author] 5 Jan, 2021 @ 4:42am 
Been making these longer than I've been modding, so I've somewhat gotten used to the idea now of them likely not making it into mods, though some do actually have a chance to due to some of the mods I'm helping out with

Also thanks, I was a little worried about my lack of time to animate these guys possibly affecting the response I got, but it's good to see that people generally don't think less of them lacking animations at the moment :)
Somebody 4 Jan, 2021 @ 8:06pm 
i love the amount of work put into these bosses. although most of these will most likely not be made into a mod the amount of detail in them is suprising
Okami Tomato  [author] 3 Jan, 2021 @ 7:14pm 
Master drops would likely just be pets based on the bosses, so I haven't listed them since it'd likely just be 'In master mode it will drop [x] 25% of the time, which summons a mini version of [x] as a pet', so I left it out

Also, checked them :P
󠁩 3 Jan, 2021 @ 3:14pm 
tomato,can you check out my guides and also can you think about master drops for these bosses
Okami Tomato  [author] 5 Dec, 2020 @ 2:33am 
Oh, sorry
Reeyy 5 Dec, 2020 @ 1:18am 
no i wasn't talking about a mod, i was talking about someone
Okami Tomato  [author] 4 Dec, 2020 @ 1:20pm 
I mean, I am helping work on a few mods now, but people still wanted me to continue Boss Ideas stuff, plus not every idea gets into the mods anyways

Not sure why Tenebris sounds familiar. Word means something I guess, but as a boss concept it wasn't based on any other mod stuff aside from some previous Boss Ideas concepts
Reeyy 4 Dec, 2020 @ 12:45pm 
tenebris sounds familiar
kolbítr 4 Dec, 2020 @ 11:46am 
"I'd make my own mod but I don't know how" starter pack
Okami Tomato  [author] 4 Dec, 2020 @ 12:32am 
KCMasterz & bigcoolboy: Thanks :)

Deliriym: (' o o)