Batman™: Arkham Knight

Batman™: Arkham Knight

29 ratings
100% Achievement Guide: Batman - Arkham Knight Part 2
By Cynic 0055
This is a comprehensive 100% Achievement guide detailing a step-by-step walkthrough to take you from 0 all the way to 100%. If you are looking for a particular Achievement or Collectible, use Ctrl+F & type it into the search bar for more direct help.

I run support & debug help on all my guides. If you have any questions, problems, or find errors in the guide itself, do not hesitate to leave me a comment & I will get back to you as soon as I am able to. Happy Hunting!
   
Award
Favorite
Favorited
Unfavorite
Introduction:


DLC Breakdown – Arkham Episodes: (5)
Story Related: (5)

DLC Breakdown – A Matter of Family: (8)
Story Related: (4)
Collectibles: (2)
Slay: (2)


This is Part 2 of 2 for the 100% Achievement Guide: Batman – Arkham Knight. Part 2 of the 100% guide covers the A Matter of Family DLC, the DLC mini-episodes, & earning all the necessary Stars for the AR Challenges for all 8 playable Characters as well as all 5 Batmobile variants. Part 1, linked in the Conclusion of the guide, covers: our first playthrough with the locations of all 243 Riddler Challenges, the Season of Infamy DLC, as well as our New Story + playthrough.

Note that you will have of course needed to purchase the: A Matter of Family DLC, Red Hood Story Pack, Harley Quinn Story Pack, GCPD Lockdown, Catwoman’s Revenge, A Flip of a Coin, 1989 Move Batmobile Pack, 2008 Tumbler Batmobile Pack, Batman Classic TV Series Batmobile Pack, 2016 Batman vs Superman Batmobile Pack, Original Arkham Batmobile, & Crime Fighter Challenge Pack #6.

All other DLCs are optional content without Achievements.

For those interested, here is an organized list of all the Achievements/Secret Achievements. This is how I derive my Achievement Breakdowns & the first reference I create before I begin my 100% journeys.
https://gtm.steamproxy.vip/sharedfiles/filedetails/?id=3534662603

Before You Play!: Note that unless you are running a “modern PC” that can utilize the Nvidia Settings in the Options Menu of the game DO NOT ENABLE ANY OF THEM. Whenever you go to boot up the game you will see the initial Title Card as you normally would… but the game will then close down. You will not be able to start the game. The only way to fix this is to delete the entire Config Folder found in Steam-steamapps-common-Batman Arkham Knight-BmGame.

If you have up to date Nvidia Drivers than you can potentially run the settings fine, but the moment they become out-dated there is a chance you will receive this game crashing bug; updating the Nvidia Drivers should fix the problem however. I played the game for 40 hours perfectly fine with the Nvidia Settings turned on, then randomly one day I got the glitch.

Guide contains major spoilers*.
Sequence 1: The Arkham Episodes
1. Arkham Episodes
2. Achievements: 82/113
-----------------------------------------------------------------------------------------------------

From the Main Menu, if you have all the DLC installed, we can access Arkham Episodes. There are 6 of these, & aside from Batgirl’s Episode – A Matter of Family, all others just have a single Story Related Achievement for completing them. A Matter of Family is larger & has Collectibles for us to find…

Harley Quinn Story Pack:


Achievement #78 – Cuckoo For Incarceration: Rescue your friend.
Story Related. For our first Arkham Episode, we will play as Harley Quinn breaking into the Blüdhaven Police Department to free Poison Ivy; this is set before the Main Story of Arkham Knight.

Fight through all the Police Officers, & defeat Nightwing at the very end to complete this Arkham Episode & unlock the Achievement.

Red Hood Story Pack:


Achievement #79 – Under the Red Hood: Shut down this operation.
Story Related. These next four Arkham Episodes take place after the events of Arkham Knight. For this Episode, we will be playing as the mysterious “Red Hood” tracking down the infamous Black Mask.

Fight through three different areas to get to Black Mask. Defeat him to complete this Arkham Episode, & unlock the Achievement. Simple.

Catwoman’s Revenge:


Achievement #80 – The Cat Came Back: Break into Riddler's secret hideout & exact your revenge.
Story Related. In the next Arkham Episode, we will play as Catwoman & break into the Riddler’s hidden Robot factory. Collect three Keycards off of his Gun Thugs without being detected to unlock the factory then carefully take out the Gun Thugs in the area. Once the Gun Thugs are dispatched, we need to open the factory doors by completing a small puzzle. In front of the door there will be a box with a Robot, Warrior, Cabin, & Griffon on them. The correct order is: Robot, Griffon, Warrior, Cabin.

Take the elevator down, & we will enter into Ridder’s Robot Factory where we will need to defeat waves of Riddler Robots. Defeat them all, then steal all of the Riddler’s money to complete this Arkham Episode, & unlock the Achievement.

GCPD Lockdown:


Achievement #81 – Rough Justice: Stop Penguin's escape from GCPD.
Story Related. Our next Arkham Episode will have us playing as everyone’s favourite, Nightwing. A group of Penguin’s Thugs are rallying together over in Blüdhaven to bust him out of the GCPD Precinct.

Rush back to GCPD on Bleake Island, & defeat a second force of Penguin’s Thugs in a Predator section; watch out for the Brute Mini-Gunner. Defeat all the Thugs, & apprehend Penguin to complete this Arkham Episode & unlock the Achievement.

A Flip of the Coin:


Achievement #82 – Succession Plans: Break into Hell's Gate HQ & apprehend Two-Face.
Story Related. For our final Arkham Episode, we will be playing as Robin. Infiltrate Hell’s Gate & deal with Two-Face’s Thugs through Predator sections. When the first two groups are dealt with, we will reach a small door puzzle we need to use the Remote Hacking Device for. Since we are dealing with Two-Face, rotate one half of the bust faces to an Angel & the other half to… some kind of gremlin face? to open the door to the next area.

Defeat Two-Face, & we will complete this Arkham Episode & unlock the Achievement.
Sequence 2: A Matter of Family
1. A Matter of Family
2. Jack-In-the-Boxes: 2/5
3. Joker Balloons: 3/10
4. Joker Teeth: 3/15
5. Achievements: 84/113
-----------------------------------------------------------------------------------------------------

Seagate Amusement Park:
For this Arkham Episode, we will get to play as Batgirl & Robin to go rescue Commissioner Gordon from the Joker at Seagate Amusement Park. There are 30 Collectibles scattered around we need to destroy but note that there is free-roam after we beat DLC Missions, & we can collect them then too. None are missable… in theory.

Game Breaking Bug!: Beware that beating the DLC there is a chance you will receive a “fatal error” message that will prevent you from continuing into Post-Game; you will keep receiving the error message & be forced to replay the entire DLC over again. Just in case, I strongly recommend finding all Collectibles before beating it…

DLC Mission #1 – The New Dynamic Duo: When the DLC begins, we will make our way across the tram car line to enter into the Amusement Park with Robin.


Achievement #83 – Ambush: Defeat 4 enemies within the duration of a single Scare Effect.
We can earn this Achievement very early on into the DLC. As we Grapnel our way up to the top of the Oil Rig after moving a crane out of our way, we will Grapnel above a group of Thugs standing near a damaged Generator. This will be our tutorial to create a Scare Effect which works similarly to a Fear Multi-Takedown. Use the Remote Hacking Device to create the Scare Effect & quickly drop down & Takedown 4 Thugs under the Scare Effect to unlock the Achievement.

We will have plenty of opportunities to earn this Achievement throughout the DLC, but this one of the better chances.


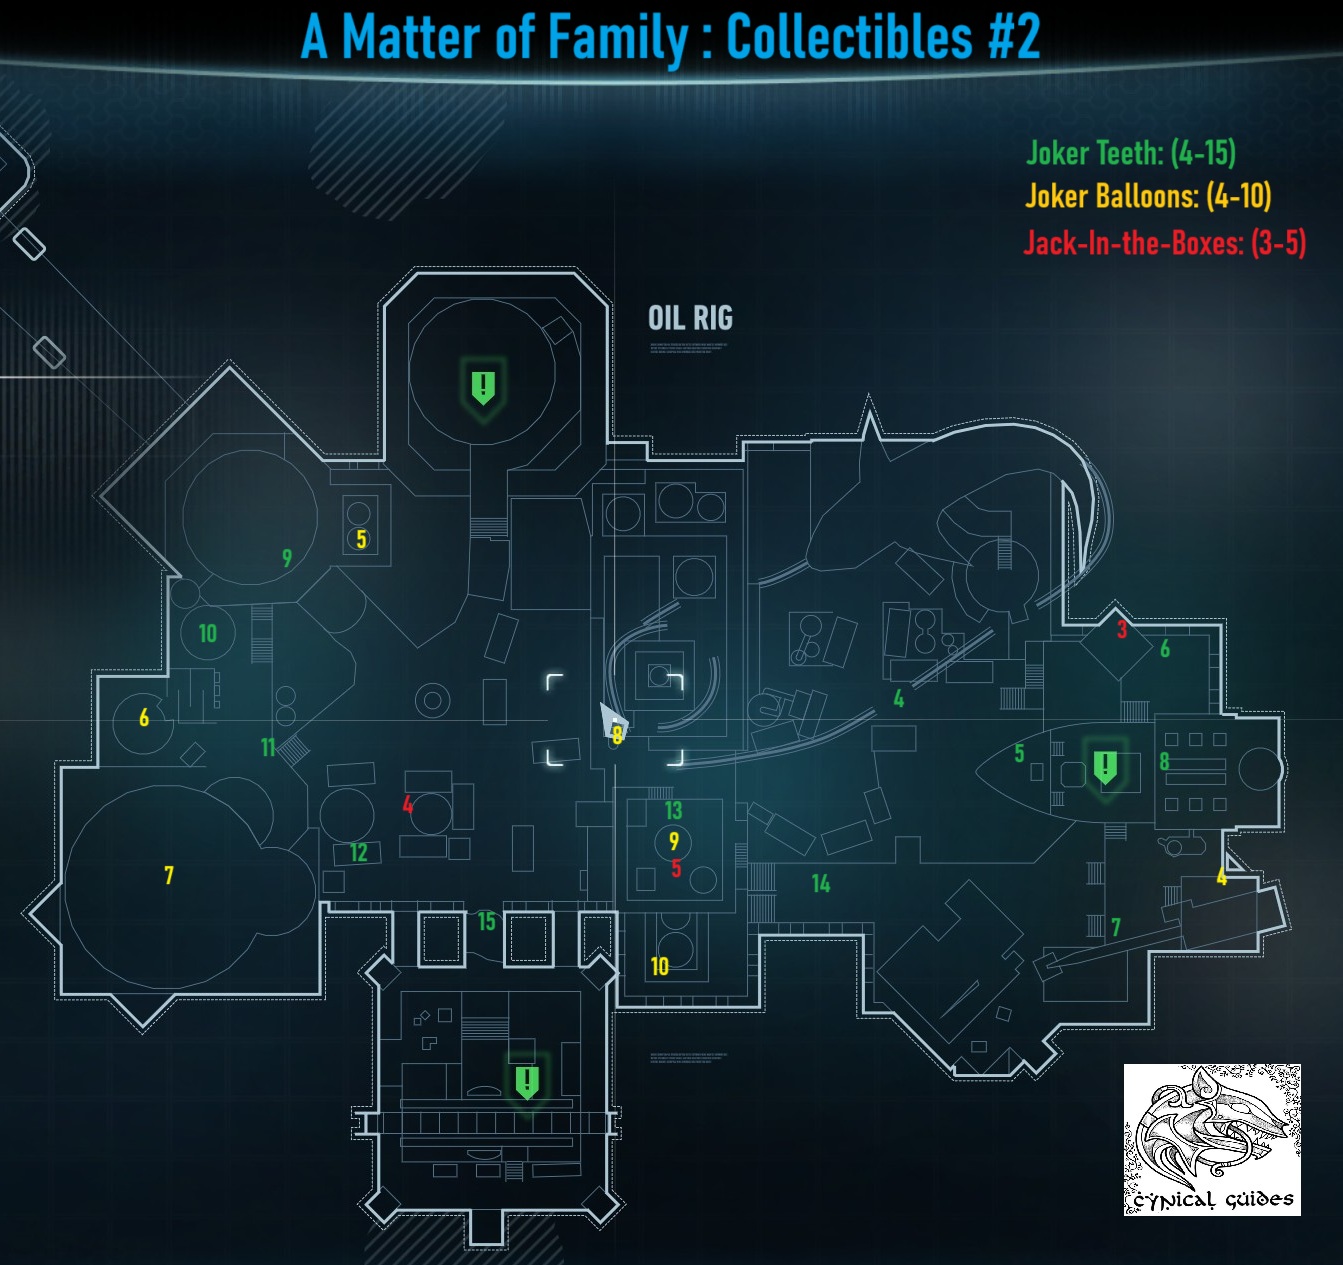
Joker Teeth #1: Continue navigating up the Oil Rig & we can rescue the second GCPD officer hostage. As we climb up the final ladder & exit outside, we can find a scuttling pair of Joker Teeth in our way before we can Grapnel out; destroy it with a Batarang. There are 15 Joker Teeth we need to eliminate around the Amusement Park.

DLC Mission #1 – The New Dynamic Duo: After we use a Batarang to Scan the Amusement Park, we will uncover the location of three more GCPD hostages. As we travel to each of their locations, we will clear out the nearby Collectibles. Keep in mind our Achievements to use Scare Effects & Hacked objects to takedown Thugs as we go & look for opportunities to work towards them…

Jack-In-the-Box #1: To start, Grapnel up to the very top of the flaming exhaust stack in the center of the Oil Rig. Up here at the highest point, we can spot a Jack-In-the Box; interact with it to spring the box open.

Joker Balloons #1: Unfortunately, we cannot place down Waypoints on our Map, so it can be a bit disorienting navigating the Amusement Park. From the center exhaust stack, drop off of it to the North & get passed a crane tower. Below the crane tower’s platform, if you look down at the North end, you can see some dangling red Joker Balloons off a smaller crane pulley above a blue Ferris Wheel billboard. Destroy them with a Batarang; these can be seen easier from the ground looking up at the building.

Joker Balloons #2: Continue further North over to large blue merry-go-round ride & we can see some Joker Balloons attached to the ticket booth beside it.

DLC Mission #2 – Hostages At the Merry-Go-Round: Approach the center of the merry-go-round & we will get lowered down into an arena. To free the GCPD hostages, we need to defeat a few waves of Thugs.


Achievement #84 – A House Made of Spun Glass: Free the hostages at the Merry-go-round.
Story Related. Defeat the Thugs in the merry-go-round arena, then use Explosive Gel to destroy the water tank that the GCPD hostages are being held in. Though it appears that they can… they cannot drown & fail the Mission.

DLC Mission #3 – Bomb At the Great White: After we rescue the first group of GCPD hostages, Robin will notify us that there is a bomb set up at the large Great White Shark amusement.

Joker Teeth #2: Before we defuse the bomb, we can snag more Collectibles in this area. To start, head directly underneath the Great White Shark & we can find a Knife Throwing amusement; a set of Joker Teeth will be scuttling below the target.

Joker Teeth #3: From the previous set of Joker Teeth, head up the stairs behind us & we can get onto a circular platform with more stairs leading up to the back entrance of the Great White Shark. We can find a set of Joker Teeth scuttling on the platform near the bottom of the stairs.

Joker Balloons #3: While still on this circular platform, look up Eastward towards the Great White’s tail & we can see a stalled rollercoaster with Joker Balloons attached to it.

Jack-In-the-Box #2: Now head up those stairs from the circular platform to the back entrance of the Great White Shark & we can find a Jack-In-the-Box in front of the barred up door.

DLC Mission #3 – Bomb At the Great White: Approach the Thugs inside the Great White Shark & they will initiate the bomb which will have a 1:30s timer! Fortunately, Robin will assist us. Take out the Thugs as fast as you can then quickly defuse the bomb using the Remote Hacking Device.
Sequence 3: Be Quiet & Glide
1. A Matter of Family
2. Jack-In-the-Boxes: 5/5
3. Joker Balloons: 10/10
4. Joker Teeth: 15/15
5. Achievements: 87/113
-----------------------------------------------------------------------------------------------------

Seagate Amusement Park:


Joker Teeth #4: Now let’s clear out the Eastern side of the Amusement Park of its Collectibles. Drop down from the Great White Shark, & walk down amongst the different vender booths where we can find a set of Joker Teeth scuttling in front of a Shooting Range booth.

Joker Teeth #5: Now walk over to the front entrance to the Ghost Ship amusement directly nearby us to see a set of Joker Teeth scuttling in front of the doors.

Jack-In-the-Box #3: Head over to the Northern end of the Ghost Ship amusement & we can see a small stage area; this Jack-In-the-Box will be in behind the drum kit. Beware of the Sniper & Gun Thugs patrolling around here.

Joker Teeth #6: Down below from the stage, we can see a small well lit bar area; a set of Joker Teeth will be scuttling around in front of it.

Joker Balloons #4: Ignore the interior of the Ghost Ship amusement for now & Grapnel over to the Southern end of it instead; we can spot some Joker Balloons on a ticket booth below a crane.

Joker Teeth #7: Walk down the stairs from the crane, & we can see a set of Joker Teeth scuttling around on the boardwalk next to a dead tree.

Joker Teeth #8: Now it is time to rescue the GCPD hostages inside the Ghost Ship amusement. Dispatch the Gun Thugs patrolling around the exterior, & we can find a set of Joker Teeth scuttling around inside the restaurant behind the front counter.

DLC Mission #4 – Hostages At the Ghost Ship: Use the Remote Hacking Device to rotate the nearby crane & drop its payload to gain access to the inside of the Ghost Ship. Drop down inside & deal with the first set of Thugs. Hack open a set of doors to head further inside the Ghost Ship to find a second group of Thugs; there is console we can Hack to cause Scare Effect here.

Deal with the Thugs to rescue the first GCPD hostage, & we can then infiltrate into the man chamber of the Ghost Ship where the rest of them are.


Achievement #85 – Weird War Tales: Defeat 15 enemies using any type of Hacking.
There are many Gun Thugs in this area, but there are also devices scattered around we can hack with the Remote Hacking Device that we can take a lot of them down with. Different hacked device effects are turning off lights to blind or attracting Thugs then causing a Scare Effect or direct takedown.

We need to dispatch 15 Thugs that are being affected by a hacked device, not necessarily directly taking them out with them. So manually taking down Thugs who are blinded will also count…

Keep your eyes open for hackable devices as we play.


Achievement #86 – The Laughing Fish!: Free the hostages at the Ghost Ship.
Story Related. Deal with the remaining Gun Thugs in the Ghost Ship & rescue the GCPD hostages here to unlock the Achievement.

DLC Mission #5 – Bomb At the Park Entrance: As we go to leave the Ghost Ship, Robin will notify us that he has located another bomb over at the park entrance. The 1:30s timer will start immediately so we need to rush to the bomb; ignore all the Thugs in our way.

Defuse the bomb, & we will then have to fight off a few waves of Thugs with Robin.

Joker Teeth #9: As we ran to get to the bomb, we will have passed a set of Joker Teeth on the landing just inside the park entrance. If you didn’t destroy them, be sure you do so now.

Joker Balloons #5: Grapnel up on the roof of the park entrance where the High Strike amusement is, & we can spot some Joker Balloons attached to the top of a smoke tower nearby.

Joker Teeth #10: On the opposite side of the park entrance as those smoke stacks, we can find a set of Joker Teeth scuttling on top of a small silo’s roof.

Joker Balloons #6: Close by, we can see a tall tower amusement ride with four rocket ship cars attached to it high up. Grapnel onto the top of the tower to find some Joker Balloons.

Joker Balloons #7: While we are up here, turn around to look at the large circus tent in the bottom Southwest corner of the amusement park to see some Joker Balloons attached to it.

Joker Teeth #11: Drop down to the front entrance of the circus tent & we can find some Joker Teeth at the top of the stairs blocked by sandbags.

Joker Teeth #12: Hop the fence in front of the circus tent & we can find another set of Joker Teeth on top of an Overboard booth in behind a large silo.

Jack-In-the-Box #4: Drop down from the booth now & walk in between the silo & a smaller one nearby to find this Jack-In-the-Box on top of a wooden barrel.

Joker Balloons #8: From where we are, if you look back up at the central flaming exhaust tower, we should be able to see some Joker Balloons attached to an offshoot pipe halfway on the building’s Southwestern side.

Joker Balloons #9: From up here, look immediately South to see some Balloons attached to the top of a water tower on the nearby building.

Joker Teeth #13: Drop down onto the building’s roof at the bottom of the water tower & we can find a set of Joker Teeth scuttling around beside it.

Jack-In-the-Box #5: On the opposite side of the water tower as the Joker Teeth, we can find our final Jack-In-the-Box.

Joker Balloons #10: Further South passed the building with the water tower, we can spot our final set of Joker Balloons attached to the roof of another building.

Joker Teeth #14: Before we approach the Ferris wheel, pitch over to the East & we can find this set of Joker Teeth on a boardwalk near the bumper car amusement.

Joker Teeth #15: Now approach the Ferris wheel amusement from the front & we can see that the bridge leading to it is broken. Look down below the broken bridge & we can find our final set of Joker Teeth.


Achievement #87 – A Blade of Memory: Destroy all 15 Joker Teeth, 10 Balloons, & 5 Jack-In-the-Boxes.
We will unlock this Achievement as soon as you destroy the last Collectible. No Collectible is missable, & they can be found at any point in the DLC including after we beat the DLC Missions.
Sequence 4: Like Father, Like Daughter
1. A Matter of Family
2. Mini-Games: 4/4
3. Achievements: 90/113
-----------------------------------------------------------------------------------------------------

Seagate Amusement Park:

DLC Mission #6 – Hostages At the Ferris Wheel: Now we must go rescue the final group of GCPD hostages. Dispatch the few Gun Thugs here & disable the spinning Ferris wheel by pulling the brake. Unfortunately doing so will cause more Gun Thugs to arrive. It couldn’t be that easy.


Achievement #88 – A Fire In Heaven: Free the hostages at the Ferris Wheel.
Deal with the rest of the Gun Thugs, & to take control of the Ferris wheel using the Remote Hacking Device to rescue the GCPD hostages by rotating it to let each of them off.


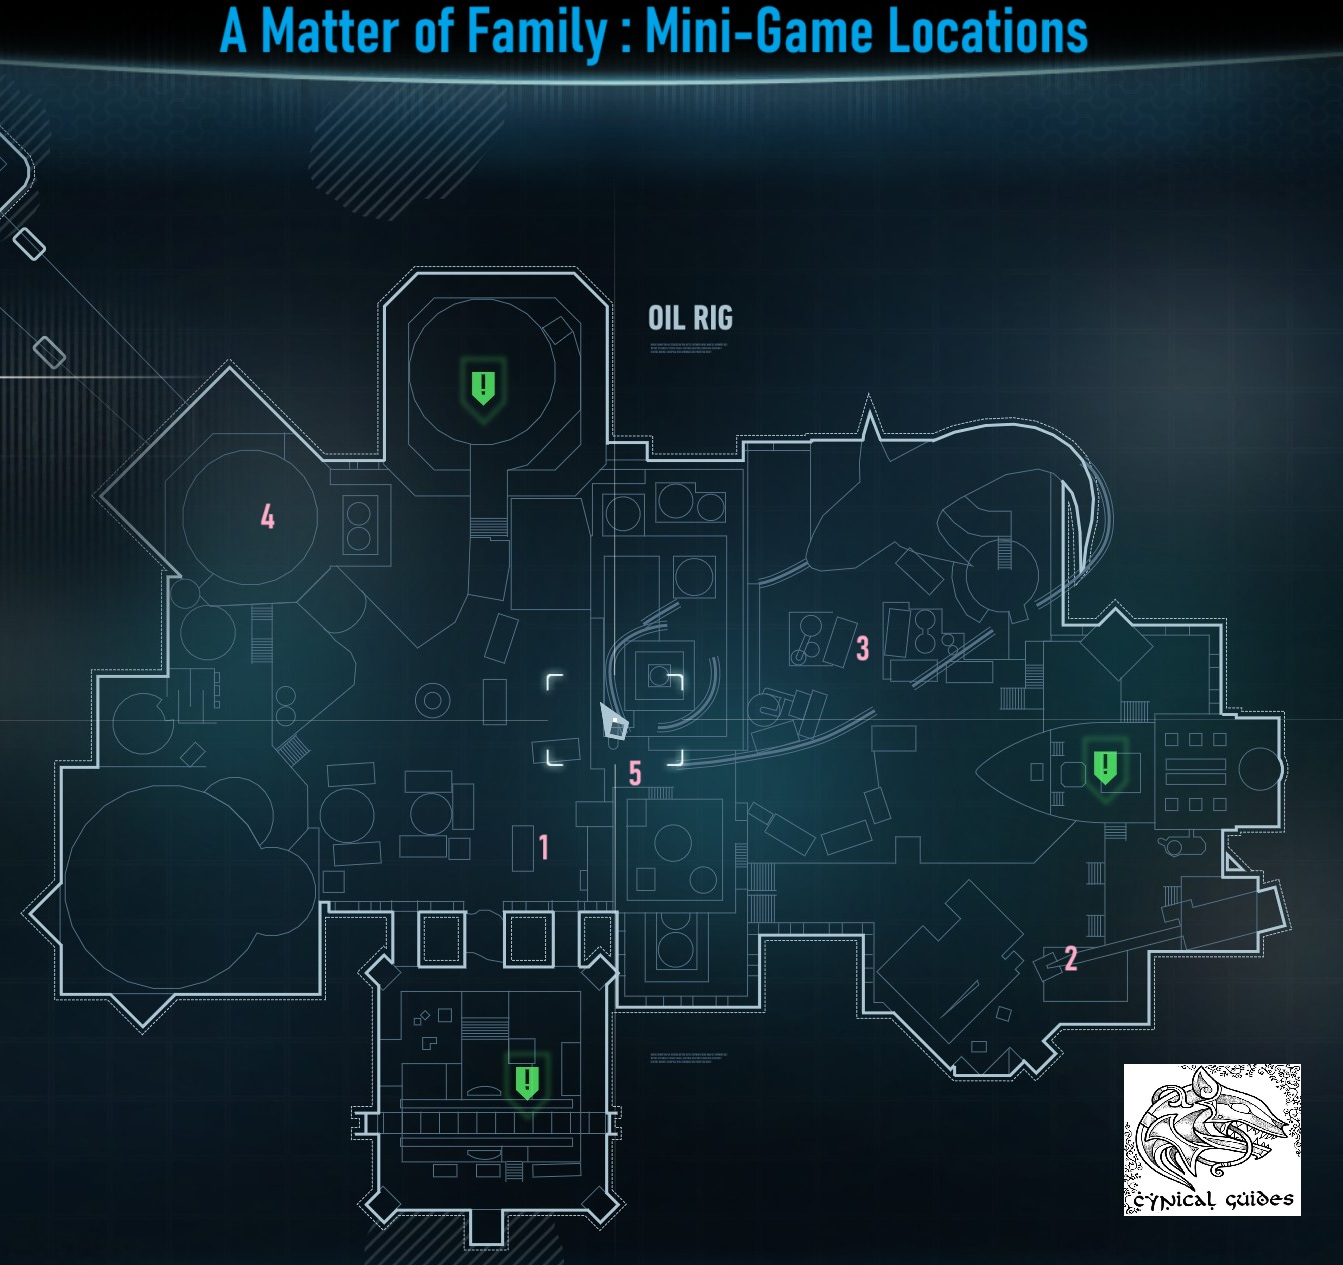
Mini-Game #1 – Dynamic Duo: Before we go to rescue Commissioner Gordon, there is one final Collectibles Achievement we need to unlock. To get it, we need to complete 4 Mini-Games scattered around the amusement park. We can find our first Mini-Game directly in front of the Ferris wheel amusement close to the broken bridge. We can find a console attached to a Dynamic Duo booth.

Activate the console using our Remote Hacking Device, & it will be a game of Match Two. There is no time limit & there are 6 pairs we need to make; we only have three attempts however until we have to restart the Mini-Game over again. The pairs do not change & you can complete the Mini-Game using trial & error to uncover where all the pictures are.

Completing the Mini-Game will reward us with a taped message from the park’s founder, Edward Burke; we need to listen to all 4 to unlock the All Snug In Their Beds Achievement.

Mini-Game #2 – Bumper Car Tile Slide: For the second Mini-Game, head over to the far Southeastern end of the amusement park to find a two-story warehouse in between the crane & bumper car amusement. Enter into it from the second floor, & we can find a console we can activate with the Remote Hacking Device.

To complete this Mini-Game, we need to shuffle the blue bumper cars below us out of the way & shift the purple bumper car all the way down to the exit door below. This is pretty straightforward to do; the cars can only move the direction they are facing. Shuffle the blue cars out of the way, & we can send the purple car all the way from the back to the exit door.

Mini-Game #3 – Fish In A Barrel: We can find the next Mini-Game at a booth close by the Great White Shark amusement – the booth is called Fish In A Barrel. Activate the console with the Remote Hacking Device & we will have 11s to hit all green fish with Batarangs. Every time we hit a green fish, we will gain an extra 3s; hit a red fish, & it will end the Mini-Game & we will have to try again. Hit all 8 green fish to complete the Mini-Game.

Mini-Game #4 – High Strike: For our final Mini-Game, travel to the High Strike tower on top of the amusement park entrance. Deal with potential Thugs up here, then activate the nearby console with the Remote Hacking Device to begin the game.

To complete this Mini-Game, we need to land on the blue star panel on the ground as hard as we can to max out the High Strike bar. To do this, Grapnel up to the tall centermost exhaust tower with flames coming out of it then glide off of it towards the High Strike panel & Dive Bomb at maximum height onto it. As you Dive Bomb, you can slightly adjust your path so even if you are not spot on over the panel, you should be able to adjust to land on it.


Achievement #89 – All Snug In Their Beds: Uncover the secret history of the park.
With all four Mini-Games completed, Grapnel over towards the center of the amusement park up to in between the building with the water tower on it & the building with the flaming exhaust tower. Along the Northern wall of the water tower building we can see a map of the amusement park with four glowing lights on it near a door.

Enter in through the door & walk down the hall towards a living quarters where we can interact with the final tape from Edward Burke. Listen to the full tape recording, & Edward Burke’s final words, to unlock this Achievement.

Game Breaking Bug!: Be sure you have found all Collectibles before rescuing Commissioner Gordon!

DLC Mission #7 – Saving Commissioner Gordon: With all GCPD hostages rescued, Robin will notify us that he has found where Commissioner Gordon is being held. If you are finished finding all of the Collectibles, we can move on to ending this DLC. Note that there is Post-Game free roam after we beat the DLC Missions so you can save the Collectible hunt for until then if you prefer… but it is best if you do not due to the chance of having your game ruined by the bug.

When you are ready, travel to the amusement park entrance & we can find a door we can head through close to where we had to defuse a Bomb. Navigate through the underbelly of the amusement park & use the Remote Hacking Device to move some containers. When in position, we can use the Line Launcher to rail towards a hanging container, then fire a second line to take us where we need to go.


Achievement #90 – A Courtship of Razors: Rescue your father.
Story Related. Reach Commissioner Gordon, & Joker will have a special event planned for us… basically just taking out more waves of Thugs. Defeat the two Bosses & rescue the Commissioner to complete the DLC & unlock this Achievement.

79% Complete
Sequence 5: AR Challenges
1. Achievements: 90/113
-----------------------------------------------------------------------------------------------------

DLC Breakdown – AR Challenges: (19)
Character Stars: (7)
Batmobile Challenges: (5)
Combat Challenges: (3)
Predator Challenges: (4)


If you are at all familiar with the Arkham series, you knew that this point in our 100% was inevitable. Unlike the previous games however, though we have way more Characters to play as… but we only actually need to earn 21 Stars with them apart from Batman who needs 69 Stars. What this means is you only need to earn 3 Stars on a minimum of 7 Combat or Predator Challenges or any combination of half finished Challenges so long as you eventually earn 21 Stars with each Character; there are 25 Combat Challenges (75 potential Stars) & 23 Predator Challenges (69 potential Stars). For Batman, though we need to earn 69 Stars, the Batmobile Race Challenges count towards his total. For 5 DLC Achievements we need to earn 21 or 33 Stars with each DLC added Batmobile which will give Batman 33 extra Stars so we only actually need to obtain 36 Stars through Combat or Predator Challenges. Personally, I find Predator Challenges the worst as they basically need you to follow a video guide to earn 3 Stars on them; I prefer Combat Challenges.

It is best to start as one Character & earn their 21 Stars before moving on to the next Character. That way you can master the flow & Quick-Fire Gadgets of the character instead of having to swap your play style constantly as they do all play quite a bit differently.

Combat Challenge Basic Tips:

1. Rule of thumb, keep your Combo going as long as possible for the highest amount Points
2. To maintain your Combo, constantly jump over/Evade enemies to give yourself ground or shuffle enemies around so you do not lose it
3. Use as many Quick-Fire Gadgets or Abilities as you can during your Combos for Variation Bonuses
4. While difficult to pull off, completing Blade Dodge Takedowns gives you a very high amount of Points (100xCombo)
5. Normal knockouts are worth 10 Points with Combat Finishers earning around 50 Points (xCombo)
6. Ground Pounds are worth 75 Points (xCombo) & are the best way to end every Round when possible
7. Not getting hit at all during a Round will net you the Perfect Knight Bonus for 500 Points
8. Maintaining a continuous Combo for an entire Round will net you the Perfect Freeflow Bonus for 1000 Points

For a full in depth look out each Character’s Variations & how to perform them, check out the guide on the Arkham Wiki. Just be sure to scroll down to the section for Arkham Knight…
https://arkhamcity.fandom.com/wiki/Combat_Variations#Batman:_Arkham_Knight

Predator Challenges:

The Predator Challenges function identically as they did in Arkham Asylum & City. To unlock all 3 Medals in a Challenge, you need to take out Thugs in 3 specific ways. Unfortunately, since each of the 8 Characters have different moves & Gadgets, they have completely different Medal Objectives for obtaining Stars.

To assist you should you opt to go the Predator Challenge route, I have included a video guide playlist by The Arkham Channel; the Combat Challenges are also included as well. The Predator Challenges require a LOT of trial & error as well as memorization. Please give the videos you use a Like & let The Arkham Channel know in the comments if they helped you!
https://www.youtube.com/playlist?list=PL7N-XnsRG9lxTxWffjJk-eLh_ptvg4o6U

While the videos listed here can be crucial for success, it should be noted that there is a lot of variance between Thugs reactions. Because of this variance, always stay vigilant for opportunities to achieve the Stars when they are presented to you regardless of when they occur in the videos. Note that your final time does not matter; take as long as you need to complete the Challenges.
Sequence 6: Batmobile Race Challenges
1. 1960s TV Series Batmobile Stars: 33/33
2. 1989 Movie Batmobile Stars: 33/33
3. 2008 Tumbler Batmobile Stars: 33/33
4. 2016 Batman vs Superman Batmobile Stars: 21/21
5. Original Arkham Batmobile Stars: 21/21
6. Achievements: 97/113
-----------------------------------------------------------------------------------------------------

Since these are their own self contained Challenge mode & will contribute to Batman’s total Stars, the Batmobile Race Challenges are a good place to start (or chip away at to change things up).

There are 21 Batmobile Race Challenges total so you have the potential for up to 63 Stars which gives you a lot of lee-way for mix & matching the different Challenges you complete. As you play through them, you will find the easier & harder ones & ideally find your favourites to repeat. I personally found the 1 Lap Races to be the easiest to earn 3 Stars on as they are quick & one single course as opposed to a longer course composed of three variations.

The only requirements for earning Stars is completing each Batmobile Race Challenge under certain times. I recommend playing the same Batmobile Race Challenge through with each Batmobile type as you will earn better & better times the more you run through them. There is no point in using the base Arkham Knight Batmobile for these Challenges, unless you wanted to; there are no Achievements for it.

As far as I am aware, all Batmobiles drive the same… but after doing the same races over & over… they did kind of feel different to me. But that could definitely be my own anecdotal bias.


Achievement #91 – Life After Death: Achieve 21 Stars in AR Challenges using the Original Arkham Batmobile.
Of the five different Batmobile variations we need to use for completing Batmobile Race Challenges with, the Original Arkham Batmobile only needs 21 Stars for this Achievement.

I found the Original Arkham Batmobile to be pretty clunky & I always seemed to get the worst times with it.


Achievement #92 – The World’s Finest: Achieve 21 Stars in AR Challenges using the 2016 Batman vs Superman Batmobile.
The other Batmobile variation that only needs 21 Stars for its Achievement is the 2016 Batman vs Superman Batmobile… the “Ben-Mobile”.

I found the 2016 BvS Batmobile was actually pretty decent, but since its wheel base was so wide, I had to rely on drifting a lot more than the other Batmobiles.


Achievement #93 – Sins of Youth: Achieve 23 Stars in AR Challenges.
As we earn Stars for the Batmobile Race Challenges, they will work towards Batman’s total 69 Stars he needs to earn; for this Achievement “Batman” needs to earn 23 Stars. Note that the max Stars earned for any Batmobile Race Challenge will only count once, Stars cannot be farmed using all the different Batmobiles.


Achievement #94 – Joy Ride: Achieve 33 Stars in AR Challenges using the 1960's TV Series Batmobile.
For the final three Batmobile variations, we will need to earn 33 Stars; earn 33 Stars using the 1960’s TV Series Batmobile to unlock this Achievement.

I found the 1960’s Batmobile to be very light. It got good distance on jumps & was fast, but I also found I flipped it over the most.


Achievement #95 – Street Demonz: Achieve 33 Stars in AR Challenges using the 1989 Movie Batmobile.
Earn 33 Stars using the 1989 Movie Batmobile to earn this Achievement.

I found this was a tricky Batmobile to use as it was so long & often clipped or was crushed by a lot of obstacles. As well, I found its turn radius was not so great either.


Achievement #96 – Gangland Express: Achieve 33 Stars in AR Challenges using the 2008 Tumbler Batmobile.
Earn 33 Stars using the iconic “Tumbler” Batmobile to earn this Achievement.

I personally found that the Tumbler was the fastest of the Batmobiles but didn’t always have a good turn radius – other times it turned the best. Driving the Tumbler really made me question if the Batmobiles were identical or had hidden “stats” differentiating them after all.

Gotham City:


Achievement #97 – A Leap of Faith: Complete 8 different jumps over 100m.
If you were lucky, you will have earned this Achievement during our two campaign playthroughs or during the AR Challenge grind.

If the Achievement did not unlock for you during the AR Challenges, load up your first playthrough of the campaign or your New Story + game & we will drive around to different jump locations. To avoid paraphrasing his hard work, I have included a video guide from the legend Maka91; if their video helps you out, make sure you leave it a Like/& or a Comment to help them back!
https://youtu.be/qmbjMzfNd7I

The Achievement is very buggy & it may take doing the same jump over 100m multiple times for it to count. Unfortunately on Steam, our progress towards the Achievement is not actively tracked so you have no way of knowing if your jump counted or not. Try the jumps multiple times to make sure you flew over 100m. The best way to do this is to drive to the very edge of the ramp, & set a Waypoint where you think you will land. Then you can see how far you are jumping & if you need to jump further. Also note that it is 100 horizontal metres & not vertical metres so keep that in mind when judging your Waypoints distancing.

I had done all the jumps over & over & over again. Gave up. Then I went back to each jump & really focused on setting my Waypoints good (taking vertical distance into account). I then truly made sure I was jumping 100m, & the Achievement fortunately unlocked eventually after redoing my 5th jump.
Sequence 7: Combat/Predator Challenges
1. Batgirl Stars: 21/21
2. Harley Quinn Stars: 21/21
3. Red Hood Stars: 21/21
4. Azrael Stars: 21/21
5. Catwoman Stars: 21/21
6. Achievements: 102/113
-----------------------------------------------------------------------------------------------------

With the Batmobiles out of the way, we can now move onto earning our Stars for the 8 playable Characters. Catwoman, Robin, Nightwing, & especially Batman have a bunch of specific Achievements for them to complete in AR Challenges but Batgirl, Azrael, Red Hood, & Harley Quinn do not. We just need to earn their 21 Stars for their respective Achievements. Because of that, it is best to start with them & get the feel for the Combat & Predator Challenges. As mentioned before, there are 25 Combat Challenges for a potential of 75 Stars; for these Characters at least, you can avoid Predator Challenges if those are not your thing.

Batgirl:


Achievement #98 – Motherlode: Achieve 21 Stars in AR Challenges playing as Batgirl.
Complete any combination of Combat or Predator Challenges, & earn 21 Stars in AR Challenges while playing as Batgirl. Since we are already familiar with her through completing the A Matter of Family DLC, Batgirl is a good Character to start with. Spice up your combat with Quick-Throw Batarangs & Quick-Fire Batclaw to boost your Variation Bonuses!

Whenever possible, opt to use X + Y for your Combo Takedown to destroy the enemies Shields & Stun Batons if those enemies arrive as it will simplify the rest of the fight & let you build up a good Combo / Variation Bonus to end on.

Harley Quinn:


Achievement #99 – Vengeance Unlimited: Achieve 21 Stars in AR Challenges playing as Harley Quinn.
Complete any combination of Combat or Predator Challenges, & earn 21 Stars in AR Challenges while playing as Harley Quinn. Harley is the start of the more difficult Characters to play as since he is unable to destroy enemy Weapons. Her Gadgets are not great for Variations & often will kill your Combo entirely when attempted. She also cannot destroy enemy Weapons. What makes Harley shine however is her Mayhem Mode. On Rounds with lots of Shield & Stun Baton enemies, build up your Mayhem Mode meter by performing Takedowns or Beat Down Finishers. Then you can instantly Takedown at least 4-5 enemies during Mayhem Mode.

Red Hood:


Achievement #100 – Higher Learning: Achieve 21 Stars in AR Challenges playing as Red Hood.
Complete any combination of Combat or Predator Challenges, & earn 21 Stars in AR Challenges while playing as Red Hood. Red hood does have pretty cheap insta-kill Desert Eagles, but those will rob you of the potential of building a Combo; use them as an emergency option. Otherwise, Red Hood has Quick-Fire Zip Kick as well as Quick-Throw Flash Bangs which can help with crowd control.

It is likely you will need to complete more Combat &/or Predator Challenges than the previous two Characters to earn your 21 Stars.

Azrael:


Achievement #101 – Shock & Awe: Achieve 21 Stars in AR Challenges playing as Azrael.
Complete any combination of Combat or Predator Challenges, & earn 21 Stars in AR Challenges while playing as Azrael. Azrael will play similarly to Batgirl & is another pretty “standard” Character, however he will also have Freeze Blasts & a Remote Electrical Charge we can employ for our Variation Bonuses. Like Batgirl, Azrael can destroy enemy Weapons with X + Y as a Takedown Combo.

Unlike the other three Characters, Azrael will have more difficult enemy loadouts per Round & will often have Brutes; Nightwing, Robin, & Batman also have stronger enemy loadouts as well…

Catwoman:
Like the other Characters, we need to earn 21 Stars as Catwoman.

Combat Challenge – Monarch Theatre (Perfect Freeflow): For The Curtain Falls Achievement, we need to complete all 4 Rounds of the Monarch Theatre in a Flawless Freeflow. This means that when we start a Combo, we cannot lose it until we beat the whole Round; we also need to do this with Nightwing, Robin, & Batman when we play as them. I recommend earning 18/21 Stars as Catwoman in other Combat Challenges first to get a feel for her playstyle.

Make sure you see the Perfect Freeflow bonus in the Combat Summary after each Round, otherwise you will need to Restart the Combat Challenge over again.

Round 1: Thugs x5
Round 2: Thugs x5, Knife Thug x1, Medic x1
Round 3: Thugs x6, Stun Thugs x2, Medic x1
Round 4: Thugs x10, Shield Thugs x6, Medic x2

The first three Rounds are pretty standard, but it is all chaos for Round 4. To start, fight through the middle of the Thugs to reach the far side & Combat Takedown the two Medics as fast as possible. Once they are down you can relax a little bit & jump around the Shield Thugs to pick off the unarmed ones. Try to group the enemies close & throw down Caltrops in their middle to jumble up the Shields. Pay close attention to where you are attacking as a Thug can pick up a Shield at anytime, even right in the middle of your attack if there is time. Note that you can leap over enemies as many times as you want & not lose your Combo so keep that in mind…

It took me around 3 hours straight to finally pull this off myself…


Achievement #102 – Relentless: Achieve 21 Stars in AR Challenges playing as Catwoman.
We can dispatch Stun Thugs by using Quick-Whip to pull them off their feet. Alternatively, use your Combat Takedowns to deal with them as well as Quick-Throw Bolas to instantly knock them out if they are the last Thug standing.

For Shield Thugs, outside of Aerial Attacks, throw down Quick-Throw Caltrops into their midst so a large group of them drop their Shields; we can only do this three times for the entire Combat Challenge so use them wisely!
Sequence 8: Nightwing Challenges
1. Nightwing Stars: 21/21
2. Achievements: 103/113
-----------------------------------------------------------------------------------------------------

Combat Challenge – Monarch Theatre (Perfect Freeflow): I recommend playing a few Combat Challenges before attempting this challenge to get a feel for Nightwing & his Quick-Fire Gadgets. Unfortunately for us, there is a more difficult alternate loadout for the enemies but only on Round 4.

Nightwing can easily disarm Stun Thugs by using Quick-Fire Remote Electrical Charge – downside is sometimes they go flying way too far out of range & we can’t close the distance in time to deal with them. As well, do not use Quick-Fire Remote Electrical Charge (technically any Gadget for that matter) twice in a row or it will kill your Perfect Freeflow – even at the beginning of the Round when you haven’t started your Combo!

For Shield Thugs, we don’t have Caltrops, but we can perform Group Attacks when we have a Combat Combo to use up by pressing X & Y together. This won’t knock anyone out unfortunately, but it will knock Thugs down & cause them to drop what they are holding. You can also press A & B together for a Combo Shock that will temporarily stun Thugs as well, but it isn’t all that useful.

Make sure you see the Perfect Freeflow bonus in the Combat Summary after each Round, otherwise you will need to Restart the Combat Challenge over again.

Round 1: Thugs x5
Round 2: Thugs x5, Knife Thug x1, Medic x1
Round 3: Thugs x6, Stun Thugs x2, Medic x1
Round 4: Thugs x10, Shield Thugs x2, Medics x2, Blade Brutes x2, Shock Fist Brutes x2

It is easiest to just Beatdown the Brutes/use your Combat Takedowns on them as soon as you can perform one. Use Quick-Fire Remote Electrical Charge to stun the Shock Fist Brutes until you are ready to take them out. Prioritize on taking out the Brutes first, then the Medics; the Medics may revive a few Thugs, but that will just make it easier for us to rebuild a Combo to Takedown the Brutes.

Combat Challenge – Crime Alley (No Damage): Unfortunately, our pain does not end here. For Nightwing, Robin, & Batman we need to beat Combat Challenge – Crime Alley without taking any damage during all 4 Rounds for The Chill In the Air Achievement. We will also get the alternate “heavy loadout” for the enemies during this Combat Challenge as well. You need to see a No Hit bonus for every enemy that spawns during the Round; No Hit x6, No Hit x8, No Hit x10, & No Hit x12.

Round 1: Bat Thug x1, Knife Thug x1, Shield Thug x1, Militia x2, Militia Assassin x1
Round 2: Thugs x2, Shield Thug x1, Stun Thug x1, Bat Militia x2, Militia Assassin x1, Militia Brute x1
Round 3: Thugs x2, Bat Thug x1, Shield Thug x1, Knife Militia x1, Gun Militia x1, Militia Assassins x2, Militia Medic x1, Militia Multi-Brute x1
Round 4: Thug x2, Knife Thug x1, Gun Thugs x2, Thug Medic x1, Shield Militia x1, Militia Assassins x2, Militia Medics x1, Militia Muti-Brutes x2

In my opinion this is much easier to do than Perfect Freeflowing the Monarch Theatre. We can’t take damage, but we also don’t have to maintain our Combo either. Enemies with Guns are the priority as, once they aim at us, it is easy to be hit. Electrified enemies can be dispelled by hitting them with Quick-Fire Batclaw; Quick-Fire Remote Electrical Charge will send them flying, but it won’t remove the electricity off of them.

Predator Challenge – Batcave (Beat Down Finishers Only): Finally, for Nightwing, Robin, & Batman we also have to unfortunately complete a mandatory Predator Challenge on the Batcave map. For the Secrets of the Batcave Achievement we must deal with all Thugs by performing a Beat Down on them; B to stun/cape stun then mash X until you perform the Beat Down Finisher. A very unstealthy way to do a Predator Challenge. What the Achievement description doesn’t say however is that we also must do this without taking any damage which is the hardest part. Fortunately, Stars/final score for the Predator Challenge are irrelevant.

There are only 5 Gun Militia but there is also 3 Camo Militia that will not appear in Detective Mode. Take your time to survey the area & watch for when Thugs get isolated from the others. Do not linger too long on nearby Vantage Points after taking down a Thug. While they won’t assess them since we aren’t doing Inverted Takedowns, we can still be spotted occasionally. This requires a lot of patience to let Thugs get isolated; the Camo Thugs are a priority if you can manage it since they can easily ruin our runs by catching us off guard. Also be very deliberate wear you are Grapnelling to – it can be very easy to accidentally Grapnel onto a walkway you didn’t mean to.

I typically just waited for Thugs to be isolated on the upper second floor area so I could always be on the Vantage Points; I never went down to the first floor unless it was a really easy mark I could escape back to the Vantage Points from.

As a weird note, for whatever reason, if you sprint right up behind Thugs they will briefly get startled. What makes that weird is when you perform your Beat Down Finisher on them, no one will be alerted. If you sneak up behind them without them knowing & perform a Beat Down Finisher, everyone else will come running over to investigate. This is a risky strategy & best done at the very beginning of the map, but you can potentially bang off 1-3 easy Beat Down Finishers this way without anyone knowing. But if you can regularly pull it off, it will let you dispatch the Thugs & then safely get back up to the Vantage Points to re-assess the room. Don’t run at them from the front though or they will be alerted, not startled, & shoot at you; you have to run at them from behind to startle them.


Achievement #103 – Acts of Violence: Achieve 21 Stars in AR Challenges playing as Nightwing.
Like the other Characters, this Achievement is at least easy to earn as it is independent of the previous Challenge Maps we had to complete. Simply earn any 21 Stars on Combat or Predator Challenges to unlock the Achievement.
Sequence 9: Robin Challenges
1. Robin Stars: 21/21
2. Achievements: 104/113
-----------------------------------------------------------------------------------------------------

Combat Challenge – Monarch Theatre (Perfect Freeflow): I recommend playing a few Combat Challenges before attempting this challenge to get a feel for Robin & his Quick-Fire Gadgets. In my opinion, Robin is the most difficult Character to play as due to having not the greatest selection of Quick-Fire Gadgets. He really does not have good counters to Shield Thugs or Stun Baton Thugs; you can use Group Attack when you have a Combo, but at that point you may as well just use a Combat Takedown instead. Group Attack can still be handy though in a pinch if there are a lot of armed Thugs. Robin also attacks much slower than both Catwoman & Nightwing, so there may be times the enemy will hit you before you can hit them while you are building your Combos; you need to prepare to Counter more.

For Stun Baton Thugs, since we do not have the Remote Electrical Charge, all we can really do is carefully evade over them & attack them in the back. Alternatively if you have an active Combo, your Quick-Fire Shurikens will be able to knock them down which can very clutch.

Make sure you see the Perfect Freeflow bonus in the Combat Summary after each Round, otherwise you will need to Restart the Combat Challenge over again.

The Round loadout will be identical to what we had to face as Nightwing except a slight variation in Round 4.
Round 1: Thugs x5
Round 2: Thugs x5, Knife Thug x1, Thug Medic x1
Round 3: Thugs x6, Stun Thugs x2, Thug Medic x1
Round 4: Thugs x10, Shield Thugs x4, Thug Medics x2, Blade Brutes x2

Combat Challenge – Crime Alley (No Damage): Next up will be completing all four Rounds of Crime Alley without taking any damage. You need to see a No Hit bonus for every enemy that spawns per Round; No Hit x6, No Hit x8, No Hit x10, & No Hit x12. We can use our Quick-Fire Zip-Kick to dissipate enemies electrified by Medics.

Once again, we will have most of the Brute enemies swapped out for Shield enemies for Robin’s loadout which is actually awesome.

Round 1: Bat Thug x1, Knife Thug x1, Shield Thug x1, Militia x2, Militia Assassin x1
Round 2: Thugs x2, Shield Thug x1, Stun Thug x1, Bat Militia x2, Militia Assassin x1, Militia Brute x1
Round 3: Thugs x2, Bat Thug x1, Shield Thug x1, Knife Militia x1, Shield Militia x1, Gun Militia x1, Militia Assassins x2, Militia Medic x1
Round 4: Thug x2, Knife Thug x1, Gun Thugs x2, Thug Medic x1, Shield Militia x3, Militia Assassins x2, Militia Medics x1

Predator Challenge – Silent Knight (Knockout Smash Only): For Robin (& Batman) we will have to play the Silent Knight Predator Challenge using only Knockout Smashes to defeat the enemies to unlock the Silent Night, Deadly Night Achievement – we also cannot take any damage either! To perform a Knockout Smash, you need to perform a Stealth Takedown then press X during it before it finishes to smash the enemy instantly. Unfortunately… this is not stealthy in the slightest & it will alert all enemies to our presence.

There are 3 Gun Thugs & 3 Medic Thugs. The Medics make things really challenging & annoying as they can just keep reviving the Thugs as we take them down. Medics are a priority, but take out who you can; you need to be very opportunistic with this one.

From where we start, immediately taking the first Medic off our right on the second floor, Grapneling up to a Vantage Point, then gliding to take down the other Medic on the second floor as he goes to investigate is a good opening move. Then it is a bit of a dice roll if there will be Gun Thugs blocking you from taking out the third Medic as he goes to revive the others; this will be the make or break. If you can successfully take out the 3 Medics, then picking off the Gun Thugs is pretty straightforward.

Once again, just ignore the time limit & the perquisites for earning the Stars on this Predator Challenge as they do not matter.


Achievement #104 – The Big Leagues: Achieve 21 Stars in AR Challenges playing as Robin.
Simply earn any 21 Stars on Combat or Predator Challenges to unlock this Achievement.
Sequence 10: Batman Combat Challenges
1. Batman Stars: 46/69
2. Achievements: 108/113
-----------------------------------------------------------------------------------------------------

Now we move onto Batman who needs more than 3 times as many Stars as the other Characters; fortunately those Batmobile Race Challenges will contribute towards them. Batman has all Quick-Fire Gadgets that you wished the other Characters had, as well as being able to destroy Weapons with the X + Y Combo. Unfortunately, Batman has a few solo Achievements that will be our hardest challenges yet on top of the regular Achievement challenges we had to complete with the others…

Combat Challenge – Monarch Theatre (Perfect Freeflow): Batman makes this challenge very simple as he is able to destroy Weapons & Shields with hss X + Y Disarm & Destroy Combo.

Batman has the same enemy loadouts as Nightwing had with all the Brutes.
Round 1: Thugs x5
Round 2: Thugs x5, Knife Thug x1, Medic x1
Round 3: Thugs x6, Stun Thugs x2, Medic x1
Round 4: Thugs x10, Shield Thugs x2, Medics x2, Blade Brutes x2, Shock Fist Brutes x2


Achievement #105 – The Curtain Falls: Flawless Freeflow in every Round of the Monarch Theatre as Batman, Robin, Nightwing, & Catwoman.
This is a very challenging & stressful Achievement to earn – amongst the hardest in the game. It took me multiple hours to complete this with each Character, though it did get quicker each subsequent run since I “knew the drill”.

Again, always make sure you see the Perfect Freeflow after every completed Round in the Combat Summary. Spamming the same Quick-Throw Gadgets at the start of the Round before a Combo has been started will automatically void Perfect Freeflow. I fortunately caught on to this… semi early… with Nightwing as I thought using the Remote Electric Charge to disarm both Stun Baton Thugs right off the bat was a good move. It wasn’t. You can only do that once, then you need to strike a few of the other Thugs before you can follow up with it again.

Catwoman was probably the most difficult since 8 Shield Thugs is a little bit ridiculous, but also I actually had a really hard time as Batman too for some reason.

Combat Challenge – Crime Alley (No Damage): You need to see a No Hit bonus for every enemy that spawns per Round; No Hit x6, No Hit x8, No Hit x10, & No Hit x12. We will have the same enemy loadout as Nightwing did with all of the Brutes.

Round 1: Bat Thug x1, Knife Thug x1, Shield Thug x1, Militia x2, Militia Assassin x1
Round 2: Thugs x2, Shield Thug x1, Stun Thug x1, Bat Militia x2, Militia Assassin x1, Militia Brute x1
Round 3: Thugs x2, Bat Thug x1, Shield Thug x1, Knife Militia x1, Gun Militia x1, Militia Assassins x2, Militia Medic x1, Militia Multi-Brute x1
Round 4: Thug x2, Knife Thug x1, Gun Thugs x2, Thug Medic x1, Shield Militia x1, Militia Assassins x2, Militia Medics x1, Militia Muti-Brutes x2


Achievement #106 – The Chill In the Air: Complete the Crime Alley AR Challenge unharmed as Batman, Robin, & Nightwing.
I found this Achievement both easier & harder than the previous one. There are a lot more Knife Thugs & Militia Assassins that can very quickly strike you before you can react. Robin’s enemy loadout is pretty easy to deal with, but Nightwing & Batman’s are pretty difficult. Like the Monarch Theatre, it will take multiple consecutive runs for you to “get lucky” & pull this off. Practice, practice, practice.

Always make sure you see the No Hit counters at the end of each Round per enemy spawned so you know you are doing it right. This is definitely not an Achievement you want to have to run through the Characters with again…

Combat Challenge – Iceberg Lounge (1,050,000 Points): For our final Combat Challenge Achievement for Batman, we need to face an “old adversary” on the Iceberg Lounge map. The old adversary is actually Killer Croc, but unfortunately, it will take 1,050,000 Points for him to spawn… which is absurd. This is our ultimate challenge & will apply both Perfect Freeflow as well as not getting hit it all to earn that many Points.

Enemies are infinitely spawning, but will more difficult enemies will progressively spawn the more you defeat. A trick to delaying the harder enemy spawns is to keep the Medics alive so they keep reviving the basic Thugs which are naturally easier to take down again & keep our Combo alive. Initially avoid using your Combo Finisher Takedowns & instead using your Combo to perform Disarm & Destroy. Not only will it boost your Combo, but you will make the area safer as you eliminate all the enemies Weapons; Shields Stun Batons, & Guns are a priority but Knives & Bats are fine too if you have nothing better to break.

When enemies are electrified, immediately dispel it with Quick-Fire Batclaw. If you do it quick enough & follow up with the Batclaw Slam attack, you can dodge attacks or bull rush grabs. This is also a great way to quickly survey the area to locate more electrified enemies or Shield/Stun Baton Thugs while you wait for the animation to finish.

At a Combo of around 330, you should have earned around 500,000 Points; ideally you can hit this point before Assassins arrive, but they will be coming soon. When the Assassins begin arriving, opting to take them out with Combo Finishers could be a good idea as they are very fast & can mess your Combo up easily.

Once you lose your Combo… unless you are above 1,000,000 Points already there is a good chance you won’t be able to make it & it is best to restart. It isn’t impossible though as a 450 Combo should get you close to 1,050,000; all it takes is a second good Combo run… with much harder enemies.


Achievement #107 – Requiem For A Killer: Defeat an old adversary in the Iceberg Lounge AR Challenge, playing as Batman.
As soon as you earn 1,050,000 Points, the enemies will stop spawning & you can eliminate them. Then Killer Croc will arrive… but so will Nightwing as a surprise appearance. Like most big bosses, Killer Croc can only be damaged through Dual-Team Takedowns. Do your best to avoid damage & build up your meter to perform your next Dual-Team Takedown. Defeat Killer Croc, & we will earn this Achievement; this is probably the hardest Achievement in the game in my opinion…


Achievement #108 – Fortunate Son: Achieve 46 Stars in AR Challenges.
Around this time, you may also have earned 46 Stars in AR Challenges while playing as Batman; with a minimum of 33 from Batmobiles alone.
Sequence 11: Batman Predator Challenges
1. Batman Stars: 69/69
2. Achievements: 113/113
-----------------------------------------------------------------------------------------------------

Predator Challenge – Silent Knight (Knockout Smash Only): Now we move on to Predator Challenges. Like with Robin, we need to complete this map by performing Knockout Smashes only. To perform a Knockout Smash, you need to perform a Stealth Takedown then press X during it before it finishes to smash the enemy instantly. Unfortunately… this is not stealthy in the slightest & it will alert all enemies to our presence.

With Batman’s Disrupter, there are a few opportunities you can do like disabling Guns or Medical Packs that will make this Achievement even easier.


Achievement #109 – Silent Night, Deadly Night: Complete the Silent Knight AR Challenge unharmed as Batman & Robin, using only Knockout Smashes.
Once again, Stars do not matter at all. Just defeat all 6 enemies with Knockout Smashes without taking any damage as both Batman & Robin to earn this Achievement.

Predator Challenge – Batcave (Beat Down Finishers Only): Next will be completing Batcave using only Beat Down Finishers. Unlike Nightwing however, Batman has the Disrupter & can remove the Optic Deflection Vests from the Camo Militia so they can be more easily tracked.


Achievement #110 – Secrets of the Batcave: Complete the Batcave AR Challenge unharmed as Batman & Nightwing, using only Beat Downs.
Stars do not matter for this Predator Challenge so long as you defeat all enemies using Beat Down Finishers without taking any damage. Batman’s Disrupter & Smoke Pellets give him an edge & will make the challenge easier than playing as Nightwing. Regardless, patience is the key for this Achievement as eventually enemies will stray away from each other opening them up to being picked off. Beat Down, Grapnel to a Vantage Point. Beat Down, Grapnel to a Vantage Point.

Predator Challenge – Wayne Manor (No Gadgets, No Damage): For exclusively Batman, we need to complete the Wayne Manor Predator Challenge without taking any damage… but also without using any Gadgets; note that we cannot even use the Grapnel! Detective Mode is alright, but no Grapneling. Fortunately, we can take the Thugs out however we want & be stealthy about it if we wish.

There are 6 enemies we need to take out. 3 Gun Thugs, 1 Medic, 1 Mini-Gun Brute, & unfortunately 1 Jammer Thug. The Jammer Thug is our biggest worry at staying hidden; we cannot use our Disrupter to disable it. At the very beginning of the Challenge, we can find the Jammer Thug in the back right corner of the ground floor & can immediately take him out which does make it easier.


Achievement #111 – What the Butler Saw: Complete the Wayne Manor AR Challenge as Batman without using any Gadgets or taking any damage.
When the Jammer Thug is taken out, it is just business as usual. Without worrying about earning Stars, you just have to take out all the remaining Thugs. You will most likely want to save the Mini-Gun Brute for the end so it will be an extended fight to take him down…

Again, we cannot use the Grapnel.

Predator Challenge – Endless Knight (50 Takedowns/Knockouts): Of course, now we get our final test Achievement for Predator Challenges; taking out 50 enemies by any means during Endless Knight, where enemies will infinitely spawn. We can take damage, we can use any Gadget, be spotted. Whatever. Unfortunately, we are timed. The Challenge begins with 5:00 minutes on the clock; we gain 25s per enemy knocked out, regardless of how you do it. Fear Multi-Takedowns contribute massive amounts of time & can give you a huge boost if you can get a good group of enemies.

Inverted Takedowns are probably the best way to take out enemies relatively safely! Also if you get detected & get the brief slow-mo, opt to use Quick-Fire Batclaw over a Batarang to disarm the enemy as it will fully disarm them & give you more time to escape. Depending on the situation, you may even be able to take them out in the process!

Medics reviving enemies does not detract from your Points; though I am unsure if taking out the same enemy multiple times adds to it. Time is really not an issue though once you get going, especially if you try to regularly use your Fear Multi-Takedowns when it is available.

I would save your Disrupter Ammo for Mines that get placed later on – the Militia will usually patrol together meaning you can take multiple out with one Mine. Of course, if you can see a Jammer Militia, disable his pack too. But be aware, it will take a while for your Disrupter Ammo to regenerate. Near the end, you will want to start saving your Disrupter Ammo to disable the Mines being placed on Vantage Points, as they are your best way to travel around the map.

Brute Mini-Gunners are almost more trouble than they are worth. Unless you can take them out through Soft Wood Paneling or a hacked Mine… trying to take them on physically will alert everyone in the area & you most likely you won’t be fast enough to not get shot at in the process. They are best left alone typically.


Achievement #112 – Eternal: Complete the Endless Knight AR Challenge, taking out 50 enemies as Batman.
It will take you a few tries to get into a flow, but this is not as bad as it sounds. Inverted Takedowns are your best way to pick enemies off, Fear Multi-Takedowns are the best way to really rack up knock outs, & then you will have to selectively use Silent Takedowns when possible to build your Fear Meter up.

Ultimately, the timer means nothing, & conserving your Health is the real key. You can be reckless at times & save yourself with the Batclaw or Smoke Pellets, but you want to keep damage to a minimum if you can help it. The Achievement will unlock immediately after obtaining your 50th knock out & not at the end of the match.


Achievement #113 – Absolution: Achieve 69 Stars in AR Challenges.
Lastly, if you have not already obtained this, simply earn any remaining Stars you need in any combination of Combat, Predator, & Batmobile Challenges to unlock this Achievement.
Conclusion:
The AR Challenge Achievements for Arkham Knight are both better & worse than they were in Arkham City. In Arkham City, you needed to earn 3 Stars on every single Challenge Map, & it was brutal. For Knight however, Stars are not the issue… but the specific Challenge Achievements were terrible. Instead of having a variety of Challenge Maps you had to grind through… you spend the whole time drilling the same Challenge Map over & over again trying to fulfill the Achievement. At the moment, the Requiem For A Killer Achievement is the only thing stopping me from earning my own 100%... that Achievement sucks, & I tip my cap to anyone who can earn it. Pro gamers, all of you. Barring the extra time it takes me to complete the Iceberg Lounge, it took me around 140 hours to 100% the game; I am certain you will be able to 100% it much faster!

If this guide helped you achieve 100%, rate the guide or let me know in the comments. Helps me know if I am doing things right!


100% Complete
Thank you for choosing Cynical Guides, & I will see you in the next one!
If you are interested in a little bit of patronage, support my projects & consider buying me a coffee. If not, no worries; my guides are, & will always be free content. Achievement Hunting is my passion, & writing these guides is a way for me to give meaning to a life long hobby!
https://www.buymeacoffee.com/cynic0055

Other Cynical Guides:
If you are looking for the guide covering Part 1, click/Favourite the guide below.
https://gtm.steamproxy.vip/sharedfiles/filedetails/?id=3534500522
If you enjoy this game & my style of writing guides, be sure to check out my:
https://gtm.steamproxy.vip/sharedfiles/filedetails/?id=2434426635
https://gtm.steamproxy.vip/sharedfiles/filedetails/?id=2771214926
https://gtm.steamproxy.vip/sharedfiles/filedetails/?id=2772379636
Check out my profile for a full list of my works.
https://gtm.steamproxy.vip/sharedfiles/filedetails/?id=2992727030
5 Comments
sz4sz 3 Aug @ 5:04am 
Just managed to get the Requiem for a Killer today, after hours of trying. I felt uncomfortable pressing the X+Y disarm takedown, on my xbox contrl and swithced to mouse + keyboard just for this challange. Better aim, and mouse side buttons set for both takedowns.
Method is always get out of the group, and try to find the 1-2 guys on the other side of the room to widen the space. I never countered the knife guys/ninjas, just jumped over their head. Hardest achi in the whole game, imo. Finally, only NG+ remaines.
Cynic 0055  [author] 26 Jul @ 9:06am 
Thanks, AlonCafry! Elden Ring will definitely take me a bit, but I also hope to have it done sometime this year; I am thoroughly enjoying it so far. Both Mass Effect & Metro are fantastic series to 100%, up there in my favourites for sure.
AlonCafry 26 Jul @ 7:27am 
Incredible work as always!:steamhappy:
Can't wait for your Elden Ring Guide (Yes yes I know it's gonna take a long time)
Finished the Merto trilogy with your guides not so long ago and it was a pleasure (both the games and yourr guides). Did ME Trilogy as well and man those games were so good!
Cynic 0055  [author] 25 Jul @ 8:30pm 
That is good to know, that is the only Achievement I have yet to actually earn. I have gotten close a few runs, but ended up messing up right at the end. 950K points is my current record.
ZeOwls 25 Jul @ 8:26pm 
The method I used for Requiem for a killer is once you build up a combo of about 100+ or so and the electrified enemies start spawning:

Switch between jumping over enemies to reset their aggro and then
spamming batclaw slam to build a x5 combo for takedowns