Limbus Company

Limbus Company

78 ratings
Mirror (Dungeon) Of Immortality Cheat Sheet
By Borderlined
This is a guide for the Mirror of Immortality Dungeon, and all that can appear in it.
2
   
Award
Favorite
Favorited
Unfavorite
Table of Contents


This is a long guide that goes over a lot of information you might already know if you aren't a beginner to Mirror Dungeons, so here are the main sections for you to skip through as you need.

  • Table of Contents <-- You are here!!
  • Introduction to Mirror Dungeons (And Rewards)
  • What is Starlight?
  • Graces of the Immortal Star
  • Grace Priority List
  • Encounter Reward Cards
  • Starting E.G.O Gifts
  • Mirror Of Immortality Information
  • The Node Types
  • Normal Difficulty
  • Hard Difficulty (Refers to Normal Difficulty Section a Lot)
  • Parallel Superposition Mode
  • Mounting Trials
  • Mounting Trials Priority List
  • Theme Packs (and Layouts)
  • Theme Pack Recommendations
  • Rental Teams
  • Achievements
  • General Strategy + Tips and Tricks
  • Thanks for Reading!!
Intro To Mirror Dungeons


Mirror Dungeons in Limbus Company are a game mode mainly played for the weekly Lunacy reward upon completing them, as well as the Battle Pass experience upon farming them. They have a rogue-lite structure similar to those at the end of Canto dungeons, though each iteration of the Mirror Dungeon tends to have its own twist, which I will go into more detail about later in this guide. Mirror Dungeons are also randomly generated, unlike the end of Canto dungeons. They consist of a variety of nodes, whether that be combat nodes or supportive nodes to help make the dungeon easier, until you reach a boss at the end of each floor.

Rewards:

Upon completing a certain percentage or all of the dungeon, you will get the rewards specified in the table below.

Floors Cleared
Battle Pass Reward Percentage
Free Lunacy Reward Percentage
Floor 1
33%
30%
Floor 2
53%
60%
Floor 3
80%
80%
Floor 4
93%
100%
Floor 5+
100%
100%

The amount that percentage matches up to depends on the amount of Weekly Bonuses used at Mirror Dungeon completion. With Normal Difficulty, you can claim up to 1 Weekly Bonus per run, while with Hard Difficulty, you can claim up to 3 Weekly Bonuses per run. The number of Weekly Bonuses consumed from a run can be freely adjusted before claiming the reward. That matches up to these rewards.

Normal:

Weekly Bonuses Used
Battle Pass EXP
Free Lunacy
Manager EXP
0
30
0
100
1
45
250
100

Hard:

Weekly Bonuses Used
Battle Pass EXP
Free Lunacy
Manager EXP
0
30
0
100
1 + 1 + 1
250
750
360
1 + 2
235
750
360
2 + 1
230
750
360
3
225
750
360

Right now, the most time-efficient method would be to complete one Hard Mirror Dungeon weekly to get all weekly bonus rewards. From there, most end-game players farm Normal Difficulty (since Hard has the same rewards as Normal without Weekly Bonuses) for Battle Pass EXP, which will give you shard crates, which will give you shards, which will give you Identities in the Dispenser without any need to gamble in the Extraction menu, just grind. This is the reason people call Limbus free-to-play friendly.

Resources:

There are two main resources we will be covering:
  • Cost
  • Starlight

Cost is a resource only accessible within the run itself and expires upon run end. Within a Mirror Dungeon, you will gain access to one 12-sinner team that can be changed at the cost of Cost at any Shop Node. You also will have a choice of E.G.O Gifts to start the dungeon with, typically relevant to a certain status effect or damage type you want to enter the dungeon with, such as Burn, Rupture, Pierce, etc.. Cost can also be used to buy or enhance additional E.G.O Gifts, further buffing your team. Cost is gained upon beating any enemy fight, though the harder the fight (elite, focused, or boss), the more Cost that is gained.

Mirror Dungeons also have another exclusive resource called Starlight, though this resource is not lost upon finishing a dungeon run. This resource can be spent in the dungeon to help with E.G.O Gift acquisition and to pick specific theme packs, but its main use is to pick Graces at the Grace of the Immortal Star, which you encounter at the start of every Mirror Dungeon before even entering it. These Graces are powerful and can help ensure your build stays strong throughout the Mirror Dungeon. I will go into more detail on the Graces and how to acquire Starlight later in this guide.

Difficulties:

The Normal Difficulty of the Mirror Dungeon of Immortality is available as soon as you complete Canto II, but might contain some enemies from future Cantos, so beware of spoilers in specific theme packs (mostly Intervallo Bosses). It, however, shouldn't contain any Final Bosses from Cantos you have not completed yet, and the main Story-relevant Theme Packs are blocked until you beat their Story counterparts, as shown below. This does not prevent those bosses and enemies from showing up in other packs though, such as Papa Bongy in Emotional Seduction.


The Hard Difficulty of the Mirror Dungeon of Immortality is available once you finish Canto VII, and is suitably harder than the Normal Difficulty in exchange for much more Battle Pass experience when consuming a Weekly Bonus. As before, be warned of spoilers. You enter Hard Difficulty at the top of the Theme Pack Selection screen, and must do all five floors in Hard Difficulty for it to count as a Hard Difficulty Run for consuming Weekly Bonuses.

The Parallel Superposition Difficulty of the Mirror Dungeon of Immortality is simply Hard Difficulty but extended 5 floors deeper, for a total of 10 Floors. To enter it, you simply do a Hard Difficulty run and ensure that the Parallel Superposition switch is turned on before picking your fifth-floor theme pack. There are no extra rewards for doing Parallel Superposition Mode, outside of Achievements and extra Starlight gain, so only do it if you want those or find it fun!

Mounting Trials:

Every Floor completed and Floor Boss felled in a Mirror Dungeon will give you a benefit and a detriment in the form of a new E.G.O Gift and Mounting Trial paired together. I already explained E.G.O Gifts slightly earlier, but Mounting Trials are essentially buffs to the enemies you fight, and some are much worse than others. Since you get to choose which Mounting Trial of a random selection is applied, its important to know what they actually do. As such, the further you go into the Dungeon, the more buffs the enemies will get and the harder the Dungeon will be to complete. Normal and Hard Difficulty both have five floors, but Hard difficulty has you pick two E.G.O Gifts and Mounting Trials per floor completion, while Normal has you pick one per completion. Parallel Superposition follows the format of Hard, so for the additional floors, you will still pick two per floor. Do keep in mind that this means Hard has more opportunities to obtain E.G.O Gifts just due to the nature of having more Mounting Trials picked. If you choose not to pick any E.G.O Gift to avoid a Mounting Trial, then one of the available Mounting Trials will be picked randomly, and you still won't get the E.G.O Gift! As such, its always best to pick which Trial to go for, at the very least for the E.G.O Gift to sell later.

This Guide assumes you have completed Canto VIII for some sections, specifically the Theme Pack and Bosses sections, so be warned about potential spoilers within.
What Should You Do to Prepare?


The strongest and fastest team in Mirror Dungeon right now is a Rupture team, so if you purely are working towards farming and finishing the Mirror Dungeon, then I would work towards building that team first. However, if you want to play around Mirror Dungeon as a game mode, I would built one team for each of the seven main status effects (Burn, Bleed, Tremor, Rupture, Sinking, Poise, Charge) so that you can see some variety in E.G.O Gifts and have some fun with lesser-used units. Why? Because most of the E.G.O Gifts I discussed earlier are based around those status archetypes, and so building your teams around obtaining specific E.G.O Gifts to buff them even further is advised.

Cycling your teams has the side effect of making your Starlight gains increase, as Starlight gain is partly based on how long it has been since you last used a unit, up to a maximum of 5 bonus Starlight per Identity (So an Identity that has not been used for 5 Mirror Dungeons in a row). This is referred to as a Loadout Bonus (or a Rest Bonus). Thus, for maximum efficiency farming Starlight you'd rotate out in a cycle of at least 6 teams with unique units, and for a maximum efficiency farming of Battle Pass EXP, you'd play Rupture while rotating out the 5 Sinners left on the bench. Do note that the Identities used for the Rest Bonus don't need to be used to fight, they just need to be brought into the Mirror Dungeon!

For the newbies among you who might not be able to fuel the experience tickets nor the thread needed to build six whole teams, nor an entire Rupture team, don't worry! Normal Difficulty buffs every Identity to Lvl 55 on entry. Hard Difficulty will use your Sinners' actual levels, and both Difficulties use your actual Uptie Levels, so be warned before entering. Lower Upties can still clear Normal, but I'd get at least Uptie III for Hard Mode unless you know what you are doing.

You can also prepare by reading up on fusion recipes in my other guide, the E.G.O Gift Fusion and Upgrading Cheat Sheet. However, that might go over your head until you actually attempt a run and try it out yourself.


The best way to prepare is to hop right in and figure things out manually, and THEN read what you are confused about! Feel free to ask additional questions in the comments. and I'll try to answer as best I can.
What is Starlight?


Starlight is this mode's main internal reward system.

Starlight is given whenever the player accepts rewards after having completed either of the Mirror Dungeon difficulties. As stated above in the Preparation section, Loadout Bonuses give starlight. However, they are not the only thing that gives Starlight. Picking Starlight Gain Encounter Reward Card Packs, picking Railway Theme Packs, doing Hard Difficulty Floors, and just clearing more Floors all help boost your Starlight gain in the end.

Starlight is used for three main purposes right now:
  • Picking Graces from the Grace of the Immortal Star
  • Searching for specific Theme Packs on Theme Pack Selection
  • Wishmaking to boost the chances of fusing an E.G.O Gift of a specific keyword
  • E.G.O Gift Search

Picking Graces is the main purpose of Starlight, but it is important to keep yourself Starlight positive from run-to-run so as to use the second and third purpose liberally. The cost of Graces varies from Grace to Grace, and will covered later on.


Searching costs 20 for the first Theme Pack, then 30 for the second Theme Pack, 40 for the third, and so on. As such, unless you require a specific Theme Pack (for a Farming or Speedrun Strategy) or all the currently presented Theme Packs are terrible, I would save Searching for emergencies. The increase in Starlight cost is reset on Mirror Dungeon completion.


Wishmaking costs 5 Starlight per use, however, you fuse much more often, and there are other methods of boosting your chance of fusion (Super Shops, more on that later), so Wishmaking is used more often when you wish to avoid possible trouble when low on cost and E.G.O Gifts to sell while needing a specific E.G.O Gift from fusion. This is most typical when fusing Tier IV E.G.O Gifts while farming Normal Difficulty.


E.G.O Gift Search lets you choose any three Tier I, II, or III E.G.O Gifts to start the Mirror Dungeon with, including Hard Mode Exclusive and Theme Pack Exclusive Gifts. However, this costs 70 Starlight for the first gift, 90 for the second gift, and 110 for the third gift. This makes it not very useful unless you know exactly what you are doing. More on this in the Starting E.G.O Gifts section below!

How to Calculate Starlight:
Starlight is calculated the same for Normal and Hard Difficulties, but different multipliers are given.

Lets take a result I know works already: A Mirror Dungeon Normal Run with 2 Loadout Bonuses on every Identity and attempting 2 Railway stages. This would result in this formula:

60 + 24 + 73 = 157 Gross Starlight gain.

Lets break that down.

The first 60 is the base amount you always get. Every single MD with always start you with 60 Starlight as a base level, before you do anything else. This is meant to let you always have a base amount of Starlight to use for Graces later in the Mirror Dungeon.

The second number, 24, is the amount of Loadout Bonus (or Rest Bonus) you get. This number is decided by how long it has been since that ID was last used in the Mirror Dungeon, adding one per Mirror Dungeon its been, capping at 5 (so six Mirror Dungeons since last used). So for the demonstration image shown below, you can see in the top right corner of each Sinner's Identity how long it has been, and the amount of Starlight you'd gain from using them. Outis, Ryoshu, and Ishmael were used in the directly preceding Mirror Dungeon, Yi Sang was used in the Mirror Dungeon before that, Meursault used two Mirror Dungeons ago, Heathcliff three Mirror Dungeons ago, Sinclair four Mirror Dungeons ago, while Faust and Gregor were used five or more Mirror Dungeons ago.


You might notice that Don Quixote, Hong Lu, and Rodya have a special blue bar in place of the Starlight. That gives them a full 5 Starlight Loadout Bonus, while also letting them be used in multiple Mirror Dungeons in a row without losing that full 5 Starlight Bonus. You get the blue bar on an Identity (not a Sinner!) by fulfilling one of these conditions:

  • The Identity is on the current Banner
  • The Identity is a part of a Rental Team
  • The Identity is one of the Event Currency Farming Identities for the current Event

Back to the example:

Since our original example had all 12 of our sinners have 2 Loadout Bonuses each, that is 12 * 2, 24 Rest Bonus. Simple so far.

The third number is where things get complicated. This number is the Exploration Score, and is separated into two separate categories:
  • Loadout Bonus Mult
  • Exploration Score Count

The Loadout Bonus Mult is simply the Loadout Bonus, so 24 in this case, multiplied by 0.017 and plus 1. So 24 * 0.017 + 1 = 1.408 (Remember your order of operations!). However, the Loadout Mult cannot be less than 1 or larger than 2, so a Rest Bonus of 60, despite 60 * 0.017 + 1 being 2.02, is actually just 2.00.


The Exploration Score Count has three parts in of itself.
  • Cleared Floors
  • Hard Difficulty Bonus
  • Refraction Railway Theme Pack Bonus

The Refraction Railway Theme Pack Bonus is the simplest of the three, just being 5 Starlight per railway Theme Pack completed. Railway Theme Packs are a type of Theme Pack based off each of the Refraction Railways, another game mode in Limbus Company. There are currently six Refraction Railway Theme Packs in the Mirror Dungeon of Immortality.

The Cleared Floors add the floor number to the Exploration Score Count upon being cleared, unless you are past Floor 5, in which case it just adds 5 per floor. The Hard Difficult Bonus multiplies a Hard Floor's Cleared Floor number by 4, and only the 3 extra copies are considered as the Hard Difficulty Bonus.

In other words, Cleared Floors give 1 Starlight for Floor 1, 2 Starlight for Floor 2, 3 Starlight for Floor 3, 4 Starlight for Floor 4, and 5 Starlight for every Floor completed past Floor 4, so Floors 5+ in Parallel Superposition Mode. These are additive, so if you completed Floor 7, you'd get 1 + 2 + 3 + 4 + 5 + 5 + 5 Starlight as the Cleared Floors score.

So knowing what we know, lets calculate the Exploration Score Count. We have done 2 RRs, so 5 + 5. We have done the first five floors, so 1 + 2 + 3 + 4 + 5. Refraction Railway Theme Packs only spawn in hard mode on floors four and five, so the fourth and fifth floors were completed in hard mode, so (4 + 5) * 3. Adding those all up, we get 5 + 5 + 1 + 2 + 3 + 4 + 5 + (4 + 5) * 3 = 52.

Remember that the Exploration Score Count was only one side of a larger equation however! We then multiply only the Exploration Score Count by our Loadout Bonus Mult, so 52 * 1.408 = 73.216. However, we can ignore everything after the decimal, as Limbus Company rounds down no matter how close to the next number you are, so just 73.

So we are left with 60 + 24 + 73 = 157 Gross Starlight gain, the formula we started with!

Here is another example:


You can see from this end screen that 5 Floors were completed, and all in Hard Mode. We can see that their Loadout Bonus is 12, and they gained 0 Starlight from the Encounter Reward Cards. We also can see that they completed one Refraction Railway Theme Pack. From this, we can calculate their Gross Starlight gain (Imagine we couldn't see it in the image itself).

It would be 60, our default, plus 12, our Loadout Bonus, plus ((1+2+3+4+5) * 4, our Cleared Floor and Hard Difficulty Bonuses, plus 5 our Refraction Railway Theme Pack Bonus, multiplied by our Loadout Bonus Mult which is 12 * 0.017 + 1).

So without all the text: 60 + 12 + ((1+2+3+4+5)*4 + 5) * Min(2, (12 * 0.017 + 1)).

Now you can calculate Gross Starlight gains yourself. Remember that this does not include any Encouter Reward Cards found in the Mirror Dungeon itself, nor does it account for any Starlight spent!

If you don't want to calculate it yourself though, the table below has a lot of common Gross Starlight calculations done already. (Not including Encounter Reward Cards). Feel free to test your knowledge of the Formula to get the same numbers I am getting!
Starlight Table
Floors Completed
First Hard Difficulty Floor
Loadout Bonus
RR Floors Completed
Gross Starlight Gain
5
N/A
0
0
75
5
N/A
12
0
90
5
N/A
24
0
105
5
N/A
36
0
120
5
N/A
48
0
135
5
N/A
60
0
150
5
5
0
1
95
5
5
12
1
114
5
5
24
1
133
5
5
36
1
152
5
5
48
1
171
5
5
60
1
190
5
4
0
2
112
5
4
12
2
134
5
4
24
2
157
5
4
36
2
179
5
4
48
2
202
5
4
60
2
224
5
1
0
0
120
5
1
12
0
144
5
1
24
0
168
5
1
36
0
192
5
1
48
0
216
5
1
60
0
240
5
1
0
1
125
5
1
12
1
150
5
1
24
1
175
5
1
36
1
200
5
1
48
1
226
5
1
60
1
250
5
1
0
2
130
5
1
12
2
156
5
1
24
2
182
5
1
36
2
208
5
1
48
2
235
5
1
60
2
260
5
4
25
2
159
5
4
30
2
168
3
N/A
0
0
66
3
N/A
25
0
93
3
N/A
30
0
99
3
N/A
60
0
132
4
N/A
0
0
70
4
N/A
25
0
99
4
N/A
30
0
105
4
N/A
60
0
140
4
4
0
1
83
4
4
25
1
117
4
4
30
1
124
4
4
60
1
166
15
1
60
5
690
10
1
25
5
490
Graces of the Immortal Star
The Graces of the Immortal Star cost a differing amount of Starlight each, and are the main way of boosting your run's strength outside of E.G.O Gifts. All of them have their benefits, but they are not all made equally. For example, Chance Comet is not very useful for the amount of Starlight it costs, but that doesn't mean it is useless.

Traditionally, when referring to the graces in shorthand you'd say the number they are from left to right, top to bottom. So if I said 1 4 10, I am referring to Star of the Beginning, Star-Shower, and Perfected Possibility.


Graces can also be upgraded once or twice, doubling or tripling the Starlight cost of that Grace respectively. These upgrades are mostly not worth it in Normal and Hard mode due to that cost increase, but they can be very useful for Parallel Superposition Mode.

Graces of the Immortal Star Descriptions
Name
Symbol
Base Cost
Default Effect
+ Upgraded Effect
++ Upgraded Effect
Star of the Beginning
10
  • Starting Cost +150
  • Theme Pack Selection +1
  • Shop E.G.O Gift Selection +1
  • One Free Normal Refresh for Shops
  • Starting Cost +250
  • Theme Pack Selection +1
  • Shop E.G.O Gift Selection +1
  • One Free Normal Refresh for Shops
  • Starting Cost +250
  • Theme Pack Selection +1
  • Shop E.G.O Gift Selection +1
  • Two Free Normal Refresh for Shops
Cumulating Starcloud
10
  • When moving to the next Floor, increase current Cost balance by 10% (max 100)
  • Increase E.G.O Gift sale price by 50% (once per Shop)
  • When moving to the next Floor, increase current Cost balance by 20% (max 125)
  • Increase E.G.O Gift sale price by 75% (once per Shop)
  • When moving to the next Floor, increase current Cost balance by 30% (max 150)
  • Increase E.G.O Gift sale price by 100% (once per Shop)
Interstellar Travel
20
  • Theme Pack Selection +1
  • Theme Pack Refresh Chance +2
  • When choosing a new Theme Pack for the first time, all Identities gain +3 Level(s) (max 9)
  • Theme Pack Selection +1
  • Theme Pack Refresh Chance +3
  • When choosing a new Theme Pack for the first time, all Identities gain +3 Level(s) (max 9)
  • When choosing a new Theme Pack for the first time(in Floor 5 or lower only), gain 1 Clash Power Up in its combat Encounters
  • Theme Pack Selection +1
  • Theme Pack Refresh Chance +4
  • When choosing a new Theme Pack for the first time, all Identities gain +3 Level(s) (max 9)
  • When choosing a new Theme Pack for the first time(in Floor 5 or lower only), gain 3 Clash Power Up in its combat Encounters
Star-Shower
20
  • Starting Cost +400
  • Starting E.G.O Gift Choice +1
  • Starting Cost +500
  • Starting E.G.O Gift Choice +1
  • When Choosing Starlight from Encounter Reward Cards, Cost +75
  • Starting Cost +700
  • Starting E.G.O Gift Choice +1
  • When Choosing Starlight from Encounter Reward Cards, Cost +150
Binary Star-Shop
30
  • Shop E.G.O Gift Selection +1
  • Encounter Reward Cost +20%
  • Greater chance for high Tier E.G.O Gifts to appear in Shops
  • Shop E.G.O Gift Selection +1
  • Encounter Reward Cost +30%
  • Greater chance for high Tier E.G.O Gifts to appear in Shops
  • Upon entering a Shop, add up all the Tier numbers of currently owned E.G.O Gifts and gain it as Cost (max 75)
  • Shop E.G.O Gift Selection +1
  • Encounter Reward Cost +40%
  • Greater chance for high Tier E.G.O Gifts to appear in Shops
  • Upon entering a Shop, add up all the Tier numbers of currently owned E.G.O Gifts and gain it as Cost (max 150)
Moon Star-Shop
30
  • One Free Keyword Refresh for Shops
  • Upon entering Floor 1, gain 1 random Tier 1 E.G.O Gift(s)
  • One Free Keyword Refresh for Shops
  • Upon entering Floor 1, gain 2 random Tier 1 E.G.O Gift(s)
  • +10% chance for super Shop to appear
  • Two Free Keyword Refresh for Shops
  • Upon entering Floor 1, gain 3 random Tier 1 E.G.O Gift(s)
  • +25% chance for super Shop to appear
Favor of the Nebulae
40
  • Upon entry, all Identities gain 3 Level(s)
  • Upon Floor clear, all Identities gain 1 Level(s) (max 5)
  • Upon entry, all Identities gain 3 Level(s)
  • Upon Floor clear, all Identities gain 1 Level(s) (max 9)
  • Upon entry, all Identities gain 3 Level(s)
  • Upon entering Floor 6, all Identities gain 3 Level(s)
  • Upon Floor clear, all Identities gain 1 Level(s) (max 9)
Starlight Guidance
40
  • Max Speed +2
  • Gain 1 Clash Power Up
  • Gain 1 Damage Up
  • Gain 1 Protection
  • Max Speed +3
  • Gain 2 Clash Power Up
  • Gain 1 Damage Up
  • Gain 1 Protection
  • Max Speed +3
  • Gain 2 Clash Power Up
  • Gain 2 Damage Up
  • Gain 2 Protection
Chance Comet
50

  • Upon entering a Shop, gain 1 random Tier 3 or less For Fuse or Sale only E.G.O Gift(s)
  • Upon entering Floor 3, gain 1 random Tier 3 E.G.O Gift(s)
  • When fusing, gain a random additional E.G.O Gift 2 Tiers below the Fusion result(must be Tier 3 or higher) (once per Shop)
  • Upon entering a Shop, gain 1 'For Fuse or Sale only E.G.O Gift'
    • Floor 5 or lower: Tier 1~3
    • Floor 6 or higher: Tier 2~3
  • Upon entering Floor 3/Floor 5, gain 1 Tier 3 E.G.O Gift from the selected Keyword category
  • When fusing, gain a random additional E.G.O Gift 2 Tiers below the Fusion result(must be Tier 3 or higher) (once per Shop)
  • Upon entering a Shop, gain 1 'For Fuse or Sale only E.G.O Gift'
    • Floor 5 or lower: Tier 2~3
    • Floor 6 or higher: Tier 3~4
  • Upon entering Floor 3/Floor 5/Floor 7, gain 1 random Tier 4 E.G.O Gift from the selected Keyword category
  • When fusing, gain a random additional E.G.O Gift 1 Tier below the Fusion result(must be Tier 3 or higher) (once per Shop)
Perfected Possibility


(Look at the Starting E.G.O Gifts Section)
60
  • Theme Pack Selection +1
  • Starting E.G.O Gift Choice +1
  • Upon entry, gain 1 Tier 3 E.G.O Gift(s) of your choice for your selected Keyword category
  • Theme Pack Selection +1
  • Starting E.G.O Gift Choice +1
  • Upon entry, gain 2 Tier 3 E.G.O Gift(s) of your choice for your selected Keyword category
  • Theme Pack Selection +1
  • Starting E.G.O Gift Choice +1
  • Upon entry, gain 3 Tier 3 E.G.O Gift(s) of your choice for your selected Keyword category
Grace Priority List


Normal
  • No Rest Bonus: 1+ 2+ 4 (Last 15 is extra for in-run consumption)
  • 1 Rest Bonus: 1+ 2+ 4 (Last 30 is extra for in-run consumption)
  • 2 Rest Bonus: 1+ 2+ 4 (Last 45 is extra for in-run consumption)
  • 3 Rest Bonus: 1+ 2 4 10 (Last 10 is extra for in-run consumption)
  • 4 Rest Bonus: 1+ 2 4 10 (Last 25 is extra for in-run consumption)
  • Full Rest Bonus: 1+ 2 4 10 (Last 40 is extra for in-run consumption)
  • 5 IDs Fully Rested: 1 4 10 (Last 6 is extra for in-run consumption)

  • MDN Farming (2 RR) Any Rest Bonus: 1 3 4 10 Look at the MD Teams Document[docs.google.com] for more specific information.

Hard
  • No Rest Bonus: 1+ 2 4 10 (Last 10 is extra for in-run consumption)
  • 1 Rest Bonus: 1+ 2+ 4 10 (Last 24 is extra for in-run consumption)
  • 2 Rest Bonus: 1+ 2+ 4 10 (Last 48 is extra for in-run consumption)
  • 3 Rest Bonus: 1+ 2+ 4 8 10 (Last 32 is extra for in-run consumption)
  • 4 Rest Bonus: 1+ 2+ 4 8 10 (Last 56 is extra for in-run consumption)
  • Full Rest Bonus: 1+ 2+ 4 8 10 (Last 80 is extra for in-run consumption)
  • 5 IDs Fully Rested: 1+ 2+ 4 8 10 (Last 20 is extra for in-run consumption)

  • MDI: 1, 2, 3, 4+, 7++ 8++ 10+ (440 Starlight Cost) (Only in the Text Only Version)
  • MDI: Every single buff at ++ (870 Starlight Cost)

Information:
  • READ THE KEY ON THE LEFT SIDE!!!
  • R.B. = Rest Bonus = Loadout Bonus
  • 1 Rest Bonus means that every ID on the field has 1 bar, so a total of 12 Starlight.
  • 5 IDs Fully Rested means that 5 IDs have a full bar while the rest have none, so a total of 25 Starlight.
  • This guide uses the numbers for if you did not do any RR packs, however, the choices do not really change if you do go for them. If you plan to go for the RR in Normal, I would bump yourself up a level of R.B. for each RR. In Hard, the difference is minimal, so just take it as extra in-run Starlight.
Encounter Reward Cards


Encounter Reward Cards appear at a percentage chance upon completing specific types of Nodes, as explained later on. Upon being shown an Encounter Reward Card pack, you will be shown a choice of 2~3 potential Encounter Reward Cards to choose from (2 Cards on Floor 1 and 2, 3 Cards on Floors 3+). There are currently 5 different types of Encounter Reward Cards, and 7 different Tiers of each type.

The Rates of Encounter Reward Cards are the exact same between Normal and Hard Difficulty.
The table for those rates is shown below:

Floor
Regular Encounter Rate
Focused Encounter Rate
Elite Encounter Rate
Abnomality Encounter Rate
Boss Encounter Rate
Floor 1
7.5%
N/A
N/A
N/A
100%
Floor 2
10%
20%
33%
100%
100%
Floor 3
10%
20%
33%
100%
100%
Floor 4
12.5%
25%
50%
100%
100%
Floor 5+
12.5%
25%
50%
100%
100% (If in Parallel Superposition Mode)

Note 1: The 'Keyword' in Cost & Keyword Gift Chance depends on the Starter E.G.O Gift Category you chose at the beginning of the Mirror Dungeon. If you do not choose a Starting Gift, then you get completely Random Gifts in that Encounter Reward Card.

Note 2: For Parallel Superposition Mode, otherwise known as Mirror Dungeon Infinite Mode or Floors 6-10, the 5th floor stats are repeated for all floors after the 5th.

Tier
Cost

Cost & Keyword Gift Chance
E.G.O Resource

Random E.G.O Gift
Starlight

Tier I
Gain 80~120 Cost
Gain 40~60 Cost, 33% chance to gain a random Tier 1 'Keyword' E.G.O Gift
E.G.O Resource +4 for 2 different Affinities
Gain a random Tier 1 E.G.O Gift
Gain additional 4~6 Starlight upon clearing the Mirror Dungeon
Tier II
Gain 90~135 Cost
Gain 45~68 Cost, 33% chance to gain a random Tier 1~2 'Keyword' E.G.O Gift
E.G.O Resource +4 for 3 different Affinities
Gain a random Tier 1~2 E.G.O Gift
Gain additional 6~8 Starlight upon clearing the Mirror Dungeon
Tier III
Gain 100~150 Cost
Gain 50~75 Cost, 33% chance to gain a random Tier 1~3 'Keyword' E.G.O Gift
E.G.O Resource +6 for 2 of the least-owned Affinities
Gain a random Tier 1~2 E.G.O Gift
Gain additional 8~10 Starlight upon clearing the Mirror Dungeon
Tier IV
Gain 110~165 Cost
Gain 55~83 Cost, 33% chance to gain a random Tier 2~3 'Keyword' E.G.O Gift
E.G.O Resource +8 for 2 of the least-owned Affinities
Gain a random Tier 2 E.G.O Gift
Gain additional 10~12 Starlight upon Clearing the Mirror Dungeon
Tier V
Gain 120~180 Cost
Gain 60~90 Cost, 50% chance to gain a random Tier 2~3 'Keyword' E.G.O Gift
E.G.O Resource +6 for 3 of the least-owned Affinities
Gain a random Tier 2~3 E.G.O Gift
Gain additional 12~14 Starlight upon clearing the Mirror Dungeon
Tier VI
Gain 135~210 Cost
Gain 68~105 Cost, 50% chance to gain a random Tier 2~4 'Keyword' E.G.O Gift
E.G.O Resources +8 for 3 of the least-owned Affinities
Gain a random Tier 2~3 E.G.O Gift
Gain additional 14~16 Starlight upon clearing the Mirror Dungeon
Tier VII
Gain 150~230 Cost
Gain 75~115 Cost, 50% chance to gain a random Tier 3~4 'Keyword' E.G.O Gift
E.G.O Resource +10 for 4 of the least-owned Affinities
Gain a random Tier 3 E.G.O Gift
Gain additional 16~20 Starlight upon clearing the Mirror Dungeon

Personally, my priority when choosing Encounter Reward Cards is:

Starlight >>> Cost & Keyword Gift Chance >= Random but Guaranteed E.G.O Gift > Cost >= E.G.O Resources

However, circumstances can change your decision, so play it based on your current situation, and only use this as my suggestion. For example, I sometimes prioritize Cost over E.G.O Gifts early in my run if I know I need to fish in the shop or enhance gifts soon.
ERC Normal Mode Probabilities
The table below gives the percentage chance of each Tier of Encounter Reward Card occurring when selecting an Encounter Reward Card Pack. Each of the Cards' tiers are calculated separately. When choosing WHICH cards to pick, it randomly chooses of the five possible choices without overlap.

Note 1: These percentages assume that you already rolled an Encounter Reward Card Pack!!! If you are looking for the chance of getting a pack, look at the table in the previous section.

Note 2: The maximum Tier for Normal Difficulty is Tier V, while the maximum Tier for Hard Difficulty is Tier VII. As you go deeper into the Mirror Dungeon, the more likely you are to get higher-tier Encounter Reward Cards.

Normal:

Floor 1:
Encounter Type
Tier I
Tier II
Tier III
Tier IV
Tier V
Tier VI
Tier VII
Regular Encounter Rate
66%
34%
0%
0%
0%
0%
0%
Focused Encounter Rate
0%
0%
0%
0%
0%
0%
0%
Elite Encounter Rate
0%
0%
0%
0%
0%
0%
0%
Abnomality Encounter Rate
0%
0%
0%
0%
0%
0%
0%
Boss Encounter Rate
0%
66%
34%
0%
0%
0%
0%

Floor 2:
Encounter Type
Tier I
Tier II
Tier III
Tier IV
Tier V
Tier VI
Tier VII
Regular Encounter Rate
50%
33%
17%
0%
0%
0%
0%
Focused Encounter Rate
50%
33%
17%
0%
0%
0%
0%
Elite Encounter Rate
0%
66%
34%
0%
0%
0%
0%
Abnomality Encounter Rate
0%
66%
34%
0%
0%
0%
0%
Boss Encounter Rate
0%
50%
33%
17%
0%
0%
0%

Floor 3:
Encounter Type
Tier I
Tier II
Tier III
Tier IV
Tier V
Tier VI
Tier VII
Regular Encounter Rate
0%
66%
34%
0%
0%
0%
0%
Focused Encounter Rate
0%
66%
34%
0%
0%
0%
0%
Elite Encounter Rate
0%
50%
33%
17%
0%
0%
0%
Abnomality Encounter Rate
0%
50%
33%
17%
0%
0%
0%
Boss Encounter Rate
0%
0%
66%
34%
0%
0%
0%

Floor 4:
Encounter Type
Tier I
Tier II
Tier III
Tier IV
Tier V
Tier VI
Tier VII
Regular Encounter Rate
0%
50%
33%
17%
0%
0%
0%
Focused Encounter Rate
0%
50%
33%
17%
0%
0%
0%
Elite Encounter Rate
0%
0%
66%
34%
0%
0%
0%
Abnomality Encounter Rate
0%
0%
66%
34%
0%
0%
0%
Boss Encounter Rate
0%
0%
50%
33%
17%
0%
0%

Floor 5:
Encounter Type
Tier I
Tier II
Tier III
Tier IV
Tier V
Tier VI
Tier VII
Regular Encounter Rate
0%
40%
30%
20%
10%
0%
0%
Focused Encounter Rate
0%
40%
30%
20%
10%
0%
0%
Elite Encounter Rate
0%
0%
50%
33%
17%
0%
0%
Abnomality Encounter Rate
0%
0%
50%
33%
17%
0%
0%
Boss Encounter Rate
0%
0%
0%
0%
0%
0%
0%
ERC Hard Probabilities
Hard:

Floor 1:
Encounter Type
Tier I
Tier II
Tier III
Tier IV
Tier V
Tier VI
Tier VII
Regular Encounter Rate
40%
30%
20%
10%
0%
0%
0%
Focused Encounter Rate
0%
0%
0%
0%
0%
0%
0%
Elite Encounter Rate
0%
0%
0%
0%
0%
0%
0%
Abnomality Encounter Rate
0%
0%
0%
0%
0%
0%
0%
Boss Encounter Rate
0%
40%
30%
20%
10%
0%
0%

Floor 2:
Encounter Type
Tier I
Tier II
Tier III
Tier IV
Tier V
Tier VI
Tier VII
Regular Encounter Rate
0%
50%
33%
17%
0%
0%
0%
Focused Encounter Rate
0%
50%
33%
17%
0%
0%
0%
Elite Encounter Rate
0%
40%
30%
20%
10%
0%
0%
Abnomality Encounter Rate
0%
40%
30%
20%
10%
0%
0%
Boss Encounter Rate
0%
0%
50%
33%
17%
0%
0%

Floor 3:
Encounter Type
Tier I
Tier II
Tier III
Tier IV
Tier V
Tier VI
Tier VII
Regular Encounter Rate
0%
40%
30%
20%
10%
0%
0%
Focused Encounter Rate
0%
40%
30%
20%
10%
0%
0%
Elite Encounter Rate
0%
0%
50%
33%
17%
0%
0%
Abnomality Encounter Rate
0%
0%
50%
33%
17%
0%
0%
Boss Encounter Rate
0%
0%
40%
30%
20%
10%
0%

Floor 4:
Encounter Type
Tier I
Tier II
Tier III
Tier IV
Tier V
Tier VI
Tier VII
Regular Encounter Rate
0%
0%
50%
33%
17%
0%
0%
Focused Encounter Rate
0%
0%
50%
33%
17%
0%
0%
Elite Encounter Rate
0%
0%
40%
30%
20%
10%
0%
Abnomality Encounter Rate
0%
0%
40%
30%
20%
10%
0%
Boss Encounter Rate
0%
0%
0%
40%
30%
20%
10%

Floor 5+:
Encounter Type
Tier I
Tier II
Tier III
Tier IV
Tier V
Tier VI
Tier VII
Regular Encounter Rate
0%
0%
40%
30%
20%
10%
0%
Focused Encounter Rate
0%
0%
40%
30%
20%
10%
0%
Elite Encounter Rate
0%
0%
0%
40%
30%
20%
10%
Abnomality Encounter Rate
0%
0%
0%
40%
30%
20%
10%
Boss Encounter Rate
0%
0%
0%
40%
30%
20%
10%


For Parallel Superposition Mode, otherwise known as Mirror Dungeon Infinite Mode or Floors 6-10, the 5th floor stats are repeated for all floors after the 5th.
Starting E.G.O Gifts


This is the list of possible Starting E.G.O Gifts for the Mirror Dungeon of Immortality. These Gifts are set in stone and will never change, but the amount of them you can pick depends entirely on which Graces of the Immortal Star you picked. Specifically, you start at being able to pick 1 of them, but if you picked Star-Shower or Perfected Possibility, you could pick 1 more for each, up to a total of 3 Starting E.G.O Gifts. However, all three must be from the same Keyword Category.

Note 1: You can reference the E.G.O Gift Guide in the Tips and Trick's Section for upgrades to these gifts. None of these gifts are specific fusion gift ingredients.

Note 2: Every E.G.O Gift here is a Tier II Gift of the Keyword Category it is within.

Burn
Bleed
Tremor
Rupture
Sinking
Poise
Charge
Hellterfly's Dream
Wound Clerid
Oscillating Bracelet
Barbed Lasso
Red Order
Cigarette Holder
Employee Card
Fiery Down
Little and To-Be-Naughty Plushie
Reverberation
Fluorescent Lamp
Melted Spring
Stone Tomb
Portable Battery Socket
Pain of Stifled Rage
Awe
Sour Liquor Aroma
Smoking Gunpowder
Grandeur
Old Wooden Doll
Patrolling Flashlight

Slash
Pierce
Blunt
Dreaming Electric Sheep
Gathering Skulls
Today's Expression
Short Cane Sword
Plume of Proof
Pocket Flashcards
Resolution
Torn Bandolier
Temporal Bridle


Generally, I recommend taking the first two gifts since the third gift of each category tends to have conditionals based on sinner selection order.

Some of the E.G.O Gifts for the Slash / Pierce / Blunt Category are special, in that they promote using a specific team composition. Resolution, the third gift in the Slash Category, promotes using a Shi Association team. Torn Bandolier promotes using Ammo using Identities. Temporal Bridle promotes using Minus Coin Blunt Identities.


Perfected Possibility:

If you selected Perfected Possibility, you also have a choice of three Tier III E.G.O Gifts of the above selected Keyword Category. Depending on your upgrade level of Perfected Possibility, you can select at least one and at most three. The table for this is listed below.

Note: Some of these E.G.O Gifts are fusion ingredients, so choose carefully!

Burn
Bleed
Tremor
Rupture
Sinking
Poise
Charge
Dust to Dust
Smokes and Wires
Bell of Truth
Thunderbranch
Midwinter Nightmare
Four-Leaf Clover
Lightning Rod
Charred Disk
Rusted Cutting Knife
Melted Eyeball
Standard-Duty Battery
Broken Compass
Endorphin Kit
Material Interference Force Field
Ardent Flower
Respite
Clockwork Spring
Deathseeker
Distant Star
Finifugality
Imitative Generator

Slash
Pierce
Blunt
Moment of Sentencing
Torn Hems
Dimensional Perception Modifier
Cloudpattern Gourd Bottle
Keenbranch
Clasped Sculpture
Resolution (Tier II Gift)
Plume of Proof (Tier II Gift)
Lowest Star (Tier II Gift)


Have fun with your Starter Gifts, and let them help you try out some new team compositions you wouldn't have thought of prior to trying out the Mirror Dungeon.


E.G.O Gift Search:


If you enabled E.G.O Gift Search, you can pick ANY Tier I, Tier II, or Tier III E.G.O Gift to enter the Dungeon with. Yes, including Theme Pack Exclusive Gifts and those found only in Hard Mode (if you are starting in Normal Mode). However, this is incredibly expensive, costing 70 Starlight for the first Gift, 90 for the second Gift, and 110 for the third Gift.

That is why I do NOT recommend using E.G.O Gift Search unless you are following a very specific strategy online or are using it to fill out your E.G.O Gift Compendium without spending any real starlight (as in, not claiming the run so no Starlight is consumed).

If you do really want to use it, however, I recommend Grand Welcome and Sharp Needle & Thread, both Keywordless Tier III Gifts. Be warned for your Starlight count drains.

Mirror of Immortality Info
The Mirror Of Immortality is everything we've discussed so far, just combined into one big 'thing'.

In case you didn't read the previous sections and are about to jump into the dungeon, make sure you read the Starlight Prioritization Section at the very least!


Now with that completed, the first thing you do upon entering the Mirror Dungeon is decide your team. I've already discussed this in the How to Calculate Starlight Section, but the Identities you choose are relevant to both how much Loadout Bonus Starlight you obtain as well as, well, what Identities you actually use in the Mirror Dungeon. Due to this, it can be useful to rotate the sinners you'd use as Backup Units, while keeping the core team the same if you don't wish to play multiple types of teams each time. This lets you get some amount of Loadout Bonus without jeopardizing the integrity of your run.

Note: Ignore the 'The current average level of Identities is lower than the recommended level.' pop-up. It takes into account your Backup Units, which you aren't going to be using.


After you select your team, you will be selecting which Graces of the Immortal Star you will be taking into the Mirror Dungeon with you. This is why it was important to pick a team with good Starlight income so your Starlight reserves stay in the positive from run to run. I go over Starlight earlier, so refer to those sections for prioritization.

Note: You can go into the negatives on this page! It takes from your reserves in that case. It helps to take into account how much you'll actually earn from the run rather than just the amount you currently have on hand, since we care about being Starlight positive from run to run, not within the run itself.


After your graces, the next thing you'll do upon entering the dungeon is choose Starter E.G.O Gift(s) from one of the 10 Categories available, each associated with a Keyword. There is Burn, Bleed, Tremor, Rupture, SInking, Poise, Charge, Slash, Pierce, Blunt. For information on what specific gifts there are, look at the 'Starting E.G.O Gifts' section above. The amount of Starting E.G.O Gifts you can choose is dependent on the Graces you chose in the previous section, with a minimum of 1 and a maximum of 3. You cannot choose Starting E.G.O Gifts from multiple keywords. If you are confused as to how exactly to select your Starter Gifts, make sure you click on the E.G.O Gift itself after selecting the category, and then press the button in the bottom right to move on to team selection.


I will be turning on the 'Activate Gift Search' button here in the top right of the screen for demonstration purposes, but it will likely not matter for most of y'all and just be an extra screen to click through. If you don't plan to use it, just leave it off. It won't hurt to leave it on, but its annoying to always click through. Otherwise, I explain this part in the Starting E.G.O Gift Section above.


Finally, you'll load into the Mirror Dungeon itself and have to choose your Theme Pack. The Mirror Of Immortality Dungeon is based around the concept of Theme Packs and Card Draws, where the player gets to choose from a set of Theme Packs for what enemies, bosses, and rewards they get on a certain floor. As you can see in this screenshot below, I have five possible Theme Packs to choose from, each showing me different information.


The 'Clear Bonus' section below each theme pack means that I will be guaranteed an offer of those four (three in Normal Mirror Dungeon) E.G.O Gifts upon beating the Floor Boss of that pack, and then will get to choose two (one in Normal Mirror Dungeon) out of those four (three in Normal Mirror Dungeon). So, for example, The 'Nagel und Hammer' Theme Pack will let me choose between Lithograph, Skeletal Crumbs, Talisman Bundle, and Oscillating Bracelet. This will be your main method of acquiring fusion ingredients, since those Clear Bonus E.G.O Gifts have a slightly higher chance to be a part of the Keyword that the Starter Gift you selected is a part of. I selected the 'Rupture' Keyword for my Starter Gift, and you can already see I am being offered three Rupture Gifts overall.

At the top right of each theme pack, you see a Magnifying Glass. Upon clicking those, you can see every E.G.O Gift offered in that pack itself, since not every single E.G.O Gifts is offered as a floor reward in every single Theme Pack, most of them being separated based on Sin Affinity or Keyword. I will go over those differences in a later section on Theme Packs.

You might also see a warning symbol at the top center of certain packs that isn't on other Theme Packs. That Symbol indicates it is a harder Theme Pack, or more specifically, that that Theme Pack has harder potential bosses, typically from the Story Dungeon of the associated theme. For example, 'Automated Factory' and 'The Unloving' are both relevant to Canto II, as you can see directly behind the names, but 'Automated Factory' only has a mid-Story Dungeon boss, while 'The Unloving' has the final Story Dungeon boss of Canto II as its Floor Boss. I will go over bosses in a later section on Theme Packs.

UI Information
Theme Pack Menu UI


Next, lets go over the rest of the UI. If you look to the top left, you'll see two buttons. The Left 'E.G.O Gift' Button merely shows what E.G.O Gifts you've currently obtained in the current Run, which at the moment should just be the Starter Gifts. The right 'Pack Search' button replaces the Magnifying Glass on each Theme Pack with a Refresh Arrow.


This lets you replace that Theme Pack with any Theme Pack available on that floor and difficulty, at the cost of Starlight. That Starlight cost increases by 10 every time you do it in the current run, so use this sparingly and only if you have a very specific pack you are trying to access, for achievements or run viability. The price of Pack Searching also increases by 50% if you have not encountered that Theme Pack already.


If you look in the top right, you'll see six buttons.

The Gear Wheel is simply the Options button. Look at the bottom of this section for additional information.

The button directly below that, which looks like a 3D box, shows all the Theme Packs in the Mirror Dungeon sorted by Normal and Hard Difficulty, along with the Featured E.G.O gifts of those packs. In addition, if you've encountered that Theme Pack in the past already, it will show the potential bosses in that pack. This can be useful as a quick reference of what possible bosses are in Packs to avoid the troubles of certain ones without having to look up this guide.

The button below that, which looks like a person, shows your current team's loadout.

The button below that shows any Active Effects in your current Mirror Dungeon run, including Mounting Trials (discussed in a later section), the Graces you chose, and any Events that might be affecting your runs.

The 'Normal / Hard' Button is what changes your difficulty from Normal to Hard and vice versa if you have unlocked both modes. Let me just say a few keywords for people Ctrl-Fing 'How to Change Difficulty' and 'Access Hard Mode'. You can change difficulty at any point in the run, but once you've selected a Hard Mode Theme Pack, you cannot change back into Normal Mode. This can be useful as a sort of last-ditch refresh of the Theme Packs available. Note that Hard Mode only counts as being completed in Hard Mode (for achievements and Weekly Bonus purposes) if all five floors were completed in Hard Mode.

The button to the Right of that that says 'Refresh' simply refreshes the Theme Packs available with a new set, though there can be repeats from the initial set. The amount of Refreshes you have is decided by the Graces you chose, and resets to its maximum amount each time you are at a theme pack selection screen.

Finally, to select a pack, you simply have to hold on the pack (with left click on computer or your finger on a phone), and pull down.

Note: Any additional E.G.O Gift Grace of the Star effects will occur now, so if you selected the 'Perfected Possibility' Grace of the Immortal Star, then you'll see a selection screen for that choice after selecting your first theme pack.

Floor Menu UI


The Floor Menu UI is almost the exact same as the Theme Pack UI, except for these minor changes.

The E.G.O Gift button in the top left was replaced with a display of the E.G.O Gifts themselves. It is still clickable.

The 'Theme Pack' button is replaced with a Legend detailing a minor description of what each Node in the Mirror Dungeon is.

You also have your current Sin Affinity Resources displayed at the very top, your current Starlight and Cost in the top right, and your team at the very bottom.

Options Menu UI


The Options Menu UI is the same no matter where you access it from. It has five buttons.

The Forfeit Button ends your run early, letting you end your run and claim (or not claim) rewards.

The Continue Button closes the Options Menu. This is the same effect as clicking outside the Options Menu.

The 'To Window' Button lets you leave the Mirror Dungeon WITHOUT ending the run, letting you continue it later. Note that Mirror Dungeons cannot be continued after the Weekly Reset, only claimed. This does mean you can 'smuggle' a completed Mirror Dungeon past weekly reset and just immediately claim it for the rewards.

The Config Button simply is the regular options menu, such as Graphics and Audio.

The Parallel Superposition Switch to the right of the menu turns on and off Parallel Superposition Mode. This is only relevant for Hard Mode Mirror Dungeons, but it is useful to always turn it on when it is available. It mainly exists in case you forgot to turn it on at the start of the run.
The Node Types
Now you are finally in the Mirror Dungeon properly! Let's go over the types of Nodes within it.


(Note the color of your Nodes will be different than mine, since the color is determined by the Floor Theme Pack. The color does not matter, only the appearance.)

As we can see, there are eight node types.

  • Start
  • Regular Encounter
  • Focused Encounter
  • Elite Encounter
  • Abnormality Encounter
  • Boss Encounter
  • Event
  • Shop

Lets go over them one by one.
Non-Combat Nodes
Start Node


The Start Node is a non-functional Node that appears at the Start of every Floor, and whose only purpose is to serve as the beginning of the Floor where the player, well, starts. It'll connect to 2 or 3 more Nodes at minimum (assuming you aren't on a set floor layout), upon which you'll have to continue through the Floor from the Start Node in order to progress.

Event Node


Events Nodes are signified by a question mark, and are the first Utility Node you will encounter. Each Event Node is a non-combat encounter with an Abnormality where the player has a minimum of 2 choices, one typically bestowing an E.G.O Gift upon the player, and the other typically harming the Sinners health or sanity. These choices can require a Skill Check based on Sin Affinities, where the player has to choose a Sinner with higher chances of success based on the Sin Affinities of their Identities' skills. You can also fight some of the Abnormalities that there is a fight encounter for, upon which you gain TWO E.G.O Gifts instead of the typical one for just doing the Event Node normally. I almost always recommend taking the fight in Normal Mode, since these Abnormality fights were incredibly nerfed in the Mirror Dungeon, having very little health compared to their Railway or Story counterparts. Given an okay team, you can beat these every time and get a second free E.G.O Gift. I would only really recommend ignoring the fight if you are going for time or are very low on health (or have not had time to build your Sanity yet on the very first floor). The buffs for these Event Nodes (that aren't just obtaining an E.G.O Gift) include gaining levels, healing health or sanity, and gaining special (and sometimes negative!) effects in the next battle.

Refer to the Guide in the Tips and Tricks section for Abnormality Event Choices, and the outcomes therein.

Shop Node


All Costs are before Grace and Gift Cost Modifications.
In Shop Nodes, you can:

  • Buy random E.G.O Gifts with Cost, with their prices depending on the Tier of the Gift and what Graces or Gifts are owned.
  • Change a random Sinner (changed when refreshing)’s skills in 3 ways:
    • Replace 1 S1 in their Dashboard with a S2 for 45 Cost
    • Replace 1 S2 with 1 S3 for 75 Cost
    • Replace 1 S1 with a S3 for 120 Cost.
  • Replace up to 3 Sinners' IDs and / or EGOs for 100 Cost

    Note that the above options, once selected, are once per slot per Shop Node. The below options are infinite.

  • Refresh the entire shop (Increases by 15 Cost per Refresh):
    • Randomly for 15 Cost
    • Based upon a specific Keyword at 90 Cost
  • Sell useless E.G.O Gifts for Cost
  • Enhance E.G.O Gifts with Cost
  • Fuse Gifts Together
  • Heal Sinners
    • Heal a Single Selected Sinner by 50% HP and 45 SP for 100 Cost
    • Heal All Sinners by 20% and 15 SP for 100 Cost
    • Revive a Single Selected Sinner to max HP and 0 SP for 100 Cost

Refer to the Guide in the Tips and Tricks section for Fusion and Enhancing Details.


Super Shop Node


A Super Shop can only be accessed in Hard Mode. It has a 3% chance (not taking into account Graces) to replace a regular Shop, with that chance increasing by 1% per 20 Cost spent. Once encountered, the percentage chance resets to 3%. You can re-increase it within the Super Shop itself by spending Cost, following the formula said earlier in this paragraph.

A Super Shop is exactly the same as a normal Shop, but has these extra features compared to a normal Shop:
  • E.G.O Gift Selection Options +3
  • Can Replace Skills for 2 Sinners instead of 1 (The Second Sinner is available only after the first has been bought)
  • Can Fuse up to 5 E.G.O Gifts in Fusion (Some Recipes require this)
  • Increased chance of higher-Tier E.G.O Gifts to appear from Fusion (Refer to the E.G.O Gift Upgrading Guide in Tips and Tricks)

As such, it can be useful to save your fusing for a Super Shop, and just enhance / buy / sell E.G.O Gifts in regular Shops if you are playing on Hard Mode.

Refer to the Guide in the Tips and Tricks section for Fusion and Enhancing Details.

Combat Nodes
Regular Encounter Node


The Regular Encounter Node is the first combat Node you'll encounter, with basic enemies of the Theme Pack you selected previously. Regular Encounter Nodes can have a variety of symbols below them, each signaling the Weak or Fatal resistances of the enemies within. This symbol below can be a Slash / Pierce / Blunt symbol, indicating weakness to that damage type, it can also be any of the 7 Sin Affinities, indicating weakness to that Sin, or it can be a mix of both.

For example, the example has a 'Slash' symbol below it, indicating the enemies within will take more damage if I bring a Slash Team within. This can be useful for guessing some of the enemies within sometimes in more varied packs, since there might be certain enemies you want to avoid due to their attacks being too strong. Above every Regular Encounter Node is an amount of Cost you will earn for completing that fight, which, before any Grace or E.G.O Gift bonuses, is 75 Cost (85 in Hard Mode) per Regular Encounter. These are the most common Nodes on every floor, just ahead of Event Nodes.

Focused Encounter Node


A Focused Encounter is very similar to a Regular Encounter Node, with a similar weakness format as before. However, the fight will give you manual control over your sinner's clashes and have you face Peccatulum or weak Distortions (such as Bongy Chickens) in battle. In exchange for this different fight, you get 100 Cost (120 Cost in Hard Mode) ,and a chance at an Encounter Reward Card Pack or Random Gift. I recommend going for Focused Encounters if able to, since sometimes they can be even easier than Regular Encounters.

Elite Encounter Node


An Elite Encounter is very similar to a Regular Encounter Node, with a similar weakness format as before. However, the fight faces an enemy with more powerful Skills than Regular Encounter Nodes. In exchange for this harder fight, you get 120 Cost (150 Cost in Hard Mode) and a high chance at an Encounter Reward Card Pack and / or Gift (detailed in the Encounter Reward Pack Section). I recommend going for this on floors 2 and 3, but weigh how strong your team actually is on floors 4 and 5 before deciding to enter one of these.

Abnormality Encounter Node


An Abnormality Encounter is very similar to a Regular Encounter Node, with a similar weakness format as before. However, the enemy is an Abnormality, such as Headless Ichthys (as shown in the example) or Dream-Devouring Siltcurrent. In exchange for this harder fight, you get 150 Cost (180 Cost in Hard Mode) and a high chance at an Encounter Reward Card Pack and / or Gift (detailed in the Encounter Reward Pack Section).

Abnormality Encounter Nodes are special in that they have a unique symbol on their front, which indicates what Abnormality you are about to fight. It can be helpful to memorize, or just use this guide as a reference, for which Abnormality symbol is equivalent to which Abnormality you'll actually fight so that you can avoid annoying ones.

Icon
Abnormality
Icon
Abnormality
Ambling Pearl
Ardor Blossom Moth
Blubbering Toad
Brazen Bull
Dream-Devouring Siltcurrent
Drenched Gossypium
Drifting Fox
Faelantern
Fairy Gentleman
Fairy-Long-Legs
Hurting Teddy Bear
kqe-1j-23
My Form Empties
Rose Hunter
Shock Centipede
Sign of Roses
Skin Prophet
So That No One Will Cry
Spiral of Contempt
Steam Transport Machine
Wayward Passenger

Boss Encounter Node


At the end of every Floor of the Dungeon is a Boss Node, which has a very similar weakness format as the Regular Encounter Node, just a different appearance. Above the Boss Node are two symbols, one indicating that (Still Making the Formula) Cost is earned upon beating the Floor Boss (before modification by Grace or Gift Upgrades), and one that indicates that you will gain an E.G.O Gift upon beating the Floor Boss.

Those E.G.O Gifts are the Clear Bonus Rewards seen when choosing the Theme Pack. These E.G.O Gifts also have randomized Mounting Trials tied to them, meaning one cannot be picked without the other, and if none are picked, Mounting Trials equal to the amount forced to be selected are randomly selected from the list, without you gaining any Gifts. When the boss on the Final Floor is defeated, the Mirror Dungeon ends.

Pictured below is an example Mounting Trial / E.G.O Gift screen from Floor 3 of Normal Difficulty.


Other Node Types

Sometimes, you will run into nodes that don't look like any of the ones above, while still not being Abnormality Encounter Nodes. These typically are due to set floor layouts (such as those in Noon of Violet), and are typically just Focused Encounter Nodes that look fancy so that they are on theme for the Theme Pack. You won't have a choice of path when these special looking Nodes are shown, so there's no point worrying about them.
Free E.G.O Gift
Combat Nodes have a chance of giving you a couple random, free E.G.O Gifts to choose from upon beating it. This chance is separate from the chance of getting an Encounter Reward Card detailed earlier in the Encounter Reward Card Section. You can't really control this, so I'll just give the percentages in case you were interested.

Note 1: The E.G.O Gift obtained can be any non-fusion E.G.O Gift, though you are vastly more likely to get Tier 1s than Tier 5s.

Note 2: The Boss Encounter version is replaced with the Mounting Trial Gift pick, and is therefore guaranteed.

Encounter Type
Regular Encounter
Focused Encounter
Elite Encounter
Abnormality Encounter
Percentage Chance
0%
75%
100%
100%
Gifts Offered
N/A
1
1
1
Normal Difficulty


You are finally able to enter the Dungeon itself! Time to learn how it works.

First of all, Normal Difficulty is obviously easier than Hard Difficulty, but how is easier?

  • It automatically levels up all units that enter it to Lvl 55, meaning it can be used to test Identities a lot easier before committing resources to that Identity. However, your Uptie Level stays the same regardless of Difficulty, so that might be an issue.
  • You also pick only 1 Mounting Trials per floor instead of two of them, so overall, you get an easier experience.
  • The Theme Pack choices available for Normal Mode are typically the easier Theme Packs, and so you are forced into picking an easier time.
  • The Fog of War is removed.
  • Finally, the base level (the level before Mounting Trial modification) of the enemies is lower in Normal Difficulty compared to Hard Difficulty, and they have slightly lower HP in addition to that.

Otherwise, it is fairly similar in concept to Hard Difficulty.

Layout

A typical Floor in The Mirror Dungeon will be some combination of the Eight Nodes in the section prior, with two main distinctions. Random Nodes, which have no set Node selected for it prior to generating the Floor, and set Nodes, which will always be that no matter how many times you run the Mirror Dungeon. This usually ends up with having the Start and Boss Nodes at the beginning and end of a Floor, a set Node right after or before them respectively, and a number of Random Nodes between them based upon what Floor Theme Pack was selected (look at Floor Theme Layouts for more information).

Random Nodes consist of Regular Encounters, Focused Encounters, Elite Encounters, Abnormality Encounters, and Event Nodes.
Set Nodes vary between Start, Shop, and the Boss Node depending on the Floor involved. Sometimes, Theme Packs have an even more set layout, where the Events and Fights occur in specific locations. These are typically Long Battles (discussed later).

A typical Floor 1 in Normal Difficulty:


Floor 1 for both Normal and Hard is a bit special compared to the other floors, in that the Random Node pool is reduced to just Event Nodes and Regular Encounters for just that Floor, no matter what Theme Pack is selected. This does mean that there are fewer chances for E.G.O Gifts on Floor 1, so when selecting a Theme Pack at the start of the Dungeon, selecting one with easy enemies and E.G.O Gifts you don't necessarily want (not including the ones obtained after beating the Floor Boss) is smart since you likely won't be able to get many E.G.O Gifts on this floor anyway.

A typical floor 2 in Normal Difficulty:


Floor 2 onward all have the full Random Node pool minus Abnormality Encounters and Floor 3 onward all have the full Random Node pool, including Abnormality Encounters.

Each floor has its layout as follows, assuming the Theme Pack itself doesn't have a unique Layout:

Note: The amount of Random Nodes on a Floor depends on the Theme Pack selected, not the Floor, so I will be saying '# Random Nodes'. See Theme Pack Layout for more information.

1 Start Node, # Random Nodes, 1 Shop Node, 1 Floor Boss Nodes.

General Suggestions

My general suggestion is to upgrade your Starting E.G.O Gifts to ++ at the end of Floor 1, and then try to find Fusion Ingredients through the Clear Bonus of Theme Packs or in the Shop Node at the end of each Floor.

Otherwise, on each Floor itself, I recommend planning your route at the beginning of the Floor at the Start Node, and then following that path to the Boss. Since Shop Nodes are fixed, you are only seeing whether you want to visit Elite, Focused, Abnormality, and Event Nodes over Regular Encounters. I typically have this as my priority list for Normal Difficulty, assuming I'm not trying to speedrun it;

Event == Abnormality >>> Elite > Focused > Regular Encounters

If I am trying to speedrun it, then the priority is almost reversed:

Event >>>>>>>> Regular Encounters > Abnormality > Focused > Elite

Mounting Trials

Mounting Trials are an element of the game where, every time you beat a Floor Boss, you get an E.G.O Gift and a corresponding buff to the enemies you fight, called a Mounting Trial. If you choose to refuse the E.G.O Gift, then the Mounting Trial you get is picked randomly from the options available, so there's no real reason to refuse the gift (Especially when you can sell or fuse it later on!). Since you only select one E.G.O Gift at the end of a Floor in Normal, you only need to select one Mounting Trial per floor compared to Hard Difficulty. In Normal Mode they don't matter as much, so I would just make sure to avoid extremely bad ones such as Brutality and Headstrong.

My general recommendations:

HP/Defense Increases > Offense Level > Clash Power > Final Power = Base Power >>> Coin Power

Look at the Mounting Trials Section for more details.

Rewards

Weekly Bonuses Used
Battle Pass EXP
Free Lunacy
Manager EXP
0
30
0
100
1
45
250
100

You can only consume a single Bonus per Normal Mirror Dungeon.

Finally, if you quit early, you will get a percentage of the full rewards based on what you completed (gone over in the Intro to Mirror Dungeon Section). This does mean you will miss out on some Weekly Lunacy if you do not complete all the Floors!
Hard Difficulty


If this is your first time trying out Hard Mode, then I wish you luck. It's honestly quite similar to Normal Mode, with a few major changes to let it stand on the stage on its own.

Changes from Normal

Those changes are as follows:
    Positive Changes:
  • Cost gained upon clearing Combat Encounters increases
  • Super Shops can replace regular Shops
  • Rewards when Weekly Bonuses are consumed are vastly increased
    • When Weekly Bonus is not consumed, it has the same rewards as Normal without Bonus, except for earning more Starlight.

    Neutral Changes:
  • 4 E.G.O Gift Choices per Boss Encounter Completed
    • 2 E.G.O Gifts and associated Mounting Trials to choose per Boss Encounter Completed
  • Unlocks Hard Mode-Only Theme Packs and E.G.O Gifts
  • Parallel Superposition Mode is available

    Negative Changes:
  • Identities have their actual Levels and Upties as their Base Level (Base Level is capped at Level 55)
  • Fog of War makes it so you can only see 2 Nodes ahead of your current Node
  • Higher enemy level and HP than Normal

Example of Fog of War


General Suggestions

These changes can mostly be mitigated by knowing what you are doing and leveling up your units yourself.

For example, since you are picking two Mounting Trials per Boss Encounter, the amount of levels the enemy gets per floor are doubled. Thus, it really helps to know exactly which Mounting Trials are better than others, and pay attention to which ones you pick.

The Fog of War can be mitigated by keeping your options open; continuing with the previous Node priority, but when given two equal choices, pick the option that has more Nodes branching off from it so that you aren't locked into a single path. This lets you avoid being trapped into doing an undesirable Node.

Other than that, the Floor Layouts and everything else are the exact same as Normal Mode!

Rewards

Weekly Bonuses Used
Battle Pass EXP
Free Lunacy
Manager EXP
0
30
0
100
1 + 1 + 1
250
750
360
1 + 2
235
750
360
2 + 1
230
750
360
3
225
750
360

Finally, if you quit early, you will get a percentage of the full rewards based on what you completed (gone over in the Intro to Mirror Dungeon Section). This does mean you will miss out on some Weekly Lunacy if you do not complete all the Floors while eating a Weekly Bonus!
Parallel Superposition Mode
Description


Parallel Superposition Mode, otherwise known as Mirror Dungeon Infinite, adds 5 more floors after Mirror Dungeon Hard is complete. It is functionally a Mirror Dungeon Hard but longer.

The main differences is that the Theme Pack choices in Parallel Superposition take from Floor 5 of Mirror Dungeon Hard, and just like all the other Mirror Dungeon Difficulties, Theme Packs cannot repeat once chosen. This means your pool decreases as you go further in Parallel Superposition Mode, though that doesn't matter that much since the pool is very large.

In addition to that, the Base Level of the ememies is frozen at 59, though it still increases from taking two Mounting Trials per Boss Encounter. The Mounting Trials also progressively get even harder in Mirror Dungeon Infinite.

Additional Notes

Make sure you have turned on Parallel Superposition Mode in the Mirror Dungeon Options Menu before selecting your Floor 5 Theme Pack!!! You can even select it on the same menu you are picking your Floor 5 Theme Pack, but if you do not turn it on, then you are not entering Parallel Superposition Mode.

If you are doing your weekly Hard Mirror Dungeon to consume bonuses but don't want to do an entire Mirror Dungeon Infinite, still keep it on. Encounter Reward Cards are guaranteed drops from bosses, so you can beat Floor 5, take the Encounter Reward Card, and then forfeit at the start of Floor 6. The main goal of this is the Starlight Encounter Reward Card, for some extra gain per run!

Rewards

There are no extra rewards for doing Mirror Dungeon Infinite, other than extra Starlight, completing Achievements, or for fun!

Do not expect to get extra Lunacy or Battle Pass EXP for doing this mode. It is considered a Mirror Dungeon Hard completion if you end at any floor of Mirror Dungeon Infinite.
Mounting Trials


TODO
Infinite Mounting Trials
Enemy Base Levels


This is the table of base enemy levels per floor. Remember that these are the BASE numbers, and thus you should add whatever bonus Enemy Level +s you got from the Mounting Trials in either Difficulty to this Base Number.

Note 1: The Base Lvl does not vary between Elite, Focused, Boss, and Regular Encounters.

Note 2: Floors 6-10 are only available in Parallel Superposition Mode.

Floor #
Normal Base Lvl
Normal Minimum Potential Lvl
Normal Maximum Potential Lvl
Hard Base Lvl
Hard Minimum Potential Lvl
Hard Maximum Potential Lvl
Floor 1
Lvl 55
Lvl 55
Lvl 55
Lvl 55
Lvl 55
Lvl 55
Floor 2
Lvl 55
Lvl 56
Lvl 57
Lvl 56
Lvl 58
Lvl 60
Floor 3
Lvl 55
Lvl 57
Lvl 59
Lvl 57
Lvl 61
Lvl 65
Floor 4
Lvl 55
Lvl 58
Lvl 61
Lvl 58
Lvl 64
Lvl 70
Floor 5
Lvl 55
Lvl 59
Lvl 63
Lvl 59
Lvl 67
Lvl 75
Floor 6
Lvl N/A
Lvl N/A
Lvl N/A
Lvl 59
Lvl 69
Lvl 79
Floor 7
Lvl N/A
Lvl N/A
Lvl N/A
Lvl 59
Lvl 71
Lvl 83
Floor 8
Lvl N/A
Lvl N/A
Lvl N/A
Lvl 59
Lvl 73
Lvl 87
Floor 9
Lvl N/A
Lvl N/A
Lvl N/A
Lvl 59
Lvl 75
Lvl 91
Floor 10
Lvl N/A
Lvl N/A
Lvl N/A
Lvl 59
Lvl 77
Lvl 95
Mounting Trial Priority List
My good friend Kälhtzsteiss helped organize a Mounting Trial difficulty list, though generally follow the rule of:

HP/Defense Increases > Offense Level > Clash Power > Final Power = Base Power >>> Coin Power.


Note: This is based on the difficulty of the Trials. Not every Trial in the same Tier is equal; for example, Keen IX is worse than the other HE in its Tier due to having +8 Offense Level, however, it is not as bad as any of the WAW. Remember to check based on the formula at the top of this section.
Theme Packs
TODO
Story Theme Packs
Keyword Theme Packs
Sin Affinity Theme Packs
Theme Pack Recommendations
Rental Teams


Rental Teams are a new feature in Mirror Dungeon of Immortality where KJH has personally hand-crafted a team for you to play. It lets you borrow Identities and E.G.Os you may not own, so as to test them out yourself.

Rental Teams come with at least 1 EGO in every slot (if an EGO exists to fill it), every EGO at Threadspin 4, and every Identity at Uptie 4, Level 55. They all have maximum Loadout Bonus.

There are a few limitations, however:
  • You only have one Rental chance per Rental Period, which is two weeks.
    • This means that you cannot use it for all of your weekly bonuses, since there are 5 Weekly Bonuses unaccounted for with that.
  • You can only consume one Weekly Bonus per Rental Team usage, even if the entire Mirror Dungeon is done in Hard Mode
  • Parallel Superposition Mode (Infinite Mode) is not available with a Rental Team
  • Swapping Identities or EGOs in the Shop is not available with a Rental Team
  • Some Achievements cannot be completed with a Rental Team
    • Note that I say some. If an achievement does not specify, then it can be completed with a Rental Team. There are even achievements that can only be completed with a Rental Team.

In exchange, you get these benefits:
  • A free, Event Farming-relevant team to complete at least 1 Mirror Dungeon with
  • The chance to try out new Identities and EGOs in the Mirror Dungeon without leveling up your own Identities
  • A free boost to your actual Unit's Loadout Bonus
  • Starlight gain from their maximum Loadout Bonus

My Recommendations

For older players, Rental Teams are not very useful. The only real benefit older players get out of them is their maxed-out Starlight. Thus, this is a feature more for newbies.

I highly recommend Newbies to always use the Rental Team in every Rental Period, just since it lets you have a much easier time in Hard (or Normal!) Mode with a stacked team. It gives you more time to build up your own teams, though you still need to build your own teams for the other 5 weekly bonus consumptions.

I also always recommend using the Rental Team in Hard Mode (if unlocked), since despite only consuming 1 Weekly Bonus, it can be helpful having a stacked team as a newbie to get those achievements out of the way. You also get slightly more Battle Pass EXP since you'd need to do two Mirror Dungeon Hards; one with the Rental Team, and one to finish off the rest of the Weekly Bonuses.

Achievements


Achievements are a feature attached to a Mirror Dungeon exclusive Battle Pass (no Paid version), where each Achievement completed gives some EXP to the Pass. Think of something similar to Integrated Strategies in Arknights. Achievements are still actively being released, so I will be going light on this section for now and update it later.

For now; Refer to the guide in the Tips and Tricks section on how to complete specific Achievements, though it might be a strategy to wait for more achievements to release in order to double dip on as many as possible in the fewest number of runs.
Tips and Tricks


For your first few runs of the Normal Mode, you shouldn't have a massive amount of trouble, though it might take a while as you get used to the UI and Mirror Dungeon System. If it is taking you longer than an hour, you are taking too long. An average, non-optimized run is about 30-40 minutes. Just remember to avoid any Theme Packs that are especially annoying for the build you are playing, or just in general, such as Noon of Violet, The Evil Defined, and Tyrannical. Generally, just remember to swap out your team for the optimal farming rotation for starlight and avoid the terror Packs, and you'll be fine in Normal Mode.

For Hard, much of the same applies, since these modes are fairly close in concept. It is absolutely completable without any of the Graces turned on as long as your team is strong enough and you pay attention, but it will take a lot longer than doing it with a few Graces while still remaining Starlight Positive. Generally, for the first floor you only care about the guaranteed drops from the boss and what types of enemies you'll be fighting, since you want enemies you can quickly raise your Sanity against and you won't encounter any Elite nor Focused Encounters. I recommend upgrading your starter E.G.O Gifts to ++ at the first-floor shop. Then, you can fuse into your team's Tier 4 Gifts at the floor 2 or floor 3 shop by getting Fusion Ingredients or junk gifts to fuse away. Just keep paying attention to what theme packs and gifts you want for your team until Floor 5, where you want to make sure you aren't fighting an uber difficult boss (unless you want to have a funky time), and end it with a bang!

General Tips and Tricks:
  • If you are doing your weekly Hard Mirror Dungeon to consume bonuses but don't want to do an entire Mirror Dungeon Infinite, still keep it on. Encounter Reward Cards are guaranteed drops from bosses, so you can beat Floor 5, take the Encounter Reward Card, and then forfeit at the start of Floor 6. The main goal of this is the Starlight Encounter Reward Card, for some extra gain per run!


I also recommend referencing these guides as supplemental material for going through the Mirror Dungeon:

EX E.G.O Gift Farming Cheat Sheet by Borderlined:

https://gtm.steamproxy.vip/sharedfiles/filedetails/?id=3524110409

Mirror Dungeon 6 Achievements Guide by ChaosComposer:

https://gtm.steamproxy.vip/sharedfiles/filedetails/?id=3544187146

Mirror Dungeon Abnormality Cheatsheet by Echo:

https://gtm.steamproxy.vip/sharedfiles/filedetails/?id=2940932941

E.G.O Gift Fusion & Upgrading Cheat Sheet by Borderlined:

https://gtm.steamproxy.vip/sharedfiles/filedetails/?id=3115645873

Mirror Dungeon 6 Team Guide[docs.google.com] by Zuihou and the Hivemind Team
Thanks for Reading!


Special Thanks to Kälhtzsteiss for letting me use their Mounting Trial Priority List image, as well as any community members that have contributed to helping refine this guide.

Final Note: If there's anything you think I should add, such as an extra Tip & Trick), got wrong (I've had to rewrite a lot each time Project Moon adds a new feature every week, I'm sure something from an earlier patch slipped in somehow), or anything else, let me know in the comments or on Discord! My Discord is the same as my name, but I'm also commonly on the two major Project Moon discords if you want to find me in the wild.
15 Comments
Eclipse Tachyon <3 30 Sep @ 6:03pm 
W
Borderlined  [author] 18 Sep @ 1:15pm 
@Kalder you are focusing on the wrong part of Interstellar. Ignore the level part. Pretend its flavor text. The main important part is giving more refreshes, letting us save starlight when fishing for specific theme packs in our runs.

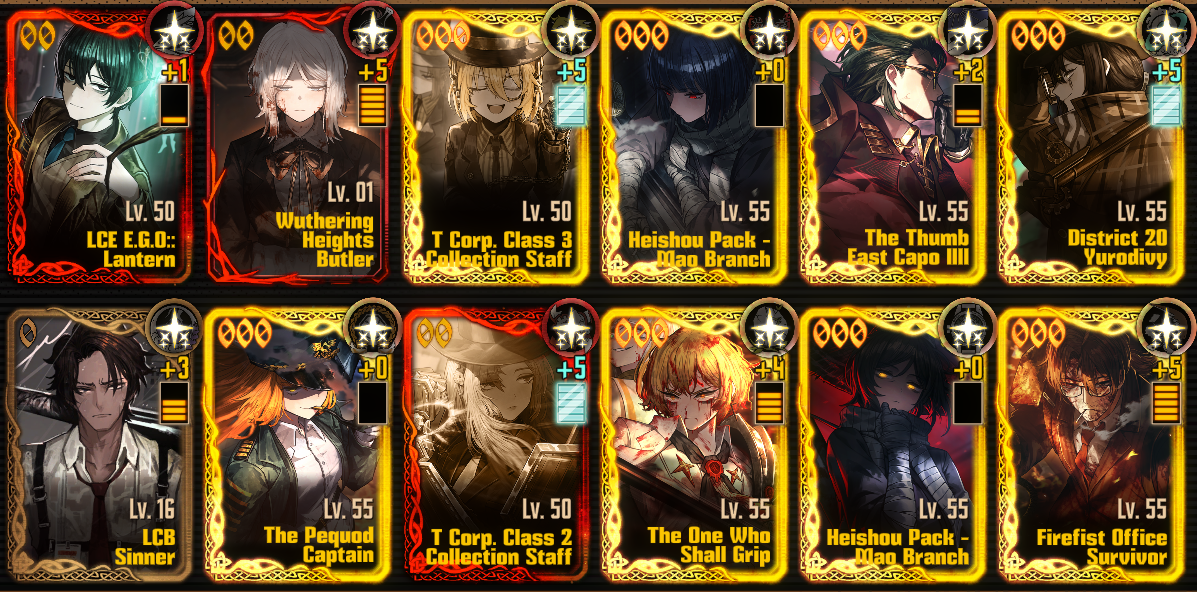
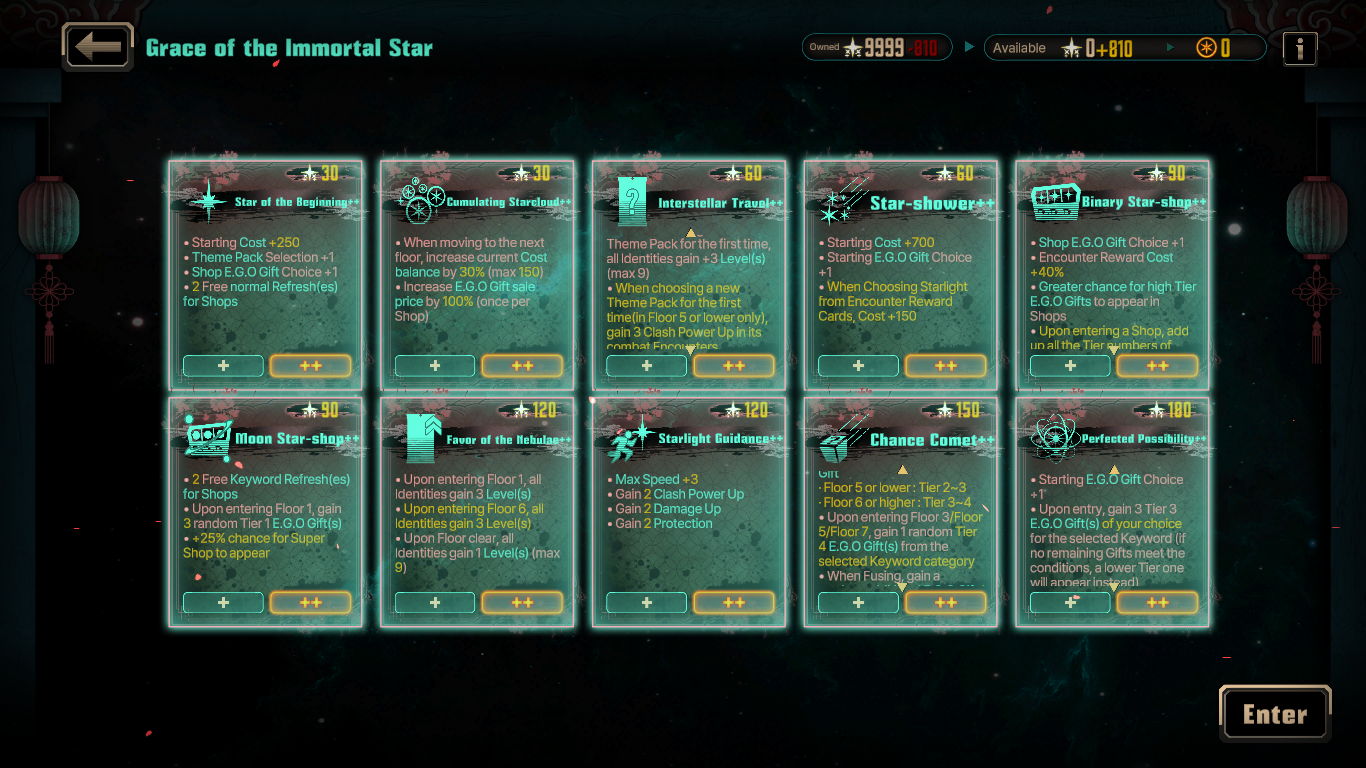
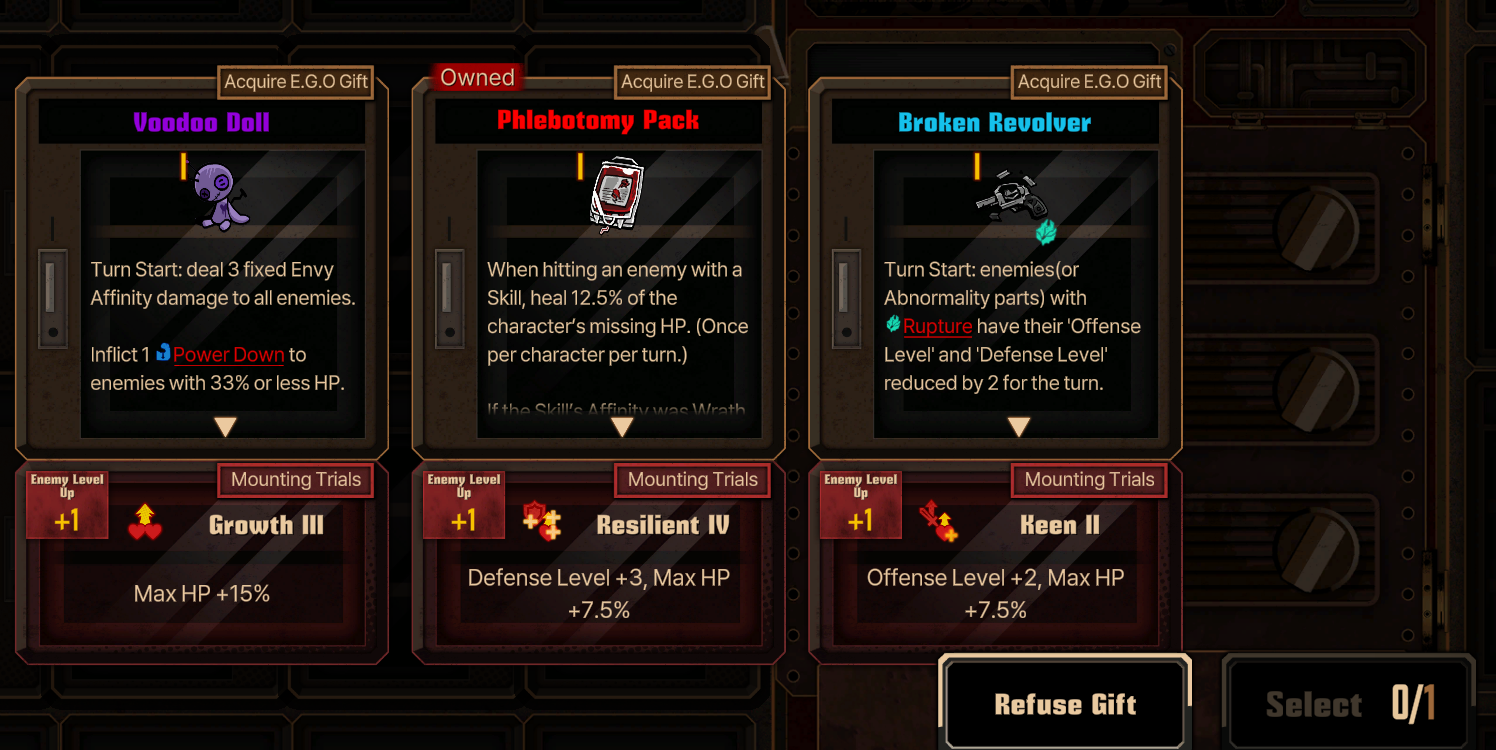
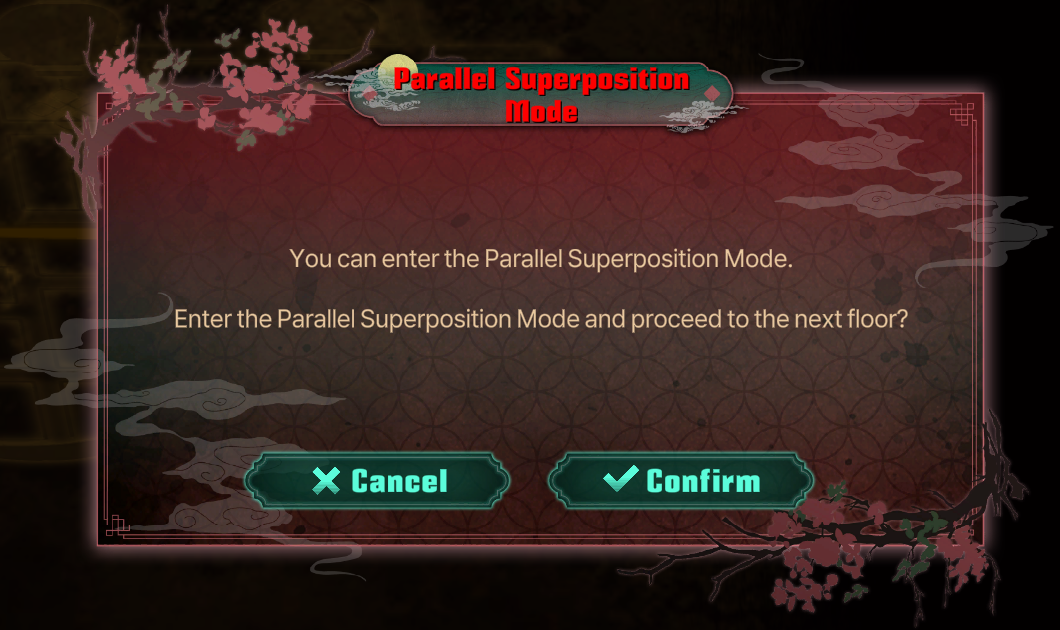
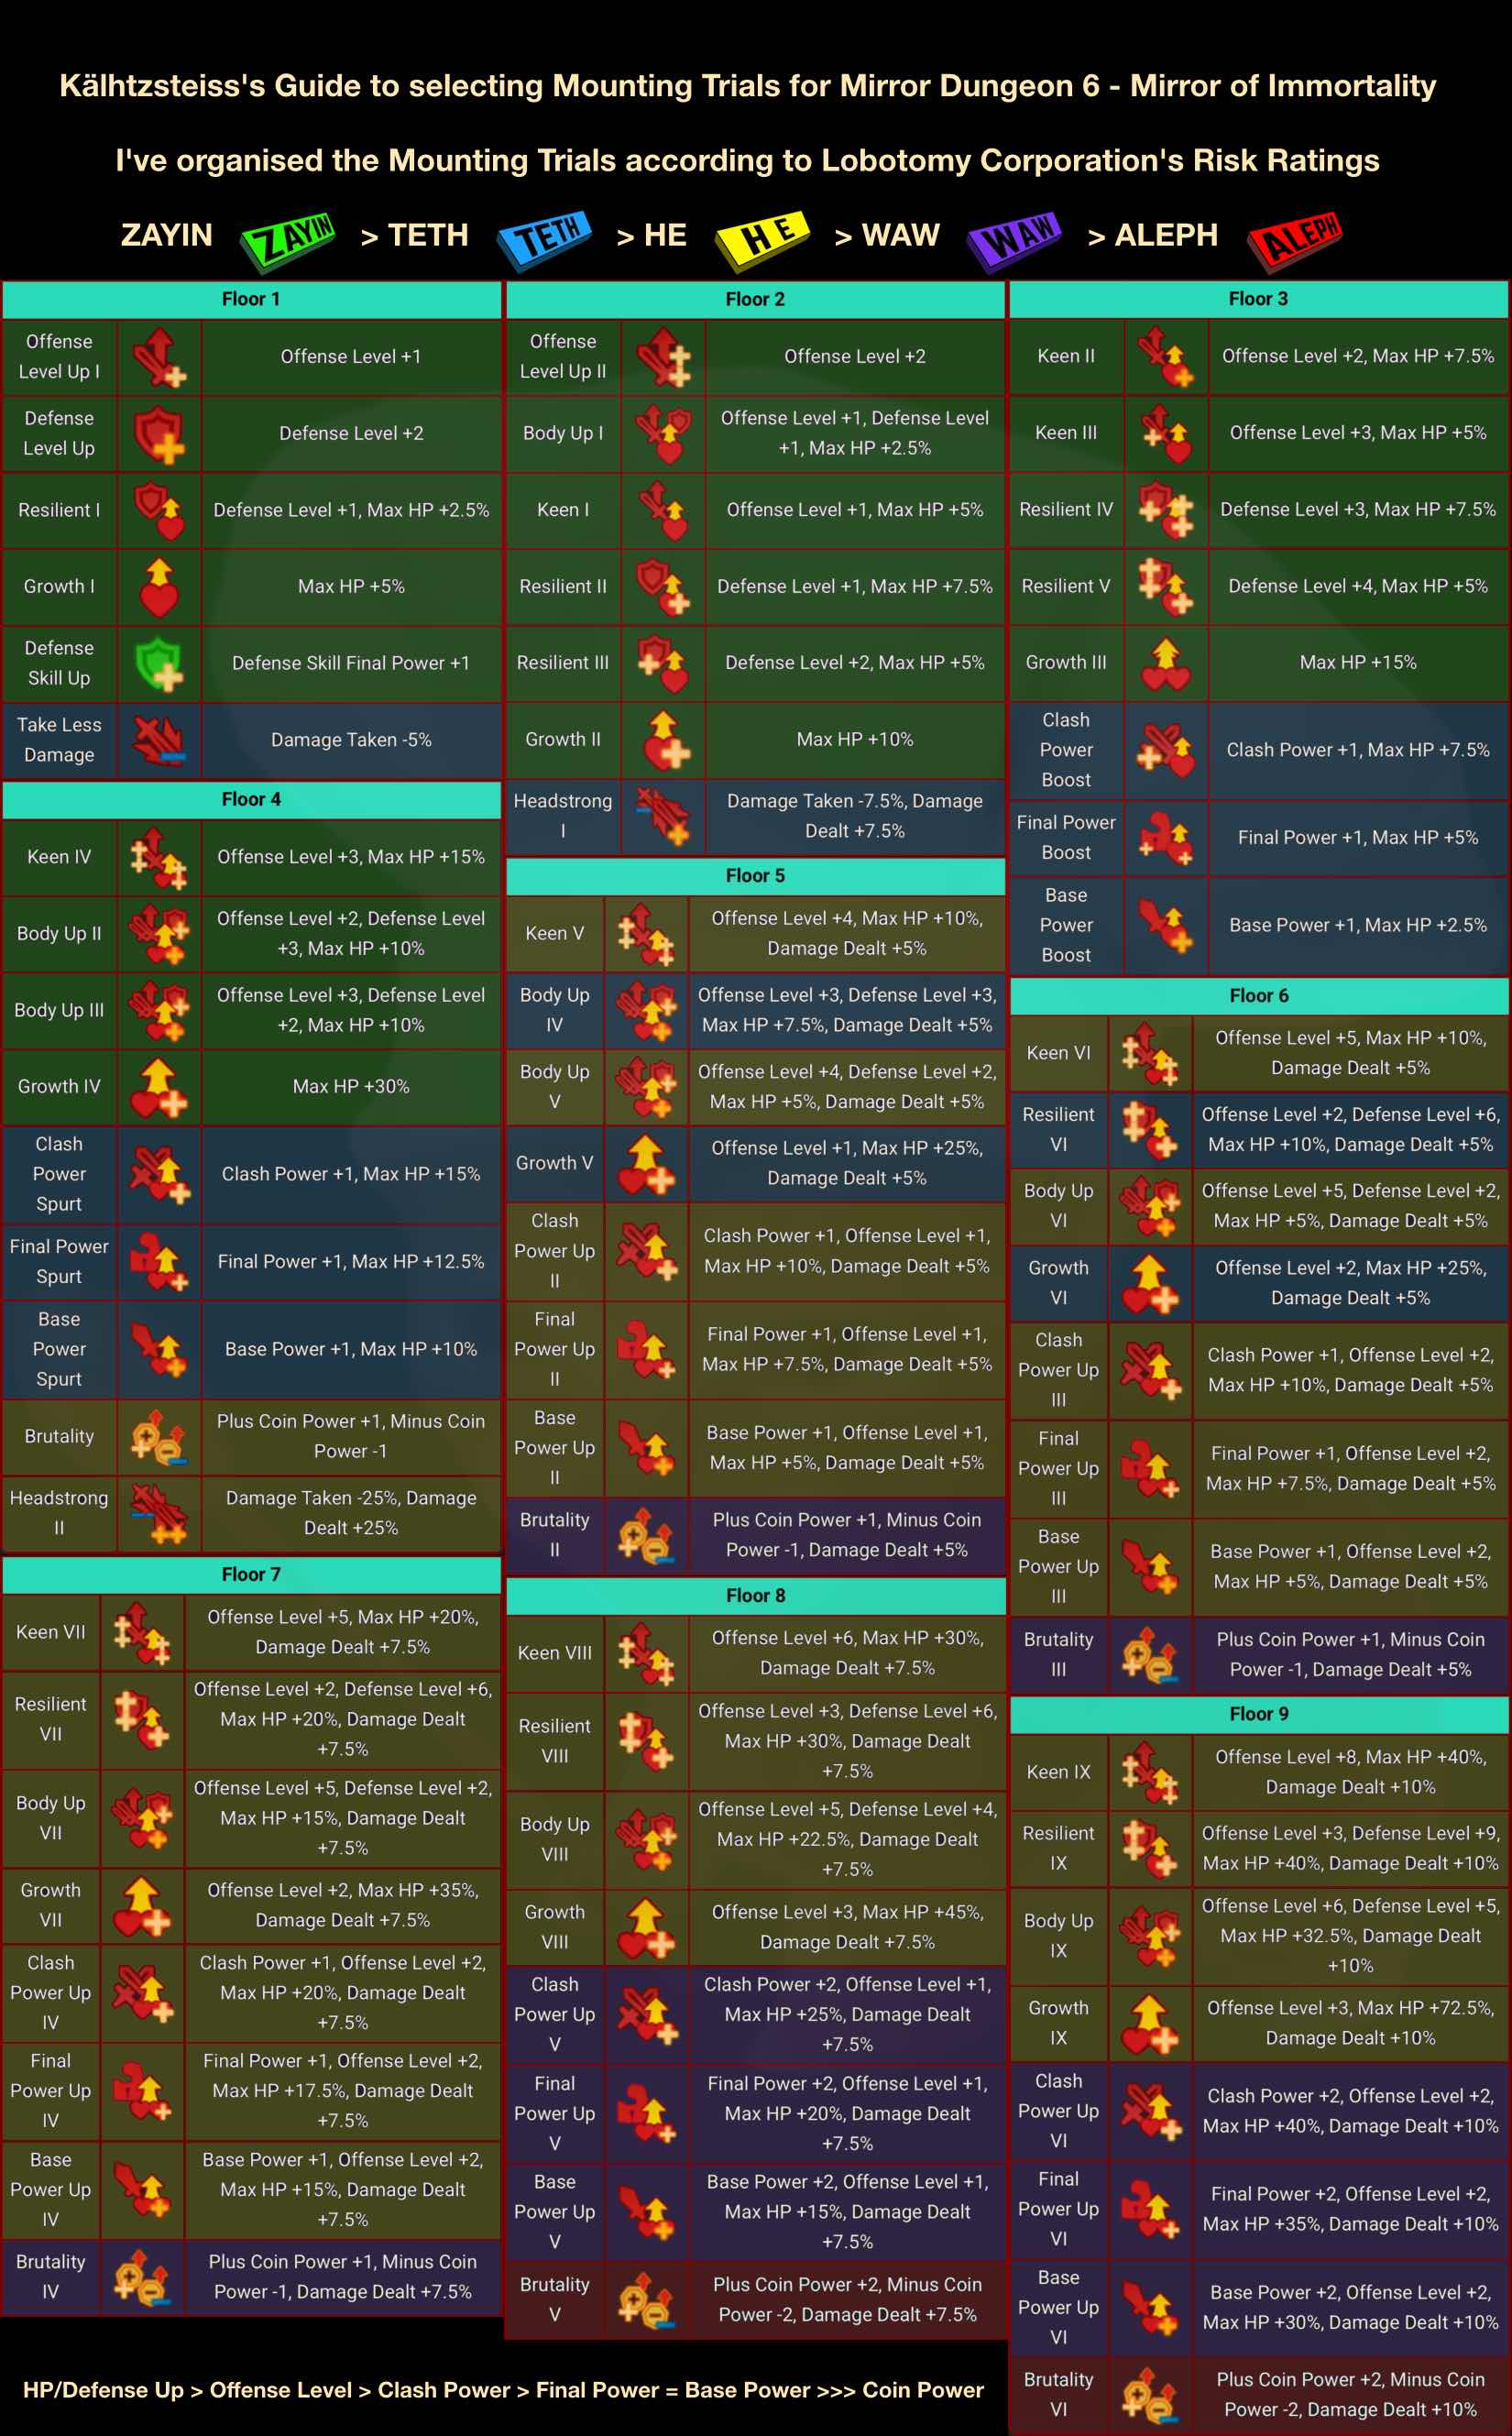
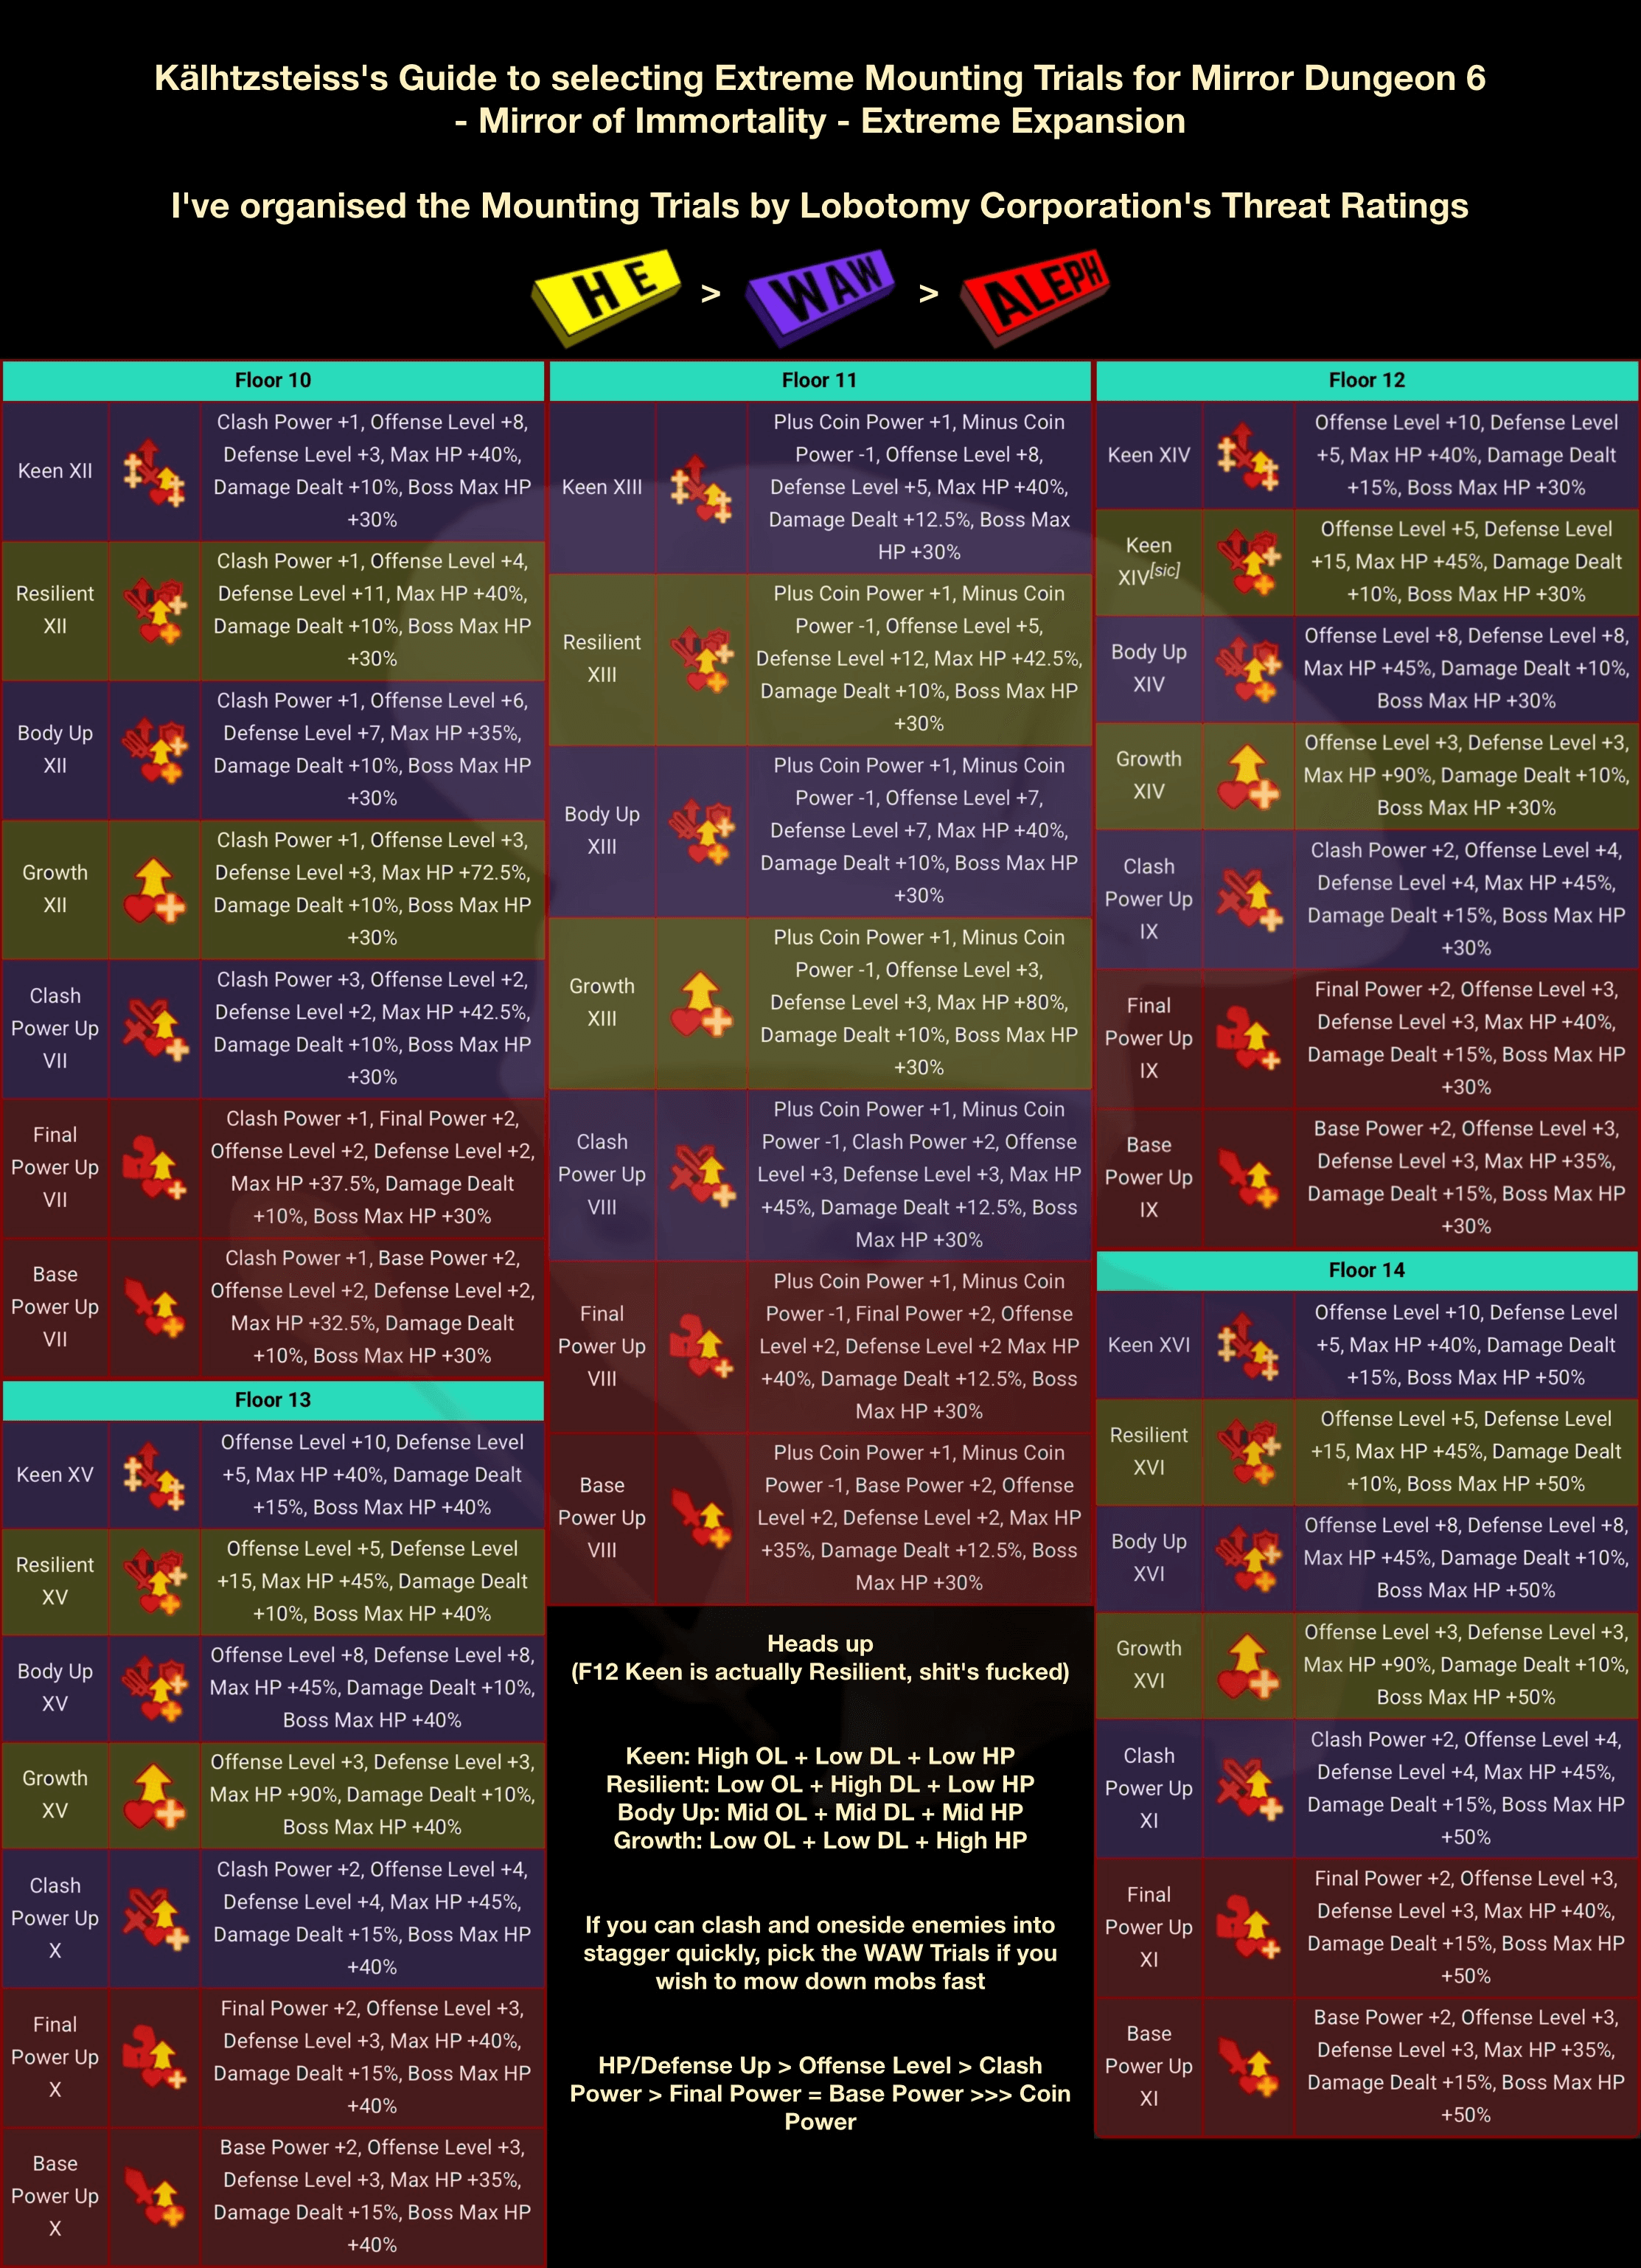
It doesn't give the level bonus.
Interstellar Travel is useless once you fill the floor compendium right? because technically you don't have any "new" floors, or does it still give me the bonus if I pick, lets say, the To be Cleaved pack 3 times in a row on 3 MD runs
Borderlined  [author] 11 Sep @ 10:35pm 
Added the Extreme Mounting Trial recommendations. Also as a quick aside, here is a good link to an IN PROGRESS MDE Guide by my buddy Koezar. Was very helpful as a reference during my run.

https://docs.google.com/document/d/1wf9qZcUOqLa3Ebd_HxxauPmhInb3VcgYSo2VsbO7n-A/edit?tab=t.0
real 13th building 8 Sep @ 4:00am 
It's excellent and helpful thk u for these hardworking sheets and dirctions!
The Phasmid 31 Aug @ 1:06pm 
This is actually really helpful for me. Been grinding it for the first time for the last 3 weeks. Still learned really good stuff here. Appreciate u
Borderlined  [author] 30 Aug @ 12:12pm 
@FlintX There is much more here than just stuff that is found in-game, such as the Starlight Recommendations or the actual percentages of multiple things like ERCs. Events / Outcomes are in one of the linked guides, the MDs Abno Cheatsheet, as are Gifts and Achievements. No clue what you mean about reward/punishment, but Mounting Trials already have a Priority List, which is also not present in-game.

Regardless, this guide is meant for people new to the MD or who want more information after their first few experiences. I specifically say 'This is a long guide that goes over a lot of information you might already know if you aren't a beginner to Mirror Dungeons, so here are the main sections for you to skip through as you need.' If you think a section isn't useful for you since you aren't a beginner, then don't read that section. But don't call the whole thing useless when much of it is not available in game, or is reworded to be more understandable than the in game's messy tutorial.
FlintX 30 Aug @ 12:04pm 
None of this is useful if you are just going to list description of things that everyone can see by playing through it, or copying the contents of the help tutorial button and transcribe here.

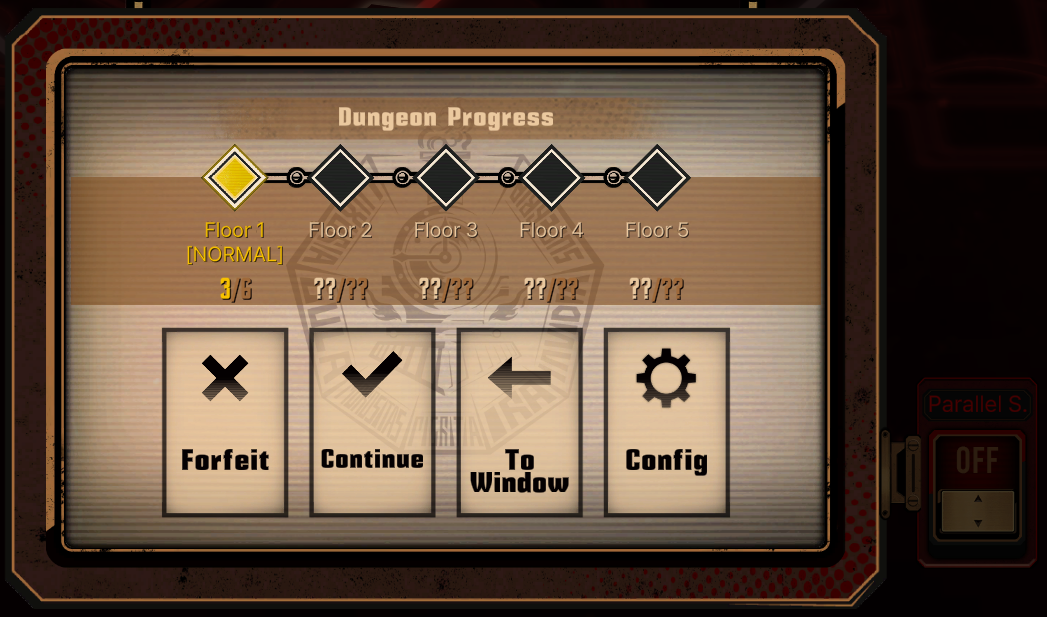
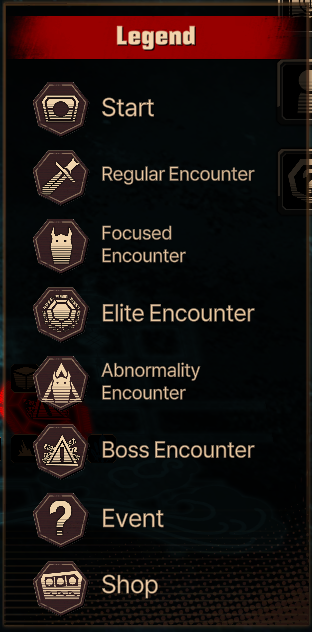
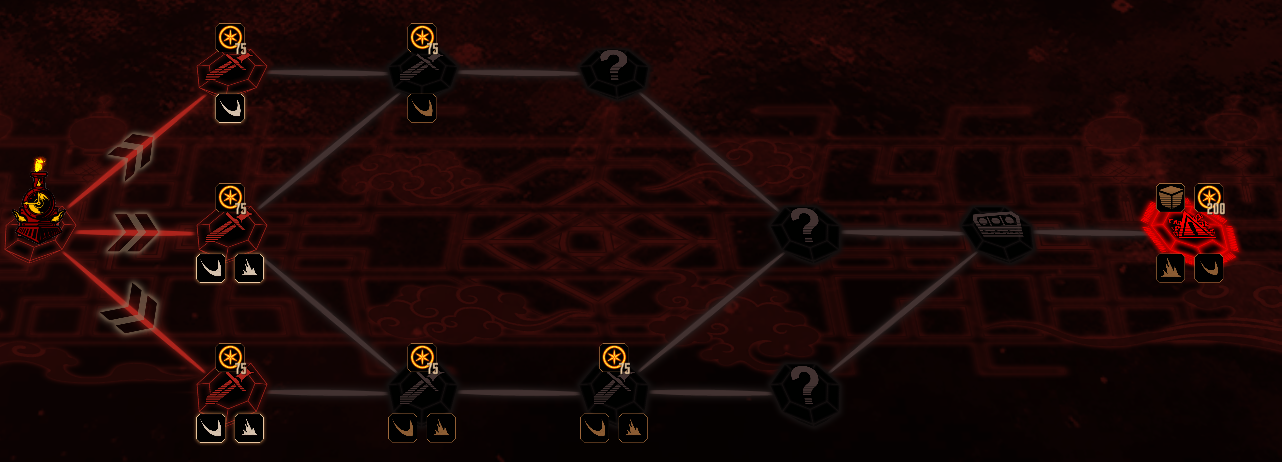
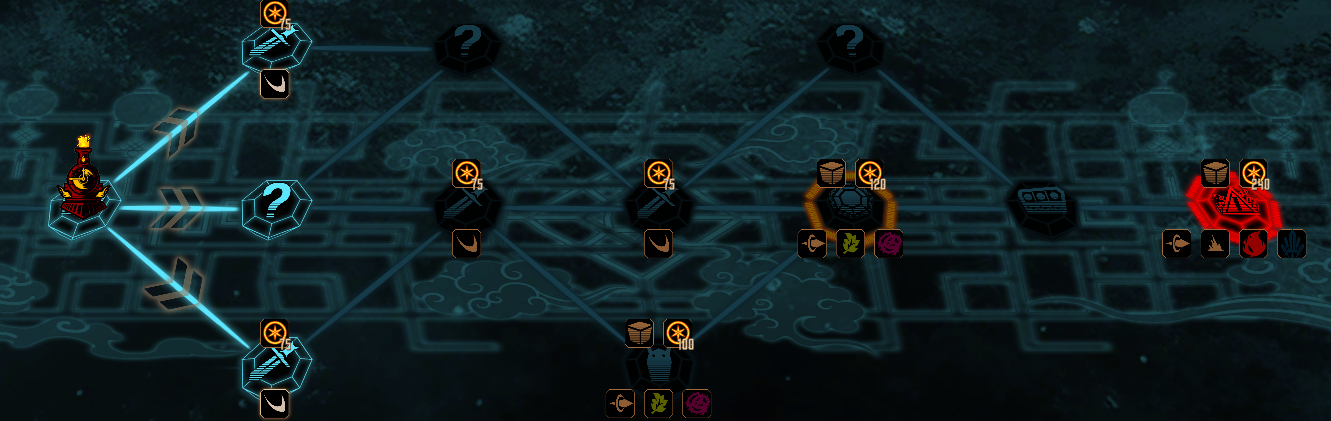
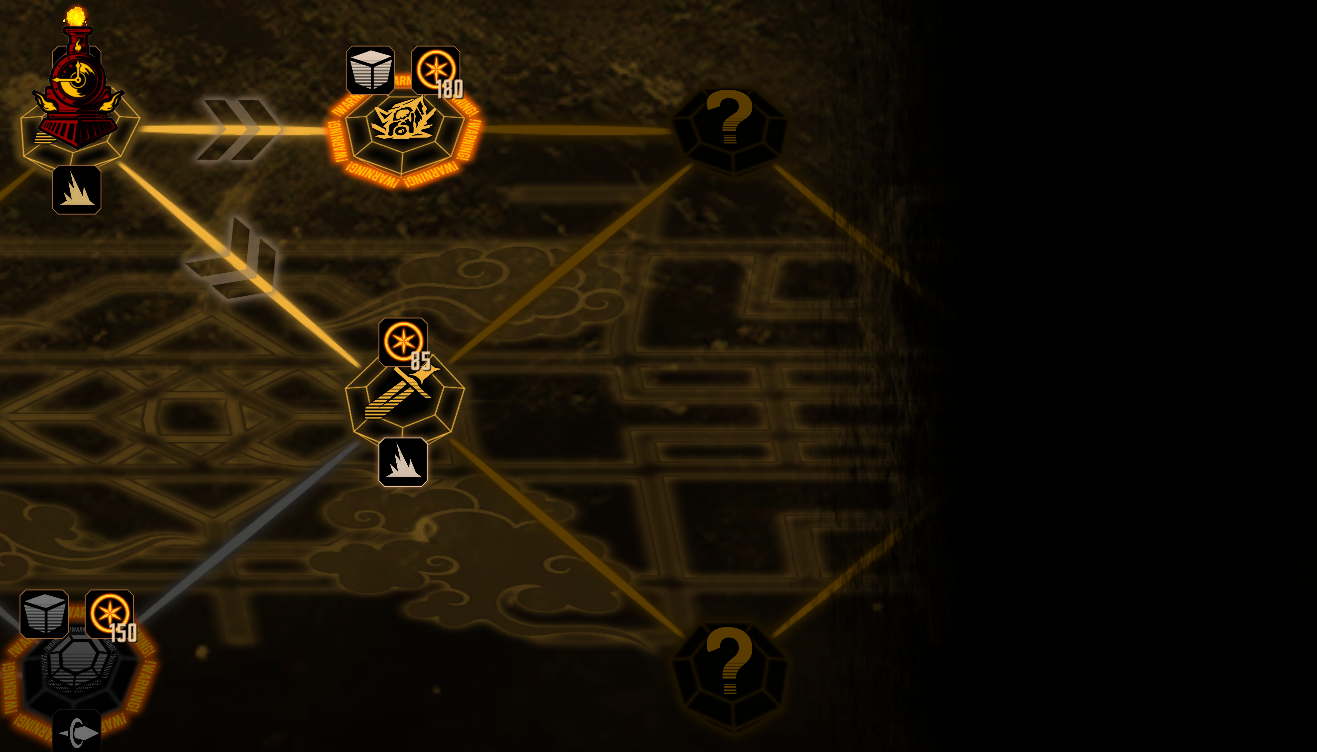
Where is the actual useful stuff, like a list for all "?" nodes events, choices outcomes and rewards/punishment, etc?
Borderlined  [author] 16 Aug @ 6:15am 
@Funk ?
Funk 16 Aug @ 4:32am 
schizophrenia on a stick