TETRIS® THE GRAND MASTER 4 -ABSOLUTE EYE-

TETRIS® THE GRAND MASTER 4 -ABSOLUTE EYE-

28 ratings
Keyboard/Controller Configuration
By Kitaru
Learn how to customize your controls like a TGM pro! The default keyboard controls in Tetris games make compromises for legacy controls from 1985. The default gamepad controls are intuitive, but may be tough on your thumbs during fast-paced action. With just a few tweaks, you can have a layout that gives quick, comfortable access to all important game actions.
6
2
2
3
   
Award
Favorite
Favorited
Unfavorite
Intro
The default keyboard controls in Tetris games make some compromises to keep “backwards compatibility” with layouts from the series roots all the way back to 1985. Some of these legacy key mappings aren’t ideal, and many Tetris players instead make customizations to their keyboard configurations to be closer to how they are typically configured on gamepads or arcade sticks. This guide will give a few recommendations of possible alternate keyboard layouts for newcomers to try.

Additionally, due to the fast-paced nature of the TGM nature, playing on standard gamepad controls may be a cause of thumb strain. This guide will also suggest some possible customizations to make the game more comfortable to play on a gamepad as well.
Background
Tetris games played with gamepads or arcade sticks usually have one hand control piece movement and dropping, and the other hand control piece rotation and other actions.

Definition of some terms, and how their controls are assigned in console and arcade titles:
  • Soft Drop: Moves the piece downward at a moderate rate. Performed pressing Down on the d-pad or joystick.
  • Hard Drop: Moves the piece down to the floor instantly and locks it in place. Performed by pressing Up on the d-pad or joystick.
  • Sonic Drop: An unofficial/community term; in contrast with Hard Drop, a Sonic Drop moves the piece down to the floor instantly without locking the piece. It is a replacement for the locking Hard Drop, and as such is also performed by pressing Up on the joystick. This guide’s diagrams will be using “Hard Drop” to refer to both types of “fast dropping” actions.
  • Hold: Swaps the current piece for the contents of the Hold queue. Usually performed with an “extra” button, such as shoulder buttons on gamepad or a thumb button on arcade controls.
  • Backstep: New to TGM4. In Asuka mode only, allows rewinding previously placed pieces.
  • Extra: New to TGM4. In TGM Rule only, holding this button changes the drop buttons to a locking Hard Drop and non-locking Soft Drop.

Below is the diagram of Classic Rule controls in Tetris: The Grand Master 3, as well as the recommended arcade control layout for the new buttons shown in Tetris: The Grand Master 4. These will be used as the basis for the suggested keyboard layouts.

Fig.1: The first button (index finger) rotates the piece to the left. The second button (middle finger) rotates the piece to the right. The third button (ring finger) is an extra button to rotate the piece to the left. The fourth button (thumb) swaps the piece with Hold. Pressing Up on the joystick performs a Sonic Drop.

Fig.2: The “fifth button” (row 2, column 2; accessible with thumb) is an alternate right rotation button, placed beneath the standard right rotation button. The “sixth button” (row 2, column 3, accessible with pinky/palm) is the Extra button. The “seventh button” (row 1, column 4, accessible with ring or pinky) is the Backstep button.

Having access to at least three rotation buttons is useful for various intermediate/advanced techniques, which may be the topic of a separate guide in the future. TGM4 is adding a fourth rotation button; this may be more niche in its applications, but is nonetheless will be considered when making a complete layout.


Keyboard
Here are a few example configurations:
Right-Hand Arrows (with alternate “Leverless” Numpad)
Often called an “Arrows ZXC” or “Arrows ASD” layout. The numpad can also be used in natural “arrows” formation, or with the thumb on Numpad 0 to drop pieces.

WASD JKL
Similar to the “Arrows” configuration, but for left-hand movement and right-hand “actions.”

Left-Hand “Leverless”
Using Spacebar to drop pieces means you’ll want to use your pinkies or keys above/below the home row for other actions such as Hold, Backstep, or Extra. If your keyboard has a Numpad, you can also consider simply moving your action keys there (e.g., Hold on Numpad 0, rotations on 456, etc.).

Split Drops
In this layout, the Up key is a “free space” that can be used for rotation, Hold, Backstep, etc. as you see fit.

One-Handed

The default “up-to-rotate” control scheme does not put other actions in close reach for one-handed players. These layouts for example layouts for left hand (QWE ASD) and right hand (UIO JKL) should give you better access to everything you need.
Rationale
There are a few ways to adapt console/arcade style movement to keyboard controls. The most straightforward is an Arrows/WASD formation. However, the “Leverless” formation seen on all-button arcade controllers such as the Hit Box is also an attractive option. A third option is to keep some of the “Hybrid” approach from the default keys and allow the “rotation” hand to also cover one of the drop keys.

  • Arrows/WASD
    • Pros: Intuitive option that is already in common use for other game genres.
    • Cons: Takes practice to access both types of drops in rapid succession; can be a source of strain on the middle finger.
  •  Leverless
    • Pros: Allows all movement and drop keys to be covered at all times.
    • Cons: Not all keyboards have enough good thumb key options (e.g., 10-keyless layouts).
  • Hybrid / Split Drop
    • Pros: For TGM rule, allows both keys to be input quickly using alternate hands. For Standard rule, some players find this prevents the “movement” hand from being overloaded.
    • Cons: Some players find this results in the “rotation” hand being overloaded (chording). May take away a thumb key from Hold, necessitating it be pressed with an index/pinky/etc. instead.

For any of the “directional” formations, you may also choose to “invert” the typical assignments of Hard Drop and Soft Drop depending on preference. One may also choose to situationally invert the Up/Down role assignments when switching between TGM and Standard rulesets.
For rotation buttons, using ZXC along the lines of the default mappings is pretty common. However, personally I find that my hand rests more naturally on ASD + Space, and made the diagrams with that in mind. Feel free to move the keys up or down a row to find what feels most natural.

While previous TGM series games featured three rotation buttons to allow for quick 180 degree rotations and other advanced techniques, TGM4 is the first game in the main series to have four rotation buttons. After a bit of thought, I decided that the “WASD” style formation for the rotation buttons was a decent way to keep quick 180s in either direction available without making things too cumbersome. This also follows the logic of Arika’s recommended arcade layout with the two right rotation buttons vertically aligned. This keeps at least three rotation buttons in a row for players of previous TGM games without stretching things out too far with a fourth in the same row. Another option is the console-style 2x2 layout, which would give equal access to quick 180s in both directions by simply shifting the fingers to AW or QS keys.

For the completely new Extra and Backstep functions, Arika’s input display layout shows the recommended locations. Extra is placed in a location that allows it to be easily anchored with a pinky or wrist to allow for repeated Hard Drops in modes with low gravity (Normal, Konoha, Shiranui, PvP). As Backstep is only used in Asuka (and then only situationally to rewind mistakes), it is placed in another location accessible with the pinky or ring finger, but does not need to be under a finger at all times the way that it’s useful for Extra to be.
Gamepad
There are a few tweaks to the default gamepad layout that one may want to consider for high-level play. One is to simply rearrange the rotation buttons to put alternates next to each other to allow for quick 180s by dragging the thumb. Another is to put one of the drops (or both) onto shoulder buttons to keep the d-pad thumb from becoming overworked.
With the inclusion of the new Backstep and Extra buttons in TGM4, it may be tricky to make changes and still find room for everything on a standard controller. But, I think a little tweaking and experimenting can go a long way.
Here are a couple of hypothetical custom layouts:
Face Button 180s

Shoulder Button 180s
Arcade Stick
Even arcade players will have to decide where to put these new extra buttons. Arika’s recommendations will work well for a control panel with 7~8 buttons, but you may need to come up with your own arrangement for those with only 6 buttons.

Arika Recommended (8B)

Compact (6B)

10 Comments
Kitaru  [author] 19 Sep @ 12:25pm 
Button configuration for leverless controllers such as Hit Box would generally follow the same logic as arcade stick. It might be interesting to play around with some SOCD tech for Zangi Moves, though discussing specific input techniques probably deserves a guide of its own.
S3 18 Sep @ 8:45am 
What are your thoughts on Hitbox? Do you think you’ll add coverage about them in your guide? I’m currently using the MAYFLASH F500 FLAT and just reached S8 in Normal 1.1 yesterday, which felt great. I really enjoy this type of controller for the game, but the only downside is having to hold down the Extra button the whole time, I kind of hate that part. I guess that applies to all controller types though...
I am a laser 16 Jul @ 9:02am 
Thank you so much, I wanted my stick controls to match the arcade layout and could not find any info online about the TGM4 official arcade layout.
Kitaru  [author] 1 May @ 10:42pm 
Correct; as of v1.1.0 (April 10th), keyboard can be rebound.
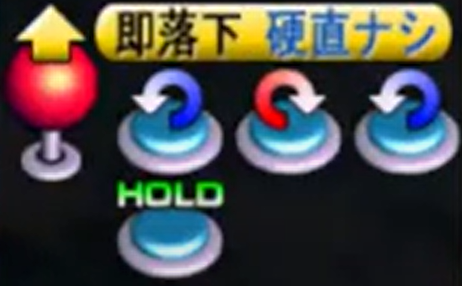
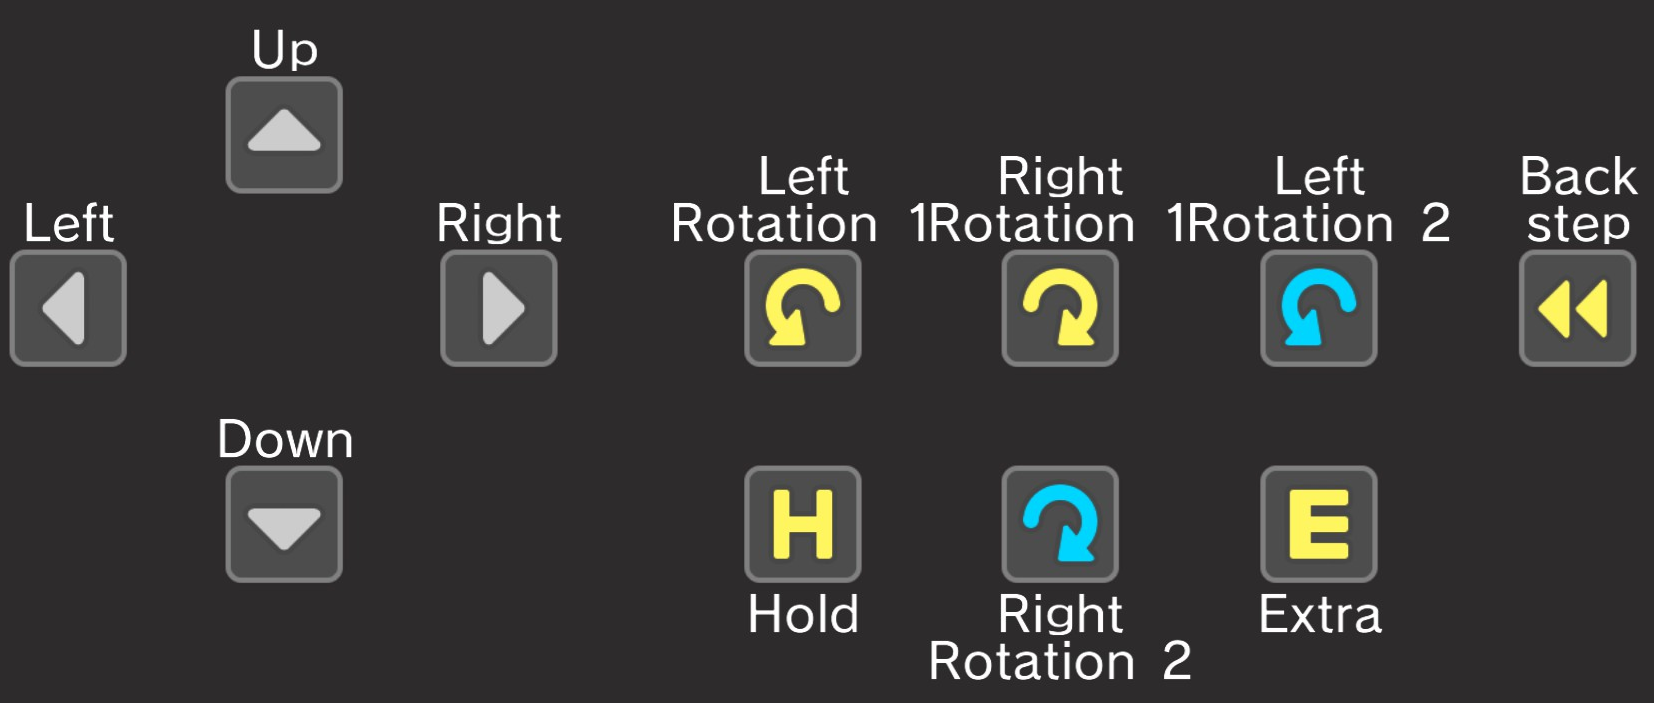
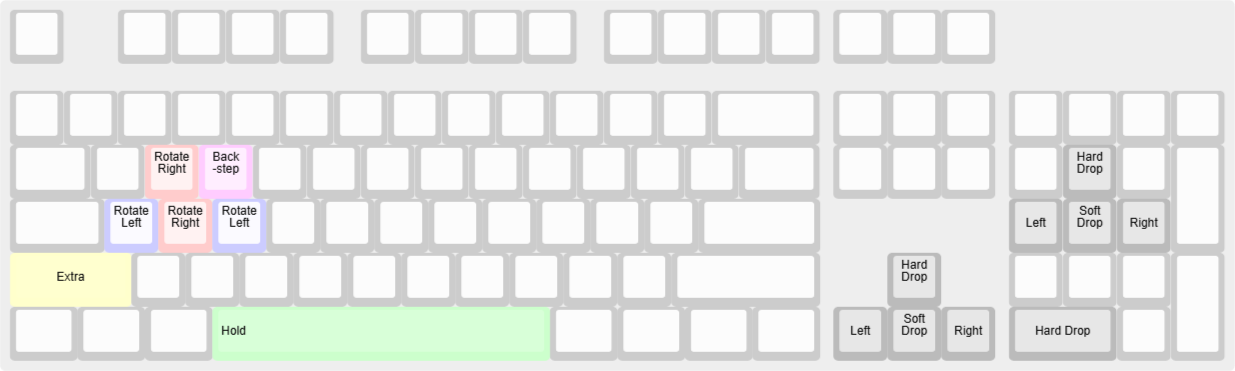
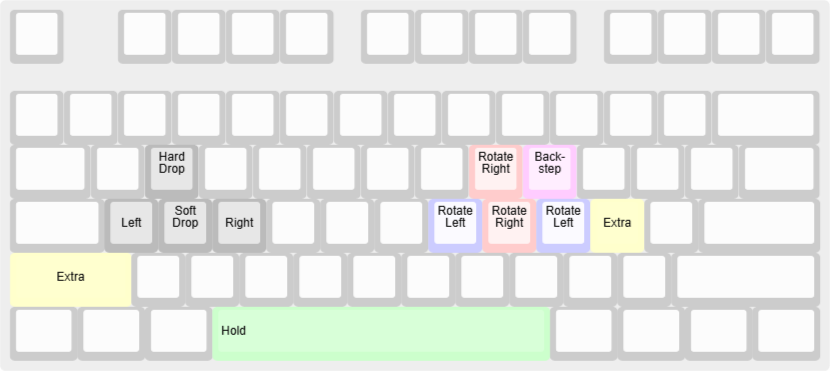
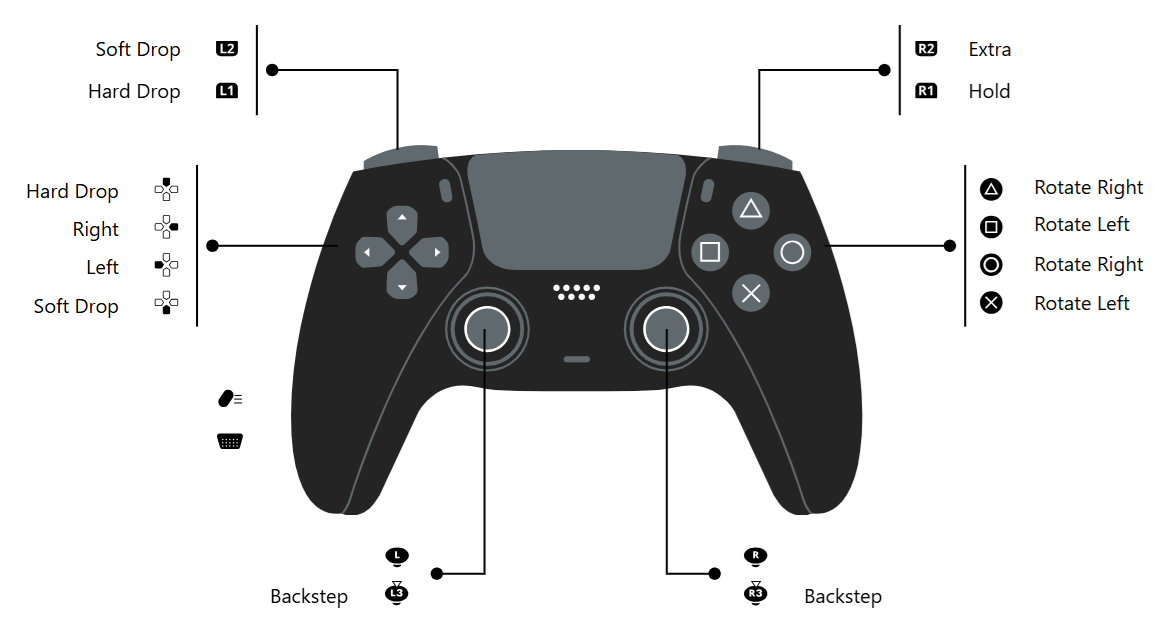
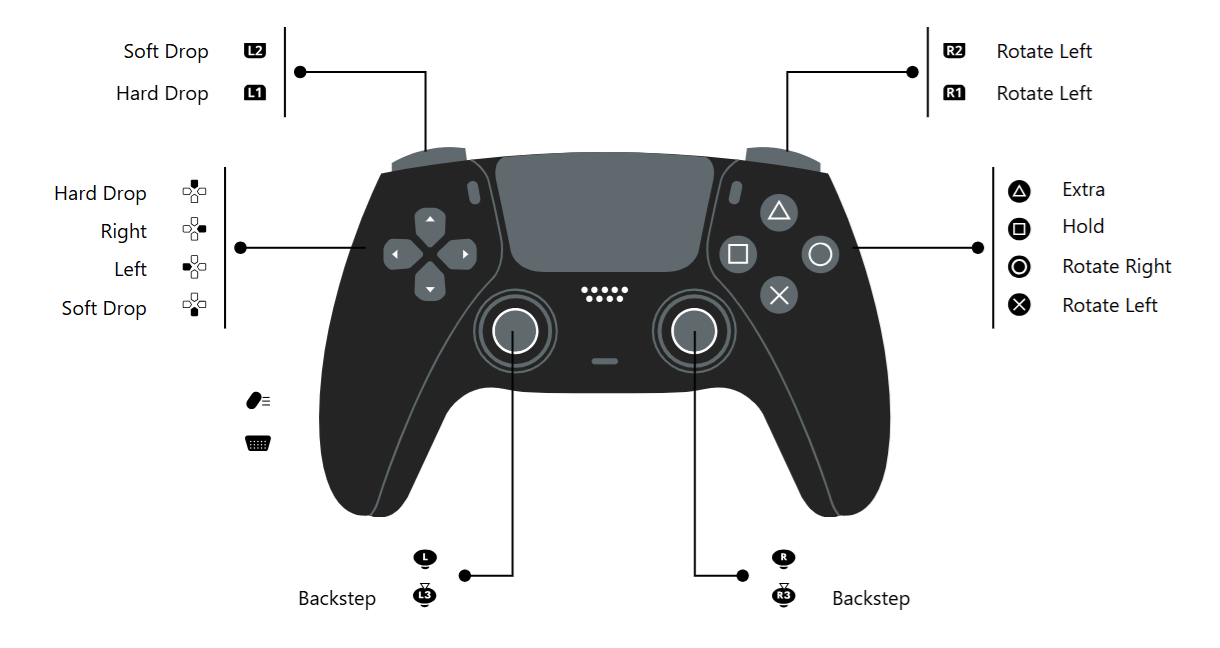
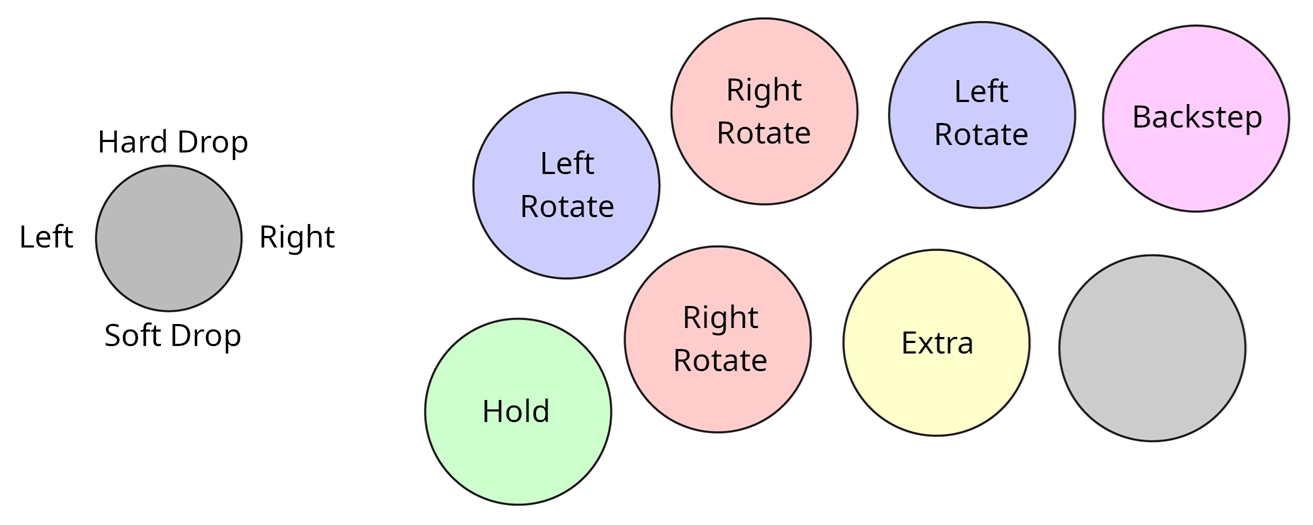
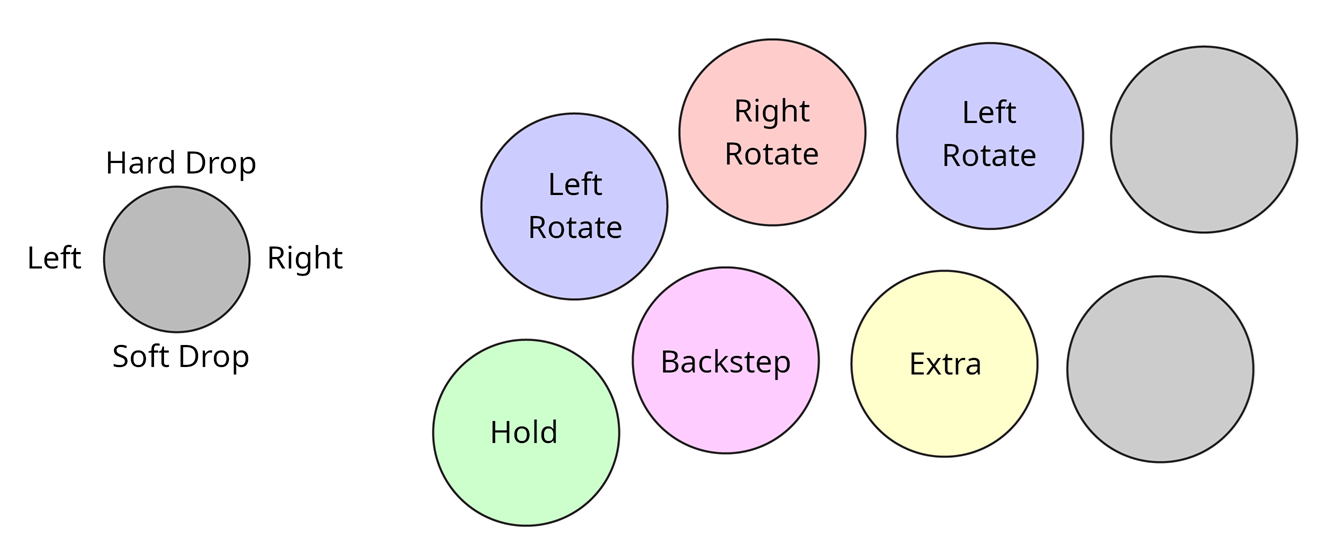
Also, as of v1.2.0 (April 30th), the controller binding menu design was made more similar to the one for keyboard, and allows rebinding of Left, Right, Hard Drop, and Soft Drop actions. Previously, a player would need to use external methods such as Steam Input or controller-level rebinding to set up "trigger drop" and other movement-related custom bindings.
pkaz 27 Apr @ 10:42am 
NOTE: As of the current version of the game, keyboard can be rebound
Asayake 5 Apr @ 3:38pm 
Imagine being bitter and sardonic to people taking time out of their day to be helpful and merely got blindsided by a half billion company allegedly asking for licensing fees for something as basic as rebinding keys [honks clown nose]
Kitaru  [author] 4 Apr @ 8:23pm 
I wrote this guide before release because the manual they published said controls could be changed in the keyboard/controller menu. It's disappointing that only controller bindings are available at the moment, but at least they've scheduled a fix for next week.
Brendan | Shinji16 4 Apr @ 4:16pm 
Imagine posting an entire control guide for a game that has no key rebind options
[honks clown nose]
Kitaru  [author] 4 Apr @ 2:57am 
Yeah, I found that out part way through my play session, heh. I'll be leaving this up to serve as example for when the feature is implemented, and also will try to make some edits now that we know what the "Extra" button does.
Prism019 3 Apr @ 8:27pm 
NOTE: As of the current version of the game, keyboard cannot be rebound.