Tokyo Xtreme Racer

Tokyo Xtreme Racer

303 betyg
Understanding Your Tuning Settings In-Depth
Av grey
An in-depth guide to understanding all your tuning settings and what they do -- alignment, suspension, gear ratios and all else.
28
16
3
10
5
4
2
2
2
   
Utmärkelse
Favorit
Favoritmarkerad
Avfavoritmarkerad
Introduction
TXR 25 is finally fully released! Yippee! This guide may be outdated in some sections; I plan to update it soon.

Despite TXR being squarely in the arcade-style genre of racing games, I still find that TXR does a fairly decent job of replicating the actual physics and dynamics of your road-going car at speed. Most of your car's settings actually have some noticeable effect on how your car drives if you pay attention to it.

For those who are auto aficionados or sim racing geeks, a lot of this stuff may seem pretty obvious. But for those of us who aren't, the help descriptions of each setting really could use some improvement. The help descriptions in suspension, for example, makes it seem like a lot of things 'improve stability', but what's that really mean? Not to mention some of the confusion concerning tuning gear ratios.

For brevity, there will also be recommendation portions of each section throughout this guide for those who want the summed up portions of advice here.

If there's anything you want to point out and correct feel free to comment. A lot of this guide on tuning settings rely loosely on my base understanding of how cars work in the real world, in sim racing (Gran Turismo specifically), and the insight from hours of racing through C1 with a stage 3-maxed RX-7 FD with different settings applied. I've also gone through a lossless second play-through of the game armed with this knowledge fairly quickly, so there's that.

Some general advice before we get into it though. When you're changing your settings, especially those you don't quite understand, try one to two things at a time so you figure out what you like and don't like. You're adjusting your car for the way you drive, after all.

Almost every setting is a trade-off in one way or another so you also shouldn't feel compelled to change any settings if you already like the way your car handles. The few options I can safely recommend for everyone are these:
  • Ride Height: -3 F, -3 R
  • LSD: 1.5 Way (FR-layout) or 1 Way (FF-layout)
  • Spring Rate: +2 F, +2 R
  • Damper: +4 F, +4 R
  • Transmission: Increase Final Drive (early game)
Wheel Alignment
Low-angle on the BCNR33.Recommendations:
  • The only setting you'll really want to change is ride height, as that will lower your car's center of gravity. In tandem with stiffening your suspension, it will help your ride feel less "floaty" at speed.
  • Setting ride height to -3 F, -3 R is a good start. Adding a bit of negative camber (-2 F, -1 R) can help with cornering in C1.

Camber
Camber angle[en.wikipedia.org] is the angle of a vehicle's wheels when viewed from the front. Camber changes the contact your tire makes with the ground. Negative camber tilts the tires inward and positive camber tilts the tire outward.

Negative camber helps with cornering. When you turn, your car's weight shifts onto the opposing side, altering your contact your tire makes with the ground. By setting a negative camber, you get a more even gripping surface. You will never want this value to be positive, as the load on your tires during normal racing will never be such that the tire's inside surface gets more loaded than the outside.

A good camber setting to start with is -2 F, -1 R. A more aggressive camber setup will offer more grip during hard cornering, but has trade-offs; too much negative camber will actually cause you to lose grip in high-speed corners and affect your straight-line braking. -5 F, -3 R is what I would consider the limit for an aggressive setup.

As to why it's recommended to run a higher negative camber in the front than the rear, that's because of the dynamics of your car during cornering. Your front wheels pivot harder and take on more load on turn-in where that contact patch matters. The rear gets loaded as well, but to a significantly lesser extent. Many drivers may choose to run zero camber in the rear for that reason.

Note that any amount of camber angle changes the contact patch when driving straight on, and too much camber causes straight-line instability. For dedicated racing on long straights like Yokohane or Bayshore Route, you'll probably want to leave it alone.

Toe
Toe[en.wikipedia.org] refers to the angle of a vehicle's wheels when viewed from the top (longitudinally). The in-game description is generally correct, but the problem right now is that you can only adjust toe in whole-degree increments, which realistically is way too much for any setting outside of at most ± 1. Basically if you can notice it, it's too much. Toe is often measured to two decimal places of a degree, or as minutes (60th subdivisions of a degree).

You are free to play around with this setting though, as TXR may model the effect of toe less intensely than in real life. I generally don't touch it as I want to maximize grip on race starts, and don't like any scrub on the tires during these race starts.

Toe has a significantly higher impact depending on your car's engine layout (which determines the weight balance of the car) and on the front tires, where turning happens first. MR cars become significantly more unstable with toe-out in the front, for example, while FR cars are less so.

For rear-wheel drive cars (FR or MR):
  • You can try a bit of front toe-in (negative toe) to increase straight-line stability at the cost of inducing a somewhat hefty slip angle on turning in. On the other hand, front toe-out induces better rotation but more straight-line instability. It exacerbates the effect of wheel drift when brake diving in a straight line.
  • Rear toe-in provides better stability during cornering, at the cost of constant slip when driving in a straight line. Rear toe-out is bad as it destabilizes the rear drive wheels and increases the likelihood of oversteer.
For FF cars, if you have problems with understeer you can try a bit of toe-out in your front wheels to better induce rotation at the cost of straight line stability (albeit less compared to FR). In my opinion there are better ways of handling understeer, but this may work for your vehicle.

For 4WD/AWD cars, you should adjust torque balance first and see if it solves any of your problems before adjusting the toe.

Ride Height
Ride height lowers your car's center of gravity. Each unit of this setting is equivalent to about 10 mm of height adjustment. I highly recommend lowering your ride at least some amount on both sides. Doing this in tandem with stiffening up your springs some amount leads to a less floaty and more tight-feeling ride.

I usually do -3 F, -3 R on most cars, which amounts to about 30 mm lower both in the front and rear. Some cars will already ride low to begin with; around 100mm of ground clearance will be good for most cruising save for the most extreme speeds.

As for if you should run different front and rear ride heights, I'd say it depends. Any difference in front and rear ride height is called rake. Positive rake is when the car's front height is lower than the rear height. This shifts the center of gravity forward, which may improve its' weight distribution and handling at the cost of more understeer. The effects of rake with regards to drag are fairly miniscule for the types of cars present and probably aren't modeled in TXR's physics engine.

Lowering your ride too much will actually make it scrape the ground, so try to refrain from slamming it to the max (-5 F, -5 R) or having an insane amount of rake (-5 F, 0 R) such that the nose touches the ground. Certain cars are less prone to this than others, given, but if your suspension is too soft and your ride is too low, this can happen as your shocks bottom out. You can tell if this is happening to your ride with either chase cam view.

Offset
Lets you set the track width; the distance between your left and right wheels. The description says "You can adjust distance between wheel center position & mounting surface" which would seemingly imply the use of spacers, but visually it just looks like the whole wheel hub moves with the wheel as well. More track width ideally means more stability but the effect is negligible enough that it's really just for the looks. Do whatever you like, get that sweet fitment or don't.

Tire Width
This lets you set your tire width. Has no effect on your car aside from visual appearance.

Extended Reading
Brake
Recommendations:
  • For max effectiveness, I would just leave the default settings. I paid for the brakes, I'm gonna use all of the brakes.

ABS (Anti-Lock Braking System)
ABS (anti-lock braking system) helps prevent your brakes from locking up, so it's generally a good idea to leave it on.

For those that may not know, brake locking refers to the phenomenon where the brakes grip on the wheels harder than the tires can grip the road surface, thus 'locking' up and causing a skid. ABS helps prevent that by rapidly pulsing the brakes in an effort to regain traction. Basically, it turns a big lockup into a bunch of small ones. If you have vibration enabled for ABS, your controller or wheel will subtly but rapidly pulse as you floor the brakes.

Turning ABS off means you'll have to manually modulate your brake pressure such that your tires maintain grip with the road surface at their very limit. This is called threshold braking[en.wikipedia.org]. Even the best drivers in the world can't do this perfectly, so there's actually nothing wrong with just leaving ABS on and flooring the brakes within the braking zone of a tight corner then gradually releasing the brakes during turn-in (trail braking[en.wikipedia.org]).

Situations where you may want ABS off are usually with low traction surfaces like dirt and gravel, which you won't see in TXR. You may also want it off if you want to initiate easier handbrake turns by intentionally locking up the rear wheels and don't mind the added difficulty.

Brake Balance
Also known as brake bias.

Here you're allowed to change the brake balance by changing how effective your brakes are. Normally this is done via a proportioning valve that determines the front to rear ratio, but it's different in TXR.

Front brakes being stronger than rear leads to less oversteer but possibly more understeer. Rear is vice versa, less understeer and more oversteer.

Ideally, all four of your wheels should slow down at the same rate, but in practice this is very difficult to achieve. Almost all cars have a front brake bias to varying degree, as during braking it's more preferable to have the front brakes grip up harder than the rear and understeer if slipping and breaking traction. An oversteer is harder to deal with since it's a more unstable state.

The other thing to consider as well is that you can forcefully initiate a more controllable oversteer by use of your handbrake[en.wikipedia.org] anyway, as the handbrake only engages the rear brakes. It's not ideal to do as it decimates your speed nor will it work on every engine layout (MR, for example), but this technique can be used to correct your car's angle on tight turns.

On the other hand, you cannot 'force' your car into an understeer during an oversteer. The only way to correct an oversteer is regaining traction, usually by counter-steering and smoothing out the throttle.

If you're racing grip and not intentionally trying to drift through every corner, there's no real need to change this. Most cars in TXR are fairly balanced, and learning your car's characteristics along with proper braking technique will usually be more helpful than altering brake balance.

If your car oversteers during braking a lot though, and this may depend on your other settings, you can set a bit more front bias by setting -1 R. You shouldn't have to set a rear bias unless your setup is awkward. Reducing the effectiveness of both brakes isn't good either, as it just means you have less braking power to begin with.
LSD (Limited Slip Differential)
Tourer V throwing it around the inside of a corner.Recommendations:
  • For FR-layout cars, I recommend 1.5 way. For FF-layout cars you can leave it as 1 way or use 1.5 way if you handle understeer well.
  • For slow cars, you can leave initial torque and LSD ratio alone for the most part. You can increase either/both slightly for more powerful cars that need the traction, but at the cost of handling.
LSD my beloved! No not that LSD. An LSD (Limited Slip Differential) forms part of your drivetrain, the final part before power is transferred over to your axles and wheels.

Sato's guide already does a pretty good job of describing LSD types and effects, so you're free to refer to his guide if you'd like as it's a little more succinct.
https://gtm.steamproxy.vip/sharedfiles/filedetails/?id=3414517114
The Longer Optional Explanation
To understand what an LSD does, you should probably have an idea of how a differential works. In a shellnut, a differential allows power from your engine to be distributed to the wheels at different speeds. When cornering, your car's inside tires rotate at a different speed than the outside tires because they travel a shorter distance.

The problem with standard open differentials, i.e. those that have no limit on how much power they can send to the drive wheel with less traction (less resistance), is that if that wheel can't get any traction then the other drive wheel that may have more traction gets little to no power. LSDs help prevent that by limiting the maximum torque difference between the two axle shafts, locking the axles together once this difference is exceeded.

Additional resources for those who want to learn more:

LSD Type
Credits to DSport
1 way, 1.5 way, and 2 way all refer to how the LSD engages. 1 way engages only on acceleration, 1.5 way engages fully on acceleration but partially on deceleration, and 2 way engages fully on both acceleration and deceleration.

My recommendation for most people is 1.5 way, especially for FR-layout cars. 1.5 way is a good, comfortable balance between responsiveness and stability. That said, 1 way may be more suitable for FF cars as they already have a lot of front grip under deceleration, and the LSD effect may be exaggerated more with a 1.5 or 2 way LSD leading to more understeer.

2 way offers the most traction and stability If you're very comfortable with your car and can confidently avoid putting it in the way of traffic, but unforgiving if you flub on getting your car pointed the correct way on corner entry, or there's a poor family of 4 at the end of the racing line you took.

For 4WD cars it gets a bit more complicated as all four wheels are drive wheels:
  • The front diff should be set to either 1 way or 1.5 way. You may prefer 1.5 way if you handle understeer well or your torque balance is more rear-biased.
  • The rear diff should be set to either 1.5 way or 2 way. I prefer 2 way, as the traction loss during hard braking can get noticeable on cars like the STI GC8.
  • Note: If your torque balance is set such that power is going to only one set of axles (0 R or +100 R), you can disregard this.

Initial Torque
Credits to DSportAlso known as break-away torque.

Determines the amount of torque required to engage the LSD. The higher this value is, the more eagerly the LSD engages. You can think of this as setting the threshold for the amount of slip the drive wheel with lower grip is allowed to have before the LSD engages.

If you're driving any cars prior to entering Stage 3 you probably won't need to touch this as the default setting is good as-is. Later on, you may want to bump this up to +6 or +7 as the loss of traction becomes noticeable with more powerful cars.

Do be careful though, as increasing initial torque too much will make the car very difficult to turn. I would avoid going past +8.

LSD Ratio
Credits to DSportDetermines how strong the LSD effect is during acceleration and deceleration. Lower is a more smooth, gradual engagement whereas higher is more tight and aggressive.

In a clutch-type LSD, you may also see this called cam angle or ramp angle as these angles determine the propensity of the clutch disks to engage. In this context, you can interpret a +5 LSD ratio as analogous to a 45° cam angle, and +7 to be analogous to 55° and so on. On 2 way LSDs, the cam angle is the same on the deceleration side. For 1.5 way LSDs, the angle for the deceleration side is roughly half; you'll see various sites list their 1.5 way LSD cam angles from 45°×15° to 45°×25°.
  • For more powerful cars, increasing this value can lead to more responsiveness, but increasing it too much makes the car handle less smooth and more jerkily.
  • There is actually a case to be made for lowering this value as the lower rate of engagement makes for more smooth and predictable handling. This may be useful for less experienced drivers or drivers that prefer more handling stability.
Suspension
GC8 sending it!Recommendations:
  • Setting your spring rates to +2 F, +2 R and dampers to +4 F, +4 R is a great start for lessening the amount of body roll your car exhibits during cornering. Going up to +3 spring rate and +6 damper reduces body roll even more, but at the cost of having less grip, as there is less weight transfer when cornering.
  • Damper balance controls how quickly your car recovers from body roll. The default setting is usually good as-is. Fine-tuning it will depend on your driving style and preferences.
Suspension plays a crucial role in your car's handling. This section allows you to change your spring rate, damper force, and damper balance.

The modern automotive shock absorber consists of a spring and a damper. The spring absorbs kinetic energy exerted upon it by compressing and converting it into potential energy, while the hydraulic damper contained within helps disperse that potential energy as heat. This makes for a smooth ride concerning normal street cars.

But being TXR is a racing game we're not too worried about comfort. If ever you've noticed driving the stock settings on your car can feel a bit floaty, like you're driving a boat, it's partly because of the way your suspension is handling the road. By changing this, along with lowering our ride height (see the Alignment section), we can make for a tighter feeling car.

If you need to test your suspension settings, a lap of C1 (either direction) will give you an idea of how your car will handle in a variety of situations. You can also go on the Wangan/Bayshore Line and do slaloms (swerving left to right) to see how your vehicle responds in a neutral situation.

Spring Rate and Damper
These are in the same section together because it wouldn't make that much sense to talk about one without the other. Strengthening the spring rate makes your springs stiffer, which necessitates making your dampers stronger as well; it's necessary to aim for a state of critical damping. Doing one without the other has consequences:
  • A spring with a damper too strong can feel sluggish as the damper absorbs more of the force the spring is supposed to. The shocks are overdamped. You can test this by slaloming or going through chicanes in C1 inner; look for if the car feels like it doesn't want to return to neutral. Note this could also be from slower damper response (see damper balance below).
  • A spring with a damper too weak results in a bouncy, unstable ride as the damper absorbs too little of the force exerted on the spring, thus sending the leftover kinetic energy into the chassis of your car. The shocks are underdamped. You can test this by braking hard in a straight line and see if it feels unstable.
I've found going with a roughly 1:2 to 2:5 spring rate to damper strength ratio works fairly well for reducing body roll.
Spring Rate
Damper
+2
+4-5
+3
+6-7
+4
+8-10
+5
+10-12

Keep in mind that not all body roll is unwanted. There has to be some body roll for your car to corner properly, especially if you have negative camber set-up. In a similar vein to adjusting your stabilizers, it's important to remember as well that increasing the rigidity of the suspension increases the load incurred on the chassis and other components as less energy is absorbed.

More powerful cars can utilize stronger shocks better as they undergo stronger forces in weight transfer; less powerful cars will suffice with more mild suspension settings as the effects of body roll help press the tires into the road surface, increasing grip.

You're free to go with different rates in the front and rear depending on how you want the balance of your car to react to weight transfer during cornering:
  • Stiffer front suspension may reduce brake dive and improve steering response, but increase likelihood of understeer and decrease grip in tighter corners on entry.
  • Stiffer rear suspension may reduce understeer on corner entry and exit, but increase likelihood of oversteer, especially on corner exit (lift off oversteer).
Damper Balance
This single-adjustment setting lets you control the rate at which your dampers compress and rebound.

The default setting is usually good as-is, but you could change it depending on your driving style or if your car has specific handling problems. The in-game help section for this could be improved as it makes it sound like adjusting towards either rebound or compression improves stability when that's not quite the case.

Moving the slider towards the rebound setting makes it such that the damper compresses and rebounds faster. This lets your car recover from a body roll faster and makes it more nimble, but with too much rebound your car will feel twitchy and skittish as it handles changes in inertia more intensely.

Moving the slider towards the compression setting does the opposite; the damper compresses and rebounds slower. This leads to slower recovery from body roll and makes it more sluggish and less responsive to driving inputs, but also more stable and less prone to the forces that would otherwise upset a car with a higher rebound rate.

One thing to note -- you can change the front and rear balance separately, but this gets complicated quickly as you have to consider the dynamics of your car during cornering (entry, mid-corner, exit) from front to rear load. For simplicity, I would try to stick to changing these values in tandem instead of running separate front and rear rates.

Extended Reading
Stabilizer
a.k.a. anti-roll bar, roll bar, anti-sway bar, sway bar, stabilizer bar, the twister resister

Recommendations:
  • The default setting is usually good as-is. If you're getting specific front/rear body roll problems, you can tweak it a bit but too much will cause a loss of grip.
The stabilizer bar forms another part of your car's suspension. Unlike a shock absorber which absorbs "shock" vertically from the wheels bouncing up and down, the stabilizer bar connects the left and right wheels together by a torsion bar that engages when cornering. When cornering, as load transfers to the outside wheels and unloads from the inside wheel, the anti-roll bar connecting the two wheels provides resistance to this twisting force via the torsion bar.

I don't want to get too much into this as there's a litany of resources that explain the effectiveness of anti-roll bars and how changes in their stiffness affect load distribution during cornering. GT's Beyond the Apex has a pretty good explanation you can see below in the extended reading. Instead I'll just focus on a few basic key points.
  • Whichever bar (front or rear) is more stiff will tend to have more load. If you want less understeer but more oversteer, try -1 F, +1 R. Alternatively if you want less oversteer but more understeer, you can try +1 F, -1 R.
  • Softening both bars equally will allow more body roll, which in certain situations with uneven terrain or banking can increase grip.
  • Stiffening both bars equally will reduce body roll, but at the cost of your steering being less responsive.
  • Making either bar too stiff can result in a wheel lifting off the ground easily. Remember that Initial D clip when Takumi lifts a wheel above the gutter by putting the AE86 weight on the outside? It's cool, but not when you want to stay planted.
  • You'll be able to tell if you have a wheel up in the air if the TCS lights up on your dash.
Extended Reading
Transmission (Gear Ratios) (Part 1)
This is likely the most important section of this guide and probably what a lot of y'all came here for. Tuning your transmission is the one thing that can actually make you win or lose races, and it can be somewhat daunting especially because it seems so much is going on and you don't know where to start.

If you want a TL;DR, just read the below section.

idc just wanna win races
  • Bugs happen with the transmission gearing sometimes during tuning changes. Make sure you start changes from the default gear ratios!
  • For stage 1 (starter cars), just increase your final drive (slider towards right) until your 2nd gear is around 85 km/h. You won't be reaching top speed in most races and doing this starts you right in the power band at the start of each battle.
  • The few exceptions to Stage 1 are Playful Gentleman (Yokohane) and Trance Drive (Bayshore). In that case you'll want to reset your gearing to default and/or possibly lower your final drive to increase top speed, buy nitro, and just hit it at race start.
  • This advice will not necessarily work for players that drive on AT (Automatic Transmission). I don't recommend driving on AT as the implementation often picks sub-optimal shift points as compared to MT (Manual Transmission). It is entirely one's prerogative to drive what style they prefer, but AT leaves a lot of acceleration left on the table as lower RPMs bog the car down.

What's a Transmission? Power Band? Huh?
Perhaps it's best to start with a really simple explanation of what your transmission actually is. It is simply a device that multiplies torque. It takes the rotational motion of a thing called a crankshaft that your engine spins really fast, multiplies that rotational motion, and sends it to your wheels. There's a bunch of stuff in-between, the flywheel, clutch, transmission, driveshaft, rear diff, etc, but for the purposes of understanding what a transmission does we'll just keep it at that.

Now you may have noticed that your car has some specs on the info sheet when you look at it in the garage or in your collection, ratings for max power and max torque.


My RX-7 has a rated max power of 418 PS @ 6800 RPM and a max torque at 48 kgm @ 4000 RPM. How are those numbers useful to us?

Well, I can tell you that it's certainly not accelerating very quickly at 4000 RPM, and it may be similar for the car you're driving as well. Perhaps it'd be better to look at the power/torque graph of a Power Unit Lv9 Mazda RX-7 Type RZ (FD3S) with the 13B-REW engine:

FD3S data[ddm999.github.io]

Your upgrades may not line up perfectly with this graph, but we're interested in the trend of this graph than the actual numbers. The torque kind of goes up gradually to around 4000 RPM, stays relatively flat for a while, and then tapers out quickly as it approaches the redline. Meanwhile power seems to linearly increase up until torque starts to quickly drop and then also drops a bit.

This is because engine power[en.wikipedia.org] is a product of torque (rotational force) times the crankshaft's RPM. As torque stays relatively constant but RPMs go up, you get more power. Power is the rate at which work gets done.

This narrow band that falls somewhere at or slightly before your max power, where power stays relatively high, is called the power band[en.wikipedia.org].

Now you may be wondering, wait -- why isn't peak torque peak acceleration? Well, it kinda is but isn't. If we stuck to exactly one gear, say 1.000 like in a direct drive system, then the very moment torque is at its highest would technically be where you accelerated the quickest, compared to the rest of the curve.

We're not interested in going faster at slow speeds though. We're interested in going faster at fast speeds. We want more power to make our car accelerate faster. Hopefully that made sense, because if it didn't there's a ton of youtube videos that might explain it better.

Why am I explaining all this even if it's a video game? Well, Genki having developed a bunch of racing games in the past, the engine model that drives the cars in this game attempts to replicate how these engines work in real life. Now we don't exactly get dyno sheets and fancy gearing plots, but a lot of that stuff you can kinda work out with a little bit of know-how.

Ok Cool. But Gear Ratios?
I'm getting there, easy.

Now that we know what the power band is, how do we use that? Well, remember what the transmission is. It's a device that multiplies torque. And gears let us choose the ratio at which that multiplication happens.

It's often simplified that shorter gears means more acceleration and longer gears means more top speed. But that's only a surface-level understanding of what gear ratios actually do. Perhaps it's better to say that adjusting gear ratios lets you choose what speeds your acceleration is highest at.

The advice I see most often from folks in discussions, reddit and elsewhere will mention something akin to "raise your 1st gear to 90 km/h and just adjust everything else", which is fine. Following this advice puts you in the power band at the start of the race, and more acceleration in the power band means starting faster and starting faster means winning more races.

For someone struggling in stage 1 though, shifting 1st gear means not only having to make 1st gear really tall, but also adjusting the final drive to actually match that 90 km/h or so, at the cost of the other gears possibly not looking right. That's why I recommend just increasing the Final Drive such that top speed drops, as you will rarely hit top speeds during your beginner races. It isn't worth the cost of fudging your OEM ratios while figuring out the correct numbers. On the rare occasion where you will have to face a difficult rival on a straight (Trance Drive, namely), you can just shorten your final drive back for more top speed and crank the nitro.

Here's how I have my RX-7 geared:

And this is how it graphs against speed:
Link to graph tool[legacypic.uk]

You'll notice my 2nd gear is a bit tall as well; a tiny bit of nitro into the 2nd gear after shifting launches me right back into the power band for more acceleration. I've kept the OEM 3rd to 6th gearing as I like them; 3rd to 5th are relatively close, while 6th starts me right at 6k RPM if I want to cruise Bayshore.

There's also one other thing I want to mention -- the lower graph's top speed of 383 km/h doesn't account for drivetrain losses due to things like drag, friction, and the weight of the drivetrain itself. If the car had loads of power, enough to overcome those resistances then it could run that speed, but in TXR it accounts for that! 325 km/h is the top speed in that gear, and I just so happen to reach that speed at... you guessed it... 418 PS @ 6800 RPM. Max power.
Transmission (Gear Ratios) (Part 2)
Terminology
  • Short and Tall/Long refers to the range characteristics of a single gear. A short gear ratio means the engine turns more times for each rotation of the wheels, and thus makes power available at lower speeds. A tall (or long) gear ratio is the opposite; it means the engine turns less times for each rotation of the wheels, in turn making power available at higher speeds.
  • Close and Wide gearing refers to the overall difference between all of your transmission's gears. A transmission described as Close-Ratio[en.wikipedia.org] has gears closer to each other than a normal (wide) transmission as you'd see in a commuter car. Gears closer to each other can more easily keep the engine in its power band.

General Gearing Strategy
  • Battles always start at 60 km/h, the auto-pilot speed. Because of this, you can safely ignore your acceleration from 0 to 60 km/h. Crashing hard enough to go well below 60 km/h, where such acceleration would matter, will almost always result in a loss. Even the slowest turn in the game, the Edobashi junction left turn on C1 Inner, can be taken in 2nd gear.
  • This means that your speed metric will actually drop when you tune with the forbearance in mind that your 0 to 60 km/h acceleration will be slower.
  • The speed metric can be disregarded to some extent. Speed metric (when concerning gear ratios) is based on the available power over a sample of speeds taken across all your gears. For example, a Supra JZA80 with end of Stage 3 upgrades has a speed metric of 436 with OEM gear ratios, but 475 when the gears are spread wide. However, this comes at the cost of slower acceleration from 60 km/h, if not elsewhere within your gears.
  • You can safely go with a taller 1st and 2nd gear while still keeping all your gears close to each other. Sacrificing 0 to 60 km/h acceleration means faster 60+ km/h acceleration overall.
  • Stage 1 cars (the game's starter cars) are generally too slow to make use of a tall 1st gear. Increasing the Final Drive for acceleration is a better idea for race starts.
  • The faster Stage 2 cars can make use of a taller 1st and 2nd gear. This applies mainly to the RX-8 SE3P.
  • Note: if you ever want to see what RPM you start a race in, just enable auto-pilot while you're on the expressway (D-down on controller). Auto-pilot may put you into 2nd gear on occasion though.
It should be mentioned that while transmission gearing does help you get better acceleration, it's not the be-all end-all. Power and body upgrades will make your car faster much more quickly.

Where Exactly Is the Power Band?
There's no set criteria where exactly the power band of your car's engine is; it's a loose range that varies not only from car to car but from person to person. The explanation doesn't have to stop there though.

We do know a few facts. We know that acceleration will always be best at peak power, and we will always run the engine from that RPM to redline for max acceleration.

Some of you may be wondering why we always run RPMs right up to the edge of redline before shifting. It's because it serves as the best reference point for exhausting a given gear's acceleration. An engine's redline is the maximum rate at which your engine runs before it starts to fail. Modern cars, including in this game, have a rev-limiter that prevents you from actually going past your engine's redline. Peak power is below redline because it is at the very point at which the engine's torque generation starts to drop quickly enough that higher RPMs no longer make up for it.

Remember that horsepower/torque graph trend in Part 1 we talked about though? The horsepower curve forms this sort of parabolic curve where peak power is located. If we assume our stage-3 maxed RX-7 FD has a similar trend, our power band as an even parabola would be roughly 6800 ± 1200 RPM, or 5600 to 8000 RPM.

Remember though, the closer your RPM is to peak power, the faster your acceleration. We're just trying to figure out the ballpark. Doing the same math on the car you currently run should give you an idea but the best way is to just drive the thing and get a feeling for it.

The other thing as well is that different engines have different torque characteristics. The RB26DETT engine that's present in the R32, R33, and R34 Skyline has a torque peak that appears earlier than that of the 13B-REW. Let's look at it.
BCNR33 data[ddm999.github.io]

You can see the power band on the BCNR33 here is actually around 6000 RPM to redline. This suggests that depending how close your gearing is, you can actually get an acceleration benefit from short-shifting at around 7700 RPM instead of at redline, depending on if it puts you at 5500 RPM in the next gear. Let's graph that using my gearing setup in the example below.


One minor thing to note though. Many of the cars in TXR come equipped with a turbocharger, a device that provides extra boost via a turbine powered by the flow of exhaust gases. If your car has one, you'll notice an extra gauge on your screen that measures your turbo's boost. At lower RPMs, this turbo will spool up slower. This delay in boost is called turbo lag.

Tuning gears can be a tricky art sometimes as you deal with where in your speed range you want your power, ergo your acceleration. The gist of it is to get the acceleration you want where you want it.
Transmission (Gear Ratios) (Part 3)
Doing The Math Yourself
Now we've talked about gear ratios and power bands at length, you may be curious about how to read the graphs or calculating RPMs and speeds for your own car. Let's talk about the math a bit.

The ratio at which your engine's crankshaft spins relative to the wheels spin is your transmission gear ratio times your final drive ratio (the drive gear located in your differential). If you have a 4th gear with a 1.0 ratio and a final drive ratio of 4.3, then your engine is spinning at a rate of 4.3:1 to the wheel.

If you know the tire size, then you can calculate the circumference (πd), which will tell you the distance a single full rotation of your wheel takes you. You can find your car's tire width and wheel diameter if you go to the aero settings and look at the default settings on your drive wheels, though the sidewall ratio involves either a bit of guesswork or looking at spec sheets online.

Speed is distance over time. RPM is revolutions per minute, a frequency of your engine's crankshaft rotations. We'll need to multiply this by 60 to get this for hours. Speed in km/h can be then calculated as such:

S = (engine RPM) × 60 × 1/(gear ratio × final drive ratio) × (wheel circumference in km)

Let's plug in these values, assuming our car's in 4th gear at redline.
  • engine RPM = 8000
  • gear ratio = 1
  • final drive ratio = 4.3
  • wheel circumference = 0.0019964 km
S = 8000 × 60 / (1 × 4.3) × 0.0019964 = ~222.85 km/h

Another example: Suppose you're driving the R34. You want to start 1st gear right at the start of the power band. 60 km/h is your speed and your target RPM is 5600 on the tachometer. Wheel size is 245/40R18, so circumference is about 2.052 m (0.002052 km). The final drive is left as default. You'll solve for your ratio like so:
  • speed = 60 km/h
  • engine RPM = 5600
  • final drive ratio = 3.545
  • wheel circumference = 0.002052 km
60 = 5600 × 60 / (3.545 × r) × 0.002052
r = 5600 × 0.002052 / 3.545
r = 3.241

When you see a gearing graph, you're looking at the speed scaled over your engine's RPM. Wheel circumference is the only thing that stays constant, so you're just graphing lines for the speeds over each gear.
Torque Balance (4WD Only)
Lets you change the torque balance of your 4WD drivetrain. Setting 0 to the rear makes your car handle like a FF-layout, setting +100 makes it handle like a FR-layout. Changing this is a matter of preference; some people may prefer more torque in the rear, others more torque in the front.

Some fun facts:
  • A number of the manufacturers in TXR have their own kinds of 4-wheel drive systems in real life that utilize some sort of torque vectoring[en.wikipedia.org] system: Honda with SH-AWD, Subaru with SAWD, Mitsubishi with S-AWC.
  • The Skyline GT-R cars by default set the torque balance to +100 (effectively FR) but in real life utilize an active electronic torque splitter called ATTESA E-TS to send torque to wheels the onboard computer detects are slipping. The R33 and R34 V-spec models use a variation of this called E-TS Pro. The dynamics of that system are likely not replicated in the game, but on the other hand you can set torque splits that realistically can't exist without making significant drivetrain modifications, as the maximum torque split is 50:50 normally.
Full Setting Examples
This section has been moved to my other guide you can see here:
https://gtm.steamproxy.vip/sharedfiles/filedetails/?id=3576069208
Conclusion
Hopefully this guide provided some clarity to all of the tuning settings available. I'm pretty impressed with the effort they chose to put into letting you actually change these settings, which I typically don't see in other arcade-style racers but more often in sim racing.

I understand that I may have went too in-depth into the actual workings of each of these parts, but I do think a good understanding of how these things work translates into useful knowledge for the game that aims to replicate those mechanics.

Feel free to correct any information or provide even more useful input in the comments.
43 kommentarer
grey  [skapare] 1 timme sedan 
Improved some of the wording in that section for clarity.
grey  [skapare] 1 timme sedan 
No... ?

I don't think MT is nearly that complicated. If it makes it easier, just remember how much the RPM drops in between shifts, and then just do that in reverse. If going from 2nd to 3rd drops you 78% on the tach, then just downshift in 3rd when you're < 78% again.

You don't even have to do that if you don't want to. Just pick a spot on the tach around 75% of the way to redline and remember to downshift around there.
ne-TzwerK 8 timmar sedan 
This discussion just reminds me that back in TXR2 I believe we actually had the graphs shown so I was able to tell at which point it would be optimal for me to shift. I just think of it because you said AT leaves a lot of speed due to bad shifting points.
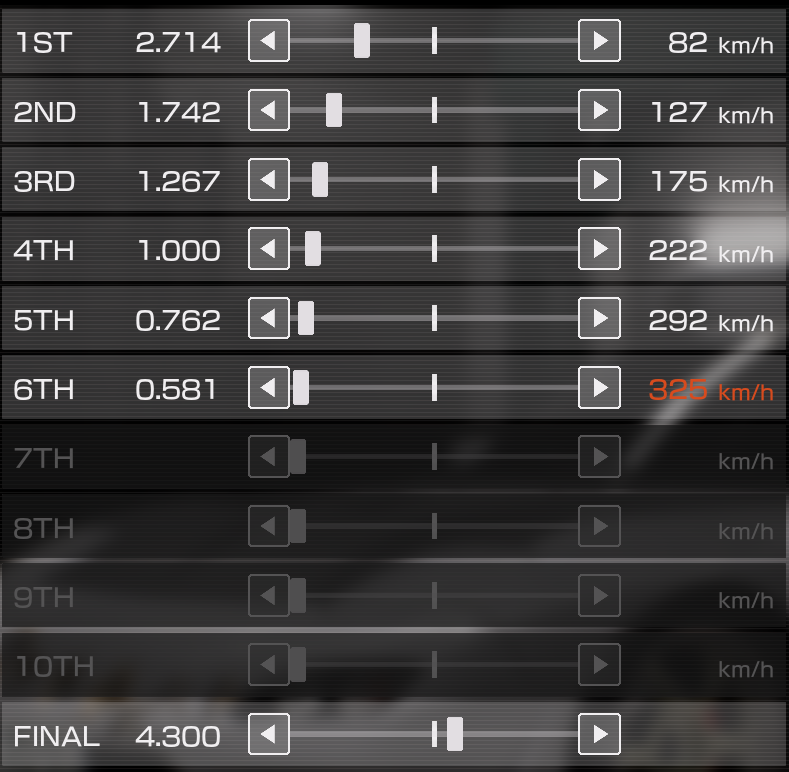
Is there some option to have these shown in TXR again? I'd be willing to try manual shifting over AT if that helps overall :)
grey  [skapare] 10 timmar sedan 
Regarding the math, you're misunderstanding quite a bit. It's basically an extrapolated speed formula; that is to say Speed = Distance over Time. You start at a certain speed on race starts, 60 km/h, you want to start at a particular RPM. You know everything else in that equation. Solve for the ratio.
grey  [skapare] 10 timmar sedan 
The final drive isn't necessarily part of the gearbox. It's the gear in your diff. Essentially it's the ratio by which *all* the gear ratios of the transmission are multiplied by before torque reaches the axles and wheels. Google any diagram of a FR drivetrain and you'll see what I mean.

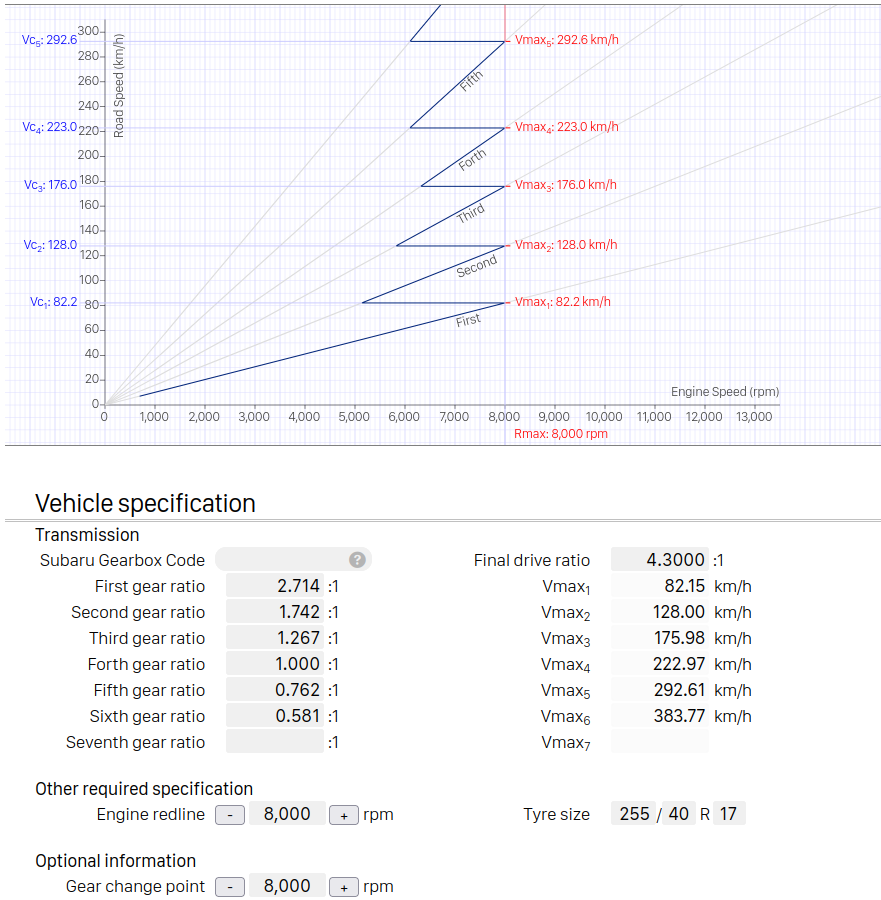
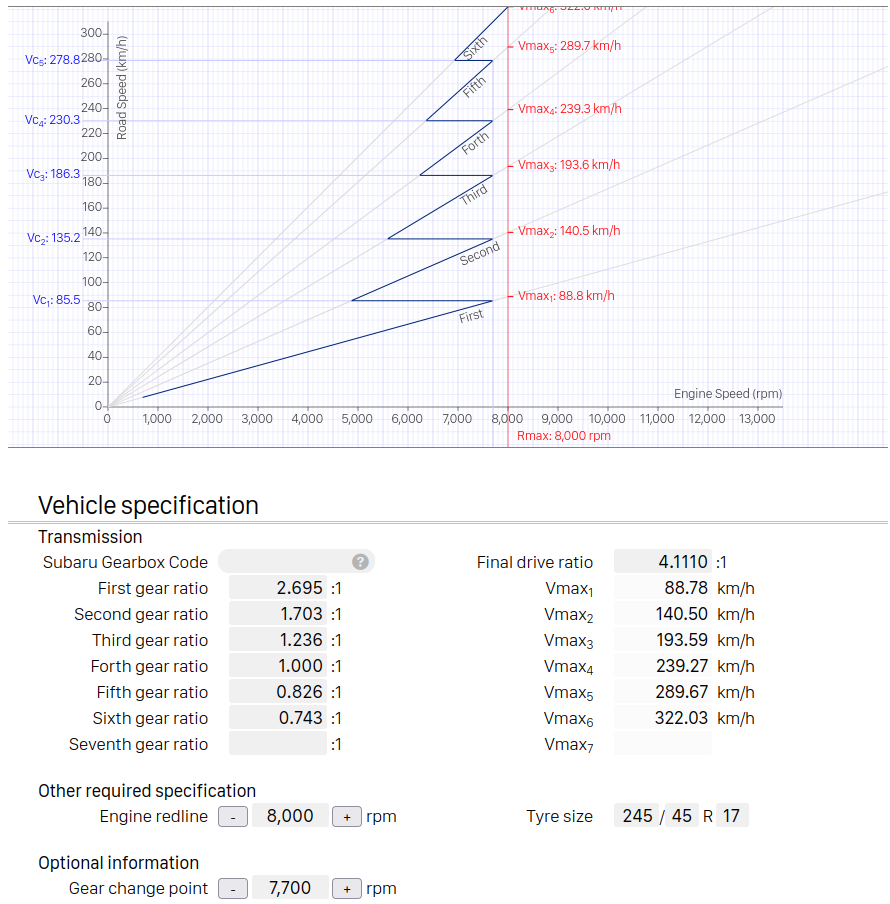
Driving AT leaves a LOT of speed off the table compared to MT, so as the AT picks sub-optimum shift points.
McSwagPants 10 timmar sedan 
Good advice with the restarting. Think I'll do that and see how my experience changes, as well.
McSwagPants 10 timmar sedan 
And just 5 minutes after writing that comment I just put final ratio to max acceleration, first and second gear to max top speed and switched from automatic to manual shifting and suddenly I'm driving much faster? I really don't get why. What exactly does final ratio mean in the context of a gearbox? And I'm not sure I understand what doing the math or the plotting with the graph tool will actually help me do. You wrote "calculating RPMs and speeds for your own car" and in your second calculation a bit further down you used 5600 RPM as the placeholder. Does that mean you used that calculation to get the gear ratio setting, at which you can accelerate to 7700 RPM to then start at 5600 RPM in the next gear again?
grey  [skapare] 11 timmar sedan 
How old before launch was your save? Sounds like you're severely under-perked. If you were refunded some amount of BP, you will be well below the amount the game intended for you to have at that point. Stage 3 is also limited to 54444244442 upgrades; end of EA was 6443323341 iirc.

Just my personal opinion, but you'd likely have more fun following the full release's progression from the beginning.
McSwagPants 11 timmar sedan 
Oof... I admire the work you put into this, but I think there are still some things I'm not quite understanding. I'm currently driving a Skyline R34 and going by the specs in your car spec compilation for the R34, it handles very nicely, but no matter who I drive against, most Lvl15 Rivals still leave me in the dust, right from the start, even if I use nitro. The only way I can beat them sometimes is by just pushing them into slower traffic or barricades, shortly after race start or by starting the race close to a point, where I know my cornering is better than the ai's. Is that supposed to be the experience of TXR? Shouldn't I be able to beat most Stage 3 Rivals if my car is equipped with Power Unit Lvl. 6, Exhaust/Intake Lvl. 4 and all other parts Lvl.3? (Technically the perks say I can only get Power Unit Lvl. 4, but this save is from before launch and I can still buy lvl. 6 now)
Dustin_5 1 okt @ 11:19 
Thanks for all of this work. I am pretty sure I was doing it wrong. I had the suspenall max plus and the final drive only as low as possible.