Wolfenstein: The Old Blood

Wolfenstein: The Old Blood

80 ratings
100% Achievement Guide: Wolfenstein - The Old Blood
By Cynic 0055
This is a comprehensive 100% Achievement guide detailing a step-by-step walkthrough to take you from 0 all the way to 100%. If you are looking for a particular Achievement or Collectible, use Ctrl+F & type it into the search bar for more direct help.

I run support & debug help on all my guides. If you have any questions, problems, or find errors in the guide itself, do not hesitate to leave me a comment & I will get back to you as soon as I am able to. Happy Hunting!
2
3
   
Award
Favorite
Favorited
Unfavorite
Introduction:


Achievement Breakdown: (50)
Story Related: (8)
Secondary Objectives: (20)
Collectibles: (6)
Perks: (16)


This game only requires one full playthrough, on any Difficulty, to unlock all the Achievements. For the two Difficulty related Achievements, they can be earned just by replaying the final Chapter on Über Difficulty.

There are 64 Gold items & 10 Letters we need to find as we play for some Collectibles Achievements; there are no Achievements for collecting all the Concept Arts or Character Entries. Note that the Gold Bars technically have their own numbers associated with them; I do not follow their numbering system & instead add all 64 of them up chronologically as we collect them.

There are 16 Perk Achievements related to killing enemies in different ways. All progress towards these Perks are cumulative across the same Save file & can be Save Scum farmed by reloading Checkpoints. What we do not earn naturally over our first playthrough we will be by reloading Chapters to farm our remaining Perk Achievements. Most will come through natural progression if you are aware of what to work towards ahead of time. If possible, as try killing enemies in ways that work towards Perk completion.

In each of the nine Chapters of the game we can find a secret “Nightmare Level” we can enter that will put us in sections of the 1992 game Wolfenstein 3D. For 10 Achievements, we need to beat each of these Levels; they are not difficult at all & actually kind of fun.

Lastly, as we play through the game we will unlock Challenge Maps of difficult battles we complete during the main campaign. For another 10 Achievements, we will need to earn Gold Medals on each of them. These are pretty challenging & will take you a few tries to earn the required scores. After a few attempts though, you should get into a flow & it will get easier with practice.

For those interested, here is an organized list of all the Achievements/Secret Achievements. Unlike most of the Achievement Checklists listed in my guides, this one was created by Carrot <3 Sexy Time. Why create a new Checklist when someone else made an even better one? Be sure to check it out, Rate it, & give them some Steam Awards!
https://gtm.steamproxy.vip/sharedfiles/filedetails/?id=437833528
*Guide contains major spoilers.
Sequence 1: Castle Wolfenstein
1. Chapters: Prologue
2. Perk Focus: Health Overcharge (200+, 250+), Overcharged Health Kills, Dual Wield Kills
3. Perks: 3/16
4. Nightmare Levels: 1/9
5. Letters: 1/10
6. Gold Bars: 0/64
7. Achievements: 5/50
-----------------------------------------------------------------------------------------------------

Like in The New Order, our only Difficulty Achievements can be earned at the end of the game by replaying the final Chapter. Feel free to play through the Campaign on whichever Difficulty you prefer – Bring’Em On! is a good middle ground Difficulty…

Prologue – German Alps:

Nightmare Level #1: After we drive to the outside of Castle Wolfenstein at the very beginning of the game, we will exit our vehicle with Agent One. Follow him & get your passport checked at security. As soon as we exit the turnstile to the checkpoint, turn around & look back where you came from. Look over to your left at the vacant security desk beside you & we can collect a Key.

Join Agent One on the elevator now & take it down to the gondolas below. Do not step onto the gondola yet & instead head over to a locked iron gate nearby. Use the Key we collected to open it, then follow the stairs down underneath the platform where we can find an old mattress we can interact with; do so, & we will enter the Prologue Nightmare.


Achievement #1 – German Alps Nightmare: Complete the Prologue Nightmare.
We will now have to complete the very first section of the Wolfenstein 3D game. Take it slow & use our more advanced controls (leaning) to take advantage of the enemies. Unfortunately, Headshots do not count as an instant kill & there are no Knife Takedowns so keep that in mind.

We can find the Collectibles, Old Silver, throughout Nightmare Levels; there are no Achievements or bonuses associated with finding them all.

Navigate through the maze of the Level until you reach a steel door with a red button on it; after opening the same looking doors for the last few minutes, it will seem pretty distinct. Open it & enter the elevator to complete the Level & unlock this Achievement.


Achievement #2 – Undercover: Infiltrate Castle Wolfenstein.
Story Related. When we are back in reality, return to Agent One on the gondola car & take it into Castle Wolfenstein. As soon as the gondola stops moving, we will unlock our Achievement.

Perks: Once we exit the gondola & take the elevator out of the station, we will be playing the game in full & gain access to our Perks. Quickly read through them all to be aware of what you need to work towards as we play. Our Perks can very easily be farmed at the end of the game by replaying Chapters, but still always look for opportunities to complete them, especially the more specific ones. Whenever possible, always kill enemies in ways to progress Perks.

Also, be sure to scavenge around for any Helmets you can find & collect them too.


Achievement #3 – Health Upgrade I: Unlock the Health Upgrade I Perk.
Dispatch the two Nazi Soldiers patrolling in the archaeology office & we can find over 10 20+ Medkits on the desks here. Quickly run around between them all to collect the Medkits & bring your Health over 200 to unlock the Achievement.


Achievement #4 – Health Upgrade II: Unlock the Health Upgrade II Perk.
Restart your last Checkpoint to reset the room. For this Achievement, we need to Overcharge our Health over 250. There are just enough Medkits in the office (with two on the shelves in the backroom) to bring us to around 280 Health if you are fast. This is a great opportunity to unlock the Achievement.

If you are reloading Checkpoints, be sure to recollect the Helmets as well!


Achievement #5 – Health Upgrade III: Unlock the Health Upgrade III Perk.
With are very Overcharged health now, quickly go & radio Landseer like Agent One has been asking. Once we are finished speaking, we will be promptly attacked by Nazi Soldiers. We should still have quite a bit of Overcharged Health still decaying. Be quick, & kill at least 5 Nazi Soldiers in a row with Overcharged Health to unlock this Achievement.

Letter #1 – Helga’s Letter: When the Nazi ambush has ended, Agent One will drop a ladder down for us to climb. Get up to the second floor & enter the planning room off our right to find our first Letter on the war table.

Join Agent One at the vent to escape the offices & complete the Chapter.
Sequence 2: Pipes, Dogs, & Super Mechs
1. Chapters: Prison Break
2. Perk Focus: Silent Commander Kills, Stealth Takedowns, Dual Wield Kills, Kills From Behind Cover
3. Perks: 3/16
4. Nightmare Levels: 2/9
5. Letters: 2/10
6. Gold Bars: 8/64
7. Achievements: 7/50
-----------------------------------------------------------------------------------------------------

Chapter #1 – Prison Break:

Letter #2 – Lotti’s Letter: As soon as Blazkowicz wakes up, we will speak with Agent One through some iron bars. While looking at them, look along the wall to their right & crouch down to see this Letter sticking out through a hole in the wall.

Gold Bar #1: Collect your Pipe Weapon from attempting to climb some to escape, then use them to scale a wall even though it looks easier to do just by hand…

Carefully pass through the three hallways with the Supersoldatens patrolling them & get past their electrified gates, then drop down to sub level S1. Head over to a wall we need to climb & enter inside a vent where we climb up. When the vent forks, we can go left or right; take the path to the right to find our first Gold Bar.

Gold Bar #2: At the top of the vent down the left path we will be above another hallway with some Supersoldatens patrolling it. Get past the electrified security door to enter the next hall & there will be a sleeping Kampfhund at the end of it. Head straight ahead across the bridge into the hall, & we can see this Gold Bar off our right at the dead end.

Gold Bar #3: Get to the service elevator & take it down further into the prison. At the bottom of the elevator, dead head of us, will be a block of stone with some wooden boards down its side & a wooden walkway coming off the top of it. Head around to the left side of the stone block, & we can wall climb up it. Almost as soon as we step onto the wooden walkway, we can see this Gold Bar in an alcove to our left.

Gold Bar #4: Carefully sneak through or use stolen MG46s to get past the Supersoldatens, pass through the electrified security door, wall climb up to a vent, & pass through it to reach a cell block patrolled by Kampfhunds.

Enter into the drainage tunnels through the hatch in Cell C4 & we follow the tunnel up to the Northwest corner to find a Gold Bar at the end of it where it exits out onto a metal bridge.

Gold Bar #5: Navigate your way out of the drainage tunnels & climb up into the next cell block. Head across the way into Cell F10 & we can find this Gold Bar inside near a vent grate.

Nightmare Level #2: Go through the vent towards Cell G11 & we can climb a ladder up to the upper floor. We will eventually drop into Cell A5 & reach the main sanatorium block with the still living prison population. At Cell A3, we will approach a Prisoner named Markus. He will mistake us for his son, but we will then be able to carry on past him & pry open the gate to the next Block C.

Get to another Cell C4 & pry open the hatch in the floor to continue & we will drop into Cell C11. In this cell, on the lower bunk, we can find our mattress to take us back to Wolfenstein 3D…


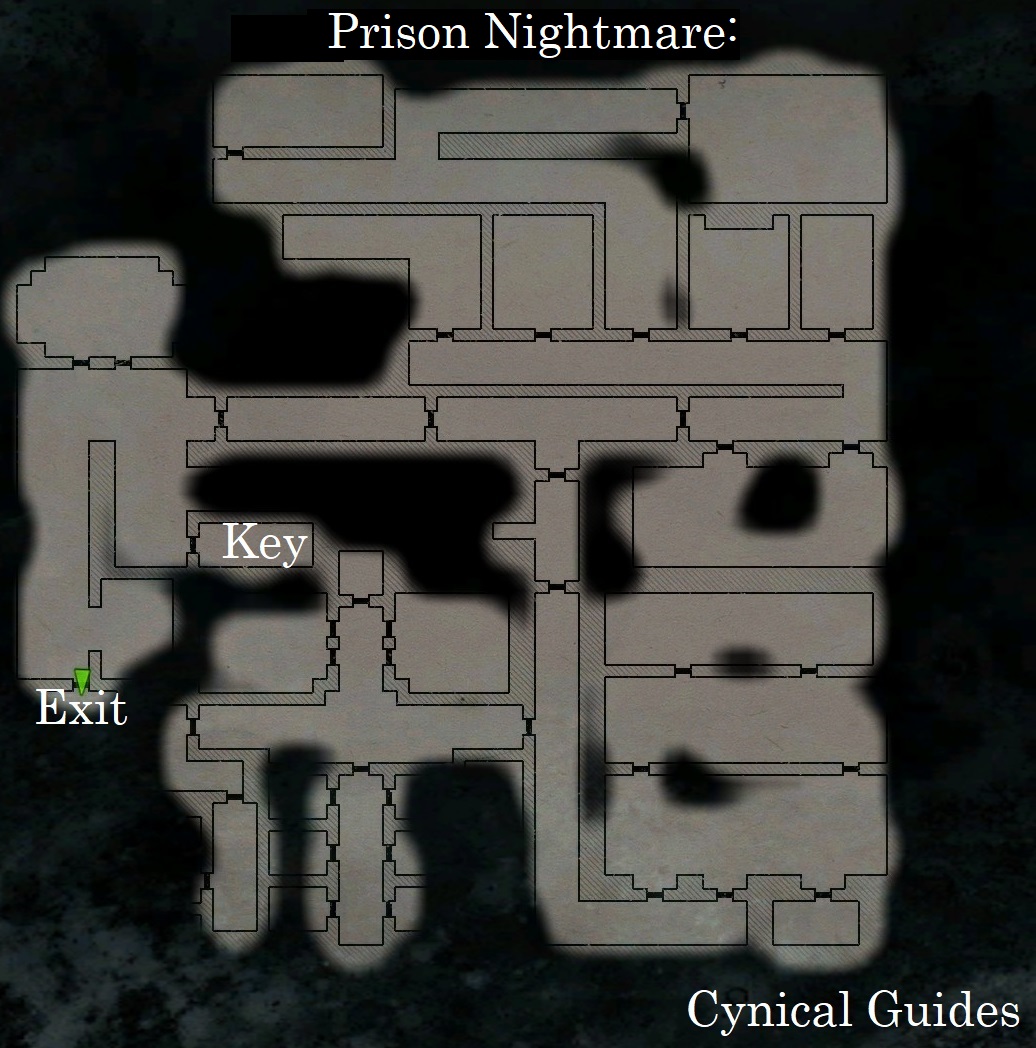
Achievement #6 – Prison Nightmare: Complete the Nightmare in Chapter 1.
Unlike the first Nightmare Level, we will need to locate a Key to open up the Exit doors. Fortunately, for this Level at least, it is not found too far away.


Open the Exit door with the Key & kill the Nazi Soldier & Nazi Commander inside to take the elevator out.

Gold Bar #6: Return back to reality after beating the Nightmare & get poked a little by a Nazi Soldier in the checkpoint room. Drop down into the next sanatorium Block B & there will be a patrolling Panzerhund nearby. Wait for it to patrol into Block C then quickly pass through a door we prop up to get into Block B.

Our anonymity will be short lived though as it will discover us when we exit out to the upper floor. Quickly rush along to the other side of the floor & use the Pipe to enter a vent, to drop down into the next area. Before progressing further into the vent, look behind you to enter a storage cell with this Gold Bar on the floor.

Gold Bar #7: Navigate through the vents to enter an area with two Nazi Commanders in it. The first is easy to kill; be sure to do it stealthily. Make your way over to the East side of the area over the bridge across the water. At the other side just as we head down some stairs, we can see two wooden crates in front of us. Break them, & we can enter into a crawl space that will end with this Gold Bar in view.

Kampfpistole: Deal with the second Nazi Commander at the far West end of the area & we can collect the Kampfpistole nearby the Barge power controls. We need this Weapon for a Perk.

Gold Bar #8: After we power up the Barge, keep heading further along the walkway towards a 75+ Armor & we can see a Gold Bar beside it.


Achievement #7 – All That Glitters: Collect 8 Gold items.
If you have been following along with the guide, we will unlock this Achievement after collecting our 8th Gold Bar.

As we travel down the waterway on the Barge, use the mounted MG46 Turret to kill the enemies that will harass us as we go.
Sequence 3: Open the Gates!
1. Chapters: Docks
2. Perk Focus: Dual Wield Kills, Kills From Cover, Schockhammer Kills, Bombenschuss Kills
3. Perks: 3/16
4. Nightmare Levels: 3/9
5. Letters: 2/10
6. Gold Bars: 16/64
7. Achievements: 9/50
-----------------------------------------------------------------------------------------------------

Chapter #2 – Docks:

Gold Bar #9: At the beginning of the Chapter, step back onto the Barge & pilot it to the gates of Wolfenstein Keep. Kill all the enemies here then head over to the right side of the docks to find a lever we can pull. Pull it, & a set of metal gates will open up ahead of us in the water with a broken power line leading towards it.

Jump into the water, but before we swim through the gates, swim over to a flipped over Barge in the water below the broken power line. Dive under the water near here & we can find a Gold Bar on the rocks below the Barge.

Schockhammer: Swim in through the gate we opened now & climb up the rubble to a breakable wall. Follow a path along the cliffs & we can wall climb up in through an open window of the keep. Take out the Nazi Soldier & Heavy Soldier & we can collect this new Weapon from the Heavy; we need to get 50 kills with it for the Schockhammer Clip + Achievement.

Gold Bar #10: Clear out the rest of the enemies we face after climbing through the window, then search the suits of armor along the wall here to find a Gold Bar on the pedestal next to the center suit’s feet.

Nightmare Level #3: After opening the first set of locks on the keep gate, we will exit back out the docks. Kill the new enemies out here then head over to the left side of the docks now to see another docked Barge here we can pilot. Do so, & it will take us through a different metal gate to the East side of the exterior. Climb out of the Barge onto the platform it takes us to & look at the back near a blocked off door to see our mattress to sleep on.


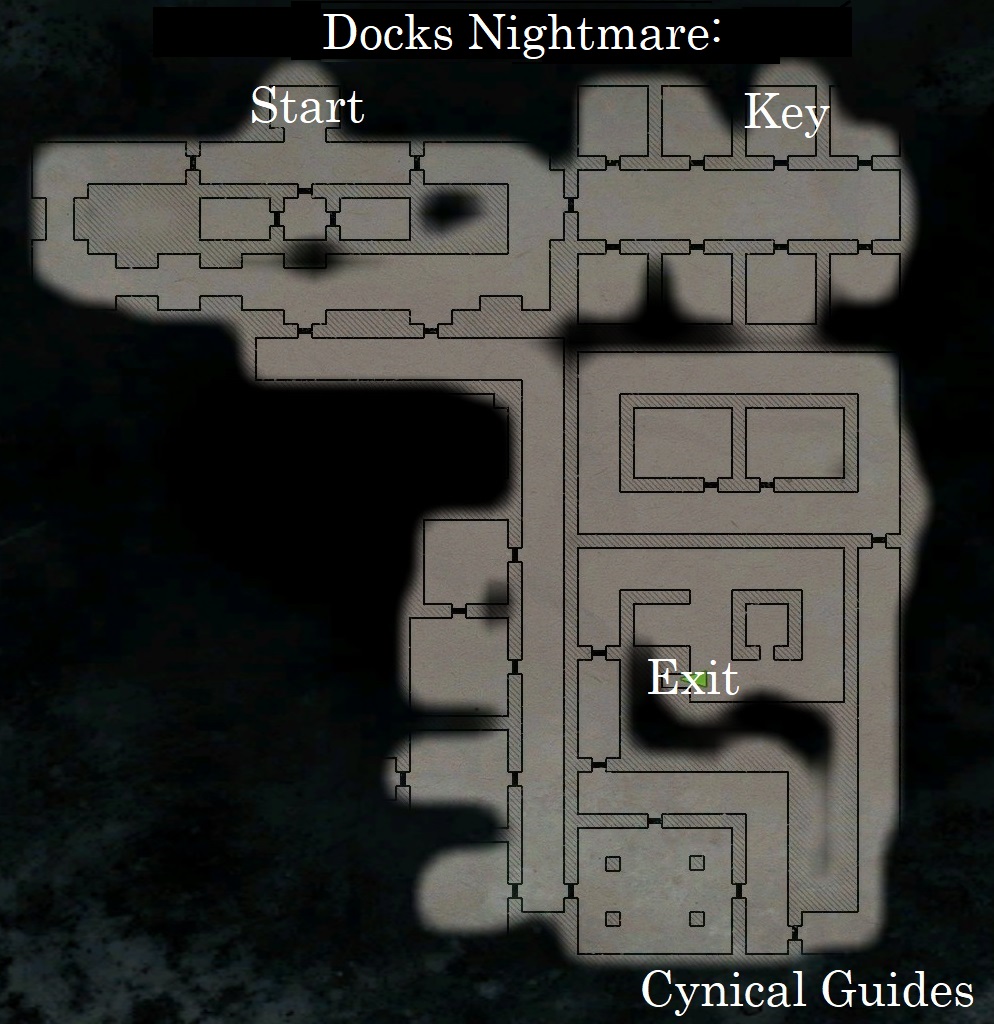
Achievement #8 – Docks Nightmare: Complete the Nightmare in Chapter 2.
This is a very simple Nightmare Level. The Key is found close to where we begin & there is not many enemies at all between us & the Exit.


Bombenschuss: Back in reality now, carry on with the Barge & we will enter an area with two Nazi Commanders in it. The first Nazi Soldier we encounter to our left after exiting the Barge is holding this Weapon; Stealth Takedown them for it.

As of now, we have/can collect ammo for all Weapons in the game. Kills with them are required for Perks. Whenever it makes sense to, & you have the ammo for it, try logging as many kills with these Weapons when you can.

Gold Bar #11: Enter inside the lower level of the tower where the first Nazi Commander is & head into the rooms off your right. At the back, near a barred gate, we can find a Gold Bar hidden on a chair behind a rolled-up rug.

Gold Bar #12: Collect a Key from a desk on the lower level & use it to unlock a barred gate so we can continue on. Do not drop down the hole in front of you & carefully leap across it to the other side to find a Gold Bar tucked behind the corner to our right.

Gold Bar #13: Drop down the hole now into the wine cellar & deal with a regular Grammar Nazi. Continue on to the far end & drop down through a hatch… then fall way down into some water. Swim over to a wall we can climb but do not scale it yet. Instead look around for a doorway blocked by wooden planks. Shoot them down then swim over there to collect a Gold Bar in plain sight.

Gold Bar #14: This area will turn out to be an old catacomb, still patrolled by Nazis unfortunately. Make your way through them until we reach a strange religious room with a cross placed upon an altar. Carry on past this room down a tunnel then up some stone stairs further on until you reach the top where the path forks. Take the path to the right towards a dead end & we can find this Gold Bar inside one the burial shelves to the right of a sarcophagus.

Gold Bar #15: Turn around from the sarcophagus now & look above you to see a path of wooden beams above us. Carefully walk along them in this tunnel & they will lead us to a secret passage above the doorway leading back into the center of the tower. Drop down the passage, & we will be underneath the wooden bridge where a Gold Bar is hidden.

Gold Bar #16: Leap down into the water & re-make your way back through the catacombs to where we were. Leap across the wooden bridge to the other side then get up to the Upper Catacombs area to wall climb up an elevator shaft to an area with two more Nazi Commanders.

Deal with them & enter into the room beyond the secondary wine cellar. Do not approach the steel door we need the Pipe to open & instead begin searching the rooms where the second Nazi Commander was. Close by a small room that has a white & blue tarp covering some crates, we can see a hole in the wall just outside it that we can crawl down into. Follow the tunnel we drop into & we can collect this Gold Bar at its end on some stairs.


Achievement #9 – Glittering Gold: Collect 16 Gold items.
If you have been following along with this guide, we will unlock this Achievement after collecting our 16th Gold Bar.

Carry on to the end of the Chapter & enter inside Wolfenstein Keep…
Sequence 4: Finding Agent One
1. Chapters: Wolfenstein Keep
2. Perk Focus: Dual Wield Kills, Kills From Cover, Schockhammer Kills, Bombenschuss Kills
3. Perks: 6/16
4. Nightmare Levels: 4/9
5. Letters: 4/10
6. Gold Bars: 24/64
7. Achievements: 13/50
-----------------------------------------------------------------------------------------------------

Chapter #3 – Wolfenstein Keep:


Achievement #10 – Schockhammer Clip Upgrade: Unlock the Schockhammer Clip Upgrade Perk.
When the Chapter begins, we will have to kill a Supersoldaten… immediately.

Once they are killed & we open the gates to proceed further we will be assaulted by a large Nazi Soldier force. Use the armory beside to stock up & get as many Schockhammer kills as you can. If you got some in Chapter 2, you may log the 50 kills we need for the Achievement; try Duel Wielding them as well to work towards the Ammunition Upgrade Achievement.

If you do not unlock it here, make it a priority to work towards throughout this Chapter… It is also very easy to farm in Post Game.


Achievement #11 – Armor Upgrade I: Unlock the Armor Upgrade I Perk.
If you have been diligent in collecting all Helmets you come across, especially when Restarting Checkpoints or after deaths, then you will most likely have accumulated 100 Helmets by now. If not, stick with it, & keep looting those Helmets!

Gold Bar #17: When the Nazis are dead, carry on further into the Keep & use your Pipe to open some hatches we can crawl through. We will then enter a kitchen area with two Nazi Commanders in it; if you are patient, they can both be sniped with your Silenced Handgun from atop the wooden beams we drop in on.

Clear out the room now & search the oven stations near the center of the room. The Gold Bar can be found on a table beside the oven station closest to the fireplace.

Gold Bar #18: Exit the kitchen area through another hatch we need to pry open & follow it along until we exit into a small room with a red carpet ahead of us. Head across the hall from us & enter into a room with a Nazi examining a bookcase. Kill them, then interact with a book on the shelf to open up a secret area with this Gold Bar in it.

Letter #3 – Ingrid’s Letter: Return back to the previous room, but before we enter back into the red carpeted hall, check the fireplace in here to find this Letter sent to Rudi by his mother.

Nightmare Level #4: Pass through a fireplace in the next room & we will enter the next area with two Nazi Commanders in it. Clear the area then go to the Northwest corner of the upper floor to find another hatch cover we can pull open. Head through it then drop down over a railing into a secret area below to find our sleepy-time mattress near a lit candle; the comfiest looking one yet.


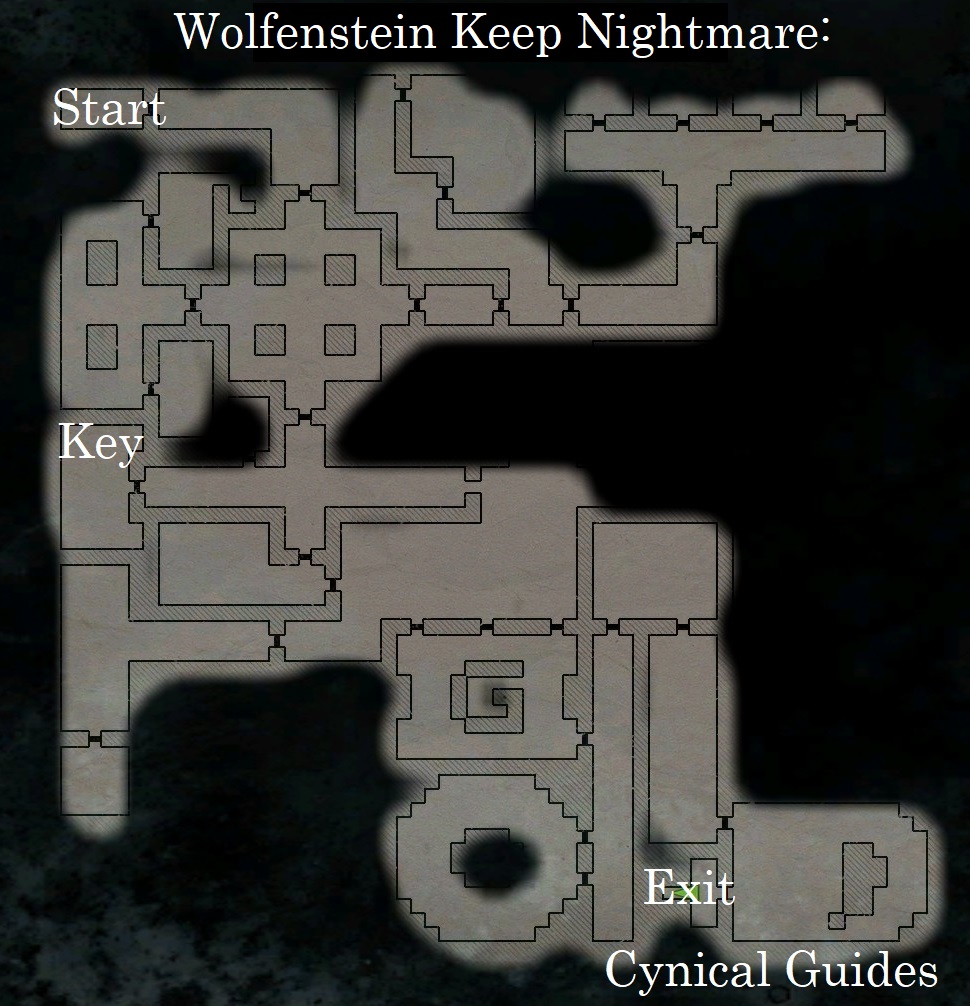
Achievement #12 – Wolfenstein Keep Nightmare: Complete the Nightmare in Chapter 3.
This Level is slightly trickier & has a lot more Nazi Soldiers in it per room; we do not have many Nazi Commanders to kill fortunately.


Gold Bar #19: When we are back in reality, head back up & crawl in through the hatch again. Jump on some crates to destroy a breakable wall to continue. Kill the Nazi Soldiers that attack us, & follow this balcony we are on over to a small grate cover we need to push open. Ignore it & carry on to the right along the balcony to find this Gold Bar at the dead end behind a pillar.

Gold Bar #20: Crawl in through the grate into a library with two Nazi Commanders in it. From where we enter, immediately turn right & follow the wall along past a door & over to the next bookshelf where we can find a Gold Bar close to its top shelf.

Gold Bar #21: While still in the library, go back over to where we entered from the grate then head straight across the room to the opposite end of this lower level. Back here, look along the bookshelves to our left to find another Gold Bar on the second from the top shelf.

Letter #4 – al-Bruni’s Letter: Clear out the library now then return to its second floor. Up here there will be two exits that lead to a higher floor on the balcony; look in between the two doorways in the library to find a small Key underneath a painting of a gold object. Collect it then head over toward where that same gold object is on a pedestal in the library & use the Key on it to open a secret area.

Head inside it & we will find this Letter in the center of the room on a table near a tape recorder.

Gold Bar #22: In the same secret room as the Letter, look along the bookshelves to our right to find this Gold Bar on it.

Gold Bar #23: Take the exits out of the library & follow the balcony along to your right to find a Gold Bar in plain sight at a dead end (going to the “left” will take you where the second Nazi Commander was near the caged cell).


Achievement #13 – Quick Turn: Unlock the Quick Turn Perk.
Use the Pipe to open the door to carry on & we will finally find Agent One… & Rudi Jäger will also find us. After that shocking turn of events, we will be weaponless save for our Pipe & have to get out of the torture chamber. Kill a Nazi Soldier for his gun then hunker down to fight off the assault.

By now you should have had plenty of kills from behind cover – get 50 to unlock this Achievement. This is an easily farmed Achievement in Post Game.

Gold Bar #24: Fight off the Nazi ambush in the torture room then enter through the door that Rudi escaped through on the lower level. Pull down a hatch in the ceiling but do not pass through the second hatch we find up here. Instead, look under large canister in the corner to find this Gold Bar.

With that done, go to the upper floor & we can find a small control office we can escape through by pushing a button near a steel door. Take the elevator & get out of here.
Sequence 5: Best Served Cold
1. Chapters: Escape!
2. Perk Focus: Stealth Takedowns, Bombenschuss Kills, Kampfpistole Kills
3. Perks: 8/16
4. Nightmare Levels: 5/9
5. Letters: 5/10
6. Gold Bars: 32/64
7. Achievements: 19/50
-----------------------------------------------------------------------------------------------------

Chapter #4 – Escape!:


Achievement #14 – Vampire: Unlock the Vampire Perk.
Over the course of the game, we should have been logging many Stealth Takedowns; for this Achievement we need 25. The enemy most be completely unaware of us & cannot react at all our it will not count. It also must be an actual Takedown & not just meleeing them in the back with the Knife or Pipe.

This Achievement is very easy to farm in Post Game.

Gold Bar #25: When the Chapter begins, exit the elevator & take the path down to our left (be wary of the patrolling Nazi Soldier). Follow the path down past some powered generators & we can see a set of concrete stairs going up off our right. Head up them to the top level & we will be in the gondola station with two Nazi Commanders.

At the top of the stairs, being mindful of the enemies & patrolling Supersoldaten (unless you kill them all first) head towards some wooden benches in the center of the platform with a “Wartehalle” sign above them; we can find a Gold Bar on these benches.

Gold Bar #26: Get to the station control room through the hatch on its roof, & we can find a Gold Bar on a desk at the opposite end of the room as the station gate controls.


Achievement #15 – Bombenschuss Clip Upgrade: Unlock the Bombenschuss Clip Upgrade Perk.
With the Schockhammer kills Achievement unlocked we now should focus on getting our 50 kills with the Bombenschuss. Again, another easily farmed Achievement in Post Game.

Gold Bar #27: Now it is time to get out of Castle Wolfenstein & take the gondola out of here after we open up the station gates. As we get about halfway down the cables, our gondola will lose power. Get onto the roof of your gondola & use the cables as a zip-line to get to the power station ahead. Do not enter inside it right away & instead just follow the outer railing around to the opposite side of the exterior to find a Gold Bar tucked behind a support beam near the dead end.

Gold Bar #28: Once the cable line is powered up again, take a new gondola down to towards the entrance. As we approach, we will once again get halted & have to climb onto the roof to escape. This time our gondola will full on get destroyed & we will plummet down into the hypothermia guaranteed waters below.

Swim into the cave ahead of us after we pry ourselves free from the gondola & we will see two Nazi Soldiers walking on a path above us. When they walk by, head up the path they came down & we can see a Gold Bar at the end; reach through the hole in the wall to grab it, or run/slide into it.

Gold Bar #29: Progress through the two sections of the frozen caverns with Nazi Commanders in them to get to an elevator that will take us out of the caves. At the top, drop down off the platform but do not head through the tunnel ahead of us. Instead head around to the left of the tunnel entrance to see a climbable wall; climb it to find a Gold Bar at the top.


Achievement #16 – Freedom: Escape Castle Wolfenstein.
Story Related. Exit out of the caves system to the outskirts of the lower gondola station to unlock the Achievement.

Gold Bar #30: Climb up the wall to the underside of the gondola station & we will need to leap over a broken section of the walkway to enter a maintenance room. There are two concrete pillars in this room; we can find a Gold Bar behind the furthest one on top of some cardboard boxes.

Gold Bar #31: Apprehend an elevator, & we will exit out into the security checkpoint we had to pass through in the Prologue. Step behind the desk of where that Nazi official checked our passport & look on top of the file cabinets back here to see an open safe with this Gold Bar in it.

Gold Bar #32: Fight your way through the blockades of Nazis & make your way into the small town of Paderborn Village. Go to the tavern & we will meet Annette. Do not leave the storage room with her & instead head up the stairs to the far end of the wine barrel wall to find a Gold Bar on a chest behind some boxes.


Achievement #17 – The Ecstasy of Gold: Collect 32 Gold items.
If you have been following along with the guide, we will unlock this Achievement after collecting our 32nd Gold Bar.

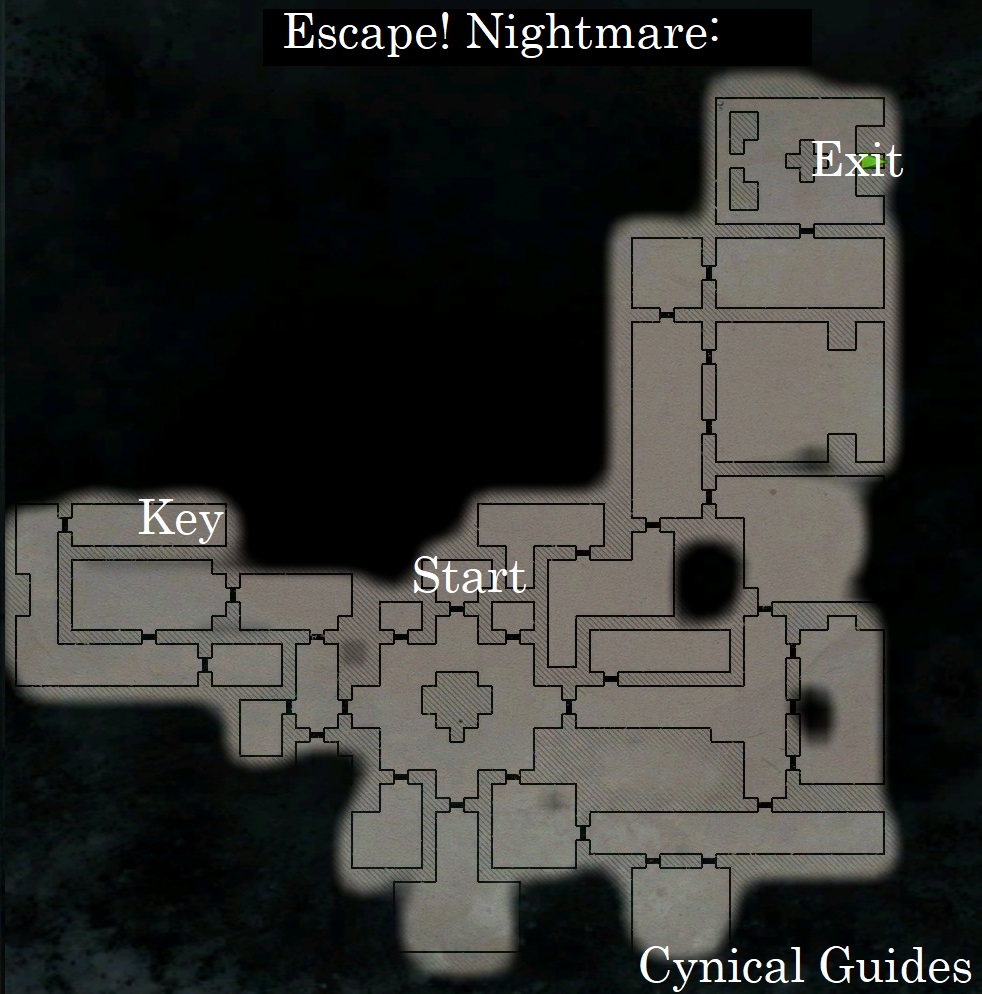
Nightmare Level #5: After collecting Gold Bar #32, walk back from the wine barrel wall but do not head back downstairs in the tavern storage room yet as we can find a mattress to sleep on at the top of the stairs.


Achievement #18 – Escape! Nightmare: Complete the Nightmare in Chapter 4.
There will be quite a few Soldiers & Commanders we will need to defeat on this Level so play cautiously.


Letter #5 – Sophie’s Letter: Join up with Kessler in the main room of the tavern & fend off the Nazi waves that come at us. Tie up a loose end & we will be tasked with boarding a small boat in an underground cave below the tavern. Before we take it, look around this cave hideout & we can find a Letter on a desk.


Achievement #19 – Paper Boy: Collect 5 Letters.
If you have been following along with this guide, we will unlock this Achievement after collecting our 5th Letter.

Get in the boat to complete the Chapter.
Sequence 6: Average Small-Town Life
1. Chapters: Wulfburg
2. Perk Focus: Dual Wield Kills, Kampfpistole Kills
3. Perks: 9/16
4. Nightmare Levels: 6/9
5. Letters: 7/10
6. Gold Bars: 40/64
7. Achievements: 22/50
-----------------------------------------------------------------------------------------------------

Chapter #5 – Wulfburg:


Achievement #20 – Revenge: Complete part one.
Story Related. We will unlock this Achievement at the start of Chapter #5 after we get off of the boat.

Gold Bar #33: As soon as we exit the boathouse at the start of the Chapter we will enter an area with two Nazi Commanders. Head up to where the North-most Nazi Commander patrols & we can find a Gold Bar on the ground near an empty MG46 stand.

Gold Bar #34: Leave the wharf & drop down into the bottom of a flooded pump house tower to continue. Do not head up the stairs of it yet & instead swim down into the center of the water to find a Gold Bar stuck in the mud.

Gold Bar #35: Get to the top of the pump house now & cross over into the next building. When we enter, head to the room off our right & look along the right wall to see two red cushioned armchairs stacked on top of each other; on the highest armchair, we can see a Gold Bar resting on it.

Gold Bar #36: Get to the upper floor of this building now & look over the railing at the wooden beam in front of it to see a Gold Bar resting on its left corner.


Achievement #21 – Ammunition Upgrade: Unlock the Ammunition Upgrade Perk.
Whenever you use the Assault Rifle, Shockhammer, & even the Handgun if you really wanted, always Duel Wield. Kill 100 enemies while Dual Wielding to unlock this Achievement.

This is easy to farm in Post Game.

Gold Bar #37: Exit the building through a window & we will enter Wulfburg Square with two Nazi Commanders patrolling it. In the center of the courtyard here will be a large rotunda. Deal with the enemies in the area then enter the rotunda to find a ladder heading up it. Get to the top of the ladder & we can find this Gold Bar in a window immediately to our left.

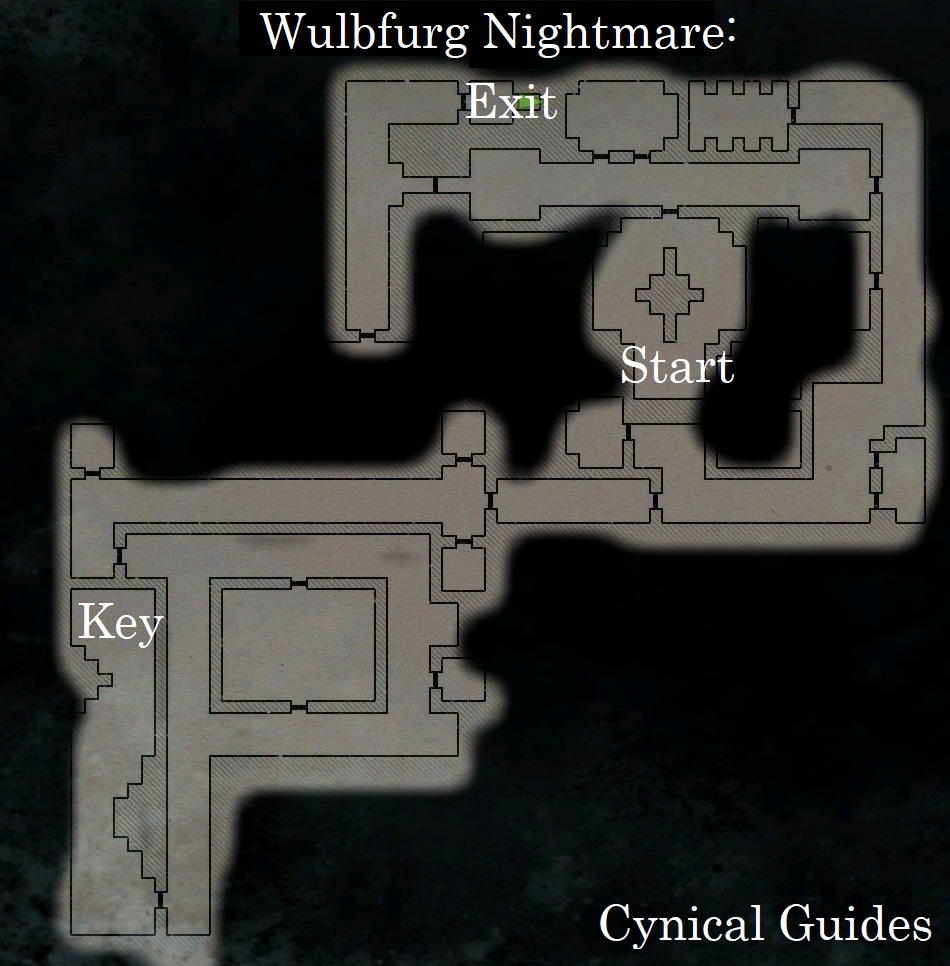
Nightmare Level #6: Climb the wall up to where one of the Nazi Commanders patrols then drop off the roof to leave Wulfburg Square. Head down some stairs to see the same looking homeless gentleman we saw outside the tavern in Paderborn Village rave at us. Take two lefts down the street from him & we can find a very smelly mattress against the wall behind a fish delivery truck. How inviting.


Achievement #22 – Wulfburg Nightmare: Complete the Nightmare in Chapter 5.
This is a pretty straightforward Level to complete; lots of Nazi Soldiers but not too many Nazi Commanders.


Gold Bar #38: Get to Agent Two’s house & we will be asked to sneak into it through their basement window. Head around to the back side of the house but do not go through the window yet. Look to the window’s right at the end of the alley to see this Gold Bar inside a wooden box.

Gold Bar #39: Enter the basement through the window now & we will meet Agent Two. As we speak, head over to the left corner of the room near the large hot water tank in the kitchen to find this Gold Bar on the floor.

Letter #6 – Wesley’s Letter: To the left of the Gold Bar in Agent Two’s house, we can find this Letter on a nearby table.

Put on a shirt to hide your swol’ body & we will commence the next phase of our mission: getting Helga’s Folder.

Gold Bar #40: Pass through the sewers & we will exit in behind the Wulfburg tavern… don’t ask me how we are going to be dry by the time we get there. Before entering the tavern, deal with the Kampfhunds, & head around to the left of the entrance & to find a Gold Bar in the far-left corner of a pile of rubbish against the wall.

Letter #7 – Schreiner's Letter: Enter the tavern now & take up your disguise as a waiter. Go up the stairs to Helga’s room & as soon as we enter it, head over to the right side of the room past the bed to find this Letter on a windowsill.

Go to take Helga’s Folder to complete the Chapter.
Sequence 7: Can't Save Them All...
1. Chapters: Ruins
2. Perk Focus: Pipe Head Explosions
3. Perks: 10/16
4. Nightmare Levels: 7/9
5. Letters: 8/10
6. Gold Bars: 48/64
7. Achievements: 25/50
-----------------------------------------------------------------------------------------------------

Chapter #6 – Ruins:

Gold Bar #41: When we wake up after the explosion, break through one of the walls in the room we are trapped in with the Pipe & we will head up into the tavern’s attic. Near the back of the attic will be a hole in the floor; do not drop through it & instead walk past its right to see a Gold Bar in the corner.

Gold Bar #42: Drop down through the hole now & we will encounter… Zombies? Nazi Zombies?! Get down the stairs of the tavern to the bottom floor & dispatch two “Shamblers” as they are called to prevent copyright infringement. Note that for the Tough Skin Achievement we need to kill Shamblers with a “Pipe head explosions”. What this means is use your Pipe & hit them in the head for it to explode.

Once the Shamblers are taken care of, head around the left side of the bar counter in the main room to find a Gold Bar on the floor.

Gold Bar #43: Get back to Agent Two’s house & collect your left behind weapons before bidding her… goodbye. Carry on out of her basement hideout & navigate to the upper floor of the building, which seems to be a hospital. Enter into the second room with beds in it & go to the far-left corner of it to find a Gold Bar under one of them.


Achievement #23 – Tough Skin: Unlock the Tough Skin Perk.
Head explosions are easy to perform on Shamblers. When you find them, quickly rush up to them before they can react & hit them straight in the noggin’ with your Pipe to one shot them. Hitting them anywhere else but the head will not count; sometimes Helmets will absorb the blow & prevent the head from exploding. There are many opportunities to work towards this Achievement throughout this Chapter; we only need 10.

Letter #8 – Katrin’s Letter: Get back to the boathouse that we were originally dropped off at in Chapter 5. Pull Kessler’s boat out from under the dock & search inside it to find this Letter.

Gold Bar #44: Exit the boathouse now & but instead of heading down the path we did back in Chapter 5, head to the right & look across the small canal to see a Gold Bar directly across from us. Drop into the water & climb up a ladder on the other side to find this Gold Bar in a pile of rubble where a street used to be.

Gold Bar #45: If the Shamblers falling from the sky seem endless… it is because they are. Drop into the water at the North end & swim through a crushed gate to climb up a ladder on the other side. Follow the path along & we can find this Gold Bar on the ground before the path switches to a wooden wharf.

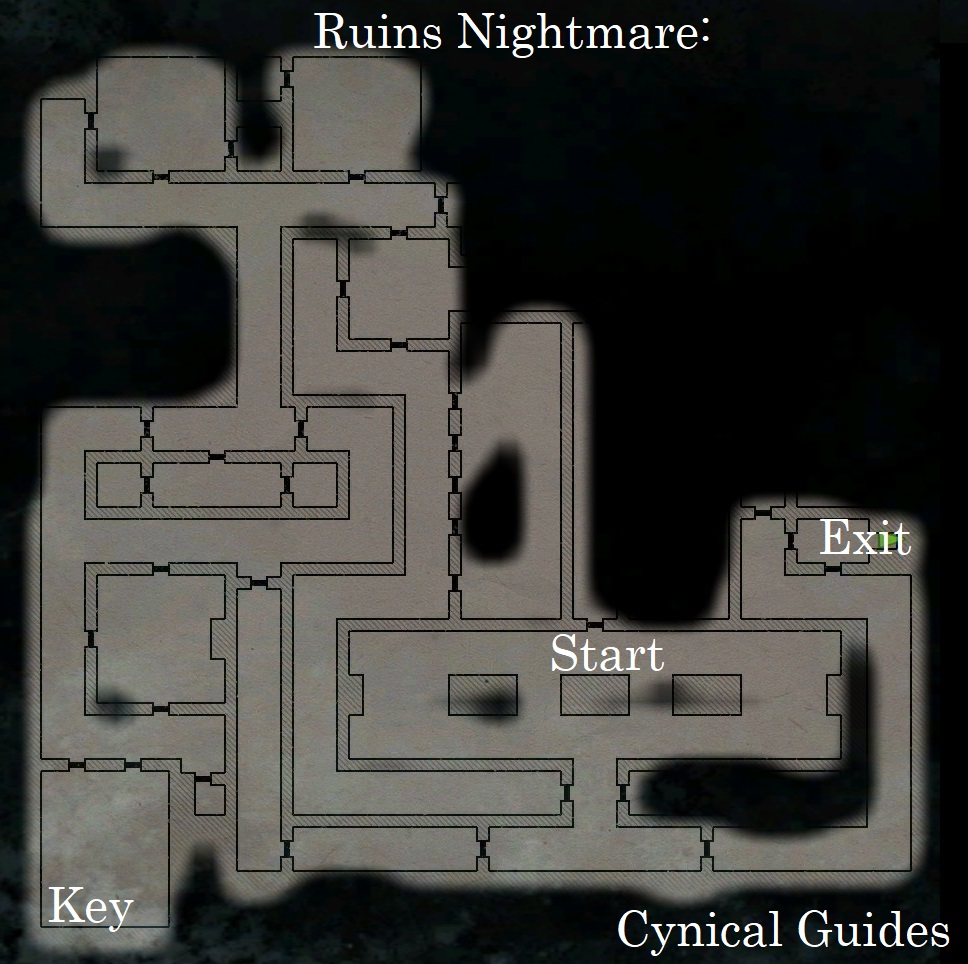
Nightmare Level #7: After collecting the previous Gold Bar, walk along the wooden wharf about halfway down & look to your left to spot an old mattress beside a random waterwheel. Now is the perfect time to sleep.


Achievement #24 – Ruins Nightmare: Complete the Nightmare in Chapter 6.
This Level is loaded with enemies so be careful.


Gold Bar #46: When we come back to reality, look directly across the wharf from where the mattress was & we can spot a lone Gold Bar on an isolated platform across the water. Run & leap over to it to collect it.

Gold Bar #47: Climb the wall out of the Wulfburg canal area & take a left at the top of the wall to enter a nearby building. Almost immediately upon entering it, look to your right in between two red tarps hanging from a doorway to see a Gold Bar in between them.

Gold Bar #48: Do not drop down through the hole in the wall of this building & instead turn around & run down to the opposite end of where we climbed up to enter a different one. In this workshop like room, look to the right a closed red door in front of us to find this Gold Bar tucked behind a flowerpot near an iron bell.


Achievement #25 – Kessler/Annette Saved: Choose to save Kessler/Annette.
Story Related. There are two ways to continue: straight ahead down the hatch in this workshop room or back the way we came from the previous Gold Bar down into a bathhouse. The workshop path will take you to Kessler & the bathhouse path will take you to Annette.

We will not be able to save them both… Whoever you do not save, we will reload this Chapter in Post Game for their associated Achievement.

Help your friends, then leap into the canal to swim over to a parked Laderoboter that we can enter to complete the Chapter.
Sequence 8: City of the Dead
1. Chapters: Old Town
2. Perk Focus: Dual Wield Kills, Kampfpistole Kills
3. Perks: 11/16
4. Nightmare Levels: 8/9
5. Letters: 9/10
6. Gold Bars: 55/64
7. Achievements: 27/50
-----------------------------------------------------------------------------------------------------

Chapter #7 – Old Town:

Gold Bar #49: When the Chapter begins, we will be in the Laderoboter. Use it to destroy the wooden gate in front of us & we will need to cut the ropes on a bridge to continue. Before doing so, climb out of the Laderoboter & swim into the water underneath a wooden platform with a ladder on it to find a Gold Bar.

Gold Bar #50: Break open the next wooden gate & clear the area of Shamblers. Before continuing on, climb out of the Laderoboter & return back to the gate we smashed. From here look off our right & we can see a broken section of the wharf. Leap across it to the other side; it can be a tricky jump. Once on the other side head down & around the corner to the left to see some wooden crates; the Gold Bar will be inside one of them.

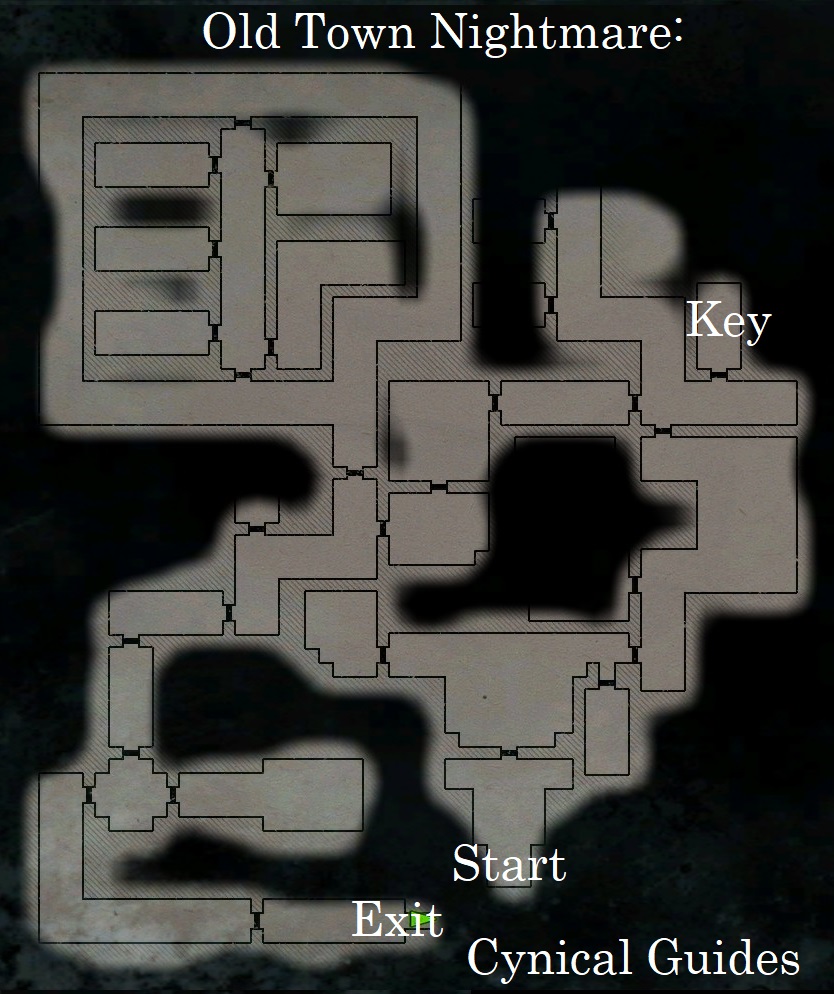
Nightmare Level #8: Before heading back to the Laderoboter, leap over the chain railing into the water & swim through one of the two sewer tunnels ahead of us. In here, we can spot a small hideout with some equipment as well as a mattress to sleep. Lulled to sleep by lovely zombie ASMR…


Achievement #26 – Old Town Nightmare: Complete the Nightmare in Chapter 7.
This is another fairly simple Nightmare Level to complete.


Gold Bar #51: Return back to reality & swim further down the sewers towards the North & we will exit back outside in small square space with a half-submerged rowboat. Carefully swim up to the rowboat, climb onto it using its oars, then carefully jump onto the wooden platform it is beside to find a Gold Bar beside some barrels.

Gold Bar #52: Return back to the Laderoboter we left in the streets & carry on into a courtyard that will have quite a few Shamblers in it. As a pro tip, Shamblers cannot climb, so the high ground is very effective against them; for farming Kampfpistole kills, lure a bunch together before killing them.

Once the Shamblers are cleared out, we will be tasked with using a lever to open a gate to proceed – hold off on doing that for now. Head around the backside of the building with the lever down a small alley & we can find this Gold Bar on a stack of green crates.

There is a 75+ Armor close by these crates, ignore it for now, but remember where it is! There is a lot of Armor in this area & we can attempt to get the Armor Upgrade II Achievement.

Gold Bar #53: Head East to the top of some stairs now, still ignoring the lever & any Armor you see apart from Shambler Helmets, & we can spot this Gold Bar on a ledge above them in plain view.

Gold Bar #54: Go down the stairs & we can enter into a building off our right; note the 50+ Armor. Go to the upper floor where we can find a Gold Bar in a cabinet beside an open window to our right.


Achievement #27 – Armor Upgrade II: Unlock the Armor Upgrade II Perk.
As of now, we have noted a +75 & a +50 set of Armor; we can also find a +25 Armor inside the lever building & another +25 Armor that we can see to the left of its entrance from the open window. If you are not at a minimum of 50 Armor, try scrounging around this area for Helmets to boost you.

When you are ready, start downstairs at the +50 Armor, run up the stairs & jump out the window to the +25 Armor ahead of us, then the +25 Armor in the lever building, to end by leaping out the window to the +75 Armor. This is more than enough for our Achievement!

Letter #9 – Helmut’s Letter: Go to the building with the lever in it now & check the table beside it to find this Letter.

Gold Bar #55: Finally use the lever to open up the iron gate & we can continue onwards with the Laderoboter & break a third wooden gate in our way. To proceed further, we will need to locate a Key for a locked gate. Close to where we broke through, we can find a building with an open red door we can enter; the Key can be found on a table immediately to our left.

Before leaving the building, look across the room to find a Gold Bar behind a fallen wooden beam near some armchairs.
Sequence 9: Beauty of Annihilation
1. Chapters: Old Town
2. Perk Focus: Dual Wield Kills, Kampfpistole Kills, MG46 Kills, 3 Kills 1 Grenade, Last Bullet In the Mag’ Kills
3. Perks: 15/16
4. Nightmare Levels: 8/9
5. Letters: 9/10
6. Gold Bars: 56/64
7. Achievements: 31/50
-----------------------------------------------------------------------------------------------------

Chapter #7 – Old Town:

Gold Bar #56: Open the gate with the Key & enter into the building. Pass through a whole bunch of Shamblers & climb up another set of stairs at the back where the path will head to the left. Before heading down it, look to your right at the top of the stairs to see a Gold Bar tucked in a small alcove in the wall.

Kill "X" Perk Farming: We have reached one of the best Perk Farming locations in the game; it is less optimal in Post Game as we need to beat the whole Chapter essentially to reach it. Though there are plenty of other options in Post Game.

There is ammo for every type of weapon in this burning building as well as an MG46 & Restarting the Checkpoint will take us back to when we unlocked the gate. Take this opportunity to farm the Shamblers for all your Kill “X” Achievements.

Do not use the lever at the end of the building or it will make a new Checkpoint!


Achievement #28 – Grenade Belt: Unlock the Grenade Belt Perk.
Killing 3+ enemies with a single Hand Grenade is extremely easy to do here as the enemies commonly swarm together in the close quarters. Throw a Hand Grenade in a cluster of them… & unlock the Achievement.


Achievement #29 – Kampfpistole Ammo Storage Upgrade: Unlock the Kampfpistole Ammo Storage Upgrade Perk.
If you have been making your every shot count, we can very quickly earn this Achievement for 50 kills on these Shamblers if you can kill them in groups of 3-5 plus; we can find Kampfpistole ammo at the top of the second set of stairs near where we found Gold Bar #56.


Achievement #30 – Carry Heavy Machinegun: Unlock the Carry Heavy Machinegun Perk.
There is an MG46 we can find near the top of the first set of stairs. They can be fully reloaded anytime you reattach/detach them to their stands essentially giving you infinitely regenerating ammo. The Shamblers are not infinite, but you can still get around 50 kills per Checkpoint reload. Start at the first MG46 stand & farm the Shamblers out, then head up the second set of stairs to the other stand to farm the next group out. When they are all dead, Restart the Checkpoint; this may take two or 3 reloads to do.


Achievement #31 – Reload Mash: Unlock the Reload Mash Perk.
For our last Perk to farm, we need to kill an enemy with the final bullet in our current guns magazine. To prevent yourself from painstakingly wasting bullets in a mag down to your last one... we can simply use the Double Barrel Shotgun as it only has two shots. Fire the first one off, then kill a Shambler with the last round. When you run out of ammo in the Double Barrel, move on to your Pistole, Assault Rifle, Shockhammer, or Bombenschuss to get the last of your kills this way.

This can be a tedious one to unlock… especially if you miss your one shot.

If you still need to, use this opportunity to farm any other non-stealth Kill “X” Achievements previously covered in this guide.

When you are finished farming (or tired of it) pull the lever, return to the Laderoboter & enter the Dig Site.
Sequence 10: Frankenstein... Meet B.J.
1. Chapters: Dig Site
2. Perk Focus: Nazi Commander Stealth Kills, All Previously Unlocked Perks
3. Perks: 15/16
4. Nightmare Levels: 9/9
5. Letters: 10/10
6. Gold Bars: 64/64
7. Achievements: 36/50
-----------------------------------------------------------------------------------------------------

Chapter #8 – Dig Site:

Gold Bar #57: When the Chapter begins, head down the graveyard path until you reach two Nazi Soldiers speaking to one another at a crossroads. Sneak down the path to the right along the cliffs; we can snipe the two Nazi Commanders from this spot before we pass into the trench which I recommend as things will most likely get loud.

At the end of the small trench, we can drop down into a mausoleum that will have many Nazi Soldiers outside it (hence why it is going to get loud). Exit outside the mausoleum & head over to a different one off our right with an open door up a small set of stairs to find a Gold Bar in front of a sarcophagus.

Letter #10 – King Otto’s Letter: Wall climb out of this little graveyard section & travel back to the starting area. Head across the wooden bridge towards a barracks that had (has) one of the Nazi Commanders inside it & we can find this final Letter on a table next to a tape recorder.


Achievement #32 – Postman: Collect all 10 Letters.
If you have been following along with this guide, we will unlock this Achievement after collecting the 10th & final Letter.

Gold Bar #58: South of this barracks, we can find a small tomb that will have an opening at its back end. Drop down inside it to find a secret area that will have a Gold Bar in the middle of the pathway.

Gold Bar #59: Leave this area by discharging an electrical security door & we will enter into the excavation area. Pass through the tunnel & take a service elevator down to the lower levels. At the bottom, we can potentially see a Supersoldaten wired up on a patrol path straight down the tunnel. At the start of this tunnel, look to the right & we can find this Gold Bar in an open locker.

Gold Bar #60: Carefully follow the tunnel down (or clear it out) & we can spot a wooden walkway leading up behind us off our left. Follow it up & take a right to enter a side cave where the Nazi Commander was (is). Here we can find a Gold Bar on top of a table.

Gold Bar #61: Go to the very far Western end of tunnel now & we can find a passage full of water to our left. Get into the water, but do not swim through to the other side. Instead, swim straight down from where we entered to see an underwater tunnel that will take us to a secret area in a submerged cave. Search around the cave to find a Gold Bar under the water.

Gold Bar #62: Return back to the tunnel & disable the arcing electrified security door. On the other side, we will see three Nazi Soldiers firing at what is most likely Shamblers beyond. Take them out, then head up the stairs to the left & look down the hall to the right to find a Gold Bar.

Nightmare Level #9: From where we collected the previous Gold Bar, head down the hall to the opposite end & we can see a hole we can drop down through. Do so, & then crawl through a tiny gap in the wall which will bring us back into that rail tunnel area we were before, but in a secret area where we can find a bedroll tucked inside one of the burial shelves in the wall.


Achievement #33 – Guten Tag!: Complete the Nightmare Boss Level.
This is the Boss Level & will be the most challenging out of all the other Nightmare Levels we have done, sort of. To simplify the Boss fight, enter the room, then quickly run along the left wall around the corner & we can find a secret room by pushing on the golden swastika on the wall. In here, we can find more ammo & Health we can ever need… including an MG46!

Kill the Boss, collect his Key, & we will beat Wolfenstein 3D!


Achievement #34 – Die, Grösse, die!: Complete all 9 Nightmare Levels.
If you have been following along with the guide, we will unlock this Achievement after completing the final Nightmare Level.

Gold Bar #63: Return back to where we were & this time head down the stairs to the right & crawl through a small opening to enter the next room. Fight through Shamblers & Nazi Soldiers alike until we reach a massive spiral staircase leading down. Walk down the stairs a little ways & they will break away. Look below us where the stairs continue further down & you can spot a Gold Bar at the top of them. Carefully leap down/across to the lower portion of stairs to collect the Gold Bar.

Gold Bar #64: Carry on towards where we can hear Helga speaking to Schreiner & activate the pedestal to light a circle of fire on the floor to begin opening up the secret passage. The secret passage will be a series of stairs slowly falling into place; we need to hold off Shamblers until they are all set.

Once the stairs are all set into place, head up them & take advantage of all the ammo & Armor placed here. To the left of the stone doors we need to pass through to reach the final Boss, we can find our last Gold Bar tucked into some rubble to the left.


Achievement #35 – Gold Master: Collect 64 Gold items.
If you have been following along with the guide, we will unlock this Achievement after collecting the 64th Gold Bar.


Achievement #36 – Hero: Complete game on any Difficulty.
Story Related. Now it is time for us to beat the game. Of course, we have a Boss to fight. To kill it… very easily, just back up to the doorway we came through & stay as far back as you can; it can only hit us with 1/3 of its attacks here. Use your Kampfpistole & shoot it straight into the mouth; hitting it anywhere else on its body won’t damage it. When you run out, use a Schockhammer, MG46, or Dual Assault Rifles to finish it off.

The Nazi Soldiers that harass us are more of a threat then the Boss so watch out! The Monstrosity is blind & attacks anything that makes noise as well…
Sequence 11: The Old Blood
1. Chapters: Ruins, Docks, Dig Site
2. Perk Focus: All Perks
3. Perks: 16/16
4. Achievements: 40/50
-----------------------------------------------------------------------------------------------------

Chapter #6 – Ruins:


Achievement #37 – Kessler/Annette Saved: Choose to save Kessler/Annette.
Story Related. Go to Chapter Select from the Main Menu & load up Chapter 6 on any Difficulty; the easier, the faster it will go. Blast all the way through the Chapter & cross the canal to the wall we need to climb where we will reach our crossroads.

To save Kessler, take the path down to the right & drop down into the workshop. To save Annette, take the path to the left & we will drop down into a bathhouse. Save whoever you did not in our first run through of the Chapter.

Fight through the enemies in the room we chose then save Kessler/Annette from Shamblers to unlock the Achievement. We do not need to finish the Chapter.

We will also unlock the final Challenge Map we need as well for saving the opposite companion.

Chapter #2 – Docks:

Stealth Perk Farming: Now we will go & farm our final Perks we need. While the end of Chapter 7 is the probably the best for all Kill “X” Perks, it does not work for stealth Perks.

While technically anywhere with Nazi Commanders will work, the beginning of Chapter 2 is good enough. Kill the first group of enemies outside the keep, then we can take the Barge on the left side of the docks where the two Nazi Commanders are & can earn our Perks there.


Achievement #38 – Eagle Eye: Unlock the Eagle Eye Perk.
This Achievement can be farmed anywhere with a Nazi Commander; two is ideal. Simply get a Checkpoint, Headshot the Nazi Commander with a Silenced Handgun for expedience, Restart the Checkpoint. Rinse & repeat 20 times.

Chapter #8 – Dig Site:
Once you have all the Perks unlocked to make your life easier, load up Chapter 8 on Über Difficulty. Take your time with this & try to have fully loaded weapons when you reach the Monstrosity Boss, especially full Kampfpistole. A lot of the early areas in this Chapter can be bypassed without conflict by using stealth.


Achievement #39 – Super Hero: Complete game on I Am Death Incarnate! (or Über) Difficulty.
Story Related. When you get to the room where we need to hold out until the stairs drop, just put your back to the stairs & keep slowly moving backwards as they slide down. Use your MG46 or a Handgun to kill any Shamblers that get close to us to conserve the weapons we need for the Monstrosity.

For the Monstrosity, use the same strategy as before & back yourself up against where the stone doors we entered through are. Start with the Kampfpistole, then swap to your Assault Rifles or Schockhammers. We can essentially stunlock the Monstrosity with the Kampfpistole if we stagger our shots & shoot it directly in the mouth.

The Nazi Soldiers will actually be the hardest part of this fight; whenever the Monstrosity is freaking out holding its head, use the opportunity to clear some of them out. The Monstrosity is blind & will only attack where sound is being made.

Kill the Boss & we will unlock the Achievement at the start of the Credits.


Achievement #40 – Über Hero: Complete game on Über Difficulty.
Story Related. We will unlock this Achievement for beating the final Chapter on Über Difficulty.

80% Complete
Sequence 12: L'Assemblée
1. Challenge Maps: Research Centre, Prison Docks, Keep Foyer
2. Achievements: 43/50
-----------------------------------------------------------------------------------------------------

For the final section of our 100%, we must now earn a Gold Medal on each of the 10 Challenge Maps we unlocked over the course of our playthrough. Each Challenge Map is a repeat of difficult battles we previously completed. Challenges can be selected from the Main Menu.

We can only earn Gold Medals while playing on I Am Death Incarnate Difficulty or higher. You can technically play on Über Difficulty, but there is no reason to; playing on harder Difficulties only increases the level of Medals you can earn & of course the difficulty of the enemies. It does not add more enemies to fight or give you Bonus Points.

Each enemy has a base amount of Points it will give you. On top of that there are Bonus Points we can earn:
Headshots: +200 Points
Combo Kills: +200 Points
Explosion Kills: +200 Points
Stealth Kill: +200 Points
Knife Throwing Kills: +200 Points


Bonus Points can stack such as a Stealth Throwing Knife Headshot… Headshots are the key to earning Gold Medals. Never rush & always try placing your shots unless you are ambushed & panic spam. As far as I am aware, time is not a factor to our final score.

In stealth sections with Nazi Commanders, kill the first Commander & as many enemies you can in stealth then use that second Nazi Commander to summon reinforcements. Extra enemies mean extra Points from kills.

Challenge Map – Research Centre:


Achievement #41 – Research Centre Combat Master: Achieve Gold Medal for this Challenge Map.
For this Challenge Map, we need to earn a minimum of 11,300 Points; we will be immediately thrown into combat & have no opportunities for stealth.

There are 18 Nazi Soldiers & 1 Marksman Soldier to kill on this Map.

As soon as the Challenge Map begins, sprint to the back room & stock up on your Assault Rifle ammo so you can Dual Wield them. In this backroom, cycle between the two doorways killing Nazis; the Hand Grenades are what will end us. As soon as a Hand Grenade is thrown at us, run to the other doorway to escape it. Ideally, cycle between the two doorways every time you kill someone so we do not get ambushed from behind.

A lot of this Challenge hinges on your ability to perform Headshots. Do not spam fire if you do not have to. As you re-attempt the Map you will begin to learn how Nazi Soldiers move & act; they are very vulnerable to a Headshot when they are throwing a Hand Grenade, dropping down from a higher level, or “strafing” our bullets. Always try & Headshot the Marksman Soldier for that extra +200 Point boost. Enemies have a high chance of blowing each other up with their own Hand Grenades as well which will add Explosive Kills & Combo Kills to our score as well.

Challenge Map – Prison Docks:


Achievement #42 – Prison Docks Combat Master: Achieve Gold Medal for this Challenge Map.
For this Challenge Map, we need to earn a minimum of 29,800 Points. We will be able to use stealth at the start of this Map opening up a lot more Points for us to earn. Really focus on not getting detected & getting as many Stealth Kills as you can for the Bonus Points.

There are 47 Nazi Soldiers (with reinforcements), 2 Nazi Commanders, & 1 Kampfhund on this Map.

At the start of the Map, be sure to try & kill the Nazi Commander in front of us with a Stealth Throwing Knife Headshot. Stealth Headshot enemies with our Silenced Pistole until you reach the vent we can enter through some wooden crates after killing the Kampfhund. Stealth kill who you can, then we want to aggro the enemies so the final Nazi Commander summons reinforcements for us to kill. Stay in this vent space as it will protect us from Hand Grenades, & get as many Headshots as you can. Be patient inside this vent & we should be able to earn 18,000-21,000 Points in here.

When the enemies stop spawning, go over & try to Throwing Knife Kill or Headshot the final Nazi Commander. When we pull the lever, we will enter phase 2 of the Challenge Map & more waves of Nazi Soldiers will arrive. Run down along the iron walkway we are on & hide behind the pillar here to snipe the first round of Nazi Soldiers that come. When they are dead, run down the stairs to spawn the second wave then run back to our pillar across the walkway to snipe them as well.

Interact with the Barge to complete the Challenge Map.

Challenge Map – Keep Foyer:


Achievement #43 – Keep Foyer Combat Master: Achieve Gold Medal for this Challenge Map.
For this Challenge Map, we need to earn a minimum of 24,500 Points; we will not have access to stealth for this Map.

There are 13 Nazi Soldiers, 13 Elites Soldiers, 7 Marksman Soldiers, & 2 Heavy Soldiers to kill on this Map.

As soon as the Challenge Map begins, you need to duck behind the crate/pillar to our left as we will be attacked by three enemies immediately. When they are dead, stock up on supplies & pull the lever to engage phase 2. When we do this, head up the small stairs to the left or right & hold out in one of the doorways to the main room; the enemies should only come at us head on but be sure to keep an eye on your flank just in case.

When the enemies stop coming, initiate phase 3 by heading up the stairs to the second level. Hold out in either the left or right ends of the passage we come up on.

When this small wave is completed, go up to the third & final floor for phase 4. Step out to trigger the enemies then back down to the landing on the stairs we just came up to wait for the enemies to round the corner. When they do, Headshot them; Heavy Soldiers will arrive as well so be sure to have Dual Schockhammers ready to be swapped to. You can also detach the MG46 up here as well to use if you want to try for Combos; it sort of nulls our Headshot Bonus unless you are lucky.

When the enemies stop arriving, pull down the hatch at the far end of the third level to complete the Challenge Map.
Sequence 13: Red Mist
1. Challenge Maps: Cable Car Platform, Caves
2. Achievements: 45/50
-----------------------------------------------------------------------------------------------------

Challenge Map – Cable Car Platform:


Achievement #44 – Cable Car Platform Combat Master: Achieve Gold Medal for this Challenge Map.
For this Challenge Map, we need to earn a minimum of 26,600 Points; this Map will begin in stealth. If possible, try killing as many enemies as you can in stealth & at least one Nazi Commander; we want to aggro the last Nazi Commander so we have reinforcements to kill.

With reinforcements, there are 15 Nazi Soldiers, 16 Elite Soldiers, 5 Marksman Soldiers, 2 Nazi Commanders, 2 Heavy Soldiers, & 1 Supersoldaten to kill on this Map.

Our holdout point will be up a yellow ladder close to where we spawn on the bottom level & hiding in the far corner of the walkway we crawl through where we have a view of the stairs dead ahead of us. The enemies are very reluctant to attack us here & basically just run to cover making Headshots very easy. Heavy Soldiers may stand directly below us & you will have to drop down to kill them at the very end once the coast is clear.

When the waves stop coming, drop down & use the Bombenschuss to snipe the Heavy Infantry & Supersoldaten then take out the last Nazi Commander. Loot up then drop into the control center to pull the lever to start phase 2. As soon as it is pulled, return to the lower level & back up the ladder to our original holdout point along the walkway to kill the rest of the enemies.

Escape on the gondola to end the Challenge Map after they are all dead.

Challenge Map – Caves:


Achievement #45 – Caves Combat Master: Achieve Gold Medal for this Challenge Map.
For this Challenge Map, we need to earn a minimum of 26,900 Points; this Map will begin in stealth.

With reinforcements there are 14 Nazi Soldiers, 11 Elite Soldiers, 4 Heavy Soldiers, 1 Marksman Soldier, 3 Nazi Commanders, 3 Drones, & 1 Supersoldaten to kill on this Challenge Map.

At the start, try getting as many Stealth Throwing Knife Headshots as you can. As we exit the tunnel, we can snipe a Nazi Commander nearby; alternatively, you can climb up the wall to our right just after stepping out of the tunnel to get closer to the Commander & try for a Stealth Throwing Knife Headshot. Switch to the Bombenschuss & kill the Heavy Soldier to alert the other Nazi Commander & kill their reinforcements before taking them out too. We can hold out back in the tunnel we started in or at the bottom of the climbable wall; there is a Drone so be careful.

Loot up, then climb the next wall to reach phase 2. Stealthily kill who you can just from where we dropped down, then just start Headshotting Soldiers to alert the Nazi Commander. Hold out in the middle of the first tunnel off our right & the Soldiers will be funneled towards us. We just have to be mindful of thrown Hand Grenades & have the Bombenschuss ready for when Heavy Soldiers round the corner.

When the enemies stop coming, carefully get up the hill to kill the Nazi Soldier on the MG46. Once we get up here, two Nazi Soldiers will spawn at the bottom of the hill we started at. Kill them, take the MG46, then walk down further into the cave to find that second Nazi Commander. A Supersoldaten will ambush us right around the corner before we get to them so use that MG46 to kill it. Kill the Nazi Commander then run back to where we killed the Supersoldaten to pick up the MG46 again as two Drones will arrive.

To start phase 3, go & approach the elevator to exit the Challenge Map, but do not push the button yet. As soon as we are up here, look through the tunnel we exited & fought the Supersoldaten to see some Nazi Soldiers appear; these are our last enemies so really try to get those Headshots. After the first wave, keep waiting here & another group of Soldiers will arrive. Kill them & we can take the elevator out of the Challenge Map.
Sequence 14: White Knuckling
1. Challenge Maps: Paderborn Bridge, Wulfburg Square
2. Achievements: 47/50
-----------------------------------------------------------------------------------------------------

Challenge Map – Paderborn Bridge:


Achievement #46 – Paderborn Bridge Combat Master: Achieve Gold Medal for this Challenge Map.
For this Challenge Map, we need to earn a minimum of 22,800 Points; we will be thrown right into the combat at the start of this Map. Since there are no reinforcements or Stealth Points we can take advantage of, success on this Challenge Map almost solely hinges on your ability to perform Headshots. I found this to be the hardest/unforgiving out of all the Challenge Maps.

There are 18 Nazi Soldiers, 9 Elite Soldiers, 2 Heavy Soldiers, 2 Marksman Soldiers, 2 Drones, 1 Supersoldaten, & 1 Panzerhund to kill on this Map.

When the Challenge Map begins, we can assess the area before the enemies arrive. Look dead ahead of us behind an orange dumpster to see a short metal wall to the right; this is our hold out point for phase 1. Now if you look around the corner to our left, against the roadway gate we can see a Bombenschuss & some ammo for it. When you are ready, sprint to the rifle & grab it for extra ammo then run to that short metal wall as fast as you can.

Now hide behind the end of this metal wall & kill the Nazi Soldiers who are taking cover behind the concrete barricades. There are two Marksman Soldiers on the walkway at the far end: definitely Headshot them for maximum Points. Refrain from throwing Hand Grenades as it will blow the enemies cover up making the odds of them charging you much higher. If a Nazi Soldier rounds the corner right on top of you, try to kill them with Throwing Knives instead of spam shooting them if you can remember to for maximum Points.

When they are all dead, be sure to loot up. There are lots of Medkits in the area, to take full advantage of Overcharged Health, do not collect them until you are ready to enter phase 2. Go inside the checkpoint room, grab your Medkits, then rush up & out the hatch through the checkpoint’s ceiling to drop down to the other side.

From where we drop down, we will hold out against that center metal wall directly in front of us. Wait for two Drones & two Heavy Soldiers to approach us & kill them with the Bombenschuss if you have the ammo still or the Schockhammer. Next kill the Nazi Soldiers.

When they are dead, quickly run & collect the Armor from the dead Drones & some ammo, then get back to your holdout point to await a Supersoldaten for phase 3. It won’t approach us, so we can safely hide in our same spot again. When you are ready, take potshots at the Supersoldaten’s electrical light to stun it, then sprint up to it as fast as you can to kill it/finish it off with Schockhammers.

Phase 4 is intimidating. Grab the Supersoldaten’s Armor & MG46 & run directly to our right into a small storage room as a Panzerhund will appear. It cannot get us in here… but we also cannot get it. Just outside of the storage room, to our right, will be a tight corner against a flipped truck. Lure out the Panzerhund then pin yourself back here so it gets stuck & we can safely unload the MG46 into its head. Now all that is left is killing the remaining Nazi Soldiers. Play cautious still & get every Headshot that you possibly can; you can even fight from back at our original holdout point if you want to.

Pull down the ladder at the back end of the bridge to complete the Challenge Map. This is a very difficult Challenge Map, & I barely made the par score by a few Points. Headshots, Headshots, Headshots!

Challenge Map – Wulfberg Square:


Achievement #47 – Wulfburg Square Combat Master: Achieve Gold Medal for this Challenge Map.
For this Challenge Map, we need to earn a minimum of 17,600 Points; this one will begin in stealth & we will have Nazi Commanders to farm reinforcements from. We have very limited enemies to earn Points from on this Map as it only takes place during this one encounter.

With reinforcements, there are 8 Nazi Soldiers, 5 Elite Soldiers, 5 Marksman Soldiers, 1 Heavy Soldier, 2 Nazi Commanders, & 2 Supersoldatens.

To start, loot the wooden crates up top where we are for some ammo. Being careful to avoid the patrolling Supersoldatens, drop down & head to the left side of the area where we can find a patrolling Nazi Commander; kill him with a Stealth Throwing Knife Headshot. Once he is dead, carefully loot all the ammo you are able to before we break stealth.

Now we need to quickly kill one of the Supersoldatens as fast as we can. Get your guns ready & ambush one, shoot its lights out, rip off the armor, & finish it. As soon as it is dead, get to the rotunda in the center of the map & climb the ladder up to the top as the Nazi Commander calls reinforcements. If you mess up your attack, don’t restart right away & roll with it; just get up into the rotunda.

Up here now, we are relatively safe & can begin taking out all the Nazi Soldiers. We have limited ammo so make every shot count. Evade the Supersoldaten(s) by firing out of different windows & not lingering too long in them; we can even jump onto the windowsills for better vantage points.

When you are certain that all the Soldiers are dead, it is now time to take the Supersoldatens out; if both are left then it will be more challenging. Snipe the lights off them, jump out of the rotunda, rip the armor off… you know what to do.

I highly recommend getting all the Armor you can & fully Overcharging your health before confronting the last Nazi Commander so that you can stand in front of him to get a Throwing Knife Headshot. Once he is dead, drop down off the rooftop he was on down into the alley ahead to complete the Challenge Map.
Sequence 15: An End to All Things
1. Challenge Maps: Workshop, Bathhouse, Graveyard
2. Achievements: 50/50
-----------------------------------------------------------------------------------------------------

As of now we will have Shamblers thrown into the mix. We can double dip Points on our enemies by Headshotting a Nazi Soldier, they will turn into a Shambler, & we can Headshot them again. This is our essential strategy for the next three Maps. Always make Shamblers a priority as they can kill Soldiers or Soldiers can kill them making us lose out on valuable Points! Killing a Soldier turned into a Shambler quickly also counts as a Combo giving us even more Points!

Challenge Map – Workshop:


Achievement #48 – Workshop Combat Master: Achieve Gold Medal for this Challenge Map.
For this Challenge Map, we need to earn a minimum of 17,200 Points.

This Map has 10 Nazi Soldiers, 7 Elite Soldiers, & 2 Heavy Soldiers. All regular Nazi Soldiers have the potential to be turned into Shambler. Headshotting Shamblers is the key to our Gold Medal & they are the most valuable enemies aside from the two Heavy Soldiers.

This is a very fast paced Map & you need to act quick; I recommend doing some waster runs just running around the area looking where all of the loot is & what you can immediately collect in the first 5-10 seconds. For our holdout point, I found the most reliable spot is up the first set of stairs off our right then standing at the very back of the walkway. The enemies will come at us head on which is both good & bad. If you are getting swarmed, duck behind the wall to your right & use it as cover or throw Hand Grenades. Really try to turn enemies into Shamblers for double Points.

There is only one phase & no extra waves of enemies. Once they are all dead, head up the stairs at the back of the Workshop & enter through the hall at the top to end the Challenge Map.

Challenge Map – Bathhouse:


Achievement #49 – Bathhouse Combat Master: Achieve Gold Medal for this Challenge Map.
For this Challenge Map, we need to earn a minimum of 17,100 Points.

There will be 8 Nazi Soldiers, 8 Elite Soldiers, & 2 Heavy Soldiers. All Nazi Soldiers can become Shamblers.

Similar to the previous Challenge Map, it will be very fast paced. I recommend a few waster runs to learn where the initial ammo & Armor spawns are. Our holdout point will be in the far Northwestern corner of the map. Begin making your way around the Bathhouse clockwise to the left grabbing as much stuff as you possibly can. Alternatively, you can head around the room counterclockwise to the right getting much more ammo/Armor but increasing the odds of being shot at.

When you reach the stairs leading up at the Northwestern corner, you will need to kill a Heavy Soldier blocking our way. Once he is dead, get up the first small set of stairs & crouch behind the short white wall to our left. This gives us a perfect view of the doorway ahead of us & enemies are pretty reluctant to attack us here.

When all the enemies are dead, head up to the very top of these stairs to complete the Challenge Map.

Challenge Map – Graveyard:


Achievement #50 – Graveyard Combat Master: Achieve Gold Medal for this Challenge Map.
For this Challenge Map, we need to earn a minimum of 28,800 Points.

With reinforcements, there will be 18 Nazi Soldiers, 10 Elite Soldiers, 1 Marksman Soldier, 2 Heavy Soldiers, & 2 Nazi Commanders. All Nazi Soldiers can become Shamblers.

When the Map begins, listen to Nazi Soldier & Elite Soldier speaking with one another. Let them walkaway & try to Stealth Throwing Knife Headshot them both; if you cannot get both them, let them go. The key for now is being hidden. Sneak up to the barracks where a Nazi Commander is patrolling, & once again try to Stealth Throwing Knife Headshot them but make sure they die if you cannot. Loot the barracks, then head South from it over to a small tomb with an open door; we have entered this once before when we had to collect a Gold Bar… Drop into it, snipe who you can & alert the remaining Nazi Commander, then drop out onto a wooden walkway over the cliff. We will hold out here.

When the fighting begins, it will be a bit tough trying to get rid of the Heavy Soldiers. Once they are gone, the Nazis can only attack us dead on by standing at the top of the walkway or charging down the hill ahead of us making them easy targets. Once everyone is dead, sneak up on the last Nazi Commander & get him with a Throwing Knife Headshot.

There is phase 2 for this map. Loot up, & run back to where we began the Challenge Map. Head over to the trench area off our right & we can drop down into a side section of the graveyard. From where we drop down, just use this back end of the tunnel to holdout in & begin Headshotting the enemies; you need to be quick to take out Shamblers as they can be stolen from us almost immediately upon creation!

Kill them all, including a Heavy Soldier, wall climb back to the first area then run up the hill out of the graveyard to complete the Challenge Map. I actually found this as one of the easier Maps being well over the par score.
Conclusion:
The Old Blood plays like a throwaway standalone DLC for the New Order. It offers neat backstory & fun gameplay, but that is about it. I did however find the necessity of completing the Wolfenstein 3D levels for Achievements novel as well as the Challenge Maps. 100% took me only 25 hours to complete.

If this guide helped you achieve 100%, rate the guide or let me know in the comments. Helps me know if I am doing things right!


100% Complete
Thank you for choosing Cynic, & I will see you in the next guide!

If you are interested in a little bit of patronage, support my projects & consider buying me a beer. If not, no worries; my guides are, & will always be free content. Achievement Hunting is my passion, & writing these guides is a way for me to give meaning to a life long hobby!
https://www.buymeacoffee.com/cynic0055

Other Cynical Guides:
If you enjoy this game & my style of writing guides, be sure to check out my:
https://gtm.steamproxy.vip/sharedfiles/filedetails/?id=3142324544
https://gtm.steamproxy.vip/sharedfiles/filedetails/?id=2307955083
Check out my profile for a full list of my works.

9 Comments
♡Alice Cousland♡ 24 Jun @ 3:16pm 
Thank you as always for this great guide! :stella_happy:
Mauro-.-Bonine 22 Apr @ 5:23am 
BAO
Division 23 Mar @ 11:44am 
Good guide though but I took some notes.

Chapter IV
Where I fought against the Nazis in the Gondola, I time the kill to the point where three Nazi soldiers died by the grenade and so I got the Grenade belt perk unlocked which is possible but it comes down to luck so I would not recommend doing that, farming against the Shamblers is what I agree with.


Challenge Map – Keep Foyer
I use the MG46 on the third floor which I stationed against all enemies, as long as you hit headshots constantly you will earn more points plus you do not risk taking damage, I hit 26,000 points after that.


Challenge Map – Cable Car Platform:
"Escape on the gondola to end the Challenge Map after they area all dead." There is a typo which is area.
Division 10 Mar @ 6:05pm 
Well it spawns new no matter when I died (I think even reloading checkpoint is the same), I did so yeah but at least it's maybe there so the boat sequence is easy.
Cynic 0055  [author] 10 Mar @ 4:30pm 
Sure Division, I can link that guide it's no problem.

As for the MG46 farming, just so I understand correctly, when you are taking the barge at the end of the Chapter you are able to reload the last Checkpoint with & a fresh MG46 will be on it that you can use to keep killing the enemies/reloading before the Chapter ends?
Division 10 Mar @ 5:24am 
I know this is a simple game with this guide already good enough to follow but maybe you can consider adding this guide from Carrot <3 Sexy Time if that's okay? Similar to how you did on New Order.
https://gtm.steamproxy.vip/sharedfiles/filedetails/?id=437833528
Division 9 Mar @ 1:06am 
"As we travel down the waterway on the Barge, use the mounted MG46 Turret to kill the enemies that will harass us as we go."

I had done some perk farming on that chapter and I noticed when I used the MG46 and dropped it away from the boat then activate the boat until I die on the boat sequence, I respawn and find an MG46 on the mount while I have a checkpoint on the boat, might wanna add that there.
Cynic 0055  [author] 29 Jan @ 8:27pm 
Ohhhhhh you are totally right! I manually unloaded my Handgun down to a bullet then had to move on to the Schockhammer. No idea why I never thought about the Sawed Off it seem so obvious. Thanks for mentioning this! :mllrsniperround:
GIIBBBAAAAYYYYY 29 Jan @ 7:40pm 
Just a thing for the "last bullet in the mag" achievement. SUPER easy to do on the shamblers with the sawed off. Could be a good note to add, otherwise, top tier guide!!!!!!