DOOM Eternal

DOOM Eternal

765 ratings
Exhaustive step-by-step guide for Ultra Nightmare, Base + DLC + Master levels (Pre Update 6.66)
By JoeBarnes
This guide will provide an in-depth breakdown of every single encounter in the game, along with advice, commentaries and proven tactics that will help you get prepared for Ultra Nightmare.

The main goal is to minimise your chances of dying in an ambush or in surprise attacks, as well as to give you a mental primer before big fights.

Dos and don'ts will be extensively listed, and a detailed roadmap for weapon upgrades, runes and suit upgrades (based on research, and my personal preferences) will be provided.

This guide is aimed at players aiming to beat Ultra Nightmare for their first time, but the advice dispensed for hard fights can be of value to all players, at all difficulties.
10
14
70
6
5
9
14
8
4
2
2
3
   
Award
Favorite
Favorited
Unfavorite
Intro - Foreword
DOOM Eternal is a pretty hard game to finish, already on low difficulty, even more in nightmare mode. It is not uncommon to die dozens of times in the first nightmare playthrough, and this highlights an important problem for anyone considering an Ultra Nightmare run:

How do I not die?

Whenever we struggle in a fight, we tend to try various, random methods until it works. However, we don't measure the efficiency of the used strategy, of how much luck was involved: once the challenge is over, we move on. From the gamer's perspective, the game throws random challenges at us, and we just need to get good enough to beat them.

However, being good enough is not enough for an Ultra Nightmare run of DOOM Eternal. A solid knowledge of every stage of the game, and an awareness of all the existing traps and tough passages is needed. The more you look into the inner workings of the game, the more you realise that every fight has been carefully handcrafted to obtain the final product you struggle through. This means that a careful inspection of mechanics and patterns can help elaborate appropriate strategies, allowing a consistent increase in survival rates.

This guide will cover every single encounter. Instead of entering each fight blindly and engaging demons reactively, praying that you don't die, detailed descriptions and specific strategies will allow you to play proactively and always be on top of the action.

That way, you will avoid every trap laid by the game, that you cannot allow yourself to fall into on Ultra Nightmare. You will be told in advance what to watch out for in more difficult fights, and what order the demons spawn in. On top of that, you will be informed on challenges in your near future, and prompted to prepare for them accordingly by making sure you enter the next difficult passage optimally.

In addition, an optimised upgrade order will be provided (heavily based on my own preferences), supported with arguments. Optional challenges will be discussed, along with their impact on the rest of the game. All the useful secrets will be pointed out, and indicated on captioned maps.

If you are not tempted by the Ultra Nightmare mode, but are nonetheless struggling in lower difficulties, this guide is also made for you. All encounters remain the same across the difficulties, with only select parameters variations, such as demons damage and attack frequencies.

If you are willing to invest time in the Ultra Nightmare mode, this guide will take your hand along the way, and be your lifeline on this journey. Its main target audience will be those that "just" want to finish the game in Ultra Nightmare. However, should your desires be a little more exotic and unadvisable, such as doing every slayer gate, doing every secret encounter, doing every challenge, doing all weapon masteries, or "simply" doing a run without shooting the BFG or using the Crucible even once, you should find what you seek here too.

It is not advised to jump directly in Ultra Nightmare, but rather to train in Nightmare first, for two reasons.

First, because even if this guide is for everyone, everyone still has their personal experiences and preferences. I encourage you to critically examine what I advise you to do, and not to hesitate to add your own personal touch to fit your playstyle.

Second, because text explanations cannot replace personal experience, and some elaborate strategies are best trained a couple of times before trusting oneself in Ultra Nightmare.

Whatever you are looking for in this guide, I sincerely hope you find it. Should it not be the case, do not hesitate to voice your opinion and critiques in the comments.

Welcome, and let the slaying begin!
This could be you, in less time than you think!
Intro - Disclaimers, sources and future plans
Disclaimer
  • This guide has been created in 2020, and the game has evolved since. So it is not impossible that some of the numbers that I have reported have changed since then. I try to keep the guide up to date, but I can't cover everything. If you notice a mismatch between my numbers and what you experience in game, be sure to let me know!

  • This guide is created, edited and maintained by me, but I am grateful for any corrections, tips and strategies you may provide

  • This guide does not make an inventory of every secret and collectible! All the useful upgrades and pickups will be indicated, but the only times collectibles are pointed out is when they are required for level challenges. For 100% collectibles and achievements, there are other guides to check out!

  • This guide is not an infallible messianic scripture that you may follow blindly, especially not in Ultra Nightmare! Use it in nightmare, and gauge its utility for yourself. You should follow my strategies only if you think they bring you something, and adapt them based on your preferences, your experience and your strengths.

  • This guide is not a replacement for your own ability to finish the game! It is merely a written support, which will provide you knowledge, not skill.

  • This guide is not directed towards speedrunning the game! It aims to assist players in the lower 98 percentiles of the community, such as myself, get through their first Ultra Nightmare run. The goal is not speed, but safety and reliability.

  • Speaking of reliability, this is something you'd better not expect too much of from the game. It sometimes happened to me that some arenas, which I've practiced 30-40 times and know inside and out, unexpectedly change some patterns (mostly demons spawn location and spawn timers). This is especially frequent in arenas with infighting demons when you arrive. It is necessary to know the arenas' default patterns, but it is vital to be able to adapt to anything the game may throw at you.


Sources
I heavily encourage you to not just check out my guide, but to diversify your sources of information.

Here are some of my sources! They are quite old at this point, but they can still be useful!
  • It's about DOOM 2016, but it's the guide that inspired me to do this one on DOOM Eternal. Check it out if you want to go Ultra Nightmare on DOOM 2016 https://gtm.steamproxy.vip/sharedfiles/filedetails/?id=1510959542

  • You can check out this very complete and helpful guide here, providing another solid equipment upgrade roadmap and some very useful tips on demons and some arenas
    https://gtm.steamproxy.vip/sharedfiles/filedetails/?id=2053280169

  • This spreadsheet is a piece of heaven for number nerds. It contains everything you've ever wanted to know about every demon HP and every weapon DPS, something the game itself is very opaque about. It is a public work maintained by the speedrunning community, and they've put an insane amount of work into it.
    Link to the Google docs spreadsheet[docs.google.com]


  • On the YouTube side, you can check out this video of Under The Mayo, that explains the weapon mods and gameplay style used by a player ten times better than me.


  • For deep lore nerds like myself, Midnight provides excellent content. This video only shows the final moments of an Ultra Nightmare run, but is still very rich in teachings for the last boss.


  • decino has temporarily let go of the first DOOMs in the series, to get to beating Ultra Nightmare on DOOM Eternal, with one eye closed and one hand behind his back.


  • It is absolutely unadvisable to use this guy as a reference for getting through Ultra Nightmare, because Byte Me is going for the 100% speedrun performance. Still, he and his hundreds of runs are very entertaining to watch, and you just might catch an exploit to scuttle along a difficult passage.


  • The myth, the man, the legend, Zero Master has also tried his hand at the 100% speedrun, and it's just as humiliating as you'd expect. It's a great watch.


I will add other sources as I discover them. Don't hesitate to chime in!
Summary - Weapons mods picks
For some weapons, both mods have their use. However, I do not advise mod-swapping during fights, for the following reasons:
  • First, even with the hot-swapper suit upgrade, you gain nothing by quick-swapping between mods, like you do when quick-swapping between weapons, by cancelling the reload animation.
  • Second, you do not spread out your ammo consumption like when quick-swapping between weapons (weapons that use different ammuniton types, that is).
  • Third, even though accidental mod-swapping is not critical, it is still detrimental, and may throw you off your flow.
  • Fourth, I personally find that there is no weapon in the game that benefits from frequently alternating between mods. No weapon possesses two mods that are so one-of-a-kind, so game-breakingly good, that you would find yourself needing to swap mods regularly during a fight.
  • Fifth, the game is definitely more fun when you're changing mods around, experimenting, going for the spectacular combo-kills where everything explodes. However, this guide focuses on keeping you alive in Ultra Nightmare, and we'll murder the fun if it gets in the way.

I consider some mods to be "this weapon's main mod" (for example, the lock-on burst), but that aspect of the game is really up to you. You might prefer micro missiles to precision bolt, or the remote detonation to the lock-on burst. Play extensively with all mods, find out which ones you prefer, and stick to them. Keep in mind that this guide, along with the developed strategies, follows my own preferences, and I heavily encourage you to stray from them and develop your own playstyle.


Here's how I use mods, quickly summed up:
  • Shotgun: sticky bombs all the way. Full auto is viable too, but it is nowhere near as useful as the sticky bombs, and using it poses more problems than it solves. The second DLC requires the full auto.
  • Heavy cannon: micro missiles up until level 04, swapping for the precision bolt in some situations. Level 05 and onward, precision bolt only. Micro missiles make a great comeback for the final boss.
  • Plasma rifle: heat wave first, as a reliable burst damage source. Replace it with the microwave once you hit the first doom hunters.
  • Rocket launcher: lock-on burst all the way. Remote detonation is good, but nowhere as good as the lock-on burst.
  • Ballista: arbalest most of the time, destroyer blade for when the game lines up demons for you, like during some fights in tight places.
  • Chaingun: turret mode and energy shield are both viable alternatives, but I slightly prefer the turret mode and usually stick to it. The energy shield can be a lifesaver in certain situations (such as for the gladiator or the icon of sin fights).

Here is my reasoning:
  • The shotgun's sticky bombs outshine the full auto in almost every metric early on, and are your go-to fodder demons removal tool. The full auto is good at killing bigger targets, but requires an unhealthy sacrifice of mobility and ammo. Furthermore, the full auto loses all its value once you get the super shotgun. The only viable use for this mod is to use it as finisher on both fodder and heavy demons alike, to gather ammo from kills with the mastery. This requires you to dump 9 WP into it, and get the mastery, so it is only marginally useful pretty late in the game.

  • The heavy cannon's micro missiles provide a great damage source early on against heavies, whereas the precision bolt is good for sniping fodders and weakpoints. In the first levels, you might swap between both mods quite a bit, depending on the situation (and your own preferences).

    Once you get the rocket launcher and the super shotgun, the micro missiles completely lose their edge, and the precision bolt becomes the dominant mod, mainly for picking off fodder and distant targets (even body shots kill fodder demons, all except mecha-zombies). There are some spots early on where you'll be really happy you picked the precision bolt (like in 01-08, 02-08 and 02-12), but overall the micro missiles do a better job at keeping you alive during the first three levels. It takes a little training, but sticky bombs are an excellent alternative for weakpoint sniping. An upgraded and mastered precision bolt heavy cannon can fit quite well in your quick-swap loops.

  • The plasma rifle's heat wave is a good damage burst source early on, that can reliably destroy weak points. It rarely shines outside of that though, but it still is in every way better than the microwave beam at the beginning.

    The microwave beam is largely useless early on, as you do not have your survivability, your damage spike weapons and your combos to back up its single target control ability, and the mobility sacrifice can land you in trouble fast. It really shines against the first doom hunters' shields in level 04, so long as you take care to reduce the fodder demons threat around you. From level 05 onward, the microwave beam becomes my main mod, and is great for picking off big, isolated threats in small quarters (like dread knights and mancubi).

  • The rocket launcher's remote detonation can do a lot of cool things. With lots of practice, you can shoot around walls and corners, the archvile's shield and the carcass' barrier. But it simply doesn't do enough damage to be considered a viable alternative to the lock-on burst. You don't want to do trick shots and falter demons, you want to stagger and kill them, quickly. Also, where the lock-on burst requires you to focus 1 second on a demon before firing in order to kill it, the remote detonation requires your focus for 3 seconds after shooting in order to merely graze the target.

    Early on, before you get the super shotgun and the ballista to roll out your magic quick-swapping combos, the lock-on burst is simply a must-have for 50% of the heavies. It also never stops being useful throughout the game.

  • Your unmodded ballista has its place in your magical quick-swapping combo, and no mod will change that. The arbalest makes your ballista a 2 in 1 tool, adding a good anti-air weapon. It shines against cacodemons, and can from time to time be used to one-shoot a carcass or a revenant. Provided you aim well, two charged arbalest shots can stagger or kill a pain elemental pretty quickly, with the added benefit of the exploding bolt that can kill the lost souls orbiting around.

    The destroyer blade mod deals high damage on a horizontal plane, and is very fun to kill groups of fodder with. However, it comes at the price of a horrible mobility penalty, and it generally does nothing special, that your other tools of death can't do better. This mod really shines during some tight arenas and secret encounters, where demons are lined up for you (like in 07-12 and 12-08). The mastery improves the weapon's consistency and flexibility, and makes for a great fodder-cleaning weapon.

  • The chaingun is a good, consistent weapon. It is not great though, and doesn't have its place in your quick-swapping combos on its own. No mod will change that, and both paths will hamper your mobility a lot. This weapon should only be used situationally, whenever you can safely put your back against a wall and shred away knights and barons, or in combination with the ice grenade when you're stuck in tight quarters with heavies and super heavies.

    The energy shield provides survivability, but the turret mode kills much faster, thus providing survivability too, in a way. I have a very slight preference for the turret mode, but you should not be afraid to swap around depending on the situation.
Summary - Weapon upgrades order
Order
Weapon
Mod
Upgrade
Cost
Location
1
Shotgun
Sticky bombs
Bigger boom
6
02-03
2
Rocket launcher
Lock-on burst
Quick lock
6
03-06
3
Super shotgun
-
Fast hands
6
03-11
4
Super shotgun
-
Quick hook
3
03-15
5
Rocket launcher
Lock-on burst
Fast reset
3
04-02
6
Ballista
Arbalest
Full speed
3
05-01
7
Chaingun
Mobile turret
Fast gunner
6
05-08
8
Chaingun
Mobile turret
Rapid deploy
3
05-08
9
Ballista
Arbalest
Bigger explosions
6
06-08
10
Shotgun
Sticky bombs
Quick rack
3
06-15
11
Plasma rifle
Microwave beam
Increased range
6
05-01
12
Plasma rifle
Microwave beam
Faster beam charge
3
08-01
13
Heavy cannon
Precision bolt
Mobility
3
08-01
14
Heavy cannon
Precision bolt
Fast loader
6
08-01
15
Heavy cannon
Micro missiles
Quick recharger
1
09-01
16
Heavy cannon
Micro missiles
Instant loader
3
09-09
17
Heavy cannon
Micro missiles
Primary charger
5
10-06
18
Chaingun
Energy shield
Faster recovery
3
10-08
Note: this upgrade order only lists the upgrades I see as useful. For 100% runs, the rest of the upgrades can be collected after this list has been completed.

Where and when you get your weapon upgrades may vary, depending on the secret encounters and slayer gates you trust yourself to do.


Explanation:
The main objective of this sequence is to get the two super shotgun and one of the lock-on burst rocket launcher upgrades as soon as possible. Those three upgrades are game-changers, and even though some of the subsequent ones are interesting, none will have the same impact. This leaves few WP points left to use early on, and the first upgrade will be for the shotgun's excellent sticky bombs upgrade.

  • The bigger boom upgrade is massive, giving a +45% explosion range to sticky bombs, and will allow you to kill fodder demons much more consistently. The quick rack upgrade is nice, but it takes valuable WPs that you will need for other, later weapons.

  • The quick lock upgrade for the lock-on burst upgrade is a must-have. Along with the fast reset upgrade (that will be picked after the super shotgun), it turns the rocket launcher into the weapon of choice for a large chunk of heavy demons (whiplashes, hell knights, revenants, and to an extent mancubi). With it fully upgraded, any isolated heavy demon becomes a non-issue, that you will nonchalantly rightclick-leftclick out of existence.

  • The super shotgun is an excellent weapon that you will use a lot, even more so once you unlock the mastery. The fast hands upgrade is a must-have, the quick hook is nice to have, but you absolutely need both in order to get the game-changing mastery upgrade as soon as possible.

  • The ballista is already very powerful on its own. The full speed provides a very nice quality of life upgrade. The stronger explosion can wait until after the chaingun is fully upgraded.

  • The chaingun is a dangerous weapon to play with, as you trade firepower for mobility. It has a lot of uses, but is generally unfit for big arena fights. Both upgrades are, like for the ballista, nice quality-of-life improvements, but fully upgrading the turret mode first allows you to farm the swarms of fodder demons at the beginning of level 06 for the mastery. The energy shield can be a lifesaver in many situations, and the faster recovery is a nice upgrade to have for it.

  • The quick rack upgrade for the shotgun can be picked after the chaingun, if you are planning on mastering the sticky bombs the hard way. More infos in segment 06-06.

  • The plasma rifle upgrades have little use, except against the doom hunters. Along with the mastery, they allow you to shred their shield much faster. With this weapons upgrade sequence, you will face most doom hunters in the game with a fully upgraded plasma rifle.

  • The micro missiles hit like a truck early game, and are your primary heavy takedown method with the sticky bombs, until you get to the rocket launcher and the super shotgun. Afterwards, it will drastically lose in charm, and the other mod becomes the better one for the rest of the game. However, the micro missiles will make a big comeback during the final boss fight, and you will need that weapon mastered at the end of the game.

    Still, the precision bolt upgrades are not that useful, because if you don't integrate it in your quickswap combos, you will almost never use it during a fight where mobility is important. If you do use it often in your quickswap combos, then the fast loader is useless, and the mobility upgrade is insignificant for the half second you will be aiming down your sight. Those upgrades can be kept for last.
Summary - Weapons mastery acquisition
This section is aimed at players that want to master all weapons, for a 100% Ultra Nightmare run, and don't mind using the master tokens. In Ultra Nightmare, you are not allowed to go back to previous levels to farm your masteries, and you only get 7 mastery tokens for 13 weapon masteries. Here is a list of each mastery condition, with suggestions on which mastery to use the token on.

If you want to forgo master tokens completely, you have four main ways of farming the more tedious masteries:
  • Killing demons in the main thread.
  • Triggering secret encounters repeatedly, not finishing them while only killing the demon(s) you need (for example, the arachnotron turrets for the sticky bombs, in the secret encounter 06-06).
  • Heading down to the ripatorium, which can be used only once after each level, starting with level 03. More and bigger heavy demons will spawn as you progress in the game.
  • Exploiting the final boss fight and its endlessly spawning demons.


Shotgun - Sticky bombs - TOKEN
Condition: destroy 25 arachnotron turrets
Upgrade: +2 sticky bombs per cartridge


There are 62 arachnotrons in the main thread, which means that you'll have more than enough chances to land bombs on 25 turrets. However, if you follow my weapons upgrade sequence, the mastery condition will unlock at the end of level 06, and there will only be 21 arachnotrons ahead. If you unlock the mastery as soon as possible, in level 02, there will be 50 until the end of the game. Secret encounter 06-06 is the only one that spawns an arachnotron, and it is not advised to farm it.


Shotgun - Full auto - TOKEN
Condition: kill 15 pinkies
Upgrade: kills with full auto drop shell ammo


If you followed my weapons upgrade sequence, it is almost impossible to farm this mastery. The latest you can start farming the mastery is segment 06-11, considering that you don't miss a single pinky. Otherwise, there are 32 pinkies in the main thread, 2 in the slayer gate in level 05, that you can exploit if you rush the full auto mastery.


Heavy cannon - Precision bolt - TOKEN
Condition: kill 75 times with headshots
Upgrade: Headshot kills trigger explosion


Headshot targets abound, and you can simply grind throughout the game. If you feel you're behind on schedule, you can pick any arena you want, leave a heavy demon alive, and perpetually snipe the spawning fodder demons.


Heavy cannon - Micro missiles - FARM
Condition: kill 3 enemies 15 times with the same salvo
Upgrade: Fire micro missiles indefinitely


Killing three with a salvo is easy, four missiles are enough to kill most fodder demons. Keep an eye out for easy groups to take out.


Plasma rifle - Heat blast - TOKEN
Condition: Kill 2 demons with the same blast 30 times
Upgrade: Plasma rifle damage boost after blast release


This mastery is tedious to get, but finding two fodder demons close to one another on your way is easy enough.


Plasma rifle - Microwave beam - TOKEN
Condition: 1 explosive kill with microwave beam 15 times
Upgrade: Concussive blast on kill


Killing a fodder demon with the explosive kill doesn't deal much damage. An explosive heavy kill can reliably kill nearby zombies, imps and gargoyles. Possessed soldiers and mecha-zombies can die from a super heavy explosive kill. Finding the right setup is relatively easy, wounded and staggered heavies die in a heartbeat from the microwave beam.


Rocket launcher - Remote detonate - TOKEN
Condition: 60 remote detonate kills with flare active
Upgrade: Larger detonation area of effect


This mastery requires either an intensive use, or a dedicated farm round. If you are more of a friend of the lock-on burst persuasion, you can pick an arena, leave one heavy demon around, and kill the perpetually spawning fodder demons with the remote detonate until done.


Rocket launcher - Lock-on burst - FARM
Condition: Kill 15 prowlers with the lock-on burst
Upgrade: Two targets can be locked on


With a total of 113 prowlers in the game (secret encounters and slayer gates included), there will be plenty of opportunities to farm this mastery. Prowlers die in two direct rocket hits. If you really hate the lock-on burst and want to use it as little as possible, two secret encounters can be exploited to perpetually spawn prowlers, the 06-13 and the 07-09.

It is advised to push back this mastery as much as possible, as it is the only one that undeniably makes the mod worse. Prowlers will appear in the final boss fight for you to farm, you can get up to 12 or 13 prowlers killed with the lock-on burst during the run and keep the last couple of kills for the final fight.


Super shotgun - Meat hook - FARM
Condition: 50 kills with the meat hook
Upgrade: Hooked demons drop 30 armour on kill


50 kills is a lot, but this mastery is an absolute must-have and needs to be acquired as soon as possible. You should start working on it as soon as you unlock both upgrades, by the end of level 03. It is easily farmed in an arena where you leave one heavy demon around while you focus the fodder demons with the meat hook. Segments 04-02 and, if not done already, 04-07 (the doom hunter fight) are great for that.


Ballista - Arbalest - FARM
Condition: Kill 20 cacodemons with charged shot
Upgrade: Charged shot recharges instantly


There will be 47 cacodemons after you pick the ballista. Given that the arbalest is the go-to counter for flying demons, it should not require any particular effort to master it. If you prefer sticking to the destroyer blade for the rest of the game, you can exploit some secret encounters (06-06, 07-09, 09-03) or wait for the final fight.


Ballista - Destroyer blade - TOKEN
Condition: Kill 3 enemies with one blade 15 times
Upgrade: Release blade before maximum charge


This one is tricky to get, because many conditions need to be fullfilled: three demons that die from one blade (mostly fodder), that do not move away while you load your blade, and with no immediate threat around you to throw you off. A well upgraded ice grenade can help a lot. There are many places in levels 06, 07, 10 and 13 where you can get away with farming this mastery without too much problems.


Chaingun - Mobile turret - FARM
Condition: Kill 5 enemies 10 times within 10 seconds
Upgrade: Mobile turret no longer stalls


A well upgraded ice grenade makes farming this mastery much easier, which you will have if you follow my suit upgrade sequence. Levels 06 and 07 abound with opportunities, even though in level 07 you will have to choose between that mastery and the 40 BFG kills challenge.


Chaingun - Energy shield - FARM
Condition: block 20.000 damage with the shield
Upgrade: launch shield forward upon release, faltering demons


Either play around in high-activity arenas (but still be careful, you're not invincible), or find corridors filled with fodder demons, and camp in one corner with the shield on until you get the mastery.
Summary - Praetor suit upgrades
Order
Segment
Category
Upgrade
Cost
1
03
Fundamentals
Hot swapper
2
2
03
Damage
Thicker skin
2
3
03
Fundamentals
Faster dasher
4
4
04
Ice grenade
Permafrost
3
5
04
Ice grenade
Frostbite
5
6
FoD
Fundamentals
Grappler
1
7
05
Ice grenade
Ice drops
4
8
FoD
Fundamentals
Hit n run
4
9
06
Ice grenade
Faster ice cooldown
3
10
06
Frag grenade
Scatter bomb
4
11
07
Frag grenade
Frag stock up
5
12
07
Frag grenade
Faster cooldown
3
13
FoD
Frag grenade
Combustion concussion
3
14
09
Damage
Explosive Pinatas
2
15
09
Damage
Regenerative barrels
2

Explanation
There are 38 praetor suit points to be collected in the levels, 5 in the Fortress of doom, and 27 earned through challenges. The following progression considers that all 43 praetor coins are collected, and that 22 of the 27 challenges are completed (see category Summary - Challenges).

  • Hot swapper reduces weapon swap time by 50%, dropping from 1s to 0.5s. This may not sound like much, but this perk is vital for quick-swapping later on. You'll spend the majority of your play time with this upgrade equipped, and your brain is used to the 0.5s. Just like when starting a new game, you have to adapt to not being able to double-dash; the faster you get back to 0.5s weapon swap time, the more comfortable you'll feel.

  • Thicker skin is not often useful, but there are some segments (especially in level 03 and 07) where you'll be really happy to be impervious to red barrels damage. It's a low price to pay to avoid some really, really frustrating deaths.

  • Faster dasher is the same as hot swapper, it reduces the dash cooldown by 50%, and the sooner you can rely on your old reflexes and game mechanics, the better. Thinking you can double dash when you can't is a sure way to add a little panic in an already dire situation.

  • Permafrost doubles the freeze time of demons. The ice grenade becomes a much more reliable panic button, and allows you to perform fancier group kills.

  • Frostbite increases the damage you deal to frozen demons, and makes your ice grenade become a central tool in heavy and super heavy demons takedown, especially early on while you're not yet that well equipped.

  • Grappler reduces by 50% the time you need to climb up ledges and swing around monkey bars. Climbing ledges is something you do all the time, so this is a nice mobility upgrade.

  • Ice drops makes frozen demons drop more health, a nice survivability upgrade.

  • Hit n run is your guarantee that you will be able to get away swiftly after a glory kill. With it, you can maximise your air time to dodge incoming fire when going for the glory kill, without having to save a dash for the escape. You will be less punished from your sting attacks.

  • Faster ice cooldown reduces the cooldown from 45s to 35s. Nothing wild, but a faster panic button reset is always good.

  • Scatter bomb makes your frag grenades more lethal the more demons are grouped together. Many heavy demons can die from such an upgraded frag grenade, if they are surrounded by 2 or 3 other demons. This makes the frag a bit more valuable, and can score you some massive group kills.

  • Frag stock up allows you to carry two frag grenades, for when you really need to lose that group pursuing you. Two frag grenades also help nicely in front of cyber mancubi that you can't blood punch, and with an additional six rockets, you will kill them 100% of the time.

  • Faster frag cooldown reduces your frag cooldown from 30 to 20 seconds.

  • Combustion concussion makes all demons falter, including the big ones. It can be pretty useful against cyber mancubi or archviles, as it can give you precious additional seconds to kill them before they retaliate.

  • Explosive pinatas transforms red barrels into loot containers. It would be very nice, if there weren't so few of them across the game. Still, you can never spit on more ammo.

  • Regenerative barrels makes red barrels respawn, providing twice the hazard for demons, and twice the ammo upon explosion.

  • The only place you would actually need Hazard protection is a nasty passage in the radioactive waste in 05-10. If you don't feel confident in your ability to survive it, pick the upgrade. Otherwise, it is mostly useless.

  • All exploration upgrades are interesting if it's your first time playing, and if you aim for the 100%. However, this guide provides complete maps for all levels, and will alert you when important, easy to miss pickups are in your vicinity, so do not bother with the upgrades. Besides, in Ultra Nightmare you cannot replay previous maps.
Summary - Sentinel crystal upgrades

Order
Segment
Upgrade
Bonus
1
FoD
Loot magnet
Armour
2
02 - 12
Loot magnet
Ammo
3
03 - 09
Quickdraw belch
Health
4
04 - 04
Quickdraw belch
Armour
5
FoD
Belch armour boost
Health
6
FoD
Belch armour bloost
Ammo
7
05 - 06
Napalm belch
Health
8
06 - 05
Health for blood
Health
9
07 - 11
Health for blood
Armour
10
09 - 11
Armour for blood
Armour
11
10 - 01
Armour for blood
Ammo
12
11 - 03
Napalm belch
Ammo


Explanation:
The first three upgrades are picked due to their usefulness. The three last ones are really anecdotal, less important in themselves than the order in which you upgrade your health, armour and ammo (ideally always in that order).

  • Loot magnet can mean the difference between life and death when you're in panic mode, or just running around in a difficult arena. It allows you to not care anymore about whatever demons drop when you interact with them. Chainsaw them, set them on fire or whatever, you don't have to stay around for a couple of seconds in order to collect the pickups.

  • Quickdraw belch decreases your belch cooldown from 25 to 12.5 seconds. It's a great upgrade that helps to almost always have a flame belch ready for when you chainsaw a fodder demon (the chainsaw cools down in 20 seconds). It comes with a health and armour upgrade.

  • The belch armour boost makes every demon produce 2 armour points every half seconds, instead of every second. Also, fodder demons will produce 22 armour points in total, instead of 16 without the upgrade. It's a nice upgrade, but nothing game changing.

  • Armour for blood allows you to refill your blood punch with armour. It's a nice thing to have, but is rendered almost useless when you consider that 2 glorykills net you the same payoff. See the section About armour farming in the category Preparations - some numbers for some more details.

  • Health for blood does the same thing as armour for blood, except its effect is even less controllable than with armour. On some occasions late game, it may help you replenish a blood punch in the middle of a fight.

  • Heavy demons give you 6 armour points when set on fire over time. The napalm belch upgrade pumps that number up to 22, just like fodder demons. This upgrade is almost useless when you consider that killing flaming heavies still grant 20 armour points, and you should really just focus your flame belches on groups of fodder demons anyway, and use the super shotgun's flaming hook on killable heavies (like prowlers, carcasses and pinkies).
Summary - Runes
Segment
Rune pick
02 - 01
Air control
03 - 05
Chrono strike
04 - 03
Equipment fiend
05 - 03
Blood fueled
05 - 04
Seek and destroy
06 - 07
Saving throw
06 - 10
-
07 - 01
-
07 - 06
-

Explanations:
First of all, it should be noted that runes are a much more personal pick than the rest of the upgrades in the game. All runes are great, but you have only three slots and some are arguably better than others. I will explain my personal picks. You are heavily encouraged to compare them yourself, and pick your own runes if you don't like mine.

  • Savagery - perform glory kills faster
    This rune is great, and makes you feel great. It allows demons much less time to reposition themselves while you're busy glorykilling, and you are allowed to retain better control over the battlefield. However, this advantage is clearly subpar compared to other runes, and it is unadvised to equip it.

  • Seek and destroy - launch into a glory kill from much further away
    This rune is also great, it makes glorykilling (and all melee actions, including crucible and chainsaw) much smoother, and less frustrating. However again, it is not as good as some other runes in the list.

    It is heavily recommended to equip this rune during one single fight, in 06-08, after picking up the berzerk powerup. You will have dozens of demons to kill, and the faster you can locate and engage the glorykill animation, the slower your powerup is consumed, and the more demons you can effortlessly kill while berzerked (taking out a cyber mancubus that way is incredibly satisfying).

  • Blood fueled - gain a speed boost after performing a glory kill
    This rune can consistently increase your survivability, and makes glorykilling in the middle of a melee much less punishing. Along with the hit n run praetor suit upgrade, you will be able to perform sting attacks much more safely. Pick this rune to play safe, but consider other choices.

  • Air control - greatly increase movement control while in the air
    This upgrade is so significant that it has been argued everywhere that it should be included in the praetor suit upgrade wheel, instead of being a rune you can pick only three of. It radically changes how you play while jumping and double jumping, making you much more flexible while in the air. It is mostly down to personal preferences, but I think this rune is a must-have. It requires a bit of getting used to if you pick it for the first time though, so be careful with it.

  • Dazed and confused - increases how long enemies remain in a staggered state
    Heavies and super heavies quickly get back on their feet when staggered, and generally regain roughly 50% of their base health when doing so. When staggering a heavy from afar, you can often be tempted to trace a beeline towards it and glorykill at all costs, only for it to stand back up when you arrive and destroy you at hugging distance. This rune gives you much more freedom in taking down staggered demons, and allows you to clean your surroundings a little before jumping in.

    It is a great rune, that can potentially save your life once or twice, however its benefits are so inconsistent and situational that it can't be considered an reliable pick, when considering other, better runes. Besides, unless you are really low on health, it is always more advisable to finish off heavy demons from afar with your conventional weapons, rather than break your flow and put yourself in danger to go give them a taste of your kneecap.

  • Saving throw - survive one death blow and briefly slow down time, giving you a chance to recover. This rune recharges on death
    This is your second life, plain and simple. The description doesn't apply for Ultra-Nightmare, where you will only get one shot for the whole game. There are many ways to use this rune. The simplest one is to have it always equipped. This is a poor choice for the beginning and the middle of the game (roughly up to Taras Nabad), because it takes the slot of another rune while having no effect, and if you burn your second life before the end game, then you won't have it for later, where the game is more difficult and you are under more stress. Preventing a death in level 12 is a bigger deal than preventing it in level 07.

    The second way to use it is to have it equipped for all the tough moments, namely the boss fights. Again, if you burn it during the doom hunter, or even the gladiator, then you won't have it for the later levels, and you might want to consider starting the game over.

    The third way to use it is to only equip it when dangerously low on health. The game will very rarely steal you your last 100 HP on one single blow, and you can generally see your death coming so that you can pause the game right before the fatal hit, equip the rune, and still do your best to dodge all the incoming shots. As for the first two methods, it is advised to just leave this rune be until you hit the later levels. Don't forget to replace it if you burn it.

  • Chrono strike - hold right-click in mid-air to temporarily slow down time. Once the rune is fully drained, you'll need to wait for it to recharge.
    This is a fantastic rune, that has many advantages at the cost of one big drawback: the activation button is the same as your secondary click. This means that you will always activate the slowdown while aiming down your sight, whether you actually need it or not.

    However, this rune allows you to snipe weakpoints much more consistently, and guarantees hits with the super shotgun meathook. This is immensely useful against maykr drones in level 12, and particularly during the fight against the Khan Maykr. With a little bit of practice, you can headshot the drones with the super shotgun and the meathook 95% of the time. This rune makes the game much easier on many accounts, but might not be to the taste of everyone. I heavily recommend it. Do note that its effect recharges only once you have depleted the rune (the indicator is in the bottom center of your screen), so be sure to deplete and recharge it before entering the next big fight.

  • Equipment fiend - enemies killed by equipment or while under the influence of equipment will decrease the recharge time.
    The effect of this rune is not that great, with each kill decreasing the reload time by roughly 5% (feel free to correct me on that one). However, considering that you use your equipment all the time, the iterative 5% can quickly add up, and 5% of 35s (the cooldown of the upgraded ice grenade) is 1,75 second. During that huge cooldown, those split seconds can quickly add up, and if you consider that this effect is shared for the frag grenades and the flame belch, then you get a great and very consistent value from this rune. It is heavily recommended.

  • Punch and reave - enemies killed by a blood punch shockwave drop health.
    The extra health on blood punches is nice, but is nowhere as useful as some other runes. This effect scales with time, as you can blood punch better and more often for each boss you take down. Still, I tend not to use it to kill groups of fodder demons, but rather to focus pinkies and cyber mancubi with it, so the effect cannot scale with numbers. I tend to ignore this rune.
Summary - Slayer gates
Segment
Difficulty
Do?
02 - 13
4/5
yes
03 - 17
5/5
no
05 - 12
4/5
no
06 - 04
4/5
no
07 - 14
5/5
no
09 - 06
4/5
no
Summary - Secret encounters
Segment
Difficulty
Do?
Segment
Difficulty
Do?
02 - 05
2/5
yes
02 - 10
2/5
yes
03 - 10
2/5
yes
03 - 13
3/5
yes
05 - 04
3/5
yes
05 - 07
3/5
yes
06 - 06
2/5
yes
06 - 13
3/5
yes
07 - 08
2/5
yes
07 - 10
3/5
yes
09 - 03
4/5
no
09 - 08
5/5
no
10 - 07
2/5
yes
10 - 09
2/5
yes
11 - 02
2/5
yes
11 - 05
3/5
yes
12 - 03
2/5
yes
12 - 08
5/5
no
Summary - Challenges
Level
Challenge
Do?
03
Pull the crystal
yes
03
Armored rain
yes
03
Master of turrets
yes
04
Musical interlude
yes
04
Big reveal
yes
04
Fire in the hole
yes
05
Weaponslave
yes
05
Bloody secret
yes
05
War pinkies
no
06
Rune ensemble
yes
06
External combustion
yes
06
Rocket removal
yes
07
Big ba-da boom
yes
07
Disarmament
yes
07
Lock and key
yes
09
Man made wiki
yes
09
Keep it cool
yes
09
Painkiller
no
10
Die by the sword
yes
10
Tricks and traps
yes
10
Doom hunt
no
11
Punched by blood
yes
11
Cut down to size
no
11
Resurrect no more
no
12
Accessories not included
yes
12
Inflight devastation
yes
12
Angel of death
yes
Preparations - Mental mindset
Let's dive into a mental exercice.

You have a dice, that has 10 faces. 9 faces are white, one face has a red skull on it. What are the chances of getting a skull, at least once, if you throw the dice once? it's 10%.
Twice? 19%.
Fourty times? 98.5%. Which means that you have only 1.5% chance of never getting the red skull, after fourty throws.

There are roughly fourty hard segments (difficulty 4 or 5 in this guide) in DOOM Eternal. Ultra Nightmare requires you to go through all of them, without dying at any of them.

If you think to yourself "that's all right, I'd say I have 90% chances of surviving each fight", strictly statistically speaking that means that you have 1.5% chances of succeeding at Ultra Nightmare. That's not very motivating now, is it?

Now. How do you manage to increase your odds?

1) Reduce the amount of dice throws
By reducing the amount of difficult fights you have to go through, you decrease your chance of dying of anything, be it by dumb luck or by a failed execution. Some fights can be cheesed through (for example, taking out key demons already present in an arena, from far away or from an upper ledge), completely avoided (by running through them, when possible), or have a critical weakness to a dominant strategy (like the BFG or the Crucible).

2) Increase the amount of white faces
By practicing those difficult levels, by getting better at the game, by increasing your knowledge of tricky moments and game mechanics, you decrease your chances of dying. Following a thought-through roadmap for all your equipment upgrades, knowing in advance what will be thrown at you, knowing what weapons to use in what situations, all those things will contribute to your wellbeing.

At first, your job will be to map the game. Know where you advance without too much sweat, where you consistently die, and you will know what to practice. A global weak point for everyone is boss fights: you cannot engage bosses in Ultra Nightmare without knowing them inside and out.

Now let's admit that, through intense training, you have an incredible 95% chances of passing each fight (twice as good as with 90%), and there are only 30 hard fights left (25% less). You get a very good 29% chances of succeeding, which is still not great, but much better than before. This highlights a central mindset you need to adopt if you wish to beat Ultra Nightmare:

You will fail. A lot. Be at peace with it.
Pretty proud of this one. I call it "Shame on me and my whole family".


Now the good thing with this mental image of dice throw is that it partially explains a perfectly normal and predictable phenomenon: sometimes you will die on the first fight. Sometimes you will die on the last fight. Everything is statistically possible, and you should not become tilted in any way by telling yourself "damn I died on the first level, what a loser I am", or "damn this final boss is impossible, look I died once". Accept failure, welcome failure. It is part of the cycle.
Preparations - Advice and good practice
  • Don't panic! It is really easy to lose your cool when dropping below 30 health points. The game has lots of safety nets implemented to prevent you from dying too unfairly or too quickly (for example, potentially fatal hits will leave you with 5HP most of the time instead of killing you right away). As hard as it may be (and I know a thing or two about this because I'm very quick to panic), control yourself. Breathe, concentrate, and pounce on your nearest health source.

  • Do not be greedy. Unless you're doing timed challenges, you tend to lose more than you gain by diving in a swarm to glory kill that one demon you've been shooting for the past fifteen seconds. If it's too dangerous, let it live another minute. Reset your mind, start anew. In Ultra Nightmare, time is not a limited resource (except for challenges)!

  • Keep on the move. Around you, at any given time, there is a circle, five meters in radius. It should make you physically uncomfortable to stay in the same circle for longer than 5 seconds. Do not just move left and right to dodge attacks, move around the arena to never give melee demons the chance to get close to you. In particular, be very careful when backtracking to chase opportunities, like fodder to chainsaw or demon to glorykill. This is how you end up meeting barons and mancubi face to face, and it never ends well.

  • Respect the platforming segments. you've gone through that section dozens of times yes, but still, do not rush. You gain one or two seconds for each corner you cut, but they can end up potentially costing you several hours of run if you die. Respect the game, or the game will put you back in your place.

  • Overconfidence is a disease, which has only two cures: humility, or death. It is dangerous to think "oh yeah, I didn't lose a single hit point last battle, I'm on a roll", and start feeling like a badass cowboy, that gracefully dances around his enemies and kills them with style (especially in level 07 and 12). This is how you die dumb, predictable deaths. Respect your enemy, no matter how strong you think you are. Drop your guard only when the last one standing is you.

  • Learn from your mistakes. Whether you flow relatively successfully through an arena, or fail miserably, leave your emotions aside for a second and try to find out at least one reason why at least one thing didn't go exactly as planned. Remember that time when you were at 5HP? Could it have been avoided? If yes, what did you do wrong? Was it an execution mistake, did you make a bad assessment, or did you take a bad decision? Always be critical of yourself, and you will not need to wait for a failure to learn a valuable lesson.

  • Look at yourself from a third person viewpoint. If you have the means and the will for it, record your Ultra-Nightmare runs, and watch them later. You may be able to detect problems in your execution, that are invisible to you while you're playing. It can happen that you die a very frustrating death that makes you feel the game cheated on you, and upon watching your footage you come to identify an array of mistakes you made, that rendered this death inevitable. Learn from this experience.

  • Less thinking, more reflexes. Your brain is a very powerful organ, but it can't process too much new information at the same time. Example: you do not have to think about what key to press to go forward, because you've committed that action to muscle memory long ago. Now, try switching the shotgun hotkey with the plasma rifle. You will constantly have to actively think about it, and this has a high brainpower cost that you could be investing on other things, like keeping a mental map of the arena, a mental list of the demons present, a mental count of your ammunition. The same thing applies for equipment hotkeys and combos, priority attribution, and go-to weapons per demon. Commit them to muscle memory, and your brainpower can be fully dedicated to dynamic threat analysis and response.

  • Always have the same grenade equipped. That way, you never have to look at the current grenade equipped to throw the grenade you want to use. Example: Ice grenade? You can always throw directly. Frag grenade? You must always switch gear, throw, then switch back. This saves brainpower, and drastically reduces your chances of throwing the wrong grenade.

  • Do not use your chainsaw recklessly. Don't get me wrong, you should use the chainsaw as much as you can, but always be sure that you are focusing a fodder demon in the middle of the screen before pushing the button. Otherwise, you run the risk of missing the shot, or worse, to aim at a heavy that you don't have enough fuel to chop down. In both cases, an animation will play, with the purpose of showing you that you can't chainsaw right now. You can't skip those animations, and as you usually are in the middle of a melee while chainsawing, you're left impotent and vulnerable, which can often induce a sudden panic, an intense frustration, and potentially a quick death. Be very careful when chainsawing, and always have a backup plan ready in case you miss your shot.

  • Learn to quick swap between weapons. The weapons wheel is a terrible tool to use when in the heat of battle, because it kills your momentum, and requires you to restart movement after closing it. The only advantage it has is to give you a short mental breather when things go too fast for you, and you need time to process an overflow of information. Other than that, everything the weapons wheel does, your mastery of quick swapping does better. Many guides exist, that talk in depth about alternative keyboard and mouse mapping that allow you to get that pesky chaingun without having to stretch your hand too much. It sounds like laziness, but it's actually efficiency. Don't neglect ways to better yourself. If you ever change your keys, practice weapon switching extensively, in peace, until the right reflexes settle in.

  • Give your brain a break from time to time. Not only should you take frequent breaks, in order to not exhaust your brain and do critical, avoidable mistakes, but you should also enjoy the couple of seconds of nothing happening during the chainsaw or glorykill animation. That, along with the chrono strike rune, allow the fight to slow down without (too much) negative repercussions. Use those precious seconds to cool your brain down, to check your equipment, your ammo, your life and armour, your surroundings, and prepare your three next moves. If you don't like the chrono strike, you should still use the chainsaw regularly, and not only when low on ammo.
Preparations - Keybindings
This section will cover my own setup, and relies mainly on my opinion, my preferences and my experience. Always seek second opinions, and always try to use what works best for you!

Here is my keybinding. It is based on a german keyboard, so keep that in mind if you want to use it.

My keybinding


My fingers spread


I put some thought into it, I tried many alternatives and this is the one that I liked the most. However it is by no means an absolute token of quality, and I encourage you to seek out other opinions (especially the opinions of pro-players and speedrunners) before making up your mind.

Key points:
  • The more you change your keybindings compared to what you are used to, the longer it will take to adapt to it. You will need to invest a frustrating amount of time training with your new keybinding before it becomes natural.

  • A mouse with more than two buttons is heavily recommended, because the more you spread your actions across your two hands, the more effective you will be. Three, four and five active buttons seem to be the norm across most mouses, but you can have many more on some models. Again, it is a matter of habit.

  • My index is responsible for a lot of things, while the region in the bottom left, under the pinky, is left almost empty. This results in me strafing mostly to the left when running around in arenas, and I mostly run laps clockwise. This can be disadvantageous in tight areas where you don't have the luxury to pick your circling direction.

  • The thumb is used for the two bottom rows. Accidentally pressing the spacebar in order to reach the grenade swap key with the thumb is absolutely not a problem, so I generally press jump whenever I press X, C or V.

  • The rocket launcher, the super shotgun and the ballista are used almost constantly, but their initial keys (4, 5 and 6) require you to stretch your finger too much for comfort. Having them right next to the index allows for much smoother quick-swapping. The chaingun (initially 7) takes the original key of the rocket launcher.

  • You may move all your keys one to three keys to the right (e.g. WASD -> TFGH), in order to benefit from having more keys to the left of your hand. This comes at a very high brain-rewiring cost though, because you move ALL your keybindings, your hand's resting position on the keyboard, AND it requires you to perform actions with the ring finger and the pinky finger that you never did before. The gain in efficiency will be great, and it is a keybinding endorsed by many speedrunners, but you will have to relearn everything. I personally did not have the courage to make the jump, but don't let that stop you if you want to try it out !


A small word on the mouse: I use a vertical mouse, an Evoluent 4. It's an ergonomic vertical mouse I've had to use for the last 4 years after rising symptoms of a carpal tunnel syndrome. I am not a health expert, but let's still let this section of the guide be a sort of public service announcement for a second:

If you experience numbness or weakness in your hand, or a tingling in your hand and/or arm, or an unusual cold feeling at your fingertips, or a slight pain under your wrist when your hand is on the mouse, then you may have a beginning of a carpal tunnel syndrome. It is mostly due to the fact that your carpal tunnel (on the inside of the wrist, just below the hand) is being compressed when you hold a standard, horizontal mouse, and the nerves that pass inside it will start being compressed too on the long run. It is nothing dramatic, but it does not heal by itself over time. Once the damage is done, you either get surgery, or you stop using horizontal mice. If you start feeling the symptoms mentioned above, immediately get in touch with your doctor, and start looking into ergonomic mice.

It took me two weeks to start being halfway as effective as I was before when I switched to a vertical mouse, and roughly three months before I got back to my previous FPS skill level. It takes a while to get used to it, but it is a valuable investment into your own health on the long term. By beating Ultra-Nightmare with a vertical mouse, I hope I can debunk the claim that it is a downgrade on the standard horizontal mouse :)


Preparations - Killing fodder demons
Zombies, Mechazombies, Imps, Gargoyles, Soldiers
  • There are two numbers to consider when it comes to fodder in any given arena: how many will spawn, and how many will spawn perpetually. Ten fodder demons may spawn in total, at the beginning of each wave of an arena. But the number at which the minimum, actually present fodder is being maintained at, is much lower, generally between 2 and 4. It is very important to understand that three gargoyles and two imps can be as much life-threatening as a cyber mancubus, and it is unwise to ignore them.
    The best thing to do is to kill dangerous fodder demons (the non-zombies) whenever you pass them in your laps around the arena. Most of the time, the fodder demon minimal number upkeep will be maintained by a random fodder demon spawn, and "replacing" a gargoyle with a zombie is a very good trade. Knowing this and acting accordingly will make your life consistently easier across the game.

  • Most arenas function in waves of spawning demons. Those waves are not only triggered when a certain amount of heavy demons from the previous wave have been killed, but also when a certain amount of fodder has been killed. This is generally true starting with level 05. Try killing only heavy demons, and you will understand.


Not-totally-fodder, not-totally-heavy
Shield soldiers, Prowlers, Carcasses, Maykr drones

Those demons are in this special category because they follow three rules:
  • They almost always spawn in fixed amounts, and do not respawn when eliminated (except the drones during the Khan Maykr fight);

  • They take three chainsaw charges to kill (with the exception of the shield soldier) (yeah I know, it's kind of confusing);

  • When the game decides to send the next wave, those demons belong neither in the fodder kill count, nor in the heavies kill count. This means that wave 4 will still be triggered, whether the prowlers and the carcasses from wave 1 have been killed or not. What it means concretely, is that those demons will not only remain a nuisance if you do not dispose of them early on, but their dangerosity will be added to the other programmed waves.

The shield soldiers, and especially the prowlers and the carcasses, are mostly dangerous due to the thick layer of unpredictability they add to each fight they are present in. A face-to-face around a corner with a shield soldier, a prowler that teleports behind you while you're running backwards, a carcass that creates an energy barrier in your face while you're shooting rockets... the examples are many, and so are the reasons to consider those demons a very high priority.

  • Shield soldiers:
    keep a 10 meter distance at all times, except when hooked with the super shotgun. Otherwise, plasma rifle to the shield.

  • Prowlers:
    lock-on burst when far enough, but preferably a good point blank super shotgun shot after a meat hook catch. With the chrono strike rune, you have no excuse for missing. Ice grenade can solve many panic situations. A direct ballista body hit will stagger them.

  • Carcasses:
    triple rockets always kill them, as one rocket will be enough to destroy its energy barrier if it ever casts it on the way. Meat hook super shotgun with the chrono strike rune provides the most reliable way to kill them, as you will get plenty of time to aim, and will one-shoot them consistently. A direct hit to the canister they carry on their back will kill them instantly.

  • Maykr drones:
    with the chrono strike rune equipped, the super shotgun is the best and most reliable way to headshoot them. Reel in and shoot at point blank slightly below the center of the head for a 90% chance of kill. It takes some practice, but it is worth all the precision bolts and arbalest shots in the world. In addition to all the ammo and health they drop, you get +30 armour.
Preparations - Killing heavy demons
Most heavy demons are easily dispatched with a lock-on burst. It is the best, fastest and most reliable way to kill hell knights, whiplashes, revenants, and much more. However, it drops in average DPS if you have to shoot more than once, and you run the risk of overkilling, and thus wasting rockets.


Arachnotron:
  • Sniping the turret off with the sticky bomb or the precision bolt is a very high priority in early levels, it makes it much easier to dance around them. An arachnotron without its turrets is to be considered as no less dangerous than one with it, as the bombs are still potentially lethal.
  • Lock-on burst is the go-to solution for an effective stagger. A frag grenade can finish the job.
  • An ice grenade followed by two point blank super shotgun shots also works pretty well.
  • The super shotgun - ballista quick swap is a great technique against them, albeit a dangerous one.

Cacodemon:
  • Very high melee and projectile damage. You cannot control a fight as long as a cacodemon is in the vicinity.
  • Sticky bomb to the gob early game, charged arbalest shot late game.
  • Cacodemons have trouble attacking anything above and below them.

Hell knight:
  • Much more dangerous than its DOOM 2016 counterpart, still hits like a truck but has a much improved range. With a little practice, you can run around and dodge pretty consistently, making it not that high of a priority.
  • Early on, a couple of sticky bombs and a full micro missiles unload is a very consistent counter.
  • Triple rocket to the face is the fastest solution. 30 turret mode chaingun rounds will kill them.
  • A super shotgun grapple rodeo is effective, but possibly dangerous. Two point blank shots are enough to at least stagger.

Revenant:
  • Like the hell knight, much more dangerous than in the previous game. Not too dangerous in multi-level arenas with lots of small passages to hide in, even though the melee attack is still lethal if you bump into one face to face. Very high priority in open arenas.
  • A charged arbalest shot can oneshoot, or stagger, or not. Its damage is pretty inconsistent, and depends mostly on where you land the shot.
  • Three rockets are much more consistent at taking them out.
  • One plasma rifle heat wave charge will just harm it. Two charges destroy one shoulder gun, three charges destroy both shoulder guns.
  • A meat hook grapple followed by point blank super shotgun shot can stagger, if aimed at the upper body. Be ready to dash away immediately afterwards if it didn't work.

Dread knight:
  • Hell knight with a very fast slash projectile and an AoE. As a consequence, much more dangerous than a hell knight, but just as chaingunnable.
  • Three rockets will stagger it.
  • Not that dangerous when you can endlessly outrun it, big nuisance in tighter spaces. High priority.
  • Like the cacodemon, it has trouble attacking anything above or below it with its projectiles.

Mancubus:
  • Very dangerous throughout the game. One of the highest priorities.
  • Precision bolt, arbalest quarrel or sticky bomb all suffice to destroy its cannons. Not harmless afterwards, but much less dangerous, especially at melee distance.
  • Lock-on burst followed by single rocket, a super shotgun shot (up to 10 meters away) or a ballista shot are enough to kill it. Remember that the lock-on burst delays weapon switch by a couple of seconds after shot, so it is always best used last in the combo sequence.
  • Mancubi frozen with the frostbite suit upgrade die in two point blank super shotgun shots.

Whiplash:
  • Not really dangerous, until you get cornered by one and remember how dangerous they are.
  • Three rockets are the most effective way to kill it across the game. Two will stagger.
  • Ice grenade help stabilise the situation if you lose control.
  • Mostly harmless from far away, or from a different altitude than you.
  • Take them seriously, always keep on the move and you won't get hurt.

Pinky:
  • Much more dangerous than in DOOM 2016. Unless they are recovering from bumping their head, or if they are frozen, you will get hit when approaching them.
  • A single super shotgun shot to the butt is enough to kill them.
  • Blood punch is the hardest counter at your disposition. Keep it ready, and use only when the pinky is idle or frozen.

Spectre:
  • Like the pinky, except invisible and less armoured at the front.
  • You cannot lock on it with the rocket launcher, or grapple it with the super shotgun.
  • Charged arbalest shot to the front can be a direct kill, sometimes. Very inconsistent solution.
  • A point blank super shotgun shot will stagger most of the time, just make sure to not stand in its way or you might get punished.
  • Rocket + super shotgun at short distance, even to the front, kills 95% of spectres.

Cyber mancubus:
  • The standard combo is ice grenade + blood punch + super shotgun/ballista/rocket. If you know when cyber mancubi appear, and are ready for them, beating them becomes a mere formality. Never underestimate their huge damage output.
  • A slightly riskier, but much more flexible method, is to grapple onto one, shooting your super-shotgun once to falter it, blood punch immediately afterwards, and shoot again. You can kill one in two seconds with this method, but it is not 100% safe: occasionally, they will not falter, so always be ready to eject at a moment's notice, before they reciprocate your love.
  • Super shotgun is the go-to weapon. If you want to switch (for example, from a rocket launcher, less ideal at point blank), switch BEFORE the blood punch, as the game sometimes has trouble registering your weapon switch request after the blood punch and you may end up shooting a rocket at your face.
  • The area of effect it unleashes when you get too close only affects you if you are within its line of sight when it activates it.
Preparations - Killing super heavy demons
Generally: only go for the glory kill if you can reach super heavies in less than two seconds. Their stagger time is very short, and if they get back up, they basically regain close to 50% of their health.

Doom hunter:
  • Respect them, even in the late game. Try to always know where they are, so that you do not accidentally bump into them. Unless you are actively engaging them, keep your distance.
  • Microwave beam can destroy the shield in 3 seconds, then lock-on burst plus an arbalest shot should dislodge it from its sled. Always be ready to shoot one more projectile.
  • A much faster but slightly riskier way to destroy the sled is to throw any grenade at them (provided you have upgraded them) in order to stun them, then close in with the super shotgun, blood punch the sled and finish it with a shot. Retreat as fast as possible: if you fail, the retaliation at melee range can be lethal, and if you succeed, the sled will explode and can deal lots of damage. Do not attempt in Ultra-Nightmare without proper training.
  • Once flying, triple rockets usually work, but not always. Be ready to shoot once more. Again, the microwave beam is pretty effective at stunning and killing them.
  • Alternatively, an ice grenade and a chaingun unload will kill an unsledded doom hunter very fast.
  • The crucible is wasted on them, due to the fact that you need one charge to destroy the sled, and one more to kill the pilot.

Tyrant:
  • Huge sacks of hit points, hit very hard, but are mostly inoffensive if you move constantly, keep your distance and have an obstacle between you and it.
  • They are prime targets for your crucible. If you can't crucible them, keep them for the end of the fight.
  • Almost impervious to the BFG, don't bother.
  • Their attacks are usually easily dodged, but don't disrespect them. When it slams the ground with its fire sword, it will send a burrowing, homing projectile towards you that you can dodge only by hiding behind something, dodging expertly at the right moment, or jumping really high.

Baron:
  • Smaller version of the tyrant. An ice grenade and a full turret mode chaingun unload (roughly 80 bullets) will do the trick.
  • You can blood punch them to destroy their armour, but do not expect much from that. Keep your blood punch for other recipients, like the cyber mancubus or the pinky.
  • Its projectiles are among the fastest in the game. Those fireballs hit hard, fortunately the baron emits a loud and distinct audio cue when it's about to shoot you (sound similar to a sword unsheathing). You'll have a couple of seconds to find cover.
  • Run away at all costs, until the pressure around you drops enough to invest energy into killing them. Ice grenades make for a great panic button.
  • Pretty resistant to the BFG. Using the crucible feels like a waste, but when you are chased by two barons, it can be a great pressure relief to just slash one.

Marauder:
  • Lowest priority, alongside the doom hunter. He requires your full commitment to take down, and this can only happen at the end of the fight.
  • Not very dangerous while you're running away from him, but mind the dog, which has the highest priority. For obvious reasons, he is lethal at close range.
  • With enough practice, killing a marauder will become a mere formality. When he lowers his guard to attack, the best countermeasure is super shotgun - ballista - super shotgun, three to five times until it staggers or dies. Throwing a frag grenade at the same time deals even more damage.
  • Try shooting your super shotgun as close to him as possible. The weapon's wide spread means you're losing lots of potential damage at even 2 to 3 meters away, so be sure to hug him to shoot, then quickly back away.
  • You may shoot four times per stun, if you feel extra badass and have health to spare. Shooting three times is always the safer option, giving you time to move away before he retaliates.
  • His behaviour is somewhat predictable, but he is mostly erratic and unscripted. Lots of practice and swift reflexes will be the best preparation. Always be ready to be thrown off your groove by an unexpected behaviour from his side.

Archvile:
  • Very dangerous, pretty tanky, but does not live long against the crucible and the BFG. It is your absolute highest priority whenever it is present. Listen for its discernable screams to locate it whenever it appears.
  • It can summon additional, buffed demons to the battle. You NEVER want that to happen. Killing the archvile removes the buff, but not the summoned demons.
  • Some archviles will summon demons first thing in the morning (like in 09-02). Some will never attempt it (like in 09-14), and some may or may not do it depending on their mood (like in 10-07).
  • Whenever the archvile summons demons, it will erect a fire shield in front of it.
  • A freeze grenade destroys the shield, but doesn't freeze the archvile unless it lands behind the shield.
  • A rocket always destroys the shield, the second rocket always falters the archvile.
  • Destroying the shield does not interrupt the summoning, but faltering the archvile does.
  • Never attempt to slash it with the crucible without having frozen it or faltered it before. It is most dangerous at melee range, with its fire AoE and its projectiles.
  • While frozen, it takes most often two, sometimes three lock-on bursts to die. Without the ice grenade, it takes three.
  • The microwave beam is a convenient way to stun it consistently while you whittle away its health bar, but you can't lock onto the it through its shield.
Preparations - Some numbers
About armour

Flame belch

You may set any demon on fire as much as you want with the flame belch, allowing you to restore full armour in between fights, with a single fodder left alive.

There are two sentinel crystal suit upgrades for the flame belch: the napalm belch, and the belch armour boost. The following tables sum up the expected amount of armour drop, in function of the condition. Those numbers rely on a flawed methodology, so the numbers might not be 100% accurate.


Those numbers inform us on the utility of both upgrades. The flame belch is pretty consistent on fodder demons, independently of the upgrades. The main difference is that demons drop two armour points every half seconds with the belch armour boost, instead of once every second without.

On heavies, upgrades seem equivalent. However, having heavies burn longer with the napalm belch means that you have more time to kill them while they are burning, and thus reaping maximum benefit.

I personally prefer going for the belch armour boost in priority, as the flame belch is best used on groups, and on quickly killable fodder. Igniting heavies and super heavies should only ever be a side effect of igniting fodder, and should never be your main goal.

Feel free to critique my numbers and my reasoning, I am not 100% sure of them.


Super shotgun flame hook

The super shotgun flaming meat hook mastery gives a consistent 30 armour point for every enemy you kill with the super shotgun, heavies included. After you unhook from a demon, it will remain on fire for roughly one second, allowing you to quick-swap to another weapon (like the precision bolt) to kill it, thus sparing two precious shotgun shells. Note that the fire from the flame belch and the fire from the hook are two distinct conditions, both can't be applied at the same time, and the hook fire overrides the flame belch fire.

Those are the outcomes after a hook:
  • Killing with the super shotgun: 30 points
  • Killing with any other weapon: 20 points
  • Hitting with the super shotgun but not killing: 10 points
  • Hitting with any other weapon, but not killing: 0 point
  • Shooting with the super shotgun, missing, shooting again: 0 point
  • Flame belch + super shotgun kill at the same time: 30 points
  • Flame belch over time, then super shotgun hook + shot: 50 points
You can quick-swap to another weapon, shoot, then swap back to the super-shotgun and shoot, but the timing is tight. The outcomes stated above apply, as long as the target is on fire from the hook.

The armour for blood crystal upgrade gives you the ability to refill a blood punch with 20 armour points, but requires you to be already fully armoured. It is a viable alternative to glorykilling two demons, if for example you finish an arena with only one demon left, and need the blood punch for the next, because you can get infinite armour with the flame belch.


About extra lives
Extra lives do not appear in Ultra-Nightmare mode. Instead, they are replaced by megaspheres or full armour pickups, with one replenishing all hit points and the other only the armour. Not all extra life pickups are replaced though, and the maps provided in the guide will mark those that are replaced, and those that are not.

For those playing in extra life mode, you start with 3 extra lives, independently of the difficulty. There are 51 extra life pickups in total across the game, so if you are going for the "Running up the high score" achievement, you can die 44 times in total. It's "slightly" more than what you get in Ultra Nightmare.

Level
01
02
03
04
05
06
07
08
09
10
11
12
13
Extra lives
4
7
6
3
4
3
6
2
3
3
3
3
4


Demons count in the main campaign
Don't act like you never wanted to know.
Yes I counted.
No I'm not proud. But I did it anyway.
No 100% guarantee for exactitude, numbers may vary between +-2
Demons listed according to their order of appearance in the campaign

Demon
Total
Main thread
Secret encounters
Slayer gates
Arachnotron
67
62
1
4
Cacodemon
83
75
6
2
Hell knight
56
48
2
6
Revenant
69
64
2
3
Dread knight
30
27
0
3
Mancubus
78
66
5
7
Shield soldier
62
57
5
0
Whiplash
65
55
4
6
Prowler
113
87
4
22
Pinky
34
32
0
2
Carcass
50
44
1
5
Doom hunter
15
12
2
1
Totem
7
7
0
0
Spectre
12
10
2
0
Cyber mancubus
28
26
2
0
Tyrant
10
7
0
3
Baron
21
17
1
3
Pain elemental
21
15
4
2
Marauder
10
8
1
1
Archvile
8
7
0
1
Preparations - External protips (WORK IN PROGRESS)
Here's a collection of useful protips I found.

======= 1 - MAIN CAMPAIGN =======
01 - Hell on earth
(click to enlarge)


01 - 01
Difficulty 2/5
There is no particular tactic there, pick the sticky bombs upgrade mod for the shotgun, and throw them bombs around until everything is dead. Get out of this fight with three chainsaw charges, so chainsaw once at most.

If you do not intend to play with the full auto upgrade, leave the modkit you will stumble upon after leaving the barge for now. Having both mods for the heavy cannon is much more useful than having both for the shotgun, and you can fast travel back to this point once you enter the citadel at the end of the level.


(click to enlarge)


01 - 02
Difficulty 2/5

1 arachnotron

The hardest part about the first level is probably the lack of double dash, not only because it’s a great survival tool, but mainly because you’ll want to engage demons like usual, only to remember that you’re not as flexible as you would like to. You can’t dance around your enemies, and that might cause a death or two. Fortunately, the stakes are very low, and even though you might tell yourself „damn, am I really that bad that I died on level one?“, you’ll be back where you died five to ten minutes later at most.

If you stocked up on fuel for the chainsaw, you can take down the arachnotron directly with it. There is enough ammo laying around for you to not have to chainsaw any fodder demon, so refrain from it. Collect the fuel canister laying on the high ground only once your first charge is back.


01 - 03
Difficulty 3/5

1 arachnotron

Do not rush the arachnotron, clear every fodder demon methodically and collect ammo so as to not chainsaw anything. Pick up the third fuel canister and keep it for later. Reserve your sticky bombs for the arachnotron, and deplete your heavy cannon on the fodder demons.

Pick up one of the two full armour pickups in the area before passing the yellow gate.


01 - 04
Difficulty 4/5

1 arachnotron

This passage is really tricky, and generally makes for a suitable coffin if you are not prepared. Engage carefully, take your time, don't take any unnecessary risk and remember which demon spawns where.

If you rush to the arachnotron, you can catch it spawning. You'll have ample time to destroy its turret with a sticky bomb. However this requires you to rush, and as stated earlier, it is not the most clever way to go. Instead, you can chainsaw it with the three charges you've amassed.

Grab the modkit, and get the micro missiles upgrade for the heavy cannon (or the precision bolt, depending on your personal preference. You will get the other mod at the end of this level.)


(click to enlarge)


01 - 05
Difficulty 3/5

2 arachnotrons, 1 cacodemon

The cacodemon is generally a very high priority demon, and at this stage of the game every single one should deserves your full attention and respect. Make it gulp down a sticky bomb, glory kill it, and onwards. When arachnotrons spawn, focus their turret with sticky bombs, throw a couple more their way, and finish them with a full micro missiles unload. Try to get out of this arena with two chainsaw charges.


01 - 06
Difficulty 2/5

2 cacodemons, 2 tentacles

A cacodemon will spawn right in front of you after you get up the stairs towards the outside.

Tentacles are not a big deal if you expect them, but can be your downfall if they catch you with your pants down. A viable tactic to take them down is to say „NO“ assertively while you shoot your shotgun at the stem when they pop out. This guide will indicate the tentacle count in each segment, so you can count them, and know when you’ve dealt with all of them. The second tentacle hole is empty, not the third one.

The second cacodemon will spawn in the parking lot, aim well for the mouth or you might accidentally make the red barrels explode. They are a serious hazard to you right now, but this problem will be solved a little later.


01 - 07
Difficulty 4/5

1 arachnotron 3 cacodemons

This is a tough fight, that you can clear either offensively, or more defensively. All three cacodemons will spawn high up, so stay upstairs. They will spawn first in the middle of the arena, then at the end, then at the front (where you entered).

One tactic that works well on this pretty difficult arena is to hang around in the "Hotcups" alcove (directly to the right when entering) until you have dispatched two of the cacodemons, which will be forced to come down to your height and virtually offer themselves to your fists. Evacuate afterwards, as the arachnotron will start harassing you. Locate and destroy the third cacodemon (it may be right over your head so watch out), then focus the arachnotron and finish the fight.

You may, again, have amassed enough fuel (one canister is directly to the right of the Hotcups alcove) to take down the arachnotron with it. If you feel like you're in control of the fight, kill the arachnotron the standard way, and keep the chainsaw charges for the next one.


01 - 08
Difficulty 3/5

1 arachnotron, 2 tentacles

Don’t rush. Snipe what you can from your vantage point, but leave a couple of demons alive to chainsaw. Same applies for the arachnotron afterwards: don’t rush. Either face it directly if you feel like it, chainsaw it if you have the charges, or back away before the two fire traps and snipe it from afar. Be very mindful of the terrain, and don’t forget about the tentacles.

Before going up the elevator, fast travel to the beginning of the level and grab that modkit you had left behind. Get whichever mod you haven't picked yet for the heavy cannon.

Fortress of Doom
Get the flame belch, and grab the armour bonus of the Loot Magnet suit upgrade with the crystal.
02 - Exultia, part 1
(click to enlarge)


02 - 01
Difficulty 2/5

1 cacodemon, 1 knight


Sometimes, the cacodemon spawns already dead.

2-3 sticky bombs and a full micro missile unload usually are enough to calm a knight down. Remember, hell knights in this game are actually dangerous to wrestle with, due of their extended range and increased dynamism, compared to their 2016 counterpart.

Don’t get surprised by the few zombies to your left when you take the elevator under the blood punch powerup.

For the rune choice, refer to the Summary - Runes section above.


02 - 02
Difficulty 2/5

1 hell knight


Straightforward fight. Don’t forget about the flame belch. Prioritise the knight with the combo discussed earlier.

There is a full health pickup you can keep for later, if you find yourself with low health after next fight.


02 - 03
Difficulty 3/5

1 arachnotron, 3 cacodemons

The cacodemon cannot leave the room it is in, so he can’t be lured onto the bridge. Focus the cacodemons, don’t let yourself be overrun. After the fight, destroy the red barrels, so they do not become a hazard for the next fight in this room.

You will get 5 Weapon Points (WP) as a starter, as well as one from the fight you just concluded. Dump them all 6 into the bigger boom upgrade for the sticky bombs mod, in order to really ramp up your efficiency against fodder demons, and turn potential misses into hits. Save your subsequent WPs for later.


02 - 04
Difficulty 3/5

1 cacodemon, 2 hell knights


Straightforward fight. Deal with the cacodemon first. Don’t step into the electrified water. You may chainsaw enemies into it though, and jump away without a single damage taken.


02 - 05
Difficulty 2/5

2 cacodemons


Easy secret encounter, but remain careful. Take cover, wait for the cacodemons to close in at glorykill range. Feed them a grenade each and kill them.


(click to enlarge)


02 - 06
Difficulty 3/5

1 cacodemon, 1 hell knight, 1 revenant


Throw a grenade at the red barrel once the revenant lands near it. Watch out for gargoyles on the higher platforms around (there is an armour bonus on the left platform). As you advance, you will trigger a knight spawn right in front of you, and a cacodemon far to the right. Try to conserve your chainsaw fuel, in order to have three charges for the future.


02 - 07
Difficulty 2/5

5 tentacles


Advance carefully. Count the tentacles, relax only when you’ve killed 5.

Get the heat blast mod upgrade for the plasma rifle.

After breaking the wall open, use the fodder demons to get as much health, armour and ammo as you can get for the fight ahead.


02 - 08
Difficulty 4/5

3 arachnotrons, 1 cacodemon, 1 knight, 1 revenant


This fight is really tough if you jump into it head on, but the difficulty will be greatly diluted if you take advantage of your high ground to snipe the already present demons. With the precision bolt, take out the turrets of the arachnotron and the revenant. Finish them with sticky bombs. Do not think an arachnotron is harmless just because you sniped its turret. The bombs are just as dangerous as its laser, if they land on you.

Jump down one level, and a cacodemon and a knight to spawn. Focus the knight with the plasma rifle while jumping around to dodge incoming fodder shots. Then take cover from the cacodemon until it's at your height, to stickbomb it. You can hide behind the smallest decor item to block its shots. Take care not to eat too much fodder shots while up there, they add up very quickly and you don’t want to jump down with 20 health. Kill the second arachnotron the same way as the first. Destroy the third one the same way, or jump down and chainsaw it. Don't forget about the charged up heat wave you built up, to destroy arachnotron turrets or clear groups of fodder demons upon landing.

Be sure to wait until your first charge fills up again before picking the canister in the arena. Continue stocking up chainsaw charges for the future.


02 - 09
Difficulty 3/5

1 arachnotron, 1 cacodemon


There’s no battle music, but don’t lose focus. Don’t forget that gargoyles are absolute beasts in melee.

Make sure you have killed the two gargoyles before picking up the power core. There are few ways to die that are more infuriating than getting helplessly chopped up by a gargoyle while your character executes his script, looking in awe at the glowy thingy he just picked up.

Don’t get surprised by the cacodemon afterwards.


02 - 10
Difficulty 2/5

5 lost souls


Trivial encounter, that can turn badly if you or a lost soul triggers a barrel in your vicinity. Hide behind the gore nest, and you can detonate all the barrels safely. Finish the remaining lost souls.
02 - Exultia, part 2
(click to enlarge)


02 - 11
Difficulty 2/5

2 arachnotrons, 1 cacodemon, 5 tentacles


There will be three tentacles in the small pool you enter in (one behind the column, one on each side).

After destroying the fissured wall, two soldiers will engage you from afar, kill them as soon as possible as you are unable to dodge in the purple goo. Then, walk ahead until you're about to fall down from the ledge. Your character will become free of the goo, and can double jump and double dash normally. If you fail and land in the purple goo, be aware that there's a tentacle somewhere left, near the pillar in the middle. Get to the platform ahead, and find safe ground to your left. Eliminate the imps, then the cacodemon spawning from the right.

Past the demonic barrier, trigger the arachnotron, then immediately walk back until you leave the goo. Kill it from there, and again, do not underestimate the bombs.

The tentacle afterwards is ~3m in front of the crystal. Get the ammo upgrade of the loot magnet suit upgrade. The ammo boost will give you three chainsaw charges, keep them for the slayer gate.


02 - 12
Difficulty 2/5

1 arachnotron, 2 cacodemons


Destroy the arachnotron's turret from afar with the precision bolt, and it will become harmless.

From now on in this level, you must respect the platforming sections. You will not always be teleported back up if falling down on the lava, and it can melt your hit points very fast. Take your time, always make sure your two dashes are available, and everything will be fine. You need all your hit points for the next fight.

The cacodemons spawn when you pick up the armour up on the pillar. If you don’t need it, leave it be. If you want to pick it up, climb up the ledge behind you first and clear the 3 ambushing gargoyles there. Then go claim the armour, climb back up, wait for the cacodemons to come to your height, sticky bomb them, kill them.


02 - 13
Difficulty 5/5

3 revenants, 2 dread knights


The stakes are still pretty low for this slayer gate, if you die you don’t have that much to catch up on. Also, you haven’t gone through any detestable hurdle (like for example 03-09) that you don’t want to lose progression of. Still it can be very annoying to die there, so be sure to practice this gate a couple of times before engaging in Ultra Nightmare, in order to get the hang of it.

My personal opinion is, do this one and ignore the rest. The three WP the gate gives you will allow you to comfortably fully upgrade the rocket launcher and the super shotgun as soon as you can later on, but your run will not be critically affected if you decide to not attempt any of the slayer gates. However if you decide that no Ultra Nightmare run is complete without all secret encounters and slayer gates done, who am I to stop you?

For the first part, just run around shooting in front and behind you. Destroy every barrel you see from a safe distance (at least 10 metres), they are still a huge hazard to you. Against all the fodder you face, you’ll be happy you‘ve picked the bigger boom upgrade for the shotgun. Fire the plasma rifle around until you build up three heat wave charges, and keep them for later. You should have three charges of chainsaw, do not use them on fodder. There are enough ammo pickups in the arena.

When you feel you’re in control of the fight, revenants and dread knights will spawn to remind you that you’re not. Try to chainsaw a dread knight, but always jump before doing so, so that you don’t end up walking in one of its area of effects. Dread knights generally don’t dodge sideways much, and are a target of choice for your micro missiles.

When you see a revenant, release the heat wave charges. That will destroy both its shoulder guns, rendering it almost harmless (still, do not hug it). Depending on how confident you feel, you may engage the two remaining ones directly, or run around some more to build up additional heat wave charges. Pick up the remaining fuel canisters before killing the last fodder. Try to have at least 2 charges before leaving.

You'll regain full health and armour at the end of the gate, but you won't regain ammo. Pick up whatever you need before leaving.


02 - 14
Difficulty 4/5

2 arachnotrons, 1 cacodemon, 1 knight, 1 revenant


This is a tough fight that can degenerate quickly, you should take it very seriously. Get the chainsaw fuel canister if you don't have three charges. Kill the arachnotron that spawned next to the teleporter, then go grab the onslaught powerup, and switch to the plasma rifle. The portal will be in your back: from this orientation, the hell knight will arrive from your left, the revenant from behind you, and the cacodemon a few seconds later up in the air, slightly to your right. The cacodemon first spawns when the hell knight is down. Once you’ve killed them, a second arachnotron will appear right where the first one did. If you lose control of the fight because you mess up or because a heavy doesn't behave as expected, you can chainsaw whatever heavy is your most immediate threat.

Be extremely careful with the onslaught powerup, you will lose perception of the damage you take, as the optic feedback (the red seams on the edges of the screen) will be less visible due to the purple mask of the powerup.
03 - Cultist base, part 1
(click to enlarge)


03 - 01
Difficulty 2/5

2 revenants


Use the flame belch on the group of zombies to finish the second challenge directly. Be mindful of the explosive mines, they can destroy the revenant's shoulder guns, but also you.

The completed challenge will award a Suit Point (SP). You should have two, with the one you collected on your last passage aboard the Fortress of Doom. Get the hot swapper suit upgrade.

Don’t forget to get the sentinel power cell.


03 - 02
Difficulty 3/5

1 knight, 3 mancubi


Flame and stickbomb the zombies, then dispatch the knight with the usual shotgun - micro missiles combo. Switch afterwards for the precision bolt.

Open the next door by standing on the platform with the hovering green circles. When you open it, disarm the mancubus with the precision bolt, and dash to the corridor to your right to isolate yourself while you deal with the imps. Wait until it stands in the trap, then trigger it. Quickly move to where the first mancubus spawned because a second one will spawn in the corridor you are currently hiding in. Disarm the third mancubus up on the platform, while you wait behind the crates until the second one walks into the swinging axes trap.

Now look at the third mancubus. If it jumps down from its platform, kill it. If it is not, and is endlessly walking forward on its platform, then it is glitched and will cause you to not be rewarded this arena’s WP progression. You need to walk down behind him, jump on the crates around, and get it to „unblock“ itself by jumping around and trying to bait it to attack you. Once it is on the floor, deal with it from around the corner, for maximun safety. If the encounter on the map is green after the fight ends, you're all good. If it is still red, you might be forever lagging behind one WP on your schedule.

If you ever find yourself trapped in some way by a mancubus, you should have three chainsaw charges to quickly eliminate one of them as a last resort. There will be lots of heavies pressuring you hard in the next encounters, so keep your chainsaw charges for critical situations if you can. Do not hesitate to use it on fodder demons if you need to, because starving yourself of ammo can be just as dangerous as being cornered.


03 - 03
Difficulty 2/5

1 arachnotron


The central platform will lift when you enter, with an arachnotron on it. Take down its turret with a precision bolt once you see it. Watch out for those red mines. Use the collected SP on the thicker skin suit upgrade.


03 - 04
Difficulty 2/5

1 knight, 1 revenant, 3 shield soldiers, 2 lost souls


Engage at will, either openly or by staying up on the ledge you came from, from which you can snipe the revenant's turrets with the precision bolt, and kill the knight without it representing a threat. Going down and baiting the knight into the trap is feasible, but risky. The lost souls spawn only once you get down from the ledge.

Use the shield soldiers that spawn afterwards to replenish your ammo if needed. Otherwise, keep your three chainsaw charges.


03 - 05
Difficulty 4/5

1 cacodemon, 3 mancubi


Get the rocket launcher, but stay where you are. Take down the mancubus on the other side of the arena with four rockets, and prepare the plasma rifle to finish it. Be ready to strafe sideways to dodge incoming attacks.

The second mancubus is located directly to your left. Throw both grenades at it (freeze first) and stagger it with three rockets. Fly away with the nearby jump pad in case of trouble. The third mancubus will be in the middle of the arena, hide from it while you shift your focus towards the cacodemon that will have spawned in the vicinity. Be careful of all the gargoyles prowling around.

For the rune, refer to the Summary - Runes section of the guide above. There’s a megasphere pickup behind the coffins on the platform behind the rune.


03 - 06
Difficulty 4/5

3 shield soldiers, 3 whiplashes


One whiplash will spawn from behind the crates ahead of you. You can preshot it with a rocket. Always shoot your rockets at the apex of your double jump, aiming at the ground. That way, you will take less self-damage from your rockets, and you are guaranteed a hit, even an indirect one.

Make extensive use of the explosives around as they are very effective against the whiplashes and the shielded soldiers, and don’t forget about your ice grenade if you’re starting to lose control of the situation. Do not underestimate the shield soldiers, they deal game-ending damage if you let them overrun you.

The two last fights feel like they were designed to make you thirst for the rocket launcher lock-on burst upgrade. Take the modkit, and dump 6 WP into the quick lock upgrade. You’ll find that mancubi and whiplashes are much easier to deal with.


03 - 07
Difficulty 4/5

1 arachnotron, 1 cacodemon, 1 knight, 2 revenants, 2 mancubi, 9 shield soldiers 1 whiplash


Don’t get cocky in front of the five shield soldiers down the corridor, use them to replenish your resources. Don’t forget about the hidden SP behind the fissured wall to your left.

Walk up to the 3 rockets laying on the ground and a mancubus will appear in front of you. Test your lock-on burst on it. Feed it a fourth rocket to kill it. Throw a grenade in the middle of the platform it was standing on to kill or stagger the fodder demons, flame belch and chainsaw at will. The two shielded soldiers here are your highest priority targets, kill them on sight.

Take care of the cacodemon spawning somewhere (not always from the same place). Once it’s down, you’ll hear a musical cue (a drums transition), at this moment a revenant will land on top of the structure to the left side of the map, an arachnotron in the middle, and two additional shield soldiers. Take care of the revenant, ideally with a lock-on burst. A knight will then spawn directly underneath, feed it the same meal. A whiplash and a revenant will spawn to the right side of the map, and another mancubus at the front. Some additional shield soldiers will be prawling around. Run around with the plasma rifle in hands to deal with shield soldiers, and switch to the rocket launcher to lock-on burst any heavy on your way. Riding jump pads with the micro missiles in hand is a great alternative to rockets for consistent damage. Be careful, play secure and you will come out of here alive.
03 - Cultist base, part 2
(click to enlarge)


03 - 08
Difficulty 1/5

1 cacodemon, 3 lost souls


A cacodemon will spawn from left OR right when you enter. Sentinel battery to your left.

Kill the cultists in the main room, and a megasphere will appear. You can press the button without picking it up, in order to save it for later if you don't need it now.

After taking the elevator down and crossing the light bridge, you’ll have to break a chain and lift a cover over 3 lost souls. Don’t let them take a single hit point from you, you will need them for the next fight.


03 - 09
Difficulty 5/5

1 arachnotron, 2 mancubi, 3 shield soldiers, 1 whiplash


This fight can be a breeze if you know exactly what to do and everything goes right, but the slightest mistake can really ruin your day. Don't enter it without having practiced a bit. First, let's cover the cueballs respawn conditions:
  • They respawn only if both have been taken out
  • They respawn at the beginning of each wave
  • They respawn every 10 seconds during a wave.

Before you jump, prepare a mental compass, pointing north towards the room with the super shotgun.

First wave: Position yourself to shoot the western cueball inside the alcove, to kill all the zombies at once. Kill the second cueball.

Second wave: From where you are, throw a frag grenade to the north or the south where the soldiers spawn, and throw sticky bombs at the other side. Finish whomever you didn't kill with the plasma rifle. Keep cueballs at the ready for the third wave. Note that it may start before you kill the last soldier.

Third wave: The wiplash will land first, on the north side. Position yourself behind the cueball to the west, and shoot it at the whiplash. The arachnotron will spawn south only once the whiplash is dead. Double dash through the middle and position yourself behind the other cueball to take it out. Now more than ever, DO NOT underestimate the gargoyles! Once you've dealt with the two heavy demons, dispatch the gargoyles as fast as you can, because the fourth wave will start very soon.

Fourth wave: Both mancubi arrive at the same time. One will spawn north-northeast, the other one south-southwest. Position yourself again behind the western cueball and take out the southern mancubus out first. Then dash towards the second cueball and kill the second mancubus. You can shoot them the other way around, the western cuebal to the northern mancubus, but as the mancubi don't spawn exactly in the middle, you have a higher chance of missing.

Practice this fight in nightmare difficulty until you don't need this guide section anymore to succeed consistently.

Once back up, pick up the crystal and get the quickdraw belch health upgrade. This will have completed the last challenge of the map.


03 - 10
Difficulty 2/5

1 cacodemon, 1 revenant, 3 shield soldiers


Approach and shoot the cueball to the right at the revenant when it spawns, then dispatch the fodder demons. Don't forget about the cacodemon.


03 - 11
Difficulty 2/5

1 cacodemon, 2 revenants


Don’t get surprised by the cacodemon when taking the left lift down. Don’t forget to grab the SP.
After taking the lift up, you’ll get jumped on by two revenants. Dispatch them carefully, you don't have much room to dodge. Go up once more to grab the sentinel battery.

The fight to get the super shotgun is trivial, you have to actually put effort into it if you want to fail there. Get the fast hands upgrade for the super shotgun.


03 - 12
Difficulty 2/5

1 arachnotron, 1 cacodemon, 1 knight, 1 revenant, 3 lost souls, 1 mancubus, 2 shield soldiers, 1 whiplash


This area wants you to use your newly-acquired super shotgun. Don’t. We’ll cover each cell one after another, clockwise, starting from the one directly in front of you.

1) Imps and gargoyles. One or two sticky bombs are enough.
2) Soldiers. A sticky bomb is enough here too. Keep them for later to replenish ammo.
3) A cueball put there for cell 4. Before opening the cell, destroy the hanging bombs around.
4) A knight and an arachnotron. Freeze them, run back to the cueball, shoot it into them.
5) A whiplash, a revenant and 3 lost souls. Open after you open the 6. Throw in a freeze grenade, then cueball them.
6) Another cueball for #5.
7) A mancubus. Lock-on burst + super shotgun.
8) A cacodemon. You know what to do.

In the next corridor, there are a lot of dumb ways to take damage. Play smart, don’t rush, stock up on ammo.

In the next room, with the big floating artifact in the middle, grab the SP and get the faster dasher suit upgrade.

On your way up, climbing the two columns, you’ll find lots of ammo laying around. If you don’t need it, don’t grab it, they’ll trigger 3 lost souls and 2 imps spawns.
03 - Cultist base, Part 3
(click to enlarge)


03 - 13
Difficulty 3/5

1 mancubus, 2 whiplashes


This encounter is pretty easy to handle with the right upgrades, and a nightmare to deal with otherwise. Still, take it seriously, as things can go wrong fast and you will have trouble escaping to try again. Make sure you have 10 rockets, the quick lock rocket launcher upgrade, and the thicker skin suit upgrade.

Activate the encounter, turn back, and lock-on burst both whiplashes as soon as they spawn. Then turn to the mancubus closing in on you from the right, freeze it and feed it the same medicine. Get your rockets back on the remaining zombies, provided they did not die in the explosions.


03 - 14
Difficulty 3/5

4 tentacles


Before entering the gory room, bait and kill the gargoyles from the doorway. You can then safely enter the room and destroy the tentacles. Don't forget to count them. There's a megasphere in the middle of the room, above a crusher.


03 - 15
Difficulty 2/5

1 cacodemon, 1 revenant, 1 mancubus, 2 shield soldiers


Send the first cueball to the revenant, and the second one to the mancubus. Take your time, aim well.

Get the quick hook super shotgun upgrade. From then on, try to kill as many fodder demons as you can with a grappling hook shot, in order to master the super shotgun.

Look over the edge of the map to the right, you'll see a cave down below with a full health pickup inside.


03 - 16
Difficulty 2/5

1 arachnotron, 1 hell knight, 3 shield soldiers


When you open the door, a hell knight will appear from the platform above. You can bait it into the axes trap, but killing it instantly with a lock-on burst is safer, considering the imps swarming everywhere.

Upon opening the second door, an arachnotron and shield soldiers will appear.


03 - 17
Difficulty 4/5

3 arachnotrons, 2 cacodemons, 3 mancubi, 4 prowlers


This gate isn't that complicated to deal with, but it can still ruin your day if you fail an execution. Its payoff will not radically change the future of your run much, but 3 WP are always nice to have. I don't recommend doing it, enter at your own risk.

First, take out the three mancubi. Flame belch and chainsaw your way through fodder demons, and keep running laps around the arena. Keep an eye out for cacodemons, and take them down as soon as possible. Afterwards, four prowlers will spawn. You can lock-on burst them, but the super shotgun is less wasteful and just as effective. The chrono strike rune is excellent for that purpose. Don't grow overconfident with the super shotgun against the arachnotrons, take them out from a distance.


(click to enlarge)


03 - 18
Difficulty 4/5

2 arachnotrons, 1 hell knight, 3 revenants, 1 mancubus, 5 shield soldiers, 1 whiplash


Don't forget to collect the SP before advancing, watch your map.

You can disarm two revenants with the precision bolt and kill two shield soldiers from where you fall down, without triggering the rest of the demons. Kill shield soldiers as soon as you see them, lock-on burst for the whiplash and the mancubus, standard means for the rest. Don’t grow overconfident, keep a safety distance between you and any dangerous heavy demon around and everything will go well.

There is an Overdrive powerup to the left, behind a wall that you can open by punching a chain link. It can help you a lot in your fight, and you can get raging with the lock-on burst on everything that moves. You must be very careful when collecting it though, because if you are followed into the nook by a heavy demon or even a shield soldier, you will not get out of there alive. The safest way to collect the bonus is to go punch the link to open the door, run a lap across the arena, and come back to collect the powerup. Remember: you will shoot faster, and you will have infinite ammo, but you will not become invincible, so do not use the powerup as an excuse to take unwarranted risks.

Use the remaining fodder demons wisely to stock up on ammo and hit points before advancing.
04 - Doom hunter's fortress
(click to enlarge)


04 - 01
Difficulty 2/5

1 mancubus, 2 shield soldiers


From the get go, you'll be greeted by a mancubus. Kill it the usual way and deal with the rest (you can try to preshot the first rocket if you are familiar with the timing). You should start farming for the super shotgun mastery now, by grappling and killing fodder demons as much as you can. This level is chock full of fodder running around everywhere.

Shield soldiers will greet you at the station, once you climb up the platform.

Don’t forget to check your map to find the hidden SP once you’ve arrived. Get the microwave beam upgrade for the plasma rifle with the modbot.


04 - 02
Difficulty 4/5

1 arachnotron, 1 knight, 1 mancubus, 1 whiplash, 2 pinkies


Take the jump platform, and you’ll land straight on a pinky. Blood punch it if you want, but always freeze it first. Otherwise, just freeze it and give it the double cannon.

There are lots of fodder demons running around, and the bigger demons spawn two by two at most. Take your time, run in circles around the map and don’t take too much risks.

Afterwards, you should have enough WPs to buy the fast reset upgrade for the rocket launcher.

Don’t forget to pick up the battery in the arena.

Later on, get the automap. This will clear the second challenge. Take the permafrost suit upgrade.


04 - 03
Difficulty 2/5

2 cacodemons, 1 knight, 2 revenants, 1 mancubus, 1 pinky, 2 carcasses


When going out, two cacodemons will spawn. Upon reentering, a pinky will charge you.

Next, a carcass and two revenants, in a large room full of zombies. If you haven’t already, now’s the perfect time to finish the third challenge, by killing at least 3 demons with a frag grenade. If you already have it, do not advace too much, so as to not trigger the revenants spawn. Instead, take out the carcass from afar with the precision bolt, and let the fodder demons come to you, while you hook-kill them with the super shotgun for the mastery.

For the rune, refer to the Summary - Runes section of the guide above.

Next up, a corridor with a knight, and a room with a mancubus and a carcass. Start being a bit more precaucious with the rocket launcher while the carcass is around.


(click to enlarge)


04 - 04
Difficulty 2/5

2 arachnotrons, 1 cacodemon, 1 knight, 2 revenants, 1 mancubus, 1 prowler, 1 pinky, 3 carcasses


The first fight is not terribly difficult, and you can get away with most of it by sniping the mancubus and the two revenants from afar. Two carcasses will spawn only once you’ve reached the other side.

Next up, get the secret inside the round tower you have to climb on, this will unlock the first challenge of the level. Don’t forget the secret SP in the hole next to the cheat floppy disk.

Back outside, a cacodemon and an arachnotron will be waiting for you.

On the crane platform, grab the sentinel battery and the sentinel crystal. Get the armour side of the quickdraw belch upgrade.

A pinky is waiting for you behind the door back inside. Afterwards, a knight, an arachnotron and a carcass will spawn.

Afterwards, an isolated prowler will be waiting for you behind a door.


04 - 05
Difficulty 3/5

1 knight, 1 whiplash, 1 prowler


You will be stuck between two doors, in a small corridor. First, two soldiers will spawn, then a knight. A super shotgun shot and a micro missiles volley will do the trick.
Next, a prowler to the left, and a whiplash to the right. Same warning, do not hesitate to shoot your ice grenade.


04 - 06
Difficulty 2/5

2 cacodemons, 2 shield soldiers


DO NOT RUSH. Nothing here will do you much harm if you go very slowly and carefully eliminate one threat after another. Three gargoyles, two shield soldiers and two cacodemons will confront you one after another. Bait the cacodemons around corners, in order to minimise your risks. Note that they may approach you from the side, and if you advance too much, from behind. Note that the cacodemons will often get stuck below the platform: if you do not see them appear, check there, or ignore them.

Grab the SP, and buy the frostbite suit upgrade.

If don't have all your hit points before entering the boss fight, once you unlock fast travel, go back and fetch a full health pickup if you have left some around.

04 - 07
Difficulty 4/5

1 shield soldier, 4 prowlers, 2 carcasses, 3 doom hunters


If you take the doom hunters very seriously, and play very cautiously, you should be able to clear this boss fight consistently. Those three doom hunters have roughly twice the amount of life of the subsequent doom hunters you will encounter throughout the game.

Once you enter the arena, you need to immediately dodge sideways and away from the doom hunter right in front of you.

First, keep an all-time minimum of 5 meters safety distance from it. Second, fire the microwave beam at it until its shield is depleted. Be aware that this mod heavily slows you down, so clear the surroundings of fodder demons before. Third, lock-on burst roughly five times until its sled is destroyed. Fourth, repeat step three until it dies. During its first phase, it will be very aggressive, and will seek contact with you.

During its second phase, it will try to keep its distance from you. It will be less aggressive, not less dangerous. The lock-on burst is again very effective, but both mods of the heavy cannon constitute a great alternative. Note that the precision bolt deals double the damage against its flesh as it does against its mechanical parts, so take your time to aim. Engaging it with the super shotgun is almost always a bad idea.

Two prowlers and a carcass usually spawn when you destroy the sled, but sometimes they may spawn after you kill it, causing them to immediately despawn.

If you have not killed 50 demons with the super shotgun hook, the second wave of the first doom hunter is a very convenient place to finish that mastery grind. Always keep your distance from the doom hunter, go where it is not, and grapple those fodder demons until your hook is on fire.

During the second fight, you'll face two doom hunters. You should always focus on reducing the amount of fodder demons running around. Once you kill either one of them, two prowlers, a carcass and some shield soldiers will spawn. Run a couple of laps around in order to weed them out, then take out the second doom hunter. Take your time while engaging the doom hunters, don't hesitate to interrupt your aggression and go running around if you feel like you're losing control of your position.


Fortress of doom

By now you should have 7 sentinel batteries. Use 4 to get the two crystal, and get both upgrades for the belch armour boost upgrade. Use 2 batteries to get one SP, and get the grappler suit upgrade with it.

If you have not yet finished the super shotgun mastery, you can do so in the ripatorium.
05 - Super gore nest, part 1
(click to enlarge)


05 - 01
Difficulty 4/5

1 cacodemon, 1 knight, 1 revenant, 3 mancubi, 2 whiplashes, 3 prowlers, 1 pinky, 1 carcass


Do not kill too much fodder demons. First, focus on the three mancubi, before triggering the rest of the fight. Afterwards, once you have killed enough fodder, a revenant and a carcass will spawn. Once disposed of, a knight, 3 prowlers and a cacodemon will spawn. 2 whiplashes will spawn after the cacodemon and the knight are dead.

The pinky will appear at end the fight. A challenge requires you to perform 3 different glory kills on pinkies. My personal favourite method (there are many) was to unload your super shotgun into its face 5 or 6 times until it staggers. Pinky wrangling is a dangerous sport, and can degenerate extremely quickly. You should attempt it only when the pinky is isolated. I do not advise doing this challenge, the SP is not worth dying for.

Grab the mod kit, get the arbalest upgrade for the ballista. That’s already the first challenge out of the way. Get the full speed upgrade.


05 - 02
Difficulty 3/5

1 arachnotron, 2 dread knights, 1 pinky


Stick to the upper side of the arena, the bottom is harder to move around, and you need space in order to deal with the heavies there. The first dread knight spawns right in front of you, the second spawns from where you just came from, once the arachnotron is triggered.

Get the SP by breaking the wall and jumping on the platform with the full armour pickup. Mind the pinky, you will need all the hit points you can have for the next fight.


05 – 03
Difficulty 5/5

2 tentacles, 1 shield soldier, 1 prowler, 1 carcass, 1 totem


This arena is brutal. You need to kill some fodder demons until a prowler and a carcass appear. The prowler is extremely dangerous. Once it is dead, the portals will be opened. It is imperative that you destroy the totem as soon as possible.

You can jump around in the room and wrestle with all the roid raged demons around if you feel extra heroic today, or you can rush across the room, reach the high ground and assume a defensive position from there. The shield soldier might stand in your way, you must keep your distance at all costs. Once in defensive position, kill the demons from up there or wait for them to come up to you. When the prowler spawns, have your super shotgun ready to immobilise it with the meat hook.

Once you kill the prowler, the teleporters will open, and a prowler and a carcass will perpetually respawn. You want to enter the one directly to your right when entering the arena, which is the one on your far left as seen from the safe spot discussed above. As long as the totem stands, the three other teleporters will send you to an early grave.

Two tentacles will ambush you right in front of the SP.


05 - 04
Difficulty 3/5

2 mancubi


Get your rocket launcher ready, and lock-on burst the mancubus on the left. Lock onto the one to the right (you’ll need to move a little, otherwise you’ll lock onto the zombie). And there you go.

Get the rune right after the yellow door. Again, refer to the „Runes“ section of this guide for advice.


(click to enlarge)


05 - 05
Difficulty 3/5

2 arachnotrons, 2 cacodemons, 2 revenants, 1 dread knight, 2 mancubi, 1 carcass


There will first be two arachnotrons and two mancubi. Once they die, the rest will spawn. Get the onslaught powerup either at the beginning, or once the dread knight spawns right in front of it.

You may use the onslaught powerup, you will not particularly need it later when you come back to this arena. Don’t hesitate to pick up the full health powerup in the middle of the arena, but if you intend on doing the slayer gate later, you might want to save it for then. The slayer gate is out of reach for now.

Kill all the fodder demons before slotting the key in the lock, as they can attack you during the cutscene.


05 - 06
Difficulty 3/5

2 mancubi, 1 shield soldier, 2 prowlers, 4 carcasses, 1 spectre


After the two zombies, a spectre will come from the right and a mancubus from the left. Spectres are nowhere near as heavily armoured at the front as the pinkies, and a charged ballista shot to the head usually does the trick.

A carcass will be guarding the crystal. Pick the napalm belch health upgrade.

In the generator room, you’ll get jumped on by a carcass, followed by two prowlers once you pass the electrified door. Play safe and everything will be fine.

To the right of the chaingun, a mancubus will jump up. Two hidden carcasses will spawn energy barriers in front of it, so engage carefully. Throwing an ice grenade at the mancubus will have the additional effect of dissipating the energy barriers.

Once in the radioactive waste, behind the rotating pillar with the fire cannons, there's a canal that leads to a sentinel battery.
05 - Super gore nest, part 2
(click to enlarge)


05 - 07
Difficulty 3/5

1 mancubus, 1 carcass


A mancubus will spawn behind you as you activate the nest. Freeze it and deal the usual combo, or spend 100 plasma to microwave it to death. Then, find the carcass down below, hook it with the super shotgun and kill it. Deal with the zombies with sticky bombs and grenades. And that’s your second challenge of the map unlocked. Get the ice drops suit upgrade.


05 - 08
Difficulty 4/5

2 dread knights, 3 shield soldiers, 1 whiplash, 1 pinky, 2 carcasses


On your way back up, a pinky will come say hello. It is alone, so you may take your time and try to glorykill it if you want to do the challenge. Don't forget to pick up the SP in the canal to your left.

Pick up the chaingun, and you’ll drop down to a duel with a dread knight. Freeze it and chaingun it to death.

After activating the first half of the generator, a whiplash and two shielded soldiers will confront you. Freeze them and dispose of them safely.

You’ll stand in front of a +25 armour above an electrified ground. DO NOT get it yet. First, shoot a projectile into the room ahead, to trigger the ambush set by a shielded soldier.

After dealing with the soldiers and the zombies, two carcasses will appear up ahead, and a dread knight will spawn right before the electrified ground. Run back to the previous room to freeze-chaingun the dread knight in peace, and deal with the carcasses later. Don’t forget to pick the modkit afterwards, and install the turret mode for the chaingun. Get both upgrades if you can, otherwise prioritise the fast gunner upgrade.


(click to enlarge)


05 - 09
Difficulty 3/5

1 cacodemon, 1 revenant, 1 totem


Once you step into the portal, be ready to run. You need to traverse the arena in order to find and destroy the totem, dodging everything on your path. A revenant will be on your way, freeze it. Once it’s done, you’ve got no reason to stay below, and you can continue on ahead along the monkey bars. Be very mindful of the cacodemon however, as it may attempt to block your path. Once up there, wait for the demons to come up at you, and take them out one by one. Once it's clear, pick up the SP.


05 - 10
Difficulty 3/5

5 tentacles, 1 revenant, 1 dread knight, 1 mancubus, 1 shield soldier, 1 whiplash, 1 pinky, 1 spectre


After climbing on the side of a building you'll find a sentinel battery. Shortly after, you’ll encounter some fodder and a pinky that you can try to glorykill. Freeze-chaingun the dread knight that follows.

Don't forget the SP in the goo pit (the one with the climbing walls).

Right before the blue door, a whiplash and a shield soldier will appear, freeze them and kill them. Run back to the goo pit if you're struggling.

Down the corridor with the caustic goo, there will be 5 tentacles, which are easy to spot. You need to advance quickly, your hazmat suit wears off quickly. As always, count the tentacles. Engage the mancubus carefully.

A revenant will spawn on the bridge outside.

A spectre will appear in a tight corridor after the bridge. Grab the sentinel battery next ot the slayer gate key.


05 - 11
Difficulty 2/5

3 arachnotrons


Drop down from the slayer gate key, and deal with the arachnotrons. Attempting to snipe their turrets from where you are is a bad idea, because the bombs they will lob at you are much more dangerous in such a room.


05 - 12
Difficulty 4/5

2 hell knights, 1 dread knight, 2 prowlers, 2 pinkies, 5 carcasses


You’ll have a lot of soldiers to deal with, and the 5 carcasses at the beginning have the potential to throw you off your flow and make you do stupid mistakes. Once they’re dealt with, the rest of the heavy demons will spawn. Blood punch the pinkies if you can, but don't get too cocky. Keep running around if you’re low on health, and you’l inevitably find a soldier to harvest from.


05 - 13
Difficulty 2/5

3 tentacles, 3 mancubi, 1 carcass


90 seconds is more than enough to make it to the exit. 3 tentacles will wait for you in line in a narrow corridor you have to dash through. You can ignore them at your own risk, or deal with them carefully.

The carcass right afterwards will attempt to block the path, just have your plasma rifle at the ready. Harvest the fodder behind it for armour and health. The three mancubi on your way will shoot at you, but their shots deal no damage. Only their flamethrower are actually a threat to you.

Fortress of Doom

You should have four batteries on you. Use them to get two SP. Get the hit n run upgrade.
06 - ARC complex part 1
(click to enlarge)

06 - 01
Difficulty 4/5

1 cacodemon, 2 hell knights, 2 revenants, 3 mancubi, 1 shield soldier, 3 whiplashes, 3 prowlers, 1 pinky, 2 carcasses


If you wish to farm the chaingun turret mode mastery, this level is perfect for it. Fodder demons will consistently be present in groups of five or more, just be sure to throw an ice grenade before and to have eliminated bigger threats around. Practice the first section of this level in Nightmare first, in order to know when heavy demons spawn on you.

First heavy to greet you will be a mancubus, followed by a whiplash. Then a hell knight, then a pinky, then a prowler. Then a revenant, then another hell knight, then a mancubus (be careful not to be surprised by it, it will jump from across a gap after the store). Focus the revenant's turrets for the challenge.

Clear the fodder demon from above, and two whiplashes will arrive as soon as you descend. You can already lock onto them through the demonic barrier.

A carcass and a shield soldier will come afterwards. You can use this room to farm the second level challenge, requiring you to kill 6 demons with exploding energy shields. You may succeed easily, or not at all, depending on the energy barrier's location, so beware.

You will then jump in a hole, then go down a flight of stairs. In the following corridor, do not advance too fast or you will get jumped on by a mancubus, a prowler and a carcass. Advance carefully. (For unknown reasons, the prowler and the carcass may sometimes not spawn. Try backtracking, in order to trigger the spawn). Don’t forget to collect the SP.

Right where the mancubus spawned, look to your right. There's a hole in the wall, through which you can take out a revenant and a mancubus from the next arena.

In this section, you should have had 5-6 good occasions to advance the chaingun mastery.

Once you have destroyed four revenant turrets, and completed the third challenge of the level, get the faster ice cooldown upgrade.


06 - 02
Difficulty 4/5

2 revenants, 1 dread knight, 2 mancubi, 1 carcass


Whatever you do, don't step into the purple goo! First, stay inside the building you are in, and try to lure in whatever demon you can. You should be able to get one revenant or two, and ideally the mancubus.

Once you feel like going out, turn 180° to the right and grab the monkey bar. Jump onto the land patch, then on the bus to the left, and climb up until you are no longer surrounded by purple goo. Once there, you can wait for the demons to come at you.

Get two chainsaw charges with the canister.


06 - 03
Difficulty 3/5

2 arachnotrons, 1 hell knight, 1 revenant, 1 prowler, 1 pinky, 1 cyber mancubus


The pinky will come out to greet you. Once inside, don't advance too much, and demons may keep infighting despite your presence. Pick up the canister and keep it. Throw sticky bombs at all the fodder demons, and kill the arachnotron and the revenant.

At the top of the stairs, you’ll trigger a hell knight. Take it out, then go up the stairs once again to trigger the cyber mancubus. You may either engage it as usual (see dedicated section of the guide), or chainsaw it.

Afterwards, a small skirmish with a prowler and an arachnotron should not give you any problem.

Grab the battery upstairs.


06 - 04
Difficulty 4/5

2 mancubi, 2 whiplashes, 1 doom hunter, 2 tyrants, 1 baron


You need to play smart and remain patient. The tyrants spawn first, but will be taken out last. They can be easily outrun on this intricate map. Locate the whiplashes and the mancubi, and take them out with the good old rocket launcher.

The worst thing that could happen to you on this map is to bump head first into a mancubus or a tyrant, which can end badly. Always keep a panic ice grenade at the ready.

A baron will spawn when you kill at least one tyrant, and can be frozen and chaingunned. A doom hunter will spawn last.


(click to enlarge)


06 - 05
Difficulty 3/5

2 arachnotrons, 2 cacodemons, 1 hell knight, 4 revenants, 1 dread knight, 2 mancubi, 2 prowlers, 1 carcass


This segment is another great opportunity to farm the chaingun mastery. Be on the lookout for groups of five or more.

After switching building with the monkey bar, you’ll face a carcass and a revenant. Ice grenade them, execute them and carry on.

Watch your map, don’t miss the hidden crystal.

A few encounters down the road, you’ll have to punch a box to move it. A cacodemon will spawn. Don’t let it corner you.

Later, a knight will appear just in front of you in a tight corridor. Collect the SP.

Do not climb up the plane until you have an ice grenade at the ready. A mancubus will spawn ahead and give you little reaction time.

Once out of the plane, a dangerous encounter will start. Do not overextend, stay defensive and wait for the demons to come at you. Take out the mancubus, then the carcass, then the dread knight, then the arachnotron, then the prowlers from the comfort of your plane. Keep an ice grenade at the ready just in case you lose control.

Sometimes, some waves may not trigger, or the combat may never end despite no demon being there. Some of them may be infighting up the stairs, past the blocked passage, throw some explosives their way. If the dread knight, the arachnotron and the prowlers have not spawned yet, back off from their insertion point (at the bottom of the stairs) each time you send a grenade, so as to not find yourself face to face with them.

Up the stairs, you’ll find yourself swarmed with fodder demons, and the occasional revenants and knight. Don’t go too fast, be sure to clean well around you before advancing.


06 - 06
Difficulty 2/5

1 arachnotron, 1 cacodemon, 1 pain elemental


If you have followed my guide until then, you'll be able to fully upgrade the sticky bombs and the arbalest by the end of the level. You can come back here later, and use the only encounter in the game that spawns an arachnotron, to farm the shotgun mastery. You can farm the arbalest mastery with the cacodemon too. Be careful with your health and ammo though, there's no endless fodder demon spawn here.

Ballista for the cacodemon, ballista + rocket launcher for the pain elemental, rocket launcher (or sticky bomb) for the arachnotron. Freeze whatever comes too close.


06 - 07
Difficulty 2/5

1 hell knight, 1 mancubus, 1 carcass


Right before switching to the next building, a hell knight will jump over from it. After you jump, a carcass will appear from the office to your left, and a cueball and a mancubus from the end of the corridor. Do not walk too fast, in order to not spawn the mancubus before the cueball is in your line of sight. Be careful not to lose too much hit points there, you will need to be full for the next fight. Exploit the fodder demons accordingly.

Pick the rune to advance the level's challenge. Take the seek and destroy rune, for the upcoming fight.
06 - ARC complex, part 2
06 - 08
Difficulty 5/5

1 arachnotron, 5 mancubi, 4 whilpashes, 3 prowlers, 3 pinkies, 1 cyber mancubus


This is undoubtedly the hardest fight of the level, with lots of fodder and heavy demons at the same time, harassing you from everywhere. Enter with the rocket launcher in hands, and dispose of the two mancubi. An arachnotron and a pinky will spawn in their stead from the left and right window, on each side of the path ahead.

If you approach the left wall of the kitchen, an additional mancubus will spawn. If you approach by the right side (the reception, where the codex pickup is), an additional pinky will spawn. You don’t need them in your life right now.

The portal from the kitchen to the wine cellar is a great way to get yourself out of trouble, but it is an equally great way to land into some more. You may escape some incoming fire, but you never know what's on the other side, and you may find yourself right in front of a mancubus ready to scorch you alive. Always be very careful with it.

Two of the whiplashes enter from the right window. When you start seeing whiplashes, go grab the berzerk powerup below in the middle of the arena. You may want to remove the chrono strike rune for the duration of the power up (or whatever rune you want, depending on which one you took), and replace it by seek and destroy. You will have much less trouble finding targets to melee kill. Once it's done, start pounding. There is no wrong target: the timer stops during a glory kill, and each kill grants half a second back. If you see a heavy surrounded by fodder, destroy them all.

Ideally, you want to take out all four whiplashes, the cyber mancubus that spawns in the middle later, and one or two prowlers while berzerk.

Once it’s done, pat yourself on the back and take a breather. Get the stronger explosions arbalest upgrade. Put back the chrono strike rune back (or whatever rune you used before).


06 - 09
Difficulty 3/5

2 arachnotrons, 1 cacodemon, 1 revenant, 1 shield soldier


The following encounter is really nothing impressive compared to the last one. You should have no problem dealing with it, but do keep your head cool and play defensively. Lots of demons spawn at once, and you might find yourself quickly overwhelmed.


(click to enlarge)


06 - 10
Difficulty 2/5

2 pinkies


You’ll get two pinkies, and a lot of opportunities to farm for the chaingun mastery. At this point, you should have two sentinel batteries. You can get all the SP from the fortress of doom with them, and don't need to collect anymore of them. If you want all the weapons mods, you need 4 additional ones, including the one up ahead. Don't forget to grab the SP, and get the scatter bomb suit upgrade (you may be a bit late on the upgrades advancement, depending on how many challenges you have finished). Later, grab the rune, it will complete the first challenge of the level.


06 - 11
Difficulty 4/5

2 arachnotrons, 2 hell knights, 1 revenant, 1 mancubus, 3 whiplashes, 2 pinkies, 1 carcass, 1 cyber mancubus


This is another intense fight. The arena allows you to walk around in circles, waiting for something in your line of sight to shoot. Don’t rush, and be cautious of the gargoyles. It is not advised to play with the overdrive powerup, as the bonus is way too short to be of any use, and thus it encourages you to play recklessly. Leave it be. There's enough fuel in the arena to chainsaw a heavy, just in case.

First will be a mancubus and a revenant. The second wave consists of a hell knight, a carcass and

A cyber mancubus will spring from the ground, once you approach it (to the left of where you first entered the arena) to open the way forward. Deal with it the usual way. If you have no blood punch, you can also pick the overdrive powerup, trigger the spawn and kill it with the microwave beam.
06 - ARC complex, part 3
06 - 12
Difficulty 2/5

1 cacodemon, 2 tentacles, 2 hell knights


Easy segment if you know what to expect, a potential death trap if you don’t. Take out the tentacles carefully, and count them. There is one between the two fireball cannons, and one just before the drop. A hell knight will spawn between the two.

Drop down, and you will find another hell knight along with lots of zombies. You may farm the chaingun mastery here if you haven't completed it already, but the knight is an absolute priority, as there is no way for you to dodge its attacks. Grab the battery on the way.

In the next elevator, you may encounter a bug that prevents you from clicking left and right at the same time (e.g. for sticky bombs). Get out of the elevator to start shooting properly.

Later, you’ll be greeted by a cacodemon in a corridor. Kill it with a charged arbalest bolt, and go to the control room just next to its spawning location, and press the yellow touchpad. It will open a door to the other end of the corridor.


06 - 13
Difficulty 2/5

1 mancubus, 3 prowlers


Take care of the prowlers directly in your vicinity. When you see the mancubus, throw an ice grenade and deal with it. If you can’t find the last prowler, go quickly check upstairs. It may have teleported there.


06 - 14
Difficulty 2/5

2 hell knights, 1 dread knight


After you shot the second turret, you’ll pass through an electrified corridor. You’ll get stuck in it with two hell knights spawning in front of you, one after another. Be ready for them and everything will be fine.

Behind the next door, a dread knight will spawn. DO NOT HUG THE DOOR! The spawn trigger is just in front of the door. If you keep your distance from the door, it will spawn in front of you. But if you hug the door while waiting for it to unlock, the dread knight will have already spawned and will be waiting to tear off half of your hit points.


(click to enlarge)


06 - 15
Difficulty 3/5

1 arachnotron 2 mancubi, 3 whiplashes, 1 pinky, 2 carcasses


In the parking lot, if you're lucky, you’ll see a cueball and a mancubus aligned with another. Do what you want with it (wink) but be aware that an arachnotron awaits in ambush, to the left of the cueball, and will trigger if you go too far. You may either kill the mancubus with the cueball, or kill it from afar and send the cueball to the arachnotron.

Take out the carcass, the whiplash, and the rest. There’s a full health boost in case you need it. The lower level has a mancubus, two whiplashes, another carcass and another cueball. Engage directly, explode the cueball or let them come to you upstairs. Get the SP.


06 - 16
Difficulty 2/5

1 revenant, 2 mancubi, 1 carcass


Right behind the revenant, there will be an onslaught powerup (x4 damage). Either engage from afar, or rush to the powerup and engage at your discretion. The safer approach is advised, now is not the time to die of carelessness. Stand back, and clean the bridge with the plasma rifle or the chaingun. Alternatively, you might just pick the powerup and run forward. The carcass will be the only one in your way.

Harvest the remaining fodder demons to stock up on hit points and ammo.


06 - 17
Difficulty 3/5

1 Marauder


Hopefully you are not entering ultra-nightmare without having practiced a couple of times against the marauder in nightmare before. You most likely know the basics, but just in case, here’s a few protips.

The dog has top priority. Don’t ignore it. The marauder usually only summons it if he absorbs damage with his shield.

Standard combo to deal the most amount of damage per stagger is: super shotgun – ballista – super shotgun. Four to five iterations of this combo will be enough to kill or stagger a marauder.

Usually if you see a marauder running towards you, it means he wants to melee you, and that is your cue to prepare your combo. Be aware though that sometimes, he may decide to brain you and to lift his shield and shotgun at the last second, which can be very disconcerting and panic-inducing. At all times, know in which direction you can safely double dash away.

Fortress of Doom
Open the last SP door with two batteries, and collect it.
07 - Mars core, part 1
(click to enlarge)


07 - 01
Difficulty 2/5

2 prowlers, 1 pinky, 1 baron


Very straightforward segment. You'll be jumped on by a prowler right at the start. When you take the teleporter, you'll be facing a baron. Ice grenade and chaingun should do the trick.


07 - 02
Difficulty 3/5

1 arachnotron, 1 cacodemon, 1 carcass, 1 cyber mancubus


Awesome music starts, awesome level starts, „Warning, the Slayer has entered the facility“. Everything is made to make you feel like an absolute badass. But not you, you’re in an Ultra Nightmare run, in a fragile body, and the slightest slip up means game over. Keep your head on your shoulders, don’t go overly wild.

Focus the arachnotron's turret that will spawn on the high ground in front of you, and kill it along with the carcass. A cacodemon will then spawn, and a cyber mancubus afterwards.


07 - 03
Difficulty 3/5

1 dread knight, 2 shield soldiers, 1 doom hunter, 1 pain elemental


Another traightforward arena. The pain elemental will spawn first, followed by the knight and the doom hunter. Be mindful of the shielded soldiers.


07 - 04
Difficulty 2/5

1 mancubus, 1 prowler


A very nasty, potentially game-ending ambush, that is disarmed by knowing about it. You’ll run into a mancubus, behind you will have spawned a prowler (it spawns only if you went far enough towards the mancubus). You can start with whichever you want first, but be sure to do it swiftly.

Ideally, deal with the prowler first, so you can take your time afterwards to snipe the mancubus' weapons, in order to advance the challenge that requires you to shoot three of them. Do not delay that challenge if you can, there will only be 3 mancubi on this level.


07 - 05
Difficulty 3/5

6 cacodemons


You can try out your new shiny toy. Alternatively, you can use the cacodemons to advance your mastery of the arbalest, and BFG the rest of the fodder demons to get 9 kills instead of 15, that count towards the advancement of the challenge that requires 40. You'll instantly get your ammo back.

This guide will tell you where you can find BFG ammo. It will tell you when it is recommended to shoot the BFG, in function of the difficulty of the current segment, and the ammo you will find later on.


(click to enlarge)


07 - 06
Difficulty 4/5

2 cacodemons, 1 hell knight, 1 dread knight, 1 mancubus, 3 shield soldiers, 1 whiplash, 3 carcasses, 1 totem


Kill the carcass guarding the door. Before you jump down, locate the totem, against the wall to your left, under a bridge. You can directly jump on it and destroy it. A carcass will spawn right in front of you, hook it and eliminate it.

The following fight can be tough, you need to play safe. Fire the BFG if you feel like it. Two cacodemons, one after another, will spawn after you kill the hell knight. The rest will spawn after you kill the first one.

You should be able to finish the second challenge of the level by sniping the mancubus‘ weapons. With the gained SP, get the frag stock up suit upgrade.

Get the SP next to the secret encounter.


07 - 07
Difficulty 2/5

1 revenant, 1 spectre


Shoot a charged arbalest shot at the revenant, finish with the super shotgun, then super shotgun the spectre’s face off, left of the revenant. The rest should be easy.


(click to enlarge)


07 - 08
Difficulty 2/5

10 tentacles, 1 shield soldier


Once you arrive, focus the shield soldier with the microwave beam, to kill all the fodder demons around him.

Below, count the tentacles and everything will be fine. Grab the SP up the ledge.


07 - 09
Difficulty 3/5

1 cacodemon, 1 whiplash, 1 prowler


Have the rocket launcher ready. Take out the whiplash when it spawns. Get the cacodemon with a charged arbalest shot, and kill the prowler with the super shotgun. With the collected WP, get the increased range upgrade for the microwave beam.
07 - Mars core, part 2
(click to enlarge)


07 - 10
Difficulty 4/5

1 arachnotron, 2 cacodemons, 1 shield soldier, 1 carcass, 2 barons


Kill the two cacodemons with an arbalest shot, but mind the terrain.

The next arena is treacherous, you can easily lose control of the situation and start panicking in front of the two barons. Shoot your BFG away once the arachnotron and the carcass have spawned (you'll get roughly 10 kills). This will leave only the two barons, whom will barely have been scraped by the shot. You’ll get your BFG ammo back immediately.


07 - 11
Difficulty 2/5

1 arachnotron, 2 cacodemons, 1 dread knight, 1 prowler, 1 baron, 1 pain elemental


A pain elemental, followed by a prowler, will spawn in the hangar.

Snipe the two cacodemons waiting for you at the exit with a charged arbalest shot.

A baron will spawn on the next island you get to. Try shooting into the huge red barrels around, one explosion can kill the it.

Go get the SP. From where you stand, you will see an arachnotron with ten zombies under you, and a pain elemental far away. Shoot your BFG in the general direction of the pain elemental in order to net 18 to 24 kills. Collect the BFG ammo on the platform above the arachnotron. Get the faster frag cooldown suit upgrade.

A dread knight will spawn on the next island. The pain elemental will perhaps not have died from the previous BFG shot. Shoot once more upwards, to get an additional 9-12 kills, if you need them for the challenge. Alternatively, the big red barrels in the vicinity can one shoot them.

Get the health for blood armour bonus from the crystal.


(click to enlarge)


07 - 12
Difficulty 3/5

9 tentacles, 1 hell knight, 1 revenant, 3 shield soldiers


Kill the two tentacles directly at the entrance, to give yourself some navigating space. Lock-on burst the knight, power ballista the revenant, mow down the rest. Don't forget about the empyrrean key for the challenge (hint: yellow touchpad).


07 - 13
Difficulty 5/5

4 hell knights, 5 prowlers, 2 barons, 1 marauder


A pretty difficult gate that is simply unadvisable at this stage of the game.

The marauder spawns at the beginning. Run away from it while you kill the prowlers one after the other. You’ll notice that fodder demons are slowly replaced by maykr drones. A good headshot is as much worth as a chainsawed standard fodder (they take 3 fuel to chainsaw), but they are slippery and overall more dangerous than your average soldier.

You’ll then have to deal with the marauder. He is dangerous, due to the exiguity of the arena and the drones lurking around. If you manage to kill it, hell knights and barons will take its place. They are much less dangerous, but still not to be taken lightly.


(click to enlarge)


07 - 14
Difficulty 4/5

1 arachnotron, 1 hell knight, 1 dread knight, 1 mancubus, 6 prowlers, 1 doom hunter, 1 baron


Get the SP, and get the combustion concussion suit upgrade.

It’s a straightforward battle, but a long one, and one filled with fodder demons. When you crack the wall open, be careful not to get directly sniped by the mancubus in the middle. Take it down, then the 3 prowlers, then the baron. Next will come the two knights, an arachnotron and some more prowlers. At the end a doom hunter and another prowler. Don’t be afraid to panic BFG.


07 - 15
Difficulty 2/5

5 cacodemons, 1 prowler


If you're a couple of kills short to finish the 40 BFG kills challenge, you can finish it here. Or you can use the cacodemons to advance your arbalest mastery, and then shoot the BFG, which will grant you 9 kills.

The BFG is not crucial for success in level 08, and you will be awarded full ammo before level 09 begins, so do not be afraid to use it there.
08 - Sentinel Prime
Difficulty 5/5

It’s time for that guy. His first phase is easy to get the hang of, but during his second wave, he has a tendency to change his behaviour from one playthrough to the other, and his inconsistency, combined with his split-second attacks and his insane damage output, will have you constantly on your toes. He’s the gatekeeper to the late game, and now it’s your turn to beat him in Ultra Nightmare.

Now don’t go trying your luck without having trained extensively before. You should be able to beat him consistently in Nightmare, meaning at least 90% of the time, hopefully with more than just 10 HP remaining. That boss has a variable behaviour, but fixed patterns, and you’ve got to commit them, along with their countermeasures, to muscle memory. The good thing with him, is that you can train in nightmare, and then directly hop back in your Ultra Nightmare run to fight him once again.

First phase:
  • During his first phase, move clockwise around him, so as to always see his entire body when he drops his defense.

  • Look at the shield. Learn its tells, and you will be able to predict its attacks. Whatever the attack, make sure you dodge them at the last moment:
    • When the shield's eyes blink: it will throw its mace straight towards you. He resets fast, so you just have time for an standard ballista or super shotgun shot. When you hear the blink, jump and dash.
    • When the shield "talks": it will slam his mace on you. This has two variants, one where he jumps (easy to dodge), one where he doesn't (harder to dodge). That's when you want to unload your rockets. When you hear the blink, double jump and double dash.
    • When the gladiator bashes its shield twice with its mace: the shield will project itself forward with a red beam attack. Easy to dodge with a dash once he hits the shield the second time.

  • A prowler (at 75% health), and later a hell knight (at 50% health), will be spawned. The rest will be standard fodder.

  • Take your time, clean the fodder if there’s too much around, but don't lose him from your sight. You want to end the fight with as much health and armour as possible.

  • Be careful what you target with your lock-on burst. You may inavertedly target a fodder in front of, or behind the gladiator.

  • A very effective method, but a VERY inconsistent one (it can work perfectly in one playthrough and not at all in the next one), is to wait five meters in front of him, and shoot him with the super shotgun as soon as he attacks. It MAY (again, very inconsistent) directly stagger him and leave him open for reprisal. You can use this method again and again, so long as it works. What determines whether he will be "receptive" to this method or not is, as far as I have been able to observe, pure randomness.

Second phase:
  • NEVER EVER even for a second lose him from your sight. Whenever you chainsaw or glorykill something, do so while looking in his direction. Every second during which he attacksm that you do not see coming, is an additional chance you’ll get hit hard, which will likely lead to panic and bad decisions.

  • His standard attacks are very hard to dodge on the ground, but are mostly harmless if you're in the air. Practice hard. When you see him throw his maces around, jump and dodge sideways. Double jump a little later, so as to maximise your air time. Land after his second mace throw to replenish your dash, then use it sideways twice when he throws his third attack.

  • When he lifts his shield up, you may or may not hear the typical audio cue signalling an imminent attack. If you do not hear it, he will just wander around, seemingly aimlessly, for a couple of seconds. If you do hear the "blink", it means one of two things:
    • If he is closing in aggressively on you: he is preparing a close melee attack, which you want to run away from at all costs. Do not jump, stay on the ground and dash away as fast as you can until he drops his shield and resumes his standard attacks. Alternatively, you can prepare for his attack by readying your energy shield chaingun, which will block all his attacks.
    • If he is walking towards the middle of the arena: once he reaches the centre, he will erect two walls around you, and harass you with sinusoidal energy beams. Pick your chaingun and shoot, while trying your best to dodge the waves (they are harder to dodge than they appear). Once the energy walls dim and the waves stop coming, prepare yourself to double dash sideways at a millisecond’s notice. Again, practice this extensively in nightmare.

  • Your rocket launcher is once again your best friend. Lock-on burst him as much as possible, while refraining from attacking at the end of his attack sequences, shortly before he goes defensive again. The ballista-super shotgun quick-swap is a great alternative if you run out of rockets.

  • The more you practice, the more manageable he will become. However, another factor will always escape your grasp if you do not control it as soon as possible: the prowlers he spawns. Up to two of them may be spawned during this phase. They can sometimes teleport behind you and cut you down, either killing you or making you panic, which will kill you anyway. They can also teleport right in front of you, and attempt to stop your rockets with their faces. Whenever a prowler appears, kill it as soon as possible. You may whip out the BFG and shoot at the wall behind the gladiator in order to kill everything he spawns, deal some damage to him (but not much), and not get the damage reflected by his defensive stance.

  • If he approaches you, run like hell and try your best to dodge his incoming attacks. If you’re lucky and a fodder happens to loiter about, you can chainsaw it. Remember, dashing only once and waiting for the cooldown allows you to move faster than double-dashing, but it takes some practice.

  • If you find yourself out of health, flame belch and fuel, do not forget the blood punch, which does a great job at refilling your health. In fact, your systematic combo „flame belch + chainsaw“ should be extended to „flame belch + chainsaw + blood punch“ just for this fight. Just in case.


Fortress of doom
Difficulty 2/5
Don’t get caught your pants down. Your crib is under attack. Be sure to get a blood punch charge for the next level on all that fodder.
09 - Taras Nabad, part 1
(click to enlarge)


09 - 01
Difficulty 4/5

1 cacodemon, 1 hell knight, 1 cyber mancubus, 1 marauder


Feed the knight rockets, and freezepunch the cyber mancubus. If you don’t have blood punch available, chaingun it from a distance.

After opening the door, dodge the marauder's attacks until you can see and shoot the cacodemon (it may spawn left or right). Afterwards, the marauder is yours.

Inside the city, after climbing up the wall and reaching a bridge, a mancubus will show itself at the door. Freeze it, you don’t have enough room to dodge effectively.

Grab the codex entry, you will need 6 for a challenge. Check your map regularly, and just use the fast travel at the end of the level if you're missing some.


09 - 02
Difficulty 4/5

1 hell knight, 1 prowler, 1 archvile


This fight is relatively easy if you know what to do, but it still can degenerate. If you don't know how to deal with an archvile, this arena will most likely be your grave.

The most important thing to do is to silence the archvile. Go check the entry in the section Preparations - Killing super heavies. Done? Alright, here's what to do.

Traverse the arena as fast as possible, and climb the stairs. Up there, behind the statue, is the most likely (random) spawn location of the hell knight, kill it quickly with a lock-on burst. If it's a prowler, super shotgun it.

From up there, you will soon see the archvile spawning from three (again, random) locations. Either to your left or to your right (across the gap, under an arch), or straight ahead to the other side of the arena, at the same height. If it spawns close to you, engage as advised in the dedicated section of the guide stated above.

If it spawns on the other side of the arena, rush to it, but not before having shot two rockets its way, one to destroy its shield and one to stun it. Take your time, do not miss, or it will cost you. Once you reach it, engage as usual.

If you did not kill the prowler and/or the knight, be careful about your surroundings, dodge accordingly, but remember that the archvile is the absolute priority.


09 - 03
Difficulty 3/5

1 cacodemon, 1 doom hunter, 1 pain elemental


At this point in the game, your main weapons are already maxed up, you do not desperately need another WP. It is unwise to trigger this secret encounter, as it has the potential to degenerate, and you may not be able to complete it. But if you must, here's how it will unfold.

The pain elemental's presence means that you will not necessarily be better off hiding in the building. Besides, all the time you hide is also some time you do not shoot at things. First, feed the cacodemon a charged arbalest shot, then the same to the pain elemental, followed by a triple rocket salvo. An ice grenade can help with that. Then deal with the doom hunter the regular way, except a bit faster than usual. If you're out of rockets, the chaingun is a viable but dangerous option against the first phase, and a very effective one against the second. Alternatively, you can chainsaw the fodder demon around to get your ammo back.

You may want to try to glorykill the pain elemental. You need to do this three times for a challenge. You will really put yourself in more danger than it's worth, so I would advise not to attempt this challenge at all. There will be 4 mandatory pain elementals, plus one from this encounter, plus two in the slayer gate. If you really want to do the challenge, you can also kill the cacodemon, try to glorykill the pain elemental, hide from the doom hunter until the timer runs out, then try again until you get three different glory kills. Three rockets followed by an uncharged ballista is a good, moderately reliable way to stagger it without too much danger.


09 - 04
Difficulty 2/5

1 prowler, 1 pinky


After the toxic bath, a pinky and a prowler will show up. Get yourself stocked up on everything, make sure your blood punch is ready.


(click to enlarge)


09 - 05
Difficulty 5/5

1 cacodemon, 1 dread knight, 1 prowler, 1 doom hunter, 2 cyber mancubi, 1 pain elemental


That’s another very hard fight, in a relatively small arena with little cover and unrelenting pressurers, like the dread knight and the pain elemental. Here's a strategy that requires a tight execution, and that you will have to practice before jumping into Ultra Nightmare. The beginning sequence is easy to mess up, so remain focused.

First, you want to take out the cyber mancubus in front of you. Jump ahead, dash twice and reel in with the meat hook, while you throw an ice grenade. Blood punch it, shoot your super shotgun once, and it will fall. The second cyber mancubus will spawn where you entered in the arena, upstairs. Don't stay static for too long, the dread knight will be burning your

If you want to play as safely as possible and want to fire the BFG, now is the time. Just when the pain elemental spawns, shooting into the air will only leave the doom hunter to deal with.

From your vantage point, the pain elemental will spawn up in the air, to the right of the entrance. You can't lock-on burst it, it is too far away and 90% of the time you will target the lost souls it throws at you. Instead, my favourite method is to do something you'll probably never do again: quick-swap between the ballista and the scoped heavy cannon.

Right after killing the first cyber mancubus, charge a ballista shot, aim at the pain elemental, shoot, switch to the cannon, aim, shoot, then land the second charged ballista shot. It's not that hard, except for the dread knight and other fodder demons that will already be breathing down your neck, so try to pull off as much as you can while moving. Do not hesitate to shoot your ballista twice and the heavy cannon last, or the opposite, depending on how well you manage the quick swap. This is where the combat gets most unpredictable, I am currently working on the strategy to increase its reliability.

Once the pain elemental is out of the picture, focus the cyber mancubus that should be hiding in the corridor of the arena's entrance. Swap to frag grenades, and the rocket launcher. Approach it and throw a grenade and three rockets. Then back away immediately by falling down below, and take the jump pad back up. Throw your second frag grenade and another rocket volley, and you should almost certainly have killed it.

Continue down the stairs to the side opposite of where you just came from, grab the monkey bar and land up on the platform with the lever you need to activate later. From up there, shoot your ballista at the cacodemon, and stay mobile between there and where you killed the first cyber mancubus. The dread knight will arrive soon, your ice grenade should be ready again. Feed it chaingun bullets, or three rockets and a knee to the jaw. Be mindful of the gargoyles and the prowler.

NOTE: When repeatedly training this arena, the cacodemon may stop spawning! It is a minor hindrance in this arena, but keep it in mind.

The doom hunter will be the only one left. If you have followed the instructions successfully, you may engage it as usual. Otherwise, be advised that it spawn once three of the initial heavy demons are dead (you do NOT want to face the second cyber mancubus AND the doom hunter at the same time). Once it's done, use the remaining fodder to get back to full health and ammo, because the next fight will also be a difficult one.
09 - Taras Nabad, part 2
09 - 06
Difficulty 5/5

1 arachnotron, 2 mancubi, 6 whiplashes, 11 prowlers, 1 tyrant, 1 pain elemental


At this point, there is absolutely no valid, rational reason to do this gate. It’s an almost nonexistent payoff for a huge risk. And you’ll answer, sure but doing the game in Ultra Nightmare is the same, there’s absolutely no valid, rational reason to do it, and the payoff is almost nonexistent. And you know what... you’re absolutely right. So let’s get to it:

The archvile and the pain elemental will be your first worries. Freeze the archvile, forcefeed it rockets and bullets, and do the same for the pain elemental. The army of prowler will be next, and even though the super shotgun is very effective at killing them individually, you might need something stronger. However, anything stronger will require a sacrifice in survivability. Pick your poison.

Then, the whiplashes will invade. Rockets are still the best way to deal with them. The rest of the gate should not be that problematic.


09 - 07
Difficulty 4/5

1 hell knight, 1 whiplash, 7 prowlers, 1 carcass, 1 baron, 1 archvile


Rush towards the middle of the map, and you will find a carcass and a hell knight to your left. Throw an ice grenade at them, but be aware that the carcass will spawn an energy barrier in front of you. Kill the carcass with a point blank super shotgun shot. Get away from the knight and feed it three rockets. The whiplash will not be far, locate it and repeat the triple rockets.

The baron will spawn, and prowlers will accompany it. Kill the prowlers before engaging the baron. Be mindful with the usual "chaingun 'till it dies" approach, the arena is small and filled with dangerous fodder demons, ready to ruin your day. You may attempt to microwave beam the baron, but remain careful. The archvile spawns very last, and is relatively isolated. Locate it quickly, harass it with everything you have. Dodge the fire attacks and interrupt its attempts at spawning reinforcements. You may use a BFG shot if you don’t feel confident. Try to have your blood punch ready for the next arena.


09 - 08
Difficulty 4/5

1 marauder


This secret encounter is very hard, but has its use. The next fight will be very difficult, and you want to be fully stocked for it. You can trigger the secret encounter as many times as you want, and just jump around the arena with the marauder chasing you, while you repeatedly harvest armour, health, ammo and blood punch charge from the three zombies belonging to the encounter. It can be a bit risky (be especially careful with the dog), but it can pay off big time.

The problem with wanting to complete this secret encounter, is that it can put you in a very bad position for the next fight. There will be no fodder demon to exploit afterwards, and if the marauder left you half dead, you will most certainly die. Additionally, the timing is pretty tight, so without a solid execution, time will run out. Just be sure to engage the marauder far away from the zombies that spawn alongside him. If you run out of time, just trigger the encounter like described in the previous paragraph.


09 - 09
Difficulty 5/5

1 cacodemon, 1 dread knight, 1 whiplash, 3 prowlers, 1 cyber mancubus, 1 marauder


Very tough fight, that can degenerate very quickly. You may reduce the difficulty slightly by baiting an already present prowler to teleport to you before entering the arena, on the broken column covering the titan.

The cyber mancubus will be the most immediate threat to your wellbeing. Approach it with the usual freeze-punch-super shotgun combo. Then run towards the other end of the map, and take the jumper, behind the floating platform with the monkey bar. While in the air, strike the cacodemon down with an arbalest shot.

Land on the platform, and try to get the dread knight and the whiplash with lock-on bursts. You should be constantly jumping between that platform and the high ground in the building next to it, the dread knight, the whiplash and the marauder will have trouble following you, while you eliminate the prowlers one after another. Once it is done, the isolated marauder is to be engaged as usual.

Get stocked up on the remaining fodder demons, your blood punch will come in handy later.


09 - 10
Difficulty 3/5

2 prowlers, 3 pinkies, 1 pain elemental


Blood punch the pinky immediately in front of you, and ignore the two others for now. Run laps around the arena until you've dealt with the pain elemental and the prowlers, then freeze and kill the pinkies. Again, use the fodder demons to replenish your ammo, health and blood punch. Alternatively, you may completely bypass this segment and dash ahead to the next arena. Be aware that the pain elemental will be stalking you if you keep it alive, but you can snipe it from your new distant vantage point.


09 - 11
Difficulty 4/5

2 cacodemons, 3 prowlers, 2 spectres, 1 pain elemental


This fight is pretty intense, and can quickly degenerate. First of all, feed an arbalest charged shot and a lock-on salvo (in that order) to the pain elemental. Then, go right and you will run into a spectre head on. A rocket and a point blank super shotgun shot are very effective at killing them.

Afterwards, run around and kill what you see. This fight is very unpredictable, so be ready for anything. Do not underestimate the prowlers. Don't forget about your panic ice grenade. You will find that the frag grenades with the scatter bomb upgrade do wonders against prowlers and spectres, if they are grouped together or with fodder demons.

Alternatively, you can kill the pain elemental, and retreat back to the elevator shaft. No guarantee on the demons behaviour though, do at your own risk.

Alternatively, you can jump down a level where the pain elemental spawns, and camp in the room where the crystal is. The demons will come at you one by one, but beware of the prowlers that can still teleport behind you. If you’re overwhelmed, throw an ice grenade. If you want to go back up to finish the job, or to pick the SP, you can always jump down, but know that the fall damage will tick twice, and you’ll take roughly 50 damage.


(click to enlarge)


09 - 12
Difficulty 3/5

2 whiplashes, 2 prowlers, 1 carcass, 1 spectre


Try to get the carcass first. If you don’t succeed before the whiplashes arrive, freeze everything and make everything explode. The arena is small, but pretty good for running around.


09 - 13
Difficulty 3/5

1 dread knight, 1 prowler, 1 cyber mancubus


Get the cyber mancubus first with the usual freeze bloodpunch super shotgun. Don’t hesitate to run from the dread knight if you feel you’re losing control.
You’ll get another master token after this fight.


09 - 14
Difficulty 1/5

1 cacodemon, 1 hell knight, 1 dread knight, 1 whiplash, 4 prowlers, 1 pinky, 2 barons, 1 pain elemental, 1 archvile


It’s time to have the time of your life! You may use the crucible on every heavy demon and three prowlers (not all four), and you’ll get out of this fight with 3 crucible charges.

Melee attacking an archvile is never a clever thing to do, and even with the crucible it remains extremely dangerous. Be sure to freeze it before engaging it, and everything will be fine.

Grappling the pain elemental with the meat hook, in order to slash it later with the crucible, is choice of approach that doesn't generally end well. Find other ways to get at its height.
10 - Nekravol Part 1
(click to enlarge)


10 - 01
Difficulty 3/5

1 arachnotron, 1 cacodemon, 2 cyber mancubi


The arachnotron will come down the stairs to greet you. Take out the cyber mancubus in the middle with the usual combo. Engage the second cyber mancubus with the microwave beam once you've cleared up the fodder demons around, or replenish the blood punch by farming fodder around with the super shotgun. The cacodemon will spawn last.


10 - 02
Difficulty 2/5

1 prowler, 1 pinky, 1 carcass


You’ll be greeted by all three demons at the same time. An ice grenade will greatly help.


10 - 03
Difficulty 2/5

1 cacodemon, 1 whiplash, 1 prowler, 1 cyber mancubus, 1 tyrant, 1 baron


Walk in front of the door, in order to trigger the tyrant spawn, then grab the onslaught powerup and set up your chaingun. When looking straight at the door, in front of it: take out the tyrant in front, the cacodemon up behind you, then the mancubus to your right, then the whiplash to your left, then the prowler somewhere around you. It’s possible to get all five of them with the powerup.
The full armour pickup is only accessible once you’ve opened the big door.
After jumping down, a baron will spawn. Chaingun it to death like usual.


(click to enlarge)


10 - 04
Difficulty 3/5

2 pain elementals


There are two safe spots where you can stay more or less indefinitely, as shown in the picture. The first eye will be alone. Once you kill it, a gargoyle will spawn every 10 secondes on each safe spot, alternatively. Once the second eye destroyed, two pain elementals will spawn one after another. Use the charged arbalest – lock-on burst combo. The third and fourth eye do not bring anymore surprise. The gargoyles will stop spawning once all four eyes are destroyed.

You can avoid dealing with the pain elementals by destroying the first eye, then shooting one charged arbalest shot into each of the three remaining eyes, without destroying them. Once you've shot all three eyes once, you can destroy them in quick succession, rush to the brain, destroy it, and advance.


10 - 05
Difficulty 2/5

2 prowlers, 2 spectres


Play around with the crushers, and finish the challenge if you feel like it. For the near future however, it is more important to make sure to fully stock up on hit points and ammo, and to refill the blood punch.

Beware, you will not always manage to crush both spectres with the crusher, do not get rushed by the second one you didn’t kill.


10 - 06
Difficulty 2/5

1 hell knight


Turning back after activating the encounter, a zombie will be to your left, and a knight will come from the right. Kill the zombie, then give yourself space to shoot three rockets at the incoming knight. The microwave beam option is tempting, but you'll likely not kill the knight in time for the challenge.


10 - 07
Difficulty 4/5

1 cacodemon, 1 hell knight, 1 dread knight, 1 whiplash, 1 prowler, 1 carcass, 1 cyber mancubus, 1 archvile


This is a hard fight, that you can either dominate or be dominated by, depending heavily on the demons spawn location. The spawn order is fixed.

When you climb up the wall, take the jump pad in front of you, and wait for the dread knight to climb up the stairs from the other side of the room. Once you kill it, a carcass and a whiplash will spawn, not always at the same spot. Make sure to replenish all your hit points before killing them. Once they fall, a cacodemon, a hell knight and a cyber mancubus will spawn. The cacodemon always spawns right above the jump pad you took at the beginning.

The archvile spawns when you've killed two of the previous three demons. The hell knight is the least threatening to leave alive, once you shift your focus towards the archvile. If you need the ice grenade to kill the cyber mancubus (see if you can't chainsaw it), wait for it to cool down before killing the cacodemon. Use that recovery time to find and kill the prowler. Once it is ready again, kill the cacodemon, and engage the archvile with the ice grenade and the crucible.

You may use the BFG if you feel overwhelmed. You’ll find ammo on this arena.


10 - 08
Difficulty 3/5

1 arachnotron, 1 mancubus, 1 pinky, 1 totem, 1 cyber mancubus


You will meet a mancubus in a large corridor. Kill it, and use fodder to get to full hit points and blood punch for the next arena. Do not lose too many hit points.

There’s a master token behind a fissured wall, to the right of the first crusher spot.

First thing to do is to find the totem and destroy it. Do not get distracted, or try to pull early kills, focus on the totem. You need to traverse the arena and jump on the high ground to your right, then run back to the other end of the arena by jumping on the platforms on the way. You might get harassed by the arachnotron or the cyber mancubus on your way, prepare an ice grenade just in case. Once the totem is destroyed, you may engage the demons the usual way, with the cyber mancubus at top priority.

Alternatively, if you want to not take any risk, you may just shoot the BFG into the room upon entry, removing all heavy demons at once.


10 - 09
Difficulty 2/5

1 baron


A baron will spawn from the right side. Have an ice grenade ready for it, and chaingun it to death.

This encounter is easily dealt with. You can exploit it by leaving a zombie alive, and harvesting the rest for resources. You can even leave it there and come back to it after segment 10 - 10. By now, you should get 80 bullets when chainsawing demons, which is just enough to kill the frozen baron, next time you trigger the encounter.


10 - 10
Difficulty 4/5

1 whiplash, 1 marauder


You’ll get jumped on by a marauder, and shortly after a whiplash. You can have your first weapons exchange with the marauder, then switch to the rocket launcher for the whiplash. Be careful, there is not much space to navigate in.

Do not forget to grab the crucible charge underneath, if you've used it previously.

10 - 11
Difficulty 4/5

1 hell knight, 1 dread knight, 1 whiplash, 1 carcass, 2 doom hunters, 1 spectre, 1 cyber mancubus


Enter the arena from the left door, and walk on. you will meet a spectre, that you can super shotgun at point blank. A whiplash will have spawned at the same time in the middle, and be to your right or behind you. Shoot it with your rocket launcher, and immediately after it dies, a carcass will have spawned at the same spot. Kill it with another lock-on burst, to be 100% sure it is dead.

Go forward by still hugging the left side of the arena, and lock-on burst the hell knight that will have spawned to the far end of the arena. You will arrive at the cyber mancubus, that you can kill with the usual combo. You want to hit fast, and retreat just as fast, because killing the hell knight will have triggered the two doom hunters to spawn.

The dread knight will spawn at the same spot as the hell knight, you may engage directly or fall back to the entrance of the arena, if you are being pressured too hard by the doom hunters. At this point, the fight will be straightforward. Be sure to practice this strategy once or twice, as it requires a tight execution. Be wary, the cyber mancubus may hide behind obstacles, do not waste your ice grenade.

Don't forget to grab the crucible charge if you need it. If you have not yet killed two demons with the crucible for the challenge, you can kill a fodder with it, provided you end the level with three charges.

Be extra careful one last time with the crushers, on your way to the back of the statue. The fire can kill you in two seconds.
11 - Nekravol Part 2
(click to enlarge)


11 - 01
Difficulty 2/5

3 cacodemons, 1 pain elemental


Right at the beginning, you can blood punch the two zombies in front of you, in order to advance the first achievement of the level. You should now have both health for blood and armour for blood crystal upgrades, which makes blood punch recharging easy. Just focus on taking as little damage as possible. Do not take too much risk to advance this challenge, there will be other opportunities later.

The pain elemental will spawn at the end of the main bridge. Two cacodemons will spawn when you reach the first pillar to the right, one will spawn at the second pillar.


11 - 02
Difficulty 2/5

2 pain elementals


Take them out the usual way. Be careful not to target the lost souls with the rocket launcher.


11 - 03
Difficulty 2/5

1 revenant, 1 shield soldier, 1 prowler, 1 carcass


A straightforward battle, put the ice grenade and the frag grenade to good use.


11 - 04
Difficulty 4/5

1 revenant, 1 mancubus, 2 whiplashes, 2 prowlers, 1 doom hunter, 1 baron, 1 pain elemental


Get ready to rocket the mancubus in front of you, but try not to shoot into the two zombies in front of it. A revenant will spawn to the right, take it out the way you want. The baron will spawn next, folowed closely by the pain elemental. The doom hunter will spawn last, accompanied by two whiplashes. The prowler will spawn once you destroy the doom hunter's sled.

You can slash the baron with the crucible if you feel like it, and backtrack to collect the crucible charge. Alternatively, you can grab the overdrive powerup and freeze chaingun it to death. Be very careful about your surroundings though, don't get killed by gargoyles.

Once you destroy the doom hunter's sled, you can leave it be and focus on blood-punching duos of fodder demons.

Stock up on ammo for next fight, and have a blood punch ready.


11 - 05
Difficulty 3/5

1 hell knight, 1 cyber mancubus


A knight will spawn to your right, a cyber mancubus to your left. Go deal with the cyber mancubus first, then turn around and chaingun the hell knight. Try to preserve your rockets.


11 - 06
Difficulty 4/5

1 arachnotron, 1 revenant, 1 dread knight, 1 carcass, 1 marauder, 1 archvile


Deal with the arachnotron first below, then the carcass. Be careful of the fodder demons that surround it, throw a frag grenade in before engaging. The revenant and the dread knight do not represent that big a threat if you keep moving around, try to get back up to full health before killing them. Kill the dread knight last, because its death triggers the archvile spawn. The marauder will come last.

Get a blood punch ready before advancing.

(click to enlarge)


11 - 07
Difficulty 4/5

1 arachnotron, 1 revenant, 1 shield soldier, 1 carcass, 2 spectres, 2 cyber mancubi


When you are entering in the elevator room, the carcass will be spawning in front of you, the two mancubi left and right, and the first spectre behind you. The cited demons spawn when the elevator first arrives at the top, independently of whether you are aboard or not. If you jump from it mid-run (for example, to pick the hidden SP behind the elevator), the demons will spawn and move around, giving you much less control over the battle.

DISCLAIMER: If you are training in Nightmare mode, be aware that upon checkpoint reloading, the revenant, the arachnotron and some fodder demons will not appear! You may train in real situation only once. If you want additional tries, you will have to reset the level. Be extremely careful with the following strategy.

Go straight ahead, run to a launchpad and take care of the carcass with the super shotgun grappling hook. Focus either cyber mancubus afterwards, with the usual combo. Then run back to the platform where you killed the carcass, if you haven't lost any armour point yet, the armour points you've gained with the super shotgun meat hook action will be enough to refill your blood punch. You can engage the second cyber mancubus directly without the ice grenade, or play safe and kill the other demons first. Alternatively, you can kill the cyber mancubus with the microwave beam, just make sure your surroundings are clear before doing so.

Alternatively, you may enter from the front, grapple the carcass above, then break the wall and advance, ignoring the rest of the demons. This is a vicious fight in a tight arena with lots of dangerous demons that can ruin your day in the blink of an eye, there is no shame in dodging this encounter altogether.


11 - 08
Difficulty 2/5

2 prowlers, 1 dread knight


There are two eyes. Get to a quadrant where there is no eye to prey on you, and deal with the fodder and the prowler coming at you. Destroy one eye, and a dread knight will spawn.
You’ll find a crucible charge at the end.


11 - 09
Difficulty 4/5

1 arachnotron, 2 cacodemon, 1 revenant, 3 whiplashes, 3 prowlers, 1 carcass, 1 doom hunter, 1 totem, 1 tyrant, 1 baron


This fight is hard due to the swarm of fodder demons roaming around, run wide laps around the map for safety. When the tyrant spawns, either use the crucible, or leave it for the end of the fight. Alternatively, you may microwave the tyrant as soon as it spawns, and it will stop mid-jump and fall down in the pit it came from. This strategy costs one plasma ammo instead of one crucible charge, for the same effect.

Take care of the carcass, the prowlers and the whiplash that spawn. Afterwards, the arachnotron, the baron, the revenant and a cacodemon will spawn. The doom hunter spawns last, with the last cacodemon. Crucible the baron if you don't feel confident. There's enough fuel canisters around to chainsaw one heavy demon, preferably the arachnotron.

You may use the BFG if you want, there’s ammo on the map.
12 - Urdak, part 1
(click to enlarge)


12 - 01
Difficulty 4/5

1 revenant, 1 hell knight, 1 dread knight, 1 mancubus, 2 whiplashes, 1 cyber mancubus, 4 drones


First things first, there’s a crucible charge after the very first portal jump. Walk around the building to find it.

You can first take down a drone or two. The hell knight will spawn below, in the middle, wait for it and kill it as soon as possible because shortly after, the cyber mancubus will spawn at the same spot. Meanwhile, a revenant will have joined the fray. The dread knight and the whiplashes will spawn afterwards. At the end, the mancubus. You will get pressured hard in this arena because the demons spawn quickly one after the other, don’t hesitate to run away but always mind the position of the mancubi.

You may use a BFG shot if threatened.


12 - 02
Difficulty 2/5

1 cacodemon, 1 pain elemental, 3 drones


Wipe the fodder out and get your arbalest. Shoot at the cacodemon (it will spawn left of the pain elemental), then at the pain elemental, with a rocket launcher finish. Be sure to move a lot while doing so, the drones will beat you up otherwise. Clear the drones with an ice grenade and your favourite headshooting technique.


12 - 03
Difficulty 2/5

1 cyber mancubus, 2 drones


Combo the cyber mancubus as usual, and kill the drones the usual way too. Nothing special.


12 - 04
Difficulty 3/5

1 arachnotron, 1 dread knight, 6 prowlers, 1 doom hunter, 1 baron, 4 drones


Once you break the grate, grapple the drone in front of you and kill it. Then run forward left, following the left wall of the arena and you will find the totem. Afterwards, deal with the arachnotron and some drones, and the doom hunter will appear with some prowlers. The dread knight should appear soon after.

In the next room, you’ll face some fodder, a baron and a prowler.


12 - 05
Difficulty 3/5

2 cacodemons, 1 revenant, 1 cyber mancubus, 1 marauder, 2 drones


When you land in the next arena, go left and you will see a drone and a revenant. Deal with both and a cyber mancubus will spawn. Afterwards, the marauder will spawn. Standard, low pressure fight if you handle it well.

After activating the portal,, two cacodemons will spawn far away.


12 - 06
Difficulty 4/5

1 mancubus, 1 dread knight, 1 pain elemental, 3 drones, 1 archvile


The pain elemental will spawn first, and the archvile soon after. The dread knight and the mancubus will arrive once you kill the archvile, independently of the status of the pain elemental.

After the fight, you can take the celestial portal towards the left, or towards the right. The guide will go left first.
12 - Urdak, part 2
(click to enlarge)


12 - 07
Difficulty 4/5

1 arachnotron, 1 hell knight, 2 revenants, 1 dread knight (later), 2 mancubi, 2 whiplashes, 1 prowler, 1 totem, 2 cyber mancubi, 1 tyrant, 2 drones


This fight is not overly hard, but you can lose control very fast and die in the blink of an eye if you get too greedy or impatient. A lot of things will be thrown at you at the same time, but the arena has a lot of features that allow you to run in circles in relative safety.

The first thing you want to do is, as always, to destroy the totem. You’ll find it when you follow the ledge to the left after landing. It is located after a monkey bar pointing outwards. After that, go up the stairs, and confront whatever is waiting for you with the rocket launcher (most likely a hell knight and/or a whiplash). Frag grenades are especially good there, because heavy demons will often be grouped in narrow passages or stairs.

The tyrant only spawns after you have taken down 2-3 heavy demons. There will only be one mancubus at the same time, and only one cyber mancubus at the same time. The two cyber mancubi and the tyrant spawn at the same location, in the middle of the map. You can take down the first cyber mancubus the usual way, and the second one with the chainsaw.

The tyrant is pretty much harmless as long as you don’t run into it and you are running safely around the edge of the arena. Again, don’t be greedy and everything should be fine. Do not hesitate to fire a BFG shot if you panic. There is a full health pickup in the middle of the arena, but don’t rush mindlessly to it, or it might cause more harm than good.

The dread knight will be waiting for you upon arrival after taking the right celestial portal.


12 - 08
Difficulty 4/5

1 whiplash, 1 doom hunter, 1 spectre


This encounter is made much easier by using the ballista's destroyer blade mod. Fully charge it once you activate the nest, release it at waist-height, and you'll only have to deal with the remaining doom hunter.


12 - 09
Difficulty 4/5

2 cacodemons, 2 hell knights, 1 revenant, 2 shield soldiers, 4 whiplashes, 2 prowlers, 2 cyber mancubi, 2 barons


Just like the previous arena, this fight is not overly hard, so long as you play safe and smart.
You’ll first have to deal with some prowlers, whiplashes, a hell knight and a cyber mancubus. The second cyber mancubus spawns only after the first one has died.

One cacodemon will spawn in company of a baron and a whiplash. After some further kills, one additional cacodemon will spawn in company of an additional baron, independently of the status of the previous baron. You may crucible the barons at will. If you feel like you need it, fire the BFG.

Don’t forget to pick the crucible charge afterwards.


12 - 10
Difficulty 4/5

1 hell knight, 2 drones


There will be a couple demons on the way to the boss. Try not to use rockets, and to get to the boss fight with full health and armour.

Alright, the Khan Maykr. It’s a horrible boss, until you get the grip of her patterns, the arena’s layout, and the tactics to use, then she becomes the most predictable, and less run-killing boss of the game. Don't let it go to your head however, do not underestimate this fight. It’s been said a hundred times already, let’s say it once more: DO NOT RUSH. Take your time, be patient, let an opportunity slip if it is too dangerous to exploit. If you have to let her go and refill her health bar so that you can do the same on your side, let it be so. It has never been easier to refill your own health bar.

Here’s how to do it:
  • First, like very often in this game, the rocket launcher will be your best friend. Two lock-on bursts, followed by either a well placed standard ballista shot, or a relatively close up super shotgun shot, will do the trick. Hook her, reel in, punch her, and start again. Alternatively of course, your best friend the BFG can deal roughly 50% damage while flying through the air, and a shot can stagger her directly if it hits her. Keep your BFG shots for the latter phases of the fight, as this is where she will be the most dangerous (most notably due to the scorched ground).

  • If you have the chrono strike rune, the best, safest and most reliable way to headshoot drones is with the super shotgun. Grapple, reel in, shoot slightly below the middle of the face, and you'll get health, ammo and 30 armour. At worst, you will stagger the drone, in which case you will just have to shoot again. Be mindful of the status of your rune though, so as to not be surprised if the game goes at real speed when reeling in.

  • If she goes 5-6 seconds without taking damage, she’ll regenerate her hit points. If she does, clear your mind, do not insist. Deal with the situation as if it was a reboot, and be at peace with it. Go fetch some ammo or some health, and start again properly.

  • You can camp without too much problem in this fight. Make sure to fulfil three criteria: you’re not stepping on scorched ground, you’ve got something (even something small) between you and the Khan, and you’re close to a roof to jump on if she decides to use her sun beam. You can stay still for a little time in order to make your chrono strike rune cool down. If you get harassed by a drone, jump on it with the super shotgun. If you don’t have the time to aim for the head, a point blank super shotgun body shot can stagger, and even kill them.

  • The high grounds will never be scorched, and you can jump pretty safely on them to attack the Khan, and to get some small cover from the drones. Just keep in mind that you’re making yourself an ideal target for her projectile attacks that way.

  • You can either engage her on those high grounds, or take one of the jump pads on the edge of the arena to get some consistent air time while shooting your two triple rocket salvoes. That way, it will be easier to dodge her projectiles. She always shoots three yellow slashes, and one purple BFG-like bubble. Be sure to always have a dash ready for the last one.

  • Ideally, take a jump pad to propel yourself upwards before grappling her for a blood punch. That way, you’ll have much more aerial control if you fail your execution.

  • It goes without saying, but still: keep your eye on her, but don’t lose sight of what’s happening on the ground. Drones and scorched grounds can be more dangerous than her attacks if you don’t pay them attention.

  • Respect the scorched ground. If you "think" you are stepping on it, you are stepping on it. Double-jumping above it will not get you out of it, you need to move to higher ground or leave it completely.
13 - Final sin, part 1
(click to enlarge)


13 - 01
Difficulty 3/5

1 arachnotron, 1 cacodemon, 1 hell knight, 2 revenants, 2 mancubi, 1 shield soldier, 2 whiplashes, 2 prowlers, 1 carcass, 1 doom hunter, 1 cyber mancubus, 1 tyrant, 1 baron, 1 pain elemental


This is a very nice arena, with plenty of space to navigate everywhere, and lots of cover. The fight can get messy, do not lose your cool now. The spawn order is hard to keep track of, but is roughly the following:
Arachnotron, cacodemon, revenants, carcass.
Then cyber mancubus, mancubi, knight.
Then baron, whiplash, prowlers, pain elemental.
Then tyrant.
Then finally doom hunter.

Feel free to chainsaw the cyber mancubus, and to crucible the tyrant.


13 - 02
Difficulty 2/5

1 arachnotron, 1 hell knight, 2 revenants, 2 mancubi, 1 prowler, 1 pinky, 1 carcass


You’ll get a mancubus, a prowler, an arachnotron, a pinky. Up next, one storey above, a knight, a carcass and a revenant.


13 - 03
Difficulty 4/5

1 arachnotron, 1 hell knight, 1 revenant, 1 dread knight, 2 mancubi, 1 shield soldier, 1 whiplash, 1 prowler, 1 pinky, 1 carcass, 1 totem, 1 cyber mancubus


Once you enter the building after jumping along nacelles, go straight forward and kill the two fodder battling each other. Refrain from mindlessly killing fodder. Behind them, a prowler will spawn. Approach it (and kill it), and a revenant will spawn. Kill it too. Once it’s done, kill fodder until the totem spawns, right from whence the revenant arrived. Try to take out the shielded soldier before the totem spawns, as he becomes a beast once buffed. Destroy the totem immediately.

You’ll then have to deal with a pinky right in front of you, blood punch it. Do not go upstairs yet! Go left, from whence the pinky just came, and you’ll face a hell knight and a whiplash. Once they are dead and you’ve cleaned up the fodder, go upstairs to face a dread knight and a mancubus (which would have spawned alongside the hell knight earlier if you had gone upstairs sooner). Behind the corner, an arachnotron and a cyber mancubus will be waiting.


13 - 04
Difficulty 3/5

1 arachnotron, 1 cacodemon, 2 revenants, 1 marauder


Be sure to grab the megasphere before going up. After climbing up the wall, you want to circle arount the building to find the access, the ramp to your right immediately triggers the next encounter. The fight looks deceivingly easy, but don’t take it lightly. Lots of fodder enemies tightly packed with heavy demons, throw frag grenades from a safe distance. Beware the cacodemon, which will not spawn directly and can bite you in the behind.

The second wave features another revenant, the marauder and lots of gargoyles. Be sure to keep the fodder demons count in check, as they can quickly overwhelm you.


(click to enlarge)


13 - 05
Difficulty 4/5

1 arachnotron, 1 cacodemon, 3 revenants, 2 mancubi, 2 pinkies, 3 tyrants, 1 baron


There are two main ways to approach this fight. First, the safe way.

You’ll have to jump to another building, where two fodder demons are infighting. Avoid them, and jump directly to the next building, where you can clear up the four fodder demons to stock up on ammo and health.

Now, in the next building, you’ll be seeing a lot of demons infighting. Fortunately for you, you’re looking at them from a very advantageous vantage point From there, you can already take out, without any problem, two mancubi, one arachnotron, one revenant and one tyrant (take the tyrant out last, otherwise the other demons will focus their fire on you). Once you’re done, you can backtrack to use the two fodder demons for your chainsaw, and then enter a much easier fight.

Alternatively, you can go in the hard way. Take the mancubus in front of you out, and seek cover upstairs. Kill the remaining mancubus, the revenants and the arachnotron. A baron will spawn afterwards, from your insertion point. The second wave starts only once the tyrant is dead.
The second wave will star another arachnotron, a cacodemon, a revenant, two pinkies, and two tyrants. Once one or two of those demons die, the totem will spawn. When you’re in the lobby, go up the stairs, follow the long corridor and turn right to find the totem. Once it is destroyed, keep evading the tyrants and kill the other demons first. As usual, but more now than ever, this fight requires you to not bite more than you can chew, and to play safe.


13 - 06
Difficulty 3/5

1 arachnotron, 1 hell knight, 2 revenants, 1 manchbus, 1 baron


Right upon getting to the next level after climbing the wall, you’ll get ambushed by a hell knight and two revenants. Take this fight very seriously, fall back below if needed.

Up the stairs, you’ll be ambushed again by a mancubus, an arachnotron and a baron. Same applies, don’t hesitate to fall back.

Try to lose as little hit points as possible, and conserve your ammo wisely, you will need everything you can have for the next fight. Go back to the ground level to scrounge for extra pickups.


13 - 07
Difficulty 5/5

3 arachnotrons, 1 hell knight, 4 revenants, 1 dread knight, 1 mancubus, 1 pinky, 1 cyber mancubus, 2 pain elementals, 1 marauder, 1 archvile


This might well be the most difficult arena in the game. That is, if you want to do a run without using the BFG or the crucible at all. If not, you’ll probably notice that the game screams at you to use the BFG. If you do want to shoot your BFG, do it right at the beginning. Pass through the door to your left after the flight of stairs, and aim at the breach in the building to your right, in order to maximise flight time, to kill the two pain elementals that spawn afterwards. That way, two revenants, the marauder and the archvile will be the only ones left. You may shoot through the right door directly at the breach, but that way you may miss a couple of heavies with the tendrils. Note that the two additional revenants mentioned above spawn only when you get to the upper level.

Here is a tactic suggestion if you want to avoid using the BFG. Do not enter by the left door, but by the right. Kill the mancubus right in front of you the usual way. Next, switch to the super shotgun and the ice grenade. Throw the ice grenade at the cyber mancubus and the pinky to your left, behind the podium with the BFG ammo. Blood punch the cyber mancubus and kill it with the super shotgun. If you feel extra heroic, stay a little more and blood punch the pinky (very dangerous). Then, run like hell, and get to the top level to dodge the dozens of projectiles headed your way. Once up there, find something to chainsaw if needed, and throw frag grenades at heavy demons that are starting to group up.

After a couple of heavies have gone down, two pain elementals will spawn. They are a serious threat, that will require dedication to kill. Once it’s done, deal with the remaining demons before engaging the marauder that just spawned. Keep the gargoyle population low. Once he dies, the archvile spawns, which is best taken care of with the crucible.

Don’t forget to get all the BFG ammo you can for the boss fight.


13 - 08
Difficulty 2/5

1 arachnotron, 1 hell knight, 1 revenant, 1 dread knight, 1 whiplash


On the bridge below, you’ll see many demons infighting (again). First the whiplash, the arachnotron and the revenant, then the two knights. If you really, REALLY do not want to take the slightest risk so close to the end, fire a BFG shot along the bridge and everything will die.

If you engage normally, try to be extra careful when dealing with them all, so as to lose as little hit points as possible. You’ll need every last bit you can conserve for the next fight. No spoil.
13 - Final sin, part 2
13 - 09
Difficulty 5/5

It’s time to finally obtain your gold-plated suit.

This boss is not very hard in itself, especially if you know what to do. However, there are lots of factors you do not have total control over, that can make the fight quickly degenerate. You won’t be allowed to be very proactive, instead you’ll have to react to what random cards the game deals you. Always play safe, do not rush, respect the boss, and you will get out of there alive and gold-clad.

Just like the original icon of sin in DOOM 2, the demons spawned there are random. This means that you can get a very peaceful run where you can almost exclusively focus on the icon, or a run where you’ll have to cut down four barons and three mancubi at least. The chance for an archvile spawning in DOOM 2 was small, but not zero. In this game, no archvile can spawn.

First phase:
  • Take cover immediately by positioning yourself in front of the portal to your left, in order to dodge the icon’s punch. Take 5 seconds to look around, and deal with any heavy monster you find with the crucible. The crucible charges scattered around the arena reappear fast, so do not be afraid to slash everything taller than you.

  • You can shoot the BFG five times in this phase. Each shot can destroy a piece of armour, so you’ll end up having to destroy only three with your conventional weapons. However, it is advised to shoot only three times and keep two shots for the next phase. Here are estimates of the amount of health of each body part:
    • Head: 8.000 - 10.000
    • Chest: 6.200 - 7.000
    • Abdomen: 4.800 - 6.500
    • Shoulder: 4.500 - 5.000
    • Forearm: 3.000 - 4.000

  • If you have the Unmaykr, you may want to incorporate it into your routine. The BFG deals 10.000 damage per 30 ammo, to any body part (for comparison, a blank ballista shot deals 680 damage). The Unmaykr deals 134 damage per projectile to any body part. You shoot 3 projectiles per ammo, which means 90 projectiles for 30 ammo. This means that, if you land 100% of your shots, the Unmaykr deals 12.060 damage with 30 ammo, which is 20% more ammo-effective than the BFG.

    The BFG is the fastest way to tear down the icon's health, but shooting a forearm with it is clearly overkill, as you deal only 4.000 damage instead of the potential 10.000. The Unmaykr requires exposure close to the icon, and is not terribly accurate, but is more efficient than the BFG. The best way to use your ammo, meaning the best compromise between being safe and being fast (according to me), is to shoot three BFG rounds into the head and both chestplates, then to keep your BFG ammo for the second phase, where you repeat the same action, and proceed to shoot all the remaining charges scattered on the map with the Unmaykr at the shoulders and forearms, whenever he punches you.

  • Landing BFG shots is not easy, as the icon constantly moves around. Above all, be patient, do not rush. Each shot is important. During the first seconds where you should look around you, the icon will move, until it reaches its „idle state“, where it lays both hands on the edges of the building. When you see it putting its hands there, you’ll know it’s about to be static for at least a few seconds. It will also be static when shooting at you with its magical demonic super secret forehead fire cannon. A bad time to shoot is basically the rest of the time. If he moves too much, wait.

  • From your position in front of the portal, you’ll want to aim towards the neck with the BFG. You are almost guaranteed a hit to either the head or the breastplate. Afterwards, go to the other side of the arena, to the right jumper inside the building. You’ll find some BFG ammo. Go all the way up, then left all the way. To your right, you will find the second BFG ammo pickup. Try a shot (or not, depending on what it’s doing), pick up the ammo, then look to your right, downwards. You will see the third pickup.

  • Once you’re done with the BFG, you will have two main ways to deal damage. The quick swap between the ballista and the super shotgun is one of them. Shoot two or three times with each weapon at the remaining pieces, then look around you to check if you’ve been followed by a knight or a cacodemon. Move around, try to read its next attack, and resume aggression.

  • Another great way to deal damage is with the micro missiles. When mastered, killing a fodder demon with the standard bullets will empower your micro missiles for 5 seconds, during which they deal even more damage than the turret mode chaingun. Land in front of the icon, kill a fodder demon around, and unload all the micro missiles you can into it, while constantly moving around.

  • Try to read and identify its attacks. When it fires its magical forehead cannon at you, take cover, it will stop only if you break line of sight. If you see it preparing a smash, switch to the side it is not targeting, or get closer to him, and you might dodge the attack. When it punches, move to the sides. When it prepares to shoulder bump the tower, go upstairs. When it lifts its hands up, it will consume the demons present in the arena, and replace them with new ones. The consumed demons will explode, and some areas will be covered in red electrical fields, so steer clear. When it points its palms towards you, it will incinerate a whole level, so prepare to evacuate. The chaingun's energy shield is a great way to nullify its punch damage. The trick is to have it activated quickly enough, which is pretty hard to do.

  • If you see a heavy demon prowling around, focus it. You want that mancubus or that cacodemon out of the picture as soon as possible, so you can line your shots on the icon properly. Remember that you do not need to waste a charge on a pinky, you can blood punch them, the effect is the same.

  • There are three jump pads right in front of the icon, up to the left and right, and down in the centre. They provide a great amount of airtime during which you can pretty safely unload your main weapons into him. Camping near them provides the additional benefits of avoiding most of his smash attacks, and to be able to escape quickly if your position gets compromised by heavy demons.
13 - Final Sin, part 3
Second phase:
  • Get out of the way as soon as the fight starts, because the icon will engage directly with a punch.

  • Same as before, you’ll find three BFG charges on this map. Aiming will be more difficult, as the icon will be more agitated, but keep aiming for the head and the torso for the biggest return on investment. The HP count for the head and the chest plates are higher this time.
    • Head: 9.500 - 11.500
    • Chest: 8.000 - 10.000
    • Abdomen: 4.800 - 6.500
    • Shoulder: 4.500 - 5.000
    • Forearm: 3.000 - 4.000

  • You will be under a bit less pressure during this phase, and you will be mostly safe from all of the icon's attacks if you remain hidden in the lower level of the map, in the middle (right under the megasphere). This is your safe spot whenever you are low on health or ammo, as demons are bound to come to you, which you can easily chainsaw or kill with the crucible.

  • If you are running for the 100% completion, and are still short a couple of specific kills, you may safely wait in the safe spot for the right demons to spawn. In this phase, the demons spawn in specific compositions. Each time the icon recalls the demons to summon new ones, this composition will change. The possible compositions are the following:
    • Imp, revenant, baron
    • Mecha-zombie, mancubus, cyber mancubus
    • Shield soldier, carcass, arachnotron
    • Gargoyle, cacodemon, pinky
    • Soldier, whiplash, dread knight
    • Prowler, hell knight, pain elemental

  • You’ll get crucible charges everywhere, don’t hesitate to use it on everything in front of you, even fodder when critical on health, in order to get health back efficiently. Be mindful of your own map awareness, you never want to bump into a baron while running backwards. Always be aware of your surroundings, the heavies have precedence over the icon.

  • The icon’s head cannon now has a laser beam retrofitted, and it will use the projectiles a bit more frequently. Its new attack will feature a meteor rain, from which you want to take immediate and prolonged shelter.

  • The super shotgun - ballista quick-swap and the empowered micro missiles remain your main damage dealers, after you've shot all your BFG charges. Again, you should abuse the jump pads everywhere, and maximise your air time when focusing the icon. In order to maximise your survivability, your routine should look like this: enter the fight, shoot your BFG ammo, grab the charges around, get to your safe spot -> clear your immediate surroundings, heal yourself if necessary -> check if the icon is preparing an attack -> if not, take a jump pad, focus whatever on the icon -> get to your safe spot -> clear your surroundings -> take a jump pad -> etc.

  • Do not commit to a suicide attack when you take out the last hit points of the icon. The end cutscene triggers several seconds after you kill it. Play safe until the very end, and only lift your hands from the keyboard once the cutscene starts playing.
Final words
If you're reading this, perhaps it's because you've succeeded at Ultra Nightmare, with or without the guide, in which case you are deserving of a hearty round of applause! Know that you have accomplished a great feat, that rewards you with absolutely nothing except a golden armour and the satisfaction to have beaten the game on arguably the hardest difficulty. Hope you're okay with that. Do not hesitate to share your feedback, in public or in private!

Or it's because you've done it at a lower difficulty. In which case, congratulations still! I hope this guide has helped you, even a little bit. Your feedback is equally important to me!

Or whatever the case, you're about to drop a fat, vulgar and insulting commentary about my mother down below. In that case, welcome! The commentary section is precisely here for that, so help yourselves. I also, and above all, welcome constructive criticism, suggestions, ideas, and contributions to this guide.

Don't forget to have a look at the "Disclaimers, sources and future plans" section at the beginning of the guide before commenting!

If you enjoyed my work, please give it a rating, and share it !


=== 2 - THE ANCIENT GODS PART 1 ===
Ancient Gods, Part 1
You thought you were done with Ultra Nightmare? The newly released DLC added three levels, just as worthy of being beaten!


Preparations - Noticeable changes
Many things have changed in this DLC, some big things and some more subtile changes.

General:
  • "Against all the evil that hell can conjure..." yeah, there's no unskippable intro here. Press R and start pounding. Thanks ID Software!

  • There is almost no tutorial section, no early-game where you need to collect your weapons and your skills. The full action starts almost immediately, which makes the run overall shorter, more to-the-point and less frustrating to fail.

  • The DLC is generally a little bit harder than the base game, due to certain game mechanics introduced to spice things up. A lot.

  • The extra life pickups are not replaced by anything like full armour pickups here in the first two levels. In the third level, all of them are replaced by full armour pickups.


Big arena fights still have a structure to it, an order in which the demons spawn, and a fixed set of triggers for them. However, some things are worth mentioning:

  • There are generally more fodder demons simultaneously in arenas.

  • Outside of big fights, shield soldiers still appear in fixed numbers. In big arena fights however, they will now spawn perpetually, in order to maintain a fixed number of them present (generally two to three). They are not any less dangerous than before, but you should not aim to hunt them down as one of your top priorities anymore. Instead, avoid them, and keep your chainsaw charges to kill them if one pressures you too much.

  • Sometimes, the same thing applies for drones, as they will spawn perpetually to maintain a set number of individuals in the arena. Sometimes, they will spawn only in a set amount.

  • Most demon spawns will be triggered by either walking somewhere, or killing another demon. A third, and very significant condition has been added for some encounters: lowering a demon's life below 25% (roughly). This means that sometimes, the next wave will be triggered before a big, central demon is dead, and if you switch your focus too fast, then the super heavy demons will supplement each other and overwhelm you. These instances will be indicated in the guide, and you will generally be urged to kill the concerned demon as fast as possible.
Preparations - Killing new demons
Turrets
  • Know where they appear, and focus them first. They require quite a bit of your time and attention to be destroyed, so be sure to not remain static.


Giant tentacle
  • Same as standard tentacles: approach enough to trigger them, then keep your distance. If this is not a possibility, kill it as fast as possible.
  • The energy shield chaingun is a great tool for them, try to activate the shield when you are about to get hit.


Spirit
  • The spirit is key to many encounter mechanics in the new DLC. Knowing which demons is possessed and which is possessable is key to handling fights where they are involved.
  • The only way to kill them is with the microwave beam. It takes 75 energy to kill them, always make sure you have them before jumping into the fray to eliminate them.
  • Make sure you know what demons are around you at the time you extract the spirit from its previous host. It is never recommended to let the spirit possess a super heavy demon, but using the microwave beam heavily reduces your mobility. Having another possessed baron is never a good thing, but having another possessed arachnotron on your hands is preferable to dying an early death due to too much eagerness.
  • The spirit will possess the nearest, strongest demon in range.
  • The spirit can't possess invisible enemies.


Blood maykr
  • The blood maykr is a very high priority heavy demon, due to its nuisance potential and the time it takes to kill them.
  • The precision bolt is the best way to deal with them. An arbalest shot works too, but you cannot quickscope with it, which greatly lowers the weapon's accuracy with raw shots, or your mobility with charged shots.
  • They will create areas of effect on their position if you get too close. This area of effect deals lots of damage, but most importantly greatly reduces your mobility, and generates disorienting visual effects on the screen. Always keep your distance, consider them as deadly as doom hunters in close combat.
  • Their ranged charged attacks come in the form of either large but slow cross-shaped projectiles, or a thrown spear that will generate area of effect on impact, just as nocive as their melee range attacks.
  • You can hear the distinct blink when they lower their shield to attack you. If you can take them on, kill them as soon as possible. If you can't, take cover and don't take any necessary risk.
Preparations - Weapons, equipment and runes
You will start with all your weapons fully upgraded. This means that, regardless of your progression in the base game, everything is already at peak capacity. One noticeable consequence of this is that the lock-on burst rocket launcher is mastered, despite it representing a downgrade on its performance.

In addition, even though you start with the BFG and the Unmaykr, you will not see the Crucible.

There will be many instances where repeated precision shots will be needed, so the precision bolt / ballista quick swap is a technique you will have to master.

The microwave beam is now mandatory, so the heat wave on the plasma rifle will take the backseat.


The runes are the same as before, and the same guidelines apply:
  • Air control is a rune that does nothing noticeable, however if you remove it after playing with it for a long time, you will immediately notice the difference, in that you will attempt manoeuvres that fail because you lack the mobility and flexibility that the rune offers. It is a must-have.
  • Blood fueled is a nice rune to have, it allows sting actions on staggered demons in dangerous environments
  • Chronostrike is a fantastic rune, but is very situational. It is mainly used for the boss at the end of the Blood Swamps, as well as for the drones and the blood maykrs in the Holt.
  • Equipment fiend was already a great rune in the base game, but with the DLC's arenas containing even more fodder demons than before, it is even more effective than before. Get used to throw your frag grenade around in groups of fodder demons with this rune equipped.
  • Second wind is the good old lifesaver. Either have it equipped all the time, or only during hard fights, or only when your health drops dangerously low.

In addition, you will be able to use an additional support rune:
  • Take Back rune is disabled in Extra Life mode, as well as in Ultra Nightmare.
  • Blood punch is great against many possessed demons (such as barons), and the Desperate Punch rune increases the damage even more. The caveat is that you need to be low on health for this. Ideally, you want to have this rune equipped when you plan to blood punch big possessed demons from the safety of your chaingun's energy shield mod, but it is a dangerous gamble to try and lower your health to meet the prerequisite.
  • Break Blast is the by-default rune, as you will be destroying weak points during the whole game. The effect is not incredibly powerful, but it is very nice to have nonetheless.
Preparations - Some numbers
Here's a video from decino, that breaks down how the spirit buff affect the possessed demons resistances to certain weapons. Possessed demons do not have more health, they have more resistance, which means that some weapons are favoured over others for certain possessed demons.

Some key points:
  • The ballista - super shotgun quick-swap is debuffed more than any other weapons.
  • The rocket launcher is the least debuffed weapon, and the lock-on burst becomes the dominant strategy against most possessed demons.
  • The cyber-mancubus is mostly impervious to the blood punch.
  • The marauder takes more damage from the ballista shot than the super shotgun shot.


Yeah I counted again. Why? No idea. Why not?

Demon
Total
Spirit
11
Tentacle
38
Giant tentacle
2
Totem
5
Arachnotron
18
Blood maykr
12
Cacodemon
11
Cyber mancubus
15
Dread knight
17
Hell knight
25
Mancubus
25
Pain elemental
4
Pinky
5
Revenant
19
Spectre
10
Whiplash
17
Archvile
7
Baron
18
Doom hunter
7
Marauder
9
Tyrant
12
14 - UAC Atlantica, part 1
(click to enlarge)


14 - 01
Difficulty 3/5

2 carcasses, 2 shield soldiers, 3 arachnotrons, 3 cacodemons, 4 cyber-mancubi, 2 dread knights, 3 hell knights, 3 mancubi, 2 revenants, 1 baron


Back in the saddle, no time to waste on tutorials. The DLC starts immediately with the action. The very first thing you want to do is to kill a fodder demon with either the flame belch or the super shotgun grappling hook, in order to harvest some armour points. The goal is to get two blood punches ready for a little later. A mancubus will appear in front of you, and to your left and right, one revenant and one hell knight each. The hell knights only spawn once you have killed enough possessed soldiers.

Below the entry deck, when approaching the door ahead, it will be busted down by a dread knight. A mancubus and a carcass will be attacking you from the far side of the room. After grabbing the blue key and backtracking a little, you will be ambushed by a hell knight and another carcass.
Once back outside, an arachnotron will spawn ahead. Killing it will trigger two cyber mancubi to spawn, one on each set of stairs upwards. This is what you wanted your blood punches for earlier, dispose of them with the usual standard trick (super shotgun, blood punch, and ice grenade for safety). Try getting the blood punches back.

Killing either cyber mancubus triggers three cacodemons to spawn. Killing the second cyber mancubus triggers the spawn of two arachnotrons upstairs. Killing either one of them triggers the baron to spawn.

Back inside, following the objective tracker, you will get ambushed by a dread knight, followed by a mancubus. Handle them with care, there is not much space to navigate and dodge. Once dead, two cyber-mancubi will spawn at each closed door entrance, and two shield soldiers will come in from the opened door. Engaging directly is possible but not recommended, instead either jump downstairs, or kill the two shield soldiers and fall back to the hallway they came from. Engage the cyber-mancubi carefully.


14 - 02
Difficulty 2/5

1 turret, 1 arachnotron, 1 mancubus


You will see the arachnotron from afar, snipe its turret away. Don’t forget to grab the megasphere on the lower platform. Jump across the gap, and on the other side a mancubus will greet you.


14 - 03
Difficulty 4/5

4 turrets, 3 arachnotrons, 1 cyber-mancubus, 1 hell knight, 1 mancubus, 1 revenant, 2 whiplashes


There are 4 turrets in the arena as you enter. A revenant will be right ahead of you, and a hell knight will have spawned to the left. The rest will only spawn once you have taken down two turrets. Note that you can destroy two turrets without stepping foot into the arena, just stand behind the door and snipe away.

The cyber mancubus will spawn just below the first turret you see upon entering, and the mancubus to the far right. Shield soldiers will spawn perpetually. Killing both mancubi triggers the next wave, so leave them be until you dispatch the last two turrets.

The last wave will see two whiplashes spawn to the far right, and three arachnotrons in the center and to the left. You have plenty of room to navigate, use the upper platforms wisely. If you can afford to, leave the quad damage pickup for later.


14 - 04
Difficulty 4/5

3 cacodemons, 2 hell knights, 2 mancubi, 3 revenants, 2 barons


Get your rocket launcher out. A revenant and a mancubus will appear in front of you, a mancubus and two revenants will come from your left. Killing the two mancubi will trigger the next wave, so keep them for last.

Next, two hell knights will spawn. After they die, three cacodemons spawn from the outside of the map. Once you kill either one of them, the baron will spawn where the cyber mancubus spawned in the previous fight. Try taking out all three cacodemons at once with charged arbalest shots. If you do not unzoom between shots, the reload animation will start sooner and you can kill them faster, but you will lose your map awareness. The reload animation starts when the previous projectile either hits or disappears, so aim carefully.

The first baron will have spawned to the left of the door through which you first entered the arena, and the second baron will spawn after you killed the first one, to the right of that door. Go collect the Onslaught powerup, and kill the two barons with the chaingun.


14 - 05
Difficulty 2/5

3 lost souls, 1 dread knight


The corridor leading ahead is booby trapped with spawning lost souls and a dread knight. Throw an ice grenade on the ground next to the lost souls, and kill the dread knight the usual way. The door does not close behind you, so if you lose control of the situation you can always flee.


14 - 06
Difficulty 3/5

1 marauder


An old friend came by to say hello. Greet him in kind.


14 - 07
Difficulty 3/5

2 turrets, 1 arachnotron, 2 cacodemons, 1 cyber-mancubus


Once you get out of the elevator, head right first, and methodically kill all the demons around, before triggering the bunch to your left, and on the other side of the ridge. Snipe the arachnotron’s turret, kill it, then approach to destroy the turrets.

Once you get to the other side, try remaining on the lower level. Destroy the turret from there, and the cyber mancubus too. You can choose to engage it at close distance, but going upstairs will trigger two cacodemons to spawn. The safer method should be preferred.


14 – 08
Difficulty 1/5

2 carcasses, 1 mancubus


In this DLC, secret encounters bring no reward for your run, only a Slayer skin.

Throw an ice grenade at the mancubus once it and the two carcasses have spawned. You should have ample time to kill them all with your turret mode chaingun before the freeze wears off.
14 - UAC Atlantica, part 2
(click to enlarge)

14 - 09
Difficulty 3/5

2 carcasses, 2 arachnotrons, 1 cyber-mancubus, 1 archvile


Before advancing, kill the six possessed soldiers coming at you. Once you jump over the electrified ground, a cyber mancubus will spawn right in front of you after you jumped over the electrified ground towards your right. Prepare your ice grenade and your super shotgun for the usual combo, then turn around to kill the arachnotrons that will have spawned. Alternatively, you can engage them the other way around, by first jumping to the left over the electrified ground.

A megasphere pickup is located enclosed, next to the arachnotrons‘ spawning point. You can jump in and out without risk, despite the barriers appearing electrified. Past the cyber mancubus will spawn two carcasses. Advance carefully to trigger them, and kill them from where you are. If you advance further, an archvile will appear ahead. Freeze it and kill it with the chaingun, the rocket launcher or the ballista-super shotgun combo.


(click to enlarge)


14 - 10
Difficulty 3/5

3 turrets, 1 dread knight, 1 mancubus, 3 revenants


On the other side of the long propulsed jump, three revenants and a mancubus are waiting for you.
Once up a level, you’ll be greeted by two turrets and some fodder. If you advance past the first turret, a dread knight will spawn up ahead. Try your best to enter the next fight fully stocked on ammo and hit points.


14 - 11
Difficulty 4/5

2 carcasses, 2 cacodemons, 1 cyber-mancubus, 1 pain elemental, 2 barons, 1 doom hunter


A baron will spawn in front of you, and a cyber mancubus will follow suit roughly 5 seconds afterwards. You have enough time to kill the baron with either four triple-rockets, or a turret mode chaingun unload. Do note that the second baron, as well as two carcasses, do not spawn once the first baron has died, but once it has suffered enough damage. This means that, if you just wound the first baron but do not kill it, you will have two barons running around, which is not a particularly good thing in such a small arena.

Kill the first baron with your chaingun, then dispatch the cyber mancubus with the usual combo. Then kill the two carcasses, which will otherwise become a nuisance for the future. Afterwards, focus the second baron with four triple rockets, while making extensive use of the jump pad directly to your right when you enter the arena, that provides a huge air time. Always keep an eye on the perpetually spawning shield soldiers, that can shred you to pieces if you land next to them.

Once the baron falls, two cacodemons and one pain elemental will spawn. The cacodemons are your highest priority, kill them with charged arbalest shots, and do the same for the pain elemental.
In the meantime, a doom hunter will have spawned upstairs. Get some ammo back by chainsawing a passing fodder demon, then engage the doom hunter with the microwave beam to down its shield. Destroy it with either triple rockets, or your trusty ballista-super shotgun combo. Again, keep an eye on your surroundings, don’t get cornered by either the doom hunter or the shield soldiers.


14 - 12
Difficulty 3/5

1 Marauder


Before grabbing the Seraphim key, you’ll have to suffer another visit from ya boy, the marauder. Be careful with this one, the room is much smaller than for the last one.


(click to enlarge)


14 - 13
Difficulty 4/5

2 carcasses, 2 prowlers, 5 arachnotrons, 2 hell knights, 1 pain enelemtnal, 1 baron, 1 tyrant[/b]

There will be three arachnotrons in the arena up ahead, accompanied by at least two shield soldiers that will perpetually respawn throughout the fight. You can snipe their turrets off from afar if you wish. Killing two of them will trigger two hell knights to spawn. Killing one hell knight triggers two prowlers, and killing the second one triggers the rest of the wave. Make sure to kill the third arachnotron and the prowlers before then.

Next, a pain elemental will spawn up in the air to the far right, looking from where you came from. Wounding it enough will trigger two cacodemons to spawn, from where you came. Killing one cacodemon will trigger the baron to spawn in the middle of the arena.

Once the baron is wounded, the remainder of the wave appears. A tyrant will spawn upstairs in front of the door leading ahead. In addition, two arachnotrons and two carcasses will spawn.


14 - 14
Difficulty 3/5

1 turret, 4 tentacles, 1 mancubus, 1 tyrant


In the corridor ahead, you will find four tentacles in total. Beware of the mancubus waiting in ambush through the door to your left. You can run through them all, they will have disappeared when you come back.

If you continue past the door after the slayer gate to your right, you will be stuck with a tyrant in a very tight corridor. Empty your rocket launcher and your chaingun into it, while jumping around to avoid its attacks. Throw an ice grenade only when it starts attacking, not before.
On your way to grab the slayer gate key, along the monkey bars, you will face a turret. You may ignore it, and just run straight through the broken grate.


14 - 15
Difficulty 4/5

2 carcasses, 1 arachnotron, 2 cyber-mancubi, 2 dread knights, 1 hell knight, 3 revenants, 2 whiplashes, 1 archvile, 1 doom hunter, 1 tyrant


In this slayer gate, you will first face three revenants and two cyber-mancubi at once. Killing any three of them will trigger the next wave. Start with the revenant to your left, then deal with the first cyber mancubus. It is safer to keep the ice grenade for the second cyber-mancubus, and kill the first one without. Alternatively, you can kill it from afar, or get away and wait for the ice grenade to cool down. You may also shoot a BFG shot in the air, to kill all five heavy demons (and maybe even more) at once and spare yourself the hassle.

The next wave comprises one arachnotron and two dread knights. Killing the two revenants, along with any two of the three recently introduced demons, will trigger the next wave, so kill the revenants last.

Next will spawn a hell knight and three whiplashes. You can kill them very quickly and easily with controlled triple rockets shots. The final and deadliest wave will only commence once every single demon has been wiped out, so take your time to replenish all your ammo and hit points before it starts. Have an ice grenade at the ready.

The archvile will spawn where the right cyber-mancubus spawned in the first wave, so wait for it there. Two carcasses will spawn to its left and to its right. Throw an ice grenade at it once it arrives (not before!), and empty your rocket launcher or your chaingun in it. Take care to dodge the incoming carcasses attacks if you have not managed to freeze them alongside the archvile.

Once it is dead, two carcasses, a tyrant and a doom hunter will spawn. Kill the carcasses first. For once, the tyrant is not your lowest target priority. The doom hunter requires sustained dedication and an unhealthily close range to defeat, so it is better to first down the tyrant, that can be weakened little by little, from a distance. Once you defeat the doom hunter and kill the remaining fodder demons, the rune is yours.
14 - UAC Atlantica, part 3
14 - 16
Difficulty 4/5

2 carcasses, 1 cyber-mancubus, 2 hell knights, 1 mancubus, 2 revenants


Go straight forward and a mancubus will jump up from your right. Kill it the usual way, and kill the cyber-mancubus at the rear up the stairs, again with the usual method. This will trigger two hell knights to spawn, one will be directly upstairs from the cyber-mancubus. Killing either one of them will trigger two revenants and two carcasses to spawn. Take advantage of the tight quarters, don’t hesitate to throw your frag grenades around and use your flame belch.

Once it is over, go upstairs in the control room where you find the diving suit. Press the green button, and go get the BFG ammo (if you need it), as well as the megasphere (again, if you need it) below the arena, behind a cracked vent in the water.


14 - 17
Difficulty 2/5

5 spectres


Throw an ice grenade at the spectre in the middle, and the whole room will be frozen. Throw frag grenades around, and kill everything that stands with your rocket launcher or your chaingun.


14 - 18
Difficulty 4/5

1 totem, 2 carcasses, 2 shield soldiers, 2 arachnotrons, 2 dread knights, 2 hell knights, 1 pain elemental, 1 archvile


Out the door, you will face two shield soldiers.

After riding the container to the next area, the arena will be to your left. There is an extra life to the right, but in Ultra-Nightmare you will find nothing except two dread knights, and an ambush by an archvile on your way back.

In the following arena, you will face two cyber mancubi and two carcasses. Killing either one of the cyber-mancubi will trigger two hell knights to spawn. As tempting as it may be to rush to a cyber-mancubus, the safer move is to first kill the two carcasses, down to the right and to the rear.

Once you kill all the heavy demons, a pain elemental will spawn outside. Once you wound it enough, a totem will spawn, so try to kill it as fast as possible. If you don’t manage, then the totem becomes your first priority. It is located upstairs, in the center right of the arena, behind crates. Have an ice grenade at the ready to freeze any arachnotron that may be barring your way.


14 - 19
Difficulty 3/5

1 turret, 1 cyber-mancubus, 2 revenants


Upon entering the next hallway, two revenants will jump on you. Advancing further will trigger a cyber-mancubus to appear upstairs near the turret. Take cover from it while you destroy the turret.


(click to enlarge)


14 - 20
Difficulty 4/5

1 shark, 2 carcasses, 2 dread knights, 1 mancubus, 1 tyrant


The shark is harmless as long as you stay out of its path.

Once you enter the facility, a mancubus will bust a door open ahead. Make sure you kill it before advancing, as the door’s rubbles may prevent a shot from connecting with the mancubus.

In the coming corridor, kill the two shield soldiers from afar, then freeze the two possessed soldiers, in order to destroy the turret behind them. Once it is done, harvest ammo, health and armour from the soldiers. Killing them will trigger two dread knights, one on each end of the corridor. Kill them, and a tyrant and two carcasses will spawn from the door you came through. Throw two frag grenades where they will spawn, and with a little bit of luck the two carcasses will die upon arrival. Use the whole corridor’s length to dodge the incoming attacks, and throw your ice grenade as soon as it is available. Kill everything with the rocket launcher or the chaingun.


14 - 21
Difficulty 3/5

2 turrets, 2 revenants


Grab the megasphere under the elevator, past the broken lid.
After jumping on the second climbing wall, two revenants will spaw behind you. Climb as fast as you can, then jump straight onto them, while throwing an ice grenade at them. Destroy them quickly, then the two turrets on either side of the room should not pose any threat if handled with care.


14 - 22
Difficulty 5/5

4 prowlers, 1 arachnotron, 2 cyber-mancubi, 2 hell knights, 3 mancubi, 2 pinkies, 2 barons, 2 marauders, 2 tyrants


It’s ya boy, the marauder. Except there are two of them now. There being two of them does not make the fight particularly harder, as the arena is huge and there is plenty of cover. Do not engage actively, wait for them to approach you, and punish them for attacking with their axes. Run around in circles, wait for opportunities to present themselves to you. Be very careful when chainsawing a fodder demon for ammo, as the marauders will not lose an occasion to surround you and potentially kill you outright.

After they die, you’ll be allowed a brief respite before the next wave starts. Three mancubi will spawn across the map. Killing any two of them will trigger two cyber-mancubi upstairs to spawn. Killing any one of them will trigger the next wave. Kill the last mancubus before either cyber-mancubus.

Two hell knights and two arachnotrons will spawn. Kill the hell knights and the remaining cyber-mancubus first, because killing both arachnotrons triggers the next wave.

Four prowlers and two pinkies will spawn, along with some perpetually spawning shield soldiers. Killing everyone is required to advance to the next wave.

The last wave consists of two barons, one spawning after the first one is dead, and two tyrants at the same time in the end. The fodder demons will consist almost exclusively of imps, and there will be a lot of them. Do not understimate the amount of imps required to surround and bodyblock you, keep them well in check with frag grenades, flame belch and single rockets.
15 - Blood swamps, part 1
(click to enlarge)


15 - 01
Difficulty 3/5

1 tentacle, 1 giant tentacle, 1 cyber-mancubus, 1 hell knight, 3 mancubi, 1 pinky, 1 revenant, 1 baron, 1 marauder


The first mancubus will appear right in front of you, after you have reached the islet with the infighting fodder demons. The second one will spawn in the distance, atop a spire.

Past the wall’s corner in the swamp, a revenant will greet you, along with a huge tentacle. The tentacle is mostly harmless, so long as you keep your distance.

Once you reach the other side, after cleaning the infighting fodder demons, a pinky will spawn and rush you, followed by a marauder.

Afterwards, when going left, a hell knight will jump up in front of you.

After jumping across the main path, in front of the big door, you’ll land on a ridge with an imp on it.

Once you jump down, a cyber-mancubus will spawn in front of you. A tentacle is waiting for you in the middle of the area, so be mindful. Jump directly on the hazard suit pickup, and dispatch the cyber-mancubus from here to avoid contact with the tentacle.

Once you emerge from the caustic goo, you will find some fodder demons and a baron. Freeze it and chaingun it.

After pressing the skull switch, a mancubus will jump up in front of you.


(click to enlarge)


15 - 02
Difficulty 3/5

2 turrets, 1 cacodemon, 1 whiplash


This guide will see you go left first. If you want to do the right part first, you can jump to 15 – 09.
Until you reach the ruins, you’ll be faced by a whiplash, then a turret, then a cacodemon right after the turret, then a second turret after the monkey bar. Be careful with the foliage at the edge of the platform right above the turret, it will shoot at you before you can see the eye.


15 - 03
Difficulty 5/5

1 spirit, 1 tentacle, 1 totem, 1 prowler, 1 hell knight, 1 mancubus, 1 marauder


A totem will be buffing a couple of fodder demons, a prowler and a tentacle. You can kill them, or rush right through to the next area where the totem is, as they will be despawned when you reach it.

A buffed marauder can be the stuff of nightmares, but the strategy remains unchanged. You just have to be more swift and careful about it. Your window of counteraction is greatly reduced, so your probability of misreading him and shooting into his shield is greater. Keep cool, don’t let yourself get tilted, and you will pull through.

Later on, you’ll face a hell knight possessed by a spirit. Possessed demons generally have twice their normal hit points, so a double triple rocket salvo should do the trick. Don’t hesitate to shoot once or twice more, to make sure it is dead. Proceed to eliminate the spirit with the microwave beam, while dodging the incoming projectiles from the mancubus up ahead. Don’t let the spirit jump to the mancubus.


15 - 04
Difficulty 4/5

1 giant tentacle, 2 turrets, 1 arachnotron, 1 hell knight, 1 doom hunter


After jumping on the crate to advance, you’ll fall into a misty swamp, where you want to take all the precaucions possible to not take unnecessary damage. An arachnotron will be infighting with fodder demons, and two turrets will be waiting for you on ridges. Kill them one at at time, don’t rush.
Once you’re clear from the swamp you’ll climb up to a platform with blazing rotating traps, and a hell knight will engage you.

After punching the column to create a very, very conveniently flat bridge, a giant tentacle will appear, along with a doom hunter some seconds later. Focus the tentacle, do not approach it. The doom hunter will be mostly alone, but be mindful of the treacherous terrain around, and don’t forget about your ice grenade. Mind the second turret at the end of the bridge you just created. Get stocked up on ammo and hit points.


15 - 05
Difficulty 5/5

1 spirit, 3 tentacles, 1 arachnotron, 3 spectres, 1 doom hunter


Another misty swamp, but this time full of tentacles. The first one will be slightly to the left of the health vial on the ground, the second one next to the flaming vent up ahead, the third one will be slightly to the left, past the flaming vent. Advance carefully, and pull the fodder demons to you, in order to kill them from the dry land you came from.

Shortly past the third tentacle, a possessed arachnotron will appear. At this point, the dry land from earlier will be closed off, so you have no choice but to face it in the mist. You want to kill it as fast as possible, mostly for obvious reasons, but mainly because after several seconds, shield soldiers will spawn and complicate the encounter. Get a hold on the arachnotron and empty your rocket launcher as fast as you can.

Immediately after it dies, three spectres will spawn, to prevent you from neutralising the spirit. You can focus on the spirit with the microwave beam, and throw an ice grenade at your feet to freeze the incoming spectres. This is still a risky move, and a safer alternative would be to ignore the spirit for now. It will attempt to possess the strongest demon around, but just as you can’t lock onto invisible enemies with your rocket launcher, so too can’t the spirits possess them. The strongest enemies within their reach are the shield soldiers and the mecha-zombies, but even possessed, they are relatively easy to deal with.

The safest option, is to kill the arachnotron, then jump up on the platforms ahead, then jump on top of the column in the middle of the area. From that vantage point, you will be completely out of reach of the spectres and the shield soldiers on the ground, and you will be able to safely root out the spirit, and toss humiliating shotgun grenades at the demons below. Alternatively, once you kill the arachnotron, you can shoot a BFG shot into the air, which will take care of all the demons present, except for the spirit. Be careful about it, because it means that the doom hunter will have spawned before the spirit is dealt with.

The doom hunter will spawn once you kill the last spectre (not the spirit). Whatever you do, do not allow the spirit to possess the doom hunter. Note that shield soldiers only spawn in the presence of the doom hunter or the arachnotron. If you have enough plasma ammo, you can stay on top of the column and kill the doom hunter from there, though you will be less able to dodge its attacks. Still, you’ll be safe from the shield soldiers.


15 - 06
Difficulty 4/5

1 spirit, 5 tentacles, 1 dread knight, 2 hell knights, 1 mancubus, 2 whiplashes, 1 tyrant


You’ll face a tyrant and two invisible whiplashes. The whiplashes are your main concern, and you will want to take them out as soon as possible, because your usual jumping around to dodge them will see you quickly land on a yellow sack, or on a tentacle. There are two tentacles: one is between the island in the middle and the skeletal spine to the right, the other is right next to the armour pickup. Don't be afraid to shoot a BFG shot in the air upon entering this arena if you really don’t want to take any risk.

There is a secret passage to the right of the titan’s head. It will lead you to some BFG ammo, if you need it. A hell knight and a mancubus will bar the way.

Up the stairs, you’ll face a possessed hell knight. A shield soldier will perpetually spawn. There are three tentacles, two in the swamp patch ahead, one to your left. Once the hell knight is approaching death, a dread knight will spawn. Focus fire on the hell knight, then microwave beam the spirit while freezing the dread knight. If you fail that operation, run around until you get another shot.
15 - Blood swamps, part 2
15 - 07
Difficulty 3/5

1 mancubus, 2 whiplashes, 1 baron


Instead of going through the big door, you can go to the left, and follow the path until you reach the gore next from before.

When looking at the gore nest, a whiplash will spawn to your left, then one from behind, then a mancubus next to it. Lastly, a baron will spawn to your right. Kill the first three with your triple rockets barrages, then freeze and chaingun the baron.


(click to enlarge)


15 - 08
Difficulty 5/5

1 spirit, 2 totems, 4 carcasses, 2 prowlers, 2 hell knights, 1 pain elemental, 1 pinky, 4 revenants, 4 barons, 2 tyrants


After the timed jumping puzzle, you will face a lone pinky. After some more jumping around, a pain elemental will spawn. Do not lose any unnecessary hit point here.

Once on top of the tower, after triggering the pressure plate, one of the hardest fights so far will start. A totem will immediately appear. From the pressure plate, follow the right edge of the arena, get past the revenant, then take the jump pad and you will land on the totem.

Four revenants will spawn. Killing any two of them will trigger two prowlers to spawn. Kill them all to trigger the next wave.

Next, two hell knights and four carcasses will spawn. Kill the carcasses before finishing off the last hell knight.

Next, two tyrants and another totem will spawn. The totem will be located just below the megasphere. Shield soldiers will spawn perpetually. Killing any one tyrant will trigger two barons to spawn. Killing all of them is required for the last wave.

Lastly, a possessed baron will spawn. You should respect it, and take every precaution should be taken when engaging it. When it is wounded enough, a second baron will spawn. From there you have two options: either kill off the possessed baron, then deal with the spirit while keeping the second baron in check with an ice grenade, or you can focus the unpossessed baron, so that the spirit can’t possess it if you fail to eliminate it after killing the first baron. Take your time, do not engage the possessed baron too closely, run around the arenas and exploit the opportunities.


(click to enlarge)


15 - 09
Difficulty 4/5

10 tentacles, 2 turrets, 2 cacodemons, 1 cyber-mancubus, 3 dread knights, 2 hell knights, 1 mancubus, 1 revenant, 1 spectre, 3 whiplashes, 1 baron, 1 marauder


From the central hub, you will now go to the right. For the left path, jump to 15 - 02.

Among infighting demons, you will face a revenant, then a whiplash, then a cacodemon.
Later on, past the armour pickup, you will start losing hit points if you remain outside of the hound’s area of influence. Stick close to it, don’t lose any unnecessary hit points.

The first torch area will pit you against many fodder demons, then a cyber-mancubus, coming from the blocked path ahead. You will not have much time to react to its apparition, so be prepared.

Before the hound lights up the second torch, to the left of it, a turret will start targeting you. After it is destroyed, two whiplashes, then two hell knights will come at you.

At the third torch, two dread knights, followed by one dread knight, one cacodemon and one mancubus will engage you. Pay attention to the dread knights‘ area of effect.

At the fourth torch, ten shield soldiers, followed by a spectre and a baron will attack you. Try keeping the ice grenade for the baron, but don’t be afraid to use it on the shield soldiers if they overwhelm you.

At the fifth torch, you will be harassed by a turret, but most importantly by ya boy, the marauder. Focusing the turret and dancing around with the marauder at the same time is pretty hard, and not having the marauder in your sight at all times put you in potentially lethal danger, but the turret must come first.

Go get the full armour pickup on top of the tallest rock in the middle of the swamps close by. Be careful if you fall, there are ten tentacles scattered around the area, fortunately their burrows are glowing red and can be easily identified, even in the mist.


15 - 10
Difficulty 2/5

1 accodemon, 1 mancubus, 1 baron


You will have to backtrack to reach the gore nest. It will spawn a mancubus, followed by a cacodemon, followed by a baron.


15 - 11
Difficulty 5/5

4 tentacles, 1 turret, 2 barons


After the jumping puzzle, you will land on a ridge, with water flowing around. There are four tentacles in it. Wipe them out, then use this low ground to snipe the turret from afar. Do not climb up until it is destroyed.

Once you climb up, you will trigger some imps to appear. Once you kill most of them, a possessed baron will spawn. The cueballs deal huge amounts of damage to the baron, and shooting both of them at it will remove roughly 75% of its health. It is a great investment, but do not take unnecessary risks. You can stun it with the microwave beam, then shoot the cueball with the same weapon, then stun the baron again while you move to the next cueball, and repeat the process. Your gamer instinct might tell you to steer away from the thorny brambles to your right, but they are harmless, you can walk into them to position yourself behind the cueballs.

The energy shield mod for the chaingun comes particularly in handy against this possessed baron. The shield blocks all the damage in all directions for a small time, but deals 800 damage per second, compared to 1200 for the turret mode (the turret mode also deals more damage per bullet). Besides giving you some additional protection, the main advantage of this energy shield is that you can blood punch through it. The blood punch deals significant damage against possessed demons, and you run no risk as long as your shield is up.

Once the baron's health is low enough, a second baron will spawn. Focus the possessed baron first, and when it is dead, throw an ice grenade at the second baron in order to kill the spirit relatively in peace. Finishing the second baron off should not be hard after all that. Do not glory kill the possessed baron! The spirit will evacuate when the animation start, and by the time it ends, it will already almost have jumped to the second baron.
15 - Blood swamps, part 3
15 – 12
Difficulty 4/5

1 spirit, 3 arachnotrons, 1 cyber-mancubus, 2 mancubi, 4 revenants, 2 barons, 2 archviles


Upon triggering the fight, a cyber mancubus will spawn directly in front of you. Engage it, then kill the two mancubi fast before the two barons get to you. Once you kill them all, the second wave will start.

Four revenants will appear. Killing them will trigger make three arachnotrons spawn, as well as perpetually respawning shield soldiers. One of them is possessed, keep your distances from it at all times, kill it from far away. Killing all arachnotrons triggers the next wave, and you don’t want the spirit to stick around, so the best course of action is to not kill the possessed arachnotron last, and to dispose of the spirit before killing the others.

Once the last arachnotron falls, an archvile will spawn at the far end of the arena. Freeze it and terminate it, two triple rockets should do the trick. Once it is down, another archvile will spawn at the other end of the arena, along with a doom hunter in the middle. Shoot a BFG shot at the second archvile, in order to neutralise it as fast as possible. Afterwards, the doom hunter will be the last noticeable demon left to kill, and the BFG shot should have downed its shield already.


15 – 13
Difficulty 4/5

Maligog’s trial is not the hardest boss fight, provided that you know what to do. There are three phases. In each of them, you will have to damage eyes inside of floating boxes. Your best tools are the raw ballista shot, and the scoped assault rifle, 5 raw shots per eye are enough. Once an eye is down, you have roughly ten seconds to get to it and punch it into the shield.

Each time the eye opens up, you have an opportunity to shoot once with each weapon, but be careful not to remain static while switching weapons. The eyes will have trouble hitting you while moving, but in addition to dealing damage, their projectile slow you down significantly, which makes you much more likely to die from the heavy demons around. You need to be proficient with the ballista-scoped rifle quick swap before using it here.

In the first phase, a hell knight will be hounding you. Don’t get caught off-guard, it spawns before the eye reveals itself. You can just jump around and ignore it. Investing resources into killing heavy demons is a waste of time at this point, because they will just respawn five seconds after dying. Focus on downing the eye, and on getting your ballista ammo back.

The second phase is identical, except this time a pinky will join the hell knight. This alone makes the fight much more hazardous, and you need to keep an eye on the pinky at all times. You can kill it easily with a blood punch, but do be careful with it. The eye should fall before you use your two blood punches.

The third phase will have two eyes to target, and two hell knights and one pinky to follow you around. You can handle them with your grenades, by freezing and stunning them. You may also shoot a BFG shot in the sky (two if you really need it) to reset the demon presence in the arena. It will have no effect on the eyes, but will provide precious seconds of respite to focus them.

Once you are done, fast travel will become available. You may use it to go get the BFG ammo you didn’t pick up yet (there are three pickups on the map).
16 - The Holt, part 1
(click to enlarge)


16 - 01
Difficulty 2/5

1 drone, 1 arachnotron, 2 blood maykrs, 1 dread knight


This will be your first contact with the blood maykrs. They are really not that hard to handle on their own, but they can become a real nuisance in bigger fights later on, where you will need to split your attention on everything happening around you.

Later on, an arachnotron and a dread knight will be on your way.


16 - 02
Difficulty 4/5

1 spirit, 4 drones, 2 blood maykrs, 2 cyber-mancubi, 1 hell knight, 4 mancubi, 2 whiplashes, 1 marauder, 1 tyrant


The first heavy demon in this arena is a blood maykr. Once it falls, two cyber-mancubi and a hell knight will appear. Usually the hell knight gets possessed, but it may sometimes occur that a cyber mancubus gets possessed instead. This makes the fight a bit more complicated. The hell knight’s presence has no incidence on the rest of the arena, and you can keep it alive for the rest of the fight, though it is ill advised.

If the hell knight is possessed, two lock-on bursts should suffice. If the cyber-mancubus is possessed, throw all the rockets you can at it, and refill your ammo on a drone. Once the two cyber-mancubi die, another blood maykr and two whiplashes will appear. Afterwards, four mancubi, and after them, a tyrant and a marauder. The marauder has top priority, drag him wherever the tyrant is not.

16 - 03
Difficulty 3/5

1 spirit, 3 tentacles, 2 carcasses, 2 arachnotrons, 2 hell knights, 1 mancubus


There will be tentacles waiting for you on the path ahead. You will encounter a mancubus, and two carcasses. Advance carefully.

If you go fetch the first full armour pickup along the path to your left, two hell knights will spawn on the way back. Make sure to have your ice grenade available.

Later on, a possessed arachnotron will appear. Three triple rockets volleys should calm it down. Another arachnotron will appear behind you, deal with it once you’ve disposed of the spirit.


16 - 04
Difficulty 4/5

1 spirit, 1 cyber-mancubus, 1 spectre


Go deal with the spectre first to the right. Once it is done, you can focus on the possessed cyber-mancubus. The ice grenade will be ineffective, so you will have to rely on jumping around while unloading your chaingun into it for survival. You have ample time to kill it, so do not take any unnecessary risk.
16 - The Holt, part 2
16 - 05
Difficulty 5/5

1 spirit, 2 dread knights, 3 archviles, 3 blood maykrs, 2 doom hunters, 2 marauders


This is by far the hardest and the longest slayer gate in the entire game, and it is unadvisable to attempt it in Ultra Nightmare unless you absolutely know what you are doing. Make sure you enter fully stocked.

Upon entering, two archviles will spawn to your left. They will attempt to summon friends as soon as they can, and you need to control them at all times. They need to go down as fast as possible. Shield soldiers spawn perpetually, preventing you from really ever be in control of the fight.

Get your rocket launcher out, and throw an ice grenade at the archvile closest to you in order to stagger it once it arrives. Two-three triple rocket bursts should suffice. Remember that you can't lock onto an archvile behind a shield, so be ready to shoot a single rocket to expose it.

Once it falls, a third archvile will spawn to the other side of the arena. Shoot a BFG projectile above the third one, in order to stagger both remaining archviles, and focus on taking down the second one as soon as possible. Use your ice grenade once the BFG projectile stagger wears off. You may use your remaining rockets, or a quick-swap combo, or your chaingun, together with your frag grenade that will stagger the archvile once it thaws.. If you equip your chaingun's energy shield, once it depletes, it will be propulsed forward and it will stagger the archvile again.

Keep an eye on the third one, and prevent it from summoning demons if you can. If any of the archviles manages to summon demons, make sure you kill the last remaining archvile last, because its death will trigger the next wave and you absolutely need to clear the arena beforehand.

Three blood maykrs will spawn at the same time. Your main goal will be to avoid them and their lethal damage output, while waiting for an opportunity to headshot them whenever they drop their shield down. Be patient, keep your distance, do not take too much risks and mind the shield soldiers prowling around.

Once two of them die, two dread knights and two doom hunters will spawn. The dread knights will spawn where the first two archviles appeared. Focus them with a triple rocket burst and a finishing shot, but keep an eye out for an opportunity to snipe the remaining blood maykr.

Always be mindful of the doom hunters' locations, you must avoid running into them at all costs. Once they are the only ones remaining, killing them should be easy. Before finishing off the last one, take a moment to breathe, recollect your thoughts and refill your health and ammo.

The next wave replaces perpetually spawning shield soldiers with perpetually spawning carcasses. There will be two of them at all times, and they will make an already stressful task much much harder: killing a possessed marauder.

You have already faced a buffed marauder, but the possessed marauder has additional resistances, making it twice as hard to kill. He is twice as resistant to the super shotgun as he is to the ballista (-61% on 1200 damage, compared to -34% on 900), making the ballista your go-to weapon. He will be much harder to stagger after a shot, and you only have time to line up two quick-swap shots. Don't hesitate to throw grenades at him to attempt a stagger, because him summoning his hound is bound to happen anyway due to the imps and carcasses shooting everywhere. More than with any previous marauder encounter, you need to respect him, play defensively and wait for him to attack you. Always engage somewhere far away from the carcasses, take your time to find a safe enough spot. He is lightning fast, and will often feign an attack, dash to your side and body block your panick-dash, so never engage in a corner. This fight can easily last more than 5 minutes, and your nerves will be tested.

Once you finally manage to take him down, the spirit will escape, and a second marauder will spawn. He will appear somewhere around the location of the third archvile earlier, and your absolute top priority is to prevent the spirit from jumping to him. You have two ways to do this: the first one is to kill the spirit fast enough, which is usually easier said than done with all the carcasses around. The second one is to kill the first marauder far enough from the second one's spawning location, so that the spirit, instead of jumping to the second marauder, will instead jump to the strongest demon in range, a carcass. No need to explain that a possessed carcass is much easier to handle than a possessed marauder. Dealing with the last marauder will feel like child's play after the first one, and once he and the spirit have died, you will have beaten what could very well be the hardest fight in the game so far.


(click to enlarge)


16 - 06
Difficulty 2/5

3 tentacles, 1 turret, 1 arachnotron, 2 cacodemons, 1 dread knight, 1 mancubus, 1 pinky


Upon punching the first tree down, two cacodemons will appear. When walking down the second tree, a mancubus will appear in front of you. Later on, you will face two shield soldiers, then a turret, then a hell knight after some fodder demons. Shortly afterwards, a dread knight in front of you and an arachnotron to your left. On the third punched tree, a pinky will ambush you.

If you fall down to go grab the codex entry, you will land on three tentacles.


16 - 07
Difficulty 3/5

1 carcass, 2 dread knights, 2 whiplashes


After the platforming section, two shield soldiers will be waiting for you. You’ll then be stuck in a small room with two invisible whiplashes, followed by a wave of imps coming from where you arrived from, followed by a carcass and two dread knights.

You can dispose of one whiplash at the very beginning by equipping the destroyer blade on the ballista, advancing steadily into the arena and shooting a fully charged shot at either one once it appears. You can then just toss your ice grenade at the second one. Use the fodder demons to stock up on hit points and ammo. Switch back to the ballista’s arbalest mod for the next fight.


16 – 08
Difficulty 4/5

1 spirit, 2 carcasses, 2 prowlers, 3 cacodemons, 1 pain elemental, 1 hell knight, 1 dread knight, 1 cyber mancubus


This arena has two stages. In the first one, after pressing the button, you need to climb on a platform to avoid the electrified ground. Three cacodemons followed by a pain elemental will spawn, you can deal with them very easily with your arbalest.

Before starting the second stage, make sure you are fully stocked on everything. If you are below 60-70% health, grab the megasphere, otherwise keep it for later. Before pressing the green button, locate the third button, in red. When triggering the next stage, a possessed hell knight will spawn to the left of the platform with the third button. Take it out immediately with a double triple rocket salvo, and dispose of the spirit while being extremely careful of your surroundings.

There will be two carcasses, two prowlers, one cyber-mancubus and one dread knight spawning around you. Shield soldiers will spawn perpetually. Keep your distance with the cyber-mancubus, kill it last, as it will trigger the dread knight to spawn. Focus the prowlers and carcasses first. Always keep either your super-shotgun or a chainsaw charge at the ready to kill shield soldiers, because you will not have a lot of time or space to kill them with the plasma rifle.

The dread knight is a great threat in such a cramped up space, especially with the electrified walls. This fight can degenerate very quickly if you are pressured from too many fronts at once, take it very seriously.

Use the remaining fodder demons to get back to full, press the third button and go grab the BFG ammo if you need it, behind a fissured wall.
16 - The Holt, part 3
(click to enlarge)


16 - 09
Difficulty 4/5

1 totem, 4 carcasses, 2 prowlers, 3 blood maykrs, 2 cacodemons, 2 hell knights, 3 mancubi, 3 whiplashes, 3 barons


After having jumped through the propulser pad, you will enter a building with two doors ahead of you. Go left, and directly kill the mancubus that will appear in front of you. There are three of them, killing any two will trigger three invisible whiplashes to spawn. The next wave triggers once you have killed every heavy demon.

The next wave starts with two cacodemons, one on each side of the arena. Two carcasses and two prowlers will spawn as well. The cacodemons trigger the rest of the wave, so kill the carcasses and the prowlers first.

After the cacodemons die, a blood maykr, a hell knight and two carcasses will spawn. Killing the blood maykr triggers the next wave, so kill it last. The next wave features a totem, another blood maykr and another hell knight. You can easily run in circles for more than a minute without finding the totem, if you are not looking at the right place. It is located on the middle ground, between the right entry door and the right exit door, next to three rocket pickups. Once you destroyed it, kill the knight first and then the blood maykr, which will trigger the last wave.

Three barons and a third blood maykr will spawn in the last wave. As the wave starts, all the fodder demons will die, the drones will stop perpetually spawning, and the present drones will be staggered. Always put some distance between any of those antagonists, because you will also have to deal with swarms of imps that can quickly surround you if you don’t pay them any attention.

Whether you want to do 16 - 10 or not, make absolutely sure that you are fully stocked for 16 - 11.


16 - 10
Difficulty 3/5

1 blood maykr, 1 marauder


To the left past the door will be standing ya boy, the marauder. To the right, the blood maykr. You can start with either of those, and pull them back into the hallway you came from, so as to not trigger the other at the same time. Ideally, start with the blood maykr, because he is arguably the easiest to deal with, then you will have all the time in the world to kill the marauder.


16 - 11
Difficulty 5/5

1 spirit, 4 tentacles, 2 carcasses, 1 blood mykr, 1 hell knight, 1 doom hunter, 2 tyrants


After taking the jump pad up, before going right to press the button, go left to collect all the health and armour you can get. Once you press the button, and go back to the other side of the bridge, two tyrants will spawn, and the one to the left will be possessed. After some time, a carcass will spawn to the left. This is one of the hardest fights to win consequently, so be sure to practice a lot before jumping into Ultra Nightmare.

You want to focus the possessed tyrant first, because any tyrant you kill will trigger a doom hunter to spawn on the other side of the bridge, and that might be just a little too much to handle safely at the same time. Face the possessed tyrant, throw all your frag grenades at it, and shoot all the triple rockets salvoes you can. Whatever you do, do not approach the possessed tyrant at melee distance, and do not walk too close to the edge of the platform, because tentacles will be waiting for you. Once you are out of rockets, face towards the other end of the bridge, and shoot a BFG shot upwards. This will stun the tyrants for a bit, as well as kill the carcass, the fodder demons and the tentacles.

Switch to the chaingun and take the possessed tyrant down, while dodging attacks from both tyrants at once. Keep up in the air as long as you can, that way you will have a chance to dodge their most precise attack, the ground slam that sends a blade hurling at you. Once the tyrant dies, directly kill the spirit, and throw an ice grenade at the other tyrant if needed. Then finish the second tyrant.

The doom hunter will have spawned alongside a carcass. Kill the carcass first, then destroy the doom hunter’s sled. Position yourself on the other side of the bridge before doing so, because breaking the sled will trigger a hell knight to spawn in the middle of the bridge, and a blood maykr where the tyrants spawned, so keep clear from those areas. Kill the hell knight first, and keep an eye out for an opportunity to swiftly snipe the blood maykr.


16 - 12
Difficulty 4/5

This is the arena behind the door to the left. It will require you to blood punch, a lot. You only need to clear one arena of the two, this one is slightly harder and more hazardous than the other.

Enter the arena, and head straight for the circular area where the eight pinkies will spawn. Use your flame belch on them, then blood punch them as they spawn. After three-four blood punches, throw a frag grenade in the center, to stun them, and carry on collecting the blood punch pickups and killing them.

Once it is done, two cyber-mancubi will spawn. You know what to do with them. There will be more pinkies running around, focus on the cyber-mancubi. Whatever you do, respect your opponents, don’t bite more than you can chew and keep a distance of security with pinkies that are rushing towards you. You can die very quickly here. This room is not very complicated to deal with, but you definitely to train a couple of times in Nightmare mode before attempting it on Ultra Nightmare.


16 - 13
Difficulty 4/5

This is the arena behind the door to the right. You only need to clear one arena of the two, this one is slightly easier and safer than the other.

As you enter, get your ballista and equip the destroyer blade mod. Head straight for the circular area where the eight shield soldiers spawn, and kill them all with the destroyer blade when they spawn. In addition, two carcasses will have spawned, one on each side. Take one out, take its high ground, and snipe the other carcass from afar. From there, kill all the shield soldiers attempting to approach you. After having killed fifteen to twenty of them, the doom hunter will spawn. Do not rush for it if it has too many shield soldiers around, instead either wait for it to either isolate itself, or to move away from the Overdrive powerup, then go collect it. With it, kill the doom hunter and clear the room, all while keeping a safe distance with any demon present.

16 - 14
Difficulty 5/5

The final fight is a very tough one, and can at times be a pretty unfair one. Like all the bosses before, you need to practice each of its five phases extensively in Nightmare, until you achieve a satisfying success rate.

First phase:
the easiest and the most straightforward to deal with. Samur will teleport across the room, and shoot slow but hard-hitting projectiles (60 damage each). You can easily strafe a little to dodge those projectiles. Just like the blood maykrs, you need to keep your distance with him at all times, as his melee-range area of effect attack also deals 60 damage.

Once he drops down to roughly 50% hit points, he will start spawning two floating eyes that generate an area of effect around them, that will slowly eat away your hit points (8 hit points per tick, three ticks per second). Against Samur as well as the eyes he summons, the precision bolts and the raw ballista shots will be your best weapons.

Take your time, do not rush, and set yourself up to be full on hit points for the next phase. There will always be two fodder demons around the arena, so use the super shotgun grappling hook and the chainsaw on them to stay at full capacity. Upon falling down, Samur will give you back your ammo.
16 - The Holt, part 4
16 - 14

Second phase:
You will have two possessed demons to deal with, a hell knight and a mancubus. Both are extremely annoying and resilient, but the hell knight is by far the most dangerous because it will actively hunt you down, while the mancubus will just stay static most of the time. You can track the position of the possessed demons by looking at the blue beam linking them to Samur.

Be aware that possessed demons in the final boss fight are roughly thrice as resilient as their normal counterpart. It will take at least three lock-on bursts to kill it. Be very careful not to walk into the corner of the room you will be pressured into, because entering the portal will throw you off your focus and confuse you, and will also put you right in front of the mancubus.

Once the first spirit is destroyed, switch your focus to the mancubus. A hell knight will perpetually spawn until you finish the phase, but it will be much easier to handle and dodge than its possessed counterpart. The hardest part about that mancubus will be to defeat it while taking as little damage as possible. It shoots volleys of three fireballs, and is much harder to avoid, so try remaining behind cover and whittle down its health little by little. Again, the goal here is to start the next phase with as much hit points and ammo left as possible. Do not try to use the chaingun’s energy shield mod against the mancubus, as it will melt almost immediately.


Third phase:
You will have to kill seven cacodemons in total. It is pretty easily done, but you should again aim to lose as little hit points as possible. Besides, the arena’s layout for this phase makes falling down potentially lethal.

The cacodemons will appear one after the other, from random locations. You can kill them with a charged arbalest shot if they are too far away from you, or you can feed them a shotgun grenade, then grapple them with your super shotgun hook and glory kill them in the air.

This phase is not limited by the amount of demons you need to kill, but by a timer. Roughly fifty seconds after the first cacodemon spawns, no matter how many cacodemons you kill, the next phase will start. The safest method is to perpetually stagger the cacodemons that spawn (first only one, the second one spawns roughly twenty seconds later) by feeding them shotgun sticky bombs. Switch to the Dazed and Confused rune, that will increase the cacodemons’ staggered state from roughly 4 seconds to roughly 9 seconds. Your main focus will then be to avoid the laser beams and the electrified platforms.


Fourth phase:
This phase is the second hardest to deal with, and you will be under pressure from virtually everywhere at once. There is no good way to handle it on the long term, so your best bet is to make it as short as possible. If you can afford it, leave the megasphere be for now, keep it for the fifth phase, but do not hesitate to take it in case of trouble.

Get away from the two higher platforms at all costs, as Samur will teleport on one of them, and will throw you off if you are on his way. You will not need the Dazed and Confused rune anymore, instead you want to pick the Chronostrike rune. This will make the two last phases much easier to handle.

Track Samur down, and lower his health with the same precision bolt – raw ballista quarrel quick swap combo as in the first phase. His attacks deal the same amount of damage as during the first phase, but this time they will slow you down for a couple of seconds. Some time after the phase starts, you will hear the distinct scream of a blood maykr spawning. You need to switch your attention to it, and kill it as fast as possible. Use the heavy rifle for this, as aiming down your sights will trigger the chronostrike. The next maykr will spawn roughly twenty seconds after the previous one has died, so you have plenty of time to focus on Samur.

Once at 50% health and below, Samur will again summon two floating eyes that will wander seemingly randomly around. You will be relatively safe from them on the platforms higher up (not those in the corners), but always be ready to jump away from the platform you are on. Samur teleporting close to you while you are focused on something else will be your main hazard during this phase.


Fifth phase:
A possessed pain elemental will appear to your left, and a possessed dread knight to your right. The dread knight’s behaviour can vary wildly from attempt to attempt, and will alternate between standing idle for extended periods of time, and actively chasing you on the platforms and down below.

Your first move will be to get the BFG out. Aim at the pain elemental with the chronostrike, and wait for it to grab a lost soul in its mouth. You want to hit the pain elemental with the BFG projectile, for additional damage. At the same time, you want the projectile to travel for as long as possible, again for additional damage. Shoot your two BFG shots at the pain elemental while dashing away. You do not have to worry about the pain elemental moving after the shot, as the projectile will stun it.

Afterwards, switch to your ballista, and shoot charged arbalest shots at the pain elemental until it dies. There are six possibilities:
  • If you have not used the BFG, then the pain elemental will require five direct charged arbalest shots to die.
  • If you have shot the BFG once, but missed, you will need four shots.
  • If you have shot the BFG twice, but missed, you will need three shots.
  • If you have shot the BFG once, but successfully hit the target, you will also need three shots.
  • If you have shot the BFG twice, missed once and hit once, you will need two shots.
  • If you have shot the BFG twice, and hit both times, you will need only one shot.

The BFG shots have the advantage of stunning the dread knight too, while the projectile flies. The blood maykr will spawn some time after the wave starts, and will start harassing you while you finish off the pain elemental, so try to remain out of its line of sight. If you miss too many arbalest shots and end up having less than 75 plasma to kill the spirit, then kill the blood maykr first and get your ammo back.

Once the pain elemental is dealt with, kill the blood maykr and get your ammo back. The dread knight is next. Attack it with lock-on bursts, and with luck, if at least 11-12 rockets connect, you will at least stagger it. Try to avoid close combat actions with the super shotgun, this dread knight is extremely dangerous, if you run out of rockets then either engage from a distance, chainsaw some fodder demons around, or wait for another blood maykr to appear.

If you stagger the dread knight, either shoot at it quickly and repeatedly with all you can, or glory-kill it instantly. Unlike standard staggered demons, the possessed ones will take at least two to three ballista shots, super shotgun shots or rockets to kill, and they remain staggered for a shorter time. If it comes back into the fight (with roughly half its health back), then start again, run around to collect ammo and kill it from a distance. Stagger it, close in fast, kill it, dispatch the spirit, and you’ve won the game.
Final words
Finishing an Ultra Nightmare run of the first DLC is arguably less of a feat than doing the same for the base game, but it is still worthy of praise. It is certainly much shorter than the initial campaign, but it is definitely harder and more condensed. If you've made it this far, congratulations!

If you have finished the Ultra Nightmare mode on the base game already, then we will see each other once the second DLC is released. If you have beaten the DLC in Ultra Nightmare first before attempting the challenge on the base game, as a warm-up with a "lite" version, then I am happy to tell you that you are fully ready for the main game! Just be sure to be well prepared for it, being good is one thing, but you will not go far if you do not practice against the bosses beforehand.

Be sure to leave constructive criticism, suggestions, ideas, and contributions to this guide in the comments below. Don't forget to have a look at the "Disclaimers, sources and future plans" section at the beginning of the guide before commenting!

If you enjoyed my work, please give it a rating, and share it !

=== 3 - THE ANCIENT GODS PART 2 ===
Ancient Gods, part 2
This second DLC is overall far easier than the first one, and it can be finished in one go in less than 2 hours, if you know what to expect and what to do. Still, it has its fair share of hard fights, not all of which are mandatory. Additional mechanics have been introduced, along with a new super weapon, new demons, and new gameplay concepts.
Preparations - Noticeable changes
Just like the first DLC, some game mechanics have changed compared to the base game. The sentinel hammer provides an additional tool to your arsenal, that will not only serve once or twice during the campaign, but can and should be used frequently.

The spawn order in arenas is generally much more liberal than before, as you will not just face independent wave after independent wave. Some demons are responsible for the spawn of further waves, while some are not. It can pay off to identify which demons are "loose ends", so that they can be eliminated first, i order to reduce the pressure and maximise survival chances.

One arena, at the end of level 18, breaks the rules discussed in other "Preparations" segments of this guide, as it will see multiple heavy demons spawn perpetually, such as dread knights and spectres.

Overall, this DLC is shorter and easier than what you have seen before, and with a little bit of preparation (and a lot of it for the final boss), you should not have too much trouble getting through it. If you are looking for a shorter and easier Ultra-Nightmare run to start with, so you can get familiar with the concept, then this DLC is a great place to start.
Preparations - Killing new demons
The giant tentacle, the turret, the spirit and the blood maykrs have been discussed in the same section of the guide, concerning the Ancient Gods part 1 additions.

Screecher
  • Standard zombies, that buff their surrounding friends for 15 seconds upon death. Provide more damage, more speed and more health.
  • Avoid killing them in possible, they die just as easily as zombies. This means: be careful with your grenades, your blood punch, your sentinel hammer, your microwave beam kills, your charged arbalest shots, and of course your rocket launcher.
  • In certain instances where they do not perpetually respawn, it can be helpful to kill them as soon as possible, so that they do not buff stronger demons coming later.

Stone imp
  • Standard imps, with a twist: it is very resistant to all weapons except for the full-auto shotgun, with which you need only roughly three direct shots.
  • Their charge attacks are powerful and disorienting, avoid getting hit by maximising your air time when you see then glow yellow and roll towards you.
  • On their own, they are easily dealt with. The fully-upgraded full-auto shotgun will provide enough shells for you to shoot without worrying too much about your ammo count. In the worst case, you can always chainsaw them.

Cursed prowler
  • The absolute highest priority demon whenever it is around, as it has the potential to completely ruin your run if it hits you.
  • If you get hit, you will be cursed: you won't be able to dash, grapple, or aim. If you are surrounded by powerful demons, this is a death sentence. The only way out is to follow the marked prowler and blood-punch it. And if you have no blood punch available, well... always have a blood punch available.
  • It is no more powerful than a standard prowler. Track it down, keep an ice bomb at the ready, grapple it and kill it with a point-blank super-shotgun shot.

Armoured baron
  • Just like a standard baron, except equipped with an unbreakable armour. Hit its hand mace when it blinks green to destroy the armour, and kill it before it reappears.
  • It is much less dangerous than standard barons, because it can't send high-speed fireballs at you. Still, don't let yourself get cornered.
  • The sentinel hammer and the ice bombs delay the reapparition of its armour. Pull down its pants, empty your turret-mode chaingun into it while you spam your grenades, and it will die a humiliating death.
Preparations - Weapons, equipment and runes
Concerning equipment and runes, the same guidelines apply as those cited in the same section, for the Ancient Gods part 1.

The sentinel hammer is the newly added weapon, which replaces the crucible. Instead of relying on a fixed amount of pick-ups, resulting in a fixed, limited amount of uses, this hammer can be recharged by shooting down weak points and glory-killing.

Over the course of the campaign, it will gain in power, providing more health and armour pickups upon use. It is a great weapon to use when freezing or setting groups of demons on fire, as it can often guarantee a full refill on hit points and ammunition. It is heartily advised to use it often, and to get used to think about refilling it. Think about destroying weak points, and think about how to stagger fodder demons instead of killing them. The shotgun's sticky bombs are great at staggering most fodder demons, and a few shots of the plasma rifle can stagger a zombie. Getting used to this aspect of the hammer will be useful during the final boss fight.
17 - The World-spear, part 1 (WORK IN PROGRESS)


17 - 01
Difficulty 3/5

The first section is straightforward. One cyber-mancubus and two shield soldiers will be on your way. You can bypass them all.

The first arena introduces the screecher. Be aware of their presence, avoid using area of effects around them (such as the blood punch or grenades), and you will be fine. Four of them face you, accompanied by two carcasses, a cacodemon to your right and a hell knight to your left. Once they die, another cacodemon to your left and a hell knight to your right will spawn. Use your chainsaw once, and collect the fuel charge later on.

The next fight takes place around a brazier. A buff totem will appear, way out of reach. Two shield soldiers, followed by two more, will appear, along with some other fodder demons. Finally, a hell knight arrives, followed by a pinky. The shield soldiers and the hell knight are easily managed with the microwave beam. Use your three chainsaw charges on the incoming pinky. As the fog dissipates, four buffed pinkies will run towards you. You can easily jump above them and run for the totem, throwing your ice bomb to freeze them. There are enough blood punch charges in the middle of the zone to take them out.


17 - 02
Difficulty 2/5

This will be your first encounter with the armoured baron. As it is alone, it is easily taken care of. Further ahead, a giant tentacle will emerge from the central plaza. Step back and kill it from a distance.

The next fight begins with two arachnotrons spawning. Killing either one triggers the spawn of a second armoured baron. Killing them all triggers two cyber-mancubi, one hell knight, one pain elemental and one prowler to spawn. The prowler will respawn up to three times. Finally, a doom hunter will appear. There are lots of fodder demons accompanying it, use them to replenish before killing the hunter.

There is a switch to the far-left end of the area, opening the door to an extra-life. It appears only after you have cleared the fight.

After taking the monkey bar towards from one building to another, you will see a shield soldier jet up in front of you. Do not rush to him, as he’s got a friend hidden to his right, ready to intercept you. A revenant will spawn behind them.


17 - 03
Difficulty 3/5

A horde of fodder demons will appear. Soon, two whiplashes and a hell knight will arrive.
The small room with a BFG charge in it will close when you collect the item, and two mancubi will spawn behind you. Pop the barrels to stagger them, and throw some explosives their way.

In the radioactive sludge area, a hell knight will spawn from the gate ahead, that you can kill upon arrival with a lock-on burst. A second hell knight will immediately follow from the same entry point, followed by a third one from whence you arrived, and a screecher will appear in the middle of the goo.

The next breakable wall will, for the first time, not be broken by you, a dread knight will get the jump on you, step back once he appears. If you collect the armour pick-up later on, a mancubus will appear ahead.

After grappling twice in a row on super shotgun hooks, two cacodemons will appear.
The next brazier fight is a tough one, due to the goo you’ll have to wade through. The first wave consists of a screecher and lots of zombies. In the second wave, more zombies. In the third wave, one mancubus and one screecher will enter from the direction of the gate forward, so use your map to make sure that you stand at the opposite side of the fountain. Once the mancubus is wounded, a second mancubus will appear on its opposite side, make sure to have an ice bomb ready for it.

The next fight will trigger as you reach the next gate. Four cyber-mancubi and a baron will spawn. They are easily taken care of with the onslaught power-up in front of the fountain, and either the lock-on burst rocket launcher or the turret mode chaingun. A BFG shot in the air works even better.


17 – 04
Difficulty 3/5

Five revenants will spawn in the arena, just after collecting the sentinel hammer. This new addition to your arsenal will prompt you to priorities shooting weak points, and will synergise with your ice bombs, flame belch and glory kills. This fight gives you an excellent opportunity to get used to it.
Once three revenants die, two cacodemons and a hell knight spawn. Once they all die, two perpetually-respawning sield soldiers and two arachnotrons will arrive, one of them spirit-buffed. Afterwards, another hell knight and two tyrants will spawn.


17 - 05
Difficulty 2/5

This fight introduces the stone imps. Switch to the full-auto shotgun and just take them out one by one.
17 - The World-Spear, part 2 (WORK IN PROGRESS)

17 - 06
Difficulty 3/5

You’ll face two revenants, four spectres and four stone imps. The full-auto works just as well against the spectres as it does against the stone imps.

Next, two dread knights and two arachnotrons, followed by two mancubi. Once they fall, one armoured baron and one cyber-mancubus will appear.

On the way up, an arachnotron, a cyber-mancubus and a hell knight will attempt to bar your way.
After the jumping section with the BFG charge to your left, the path will be blocked and you will be stuck with a swarm of imps in a small space filled with explosive barrels. Once you kill enough of them, six pinkies will spawn, spread randomly on either end of the tunnel. Keep your ice bomb at the ready for when they decide to engage, and blood punch away. There are enough blood punch pick-ups everywhere for you to easily dispose of them all. Alternatively, shooting a BFG shot towards the tunnel entrance will easily clear them all. Don’t forget to pick up the charge nearby afterwards.


17 - 07
Difficulty 4/5

This is the first big fight of the DLC. It will start with two cyber-mancubi and two whiplashes. Killing the cyber-mancubi triggers two additional whiplashes to spawn.

Killing three whiplashes triggers three cacodemons, two hell knights, four pinkies and two perpetually respawning prowlers to enter the arena. Killing three pinkies triggers a baron and two carcasses to spawn. Besides the baron, all of these foes will die immediately to a BFG shot in the air, so if you find yourself overwhelmed, shoot and go back to collect the charge you left earlier in the jumping section.


17-08
Difficulty 4/5

This is the second gore nest fight, which brings no reward whatsoever, and provides plenty of opportunities to die an avoidable death, so attempt at your own risk. The first portions of the fight are straightforward: first, four cacodemons and two pain elementals. After them, five hell knights.
After them, two cyber-mancubi and three mancubi. Afterwards, one archvile, followed by a second one. At the end, two tyrants and two doom hunters. Locate the archviles as quickly as possible to avoid them calling reinforcements; if you can’t find them in time, the BFG can save you.


17 – 09
Difficulty 3/5

An armoured baron will spawn. Up ahead, a turret will be on your way. Upon advancing further, two cyber-mancubi will spawn in front of you, and one mancubus behind you. If you do not have your two blood punches to take care of the cyber-mancubi quickly, focus on the mancubus and take a couple of steps back to deal with them safely. Alternatively, you may toss an ice bomb at the cyber-mancubus to the right ant take the monkey bar upwards. This will cause all three of them to despawn.

After the jumping section, you’ll be trapped in an arena with a blood maykr. After it, two prowlers will spawn, followed by a two additional blood maykrs, one after the other.

Next, upon grabbing the first monkey bar, a giant tentacle, two arachnotrons and two barons will spawn. It is unadvisable to face them all at once, so retreat back to the nook where the two cyber-mancubi spawned earlier, and take them out as they come at you. Kill the giant tentacle from a safe distance afterwards.
18 - Reclaimed Earth (WORK IN PROGRESS)


18 - 01
Difficulty 2/5

This is the introduction of the cursed prowler, which will be the absolute highest priority kill whenever one is around. One will appear along with a hell knight. Upon death, an armoured baron will appear, a mancubus and a second hell knight will appear.


18 - 02
Difficulty 4/5

This fight’s difficulty depends a lot on the order in which you kill the demons. First, a cyber-mancubus, a cacodemon, a hell knight and a perpetually respawning prowler will face you. Killing all three heavies will cause the prowler to stop spawning. The next wave consists of one pain elemental, three whiplashes and a cursed prowler.

Here are the triggers: killing two whiplashes triggers two dread knights to spawn. Killing two whiplashes and the cursed prowler will cause two tyrants, one carcass and three shield soldiers to spawn. Killing one tyrant summons two barons, whose deaths trigger one mancubus to appear. Killing demons in the wrong order will see you quickly overwhelmed, and so you several ways to approach this fight:

First, focus on the loose ends first. The prowler, the pain elemental, the two dread knights, the third whiplash and the second tyrant do not trigger anything. This approach minimises the amount of simultaneous demons, but does not make you deal with the most dangerous ones first, such as the cursed prowler. This is a risky approach.

Second, kill the cursed prowler as a priority. Killing two whiplashes will trigger a huge wave, that you can either face head on, or dispose of with a BFG shot, leaving only the two tyrants to deal with.


18 - 03
Difficulty 2/5

After a jumping section, two stone imps and a mancubus will face you in an alleyway.
After restoring the power, you will face three chaingunners. Do not remain in the nook you find yourself in, get out and make use of the terrain to dodge the incoming shots. After killing two chaingunners, a blood maykr will appear.


18 - 04
Difficulty 4/5

Two mancubi, one dread knight, one prowler and one cacodemon will spawn. Killing the mancubi and the dread knight will trigger the next wave.

Two machinegunners, a carcass, three revenants and a cursed prowler will spawn. As usual, this prowler has the highest priority. Killing the cursed prowler and two revenants triggers a cyber-mancubus and a marauder.


18 - 05
Difficulty 5/5

Again, this second gore next fight is optional. Two pinkies, two arachnotrons, a prowler and a pain elemental slightly later will first appear. Killing the pinkies and the arachnotrons triggers the next wave.

Next, two machinegunners, two hell knights and a cyber-mancubus spawn. Leave the cyber-mancubus until you are fully stocked on ammunition and hit points.

A cursed prowler will spawn, followed a few seconds afterwards by an archvile. The archvile will spawn in the upper or the lower center of the arena, most of the time. Try to locate and eliminate the prowler as soon as you can. If you can’t manage to kill it, shift your focus to the archvile, who will almost always immediately start summoning reinforcements. Have the ice bomb and the sentinel hammer at the ready to keep control of the situation.

Once they are dealt with, a spirit-buffed hell knight will appear. Killing it will trigger the next wave, consisting of two cacodemons, two machinegunners and two spectres. It can get really dangerous to focus on the spirit, so if worse comes to worst, let it possess a cacodemon and flee. However, killing two spectres and one cacodemon is what triggers the next wave, so whatever you do, do not kill the buffed demon last.

The last wave consists of a doom hunter and a marauder. Be careful of the many gargoyles prowling around, they can corner you and blindsight you easily in this small arena.


18 - 06
Difficulty 3/5

In the next corridor, you’ll be faced with lots of fodder demons, gradually reinforced by a prowler, five shield soldiers and two mancubi. Next, two cueballs in front of two machinegunners and one mancubus. Later, as you emerge from water, a hell knight will greet you.

One mancubus, one spirit-buffed pinky and one stone imp will be waiting behind the next door you have to open. Kill the mancubus and the stone imp as fast as possible, in order to isolate the very dangerous pinky. Make good use of the stairs upwards with the middle ramp, and bait the pinky into rushing towards a wall by waiting for it on the other side of the ramp.

Later on, a mancubus will be infighting with lots of fodder demons. Killing it will make one doom hunter and two carcasses spawn. You may ignore them completely and carry on with the jumping section, they will despawn once you reach the next section.


18 - 07
Difficulty 3/5

Two whiplashes, one blood maykr and two perpetually respawning stone imps will face you. Killing one whiplash triggers one dread knight and one cyber-mancubus to spawn. Killing the two whiplashes, the blood maykr and the dread knight triggers one armoured baron and one prowler to spawn.


18 - 08
Difficulty 2/5

One mancubus and one hell knight will be on your way. Later on one cyber-mancubus, then two revenants.

After the jumping section, two invisible whiplashes and one hell knight will await you, accompanied by two screechers. Keep the hell knight for last, because killing it will make another one spawn. Use the ice bomb to immobilise and isolate the whiplashes, in order not to accidentally kill a screecher with explosions. Alternatively, you may rush down the right corridor and break the glass to your right, revealing a large secret room in which you can bait the heavy demons into following you, away from the screechers.

Later, across the chasm, a cacodemon will open the way forward.


18 - 09
Difficulty 5/5

This may well be the hardest fight this DLC has to offer. A doom hunter and a hell knight will start the round. Killing them will spawn a carcass, a cursed prowler and another doom hunter. Killing the cursed prowler will make a baron spawn.

Killing them all triggers a pain elemental, a hell knight, and a spirit-buffed mancubus to appear. Killing the mancubus (not the spirit) will trigger the next wave, so keep it for last.

Next, another mancubus, an archvile and two revenants will spawn. The archvile will almost always start summoning immediately, it is imperative that you find it as soon as possible, after having dealt with the spirit. If you can’t find it, a BFG shot across the room can greatly help.

Killing the archvile triggers the next wave, which works in a special and unique way. Two cacodemons and one baron will spawn, and their death are required for the next phase. Until then, a seemingly random mixture of dread knights, spectres and shield soldiers will perpetually spawn. For this reason, killing the baron and the cacodemons is your priority. Once they die, a tyrant and another pain elemental will arrive. Once again, they are your top priority, as all the other heavy demons will perpetually respawn until these two are dead. Don’t hesitate to shoot your BFG a second time if you find yourself overwhelmed. There are enough charges around the level to replenish your ammunition, once you unlock the fast travel just after this fight.
19 - Immora (WORK IN PROGRESS)


19 - 01
Difficulty 1/5

On your way, you will find a mancubus, a revenant, five shield soldiers. Nine tentacles in total will be present, on the way as well as towards the secret extra-life to your left. This entire section can be rushed through.


19 - 02
Difficulty 4/5

This is a hard, but straightforward fight. Two dread knights, two revenants, one prowler and perpetually respawning maykr drones will constitute the first wave. After them, four whiplashes and two doom hunters. Finally, two barons, two cacodemons and two carcasses.


19 - 03
Difficulty 4/5

Again, this fight is optional. It will start with an armoured baron, two carcasses and a perpetually respawning drone. Wounding the armoured baron (not killing it) will trigger the spawn of a baron and two prowlers. Killing the baron will trigger the next wave, made of two cacodemons and a marauder. Killing the marauder triggers the last wave, made of two tyrants and two prowlers. Killing either tyrant makes a second marauder appear.


19 - 04
Difficulty 3/5

On the way forward, a dread knight, an arachnotron, a giant tentacle and a hell knight will face you. Although risky, you may bypass them. Up ahead, two hell knights and two mancubi will ambush you.

Next, three stone imps and one arachnotron will block the way. Once the arachnotron dies, three additional stone imps and two pain elementals will appear. You can either kill the first two stone imps before killing the arachnotron, or wait until there are six of them and take them all out with one hit of the sentinel hammer.

Up ahead, four machinegunners and a prowler will wait for you. One well-thrown ice bomb will incapacitate them all.

You’ll then step into the purple sludge. Do not get down from your ledge until you take out the two turrets that are up ahead. Advance slowly until you trigger them, and take them out from behind cover. There is one visible tentacle nest on the way.

Finally, a spirit-buffed hell knight will spawn. Upon death, a second hell knight will spawn.
Once inside the city, a pain elemental will greet you, along with the cutest and squishiest hell guards in existence.


19 - 05
Difficulty 5/5

This is a brutal fight that can go sour very quickly. You will face two marauders, surrounded by three screechers. These screechers will perpetually respawn, so do not think of killing them first, then dealing with the marauders later. The use of the sentinel hammer or the BFG is equally unadvised. If you accidentally kill a screecher, run away from the marauders until the buff expires. save the megasphere in the centre for when you really need it. Take your time, try to isolate the marauders from one another.

Killing one and putting the second one at below 50% health will trigger the apparition of a baron. Remain cautious and try to isolate it from the marauder.


19 - 06
Difficulty 2/5

On the way forward, you’ll face a dread knight, an arachnotron, one shield soldiers, an armoured baron, a doom hunter, two prowlers and one drone. Once inside the building, you’ll face two shield soldiers. Collecting the BFG charge from the secret to the left will trigger one revenant and two machinegunners. Upstairs, an invisible whiplash, an armoured baron and a mancubus.

Anything you face after pressing the button to open the door can be rushed past. Be sure to keep an ice bomb at the ready for the final mancubus on the way.


19 - 07
Difficulty 4/5

In the last arena fight before the final boss, a tyrant, a cursed prowler and two hell knights will appear. Wounding the tyrant will trigger the next wave, made of a blood maykr and a mancubus. Killing the blood maykr triggers the next wave.

Two arachnotrons, two carcasses and one spirit-buffed baron will appear. This baron is extremely dangerous, and it is easy to get stuck against a wall because fodder demons are on your escape route. Take your time and do not take risks. The only way to control a buffed baron is with the microwave beam, you can kill it slowly with it by emptying your plasma on it, then running around to replenish your ammo.

Once it dies, two cyber-mancubi and one armoured baron will spawn. Taking out the spirit is a top priority. Always be sure to have at least 75 plasma units for that.


19 - 08
Difficulty 2/5

You will be pitted against twenty-four stone imps, and a heckload of shells to do your work. You know what to do.
20 - The Dark Lord (WORK IN PROGRESS)
Difficulty 4/5

This final boss is similar to the gladiator in your approach: once you are familiar with its attacks, and you know what to do, it becomes relatively easy to handle, except for the curveballs that can be thrown your way from time to time. Stay focused, train well and you will get through this.

This fight is made of five phases, that work the same way, with gradually increasing difficulty. The boss will spawn reinforcements, that can either be immediately dispatched with your sentinel hammer, or killed the good old way. These summons have less hit points than their real counterparts, so for example the chaingun can make quick work of the summoned tyrant.

You need to be patient, focused and disciplined. Letting the boss attack you will not only remove your health, but his melee attacks will also replenish his own. Always stand clear of his sword slashes, always dash away from his shield rushes, and do not underestimate the blast radius and the damage of his grenades. If worse comes to worst, don’t forget about your saving throw rune.

During the first phase, the boss will only spawn one hound at a time, that will drop half of a sentinel hammer charge. During the second and third phase, he will spawn two hounds at once. During the fourth and fifth phase, he will summon two hounds and one hell knight. The hounds are easily dealt with with the super-shotgun. The hell knight has 50% of a normal hell knight’s hit points.

During the fourth and fifth phase, he will also occasionally spawn a mancubus, a pain elemental, a baron and a tyrant to assist him. They can all be dispatched with the sentinel hammer. If the dark lord stands between you and one of his summons, the sentinel hammer might not hit it, so make sure to have a clear line of sight to all four spawns. If you do not have a sentinel hammer charge when he summons this group, shoot a BFG charge in the air.

You should always strive to have a sentinel hammer charge on you, and get one as fast as possible if it isn’t the case. The summoned hounds is the fastest way to get the charges, but if they don’t come, fire three to four shots of your plasma rifle at the surrounding zombies, and glory kill them.

Once you have enough hit points and ammunition to face him, stand in front of him at 3 – 4 meters distance, in order to trigger his flash attack. Stand too close and he will destroy you, stand too far away and you won’t trigger him. There is only one animation for his flash attack, he will attempt to slash you by lifting his sword above his shoulder. If you see him lift his sword above his head, or at knee level, this is not it. Learn to identify his animations, and you will know when he will flash green.

Once he flashes, hit him with a super shotgun shot. Smash the hammer on the ground to extend his stun duration, and empty your guns into him. One of the most reliable methods is to shoot your two frag grenades and three lock-on bursts at him. Shoot at him from the left, so that the rockets don’t land on his shield. The amount of damage dealt by this combo varies, but most of the time, two such combos will bring him down a phase, provided that you do not get hit later on. The turret mode chaingun is a viable alternative.
======== 4 - MASTER LEVELS ========
Master level - Super Gore Nest, part 1
(click to enlarge)


MS 01 - 01
Difficulty 3/5

6 lost souls, 2 carcasses, 2 shield soldiers, 2 arachnotrons, 2 cacodemons, 1 dread knight, 2 hell knights, 7 revenants, 2 barons, 1 tyrant


You start the level fully equipped, but don’t rush. Advance carefully, take out the lost souls, the shield soldiers and the revenant ahead of you, and set yourself up for the fight ahead without losing too much unnecessary health.

A tyrant and some fodder demons are waiting for you behind the breakable wall. You can throw a grenade or two ahead, while you spin that turret mode minigun to take down the tyrant. As you approach the pillar with the armour on top, an arachnotron will jump up in front of you and one to your right. Two rocket volleys (and some finisher shots for each one) later, two cacodemons will appear in front and from the left, followed by two tyrants, two hell knights, and six revenants.

You can choose to mingle with the demons and dance around in the arena, or you can just stay in the alleyway you entered from and let the demons line up in front of you. Carcasses will spawn until the last heavy demon dies, so maintain your trigger discipline when shooting rockets.

It is always good practice to exploit the remaining fodder demons in an arena, in order to be fully stocked on everything for the next fight, but it is vital that you do this after every arena in this master level. Some fights up ahead will be brutal, and will be rendered that much harder to pass if you don’t make a habit of constantly recovering the ammo you spend.


MS 01 - 02
Difficulty 4/5

15 tentacles, 1 totem, 1 cyber-mancubus, 2 dread knights, 4 hell knights,


Past the broken window, two tentacles, a cyber-mancubus and a dread knight will appear. Get your turret mode chaingun out, trigger the tentacles to come out then back away. Throw an ice grenade at the cyber-mancubus as soon as it spawns, then proceed to mow down the dread knight and the two tentacles. In the same chaingun spin, kill the cyber-mancubus while carefully dodging its projectiles.

The next climbing wall has a lower portion, and an upper portion on the other side. On the ledge of the lower portion side, two tentacles lie in ambush. Climb up on the other side, then dash past the tentacles between them while dropping a sticky bomb on your way.

Perform the exact same trick for the two tentacles at the entrance of the next arena. Dash between them and around the central pillar, and immediately destroy the totem located right behind it. Once it is done, get back up as fast as possible because 7 tentacles are scattered in the lower level and will make minced meat out of you.

Lots of carcasses will spawn indefinitely, you need to kill 8 to trigger the next phase. Again, you can elect to back away to the corridor you came from, or you can dance around in the upper level of the arena. There are two zombies you can exploit for ammo, but they can be hard to find in the mess that the carcasses create with their barriers.

At the beginning of the next phase, all tentacles in the arena will die, and six hell knights will spawn. You can retreat to the corridor and await them with rockets, but again, the multiple carcass barriers might land you in more trouble than safety.

After the fight, head outside through the breakable wall upstairs. As you pickup the armour on the pillar, a tentacle will spawn on the way back. A second tentacle is waiting for you in front of some collectibles on your left, and a dread knight will spawn after collecting the armour in the hole up ahead.

Watch your map: at the top of the central pillar of the previous arena, you will find a crucible charge.


MS 01 - 03
Difficulty 4/5

2 whiplashes, 1 marauder


Once you reach the center of the next arena, it will fill up with fog. Many mecha-zombies will spawn around you, along with two invisible whiplashes. Locate them with their slithering sound, and don’t be afraid to throw all your grenades around to stun and kill them.

Once they are dead, a marauder will spawn. The fight is a standard marauder encounter, except it is much harder to keep track of its location. Exercise caution and trigger discipline, wait for the opportune moment to strike, and exploit the mecha-zombies around to keep yourself alive. Fortunately, the hound is very easy to spot in the fog.

Past the yellow door, a jumper to your right will lead to a megasphere. Pick it up if you need it, otherwise keep it for later.


MS 01 - 04
Difficulty 4/5

5 cacodemons, 5 cyber-mancubi, 2 pain elementals, 3 barons


Upon entering the next arena, five cyber-mancubi will spawn around the keylocks. Take them out one by one with the usual rodeo method (grapple, super-shotgun, blood punch, super shotgun), or with your preferred strategy. Once you kill the first one, two pain elementals will spawn.

Once you kill a second cyber-mancubus, head into the sheltered area below the keylocks, and kill the closing cyber-mancubi with the turret mode chaingun, while using grenades and the chainsaw on the surrounding fodder demons, and jumping and dodging around. Alternatively, you can shoot a BFG shot in the air, and kill all seven fat ugly birds with one green, radioactive, overpowered stone.

Holding your position will have the arguably beneficial advantage of pulling the pain elementals at your level, rendering the chaingun, as well as the super-shotgun / ballista / super-shotgun quick-swap combo very effective against them. However, it will considerably reduce your mobility, so do not take too many risks and keep an eye on an exit path if things don't go as planned.

Once all those demons have died, four cacodemons will spawn. Again, you can bait them in the enclosed space and take them out there (be careful not to bury yourself in a corner), or you can prance around outside. Three barons will follow, which will definitely require you to not remain in the enclosed area. Again, once the heavy demons have fallen, exploit the remaining fodder demons to get back to full ammo and full health. If that’s still not enough, go get the megasphere from the previous stage if you haven’t picked it up yet.

Below the ledge in the middle of the arena, there is a secret tunnel with a BFG charge in it.


MS 01 - 05
Difficulty 5/5

1 doom hunter, 2 tyrants


Just before jumping down the elevator shaft, you will be intercepted by a tyrant. This fight requires a tight and nervous execution. Have your chaingun at the ready, and unload everything into it, while keeping it faltered with your frag grenades.

Once it falls, a doom hunter and another tyrant will show up, accompanied by two perpetually respawning carcasses. Get your crucible out and take down the second tyrant, then throw an ice grenade at the doom hunter. You can then easily take care of its shield with the standard methods, or directly blood punch its sled to immediately trigger its second phase. Two carcasses will perpetually respawn, and they take five seconds to do so. It is not much, but it is enough to give you a slight breather to fully concentrate on killing the doom hunter.
Master level - Super Gore Nest, part 2
(click to enlarge)


MS 01 - 06
Difficulty 3/5

1 totem


Down the shaft, a horde of zombies will spawn, along with a totem in the security booth at the entrance, protected behind a demonic barrier. Make the best possible use of your flame belch and your grenades (you can clearly see the “Equipment fiend” rune at work here). You will then face a second zombie wave, followed by two imps waves and a gargoyles wave.

You will need to kill a couple of gargoyles in order to open the barrier. Be very careful, make extensive use of your favourite explosives, and destroy the totem as soon as it is exposed. Again, chainsaw the last remaining gargoyles. Pick up the first chainsaw fuel can on the way forward at the end of the fight, then the second after falling down the second shaft, to get three charges for the upcoming arena.


MS 01 - 07
Difficulty 5/5

2 arachnotrons, 1 marauder


What starts as a standard, albeit tight marauder encounter, quickly degenerates into a very dangerous fight once two arachnotrons appear (once the marauder hits half health). You need to kill or incapacitate both arachnotrons as soon as possible, as navigating the room with all three at once is impossible. Start by chainsawing the arachnotron closest to you, and dispose of the second one with an ice grenade and your favourite close quarters burst combo.

A portal will have appeared on the opposite side of the room, going through it will teleport you to the room’s entrance and you will be able to travel back and forth to dodge the marauder’s attacks. It requires a little bit of getting used to, so be sure to practice this room extensively. Watch out for the zombies, keep your distances.


MS 01 - 08
Difficulty 5/5

2 tentacles, 2 cacodemons, 2 cyber-mancubi, 1 dread knight, 4 spectres, 1 doom hunter


The fighting in the radioactive pit starts once you reach the hazmat suit. A doom hunter and two cacodemons will spawn on the other side of the pit. There is a tentacle hidden right in front of the radioactive protection pickup.

Once you trigger the doom hunter spawn, get a scoped heavy rifle or a super-shotgun out, kill the tentacle, then switch to the arbalest. Charge two shots, and kill the two cacodemons. Afterwards, throw an ice grenade at the doom hunter, in order to incapacitate it and all the gargoyles prowling around. Again, either destroy its shield and throw rockets at it, or blood punch the sled.

Once it dies, two cyber-mancubi will spawn in the pit, a dread knight where the hazmat suit was, and four spectres where the doom hunter spawned. It is a very hard fight to control, and the gargoyles make it very hard to ever be safe anywhere. The cyber-mancubi have to go first, wait for one of them as they spawn and take it out before it has time to retaliate, then deal with the second.
Run around the arena while throwing grenades around and destroying all you see (and also what you don’t, the spectres) with your quick-swap combos. Despite representing a huge threat, focusing gargoyles avails to nothing, as they respawn almost instantaneously. Running away in the following corridor full of fire traps is not particularly smart, but can be pulled off if you have already reduced the spectre threat.

It is a brutal fight, and it can be dramatically shortened by shooting a BFG shot towards the fire traps, once the cyber-mancubi and the rest have spawned. With a little bit of luck, you will wipe out all present heavy demons and be left with only gargoyles to deal with.


MS 01 - 09
Difficulty 4/5

6 tentacles, 2 tyrants


In the next room, a tyrant on the other side of the pillar, followed by a second one on the other side again, will spawn. There are tentacles everywhere in the radioactive goo, so be mindful of where you step. You can kill the first tyrant with the crucible (a tentacle is located right in front of it), then follow the tunnel behind it to find another crucible charge.

On your way back, the second tyrant will wait for you. You’ll have both feet in goo, so keep your airtime to a maximum and kill the tyrant with a combination of ice grenade, microwave beam and chaingun. The remaining mecha-zombies should not be a huge threat to your survival during this phase. Alternatively, you can bait the second tyrant into the tunnel, so that you can calmly kill it from the ledge with the crucible charge, with grenades and the microwave beam. Once both tyrants die, the tentacles die too.


MS 01 - 10
Difficulty 3/5

3 lost souls, 3 carcasses, 2 cacodemons, 1 pain elemental


A pain elemental will burst from the ceiling in the next arena. Behind it you will find a megasphere. Go grab it if you need it, then come back to the entrance platform. If you drop slightly below the ledge, the spawns will be triggered, so you can drop down, jump back on the ledge, and just wait for the demons.

Two cacodemons, two lost souls and three carcasses will have spawned underneath. Deal with the cacodemons first, root out the lost souls, then kill the carcasses, all from your vantage point. There is a tentacle directly in front of the goo cascade, that will die once the other demons have died. Don’t forget to go grab the BFG charge in the tunnel down right if you need it.

On your way back, what used to be the locker with the chaingun in the main campaign will now be an access to an underwater section below. There are tentacles in it that you can’t really retaliate against, except by dashing into them repeatedly. The only payoff is a full armour pickup at the end. It is not worth the risk; you can just skip it.


MS 01 - 11
Difficulty 3/5

1 totem, 2 cyber-mancubi, 1 mancubus, 2 spectres


In the small room with the locked teleporter, the corridor behind it will open, revealing lots of zombies to chainsaw and flame belch. Two spectres will appear. Once you have killed them, along with every other zombie, two cyber-mancubi will spawn on each side of the room. Toss an ice grenade if you don’t feel confident facing them in such tight spaces.

Once they die, the room will fill with fog, and totem-buffed mecha-zombies. You can remain in the room, or camp defensively in the corridor. At one point, a mancubus will appear. It is buffed, so do not engage it directly. Throw an ice grenade, kill it, then go destroy the totem and the remaining fodder demons.
Master level - Super Gore Nest, part 3
(click to enlarge)


MS 01 - 12
Difficulty 5/5

2 tentacles, 2 arachnotrons, 2 cyber-mancubi, 2 mancubi, 1 pain elemental, 5 revenants, 1 archvile, 1 baron


The next segment is a long one, that will see you permanently harassed by lots of fodder demons. Two arachnotrons will greet you upon passing the portal, and a pain elemental will slowly creep towards you from up left. Throw rocket volleys at the arachnotrons, finish them, and kill the pain elemental with arbalest shots. Always keep an eye on the swarm of fodder demons around you.

Two mancubi will spawn in the upper left section. Contrary to the original map of the campaign, you will find a platform bridging the lower and upper left level directly. You can either get to the mancubi, or wait for them to come down.

Each mancubus you kill will trigger the spawn of a cyber-mancubus. The first one will spawn in the upper right section, the second one right where you teleported at the start. Once you kill them, the next wave will require you to advance in order to trigger. Be careful, you have killed two cyber-mancubi in the previous arena already, so you may not have replenished all your blood punch charges yet.

Upon jumping from the top left ledge to the top right, three revenants will spawn on the other side, waiting for you. Once you land on the right side, an archvile will spawn on one of the platforms leading forward. It is not advised to face all of them at once, so you can either trigger the revenants and kill them from afar (not recommended either, due to the fodder demons constantly chipping your health away), or shoot a BFG directly at the archvile, in order to kill it and the revenants at the same time.

Note: you can’t access the archvile’s platform, even with the super-shotgun grappling hook, unless you punch the crate. An invisible wall will prevent you from climbing to it.

Past the archvile, two revenants will spawn in the torn down building level you need to climb up to. Engage them from afar (again, with lots of fodder demons constantly on you), or climb up and get confronted by two tentacles on the ledge. If you opt for the latter approach, do not approach the door forward too much, because a baron will burst it open if you do, and you will have trouble dealing with the revenants, the tentacles and the baron at the same time. Be careful, take your time, but not too much because you will be constantly under pressure, and make good use of your grenades.

The first segment of the map can be made much easier by rushing towards the tunnel you need to go through in the original campaign. After jumping above a huge maw, you will find a jumper that brings you to the upper left platform. You can exploit this jumper to maximise your safety, by simply jumping again and again and shooting once or twice at the top of your leap, at whatever is standing in front of you. Just be mindful of the pain elemental, that can sneak into the jumper shaft.

Another alternative method consists of reaching the end of the arena at the very beginning, by rushing past the arachnotrons, jumping to the right segment, punch the crate, and advance up to the blocked door forward. The revenants and archviles will not have spawned yet, and from this vantage point you can take down everything that moves, with reduced risk. Some fodder demons will reach you, but they will all come from the same spot, which you can camp at, and harvest them for ammo and hit points.

The revenants and archvile will spawn along with the first cyber-mancubus, and the building’s demons spawn once the archvile falls. This time, you will be waiting for the demons to arrive, and not the other way around, but make sure to kill them quickly, and to use your grenades on the revenants and tentacles, while you immobilise the baron with the microwave beam.

While looking at the door forward, to your left you will find a rotating platform with a monkey bar, leading to a full armour pickup.


MS 01 - 13
Difficulty 4/5

6 tentacles, 2 totems, 1 mancubus, 4 cacodemons


Four tentacles will lace the way forward, with each second hole being occupied. Upon triggering the fourth one, an empowered mancubus will burst the cracked wall and immediately shoot at you, so be ready to take cover. Toss an ice grenade for maximum safety.

Past the broken wall, mecha-zombies will spawn left and forward. Flame belch the lot for armour, throw a couple of explosives, and immediately rush for the first totem. Follow the path to the left, then destroy the totem hidden in the nook to your left. Land upon the totem and do not run on the ground to it, as a couple of tentacles will be waiting on the way. They will die as soon as you destroy the totem.

Two cacodemons will spawn, along with a perpetually respawning carcass. Killing the first cacodemon triggers the second totem to spawn along with two more cacodemons. You can wait for the totem to spawn in the radioactive goo, where the armour pickup is, behind the pillar, in order to immediately disable it.

The arbalest is by far the superior choice to deal with cacodemons, as each bolt one-shoots them, and staggers those in a few meters around the initial target, including nearby zombies. Keep your distance from the cacodemons, run around on the mecha-zombies’ heads, and stock up for the way ahead.


MS 01 - 14
Difficulty 3/5

4 whiplashes


Traverse the goo pit up ahead, and at the end the way out will be blocked. Four invisible whiplashes will spawn in the pit, and will be no threat to you as long as you remain above. You can hug the demonic barrier for a safe footing, and kill the two whiplashes directly under you.

You will then need to move on the platforms on the other side of the steel beams to find a megasphere, and a line of sight to the two remaining whiplashes. Leave the megasphere be if you don’t immediately need it. Make sure that you exit the goo pit with as much radioactive resistance left as possible for the next arena.

Go ahead and grab the blue key. You will then not be locked up in a room full of demons, but be in a room where demons are locked up with you. Get the berserk powerup, and do your job. Prowlers, carcasses, hell knights and other fodder demons will spawn. Don’t forget to use your flame belch to retain your hit points.

Once you’re done, stand in the middle of the room, in order to collect the onslaught powerup, use your flame belch on everything that spawns, throw all your grenades around and toss sticky bombs. Do your best to remain at full hit points and full ammo at the end of the fight. Go grab the megasphere from the previous goo pit if needed.
Master level - Super Gore Nest, part 4
MS 01 - 15
Difficulty 5/5

1 hell knight, 2 marauders, 1 tyrant


You will face two marauders in the goo pit up ahead. This is a linear corridor, and you will want to run from one end to the other in order to dodge the marauders’ attacks, and regularly pick up the radioactive protection pickup in the middle.

The best way you have to trigger a reliable pattern from a marauder (that is to rush towards you and attack you), is to get far away from them, so go from one end of the tunnel to the other, wait for them there, retaliate if they blink and dodge if they don’t.

Use your flame belch on the zombies as much as you can. Always strive to maximise your air time by jumping and dashing, and don’t be afraid to dash above a marauder’s head. Be wary though, their super-shotgun shots and attacks will push you back and slow down your directional speed while in the air. Take your time, be careful, don’t lose your cool and you will get out of this alive.

A tyrant will await you at the exit, take it down with the chaingun or the microwave beam. At this point, if you are well enough stocked, you can just go ahead and go to the next arena by taking the monkey bar to your left. If not, then go forward past the door, and you will find a megasphere, along with lots of fodder demons just waiting to be harvested. In one corridor, you will face a hell knight, be ready for it.


MS 01 - 16
Difficulty 4/5

4 arachnotrons, 3 revenants, 3 archviles, 4 tyrants


In the central arena, four arachnotrons will spawn, along with a plethora of fodder demons. Killing three of them will trigger three revenants to spawn. Before killing them, go to the secret tunnel underneath the keylocks platform, where the BFG charge is, and take it. Once they are all dead, all the soldiers will die, and be replaced by perpetually spawning carcasses. This means that the number of chainsawable demons will be greatly reduced, so keep an eye out for imps prowling around.

Four tyrants will appear, along with a totem, located on ground level, to the right of the keylocks platform. Notice that a BFG charge has appeared next to it, that wasn’t there the first time you fought in this arena. Keep its location in mind for later.

The fight against the tyrants will be a hard marathon to run. It will be hard to dodge everything thrown at you, while focusing on taking down any of them, so you will spend most of your time running around and chipping away their health bars. Once one of them is staggered, think twice before pouncing on it for a glory kill. Make sure that its surroundings are safe, and that no buddy of his is standing nearby, ready to stomp you on arrival.

Remember the carcasses, their barriers can cut off your escape routes, and block your glory kill attempts. You may want to get the energy shield mod for the chaingun, which will allow you to shoot more safely at tyrants for a couple of seconds at a time.

As you kill the last tyrant, three archviles will spawn. Big problems require big solutions, and if you have followed this guide’s use of the BFG, you will have three shots at your disposition. The third charge is where the totem was located earlier. Shooting all three charges in the air will not always be enough to kill all three archviles, depending on where they stand when you shoot.

Alternatively, you can shoot directly at them, killing each of them instantly one after the other. The choice largely depends on your current situation: do you have enough health to hold your shot a couple of seconds, in order to reposition yourself? Do you have them in your line of sight, or is one of them hidden at the other end of the arena, behind a pillar? The panic move is to shoot in the air, and it is a valid one, but if you can help it, shoot at the archviles directly (and make sure to hit them, otherwise the shot will have a shorter travel than a shot straight in the air, and the overall damage done will be reduced).

Once the fight is over, open the hellified barrier, jump down the shaft, and the fast travel will be unlocked to you. Use it to get all the hit points you can for the final segment of the level. If you have followed this guide’s use of the crucible, you should have two charges on you.


MS 01 - 17
Difficulty 5/5

1 mancubus, 1 doom hunter, 2 marauders, 1 tyrant


This is the final timed rush, just like the main campaign. You will have to rush through many super heavy demons, all buffed by a totem. You can maximise your chances of getting out of it alive by knowing what is waiting for you, but you are never fully protected against being body-blocked by any of them, and helplessly dying stuck against a wall. It is very important to practice this segment multiple times in Nightmare mode before attempting it in Ultra-Nightmare.

Upon activating the reactor, you will have 100 seconds to escape, which is more than enough, so take your time, don't let the panic set in. Your first obstacle will be a horde of imps, that you can easily dispose of with explosives. Do not use your flame belch on them, you do not need the armour yet.

Past them, a mancubus will jump up from the pit below. It is extremely dangerous, so you need to kill it as fast as possible. Don’t be afraid to use your crucible on it. Alternatively, tossing a grenade to stun him on arrival, followed by a microwave beam or the usual quick-swap combos works well. Keep your ice grenade for later. Don’t worry if you get hit once or twice, because you will find a horde of zombies afterwards that you can flame belch to get all your armour back.

The next obstacle will be a tyrant. If you’re feeling confident, you can grapple it with the super-shotgun hook and breeze past it, or kill it with the crucible. If you had only one crucible charge to begin with, and have to choose between the previous mancubus and the tyrant, use the crucible on the tyrant, which is a bit harder to walk by and a bit more dangerous. Besides, a marauder will be rushing towards you from further ahead, so you don’t have time to play with the tyrant.

Dash past the marauder, and you will face a doom hunter on the other side of a ledge. Immobilise it with the ice grenade, climb up the wall, and dive in the underwater section. You will be offered a brief rest, as this section doesn’t contain any threat, but don’t dawdle.

Upon emerging, you will pass a portal, and face another horde of zombies, that you can again harvest for armour. Behind them, a second marauder will be waiting. Do not attempt to pass by him in the corridor, he will likely body-block you. Instead, either bait him into the room with the zombies, and pass him by there, or push through with the chaingun’s energy shield active, to negate all damage. The final exit portal is right behind him, to the right.
Master level - Taras Nabad, part 1
(click to enlarge)


MS 02 - 01
Difficulty 5/5

2 lost souls, 2 carcasses, 2 arachnotrons, 3 hell knights, 3 mancubi, 2 pain elementals, 2 pinkies, 2 spectres


Upon leaving the cave, an arachnotron and two lost souls will face you. Once you kill the first arachnotron, a second one will come from behind. You may completely bypass this first fight by hooking the first arachnotron, then releasing and jumping above and past it. All present demons will despawn once you reach the main platform.

Two mancubi will appear from the left, and two carcasses from the bridge up ahead. Use your flame belch on the soldiers, and give each mancubus three rockets. Take care of the carcasses, and wait for the rest of the demons to walk up to you on the bridge. Make sure to chainsaw a soldier before killing the last mancubus.

In the second wave, two pain elementals, two pinkies, two spectres and another mancubus will spawn. You want to stay next to the two door switches on the bridge, where the two pinkies spawn. Dispose of them first with two blood punches, and kill the mancubus in front of the door as fast as you can. The two pain elementals will close in on you along with the spectres, toss all your grenades at them and kill them with either charged arbalest shots or lock-on bursts.

Depending on how the pain elementals and spectres behave around you, this fight may be very easy to win or impossible to overcome. If the spectres remain passive, then you only have the pain elementals to handle, but if not, you will be quickly overwhelmed. It is the first combat of the level, so dying at this point is not a big deal.

Once you pick up the megasphere next to the two door switches, the area will be locked off and two barons will spawn. They are not particularly hard to handle, but you might wait for your ice grenade to cool down, for safety. A second megasphere is available, accessible by jumping off the cliff and under it, inside the secret passage. Picking it up will close the corridor’s exit, and pit you against three hell knights. Be sure to have enough ammunition to handle them.


MS 02 - 02
Difficulty 2/5

1 arachnotron, 1 marauder


After the monkey bars, a horde of imps will spawn in front of you. A single grenade is enough to take them all out, make the most of them with the flame belch. An arachnotron will jump from the pit between the bridge and the climbing wall, you can kill it or simply walk past.

On the bridge above, you will face a marauder. Hug the wall at either end of the corridor, wait for him to attack you and punish him. Jump above him and go to the other end of the corridor if your dodging room becomes too tight.

Pro tip for classic playthroughs, where you only have the sticky bombs shotgun to play with: a standard shotgun shot will almost certainly stagger the marauder, whereas the sticky bombs will most likely not. Avoid using sticky bombs at all.


MS 02 - 03
Difficulty 4/5

5 arachnotrons, 4 cyber-mancubi, 2 revenants, 3 whiplashes, 4 barons, 2 tyrants


In the next arena, two tyrants will spawn on the other side of the courtyard. Once you kill them, five arachnotrons will appear from the other side of the arena. Once you kill two of them, two revenants will appear from the sides. Killing all of the heavy demons triggers the next wave.

Next, four cyber-mancubi will spawn. Killing two will trigger two barons to spawn, and killing the last two will trigger three whiplashes spawn. Killing two whiplashes triggers two additional barons to spawn. Prioritise killing the two first barons, as having four of them running around isn’t good for your health. Don’t forget to headshot the perpetually respawning maykr drones for a full health, ammo and blood punches recovery. They will allow you to spam the lock-on burst against all the heavy demons here.

This is not a particularly hard fight, but it is long and can be tense. You can freely shoot your BFG once to clear the arachnotrons or the cyber-mancubi, but remember that the barons will mostly shrug the damage off.


MS 02 - 04
Difficulty 3/5

4 tentacles, 4 shield soldiers, 1 cyber mancubus, 1 mancubus, 2 revenants, 3 cloaked whiplashes


Once out of the toxic waters, you will face four tentacles. In the next court, a mancubus will stand waiting for you. Two revenants, a cyber-mancubus and four shield soldiers are also there waiting for you. You can jump into the arena and engage them directly, or you can bait them into the corridor you came from, waiting for them with the microwave beam plasma rifle, making them much more manageable. Upon reaching the top of the stairs, three cloaked whiplashes will spawn from the other end of the arena, you can easily dispose of them with rockets and grenades. Mind the electrified ground, don't take more damage than you need to.


(click to enlarge)


MS 02 - 05
Difficulty 4/5

6 cacodemons, 2 hell knights, 1 marauder, 2 tyrants


The first heavy demons will be two hell knights, followed by four cacodemons. Upon killing two cacodemons, two tyrants will spawn at the top of the stairs. Make sure to kill all of the cacodemons before killing the first tyrant, as this will trigger the next wave.

Ideally, set both tyrants up to die simultaneously, or one directly after the other one, in order to render the next wave more manageable. Two cacodemons and a marauder will spawn, which should not pose too much of a threat. Mind the gargoyles. Don’t forget to pick up the BFG charge if you have used it, because you won't be able to come back here afterwards.


MS 02 - 06
Difficulty 3/5

4 tentacles, 1 totem, 5 lost souls, 2 shield soldiers, 1 dread knight, 1 mancubus, 1 revenant, 2 doom hunters


Four tentacles will spawn slightly after you advance past the first one. Walk slowly, take them out one by one.

To your left is the slayer’s gate, to your right the toxic water pool. Going left, a dread knight will ambush you. Inside the slayer’s gate room, you will find a full armour bonus, that will trigger the spawn of two doom hunters. They are on their own, and are relatively easy to kill with the standard method, but you tend to lose more than you win here. In normal modes, the payoff is an extra life, but in Ultra Nightmare, you’ll get nothing for your troubles.

Enter the radioactive water room and back off a little, as you will have triggered the spawn of a revenant, two shield soldiers and five lost souls. Dispose of them carefully with the plasma rifle’s microwave beam, which allows you to immobilise everything that comes your way.

Make a mental note of the location of the first wall you need to break while underwater. This is where the totem of next paragraph will stand.

Upon leaving the room, a mancubus will wait for you in an upwards canal. As you try to enter the next arena, the door will close and the totem will spawn. If you are fast enough to sprint back to the previous room, you can have climbed on the crate before the first gargoyles become a threat to you. You can then safely punch the totem, and the summoned fodder demons will automatically die 5 seconds later. You can either let them vanish, or exploit them for extra armour and ammo.

Pick up the full hit point pickup if you need it, otherwise leave it for after the next fight.
Master level - Taras Nabad, part 2
MS 02-07
Difficulty 5/5

4 carcasses, 3 arachnotrons, 2 hell knights, 2 prowlers, 3 cloaked whiplashes, 3 barons, 1 doom hunter, 1 tyrant


You will need to kill 6 fodder demons in order to trigger the first wave. Use this opportunity to stock up on all the good stuff.

Three arachnotrons will spawn. Once you kill two, two hell knights and one prowler will spawn, along with two perpetually respawning shield soldiers. Be really careful with them, try to keep an eye on them at all times, and avoid hanging around in the foggy pit as much as possible.

Once they all die, three invisible whiplashes will spawn. After them, four carcasses and a tyrant, that you may kill with the crucible. Once the tyrant falls, three barons will spawn. Make sure to kill the carcasses before the tyrant, as the arena is already hard enough to navigate. Once you kill two barons, a doom hunter will spawn, followed by another.

A relatively safe way to deal with the barons (and everything around them) is to camp at the teleporter to the right of the room, the one that requires a jump to reach. Stand there with the energy shield chaingun, and wait for the barons to show up. Throw your grenades to incapacitate them, and mow them down. If your shield falls, or if you get overwhelmed, simply cross the portal to safety, run around the room to disperse the demons and recover your grenades, then start again.

You may use your BFG once here too, although you won’t get much value out of it, and it would be much better to keep your shots for later. Don’t hesitate to use your crucible on the tyrant if necessary, but keep it for later if you feel you can afford it. Don’t forget to collect the crucible charge if you have used it.

On your way out, make sure to open the secret passage and collect the full armour pickup. This will make a single zombie spawn, that you can exploit all day long to get back some hit points.


MS 02-08
Difficulty 4/5

3 shield soldiers, 3 carcasses, 4 arachnotrons, 2 cyber-mancubi, 2 pain elementals, 3 revenants, 2 archviles, 1 tyrant


Once you climb your way up the well, you will be faced by a carcass, three shield soldiers and three revenants in the distance. Make sure to regain your blood punches here.

After picking your crucible (that, for some reason, you already had on you… suspicious) and entering the next arena, two cyber-mancubi and two carcasses will spawn in the building to your right. Take out the carcasses first. Once you kill the first cyber-mancubus, the first archvile will spawn on the levitating platform in the middle of the arena. Once it dies, the second one will spawn at the top of the stairs. Once the second archvile spawns, two maykr drones will perpetually respawn. You need to kill all the heavy demons to trigger the next wave.

Try killing the second cyber-mancubus fast, before turning your attention on the archvile. You need to prevent the archviles form summoning backup at all costs, as always. If you feel you are losing control of the battle, don’t hesitate to whip out the crucible, but try using it only once.

Four arachnotrons and one tyrant will spawn after the second archvile falls. Once you kill two arachnotrons, two pain elementals will spawn. The situation can become a little bit overwhelming, and you always have the opportunity to go back to the open area around the titan, in order to catch your breath. Be advised that all the demons will catch up to you sooner or later, and you will not be able to use the environment to catch all the projectiles and lost souls headed your way. If your life is really hanging by a thread, and you have left the megasphere in the sewers, you may go and collect it.

You may use your crucible on the tyrant and/or on the archviles, depending on the situation, but the tyrant is by far the easier one to handle without. It is recommended to use the BFG to dispose of the pain elementals and the arachnotron, once the pain elementals spawn. If you used any of those, be sure to go back to down the well to the previous arena to pick up the charges, if they are still there. Whatever you do, it is very important for the future that you keep at least one crucible charge (much better two, ideally three), and at the very least one BFG charge (ideally two).


MS 02-09
Difficulty 4/5

1 arachnotron, 3 cacodemons, 1 cyber-mancubus, 1 dread knight, 4 prowlers, 3 revenants, 3 whiplashes, 2 doom hunters


Up next, an arachnotron will await you. You will find a cueball on your way, that you can send to a spawning dread knight and/or to a cyber-mancubus up ahead.

In the next arena, two shield soldiers will perpetually respawn. Three revenants, followed by three whiplashes, followed by three cacodemons and a doom hunter will appear. Once the doom hunter falls, another one will spawn alongside four prowlers. There will be plenty of fodder demons around, make good use of the flame belch and the frag grenades.


(click to enlarge)


MS 02-10
Difficulty 4/5

2 shield soldiers, 1 cyber-mancubus, 1 pain elemental, 3 marauders, 2 tyrants


Lots of gargoyles and imps will ambush you on your way up ahead. Make sure to stock up on resources on them.

In the next arena, you will first face two tyrants. Once either of them falls, a marauder and three perpetually respawning prowlers will face you. Try killing both tyrants at the same time. Be extremely careful when dealing with the marauder: as this arena is a tight torus, whenever you are facing the marauder, prowlers will not be able to teleport to your side, and will likely try to teleport right behind you, body-blocking you and ending your run in half a second.

Once you kill the marauder (and the remaining tyrant), you’ll need to get ready for two more. You’ve probably faced two marauders at once before, but you’ve never faced them with such a dense population of prowlers around. In addition, they are surrounded by demons with a tendency to randomly shoot projectiles around, that will often hit the marauders and make them summon their hounds. You need to take it slow and safe, do not overextend. Always keep in mind the shortest way to the megasphere.

After jumping to the next bridge, you’ll face a pain elemental, two shield soldiers and a cyber-mancubus. Toss an ice bomb at the pain elemental to help handle it. Alternatively, you can jump back to the other side of the bridge gap and take them all out from a distance.

Master level - Taras Nabad, part 3
MS 02-11
Difficulty 5/5

1 totem, 13 shield soldiers, 7 carcasses, 3 cyber-mancubi, 7 hell knights, 3 barons, 1 doom hunter


In front of the vault door, a baron will spawn. Do whatever you can to lose as little hit points as possible, you will need them all for the fight ahead. A hell knight will ambush you at the right switch.

Nine shield soldiers will greet you as you enter the vault. Take your time, take them out from a distance.

This next fight is very hard, and you should train it extensively before jumping into Ultra-Nightmare. Four carcasses, two hell knights and a doom hunter will spawn. Two prowlers will spawn perpetually until the end of the encounter. Remember the spawn positions of the carcasses, and kill them as fast as possible with point blank shots from the super-shotgun and the ballista. Then, kill one hell knight and leave the second one be.

You now need to slow the fight down and prepare as best you can for the next phase. That means getting all your blood punches, and as many hit points as possible by farming the fodder demons and the prowlers. Once the doom hunter’s life is low, a baron will appear. Dispose of it, and keep the hell knight alive until you are fully prepared to face the next phase. The next phase starts once all heavy demons (excluding the prowlers) are dead, so if you fail to keep a hell knight alive, you can always work on getting your health back with the baron around.

Afterwards, three cyber-mancubi and four shield soldiers will spawn around the arena, along with the already present prowlers. In addition, once you kill two cyber-mancubi, two hell knights will spawn, followed by another two. They are all buffed by a totem, protected behind a forcefield, which makes this phase of the encounter extremely hazardous.

You may have the clever idea to position yourself right atop the totem’s spawning location, before the nook is sealed off by the force field. This will result in you being teleported right in the middle of the melee as soon as the totem appears, making you lose precious time for the recommended strategy, and disorienting you.

It is vital that you clear up the space, in order to navigate freely to dodge the lightning-fast hell knights. Take out the first spawning cyber-mancubus to the left with the usual super-shotgun – blood punch – super-shotgun, then a second one, as fast as you possibly can. By the time you face the third one, the other demons will have surrounded you, and you should retreat and kill the third cyber-mancubus from a distance. Make sure you clean up the shield soldiers quickly, they are extremely dangerous and you can't remain in mid-air forever.

The couples of hell knights should absolutely not be underestimated either, especially because they will be backed up by prowlers, who will be just as fast. The chaingun with the energy shield is a good way to safely dispose of them, one at a time, however the shield will get shredded in seconds.

This is one fight you have saved your BFG charges for. You may shoot a BFG charge across the room early to kill the three cyber-mancubi and shield soldiers, but you may have to contend with four (with luck, two) hell knights. However, with no demons around to harass you, you are free to just stand on the central demonic barrier and shoot triple rocket bursts at all the knights that spawn.

Alternatively, if you feel you can kill two cyber-mancubi fast and safely enough, you will have the opportunity to shoot the BFG while two hell knights have already spawned, making it possible to even catch the two additional hell knights spawning right afterwards.

Once the final hell knight falls, three carcasses and a baron will spawn, and the totem (in the nook to the right) will be revealed. Toss an ice grenade at the carcass in front of the totem if you have it, and destroy it as fast as possible. Take all the possible precautions to ensure that your way to the totem doesn’t get blocked by a carcass, or its force field (that also means no throwing the ice grenade too early).

Once it is destroyed, you will be able to breathe a little bit better, but don’t let your guard down, the room’s population is still more than capable of killing you. Kill the carcasses, kill the baron, take the time to fill up your blood punches, clean up the rest, and give yourself a pat on the back.


MS 02-12
Difficulty 3/5

2 arachnotrons, 2 hell knights, 1 mancubus, 4 pinkies


Before you jump down the well and into the radioactive water, the area will be sealed, and you will face two hell knights. Once they die, four pinkies, one mancubus and two arachnotrons will spawn. Locate the pinkies as fast as possible and deal with them. If you find them isolated, blood punch them. If they are grouped, throw grenades to freeze or stun them. Try dodging the other heavy demons while you’re still dealing with the pinkies.

Down the well, behind the breakable door (look at your map, it is located slightly above the blue lights’ height), you will find a full armour pickup.

Pro tip for classic playthrough: in this nook behind the breakable grate is where the BFG is located. Segment #14 is probably the hardest fight in the whole game if you don’t have the BFG with you, and unless you are extremely good at the game, you are very likely to not get through it. Once you fall in the water, you can’t load a previous checkpoint, so if you have failed to get the BFG, you’re out of luck.


(click to enlarge)


MS 02-13
Difficulty 3/5

2 carcasses, 1 cyber-mancubus, 5 hell knights, 3 mancubi, 8 prowlers, 3 spectres


In the small room after the radioactive water, you will be swarmed by fodder demons. Three spectres will spawn around the arena. Once they fall, two carcasses will spawn. After them, a cyber-mancubus, and finally, three mancubi. You will need to kill all the demons present to trigger the next wave, so take the time to replenish your ammo and health.

The next wave consists of a brutal mass of 5 hell knights and 8 prowlers. The prowlers are arguably more dangerous than the hell knights, as their vicious teleportation will hinder your ability to dodge the hell knights. Make good use of your grenades, your blood punches and your sticky bombs, but keep the ice grenade at the ready if you ever find yourself surrounded. The ballista’s destroyer blade can be really effective, but the reduced mobility can also land you into trouble very quickly.

Make absolutely sure that you are stocked up on everything before killing the last demons.


Master level - Taras Nabad, part 4
MS 02 - 14
Difficulty 5/5

2 dread knights, 2 archviles, 2 tyrants


This section is brutal, and is probably the hardest fight in the entire game to win without BFG or crucible. If you stick to the following strategy, the segment will be over in 20 seconds, and with luck you can even not get hit once. Be careful though, as archviles are involved, the randomness of the backup they spawn will have a big impact on how the fight goes, so take it extremely seriously and practice well before attempting an Ultra-Nightmare run.

As you enter the room, two archviles will spawn behind force fields, rendering them invulnerable, and free to spawn whatever demons they like. These demons will be buffed, and fighting four or more buffed heavy demons in such a cramped arena is very unsustainable, so you need to keep it to an absolute minimum.

Two dread knights will spawn in the passage downstairs. Once they die, two tyrants will spawn, one in each staircase corner. Once they die, the archviles’ force field will fall and you will be free to slaughter them.

You need to kill the dread knights as soon as possible. The first round of summoning will arrive mere seconds after they spawn. The fastest and most reliable way to kill them is as follows: put the destroyer blade mod on your ballista, and wait in the stairway corner against the wall. You will inevitably be targeted by a fire attack from one of the archviles. When this happens, dash forward once, then charge your destroyer blade to maximum. Once both dread knights spawn in front of you, release the blade. You will need to give them one more shot to kill them, with the super-shotgun, a raw ballista shot (not recommended, since it will be on cooldown) or a precision bolt.

Once they fall, you need to wait for either tyrant to spawn, and immediately cut it down with the crucible. Go to the other one as fast as possible, ideally from upstairs, as it is likely that the downstairs route will be blocked by a heavy demon. If the path upstairs is also hindered, release a BFG shot across the room. Slash the second tyrant with the crucible.

The demonic barrier protecting the archviles will fall. At this stage, if you have followed this guide, you should have at least one or two BFG shots ahead of you (counting the charge located in the middle of the arena). Shoot once across the room to damage the two archviles (and the remainder of the demons), or directly at one archvile to immediately kill it. If you feel insecure about your health, or your ability to dispose of the second archvile, shoot a second BFG shot, or better yet, use your last crucible charge (if you still have it).


MS 02 - 15
Difficulty 4/5

1 totem, 4 arachnotrons, 4 cacodemons, 7 hell knights, 3 mancubi, 2 pain elementals, 3 barons, 2 doom hunters, 2 marauders, 3 tyrants


The last fight is not a particularly hard one, but it is a long one, so remain focused until the end. It will take place in four stages.

In the first one, in the final arena, five hell knights will spawn, followed by three mancubi once you kill two knights. This should be easily done with lock-on bursts. The next phase starts once you kill the last heavy demon, make sure to get fully stocked before then.

In the second phase, you will be teleported in the large courtyard of segment #3. Two arachnotrons, two pain elementals and four perpetually respawning shield soldiers will await you. They will all be buffed, the totem is located to your upper left. Take the jump pad, dodge the shield soldier waiting for you, and past it you will find the totem. You may go destroy it with or without the overdrive pickup, which will make you move faster.

If you have a BFG charge remaining, you can let go of it now. Once the heavy demons die, four cacodemons, two hell knights and two additional arachnotrons will spawn. Killing them will teleport you to phase three.

You will face three tyrants in front of you, in the corridor between segment #10 and #11. You will be given one crucible charge per tyrant, making this segment a walk in the park. It is made slightly easier by having at least one crucible charge on you, so that you are not forced to sheathe the crucible after each takedown.

The last phase will take you back to the last arena. It will be foggier than before, so be on your guard. Two doom hunters will spawn, and once you kill either of them, three barons will arrive. You are free to use your remaining crucible charges on them.

Once all the heavy demons die, two marauders will spawn. Take this fight slowly, and chose your engagements carefully. Whenever you wait for them to approach you, make sure that no hound is around, that you won’t get backstabbed by gargoyles, and that you can escape easily enough. Play it safe, don’t take too many risks, and you’ll have gotten yourself through the Taras Nabad Master Level in Ultra-Nightmare!
Master level - Mars Core, part 1 (WORK IN PROGRESS)
Your first opposition consists of three shield soldiers, followed by a mancubus jumping from the right, followed by three additional shield soldiers.

After the vent, one arachnotron and two carcasses will await you. Deal with them without advancing too much, or you’ll trigger the next arena.

Two cyber-mancubi will spawn, followed by two more, one after each kill. They are easily dealt with thanks to the two blood punch pick-ups around, and a healthy dose of super shotgun shells.

As you advance in the corridor, one archvile will spawn behind you, accompanied by two carcasses. Killing them all provokes the same combination to spawn once more, from the other side of the corridor. You may spam your grenades at the first archvile, leave the last carcass alive for them to cooldown, and then engage the second one with all your grenades again.

Next, seven cueballs in a room where two hell knights and four revenants will spawn. You can shoot the cueballs from up above, but they will respawn once you hit the ground. Make good use of your grenades and your flame belch.

Past the teleporter, you’ll be faced with three mancubi on a dangerous electrified ground. Double-jump to the right of the crates to your right, grapple on the the mancubus to your right, freeze it with the ice bomb, and pass the door behind it. You’ll be on safe ground there, and you can take out the mancubi one by one.

After killing them and most of the fodder demons, a dread knight will burst the door forward open, followed by three spectres.

Once you get the yellow key, a tyrant will spawn behind you. There is a megasphere at the other end of the corridor, decide for yourself to pick it up when you need it most.

You’ll get stuck in the airlock, with purple sludge slowing you down and lasers preventing you from hugging the walls. First, a hell knight will spawn on the other side of the airlock. Once it is wounded, a baron will spawn from the other side end of the airlock, where you entered. You may slay it with grenades and the chaingun, or you can slash it with your crucible. There is a crucible charge some meters before the airlock.

Outside, four revenants and eight pinkies will await you. Four more pinkies will spawn as you kill them. Take care of the revenants first, and you’ll be free to blood punch around afterwards.

Later, a wave of fodder demons and shield soldiers will arrive. Killing enough of them will trigger five cacodemons. Killing four of them will spawn a totem, located in the middle of the arena, up, hugging the wall.

Once you destroy it, two tyrants and two pain elementals will spawn.

Later, two cyber-mancubi, a hell knight, two revenants and two carcasses will spawn on you from above. If you have two blood punches, you can toss your ice bomb and take out the two cyber-mancubi first. Alternatively, you can retreat and wait for them to follow you, taking them out from a safe distance.

In the next arena, lots of fodder demons will spawn. Killing enough of them will trigger four arachnotrons to spawn. After killing three of them, one archvile and two dread knights will spawn on the other side. Once you kill the archvile, the second one will spawn in the middle of the arena. Keep the Onslaught power-up for when the first archvile spawns, and you will be able to kill everything easily with the chaingun. You can safely let go of a BFG charge if you feel like it.

Below the bridge, two pain elementals, one arachnotron and two carcasses will spawn. There are many ways to deal with them, if you feel overwhelmed you can always jump in the void and you will reappear above, out of harm’s way. You may deal with either demon first, they are all dangerous if left unchecked for too long. The pain elementals require a lot of effort to take down, so it is preferable to keep them for last. Rush for the arachnotron, kill it with a triple burst and a finisher of your choice, then toss your grenades at the carcasses, which will kill them both most of the time. Once this is done, the pain elementals will be easy to deal with, especially given that they tend to stick themselves within the walls to the side.

Next, three lost souls and two automated turrets will wait for you past the breakable lock. These turrets cannot be destroyed by any means, except for the plasma rifle’s standard shots. They only shoot horizontally, so you may just jump above them.

In the next room, one doom hunter and one perpetually respawning prowler will appear. Killing the doom hunter will cause two additional doom hunters to spawn.

Later on, the corridor will be blocked, and a totem will appear on the other end. A hell knight will appear, along with several respawning imps. Once you destroy the totem, a cyber-mancubus will spawn at the top of the stairs.
Master level - Mars Core, part 2 (WORK IN PROGRESS)
After grabbing the BFG, you’ll be greeted with a rare occurence: a BFG charge that reappears every 15 seconds. Grab it, and six cacodemons will appear. Shoot your first BFG shot into the air, collect the charge, and six hell knights will appear. After they die, two pain elementals and three arachnotrons will spawn. There’s a sweet spot for you to shoot the next BFG charge: if you position yourself under the entrance gate to the BFG core, and shoot straightforward into the air, the BFG charge will kill all the six hell knights, the two pain elementals, and only two arachnotrons. You can leave the last arachnotron alive, in order to fill up on BFG ammunition, and using the three zombies around to replenish the rest of your hit points and ammo. Killing the last arachnotron will trigger six cacodemons, two tyrants and one doom hunter to spawn. Go back to the BFG core gate, and from here, shoot the BFG once at each tyrant, which should kill everything.

The next section is a little bit chaotic. The first contact is with a cyber-mancubus, that you can bypass. Next is an arachnotron, whose death triggers a baron to appear. You can easily jump past them all, they will despawn once you trigger the next encounter.

Approaching the lever will trigger one mancubus and three shield soldiers to appear. Pulling the lever will trigger one hell knight and four mecha-zombies. The next lever triggers two invisible whiplashes and an arachnotron, that you can easily dispose of with your frag grenades. After grabbing the blue card, three spectres will wait for you.

The next fight is a long and tense one. A horde of fodder demons, with five perpetually respawning shield soldiers, will face you. Killing enough will trigger three revenants to spawn. Killing two of them will bring two more. Killing two will trigger two prowlers to appear. Killing them all spawns the next wave.

A pain elemental and a baron will appear. Hurting either of them triggers an additional baron and an additional pain elemental to appear. After they die, you’ll get some respite before the next wave, use the fodder demons to stock up on everything.

In the last wave, a marauder, two hell knights and a cyber-mancubus will spawn. Once you wound the marauder, a second one will spawn. While they are alive, the other heavy demons will respawn. The cyber-mancubus will appear only four times, and it is a dangerous demon to leave around, so prioritise taking them out first. Once they are out, the hell knights will occasionally let a whiplash spawn instead. The marauders are hard to isolate from the hell knights, as they run after you with roughly the same speed, so be patient and don’t take opportunities that appear too risky.

After the arena, you’ll fall down a hole. A cacodemon will burst through the cracked wall, be ready for it and don’t stand in front of it. Past the jump and up the stairs, a mancubus and two carcasses will ambush you. They are tightly packed, throw all your grenades and finish them. Afterwards, some shield soldiers and two dread knights will face you, you may safely backtrack to give yourself some safety.

Next up is a scary encounter: there’ll be a totem somewhere ahead, three mancubi and a lot of buffed fodder demons to guard it. The totem needs to go as fast as possible. Rush forward, and the first mancubus will spawn behind the pillar in front of you. Toss a frag grenade to falter it, swap to your ice grenade, then head left with your super-shotgun in hand. Follow the tunnel then head right, you will face a couple of fodder demons and a mancubus behind. Shoot the super-shotgun once to clear the way, toss your ice bomb at the mancubus, then grapple onto him to propel you towards the totem, that is on an upper ledge behind. If you miss the ledge and do not destroy the totem, head quickly towards the left side of the room, where you will find a couple of crates to climb on, which represent the standard way of reaching the totem. Once it is destroyed, you may advance without looking back.

After jumping down the hole, the path goes forward, but there is an optional encounter to your left. First, you’ll face four shield soldiers and a hell knight, followed by an arachnotron that will appear in front of you after turning along the corridor. Behind the teleporter, eight mancubi will spawn behind one another. The only reward for this encounter is a megasphere, and while it can be very fun to play with in sntadard playthroughs, it is completely unadvisable for Ultra-Nightmare. But, if you must: you may either shoot a BFG charge in the air (which you won’t get back until later), or you may throw your grenades one after the other to incapacitate the front mancubi while you jump around with your energy shield chaingun, or you may throw grenades to give you time to shoot two fully-charged destroyer blades, which will take them all out if aimed properly.

Up ahead, five arachnotrons will spawn, you may bypass them entirely. After them, four cacodemons will spawn around a jumping section, and despawn immediately after you reach the other side.

Later on, two cyber-mancubi will spawn. After a long leap, five arachnotrons will await your arrival. You have several ways of approaching the situation. You can either take it slow, dispose of the cyber-mancubi, snipe the arachnotron’s turrets off, and use the four zombies on your platform to replenish your stock. Or, you may grapple past the cyber-mancubi and jump directly on top of the arachnotrons. You may jump in and shoot a BFG shot to go faster, but it is unadvisable.

After killing them all, two pain elementals and one doom hunter will appear. The two pain elementals spawn close together, so an ice bomb is sure to freeze them both. After they all die, one pain elemental and two doom hunters will appear.
Master level - Mars Core, part 3 (WORK IN PROGRESS)
The next arena is a tricky one, but can be dealt with relatively easily. First, once the mist settles in, four cacodemons and three invisible whiplashes will spawn. You may either deal with them the hard way, which is largely feasible but relatively dangerous, or you may simply shoot a BFG shot across the room once everything has spawned. Next up, a tyrant will spawn at the entrance, and two barons at the other end of the room. The middle of the room will have been filled with purple sludge, making baron rodeo very hazardous. You may simply slash the tyrant with your crucible, and deal with the two barons with your grenades and your chaingun. You will not get to collect the BFG charge from the previous arena.

Next up, you’ll have two cyber-mancubi, two arachnotrons and one dread knight waiting for you. You may take out most of them by shooting the huge red barrels around, although it is probable that a cyber-mancubus and the dread knight will remain.

Next up, a revenant and four carcasses will spawn. You can also run straight past them, although don’t forget to pick up the BFG charge if you need it. In the next arena, three mancubi and a lot of fodder demons will face you. Killing two mancubi will trigger two pain elementals and one totem to spawn, upstairs. You can’t bypass the fight, but you can jump back to the previous platform, in order to isolate the pain elementals from the rest.

After the long jump, if you go pick up the sentinel armour, a hell knight will ambush you. Once inside the building, a swarm of hell knights will attack you. Once you kill eight of them, whiplashes will spawn and the hell knights will stop spawning. Once oyu kill six whiplashes, they will stop spawning, and one carcass and three pinkies will spawn.

When entering the room, a wall will move in front of you, revealing a crate and two blocked vent accesses. You can jump on the vent ledges, where the hell knights will not pursue you. You will still be vulnerable to fodder demon shots though.

Just before the escape pod, the room will be locked and you will find yourself in company of a swarm of shield soldiers, accompanied by a respawning carcass. The microwave beam is a poor help in this scenario, and the heat blast does a good job at providing the extra area of effect required when you get overwhelmed. Make good use of your flame belch and your grenades.

This is an extreme and chaotic fight. It will start with two tyrants, two dread knights and perpetually respawning shield soldiers and prowlers. The first tyrant you kill triggers two cyber-mancubi to spawn. Keep your crucible charges to yourself for now, if you can.

Next up, two doom hunters, along with lots of perpetually respawning hell knights and carcasses. Once the doom hunters die, the perpetual spawn stops. Killing all the remaining heavy demons triggers the next wave. Don't hesitate to use the BFG to help clear out the doom hunters' surroundings, and to immobilise them for a few seconds.

One cyber mancubus and two mancubi will spawn in front of a shielded totem. You need to take all three of them down to expose the totem. Now’s a great time to use your BFG: shoot into the air and the totem will be exposed.

Afterwards, four arachnotrons, two pain elementals and two barons will spawn, alongside perpetually respawning prowlers. You can shoot your BFG once more there.

Once they die, three tyrants, along with perpetually respawning cacodemons and whiplashes, will appear. You may use all your crucible charges on them. If you still have one, you may shoot your BFG in the air.

Lastly, past the door, you will collect a BFG charge and face eight cyber-mancubus and two tyrants at the back. Clear out the cyber-mancubi with the BFG. You may start working on the tyrants from a distance, although you might run out of ammo before you achieve anything. There are some zombies to chainsaw next to them.
137 Comments
Gamer911 (RUS) 10 Jul @ 1:08am 
Amazing guide! Thank you. Finished the base game, both DLC's and now doing the master levels! :bigjohn:
JoeBarnes  [author] 3 Sep, 2024 @ 8:06am 
Hey, thanks for the heads up! I reuploaded it, sometimes Steam likes to make pictures disappear. Good luck with that run :D
BlaiseEbuth 30 Aug, 2024 @ 4:55pm 
Hey! Awesome guide! Thanks for that. :)

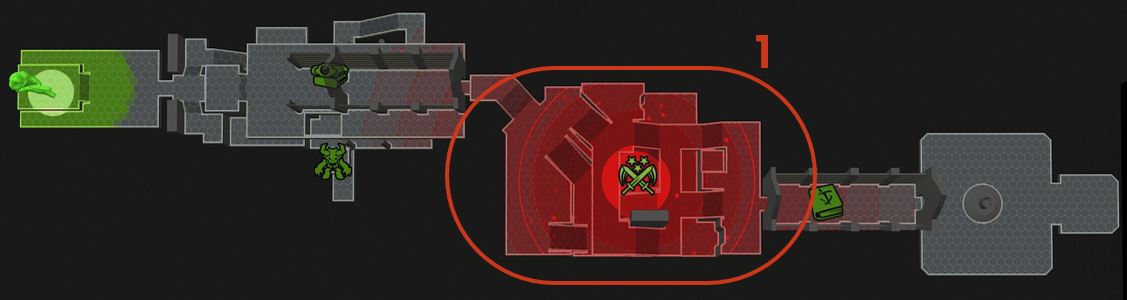
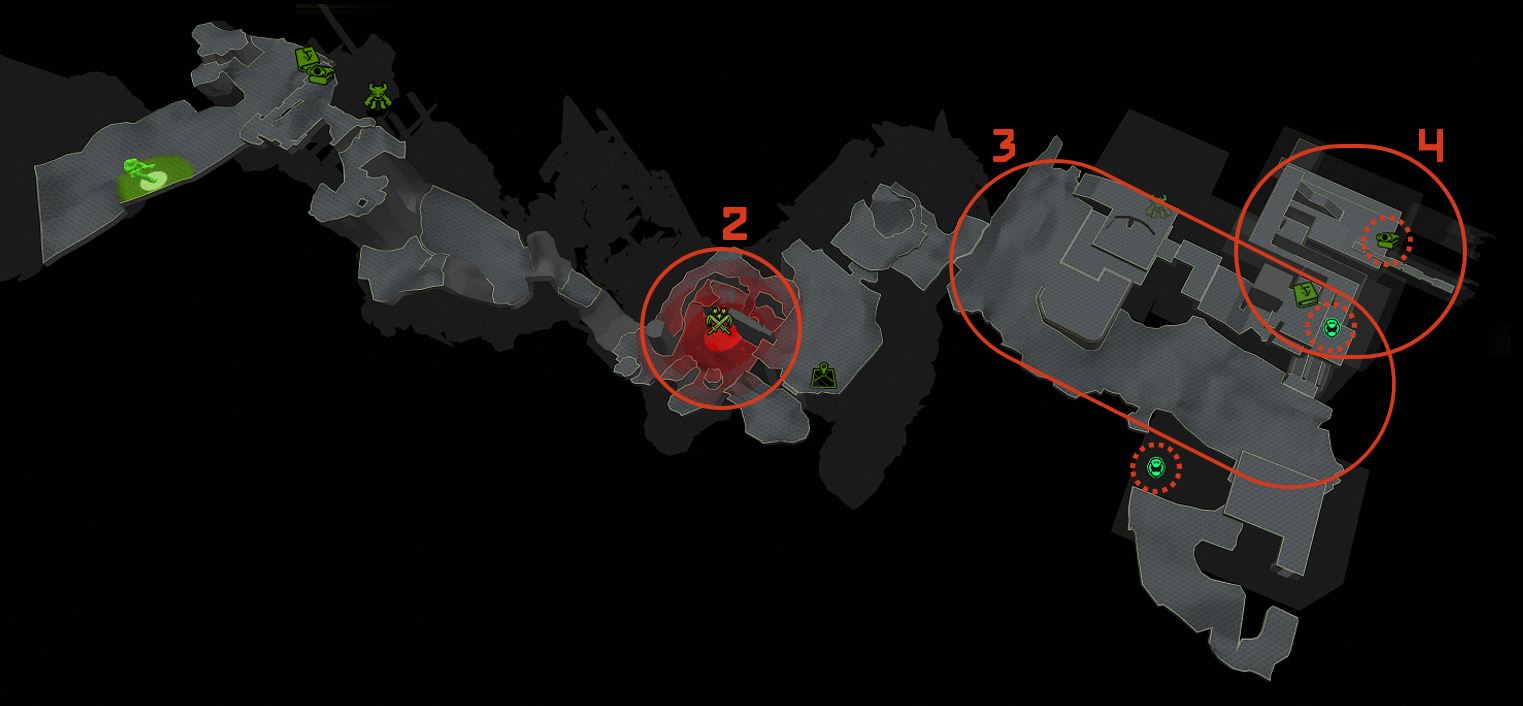
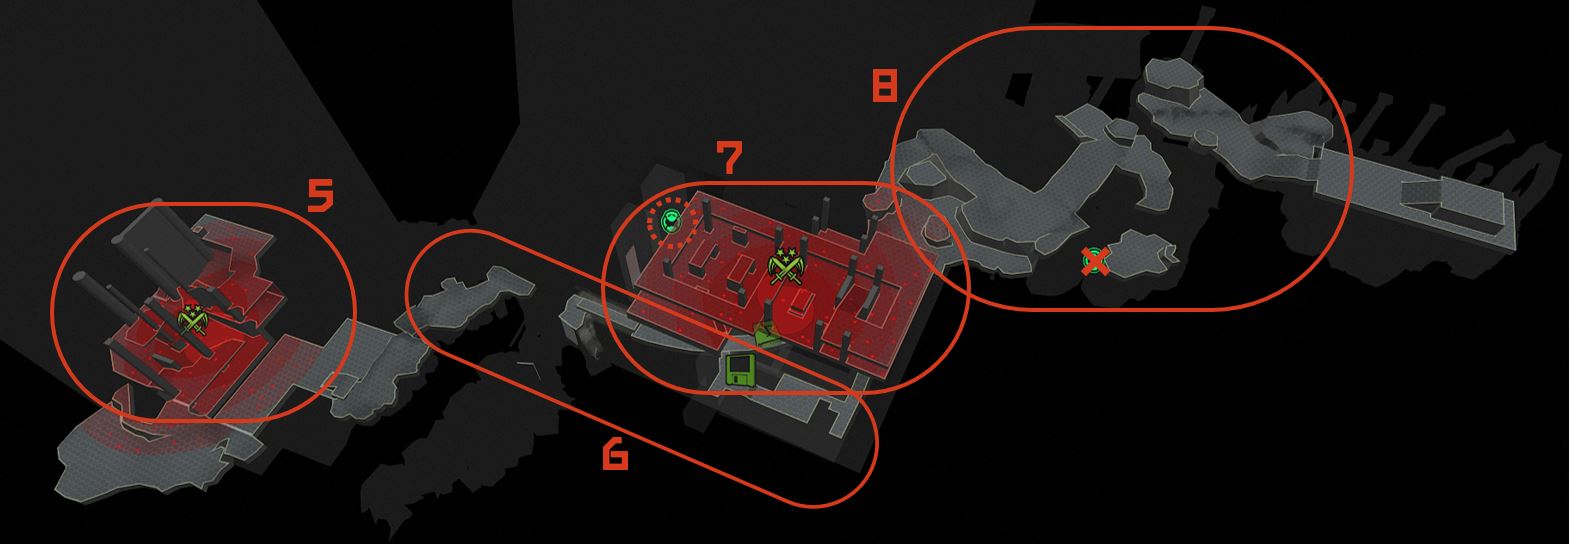
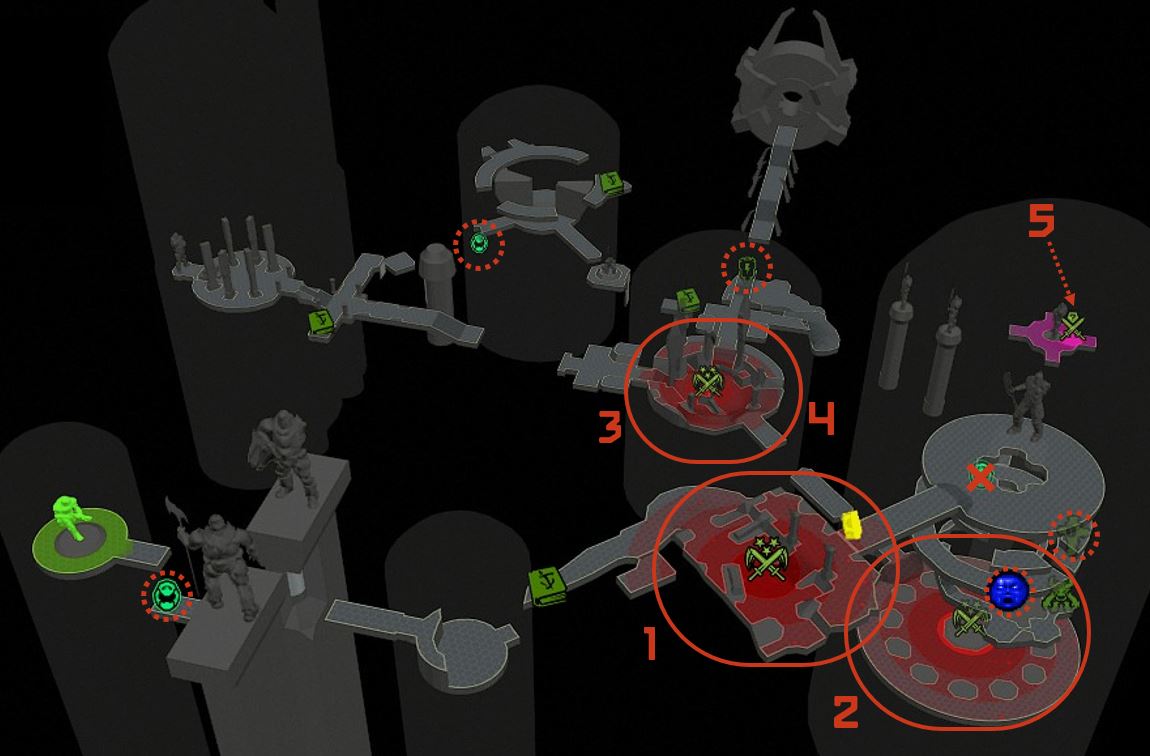
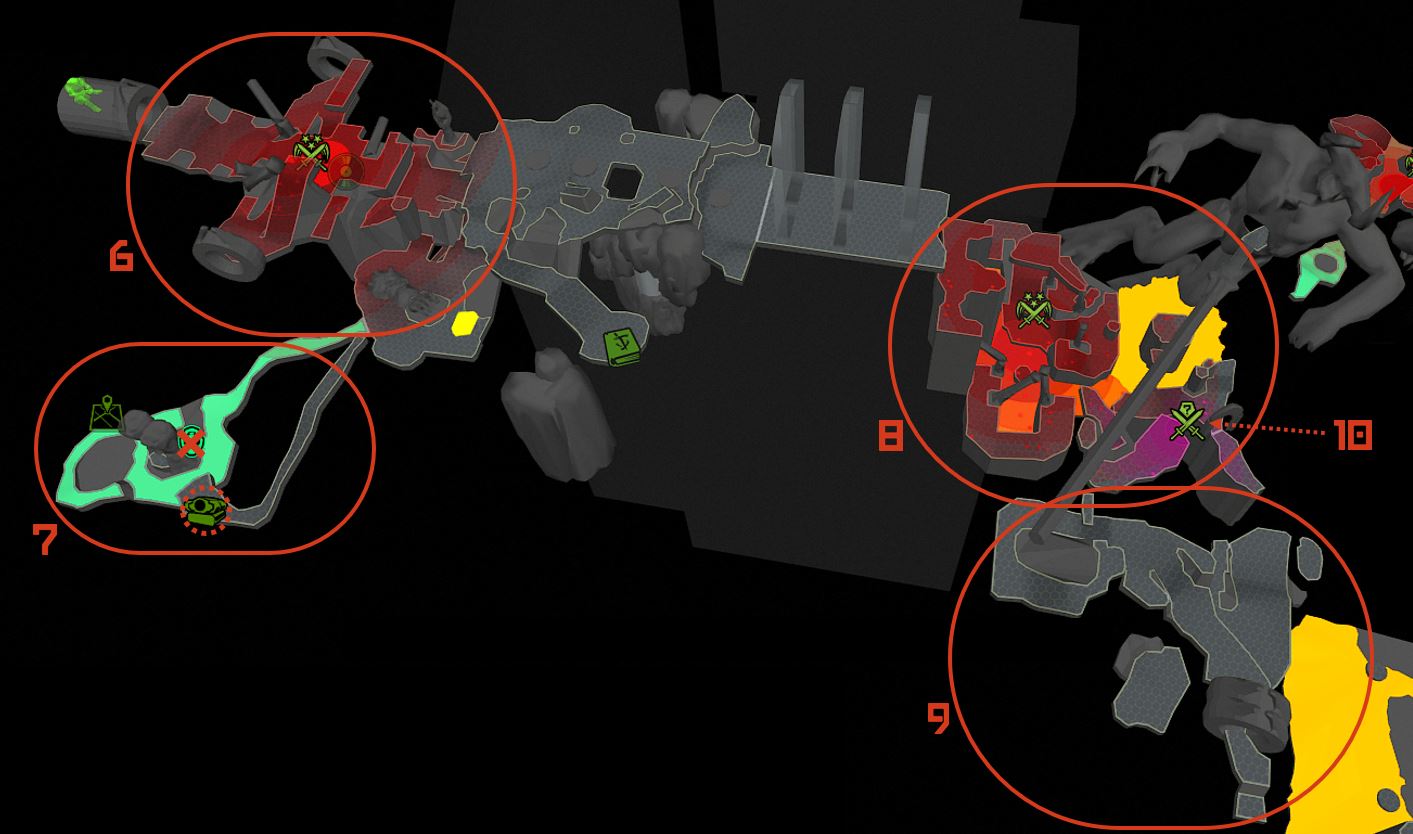
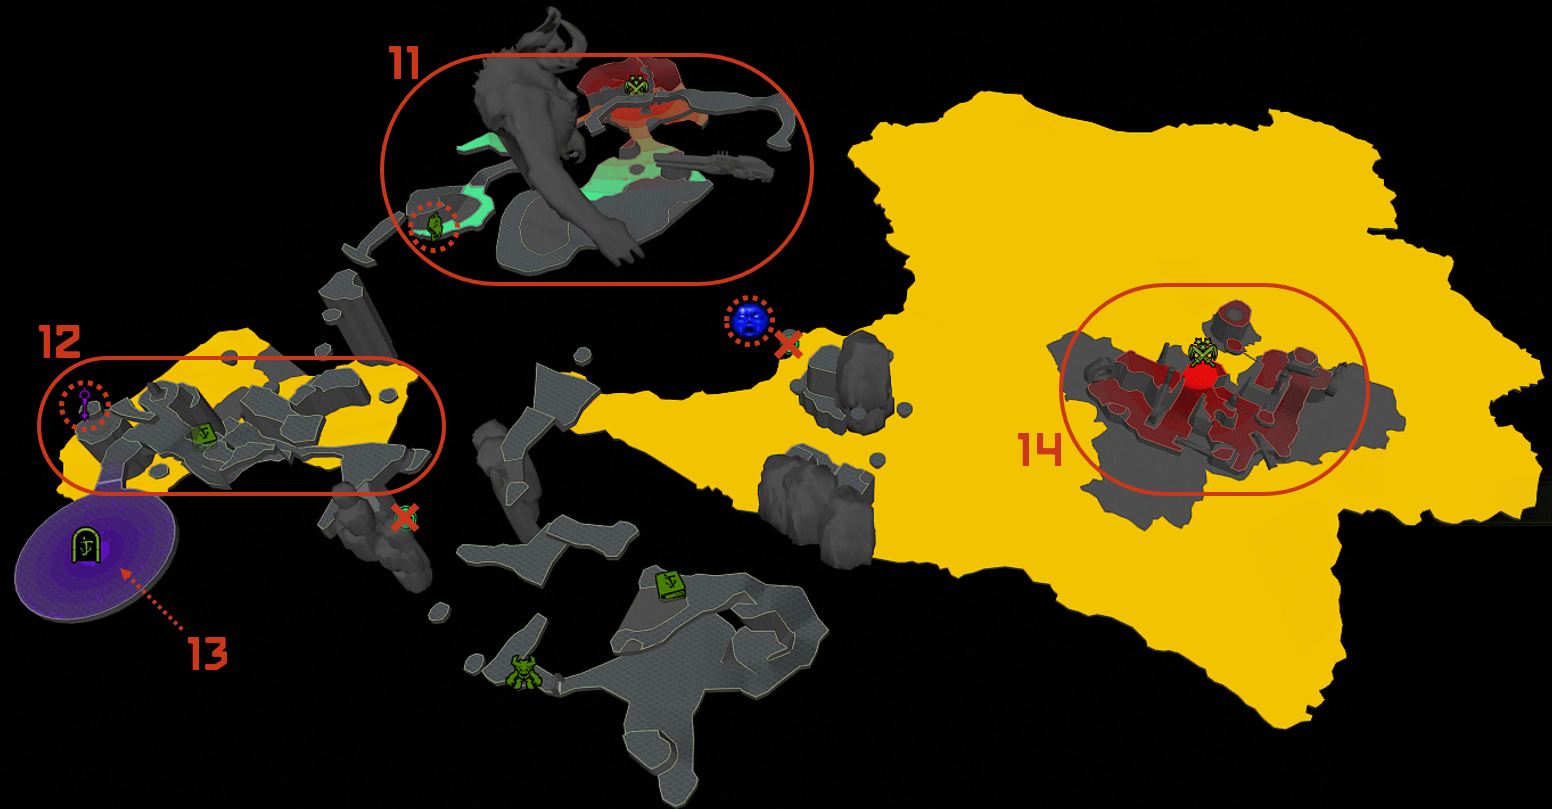
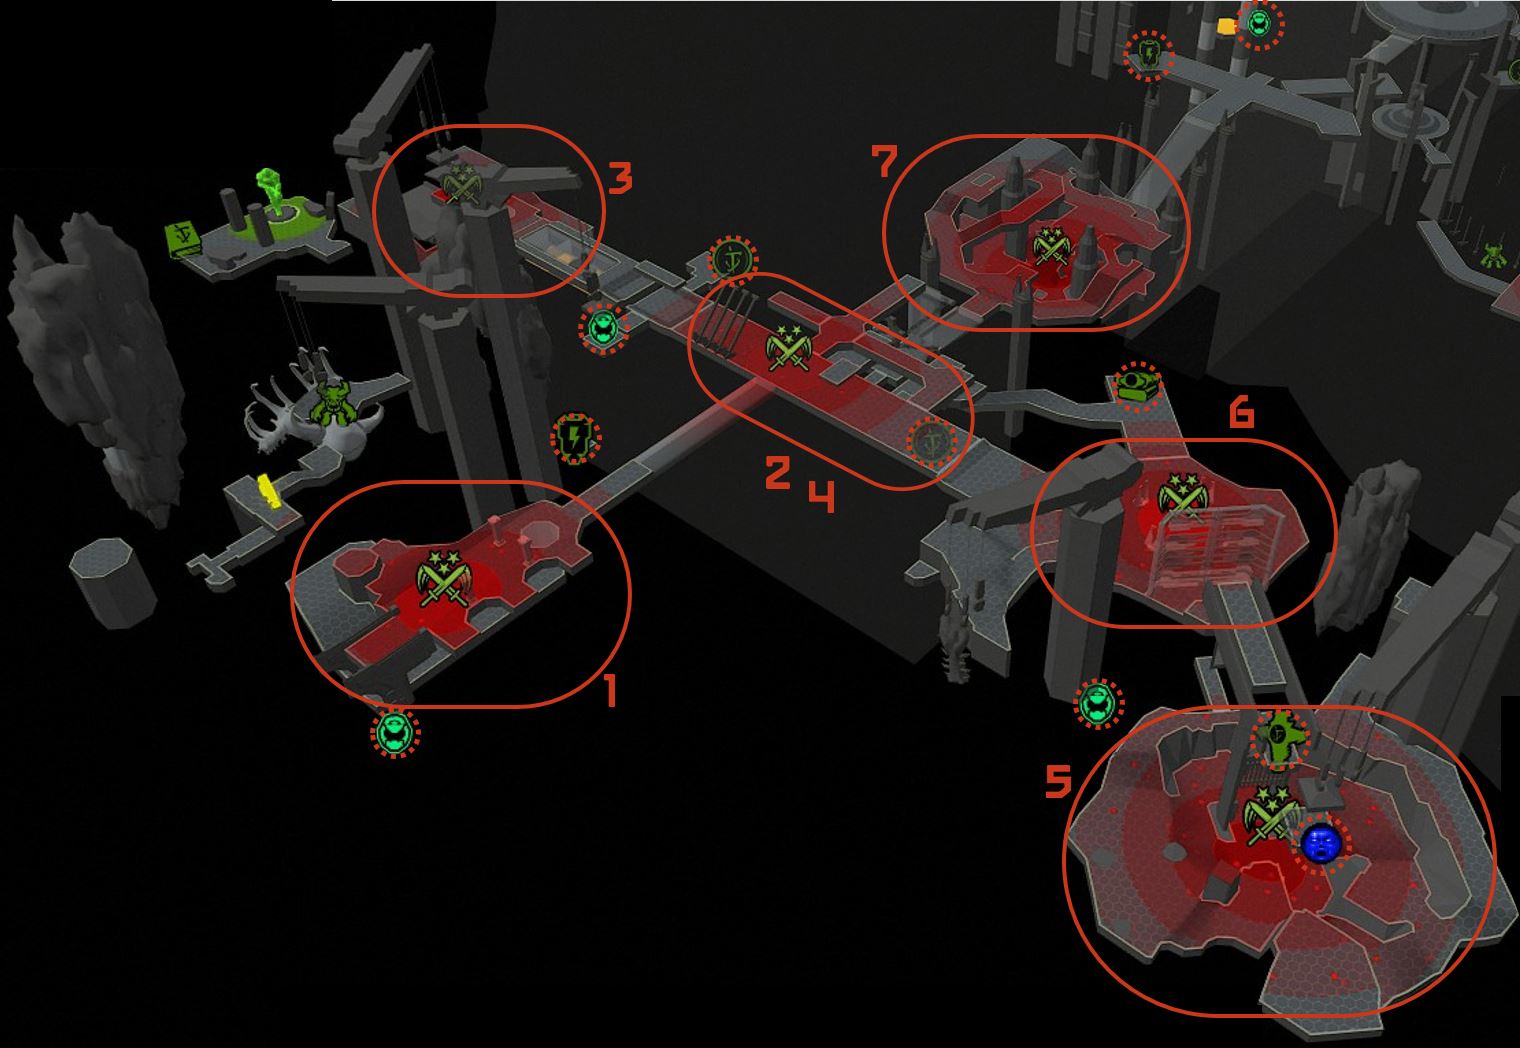
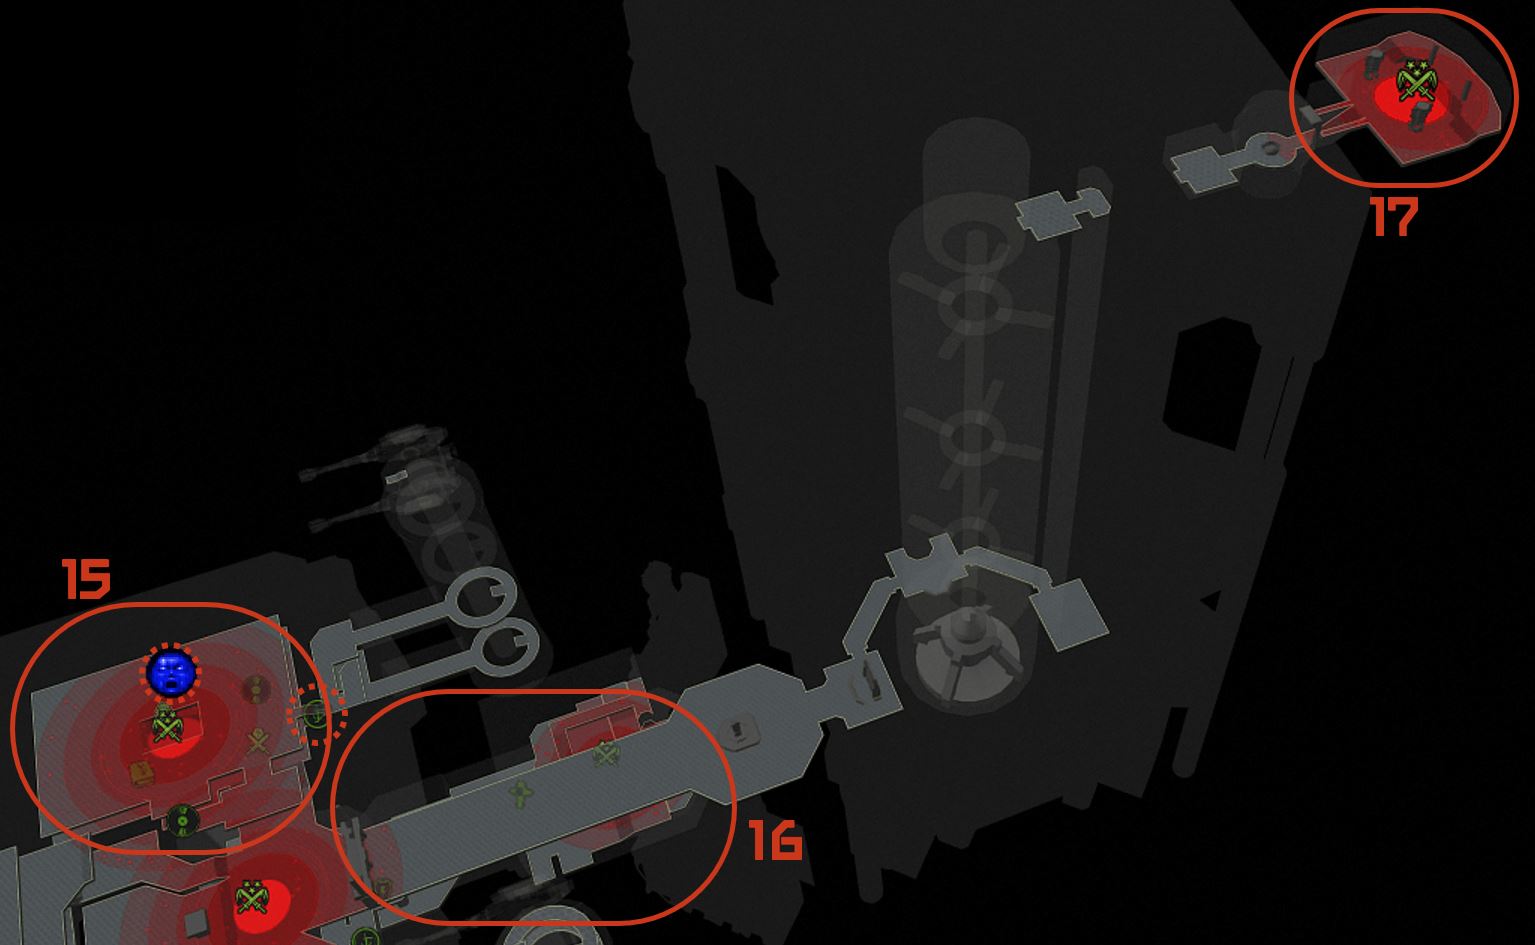
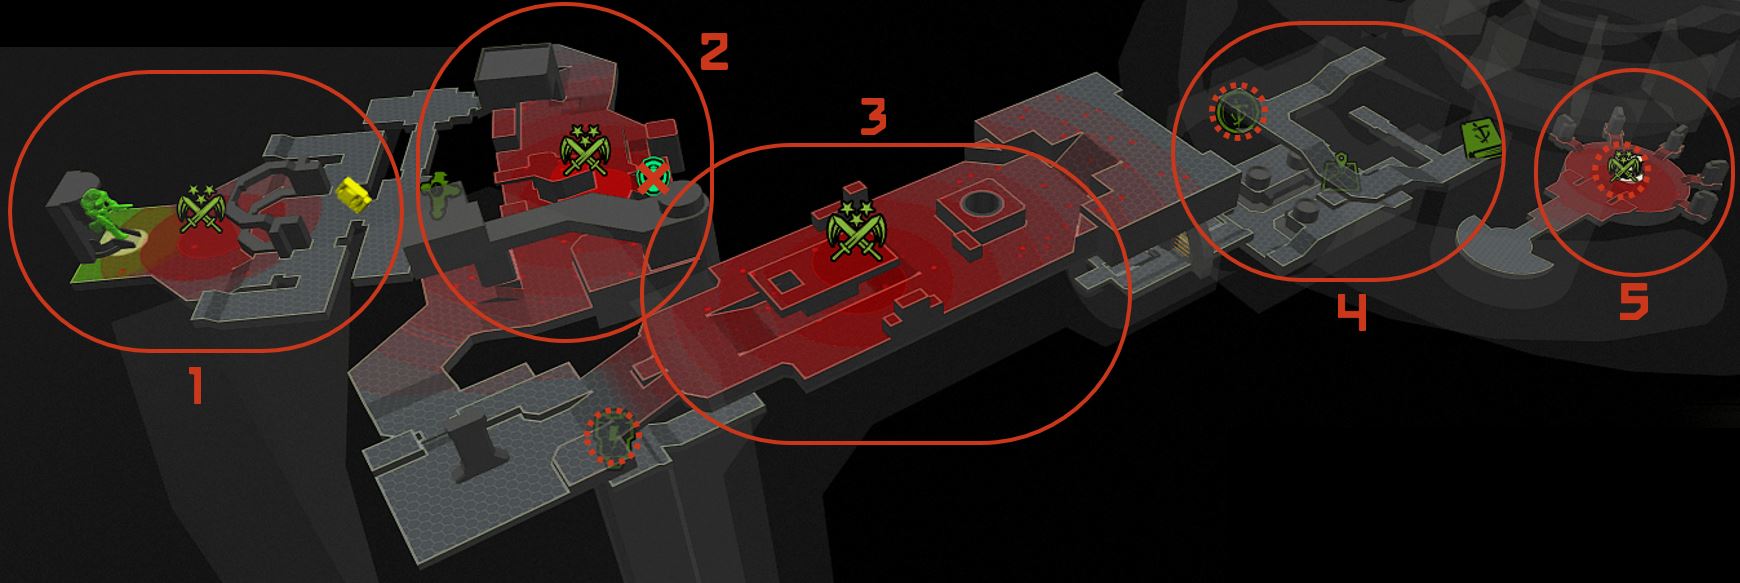
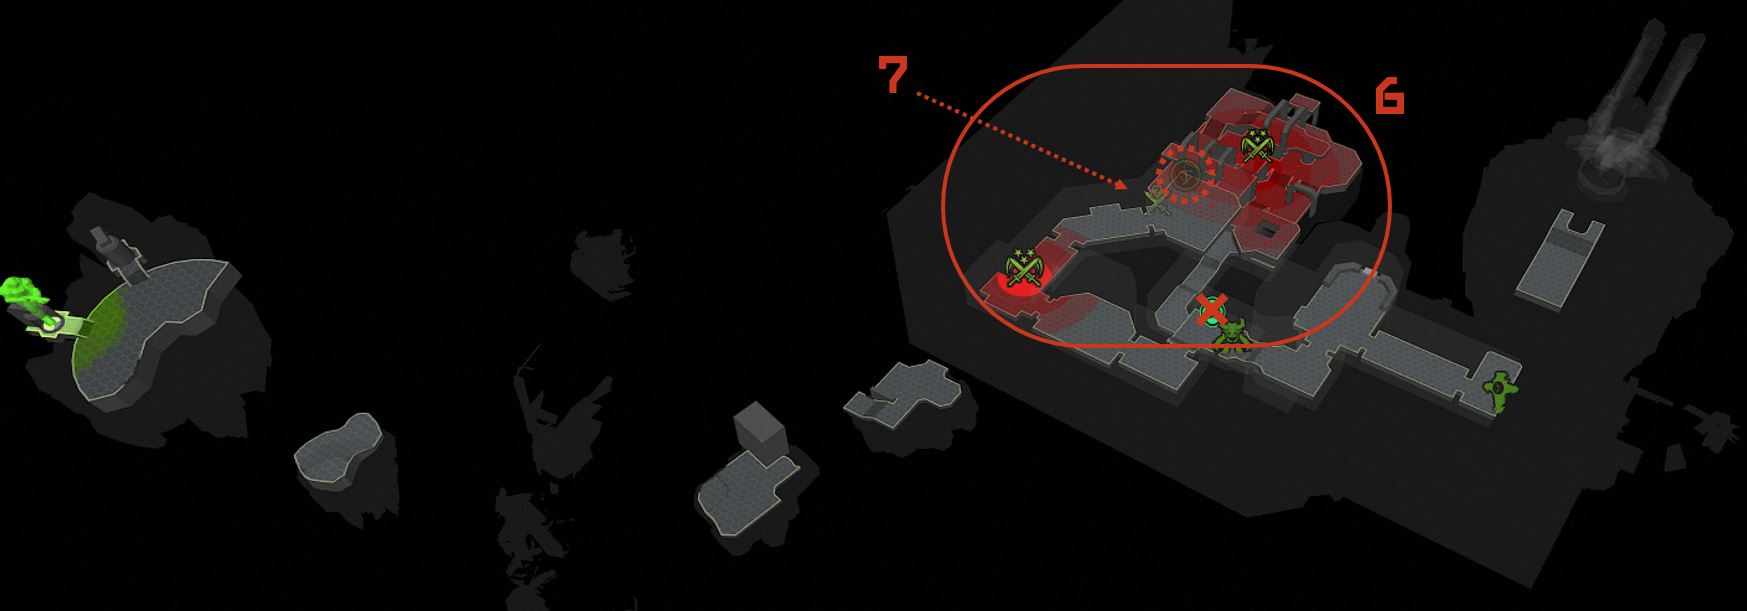
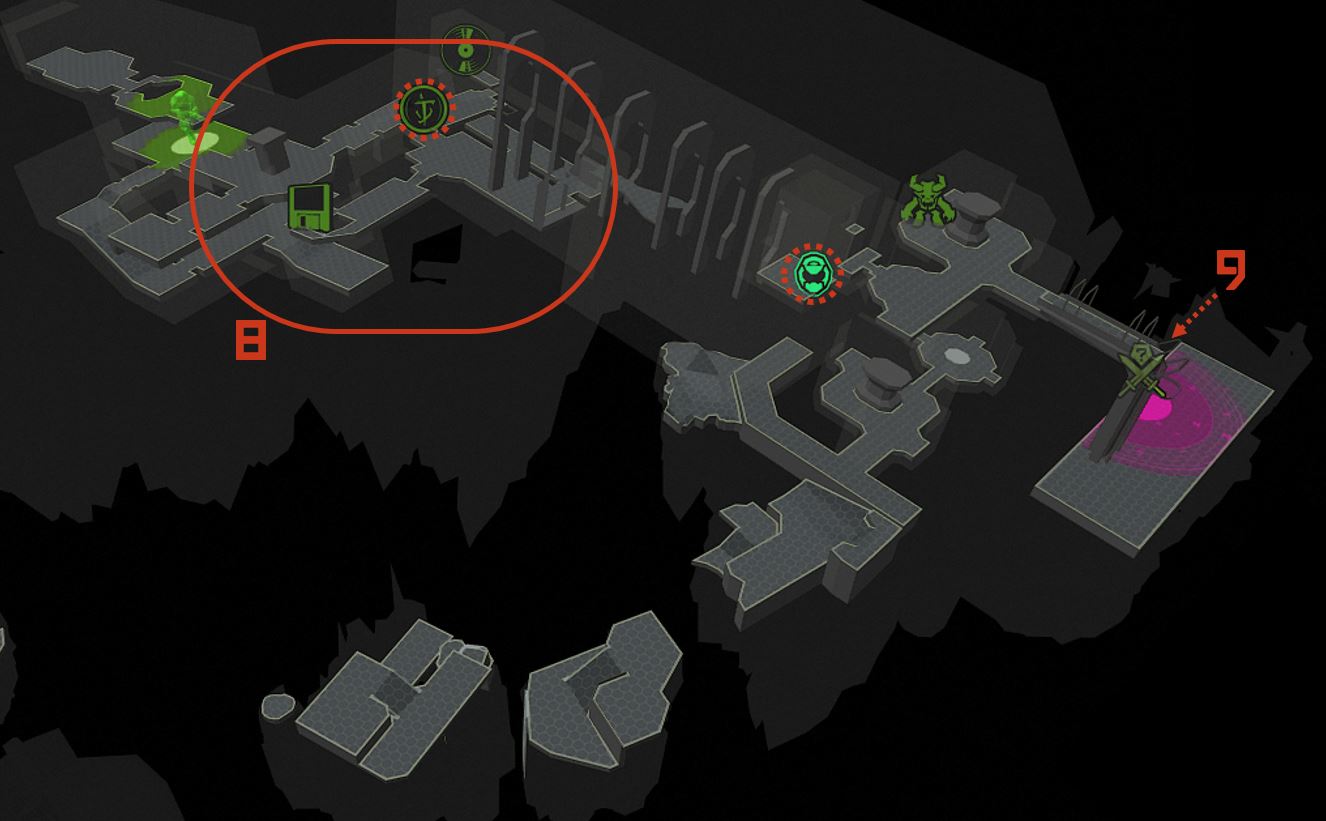
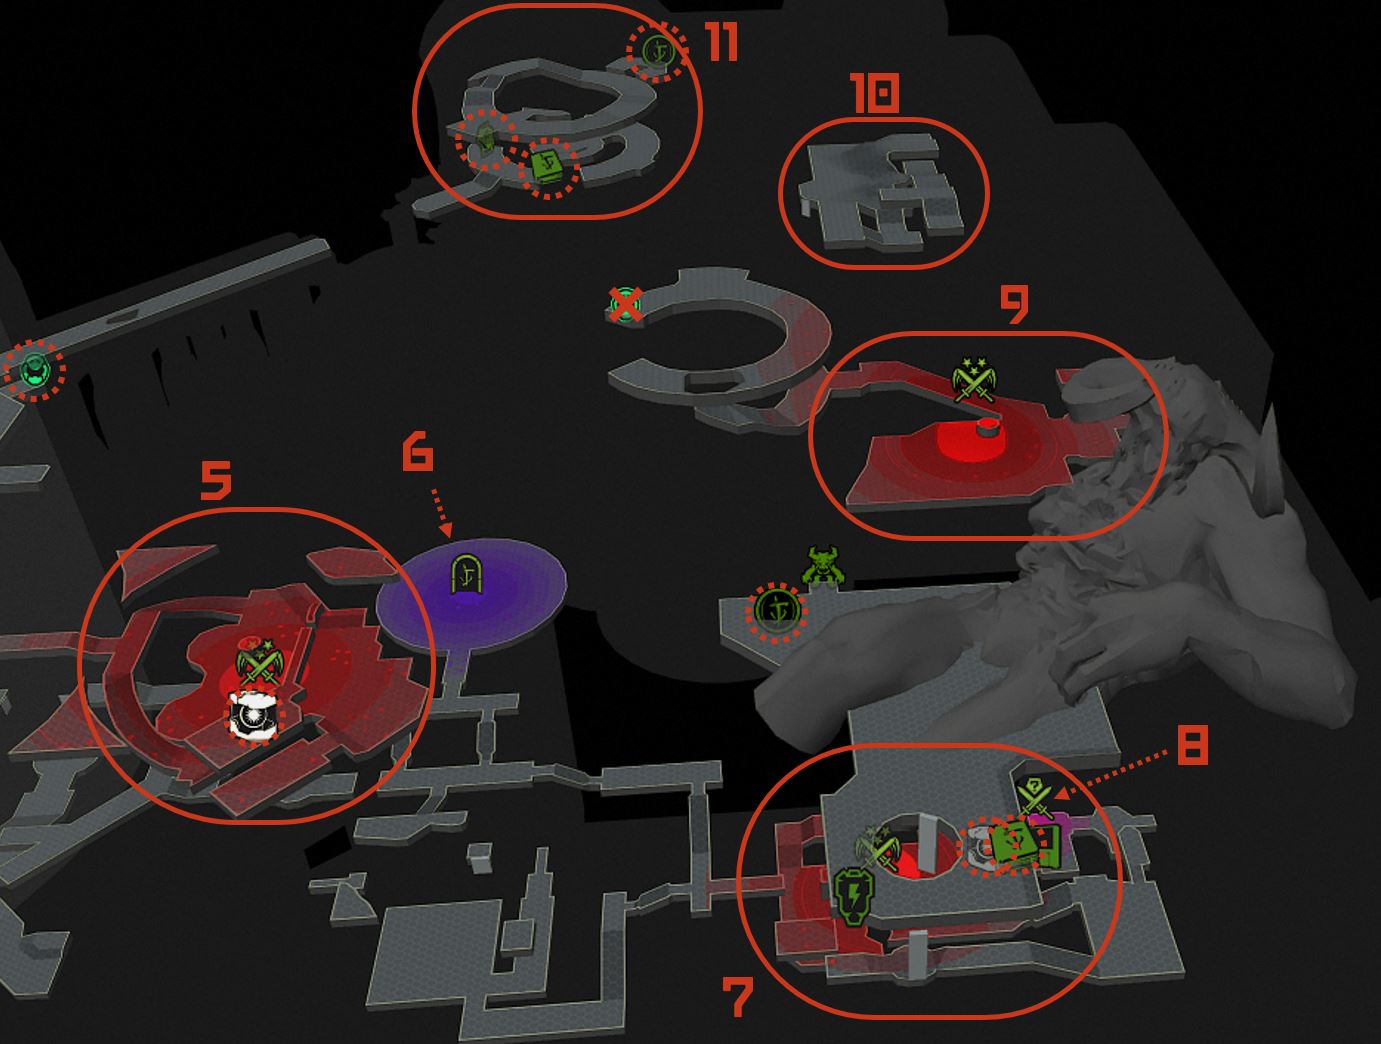
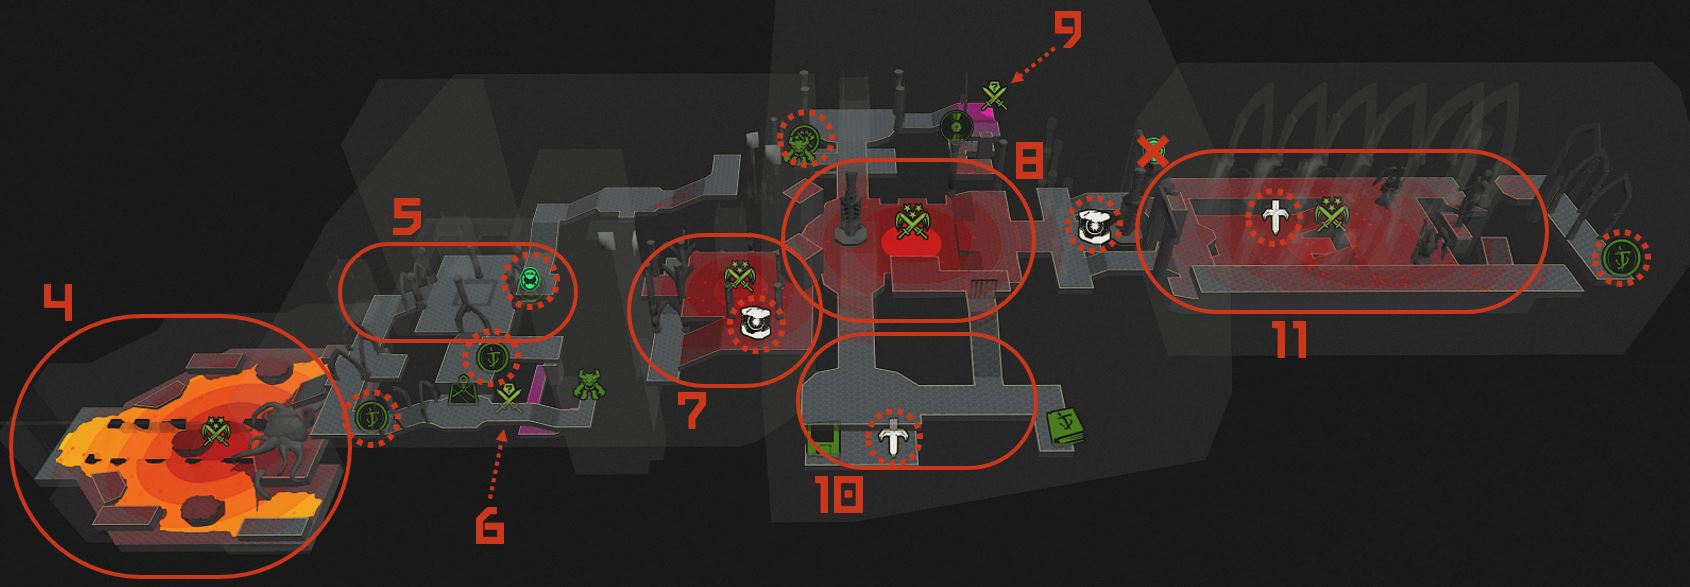
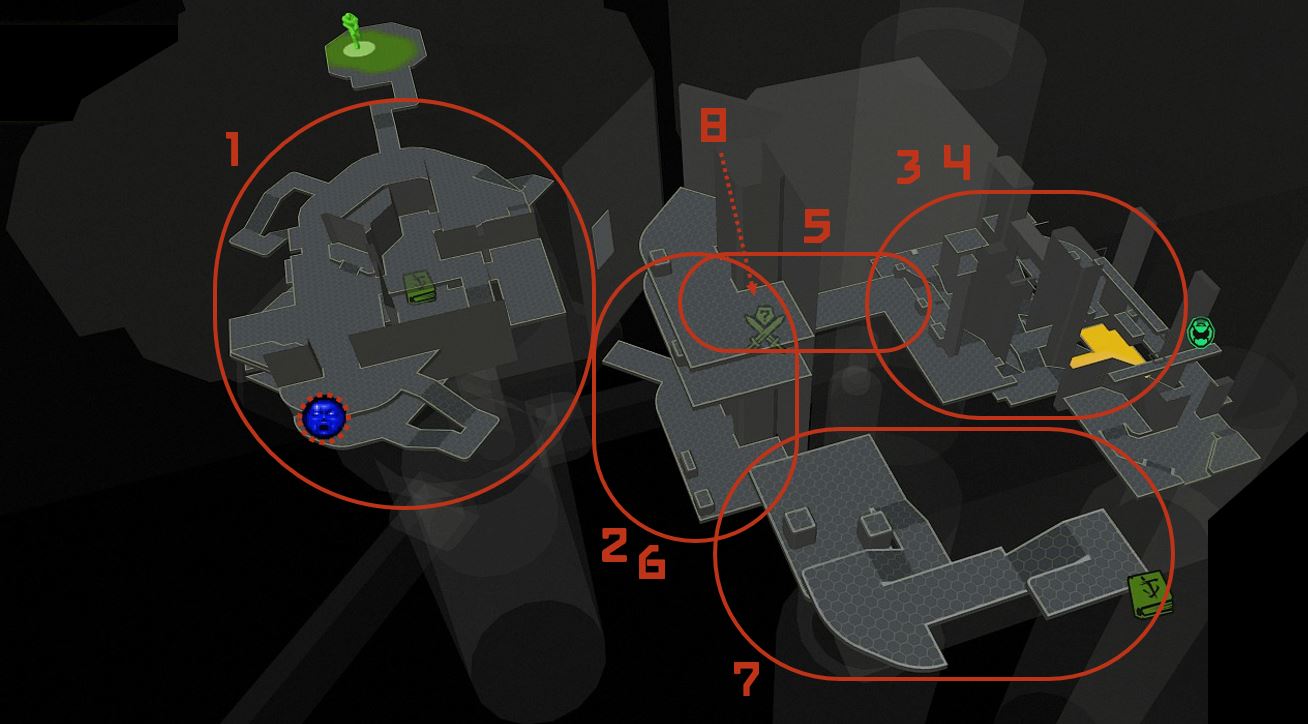
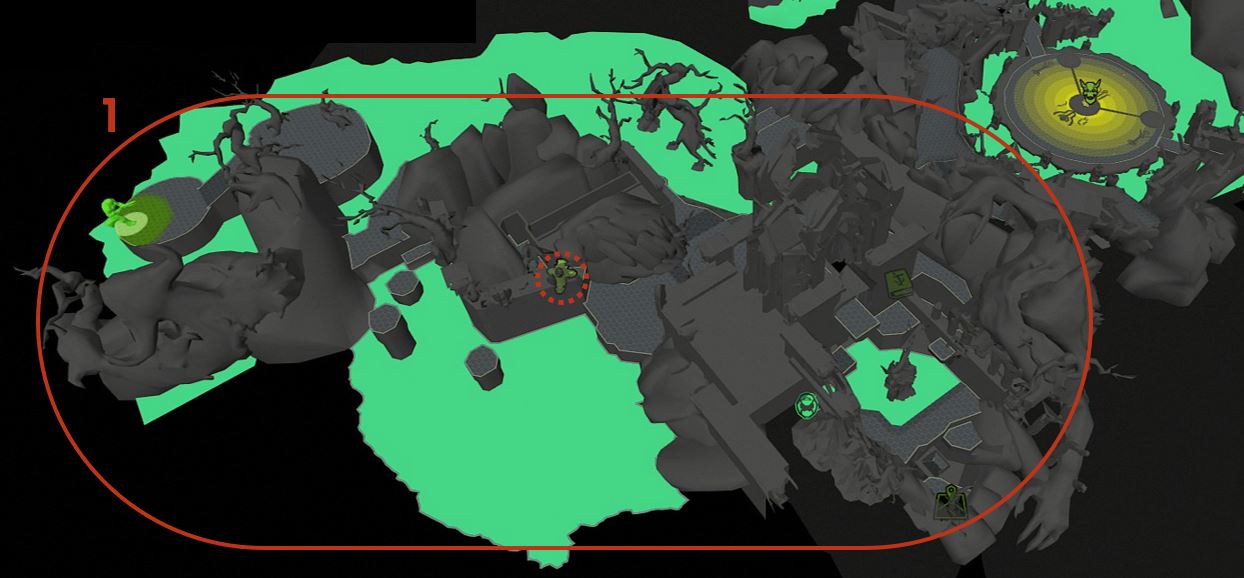
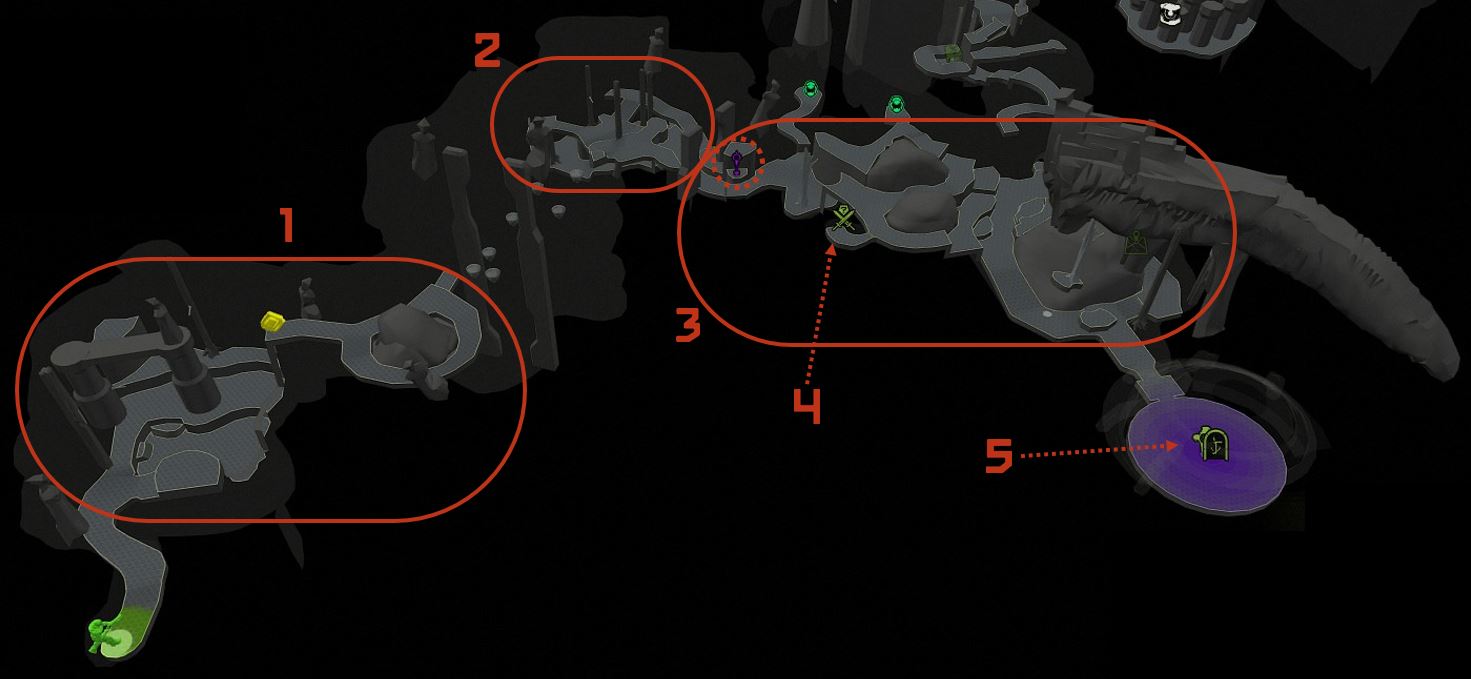
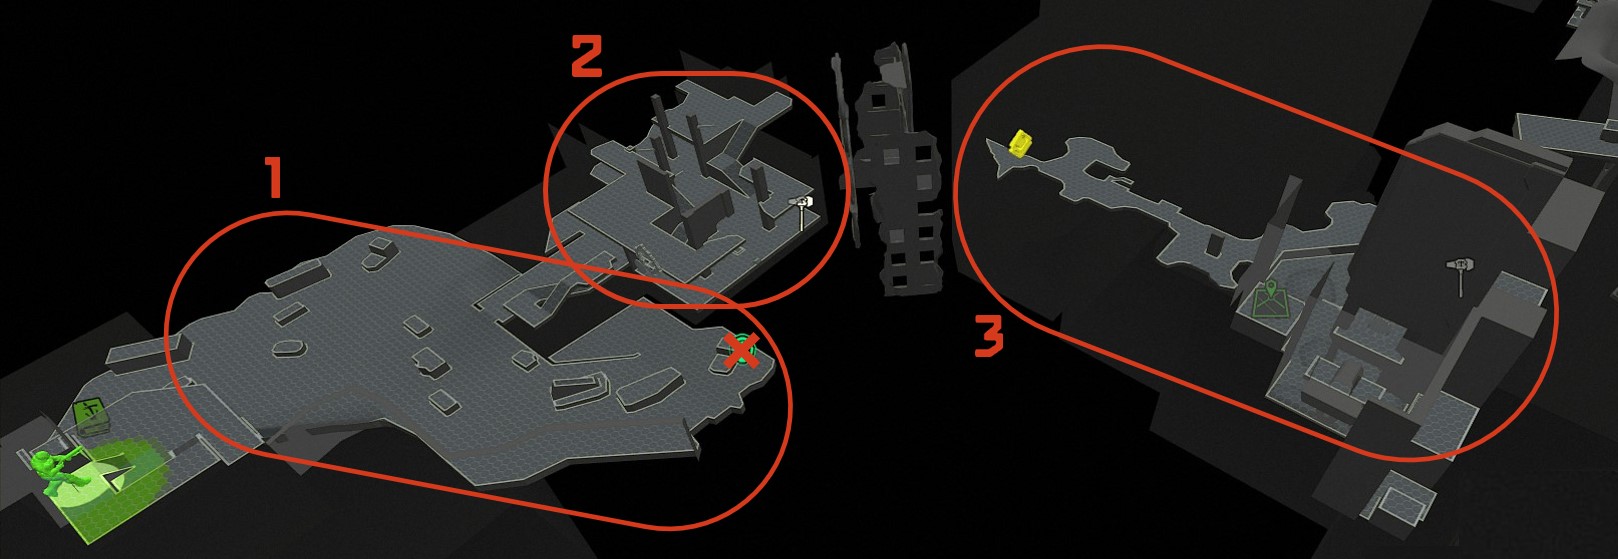
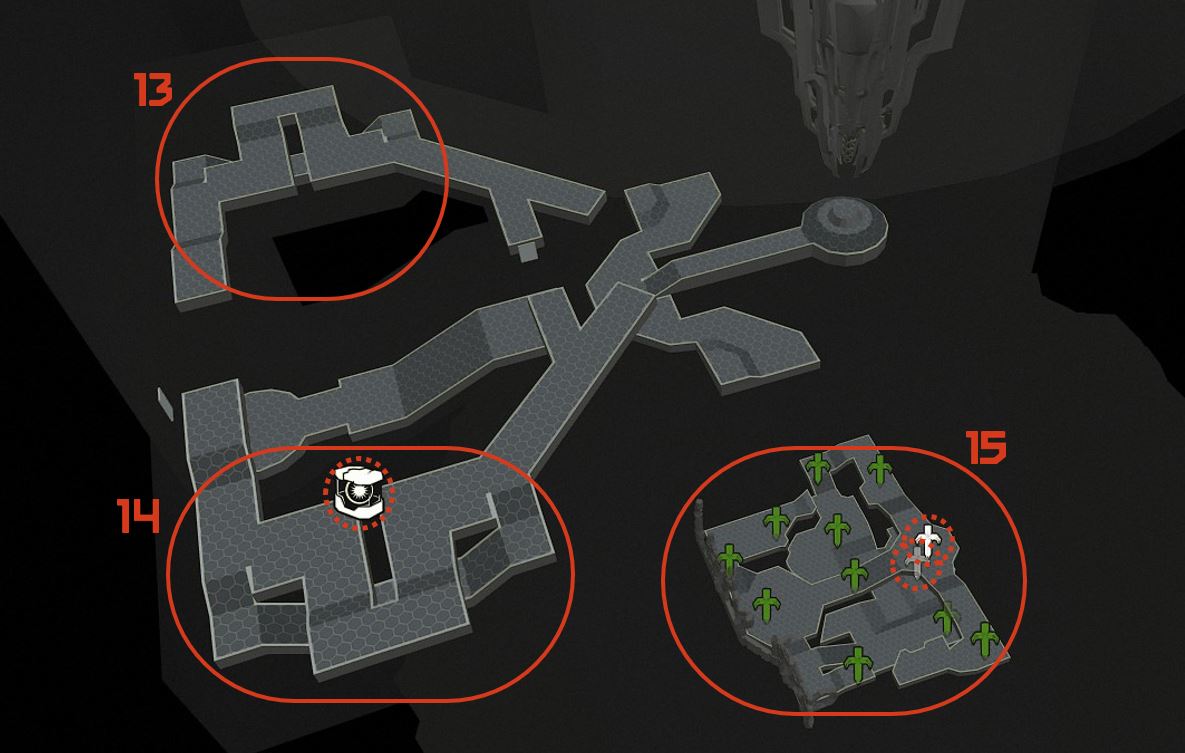
I'm doing a first run following it, and I noticed that the first map of "05 - Super Gore Nest, Part 1" is missing... Any chances you can add it back?

Thanks again!
itchy 17 Feb, 2024 @ 3:24am 
small tip with keybinds that has helped me a lot, is moving movement keys (WASD) one key over to ESDF. what this does is give you two more keys to the left for easy to reach binds, instead of finding places to bind them that are a bit more awkward to reach. Also, I use layering on my mouse, with the biggest thumb button as layer swap when held, then I bind my flame thrower and chainsaw to left and right click while holding down that thumb button (i bind them in software to numpad 1 and 2) this frees up the keyboard so again i'm not reaching with my left hand quite as much.

Also, there's a mod I find absolutely necessary, it makes grenade and ice bomb into seperate keybinds, so you no longer have to switch between them. I forget what it's called but it's easy to find on nexusmods.
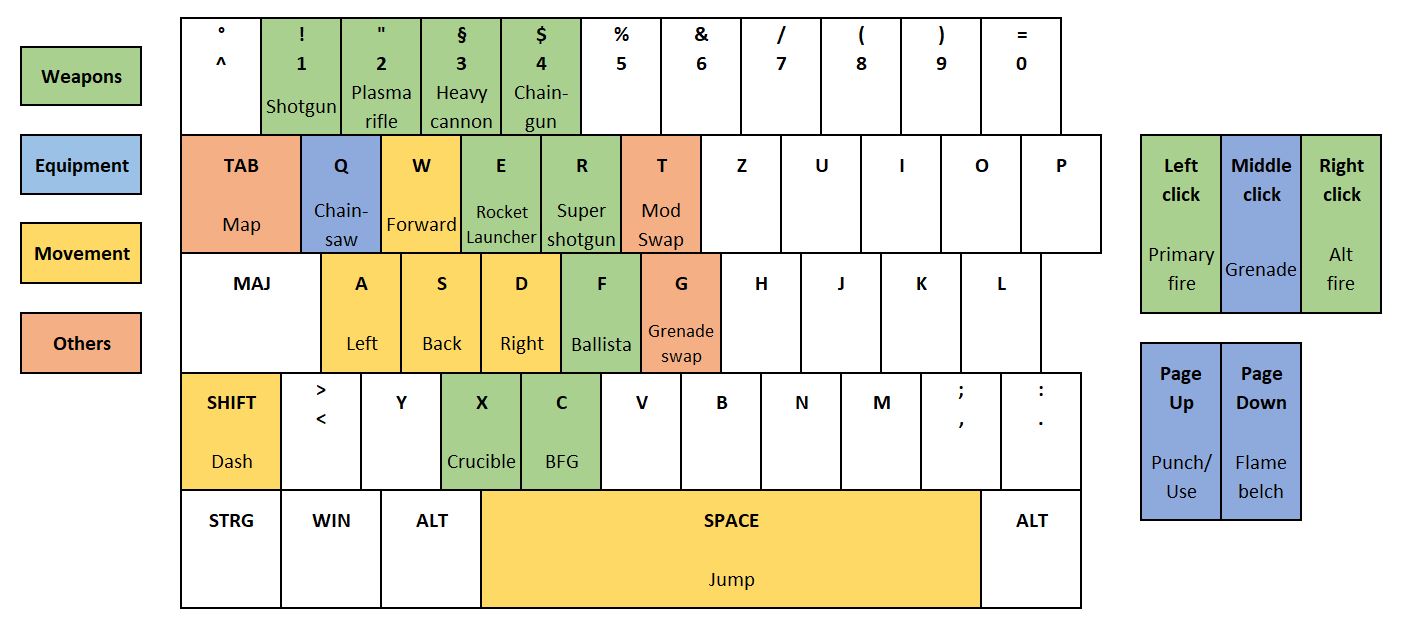
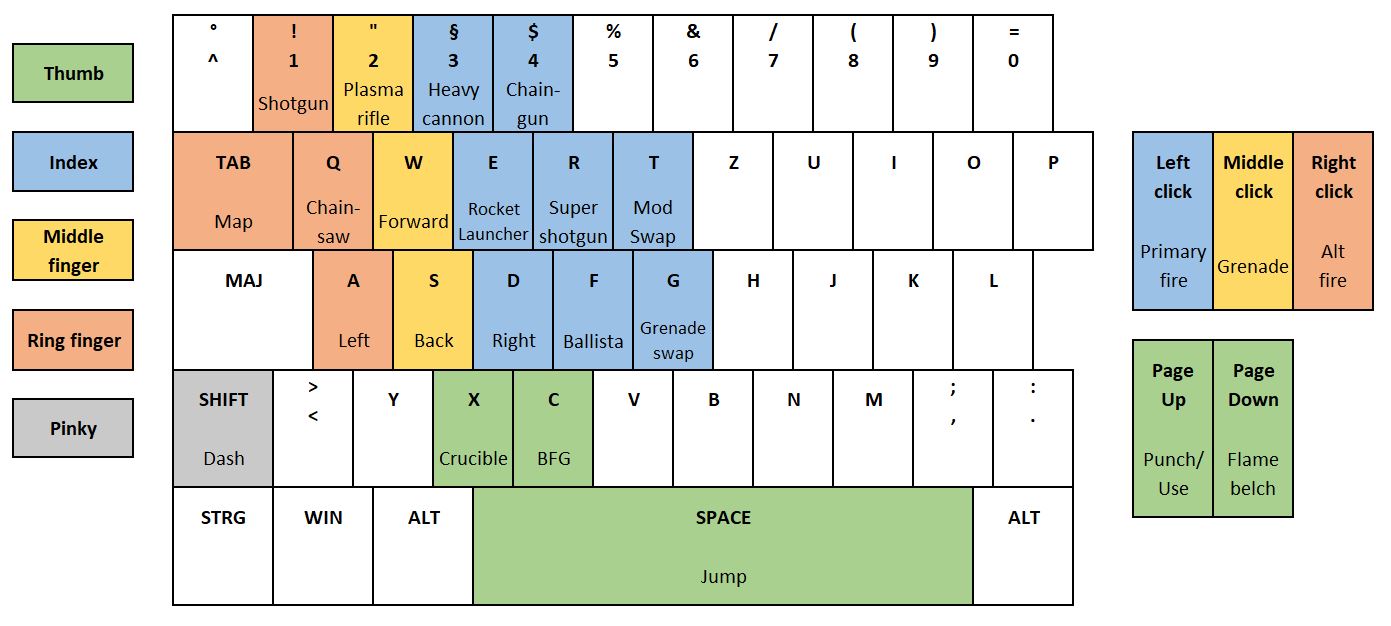
JoeBarnes  [author] 13 Feb, 2024 @ 12:46am 
That ballista and rocket launcher keybind is a scary flex, I can respect that :D But yeah as you say, the most important is to find something that fits you
King Florf 12 Feb, 2024 @ 3:01pm 
My keybinds
Rifle: Q
Super Shotgun: E
Combat Shotgun: 2
Plasma rifle: Z
Mini gun: X
Ballista: mouse wheel up
Rocket launcher: Mouse wheel down
Flame thrower: F
Grenader: Mouser 4 (if you have the buttons where your thumb rest on your mouse)
Ice Grenader Mouse 5 (if you have the buttons where your thumb rest on your mouse)
BFG: 3

i believe that pretty much everything if i missed something just let me know or figure something out that works for you
JoeBarnes  [author] 12 Feb, 2024 @ 1:08pm 
You can check my layout in the category "Preparations - keybindings"!

"Quick swapping" is not a key, it's the action of swapping between weapons quickly, in order to skip the reload animation. Once you have the "Hot swapper" praetor suit upgrade, you can swap weapons twice as fast
T0xic_Cvnt 11 Feb, 2024 @ 6:05pm 
What key do you use to quick swap?
King Florf 3 Feb, 2024 @ 8:58pm 
honestly what helped me in ultra nightmare was just being good at quick weapon swapping and having good aim, percision bolt + ballista with good aim shreds basically anything, super shotguun and rocket launcher combo is also goated
JoeBarnes  [author] 21 Jan, 2024 @ 10:20am 
I'm always happy to hear that my work could help people! It was a hell of a lot of work indeed, but it was directly used as preparation for my own UN run. You know that Mythbusters saying: "The only difference between science, and fooling around, is writing down the results of your experiments!"

Hopefully your achievement ended up triggering! May your armour be golden and your chest hair plentiful, my chad friends <3