Alwa's Awakening

Alwa's Awakening

32 ratings
Basic orb/item guide
By Evil Mr Henry
Locations of all orbs/items, and various other info that I consider useful.
2
   
Award
Favorite
Favorited
Unfavorite
General notes
  • I suggest turning assist mode on. (Quick Respawn specifically. The other stuff is nice, but not as important.) There is a lot of precise platforming, where one wrong move will kill you...and return you to the last checkpoint. This gets old really fast. I personally feel this makes the game too easy, but it's still an improvement over the default experience.

  • The default keyboard controls aren't great. I used space (jump), z (attack), return (start), and x (change magic).

  • There are fake walls everywhere. If you're stuck, walk into walls and see what happens. Spikes and other hazards can also be fake; I think they're all on the floor, so you can just drop a block on them to check. There is also exactly one invisible green switch in the game.

  • If you can't figure out how to get an orb, it may be a passage from another screen. Poke around the neighboring screens.

  • https://gtm.steamproxy.vip/app/549260/discussions/0/135508031954077801/ has some more information on the super-secrets.

  • The secret word is for a website, not anything in-game.
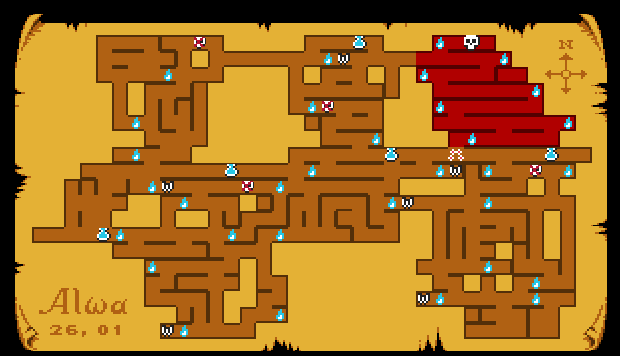
Map
Magic
  • Green block: Places a block. This can block some enemy shots, can be placed on green switches, and can be used for general platforming.
  • Green block upgrade: now floats in water. You can ride it.
  • Blue bubble: Places a bubble. This bubble will float up for a bit before popping. This is exclusively used for platforming.
  • Blue bubble upgrade. Bubble will keep going up until it hits something. It can go up multiple screens; when near the top edge of the screen, just stay on it, and everything should just work.
  • Yellow bolt: Fires a bolt. This opens doors with the bolt symbol, and hurts enemies. There is no upgrade.
Items
  • Magic staff: can attack enemies.
  • Copper coin: unlocks the door to the flask. Talk to the thief-looking guy.
  • Eye of the Beholder: makes certain platforms/doors "visible". (They don't actually exist before you collect this item.) If you see a giant gap over flame or something, it probably needs this.
  • Key: unlocks the Amethyst Passage dungeon.
  • Book of Sutter: doubles your weapon damage.
  • Map: gives you a map....
  • Flask: can be filled at wells. Will automatically refill your health if you would otherwise die. (Not as good as you think. Refilling it requires a significant trek, and it doesn't refill if you die.)
  • Tablet pieces: Unlocks a very slightly different ending if all pieces are collected, according to the Internet. I've only seen the complete tablet ending, and it's nothing special. If you want to see it, stay on the "Thanks for Playing" screen for a couple of minutes.
  • Keys: used to unlock locked doors.
  • Orbs: Automatically damages the boss at the start of a fight. Will take off 1 health at 10 orbs, 2 health at 25 orbs, 3 at 35, 4 at 45, and 5 at 99. (Notice that big jump from level 4 to 5. The final boss is reasonably easy, and the effect of that last level is small, so unless you're going for 100%, there's no real need to collect more than 45.)
Bosses
  • Amber Sacellum boss: Will jump down from the left ledge to the left platform and back again. Wait on the right edge of the left platform, and hit the small spiders whenever they get close. Whenever the boss jumps down, hit him, create a block, and duck behind it.

  • Shrine of Sea Monk boss: I highly recommend having the bolt magic and at least 25 orbs before facing this boss. The hitbox on this boss is weird, he can't be harmed by your weapon most of the time without injuring you as well, and if you're running after him, you are more vulnerable to attacks. Just grab the bubble powerup, extract yourself from the dungeon, and visit the Void Tower. When you come back, hit him with a bolt immediately, use a bubble to get over him, hit him with another bolt, then use a bubble to get on top of the ledge to the left, and wait for the two wave attacks to complete. Then hop back down, and use bolt and your attack to finish him off.

  • Void Tower boss: Basically, get on the top platform, put a block on the right hand side of the platform, and fire your bolt at him. The only attacks you need to worry about are the aimed shots from the left (just dodge best you can), and the big shot from the left, which will destroy the block you placed. (Replace it ASAP.)

  • Amethyst Passage boss: The boss will spawn 3 bats, fire a burst of shots from the upper eye, then fire two big shots from the lower. Place a block on the right edge of the leftmost platform. Kill the bats when they spawn, then fire a bolt at the lower eye as soon as the upper eye fires a burst of shots. Time it right, and it will hit the lower eye before it fires the 2 big shots (which can deflect your bolt). Hide from the burst of shots behind your block.

  • Vicar: Can appear in one of 4 locations.
    If one of the bottom two, hit him with a sword/bolt.
    If the upper-right, just dodge as best you can.
    If the upper-left, move to the lower-right, and hide behind a block.
    Your default position should be in the middle, next to the water. This lets you get an easy hit on the bottom two positions.
    You can fire a bolt the first possible second, and get an easy first hit.
Item list
The coordinate system is the same one used in-game on the map screen, where 1,1 is the upper-left hand corner. I generally won't bother noting the magic needed for an orb if you should have that magic by the first time you pass through the area.


Forsaken Valley:
1,13 Key to Amethyst Passage: needs upgraded block, and a full flask.
4, 9 Tablet: needs eye
4,10 useless sign

4,11 needs upgraded bubble. (I suggest crouching while floating up, then jumping when fired at.)
6,11 (3x) needs block
7,9 needs block
6,11 hidden door behind waterfall; will give you an orb and part of a word if you have the Book of Sutter.
3,10 need upgraded bubble. Float up from below


Amber Sacellum:
6,14 key
11,14 Green gem (block)
13,12 Copper coin. Fall through the fake spikes in 13,11 (leftmost group) or use the hidden passage if you have the bubble.

10,10 needs block
12,10
9,12 If you fail, getting back won't be possible for a while. Don't worry too much about it.
8,13 hidden passage from right
8,14 needs block
10,14
14,12
15,10 needs bolt
12,12 (3x) needs upgraded bubble
15,11 needs bubble, enter from right


Town of Westwood:
13,9 needs bubble
13,9 (3x) needs eye (door leads into tower)
13,9 needs bubble (inside building)


Central Alwa:
17,10
17,8
21,9
24,9
24,8
23,8 (enter from right)
23,10 needs upgraded block


Underground Chamber:
22,12 Book of Sutter (enter from right)

25,11 (enter from right)
18,10 needs bubble
18,12 (3x) needs bubble
20,13 needs eye
21,12 fake water in 20,11
21,13


Gloom Lake:
30,8 needs bubble
33,8


Shrine of Sea Monk:
31,10 Flask: needs coin
30,11 Key: needs bubble
29,14 Key
31,12 Key
29,12 Blue gem (bubble)
33,11 Prisoner: you'll need to loop around from 32,14. (Note that there is a hidden passage from the seemingly dead-end to the switch) The prisoner will then show up before bosses to give you hints.

30,9 needs bubble
28,9 needs bubble (hidden passage from 29,9)
28,10 (having trouble? Come back later with the bubble, and float up from the upper-left corner of 28,11)
27,12
28,12 (hidden passage from 27,12)
28,15 needs upgraded block
30,15 needs bubble, or come from the hidden passage from 31,15
31,12
33,9
31,14 (3x) Needs upgraded block and bubble. There's a hidden passage above the locked door in 31,15; use it to save a key. (There is also a hidden passage to the left in 31,15)


Void Tower:
6,8 Key
9,7 Key
6,3 Key
7,1 Bolt magic

8,8 go to the lower-left of 8,7, and go through the fake wall and spikes
8,8 same, but with the bolt spell
8,6 (3x) two switches in 8,5 open the doors
6,4 needs upgraded bubble
5,1 needs bolt
8,1
10,1 come from below
12,3 needs eye
11,5 Fall through the fake fire in 11,3. In 11,4, fall down, but press up against the left wall. There's a hidden passage to the left of the orb
10,5 Come from 9,5


Stone Cellar:
26,15 Key
30,17 Blue bubble upgrade
25,15 Tablet: needs eye

26,13 (come from below using the upgraded bubble and you can save a key)
26,15 (the spikes are fake)
27,16 (3x) come from below, needs upgraded bubble
30,18
29,18
34,17 needs eye
29,16 needs upgraded bubble


Sacellum Depths:
10,18 Key: hidden passage from right. In 11,18, there's a hidden passage along the top to enter the locked portion of the screen.
8,16 Key
10,16 Green block upgrade
13,16 Tablet: needs eye

15,14 (3x)
13,14 (hidden passage from middle)
13,15
12,18 (2x) (hidden passage in right of structure)
11,19
15,17 (left) drop down from above
15,17 (right) needs upgraded bubble; hidden passage from right
16,16 In door


Amethyst Passage:
The boss door is going to be unusable until you get the eye. Just keep going into the Solstice Mountain area to pick that up.
There is an invisible switch inside the boss door room, 3 tiles right of the door. It unlocks the sign.
22,5 sign

22,6 come from above
20,5 (3x) come from below
18,6 enter from the lower-left of the save room. (Drop a block in the water and ride it to the left.)


Solstice Mountain:
18,1
20,4 (3x)
23,4 drop down from above


Darkmoon Village:
21,1 Useless rock (on top of building) (talk to the NPC at 6,13)
20,1 (3x)
21,1 inside the building


Lost Cemetery
35,8 The rightmost two tombstones have something interesting; a piece of the word, and a piece of the tablet inside a small dungeon.
35,8 Select the bolt spell, stand under the light, and hold up for a while to unlock an easter egg room. (It will play a noise and change the color of the light when done.) You can access the room from warp locations.
4 Comments
©HiHoFai™ 17 Jun, 2020 @ 8:01am 
The other tablet you missed is in 4,9 in Forsaken Valley. You need to have the eye in order to get it.
darkly77 15 Feb, 2020 @ 11:35am 
Great guide man, thank you.

Also I dumped the text and can confirm there's no upgrade to the lightning weapon (yellow gemstone): {LINK REMOVED}
longbowman 6 Sep, 2019 @ 2:00pm 
Nevermind. I found it. It's in 4,9 Forsaken Valley.
longbowman 6 Sep, 2019 @ 1:52pm 
Thanks for the guide. Aren't there 4 tablet pieces? You've only listed location of 3. I'm still missing 1 piece. Found all those you mentioned.