
Install Steam
login
|
language
简体中文 (Simplified Chinese)
繁體中文 (Traditional Chinese)
日本語 (Japanese)
한국어 (Korean)
ไทย (Thai)
Български (Bulgarian)
Čeština (Czech)
Dansk (Danish)
Deutsch (German)
Español - España (Spanish - Spain)
Español - Latinoamérica (Spanish - Latin America)
Ελληνικά (Greek)
Français (French)
Italiano (Italian)
Bahasa Indonesia (Indonesian)
Magyar (Hungarian)
Nederlands (Dutch)
Norsk (Norwegian)
Polski (Polish)
Português (Portuguese - Portugal)
Português - Brasil (Portuguese - Brazil)
Română (Romanian)
Русский (Russian)
Suomi (Finnish)
Svenska (Swedish)
Türkçe (Turkish)
Tiếng Việt (Vietnamese)
Українська (Ukrainian)
Report a translation problem


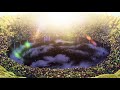


1) Mask the cloud layer
2) Duplicate it - you now have two layers 1 & 2.
3) Hide 2 for the time being, take 1 (this will be the top layer) set a keyframe at the beginning for scale, rotation and opacity - all default values.
4) Go to the end of the animation (in this case 5 seconds in) keyframe your desired rotation and opacity to 0. For this animation I actually made the layers 3D to help with the rotation I then set the following values for each axis: x -2, y +13, z +1.5. You now have the clouds rotating and fading out.
5) Go to layer 2 and now start with the keyframes you ended on for layer 1 and end on the default rotation values and 100% opacity. You will then have the same start and end point to allow the animation to loop.
6) Halfway through the animation (when the 2 layer animations intersect) you may want to add a blur effect to ease the transition - I just added a CC radial blur.