Tyranny

Tyranny

389 ratings
100% Achievements Guide [SPOILERS]
By fabula_rasa
This is a complete achievements guide for Tyranny, including Bastard’s Wound DLC. Beware of spoilers.
2
15
3
2
   
Award
Favorite
Favorited
Unfavorite
Introduction
There are four main Paths in Tyranny and the whole game world is shaped by your choice of allies. Those are: Disfavored Path, Scarlet Chorus Path, Rebel Path, and Anarchy Path. Quests, accessible areas, available alliances etc. – they all differ from Path to Path and are additionally shaped by decisions you make during the Conquest part of character creation. And so, many achievements can only be acquired if you are on a certain Path.
Because of that, it is impossible to get all the achievements in one playthrough and you will need at least 4 (one for each Path) to gather them all. Well, 3.5 if you want to create a branching save at the end of Act I or somewhere in Act II, betray your current alliance and go Anarchy :).

Achievements that come with the Bastard’s Wound DLC are marked with [BW] at the end of the name.
Story
Those will unlock automatically as you progress through the story and are impossible to miss.

Master of Ascension (Act I)
Lay claim to Ascension Hall in Kyros’ name, ending the Overlord’s Edict of Execution.


The Mountain Spire
Gain control of the Mountain Spire in Vendrien’s Well.


Exarch (Act II)
Issue an Edict from the Mountain Spire, establishing yourself as an Exarch – a potential Archon.
Companions - General
Magnetic Personality
Recruit every Companion character in the game.


There are six recruitable companions in the game: Verse, Barik, Lantry, Eb, Kills-in-Shadow, Sirin. You will get a chance to recruit most of them as you progress through the story and the only thing you need to do is agree to them joining you. The only ones that can be “missed” are Eb and Sirin. When you first meet Eb, you will not be able to recruit her but you will be able to kill her. So just hold of the murderous instincts and you will be able to recruit Eb later. Sirin you also cannot recruit when you fist meet her at Scarlet Chorus Camp. She becomes recruitable in Act II – go to Lethian’s Crossing and pick her up from a house where she resides with her worshipers.


Inspiring Leader
Reach maximum Loyalty with a Companion.


You need to reach Loyalty 5 with a companion. By default, conversation options with Loyalty gains are marked. With all the companions, you can easily gain Loyalty 3 just by talking to them about everything and choosing proper conversation options. Companions also react to certain Conquest decisions. It is impossible to max Loyalty with a companion that does not travel with you.
  • Verse – she is the easiest. Just do her quests (“The Fire Inside” and “The Third Degree”) – that is enough to get her from Loyalty 3 to 5. There are also several opportunities to gain additional Loyalty with her on any Path. Conquest decisions that Verse likes: Assassinate the Queen in “The Fall of Apex” (Year 2, Apex); Send Chorus to hunt down Stonestalkers in “Cairn’s Tribe” (Year 3, Azure); Chose Chorus’ plan during “The Marriage Bed Armistice” (Year 2, Apex).
  • Sirin – take her to Cairn’s Passage in Bastard’s Wound so she can hear the music there. After that, several new conversations with her will become available as she figures out that music piece and eventually upgrades her headgear. This chain of events is a huge Loyalty boost and I got her from 3 to 5 Loyalty that way easily. She hates Scarlet Chorus, so she will like practically anything you do against those buggers. Conquest decisions that Sirin likes: Send her cult to the Chorus in “The Cult of Sirin” (Year 2, Lethian’s Crossing); Honor the Right of Challenge in “Right of Command” (Year 3, Vellum Citadel)
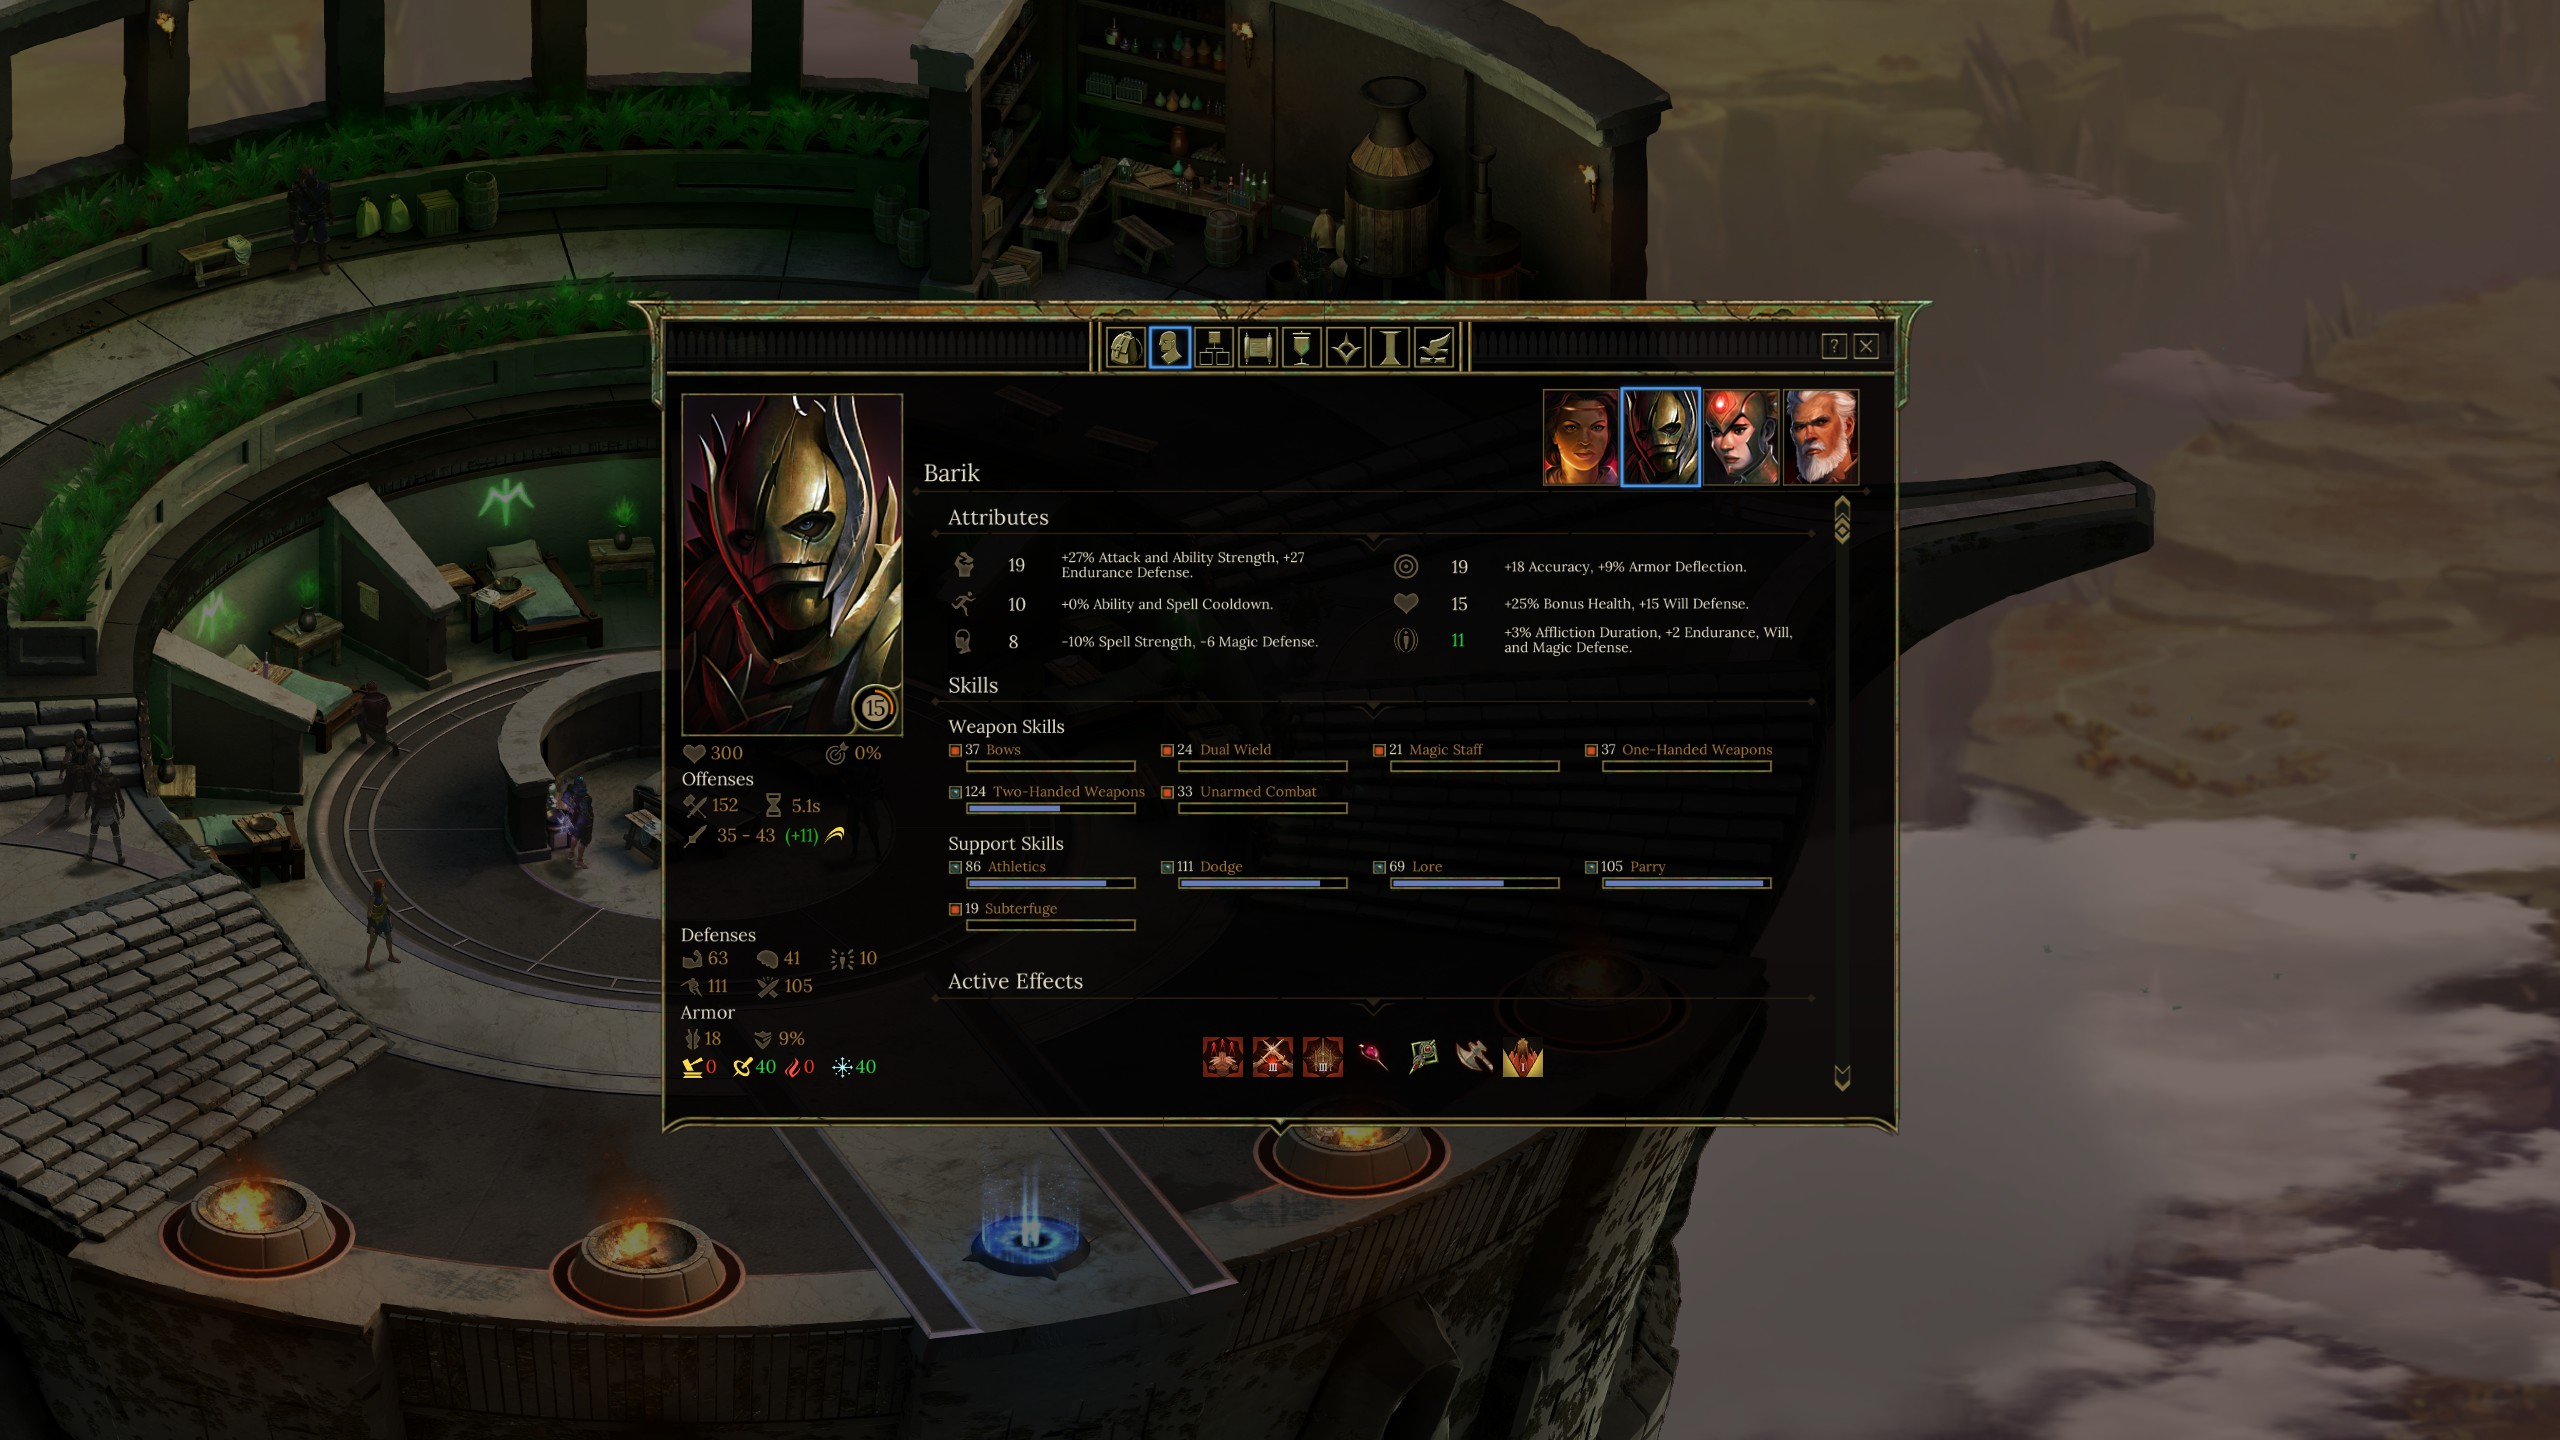
  • Barik – he is easy to keep happy on Disfavored Path. So, side with Disfavored and remain loyal and respectful. Take him to Sentinel Keep and end the Edict of Stone. Doing his quests (“The Weight of Aegis” and “Never Free”) won’t really gain you Loyalty with him. Conquest decisions that Barik likes: Wipe out the School of Wild Wrath in “Containing the Fire” (Year 1); Honor the Disfavored’s reputation in “A Contentious Setback” (Year 3, Stalwart).
  • Eb – likes when you are compassionate but strong and capable. As such, she is the easiest to please on Rebel Path. She really likes when you allow her to examine the Mysterious Device on your Spire. In my experience, it is next to impossible to get Eb to Loyalty 5 without making Conquest decisions that she likes. Conquest decisions that Eb likes: negotiate surrender in “The Fall of Apex” (year 2, Apex), Choosing to fight the mages in “Denial of Strength” (year 2, Apex).
  • Lantry – he likes intelligence, concern and appreciation for knowledge. He approves of ending the Edict of Stone. That said, I never managed to get Lantry to Loyalty 5 although I came very very close. Conquest decision that Lantry likes: Give warning to the Sages in “Edict of Fire” (Year 3, Vellum Citadel).
  • Kills-in-Shadow – she appreciates strength and assertions of domination. Slapping her in the face during the first meeting is a great way to gain some Loyalty. She likes when you express interest in her and beastmen clans. She likes breaking the Edict of Stone and helping Left-Claw in Halfgate. She dislikes Disfavored. That said, I personally never managed to get her to Loyalty 5.

Tyrant
Reach maximum Fear with a Companion.


You need to reach Fear 5 with a companion. By default, conversation options with Fear gains are marked. With all the companions, you can easily gain some Fear (no more than 3 but it varies wildly) just by talking to them about everything and choosing proper conversation options. Companions also react to certain Conquest decisions.
  • Verse – personally, I doubt that reaching Fear 5 with Verse is possible. There is not much that fazes this woman. She hates when you compare her to Voices of Nerat or interrupt her mocking of the Disfavored. There are also several options of gaining Fear with Verse during her personal quest.
  • Sirin – she does not react well to cruel acts (like killing Amelia’s baby or offering it’s blood for Barik’s quest; choosing to blight the land in the Stone Sea). She dislikes Scarlet Chorus, Voices of Nerat in particular, so it is rather easy to keep her in Fear while on Scarlet Chorus Path. She likes Cairn, so she will be very unhappy when you keep him alive and suffering. Conquest decisions that Sirin dislikes: Allow Disfavored to destroy her cult in “The Cult of Sirin” (Year 2, Lethian’s Crossing).
  • Barik – he hates siding with anyone but the Disfavored and expressing disloyalty to the forces of the empire (and Graven Ashe in particular), killing members of the Disfavored, feeding companions to Voices of Nerat. It is very easy to gain Fear with Barik while on Rebel Path as he dislikes many of your decisions there. Just keep in mind that you will need to convince him, or rather order him, to stay with you near the end of Act I if you side with anyone other than Disfavored. Conquest decisions that Barik dislikes: Punishing the Disfavored commander in “A Contentious Setback” (Year 3, Stalwart)
  • Eb – the easiest one. Just be a bastard towards rebels throughout the Act I, make conquest decisions she doesn’t like and – most importantly! – throw Tarkis Arri off your Spire with a note. That act will skyrocket Eb’s Fear and you will hit the achievement the second you allow her to join you. Eb dislikes any love for the empire of Kyros and strong-handed treatment. Conquest decisions that Eb dislikes: Capturing the mages in “Denial of Strength” (year 2, Apex); Challenging the Queen in “The Fall of Apex” (year 2, Apex).
  • Lantry – it is hard to keep Lantry in Fear and I am not sure if there are enough opportunities to gather Fear 5. He doesn’t like when you’re rude and uncaring. He hates when you make him write the message before you attach it to whomever you are throwing of the Spire (usually Tarkis Arri). He hates when you convict Lexeme to death (but doesn’t mind you killing her after she already sicked Lullaby on you). He hates when you attack the rebels during a peace meeting in Act I.
  • Kills-in-Shadow – she hates Disfavored and will be very easily kept in Fear on Disfavored Path (akin to Barik on Rebel Path). She also gains some substantial Fear if you allow Sirin to sing her a song of pacification.

By Our Powers Combined
Successfully use a combo ability with each Companion in the game.


Recruit every available companion for this (see: “Magnetic Personality” achievement). To unlock a combo ability with a companion you need Loyalty 3 or Fear 3. You can easily gain Loyalty 3 by talking to a companion about everything and choosing proper conversation options. After you gain that, simply add the companion to your current party and activate the combo ability anytime. It does not have to be in combat (except for those that are combat-only, obviously).
Companions - Quests
Change of Carapace [BW]
Complete Barik’s Companion Quest


To do this you will need to complete two of Barik’s companion quests: “The Weight of Aegis” and “Never Free”.
“The Weight of Aegis” will unlock automatically at the beginning of Act II – Barik will ask you to speak to Tunon on his behalf. After doing that, you need to talk to Barik again and be sure never to agree that he should stay encased in his armor. The knucklehead wants to stay trapped in his metal and if you agree with him, you will gain some Loyalty but fail the “The Weight of Aegis” quest. Other than that, the quest is pretty straight-forward. To find a proper smith, you can either talk to Lohara (or Zdenya) in the Forge-Bound forge in Lethian’s Crossing or talk to the smith on your Forge Spire.
“Never Free” will unlock automatically at the beginning of Act III, if you finished “The Weight of Aegis”. This one is very straight-forward, just be sure to talk to Barik and do everything the quest requires before you go to your last confrontation with Graven Ashe. You will be able to successfully finish the quest whether you kill Ashe or convince him to submit.


Sloppy Seconds [BW]
Complete the game with Barik freed out of his armor but trapped in a cage of abuse.


After you complete “Never Free” quest (see: “Change of Carapace” achievement), just travel between some locations (any travel will do, except teleporting from Spire to Spire). A random event will pop up, in which you will have a chance to convince Barik to bathe himself. Don’t try. Just leave. And let Barik remain smelly. The achievement will pop at the end of the game.


Truth and Reconciliation [BW]
Complete Lantry’s Companion Quest


You need to complete “Truth and Reconciliation” and “Annal Sects” quests. “Truth and Reconciliation” starts when you talk to Mell in Bastard’s Wound with Lantry in your party. While in Bastard’s Wound, don’t kill Lexeme. Ever. For any reason. She is necessary for proper resolution of the quest. You could in theory acquire all the chronicles, finish “Truth and Reconciliation” and only after that judge and kill Lexeme. But it seems that Lexeme dying prevents “Annal Sects” quest from unlocking in Act III even if you properly finished “Truth and Reconciliation” (happened to me on two playhtroughs). So just leave her alive.
Side note: if you are on “History of the Oldwalls” quest, Lexeme will just give you the keystone you need to get to the area with the last piece of chronicle. But if you are on “Blood and Beast” or “Bone and Beast” quests, she will always sick Lullaby on you fist, before you can get the keystone from her. It is not a problem and does not affect “Truth and Reconciliation”, as long as you find it in you black Fatebinder heart to forgive Lexeme and do not kill her afterwards of course.
“Annal Sects” starts in Act III automatically, if you finished “Truth and Reconciliation”. This one is very straight-forward.


High as the Mountain Spire [BW]
Share an uncomfortable moment with a party of four or more (Sirin doesn’t count).


After you finish “Annal Sects” quest, interact with the berry bush in the Indigo Fields again and enjoy some interesting hallucinations. Be sure to have three companions with you – just do not take Sirin as she is too young for such perversions :). There also seems to be a bug with Kills-in-Shadow, she will unequip her Infused Shadows artifact (if she got it from Bastard’s Wound adventures) during the cut-scene and be unable to equip it again. So either save before interacting with the bush, or don’t take Kills with you either.


Unfinished Business [BW]
Complete Verse’s Companion Quest.


To do this you will need to complete two of Verse’s companion quests: “The Fire Inside” and “The Third Degree”. “The Fire Inside” will start in Act II when you receive a missive from the Voices of Nerat. This quest is very straight-forward and there is nothing you can do to spoil it, just be sure to finish it in Act II.
“The Third Degree” will start automatically in Act III if you finished “The Fire Inside”. This one is also straight-forward, just be sure to talk to Verse and do everything the quest requires before you go to your last confrontation with the Voices of Nerat. During that last confrontation, do not offer Verse to Nerat. If you are on Chorus Path and want Nerat to submit to you, offer him a different companion. If you are on other paths, just kill him.


Let the Next Verse Begin [BW]
Complete Verse’s Sidequest and have her usurp the Voices of Nerat.


To do this you will need to complete two of Verse’s companion quests: “The Fire Inside” and “The Third Degree”. Do everything as described in “Unfinished Business” achievement with one exception. During the final conversation with Voices of Nerat, offer Verse to him/agree to him taking her. You also need at least Loyalty 3 with Verse or she will fail to usurp the Voices for you.
Factions
Chorus of Victory (Act III)
Complete the game as an ally of the Scarlet Chorus.


Simply chose to ally yourself with Scarlet Chorus in Act I and never betray that alliance. To become an ally of the Chorus, you need to chose them as an army that will lead the charge on Ascension Hall near the end of Act I.


Legion of Victory (Act III)
Complete the game as an ally of the Disfavored.


Simply chose to ally yourself with Disfavored in Act I and never betray that alliance. To become an ally of the Disfavored, you need to chose them as an army that will lead the charge on Ascension Hall near the end of Act I.


Victorious Alliance (Act III)
Complete the game after forging an alliance among the rebel factions of the Tiers.


Simply chose to ally yourself with Rebels in Act I and never betray that alliance. To do this you need to let Matani Sybil and her people go free instead of killing them during “The Battle of Echocall Crossing” and let Pelox Florian go free instead of capturing him during “Taking the Outer Valley”. If you do this, you will receive a missive from Tarkis Arri inviting you to a meeting. Go there and affirm your devotion to the poor outnumbered rebels fighting against an evil empire :).


Chaotic Victory (Act III)
Complete the game without any allies.


To step on the Anarchy Path you need to betray your chosen alliance. The earliest chance you get to do that is right before you take Ascension Hall in Act I. But you get other opportunities throughout Act II. After the betrayal, you will get a missive from Bleden Mark. Go to a meeting with him and from that point on he will lead you in your quest for power.


Charismatic
Reach maximum Favor with a faction.


This one is very easy. If you roleplay your character consequently, you will reach Favor 5 with the faction you want to be allied to in no time. You also gain quite a bit of Favor with Scarlet Chorus or Disfavored by making faction-specific choices during the Conquest.


Intimidating
Reach maximum Wrath with a faction.


This one is very easy. If you roleplay your character consequently, you will reach Wrath 5 with the enemies of your allies very fast (e.g. if you act as an ally of the Chorus or Disfavored, Vendrien Guard will hate you). You also gain some Wrath with Scarlet Chorus or Disfavored by making faction-specific choices during the Conquest.


Building a Reputation
Gain your first Reputation Ability.


To gain a reputation ability, you need Favor 3/Wrath 3 with any faction or Loyalty 3/Fear 3 with a companion. This will happen practically automatically.
Archons
Final Judgement
Emerge victorious from your trial with Tunon the Adjudicator, forcing him to submit to your rule.

In Act III, you will be summoned by Tunon to answer for your actions in “Final Judgement”. Any companion you bring with Loyalty at least 3 will speak in your favor. And you will need at least Favor 4 with Tunon. With those two elements in place, just be fairly respectful when you speak during your trial – Tunon will judge you innocent and submit to you.


How the Mighty Have Fallen
Defeat each of the Archons in a single playthrough of the game.


You need to kill four Archons: Graven Ashe, the Voices of Nerat, Tunon the Adjudicator, and Bleden Mark. In Act III, you will need to confront the Archons. During those confrontations, just chose to attack and kill. It is possible to do on any Path.
  • Tunon always summons you for Final Judgement. You can attack him right away, without even standing trial. But if you do choose to stand trial, you can still attack Tunon afterwards.
  • You will always confront Graven Ashe in the Iron Hearth and can chose to attack him even if you are allied with the Disfavored. BUT killing Ashe will break your alliance with the Disfavored, so do not do that if you are going for “Legion of Victory” achievement.
  • You will always confront the Voices of Nerat in the Cacophony and can chose to attack him even if you are allied with the Chorus. Interestingly, Chorus doesn’t really care.
  • Bleden Mark will always attack you in the Tunon’s Court (or you can arrange a meeting and fight him beforehand). Except on Anarchy Path if you gained enough Favor with him. But even then, you can chose to attack him.
That said, this one is easiest to do on the Rebel Path as killing Archons there does not interfere with any other potential achievement for this Path. You need to kill Ashe and the Voices during the main quest anyway, Bleden Mark will attack and you can just happily murder Tunon.


Paved with Good Intentions
Sacrifice one of your Companions to the Voices of Nerat, taking control of the Archon’s Mind – and the Scarlet Chorus.

This is most naturally done on Scarlet Chorus Path and if you do not have Bastard’s Wound DLC, it can only be done on Scarlet Chorus Path. In Act III, when you confront the Voices of Nerat, you need to agree to give a companion to him. Any of the companions will do as long as you have at least Loyalty 3 with the chosen one.
However, if you have Bastard’s Wound DLC, do Verse’s companion quests (as described in “Unfinished Business” achievement), and take Verse with you to the final confrontation with the Voices of Nerat – you can do this achievement on any Path. At some point in conversation, Voices will say he wants Verse and all you need to do is agree to give her to him. You still need to have at least Loyalty 3 with Verse for it to work. If you have both Verse and Barik, Barik will offer to be eaten instead of Verse. That works too if you agree (and have at least Loyalty 3 with Barik).


Might Makes Right
Convince Graven Ashe to submit to your rule, swaying his allegiance from Kyros.


Only possible on Disfavored Path. In Act III, when you confront Graven Ashe, you need to convince him to stand down and submit to you. You need at least Favor 4 with Graven Ashe to succeed.


From the Shadows
Gain Bleden Mark’s loyalty and have him turn on Tunon the Adjudicator.


Only possible on Anarchy Path. In Act III, be sure to do “Final Hunt” quest (given by Bleden Mark) before you go to Tunon for the “Final Judgment”. It also seems necessary to go to Ashweald and talk to Bleden Mark before going to Cacophony and Iron Hearth. You also need at least Favor 4 with Bleden Mark.
When you go to Tunon, attack him – Bleden Mark will show up and betray Tunon, effectively declaring his loyalty to you.
Alternatively, you do not have to attack Tunon right away, if you are sure that you will loose in his trial and be convicted – result will be the same.


The Prosecution Rests
Convinct an Archon in Tunon’s Court.


You need to successfully convict Graven Ashe or the Voices of Nerat.
At the beginning of Act II, Tunon gives you a quest “A Trial of Archons” – you must gather evidence against the Voices of Nerat and Graven Ashe and decide which one is guilty of starting the civil war between them. You gather the evidence throughout Act II. What kind of evidence and how much you will be able to find depends on both your decisions during the conquest and Path you are on. But, if you do all available side quests and thoroughly talk to the NPCs, you will have enough evidence to convict any Archon you want.
The convicting itself happens in Act III (which is a bit confusing as “A Trial of Archons” quest just completes without apparent resolution). Tunon summons you for the “Final Judgment” – during which he will hold first the trial of the Archons and then yours. During the first part, chose an Archon you want to convict and present your evidence to Tunon – typically you will want to chose the Archon against whom you have more evidence. Successful conviction requires evidence of at least one crime in each of the categories: sedition, incompetence, war crimes, and hoarding of forbidden knowledge. You need to exhaust all the evidence you gathered.

Note 1: At the beginning of Act III on any Path except for Anarchy Path, you will receive a missive from Bleden Mark. If you have at least Favor 3 with him, you can arrange to meet him in Ashweald and subsequently fight him there. Yet if you do that before you go to Tunon’s “Final Judgment”, the Trial of Archons will not happen. The Trial will also be skipped if you kill Graven Ashe and/or the Voices of Nerat before you go to Tunon’s “Final Judgment”.

Note 2: In my Anarchy Path playthrough, I betrayed my Chorus alliance the first chance I got (at the end of Act I) and at the beginning of Act II, Tunon did not even give me “A Trial of Archons” quest. So I assume that the Trial is also skipped on Anarchy Path but my experience might have just simply been a bug. If anybody has some input here/different or same experiences, I’d love to hear about it :).
Locations - Blade Grave
Lawyered
Exploit a legal loophole to keep Amelia’s baby alive.


This can be done on any Path. After you storm the Sentinel Keep, you find out that Amelia has a baby. To get this achievement, you need to find a way of ending the Edict of Storms without killing the baby. If you have been to the Burning Library before, you should have found a piece of paper describing a similar situation and that document will give you a clue how to break the Edict without murdering infants. But you can also just pass a lore check to realize how to do that on your own (the height of the check depends on your level – the lowest value I saw was 61 and the highest was 83).


Taking a Stand
Claim Sentinel Stand Keep for yourself.


This can only be done on the Anarchy Path. It is not a part of the main quest on the Anarchy Path, so there is no associated quest. However, while adventuring in the Blade Grave, you can simply go to Sentinel Stand and take the Keep as you would on any other Path.
If you are on Disfavored Path, you can chose to betray them just before you take the Keep, effectively taking the Keep for yourself.
Locations - Burning Library
Feel The Burn
Destroy the Burning Library.


On Disfavored Path, this is done as part of the main quest (if you chose to visit the Burning Library). But you can also do it on Chorus Path and on Anarchy Path. Simply chose to take the Silent Archive without replacing it with another artifact. And run!
Note! You cannot do that on Rebel Path, as you want to recruit the sages to your rebel alliance. You will only see the option of replacing the Archive and you will not be able to destroy the Library.


Unconventional Materials
Cut the rune from the Sage’s chest in the Burning Library.


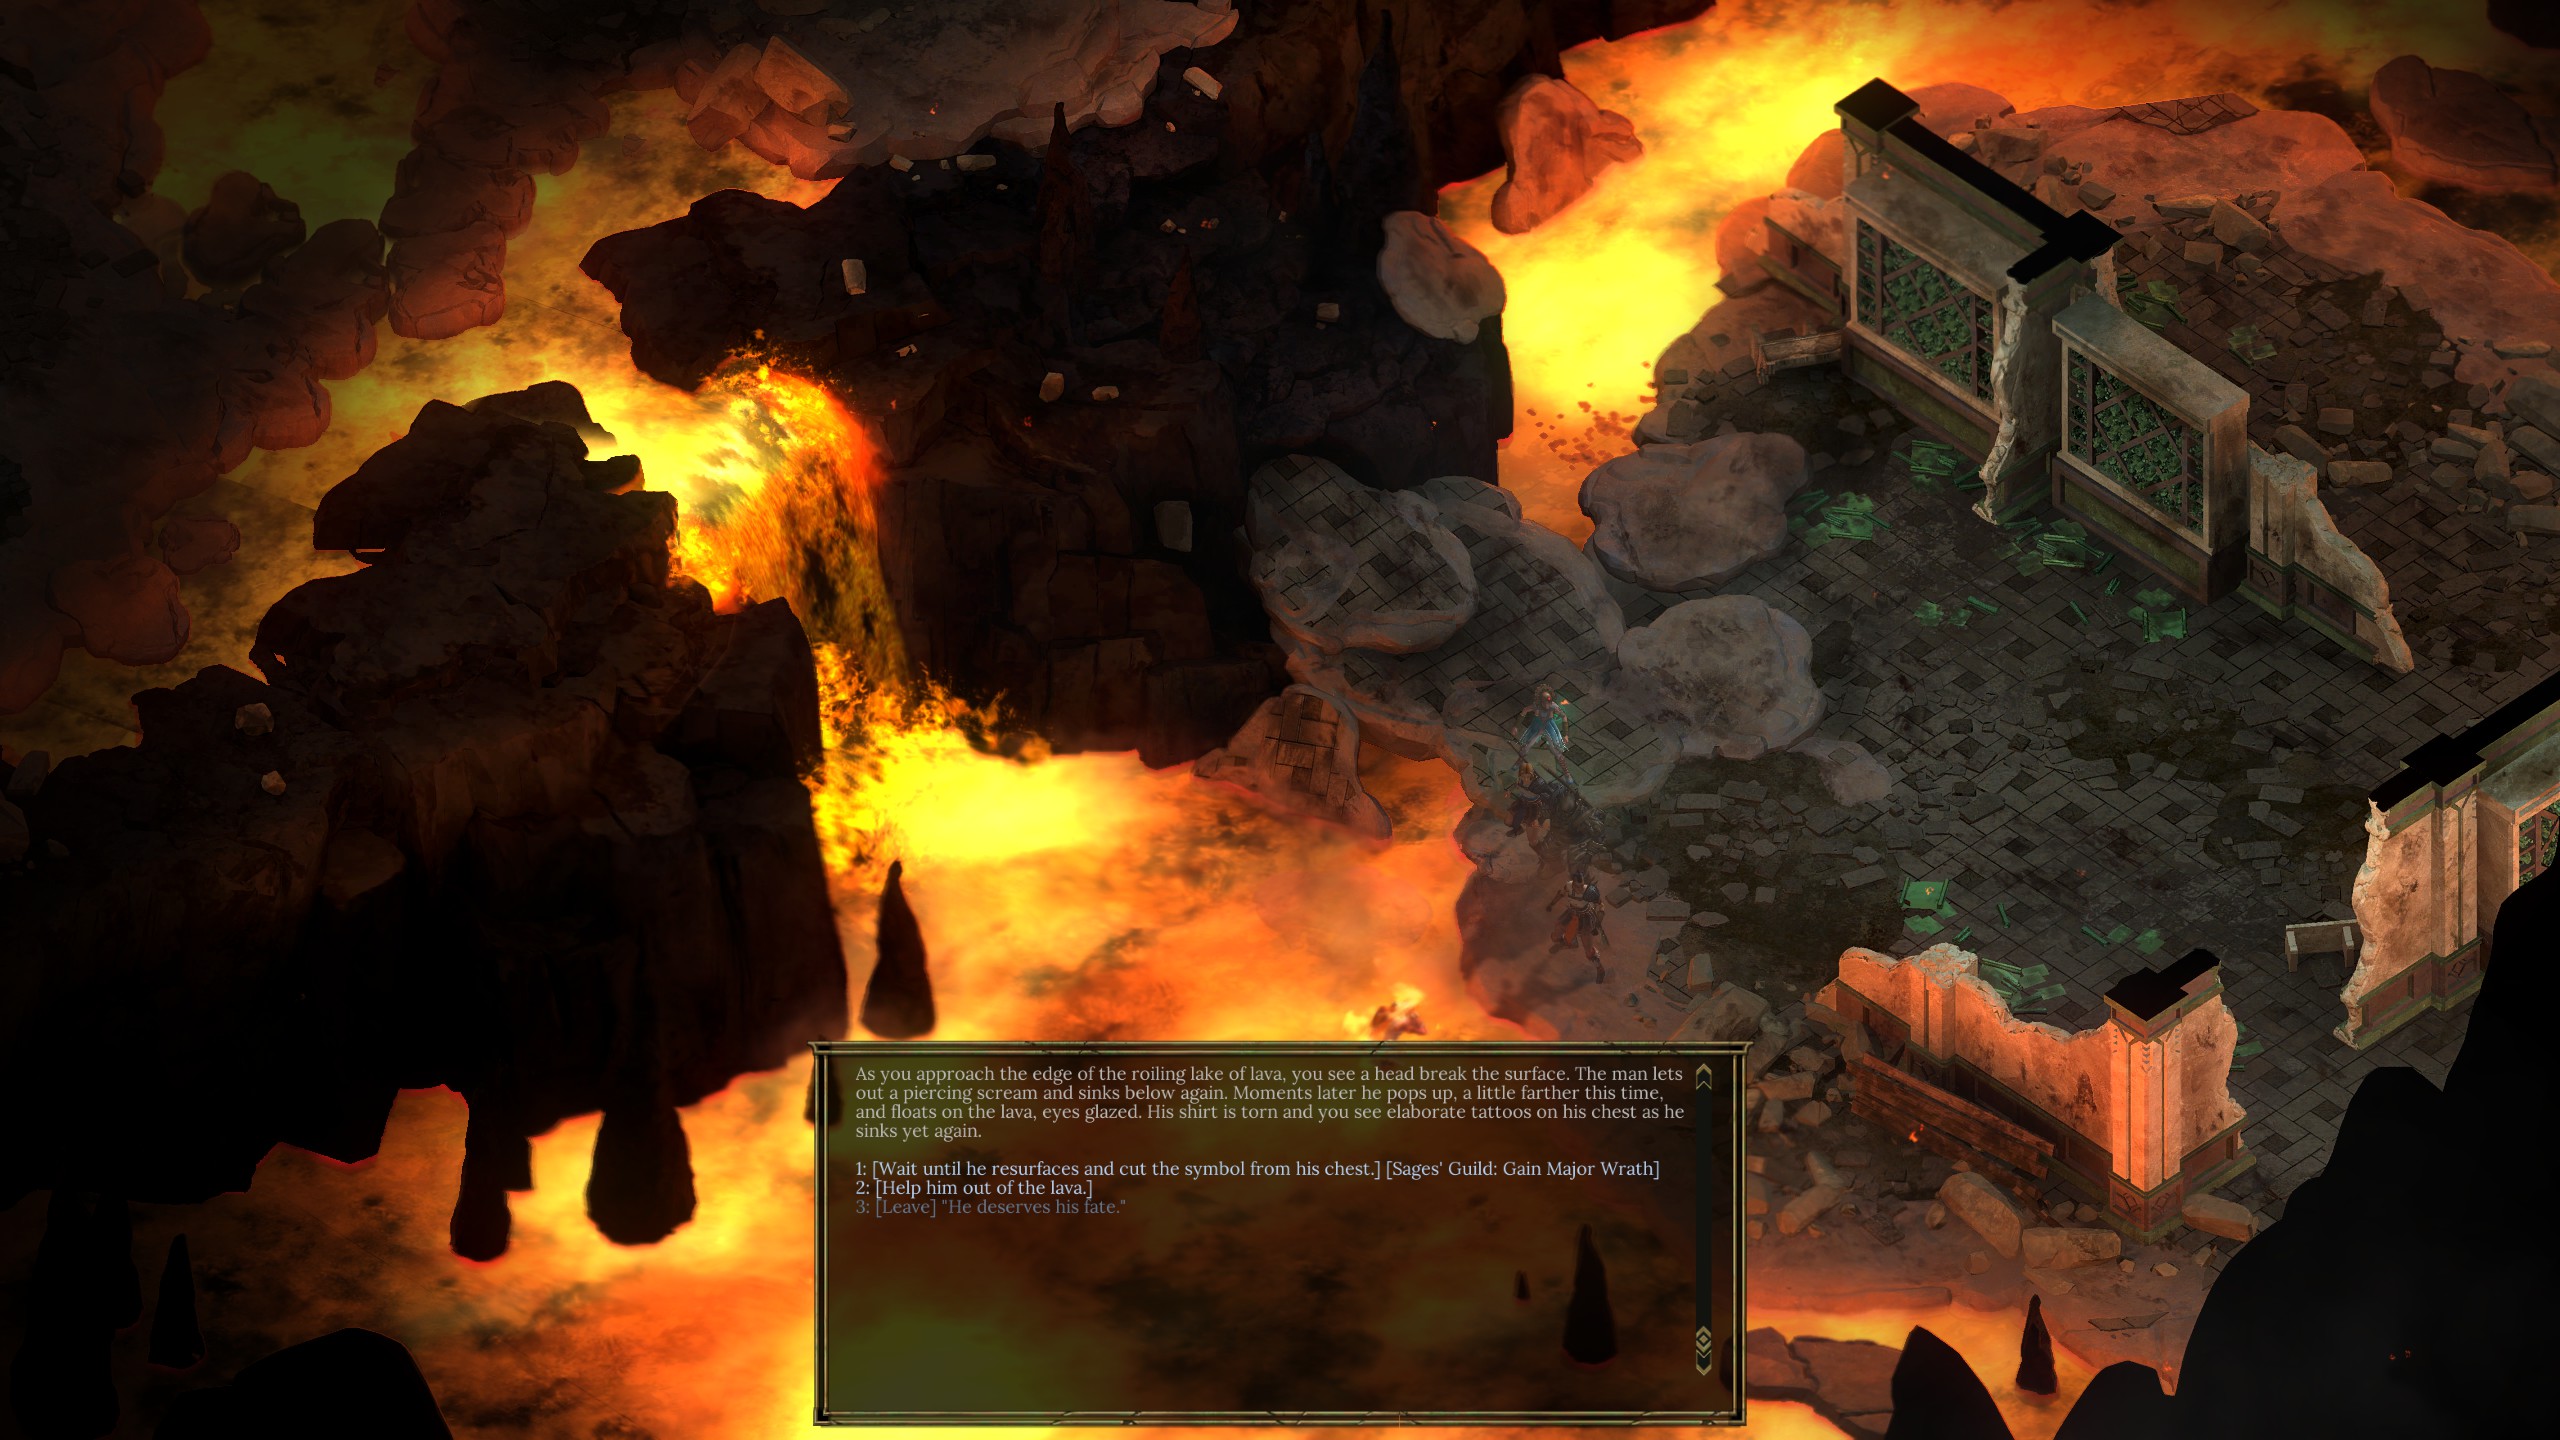
You need to go to the Vellum Citadel in the third year of the Conquest and in “Edict of Fire” chose to give warning to the Sages. This will open up a small area in the south-east corner of the Burning Library – Lower Ruins. Go to this area and you will see a Sage drowning in lava. Dialogue will pop up and one of the options will be to cut the rune out of his chest. Having Lantry with you only seems necessary here as he is the one that draws your attention to the rune on the Sage’s skin. Yet, you can also notice it on your own if your character has enough Lore (without Lantry though, you will need to interact with the Sage on your own, the dialogue won’t just pop up).

Note: On Rebel Path, you can do this with any Conquest setup. Simply go back into the Library once you exchange the Archive for another artifact. The small area with the mage will now be open to you. It may be possible also on a Anarchy Path and Chorus Path, as long as you chose not to destroy the Library (but this needs confirming). (thanks to Drap' for the info )

Locations - Lethian’s Crossing
Solo Performance
Spend some time alone in the brothel in Lethian’s Crossing.


During the second year of the Conquest, go to Lethian’s Crossing and leave the Scarlet Chorus in charge of the town. In Act II, go to Lethian’s Crossing and visit the brothel there. Talk to the owner and rent a room for some “alone time”. You will even get some toys to play with ;).


Boom
Distract the Forge-Bound smith in Lethian’s Crossing until he loses control of his magic.

In the forge in Lethian’s Crossing, there is a smith standing just to the left of the furnace. When you try to talk to him, he just says stuff like “don’t distract me”. Just keep talking to him (clicking on him) till he gets distracted and… explodes.


Bane of the Crossing
Claim the Magebane Helm after defeating the Havoc inside the Oldwalls by Lethian’s Crossing.

On Anarchy Path, this is done as part of the main quest. But you can do it on any Path – simply chose to keep the helmet instead of giving it back to Eldian after you are done with Lethian’s Crossing main quest.
Locations - Stone Sea
Eternal Suffering
Keep Cairn alive, suffering from the effects of Kyros’ Edict.


This can only be done on Rebel Path. During the Conquest, do not go to Lethian’s Crossing in the year 2 – this way the Bronze Brotherhood will not be mad at you and they will be in charge of Lethian’s Crossing.
In Act II, on Rebel Path you first go to Lethian’s Crossing. During your main quest there, chose to ally yourself with the Bronze Brotherhood (instead of the Forge-Bound). Your new Brotherhood allies will propose alliance with Stonestalkers as an option. So now you need to go to the Stone Sea and chose to ally yourself with Stonestalkers (instead of the Earthshakers). As part of the quest to gain Stonestalkers as allies, you will push the Disfavored out of the area but keep Cairn alive, shaking the earth till the end of days.


Savage Stone
Survive the Rite of Savagery and Stone, joining the Stonestalker tribe.


This can be done only on Chorus Path and on Rebel Path. When you first enter Gulfglow Oldwalls, you will meet some Earthshakers. Do not attack them, but tell them you will talk to Red-Fang and try to resolve the problem. You will find Red-Fang at the Gulfglow Runic Hall. You have to tell her that you want to resolve the problem peacefully. To that she will say that only the member of the tribe can speak for the tribe and she will give you a chance to join the tribe by undergoing “Rite of Savagery and Stone”. Agree, go back to Gulfglow Oldwalls, defeat some beastman and return victorious to Red-Fang.


Shattered Stone
Kill Cairn while on the Anarchist Path.


While on Anarchy Path, after you acquire the Azure Shield, return to Hundred-Blood (before you return to Bleden Mark). She will happily unlock the Howling Rock area for you and you can go there, wipe out the Earthshakers and kill Cairn. The achievement will unlock after you take your piece of Cairn’s body.
Note! Nothing much changes if you chose to kill Hundred-Blood earlier, you will get access to Howling Rock anyway. (thanks to Zarddin for the information)
Locations - Vendrien’s Well
Day of Swords
Allow Kyros’ Day of Swords to arrive without taking Vendrien’s Well.


In Act I, after you proclaim the Edict of Execution, simply sleep in the tent again and again until the Day of Swords comes and everybody dies. There is a helpful red day counter on your hud that will show you how much more sleeping you have to do. Save before you do that as you will loose the game.


A Slow Death
Have Tarkis Demos executed in Edgering Ruins.


At the beginning of Act I, in Enderging Ruins, agree with the Disfavored and execute Tarkis Demos.


This! Is! Tyranny!
Kick someone off of your Spire.


You will get an opportunity to do that at the end of Act I, after you take your first Spire. You will get an option to give a note to your prisoner (it will be Tarkis Arry, unless you allied yourself if the Rebels) and throw her/him down. Take that option and feel like Leonidas!
Locations - Bastard’s Wound, Part I
The Bastard Tribe [BW]
Install Reef-Talon in a position of authority over the Bastard’s Wound.


First of all, you will need to convince Reef-Talon to come back to the settlement. There are at least two ways to do it.
If you are on the “History of the Oldwalls” quest for Mell, returning Reef-Talon to the Wound is your objective. To do that successfully, you will need to examine some murals and provide proper interpretations of them to Reef-Talon. After you talk to Lexeme in The Abbyss and she lets you through to Reef-Talon, tell Reef that Lexeme believes her powers can be trained. After a bit of conversation, you will follow Reef to the big and colorful mural of a beastwoman. Talk about this mural in positive terms, chose conversation option with Lore requirement if you can as those are the most convincing ones. You will also get a chance to knock some sense into Reef with Athletics and if you have Kills-in-Shadow with Loyalty 3 with you, she will do it. Now you will go examine three murals in Fractured Depths and Darkened Hollow, and return to Reef-Talon to talk about them. The interpretations that are the most convincing are:
  • “The Oldwalls once had many different inhabitants...”,
  • “Beastmen were meant to fight bane...”,
  • “Many of the prints were formed with essence...”,
  • “The beastwoman is showing her dominance...”,
  • “What you’re seeing is a historical record....”.
This way you will definitely successfully convince Reef-Talon to come back.
If you are doing “Blood of the Beast” for Wagstaff or “Bones of the Beast” for Jaspos, you can still convince Reef-Talon to come back. If you provide her some therapy in the form of merry slaughter, as described in “They Sort of Deserve It...” achievement, she will get rid of her guilt and return to the Wound.
After you are done with Reef-Talon and come back to the settlement, you will see Mell, Wagstaff, Jaspos and Reef-Talon. They will be arguing about the future of the settlement. Tell them you will resolve the issue. You will go to another area, where all the prospective leaders will present their cases and you can do some questioning. At the end of all that, chose Reef-Talon as a leader of the settlement.


Prince of Tidecasters [BW]
Place Wagstaff in a position of authority over the Bastard’s Wound.


It doesn’t matter who you chose to ally with in the Wound and whose main quest you were doing (“History of the Oldwalls” for Mell/Reef-Talon, “Blood of the Beast” for Wagstaff, “Bones of the Beast” for Jaspos). After you confront Reef-Talon and come back to the settlement, you will see Mell, Wagstaff, Jaspos and Reef-Talon (if you convinced her to come back one way or the other). They will be arguing about the future of the settlement. Tell them you will resolve the issue. You will go to another area, where all the prospective leaders will present their cases and you can do some questioning. At the end of all that, chose Wagstaff as a leader of the settlement.


Set in Stone [BW]
Appoint Jaspos to a position of authority over the Bastard’s Wound.


It doesn’t matter who you chose to ally with in the Wound and whose main quest you were doing (“History of the Oldwalls” for Mell/Reef-Talon, “Blood of the Beast” for Wagstaff, “Bones of the Beast” for Jaspos). After you confront Reef-Talon and come back to the settlement, you will see Mell, Wagstaff, Jaspos and Reef-Talon (if you convinced her to come back one way or the other). They will be arguing about the future of the settlement. Tell them you will resolve the issue. You will go to another area, where all the prospective leaders will present their cases and you can do some questioning. At the end of all that, chose Jaspos as a leader of the settlement.


Complicit Justice [BW]
Learn of the infighting in Bastard’s Wound, and do nothing to resolve it.


At the end of the Bastard’s Wound questline, after you confront Reef-Talon and come back to the settlement, you will see Mell, Wagstaff, Jaspos and Reef-Talon (if you convinced her to come back one way or the other). They will be arguing about the future of the settlement. Chose to just walk away and let them solve their own problems. Afterwards, get out of the Barstard’s Wound.


Let Sleeping Abominations Lie [BW]
Resolve the troubles of the Bastard’s Wound without slaying the resident havoc.


This is only possible if you chose to do “History of the Oldwalls” quest for Mell, not possible if you chose to do “Blood of the Beast” for Wagstaff or “Bones of the Beast” for Jaspos.
When you complete the two initial quests in the Bastard’s Wound – “Knapping on the Job” and “Tide Together”, both Jaspos and Wagstaff will have the same proposition for you: find and kill Reef-Talon for them (if you completed only one of the initial quests, only one of those guys will propose that and the other one will be mad at you). Do not agree to any of that. Instead go talk to Mell and accept his quest to bring Reef-Talon back: “History of the Oldwalls: Part I”. When you reach Lexeme in The Abbys, tell her that Mell sent you and that you come in peace. She will give you a keystone you need to get to Reef-Talon and proceed with your quest. Do not enter the big room directly behind Lexeme – that is where Lullaby is and we don’t want to disturb him. After that simply finish the main quest and chose a new leader for the Wound.


Troubleshooter [BW]
Complete all available quests and sidequests in the Bastard’s Wound.


To unlock this achievement, you cannot judge the settlement guilty and murder everybody (see: “Bastard Wounder” achievement) and you cannot walk away without helping the squabbling leaders at the end (see: “Complicit Justice” achievement). You will need to finish following quests:
  1. Hidden Truths
  2. The Ones Who Got Away
  3. Knapping on the Job
  4. Tide Together
  5. Gambler’s Ruin
  6. Midnight Wanderer
  7. Water Intoxication
  8. History of the Oldwalls: Part I and II OR Blood of the Beast OR Bones of the Beast
  9. Fatebinder’s Judgement
“Hidden Truths” and “The Ones Who Got Away” will unlock and proceed automatically as you go to Shattered Bastion and into Bastard’s Wound. Once in the settlement, after talking to Mell, go talk to both Jaspos and Wagstaff and pick up their quests (“Knapping on the Job” and “Tide Together”) before you leave Bastard’s Wound. Go and do both of those, come back and return them but do not pick up any other quests from Jaspos, Wagstaff or Mell yet (so, do not agree to help any of those three with anything yet!). Now it’s the time to pick up and resolve three quests: “Gambler’s Ruin” form Rostrom Len, “Midnight Wanderer” from Eisly, and “Water Intoxication” from Tycho at Bastard’s Wound Farm. After you are done with those three, you can decide who you would like to support and pick up a quest from that person: “History of the Oldwalls” form Mell, “Blood of the Beast” from Wagstaff or “Bones of the Beast” from Jaspos. For the purposes of this achievement, it does not matter who you choose. “Fatebinder’s Judgement” will start when you come back to Bastard’s Wound after dealing with Reef -Talon. You need to agree to resolve the choice-of-leader issue. Achievement will unlock after you chose a leader for the Wound and have a chat with him/her.
Locations - Bastard’s Wound, Part II
Bastard Wounder [BW]
Slay all who would willfully trespass the Oldwalls in the Bastard’s Wound.


When you enter the Bastard’s Wound for the first time, you will talk to Mell. In this conversation, you will get a chance to judge the settlement guilty of trespassing in the Oldwalls and condemn it. Afterwards, merrily proceed with slaughtering everybody (remember about people living inside the two dwellings). You will need to also kill everyone in Cairn’s Passage, find and kill all the Sleepless in Fractured Depths and Darkened Hollow (some of them are hostile and fight alongside the Bane but some of them you will need to talk to to get an opportunity to push them off the edge/strangle them/shank them etc.). Finally, you will get to The Abyss. Here you need to kill Lexeme and Reef-Talon with her entourage. The other Sleepless that you see standing around in this area do not matter and you cannot kill them – they will for some reason just mysteriously disappear after you kill Reef-Talon. Maybe they just collectively jump into some pit.


Nice to Meat You [BW]
Slay a foe with a slab of meat.


After you decide to execute everybody in Bastard’s Wound for their crime (see: “Bastard Wounder” achievement) and start killing people, you can loot a corpse of one of the merchants (Neread, if I remember correctly) for Artyx’s Haunch – a one handed superior weapon. Equip that weapon and kill just anybody anywhere with it.


I’ve Made A Huge Miss Steak [BW]
Perform a Critical Miss wielding a slab of meat.


After you decide to execute everybody in Bastard’s Wound for their crime (see: “Bastard Wounder” achievement) and start killing people, you can loot a corpse of one of the merchants (Neread, if I remember correctly) for Artyx’s Haunch – a one handed superior weapon. Equip that weapon and fight with it until you critically miss and unlock the achievement. If you are having trouble missing, try equipping the weapon on somebody that has no skill with one handed weapons whatsoever and preferably as little Finesse as possible.


They Sort of Deserve It… [BW]
Trick Reef-Talon into inadvertently wiping out her loved ones in Bastard’s Wound.


For this one you will need to talk to Reef-Talon and convince her that the only way to help her Sleepless brethren is to slaughter them. The opportunity to do so is a bit hidden in the conversation as you need to tell her that she is only running out of guilt twice. Here are exact conversation choices you need to make to convince Reef-Talon to do some murdering:
  • “It’s time for you to return to the Wound, in one form or another”
  • “Return to the Wound. You can be of help there – perhaps even lead the settlers”
  • “You’re only running because the Sleepless remind you of your guilt. If I could help them find peace, would you return?”
  • “Yes. What other choice do we have?”
  • “You’re only running because the Sleepless remind you of your guilt. If I could help them find peace, would you return?”
  • “[Athletics 56] [Yell at her.] You need to take responsibility and end their suffering! Only you can do that!”
  • “[Subterfuge 61] If someone seriously hurt your cub, but did so by accident, would you rather they mercifully end the creature, or would you prefer they prolong the cub’s suffering to ease their guilt?"

Requiem for the Somnombulists [BW]
Slay all of the Sleepless in Bastard’s Wound.


Firstly you will need to kill every Sleepless in Fractured Depths and Darkened Hollow. Some of them are hostile and fight alongside the Bane but some of them you will need to talk to to get an opportunity to push them off the edge/strangle them/shank them etc.
Secondly, in The Abbys, you need to kill Lexeme – simply sentence her to death for her crimes.
And lastly, you will need to trick Reef-Talon into killing the remaining Sleepless, as described in “They Sort of Deserve It...” achievement.
You will not be able to do this one if you chose to help Mel and are on the "Hisotry of Old Walls" quest (thanks to dave-tx for the information).


Sleepless in Three Battles [BW]
Defeat three encounters with Sleepless opponents.


You will find groups of Bane and Sleepless all around Fractured Depths and Darkened Hollow. Simply win three battles with them.


Well Done [BW]
Wantonly murder a bystander to distract some easily-defeated guards.


While in South Haven on “Knapping on the Job” quest, talk to Cassandra and chose to lie to her, saying that you decided she should keep her tools. Afterwards, talk to Capteron and wait till nightfall. While sneaking around town at night, you will notice a villager standing near the well. Push him into the well to create a distraction.
Possessions and Spells
All You Survey
Gain control of every Spire.


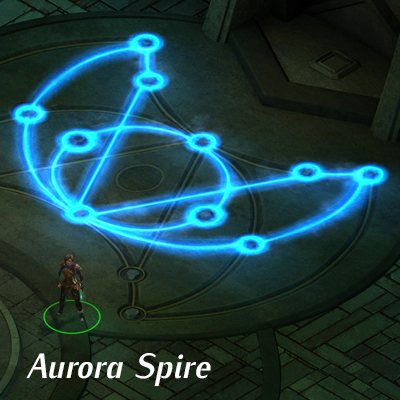
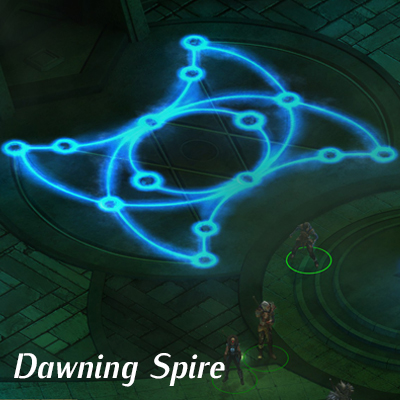
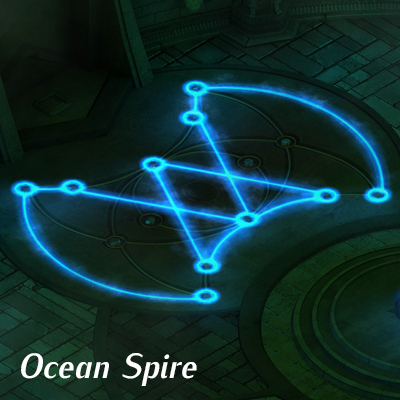
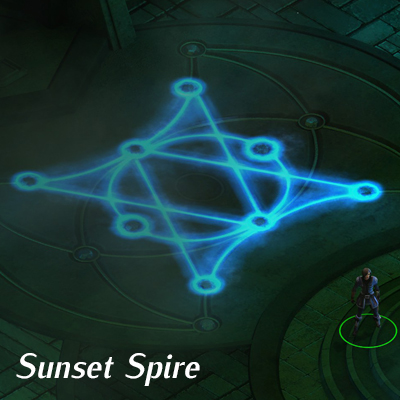
There are 5 spires in the game: Mountain Spire in Vendrien’s Well, Sunset Spire in Lethian’s Crossing, Aurora Spire and Dawning Spire in Stone Sea, Ocean Spire in Blade Grave. One you claim as part of the story. Access to the rest is unlocked as you adventure in various areas during Act II.
Any Spires that you did not claim in Act II can still be claimed in Act III. Access to them will be automatically unlocked at the beginning of the Act III in conversation with Fatebinder Calio. You do not need to complete any quests in the areas, you do not even need the charcoal rubbings if you already know the proper rune to draw.


Some Assembly Required
Construct an upgrade on one of your Spires.


When you claim a Spire, you can chose to build an upgrade on it, giving it a chosen function (Infirmary, Library, Forge, Training Grounds). You do not need to do it right away, you can do it later through the Spire menu. Upgrade one Spire to get the achievement. Mountain Spire cannot be upgraded (as it already has a Mysterious Device) and as such it doesn’t count.


Look On My Works, Ye Mighty...
Construct an upgrade on every Spire.


Upgrade all 4 Spires to get the achievement (see: "Some Assembly Required" achievement).


Legendary
Acquire an Artifact.


Some weapons and pieces of equipment in the game are artifacts. There is a lot of those and a playthrough without finding at least one is impossible – as you will always kill at least one Archon and all of them have an artifact on them. You can also craft artifacts in your Forge Spire. Companion-specific artifacts do not count (Infused Shadows for Kills-in-Shadow, Wave’s Crest for Eb, Songbird’s Encore for Sirin). See “Overkill” achievement for an extensive list of artifacts.


Arsenal
Acquire 5 Artifacts.


Companion-specific artifacts do not count (Infused Shadows for Kills-in-Shadow, Wave’s Crest for Eb, Songbird’s Encore for Sirin). See “Overkill” achievement for an extensive list of artifacts you can find/craft.


Overkill
Acquire 10 Artifacts.


This is the easiest to do on Anarchy Path – you visit 4 instead of 3 areas while on this Path and acquiring artifacts is really the whole point of a main quest there. But it can be done on any Path. Companion-specific artifacts do not count (Infused Shadows for Kills-in-Shadow, Wave’s Crest for Eb, Songbird’s Encore for Sirin). There are many artifacts to find and craft.
  • Researched at the Library and crafted at the Forge: Deathbringer, Heart’s Blood, The Baneward.
  • Researched at the Library (only if you have the Silent Archive) and crafted at the Forge: Scales of Mercy, Snowfang
  • Crafted at the Forge: Alchemist’s Gloves, Commander’s Plate, Hierarch’s Robes, Nightwalker’s Boots, Staff of Cairn (need a piece of Cairn to unlock)
  • (Stone Sea) Gulfglow Oldwalls: Azure Shield (looted from Red-Fang).
  • (Vellum Citadel) Burning Library: Banner of Ardent, Staff of Hours
  • (Heaven) Twin Rivers Oldwalls – Depths: Sunlance
  • (Heaven) Lethian’s Crossing Oldwalls – Antechamber: Tempest
  • (Blade Grave) Blade Grave Oldwalls – East: Gravebow
  • (Blade Grave) Infested Oldwalls: Dauntless
  • (Blade Grave) Oldwalls Breach: Steadfast Insignia
  • (Blade Grave) Rust Canyons: Helm of the First Regent (if you proclaimed the Edict there with no warning)
  • (Bastard’s Wound) The Abbys: Penumbra (possessed by Reef-Talon)
  • Possesed by Archons: Peacemaker (Graven Ashe), Final Scream (Voices of Nerat), Binding of Shadows (Bleden Mark), Face of Judgment (Tunon)
  • Quest items/rewards: Edict’s Crescent (from Lycentia for “Never Free"), Edict’s Mallet (from Lohara for “Never Free"), Circular Reason (from Lexeme for “Truth and Reconciliation"), Magebane Helm (Lethian’s Crossing), Weeping Whispers (Found at Torn Strand during Verse’s companion quest)

NOTE: If you are having trouble unlocking this one with artifacts you find, try crafting 10 of them at your Forge.

Arcanist
Create a spell from all 11 schools of magic in a single playthrough.


There are 11 spell cores (spell schools) that can be used to create spells. You need to learn all the cores and create at least one spell with each core (assign a created spell to a character after making it). List of cores and where to find them:
  1. Fire: Lethian’s Crossing, merchant Biotus; Lethian’s Crossing, merchant Harchian Bronze; found on a corpse after betraying Scarlet Chorus in Ascension Hall; Conquest: side with Scarlet Chorus in Taking the Bastard City/Betrayal of the Bastard City; Burning Library: on the plateau with the cross formations, only accessible if you gave the Sages warning before casting the edict.
  2. Lighting: learned at character creation; Lethian’s Crossing, merchant Basila; Kosma, merchant in Edgering Ruins; Lethian’s Crossing, merchant Basila; Elegy, merchant in Bastard’s Wound
  3. Frost: learned at at the character creation; Pentibor, merchant at the Disfavored Camp; Lethian’s Crossing, merchant Basila.
  4. Terratus: taught by Eb (requires Fear 3 or Loyalty 4); taught by Wagstaff in Bastard’s Wound if you request knowledge as a reward for his quest
  5. Emotion: taught by Sirin (requires Loyalty 2); Blade Grave Oldwalls – Central, in a chest surrounded by floor trap and guarded by one Bane; Tunon’s Court: given by Blood Mulch if Tidecasters were interrogated by the Chorus during Conquest; Burning Library: sold by Boltok (Chorus Path), or Myrum (Rebel Path).
  6. Life: taught by Lantry
  7. Vigor: learned at character creation; Sniggler Dagos, merchant in Scarlet Chorus Camp; merchant Irene in Halfgate
  8. Stone: Zephilos, merchany in the Iron Hearth; Jagged Maw Shrine – touch a pillar; random encounter after you destroy the Burning Library – a Library Looter merchant; taught by Scovik in Settler’s House in Halfgate
  9. Illusion: Scarlet Chorus Camp, scroll to read; Lethian’s Crossing, merchant Harchian Bronze; hidden under the stairs in Storm Down Gorge
  10. Force: Scroll on a desk in Citadel Barracks; random encounter after you destroy the Burning Library – a Library Looter merchant; received from Basilion as a reward for killing Beastman for the Earthshakers in Gulfglow Oldwalls
  11. Atrophy: learned at character creation; Echocall Crossing (hidden under a rock, south-west); merchant Irene in Halfgate
There may of course be other sources of the cores that I just never found. So if you notice a core source that I missed, I will gladly add it here.


Loremaster
Create a spell with a high Lore requirement.


You will need a character with at least 100 Lore. Crate a spell, any spell, that requires at least 100 Lore to cast and assign it to that character.
Gameplay
Capstone
Learn the last talent in any of the player’s 6 talent trees.


Just pick a tree best suited to your character and put points in it until you are able to learn the skill at the very bottom of that tree, and learn it.


Iron Victory
Finish the game on Trial of Iron mode.


Trial of Iron is a mode that allows you to have only one save and that save will be deleted if your party dies. You need to chose that mode when you start a new game. Plying in this mode logically requires you to be careful. But it is really easy to do on Normal or Easy difficulty. If you feel adventurous, combine it with Path of the Damned difficulty :).


Victory of the Damned
Finish the game on the Path of the Damned difficulty setting.


Path of the Damned difficulty needs to be chosen when you start a new game. And you cannot change it throughout the game. It is really not as hard as it sounds. And you do not need to have a perfectly min-maxed character, play “that one and only class that works” or do that one specific thing in the Conquest. I finished PoTD with two handed damage dealer, leadership lightning mage, one handed warrior with some frost spells support – none of them really had much trouble. Here are some things to keep in mind when you are playing PoTD that will make your life easier:
  • Establish which skills you need on each of your characters and prevent other skills from gaining experience. Do it right away and with your character as well as with your companions as they join. This way your precious experience points won’t go needlessly into e.g. two handed weapons on your pure mage or into some school of magic that you use rarely. You can prevent the skills from gaining experience by marking them with a red rectangle on your character sheet.


  • Spectral Blur and Mirror Image spells are your best friends. It is very beneficial if every character in your party can cast those to quickly buff himself/herself. Sure, buffs cast by a warrior and not a pure mage won’t be as strong but they will be there and be a huge defensive help. Beware though, Sigil of Guarded Form that you need to create Mirror Image can only be acquired from one source: Sterling Hagnon, merchant outside the Disfavored Camp. So I would recommend allowing him to stay even at the cost of a bit of Disfavored Wrath.
  • Teaching at least one healing spell to everyone is a very good idea.
  • Every character should be taught some Lore, so they can effectively buff themselves and heal themselves when in trouble. 70 Lore seems like a nice amount for non-mage companions.
  • Passive buffs that you get from Favor 3/Wrath 3 with factions are all great. And if you roleplay your character with consequence, you should have no trouble reaching Favor 3 with your friends and Wrath 3 with your enemies fast.
  • Never forget consumables. Especially in Act I, where they will mean a difference between success and failure. Eating/drinking consumables outside of fights sends you into 20 second recovery. So it may require a bit of waiting around, but it is still a good idea to eat some 3 pieces of longer-lasting consumables before bigger fights.
  • Rest in your Mountain Spire for a nice resting buff for everybody. Or have some fun in a brothel for a nice buff of choice for your character :).
  • Always get an Arrow Shield skill form Agility tree. No matter what kind of character you are building. This way you can safely ignore Dodge skill and just focus on Parry for your defenses.
  • Light armor (leather not cloth) is great for anybody. It provides decent deflection while not imposing huge penalties on recovery. I always put my whole party in light leather armor (except for Barik and Kills-in-Shadow for obvious reasons). However, it is not one and only viable solution and if you prefer more survivability to a bigger punch, put your party in heavy armor. Just keep in mind that with a heavily armored party each fight will last longer.
  • Finesse is the best attribute. It provides both survivability (by boosting your deflection) and better attack accuracy.
  • Do not ignore Leadership tree. It has some really nice all-round passive buffs for your whole party, additional spell slots, consumable slots and even resurrection ability (which is useful if you do not want to drag Lantry with you, not so useful if you do have healer-speced Lantry).
  • Remember that you can upgrade your weapons and armor on the Forge Spire. There are not that many pieces of armor that provide some additional bonus, apart from the standard benefits, so it is always better to upgrade the quality of a piece that has a bonus you like than to exchange it for something without a bonus, just because it’s e.g. exquisite instead of fine. Barik’s twisted metal armor can also be upgraded!

Zero Consumption
Complete the game without ever using a Health Potion.


You cannot drink any potion that will restore your health. This is very easy to do on Normal or Easy Difficulty. Just make sure every character has at least one healing spell equipped and have a mage specialized in healing (yes, it will most probably be Lantry).
Others
Apocalypse Later
End the conquest of the Tiers with a peaceful surrender.


At the very end of the game, when you stand on top of your spire, chose not to cast the Edict on the Northern Empire. Instead, chose to affirm your loyalty to Kyros.


Correspondence Course
Send your first Missive.


You will receive many missives throughout the game. Just reply to any of them.


Cry Havoc!
Defeat every Havoc in the game.


There are 5 Havocs in the game and you need to kill 3. However, Lullaby from Bastard’s Wound does not seem to count for the purposes of this achievement. So that leaves us with four. This cannot be done on Disfavored Path.
  • Lethian’s Crossing Havoc is located in Lethian’s Crossing Oldwalls – Antechamber and will be killed while on the main quest in Lethian’s Crossing on any Path.
  • Blade Grave Havoc is located in Blade Grave Oldwalls – Central and is killed while on a quest to claim Sentinel Stand Keep and kill the regent on any Path. On Anarchy Path you do not have to acquire Steadfast Insignia for your main quest, yet you can still do it (and kill the Havoc in the process) while in Blade Grave.
  • Burning Library Havoc is located in Burning Library – Upper Ruins but appears only if you do not destroy the Library (so if you replaced the Silent Archive with another artifact). Impossible on Disfavored Path.
  • Stone Sea Havoc is located in the Passage of Culling. It is only accessible while on the quest “The Culling Dance” (the quest is given by Speaks-for-Soil after you complete the “Rite of Savagery and Stone”). Possible on Rebel, Anarchy and Chorus Paths.

I Am The Law
Become a seasoned adjudicator.


In the Act I and Act II there will be many situations in which you will be called upon to adjudicate a dispute between two characters. After you pronounce your decision in enough of them, you will get the achievement. Be sure to periodically revisit Scarlet Chorus Camp and Disfavored Camp in Act I and talk to any pair of characters you see. In Act II, be on a lookout for any pair of characters in every area – there are a lot of disputes happening in Lethian’s Crossing, Halfgate/Plainsgate, Cacophony, Iron Hearth and so on.


Made To Be Broken
Break all of Kyros’ Edicts.


There are three Edicts and you need to break them all.
  • Edict of Fire – it will be broken when you acquire the Silent Archive, whether you replace it with another artifact, throw it into lava to destroy it or just take it.
  • Edict of Stone – it will be broken if you kill Cairn by any means (either by destroying the Disfavored totems or by allowing the Disfavored to do their ritual). The Edict will not be broken if you ally with Stonestalkers on Rebel Path (as they want to keep Cairn alive).
  • Edict of Storms – it will be broken when you end the Regent line, whether by killing Amelia’s baby or by telling Amelia that she can just give up succession rights in her daughter’s name. Edict will not be broken though if you send Amelia and the baby to the Voices of Nerat on the Chorus Path.
This is the easiest to do on Anarchy Path as you do main quest in all four areas, on other Paths you can only do three out of four. You can also do it on Disfavored Path and Chorus Path if you chose not to go to Lethian’s Crossing main quest. This is not possible on Rebel Path as you have no choice there – you have to go to Lethian’s Crossing main quest.


Perceptive
Discover 25 hidden objects.


Hidden objects are discovered when you are close to them and your Subterfuge skill is high enough. If you are sneaking, the Subterfuge skill requirement is lowered. But sneaking in Tyranny is so painfully slow that I would not recommend it to my worst enemy. Just keep Subterfuge decently high on one of your party members (60 is high and no reason to raise it higher than 71) and be sure to explore every area fully, and you will have no trouble discovering 25 objects.
68 Comments
𝐀𝐍𝕘𝑒𝕃คʎคW☯ 13 Sep, 2024 @ 11:07am 
:mb2spark::bluevoidheart::heart_blue::bluevoidheart::DonaldToad::bluevoidheart::heart_blue::bluevoidheart::mb2spark:
:heart_blue::mb2spark::mb2spark::mb2spark::heart_blue::mb2spark::mb2spark::mb2spark::heart_blue:
:bluevoidheart::mb2spark::mb2spark::mb2spark::mb2spark::mb2spark::mb2spark::mb2spark::bluevoidheart:
:heart_blue::mb2spark::mb2spark::mb2spark::mb2spark::mb2spark::mb2spark::mb2spark::heart_blue:
:DonaldToad::bluevoidheart::mb2spark::mb2spark::mb2spark::mb2spark::mb2spark::bluevoidheart::DonaldToad:
:DonaldToad::DonaldToad::heart_blue::mb2spark::mb2spark::mb2spark::heart_blue::DonaldToad::DonaldToad:
:DonaldToad::DonaldToad::DonaldToad::bluevoidheart::mb2spark::bluevoidheart::DonaldToad::DonaldToad::DonaldToad:
:mb2spark::DonaldToad::DonaldToad::DonaldToad::heart_blue::DonaldToad::DonaldToad::DonaldToad::mb2spark:
jahlis 7 Apr, 2024 @ 6:22am 
it's a shame Eternal Suffering is only obtainable with the Brotherhood. I didn't even think about recruiting them, the Forgebound made more sense to me.
Kurak 4 Mar, 2024 @ 9:25am 
"Eternal Suffering":
I managed to unlock this despite the fact that I'd left the Scarlet Chorus in charge of Lethian's Crossing during the Conquest.
I simply did my best to be nice to the Bronze Brotherhood afterwards, i.e. did NOT kill Raetommon when I first met him; instead I spoke to Welby who said how she'd do things differently. Later on, when chasing after Raetommon with the helmet, I helped Welby and the Bronze Brotherhood when I could. I was still able to choose the Bronze Brotherhood over Forgebound just fine.
Kurak 4 Mar, 2024 @ 9:21am 
"Bane of the Crossing":
I unlocked this on my Rebel playthrough by retrieving the helmet and giving it back to Eldian -- it looks like a bug, I guess.
mojave_wastelander 23 Aug, 2022 @ 12:51pm 
PoTD in Tyranny is very unbalanced thanks to combat system and unreasonable stats for most enemies. Either you need a team with high damage or stacking heavy debuffs (freeze, daze etc.), most fights are impossible without proper healer because enemies do insane damage and you don't get to have enough armor until Act 2 and forge upgrade.
But most obvious bs is the AI, enemies will disregard any zone of control and go straight for your your backline, thus keeping Landry/Sirin alive early in the game is hard. Even better if you choose anarchy you need to have 2 fights in a row at first spire, so if you fail you need to start over.
POE and POE2 are much easier on PoTD as there defense and accuracy are pretty straight forward compared to heavy RNG system used in Tyranny. POE2 also has mods and most important programmable tactics which with proper settings will make many fights to play themselves as you don't need to manage the party.
fabula_rasa  [author] 6 Aug, 2022 @ 5:31pm 
@vokiel "It's an Obsidian game, you need to do this on every one of their dumb titles."

I disagree. In both parts of the Pillars of Eternity PotD could be finished with many classes, builds and combinations. There was not "that one and only build that worked", as there isn't here. It's about using your resources to the fullest, combining them well and playing it smart, whatever class you go for. And of course the first act is always the hardest.

Now, PoTD solo in PoE is a whole other story - your choices here are more limited. However, even here there is not one and only build that works, as shown by many people finishing it with myriad of classes.
vokiel 6 Aug, 2022 @ 5:27pm 
Yes, but is the difficulty curve on PoTD affected by it?
Baraz 6 Aug, 2022 @ 5:21pm 
@vokiel
Bastard Wound adds quests for your companions.
It adds an area that is optional, so you do not have to do everything there. Most companion quests are not related to that optional area.

I am not sure why you see that DLC (which should have been a free addition) as a problem.
vokiel 6 Aug, 2022 @ 4:13pm 
Challenging?? It's not supposed to be as per this guide.

"And you do not need to have a perfectly min-maxed character, play “that one and only class that works” or do that one specific thing in the Conquest."

If it's not auto-death, it'll be as soon as you reach the Ascension Hall fight. For the rest if I couldn't disable Party AI, which is just plain atrocious, and bait/kite enemies I wouldn't even have passed Echocall Crossing!!

This guide just gets it wrong, intentionally! My guess is laziness, which is fine. YOU DEFINITELY NEED TO FIND THE PERFECT COMBINATION for PoTD. Here, was this so hard to say? It's an Obsidian game, you need to do this on every one of their dumb titles.

So now I'm looking to find the perfect combo skill tree with the perfect class and have a perfect progression path, because otherwise my party gets wiped by kittens. ... lmao

Q: You have Bastard Wound installed? Maybe I should remove it.. Could be a big difference.
Baraz 4 Aug, 2022 @ 8:23pm 
@vokiel : I too often react negatively to players who claim games are easy, etc. The first act is challenging for sure, but is not auto-death either (you have to micro-manage every action and have companions). I believe I had a casualty on my first battle. I played as a caster/healer also, using some defensive gear nonetheless. Once I found Barik it was of course easier, not to mention more powerful crowd control spells!

I would not say the game balance is crap because it was hard in act 1. I was using the Hard difficulty (described as for veterans of CRPGs). The majority of CRPG I played were crazy deadly the first few battles. In Icewind Dale 1, my very first fight, a Goblin killed my paladin, leader of my party! Bloody rough start and a blow to the morale of my party. :P