The Tenth Line

The Tenth Line

Not enough ratings
How-to Guardbreak and juggle for maximum combat damage
By Enfys Ellezard
A quick guide that focuses on the more advanced combat mechanic of the game "The Tenth line" that aims to teach the reader how to utilize the guard breaker mechanic along with the critical attacks (Juggling) in order to maximize their damage to defeat difficult foes much easier.
2
   
Award
Favorite
Favorited
Unfavorite
Introduction
While it looks simple at first glance, "The Tenth Line" actually has a rather high skill floor and learning curve that most players will have trouble with.

In this guide, you will learn about two different mechanics that are very crucial in order to defeat stronger foes in this game and to maximize the power of your characters' skills.

Guard breaking

And

Juggling

The guide will not focus on any other mechanics like the "Training" and "Specialization". This will focus purely both Guard breaking and Juggling and how to combo with them for the best possible damage output in a single turn.
Understanding your skills
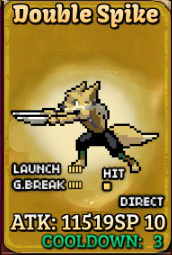
Before I start explaining what guard breaking and juggling are, it's best to learn about what your skills can do first beside dealing damage. Here are a few attacks in the game.


On your skill, you will find

1) The skill name
2) The amount of Hit
3) How powerful is the Launch power is
4) How powerful is the guard breaking power is

5) Current damage based on your atk (enemies' defense not included)
6) Amounts of hit

And based on the picture

7) The element of the attack

For this guide, the most important thing to look out for are the bolded #3 and #4.
Launching and Guard breaking
Guard breaking

In this game, some enemies and bosses will put up their guard when you start your first attack.


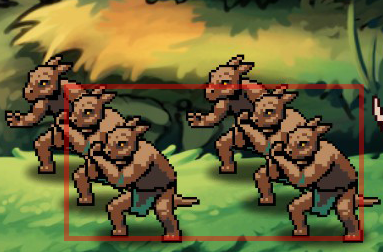
As you can see in the picture, the enemies in the red box are currently guarding.

Enemies that are guarding will receieve a significantly reduced amount of damage until the guard is broken.

In order to deal your normal damage, you must first break your enemies guard.

Enemies that have been afflicted with Hinder will not put up their guards (shown by the orange colored hued when Hinder is applied) so use this to your advantage to set up for the strongest AoE wipe on the next turn.


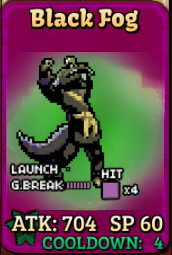
As you can see on the Black Fog card, the skill has a power of 7 after a total of 4 hits. This move will destroy a lot of guard with ease and leave your enemies defenseless when they are hit enough time that the total guard break power accumulated from each hit is enough to break though.

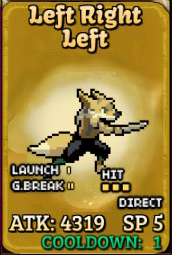
However, Left right Left has almost no guard break power at all and using all the hits on the a guarded enemies might not even break the guard.

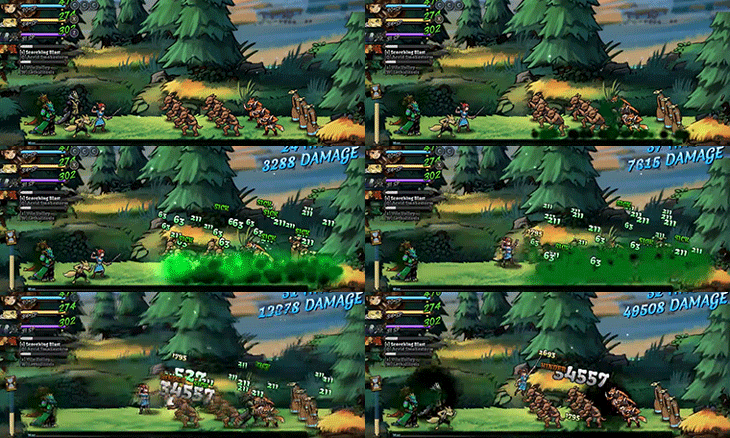
Always start your combo with a high G.Break power attack (Or a quick attack to an assist) before you use any of your powerplay move such as the gif below


Launch

Refer back to the same Gif. Can you see the giant number that appear during all the damage? Attacking enemies that are knocked into the air will result in a critical hit, greatly increasing the amount of damage you are dealing.

This is what the Launch power is for. The higher the card launch power is, the higher the attack will knock the enemies into the air.
It doesn't matter how high you knock enemies up into the air. The crit multiplier is the same. Higher launch power just make it easier to confirm a critical attack.

Should the player just button mash while something is in the air to deal a bunch of damage? THe answer is... No. This will be explained in the next section on how critical attack really works and how to use it.
Critical Attacks and Juggling
Now we are getting to the hard part of the damage dealing! Juggling.

When you hear the term "Juggling", it usually involves attacking an enemy while they are airborne and keeping them in the air for as long as possible. It's the same here as well...but with a special rule.

You must alternate between attackers as you are juggling to get the most damage.

Let me first explain how the critical attack in this game really works based on the explanation given by the dev (Sungazer Software)

Everytime a hit is made by your side, the game will keep track of the game "Last attacker" based on who deals the last instance of damage.

So for example, if you hit someone with The Princess, the game will say "The princess is the last attacker!".

This includes multiple hit skills like The Princess' Air whips that hits 4x.

-If you hit an enemy with the Air Whip, The princess will be marked as the last attacker.

-If you then hit someone with Rik while the air whip is still in effect, Rik will be marked as the last attacker.

-if Rik's attack happen before the 4th hit of Airwhip deals damage, The princess will be marked as the last attacker again when the last strike hit as the Air whip's 4th hit is the last instance of damage caused by your team.

Here's one restriction for critical hit that you should know.

The person who is the last attacker CANNOT land a critical hit.

And in this game, to land a critical hit, you must attack an enemy while that enemy is airborne.

So when you combine them together, you get the following rule for juggling and landing multiple crit.

In order to land multiple critical hits, you must attack an enemy while it is airborne because of another character and then alternate between attackers to get as many hits as possible while it is still airborne
Juggling in action
Now with the explanation out of the way, let's show what it looks like in actual combat.

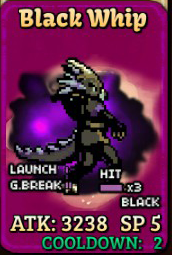
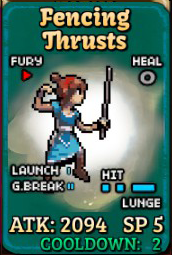
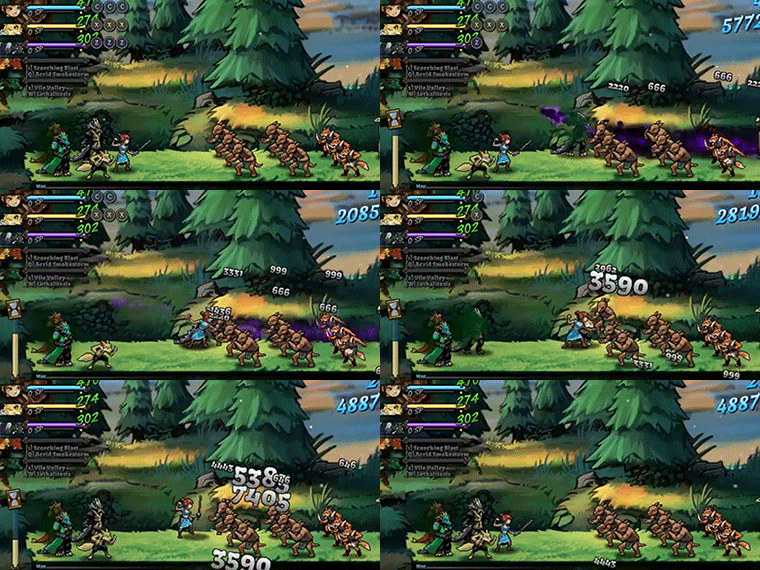
Here's the basic combo using Black whip -> Fencing Thursh -> Left Right Left


Start off with the Black whip as a potential guard breaker.
Follow it up by the first hit of Fencing Thrust in an attempt to lift the enemy. (Princess Last Attacker)
Follow it up by first hit of Rik's LRL in an attempt to help knock the enemy up and score a critical hit. (Rik last attacker)
Follow it by the next hit of Fencing Thrust for a critical hit. (Princess Last Attacker)
Follow it by Rik's next hit for another critical hit. (Rik Last attacker)
Follow it by the Princess. (Princess last attacker)
Follow it by Rik as the last hit. (Rik last attacker. End of turn)


You can see many giant numbers in the gifs showing multiple crit attacks in one combo. If executed flawlessly, there will be even more large numbers on the screen and you can even do this with more powerful attack with moves like.


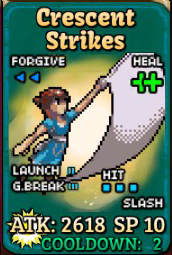
Crescent strike has a lot of launch (3x hits at 2-box launch power each) and guard breaking power making it a very strong boss killer when used with something like Tox's Geyser and Rik's Double Spike/Flame dash/Super-boosted 3x Piercing Knife
Conclusion and golden rules
That's pretty much it with the juggling and guard breaking mechanic in this game. To make it easier to learn, just remember the following golden rules.

Always start off with a strong guard breaking move even if it deals little damage compared to the other attacks.

Keep your enemies in the air

Alternate between attackers while the enemies are in the air for as many crits as possible

Use assists for guard break, not for damage (especially in the NG+ run and end-game contents where assist deal way too little damage)

Hinder is insane to apply on group of enemies before you use your best moves on the next turn . Vax is the best assist in the game because of this and his group attack + hinder
6 Comments
bruhmanfromthefifthfloor 6 Mar, 2020 @ 8:54am 
great guide, thanks for taking the time and doing this.
Pudding's Emporium 29 Mar, 2017 @ 8:06pm 
I had no idea juggling even existed, i used to just mash bottom to attack
rosedragon 28 Mar, 2017 @ 11:34am 
I finished the game with neglecting guard breaking and juggling xD ....
Space Lizard  [developer] 27 Mar, 2017 @ 3:58pm 
Actually, the one that guards is the Crimson Crawler , and that's an optional boss. You'll start running into shield-bearing "protectors" toward the end, though, so guard-breaking is still handy to have!
Enfys Ellezard  [author] 27 Mar, 2017 @ 1:52pm 
Good luck with your playthrough. One thing to mention is that based on the Dev comment in one of the threads, only one boss should be able to guard (and it's likely the green one). The rest are just naturally tanky so you will have to focus more on juggling over guardbreaking for that one.

However, for wiping the floor of the stronger mobs especially in Chapter 5 boss fight (usually any shield bearer), guard breaking will still be a thing to go for.
AndrewBagel 27 Mar, 2017 @ 1:49pm 
Thanks for taking the time to write this up! I'll have to try out using guard breaks more (I've been mostly going for raw damage).