Danganronpa 2: Goodbye Despair

Danganronpa 2: Goodbye Despair

86 ratings
Magical Miracle Girl ★ Monomi - Walkthrough
By Derpovic and 1 collaborators
This walkthrough focus on the minigame in Danganronpa 2: Goodbye Despair, and gives detailed informations about the gameplay, the items, tips how to play it and much more. If you found the guide to be helpful please rate it!
   
Award
Favorite
Favorited
Unfavorite
Introduction
Danganronpa 2: Goodbye Despair offers next to the main mode and the bonus mode 'Island mode' a minigame, called Magical Miracle Girl ★ Monomi where you play Monomi on her way to defeat the Monobeasts parallel to the respective chapters for each Monobeast. That means you'll have to clear the main mode first to have all chapters for Magical Miracle Girl ★ Monomi unlocked. For this guide I'll go in detail for the following sections of the game:

  • Controls
  • Gameplay
  • Mechanics
  • Stats
  • Items
Menu Selection
So for first you can choose between English or Japanese langauge for the voices of the characters, whatever you prefer more:
 
Now entering the Select Stage menu you can choose between the available stages, the Equipment menu, the Help menu and to save your progress. You can go back to the Title Screen pressing ESC or the Back Button (Gamepad users):
 
In the Equipment menu you can customize your weapon, your ribbon and your diaper. They determine your stats that makes Monomi stronger and you will find new equipment parts while playing. You'll start with the items shown below:
 
The Help menu shows the key configuration and by pressing the E key it even explains you the game mode. So at this point: WHY DO YOU BOTHER TO READ THIS GUIDE?
 
Controls (Gamepad Users)
Now let's take a look at the controls: The Help menu shows you the controls for keyboard users. While some users (and I) prefer to play on a gamepad I will explain the control for gamepad users (I am playing with a Logitech Gamepad so it may vary for you, anything else should be the same!):

  • Directional pad - to move Monomi/Usami
  • B button - to jump
  • X button - to run and draw a Magic Circle - probably the most used attack method while playing (there are just two though..) / After jumping press the button to do a Whirl Attack.
  • RB button - to transform into Usami, the actual form of Monomi.
  • Start button - to open the Pause menu.

Aside of that, I am pretty sure you have figured out the controls for the menu so I don't bother to explain them again. :P
Gameplay
So now, let's play the first Level. Before you start you can choose between three difficulties: Easy, Normal and Hard. The only two (significant) differences between the difficulties are the equipment drop tables and the damage taken/dealt from enemies; there's no changes like improved enemy AI or different wave layouts. As well, for every difficulty you have your own high score, so if that sounds like something you want to do, this game mode is perfect for you!
HUD

So here we are! Let's kick some Monobeast butt! The HUD is very minimalist: Your HP is shown as the heart on the left upper side, next to it you have your high score (shortend: HIGH) and your current score in this playthrough. On the upper right, you have a timer - while I can ensure you'll never ever run out of time unintentionally since the level doesn't take longer than ten minutes each (like, if you are REALLY slow and have no equipment) and even then you can find items which gives you some extra time so it's almost impossible unless you force it. At the bottom left your Usami gauge is shown. on the bottom right is your combo counter which counts up for every hit you land, increasing your score and fading after a few seconds. And last, your current wave will be shown at the bottom after finishing the previous one.
 
How to fight:

You have two modes of attack:
  • Your Magic Circle requires you to "draw" a circle on the ground while running. Enemies caught in the ensuing tornado/tree/spikes will be knocked into the air and take damage.
 
  • You can jump on your enemies (à la Mario), at which point you can take the interaction two ways: you can do nothing, which in most cases will stun the enemy, leaving them open to Circle attacks; or you can do a Whirl Attack , which requires you to hit the run/button immediately after landing on an enemy, dealing damage roughly equal to 2 ticks of a Magic Circle attack. Whirl Attacks can be a risky maneuver as the timing is somewhat strict and doing one locks your aerial movement for a large duration of your jump. However, well placed Whirls can be very useful in taking the armor of the large enemies.

    It is also worth mentioning that you can't jump on the spiny needle launching enemies for some reason.
 
Usami Gauge and Stamina:

Normal Monomi has a Stamina bar that is hidden from the player. You run for a total of ~7 seconds with sweat droplets popping out of Monomi at around 5 seconds. If you run out of Stamina, you'll be stuck completely immobile, leaving yourself open to attack. Stamina regenerates more quickly than it is used, so be sure to take your foot off the gas for a second or two to replenish if your going to make a big maneuver.

When the Usami gauge is at 100% you can activate your Usami transformation, increasing your Magic Power and giving you infinite Stamina. However, you cannot jump on enemies, meaning you also can't do Whirl Attacks.

And this is pretty much everything you have to know about the gameplay. As simple as it sounds, it can sometimes be frustrating to nail the enemies down.
Mechanics
The most annoying mistake are too small circles, caused if you have not enough room to draw a proper circles, results to have a cross instead and doing nothing.
 
Another mistake which can happen to you is missing your target if you plan to do a Whirl Attack, or if you miscalculate the movement of your enemy since some use dash attacks to hit you and they may dash out of your circle. Especially for Speedrunning this game mode requires some time to master without getting smashed by these Monobeasts.

Lastly, if you're running as Usami, do NOT stay in the near of enemies since you cannot do anything while transforming back to Monomi which makes you vulnerable. The animation proceeds instantly when the Usami gauge reaches 0% so it will also stop your attacks.
 
As many things you should avoid, the same you have tactics and mechanics you should use to knock down a bunch of enemies:
  • Using a Whirl Attack on an enemy while some other are standing near enough cause AoE (area of effect) damage so if your strenght is high enough you may beat many Monobeasts with one Whirl Attack - without even jumping on them!
 
  • Use your Usami transformation reasonably - if you haven't found good equipment so far, then you should follow that suggestion. Keep it for the bosses of every level or for the annoying Monobeasts.
  • Talking of the Usami gauge - you can farm the counter up by soft jumping on Monobeasts, they do less damage but gives the same amount of percentage to fill. If you think you're close to a boss, just farm a bit - you have enough time.
  • A tactic which is a bit risky to use is to damage boost yourself if you have to rest because you have no more stamina. Being hit while you rest makes you move again so it could be helpful if your enemy is almost beaten. However, use this with caution!
  • Bosses do always spawn at the mid of the map and have a short spawn animation - great oppoturnity to prepare one or two Magic Circle(s). Since they don't move while they're attacked you have enough time to damage them and to take enough distance of them without taking any damage.
Stats
You have four stats: Magic Power, Strength, Defense and Usami.

  • Magic Power (MAG) increases the strength of Magic Circles attacks.
  • Strength (STR) increases the strenght of your Whirl attacks.
  • Defense (DEF) determines how much damage an enemy does on you.
  • Usami is the stat to determine how long the duration of Usami's transformation is.

Weapons increases Magic Power, Strength and Usami mostly, Ribbons increases Magic Power mostly and Diapers increases the Defense primaly. There are more equipment parts which improves all stats or gives you special perks:

  • Gold Rush (Weapon) - Increases the drop rate of Gold Bars slightly.
  • 2 Tax Gold (Ribbon) - Doubles the drop rate of Gold Bars.
  • Old Man's Grass Skirt (Diaper) - Increases the drop rate of Present Boxes slightly.
Items
If you beat an enemy they have a chance to drop items which can help you in various ways. The few items below are listed what purpose they have and how they are used:

Milk:
Recovers a small amount of HP, around 150~200 HP.


Cookie:
Recovers a decent amount of HP, around 350~400 HP.


Monomi Doll:
Increases the Usami Meter by 10%.


Stopwatch:
Increases the timer by 30 seconds.


Gold:
Gives you some extra points, between 1000 ~ 5000. Also you can get some extra Monocoins when you clear the stage, based on the amount of gold you obtained.


Present:
Gives you a random equipment item, depending on the level and difficulty the chances vary. For a detailed list, please check the equipment list below.


Weapon
  • Wooden Branch: Starting equipment.
  • Sturdy Branch: Appears in Stage 1/Secret on Easy/Normal.
  • Bamboo Broom: Appears in Stage 1/Secret on Easy/Normal.
  • Souvenir Wooden Sword: Appears in Stage 1/2/Secret Stage on Easy/Normal.
  • Wash Line Pole: Appears in Stage 1/2/Secret Stage on Easy/Normal.
  • Carpenter’s 2×4: Appears in Stage 1/2/3/Secret Stage on Easy/Normal.
  • Sacred Tree Branch: Appears in Stage 1 on Normal/Hard Stage 2/3/Secret on Easy/Normal.
  • Barbed Wire Bat: Appears in Stage 1 on Normal/Hard and Stage 2/3/4/Secret on Easy/Normal.
  • Witch’s Broom: Appears in Stage 1 on Normal/Hard, Stage 2 on all difficulties and Stage 3/4/Secret on Easy/Normal.
  • Summer Carnival: Appears in Stage 1 on Hard, Stage 2 on Normal/Hard, Stage 3 on Normal and Stage 4/5/Secret on Easy/Normal.
  • Bartholomew: Appears in Stage 1 on Hard, Stage 2 on Normal/Hard, Stage 3 on Normal and Stage 4/5/Secret on Easy/Normal.
  • Rayxanber’s Rod: Appears in Stage 2 on Hard, Stage 3 on Normal/Hard and Stage 4/5/Secret on Easy/Normal.
  • Topsy Turvy: Appears in Stage 2 on Hard, Stage 3 on Normal/Hard, Stage 4 on Normal and Stage 5/Secret on Easy/Normal.
  • Pink Bomb’s Rod: Appears in Stage 3 on Normal/Hard, Stage 4 on Normal and Stage 5/Secret on Easy/Normal.
  • Master Rod: Appears in Stage 3 on Hard, Stage 4 on Normal/Hard, Stage 5 on Normal and Secret Stage on Normal.
  • Gold Rush: Appears in Stage 3 on Hard, Stage 4 on Normal/Hard, Stage 5 on Normal/Hard and Secret Stage on Normal.
  • Meteor Rod: Appears in Stage 4 on Normal/Hard, Stage 5 on Normal/Hard and Secret Stage on Normal.
  • Vanquish: Appears in Stage 4 on Hard and Stage 5/Secret on Normal/Hard.
  • Despair Rod: Appears in Stage 4 on Hard and Stage 5/Secret on Normal/Hard.
  • Seventh Sea Hope Rod: Appears in Stage 5/Secret on Normal/Hard.


Ribbon
Monomi’s Ribbon: Starting equipment.
Freshman Ribbon: Appears in any stage on Easy difficulty.
Polka Dot Ribbon: Appears in any stage on Easy difficulty.
Red & White Headband: Appears in any stage on Easy difficulty.
Camellia Hairpin: Appears in any stage on Easy difficulty.
Bunny Ears Headband: Appears in stage 3 and above on Easy difficulty.
Feather Scrunchy: Appears in stage 3 and above on Easy difficulty.
French Twist Ribbon: Appears in stage 4 and above on Easy difficulty.
Bride’s Veil: Appears in stage 3 and above on Easy difficulty, as well as in most Normal difficulty stages.
Gold Brocade Ribbon: Appears in stage 5 and Secret stage on Easy or Normal difficulty.
Pop Star: Appears in stage 4 and above on Easy difficulty.
Melancholy Ribbon: Appears in the Secret stage on Easy difficulty, as well as in most stages on Normal difficulty.
2 Tax Gold: Appears in stage 5 and Secret stage on Easy difficulty, and in most stages on Normal difficulty.
Magical Ribbon: Appears in stage 5 and Secret stage on Easy difficulty, and in most stages on Normal difficulty.
BPM: Appears in every stage on Normal difficulty, as well as in stage 3 on Hard difficulty.
Silver Rabbit’s Ribbon: Appears in stage 5 and Secret stage on Normal difficulty, as well as in most stages on Hard difficulty.
Swallowtail: Appears in stage 5 and Secret stage on Normal difficulty, as well as in most stages on Hard difficulty.
Mercurius: Appears in stage 5 and Secret stage on Normal difficulty, as well as in most stages on Hard difficulty.
Despair Ribbon: Appears in stage 5 and Secret stage on Normal difficulty.
Autumnal Hope Ribbon: Appears in stage 5 and Secret stage on Normal difficulty, as well as in most stages on Hard difficulty.


Diaper
Monomi’s Diaper: Starting equipment.
Crawley Diaper: Appears in any stage on Easy difficulty.
Aquatic Diaper: Appears in any stage on Easy difficulty.
Copyrighted Diaper: Appears in any stage on Easy difficulty.
Wool Pants: Appears in stage 4 and above on Easy difficulty, as well as in most stages on Normal difficulty.
Holy Diaper: Appears in stage 2 and above on Easy difficulty.
Premium Diaper: Appears in stage 3 and above on Easy difficulty.
Old Man’s Grass Skirt: Appears in stage 3 and above on Easy difficulty.
Stealth Scanties: Appears in stage 4 and above on Easy difficulty.
Normal Undies: Appears in the Secret stage on Easy difficulty, as well as stage 5 on Normal difficulty.
Cattle Trunks: Appears in stage 4 and above on Easy difficulty.
Briefs of Resolution: Appears in stage 4 and above on Normal difficulty.
Ante Panties: Appears in the Secret stage on the Easy and Normal difficulties.
All or Nothing: Appears in the Secret stage on Easy difficulty, as well as stage 5 on Normal difficulty.
Ruler’s Underwear: Appears in stage 5 and above on Normal difficulty.
Bayonet Bikini: Appears in the Secret stage on Normal difficulty, as well as in stage 3 and above on Hard difficulty.
Orthodox White: Appears in stage 5 and Secret stage on Normal difficulty.
Mystery Cruise: Appears in the Secret stage on Normal difficulty.
Despair Diaper: Appears in the Secret stage on Normal difficulty, as well as stage 4 and above on Hard difficulty.
Hope Cloth Beam 1000: Appears in stage 5 and Secret stage on Normal difficulty, as well as in the Secret stage on Hard difficulty.
Achievements
You can unlock two achievements over this mode:
 
A Magical Ending
Cleared all stages of Magical Miracle Girl Monomi
 
 
Monomi Won't Miss These, Right?
Collected every possible item in Magical Miracle Girl Monomi

15 Comments
Kamibra12 19 Jul @ 4:11pm 
thanks bro.
Bermuda Blob 2  [author] 29 Jun, 2021 @ 3:52pm 
Sorry for a late response. This guide is pretty out of date and is in many ways not reflective of current knowledge of the game. An accurate drop table that I made can be found @ https://danganronpa.fandom.com/wiki/Magical_Girl_Miracle_%E2%98%85_Monomi .

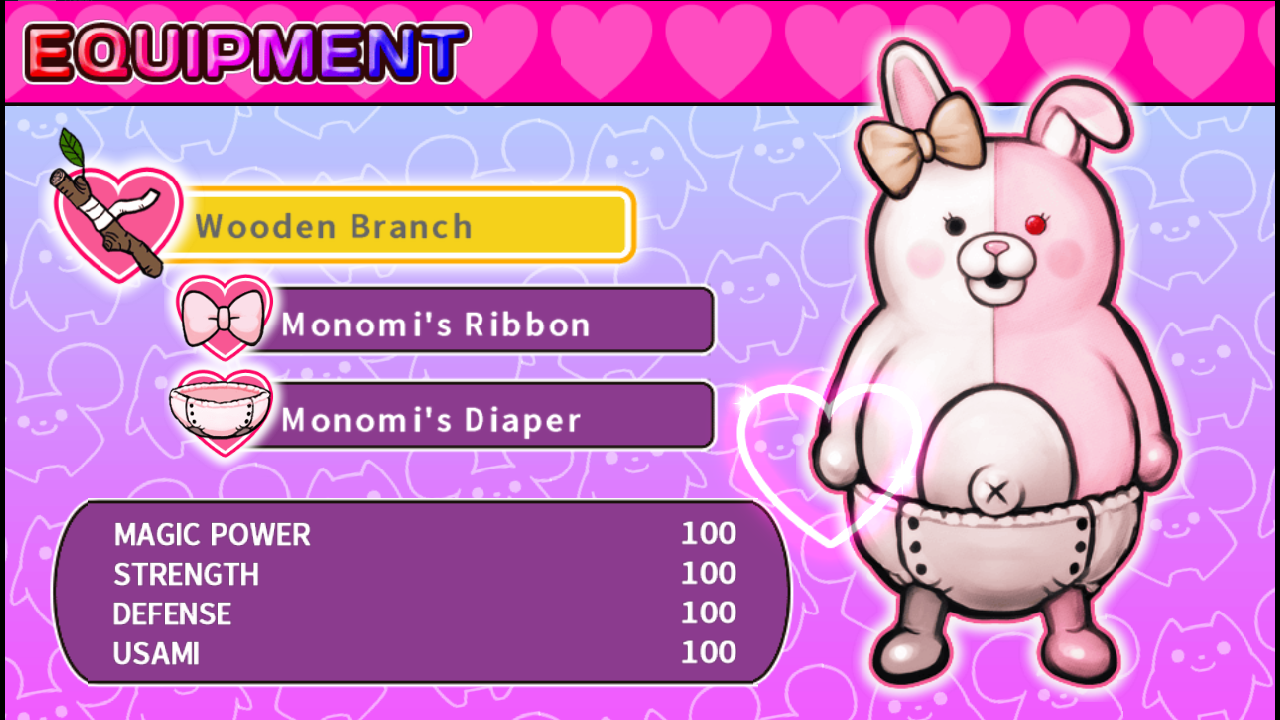
If that item is still the one thing keeping you from getting the achievement, I'd recommend going to Secret Stage on Hard with the highest Magic equipment you have + Old Man's Grass Skirt and just repeating Wave 1 (like this https://youtu.be/gNXiQBIq8yY?t=826 ).

My apologies for leaving this guide in the state it is. Fixing it was a project that was abandoned a while ago.
leona 27 Jun, 2021 @ 7:56am 
I will do anything for the Despair Diaper...
Bermuda Blob 2  [author] 31 Jan, 2021 @ 2:39pm 
Usami makes you invulnerable and makes it so that your circles do 50% more damage. However, it also removes your ability to jump on enemies.
BillyGreen 31 Jan, 2021 @ 6:45am 
What does turning into Usami actually do? As far as I can tell it makes no difference at all.
Bermuda Blob 2  [author] 19 Nov, 2019 @ 7:49pm 
Have you finished stage 3? That would probably be simplest explanation.

If you have, could you share your save file with me over discord?
xanderwhovian 19 Nov, 2019 @ 10:05am 
Hey, i've finished chapter 4, but stage 4 hasn't unlocked, and i have no idea why.
Bermuda Blob 2  [author] 2 Sep, 2019 @ 4:42am 
Hey MakoSipper, I was the one who made the updated guide on the wiki. HungryKronos on speedrun.com . If you want to help me and Slowpoke with updating this guide, feel free to join the DR speedrun discord and we can discuss further there.
MakoSipper 31 Aug, 2019 @ 3:29pm 
Here's the link to the spreadsheet tool. Users need to make a copy before using it. Feel free to add it to your guide.

https://docs.google.com/spreadsheets/d/1_SGL4LPIbNXvaYd2CNZUTmSMiwi9Xl3HVHpgxWz3OhE/edit?usp=sharing
MakoSipper 30 Aug, 2019 @ 12:00pm 
I've posted something about different magic types here, in case you're interested: https://gtm.steamproxy.vip/app/413420/discussions/0/1637542851360763783/

I'm also working on a GSheets tool that will help collect all the equipment. Here's a preview, maybe you'll want to add a link to your guide later:
https://i.imgur.com/IX1A8K5.png