Factorio

Factorio

1,127 ratings
Seamless Space-Saving Blueprints (18x18 tiles)
By ChrisG😎
Many examples how to build on a very small place only using the substation range of 18x18 tiles.

!!! For Experimental Version v0.15.x !!!

Latest Update: (05/014/17) v0.15.x Added new Chapter Uranium Production with seamless Example
11
3
5
12
3
2
3
2
   
Award
Favorite
Favorited
Unfavorite
Take Note!

Try to build on a 18x18 tiles grid from the beginning and don't set other stuff inside your first setup until you are able to upgrade.

This is the best way to use your space efficient and just update your production from the beginning to the end instead of completely rebuilding it.

Also take note that all blueprints can be turned in 90 degree steps to work from left to right, top to bottom, or bottom to top.
My examples are mostly made from right to left.
Stone Furnace (Beginning)
Let's start with a simple 18x18 Furnace setup. The Iron/Copper Ore and the coal line coming from the middle right of the grid and goes to the left.
You can easily upgrade your production by placing more of this setting on the left or right side. (Seamless)

Info: I have used Long Handed Inserters for the outcome materials cause i want the outer belts on the same height as the Electric Furnace Setup for easier upgrading.

Stone Furnace Blueprint[www.chrisgpoint.eu]


As you can see in this example the iron plates going to the upper and lower side of your 18x18 grid and can be seamlessly attached to the next part.


Well, that was easy right? Now let's check out the midgame setup.
Steel Furnace (Midgame)
Since the melting is the most important part i will show you how to perfectly use your 18x18 grid for the Steel Furnace.

Steel Furnace Blueprint[www.chrisgpoint.eu]


There is no big difference to the stone furnace.
This setup just uses different belts/ inserters and electric poles.
And again, it's fully seamlessly upgradable.


Much faster but nothing against the Electric Furnace and the substation we use in the Endgame.
Electric Furnace (Endgame)
Now, that's it. You unlocked the substation? The Electric Furnace? Yes?
Then we can finally build space saving setups.

First Example is the highest furnace form, the Electric Furnace.
Negative is, it needs electricity.
Positive is, we don't need the coal line anymore.
Negative is, it's not faster as the Steel Furnace.
Positive is, you can use modules on it to speed it up.
Electric Furnace Blueprint[www.chrisgpoint.eu]


As you can see i used beacons around the 18x18 grid.
You can easily copy the setup and it will fit perfect seamlessly on all 4 sides.

Now you've got a good space saving melting production and you only need 1 substation per 18x18 grid and no other electric pole is needed.

In this example you can see how it looks like if you have 4 setups seamlessly conntected.
All the electricity comes from substations only.


In the next parts i will show you many examples how to build other production lines on this smallest possible grid.
Other Furnace Usage
Same setup as in the previous part, you just have to change the income material.

You see i use the same setup, i just set the income line to iron plates and i will get steel plates.

Of course, you can also use it for stone to bricks, copper ore to copper plate... etc.

In this example you can see how you can switch the belts from outer to inner sides.
Assembling Machine (1 Income)
Now the fun part. This arrangement is also compatible to assembling machines.
What a surprise!!!

Here the Basic Assembler Setup Blueprint.
Assembler Basic Blueprint[www.chrisgpoint.eu]
Just replace the furnaces with assembling machines and it ... it just works... AMAZING!
Fully seamlessly aswell!!!

Example 1: Iron Gear Wheel
Income: Iron Plate


Example 2: Copper Cable
Income: Copper Plate

That wasn't so hard right?

Let's go to the next part then...
Assembling Machine (2 Income)
Now it gets complicated... naaah, not really.

A 2 item income line? That's so easy since you already got 2 ingoing lines.
You just need to choose which one gets which item.

Then just place 12 Long Handed Inserters between the middle inserters.
So every assembling machine can reach both lines.

Example: Shotgun Shells
Income: Iron Plate/ Copper Plate


You could also craft 2 items if they share the same income materials.

Example: Shotgun Shells (Upper Belts) and Pistol (Lower Belts)
Income: Iron Plate/ Copper Plate
Assembling Machine (3 Income)
Are we already at 3 items incoming lines?
Yes, we are!

It's not very complicated, you just have to check which item you need most
and this one should get the full line, the other 2 items have to share the other line.

Don't forget, it's still fully seamlessly.

Example: Piercing Rounds Magazine
Income: Regular Magazine/ Steel Plate/ Copper Plate
Assembling Machine (4 Income)
That's the most complicated part. So listen carefully.
Instead of only 1 line which has to store 2 items it needs to be both lines. :O

Ya, that's too easy for you, i know.... :/

Example: Stack Inserter
Income: Iron Gear Wheel/ Electronic Circuit/ Advanced Circuit/ Fast Inserter


You think that was too easy for you?
Then check out the next part and see how to get fluids into your assembling machine.
Assembling Machine (Fluid Income)
How to deal with that less space and fluids? It's not easy, but still possible.

Negative effect is, you have to remove the top and bottom beacons to get space for the pipes.
Positive is, you can still use modules inside the assembler if needed.

Here the Basic Assembler Fluid Setup Blueprint.
Basic Assembler Fluid Blueprint[www.chrisgpoint.eu]

Example: Processing Unit
Income: Electronic Circuit/ Advanced Circuit/ Sulfuric Acid


The Sulfuric Acid source can be placed on the top and bottom or left and right of the grid.
Also it is still a seamless build.


That was the basic build ups. Let's see the next parts.
Solar Panels/ Accumulators
This section shows how to use the substation 18x18 grid for solar panels and accumulators in a separate way and in combination. The Concrete Underground is optional.

Example 1: Solar Panels separate
Positive: You still have a path to walk between your Solar Park. And again, it's seamless.


Example 2: Accumulator separate
Positive: Full usage of the 18x18 grid and perfect seamless.


Example 3: A combination of Solar Panels and Accumulator.
Solar Panel Combi 1 Blueprint[www.chrisgpoint.eu]
Postive: Full usage of the 18x18 grid and seamless connection to the next part.


Example 4: Another combination of Solar Panels and Accumulators.
Solar Panel Combi 2 Blueprint[www.chrisgpoint.eu]
Positive: Full usage of the 18x18 grid and nearly optimal ratio between solar panels and accumulators. And seamless connection to the next part.
Oil Refinery + Production
This section shows how to use the Substation 18x18 grid for Oil Refinery including an production example.

Single Setup: Oil Refinery Basic Setup (Advanced Oil Processing)
Oil Refinery Basic Setup Blueprint[www.chrisgpoint.eu]
Income: Crude Oil/ Water

The Single Basic Setup has no connection to the storage tanks, that's up to you.

Combi Setup (x3): Oil Refinery Combi Basic Setup (Advanced Oil Processing)
Oil Refinery Combi Basic Setup Blueprint[www.chrisgpoint.eu]
Income: Crude Oil/ Water

The Combi Basic Setup is ready to use and all fluids goes into separate storage tanks.

That's how it will look in game.

I prefer Storage Tanks between the production just cause it gives you a good stock overview and you always have a little reserve if you get low on a liquid.

The following Production Example is using 6 18x18 Substation Grids in Total.

Example: Multiple Production
Oil Refinery Multiple Production Basic Setup Blueprint[www.chrisgpoint.eu]
Income Belts: Coal/ Copper Plate/ Iron Plate
Income Pipes: Crude Oil (1x)/ Water (2x)
Outcome: Lubricant/ Sulfuric Acid/ Plastic Bar/ Battery

The Heavy Oil converts to Lubricant and to Light Oil and the Light Oil converts to more Petroleum Gas. So all fuilds gets used.

For a better understanding i made a connection scheme.


Get ready for the next chapter.
The Uranium!
Uranium Production
My seamless solution for a Uranium-238 and Uranium-235 production.

You don't really need that much centrifuge but i want to use the whole grid. :)
Also, as more you have as faster you get the necessary 40x Uranium-235 for the Loop Production.

The Setup works right after you feed it with Uranium Ore in the middle belts.
Due to the very low chance for Uranium-235 it can take several hours before the Kovarex Centrifuge will start to work.
Just be very patient and put some speed modules in the beacons and centrifuge.

And use the outcoming Uranium-238 for ammo and more while waiting for the Uranium-235 cause once the Outcome Belt is full it can stop your production.

Example: Uranium-238/ Uranium-235
Uranium Production Setup Blueprint[www.chrisgpoint.eu]
Important Income: Uranium Ore


At start it will look like this.
The Uranium Ore in the middle goes into the 9 centrifuge and creates Uranium-238 on mass and with a very low chance Uranium-235. The Belt is separated so that both elements will not get mixed.

Once all the centrifuge have send 40x Uranium-235 in total to the Kovarex Centrifuge your Loop will start.
After one Kovarex Process is done it will send 40x Uranium-235 to a storage box and then back to the belt for the next loop and 1x Uranium-235 to the upper belt for you to use.

After a while you will have more and more Uranium-235 on your upper belt but still only 40x Uranium-235 on the Loop Belt.

If you want you can put your outcome Uranium-235 inside the marked storage box.
That will lead to a full production belt. This will not affect your Kovarex Production Speed.

For me i think it looks nice that the 40x Uranium-235 wriggle all the way arround your Grid to the Kovarex but if you want it to be a little bit more efficient you can make the following change.
Remove the marked inserter under that storage box and...

... place it like this on the upper side of the box.

And then you could also remove the little underground belt under that removed inserter.

This will immediatly put the 40x Uranium-235 back to the Centrifuge instead of that funny wriggle effect. :P


Ready for the next part?
I show you some examples for a complete production line in only one 18x18 grid.
Complete Production in (1) Grid
Now i show you some examples how to efficient use that small place.
Always look for the Income Lines or the blueprint will not work correctly.
Some Income Lines are optional and not important but they could speed up the Setup.
Also all blueprints don't have modules in it, that's up to you to add some.

Example 1: Science pack 1 (Red Juice)
Science Pack 1 Setup Blueprint[www.chrisgpoint.eu]
Important Income: Iron Ore/ Copper Ore
Optional Income: Iron Plate/ Copper Plate


You can see how the raw materials come from the right.
Both get melted to iron plate and copper plate.
Iron Plate converts to Iron Gear Wheel and then everything goes to the final assembler.
And at the end you get 1 belt full of Red Juice at the bottom.
And the whole grid is seamless for expanding your Red Juice Production.


Example 2: Science Pack 2 (Green Juice)
Science Pack 2 Setup Blueprint[www.chrisgpoint.eu]
Important Income: Iron Ore/ Copper Ore
Optional Income: Iron Plate/ Copper Plate


First it looks very complicated and on the second it kinda is.
Raw comes again from the right and gets melted to the top and to the bottom.
And the Green Juice goes to the left. And seamless.


Example 3: Science Pack 3 (Blue Juice)
Science Pack 3 Setup Blueprint[www.chrisgpoint.eu]
Important Income: Petroleum Gas/ Coal Ore/ Iron Ore/ Copper Ore
Optional Income: Copper Plate


I just leave this here. :S
It's pretty much inefficient but hey, it works. :D
Take note to connect the Petroleum Gas from the underground if you come from the right side.
And the 4 Income materials goes seamless to the next setup.


Example 4: Military Science Pack (Grey Juice)
Military Science Pack Setup Blueprint[www.chrisgpoint.eu]
Important Income: Coal Ore/ Iron Ore/ Copper Ore
Optional Income: Iron Plate/ Copper Plate


Don't think too much about it, it works and it's seamless!!!


Example 5: Production Science Pack (Purple Juice)
I really tried to bring all on 1 Grid but the purple juice just needs too much space. :S
So it's using 2 seamless grids of 18x18 tiles. :)
Production Science Pack Setup Blueprint[www.chrisgpoint.eu]
Important Income: Lubricant/ Stone/ Plastic Bar/ Iron Ore/ Copper Ore
Optional Income: Copper Cable/ Electronic Circuit


This Setup takes some time before you will see any movement at the Juice Assemblers.
I've placed some beacons in it, you can fill them with speed modules.

I also tried to add the Plastic Bar production into this setup but i kinda gave up on that point.
So Plastic Bar is the only one you have to produce outside, check out the Oil Production chapter on this guide.

Take care of the Income belts which share 2 items!
If these items come in on the wrong side of the belt the setup could stop to work!
Atleast for the Optional Income belt. (Copper cable, Electronic Circuit)


Example 6: High Tech Science Pack (Yellow Juice)
I could have done it on 1 grid but it was working a bit better with 2 grids.
!!! Take care of the Coal Line, only place coal on the lower side of the belt !!!
High Tech Science Pack Setup Blueprint[www.chrisgpoint.eu]
Important Income: Sulfuric Acid/ Coal Ore/ Petroleum Gas/ Iron Ore/ Copper Ore
Optional Income: Plastic Bar


It will take several minutes before you see a first movement on the Juice Assembler due to some item stacks at the beginning but then it goes faster and faster
You can use Speed Modules everywhere for pushing it a bit.


The other juice will come soon!!! ... Only White left :S


That's it! We did it!!! Now we can bring all the juice to the thirsty scientists in your labs.
Science Lab Setup Blueprint[www.chrisgpoint.eu]
Income: All the delicious juices! :d

Yes, it's seamless!!! :D
The End
Thanks for reading. Leave a like or not. Your choice. :)

At the end, an actual picture of a part from my game.


Update Log: Latest Update: (05/014/17) v0.15.x Added new Chapter Uranium Production with seamless Example Update: (05/014/17) v0.15.x Added seamless High Tech Science Pack (Yellow) Blueprint Fixed Science Pack 3 Blueprint Update: (05/011/17) v0.15.x Added seamless Production Science Pack (Purple) Blueprint Added Income Lines Scheme Update: (05/010/17) v0.15.x Added seamless Military Pack Production Added seamless Science Lab Setup Update: (05/09/17) v0.15.x Changed Science Pack 1 (Red) and 2 (Green) to seamless connection Added seamless Science Pack 3 (Blue) Blueprint Update (05/08/17) v0.15.x Changed Oil Setups to 18x18 Changed Red and Green Juice to 18x18 Update (05/07/17) v0.15.x Changed Furnace Setups to 18x18 Changed Assembler Setups to 18x18 Changed Solar Panels/ Accumulator Setups to 18x18 Added Blueprint Links Update (04/28/17) v0.15.x Substation area changed to 18x18 tiles. You can still use this guide but since latest update you have much more space. Added Electric Furnace 18x18 Example Update: (04/24/17) Experimental v0.15.0 Added Blueprint Strings for the Basic Furnace Settings Added Blueprint Strings for Red/Green Juice Production
177 Comments
quake513 5 Aug, 2022 @ 7:17pm 
sweet lay out
TeaAlc 12 Jun, 2022 @ 1:20am 
Super Sache!!
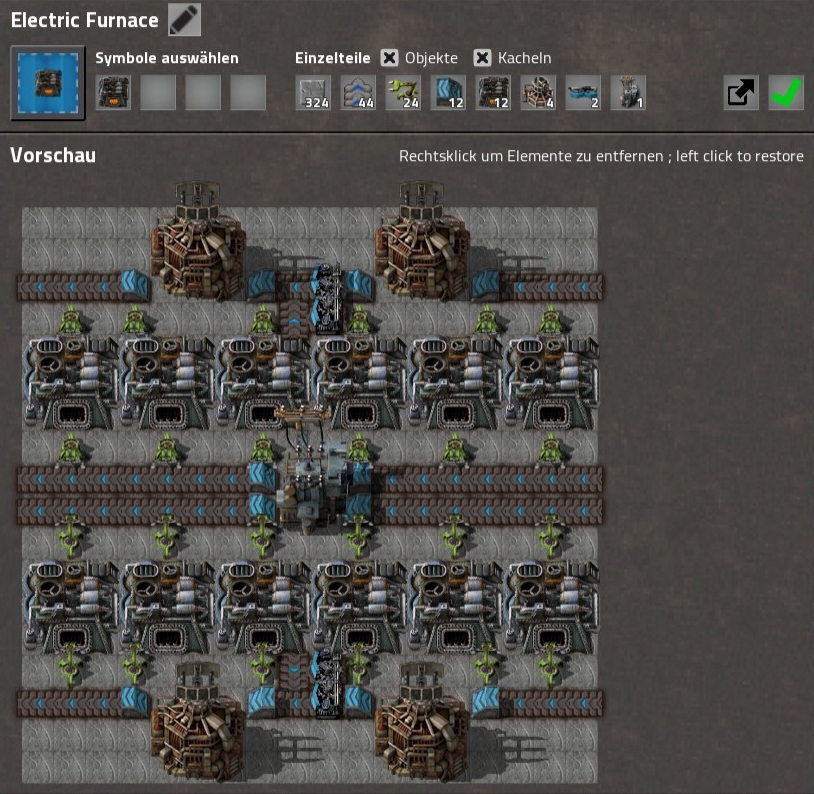
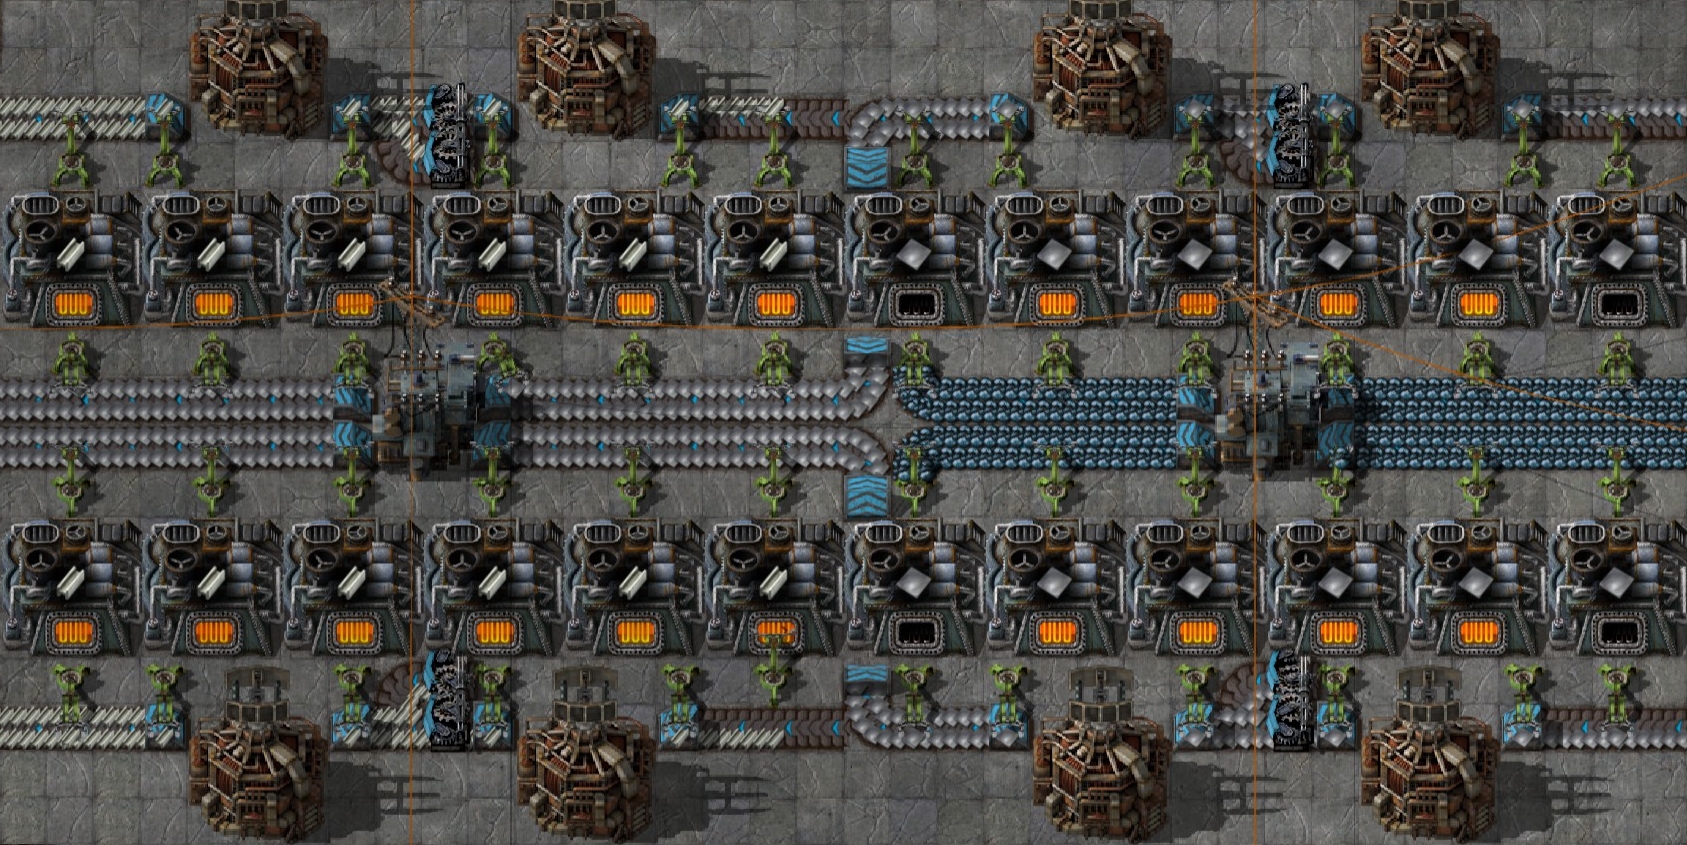
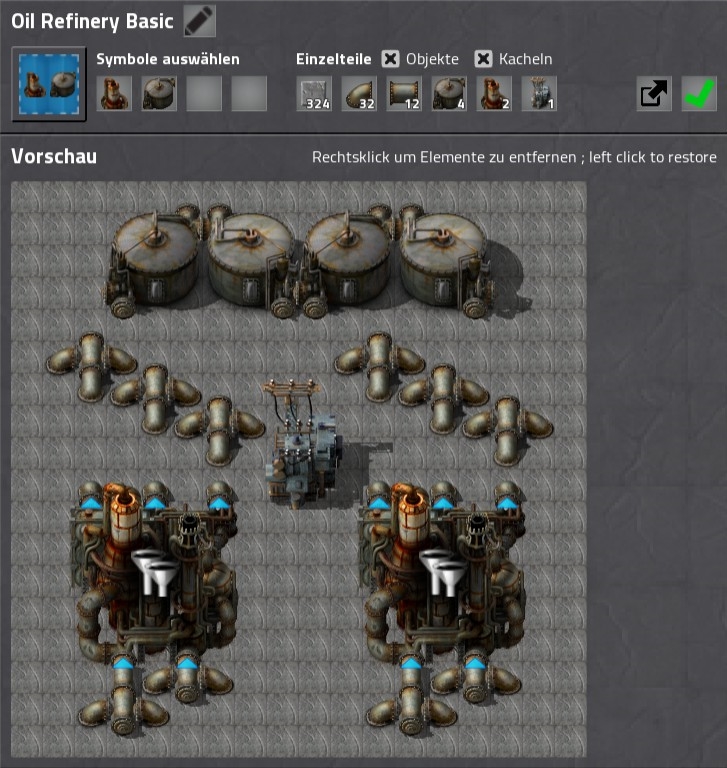
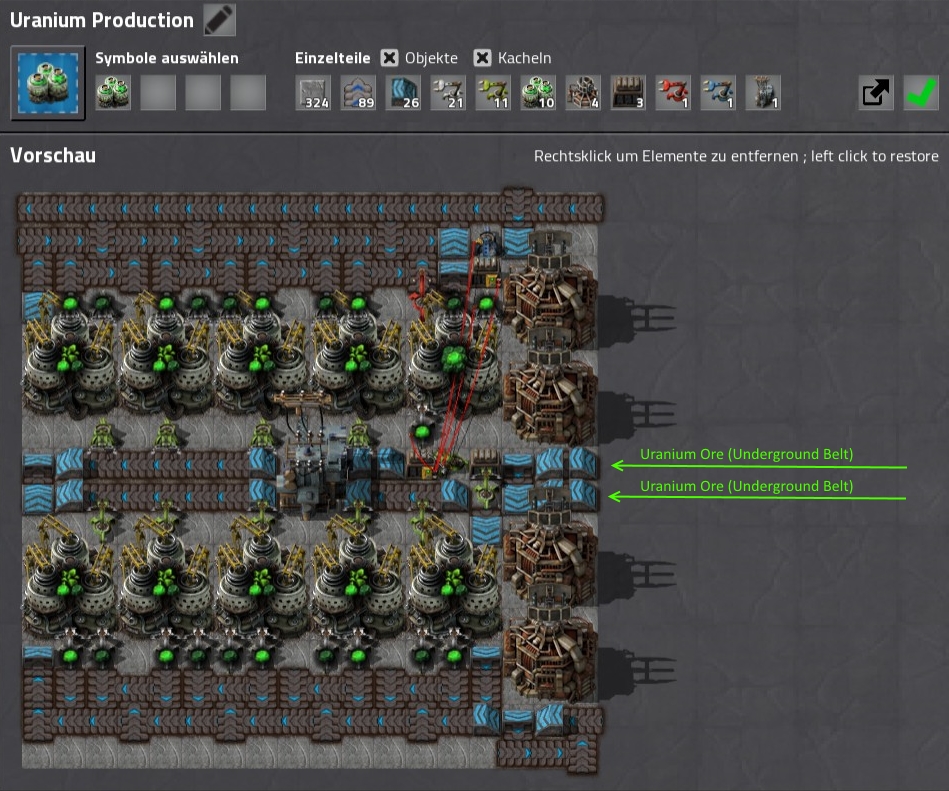
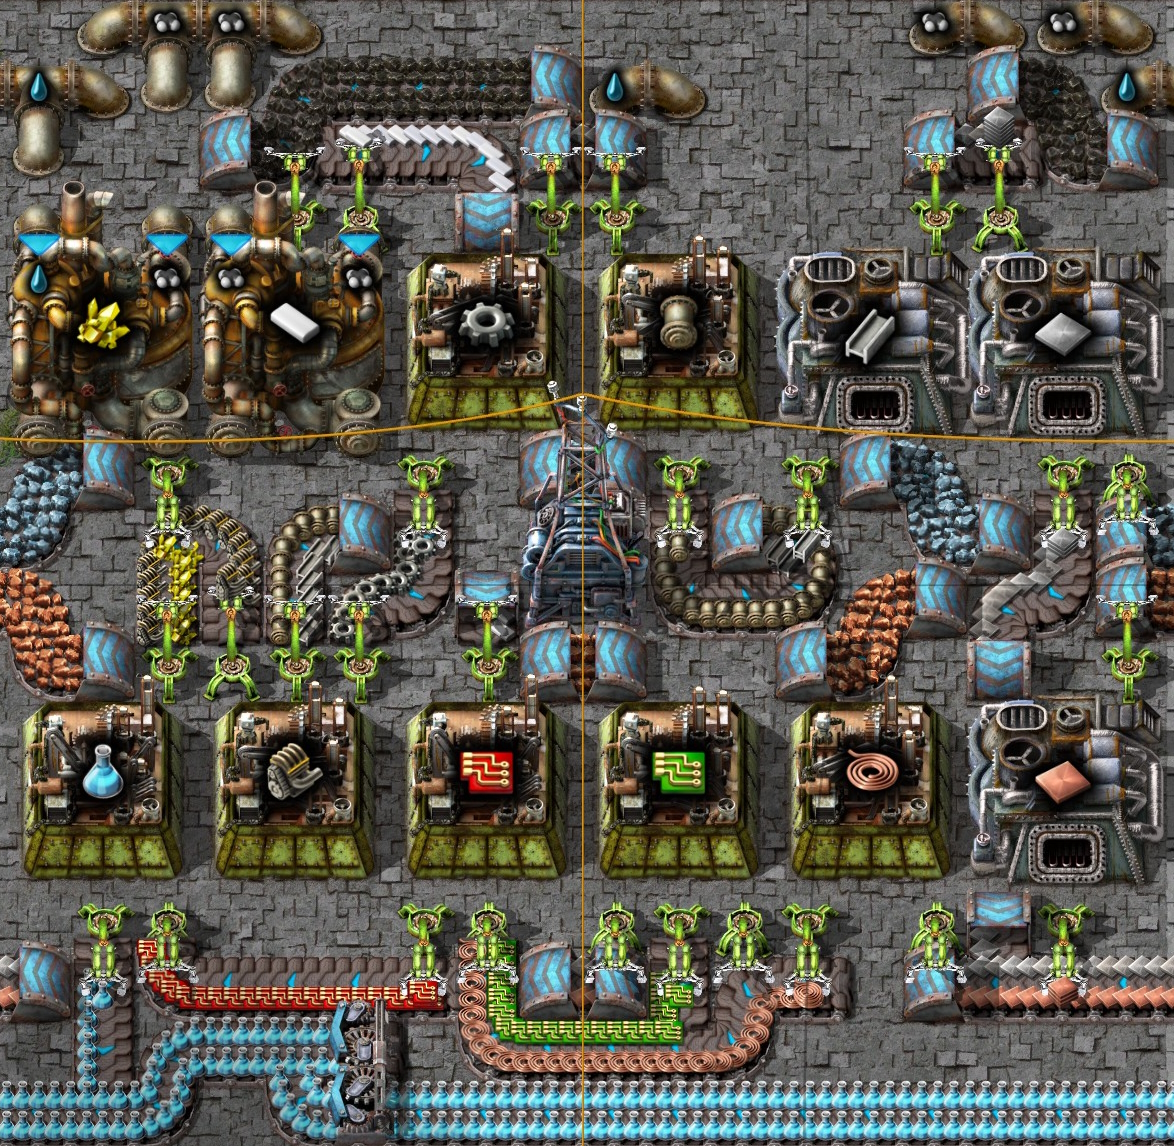
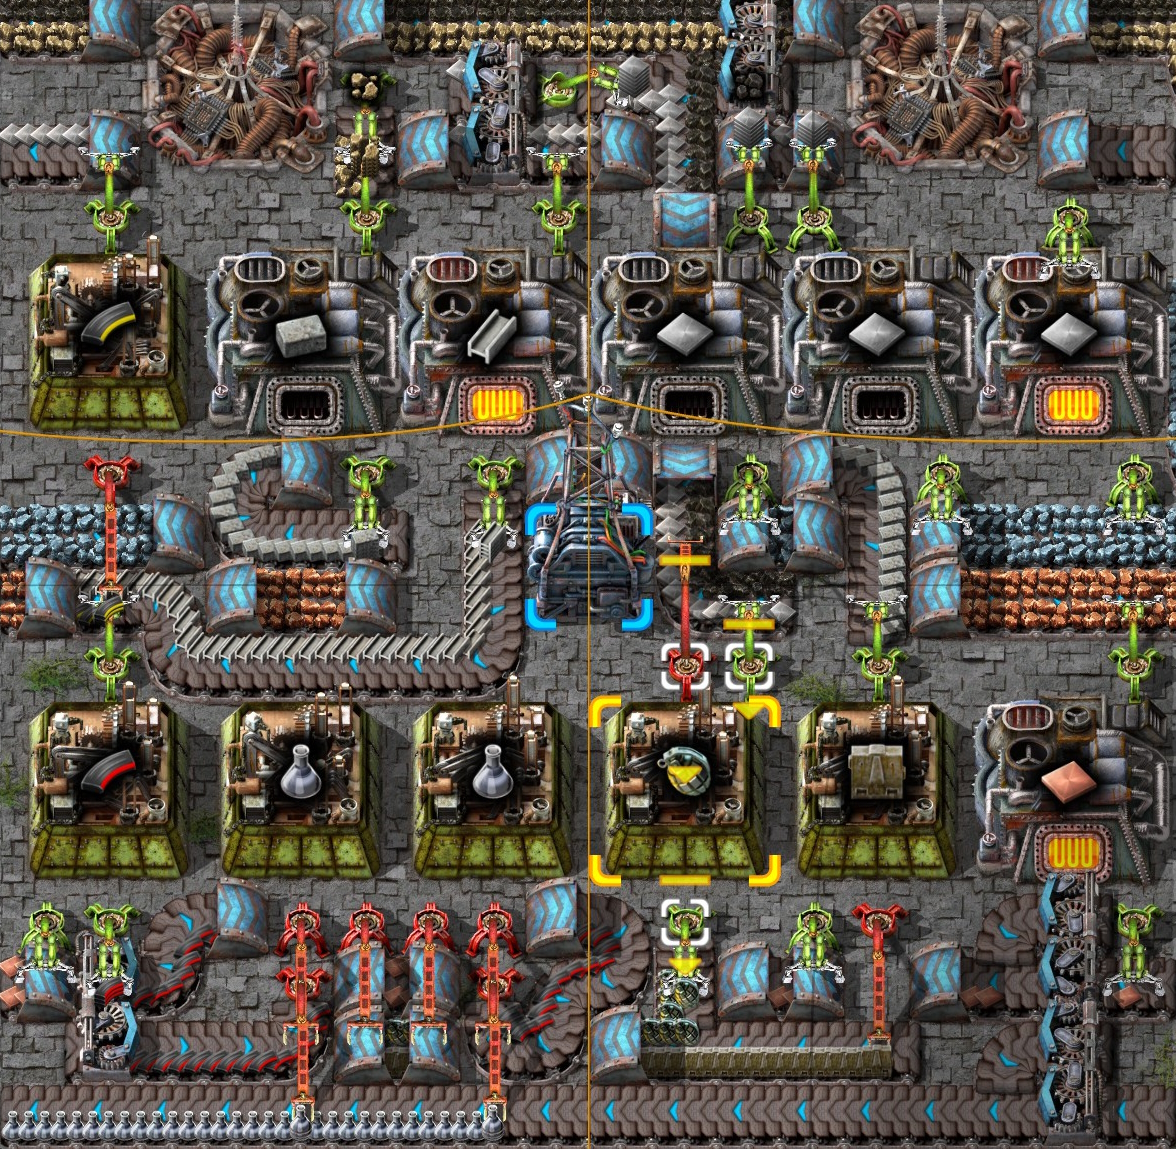
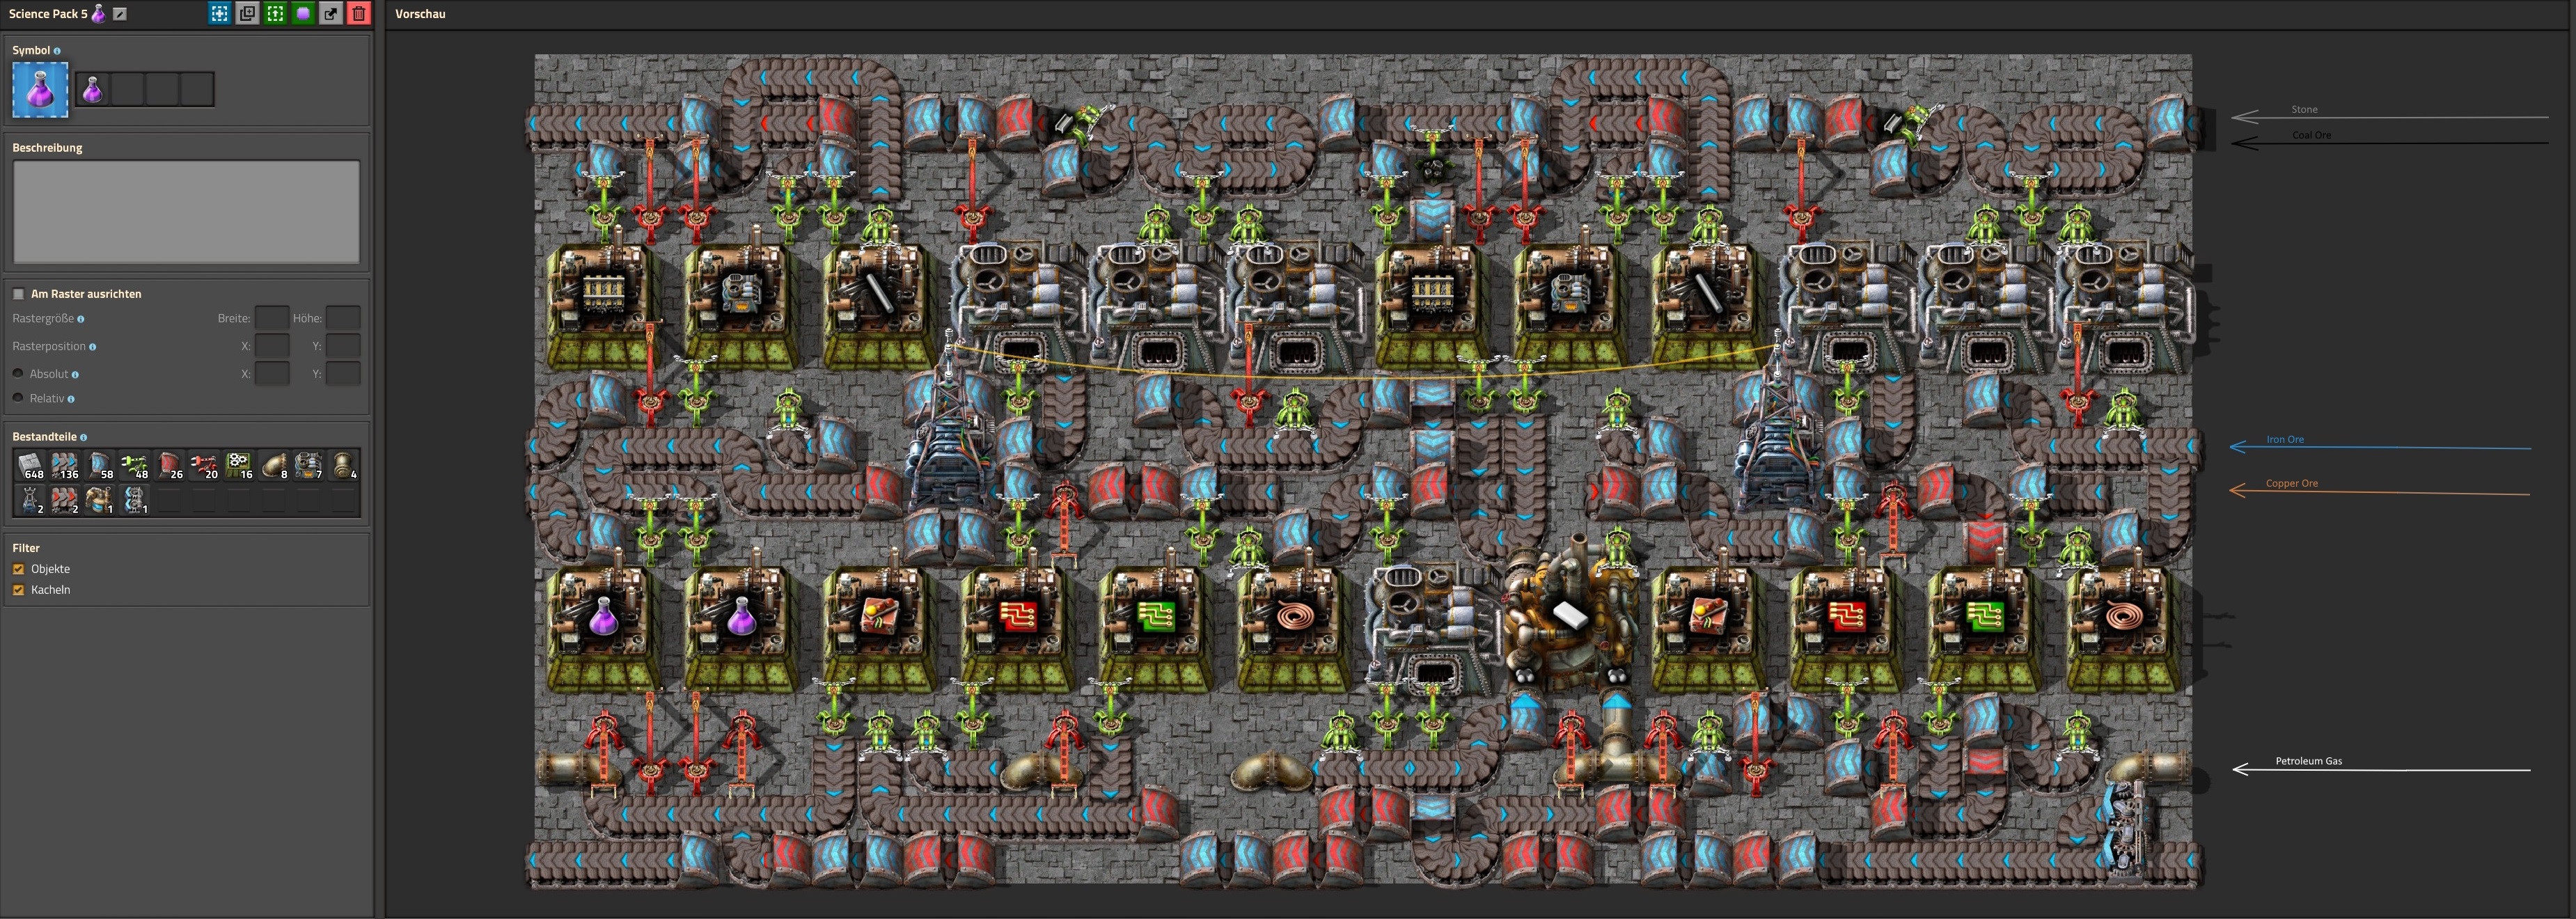
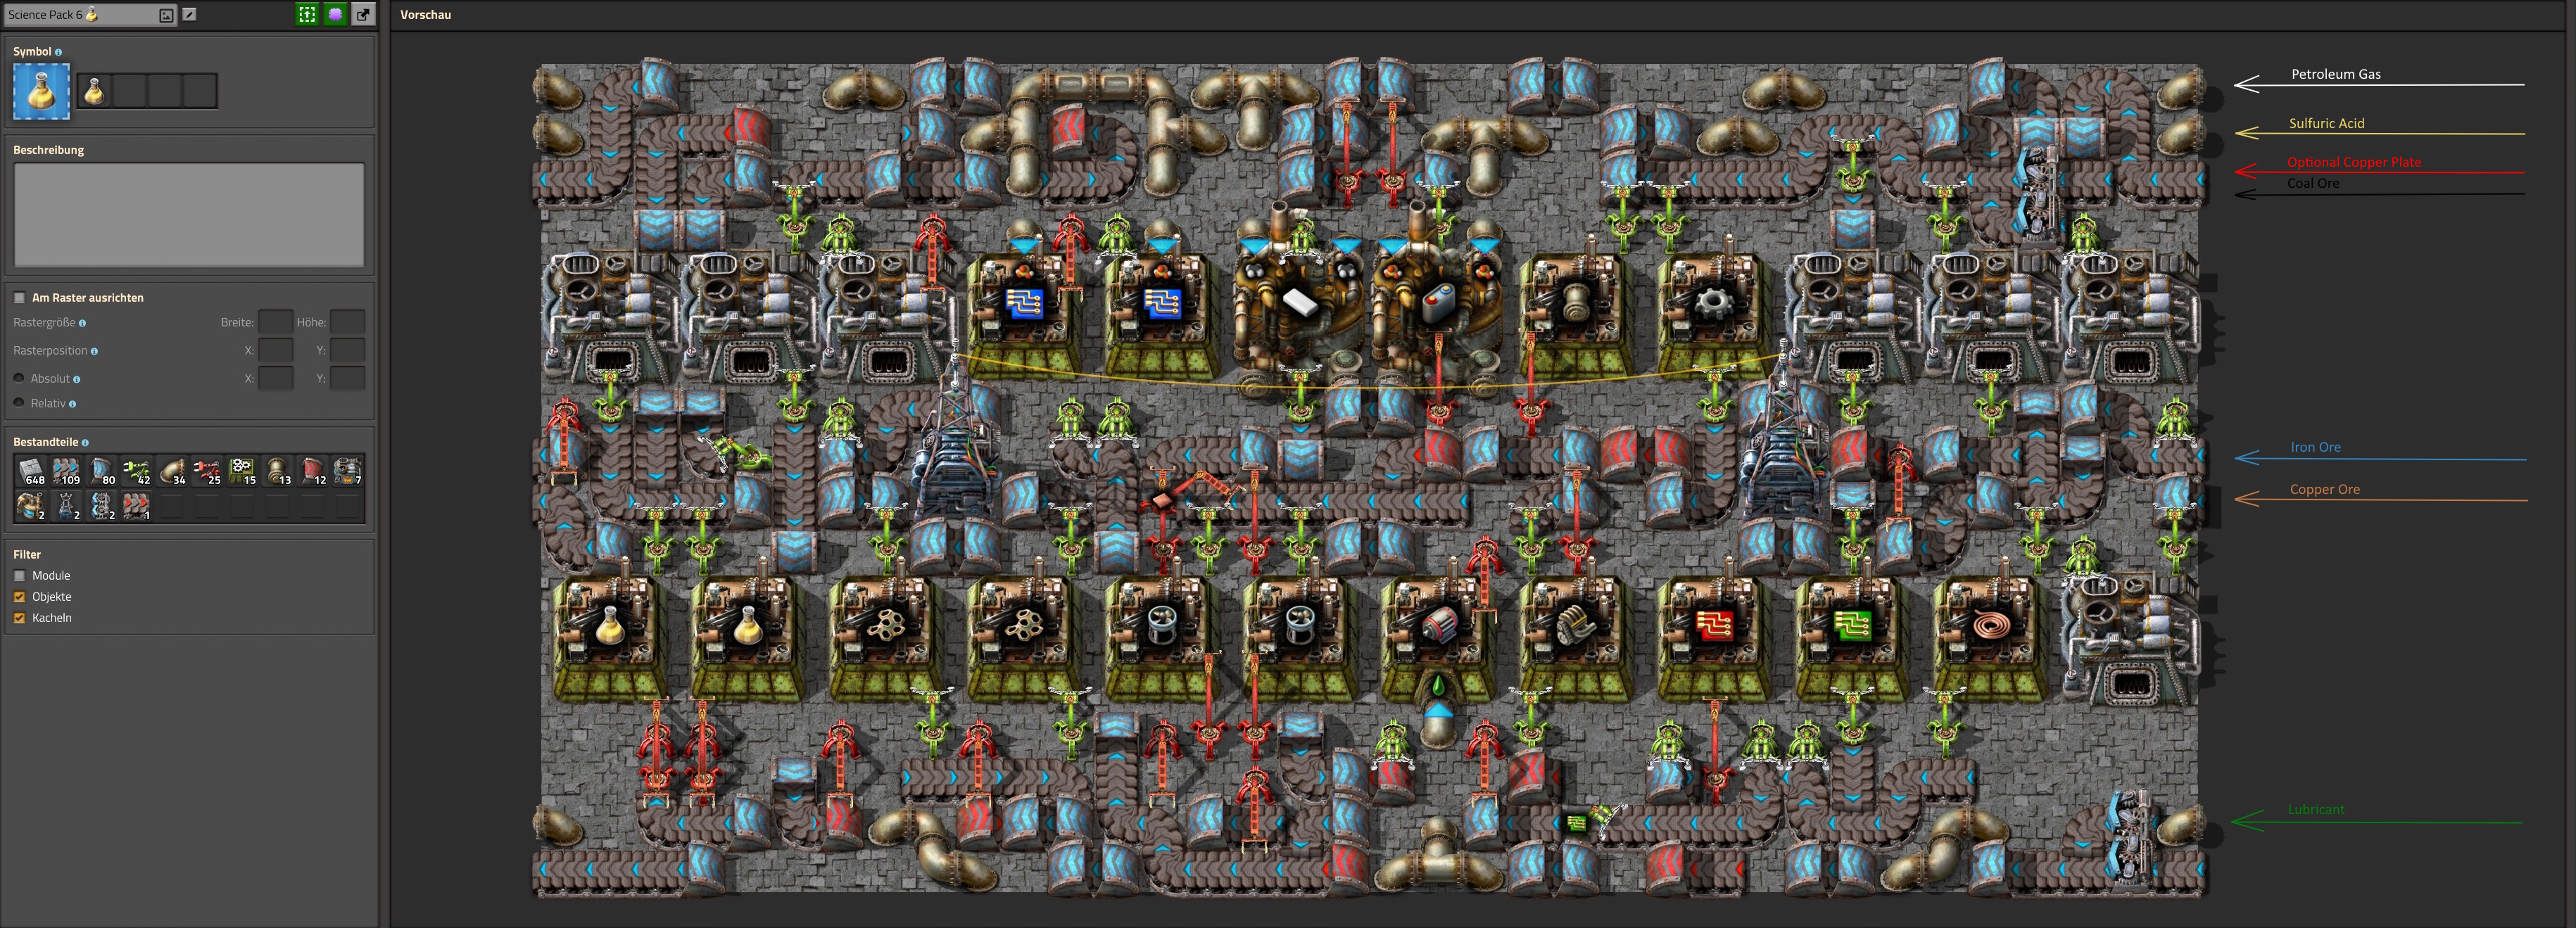
Den Vanilla-Einsteigern zeigen die Blueprints was alles möglich ist, und wie sie diverse Probleme lösen können.
Auch wenn ich selbst die Blueprints nicht nutzen kann, da ich immer Space Exploration spiele, Thumbs UP.
Yep, Cock. 11 May, 2022 @ 1:00am 
yo this is epic :OhSure:
Cobalius 3 May, 2022 @ 1:53pm 
i definitely build better modular stuff. yeah, and i also dont do vanilla anymore. AB is way more fun. For comparision, my new electrical crusher build is 299 tiles big, while consisting of 10 crushers. that's smaller than putting all crushers in a line with inserters and belts on each side (360 tiles). It also eats 2 full belts and spits out 3 full belts.:steamsalty:
Criminal Chris 4 Nov, 2021 @ 5:59am 
F'n brilliant modular blueprints, straight forward, and concise instructions and explanations, & your screenshots are both intuitive & easy to read & conceptualize. Thank you immensely for volunteering and investing the time and the effort you put into publishing such a wonderful visual aid in a format that effectively extracted simplicity from complexity. Rated, Favorited, & Awarded, kudos on a job well done! :steamthumbsup::Gifting::vikingfist:
en.core 15 Sep, 2021 @ 10:08am 
Krank!
† Ærrør † 17 Feb, 2021 @ 10:32am 
Du musst natürlich für den Abtransport sorgen, weil sie zu Anfang fast ausschließlich U-238 produzieren
† Ærrør † 16 Feb, 2021 @ 10:27pm 
Ja, die funktioniert noch einwandfrei. Hab sie selbst im Betrieb mehrfach sogar.
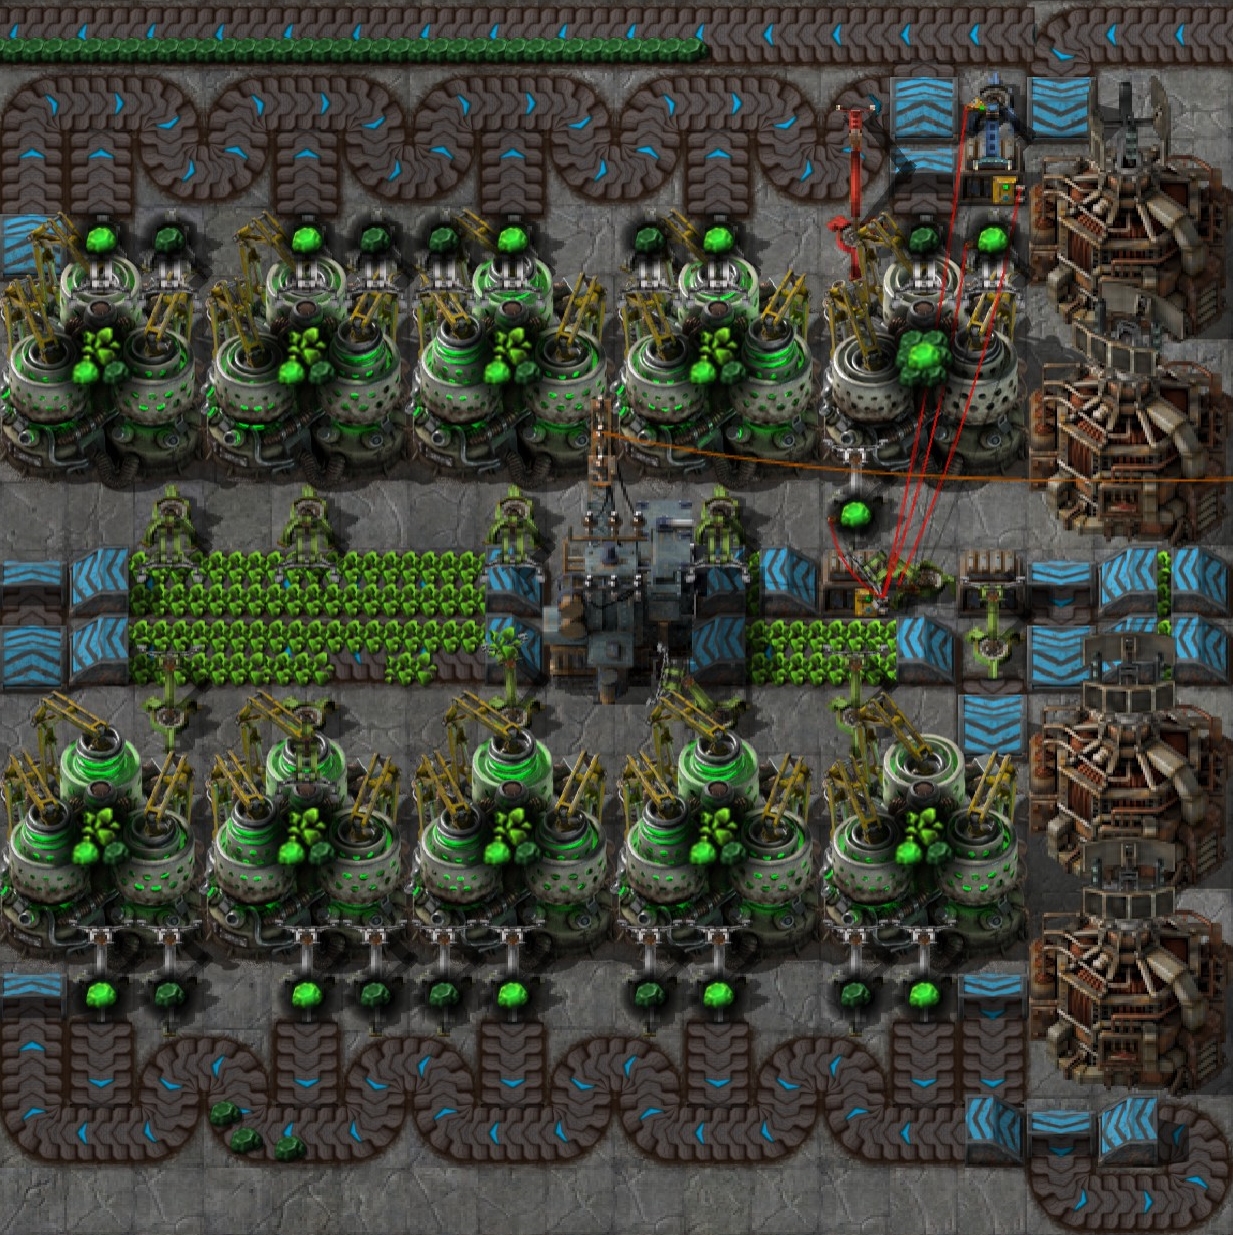
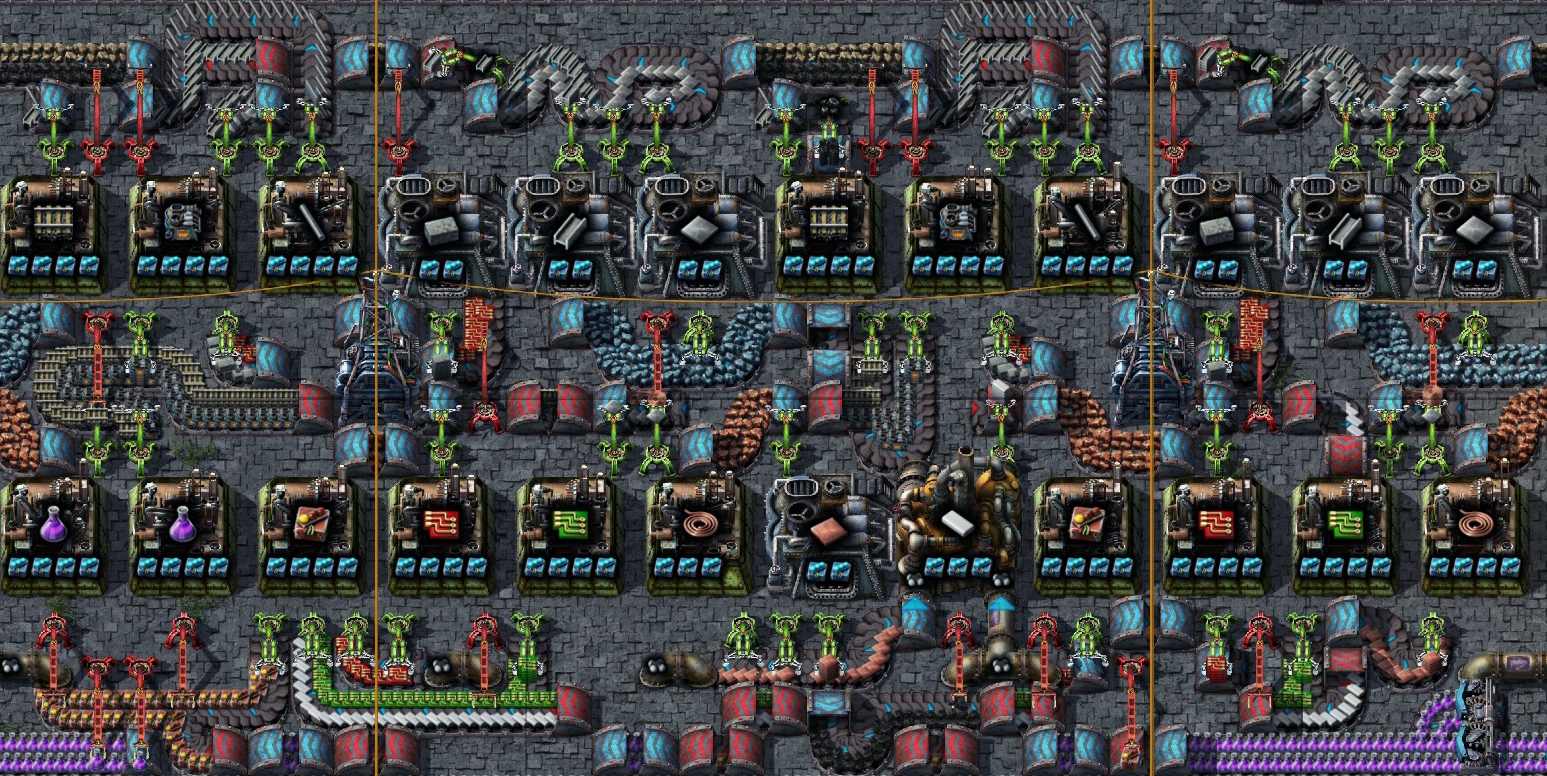
Du musst eine ganze weile warten, weil sie erst fast ausschließlich das U-238 produziert. Lass ca. 10-20 Minuten real Time vergehen, dann fangen sie an das U-235 zu produzieren.

Je länger sie im Betrieb sind, desto mehr U-235 produzieren sie, bis sie nur noch U-235 produzieren. Ein Rat den ich dir geben kann ist > baue mindestens 4 Anlangen. Drunter sind sie wenig effektiv.

Grüße :)
Unkn0wnUs4r_ 16 Feb, 2021 @ 8:45am 
funktioniert die uran anreicherung noch? bei mir klappts iwie nicht
† Ærrør † 1 Feb, 2021 @ 11:41pm 
Hey Mate, i tried your Covarex-Plant Blueprints and they are awesome. I read your description before to understand how they works. I am not a good engineer or tactican so i am very thankfull for those Blueprints. Very great work realy. :) :steamthumbsup:

Cheers :)