Counter-Strike 2

Counter-Strike 2

567 ratings
How to create artwork for your profile!
By PhxR
Simple guide on how to make your profile on steam fancy!
   
Award
Favorite
Favorited
Unfavorite
This guide is sponsored by Modurist - best graphics design website!
Visit http://www.modurist.com and use code "PHXR" to get a discount!
Introduction
Hello everyone, I'm your host PHXR and today we're going to be making YOUR profile fancy asf.
Requirements
  • Level 10 or higher on Steam
  • Adobe after effects (I use CC 2014, you can use any version)
  • Sony vegas (I use 13 pro, but you can use any version)
  • Knowledge of how to use both of the programs (duh.)
Step 1
Find yourself a profile background. the best way to find them is either Steam market or Steam.Tools website[steam.tools]. Try to find something that is detailed and isn't black at the center. for this guide I'm going to be using a profile background called "Cityscape".
Step 2
Once you found a background that fits your profile, Press "View full size" Button that is to the right of the image. This will bring your picture to full size.
Step 3
Once you've opened your background in full size, copy it's URL. Then go to Steam.design[steam.design] website and copy paste the URL where it says CHANGE BG.
Alternatively, you can type "Steam.tools/#(BACKGROUND URL HERE)" on your search bar and it will instantly load your backgrounds site.
Step 4
Download the zip package, put it on desktop or somewhere easily accesable and extract its contents to a folder.
Step 5
Load up Adobe After Effects And import images labeled "Artwork_Center", "Artwork_right_1top", "Artwork_right_2middle" and "Artwork_right_3bottom"
On the top press "Composition" > "New composition". Change all the settings as shown @ the image below.
Step 6
Drop the center image to your composition as shown below.
Then choose Text tool from the toolbar on top
And write your name in the composition. You can allign it to center by dragging it to center while holding CTRL button on your keyboard. Change font and size that fits your preference.
Step 7
Now it's time to add some effects, because noone wants to look at your name just sitting there


1st Thing I will add is "Glow" effect. it comes with Adobe after effects itself so you won't need to download it. after adding glow your text should look something like this.


Looks way better than the 1st one!

Another thing you can add is some wiggle. For this I will be using effect called "S_Shake" from Sapphire plugins, which you will need to download. Here are my wiggle settings


Final Thing should look like this[i.gyazo.com]

Step 8
There are plenty other effects we could add, but let's just say we're finished for now. It's time to render the whole thing. NOTE THAT STEAM ONLY ALLOWS FILES BELOW 9 MB SO BE CAREFUL AND DON'T PUT TOO MANY EFFECTS!

Let's say I want to make my gif 5 seconds long. Move your cursor to 5 seconds, and move the slider to the same spot like shown below


Now Press "Composition" again and then press "Add to render queue". Alternatively you can just press CTRL+M on your keyboard. Make it output to desktop and make sure that you're rendering
.AVI format.
Step 9
At this point we've rendered the file so you can close After effects. It's time to open Sony vegas. Drag rendered .AVI file to sony vegas, Right click on it, go to properties and disable resample. Alternatively you can right click on it, go to switches and disable resample from there as shown in the screenshot below.


Now double click on your video, go to "File" > "Render as...". My favourite way to render it out is using SONY AVC/MVC format. Press on the "Internet 1920x1080-30p" and then "Customize Template...". There you want to do exact same thing as shown in the gif below.


Now save that template & render your video.
Step 10
Once you've rendered your video, go to EZGIF - Video to gif[ezgif.com] website and select your video, then press upload. it should take a few seconds to upload. After that change framerate to 20, keep the original size and press "Convert to gif" as shown in the gif below.


Press "save" and it will download the .gif file.
Step 11
That's basically it! Now you just upload the artwork to your profile as shown in the gif below


Then select artwork showcase as your showcase when editing profile and put the gif to the center showcase.

And you're done!
I hope this guide helped you, if it did, please rate, favourite and share it to your friends !
NOTE!
IF YOU WANT TO MAKE ARTWORK FOR 3 SMALL WINDOWS USE 100 x 80 AS THE RESOLUTION
114 Comments
Tron Chonk™ 11 Apr, 2021 @ 11:32pm 
i was looking for making art guide, not this.
Sander 10 Aug, 2019 @ 5:22am 
This guide is really shit, it dosen't even show how to do things for beginners, it exepts that you have already made artwork before 2 stars total.:csgox:
Jeruzalem wannabe 30 Jun, 2019 @ 12:38pm 
i just have potato pc lmao
Luka 18 Jun, 2019 @ 11:16am 
this guide is empty for me , any solution ?
Gibus Les Paul 26 Apr, 2019 @ 6:18pm 
how do you load adobe after effects
「Koro」 20 Jan, 2019 @ 11:25am 
who can make me an artwork with natsu ??
اب موسى 20 Jan, 2019 @ 8:56am 
Hello!, Im doing designs for cheap skins! pm me if you are interested!
NAVY SEAL 11 Nov, 2018 @ 8:38am 
Selling simple 5€ custom artworks.
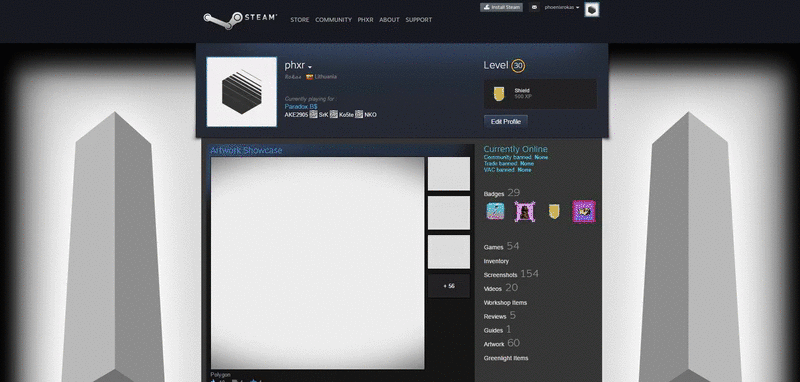
Check my profile for more info
Dopolis 22 Sep, 2018 @ 5:32pm 
That's awesome
Anirossa 13 Aug, 2018 @ 10:37am 
Looked at loads of gif generating sides and I highly recommend using this one: {LINK REMOVED}

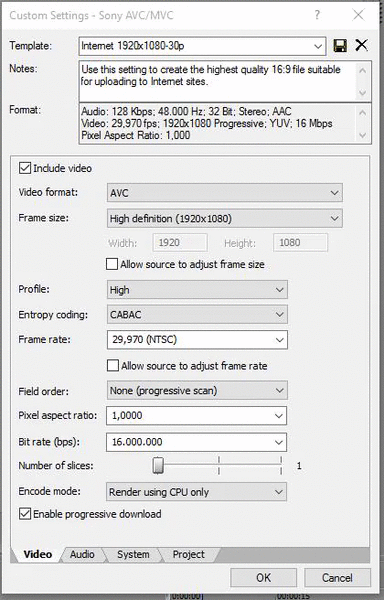
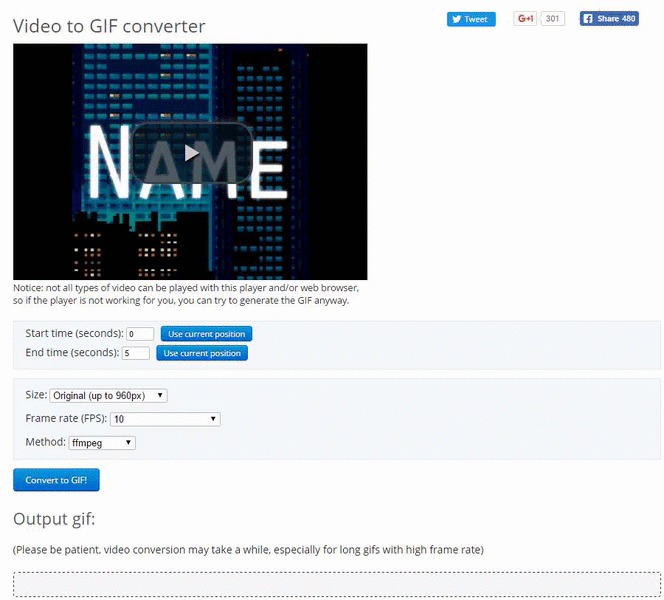
it let me select fps and all kind of things just like I wanted and then it also let me trim it down so I ended with 7.98 mb (limit is 8 mb for artworks) so you get the max quality you can.

Also, remember, the more effects the less details can you have in your gifs.

And if you want a long artwork showcase youtube it, its some great videos, u basicly put

document.getElementsByName("image_width")[0].value = 1000;
document.getElementsByName("image_height")[0].value = 1;

into your browser consol as you are uploading the gif, but yeah, youtube it, if not, link here: https://www.youtube.com/watch?v=kOJz_Ln8qEY&index=3&list=PLD5lpRPaBG74ASdTDnCegtDT3ulMIPO29&t=3s