Stranger of Sword City

Stranger of Sword City

121 ratings
Stranger of Sword City: The Basics
By BaptismByLoli
Fundamentals of Sword City to help players gain a basic understanding of the game
5
2
   
Award
Favorite
Favorited
Unfavorite
Introduction
Strangers of Sword City is a Dungeon-Crawler JRPG originally created for the PS Vita but recently ported for consoles and PC with localization. Don't let it's original platform trick you however as the game is relatively fun and challenging at the same time. For the sake of keeping things short and simple, the game will, from here on out be referred to as 'Sword City'.

Before purchasing the game however, please note that this product is not meant for everyone. JRPG's are famous for being a grindy. Added with the fact that the game is of the Dungeon-Crawler genre and you have yourself a grind-fest. Most of the grind that players will be commiting are either for equipment or levels, two things that players will find themselves in short supply.

Added with the fact that the game is relatively difficult with minimum hand-holding, painful bosses and even strong enemies and you have yourself a game that only appeases itself to certain individuals.

So if you have no problems constantly strategizing, dying, losing, grinding or all four then please read on.
The Interface
The Stranger Base
The main hub of the game where players will spend a better part of their time to recuperate and plan their next move.
The 5 tabs and what they generally do are:
  • Base
    Brings you to what is pretty much the medical bay of the game where you can revive and rejuvenate party members. Thematically, it represents as a lounge/common area for other Strangers.

  • Leaders Room
    Where Riu, leader of all strangers resides. Used to further strengthen your divinity, commit class changes, and make further changes to your current party

  • Shop
    Where you can purchase, sell and store additional equipment and consumables. Up to 100 items can be carried at any point in the game. The shop does not restock its inventory so be mindful of what you purchase

  • System
    Allows player to save/load their progress, adjust their options or exit to the title screen.

  • Leave
    Exits the Stranger HQ and travel to the overworld where you can then select a labyrinth(dungeon) to explore

The Stranger Base - In Depth

Base
A room that you will be frequenting many times, especially after a successful lineange/boss battle. Take note that time in this game advances not through standard means but rather by combat the player finishes.
  • Edit Party
    Pretty much reconfigures who fights and who stays on the bench. Take note that, unless they are dead, party members slowly earn EXP and a small amount of money only after each successful combat the party has finished

  • Revive/Recover
    Revive - Brings a dead party member back to life provided that he still has Life Points. Takes between 1 to 2 days depending on Age and current Life Point [Est 5-15 battles]

    Recover - Everytime a party member dies, they instantly lose 1 Life Point. If their current life point is 0, they're gone, perma-death. If not, they can still be brought back to life through the aforementioned 'Revive'. Recover takes up to 7 days to take effect. [Est 40+ battles]

  • Talk
    Brings you up to date with current events if you are lost. Updated after a new story sequence has occured.

  • Lineage Rumour
    Gives you tips on where and how new lineage types can be encountered.

Leaders Room
A room that is fundamental as it allows you to add/remove, register and commit class changes to your existing party. In addition, this is also where you can modify the apppearance, name and voice of existing party members, including your own if you see fit.
  • Register
    Add or Delete new party members into your happy few. Maximum number of players that you can have, including the protaganist is 16. Newly added party members would gain a fixed experience based on the protaganist's current experience so sometimes it's not a bad idea to delete party members who are either too slow or those whose stat you've messed up with

  • Manage
    This where you can do thematic changes to your existing party members such as their names, appearance and voice as previously mentioned.

  • Class Change
    Halves a members current level in exchange for a variety of bonuses and limitation. Best you see the in-game explaination

  • Give Blood Crystal
    Offer the life source of a Lineage Monster in exchange for a specific Divinity Ability, a power that can change the tide of battle with proper usage.

  • Talk
    Brings you up to date with current events if you are lost. Updated after a new story sequence has occured.

  • About Class Change
    Useful information on why and why you shouldn't do class changes

The Overworld

The menu you'd see when choosing a labyrinth to explore. Take note that in some cases, a labyrinth can only be accessed through an existing labyrinth only until you have found its corresponding Fast-Travel Point

The Menus

Can be accessed at any point in the game, either in Strangers Base or inside Labyrinths. Take note that, when outside labyrinths, certain features will be locked. Accessed with either 'Y' or the Right-Mouse Button
  • 1
    Morale of the party. Used to unleash divinity power or to set up ambushes. Regain by killing enemies and by dealing a certain amount of damage eaach turn

  • 2
    Currently active Divinity skills. Divinity Skills in effect will shine for the remainder of their duration

  • 3
    The Menu Tab where you can access the party inventory, change gear, use consumables and so on. I highly recommend you access 'Info > Monster Encyclopedia' regularly to know the weaknesses of your foe

  • 4
    Current Money of the party

  • 5
    A summarised information about the party member. From Top to Bottom it is
    Player Level
    Player Portrait
    Player Health
    Player Mana (If applicable)
    Experience Progression

  • 6
    Currently active party buffs. Applicable once Wizards and Clerics have unlocked the neccessary spells.

The Menus - In Depth
Party Menu

The Party Menu Accessed. Some options were greyed out as I was outside of a labyrinth when taking this shot.
  • Member
    Detailed information on current party members. Allows you to change their equipment/stock skills or level them up.

  • Skill
    Orders a party member to use a specific skill in preparation for combat. Can range from exchanging Mana to other things as well.

  • Spell
    Orders a party member (Cleric) to cast a specific spell outside of combat. Good when preparing for an ambush or a lineage battle. Take note of the other spells exclusively placed on the other tabs as well. (Accessed with Right/Left Triggers on controller)

  • Item
    Peruse your current consumables and other miscellaneous items you may be carrying. Take note of the tabs underneath eaach item description as they help filter out the items. (Accessed with Right/Left Triggers on controller,)

  • Identify
    Using the party member with the highest identification skill, players will attempt to unearth the unknown object in your inventory. Not really that important as exiting a dungeon will still do the same thing for you but with a 100% success rate.
The Party
We Happy Few
Type A and Type B Party Members artstyle Respectively

The people who will you be serving with you throughout this entire ordeal. Each of them have their own racial traits which makes them more suited towards a given class alongside a given age which affects their starting prowess.

The Stats
Before I begin going deeper, it is important to note what each stats represent as certain classes heavily rely on each of these stats in order to do their class role well.

Certain equipments require a minumum stat number in order to be equipped.

When creating a character, age affects how much bonus points you can put into these stats. This is important as when levelling up, you will only have 1-2 points to spend on your stats, There are 6 Stats and what they each do are
Stat
Description
STRength
Represents the raw power of a given character that affects the physical output of his attacks, both melee and ranged
INTelligence
Increases Max MP while also improving the damage of offensive spells. Take note however that it does not improve the strength of healing magic. Affects wand and thrown magic items
PIEty
Increases Max MP while improving the strength of healing magic. Take note however that it does not improve the damage output of offensive spells. Also affects healing items
VITality
The durability of a character in terms of both raw defensive stats and how much punishment he is able to handle
AGIlity
Affects the turn order of a battle. The higher the agility, the faster a player can commit his actions. In addition, also affects the accuracy of their attacks, change to dodge an enemy attack and the penalties sustained when dual-wielding
LUCk
Affects chance to execute and avoid critcal attacks, chance to be affected and inflicting status effect, Hiding (Ninjas) and surviving Insta-Kill moves among other small but useful things


The Age
Observe the two images carefully. As you can see, at the tender age of only 10, a party member at the tender age of 10 is full of vitality represented by his 3 Life Points. However, he lacks wisdom and thus, can only spend 3 points to boost any of his existing stats.

However, a character at the fragile age of 99 is, while lacking the vigour of his youth, has much more wisdom at his disposal, represented by the fact that he can spend up to 10 points boosting any of his pre-existing stats. Be warned however that, should he die, he will permanently die as a result of having only 1 Life Point to spend.

If you want the best of both world, age 40 is the best.

The Races
Like most games, a character's Race affects his starting stat points and this game is no different. This makes each race more geared towards a specified role where they can best perform.

The races available in Sword City are
Race
Summary
STR
INT
PIE
VIT
AGI
LUCK
Human
The jack of all trades, they can do anything but are the master of nothing. A good race to do class changes as a result
9
9
9
9
9
9
Elf
Fragile but relatively smart and nimble folks who can do wonders with their high INT score making them great WIzards
7
13
8
8
10
8
Dwarf
Hardy and strong folk that can both dish out damage as well as they recieve it Not the fastest nor smartest warriors unfortunately
13
6
9
13
6
7
Migmy(Hobbits?)
Bright and nimble people, they make great healers with their high PIE score though their fragility is a major concern should they suddenly find themselves in the front row
6
8
12
7
11
10
Ney(Cat-People)
As nimble as they are strong, they make great front-row fighters though their low PIE means that they need support when it comes to healing themselves
11
7
6
9
13
8
The Party Cont.
The Classes
The most crucial part when creating your party. To make the most out of your party, it is important that you know who does what so as to succeed in the labyrinths of Sword City.
Secondary and Tertiary Stats are inter-changeable depending on how you wish to use them
Class
Summary
Primary Stat
Secondary Stat
Tertiary Stat
Fighter
Your basic DPS dealer who is still strong enough to handle a few hit or two. When properly levelled, they gain a good AoE ability and a good single target ability
STR
AGI
VIT
Knight
The Tank of the party. This means that he does anything and everything possible to draw the ire of the enemy towards him where his strong armour and VIT easily shakes off enemy blows, not mentioning his abilties that aids as well
VIT
STR
LUC/AGI
Samurai
Fragile but agile fighters who swiftly takes out the enemy. When levelled, their powerful AoE abilties can target rows of enemies. Also geared towards targeting single enemies should though it is a risky given their low VIT
AGI
STR
VIT/LUC
Wizard
The DPS Mage with abilties and skills geared towards killing enemies. Great selection of AoE and Single target spells that can be used to exploit enemy element weaknesses. Can also debuff enemies and support allies to some extent
INT
PIE
AGI
Cleric
The Healer and the support. In a pinch, they can serve frontline combat with their Maces though I'd advise against it as you put your only effective healer at risk. Also offers buffing magic
PIE
INT
STR
Ranger
Terribly weak fighters who should never at any point in time be found in the frontline. However, they make excellent back row combatants with their Bow they can single out enemies and deal constant huge burst damage or even debuff them should the situation demand it
AGI
STR
LUC
Ninja
Effective fighters that can hide in combat to avoid being targetted and gain a bonus when fighting unarmoured. Rely on their speed and luck to deal painful damage and status ailments in quick succession. Unfortunately, they can't take a beating
AGI
LUC
STR/VIT
Dancer
Pecuilar support members with a niche role of fulfilling the role of either a wizard or a cleric with their bizzare skillets from increasing morale, gaining unlimited weapon range and using items twice. Mainly uses throwing weapons
AGI
PIE/INT
STR
Order

Unit Formation

Once you've created your party. It is imperative that you open up the in-game menu(RMB or Y) and immediately select 'Order' in order to fine tune the set-up of your party. This will help make or break all future engangements.

Using the top picture as reference, the bottom row is the current party formation whereas the top is the new party formation. Characters on the first 3 from the left count as 'Front-Row' meaning they are more likely to be hit whereas characters on the last 3 serve as 'Back-Row' meaning it is harder to reach them due to weapon limitation that will be accounted for later.

Beware that when a party member from the front row dies, the back-row 'moves up' to fill the gap. For example, were my dwarf to die in combat, the next party member, the Ney beside the dwarf would move up to take his spot. The Ney beside her as well - my ranger, would also move up placing her in harms way as she is now in the front row

In summary, make sure that tough members fills the left most while the most fragile fills the right most.
The Labyrinth
The Map
The area you'll spend most of your time in grinding and dying. Before we begin talking about the dungeon and it's how to, we must first understand the most important part about labyrinths, how to navigate them. To do this, you have your trusty map. Let us take a look at the map.

The Map Opened

Not pictured are Player Icons (Triangle), Pitfalls (Black Circle), Locked Doors (Red Rectangle), Exit Points (Bright Yellow Archs) and Labyrinth Quirks (To be explained later)
  • 1
    The name of the location you are currently looking at. Useful when hunting lineages or quests.

  • 2
    An access point going up

  • 3
    An ambush point to gain new equipments. Be careful as some enemies tend to be rather powerful so make sure you check their levels beforehand

  • 4
    A passable door.

  • 5
    An unlocked door.

  • 6
    An access point going down

  • 7
    Auto-movement. Select a viable destination on the map and press the corresponding button to move towards said location at a much faster rate. Path will attempt to avoid both treasure and enemies unless said path is a chokepoint in which case they will engage. Can be cancelled with any button

Party Set-Up
Clearing out a labyrinth is a job. And like any other job, you always need to bring the right tool. In this case, you need to bring the right party. Unfortunately, each player may have their own preference which suits their style so rather than being too detailed, I'll just mention the very basics of creating a party.

Here is an example of my Party Set Up when I'm grinding or exploring labyrinths

From Left to Right they are
Tank | Tank/DPS | DPS/Crowd ---- DPS | Healer | DPS/Crowd

Front Row - They take the brunt of the damage to ensure that the people around them don't. To be filled with characters who can take a beating. Notable Examples include Knights and Fighters that can both take and dish out damage.

Back Row - Fragile Characters who can either offer support or deal damage while the Front Row distracts the enemy. Notable examples include Rangers, Clerics and Wizards.

This is a general party suited towards handling all sorts of situations except bosses and lineages.
When encountering lineages or boss, don't be afraid to experiment with alternate party formations and create your own specialized party. Remember that Speciality > General

Story Spoiler
When fighting the Wyvern Boss Fight, I had 3 tanks supported by 1 Ranger, 1 Cleric, and 1 Wizard. The Wizard and Ranger kept debuffing the Wyvern while the Tank just stood their ground, letting the Cleric patch their wounds and only retalliating when the Wyvern prepared his Ohm Strike

The Enemy
All enemies encountered in Sword City will always be of a higher level than you. This can throw some players off-balance and unfortunately, turn players off. As a result of this, I have created a rough range to help players know which combat they can take.

Current Range
if average party level == < 15 of enemy combat = good else combat = bad
So if your party full of level 10 finds itself fighting level 25's-30, be extremely cautious. Anything higher should immediately avoided no matter what

Another useful method of trying to find that sweet spot is by checking how often you can successfully hit the enemy, how often he hits you and how much percentage of HP is lost when he attacks your front row members. This however, requires a lot of trial and error.

Treasures
What good is a dungeon crawler game without loot? Sword City has a special mechanic of gathering loot in which the player simply needs to ambush an enemy transporter and make off with their stuff. Not only do I find this intriguing but is also answers the age old question of who the heck leaves treasure scattered about in dungeons.

Below is an ascending chest quality,
Wooden > Metal > Silver > Overdrive Gold
Higher chest quality results in better loot but also better enemies. So don't jump the gun.

Opening Treasures
After completing your first ambush, this screen will have a high chance of popping up. Note that in some rare cases, treasure chests can end up being untrapped though I do not know the exact numbers for this.

The formula for identifying a treasure chest's trap is
10 + AGI + LUC + (any OL% on equipment + Intuition(30)
Limited to 95%. Where OL refers to Open Lock. As you can see, the Intuiton skill gives a high boost
When in doubt, the best option is usually the trap that will cause you the most harm.

Weapon Range
There are three weapon ranges in Sword City. This is crucial to know as they determine who your party members can and can't hit. To determine the range of each weapon, observe the info box for each weapon. It should be stated at the 2nd column

The three ranges are
  • Short
    Commonly found in Wands, Staffs, Daggers, Maces, Swords and Katanas

  • Middle
    Commonly found in Polearms such as Spears

  • Long
    Commonly found in Thrown Weapons and Bows

Here is a visualisation of the ranges in each weapon. Take note that an enemy can have up to 4 columns of enemies. Also take note that the game can't differentiate between Rows and Column so some skill description may be a bit wrong. I may need to find another way to represent this in the future

FS - Front Short
FM - Front Middle
FL - Front Long
-------
BS - Back Short
BM - Back Middle
BL - Back Long

As you can see from the table, party members with short ranged weapons should be placed at the front as their weapons can only hit targets in F1 - the enemies front row. Should they be placed at the back row, they can only hit their own front row members which is less than optimal.

Exceptions
There are however, certain classes that can offset a weapons limitations. The most notable of which are 'Dancers'
This ability lets them use any weapon provided they are of course proficient in it to hit any enemy the desire.

Another exceptions to this are of course, character skills the most earliest example of which belongs to the Samurai
When the skill is executed, even though their short-ranged katana forbids them from attacking F2 enemies, the skills bypasses that rule, allowing them to inflict damage.
The Miscellaneous/Terminology
Recommended Progession
[5]Mausoleum of Metal > [8]Mausoleum of Forest > [10]Shadow Kingdom > [13]Valley of The Ruined
[] = Recommended Level at End

Art
Type A/B Art Respectively
Type A = Dark Fantasy
Type B = Moe

Art Style also changes the aesthetics of the cutscenes. (Does it change the enemy's appearance as well?)

Ambushing
  • Ambusing is always better than buying new gear.

  • The deeper the area, the harder the enemy

  • Certain enemies can only be encountered by ambushing

  • They are also much stronger than the typical enemy

  • The better the chest, the better the enemy
Labyrinths
  • Running is a viable option

  • If it looks scary, it's because it is scary

  • When an enemy is alone, it's because he's hard.

  • Some enemies can call allies indefinitely

  • Divinity charges when you deal damage or kill monsters. Use it liberally

  • Every labyrinth has a special enemy to screw you over.

  • Every labyrinth has a special surprise to screw you over

  • After killing an enemy, check the Monster Encylopedia, it can give you viable information

  • Always check their levels first

  • Higher levels increases all their stats. And I mean all. From Damage Output to Health and finally to their Evasion and Hit chances.

  • An enemy giving you trouble? Check their level

  • An enemy still giving you trouble? Check their Type [Immortal or Spirit]

  • If it looks undead, use Holy Weapon from the Cleric without hesitation. If it looks neither undead, human nor monster-ish, use Magic Weapon from the Wizard without hesitation.

  • Bosses and Lineages are Hard. Very Hard

  • Someone will die. So be prepared

  • (De)Buffs stack

  • Debuffs are great against bosses, but bad against you

  • Touching a butterfly nests teleports you to base. Killing them gives you EXP and a chance to drop a butterfly wing

Items
  • The shop does not restock its wares at all

  • Wands are items that rely on either INT or PIE to be used. So use them until they turn cursed in which case you can go back and restore them back to normal. It saves mana and it's not like you'll use your mages in physical combat

  • Healing Items rely on PIEty

  • Items can be sorted. Look carefully

  • Some items attract Lineages

  • Some items are downright useless. Examples include Poiney Powder.

  • Don't sell rare equipment. Give it to the Special NPC and hope for better stats on said equipment.

  • Said special NPC will always appear within a certain area of the map. Try your best to locate and remember it

  • 10 stat all across the board ensures that your character can meet the stat requirement for all equipment.

  • Wearing something is better than wearing nothing unless your Class is a 'Ninja' or it decreases your player's HP

  • Butterfly Wings can be gained by killing butterfly nests

  • The formula for identification is
    10 + Piety * 2 + (any id% on equipment) + Educated (30%) Limited to 95%
    This means that you will always have a base 5% chance to fail. 'Any id% on equipment' refers to equipment that gives boost to item identification

Party
  • Class Changes are a long term investment

  • Class Changes work well with certain combination. Have you ever seen a Samurai > Ranger that can deal damage to all enemies from the first 2 rows?

  • Feel free to remove the dead weight

  • Always create a back-up

  • Don't forget that there are multiple tabs under the 'Spell' section

  • Stat Re-Rolls are infinite. So take your time.

  • Your character can't die. So don't be afraid to make him old if you want him to have good starting stats

    More to be added
Closing Remarks
With this in mind you should be somewhat ready to take on the labyrinths of Escario. Good luck Strangers

If I missed something or got something wrong, please message me so that I can make the appropriate changes.

If you also feel that 'xyz' should be mentioned because of how important it is, don't hesitate to inform me and I'll get right on it.


30 Comments
Sultryhag 28 Sep, 2022 @ 11:55am 
I wanted to ask about the minus hit on an equipment. If it is on armour does that mean it mitigates that amount of damage or it means you take more damage equating to that figure. The plus and minus confuses me.
PeliasDeWizzzrd 14 Oct, 2021 @ 12:32pm 
Many many thanks !
WhitePhantom 2 Mar, 2021 @ 8:22am 
Excellent guide, thanks.
DarkRite 25 Jun, 2020 @ 8:50pm 
Though most of your characters will likely be fortunate, for the +3 bonus stats (meaning that you should then be trying to get at least 16 bonus points for most of your characters, but the more you get the better, again it's a matter of patience). Invincible can be pretty good for frontline characters early game but is utterly pointless later on, as both Cleric and Knight provide a passive skill that does the same thing, and you're quite likely to use these two classes sometime in class changes. But that said Invincible does help for going to the valley of ruin, if you put it on a frontline character like a knight who can draw aggro, though really you'd pick invincible to go on someone who you don't want to class change to knight or cleric but given how useful those classes are it seems ridiculous.
DarkRite 25 Jun, 2020 @ 8:50pm 
Then there's other talents, Educated and Intuition are decent but at really high levels don't really give you much benefit if any. They are fairly useful early on as Intuition makes disarming traps in chests easier by lowering options if not completely eliminating options and just opening the chest outright. Though certain dungeons have a set availability for traps, you won't see teleporters or mimics for most of the early dungeons, though Shadow Palace is when I started seeing mimic traps actually go off (not sure you'd run into them in the other dungeons as much if at all, but then again it may be possible, though I don't think I've pulled a mimic on metal or wooden chests at all). Educated is a bit more meh, but it's not bad for early game.
DarkRite 25 Jun, 2020 @ 8:49pm 
I do however agree that you should definitely prioritize putting a fair amount of points into vitality or piety/intellect to start. Now, excluding your MC, all your other characters will probably be age 40 or so, and will have at least 13 bonus points (cause you can have absolutely abysmal luck on these rolls, so it's a test of patience more than anything else).

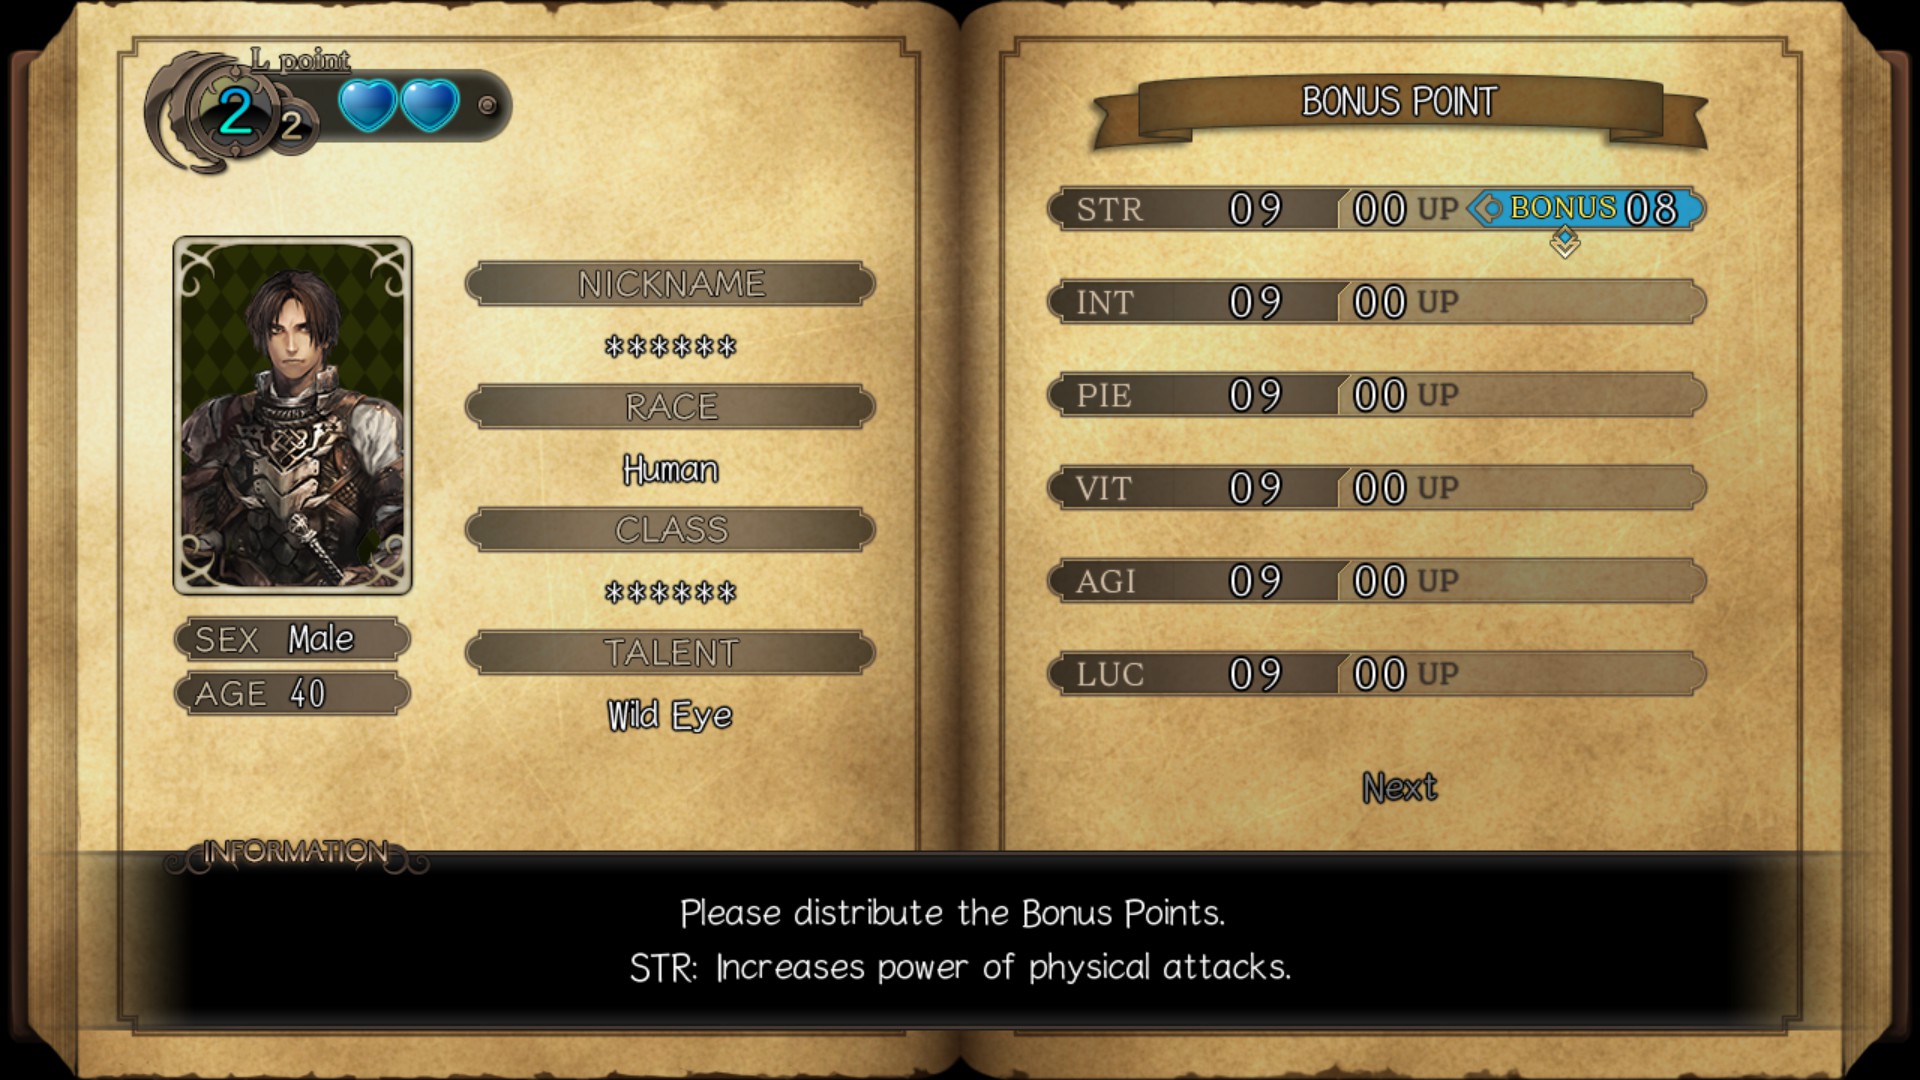
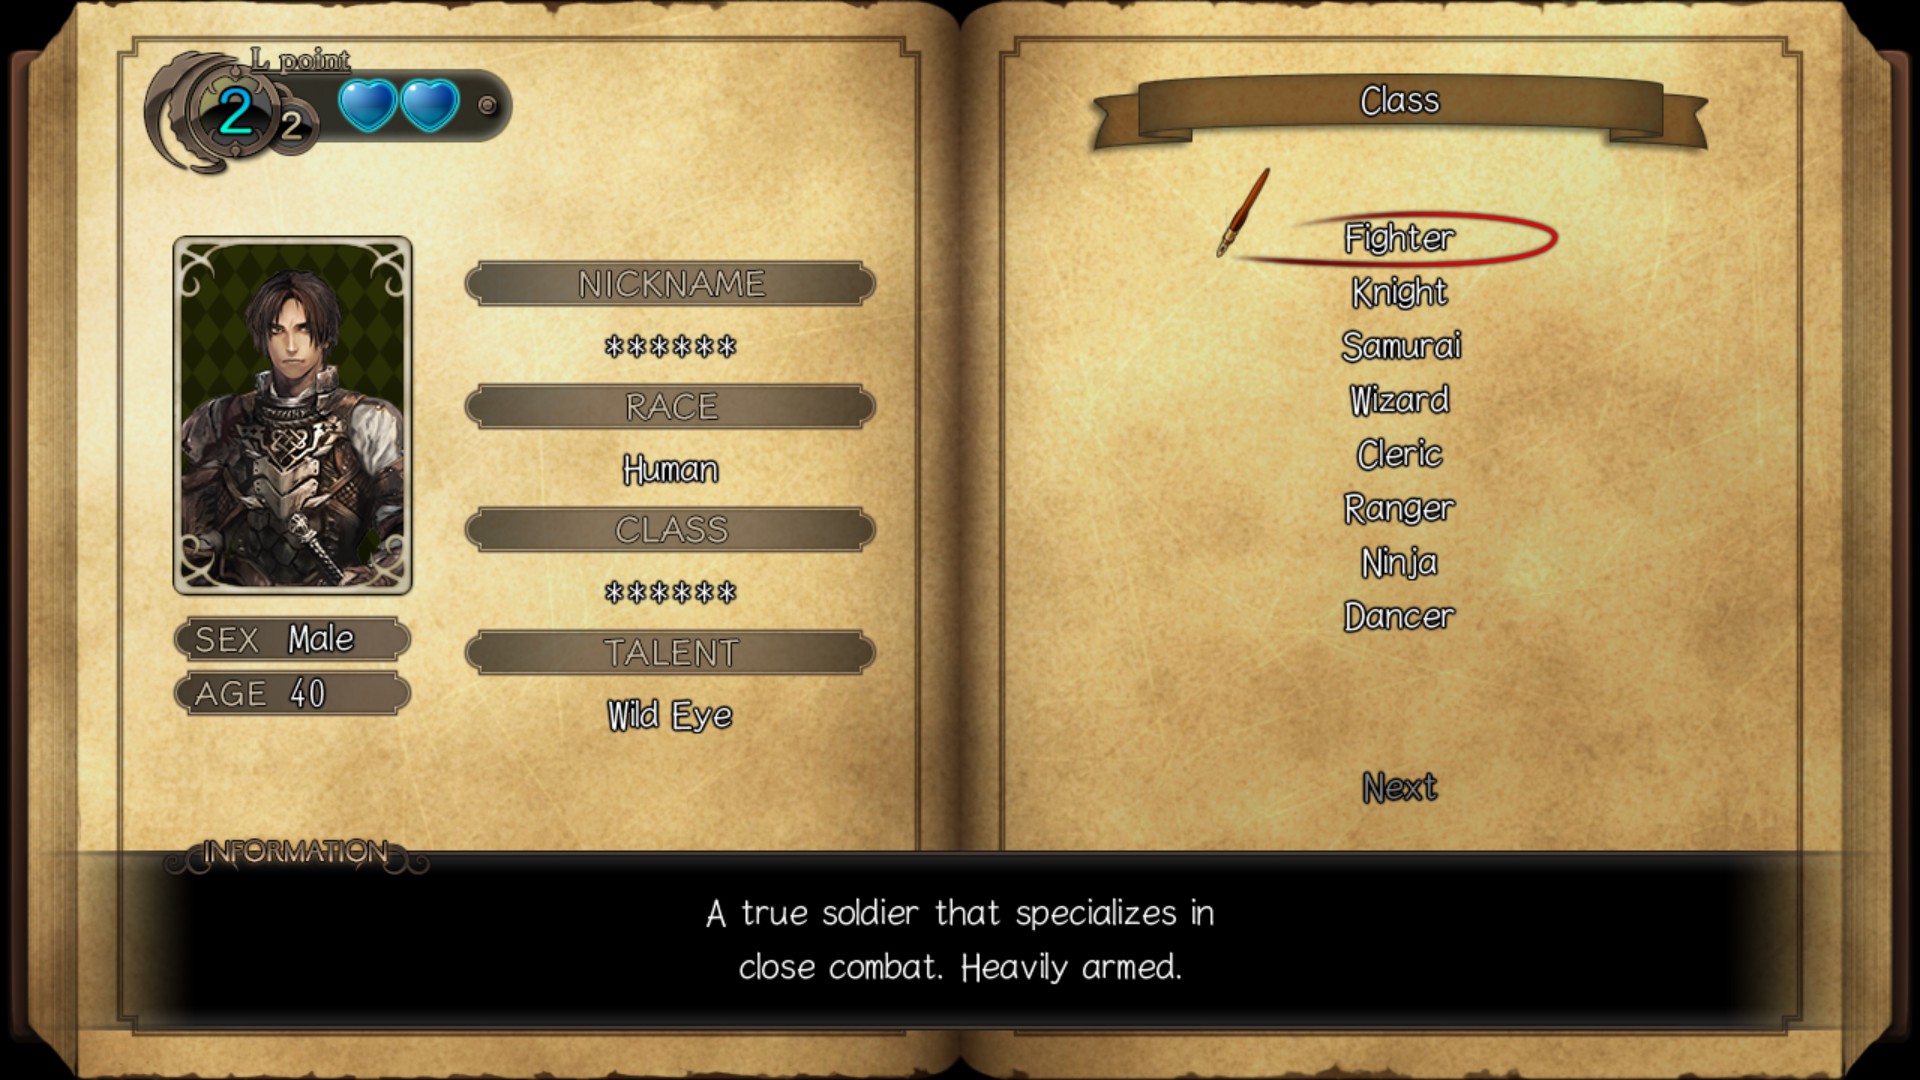
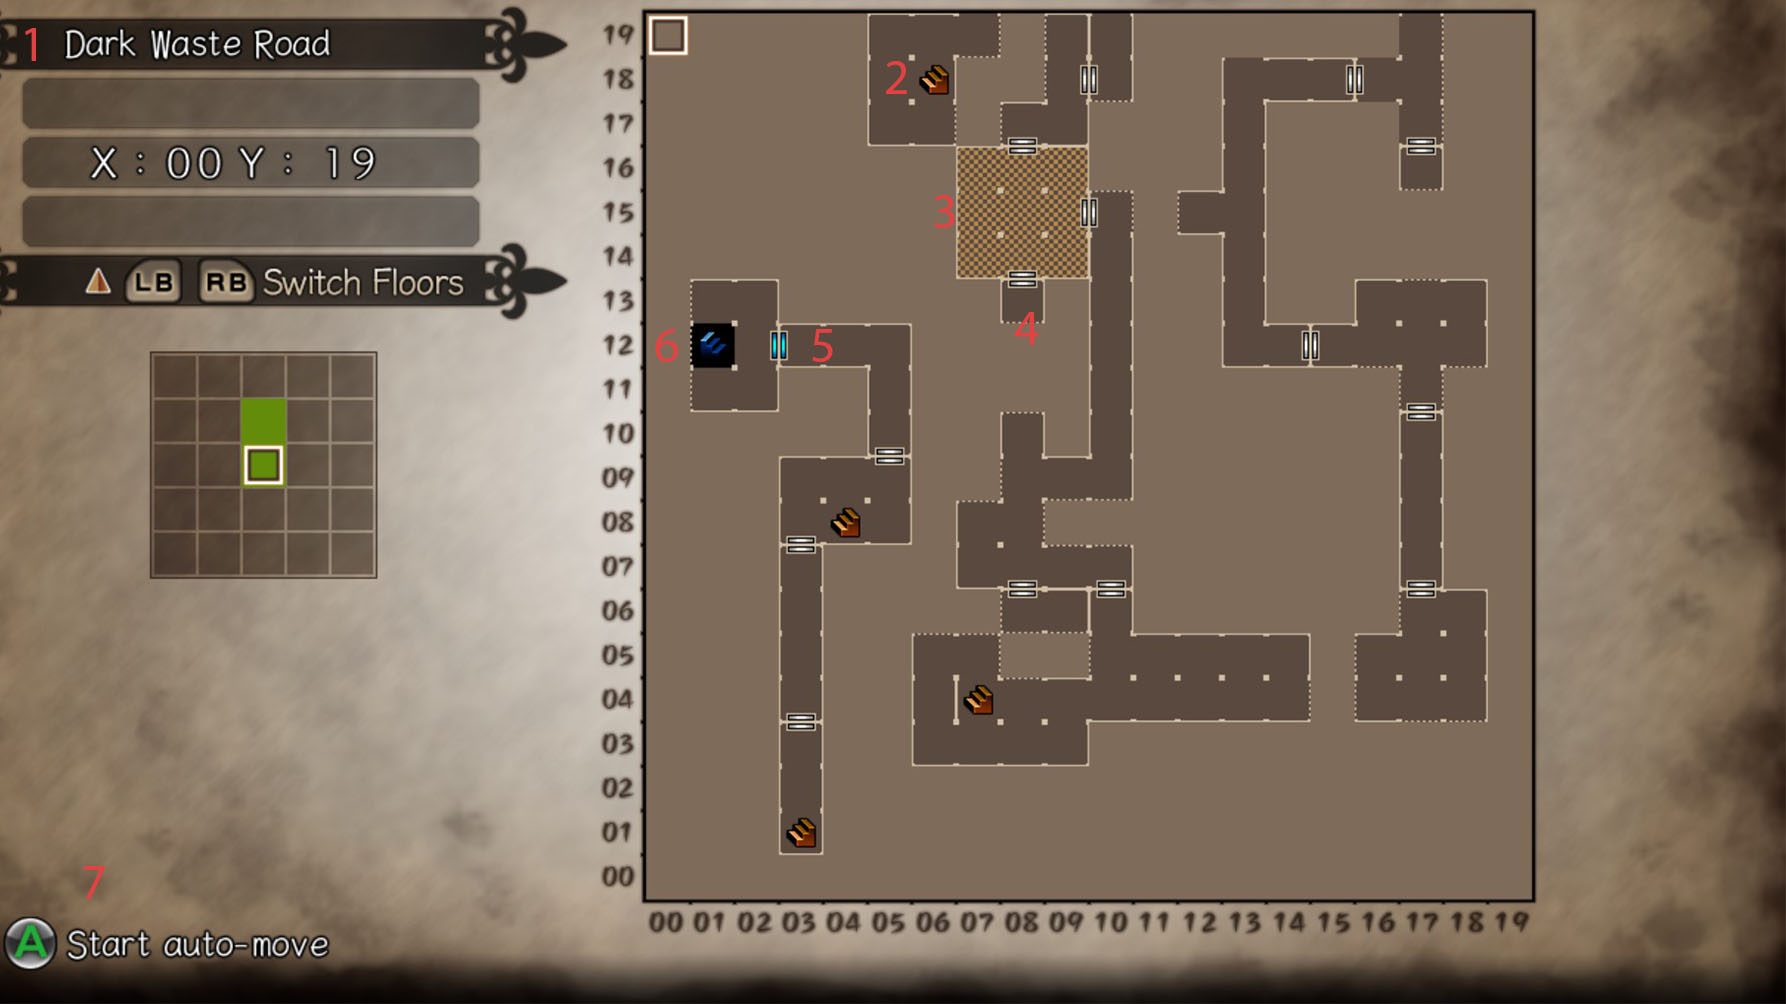
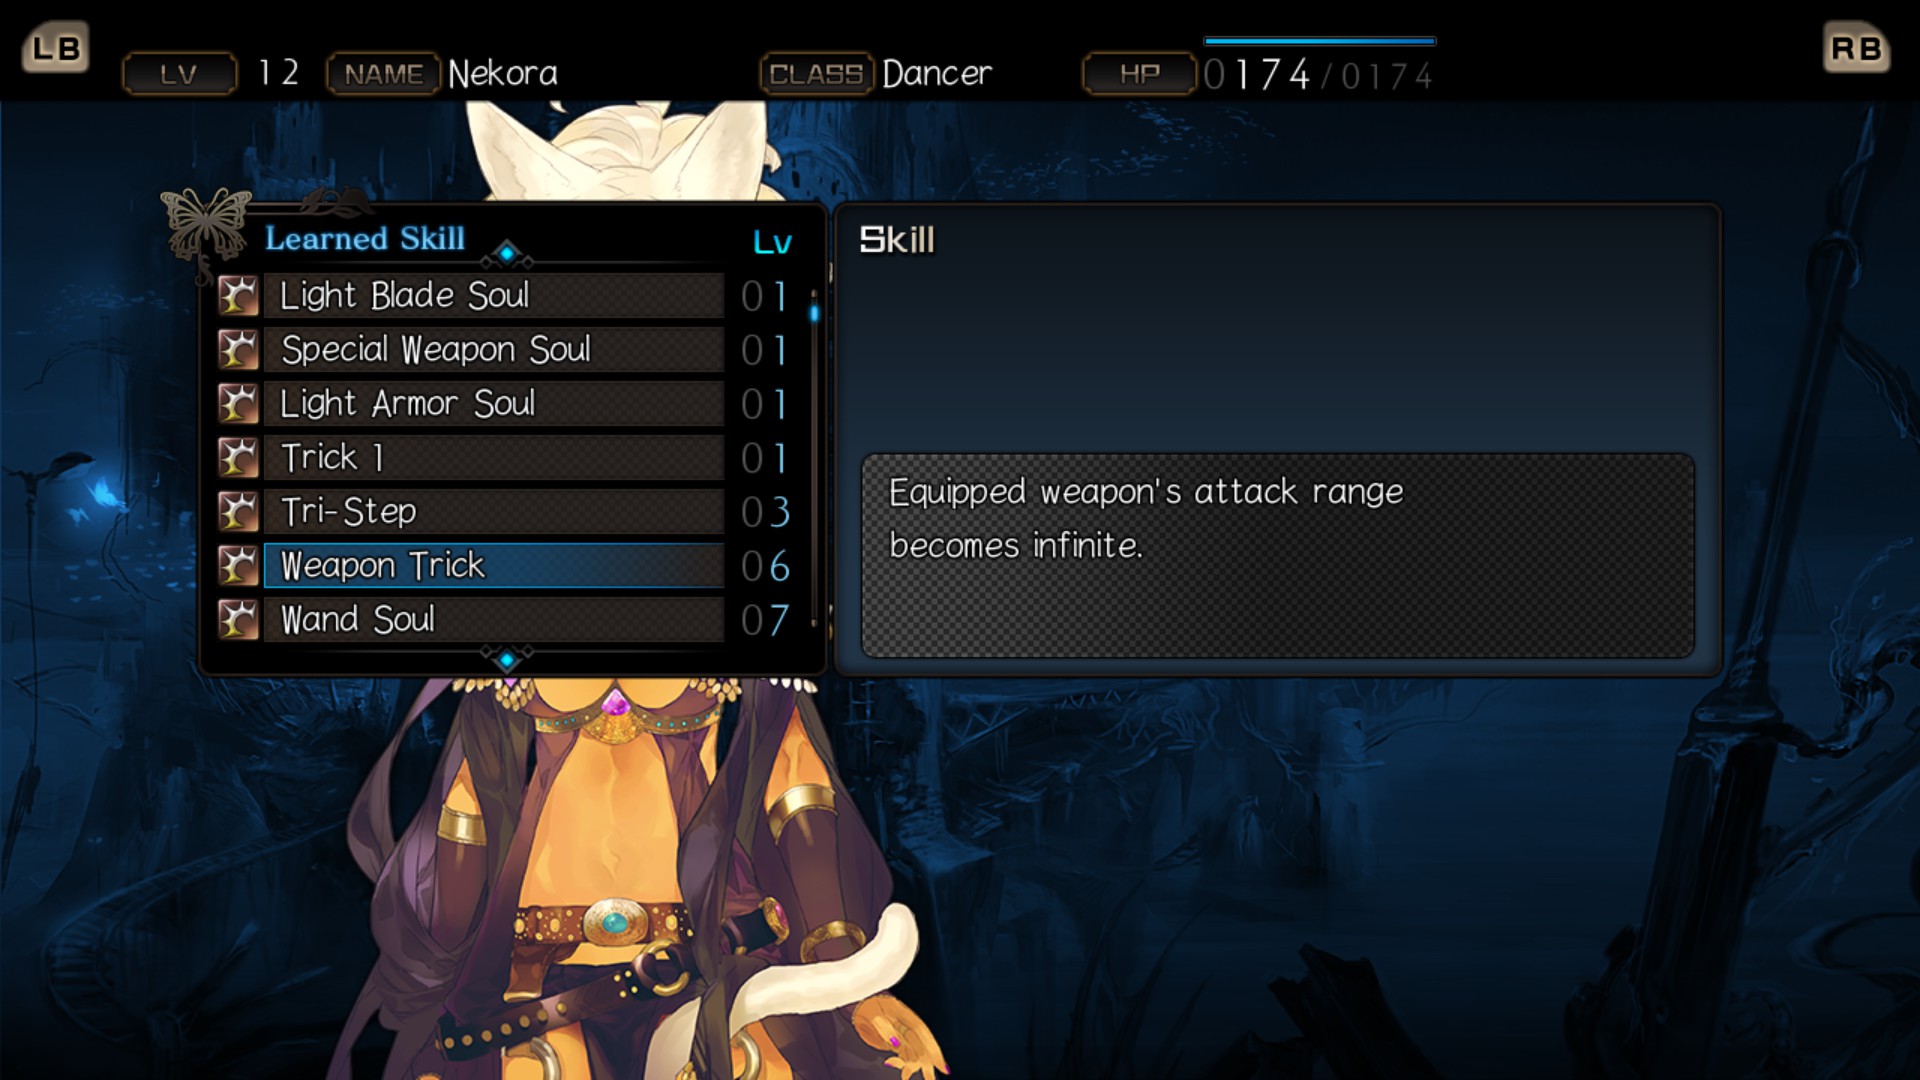
Now, if you don't want to look up guides for maps and such, you can have wildeye to make spotting ambush locations and hidden doors easier, but you don't need it to be able to spot those, sometimes other party members will also notice something, it's just that wildeye means that the character has a higher chance of noticing something, which means it's still possible they won't notice something when it's there. Can't seem to figure out where to go, just investigate all the walls, or any room that seems like it may be an ambush room. As such wild eye isn't needed, but if you want someone to have it that's fine.
DarkRite 25 Jun, 2020 @ 8:49pm 
So I'd still say to make all characters age 40 to 59 as it gives you the benefit of being able to avoid losing anyone. And given you should have made 10 characters the moment it became available to do so. I don't see it as a big deal to just swap out. Especially if you just barely managed to beat a tough boss, as having to redo a boss fight instead of just spending some time with one of your secondary characters seems like an utter pain in the a**. It also defeats the purpose of the recovery and revival mechanics entirely. But I'm the type of person who actually takes his secondary characters to go lvl up because I prefer planning ahead anyway (even though my main character nearly annihilates everything already, and that's before he's even halfway through class changes).
DarkRite 25 Jun, 2020 @ 8:48pm 
Eh, I made my characters ages around what I think they'd be given their race and picture, but with some amount of tweaking. Though even with the youngest looking characters, I do still make them at least 20. Yes I'm aware that from a gameplay perspective it's completely pointless to do that. But I mitigate loss by rolling stat bonuses until they're decently into the teens, so for instance my one character despite being 20 years old, had 16 bonus stat points (I spent over an hour rolling her). That niche aside, I don't like reloading saves that often unless it's a major f**k up.
sigloxx 31 May, 2020 @ 2:09am 
One last thing : after vit, agi is the second most important skill for all melees. more important than str8 by far. for your casters,you can start with not maxed vit (for instance 10 points in vit and 10 in int for wiz/pie for cleric, as mp are very important for them and they won't be damaged as often. still max these 2 stats first, and get agi only afterwards.
sigloxx 31 May, 2020 @ 2:04am 
Also another tip to know : if your main dies, it ll cost you all your coins to resurrect it. So hit the shop and buy useful items with your money in case you really prefer to rez him than to load your last save (my main is samurai and uses Carnage often, which can be a fast way to suicide against tough ennemies ^^. He s the only one that ever died though, especially now that ninja has illusion and knight iron defense).