Dragon's Dogma: Dark Arisen

Dragon's Dogma: Dark Arisen

1,596 ratings
The Arisen's Handbook: A Guide to Adventuring in Gransys
By ̧҉ ҉Minorou ꧁💀꧂
This guide contains a wealth of information on various topics, such as manipulating pawn behavior, notable items and equipment, general questing/exploration advice, and a complete missable sidequest guide so you don't miss a thing.
21
12
5
21
7
3
3
2
3
3
   
Award
Favorite
Favorited
Unfavorite
Greetings, Arisen!

"Perhaps we'll find aught of use here."
Welcome to Gransys, where everyone speaks a silly dialect and mythical creatures are out to kill you. Like any long RPG, there is a lot to see, a lot to do, a lot to learn, and a lot you can miss. I’ve played through Dragon’s Dogma several times on console, and in anticipation of a PC release I wanted to help those new to the series, and perhaps those returning, with a guide to make things easier. If you come across a term or phrase you don't understand, try the glossary at the very bottom of the page.

There is a lot of information out there, some of it conflicting. I've done my best to parse the truth from rumors or erroneous assumptions. However, keep in mind most of this guide is adapted from information from the console release, so the contents are subject to change. I will add and update info based on changes in the PC version as soon as I find out.

I've done my best to minimize spoilers in this guide, though some things simply cannot be hidden in order to offer adequate information on late-game events.

Why not get into the mood by listening to the wonderfully cheesy JRock theme song of the original release? (Video sadly not available for those in the United States, though I'm sure the savvy among you have already modded it into your game.)


B'z - Into Free


With that out of the way, let's delve right in, shall we?
What's changed from the console version?
If you're new to the game, you can freely skip this section with the knowledge that this is the definitive edition of Dragon's Dogma, minus two mid-game armor sets and Japanese voiceover. For those curious or coming in from consoles, here's a list of changes between console and PC:
  • The console versions had letterboxing; the PC version does not. In addition, Capcom representative wbacon has stated that the PC version should support all resolutions, though they have only tested up to 4K (3840 x 2160).
  • There are graphic improvements including increased texture sizes, further draw distance, and improved lighting.
  • Maximum framerate has been set to 150.
  • All DLC, including pre-order exclusives and bonuses such as hard mode, are included in the PC version. Most of it will be available from the start of the game. The rest, including the Eternal Ferrystone, will become available upon completing the escort quest that takes you to Gran Soren for the first time. These items will be found in your storage.
  • Due to licensing restrictions, Japanese voiceovers and the Berserk armor sets are not available.
  • You cannot transfer saves between consoles and PC.
  • There are no rift crystal microtransactions.
  • You can silence Pawns so that they only talk when spoken to by switching Pawn Chatter to OFF in the Options menu.
  • The game still only has one save slot. While you can hot-swap your save file, this may cause synchronization issues with your pawn uploaded to the game servers.
  • While the game does not officially support mods, Capcom has stated that they will not stop people from modding their game.
Character Creation and Advancement Part 1
Dragon’s Dogma has a very robust character creator, giving you extensive choices for you and your main pawn. While you have plenty of freedom, keep these facts in mind:
  • Gender has a minor effect on gameplay. There are pieces of armor and clothing that are exclusive to men or women, but not many. There are also a few NPCs that will react differently to you depending on gender. While there is a rather minimalistic romance system, gender has no bearing on it.
  • The larger and heavier you are, the more you can carry. Large characters have larger stamina pools but stamina regenerates slower. Large characters also benefit from longer reach with their melee attacks, and being taller allows you to stand in deeper water without dousing your lantern. Taller characters walk faster than shorter characters.
  • The smaller and lighter you are, the less you are able to carry. Small characters have smaller stamina pools but stamina regenerates quicker. You have a smaller hitbox, so some attacks against you might miss when it could have hit a taller character. The shortest characters are able to fit in some areas made for goblins as shortcuts. If you're playing a small character, consider getting a larger pawn to carry your loot.
  • Run speed is the same regardless of character size.
  • You can change the way you look after character creation. There is a barber shop in the main city that allows you to change your hair, eye color, skin color, and voice. For more extreme changes, you can return to the character creation menu by going to the Encampment and buying the Art of Metamorphosis for 5,000 rift crystals for a one-time change. In the post-game, you can get the Secret of Metamorphosis for 10,000 rift crystals to change you and your pawn freely. These are used from the main menu by selecting Character Edit.
  • You start the game with a choice between Fighter, Strider, and Mage. You will stay in that vocation until you reach level 10. Once you’ve done so, you can change to any vocation at the inn of the main city of the game, Gran Soren. You’ll reach Gran Soren very early in the game. You can also change by talking to Olra in Bitterblack Isle.
  • There are a total of 9 vocations (classes) in the game. In general, basic vocations have a mix of offense and defense, advanced vocations focus more on dealing damage, and hybrid vocations offer unique abilities and versatility. Pawns cannot have hybrid vocations.
Vocations
Vocation
Type
Weapons
Description
Fighter
Basic
Sword, Shield
The basic sword-and-shield fighter has a variety of offensive and defensive options. They can withstand heavy damage with high HP and heavy armor. They can draw attacks away from allies to let them fight without fear of counterattack.
Warrior
Advanced
Greatsword, Warhammer
The warrior eschews shields in order to go all out with two-handed weapons. While their attacks are slow, they hit for devastating damage. They are resistant to stagger and knockdown ensuring they unleash their might. However, they only get 3 weapon skills instead of 6!
Strider
Basic
Bow, Daggers
The strider can strike foes from afar with a bow and can scrap in melee with dual daggers. They have the unique ability to steal items from enemies and are very well suited to climbing big foes. They have the most balanced stat growth of all classes.
Ranger
Advanced
Longbow, Daggers
The ranger focuses even more with the bow for devastating long-ranged damage. Extremely deadly when using specialized ammo such as Blast Arrows.
Mage
Basic
Staff
The mage has a nice selection of basic damage and support spells. The backbone of any balanced party. This is the only vocation with a healing spell!
Sorcerer
Advanced
Archistaff
The sorcerer loses some support capability in exchange for flashy and powerful spells that wrack the battlefield. Multiple sorcerers can spell synch for rapid-fire casting.
Assassin
Hybrid – Fighter/Strider
Sword, Shield, Bow, Daggers
The assassin is a weapon master, being able to wield 4 types of weapons with different movesets to adapt to different combat scenarios. They are very powerful physical attackers.
Magick Archer
Hybrid – Strider/Mage
Magick Bow, Daggers, Staff
The Magick Archer uses magick through their bow with homing capabilities. They are very mobile and have versatile magick utility. Their special arrow attacks span across all elements.
Mystic Knight
Hybrid – Mage/Fighter
Sword, Mace, Staff, Magick Shield
The Magick Knight is a melee caster in heavy armor that can cast enchantments on their shields and have the signature ability to summon a “magick cannon” to fire upon enemies.

KaZumaKat wrote a detailed breakdown of each vocation. I recommend giving it a read if you're still not sure of what to play.
Character Creation and Advancement Part 2
  • Your character level and your vocation level are entirely separate. Your character level is your character's overall level of power, and can go up to level 200. Each of the nine vocations have their own level up to 9, which unlocks more attacks, spells, and augments for that vocation. You increase your character level and your current vocation level at the same time. Your current vocation determines what stats you gain when you increase in character level.
  • While every vocation has a basic attack that does not consume stamina, vocations mostly use skills in combat, which are combat maneuvers, special attacks, or spells that require stamina. Vocations can equip up to 6 skills at once, with the exception of Warrior, which can only equip 3.
  • There is no such thing as mana or MP in this game. Instead, spells are balanced by their stamina cost and casting time. If you get interrupted while casting a spell, you'll lose all progress and will have to start casting from the beginning. Thus, the biggest, flashiest spells take a long time to cast and are risky in a chaotic fight.
  • Speaking of big flashy spells, don't worry about harming your pawns; there is no friendly fire in this game except the possession debilitation and a Magick Archer ability that requires sacrificing a pawn to cast. However, you can harm friendly NPCs, so be careful if you start attacking near them.
  • Having multiple sorcerers in your party enables a unique ability called spell synching. Whenever a sorcerer incants a spell, another sorcerer nearby can cast the same spell almost instantly. This can be terrifyingly powerful in the right circumstances. Unfortunately, mages cannot spell synch with sorcerers.
  • For equipment, you can equip both armor AND clothing in the same slot for chest and legs. You'll be missing out on defenses if you don't equip a shirt underneath your chest plate, or pants beneath your legguards. You can also equip two pieces of jewelry at once, even two of the same kind.
  • The stat gains you get from levelling up as a certain vocation are permanent and cannot be changed. Despite this, it's not really necessary to worry about character optimization or builds. Seriously, you can play any vocation at any time without much trouble throughout the entire game, so feel free to experiment with different vocations and find out what is most fun to play. You can always obtain gear that will offset any stat deficiencies your character might have when switching vocations.
  • If you're unsure about how much or how little of an impact min/maxing does, this image covers the subject rather nicely.[i.imgur.com]
  • If you do care about optimization a little, simply decide whether you want to be Physical-based or Magick-based, and focus on vocations that match that archetype. Even within those restrictions, you’ll have a variety of playstyles available.
  • If you care about optimization a lot, try reading this[pastebin.com] and look over this[i.imgur.com] (credit goes to their respective creators). There is plenty of material out there to find regarding "highly-optimized builds", though they can be monotonous to level and you’ll only start reaping benefits by New Game+. It is NOT recommended for new players.
  • For more information regarding augments and stat growth, go to the Useful Links section below and check out my other steam guide which covers those subjects.
Your Pawns and You

Pawns are the main feature of Dragons Dogma that separates it from other games in the genre. You play the game with a main pawn and two support pawns, making a dynamic party of four.
  • Your main pawn is yours. It sticks with you throughout the entire game and it levels up alongside you. You'll get your main pawn very early in the game, typically within the first hour of gameplay. You create it and can customize it almost as much as your main character.
  • Support pawns are the main pawns of other players of Dragon’s Dogma. Every time a player rests at an inn, their pawn gets uploaded to the game servers. From there, other players of the game can find and choose other player’s pawns to be part of their team for a while. After you get your main pawn, you can hire support pawns from any Rift Stone. You can also sometimes find pawns walking along the roads of Gransys, or around the Pawn Guild in Gran Soren.
  • The game has a selection of support pawns available at every level for those who cannot play online.
  • It’s a good idea to tailor your party for what you’d expect to face for the next few areas and quests. Try to cover your bases. A good general party will have at least one melee vocation, one ranged vocation, and one magic vocation. It is highly recommended to have a mage in your party at all times, as they are the only vocation that can heal the party without the need for items.
  • Pawns have their own knowledge on quests, monsters, and locations. They’ll gain knowledge as they experience the subject in question. If someone hires your pawn and does a quest you haven’t done yet, your pawn will know how to complete it when you start the quest yourself.
  • The same idea applies for monster weaknesses. If you hired a pawn that’s fought a cyclops before, that pawn can shout out what its weaknesses are and your party can act accordingly.
  • Support pawns are meant to be a temporary pact. They do not level up with you and it’s expected to rotate out pawns every couple of levels.
  • You can choose to hire pawns of higher or lower level than you. You get bonus experience for having pawns of lower level than you, and an experience penalty for pawns of higher level. The modifier is 1% per level difference up to 25. For example, if your party had a pawn 27 levels higher than you and a pawn 8 levels below you, you’d get a total 17% penalty to experience gain (8 - 25 = -17).
  • Having no pawn at all counts as 25% increased gain. This bonus is multiplicative, meaning if you play the game with just you and your main pawn you'll get 56% more XP, and if you go completely solo you'll earn 95% more XP.
  • You must pay rift crystals to hire pawns of higher level than you. Rift crystals are the secondary currency of Dragon’s Dogma, and are used in some shops and end-game item identification. You’ll get rift crystals over time through regular gameplay, though you’ll find them more often in Bitterblack Isle. You’ll also receive rift crystals when other players hire your pawn.
  • You can hire pawns from your friends for free, no matter what level they are. Keep in mind that the experience modifiers from level differences still apply.
  • Don't get discouraged if your pawn returns to you with a 3-star rating with no comment or gift. This almost always means your pawn died in the other player's world, usually via endless pit, the brine, petrification, or instant death effects. This leaves the player who hired your pawn unable to give them a proper rating.
  • You'll find that pawns can be quite the chatterboxes. If it ends up being too much, you can reduce the frequency of speech at the Knowledge Chair at inns or at the Pawn Guild, or turn off their subtitle display in the options menu. The PC release features a new listing in the options menu to have them only speak when spoken to.
  • As you explore Gransys, your pawns will pick up loot occasionally. Everything they pick up will always be yours, so don't worry about your support pawns' inventories when you dismiss them or if they die; everything in their inventory will automatically go to your storage.
  • On the other hand, if you wish to give items to other players, you can do so by giving gifts to their pawn while dismissing them in the rift.
  • You cannot take items equipped on a support pawn. If you try, it will be unequipped but it won't appear in your inventory. If you put your own equipment on a support pawn, that equipment will be gifted to that pawn's master. You'll get a note on-screen notifying you when you're about to do this, so you can't accidentally lose anything.
  • If you give the "Help!" command out of combat, mage pawns will cast their weapon buffs on you. If you command "Help!" in combat, mages will stop what they are doing to heal you. However, doing this often influences your main pawn's inclinations (see the section below.)
Pawn Behavior and Inclinations - How to Get Your Pawn Hired
Just as pawns have their own knowledge, they also have their own personality that dictates how they will act in and out of battle. This has a great effect on how they perform, so much so that expert players can and will hire pawns based on inclinations. Having the right inclinations are just as, if not more important than, having the right gear and skills equipped. A heavily-armored fighter pawn is useless if it walks around picking up herbs while you’re getting skewered by bandits. It’s easy to overlook, so many players fall into the trap and end up with unhelpful pawns. Inclinations are always updating over time depending on your behavior, so pay attention to your pawn.

You can check pawn inclinations on the status screen. You'll see the top two inclinations that define their priorities and tendencies in battle. The primary inclination has the strongest influence. The third-highest (tertiary) inclination also has an effect on behavior, even though it is not displayed. Inclinations below the top three are effectively ignored. However, remember that inclinations are guidelines for behaviors, not absolute. For example, a pawn with Mitigator/Scather/Challenger as its top three inclinations will still pick up items from time to time, even if Acquisitor is its lowest stat.

Changing your Main Pawn's Inclinations
When you first create your pawn, you will be asked a set of four questions that influence its starting inclinations. You are able to see the effects of each answer, so pay attention to what you want and choose answers accordingly.

Your pawn observes how you play and learns to emulate your behavior. Because of this, their inclinations slowly change over time. If you often pick up loot during battle, your pawn’s acquisitor inclination will increase, and so on. The pawn learning system is deceptively complex; this guide only scratches the surface.

You can also change your pawn’s inclinations by sitting down in a Knowledge Chair that’s often found in Inns, near Rift Stones, or at the Pawn guild. Your pawn will ask you questions on how to act, and your answer will change how they behave. You can also change some non-inclination behaviors this way, such as how often they speak.

You can more directly influence inclinations by consuming Inclination Potions sold by Johnathan at the Encampment. They require rift crystals to buy, but they are the fastest and easiest way to change inclinations. If you're short on rift crystals you can duplicate inclination potions at the Black Cat. To really cement in your choices for a good long while, buy 3-4 elixirs of the top three inclinations you want, then have the pawn drink them in reverse order. That means if you want a Utilitarian primary, Mitigator secondary, and Scather tertiary, drink the Scather potions first, then Mitigator, then Utilitarian last. You can also accomplish this with fewer elixirs, but the effects won't last as long due to behavior emulation described above.

Orders given also influence inclinations, as seen in the table below.

Inclination
Encouraged by
Effect
Scather
Using “Go” command in battle
Scathers attack the strongest foes first in close-range combat and climb more often. Best on melee pawns; not recommended for long-ranged vocations.
Medicant
Using “Come” command in battle; healing yourself from critical HP with items
Medicants prioritize healing and avoids combat. Useful on mages. Best as a secondary or tertiary inclination.
Mitigator
Attacking weak foes first
Mitigators attack weak foes first. Spellcasting pawns will use large AoE (area of effect) spells more often.
Challenger
Attacking foes with ranged or support abilities first
Challengers will prioritize foes with long-ranged attacks like bow-users and spellcasters.
Utilitarian
Using support skills and enchantments in combat; Using “Help” command in battle
Utilitarians focus on support actions. Sorcerers will spell synch, fighters and warriors will grapple, mages will enchant. Works well with more monster knowledge. More utilitarians in a party will coordinate tactics.
Guardian
Using "Go," “Help,” and “Come” commands in combat; Any situations that require the pawn to aid the Arisen (picking you up from low stamina, etc.)
Guardians stay close to the Arisen. Usually only useful when you and the pawn are both melee. Anything else and the pawn will often struggle with conflicting priorities.
Nexus
Reviving pawns; Equipping pawn with Magnanimous Cloak
Similar to Guardian, except that it supports other pawns. Can cause similar issues as Guardian. The pawn will pick up downed allies in combat and drop them closer to you.
Pioneer
Using “Go” command out of battle
Pioneers will scout the surrounding area. Can be useful if paired with acquisitor. Can cause the pawn to attract unwanted attention from distant enemies.
Acquisitor
Picking up items
Acquisitors gather items more often. Very useful, but they can also disengage from battle in order to loot distant items.

Beware of Inclination Conflicts
Pawns choose their actions semi-randomly from a pool of actions provided by their inclinations. Because of this, conflicts can occur when inclinations provide contradictory actions. This is mostly due to inclinations that influence position in combat. If one inclination wants the pawn in the middle of combat and the second tries to keep them away, you've got a conflict.

The problems of a conflict can also depend on your own vocation. For instance, let's say you're a sorcerer and your main pawn is a Scather/Guardian. Combat starts and due to Scather, your pawn charges into battle. Then due to Guardian, they run back to your side to protect you. The pattern repeats. As a result, a lot of the pawn's time spent in combat is just running back and forth accomplishing very little. On the other hand, this very same combo will not be a problem if you're a fighter or warrior; guardian and scather will keep your pawn with you in the middle of battle, right where you want them.

Common problematic conflicts are between Guardian, Nexus, Scather, Pioneer, and Acquisitor. Try to keep your inclinations complementary to avoid these conflicts.

The Guardian Trap (and Nexus, too)
The Guardian inclination is by far the most common inclination as players, especially new ones, act in ways that raise guardian. In most cases, it is also the least helpful inclination to have. If you’re a mage and your fighter pawn is a guardian, they will stand around passively until you are attacked, in which case they've already failed at “guarding” you. In fact, having two targets standing close together is more likely to draw attacks towards you rather than draw them away. Guardian is the most common cause of inclination conflict. As a general rule, avoid Guardian inclination, especially if your Arisen is a caster or bow-user.

Nexus pawns have similar issues to a lesser extent. Aside from having the same issues as Guardian (exchanging standing near the Arisen for standing near allied pawns), a Nexus pawn will spend time in combat picking up downed allies and dropping them near you. This is remarkably unhelpful, as this keeps the Nexus pawn unfocused on combat and again draws attacks towards you, the player. You also can't revive a pawn if they're being carried; in most cases it's faster to just run to the fallen pawn yourself.

Experienced players tend to avoid hiring pawns with Guardian or Nexus.
TL;DR: Recommended Inclinations
So, that's a lot of information regarding inclinations up there. Want the short version?

If your pawn is a...

Fighter: Scather/Utilitarian/Challenger/Mitigator. Fighter pawns are usually meant to be tanks, to attract the enemy's attention away from the squishier party members. Give them Scather as a primary so they get in the middle of the fray. Having Utilitarian as a secondary has them use their aggro-drawing abilities more often.

Warrior: Scather/Mitigator/Challenger/Utilitarian. This class wants to get in the enemy's face and deal damage, so these are your go-to choices. Order them however you prefer. Easy.

Strider: Mitigator/Scather for dagger-focused/Challenger for bow-focused/Utilitarian. Striders are effective at most ranges, so choose Scather or Challenger based on how you want them to fight. If you'd rather not decide, you can't go wrong with Utilitarian.

Ranger: You want Challenger/Mitigator/Utilitarian. Rangers work particularly well as Challenger, as they can easily pick off dangerous foes from afar. Avoid Scather, as this makes a conflict between standing in melee range and being at the best distance for longbow use.

Mage: Utilitarian/Medicant/Mitigator/Challenger. Have Utilitarian as the primary inclination. They will keep buffs up and will still attack and heal appropriately. Have Medicant as a secondary or tertiary for reasons listed next paragraph, depending on your preferences. Mitigator and Challenger are good choices for a more offense-oriented mage. Scather is not recommended, as mages don't want to be in close range for the increased likelihood of getting their spellcasting interrupted.

Special note about Medicant: Its position as a primary, secondary, or tertiary determine at what health you or your pawns must be for your mage pawn to stop whatever it is doing and begin casting their heals. With Medicant as a primary, your mage will focus on healing any damage taken at all. This means they'll rarely have an opportunity to cast anything else. With Medicant as a secondary, they will start healing at around 75% health. As a tertiary, around 50% health. A mage without Medicant will heal in combat if health is critical, but otherwise only heal once combat is over. I recommend having Medicant as a secondary or tertiary; this leaves them more versatile in combat rather than being a monotonous healbot.

Sorcerer: Mitigator/Challenger/Utilitarian. Sorcerers want to destroy the battlefield with big spells, so Mitigator is great for encouraging AoE use as a primary. Challenger lets them focus on killing as well, and makes a good primary or secondary. If you want them to keep up with buffs, Utilitarian is a good secondary or tertiary. Avoid Scather: sorcerers do not want to be in close range, especially since they have very long cast times for their best spells.

You'll notice Utilitarian is in all pawn suggestions. It is another interesting inclination as it gets more effective the more bestiary knowledge the pawn has. It also becomes more effective if multiple pawns in the same party have Utilitarian together. You can't really go wrong with Utilitarian on pawns.

And, as I've said before, always avoid Guardian and Nexus unless you know what you're doing and are going for a very specific behavior set.

If all of this still seems too daunting, don't get too hung up on all these do's or don'ts. If you're paying half-attention your pawns will do just fine.
However, if you take the time and groom your pawn well and hire similarly cared-for pawns, the results will be fantastic. A group of well-trained pawns are a force to be reckoned with. Good pawns are well-trained, and good pawns get hired. It doesn't hurt if they're good-looking, too.
Inventory and Equipment Part 1 - Basic Tips and Upgrades
  • Feel free to pick up just about everything you come across. If you get too heavy, you can always give excess cargo to your pawns.
  • By carrying too much, you'll become encumbered. You'll move more slowly, recover stamina slower, and consume stamina faster.
  • You have item storage available at every inn. Items deposited in one area will be available to pick up everywhere else for convenience.
  • Pawns will automatically use the appropriate curatives in their inventory if they reach low enough health or become afflicted with a status effect.
  • Items in your support pawns’ inventory will be automatically sent to your item storage when they leave, so don’t worry about losing items if they die off or you dismiss them without checking their inventory.
  • Always keep a lantern on you. The game is very dark underground and at night. Have some flasks of oil ready to refill it when it starts to flicker and dim. If you get drenched in water, it will go out. You can relight it by putting it away then taking it out again. Pawns can use lanterns without needing refills, but the light radius is very small.
  • It’s a good idea to buy or find a pickaxe early on for you and your pawn. Your pawn can often start mining from an ore node you didn’t even realize was there. You are also able to mine nodes by hitting them with attacks with high impact, such as a two-handed weapon swing or a powerful spell.
  • Some items have expiration dates! Don’t expect that carrot you picked up to be good forever. It will eventually become a moldy carrot, then a rotten carrot. Items deposited into item storage do not age. You can also keep items from aging by putting them in airtight flasks. Don’t throw them away, though, aged items have their uses too.
  • Don’t sell items unless you’re short on cash. Deposit everything you aren’t going to use. Strange, obscure, or seemingly useless items can be quest objectives, ingredients for an item combination, or a required item for an equipment upgrade.
  • You can combine items from your inventory. It can be quite useful in you're in a pinch. You can find a complete list of item combinations here[dragonsdogma.wikia.com].
  • There are seven tiers of equipment upgrades which raise the stats of the weapon or armor in question. Note that you can skip lower tiers if you have the materials for it.
Upgrade Level
Upgrade Requirements
Base
No stars. You’ll acquire equipment at base quality.
Requires naught but gold.
★★
Requires gold and common or uncommon items.
★★★
Requires gold and rare items.
Dragonforged
Killing a dragon yields a chance that the Arisen's current equipment gets dragonforged. See the section below.
Rarified (Silver Dragonforged)
Done by Barroch on Bitterblack Isle. Requires rift crystals and rare items. Can only be done on Dragonforged equipment.
Rarified (Gold Dragonforged)
Done by Barroch on Bitterblack Isle. Requires rift crystals and very rare items. Can only be done on Silver Dragonforged equipment.


Dragonforging
Killing a dragon yields a chance that the Arisen’s current equipment get dragonforged. More stars on equipment increases the chance, and more powerful dragons increase the chance. Equipment on pawns do not get dragonforged.

Base
★★
★★★
Drake, Wyrm, Wyvern
0%
2%
6%
18%
Dire Drake, Dire Wyrm, Dire Wyvern
5%
15%
25%
40%
Cursed Dragon
40%
55%
65%
75%
Grigori
100%
100%
100%
100%
Offline Ur-Dragon
0%
2%
10%
30%
Online Ur-Dragon
100%
100%
100%
100%
  • As you can see, the more stars on your equipment, the higher the chance of it becoming dragonforged. The exception is Grigori and the online Ur-Dragon, which always dragonforge everything you have equipped.
  • Dragonforging occurs at the dragon's death, and at no other time. It is not affected by being hit by dragon's fire, or anything else. You can fight with your main gear and then switch out right before the killing blow to dragonforge the equipment you desire.
  • While equipment on pawns do not get dragonforged, you can equip something, get it dragonforged, and then equip it on your pawn.
  • For information on efficient ways of farming the dragonforging process, try reading the dragonforging section of the "Science etc." document[docs.google.com].
Inventory and Equipment Part 2 - Useful Items of Note
Like in many RPGs, you'll be collecting a lot of loot. It can sometimes be difficult to separate the raff from the gold. Here are some items of particular note that you should pay attention to throughout the game.
  • DLC/Bonus Items - A good portion of DLC and bonus items and equipment are available free in the PC version. You'll find them in your item storage at the beginning of the game, and a few more will be given to you once you finish the quest that leads to Gran Soren. By far the most useful is the Eternal Ferrystone, allowing you free teleports anywhere except within Bitterblack Isle.
  • Baleful Nails - This is a piece of jewelry sold by Madeleine. She only sells one at a time, but it is highly recommended to buy one each time she restocks. Each one you equip grants you +10 Strength and +10 Magick for a nice offensive boost in stats. You can equip two at once, so get a set for your main pawn and yourself.
  • Seeker's Tokens - You need 20 Seeker's Tokens for the quest Foreign Service. You can find some all throughout Gransys, but an easy way to farm them is finding them around the seaside cliffs on the path between Cassardis and the Encampment.
  • War Bugles - You need 50 War Bugles for the quest Reveille Revelry. You can often find War Bugles in the chests around the guard towers of the south entrance to Gran Soren, but most Bugles will come from the Encampment noticeboard quest Final Farewell, which rewards 40 War Bugles.
  • Sour Ambrosial Meats - You need 5 for Epicurean Delights and 1 for Farewell, Valmiro. You can let Ambrosial Meat sit in your inventory so it becomes Sour, but be careful not to let it rot. Leave your collection in item storage to keep them at the Sour stage until you turn it in. You can rarely get some from killing oxen, deer, and griffins, but the most convenient way is to pick up the respawning ones in the Ancient Quarry (in the central area, destroy some boxes) or close to the entrance of the Midnight Helix on Bitterblack Isle. You can steal some from wandering pawns as a Strider, or have some drop from the Offline Ur-Dragon. You can also get five from the quest Supply and Demands.
  • Spring Water - A simple, powerful curative that you can get early on in the game. Simply buy empty flasks, travel to a healing spring, and gather the water for an item that restores 330 HP to the entire party. Having a few on hand (or in your pawns') greatly mitigates the danger of exploration.
  • Throwblasts - A lot of people underestimate the power of throwing items at enemies. Throwblasts deal a high amount of damage, knocks small creatures away, and has a high chance of staggering large enemies. Blast arrows offer similar utility and damage for bow-using classes. Invaluable for killing Maneaters, the yellow worms in chests in Bitterblack Isle. You can buy Throwblasts and Blast arrows from Aestella in Cassardis.
  • Demon's Periapts and Conqueror's Periapts are consumable items that increase Magick and Strength, respectively. You can stack them up to four times and they last 60 seconds. Keep some on hand and use them when you get a good opening on a boss - you'll notice the difference right away, as you'll be doing devastating damage. You can buy periapts from Fournival.
  • The Gold Idol - The Gold Idol has several purposes. Merely holding it in your inventory (or your pawn's inventory) grants you a whopping 30% discount at stores. It is also the best item to give for the quests Idol Worship or Supplier's Demand. A forgery is a costly 125,000 G, but the savings you'll get will pay it off. It's highly recommended to give the Gold Idol to whoever your prefer, Madeleine or Caxton, and keeping the forgery for yourself. Rewarded from the quest Escort Duty.
  • The Wyrmking's Ring - This little ring has an outstanding feature: it reduces the cast times of spells by 15%, and stacks with other effects that do so. It doesn't even have to be equipped; merely having it in your inventory will do. Highly recommended to make a forgery of this to turn in for the quest of the same name, and keep the real one for yourself.
  • The Maker's Finger - An arrow that instantly kills any target it hits, including most dragons (if you hit them in the heart). Don't miss; the game saves as soon as you fire it. You can buy it from Fournival. He only stocks one and will not restock until you use the one you have. Most end-game bosses (especially those on Bitterblack Isle) will not die instantly. Instead of dying, they will take one full bar of damage. Curiously, the major story boss The Dragon, Grigori can be killed instantly with it, but you'll miss out on some loot if you kill him during the "chase".
  • Godsbane - Gained from the quest The Final Battle. A dagger used to kill yourself. No, really, it's useful. It's a quick "Quit Game without Save", allowing you a free retry. Didn't like the loot in that chest? Godsbane and reset to get another roll for loot! Didn't like what the boss dropped? Godsbane! That equipment didn't get dragonforged and you don't want to wait on a dragon respawn? Godsbane!
  • Rusted, Aneled, and Golden weapons don't seem like much at first. They aren't... until you upgrade them to three stars, where they acquire the ability to inflict debilitations on enemies.
    • Three-star rusted weapons inflict Torpor and Poison. Torpor is so powerful it can render extremely difficult foes into trivial punching bags.
    • Aneled weapons inflict Tarring on enemies regardless of upgrade level, which is great when combined with fire spells. However, at three-star enhancement they also inflict Blindness.
    • Golden weapons, when enhanced to three stars, inflict Silence. Enemies who rely on spellcasting become essentially useless in battle, as they continually try to cast spells (and fail).
Inventory and Equipment Part 3 - Forging Forward with Forgeries
The Black Cat is a store run by Mountebank in an alley southeast of the Fountain Square of Gran Soren. He sells rare or unique items, such as ferrystones. If you lose or accidentally sell a Special Item (quest items), you can probably buy it back at the Black Cat.

The Black Cat also offers a counterfeiting service. For a price, you can make a copy of just about anything in the game that's not weapons or armor. Most items are simply duplicated, but a few items will be specially marked as forgeries. Note that magical items can be copied but their magic effects are not; you can make a forgery of a ferrystone, but don't count on it taking you anywhere. Forgeries take roughly one day to complete, and you can only forge one item at a time.

Naturally, forgeries can be quite useful if used correctly, especially on quests.

The Gold Idol grants you a 30% discount at stores when you have it in your inventory. Forging it allows you to keep the forgery (and thus the discount) while you turn in the real one for Idol Worship or Supplier's Demand.

When you get the Confidential Letter for The Conspirators quest, you can turn the letter in to either Fedel or Ser Gabrian. With a forgery, you can give a letter to both, thus getting double the quest reward.

The Wyrmking's Ring from the quest of the same name reduces spellcasting time by 15% when held in your inventory. Get a forgery to turn in to Aldous while you keep the real version yourself. The ring also functions as a key for a treasure chest in the Duke's treasury. When you go there for the Reward and Responsibility quest, the chest won't be able to be opened with the forged ring. However, since you have the real ring, you can simply sneak in at night and get the contents yourself if you wish.

The Gift Ledger and the Chamberlains Affidavit are both found in Fournival's Manor and can be used as evidence in the Trials and Tribulations quest. They are also needed for the quests Trail of Corruption and Thanks Mislaid. If you want to use them for evidence but also need them for the later quests, get them forged.

If you need a boost to the amount of items needed for a quest, or don't want to rely so much on random drops, you can certainly make forgeries of Seeker's Tokens, War Bugles, or Sour Ambrosial Meats in order to meet the quest's quota.
Exploration, Questing, and Combat

  • Save often. There’s no worse feeling than trekking halfway across the map only to die because you took a wrong turn and a chimera pounced on you from behind.
  • Selecting Save/Quit on the pause menu will not actually Save and Quit. Instead, you'll be given different options, such as Save and Continue, Save and Quit, etc.
  • The game is designed around only having one saved character, but that one save has two save "slots" which serve different purposes. The first is a general save slot that autosaves when you enter areas or complete quests. It is also what you save to when you manually save. The second is the checkpoint save, which occurs every time you rest at an inn or enter a rift stone. If you mess up on a quest or want to retry something but the game has autosaved since, restart from a checkpoint to return to the inn or rift stone.
  • Early in the game, avoid travelling at night. Visibility is low, exploration is hindered, and very deadly beasts prowl around.
  • Early on, beware the armored bandit on the way to Witchwood.
  • Rest at inns on a regular basis. Not only does this restore health and upload your pawn data, it also sets the game time to an hour after morning, or an hour after nightfall: excellent for doing quests on your own terms.
  • Resting benches on Bitterblack Isle do not pass time. If you're trying to advance time on BBI (such as waiting for respawns), leave the island and rest at an inn.
  • You have infinite stamina in safe areas such as in town, so you can sprint as long as you like.
  • Day lasts 32 minutes; night lasts 16 minutes. Each in-game hour is 2 minutes long, so a full in-game day is 48 minutes long.
  • When you take damage, you will see your health bar decrease, as well as have a light gray and a dark gray section. The light gray part of the health bar can be recovered with healing magic. The dark gray part of the health bar can only be recovered via healing items or staying at an inn.
  • While you can walk in shallow water, you cannot swim in deep water, which houses the mysterious Brine. The Brine is identified by its "bloody" appearance when you get too close. An Arisen fallen into the Brine will respawn close by without issue, but any pawn claimed by the Brine will be sent back to the Rift as if killed. Monsters that fall into the Brine will be instantly killed but won't drop loot.
  • An easy, powerful curative item in the game is spring water. Simply take some empty flasks to any healing spring and perform the gather action to take some. Flasks are cheap, and each flask of spring water heals the entire party for 330 HP!
  • For increased mobility, consider using vocations with daggers, which have a double jump core skill. There is also a core skill for staff/archistaff for the ability to levitate. Using these, you can reach some areas normally inaccessible. Unfortunately, neither of these skills prevent falling damage.
  • Weapon enchantments are a wonderful thing. Try and have at least one person in your party able to buff your weapons. In terms of which element, it depends on what you're up against, but for the most part Fire and Holy has you covered in most bases. Holy has an extra benefit of slightly healing you whenever you deal damage, but fire is better for fighting beasts. Both are great against undead.
  • If you learn an advanced version of a spell or skill, you use it by charging up the basic version of that spell/skill, then keep holding the charge past the initial threshold in order to begin charging the advanced version. If you release before the advanced version is fully charged, you will do the basic one instead.
  • Pay attention to your stamina! Running out of stamina will cause you to pause to catch your breath, which leaves you vulnerable for several seconds. Pawns can “pick” you up from this state to shorten the animation.
  • Don't underestimate status effects; they are quite powerful even against boss monsters. If you're having trouble, even early on, try throwing a skull at an enemy to inflict curse.
  • If you see small explosive barrels around, you can detonate them by attacking them, or you can pick them up and throw them directly at your enemies.
  • If you accidentally kill an important NPC, they will respawn in 7 days.
Quests
  • A green icon over a character's head means they have a new quest for you.
  • A red icon means the character is important to your current quest.
  • A yellow icon means they are important to a quest that isn't your currently selected one.
  • A blue icon means you have completed the quest. Talk to the person to turn it in.
  • You can change which quest is your currently-tracked one in the quest menu.
  • Each noticeboard for quests has its own pool of sidequests. Be sure to check every noticeboard every now and then.
    Noticeboard locations:
    • Cassardis Inn
    • The Encampment
    • Gran Soren Inn
    • Arsmith's Alehouse
    • Pawn Guild
    • Lower Pawn Guild (From a Different Sky quests)
    • Bitterblack Isle Entrance
    • Warrior's Respite in Bitterblack Isle
    • Arisen's Refuge in Bitterblack Isle
  • You have no limit to the quests you can have at once. Visit quest boards every now and then to pick everything up. Just be careful with escort quests: once you start one, you cannot pick up more quests until you complete or abandon the escort.
  • The exception to the quest limit is the From A Different Sky series of quests, which are scavenger hunts gained from the notice board at the bottom of the staircase in the Pawn's Guild. There are a hundred of them and you can only have six of these quests active at once. They have no story involved and merely involve exploration and creative platforming to complete. They are a great source of rift crystals. Double jumps, levitation, and Frigor ice platforms are recommended; shooting them down with arrows is required for some.
  • If you are doing every quest in the game, or take frequent visits to Bitterblack Isle throughout the main story, you'll find yourself starting to overpower storyline quests. This normally isn't a problem, except for one in particular: Griffin's Bane. When you first fight the Griffin, go easy on it, or simply stand out of the way and observe the fight. The Griffin is supposed to fly away and escape, leading to a fun sequence later on. If you kill it there on the grassy cliffside, you'll deprive yourself of the experience (and loot!)
  • Despite what it looks and sounds like, the quest The Final Battle is far from the end of the game. There is much more to do afterward, so don't leave the game thinking you've won.
  • There are missable quests in this game. See the "Story Phases – Missable Quests" section below for detailed information.
Fast Travel - Using a Ferry to get to Port
It gets tiresome to walk everywhere by foot. Luckily, we have portcrystals and ferrystones. Use a ferrystone to travel to any portcrystal you've seen before. Ferrystones are one-use items, but you can buy or find more. Thankfully, the PC release includes the Eternal Ferrystone, which has infinite uses.
  • You can buy unlimited amounts of ferrystones at the Black Cat, the same place you can get forgeries. Fournival sells cheaper ferrystones, albeit in limited quantities.
  • If you don't want to be bothered by all that, you can use the Eternal Ferrystone. It will be found in your storage once you complete the quest that first takes you to Gran Soren. It was originally a bonus item in the console release, but is freely included on PC.
  • There are three permanent portcrystals: by the Pawn Guild in Gran Soren, beside the gate just outside Cassardis, and the entrance to Bitterblack Isle. The other portcrystals are able to be picked up and placed anywhere you want as a customizable warp destination.
  • The Portcrystals you can find, pick up, and place anywhere are not really hidden and are easily found through normal gameplay. If you must know their initial locations, see below. They are in rough order of when you would encounter them:
At the bottom of the Everfall, retreivable the first time you go there.
In the cave at Hillfigure Knoll, where the Dragonforged NPC lives.
Inside one of the prison cells at the Shadow Fort.
At the top of Bluemoon Tower.
In the passage underneath the Witch's House in Witchwood, during/after the Witch Hunt quest.
  • In New Game+, you can buy portcrystals from The Black Cat.
  • You can have up to 10 portcrystals deployed at the same time.
  • I recommend placing portcrystals by healing springs. They are rather close to several points of interest and allow for easy escort quests/collecting valuable spring water.
  • Escorts go with you when you teleport via ferrystone, so escort quests can be done easily by warping to a portcrystal near the destination.
  • You can use ferrystones at the entrance to Bitterblack Isle, but nowhere else within. You need liftstones to warp out of Bitterblack Isle. You can buy them from Barroch, or find them as random loot on the island.
  • Remember, forgeries do not copy magic properties: forged ferrystones or portcrystals don't work!
Grappling and Climbing for Dummies
Dragon's Dogma combat features grappling enemies your size and climbing on those larger than you. While this is a neat addition, it plays a smaller role than you'd think, especially if you're playing a ranged character.

Grappling
  • Grappling means grabbing hold of an enemy such as a goblin or bandit and holding them in place. This reduces the grappled foe's defenses and prevents them from taking any actions. You must hold the button in order to maintain a grapple.
  • Only Fighters, Warriors, Mystic Knights, and Assassins can grapple an enemy. Other classes will attempt to pick them up. All classes are able to pick up enemies and throw them off cliffs for massive damage.
  • While grappling, stamina slowly drains. Larger and heavier characters lose stamina at a slower rate. You'll automatically let go if you run out of stamina.
  • Pawns can grapple as well, especially if they are Utilitarians. By default, the dynamic camera will pan to a pawn grappling an enemy, letting you know that you are free to attack. You can disable this camera function in the options menu if you find it too disruptive.
  • Some enemies must be stunned or knocked down in order to be grappled.
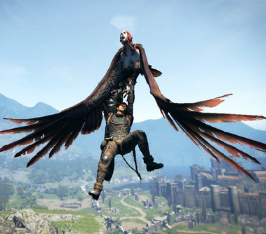
  • Believe it or not, you can grapple a flying Harpy by the legs and somewhat steer the direction you fly. She will eventually knock you off, but it's a neat thing to try nonetheless. You could even use a harpy to fly to hard-to-reach areas if you're clever enough, though actual uses are limited.

Climbing

The more bombastic variant of grappling that allows melee classes to reach and attack weak points or specific limbs that they normally cannot reach. This functions somewhat similarly to how climbing works in the game Shadow of the Colossus.
  • You can climb on just about any creature larger than you.
  • Like grappling, climbing will slowly drain stamina. A monster can attempt to shake you off, which drains stamina quickly. You will be unable to move or attack while holding on during erratic movement.
  • You are able to consume stamina-replenishing items while climbing, so you can hang on for as long as you need to.
  • How fast you climb depends on your vocation; those with daggers climb the fastest. In addition, smaller characters climb faster, in exchange for their smaller stamina pools.
  • You can also "climb" by repeatedly jumping off and grabbing on as you jump higher, though beware that this can be difficult to pull off if the monster is moving erratically.
  • You can target different parts of the body for an advantage. For example, you can attack a cyclops' arms to have them drop something they're holding, attack the legs to make them stumble and fall, or attack the head for extra damage. You can burn a griffin's wings with a fire weapon to prevent it from flying. A notable enemy for this is the Chimera: it has three heads. You can focus attacks on the goat head to stop its ability to cast spells, or chop off the snake head to prevent poisoning, and so on.
  • While climbing, you are mostly restricted to light attacks, as heavy attacks will launch you off the monster. Notable exceptions are the Scarlet Kisses, Hundred Kisses, and Thousand Kisses dagger attacks. These are spammable and are very well suited to dealing massive sustained damage to a weak point. The Magick Archer Immolation skill and the Assassin's Gouge also function well while climbing.
  • Be wary if you climb onto a flying creature; it could fly high up into the air with you on it, leaving you to a nasty fall if you let go.
  • Scather Pawns are inclined to climb large foes more often.
  • The augments Dexterity, Arm-Strength, Adhesion, and Opportunism aid climbing. The armor piece Gloves of Might also increase climbing speed.
  • You'll earn the Gloves of Might from a quest reward. After completing the storyline quest Come to Court, a quest will appear in the Cassardis Inn notice board called Winged Reaver. The quest objective is to kill a Griffin.
Debilitations and Status Effects
or, "WTF do these symbols mean on my equipment screen?"
Like most other RPGs, Dragon's Dogma has its fair share of status effects. Most status effects are chance-based to apply, except for Stagger and Knockdown. Every creature in the game has a stagger threshold and a knockdown threshold that you must exceed to stagger or knock them down.
Debilitation
Effect
Burning
Elemental. Lose 24 HP per second while on fire.

Tarring
Elemental. Covered in oil. Take double damage from fire attacks, and also get affected by Burning.

Drenched
Elemental. Covered in water. Take double damage from ice and lightning attacks, and take less damage from fire. Extinquishes lit lanterns.

Frozen
Elemental. Take double damage from all sources. Caused by ice attacks, especially when drenched beforehand.

Thundershock
Elemental. Affected targets are stunned and collapse to the ground for a few seconds. Caused by lightning attacks, especially when drenched beforehand.

Blindness
Obscured vision. Lasts 15 seconds on enemies, who become confused and have trouble finding targets. Lasts for a minute on the Arisen, where black fog coats the entire screen.

Curse
Attributes reduced by 40%, and increase damage taken by 40%.

Lowered Strength
Deal 30% less physical damage.

Lowered Magick
Deal 30% less magick damage.

Lowered Defense
Take 30% more physical damage.

Lowered Magick Defense
Take 30% more magick damage.

Petrification
Character slows down over 40 seconds, turning to stone for instant death.

Poison
Lose 20 HP every 6 seconds.

Possession (Ghost)
Movement is hindered and slowly take damage over time.

Possession (Dragonkin)
Only affects pawns. Affected pawns attack the Arisen.

Silence
Prevents the use of spells. Weapon skills unaffected.

Skill Stifling
Prevents the use of weapon skills. Spells are unaffected.

Sleep
Asleep for 20 seconds. If attacked, take 50% additional damage but wake immediately.

Torpor
All actions including movement slowed to less than half speed. Lasts just under a minute.
Stagger
Lose balance and abort current action. Enough cumulative attacks cause stagger.
Knockdown
Fall down and abort current action. Cumulative attacks, or very powerful attacks, cause knockdown.
Affinity and Choosing your "Beloved"
Affinity is, simply put, your relationship with a character. You can tell someone has maximum affinity if they have a pink glow around their head when they speak to you.

Things that raise affinity:
  • Talking to them
  • Giving gifts
  • Completing their quests
Things that lower affinity:
  • Attacking them (be careful of being arrested in some areas)
  • Unsheathing your weapons around them
  • Carrying them until they struggle (throwing them is an arrestable offense)
  • Running and bumping into them
  • Gifting them Liquid Effluvium (resets affinity to zero; bought from Barroch in Bitterblack Isle)
The benefits of high affinity:
  • Some quests may become available, or you can complete them in a different way
  • Vendors can sell better merchandise
  • Vendors can lower their prices
  • Determines your Beloved
The Beloved is the person with the highest affinity for you by the time you start the events of the Deny Salvation quest. Age or gender has no bearing on this; you can have anyone be your beloved, with the exception of pawns, Duke Edmund, the Dragonforged, Elysion, Olra, and Barroch.

While most people in the game can be your beloved, these are considered the "special" candidates that have extra dialogue:
Men: Valmiro, Reynard, Julien, Ser Maximilian, Fournival, Aldous
Women: Aelinore, Quina, Selene, Madeleine, Mercedes, Symone

If you have multiple people at maximum affinity, then it will be the last of those people you have spoken to. Take care if you want your beloved to be someone who becomes unavailable after completing their last quest, like Mercedes or Aelinore.

The Arisen's Bond is a special item obtained from the quest The Dragon's Tongue that will instantly maximize the affinity of whoever you give it to. However, The Arisen's Bond is NOT a guarantee that someone will be your beloved. If you talk to someone else with max affinity, your beloved will change!

Your Beloved will move to your house after you finish the quest The Final Battle. Note that your Beloved can still change after this. There is a cutscene after the quest that completes the game. If you spoke to someone else with max affinity, your Beloved will change to them for that cutscene. To keep your Beloved for both quests, talk to them again in your house right before turning in 20 wakestones in the Everfall for the main quest.

Amusingly, in the original release of the game, players would be shocked to find their beloved accidentally be Asalam, Caxton, or Fournival: vendors or innkeepers that players speak to often just from day-to-day activities. Thankfully, in Dark Arisen they reduced affinity gain for speaking to vendors and innkeepers to prevent this.
Story Phases - Missable Quests Part 1
This section doubles as a sidequest guide. While other sources list these sidequests in the order you can start them, I've listed them in order of the latest they can be completed. I did this because some quests are very difficult if you attempt them as soon as you get them. Consider it a checklist to review before advancing the main questline.

The main story of Dragon's Dogma follows a set of phases. The spoilers are a description for further context in case you don't pay attention to quest names.
  • Phase 1: Beginning of the Game
  • Phase 2: Complete Off With Its Head quest Delivering the hydra's head to Gran Soren
  • Phase 3: Complete Lure of the Abyss quest Explore the Everfall beneath the Pawn Guild
  • Phase 4: Complete Come to Court quest Meet the Duke
  • Phase 5: Complete Aldous's first two quests Fournival's trial and hunt the griffin
  • Phase 6: Complete Reward and Responsibility quest Accept the Duke's reward from his treasury
  • Phase 7: Complete The Final Battle quest Face the great dragon Grigori
Despite what it sounds like, The Final Battle is far from the end of the game. It simply marks the end of missable quests.

As phases change, many stores will expand their inventory and sell new items.

While most quests transfer over between phases (like notice board quests), there are sidequests that must be completed before certain points in the story, otherwise you won't be able to get them anymore. Even if you accepted them, they will automatically fail when the phase changes. If you're a completionist, or worry about missing anything, here are the missable quests of Dragon's Dogma:

Not a quest, but not doing this prevents a quest from appearing later: Save Reynard when he's attacked by goblins on the road between Cassardis and the Encampment. Be sure to talk to him after saving him. This ensures that you can get the Search Party quest later on.
Floral Delivery Near the inn in Cassardis, Benita requests 5 Sunbright and 1 Moonglow. Sunbright is found in daytime around large trees on the road between Cassardis and the Encampent. Moonglow can be found at night; you can find one on the beach in Cassardis.
Lost Faith Father Clemente in the Cassardis church is missing his scripture. You can find it on the rooftop of the building due north of the church.
Grim Tidings Elvar needs you to deliver news to Merin. Both are in Cassardis. Elvar is usually found in the church during the day, or in his home just downroad from the church. Merin can be found on the beach during the day, inside Inez's Alehouse at evening, and his house (north of your house) at night.
Strength in Numbers Ser Berne wants you to do training maneuvers with your pawns. He will take you to his training ground automatically during the game after getting your main pawn; this quest is missable if you simply walk out and not complete it.
Guard Duty Becomes available after doing the story quest "Call of the Arisen" at the Encampment. Madeleine in the Cassardis inn wants you to escort her to the Encampment.

Cutoff point: the above must be completed before Phase 2 (Completing Off With Its Head)

Deep Trouble Poll wants you to investigate the sounds from the Cassardis well. Go in and kill the Saurians, then report back. If you're having trouble, try throwing skulls to curse them.
An Uninvited Guest Pablos at the Cassardis inn wants you to catch a thief. Talk to the other storekeepers and report back. Find and grab the thief (hold him over your shoulder) to complete the quest.
Lost and Found Elvar in Cassardis reports that Quina is missing in the Witchwood. Travel past the Encampment and hug the left cliff wall; it will eventually take you to Witchwood. Reach the end of Witchwood and inform Elvar.

Cutoff point: the above must be completed before Phase 3 (Completing Lure of the Abyss)

Not a quest, but not doing this prevents a quest from appearing later: During the Seeking Salvation Wyrm Hunt quest, you must decide to kill the cultist. If you spare him, Mason won't deal with you anymore and will lock out the quests Chasing Shadows and A Promised Meeting.
Chasing Shadows Mason (found at Fountain Square in Gran Soren, or in the slums) asks that you tail someone suspicious. At night, head towards the entrance to the castle. Follow the suspect; don't get too close or you'll fail the quest. Once you're done tailing him, report to Arsmith at Arsmith's Alehouse at Fountain Square.
Not a quest, but not doing this prevents a quest from appearing later: After Chasing Shadows, enter the building just past the Black Cat to have Madeleine open her shop. If this does not work, leave the city, re-enter, and check again. Without the shop, you cannot do the quests Supplier's Demand or Bad Business.
A Troublesome Tome Steffen (found around or near Fountain Square) asks that you find a magic tome. You'll find it at the top of the tower of the Ruins of Aernst Castle just west of Witchwood. The bandits inside are not hostile. Either climb the tower and grab it, or raise the bandit leader Maul's affinity by giving gifts to him (skulls work well) for him to just hand it over. Give the tome to Steffen.
Dying of Curiosity Merin in Cassardis asks you to find Valmiro. Bring six Greenwarish and head to the beach just outside the exit of Cassardis. You'll find him, and he will take off. Walk to the Encampment and look to the left of its entrance to find him again. He will leave once more. You will find him a few steps inside of Witchwood. Report back to Merin.
In order for Come to Court to become available, you need to complete two of the four Wyrm Hunt quests. It's recommended to do all four; any Wyrm Hunt quest you do not do before accepting Come to Court will be missed.

Cutoff point: the above must be done before even accepting Come to Court to end Phase 3

Reaper's Scorn Inside the house just outside of the Pawn's Guild in Gran Soren, Austine laments the death of his son. He requests a Wakestone, which is made from three Wakestone shards. He gives you two, so you need only supply one. You can buy one from Fournival or Montebank, or find one at the bottom of the Everfall.

Cutoff point: the above must be completed before Phase 4 (Completing Come to Court)
Story Phases - Missable Quests Part 2
Not a quest, but not doing this prevents a quest from appearing later: Upon leaving the castle after meeting the Duke, a cutscene will play showing Aelinore in the distance. You must speak with her during your first visit to the castle. Not doing so (such as ignoring her, leaving by ferrystone, or committing a crime in the castle) makes the quest Arousing Suspicion unavailable later on.
Rise of the Fallen Ser Maximilian just outside the castle asks that you investigate the Salvation cult. First, observe a meeting between two members underneath the bridge south of Fountain Square. You need a key, which is obtainable in several ways. You can equip a set of Salvation robes to tail Dillan, then grab the key when he hides it in a barrel. If you don't have the robes, simply run up and confront Tagert; you can either bribe him or take the key by force. If you miss both opportunities, you can buy a key from the Black Cat. Head to the Catacombs (you went there for the Seeking Salvation quest). With the key you can go in deeper. Find the five Gems of Salvation to open the door furthest in and kill the cultist inside. Report back to Ser Maximilian.
If you get a guilty verdict in Trials and Tribulations (one of Aldous's quests), you will lose the ability to do the quest Escort Duty if you have not done it already.

Cutoff point: the above must be completed before you complete one of Aldous's quests.

The Conspirators Fedel in the Duke's castle requests that you meet him at night. Go to the pagoda on the east side of the castle and be patient. He takes a long time to walk there. After meeting him, go to Soulflayer Canyon west-northwest of Gran Soren. You'll find the Confidential letter among ten Parcels after a series of slopes. Keep the parcels for later (Parcel Service quest). Return the letter to either Fedel or Ser Gabrian at the castle. If you're feeling duplicitous, forge the confidential letter at the Black Cat and turn in the letter to both, doubling the quest rewards.

Cutoff point: the above must be completed before Phase 5 (Complete Aldous's first two quests)

Supply and Demands Ser Daerio at Windbluff Tower (north of Gran Soren) asks you to request a week's worth of supplies from Julien at the Duke's castle. You can take the message to a guard outside the castle, or talk to Julien directly. Julien will give you five Ambrosial Meats. Go back to Ser Daerio to complete the quest. If you give Ser Daerio the five Ambrosial Meats he gives you a key to access a decent warrior/fighter/mystic knight chestpiece and helm. You can also keep the Ambrosial Meats yourself; they're useful for quests Epicurean Delights and Farewell Valmiro.

Cutoff point: the above must be completed before starting the main story quest Pride Before a Fall (given by Aldous)

Talent in Bloom Speak to Quina at the abbey west of Gran Soren. It may require speaking to her more than once. She will give you a Blessed Flower to give to whomever you choose. Be quick; the flower wilts after one day. She doesn't like it if you turn it in to her; the best option is to give it to Geffrey in the Gran Soren Cathedral. After giving the flower to someone, return to Quina.
A Parting Gift After completing Talent in Bloom, speak to Clarus. If the quest is not available, reset the Abbey by entering the rift stone nearby. Clarus wants a pilgrim's charm. To end the quest quickly, just hand her one (bought from Fournival, found in Soulflayer Canyon, or combine a Veteran's Periapt and a Banker's Periapt). Otherwise, you get more rewards if you go to the Catacombs. Meet with Quina at the entrance by the castle walls (the southernmost one closest to Gran Soren) and explore with her along. You'll find a Pilgrim Charm in the first large chamber; head back and give it to Clarus. Finding the catacombs charm grants extra XP and 10 Ne'er-Do-Part flowers, a very powerful healing item.
Arousing Suspicion The handmaiden Mirabelle in the Duke's castle asks that you meet with her after sunset. Do so, and she will say that Aelinore wishes to meet you in secret at her bedchambers at night. Go to Aelinore's room at night (the guard will be absent) and a cutscene will trigger. When the cutscene ends, you could stay and watch the events unfold (unadvised, as it locks out two later quests, Duchess in Distress and Beyond This Stony Cage), or walk out and confront the Duke. Either way, you will be caught and sent to the castle dungeon. If you saved Aelinore she will give you two skeleton keys; otherwise you must escape on your own. Leave via the cell in the far corner, which has a tunnel that leads out to the slums, which completes the quest.

Cutoff point: the above must be completed before Phase 6 (Reward and Responsibility quest)
Story Phases - Missable Quests Part 3
ALL NON-NOTICEBOARD SIDEQUESTS MUST BE COMPLETED BEFORE PHASE 7
If you've completed all the quests above so far, check for these quests in case you have not completed them:

Duchess in Distress After receiving the loot in the treasury from the duke, Mirabelle the maid is standing just outside the front door of the castle. She says Aelinore is in trouble and gives you a Set of Royal Guard Armor to use as a disguise. Head to the Blighted Manse, north of Hillfigure Knoll, and equip your disguise to get in. Head to the top of the Manse to find Aelinore. Escort her safely out to complete the quest. She will leave the game until NG+.
Deeper Trouble Seven in-game days after completing Deep Trouble, go back to the well in Cassardis to find Rorric. Go back to where the saurians were before and you'll see a new area opened up. Kill all saurians and destroy all nests, then return to Rorric.
Land of Opportunity Fournival needs a family evicted from his lands. Speak to Jasper behind the inn during the day; he won't make a decision without his wife and his son. Find his wife Sara around the fountain square and talk to her; have one in-game day pass and speak to her again to get her consent. Their son Pip is around Fournival Manor; talk to him and he will run. Find him on top of the roof of the barn in the Craftsman's Quarter. He will run again, this time to underneath a bridge in the Urban Quarter. Now he will run and you have to grab him. Do NOT attack him, as you will be jailed. He will consent once he is caught. Return to Jasper for his consent; you must pay him 30,000 G. Then, turn in the quest at Fournival. If you can't be bothered waiting for Sara or catching Pip, speak to Fournival and finish the quest by paying him 80,000 G.
Of Merchants and Monsters West-southwest of Gran Soren is Alon at the entrance to the Ancient Quarry. He will request that you kill the three ogres inside. Do so, and you'll unlock the Ancient Quarry as a "safe area" to run through without stamina consumption. He will also set up shop halfway through, and sell several unique items, including armor from Berserk (Guts and Griffith). (The armor sets were removed for the PC version, but it's possible the files are still there and can be modded back in.)
Thick as Thieves The female bandits reside in the Ruins of Heavenspeak Fort to the west of Gran Soren. This quest is to win the trust of the leader, Ophis. The female bandits will attack any males on sight: it is recommended to change your support pawns to females and, if you or your main pawn are male, buy a Set of Lady's Garb at the Black Cat to disguise yourselves. Once your party is female or disguised as such, walk west along the road and up the cliffs. Do NOT kill the cyclops near the entrance to Heavenspeak Fort; that is Ophis' pet, and killing it will make this quest impossible to complete. Speak to Ophis or Betaiah at the fort. Betaiah will suggest grabbing a monster (recommended: goblin) and feeding it to the cyclops. You can do so by placing the "food" in front of the cyclops. Ophis will suggest killing 10 male bandits of Aernst Castle Ruins. You can do so without angering Maul by killing the already-hostile bandits outside the castle. Doing either of these is enough, but you can do both for a bigger reward. Speak to Ophis to get a badge that allows you to pass through unhindered, even if openly male. Beware: bringing Maul's Badge of Amity to the female bandits makes them hostile.
No Honor Among Thieves The male bandits reside in the Aernst Castle Ruins to the west of Witchwood. This quest is to win the trust of the leader, Maul. Unlike the female bandits, the male bandits within the castle walls are not normally hostile. Maul offers two choices. Option one is to kill 10 female bandits; you can do so without invoking Ophis' ire by killing the random ones outside her fort. Option two is to handle a deserter from their gang. That deserter is named Pike, and he is the thief you caught in Cassardis for the "An Uninvited Guest" quest. Talk to Pike in the Cassardis inn; any choice works, but convincing him to return gives the best outcome. You can do one task or both for extra rewards. Speak to Maul to get a badge that makes the bandits outside the castle walls neutral toward you. Beware: bringing Ophis' Badge of Amity to the male bandits makes them hostile.
Supplier's Demand and Idol WorshipSpeak to Madeleine and Caxton at their stores. They both request an idol to give them access to a new supplier. There are gold, silver, and bronze idols. The better quality idol you give, the better their stock will be. Caxton offers more weapons and heavy armor; Madeleine offers more magic-oriented items and female equipment. The Gold Idol is gotten from Escort Duty (see below), the Silver Idol is gotten from Put the Eye Out (pawn guild notice board), and the Bronze Idol is found in Selene's Hut in Witchwood and a second in the home of the Dragonforged at Hillfigure Knoll. Merely holding an idol in your inventory gives you a discount at shops (Max 30% discount with the Gold Idol; discounts between idols do not stack). It is recommended to forge a copy of the Gold Idol and hold the forgery in your inventory and give the real one to Madeleine or Caxton. Giving a forgery will NOT improve their stock, so give the Gold to the one you prefer and the Silver to the other, keeping the Gold Idol Forgery for yourself.
Escort Duty Fournival's busy, so he needs you to entertain his angelic daughter Symone for a day. In preparation, rest at an inn and grab a flask of water. Walk beside her, being careful not to bump into her. She will fall; simply let her stand on her own. She will request a game of hide and seek. Find her quickly: she'll either be in the inn next to the fireplace or behind Arsmith's Alehouse. Once found, follow her again. She will claim she is thirsty; give her the flask of water. Then, she will be up for a race to the gate at the far end of the Craftsman's Quarter. Let her win, but don't be too far behind. Once the quest is complete, speak with Symone. If she's pleased with your performance, she will give you a Gold Idol. If not, you can restart from a checkpoint to try the quest again.
An Innocent Man Speak with Tomlin in Cassardis. His father, a gardener was arrested under suspicion of being a spy. Head to the Duke's castle with a couple of skeleton keys in hand and go into the prison. Speak with Ansell, Tomlin's father, and sneak him out through the tunnels that lead to the slums. This quest can be done at the same time as your own escape during Arousing Suspicion.
Witch Hunt At Fountain Square you'll overhear that a search party is out to hunt the witch. Travel to Witchwood and reach Selene's hut to find the search party. A golem beneath the hut will awaken, chasing off the angry mob. Kill the golem (it is immune to magic damage) and you'll find that it was guarding a path to the second half of witchwood. Head in (grab the portcrystal) and follow the path to find Selene and Sofiah at the end.

(List cont'd in next section)
Story Phases - Missable Quests Part 4
Mettle Against Metal Find the metal golem in the second area of Witchwood. If you've just completed Witch Hunt, leave Witchwood and return. The metal golem is immune to all damage; you must destroy the magic discs hidden around the area. If you're having trouble locating discs, watch for trails of energy flowing to the golem; follow those. It is recommended, perhaps even necessary, to be a class with a non-magick bow (strider, ranger, assassin). The first disc is on the island you'll find the metal golem at. The others are relatively easy to find; they glow purple and occasionally shoot balls of light towards the golem. Follow the light and destroy them. Be sure to look up; one's high in a tree branch, and is the reason you needed a bow. Frustratingly, pawns rarely attack that one on their own. The quest completes when all discs are destroyed.
The Dragon's Tongue If you've just completed Witch Hunt, leave Witchwood and return. You'll get the quest by picking up the Ancient Tablet at the Guardian's Grave (where Selene and Sofiah were). Rowland speaks up and advises taking it to a priest. Go to any church and the priest will recommend taking it to the Dragonforged. Go to the Dragonforged at Hillfigure Knoll and he will give you the Arisen's Bond, an item that will maximize the affinity of whoever you give it to.
Nameless Terror Speak to Ser Rickart standing outside the south entrance to Gran Soren. You've been marked for assassination. Survive the ambushes to complete the quest. The ambushes only appear at night, so rest at an inn and go across the bridge just northwest of Gran Soren. Right past the fork in the road, four assassins will appear. Once you've killed them, run southwest to the entrance to the Ancient Quarry. Three more assassins will come after you. Head to Gran Soren and rest at the inn to set it to night again for more time; you need to trek from Gran Soren back to Cassardis within one night. Take the same path you took when transporting the hydra's head. At some point in the mountains, you might encounter one assassin, but don't worry if you don't; he's not necessary. Between the Mountain Waycastle and the Encampment, keep following the road and two more assassins come out. For the final stretch, you'll find the final assassin right outside Cassardis. Listen to his monologue, then kill him to complete the quest.
Farewell, Valmiro Valmiro is overlooking the pier in Cassardis, pondering about taking a journey. He requests four items for the trip: a potent greenwarish (you should have plenty), a lantern (buy one at Aestella's general store), sour ambrosial meat (you can find one in a box in the center area of the Ancient Quarry, or keep an ambrosial meat in your inventory until it turns sour), and a pilgrim's charm (buy one from Fournival, find one in Soulflayer Canyon, or combine a Veteran's Periapt and a Banker's Periapt). The quest will end once you give him the items.
Search Party In order to get this quest from Reynard, you must buy from his shop ten times. With each purchase, you must exit the shop and dialogue and talk to him again. Annoying, but necessary. He will request a piece of scrap iron, obtained by killing skeletons. Buy five more items from his shop (same method) and he will request Miasmite, a rare drop from Phantoms. You can also combine a Miasmite Shard (common Phantom drop) with a Firefly Stone (mined from ore nodes). Make ten more purchases, and he will ask for six journal entries. The first is in a chest in the encampment. The second is in a chest in the Catacombs. The third is in a chest in Gran Soren; jump down from the rooftops near the Black Cat. The fourth is in a chest in the southernmost part of Barta Crags, past the female bandits west of Gran Soren. The fifth is in the western part of Soulflayer Canyon west-northwest of Gran Soren (or east of the Greatwall). The final one is in a chest in the Ancient Quarry, west-southwest of Gran Soren. Giving all six to Reynard completes the quest, but also causes him to leave the game until New Game+.
Bad Business After doing Madeleine's quests and near the end of Phase 5, enter her shop to find her missing. For bonus points, pick up her daggers on the counter. Go around town speaking to citizens for more information. At some point you'll be directed to the aqueduct by the slums. A cutscene will play; follow Madeleine out of Gran Soren's east exit. You'll find her hiding behind a crate. You can return her daggers for a boost in affinity. Guards will come by and ask you a question, but your answer doesn't matter. Madeleine will ask for 50,000 G in expenses; pay her if you want to raise her affinity further. After the quest completes, she will disappear from the game. After Phase 7 starts, she will set up shop in Cassardis.
If you're after the From A Different Sky scavenger hunt quests, the Badge of Vows 39, 40, and 87 are only available during the quest Deny Salvation. Only do this if you're crazy.
In addition, the Duke's Demesne will no longer be accessible soon, so gather Badge of Vows 33, 34, 51, 69, and 77 while you still can.


Cutoff point: the above must be completed before Phase 7 (The Final Battle)
Common Questions about Quests
Where is the Snakeskin Purse?

It's here:


In the river there's a fishing spot where you gather the Snakeskin Purse. You can also get it in a few other places as random drops, but this is the intended spot to get it for that specific quest.


The Trials and Tribulations Quest - Innocent or Guilty?

Trials and Tribulations is one of Aldous' quests in phase 4, to prove whether Fournival is guilty or innocent of various crimes. These are the effects of each outcome:

Guilty: Fournival is arrested and no longer available in the game. Symone moves to the slums; you can buy Fournival Manor back for 100,000 G to let her move back.
Innocent: Fournival stays as-is. His affinity for you will raise, and he will grant you a 10% discount on every item he sells. Since he sells many unique items such as the Maker's Finger, the Magnanimous Cloak, cheap Ferrystones, and others, many players prefer getting an innocent verdict.

You have four days to collect and turn in evidence to Aldous. If you want to be careful, rest at an inn before starting this quest, and restart from checkpoint if you did not get the result you wanted. Note that providing no evidence at all usually grants a guilty verdict.

Evidence for innocence:
  • Ser Daerio at Windbuff Tower will give you someone to testify in favor of Fournival's innocence. You'll need to escort Ser Castor back to Aldous from Windbluff Tower.
  • Geffrey, the head priest of Gran Soren Cathedral, will give you Geffrey's Petition.
  • Symone, Fournival's daughter, will give you Symone's Petition.
  • Fedel, in the Duke's castle, will give you Fedel's Petition.
  • You can find the Chamberlain's Affidavit from Fournival Manor, which helps prove innocence. There is another quest that uses this (Thanks Mislaid), so make a forgery if needed.
  • Reynard at the Fountain Square will sell you falsified documents for innocence for 3,000; 5,000; 7,000; and 9,000 gold.
Evidence for guilt:
  • If the quest An Innocent Man was completed, Ansell will testify for Fournival's guilt. You'll need to escort him back to Aldous from Cassardis.
  • If Jasper's family was evicted during the Land of Opportunity quest, he, his wife, and his son will all offer Jasper's Condemnation, Sara's Condemnation, and Pip's Condemnation.
  • You can find the Gift Ledger from Fournival Manor, which helps prove guilt. There is another quest that uses this (Trail of Corruption), so make a forgery if needed.
  • Reynard at the Fountain Square will sell you falsified documents for guilt for 3,000; 5,000; 7,000; and 9,000 gold.
You can get a feel for what the verdict will be when you meet with your pawns as you leave the Duke's Demesne from the gate. Generally, 3 documents and a witness for a particular verdict should be enough to guarantee the result you want. If you've turned in evidence for both guilt and innocence, it can go either way. When the deadline is up, go to Fountain Square and a cutscene will play that reveals the outcome of the trial.
The Everfall
The Everfall was the end-game dungeon of the original Dragon's Dogma pre-Dark Arisen. While it houses some of the main storyline and the lair of the Ur-Dragon, for the most part it has been replaced by Bitterblack Isle as the go-to post-game area.

You'll visit the Everfall early on in the storyline. You'll find it underneath the Pawn's Guild in Gran Soren. It will be a long downward spiral to an ominous cracked floor. The storyline quest merely requires you to reach the bottom and return. The area features a lot of undead and an ogre, but it shouldn't be too difficult. Once you've reached the bottom and the tentacles start spawning, it's time to get out of there: the tentacles are very dangerous, spawn infinitely, and do not give experience when you kill them. You'll find out who the tentacles belong to later.

Once you have completed the quest The Final Battle, the Everfall will truly open. You can enter by jumping in, and can choose what floor to enter by simply falling onto it. You'll take minimal fall damage if you hit a floor, though you can use the grab button near a floor to enter a cutscene where you'll take no damage. If you don't choose a floor and reach the bottom, you'll find yourself looped back to the sky above Gran Soren, leaving you to fall repeatedly until you choose your destination.

Regardless of where you land, the first chamber you enter will always be the Chamber of Confusion, where you'll fight the source of the tentacles, the Evil Eye. Defeat the space-distorting creature to unlock the ability to go to any other floor. From there you can freely explore the rest of the Everfall. Loot will respawn every three days.

There's a good map here[vignette1.wikia.nocookie.net]. It might be hard to read without context, but once you've fallen in, you'll understand right away.

The first floor is the exit; you can walk up and leave through the door to the Pawn's Guild. Also here on the first floor is the pawn, Quince. She will ask for twenty Wakestones, which you can gather from the Everfall. Completing her quest is the point of no return for the story: the game autosaves, so you cannot go back. From there on out you have to complete the game. This also locks out access to the Everfall until you reach this point in the story again in a subsequent playthrough. However, you can still access the Chamber of Lament in New Game+ from a rift stone in Cassardis.

The eighth floor, the small rectangular outcrop to the bottom right, is the Chamber of Lament: home to the Ur-Dragon.
The Ins and Outs of the Ur-Dragon

The Ur-Dragon is an optional end-game boss at the deepest part of the Everfall dungeon. It is a massive undead dragon with offline and online versions. The offline version has about 1.47 million HP, and it is up to you and your pawns to fight. The online Ur-Dragon is fought collectively across the world, with an HP pool in the billions. For each round you fight, your damage is uploaded to the server. Unsurprisingly, the online Ur-Dragon is harder to kill and drops better loot. You can choose to go online or offline in the options menu.
  • The Ur-Dragon is located in the Chamber of Lament in the Everfall (the entrance will be in the southeast). In New Game+, a rift stone will appear on the beach in Cassardis that takes you directly to the Chamber of Lament.
  • The Ur-Dragon will fight for about 8 minutes before flying away. It's helpful to use item buffs to do as much damage as you can. You can leave the Everfall and come back, and he will come back to fight as many times as you wish.
  • Try fighting on the western side of the arena when possible. It reduces the chances of the Ur-Dragon flying away to perch and shoot fireballs from afar. This wastes valuable time that could be spent dealing damage.
  • He is weak to Holy, and has 30 hearts spread throughout his body that serve as his weak points. Each heart can only take so much damage before breaking. Check the color of the blood as you hit a heart: if it's purple, you're dealing damage. If it's grey, you're not.
  • Once the online Ur-Dragon's collective health reaches 0, he will enter a grace period for anywhere between 1 to 45 minutes. Any player who starts fighting during the grace period will find the Ur-Dragon alive with a sliver of health left, and is able to perform their own killing blows for bonus loot.
  • If you're killing the Ur-Dragon during his grace period, be sure to loot everything that drops off the Ur-Dragon before the killing blow. The game has a limit on how many items that can be on the ground at the same time. If there is too much, you will receive your wakestones but your armor and weapon rewards may not spawn.
  • If you miss a grace period, don't worry: you'll still get loot drops the next time you enter the chamber. The more you participated (more rounds; more damage), the more loot you get.
  • When the Ur-Dragon appears, it also displays what generation it is. The first Ur-Dragon will be Generation 1, the one to come after it will be Generation 2, and so on.
  • Once the Ur-Dragon dies and the grace period is over, a new Ur-Dragon appears. The generation will increase by 1, and its max health will increase from the previous generation.
  • The online Ur-Dragon automatically dragonforges every piece of gear you have equipped when you kill it, making it a good way to power up gear for you and your main pawn if you stay on top of grace periods.
  • The Ur-Dragon is unaffected by easy mode or hard mode. The game is always in normal mode in the Chamber of Lament.
  • The online Ur-Dragon has an anti-cheat measure: if you deal more than 28 million damage to it in one round, it does not upload the damage to the servers.
  • People typically post the current generation's health at various gaming forums. You can access the steam discussion forums for online Ur-Dragon health here.
Delving into Bitterblack Isle

Bitterblack Isle is a dangerous end-game area where all the strongest monsters are (as well as the best loot). You can access Bitterblack Isle any time by speaking to the woman standing on the pier in Cassardis at night. Once you've done so, you can get there more quickly by using a ferrystone to the portcrystal on the island.

While Bitterblack Isle is supposed to be end-game content, there isn't a minimum level for going there. It's up to you whether you want to save BBI for after you're done with the main story or go there early for loot, XP, or rift crystals. Most sources say to be at least level 60 before starting BBI, but depending on how crafty you are, you could delve into it as low as level 20 or 30 and get a decent run for loot as far as you can take it.

Cursed Loot
You can sometimes find cursed items in Bitterblack Isle. By "cursed" it simply means that you have to go to Olra to purify (identify) them for rift crystals. They have several categories (Bitterblack Gear, Bitterblack Weapon, Bitterblack Novelty, etc.) that determine the type of item they are and have three levels (Lv 1, Lv 2, Lv 3) that determine quality. These cursed items are where you'll get the most powerful items and equipment in the game, and you won't know what you have until you purify them.

Fixed Items:
Once you pick these up, the item they turn into is already decided. These cursed Bitterblack items above will always turn into the same thing when you purify them, no matter how many times you reset. However, you can somewhat manipulate the outcome with the variable pieces below...

Variable Items:
  • Bitterblack Weapon
  • Bitterblack Armor
  • Bitterblack Gear (Skill Upgrade Rings)
Unlike fixed items, the Bitterblack Weapons, Armor, and Skill Upgrade rings can turn into one of three different items between resets (using that handy Godsbane). What they turn into depends on the color of you and your main pawn's vocation colors at the time of purification. The colors of your vocations when you pick them up doesn't matter. What colors, you ask? See for yourself:


There's a red pool of equipment for Fighters/Warriors, a yellow pool for Striders/Rangers, and a blue pool for Mages/Sorcerers. For example, if you are a Warrior and your main pawn is a Ranger, then equipment will purify into items from the red or yellow pool. If you reset and change yourselves both to Sorcerers, you will only get equipment from the blue pool.

However, it doesn't matter how many times you reset: if you and your main pawn reset and purify again as Sorcerers, you will get that exact same item every time. The only time it's different is between the three different-colored pools.

Therefore, you can change you and your main pawn to blue classes, purify, and see what you get. Reset, change to yellow, see what you get. Reset, change to red, and see what you get. From there, you've seen all possible outcomes for purification for that set of cursed items, so you can choose what color to be for the items that you want to receive.

Note for hybrid-only equipment, Magick Shields are part of the red pool and Magick Bows are part of the yellow pool.

If you gift the variable Bitterblack item to another player via their pawn, that item will not turn into the same items; it will be a different set of three.

Check the Bitterblack Purification Loot Tables[docs.google.com] to see what you can obtain from purification.

For an alternate explanation of how this works, I recommend the Purifying Cursed Items section of the immensely informative "Science etc" document[docs.google.com].

For a more visual explanation, check this[imgur.com], which also includes stats for the Bitterblack weapons.
Tickling Toes for Fun and Profit: Early End-Game Gear and All the Gold You'd Ever Need
Want to have more gold than you'd ever know what to do with? Want easy access to some end-game equipment? Look no further than the chained-up Condemned Gorecyclops in the Midnight Helix of Bitterblack Isle. All you need is a levelled up Strider vocation so you get the Pilfer dagger skill (or preferably its upgraded version, Master Thief). Make your way through the early part of BBI until you reach the Midnight Helix, walk towards the Condemned Gorecyclops, and use Pilfer/Master Thief on his feet a couple of times. Once you get four items, dash back the way you came and use the door. The game will autosave and the gorecyclops' loot table will reset, so go back through the door and repeat as you wish. Once you're done, Liftstone out. You'll mostly get Rugged Femurs, Cyclops Fangs, and Blue Iron Buckles, but you'll rarely grab cursed gear as well.

I was able to try this trick at level 30. I spent a half hour grabbing loot until me and my party were overencumbered, then I liftstoned out and sold all the femurs, fangs, and buckles for 2.2 million G. I uncursed the Bitterblack Gear Lv 3's I obtained and got two rings, one of which gave +99 to my magick stat. Not bad for a half-hour's work.

Of course, do this at your own discretion. You know best whether or not you'd like to have end-game gear early on in the game, or if having more gold than you'd ever hope to spend would ruin your experience. With that much gold I suggest giving extravagant gifts to pawns you hire. Certainly better than giving a rotten carrot, right?
Hard Mode and Speedrun Mode
One piece of DLC for Dragon's Dogma included free in the PC release is the availability of Hard Mode and Speedrun Mode.

Hard Mode
When playing in Hard Mode, the following changes apply:
  • Hard Mode starts at the beginning of the game. If you switch the difficulty from Easy or Normal to Hard, it will reset story progress back to the beginning, but leave your level, items, skills, and such intact. You can change from Hard Mode to Normal or Easy without resetting story progress.
  • Damage taken is increased to 450%, except on Bitterblack Isle (which has its own difficulty).
  • Enemies have higher stagger and knockdown resistance.
  • You consume 50% more stamina when using skills or spells. Stamina drain from running is unaffected.
  • Enemies drop more gold. However, this seems to overwrite the ability for rift crystals to drop, as they'll drop gold instead.
  • You gain double experience points from kills. The effect stacks with Weal bonuses to give you quadruple experience from kills. Experience gain from quests is unaffected by Hard Mode.
  • You earn double discipline points, and your rented pawns earn double rift crystals.
  • Upon completing the quest The Final Battle, you are rewarded an Abyssinal Outfit, the clothing chestpiece of the end-game set of the original game pre-Dark Arisen.
  • Upon completing the quest The Great Hereafter, you are rewarded a Set of Duke's Clothing. This is the only way to receive that set, and what an amazing set it is.
  • Hard Mode does not apply to the Ur-Dragon fight and Bitterblack Isle; the difficulty will change when entering those areas. It will automatically return to Hard Mode when you leave.
  • Pawns are unaffected by difficulty. The penalties apply only to the Arisen.
It goes without saying, Hard Mode is very difficult early on. Dealing with more than double damage and extra stamina consumption is no joke; be sure to stock up on plenty of curatives and stamina restoratives on your travels.

Depending on how much side content you do, all of the extra experience and discipline points will have you out-level the content and it can wrap back around to being easy.

Speedrun Mode
This is, unsurprisingly, a mode that allows players to try and beat the game as fast as possible.
  • You can use a previous game save to enter Speedrun mode with, including your levels, skills, items, and equipment.
  • Speedrun Mode does not overwrite your main game. It is completely separate.
  • Items used in Speedrun Mode are not consumed for the main game save, allowing you to use as many buffing/healing/stamina items as you need. On the other hand, you cannot carry over gold/experience/items gained from Speedrun Mode over to your main game.
  • As such, you can save a lot of time by stockpiling items required in the story, such as wakestones and a forgery of the Wyrmking's Ring. You'll also save a lot of time by placing your portcrystals at key locations near quest destinations.
  • You cannot save the game during Speedrun Mode; you must complete it in one sitting. You can, however, still pause the game.
  • The speedrun counter only progresses when you are in control of your character. So, pausing, cutscenes, using your inventory, or resting at an inn does not add to your speedrun time. Time also does not pass while in the Rift selecting your pawns.
  • You cannot use online pawns in Speedrun Mode. You must use the offline pawns.
  • Game difficulty is set to Normal.
  • Once you complete the speedrun (by facing The Seneschal ), the game will save over your main game file to add your rewards, the Forest Tunic Set and a Set of Caretaker's Garb.
    Take note: If you are in Hard Mode and complete a Speedrun, it will set your game to Normal difficulty. You'll have to start over from the beginning if you want to go back to Hard Mode.
  • There are no additional rewards for beating a Speedrun record. As far as I'm aware, the fastest speedrun completion time is 12 minutes, 12 seconds[www.speedrun.com].
Useful Links (Tools and References)
For information regarding augments or stat growth, try taking a look at my other guide:

http://gtm.steamproxy.vip/sharedfiles/filedetails/?id=601022096
For further information try these useful tools and references:

Weight/Height/Inventory Thresholds[docs.google.com]
Stat Growth Tables[docs.google.com]
Stat Planner[stackoverflow.github.io]
Attack, Skill, and Spell Damage[docs.google.com]
Confusing Skills Explained
Enemy Weaknesses/Resistances[docs.google.com]
More Maps (Gransys, Everfall, Moonbeam Gem Doors)[imgur.com]
Bitterblack Isle Cursed Items/Weapons Explanation[imgur.com]
Bitterblack Isle Loot Maps[imgur.com]
Bitterblack Purification Loot Tables[docs.google.com]
Bitterblack Gear (Stat Rings) Chart[docs.google.com]
List of all Health Recovery Consumables[docs.google.com]
List of all Stamina Recovery Consumables[docs.google.com]
List of all Stat-Boosting Consumables[docs.google.com]

I did not make any of these; credit goes to their respective creators.
Known Bugs
Every game has its problems. Here's a list of known bugs that affect Dragon's Dogma: Dark Arisen.
  • Adaro (village chief of Cassardis) is integral to the sidequest Lost and Found. If you take an escort quest with Adaro (Guardsman Sought) at the same time, you will not be able to speak with him about Quina, even if the escort was completed. This causes Lost and Found to be incompletable for that playthrough.
  • The Inflection augment is supposed to reduce damage taken when casting a spell. Instead, it increases damage taken. This bug was fixed in a patch on 12/18/2017.
  • Impact, Preemption, and Magnitude augments are likely bugged or tuned improperly. Testing shows they have little to no effect at all.
  • There is a rare bug when the Tenacity secret augment activates that causes Pawn AI to become inactive as the game thinks you are dead. Reloading from an earlier save is the only known solution.
  • The Asura armor and the Ring of Perseverence both increase the rate you gain Discipline Points (DP). These effects stack if you equip the armor first. A bug causes them to not stack if you equip the ring first.
  • Pawns never cast Grand Brontide. They will instead only cast High Brontide.
  • Some players (myself included) cannot see some friends' pawns in the rift, despite the fact that both players are playing online and rested at inns.
  • The Bitterblack Isle quest Trappings of Evil requires acquiring specific 13 pieces of armor. In the PC version, the quest cannot be completed if you upgrade any of those pieces of armor. This bug was fixed in a patch on 12/18/2017.
There is not enough room in this guide to include every bug in the game; I've only listed the most notable ones here. For a more comprehensive list, check here[dragonsdogma.wikia.com].
Glossary
The glossary is not comprehensive, but contains words used in this guide that may need further clarification for new players.

Anodyne - The name of the game's healing spell. Only mages are able to cast it.

Augment - A bonus granted to your character. Each vocation has its own set of augments. Once unlocked you do not need to remain the same vocation you earned the augment from to have it equipped. You can have up to 6 equipped at once.

BBI - Bitterblack Isle, the end-game area added by the Dark Arisen release.

Core Skill - An ability for a specific type of weapon. Unlocking a core skill unlocks the same skill across all vocations that use that same weapon type.

DA - Dark Arisen. The re-release expansion to the original Dragon's Dogma game which added Bitterblack Isle and many quality-of-life changes. It also includes the base game.

DD - Dragon's Dogma. Can mean the game as a whole, the original release before the Dark Arisen expansion, or the game as a series (including Dragon's Dogma Online, which is unavailable in the west.)

DP - Discipline Points. Earned at the same time as XP, but at a lower rate. Used to unlock new vocations, as well as skills and augments for those vocations.

G or GP - Gold. The primary currency of the game, used for most transactions.

Godsbane - An item given to you near the end of the main storyline. Using it kills you. Useful for quitting and resetting the game without saving, usually for RNG-related events such as item drops.

Gran Soren - The capital city of Gransys.

Gransys - The setting of Dragon's Dogma, the province of land governed by the Duchy of Gran Soren.

HM - Hard Mode. A mode of increased difficulty but increased rewards.

Into Free - The main theme song of the original release of Dragon's Dogma, performed by B'z. The rights expired for the Dark Arisen release.

Main Pawn - The pawn associated with your main character. It levels up alongside you.

Min/Max - The concept of building a character in a way that maximizes strengths or minimizes weaknesses, often a combination of the two.

NG+ - New Game plus. A mode that allows you to play through the game's story again after completing it. You retain all your character levels, vocations, items, and equipment.

Prosperity - A buff that doubles gold gained. In addition, enemies and critters have a high chance of dropping gold on death.

RC - Rift Crystals. The secondary currency of the game, used for hiring high level pawns, buying items from the Rift Crystal shop in the Encampment, and identifying Bitterblack Isle gear. Earned by having your main pawn hired by other players in their game or as rare drops in the main game (and common drops in Bitterblack Isle.)

Rift - The blue-black void where you hire and dismiss pawns. You access the rift via Rift Stones scattered throughout the game.

SM or SRM - Speedrun Mode. A mode built to test your ability to complete the game's story as fast as possible.

Support Pawn - The main pawns of other players. You can hire up to two to assist you, but they do not level up.

Vocation - The term for this game's class system.

Weal - A buff that doubles XP, Discipline Points, and Rift Crystals you earn for as long as it is active.

Weapon Skill - A skill for a specific type of weapon unique to a particular class. For example, a Fighter can use the sword skill Flesh Skewer, but an Assassin wielding the same sword cannot.

XP or EXP - Experience Points. Earned by killing enemies and completing quests. Earning enough increases your character level and vocation level.
Credit Where Credit is Due
This guide turned out to be a lot bigger than I imagined when I first started. I cannot claim all of this information as my own; I've used several sources to speed up research, confirm data or discrepancies, or add to what I already knew.

Sources
Dragon's Dogma Wikia[dragonsdogma.wikia.com]
The Hero (Missable Quest List)[www.xboxachievements.com]
/vg/ Dragon's Dogma General FAQ[docs.google.com]
Science etc[docs.google.com]
wbacon (Capcom representative who, through words and actions, shows he really cares about the community)
Jemolk (For pointing out NPCs that can't become beloved)
IsaacClarkeSNL (For information on Rusted, Aneled, and Golden weapons)
Suru (For adding that Badge of Vows 69 will no longer be available after the quest A Warm Welcome)

Time spent planning, researching, writing, and editing this guide: 59 hours
Worth it? Yes.

While you're out adventuring in Gransys, keep an eye out for my pawn, Gabe Newell. I'm going to be thorough with my playthrough to ensure he knows as much as possible. Perhaps he can help you out in a pinch!


If you have further questions, leave a comment below. If you have further tips to add for fellow Arisen, feel free to share!

54 Comments
AlireSUS 22 Jun @ 1:53pm 
Damn, didnt expect a game like ddda could have a cult following like this! the online is pretty empty now.....also didnt expect the game to have this much depth! thanks for all the info
̧҉ ҉Minorou ꧁💀꧂  [author] 22 Mar @ 12:11pm 
Unfortunately I haven't heard of a similar issue. I've looked around online for others who have encountered similar problems. There's a few possible solutions, such as lowering settings via the .ini file and playing in windowed mode. It could also be a driver issue; try updating your drivers. Others say it could be a problem with hardware, especially with Radeon.

I wish you luck. If nothing else works, yes, getting in the habit of saving before screens is annoying, but better than nothing. It could be rough in Bitterblack Isle, though.
MidnightGuideWriter 22 Mar @ 10:51am 
There is a bug that occurs as a result of the game auto saving when changing map screens, i.e., occasionally when I enter a town the game will crash during the transition between the open world into the town and occasionally the auto save animation will cause the game to stutter instead of crash.

Are there any known fixes for this besides remembering to hot save before transitioning?
MissBunny 25 Feb @ 9:46am 
Wow. Incredible work. Thank you
tankanidis 9 Jan @ 12:16pm 
thank you! (especially the do this before this stage / missable / bugs )
Anubis 1101 15 Jun, 2021 @ 11:55pm 
excellent guide!
one thing id like to add from my own research- stat growth from vocation drops off DRAMATICALLY after level 100, so if youre even slightly perfectionist about the stats, just stick with your vocation of choice until then and the pitiful points you gain after that wont make any tangible difference.

the wiki lists stat growths pretty plainly as well
Rookie 15 Jun, 2021 @ 5:17am 
59 hours to make!!! absolute MASTERWORK!!!!
Bolas Boi 8 May, 2021 @ 5:15am 
Oh my God thanks you absolute massive mental unit of a man <3
Arctic 17 Mar, 2021 @ 8:52am 
I can't overstate just how incredible this guide is. From putting my anxieties about min-maxing to rest, to covering all the missable quests step by step, to the breakdowns of how pawn inclination works? It's amazing stuff, and I'm probably gonna be coming back to it time and time again, as I revisit this game every couple years. Thanks for all the hard work, dude.
Gint the Monkey 20 Jul, 2020 @ 11:54pm 
really appreciate for this guide, I find a lot of useful info. :steamhappy: