Heroes of Might & Magic III - HD Edition

Heroes of Might & Magic III - HD Edition

28 ratings
[Walkthrought] - Long Live The King
By Warlard
An in-depth guide to the Long Live The King Campaign.
   
Award
Favorite
Favorited
Unfavorite
A Gryphon's Heart - Introduction
To win, you must bring the Spirit of Oppression to the city of Stonecastle within 3 months. Seek out the Seer - completing the Seer's Quest will allow you to carry the reward to the next scenario. Starting Bonus: Scroll of Death Ripple or 1 Black Knight or Skeleton Transformer.
A Gryphon's Heart - Maps


  • Green - Friendly Town
  • Red- Enemy Town
  • Grey - Neutral Town
  • Yellow - Underground Passage
  • A# - Allied Towns
  • O# - Opponent Towns (a,b,c,d,e,f,g indicates which enemy)
  • N# - Neutral Towns
  • M# - Mirror Entrances (a) and exits (b). two-way unless stated
  • E# - Exit (a) entrance and (b) exit
  • S# - Seer (a) and the location of the item (b)
  • G# - Guard Tents (a) and the location of the Guard Tower (b)
  • J - Jail
  • X - Ambush

A Gryphon's Heart - Starting Out
This is a very interesting map as it combines a very limited enemy who won't attack your town along with three Seer quests to fulfill. If you dawdle you will certainly reach the three-month limit so take the Black Knight as your bonus. None of your heroes will transfer over to the next map so don't spend any time building them up.
A Gryphon's Heart - First Leg
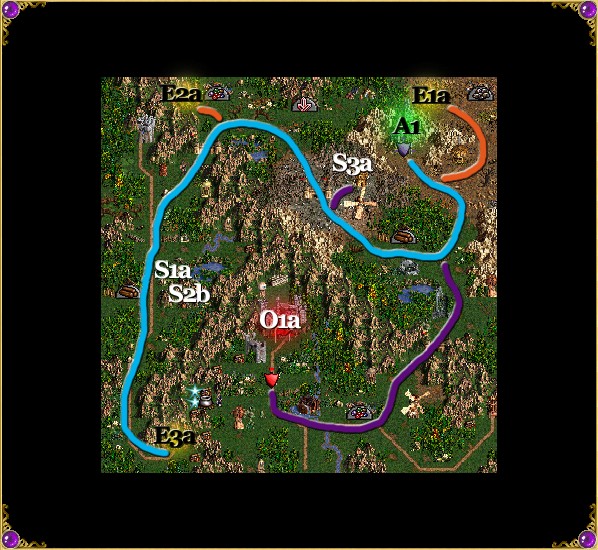
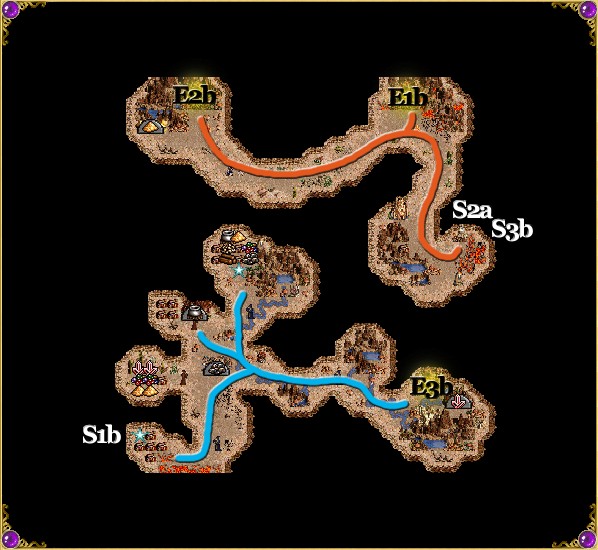
There is no need to worry about being attacked since the enemy will never travel from from his town and you can build up troops right up until the time limit if you want to. Start out by giving your hero all of the troops and following the teal path. There are 10 Archers and 10 Pikeman in each of the Garrisons but they should be not difficult to defeat. Be sure to visit the Shrine along the path to get the Blind magic spell before heading into E3a. You'll appear underground at E3b where you'll have to head west where there are quite a few Monks and Zealots guarding your way. They are in small numbers but, considering how slow low-level undead units are, they can do a great deal of damage before you reach them. If you got the Blind spell, that will help you out immensely and there is a Magic Well in the area that you can use between battles. Your true goal is to get S1b (Pendent of Total Recall) which is lying out in the open and is the first artifact that you need to get the Spirit of Oppression. Now go back up through E3b and give the Pendent of Total Recall to S1a to get a Hourglass of the Evil Hour. Now go north on the teal path and onto the orange path by E2a to head to a different area of the underground. Head along the orange path to hand S2a the hourglass to get the Pendent of Dispassion in return. Head north to E1b to appear right next to your town where you can upgrade your existing troops and get new ones.
A Gryphon's Heart - Finishing Up
You should give the main hero all of the troops and first visit S3a to exchange the Pendent of Dispassion for the Spirit of Oppression which is the artifact you need to bring to the enemy town once you've conquered it. Then go south along the purple path to defeat the only enemy hero. His troops consist of a few Archers, Marksmen, and Swordsmen but around 200 Pikemen which are the main threat. Defeat them in any way possible. Once you are victorious, simply visit O1a with the Spirit of Oppression in your inventory to win the map. Remember, no heroes are transferred over so there is no reason to hire any other heroes or have them visit any Places of Learning.
Season of Harvest - Introduction
To win, you must have a total of 2500 Skeletons in all your armies within 3 months. Some Border Guards can only be passed if a Hero carries a Quest Artifact from a previous scenario, but the artifact beyond the Border Guard will travel with you to the next scenario. Starting Bonus: Vampire's Cowl or Necromancy Amplifier or Unearthed Graves.
Season of Harvest - Maps


  • Green - Friendly Town
  • Red- Enemy Town
  • Grey - Neutral Town
  • Yellow - Underground Passage
  • A# - Allied Towns
  • O# - Opponent Towns (a,b,c,d,e,f,g indicates which enemy)
  • N# - Neutral Towns
  • M# - Mirror Entrances (a) and exits (b). two-way unless stated
  • E# - Exit (a) entrance and (b) exit
  • S# - Seer (a) and the location of the item (b)
  • G# - Guard Tents (a) and the location of the Guard Tower (b)
  • J - Jail
  • X - Ambush
Season of Harvest Starting Out
Take the Vampire's Cowl as your starting bonus as you will easily be able to build the other two buildings. The Vampire's Cowl will provide a long-lasting benefit to Vidomina who has the Necromancy specialty and she should be your main hero because of this. There are no enemy heroes on this map so you don't have to worry about anything except getting as many Skeletons as possible.
Season of Harvest - First Leg
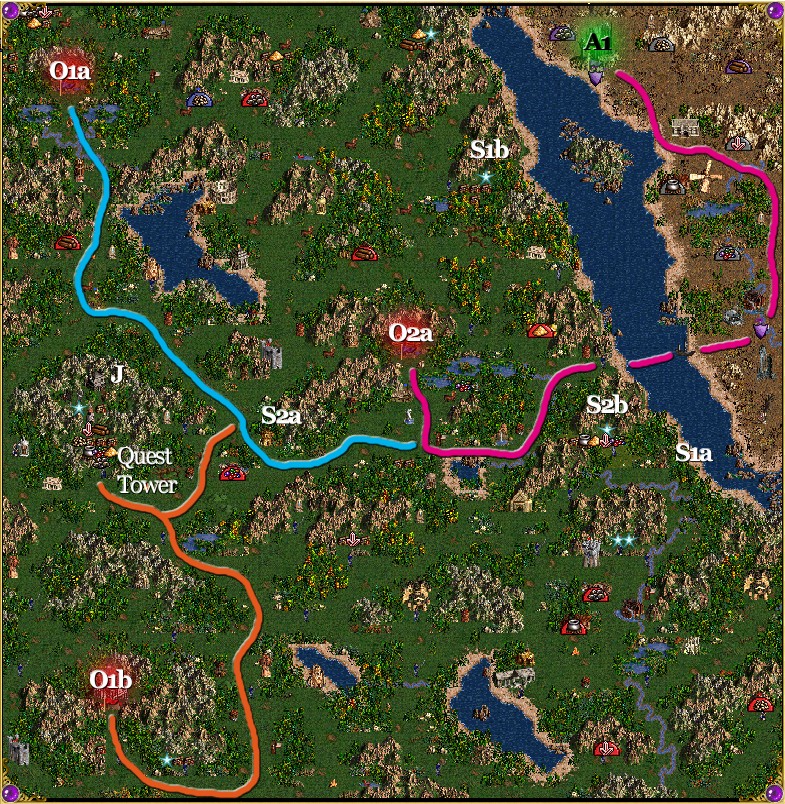
Have Vidomina get all of the troops from your town and head south on the pink path to meet with Vokiel to get the Vampire's Cowl from him as well as his troops. There is a boat to the west of Vokial that you should get on so you can take over O2a. You don't need to do this but you can transform the creatures produced in the towns to skeletons which will really help with your goal. It will also help with transporting all of the troops to your town to convert to Skeletons once you get the Town Portal spell.
Season of Harvest - Second Leg
After defeating O2a, head on the teal path to take over O1a which shouldn't be very difficult at all. Once finished, head back south to free Sandro from the jail and to get the stacks surrounding it since they will all join you. Just be sure you can accept the new creatures into your army so consolidating troops with Sandro will work out well. You do need the Spirit of Oppression to get past the Quest Tower but the artifact will carry over from the first map. Now continue south on the orange path and take over O1b which will result in the defeat of all of the enemies.
Season of Harvest - Finishing Up
There are a few ways to get very many Skeletons. You should attack all of the wandering stacks, not let any of them run away, and to let them join if they want to. You can always put the joined stacks in captured towns to transform into Skeletons later. Always be sure to protect your Skeletons in battle and only use them to attack when there is no chance of retaliation. Town Portal is a helpful skill because it will let you visit all three captured towns, hire the low-level troops, and transform them into Skeletons. When you have 2500 Skeletons, put them on a hero and leave the town since the Skeletons who are in garrisons don't count towards the goal.
Corporeal Punishement -Introduction
To win, you must defeat the Death Knight, Mot. Some Border Guards can only be passed if a Hero carries a Quest Artifact from a previous scenario, but the artifact beyond the Border Guard will travel with you to the next scenario. Starting Bonus: Pendant of Death or Scroll of Protection from Earth or 25 Zombies.
Corporeal Punishement - Maps


  • Green - Friendly Town
  • Red- Enemy Town
  • Grey - Neutral Town
  • Yellow - Underground Passage
  • A# - Allied Towns
  • O# - Opponent Towns (a,b,c,d,e,f,g indicates which enemy)
  • N# - Neutral Towns
  • M# - Mirror Entrances (a) and exits (b). two-way unless stated
  • E# - Exit (a) entrance and (b) exit
  • S# - Seer (a) and the location of the item (b)
  • G# - Guard Tents (a) and the location of the Guard Tower (b)
  • J - Jail
  • X - Ambush
Corporeal Punishement - Starting Out
I recommend taking the 25 Zombies as there is a great deal of cursed ground and so magic won't be of much use. None of your heroes will transfer over to the next map so don't spend any time building them up.
Corporeal Punishement - First Leg
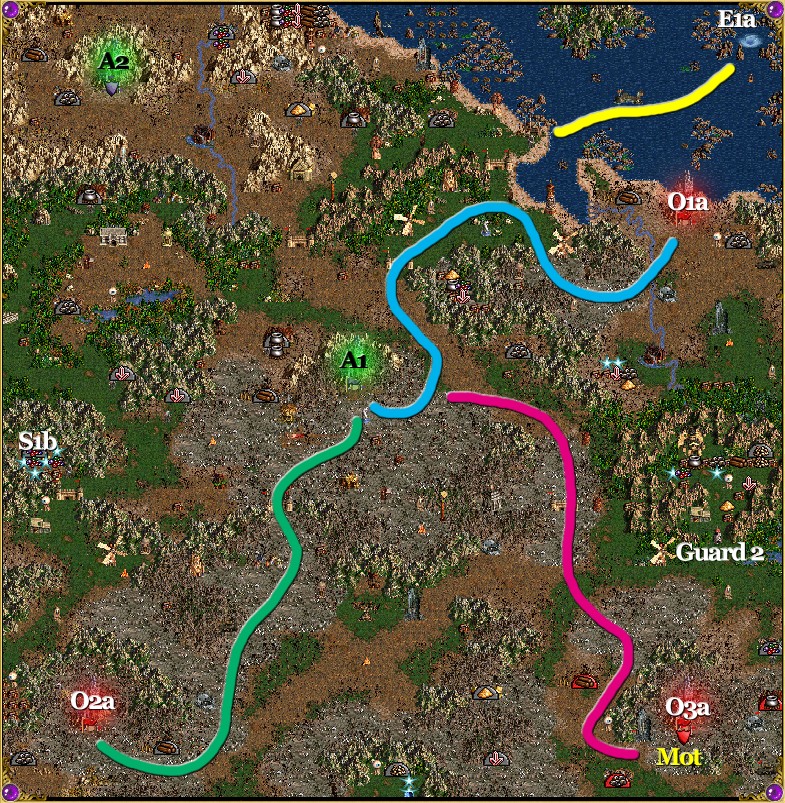
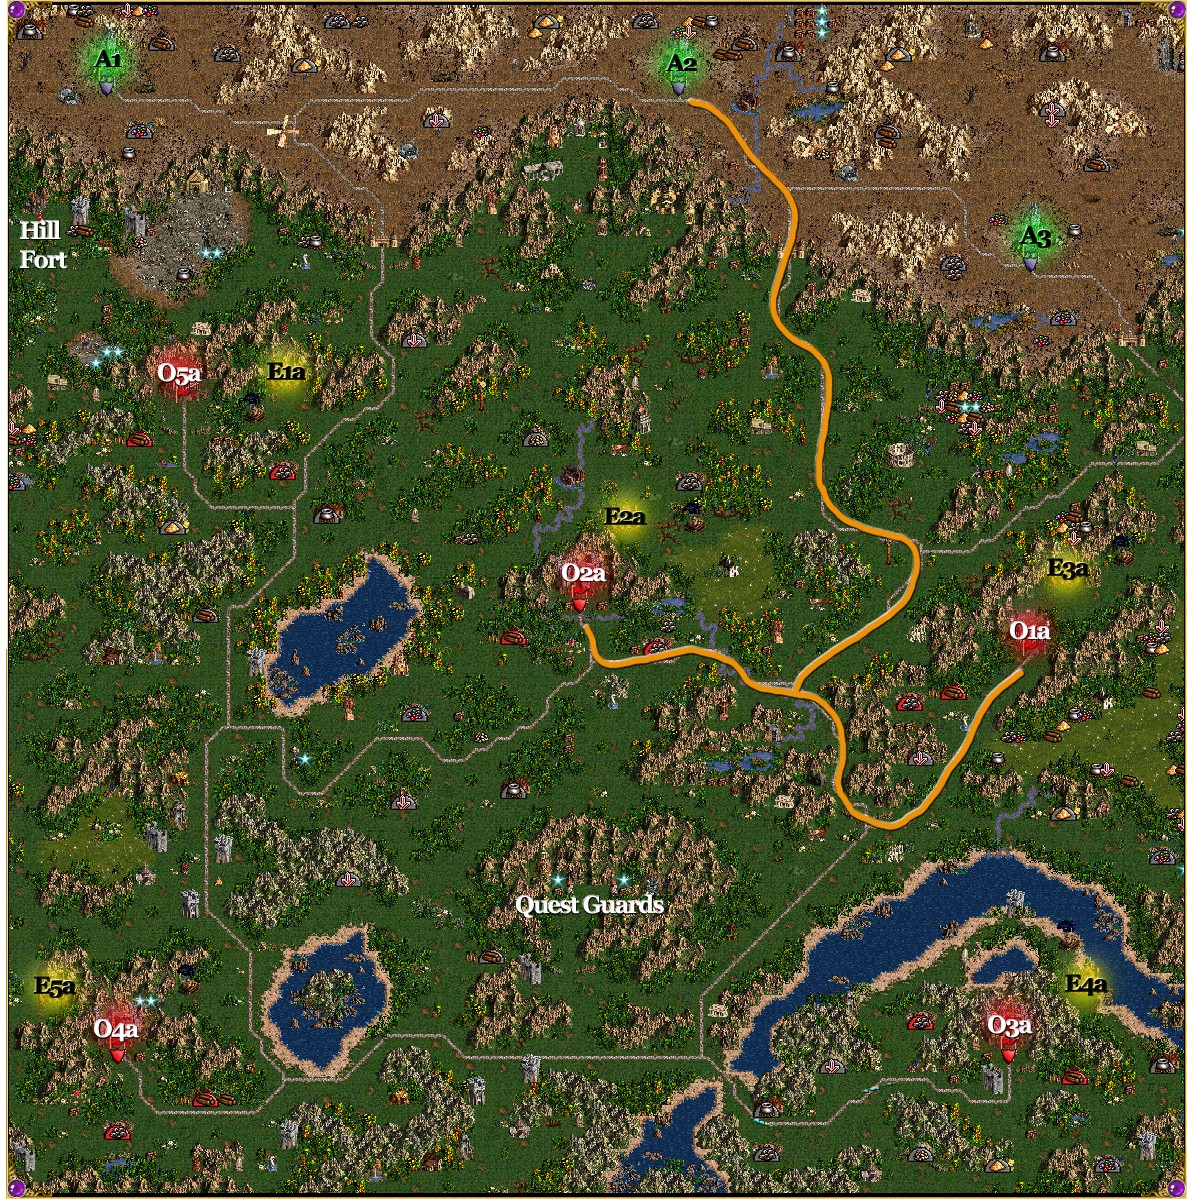
Mot is prevented from traveling very far from O3a so your first priority should be to take over O1a and O2a to tip the odds in your favor. I used A2 as a money/resource generator because it is so far north of the enemy towns and used A1 and later O2a as my main creature generators. I primarily relied on Vampire Lords and Power Liches as my forces, but you can use whatever troops you favor most.

It's impossible to say whether you should follow the blue path to take over O1a before or after you take the green path to take over O2a because it all depends on what the enemy does. I took over O1a in the fourth week and then I built up A2, scouted the area, defeated enemy heroes, and took over O2a in the start of the second month
Corporeal Punishement - Second Leg
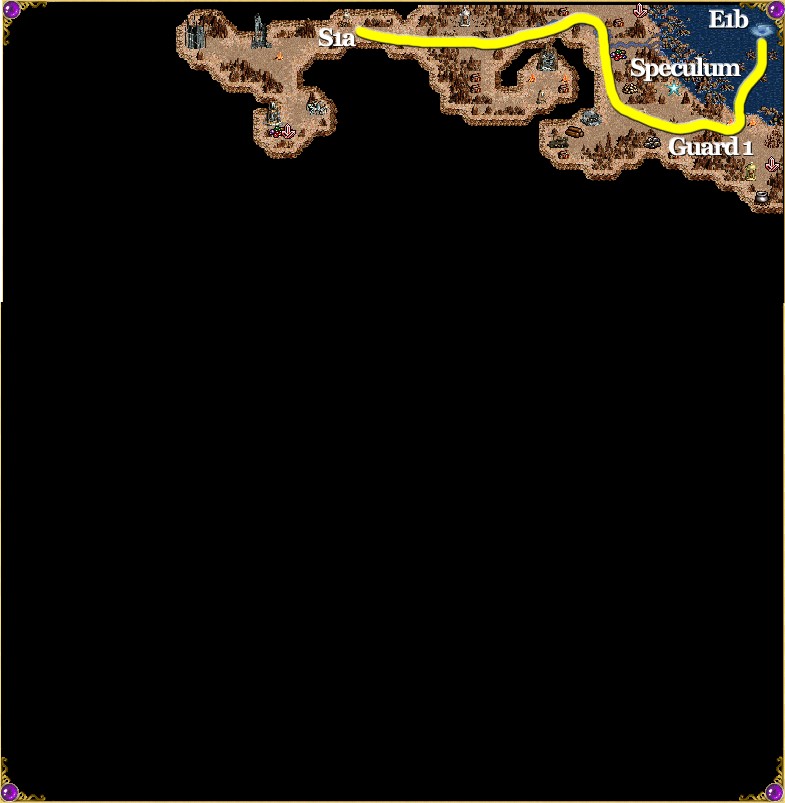
Now that you have taken most of the enemy's gold and resources away from them, you should take the time to go on the water on the yellow path. Give that hero the Collar of Conjuring and head to S1a to appear in the underground at S1b. Go through Guard 1 (requires the Collar of Conjuring) and pick up the Speculum which will carry on to the next map. The Seer at S1a asks for the Badge of Courage for a +2 spell power to that hero. Since none of these heroes transfer over to the next map and since there is so much cursed ground, it's a useless quest. There are lots of creature generators but they are all guarded so you'd better bring down some troops if you want to fight them. If you are playing this map before Season of Harvest than you can use the Spirit of Oppression to get into Guard 2.
Corporeal Punishement - Finishing Up
Once you have enough troops, give them to your best hero (preferably might due to the cursed ground) and attack O3a. You get a better score if you capture the town with Mot not in it. You do this by sending a weak hero close to O3a and the hero with all of the troops far enough away so that Mot attacks the weak hero but close enough so your strong hero can make it into O3a with Mot still out of it. Then Mot will attack the town and with the Castle now on your side, it should be an easy battle. Especially since Mot will most likely be much weaker than your strongest hero (he only had primary skills of 3 2 3 3 when I fought him) and you will have a much bigger army.
From Day to Night - Introduction
To win, you must capture all enemy towns and castles and defeat all enemy heroes. Some Border Guards can only be passed if a Hero carries a Quest Artifact from a previous scenario, but the reward is great indeed. Starting Bonus: Scroll of Death Ripple or Dead Man's Boots or 3 Ghost Dragons.
From Day to Night - Maps


  • Green - Friendly Town
  • Red- Enemy Town
  • Grey - Neutral Town
  • Yellow - Underground Passage
  • A# - Allied Towns
  • O# - Opponent Towns (a,b,c,d,e,f,g indicates which enemy)
  • N# - Neutral Towns
  • M# - Mirror Entrances (a) and exits (b). two-way unless stated
  • E# - Exit (a) entrance and (b) exit
  • S# - Seer (a) and the location of the item (b)
  • G# - Guard Tents (a) and the location of the Guard Tower (b)
  • J - Jail
  • X - Ambush
From Day to Night - Starting Out
To win this map, you must be aggressive and start taking over the enemy towns on the first day. Not only do they have five towns to your three, but there are many natural resources just lying around that will enable them to build and hire troops more rapidly than you. In this spirit, definitely take the 3 Ghost Dragons as your bonus.
From Day to Night - First Leg
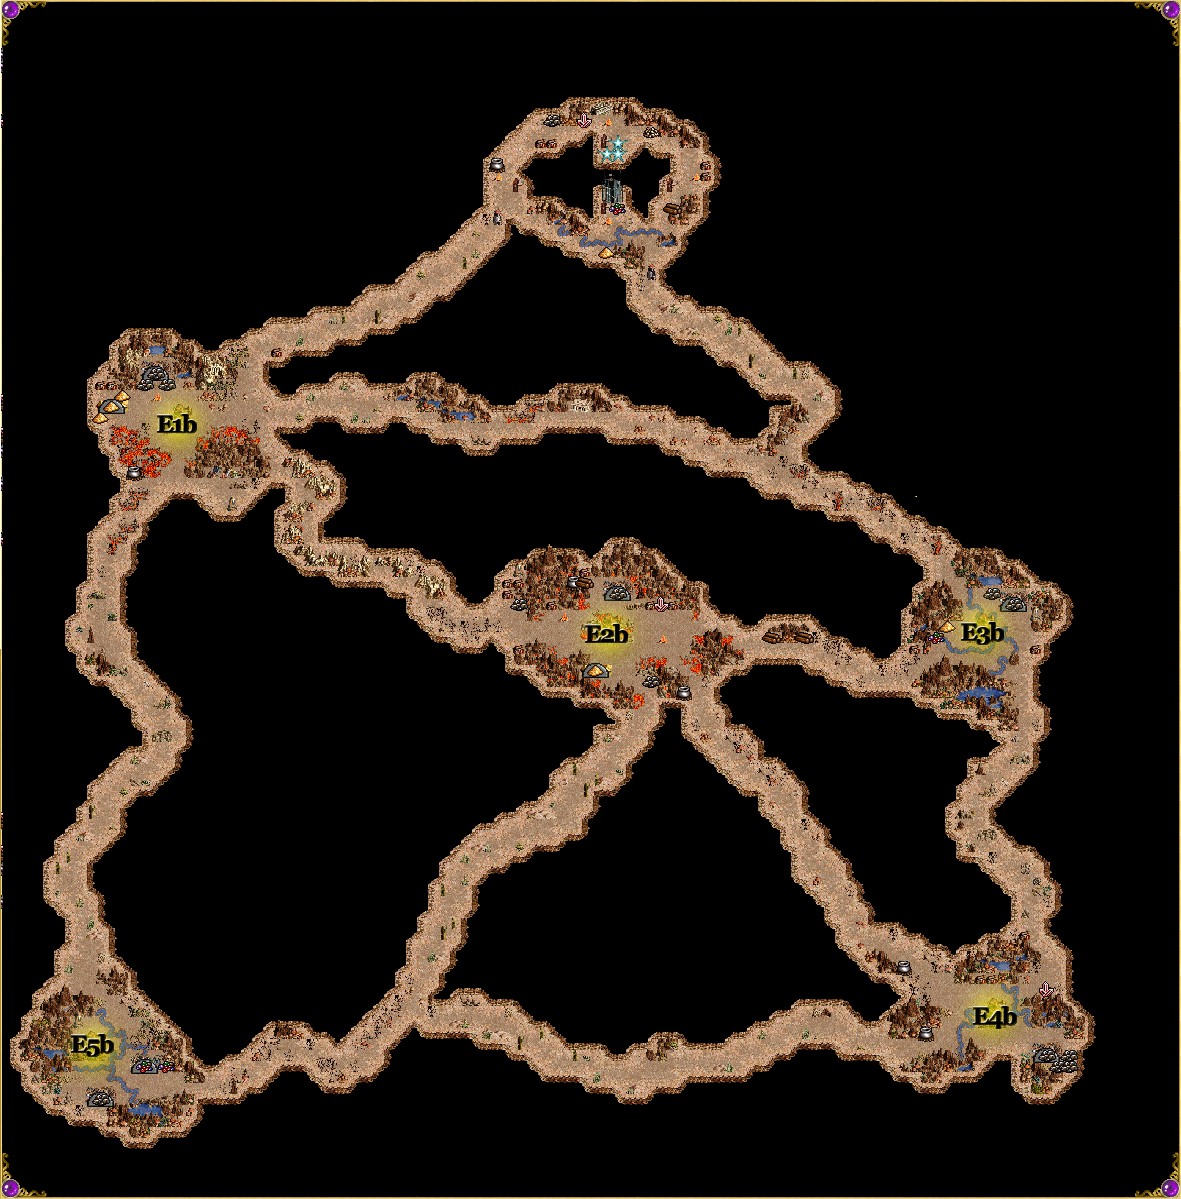
Vokial will be by A2 with the 3 Ghost Dragons and some other troops. Leave the rest of the troops in the castle and head south on the orange path, through the garrison (leave all skeletons there), and head east once you get to the branch and take over O1a. This town doesn't have a Fort so I recommend using it as a money-producing town. Hire another hero to grab up the resources and mines in the area and have Vokial return to the orange path to take over O2a. This town is not restricted in anything it can build so it's a good town to build up in order to better protect both O1a and O2a. I suggest leaving Vokial in the immediate area flagging mines while you build up O2a in order to give him some more troops.

While Vokial is taking over towns, have your other heroes explore the area by A1, A2, and A3. You will need a great deal of wood and ore to build up your town and thankfully, there are many supplies of both resources within easy reach. I recommend building up A1 and using A2 and A3 for gold and resources, especially in the first few weeks. One reason is that it's close to a town that you could take over once you have more troops, but a Hill Fort is close by so there's no reason to build upgraded troop buildings.
From Day to Night - Second Leg
From this point on, what you do is mostly dependent on what the enemy does. There are five underground passages and so it's possible for an enemy hero to pop up by O2a when your main hero is by O4a. This is why I recommend building up both A1 and O2a in order to not let your conquests be taken over. Visiting the Quest Guard with your Speculum is very helpful since there is a Cartographer who will reveal most of the map for only 1000 gold. If you don't have the View Air skill, this is a great way to keep track of what the enemy is doing.

What worked well for me was to have Vokial plus some castle troops defeat the enemy heroes he came across until enough castle troops were produced in O2a. I then defeated O3a and hired a hero to flag the mines there. Taking over this town helped me greatly because the hero I hired there was able to prevent the enemy heroes from appearing at E4a and wreaking havoc. I generally took over O4a next and hired a hero to flag the mines as well.

A good idea might be to have a hero stand next to the last remaining town with a good-sized army and defeat all of the scouts that the enemy will periodically send out. This way you won't have to worry about defending all of your towns and can concentrate on finding the last remaining enemy heroes before you take over O5a to win the map.

If you make sure that you have enough troops in each castle to protect it against scouts, have Vokial equipped with his Ghost Dragons and Castle troops (Marksmen and Cavaliers are my personal favorites), and making sure to not let a strong enemy hero take back a town you conquered, you will eventually triumph over this map.
From Day to Night - Finishing Up
Once all of the enemy heroes are found and defeated, simple give the hero of your choice the troops of your choice and attack O5a. It shouldn't really matter which hero you choose or whether you use Castle or Necromancer troops since the enemy should be so weakened by this point, you should have no problem defeating them.
7 Comments
Ξ Madman Ξ 1 Feb @ 4:24am 
Hey guys :winter2019happysnowman:


.. i have a question about >> Long live the king a gryphon's heart mission !!!!!!!!!!


.. is it possible somehow visit warriors tomb????? WITHOUT CHEATS

.. did anybody ever tried this?


P.S. i tried more than 10x build all mage guild levels .. but can not get tleport or fly spells
Jylppy 19 Jan @ 1:47pm 
Why I have dark blue and brown guards blocking the access to cartographer and dragon vault There are no tents of that color anywhere on the map?
Laffibob Dongripants 3 Jul, 2023 @ 7:04am 
Green Border Guard -> You need to have done the "kill the necromancer MOT" level first to get access to this! They're probably not even colours; but artifacts required. It's super confusing.
Rashkavar 15 Mar, 2020 @ 1:54am 
@Tsuhyoshi I believe that's the place you take the artifact behind Guard 2 in Corporeal Punishment, if you opt to play that map first. If you're doing Season of Harvest first, you'll be getting a different artifact from the quest guard that's labeled on the map. Good to mention, though.

@Pewpew Those presumably take whatever artifact you inherited from the previous map. It's a pity the message turning you away defaults to referencing the tents even when it's using a different mechanic - goes to show just how far they were pushing the limits of the game when they set up the multi-campaign questlines. At least they work - apparently in the Complete Collection (the one including the expansion packs) they were broken altogether).
Tsuhyoshi 6 Jan, 2020 @ 5:32am 
In season of harvest there is a green border guard tower in the upper most left corner but i cant seem to find a way to open it.
M 2 Nov, 2019 @ 9:49am 
how do you pass the quest guards on From day to night tho. I can't seem to find the dark blue and brown tent anywhere on the map.
The Darius 30 Oct, 2016 @ 9:21pm 
Il'y a un erreur sur le titre [Walkthrough]. Efface ce commentaire, apres! :)