Way of the Samurai 4

Way of the Samurai 4

206 ratings
Way of the Samurai 4 - New Player Handbook
By Potato Doge ( ★ ★ ★ )
A handbook for new players so they can understand how various stuff in the game works with no/minimal spoilers.
9
2
   
Award
Favorite
Favorited
Unfavorite
Introduction
Hello, I'm Gun Wolf.

I'm the author of this guidebook. After I've played WOTS4 for a bit and helping out a friend of mine, I felt I should make a New Player's Handbook for WOTS4 for those who don't want to get spoiled of the various stories/plots of the game.

Before we begin I would like to say that I am going to recommend a controller for playing the game.
My personal setup is using a PS4 controller via USB ontop of the program DS4Windows found here[ds4windows.com]. Don't worry if you are using Keyboard/Mouse or an Xbox controller, I'll label the controls with their respective buttons/inputs.

Anyways, that's enough of the introduction, let's move onto the basics.
Basics - Starting a New Game
Okay okay, this is probably a bit confusing at first, so let me explain with pictures. Starting from the beginning.

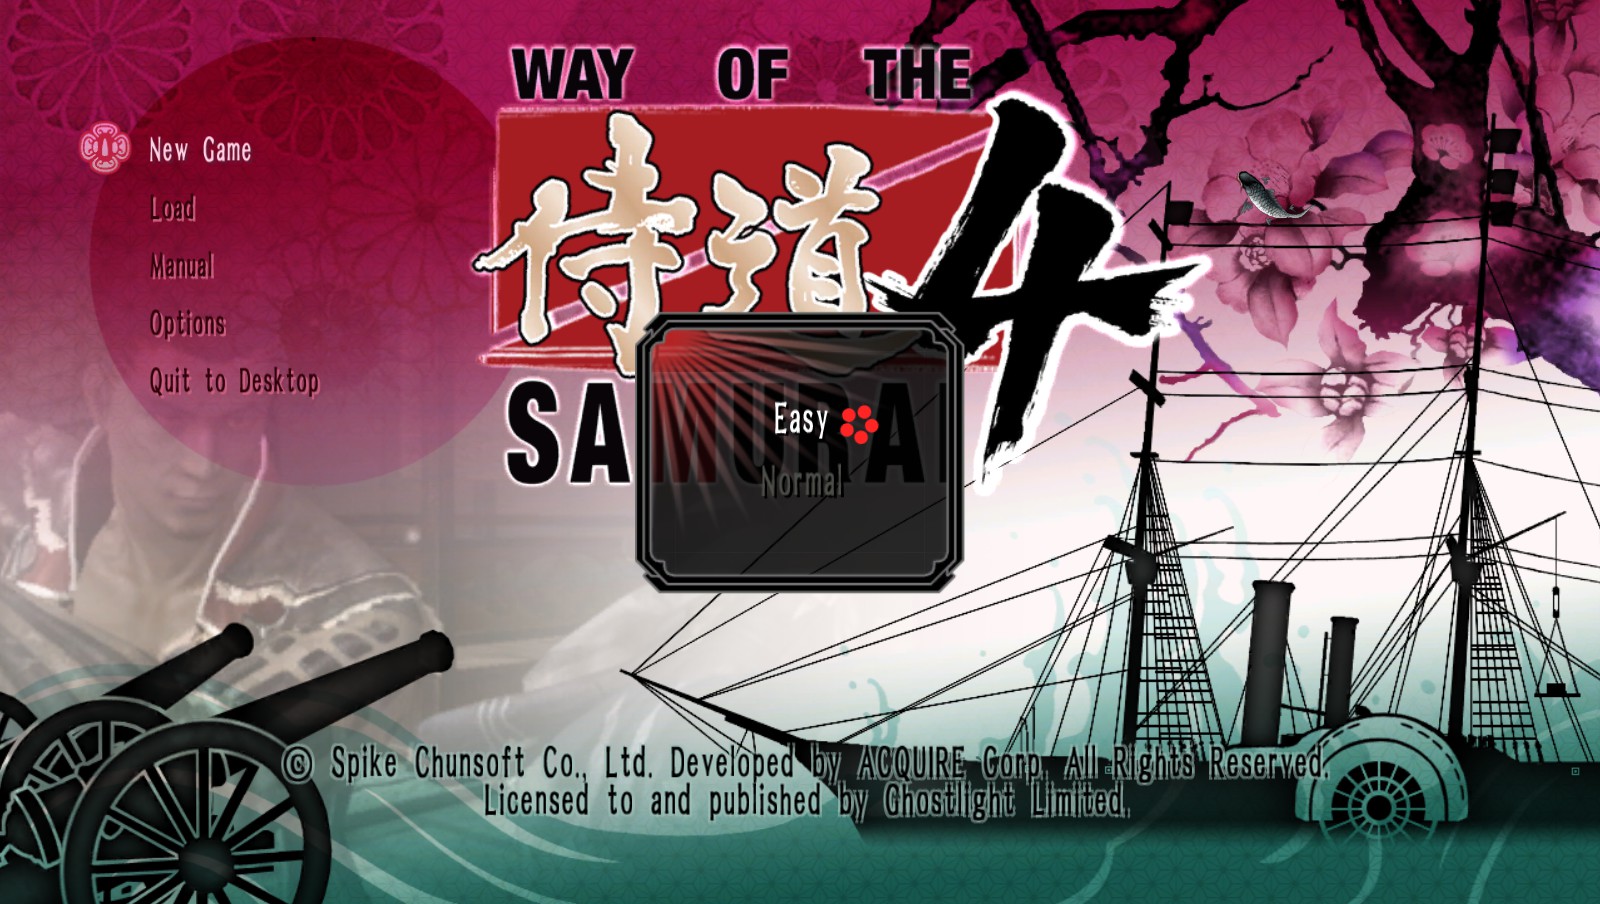
Easy Mode or Normal Mode?


So you're starting a new game. You go, "Oh, I've played games before, Normal is for me."
No, stop what you're doing. You do not know what you're about to do.
This game's difficulties are not what most expect them to be, assume for right now, Easy is Normal, and Normal is Hard.

The reason why is because Easy mode is expected to be completed with an upgraded sword that has 50 Strength. If you are playing for the first time, your sword will not be upgraded at all, and it will not have 50 Strength(I believe it's somewhere around 10). We'll get to upgrading sword later.

Normal mode on the other hand, is expected to be completed with a sword that has at the least, 100 Strength.

When my friend started up the game, I told her she needed to play on easy mode, and to take my word for it. Later on, I asked her, "Have you had a fight that is really hard yet?" and she replied, "Yes, multiple times."

Of course, she didn't know about certain mechanics and was losing a lot because of this. But this was also on Easy mode. If you want to play on Normal mode, go for it, I did it on my first play through, but I'm a bit stubborn when it comes to games and Easy mode, and trust me, it was hard, even with my experience with the previous installments of the series.

After the difficulty

Alright, so after the difficulty selection you're faced with a couple of options.


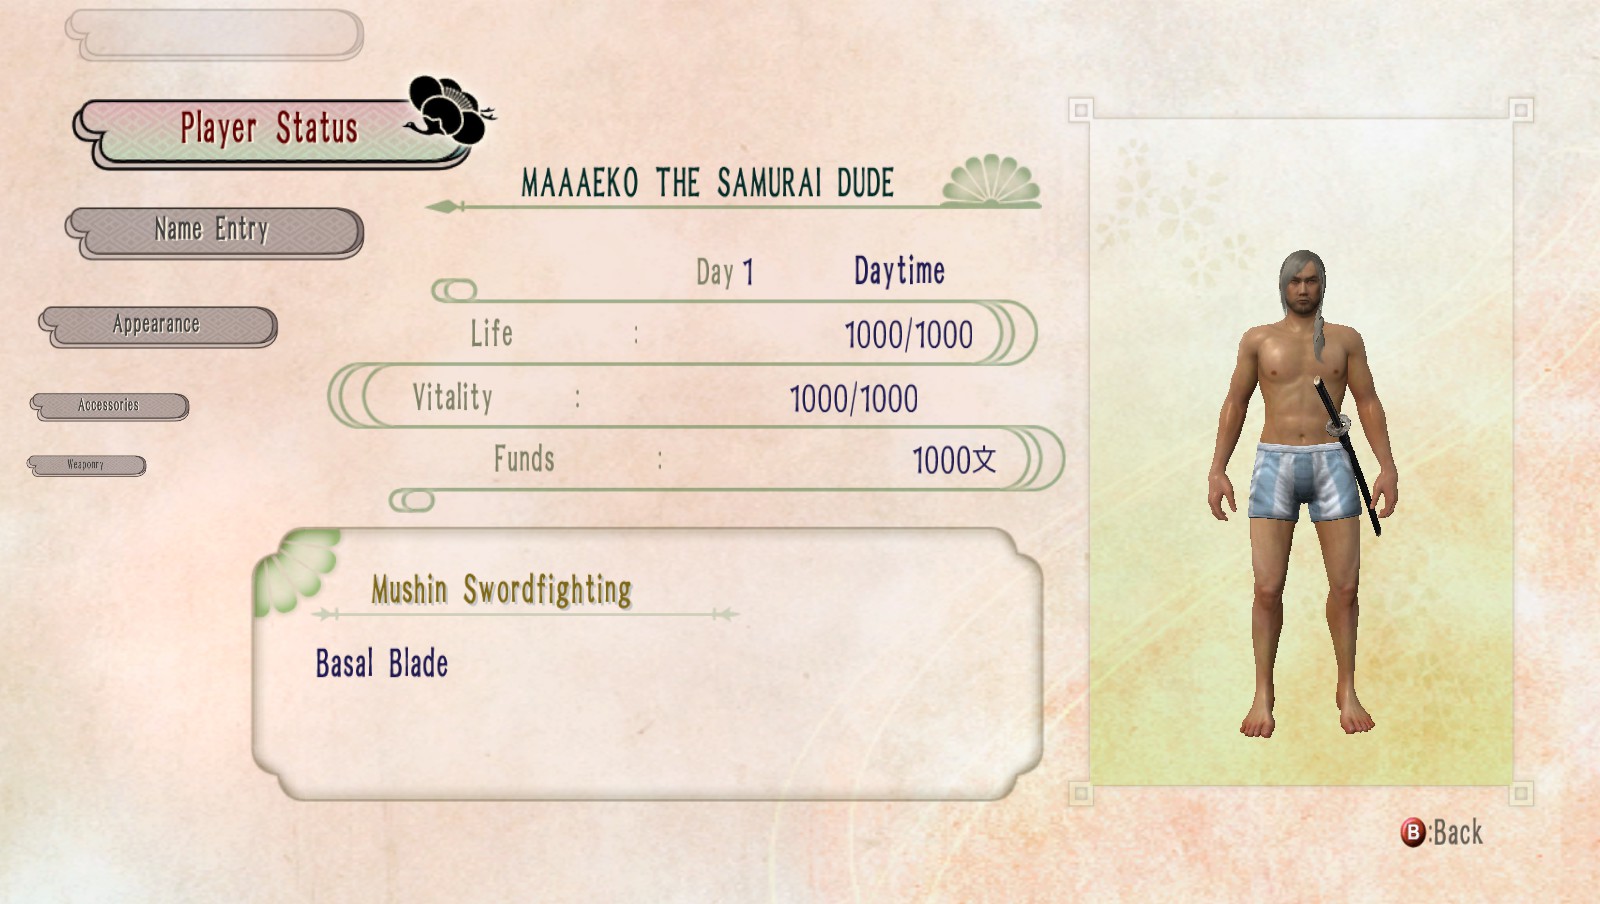
For now, as a new player, I'm going to have you ignore a couple of these, more specifically, Weaponry, and Style/Moves. If you want to take a look at these now, you can, but it's a bit easier to explain them later after learning some of the other stuff. So basically goof off and make your character however you want. No seriously, here's an example of me entirely goofing off with the default options.

I AM MAEKO THE SAMURAI DUDE!

I named him MAAAEKO.
Or Maeko for short. :p

Anyways after you get your stuff sorted out, go ahead and begin your adventure.
So onto the next section!
Basics - Getting off the boat/Controls
On da boat
So, you've created your char...And...You're on a boat? "The **** is this ****, I wanna swing my sword and cut people down!"


Well hold on, you'll get to that very shortly, but we need to talk about Interjection first.
If you take a look here, you are given different options to respond. Throughout Way of the Samurai 4, you will be talking in various conversations, and how you talk and how you act can determine the outcome of the game. The in-game tutorial explains this, so choose whatever words you want and roll on.


Do remember you can hit right and left to swap who you're talking to.

Gettin' off da boat

Alrighty, so you are off the boat and you see off in the distance a crowd. Surely this will be important on your quest, but wait! You don't know the controls first.


Let's go over the controls first sadly, and omg, I feel sorry for you mouse/keyboard users, anyways, let's go down the List, here are the basic controls
Keyboard/Mouse:
  • Space - Ok/Talk
  • Cancel/Jump - E
  • Draw Weapon - Shift
  • Sub Menu - L Ctrl
  • -then Space -> Reverse Blade
  • -then H -> Switch to Unarmed/Sword
  • -then U -> Discard Current Weapon
  • -then E -> Dual Arm(when you can)
  • O - Guard
  • H - Weak Attack/Interact with objects/Kick when holding guard
  • U - Strong Attack
  • Up Arrow Key - Up
  • Down Arrow Key - Down
  • Left Arrow Key - Left
  • Right Arrow Key - Right
  • i - Look up
  • K - Look down
  • J - Look Left
  • L - Look Right
  • N - Hold
  • W - Move Forward
  • S - Move Backward
  • A - Move Left
  • D - Move Right
  • Tab - Status Screen/Menu
  • M - Map Display
Using the mouse is a bit confusing to me, so just test it out and see if you like keyboard or mouse more.

Xbox Controller:
  • A - Okay/Talk
  • B - Cancel/Jump
  • LB - Draw Weapon
  • LT - Sub Menu
  • -then A -> Reverse Blade
  • -then X -> Switch to Unarmed/Sword
  • -then Y -> Discard Current Weapon
  • -then B -> Dual Arm(when you can)
  • RB - Guard
  • X - Weak Attack/Kick When guarding/Interact with objects
  • Y - Strong Attack
  • D-pad - Up/Down/Left/Right
  • Right Thumbstick - Look
  • Left Thumbstick - Move
  • Start - Status Screen/Menu
  • Back - Map Display

PS4 Controller:
  • x - Okay/Talk
  • Circle - Cancel/Jump
  • L1 - Draw Weapon
  • L2 - Sub Menu
  • -then X -> Reverse Blade
  • -then Square -> Switch to Unarmed/Sword
  • -then Triangle -> Discard Current Weapon
  • -then Circle -> Dual Arm(when you can)
  • R1 - Guard
  • Square - Weak Attack/Kick When guarding/Interact with objects
  • Triangle - Strong Attack
  • D-pad - Up/Down/Left/Right
  • Right Thumbstick - Look
  • Left Thumbstick - Move
  • Options Button - Status Screen/Menu
  • Share Button - Map Display

Alrighty, got the controls down? Good.
Now remember that crowd of individuals over there? Go over there, you can ignore them and veer off the left and hug the wall to skip/ignore this event, but you should do it anyways as it doubles as a tutorial along with helping you get the combat down.

Also, first real tip for your first walkthrough, if you guard and then hit the weak attack button, you will do a kick. This kick can allow you to quick pick-up items on the ground(which I suggest you do when you kill an enemy), at the cost of some samurai points if you accidentally hit a dead body(as it's not samurai-like to kick a dead body).
But don't worry about the samurai points, just worry about picking up items.

Onto the next section of the guide!

Basics - The HUD
Alright, so now we are onto the really fun stuff, the combat. But wait, why does the opponent's health regenerate? Why doesn't mine? Well, these will be answered below.

Okay, look at the lower left hand of your screen.
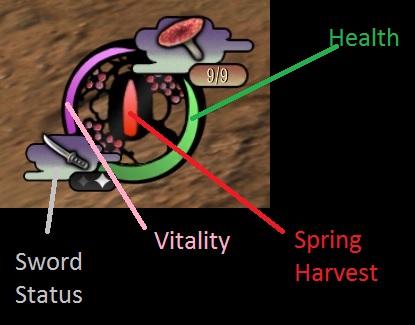
You should see something like this.


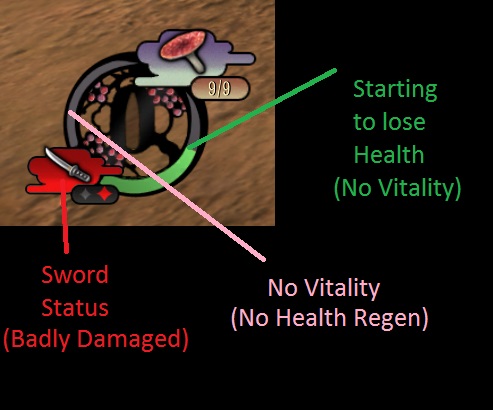
There are five different areas, which I will talk about below.
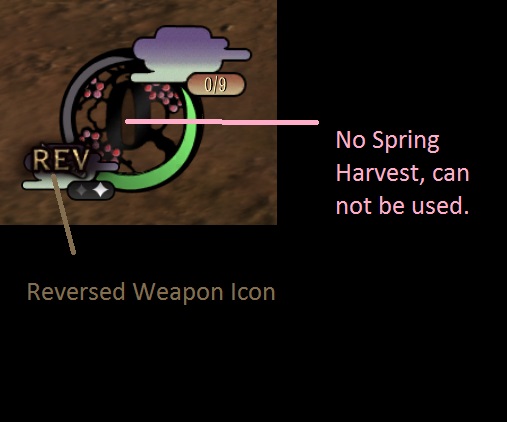
There is your Health, Vitality, Sword Status, Spring Harvest Gauge, and your Item Select.

You can change the usable item you have selected via right or left on your d-pad and use it via up on the d-pad. I currently have a mushroom selected, so if I wanted to eat that, I would hit up on the d-pad.
Note: Some items are only usuable in certain conditions.
I.E. To use a whetting stone you have to unsheathe your weapon.

Sword Status
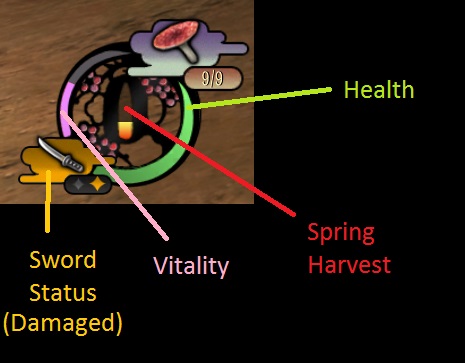
Next up is your Sword Status, after using it for awhile, it's durability will go down, it will be a white icon when it's Good Durability, Yellow when it's Okay Durability, and Red when it's Badly Damaged, From these 3 different states, you can repair the sword using a whetting stone if you have one on hand, also, if you hit the Sub-Menu button, you can see the durability status of your currently equipped sword.
Your sword can also break. Don't worry, it can be fixed, but not with a whetting stone. It can be fixed at a smithy, but more on that later.
Note: It's actually better not to waste money on whetting stones, so just drop by the smithy while you can as it's much cheaper. Also, it's not entirely a bad idea to have 1 or 2 whetting stones on hand just incase you get into a really long fight.


Vitality

Okay, vitality is pretty important. It does a couple of things. It regenerates health, and is used when fast-traveling and when attacking. It's pretty much what keeps your opponent alive, and keeps you alive, and it doesn't cost much Vitality to restore HP. So as a tip, if you're fighting against a strong enemy with a lot of health, reverse your blade by opening the sub menu and reversing the blade. By doing this, you start damaging their vitality instead of their health, and sometimes enemies will give up when they hit low vitality and you keep beating them, other times, you just need to kill them. So yeah, if they are strong, try taking down their vitality first so they can't heal.
Note: Health Regen takes a second to kick in, so you can sometimes kill an opponent quick enough before they get their health back, but same goes for you, so be careful.


Spring Harvest and Reversing your Blade
The Spring harvest gauge will fill up whenever you kill someone or damage someone. Once it's at a certain point(basically is blinking and about halfway), you can hit both the guard and sheathe buttons to enter Spring Harvest Mode, where you get an attack speed and damage boost, making you one quick samurai. You also will regain Spring Harvest when hitting certain combo counts whilst in the Spring Harvest mode, one of them being the 25-hit Combo mark. AND, when you kill someone, you get Spring Harvest back along with them being stuck standing. Why would they be stuck standing you ask? Well, that's simple, because you can finally do that badass samurai ♥♥♥♥ where once you end spring harvest via hitting the sheathe button, you sheathe your sword all samurai like. You can also hit both the sheathe and the guard buttons to keep your sword out and still do the badass samurai finisher. However, if you run out of spring harvest without finishing it, you will take a kneel and be momentarily vulnerable, so make sure you end it before you run out.
Note: As a side note, you do not gain Spring Harvest while having your weapon reversed, also, you do not lose spring gauge when you switch to it, it comes back when you un-reverse your weapon.


Okay, so we got all that out of the way, right?
Thankfully I don't need to go through the combat as the game gets that for you pretty well. Plus I want you to learn some things on your own. :p
Regardless, let's move on.
Saving the game and understanding the map
Saving the Game
So, first thing I want you to do after you complete the first fight is this. Look around, you should see a photographer.
This dude here-

Walk up to him, and choose to let him take your photo with, "I'll strike a pose."
This is how you save manually. You basically can choose a slot to save here, so it's pretty self-explanatory. Do note the game auto quick-saves, so if you die you can hit retry and continue on. However, the game can crash or you can make a decision you don't want to, so save often.
Note: Also save because if you quit out of the game, I do not believe the quick saves are stored, as you can not load them.

The Map
Okay, so you've saved your game, great, now where to go?
Well, that is pretty easy actually. Open up your map using the map display button.
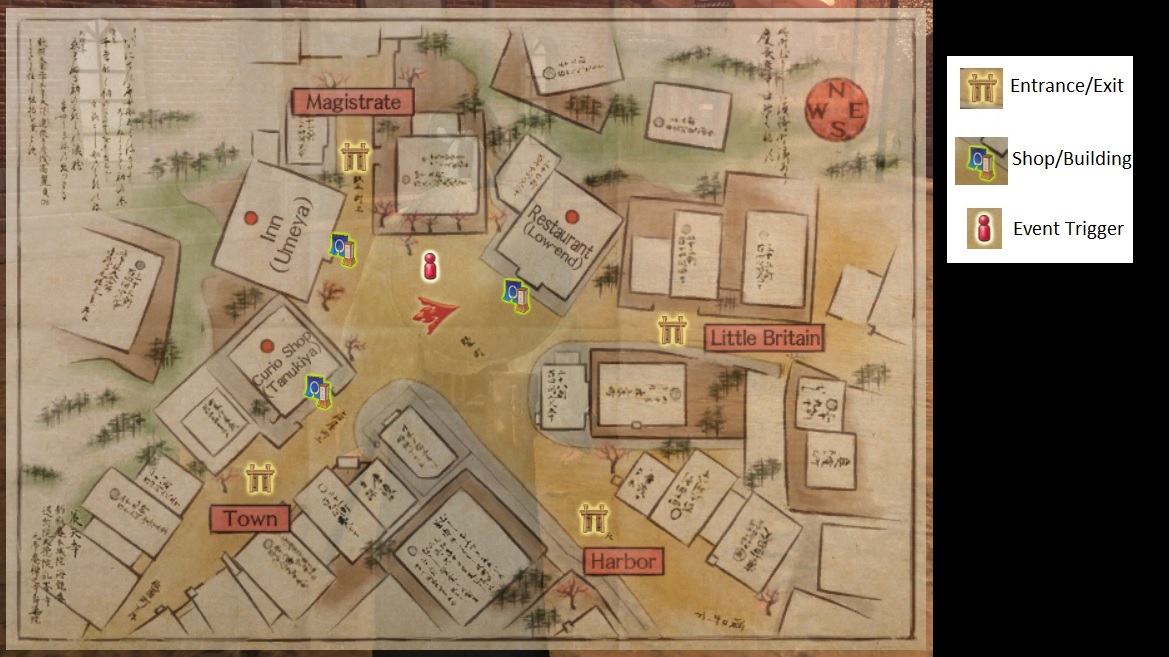
As of right now your in the harbor, so I'm gonna use the map from my main save to show you a couple of things.
Okay, so the only thing I didn't show here are the sleeping spots, because they aren't that important unless you plan on skipping events(which by then you wouldn't need any help :p)

Anyways, if you look on the map, there are entrances to buildings/shops, the entrance/exit to the area, and the event trigger marker.
The event trigger marker is essentially what triggers an event which progresses the story.
Do note that not all buildings can be entered at the start, but if you'll also notice, there are names to various areas. One such place is the Curio shop, otherwise the clothing/hair/accessories shop.
I actually decide I want to take Maeko here to pick up an item or two.


Now, when you enter the Curio shop, you need to walk up to each side of the store and the guy will run over to that side. Each side sells Hair, Clothing, and Accessories respectfully, so that's why I'm on the right side. However, if you do go to any store, make sure you have a sufficient amount of funds, otherwise you can't pay when you buy an item and you might be arrested.


Maeko is looking more and more like a true samurai with every step!

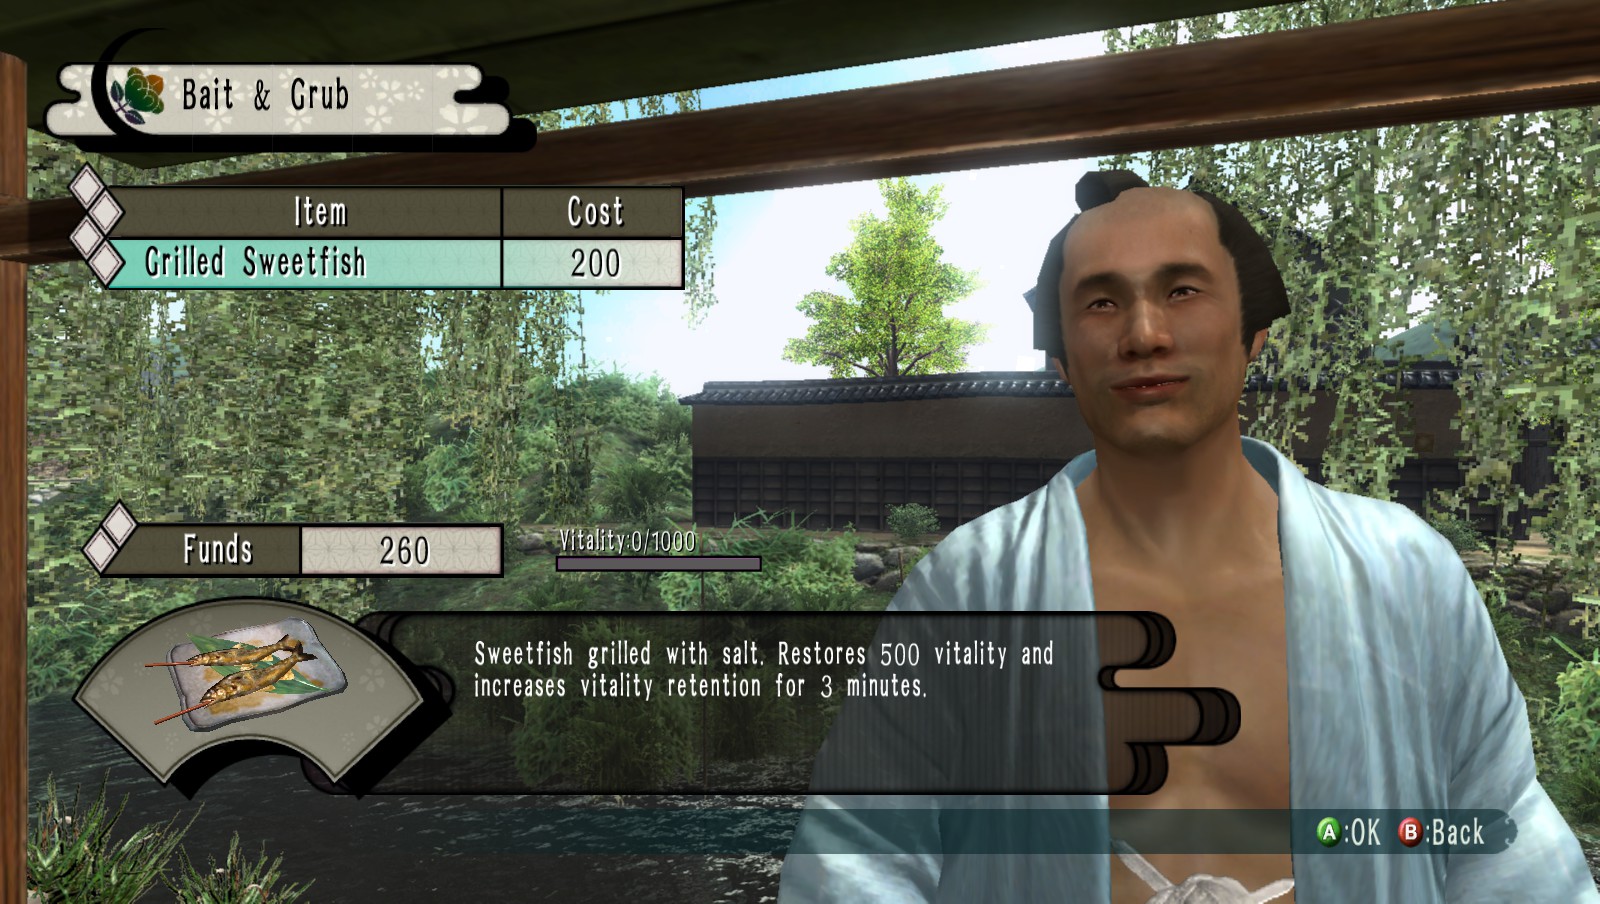
I decide afterwards I need my vitality to be increased and my sword to be repaired, so let's head into town. And near the entrance/exit to the habor going into the town, there's a store that sells food that restores vitality and retains it for 3 minutes(this is where I generally head to get my vitality up)

This guy also sells bait to go fishing, if you decide you want to go do that, go buy some bait, go buy a fishing pole, find an amount of water, stand in it and start fishing. Don't ask me where that is though, I won't tell. :p

Anyways, I buy the food and have a nice meal.


Then I head off to the smithy to repair my sword.
"Help! My sword is broken!" and "All of mah items."
Heading to the smithy
Well, I went over to the smithy at this point, but if you happened to have your sword broken, don't fear, you can get it repaired here!
Simply go to the Smithy, choose refine, choose polish, then select your sword that is broken/needs repairing, and for the fee, he will repair it!


Alrighty, done with that!
Let's take a look at the stuff I told you to ignore in the beginning, which is your weaponry and your styles.

Weaponry

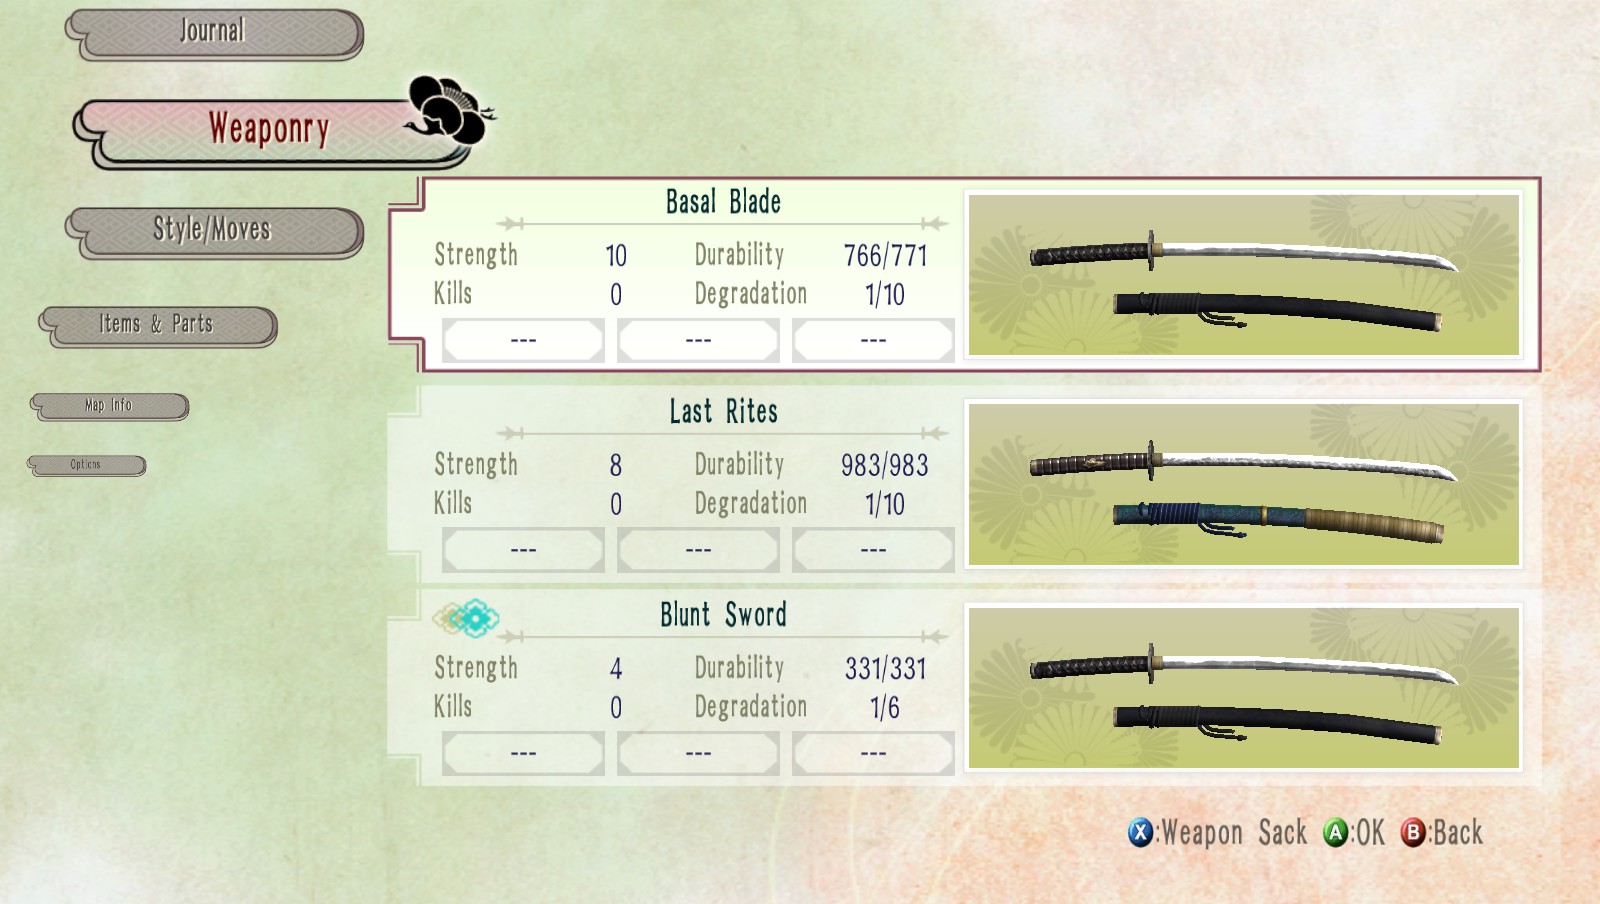
Okay, so, if you look here, you can see a couple of things.
For each different weapon you have, you'll have different stats, Let's take a look at these three blades.
Strength is essentially how much damage the sword does.
Durability is how much your side can take until it breaks.
Kills is how many kills you've gotten with the sword(this is actually somewhat important)
Degradation is how many times you can upgrade the sword without recasting it.
The three boxes with lines in them is where charms go, which when making a sword, if you get 3 charms in a row, you get a charm, but I'll leave that to figure out for yourself for later.

Okay, so given from this, we have to decide which sword would be better between the Basal Blade and the Last Rights, as it's obvious the Blunt Sword is pretty bad.
Now, before we begin, let's understand what are the possibly max stats for a sword in the game. For Strength the maximum is 500, for Durability, the maximum is 2000.
Now, you get around 500 durability per refine--->make harder for the cost of some money and then a degradation increase of 1.
For strength, you generally get around 5-15 strength per refine--->make stronger for the cost of some money and then a degradation increase of 1.
Once your degradation is maxed out(for these swords it would be another 9 upgrades, making it 10/10), You then have to recast instead of refine, this costs less money in the long run but requires a lot of scrap metal(which you can get from smelting weapons).

So, after having all of that out of the way, let's decide which sword would be better to hold onto.
And for this, we will assume there will be no variation when upgrading the Strength, and that every time it will be upgraded by 10

So for the Basal Blade, let's upgrade it to the max durability which will be 3 upgrades. So now it has 2000 Durability.
Let's also increase the strength and cap out the Degradation, so given it has 6 upgrades left (3+1=4 and 10-4=6), It's ending strength will be 70

So Basal Blade's stats are now:
Strength - 70
Durability - 2000
Degradation - 10/10
Kills - 0

Alright, let's upgrade the Last Rites
Now let's not upgrade Last Rites to max Durability as we only get 17 increase in durability on the 3rd upgrade, and instead let's give the strength another upgrade(See where I'm going with this?)
Stats for the Last Rites are now:
Strength - 78
Durability - 1983/1983
Degradation - 10/10
Kills - 0

So it seems in the long run, this is what we end up with. The differences aren't great, but they are both well above what the Blunt Sword would be if we decide to upgrade it.

Now as for the kills. Swords can be Appraised to give them a certain quality, these qualities will give the sword a name attached to it. There are different qualities. One for Durability(Reduces the durability reduction when using the sword, basically get repair points). One for Spring Harvest(Guess), one for extraction(basically smelting the sword), and one for Strength(basically get kills). If you hit appraise, he will look at your sword, and if your sword can be apraised, you can then hit the map display button to get a description of the appraisals and what they do.

Now we got the weaponry down, let's move onto styles.

Styles and Attack Moves

These basically shows which style you have equipped, how many kills with that style, your rank with that style, and your skill points with that style.
If you click on the style library-

You now see what styles you can equip. There are plenty of styles. On my main I haven't stepped past getting the Chu-Dan(Mid) ready position styles down.
You can also check the moves library that will tell you requirements and show you moves.
Note: There are secret moves, and they require specific swords, so if you find you haven't mastered a style for some reason, this might be it.
You can learn non-secret moves from scrolls if you happen to find them.

Onto the items!

All of mah items
What, I can't pick up a sword? I can't pick up a style? I CAN'T PICK UP ANYTHING! WHAT IS THIS?!

Well, to put it short, you've hit your inventory cap for your stuff. If you go to the dojo, you can drop stuff off, and trust me, you can not have every item in the game in your inventory(if you can find every item I'd be impressed.)
But yeah, there's plenty of items, look around talk to people(this is how you can get jobs btw). Pull your sword out and try and get people to fight you.

Maybe you can be like Maeko and kill a duelist all bad-ass like. :p
Closing Statements
All in all, Way of the Samurai 4 is a fun game, but just needs some understanding is all.
I did leave some stuff out as I felt some stuff was at least decently obvious, but I also wanted to make sure not to spoil too much. So forgive me if you believe I spoiled anything at all.
If you want a full-walkthrough, here you go.
DO NOTE, SPOILER WARNING STATED BY THE WALTHROUGH POSTER-
Spoiler warning! There are small spoilers here and there, my endings are bare minimum and I never really describe the plot in the events however be warned that some facts will come out and ruin events, try to get things yourself 1st it's part of this game!
http://www.gamefaqs.com/ps3/611500-way-of-the-samurai-4/faqs/64880


Also, just incase you peeps would be wondering, this is my main:

Have fun and Good Luck. :p

Special Thanks:
Dr. Objection for making sure I make at least some sense in this guide.
Maya for getting me to look up some stuff I originally didn't know(I never knew you couldn't hold every style!)
Ghostlight for bringing this game to steam. Seriously guys, I'm glad I got to play this as I lost my chance when I sold my PS3.
You guys who read all the way through of my long detailed stuff.
(Might actually add more in this guide, might take some suggestions from peeps)
18 Comments
FloridaYeti175 23 Jun, 2023 @ 4:48pm 
Hey, how do you switch targets in combat I can't remember.
Gambit 12 May, 2023 @ 3:37pm 
very helpful
William Shakesman 8 Apr, 2023 @ 11:41am 
Super good guide for teaching people the absolute basics of WOTS4 without boring them with the details of weaponcraft. I've played dozens of hours in this game and this is just the ideal tutorial for new people. The only thing I would add is some stuff about story events progressing time and nothing else but that's all story spoiler stuff people can learn
HOSTILITY 22 Mar, 2021 @ 6:02pm 
thanks this was super helpful i was losing my god damn mind trying to play this game on normal
The_Order™ 28 Aug, 2020 @ 4:22am 
can i ask some question about the accessories and clothing also i din't buy all the item in curio shop but its all missing. is can be affected in the crime rate?
Sauriel 12 Apr, 2020 @ 2:48am 
its an okay guide. By the way you can replace appraisal titles so if you get your first title by kills or repeatedly repairing it its a plus to use it. But it doesnt work adding a bonus damage title from kills to a 500 max damage sword, though you can use charms to multiply the damage (ive read around about charm called bigshot but hasnt tested it yet, supposedly its for guard break moves and also other moves that doesnt directly involve the sword blade, like a bash with the hilt or kicks, maybe) Dual wield i think also stacks charms on each sword but only up to its max 3 ability, like the sum of 1 of them on one sword and 2 of the same on the other for example.
Raven 7 Sep, 2019 @ 10:17am 
Hard to call this a guide when you decide "I'm not telling you where" and "figure it out for yourself" is a running common theme through this...Yeah, you give some useful information, but you get kinda lazy during parts of it...
KIKI 13 Dec, 2017 @ 10:23pm 
I've actually been playing this game for a while now, and this guide was still pretty helpful.
Pherros 1 Dec, 2017 @ 4:04am 
Excellent guide my friend. It helped me understand things better with this game. :dwarven:
Potato Doge ( ★ ★ ★ )  [author] 16 Mar, 2016 @ 3:37pm 
@Archone

If you are using a controller it should be Right Trigger (I.E. R2 if you're on Playstation Controller)

I'm not sure what the keyboard button is for it, I haven't played the game in awhile (I could be wrong).

I also currently do not have the game installed so I can't tell you right off the bat.