Killing Floor 2

Killing Floor 2

209 ratings
Hell on Earth Guide
By Undefined
This guide will help you defeat Hell on Earth difficulty on Killing Floor 2 Early Access (v1008).
   
Award
Favorite
Favorited
Unfavorite
Change Log
8/18/2015: Added the Flamethrower and EMP Grenade to "Weapon Intricacies". Added tactics for Fleshpounds in the "Berserker" section. Added a new loadout for Support in a separate section. Added EMP Scrake Panic to "Common Mistakes" section. Added a new Con for EMP + Magdump tactic in "Scrake Tactics :: Team". Thanks to q3.railgun for the ideas videos he produced that make up a lot of the new content that in this update.

8/14/2015: Updated "Common Mistakes" to talk about current Berserker meta and Pulverizers. Re-did the "Introduction" section to make it easier for people to go through the guide without being overwhelmed.

8/11/215: Cleaned up section for each class to make it more visually appealing. Updated "Common Mistakes" section.

8/9/2015: Added a new "Tactic" for Commando. Added more info for "Melee Bash" under "Weapon Intricacies" regarding damage. Updated Support's Bombard Fleshpound tactic to emphasize the importance of killing the FP by the 2nd rage.

8/8/2015: Updated "FAQ" to talk about Commando's Level 25 perks. Added a bit more info to Commando's Role.

8/6/15: Added "Parry Lock + AA12 Dump" tactic under "Fleshpound Tactics :: Team". Added a section for Hans Volter.

8/5/15: Updated "FAQ". Updated "Tactics" for Medic class to include the difference between shooting healing darts in rapid succession vs 1 second intervals. Included video in "Weapon Intricacies - Melee Bash" to demonstrate the technique of stumbling Scrakes with the Melee Bash and talk about the mechanics behind it. Added video link for Perma-raging Fleshpounds in "Common Mistakes" section.

8/4/15: Updated "Common Mistakes" to talk about Medic Grenades and Shotgun Penetration. Also moved "Common Mistakes" up near the beginning of the guide because it's worth mentioning these things as they happen a lot on HoE pubs. Updated "Weapon Intricacies" to talk about Melee Bash.
Introduction
This guide is pretty long. I recommend that you read about it in this order so you don't get overwhelmed by it:

1. "About this Guide" section.
2. "About HoE" section.
3. "Scrake Tactics :: Team" -> EMP + Magdump.
4. The section for the class you like playing as or, if you're one to adapt to what the team needs, read the section for every class.
5. "Fleshpound Tactics :: Team" -> Pulverizer Pounding.
6. "Notes on Special Zeds" section.
7. "Weapon Intricacies" section.
8. "Common Mistakes" section.
About This Guide
Most of the guide is written based on the assumption that you and your team have your classes at level 25. While it's not necessarily a requirement to be at level 25, it is recommended and quite a few things discussed here will require you to be level 25.

I will discuss roles and strategies in this guide. I have no plans at the moment to break down every map, but maybe that changes in the future.

I understand that some of you may have your own preferred loadouts and perks. These are the ones I've found that help me out because they play to the weakness of Scrakes and Fleshpounds while allowing you to not run out of ammo in the last two waves. If you have any criticisms or suggestions, I'd love to hear about them in the comments section.

My hope is that some of the tactics and strategies discussed here will become more popular so that it won't have to be explained every time in an HoE public server and will increase the success rate of an HoE pub (which is pretty awful as of now).

If you found this guide to be helpful, don't forget to Like and Favorite!
About HoE
Hell on Earth, especially in KF2, comes down to three things:

1. How fast can your team kill a Scrake or Fleshpound? If you can remove FPs and SCs from the equation, you'll only have to worry about the lesser zeds, which is a lot more easier. To break this down into smaller pieces and use the Scrake as an example:
  • When a Scrake spawns, does your team have eyes on where it might be coming from?
  • If the spot you're holding has a single zed funnel entry (think Burning Paris hotel hallway), is your team grouped up and ready for the EMP to go down when the Scrake turns the corner?
  • If the spot you're holding has two zed funnel entries (think Outpost trucks), does your team have mics on each side (or at least "Request Help") to communicate immediately when it is in visual for an EMP?
    • When a teammate calls out visual on a Scrake, does your team's formation shift rapidly and group up to take it out when the EMP drops?
If you can't answer "yes" to any of those questions, you will struggle to beat Hell on Earth. The game will spawn Scrakes back-to-back many times. The most I've seen is 6 Scrakes spawn one right after the other. Even if you kite, you will still have to worry about other Zeds or teammates raging the Scrakes, so it is not an easily avoidable situation. The best solution is to take them out immediately.

2. If you're not prepared to deal with a 2 FP / 1 SC spawn (for example), how quick is your team to recognize the situation is futile and either kite the rest of the wave or kite in order to reset your camping spot? When in doubt, run. Until you get everyone to buy into what is needed to deal with those situations immediately, your best solution is to kite. But if one or more players doesn't recognize just how bad the situation is, they might get left behind and die, which doesn't help your cause.

3. How good is your team? Before I ever completed a single Hell on Earth map, I was playing on HoE pubs for about 3 weeks. It wasn't until I rented a private server and set a password so that no randoms would join in that I was able to complete HoE. It only took about 2 weeks to do that, with Volter Manor taking up about a week. The running joke amongst my friends was that HoE was "pay to win" because you could not complete it on a public server. At the time, I only had 4-5 friends who I absolutely trusted and every one of our games on a public server was ruined because the player(s) that joined did not understand what it took to get the job done. With all that said, it takes a lot of teamwork, chemistry, and time to be able to complete Hell on Earth. If you don't have 6 friends that you can count on to know what it takes, or less than 6 friends but you don't have access to a private server, it will be much more difficult.
Common Mistakes
Will add more as I get the time, but this is some of the common mistakes I'm seeing on HoE pubs:
  • Berserkers refusing to carry a Medic AR or even just the SCAR. Berserkers are playing spectator when an EMP gets dropped on a Scrake when they can be adding DPS. They can also help out occasionally with healing while having a weapon that's useful for kiting. Personally, I've saved quite a few lives thanks to the Medic AR. Without it, I would've been a spectator to their deaths.
  • Players shooting at the Scrake before the EMP detonates. This causes the Scrake to panic and will ruin everyone's aim. The end result is usually a raging Scrake. Here's a video (link) by q3.railgun to explain how shooting a Scrake (even with just a pistol) will cause it to panic if an EMP detonates at the same time that you shoot it.
  • Players refusing to carry a Pulverizer. If you're wondering why you're running out of ammo, maybe it's because you're dumping mags at a Fleshpound that takes 50% damage resistance to non-explosives and non-piercing weapons. Why not play to the Fleshpound's 50% extra damage from explosive weakness and use the best weapon in the game against it? And what are you going to do when they patch Circle Strafing for Scrakes; just die because you refused to carry a weapon that can stumble a Scrake and perhaps save your life or a teammate's life? Oh, don't tell me: you're going to use one of those Stumble perks for Commando / Support. Yeah, sure.
  • Players backpedaling Sirens. Wait till it finishes screaming, then tank it. It will do its slow, weak melee attack and will give you the easiest headshots so you can kill it while stopping it from screaming.
  • Players constantly shooting at Fleshpounds and not allowing them to calm down (video link). What will happen is, the Fleshpound will skip its rage animation and continue to attack. By doing so, you've essentially turned it into a raging Scrake. After it hits a player, let it calm down so that when you rage it again, it will do its rage animation (easier headshots) and the Zerk can parry it.
  • Medics carelessly throwing grenades when there's a Scrake around. This is a sure-fire way to get Scrakes to rage. Be very careful when you toss a Medic grenade, making sure there is only trash around. When kiting, don't throw medic grenades behind you if you want to take out trash zeds. Instead, throw them a bit ahead of the direction of your kite path so it ensures that the trash still takes damage before the Scrake has a chance to walk through it. With that in mind, be careful when throwing them in your path where you can't see what's ahead. A Scrake that just spawned or teleported could be up ahead and will likely rage if it gets dealt enough damage from the grenade.
  • Supports firing off shotguns at zeds who are in front of a Scrake. The shotgun penetration is another sure-fire way to get Scrakes to rage. Be very mindful of where you aim and shoot when there's a Scrake in your sight. Either get a different angle on the zeds or avoid firing your shotgun altogether.
Berserker
Role:
As a Berserker, your role is to tank a door or a tight corridor. There may be times where you will be out in the open. Either way, you will often be the team's frontline defense. There are times where it's more beneficial to cover the team's weakside so that they can focus on what's in front of them without getting flanked from behind. You will also have to learn to parry, mainly for Fleshpounds, but also for Scrakes once in a while. You are the most money-efficient player on the team, so you will be providing extra money to help others ramp up to their loadouts.


Perks:


Loadout:
  • Pulverizer
    • The Pulverizer will be used on everything but Husks and Scrakes. The only time you want to use the Pulverizer on a Scrake is when the EMP + Magdump tactic didn't finish the Scrake. From there on out, you will alt-fire the Pulverizer to stumble the Scrake and then proceed to parry. Or you can alt-fire, back away and wait for the Scrake to lunge at you, run past it as it lunges, then alt-fire it again. If you don't wait for it to lunge at you, the alt-fire won't stumble it (there's a cooldown timer of 3 seconds for stumbling a Scrake). Rinse and repeat until the Scrake is dead (shouldn't take more than three alt-fires as the Scrake should be very weak by then).
  • HMTECH-401 Assault Rifle
    • The Medic AR will be mainly used on Scrakes after you throw down an EMP. With 30 rounds and 40 damage, it gives you the highest total damage output (1200dmg) of any weapon that you can carry with the Pulverizer. It also allows for healing teammates, so that will help your team's Medic out. Lastly, it's great for regaining ground from all the trash that got through while your team was focused on the Scrake, or for kiting when the Pulverizer isn't optimal.


Ramping Up:
  • Wave 1-4 of 7: Stick to using the Crovel. Go around picking up weapons that you can find. Unless you pick up a Katana, don't sell the weapons, as you can use them to kill Husks. Go around looking for ammo near the end of the wave; you should not be buying EMP grenades until at least Wave 6. You should be giving your money to help your teammates ramp up. By the end of Wave 4, you should be able to buy the Pulverizer, but no big deal if you can't. It is only necessary for Fleshpounds and the Crovel will serve you fine until then.
  • Wave 5 of 7: By the end of Wave 5, you should now have enough to purchase the Medic AR. If not, ask around for money. Scrakes will start appearing more frequently and being able to help out in killing them quickly is important. Explain that to your teammates if they're hesitant about giving out money.

Tactics:
  • If zeds are lined up, the vertical slash will serve you better (press forward / backward key and M1). If zeds are side by side, the horizontal slash will serve you better (press either sidestrafe key). One thing to note is, when you decide on which type of slash you want, you don't longer need to press the corresponding key. Just keep slashing away and it will swing in that direction. This is mainly useful for the horizontal slash.
  • The Crovel is great for decapitations and will often trigger zed times once you understand where to aim for each zed. The Pulverizer, on the other hand, is very inaccurate (6% accuracy to be exact), so it will not trigger as many zed times due to lack of decapitations. You're more likely to decap with a forward slash using the Pulverizer than you would with a horizontal slash.
  • The Pulverizer's alt-fire can get you out of some bad situations and might even get you collateral kills. The ammo barely ever runs out, so don't be shy about using it.
  • Be on the lookout for Sirens and take them out ASAP with the Pulverizer alt-fire. It's the quickest way to exterminate them. With Bloats, it is hit or miss whether you will decapitate them with a vertical slash alt-fire from the Pulverizer; instead, use the forward slash light attack. If you don't decap it with the first swing, continue to forward slash until you do as it will stay stumbled and you will not take damage from the Bloat bile. With Husks, it's rather risky, but if you know your teammates have dealt damage to it, it will go down with a single Pulverizer alt-fire; otherwise it, will require two alt-fires and will leave you vulnerable to the flamethrower.
  • For Fleshpounds:
    • If you're team is ill-equipped to deal with them in a timely manner, the best solution is to lure them behind your team's frontline so that the rest of the team can focus on trash control. q3.railgun does a great job of explaining how to do this in one of his videos (link).
    • Another good tactic is, if you're covering a door, when a Fleshpound spawns in front of you, use the Fleshpound to block the door entrance. This way, you can block the other zeds behind it from getting through. As long as Medic heals you, ranged zeds such as the Bloat and Siren won't be much of a threat.
    • When double Fleshpounds spawn and are side-by-side, be very careful as both of them can deal enough damage to kill you quickly.
Commando
Role:
As a Commando, you're role is best suited for long corridors where you can manipulate the zed pathing so that they come at you in a straight line. One Commando is usually enough to hold down a long corridor by himself. This way, the rest of the team can focus on areas where zeds are likely to come from in multiple directions. Also, the long pathway and being solo assures that you will proc Zed Time extensions, which not only help your team's level 25 skills, but also allow them to assess the situation and land accurate headshots. When Scrakes and Fleshpounds are around, you can play one of two roles: provide the damage needed to kill them or go on trash control and try to proc and extend Zed Times. In the case of the latter, hopefully your Medic will land the Zed Sedatives which will really help your team out.

Perks:


Loadout:
  • HMTECH-201 SMG
    • The Medic SMG is there to help conserve ammo on the SCAR. Use it to start the wave and whenever you catch a break in the middle of a wave. It is only for trash zeds; use the SCAR for everything else. The Medic SMG is the best weapon you can carry that accommodates the Pulverizer and SCAR. With "Rapid Fire" perk, it also works beautifully in Zed Time. Not to mention it will help ease the Medic's burden of healing teammates as well as healing himself.
  • Pulverizer
    • The Pulverizer is there to help the team deal with Fleshpounds instead of wasting ammo on them with the SCAR. If you've gotten good at Parrying, that will be even a bigger benefit as you can tank the FP. It will also help you stumble a raging Scrake since let's face it: no one is using "Impact" perk.
  • SCAR-H Assault Rifle
    • Both the AK12 (Burst Fire mode) and the SCAR are great weapons for dealing with Scrakes, but I went with the SCAR. With the SCAR, it will take 25 bullets on a 6p HoE Scrake. It is a bit less accurate due to the recoil, so make sure you fire it in bursts until it is close enough where full auto won't throw your aim off. Switch to the SCAR if you really gotta kill that mob of zeds that's approaching, a Husk / Siren / Bloat, or to recover after a Scrake or Fleshpound has died.

Ramping Up:
  • Wave 1-3 of 7: You will be using the AR15 for the most part. For a single zed or two, use the AR15 weapon melee bash; if you aim it right, it will decapitate them. Don't waste ammo on a big mob of zeds; it's much more efficient to throw down a well-placed grenade and kill them all. Go around looking for weapons and only keep the SG 500 Shotgun; sell the rest and let them earn you some money and ease the burden of buying ammo for the AR15. At the very least, you should be picking up 5 ammo boxes to refill your grenades. At the end of Wave 3, you should now have enough money to buy the SCAR and perhaps keep the AR-15 to start the wave or when you catch a breather. If not, ask teammates to help you out.
  • Wave 4 of 7: Use the AR15 to start the wave and don't be shy about using Burst Fire mode since you probably will have a lot of ammo left over by the time you sell the AR15. When a mob of zeds start appearing, throw a grenade and switch to the SCAR. Finish the wave with the SCAR so that you can guarantee you don't split the money with your teammates that the zeds give when they die. By the end of this wave, you should have enough to buy the Medic SMG.
  • Wave 5-6 of 7: By the time one of these two waves are over, you should have enough to buy the Pulverizer. Don't buy any ammo for it. The starting ammo is just fine for what you will use it for.

Tactics:
  • Headless bodies walking around can be used to extend Zed Time. Just tag them with your gun if you have plenty of time or kill them if Zed Time is about to run out.
  • When a Scrake or Fleshpound appears and there's trash around it, throw a grenade to clear out the trash. The Scrake has 50% resistance to grenades so it will not easily rage. Fleshpounds, on the other hand, take 50% more damage from explosives and piercing weapons.
  • Use your grenades to clear out a mob of zeds. It is far more efficient than wasting ammo.
  • Use your grenades at a blindside choke point when a Scrake is in visual so you know you bought your self a bit of time before trash comes from that area. Or throw it behind the Scrake to kill whatever trash is behind it.
Support - Pulverizer
Role:
The Support class is quite versatile and can handle multiple defensive positions. The best role for a Support is a short corridor where you can mow down a mob of trash zeds with your Double Barrel. But you can also hold out a medium length corridor by yourself as long as you have the SG 500 and Double Barrel. You can provide support for a Berserker who's tanking a doorway or a Commando who might get overwhelmed defending a short length corridor. You can also hold down a doorway by yourself with the Double Barrel and the AA12. Lastly, if your teammates are covering multiple spots, you can go around providing support to each side and help your teammates who are being attacked, all while covering a weak spot. When Scrakes and Fleshpounds are around, you will provide the damage needed in order to take them down.

Perks:


Loadout:
  • Double Barrel Shotgun
    • The Double Barrel Shotgun will be your trash killing shotgun and it is great when a mob of zeds has breached and they're in a group. On a single trash zed, just melee bash it. The only time you'll use the DBS on a single zed is for killing a Husk / Bloat / Siren. It also can down a 6p HoE Scrake with 3 well-placed headshots.
  • Pulverizer
    • The Pulverizer will help your team down Fleshpounds faster and more efficiently, especially if there is is a Zerk on the team. If you're good at parrying, that will even be an even bigger benefit to your team as you can tank the FP. It will also help stumble a raging Scrake since let's face it: no one is using "Bombard" perk.
  • AA12
    • The AA12 speaks for itself. It will be used for the EMP + Magdump tactic on Scrakes as well as your go-to weapon when having to cross a death trap when kiting. If the EMP tactic did not kill the Scrake, the Double Barrel alt-fire can be used afterwards to land the fatal blow to the Scrake.

Ramping Up:
  • Wave 1-3 of 7: Your weapon melee bash is great for dealing with single zeds while conserving your ammo. Don't use the pump action unless there are multiple zeds lined up or unless you really have to kill that zed in front of you; the melee bash will suffice for the most part. The SG 500 only takes 6 ammo boxes to refill, so don't waste money on ammo. Remind everyone that you're a Supplier so that they take ammo from you and will leave you ammo drops. Make sure to pick up other weapons and look for ammo drops. The +5kg perk should help you carry a plethora of starting weapons, the one you will want to keep and use is the AR-15. At the end of the wave 3, you should have enough to buy the AA12. If not, ask teammates for money.
  • Wave 4 of 7: Hopefully, you've been refilling the SG 500 and AA12 through ammo drops. If you've picked up other weapons and have been letting them earn money for you, you can sell them along with the SG 500 and should have more than enough to buy the Double Barrel Shotgun. Continue to pick up ammo drops because your weapon upkeep along with your armor vest upkeep will put a heavy burden on your ability to acquire the Pulverizer.
  • Wave 6-7 of 7: From here on out, you should be able to buy the Pulverizer. If not by Wave 6, then definitely by Wave 7. Ask your teammates for money and explain to them that you'll need it for the Pulverizer in order to deal with the Fleshpounds more quickly.

Tactics:
  • While the Support's weapons are very costly to refill, they're actually very easy to refill from ammo boxes. The SG 500 only requires 6 ammo boxes to completely refill and the AA12 only requires 4 ammo boxes to completely refill. You should avoid buying ammo at all costs except for the Double Barrel Shotgun.
  • Except for the AA12, the Support's weapons are very unforgiving if you miss a shot. Hone your aiming and know that it is is often better to throw a grenade to clear out a mob of zeds approaching from afar than it is to try to take them out using your shotguns.
  • For the SG 500, the spread is pretty narrow. To take advantage of the SG 500, you will either have to be far away from where a group of zeds will group up or you will have to wait till enough of them line up so that your shotgun penetration will get you multiple kills. In either case, you will want to keep a far distance from where zeds will appear.
  • The Double Barrel is best suited for regaining ground after the zeds are near or have breached. It's also great for Sirens, Bloats, and Husks. For Sirens, you will either rush up before they've had a chance to scream, or rush in after they're about to stop screaming and then hit them with a shot from the Double Barrel. The same applies for the Husk, but replace the scream with the fireball / flamethrower attack and use the alt-fire instead.
  • The AA12 is great for when the SHTF and you have to absolutely kill every zed surrounding you. It will also be your go-to weapon if you're forced to kite. The problem with the AA12 is that the ammo is very limited, especially when you will be using it on Scrakes, so you must make shots count.
  • If you have the Supplier perk, you should run up to teammates during the middle of a wave and wait for a few seconds to give them a chance to grab ammo off you. You should also both announce it to your team that you have Supplier and remind teammates to grab some before the wave ends.
  • When a Scrake appears and there's trash around it, throw a grenade to clear out the trash. The Scrake has 50% resistance to grenades so it will not easily rage from a grenade. You'll probably catch flak from KF know-it-alls for throwing a grenade around the Scrake, but just ignore them or explain to them why you're throwing the grenade.
  • Fleshpounds, on the other hand, take 50% more damage from explosives and piercing weapons, so it's good to throw a few before you engage them as it will clear the trash, deal them damage, and allow you to go in for the first Pulverizer alt-fire when they do their rage animation and setting up the parry-lock.
  • Practice parrying a Fleshpound. Its moves are pretty predictable, unlike the Scrake's, and you will need to know how to do this or you'll get eaten up if you don't know what to expect. You might not need to tank the Fleshpound if there's a Zerk around, but in case you do find yourself in that situation, it's always good to know how to parry them.
Support - SCAR
About:
This loadout replaces the Pulverizer with the SCAR-H Assault Rifle.

Loadout:
  • Double Barrel Shotgun
    • The Double Barrel Shotgun will be your trash killing shotgun and it is great when a mob of zeds has breached and they're in a group. On a single trash zed, just melee bash it. The only time you'll use the DBS on a single zed is for killing a Husk / Bloat / Siren. It also can down a 6p HoE Scrake with 3 well-placed headshots.
  • SCAR-H
    • The SCAR will be used on Scrakes so you don't need to toe the fine line between getting close enough to land headshots on a Scrake while staying away from its lunging distance and screwing up the EMP + Magdump tactic.
  • AA12
    • The AA12 will no longer be used for Scrakes as in the previous loadout. The AA12 will now be used for landing headshots on Fleshpounds using the "Parry Lock + AA12 Dump" tactic. The AA12 is the best ballistic weapon for a Fleshpound

Pros:
  • Virtually impossible to screw up the EMP + Magdump tactic now that you can headshot Scrakes from a safe distance.
  • AA12, the only good ballistic weapon for Fleshpounds as long as you land headshots, can kill Fleshpounds pretty fast.

Cons:
  • Expensive loadout and upkeep. The Pulverizer costs 400 less and the default ammo is enough for 3 Fleshpounds if there's at least one other Berserker with the Pulverizer on the team.
  • Slightly ammo inefficient. The AA12 will require about a full clip or a bit more to kill the Fleshpound.
Field Medic
Role:
As a Medic, your role is very simple. Most of your focus will be on healing. For the most part, when your team is in control, you're only looking to kill certain types of zeds: Bloats, Husks, Sirens, and Crawlers. But if other zeds aren't being dealt with, are attacking your teammates, or your team is about to get overwhelmed, you (obviously) must help out. You will be playing a very big role when Scrakes and Fleshpounds arrive. If you execute properly, taking them out should be a lot easier for your team.

Perks:


Loadout:
  • HMTECH-101 Pistol
    • The Medic Pistol is mainly there to provide 2 healing darts by switching to it in the same time it would take to regenerate 1 healing dart from the Medic AR, which is useful for regenerating armor or saving a teammate's life.
  • Pulverizer
    • The Pulverizer will help make quick work of the Fleshpounds in wave 7 of 7 especially if you throw yourself a healing grenade to tank the Fleshpound. It will also help you stumble a raging Scrake.
  • HMTECH-401 Assault Rifle
    • The Medic AR is the main weapon you will be using. It has 330 total ammo, so if you use it wisely, it will last you the entire wave 6 and wave 7. But if you spend more time killing or missing shots, you can find yourself running short on it. It will also be used to help your teammates out when the Zerk uses the EMP on the Scrake.

Ramping Up:
  • Wave 1 of 7: You can use your knife until the mobs of zeds start appearing, then switch to the Medic Pistol. Look for weapons and fill up your med grenades from ammo drops. If your teammates are wise and generous enough, they will spare you enough money to purchase the Medic AR. Offer to give them back money in the subsequent waves.
  • Wave 2-3 of 7: Assuming your teammates didn't give you money, by the end of Wave 2, I like to purchase the Medic SMG purely because it's an upgrade over the pistol (total ammo capacity, DPS, bigger magazine) and because your teammates will overwork your Medic Pistol's healing recharge. Your team should not be paying for armor; offer to give them free armor by having them take fall damage. If you see a Siren near the end of the wave, tell your teammates not to kill it. It will speed up the process of giving away free armor. By the end of wave 3, you should have enough to purchase the Medic AR. If not, sell the SMG and use that money to buy the AR.
  • Wave 4-5 of 7: Use the Medic SMG to start the wave and when you catch a breather in the middle of a wave. Switch to the Medic AR when things start getting hectic and when teammates need healing. During the first Fleshpound wave, the team's Zerker should be able to tank it, therefore you won't need the Pulverizer just yet. At the end of wave 5, purchase the Pulverizer only if everyone has their optimal loadout. If not, wait till wave 7.
  • Wave 6 of 7: You should now have your optimal loadout. The Medic Pistol should have full ammo from all the ammo drops you picked up. When you start the wave or when you catch a breather in the middle of a wave, spam the Medic Pistol since its only purpose is to ease the burden of wasting Medic AR ammo. Use the Medic AR when things begin getting hectic and when teammates need healing. The Pulverizer doesn't need full ammo; 20 rounds should be enough.

Tactics:
  • If you pump a teammate full of darts really fast, it will take longer for them to restore their HP than if you would had you waited 1 second in between each dart. Here is a video demonstrating what I mean(link). This is useful to know depending on the situation: if farming armor or wanting to get their armor back up, shoot the darts fast. If needing to save a teammate, especially from a Siren, shoot the darts a bit slower. It will ultimately be up to you to decide whether the teammate could benefit more from armor or from HP. Sometimes, it might be both.
  • Pick up weapons off the floor and, unless it's a Katana or Crovel, only sell them after you've acquired the Medic AR; the Medic Pistol is one of the worst starting weapons when things start getting hectic so you'll need something else in the mean time. An SG 500 or AR15 will serve you much better in the early waves while allowing you to save money on ammo.
  • If a Zerk is tanking a door or corridor and is getting overwhelmed, throw a med grenade at the door so he can keep his ground without allowing it to breach. The same concept applies after a breach; throw a med grenade so you don't have to constantly deal with zeds coming out of an entry point and can regain control of the area.
  • If you're trying to heal teammates but trash is annoying you, throw a med grenade at your feet and continue healing your teammates with the medic weapons.
  • When you're getting overwhelmed with healing, throw a med grenade at your team and tell them to tank in the middle of the grenade.
  • When a Scrake arrives, throw a med grenade behind the Scrake so that you can kill / deal damage to the trash zeds that are behind it. If the trash can come from two sides, you may also want to throw a med grenade at the two sides to cut off those entry points.
  • When a Fleshpound arrives, throw a med grenade when the Zerk is in place to tank it. You will want to do the same for yourself when you go to help out with the Fleshpounds.
Scrake Tactics :: Team
These are some of the tactics that can be used to take down a Scrake. You will often see these tactics on Public Servers, so recognizing which one your team is using is important so that you know your role and don't screw things up. My preferred method is EMP + Sedative + Magdump.

EMP + Sedative + Magdump
This is simply the EMP + Magdump technique with a possible Sedative thrown in to make killing the Scrake easier. Read the EMP + Magdump and Sedative + Magdump techniques to learn more.


EMP + Magdump
This is my second preferred method of dealing with Scrakes. The idea is very simple:
1. Spot the Scrake and announce it to your teammates (via in-game mic or using the "Request Help" voice command). Make sure to let them know you need your Supports / Commandos to be in place and ready to take it down.
2. With the team in a place (making sure they're grouped up so the Scrake comes at them in a straight line), the Berserker drops the EMP grenade.
3. When the EMP goes off, the team proceeds to shoot at the Scrake's head. The Scrake should be dead before the EMP wears off.


Pros:
  • Fastest way to kill a Scrake.
  • Efficient.

Cons:
  • Not quite the meta yet in terms of dealing with Scrakes; you'll likely have 1 or more players who do not understand the tactic.
  • A player who does not know what is going on will attempt to Circle Strafe when the EMP gets thrown down.
  • The player who the Scrake is following will not head towards the group, and it will throw off everyone's aim.
  • Players might shoot at the Scrake at the same time the EMP detonates and cause the Scrake to panic (video).
  • A player (usually a Support) will stand too close to the Scrake in order to land headshots, causing the Scrake to lunge, thus ruining everyone's aim.
  • Requires an EMP grenade, and in the late waves, there will be more than 5 Scrakes, so it is important that the Berserker lands the EMP, the team takes advantage, and that there is a Support with Supplier perk around in order to help replenish EMP grenades. Because of this, I highly recommend having 2 Berserkers on your team.

Sedative + Magdump
This tactic requires a level 25 Medic. It is a great tactic, but it requires a bit of RNG and a level 25 Field Medic with the "Sedative" perk. It also helps to have a Commando guarding a long corridor who can help trigger a Zed Time. The good news is, a Zed Time is likely to occur when a player has visual contact with the Scrake. While I'm not 100% certain this is by design (and I don't think it is), I do know from experience that it happens a lot.

1. When the Scrake spawns, call it out and tell teammates to get in a group, ready up, and make sure everyone is healed so that you don't auto lock onto a hurt teammate when Zed Time kicks in.
2. As a Medic:
a) Clear out the trash. This will be good for two reasons: it helps your teammates keep a full clip on their weapons rather than wasting it and have to reload while the Scrake is sedated, and it will help trigger Zed Time.
b) Make sure no teammates are in your Medic weapon's line of sight in case they get hurt so that the autolock function of your Medic darts don't cause you to miss the Scrake.
3. When Zed Time procs, shoot a healing dart at the Scrake and let everyone know the Scrake is sedated.
4. Everyone goes up to the Scrake at point-blank range while shooting at its head. You should have about 2-3 seconds to land clean headshots to decapitate it.

Pros:
  • A fast way to kill a Scrake.
  • Very efficient.
  • Cleanest headshots you'll ever get on a Scrake
  • Procs all Zed Time Perks, meaning Support's level 25 "Barrage" will give everyone 15% extra damage (and if there are multiple Supports, the damage bonus can really stack up)

Cons:
  • Completely RNG-based.
  • It might take a while before you get the Zed Time or it might come sooner than expected and you'll have to wait for another Zed Time.
  • Your teammates may be out of position or low on ammo by the time Zed Time procs.
  • You may run out of ammo and reload when the Zed Time procs, thus ruining your opportunity.
  • Requires the Medic to land a Medic Dart on the Scrake. With Auto Lock, this might mess things up if teammates are hurt.

EMP + SCAR
This tactic requires a very skilled Commando with the following perks: level 10 perk "Large Mags", the level 20 perk "Autofire" with the SCAR on Full Auto mode. It also requires a Berserker to throw down an EMP grenade. Because it requires the Commando to land 24 headshots out of a possible 30 from the clip, it is extremely difficulty to pull off, let alone all the other things that can go wrong. But if you have a Commando that can pull this off consistently, your team is well on its way to completing every HoE map:

1. When the Scrake is spotted, the Commando and Berserker get ready.
2. The Berserker throws down the EMP grenade
3. The Commando then proceeds to unload his SCAR clip onto the Scrake's head.

Pros:
  • A fast way to kill a Scrake.
  • Very efficient.
  • Only requires two players.

Cons:
  • All of the cons listed for the EMP + Magdump tactic.
  • Requires one badass Commando.
  • Requires that the Commando lands 24 headshots out of a possible 30.
  • SCAR recoil might cause the player to miss headshots.

Circle Strafe
This method is the current meta despite not being very efficient and still having its risks. Also, it is going to be patched (eventually), so people should really stop relying on it as a crutch and learn the other methods instead.

The idea is very simple:
1. Approach a Scrake. The Scrake will lunge at you. Avoid the lunge by walking or sprinting directly to the right or left of the Scrake (right is preferred).
2. Get behind the Scrake and continue move around it in a circle (counter-clockwise is preferred).
3. You and your teammates shoot the Scrake while you continue to circle around it.

Pros:
  • The team is safe from the Scrake
  • Easy to pull off.
  • The best way for a Support or Commando to avoid dying to a raging Scrake that is chasing him.
  • Requires no resources other than time.

Cons:
  • Time consuming; other zeds might sneak up on you.
  • Very tough and risky when there are multiple SCs or FPs around. They will eventually target and kill the player circle strafing.
  • Inefficient; getting headshots isn't as easy and thus will require more ammo.
  • If the player circling the Scrake goes to fast, the Scrake might begin the chainsaw to the gut attack and either damage the player, scare them where they might try to move away, or just kill them.
  • The player circling the Scrake must be protected from other zeds.
  • It will be patched eventually, so this tactic will be obsolete.
Scrake Tactics :: Berserker
These tactics are for taking out Scrakes by yourself, either on a team or when playing solo.

Pulverizer Parry Lock
A not so popular method and should only be attempted by a player who has enough practice parrying Scrakes.The tactic is not complicated, but requires practice:

1. A player with the Pulverizer (usually the Berserker) approaches the Scrake and alt-fires with the Pulverizer, causing it to stumble.
2. The player then proceeds to hug the Scrake then swing at it with a normal swing (Mouse 1), causing the Scrake's stumble animation to be cut short.
3. The player immediately parries, causing the Scrake to lose its balance.
4. Rinse and repeat. If doing this solo on a 6p Scrake, you will have to reload as it requires more than one clip from the Pulverize to kill the Scrake.


Some variations:
  • It is advised that you have a Medic focus healing you in case you miss a parry.
  • If your teammates are shooting at the Scrake, you will have to skip Step #2 as your normal swing will cause you to be late to parry because the Scrake's stumble animation would have been cut even shorter due to taking extra damage from your teammates.

Pros:
  • Allows the rest of the team (or at least a few others) to focus on the other zeds.

Cons:
  • Very risky. Missing a parry can get you severely hurt or killed.
  • Can be time consuming depending on whether your teammates are helping out.
  • Inefficient. It takes many alt-fires from the Pulverizer to kill a 6p HoE Scrake.
  • Requires parry to be working. There is a bug at the moment that might cause parry to break.
  • Your teammates shooting at it might cause the Scrake's stumble animation to be cut shorter than you'd expect and cause you to take damage or die.
Scrake Tactics :: Commando
SCAR Impact
This technique is easy to learn, which is great. It requires the Level 20 perk "Impact":

1. Shoot at the Scrake's head from afar using the SCAR on Full Auto mode.
2. When it gets near you, melee bash the Scrake to cause it to stumble, then move back and reload.
3. Shoot at the Scrake's head then melee bash it to stumble it. This time, do not reload, just get some more distance from the Scrake.
4. Unload the rest of your clip into the Scrake's head. If you didn't land enough head shots to kill it, you might have to repeat steps 2-4.


Variations:
  • It is advised that you have a Medic focus healing you in case you miss a melee bash.
  • Instead of moving backwards, you can move past the Scrake to the opposite end. You can also bait the lunge attack and move backwards.

Pros:
  • Allows the rest of the team (or at least a few others) to focus on the other zeds.
  • A solid tactic for taking out Scrakes as the last man standing, especially when Circle Strafing gets patched.
  • Ammo efficient. Requires about a bit more than a full clip.

Cons:
  • Risky. The Scrake might get a few hits on you if you don't melee bash at the right moment. Also, other zeds might attack / grab, which could spell death.
  • Slightly time consuming even when you get it right.
  • Requires space to move back. You might not be aware of objects behind you or you might run into some other zeds.
  • Your teammates shooting at the Scrake might cause its stumble animation to be cut shorter than you'd expect and cause you to take damage or die.
  • Opportunity Cost. You have to give up Autofire (20% more damage for Full Auto mode) for Impact perk.
Scrake Tactics :: Support
Double Barrel Dance
This technique requires a lot of skill and practice, but can be well worth it if you master it:

1. Approach an unraged Scrake and alt-fire it with the DBS to its head while making sure to go to its right to avoid the Scrake lunging at you.
2. Turn around, go up to the Scrake, unload another alt-fire to its head, then retreat to avoid its attack while giving you a chance to reload.
3. Wait for the raging Scrake to approach you and unload an alt-fire into its head before it lunges at you.


Variations:
  • It is advised that you have a Medic focus healing you in case you don't evade the Scrake's 2nd and 3rd attacks.

Pros
  • Pretty fast Scrake kills.
  • Ammo efficient.
  • Allows your teammates to focus on other zeds.
  • A potential alternative when Circle Strafe gets patched.

Cons
  • Very risky. Not avoiding the Scrake's 2nd attack can potentially get you killed.
  • Requires a lot of practice and one mistake can be deadly.
  • Other zeds can sneak up on you and get you killed.
  • Requires a bit of space, so make sure there's no obstacles behind you.

Double Barrel Bombard
This is a pretty easy to tactic to learn. The skill requires the level 15 perk "Bombard", which competes with "Tactical Reload", so it's not always an easy to choice to take:

1. Approach Scrake and hit him with a melee bash.
2. Wait about 1.5 seconds, shoot its head with a single fire (Mouse 1), then aim towards its legs and shoot them again with a single fire while backing away. Reload.
3. Wait for the Scrake to sprint at you then melee bash it.
4. Repeat steps 1-3 three more times.


Variations:
  • Instead of aiming down to shoot its legs, I prefer to crouch down immediately after shooting its head. Personally, I found this to be more reliable in proc'ing the leg stumble.
  • It is advised that you have a Medic focus healing you in case you don't evade the Scrake's 2nd and 3rd attacks.

Pros
  • Very easy to learn and execute.
  • Somewhat ammo efficient. Can potentially kill up to 5 6p HoE Scrakes with a full ammo on a DBS.
  • Allows your teammates to focus on other zeds.

Cons
  • Risky. Missing a leg shot or not shooting its leg fast enough can get you killed.
  • Time consuming.
  • You have to give up "Tactical Reload" perk.
  • Not very ammo efficient.
  • You can potentially not reload the DBS if you melee bash too soon, thus getting you killed.
  • Other zeds can sneak up on you and get you killed.
  • Requires a bit of space, so make sure there's no obstacles behind you.
Scrake Tactics :: Field Medic
Kite
This is a very simple tactic, but it is only intended when there are only Scrakes alive after you've cleared the map of other zeds. It requires little to no skill, just an assault rifle:

1. Find a kiting path with a long corridor that has either doors or a balcony that you can jump off that the Scrake can't jump off of.
2. Starting from at the end of the long corridor, aim at the Scrake's head and shot at it to rage it. Keep shooting at it until it starts getting closer, then begin kiting.
3. Along the kiting pattern, close the doors (if there are any) in order to help create distance between you and the Scrake.
4. When you reach the end of the long corridor, turn around and proceed to shoot at the Scrake's head.
5. Repeat steps 3-4 until the Scrake is dead.

Variations:
  • You can throw a Medic grenade at a door ahead of you so you can heal and close that door so that the Scrake takes extra damage.
  • If you fall off a balcony and take fall damage, you might have a chance to heal yourself before the Scrake gets close, thus regaining some armor thanks to Armament + Vaccinate.

Pros:
  • Easy to learn.
  • Not risky.
  • Can take out multiple raging Scrakes one by one.

Cons:
  • Very time consuming.
  • Not ammo efficient. 47 headshots from the Medic AR to kill a Scrake, assuming every shot you land is a headshot. That likely won't be the case.
Fleshpound Tactics :: Team
Pulverizer Pounding
In a 6p HoE game, assuming at least 4 players have a Pulverizer, this technique will wipe away a Fleshpound quickly once the attack begins. I've detailed the "breakpoints" in swings required from each player in this spreadsheet (link)[docs.google.com]. I've found this variation to be the most efficient. If the grenades hit perfectly, it will require 2 hits from the Pulverizer alt-fire from each player:

1. Spot the Fleshpound and announce it immediately to the team. Don't get near it as there may be a Siren behind it.
2. Supports, Medics, and Commandos all throw 2 grenades to rage it.
3. Once raged, Supports, Commandos, and Zerker switch to the Pulverizer and begin to alt-fire the Fleshpound.
4. Medics will be on healing and trash duty while looking to proc a Zed Time. If and when the Zed Time procs, Medics will shoot darts at the Fleshpound to sedate it (the healing cloud from the grenade, if still active, will also sedate the Fleshpound, but play it safe anyway by shooting darts). This will give the team more than enough time to kill the Fleshpound and not take any damage.
5. Each non-Medic player starts hitting the Fleshpound with the alt-fire from the Pulverizer until it is dead.

Variations:
  • For the last two Fleshpounds that spawn in the last wave, use 3 grenades each instead. This will require one less Pulverizer alt-fire from each player to kill the Fleshpounds. There is no sense in pulling any punches at this point. It will also reach a new breakpoint, lowering the required hits from the Pulverizer alt-fire by 1 for each player.

Pros:
  • Fastest way to kill a Fleshpound.
  • Ammo efficient.
  • Lack of shooting ensures that Fleshpound won't stay permanently raged.
  • Fleshpound can be easily parried.

Cons:
  • Requires lots of coordination. Getting a pub to go along with this technique will be tough.
  • Very expensive dosh-wise to have the whole team carrying a Pulverizer, but still achievable.
  • Sirens can eat your team's grenades if you're not careful.

Parry Lock + AA12 Dump
You should have an easy time getting a team to buy into this. It requires a Support with the AA12 and someone to parry the Fleshpound. The Pulverizer is the preferred method for Parrying since it has the widest parry window of any weapon and can rage a Fleshpound with one alt-fire. For the sake of keeping things simple, I will say the Berserker is the one parrying, but it can be any class:

1. Tell the rest of the team not to shoot at the FP. Have them focus on trash instead.
2. When the Fleshpound is near the team, have the Berserker rage it or Support rage it.
3. The Berserker hugs the Fleshpound and parries its attack.
4. The Berserker now hits the Fleshpound with an Alt-Fire from the Pulverizer and causes it to rage.
5. The Fleshpound will do its rage animation. When this happens, the Support unloads his AA12 onto the Fleshpound's head at point-blank range. If all pellets land, it will only take 17 headshots on a 6p HoE Fleshpound to kill it. The easiest animation to land headshots with is when it has its head up in the air. For when it puts its head down, you will have to aim diagonally to the left, then right, then left, then right.
6. If the Fleshpound did not die: when it stops doing its rage animation, stop shooting at it, wait for the Berserker to parry, alt-fire to rage it, and then be prepared to fire again when the Fleshpound does its rage animation.
7. Repeat steps 3-7 until the Fleshpound is dead.

Variations:
  • Teammates can help, but only if they stop shooting at the Fleshpound when it finishes its rage animation.
  • Have a Medic keeping an eye on both players in case they take damage or something goes wrong.

Pros:
  • Easy to get the team to buy into this, even pubs should have no problem.
  • Pretty fast FP kill if you have a Support with good aim when the FP puts its head down.
  • Allows the rest of the team to cover the trash.
  • Not very risky.

Cons:
  • Not very ammo efficient. Requires practically a fully clip from the AA12 to kill it. There are 4 FPs in the last wave, so that's 1 clip per FP (assuming you're using Supplier perk). Make your shots count.
  • Requires +5kg perk for Support since they will be useless when Scrakes show up. Not that Tenacity is any good, but some players might think that 10% extra damage makes a world of difference. To make up for this, buy an AK-12 and use Burst Mode for when Scrakes arrive.
  • When double FPs arrive, you'll need two people to parry and two Supports if you want a fast kill. If not, it will take more time.

Brute Force
Not much to explain here. You and your team just continue dumping mags into the Fleshpound while the Medic focuses on healing the player that the Fleshpound is attacking. Hopefully, your team will give it time to cool down after it completes its rage so that it stops raging then proceeds to do its rage animation, rather than constantly staying in its rage phase.

Pros:
  • No technique required so no one can screw it up.

Cons:
  • Worst way to deal with a Fleshpound.
  • Not ammo efficient. You will end up running low on ammo in the late stages of the wave.
  • Takes a long time to kill the Fleshpound and other zeds, including Scrakes, will breech.
  • Run the risk of the Fleshpound staying in rage mode thus increasing the chances of a teammate getting killed.
Fleshpound Tactics :: Berserker
Pulverizer + Parry Lock
The Zerker on your team must be able to parry Fleshpounds if you're going to complete HoE. If there is no Zerker, than you will have to take on the role of tanking the Fleshpound:

1. Wait for the Fleshpound to rage.
2. Hug the Fleshpound, and when it is about to attack you, parry it with the Pulverizer.
3. Attack it with the alt-fire from the Pulverize.
4. While it is doing its rage animation, attack it with the alt-fire again.
4. Repeat steps 2-4. When you use up your last shell from the Pulverizer, parry the Fleshpound, then back away and reload.
5. Repeat steps 2-5.


Variations:
  • A Medic focus heals the Berserker. Very preferable.
  • A Medic throws one or more healing grenades as the Berserker tanks the Fleshpound.
  • One or more other players has the Pulverizer and alt-fires the Fleshpound along with the Berserker.
  • Teammates help out with grenades and shoot at it.

Pros:
  • Easy to learn.
  • Allows the rest of the team to focus on other zeds.
  • Medium risk.

Cons:
  • Takes a long time to kill the Fleshpound.
  • Missing a parry can hurt you badly.
  • Must keep an eye on your Pulverizer ammo so that you don't end up with an empty swing that doesn't rage the Fleshpound.
  • Requires your teammates to kill trash around you.
  • If your teammates are consistently shooting at it and you missed a parry, it will skip its rage animation and continue to stay in rage mode until you can parry it again.
Fleshpound Tactics :: Commando
SCAR + KF-BAR Parry
This technique is easy to learn if you've already mastered parrying Fleshpounds:

1. Keep a healthy distance from the Fleshpound so it doesn't lunge at you.
2. Start shooting at its head with the SCAR.
3. When it rages, switch to your knife, hug the Fleshpound, then parry its attack.
4. Back away and reload your weapon.
5. Repeat steps 2-4.


Variations:
  • Have a Medic focus heal you.

Pros:
  • Medium risk.
  • No perk required to use it.
  • Allows your teammates to focus on other zeds.

Cons:
  • The animation when you pull out the knife takes a while to run its course, so if you don't pull it out on time and parry, you'll take a lot of damage or die.
  • If you're too close to the Fleshpound, it will lunge at you.
  • Not ammo efficient. A 6p HoE Fleshpound requires 51 headshots from the SCAR with the "Full Auto" perk to kill it. Factor in the shots you might miss and it will require more ammo.
  • Time consuming.
  • Requires space to move around. Must be careful of your surroundings so you don't backpedal into a wall or corner.
  • Other zeds can sneak up on you if you're not careful.
  • Teammates shooting at the Fleshpound might cause it to continue rage if you miss a parry or cause it to rage early, thus throwing off your rhythm.
Fleshpound Tactics :: Support
AA12 + Machete Parry
This technique is easy to learn if you've already mastered parrying Fleshpounds:

1. Keep a healthy distance from the Fleshpound so it doesn't lunge at you.
2. Start shooting at its head with the AA12.
3. When it rages, switch to your knife, hug the Fleshpound, then parry its attack.
4. Back away and reload your weapon.
5. Repeat steps 2-4.

Variations:
  • Have a Medic focus heal you.

Pros:
  • Medium risk.
  • Somewhat fast kill.
  • No perk required to use it.
  • Allows your teammates to focus on other zeds.

Cons:
  • The animation when you pull out the knife takes a while to run its course, so if you don't pull it out on time and parry, you'll take a lot of damage or die.
  • If you're too close to the Fleshpound, it will lunge at you.
  • Not ammo efficient.
  • Time consuming.
  • Requires space to move around. Must be careful of your surroundings so you don't backpedal into a wall or corner.
  • Other zeds can sneak up on you if you're not careful.
  • Teammates shooting at the Fleshpound might cause it to continue rage if you miss a parry or cause it to rage early, thus throwing off your rhythm.

AA12 Bombard
This is easy on the surface, but very tough to master. The risk is huge: if you don't kill it after the Fleshpound rages the 2nd time, you will likely die. The rewards can be worth it if you master it, though. It requires the "Bombard" level 15 skill:

1. Start firing shots in single bursts at the Fleshpounds head until it rages.
2. Identify its head movement in order to know which rage animation will play out (the head up animation or the head down animation)
3. Approach the Fleshpound while its raging and continue to dump your AA12 magazine into its head.
4. Before it stops its rage animation, hug the Fleshpound and proceed to melee bash it.
5. Back away and reload your weapon.
6. Repeat steps 1-3. If you do not kill it by the 2nd rage, you will likely die.


Variations:
  • Have a Medic focus healing so that you can recover HP+Armor after taking a hit from the Fleshpound.
  • "Tenacity" perk makes it easier to kill the FP.

Pros:
  • Relatively fast kill.
  • Allows your teammates to focus on other zeds.

Cons:
  • Very risky. There is no going back after the 2nd rage as the Stumble has a 15s cooldown timer. You will die if you don't kill it.
  • "Bombard" perk competes with "Tactical Reload"
  • Must practice landing headshots as the Fleshpound does its raging animation.
  • To unrage the Fleshpound, you have to take damage.
  • The window of opportunity to melee bash the Fleshpound to cause it to stumble, while taking damage in order to unrage it, is very small.
  • For the rage animation where the Fleshpound puts its head down, you have to aim diagonally to the left, then right, then left, then right. Requires a lot of practice.
  • Requires a lot of ammo, but it should be enough to down 3 Fleshpounds if executed properly.
  • Teammates shooting at the Fleshpound will cause its stumble animation to be cut short and possibly get you killed.
Fleshpound Tactics :: Field Medic
Kite
The most common method for a Medic to kill a Fleshpound and can keep your teammates safe, if they're still alive, as long as they stay ahead of you. The AA12 and SCAR are good alternatives:

1. Shoot at the Fleshpound to cause it to rage.
2. Close any doors behind you to create some distance between the team and the Fleshpound.
3. Repeat steps 1-2.

Variations:
  • If there are no Scrakes around, throw a Medic grenade at a door ahead of you and close the door after you exit.
  • Teammates can help out.

Pros:
  • Least risky tactic.
  • Doesn't require a specific weapon or perk.
  • Teammates shooting at the Fleshpound doesn't mess with the technique.

Cons:
  • Very time consuming.
  • Not ammo efficient. 102 headshots needed from the Medic AR in order to kill a 6p HoE Fleshpound.

Medic AR + Scalpel Parry
This technique is easy to learn if you've already mastered parrying Fleshpounds:

1. Keep a healthy distance from the Fleshpound so it doesn't lunge at you.
2. Start shooting at its head with the Medic AR.
3. When it rages, switch to your knife, hug the Fleshpound, then parry its attack.
4. Back away and reload your weapon.
5. Repeat steps 2-4.

Variations:
  • You can use any weapon you'd like just as long as it has range. The AA12 and SCAR are good alternatives.
  • Throw a Medic grenade before you rage it so that deals extra damage.

Pros:
  • Medium risk.
  • Doesn't require a specific weapon or perk.

Cons:
  • Very time consuming.
  • Not ammo efficient. 102 headshots needed from the Medic AR in order to kill a 6p HoE Fleshpound.
  • If you miss a parry and teammates are shooting at the Fleshpound, it will stay in rage mode and not do its rage animation.
Hans Volter
This is a rough draft until I can make it all pretty and a bit more detailed.

As a rule of thumb, the best places to fight Hans is where there are obstacles you can kite around. These obstacles can't be too big because Supports must be able to turn corners before Hans has a chance to attack them. But they also can't be too short because you have to be able to avoid the gas grenades and explosions.

Commandos are not as good for Hans as Supports are, IMO. If you're not a Medic, go Support and advise Commandos to switch to Support.

I'm assuming you know all of Hans' mechanics (i.e., don't shoot at him when he's looking to heal or healing, always get grabbed immediately when he's looking to heal).

Buy extra AA12s if you can. Even better, see if you can get them close to the spot where you will fight Hans.

At the very least, everyone should have a Medic Pistol and use it. To be safe, buy multiple Medic Pistols and throw them on the floor, in hopes that your teammates will pick them up and remember to use them (remind them that they do have them).

Method A) Zerker parry-locking with Pulverizer (90% damage reduction if parried, 50% damage reduction if blocked) + "Formidable" perk (reduce Specimen damage by 15% when they're melee attacked), along with 2-3 medics focus healing + med grenade + shooting (don't reload or you might get the Zerk killed!), and the rest of the team (Supports w/ AA12) mag dumping is the safest, non-exploit way to kill Hans.
  • Zerk has to proc "Formidable" only one time (it doesn't stack).
  • I haven't tested it yet, but Zerk may swing once with M1 click then proceed to parry. This may not work due to your team's firepower cutting Hans' stumble animation shorter than the time it takes to finish the swing animation, and Zerker may end up missing the parry. I need more testing for this as I've never been the Zerker in that situation.
  • Also, the team MUST stay a safe distance away from Hans. If more than 2 players are close to Hans, he will throw a gas grenade at his feet and likely get the Zerker killed.
  • The tricky part is to get Hans to aggro on the Zerker and perform a melee attack so the Zerker can parry-lock him. Hans can perform a melee attack when he has his guns out. If the Zerker can sneak around him when he's not aggro'd on them, and proceed to hit Hans to draw his aggro, he might get Hans to perform the Melee attack with the guns out. If Zerker is hiding and Hans is throwing grenades with no player near Hans, he may also try running to Hans while he's throwing grenades and attack him at melee range. Hans may tag the Zerker and attempt to do his melee attack, at which point you can begin the parry-locking process. The last method is for the Zerker to run around a short obstacle with Hans close behind him and Hans may attempt to do his melee swipes for a bit. At this point, the Zerker just needs to turn around and parry-lock him.

Method B) All Medics w/ AA12 and Med SMG + Med Pistol. Use your speed advantage to avoid Hans, get off shots when you can. Corners and short corridors are your best friend as it gives you enough time to avoid grenades and gun fire damage.

Method C) Requires a balcony and something to run around on the first floor while avoiding Hans. Supports go to 2nd floor balcony. Medics stay downstairs and go around an obstacle in a circle making sure to draw Hans' aggro by shooting at him. If Medics follow through correctly, Supports can shoot from 2nd floor without Hans doing much (if any) damage to them. The best time is if your Medics can get Hans to stop right below where the Supports are. If Hans manages to aggro on one of the players on the 2nd floor, just have them jump down and make their way back up to the balcony through another route while Medics re-aggro Hans.

Method D) Assuming you have no balcony from which to work with, but still have obstacles you can run around, the team must be aware that whenever Hans is not targeting them, they must take advantage by dumping a magazine into Hans while the person who Hans is targeting must run around the obstacle looking for cover. At which point whenever Hans switches targets, the person he is targetting must look for cover. It's basically a game of "Tag" at this point. Everyone must recognize who got tagged and the others proceed to take advantage by dumping a magazine into Hans.

Method E) Circle Strafe. It's cheesy, it's an "exploit" (more like a failure by the Devs to program Hans to be able to deal with it), but it's currently valid. It is by far the easiest method and safest.
Notes on Special Zeds
Sirens

Continually backpedaling from a Siren is a big mistake because the Siren's melee attack is very slow and weak. When a Siren is around, wait for it to Scream. When it stops screaming, draw its aggro and then hug the Siren and don't move if you drew its aggro. You can now shoot freely and easily at its head without fear of it killing you. Just make sure not to back away from it or melee bash it until it is dead. The scream it releases will get you killed or leave you seriously injured.

The Siren has one of the worst pathing mechanics in the game. Sometimes, you may think it's going to another teammate because it will walk to the side of you, only to turn to your right or left hand side and attack you. If you move away from it or melee bash it by mistake, it will attack you with the scream. Other times you might think it is coming towards you but will walk to the side and go for a teammate. In this case, it might cause you to miss shots and waste a bit of ammo, all while attacking with her scream.

Berserker: As soon as you spot a Siren, maneuver your way to it (if possible) and kill it. The easiest way to kill it is to hit it with an alt-fire from the Pulverizer. As a Zerker with the Pulverizer, you're on Siren duty.

Medic: you should be able to flinch-lock it with the Medic AR.

Bloats

If you ever need to run past a Bloat but won't be able to avoid its Bloat Bile, just melee bash it and continue moving. You will dodge the Bloat Bile.

If you decapitate a Bloat with a slash attack, it will instantly die rather than walking around with its head cut off. This is important to know because a Bloat blocking an exit that is not decapitated with a slashing attack will take a long time to die out and shooting its dead body not only takes time and ammo, but will hit you with Bloat Bile when it explodes. This video (link) explains it in greater detail.

Berserker: The Crovel forward slash has a great chance for decapitating the Bloat on the first try. Go in, forward slash, then back out while slashing again. This will give you a chance to evade the Bloat Bile in case you didn't kill it. The Pulverizer alt-fire is usually a waste; instead, use a forward slash with the light attack (M1 click). Even if you don't decap it, it will stumble the Bloat meaning that you won't get hit with Bloat bile. If you don't decap it, continue forward slashing until you do, as the Bloat will continue to stumble.

Husks

Berserker: avoid the Husk at all costs unless you know it is damaged, it's proc'ing its cooldown timer after an attack, and you have a shot to kill it with the alt-fire from the Pulverizer. Or, if you have an assault rifle, you can kill from a safe distance.

Medic: you should be able to stumble lock it with the Medic AR.

Support: The only safe method is a Double Barrel point blank to the head after it begins proc'ing its cooldown timer. You will be able to kill it with one shell if even half your pellets land.

Scrakes

Takes 50% less damage from Explosive and Slashing weapons.

If kiting, you must deal with Husks, Bloats, and sometimes even Fleshpounds as all three might eventually rage a Scrake if left unchecked.

Medic: you need to be very careful as to where you throw Medic grenades. One Medic grenade is enough to rage a Scrake.

Support: you need to be very careful when shooting at other zeds in front of a Scrake as the penetration from your shotguns will deal it damage.

Fleshpounds

Takes 50% extra damage from Explosive and Piercing weapons.
Has 50% Damage Resistance from all other sources.

If you continue to shoot it after it has attacked a teammate, it will skip its rage animation and go straight into its rage mode attack (which deals more damage). Let your teammates know to stop shooting at it after it has attacked a player and unraged. A Fleshpound that never leaves rage mode can take a few players with it before it dies out, while a Fleshpound that does its rage animation leaves it susceptible to easy headshots.
Weapon Intricacies
HMTECH-401 Assault Rifle:
  • Has the ability to flinch-lock Husks and Sirens. Just fire off a few rounds repeatedly and they will stay flinch-locked. The Husk, however, will stopped being flinched once he is due for an attack. By then, though, you and your team should have dealt enough damage to kill it.
  • If you're a Medic, you should be able to continually pump out healing darts if you don't spam click the alt-fire button.

Double Barrel Shotgun:
  • The DBS has a pushback force when you alt-fire it. This can be useful to avoid a Fleshpound that lunges at you, as well as gain an extra speed boost when you have to escape a mob of zeds. You can also use it to jump over a Scrake or Fleshpound by aiming down, jumping, then alt-firing the DBS.
  • As a Support, it can kill a Scrake with 3 well-placed headshots.

Melee Bash:
  • A gun's Melee Bash has enough power to stumble an un-raged Scrake (video link). This is useful if your teammate is about to get blindsided by an un-raged Scrake, among other reasons. However, every time a zed takes a certain amount of damage, it's stumble resistance is increased by 1, so do not attempt to stumble a Scrake with your gun when it is raged (unless you are using Support's "Bombard" perk, Commando's "Impact" perk, or Zerk's "Furious Defender" perk). There is also a 3 second cooldown timer where the Scrake cannot be stumbled again, so wait for that timer to expire before attempting another stumble.
  • Another note about Melee Bash, to improve your chances of decapitating a trash zed, first look straight ahead then aim slightly up before bashing it. For Slashers and Stalkers, aim straight ahead or slightly below.
  • The following weapons' Melee Bash deals 20 or more damage, the minimum required to decapitate a trash zed: All Shotguns (including Medic's), Nallgun, and Eviscerator
  • Commando's weapons only do 15 damage from the Melee Bash, but can be bumped up to 21 damage if using the "Back Up" perk.

Flamethrower
  • q3.railgun produced a great video (link) breaking down the complexity of the Flamethrower. If used properly, it can be a pretty good weapon, but we won't see it's true potential until Firebug is released. In the mean time, while you wait for Firebug, you should get to know how to take advantage of the Flamethrower.

EMP Grenade
  • The required amount of EMP grenades for causing a zed to panic can be reduced by 1 if you or a teammate shoot the zed at the same time the EMP detonates. This is generally not a good thing since you want to save EMPs for Scrakes (and you definitely don't want to panic the Scrake), but it is worth mentioning nonetheless.
FAQ
In this section, I will answer questions that you may have regarding my guide, such as why do I choose a certain perk or certain weapon loadout.

Q:Why choose Rapid Fire over Professional for Level 25 Commando?

A: I think both perks are good for extending Zed Time (ZT). For me:

1. Rapid Fire allows me to easily rack up the 5 ZT extensions, especially if zeds are moving sideways or are far away. It's more forgiving if you miss a shot or spot a target when ZT is about to expire, where as without it, you have to make almost every shot count if you want to extend ZT.
2. It allows you to extend ZT on Sirens and Husks.
3. It allows me to time it perfectly to get the maximum duration of each ZT.
4. If a ZT occurs on an EMP + Magdump, the DPS is incredible.

Personally, I don't even care about the 3% damage bonus that it gives; the ability to shoot 3x faster is just amazing.

Professional does have the advantage of not having to worry about getting caught in a reload or weapon switch, which tends to happen quite often. To make up for that, I've become a bit more disciplined at recognizing when a ZT is due and *trying* not to reload when I have a lot of ammo left in my gun. Both perks have their benefits and drawbacks. It's ultimately up to you to decide which one you think helps you out.

Q: I've tried Melee Bashing the Scrake, but it didn't work. Is a certain Perk required?

A: No perk is required, but you must understand the mechanics behind Melee Bashing a Scrake. To put it shortly,
  • Once the Scrake has taking a certain amount of damage, it can no longer be stumbled using the Melee Bash UNLESS you have Commando's "Impact" perk, Support's "Bombard" perk, or Berserker's "Furious Defender" perk. As a rule of thumb, do not attempt to Melee Bash a Scrake once it has been raged.
  • The Scrake has a 3 second cooldown once it has been stumbled. You will have to wait 3 seconds before you can stumble it again.
Here is a video (link) demonstrating the mechanics behind it (read the description box).
Resources
Killing Floor 2 Spreadsheet (link)[docs.google.com] - Everything you need to know about the inner workings of Killing Floor 2 plus more.

q3.railgun YouTube channel (link) - A lot of videos on tactics amongst other things.

dev D. YouTube channel (link) - Videos on tactics.

(KFM)Blockyz YouTube channel (link) - Videos on tactics.

Kinx YouTube channel (link) - A few videos on tactics.
Credits
Thanks to the following people whose videos and advice helped me out in completing this guide and HoE in general:

q3.railgun
(KFM) Blockyz
Dev D.
simple cat
Kinx
46 Comments
Ænigma 25 Jun, 2017 @ 7:15am 
this guide is old refresh it please its a good one !
Mara Jadewind 11 Dec, 2015 @ 10:21pm 
I hope author will update this guide is very informative and very helpful.
Much love this guide. Thx author for such a great jobs !!
Hat off to you guys.
Really Appreciate all ur hardwork and effot =)
Pels 2 Sep, 2015 @ 12:31pm 
So you guys will update this guide? Because that will be great :facepunch:
Undefined  [author] 30 Aug, 2015 @ 4:46pm 
@luck.duck I could've sworn the Nailgun had the Piercing damage type, but the KF2 Stats spreadsheet says otherwise. Only Support's Frag grenade and melee weapons that have the Stab feature (which replaced the Melee Bash) have the Piercing damage type.
MBOmnis 30 Aug, 2015 @ 1:48pm 
One little curiosity I have but forgot to ask previously:
It says the Fleshpound takes 50% extra damage from Piercing. Which weapons deal Piercing Damage? I'd assume the VLAD, but I'm asking to make sure.
Mr Circle 30 Aug, 2015 @ 7:47am 
Slight edit to my last, now have completed 3 maps HoE, and am pretty satisfied with the loadout, however I do recommend rolling with the 200 health perk on the Bezerker, it just gives more wiggle room than the 3HP regen per hit, and the Zweihander is the best option for you.
Mr Circle 29 Aug, 2015 @ 10:49pm 
@Rusty Shackleford, part 3

When it comes to mixing it up for Hans, the Zerka is best off taking the 200 health. All the way up to Suicidal, you can tank Hans, all you need is two Zerks and two Medics to keep them alive. The other two players can just dump ammo into Hans, any spawning trash Zeds and to assist the medics in healing the Zerkas. If the Zerkas are rocking knock-down (like I do) then you can send Hans to the ground as well, limiting his attacks greatly.

I will note, I haven't actively attempted to play much HoE or Suicidal yet, as I have been focusing on levelling perks, (I started all my perks 2 weeks ago, despite having owned KF2 from the start) so what I say can only be taken as gospel for Hard and some Suicidal. I hope these 3 long comments help.
Mr Circle 29 Aug, 2015 @ 10:47pm 
@Rusty Shackleford, part 2

When using the Firebug, a caulking gun and a microwave are my go-to weapons. I save the Microwave for the big guys, and try to hit multiple enemies at once with my attacks, rather than kills. When a big zed comes in, if the zerk on the team has him naded, and the team is mag-dumping, I will instead focus on the trash, as I can ensure they don't overrun the position.

With the Demo, I haven't found a strat that feel right yet. You throw TNT like a limp wristed 2 year old, and your best weapon, the RPG, is so heavy that you simply cannot reliably take it and aid the team, you're called upon too often to switch to your backup. After countless 7-round games as the Demo (just to level up) I never felt as satisfied as I did in KF1 rocking an M79/M32 combo with pipes. Basically, this class is wasted on HoE.
Mr Circle 29 Aug, 2015 @ 10:31pm 
@Rusty Shackleford,

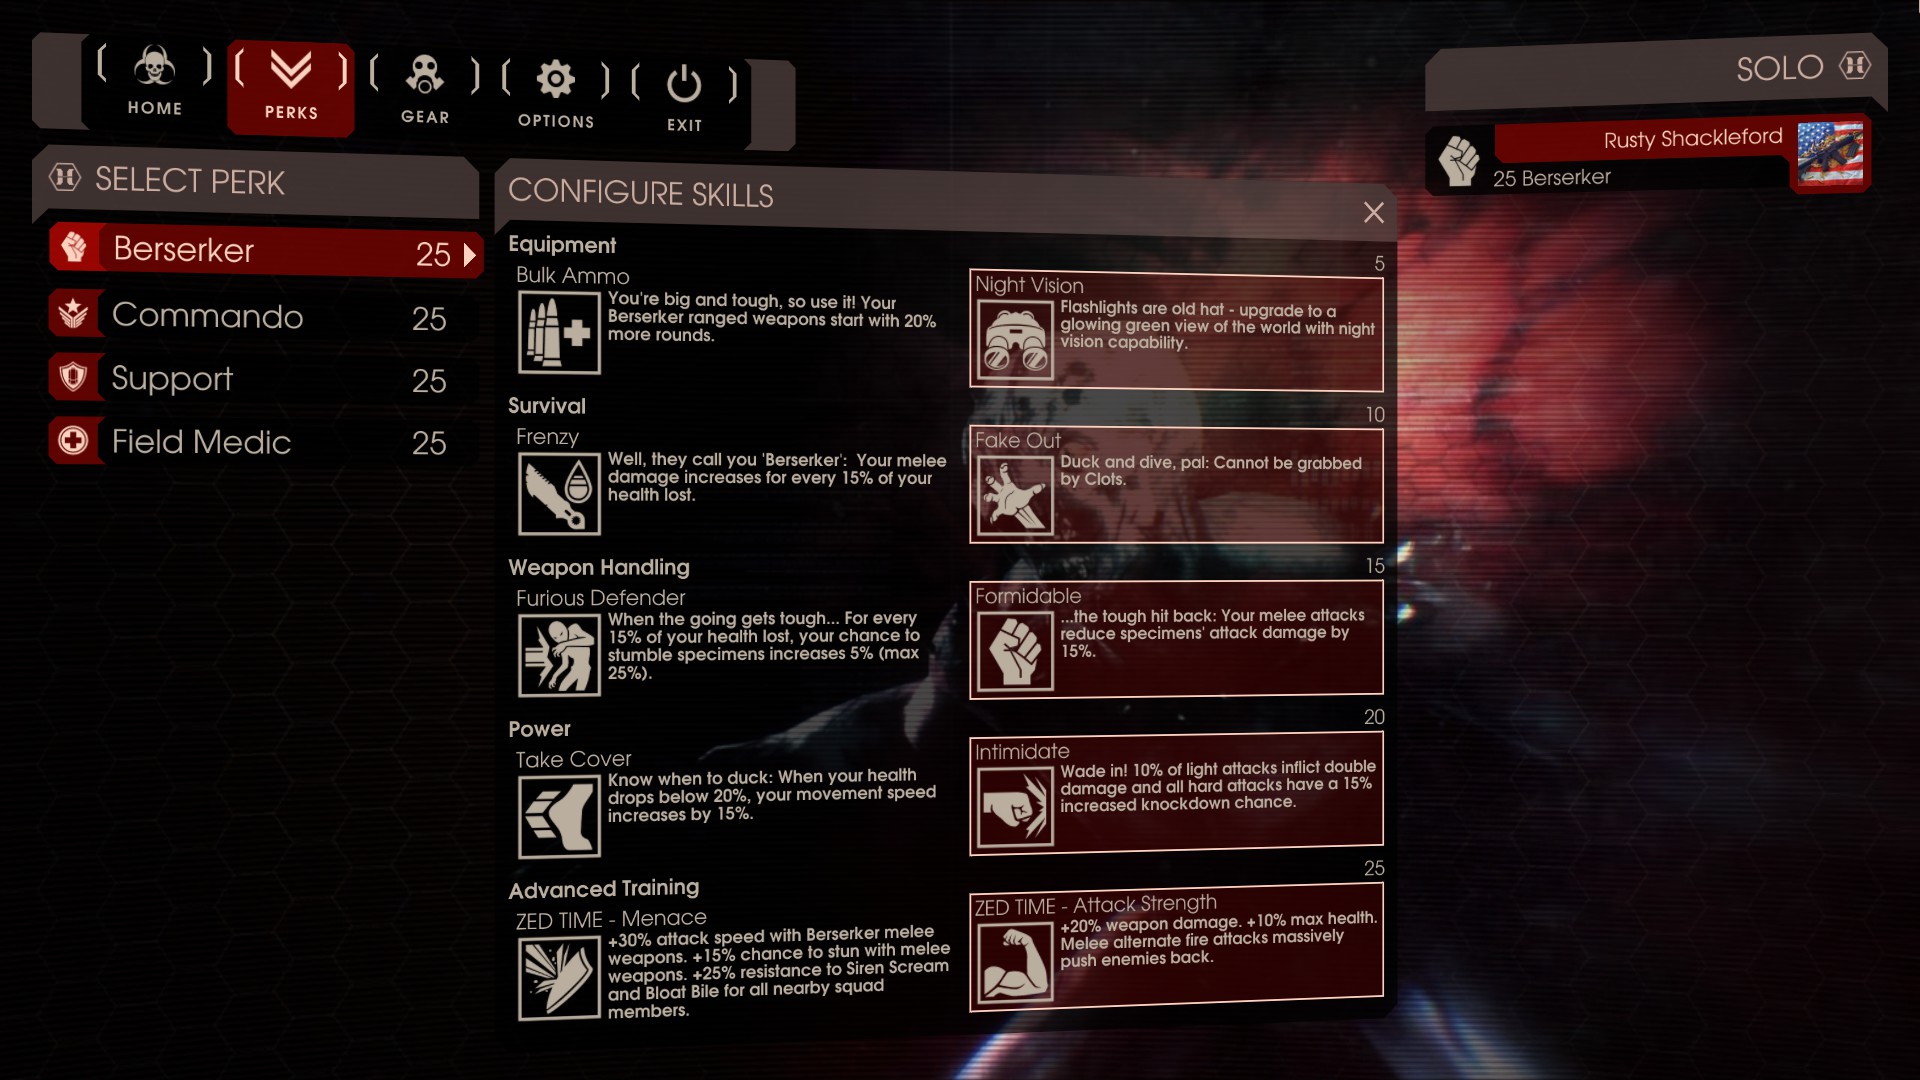
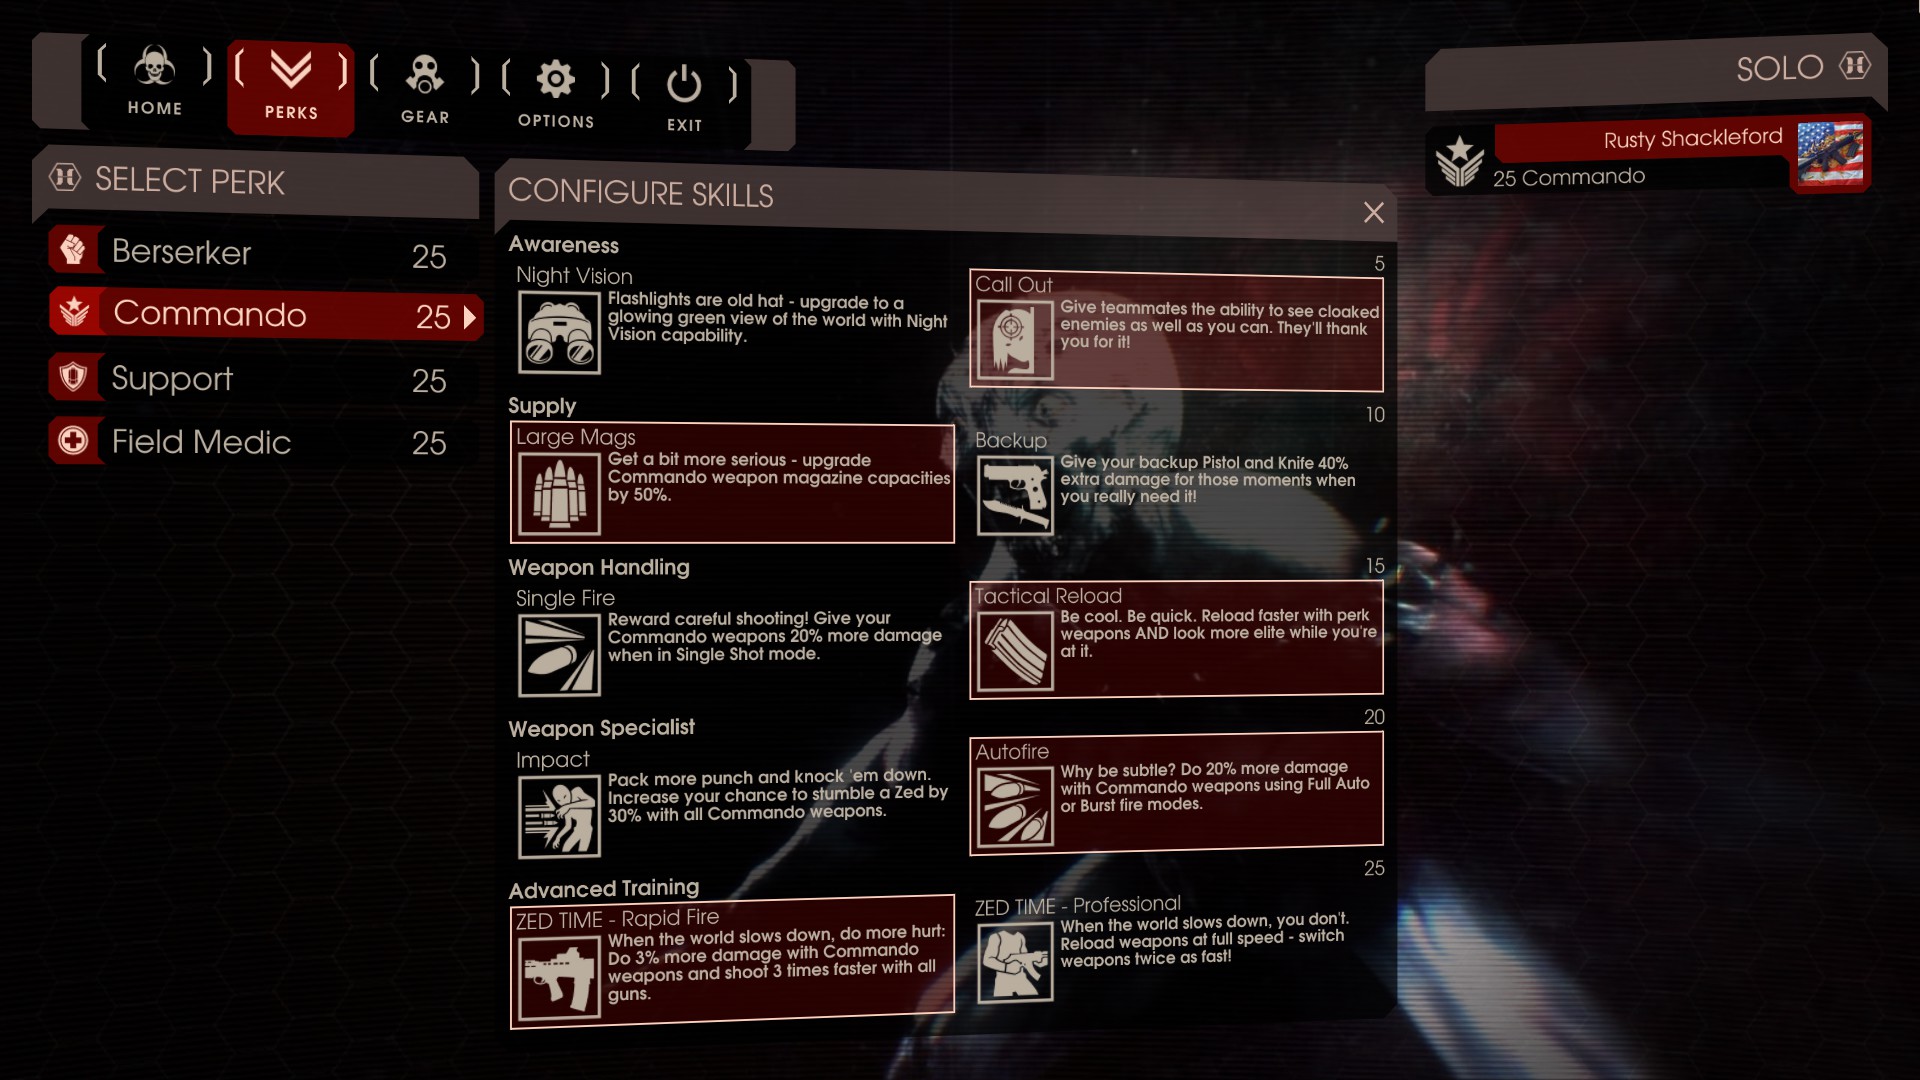
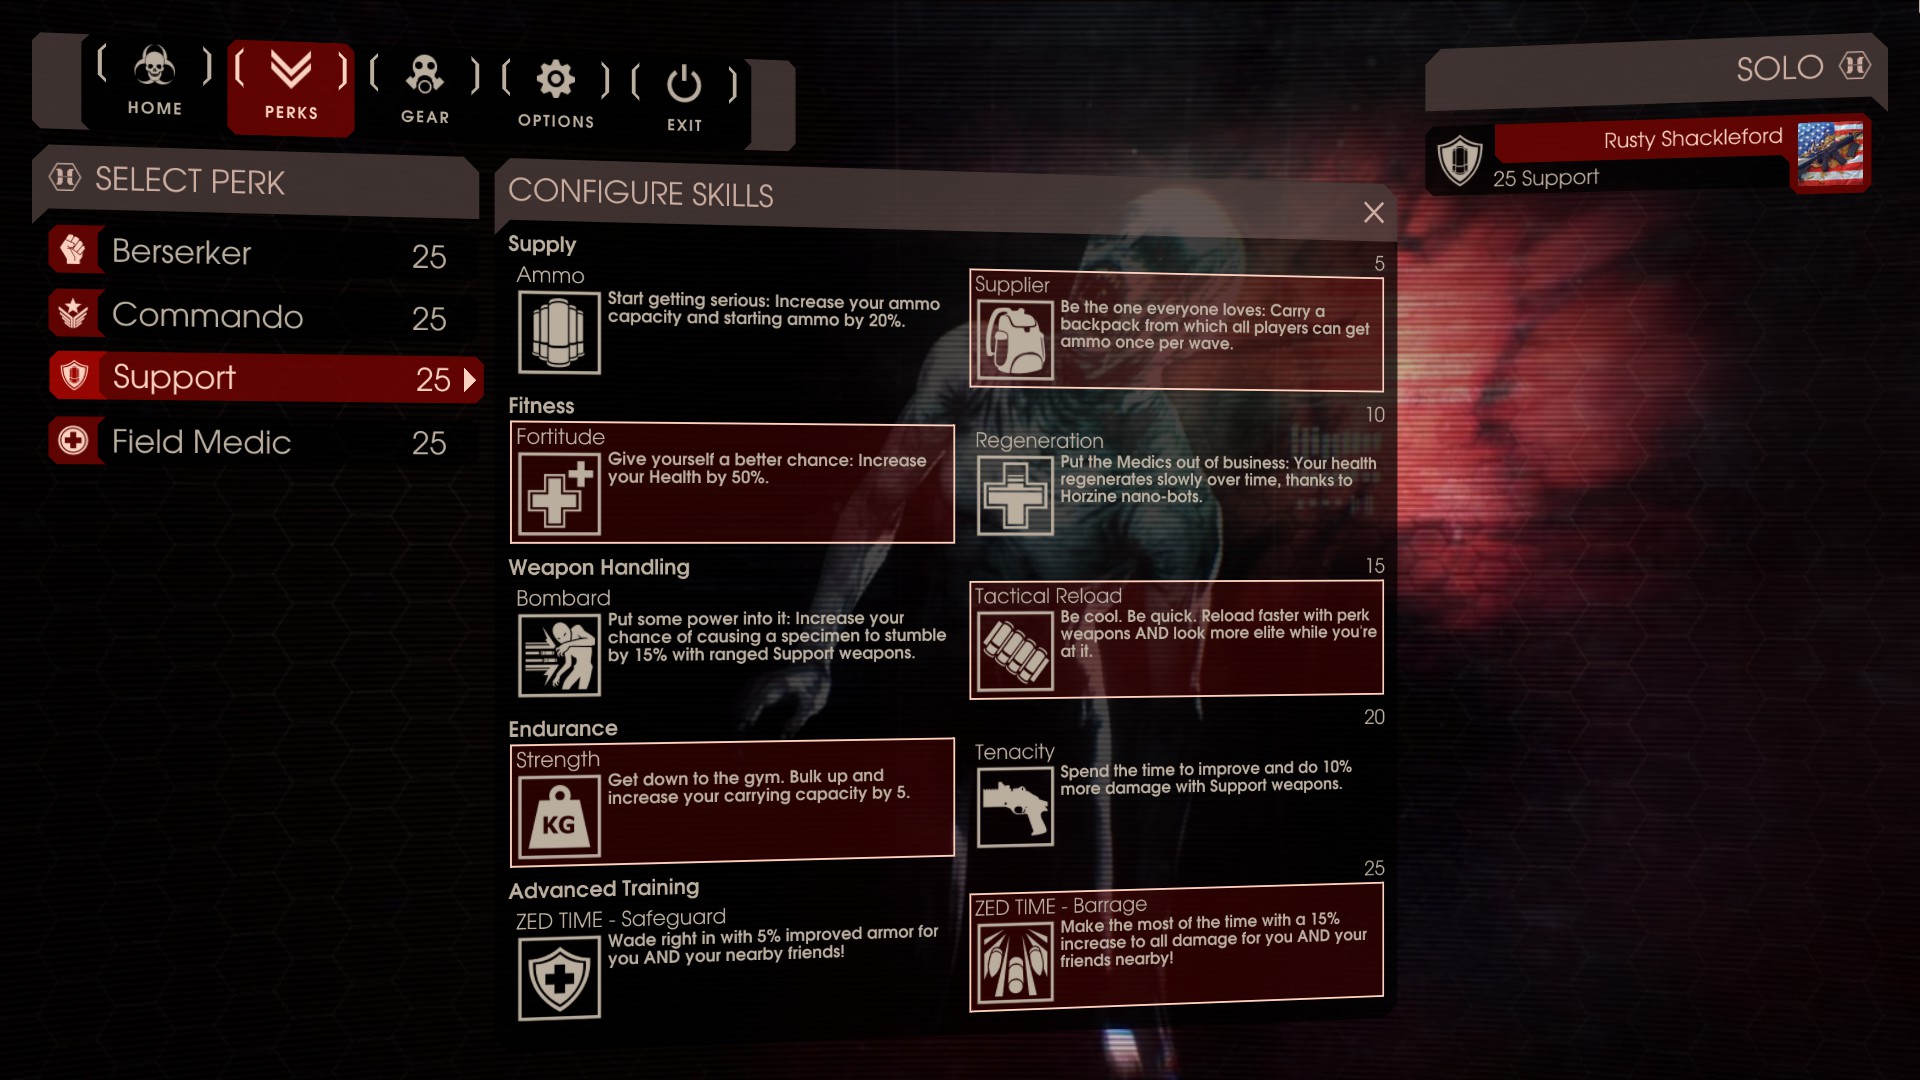
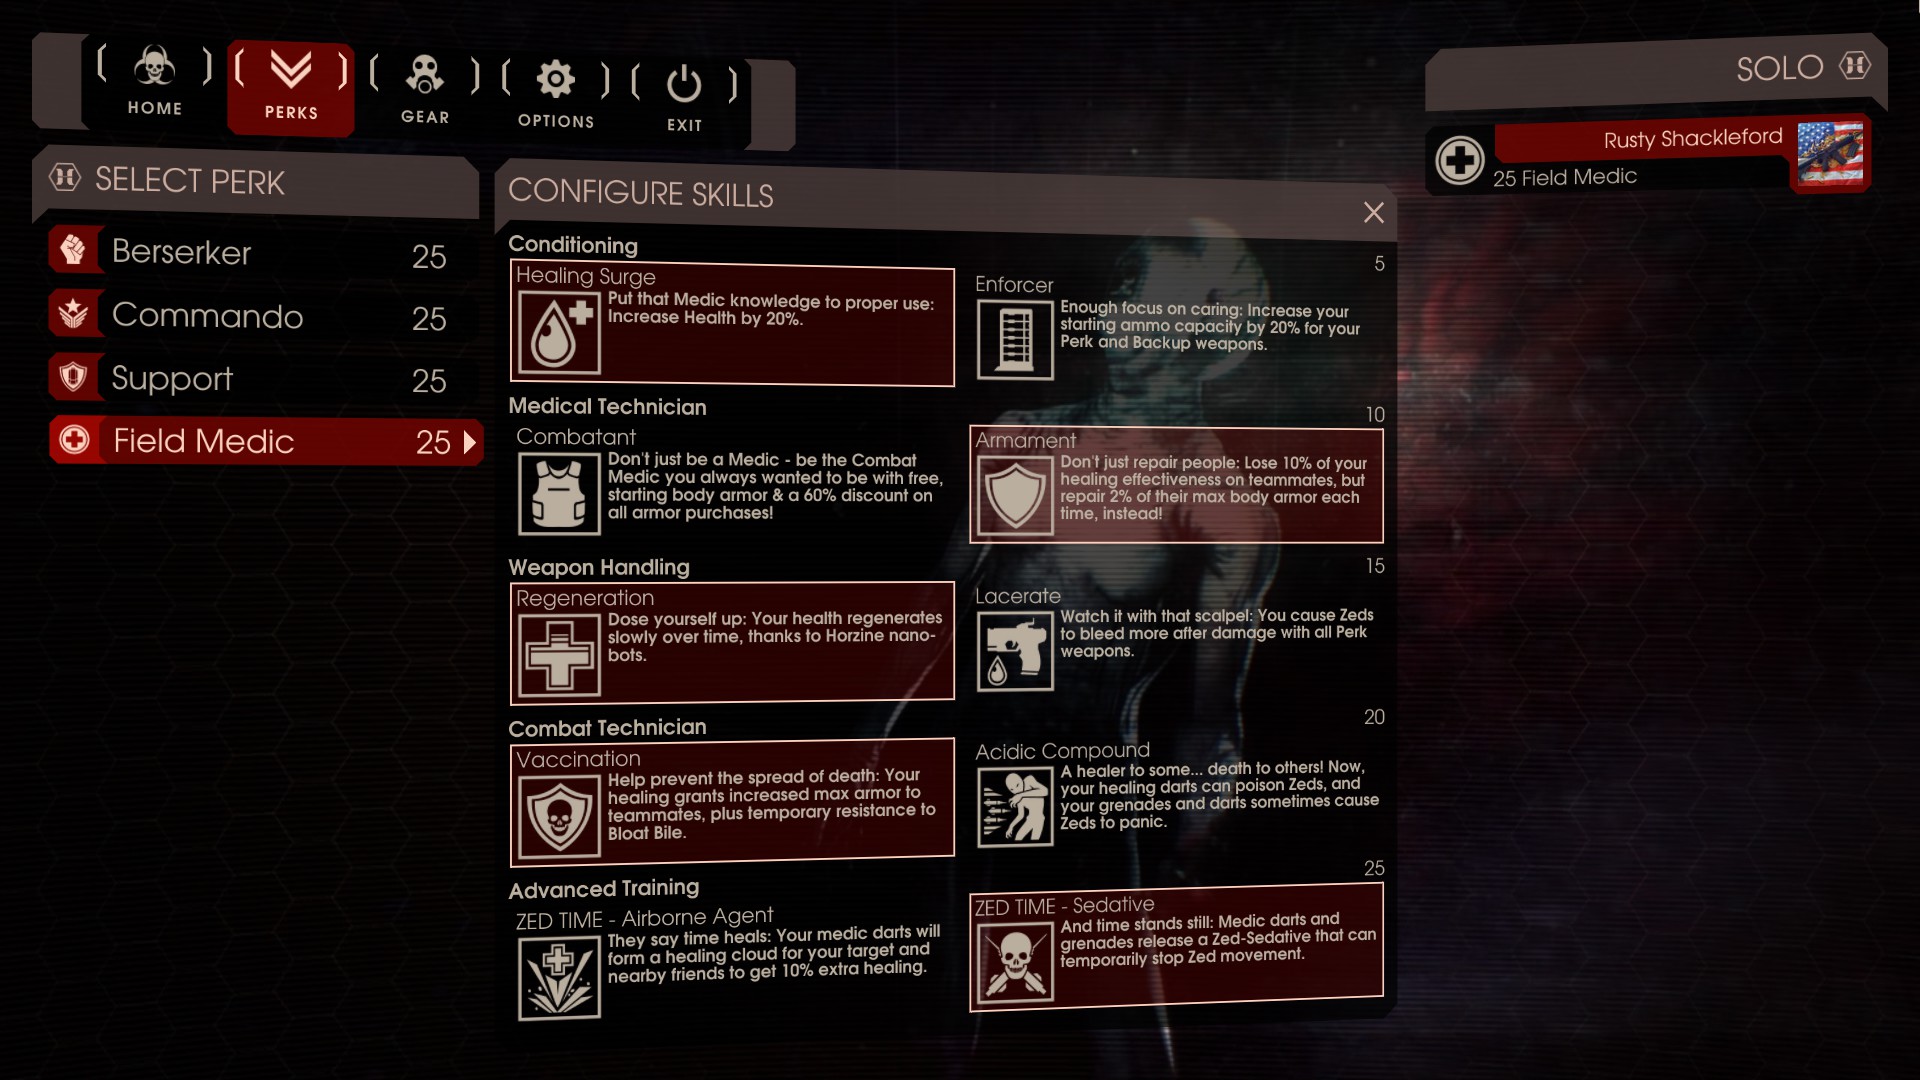
I spent the last day levelling my perks (finally all to level 25, but that's another story full of maths and figures). If you want, my perk screens are here:

http://gtm.steamproxy.vip/profiles/76561198035025103/screenshots/

This should include all 6 classes, and what I run with. I do change them up slightly for Hans, and the flare ability on the Firebug can be swapped with the free ammo, depending on the map. If I am playing Suicidal+ then I use flare in an attempt to light the map up for my allies. Otherwise, ever since KF1, I play the game pretty much as you suggest in the guide, with a medic pistol on almost every class (it sucks, but the small carry weight allows me to fit it in) or even up to the assault rifle on the zerka, where I can pop crawlers instead of them eating all my armour off prior to the Big Zeds.
Undefined  [author] 29 Aug, 2015 @ 2:31pm 
@Predator: I'm interested to know in what you guys are currently running! Let me know what perks and loadouts you guys like so far.