Not The Robots

Not The Robots

31 ratings
Not The Robots: A Comprehensive Guide
By pup
More than you ever wanted to know about Items, Enemies, and objectives! This is the de facto Prima guide to Not The Robots. INCLUDED: Information on every item and its abilities, every enemy and its behavior, and much more!
   
Award
Favorite
Favorited
Unfavorite
TABLE OF CONTENTS
Not The Robots Comprehensive Guide by Kushamo

1. TIPS AND TRICKS
2. INFO AT A GLANCE (Items and Enemies)
3. INFO AT A GLANCE (Unlocks, Operations, and Difficulties)
4. ITEMS AND UPGRADES (Armor to Invisible+)
5. ITEMS AND UPGRADES (Teleport to Quickcharge+)
6. SENTRIES
7. OTHER ENEMIES
8. CAMPAIGN: Objectives and Bonuses
9. CAMPAIGN: Buildings
10. SPEEDRUNNING
11. MISCELLANEOUS SECRETS
12. CLOSING


TL;DR: Eat where you can without overextending, Dig+ and Quickcharge are the best, learn to avoid Sentries, use the first three buildings to prepare for the next three, Dig+ really helps make end-game easier, and you should try speedrunning.
1. TIPS AND TRICKS
General:
  • Eating is a liability. You don’t want to eat, you have to eat. You have to eat to finish the level, and you have to eat to recharge items. Every piece of furniture you eats removes one piece of cover. Eat strategically.
  • On levels with sentries, don’t clear out whole rooms. Leave behind a couch or desk to hide behind. This ensures you have a safe path, from one piece of cover to the next, on the way back.
  • Similarly, eat first and foremost to complete the objective. Unless you want max food, the only reason to eat after clearing the objective is to recharge your items. If your items are full don’t distract yourself by eating unnecessarily, and if they aren’t then eat carefully.
  • You want to avoid backtracking wherever possible. When you have to go to an area you’ve already been, there’ll be less cover to hide behind and less furniture to charge your items. This makes backtracking simultaneously risky and tedious. Dig and teleport are both very handy to pass through or destroy permanent walls, which minimizes backtracking by opening new paths.
  • In many situations, you’ll have to pick the lesser of two or more evils. If you’re crouched, hiding from a sentry behind a CRT, and a spotlight comes nearby, it’s always better to risk detection and avoid the Spotlight than stay put and eat guaranteed damage.
  • The game's core skillset heavily emphasizes situational awareness and thinking under pressure. Situational awareness is knowing the current gamestate (i.e. the location of sentries, objectives, and the items you have) and taking a course of action; thinking under pressure is for when the things go wrong. And things will go wrong.

Items:
  • If you use Dig or Dig+ on a corner or intersection wall, it creates an opening which the player can pass through but sentries cannot.
  • You can eat blocks created with Blocks and Blocks+ if you stand next to it and press the eat button. It does not work if you hold it down and then move next to it, to prevent accidentally eating it.
  • Super forms are white (or purple*) variants of enemies created under specific circumstances. They do more damage, move faster and less predictably, and are generally more unpleasant. Be extra-careful around them.
  • You can use Blocks to trap a sliding wall in an enclosed space. Be careful with the timing, though, because whichever side the opening is on is the one that stays.
  • You can use Blocks next to most walls to create a space the player can hide in.
  • Don’t feel like you have to be on the move to get the most of Sprint or Invisible+. They both last ten seconds – if you can get to safety in eight seconds, but there’s an objective or upgrade box twelve seconds away, you shouldn’t necessarily risk getting caught in the open if you don’t have to.
  • The stun mine is able to block bullets.
  • If you drop the Tagger, it spawns over your head like Blocks. This means you can use Tagger as a makeshift Block in moments of danger.
  • Since Teleport+ and Quickcharge+ have ridiculously long recharge times, it might be worth dropping it as soon as you use it, instead of holding onto it for another use.
  • At high health, Armor reduces damage, effectively increasing your health. However, the damage reduction effect won’t save you from death, so at lower health it might be better to pick something else up to avoid damage entirely, like Invisible or Teleport.
  • Similarly, Freebie and Freebie+ are really useful at low health, but if you’re at full health it just sits there taking a slot. If another item would be more useful, you can eat it for a free bonus point.
  • If you pick up a Blocks, Stun, or Quickcharge+ and don’t really want it, there’s no reason not to use it before dropping it. You can create easy cover, protection, or refill your items with no downside!

Enemies:
  • Sentries have an infinite line of sight within a ~30 degree cone of vision[gfycat.com]. However, their movement is random, and they can turn around at any time. For this reason, don’t avoid a Sentry’s immediate location, avoid the room it’s in.
  • However, if a Sentry is alone, don’t be scared to hide behind a corner and sneak by! 30 degrees isn’t actually that large, and if you’re hugging the wall you can easily whizz by.
  • If you’re crouched, Sentries won’t be able to see you behind a Sliding Wall of any color.
  • If a Sentry sees you behind a Sliding Wall, the wall will protect you from its bullets. Be warned that the Sentry can pass through the wall at any time.
  • Additionally, lasers cannot pass through sliding walls.
  • Spotlights won't hurt you if you're on the move. However, if you're hiding from something else behind furniture, Spotlights can force you out of your cover. If there are any Spotlights nearby, be ready to bolt.
  • Lasers mostly do chip damage, lowering your health so other things can kill you. If you're being chased and have a medium amount of health, it might be worth going through the laser and eating the damage rather than taking the time to go around it. It's situational.
  • Floor Traps, on the other hand, can do an appreciable amount of damage if you run through them. If you're being chased past a Floor Trap, it's worth either going around it or waiting for it to turn off, depending on the cycle.
  • Sensor Bombs deal a hefty 50 damage, so it's worth being vigilant if one's nearby.
2. INFO AT A GLANCE (Items and Enemies)
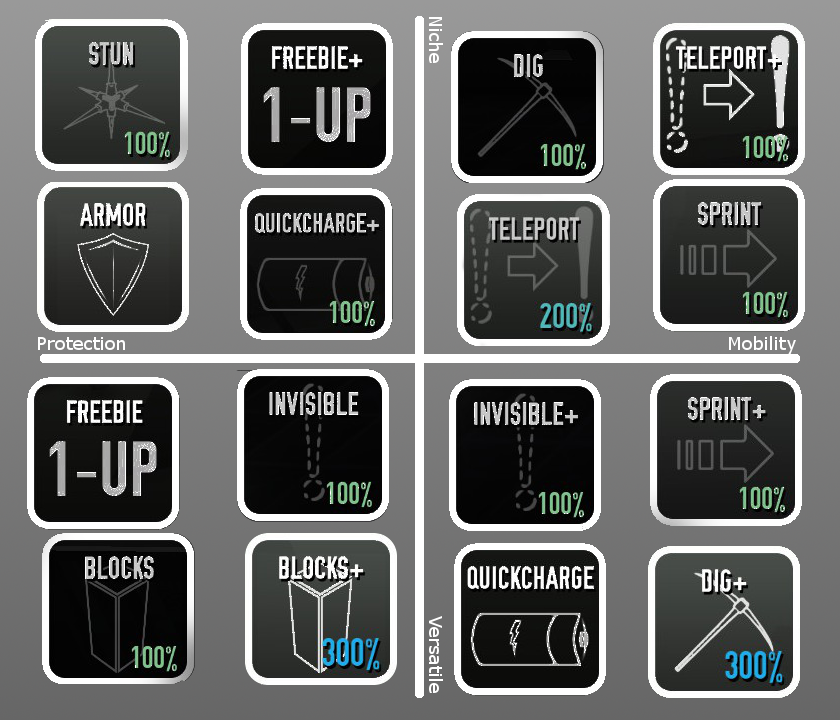
ACTIVE ITEMS
Food to Recharge
Notes
Blocks
67
Blocks can be eaten if you press eat next to them. It does not eat if you hold eat and then go to them.
Blocks+
200 (3 uses)
See Blocks
Dig
34
Walls give 1 food towards the objective (2 for Dig+). It does not fill the charge for any item.
Dig+
100 (3 uses)
See Dig
Invisible
67
Immune to damage but cannot move or use items. You can eat if food is nearby.
Invisible+
167
Lasts 10 seconds. Can use items, tagger, and eat.
Teleport
134 (2 uses)
Travels 4 blocks, can go through blocks and walls.
Teleport+
334
Freezes all enemies, allowing you to move anywhere before resuming play. Teleport+ has a secret "hidden power:" You can use tagger up to 5 times while time is stopped.
Stun
134
Stuns Sentries for 10 seconds; destroys sensor bombs; can block bullets like a shield.
Sprint
27
33% speed boost for 10 seconds. Only active when standing up.
Sprint+
34
33% speed boost for 10 seconds. Forces crouch.
Quickcharge+
334
Instantly fully charges all other items in your inventory, except other Quickcharge+

PASSIVE ITEMS
Effect of 1
Effect of 2
Effect of 3
Effect of 4
Effect of 5
Armor
25% damage reduction
40%
50%
57.1% (4/7)
62.5%
Quickcharge
2x charge speed
3x
4x
5x
300x
Freebie
On death, the player is respawned with 25 health and an Invisible effect.
Freebie+
On death, the player is respawned with 50 health and a limited Telepeport+ (Up to 4 blocks)

ENEMIES
DPS
Unlocked by
Notes
Sentry
Up to 20
Less accurate at long distances; ~30 degree field of view. Moves randomly.
Sensor Bomb
50 each
Reach level 14
Detection range of 3 blocks. Will follow if detects the player.
Super Sensor Bomb
50 each
Spinning Laser hits bomb
Faster; can move furniture (like Sentries)
Floor Trap
40
160 damage per cycle; cycle is 4s on then 4s off
Super Floor Trap 1 (Purple)
~25 each burst
Sensor Bomb explodes over Floor Trap
Floor activates randomly, in fast but highly-damaging bursts
Super Floor Trap 2 (White)
~50 each burst
Super Sensor Bomb explodes over Floor Trap
Floor activates randomly, in fast but highly-damaging bursts
Spinning Laser
40
Double laser does 2x damage if both lasers hit. One rotation takes 15 seconds.
Super Spinning Laser
80
Sliding Wall (of any level) hits laser pole
Rotates and changes direction randomly. Double laser does 2x damage if both lasers hit.
Spotlight
~25
Reach level 10
Moves randomly
Super Spotlight
~50
Spotlight activates inside another spotlight
Bigger and faster
Sliding Wall (Yellow)
20-25
Reach Level 6
Can pass through. Blocks bullets Sentries shoot.
Sliding Wall (Red)
40
Reach level 17
Cannot pass through.
Super Sliding Wall 1 (Orange)
Bad
Sliding Wall’s doorway hits an active Floor Trap
Cannot pass through.
Super Sliding Wall 2 (Purple)
Super bad
Sliding Wall’s doorway hits an active Super Floor Trap 2
Cannot pass through; white edge of doorway deals damage
Super Sliding Wall 3 (White)
Terribad
Sliding Wall’s doorway hits an active Super Floor Trap 2
Cannot pass through; white edge of doorway deals damage
3. INFO AT A GLANCE (Unlocks, Operations, and Campaign)
Level experience & Unlock
Level
Buildings Needed
Buildings Total
Unlock
1
1
1
Freebie (1-Up)
2
3
4
Challenges 1-4
3
6
10
Quickcharge, New Difficulty
4
10
20
Sprint+
5
10
30
Yellow Sliding Wall Trap
6
10
40
Teleport, Challenges 5-8, New Difficulty
7
10
50
Armor
8
10
60
Double Laser Trap
9
10
70
Stun, New Difficulty
10
10
80
Spotlight Trap, Challenges 9-12
11
10
90
Nastier Floor Traps, Second Inventory Slot
12
10
100
Dig+, New Difficulty
13
10
110
Blocks+
14
10
120
Sensor Bomb
15
10
130
Quickcharge+, Challenges 13-16, New Difficulty
16
10
140
Invisible+
17
10
150
Red Sliding Wall
18
10
160
Freebie+, New (Toughest) Difficulty
19
10
170
Teleport+
20
10
180
Challenges 17-20
21
10
190
Custom Levels
21+
10
200+
Bragging Rights
NOTE: You start at level zero. The XP bar filling up is not just the number of buildings you complete (though one building completion is always worth exactly one point). The scoring formula works like this:
(buildingsCompleted + (bonusesEarned/4.0) ) * multiplier
If you die on the second floor of a building, you still get half a point for completing the first floor. All bonuses are worth the same amount (¼ of one building, or ½ of one floor). If you start a Campaign on a higher difficulty, you also start with a higher multiplier.


Operation
Condition to Unlock (Achievement spoilers)
1. Normal
Reach Building 4
2. Hard
Reach Building 6
3. Boss Run
Beat the campaign at any difficulty
4. Floor Trap + Sensor Bomb
Create a Super Floor Trap
5. Laser + Sliding Wall
Complete three laser-based challenges (Catherine, Zeta, Jones)
6. SQUAD: Sentry + Spotlight
Kill a sentry with the elevator
7. Sprint+
Use a sprint, refill its charge, use it again before it ends
8. Stun
Destroy two bombs with one stun
9. Dig+
Use dig a lot in one level
10. Teleport / Armor
Have three armors at once
11. Teleport Festival
Use tagger under the effects of Teleport+
12. Mashy Smashy Bomber Bot
Use the Konami code in the operations menu
13. Fragility
Max Food + No Damage four times in a row
14. Wallless
Create a custom level with no walls
15. FPS
Beat the campaign on at least “Level 5” difficulty

A list of all the different names of campaign difficulties, their multipliers and health values:
Difficulty
1
2
3
4
5
6
7
8
Normal
Tough
Tougher
Medium
Difficult
Hard
Rough
Insanity
Standard
Better
Tallanted
Skilled
Amazing
Showstopping
Elite
Superlative
Normal
Bad
Horrible
Offensive
Rude
Cruel
Atrocious
Inhimane
Standard
Antsy
Fidgety
Nervous
Anxious
Overwrought
Agitated
Panicked
Regular
Mild
Peppery
Medium
Spicy
Caliente
Fiery
Capsaicin
Multiplier
x1
x1.4
x1.7
x2.1
x2.4
x2.6
x2.8
x3
Starting Health
100
90
85
80
70
65
55
50
Max Health
200
180
170
160
140
130
110
100
4. ITEMS AND UPGRADES: Armor to Invisible+
Items are the tools you’ll be using throughout the campaign to stay alive. They are found in blue boxes on every single floor, and are picked up by eating them. Regular items are in dark blue boxes, and plus variants are in lighter blue ones. You start the game with one inventory slot, up to a max of three via inventory upgrades in the campaign. After you reach level 11, you’ll start every campaign with 2 item slots and can go up to 5 with upgrade boxes. Because of this very limited space, the opportunity cost of having an item is huge, and since every item has its own situational use there’s no single loadout which will prepare you for everything. Several items are better either earlier or later in the campaign, and more useful on floors with or without sentries. Ideally you could swap between items when you needed them, however unless you have enough scanners that usually isn’t realistic since you never know what’s in any given box. Therefore, it is important to recognize the usefulness of every item and be capable of using all of them to their maximum potential.


Armor:
Armor is a passive item which reduces incoming damage. One armor reduces damage by a quarter, effectively raising your health by 33%. 100 health becomes 134, 200 becomes 267, but 30 only becomes 40. That's nothing to sneeze at, and there are always situations where this will be helpful. Unless you’re trying a no-damage run, armor isn’t ever useless. However, the opportunity cost for an armor is an active item – sure, armor can reduce the damage you take, but wouldn’t it be better to have Invisible+ and take no damage at all? If you want to maximize your use out of it, you should pick it up at high health and stick with it until you’re low enough where you’d die anyway, then switch it out for an active item to save yourself. Armor is overall a solid item, it’s never worthless, but it isn’t always your first choice.

Blocks:
Blocks spawns a tile-wide and wall-high block, which hits the ground when you move away from the space. It has a recharge of 67 food; Blocks+ has 3 uses with the same charge each use and same effect, so it’s strictly better. Block has two significant properties: It can’t be teleported by sentries or bombs, so it can create a permanent barrier if you’d like it to, but the player can eat it by pressing eat next to it, so it can also be temporary.
Blocks is a very versatile item, and it can be either a game-changer or a waste of a slot, depending on the situation. It’s most obvious use is to block the sightline of sentries, but this can lead to a scary ring-around-the-rosie where you’re circling the block to stay out of sight. If you’re near an edible wall, you can avoid this by placing a block next to it, and you’ll be able to fit in the crack out of sight.Even still though, Blocks has many less-obvious uses. It can limit the size of a sliding wall. It can block the path of lasers. It can seal off doorways, so giving you as much time as you need to come up with a plan.
In all, Blocks is a defensive item which can be used to buy time. Compared to Invisible, the next defensive item, Blocks is probably better because the block doesn’t disappear, but Invisible is more useful in a pinch.

Dig:
Dig allows you to eat through otherwise-permanent wall tiles, giving you 1 point (Dig+ gives 2) towards the objective. Dig has a charge meter of only 34 food, the same as Sprint+ and half of Teleport. Like with Blocks+, Dig+ has three uses with the same charge each. I will say right now that Dig+ is hands down one of the best items in the game.
Let me elaborate on why I think so: If you’ve made it to Buildings five and six, you’ll know they’re a lot harder than the buildings before it. They’re bigger, with more enemies, more food, and you have to tag all of them. Each room typically only has two or three doors each, so the map basically consists of a bunch of one-way paths, and because of the objective you have to go through all of them. These paths are a pain to deal with because it’s easy to get caught in dead ends, it’s hard to escape out of dead ends, and even if you do there’s usually one (maybe two) way you can go – and if there’s a sentry patrolling around there, too, then you’re sore out of luck. Dig, however, lets you bypass all of that. It allows you to create your own paths, even ones Sentries cannot go through. I cannot stress enough how much easier the last buildings are with Dig+.
In the earlier buildings, I’d say Dig is only marginally better than Teleport. Let’s face it, you’ll pretty much always use teleport to get past a wall. If you only want to drop in and teleport back out, you have to use it twice. Dig does the same thing, but it only has half the charge and you can move in and out freely forever.

Freebie:
Freebie and Freebie+ are passive items which revive you with 25 or 50 health, respectively, when your health reaches zero. With Freebie, you get receive an Invisibility effect, so you can’t move until you hit the use item button (default left-click) while Freebie+ gives you a limited Teleport+ effect, where time freezes and you move to a spot within four spaces to respawn. If you have Freebie+, make sure to die near a wall or other cover – since time “freezes” you can’t wait for things to calm down, like with regular Freebie, and if you have to respawn in an open area you’ll still be in the sentry’s line of sight. Destroying either a Freebie or Freebie+ gives you the “Eat a Freebie” bonus. Freebie is a handy item towards the end of the campaign. It’s a second chance, a lifeline. If you have 200 health, it might not be worth holding onto, but then again you might not find one when you really need it.

Invisible:
Use it once to render yourself invisible to sentries and immune to all damage, use it again when you’re ready to continue. Invisible is a solid, safe, defensive item. Like Freebie, it’s essentially a get out of jail free card. You can also eat nearby furniture while Invisible, but you cannot use items like Tagger or Blocks (if you try you will become visible). It gives you as much time as you need to wait out sentries and come up with a plan, and really that’s all there is to say about it. It isn’t as versatile as Blocks, but Invisibility is immediately useful and protects you from stray spotlights, whereas you’d have to give up your cover with Blocks.

Invisible+:
Invisible+, unlike Dig+ and Blocks+, isn’t a straight upgrade to Invisible. Invisible+ gives you the same imperviousness that Invisible does, except it only lasts ten seconds and you can move freely during that time. You can eat, use items (including Tagger!), complete sequences, and do anything else under the effects of Invisible+. The only limitation is that you cannot enter the elevator while using it, you have to wait for it to wear off. Invisible+ is great for when you need to pass an area undetected, tag a group of sentries, or need to escape a risky situation.
Compared to Sprint and Sprint+, you give up insane reusability for an equally insane invulnerability. Invisible+ has five times the charge time as Sprint+, but for obvious reasons Invisible+ is much safer. Don’t make me pick favorites.
5. ITEMS AND UPGRADES: Teleport to Quickcharge+
Teleport:
Teleport moves you four blocks in the direction you’re moving in. You can teleport through walls, furniture, and enemies. If 4 spaces away is inside a wall, it won’t work, but if 4 spaces away is inside furniture you’ll automatically eat it. Teleport is the only item which has two uses, instead of one or three. This allows you to teleport in and out of an area, at the cost of both its uses.
Teleport is good for escaping a dangerous area in a pinch without leaving a hole for any pesky Sentries or Sensor Bombs to follow through. However, Dig can do the same thing at corners. The drawback is it takes slightly longer to get to a corner, however Dig has half the charge time and the hole doesn’t ever disappear. Teleport is good in lieu of Dig, but generally Dig fulfills the same role better.

Teleport+:
Teleport+, instead of having a set distance of 4 blocks, allows you to instantly teleport anywhere on the floor. Teleport+ is tied with Quickcharge+ for the longest recharge in the game at 334 food. This means you should hold it until you need it, and then drop it after using it. It’s an item of risk vs reward: The risk of carrying it is that you lose an item slot, but the reward of teleporting to the elevator after completing the objective can be huge, especially on the last floor. Whether you like it or not really depends on if you think the payoff is worth it or not.
(SPOILER) Teleport has a helpful hidden power: You can tag up to five enemies with Teleport+

Stun:
Stun creates a mine which, when triggered, stuns Sentries for 10 seconds and harmlessly detonates sensor bombs. It has a small area of effect, so it’s possible to stun multiple sentries if they’re close enough. Stun also has a secondary effect, like sliding walls: It is able to block Sentry bullets. They can still see you through it, but they can’t shoot through it. Stun can be used both offensively and defensively.
In contrast to the other items, Stun allows you to fight back. You can either proactively run into a sentry and use it inside him, or place it in a one-tile-wide doorway and lay low until he walks into it. Either way, you get 10 seconds of free reign to eat whatever you can before he wakes up.
Personally, I prefer to use Stun at the doorway to close off large areas without any sentries at all. I use it as a “set it and forget it” safeguard to explore open areas of the stage while they’re still open. If a Sentry decides to come over, you have ample time to leave, take cover, or just set another mine on him to give 10 more seconds. I typically don’t use where there’s already Sentries because in my opinion Invisible+ and Dig are better suited to avoid them entirely, and generally 10 seconds won’t be enough to clear out an area before it wakes up. Your mileage may vary.

Sprint:
Sprint and Sprint+ give you a 33% speed boost for 10 seconds, with charges of 27 and 34 food respectively. This is a deceptively powerful item – if you’re caught in a bad position, a 33% speed boost translates to taking 33% less damage, which is about as good as armor. That’s worst-case, however – it’s more effective if you use it before you’re seen, and you can run past sentries before they can even turn around to see you, eliminating 100% of the damage.
Sprint suffers from massive underuse for a few reasons. It’s hard to use well and easy to use poorly. On the surface, Sprint seems to promote a run-and-gun playstyle, which for most people means recklessly running into danger and eating everything in sight. Unlike most other items, which allow you to hide from, evade, or stun sentries, Sprint appears to encourage running into danger, hoping not to be seen. That’s not the case, of course, so here I’ll make a case for Sprint:
First, Sprint has the quickest recharge in the game of only 27 food. Sprint can be charged even in trivially small rooms, and can be re-used indefinitely. During speedruns, it isn’t unrealistic to have Sprint up for two-thirds of the time, and in theory it can be kept up for the entire campaign. If you want to know why I rate Sprint so highly, just imagine if you had a permanent 33% speed boost. You can literally run from your problems. Incidentally, this leads into my next Sprint tip: Don’t let it change your playstyle. A 33% speed boost is only ever beneficial, no matter how slow you play. If you’re in danger, or even at risk of danger, don’t hesitate to use a Sprint to get wherever you need to be. Just don’t feel like you have to be on the move the whole ten seconds – if you’re safe and comfortable at a spot six seconds away, don’t run into a Sentry nest nine seconds away just because you can.

Quickcharge:
Quickcharge is stupid good. It’s a passive item which makes your other items recharge quicker. How much quicker, you ask? A single Quickcharge cuts how much food you need to recharge all your other items in half. Quickcharge is stupid good. Its only downside is that it takes up an item slot, but considering it effectively gives you twice as much item usage it’s almost always worth it. It works great with any setup. If you have at least three slots and aren’t using any other passive item, it’s definitely worth giving something up for.

Quickcharge+:
Quickcharge+ is an active item which immediately refills all your other items (except other Quickcharge+) to full charge. It requires a whopping 334 food to charge each use – that’s double the charge of Invisibility+, which has the next-slowest recharge. In the campaign, it’s actually impossible to use it twice on the same floor because of how much it takes. With this in mind, it’s often worth dropping it as soon as you use it. It’s really straightforward – it gives a substantial effect, but it has almost no reusability. Not much more to say.


Upgrades
Upgrade boxes are locked until you complete the objective, at which point the turn green and are edible. This allows you to use them as cover before you finish the level, but be wary that they can be teleported by sentries and bombs. Upgrades have a hidden “rubber banding” mechanic, in that at least five have to spawn in the entire campaign. (Since I don’t talk about them anywhere else, I’ll just add here that health boxes work similarly.) If you’ve only seen one or two in the first few buildings, then you’re guaranteed four more before Building 7. However, if you see five and don’t pick any up, they still count and you aren’t ensured anything. There are only three possible upgrades:
  • Multiplier: Multiplier is useless and I hate it. Multiplier increases the experience you receive when you receive when you either die or finish the campaign. Also, it’s useless and I hate it <3
  • Scanner: Every scanner shows you the contents of one item box or upgrade box, with no upper limit to how many you can have. This becomes more beneficial the further in campaign you get – since you know the contents of an item box, you won’t risk life and limb for an unknown item, only for it turn out to be the opposite of what you need. Additionally, it gives you the ability to cherry-pick your item loadout, so you can pick the items most immediately useful instead of holding onto one for the duration of the campaign until you need it.
  • Inventory: Inventory allows you to carry an extra item slot, up to a maximum of 5. In most cases, it will be the most beneficial upgrade, but that’s not to the detriment of Scanner. Inventory works best in tandem with Scanner, showing you what everything is so you can pick up whatever you want the most.
6. SENTRIES
Sentries, turrets, flying skull bastards:
Whatever you call them, they’re undoubtedly the biggest threat your own survival. Of all the obstacles, only the spotlight, sensor bomb, and sentries move randomly. In addition, the sentry has a formidable line-of-sight which can threaten any open space. Looking purely at the numbers, however, you should note that sentries have the worst damage potential of all enemies. This is because 50% of the sentry’s power is its very presence. Getting spotted leads to panic, panic leads to rash decisions, and rash decisions lead to death. A single sentry patrolling an area is enough to make it a valid threat. Essentially, sentries are the kings of area denial.

Now consider that sentries seldom appear on their own. The later buildings can have as many as seven sentries per floor, each one doing its own thing. The other 50% of the sentry’s power comes from its strength in numbers. If you’re at a dead end with three sentries wandering in and out, then you’re almost as good as spotted. I could go on about the design and the role sentries serve to facilitate literally all the action in the game (If you can’t already tell, I’m in love with so many things about this game), but that’s a discussion for a different time. (HINT: It’s because all other enemies are predictable and easily avoidable)


Actually, though, Sentries are surprisingly weak. For one, they have an exploitably small field of view. (Example)[gfycat.com] You can easily stroll right on by a Sentry without it noticing, if you’re ballsy enough to try. And even if a Sentry does catch you, they only deal an actually quite pitiful 20 DPS at most. You can easily get away from Sentries at high health.

The trickiest thing with sentries is their unpredictable behavior. Rather than following set paths, they explore areas randomly. They can go in a straight line across the whole floor, or they can pull a sick 180 at a second’s notice. Usually, though, they don’t change direction much more than they have to. If a Sentry is moving toward a wall, item, or piece of furniture, it will have to either change direction or turn around entirely. If it’s in an open area, facing the opposite way, you’re usually good to zip past it.

Once you’re spotted by a sentry, there isn’t much you can do except beeline to the nearest cover. Your number one priority should be to escape its line of sight. Being caught without cover is analogous to being caught with your pants down. I’ve said this before, it’s worth repeating: The best way to prepare for trouble is to leave some furniture handy to hide behind at a moment’s notice. In the same vein, a small piece of furniture directly in front of a door works wonders because sentries cannot pass through it. Use your small size to your advantage.

Once you break the line of sight, Sentries will panic, spinning counter-clockwise at about one revolution per second to look for you. During this panic, the Sentry will feverishly scan the area it last saw you, until it returns to normal after ten seconds. Well, not quite - after spotting you, Sentries will be able to infrequently teleport nearby furniture around the room in an effort to uncover you. One last note: Sentries act independent of one another, so one Sentry spotting you will have no effect on another Sentry in another room. The alert sentry is panicking and spinning frantically and the other sentry is prolly all like “chill, bro.”
7. OTHER ENEMIES
Other enemies, while equally threatening in their own right, primarily act as foils to Sentries. Floor Traps and Lasers, for example, are predictable and avoidable, until a Sentry chases you into them. Sliding Walls further limit your movement, especially the red ones. And Spotlights can go through walls, therefore forcing you out of valuable cover. Like with items, every Enemy and Trap serves its own identifiable role, which can be anything from area denial to pure damage output.

Sensor Bomb:
Sensor bombs are probably the next biggest threat. They're slow and laughably easy to avoid in open areas, but they're small enough that you can easily miss them if you aren't careful. Additionally, if they’re blocking a doorway or choke point, than they can effectively lock you in a potentially dangerous room. If a sensor bomb takes you by surprise, you’ll eat a whole 50 damage, so it’s worth keeping out an eye for them. That’s really all you can do about them, unless you can lure them into a stun mine.
If a rotating laser hits a sensor bomb, it will go into is super form. The Super Sensor Bomb still does 50 damage, but it’s a bit faster and can teleport furniture around the room, like a flashing sentry. Unless you want to take the time (and risk) to lure a bomb away from a laser, you won't be able to stop its super form. Fortunately, though, it isn’t that much more threatening. Just don’t get caught in a corner with one nearby.

Rotating Laser:
In most circumstances, lasers are the first enemies you’ll encounter. Lasers rotate slowly and aren’t a threat on their own. Lasers do chip damage, meaning they chip away at your health so other things can kill you easier. If you’re above 50 health, it probably won’t kill you, but it can bring you down to where a bomb or spotlight will. There are three kinds of lasers:
  • Brown lasers are as tall as the robot, and so they can be ducked under.
  • Blue lasers are shorter and cannot be ducked under. Small furniture like monitors and couches can block and even hide blue lasers, catching you off-guard.
  • Red lasers shoot from both the top and bottom. If both ones hit you, it will do twice as much as the other kinds, so watch out!
Super Lasers are created when a Sliding Wall hits the laser pole. Super Lasers turn white, change speed and direction randomly, and do twice as much damage. Usually you’ll have to create it by accidentally eating a furniture blocking a Sliding Wall, but most of the time it’s preventable. If you need to get around a Super Laser, it’s generally safe to move around the opposite side the laser’s on. Really watch out for Double Super Lasers though, if both ones hit you it does a devastating 160 DPS and can take you out in a pinch.

Floor Trap:
Floor Traps are really simple, stationary obstacles with a basic pattern: They turn on for four seconds, then stay off for another four seconds. When on, they deal a continuous 40 damage per second until you step off the tiles. Here’s a handy tip to avoid damage from floor traps: Don’t step on them. Really though, Floor Traps are simple that’s all I have to say about them.
The weird thing about Floor Traps is that they have two super forms. Level one is purple and triggered when a Sensor Bomb detonates above a Floor Trap, and level two is white and triggered when a Super Sensor Bomb detonates above it. Both super forms, instead of following a basic pattern, turn on randomly for a split second dealing 25 or 50 damage. You can wait for it to activate, then immediately run past it before it goes again, or you can just go around the trap altogether.

Sliding Wall:
Sliding Walls come in many different colors, however they all behave the same way: They span along a single tile as far as they can, until they’re interrupted by a wall or piece of furniture. The opening moves back and forth, and the colored wall does damage if you touch it. The wall acts a sort of force field – even if Sentries see you, they cannot shoot through the wall. They can, however, pass through the wall freely, so don’t get too comfortable. Additionally, if you stay crouched, the Sentry will not be able to see you on the other side, so you can use it as cover. If the Sliding Wall doesn’t extend all the way to a wall, you can go around it, but otherwise you just have to carefully run through the opening. You can pass through yellow walls (taking damage while doing so,) but otherwise the only difference between levels are the damage the wall does. Red ones deal 40 damage per second, and orange, purple, and white ones deal increasing amounts respectively. Its three super forms are created when the wall goes over a Floor Trap of the same color, however purple and white are so stupid rare that I only found out about them after months of playing.

Spotlight:
Spotlights are large yellow circles which wander around the room aimlessly and randomly. If the player enters one, the Spotlight centers itself around the player’s current position, and after two seconds it “discharges,” dealing up to 25 damage if the player is still inside of it. On their own, Spotlights are a trivial enemy which can be avoided easily.
Unlike other enemies, however, the Spotlight can pass through walls and furniture uninhibited. This is what makes Spotlights a threat – you can’t hide from Spotlights. At least not in the same way you hide from Sentries. You can’t hide under a desk, or behind a cabinet; you can only avoid damage by turning invisible or keep moving. If you’re hiding from a sentry, and a Spotlight wanders near you, you’re in trouble. In cases like this, you have to pick the lesser of evils. The Sentry isn’t likely to wander out of range in two seconds, so it’s always better to leave your cover and risk detection than stay and eat a guaranteed 25 damage every two seconds. Sometimes damage is inevitable, and you just need to do what you can to minimize it.
A Super Spotlight is formed when a spotlight discharges inside another spotlight. Super Spotlights are a bit larger, move a bit faster, and do twice as much damage. They behave the same way though, so you can avoid it just as easily as the regular one.
8. CAMPAIGN: Objectives and Bonuses
Objectives:
Food – The food objective is present in every building except Building 7. You have to eat a certain amount of food, depending on the current floor (usually around ~80%). Buildings 5 and 6 can have as little as 90 food to as much as 220, depending on the size of the floor. To give a rough idea, Sprint takes 27 food to charge, Invisible takes 67, and Quickcharge+ takes 334.

Sequence – Sequences are in buildings 3 and 4. You have to go each panel in order from highest to lowest number. There are always between 3 and 5 panels, but the total length from the first to last panel, in order, has to average within a certain distance. This means if there are five panels, they will be closer together than if there were only three panels, so the total distance is the same. In practice, this can be thrown off with unlucky wall generation.

Tagger – By far the most intimidating objective, with tagger you have to move next to each enemy (except floor traps) and “tag” them. But wait, it gets better – since the tagger takes up an item slot, you’ll usually have to give up an item in order to use it. If you drop the tagger, it falls onto the spot you’re standing on – this means you can use the tagger as an impromptu Blocks item, with no recharge time. Be warned that it takes about a second of holding drop (F default) to drop it, so it has a bit of a start-up time, that it can be teleported, and it is only one block high. The Tagger is in Building 5 and the second floor in building 6.
Note: The objectives for each building are always the same, regardless of difficulty. The only thing difficulty changes are the amount of enemies that spawn and your starting health and max health. There are eight difficulties in total.


General Advice: One thing you’ll see again and again is to avoid backtracking. This is important because when you eat furniture on the way and have to turn around, (1) there’s less furniture to hide behind and (2) there’s less furniture to charge your items. This is why Dig and Teleport are such valuable items, because they allow you to take new and safer paths instead of backtracking. Backtracking is both risky and tedious, so it’s important to reduce it wherever you can.

Bonuses:
Max Food – Eat 100% of the furniture on a floor
No Damage – Take no damage the whole floor
Gluttony – Eat a health box at max health. The max health varies by difficulty.
Eat a Freebie – Destroy (by holding F) a Freebie or Freebie+
Bomb Squad – Destroy a sensor bomb with a stun mine
Schadenfreude/Justice/Revenge/etc (bonus title is mildly randomized) – Destroy a Sentry by closing the elevator when it’s standing in it.
9. CAMPAIGN: Buildings
Building 1:
Easy peasy. Take advantage of it for easy No Damage and Max Food bonuses.

Building 2:
Your first encounter with sentries. They’ll either be alone or in a pair, but usually the wall generation is generous enough that you can stay out of its area and still beat the food objective without a problem. If you have to get past a guard, for an item, upgrade, or to get to the elevator, do so carefully. You can exploit its line of sight by hiding around corners, behind furniture, or using items.

Building 3:
This is usually the last easy building in the campaign. Use the first three buildings to prepare for the last three – this means you’ll want to have good items, upgrades, and health by the end of this building. You’ll need it. You don’t have to head immediately for the sequence, but try to go in its general direction at the start to minimize backtracking. Most of the enemies are stationary, and the two that aren’t (sensor bomb and spotlight) are easily avoidable enough that you’ll have time to safely hide and plan your next moves.

Building 4:
Here’s where the going gets tough. Immediately, before exiting the elevator, it’s worth examining the wall layout, how many sentries there are and their locations, and the location of the highest number in the sequence. It also helps to find a couple of nice hiding spots around the room, in case you get spotted, or if you just want a break to plan your next move. (Have you noticed you should be planning a lot? Plans are nice.) Also keep in mind that it helps to avoid as much backtracking as possible. If you leave an area, and there aren’t any sequences (or Sentries) nearby, try to eat as much food as you can around you because you probably won’t come back there.

Building 5:
Building 5 is roughly the same difficulty as building 4. On the plus, there’s no sentries, only the stationary and predictable enemies, but to compensate the floors are usually much larger, and you have to tag all the enemies. The only advice I have here is that the objective is essentially a sequence with no set order, the optimal path is just from one enemy to another instead of one number to the next. To avoid backtracking, tag all enemies and eat enough furniture when you leave an area.

Building 6, Floor 1:
The only objective here is food, but it can take as much as 200 to fill it. There are also more Sentries than ever. If you aren’t adequately prepared, you won’t probably won’t pass this building. Keep in mind the advice for previous floors. The benefit to having only the food objective is that it’s possible to go in a big circle, eating along the way and minimizing backtracking. Dig and Teleport are especially useful for this. Additionally, you don’t have to worry about tagging or sequencing allowing you to focus purely on food.

Building 6, Floor 2:
Good news: You’ve made it this far, you’re on the home stretch, the end is in sight. Bad news: Sentries. Lots of them. And you have to tag them. If there are any upgrade boxes, it isn’t worth going out of your way to pick them up because they won’t have any use after this. Instead, you should just leave it as cover. Other than that, try your best.
Tips for tagging Sentries: Try to single out sentries and get them one at a time. Walls and large pieces of furniture are your best friends here. Remember that once you’re spotted, it immediately becomes harder since there’s always the threat of teleporting furniture. It’s okay to make mistakes, as long as you’re ready to run and can make it to safety without crossing paths with another sentry. It’s better to miss a chance to tag something than to stumble and have it kill you.

Building 7, Floor 1:
This is an ominously empty room – empty except for one sequence and four health boxes, separated by what can only be described as a SolarGroup Material Emancipation Grill. The first time you see this, you know something’s up – it’s the silence before the storm. Take a moment to relax after Building 6, because this is the only chance you’ll get.

Building 7, Floor 2:
Boss time. The fight consists of three phases, each time you need to wait for an item to spawn then wait for it to charge, all while avoiding his attacks and the enemies around you.
First phase: The big, bad, machine is introduced and… follows you around? This part isn’t hard, just keep your distance until Stun is charged and use it near him, so he sucks it up. There are also spotlights, so be sure to keep moving. They’re not a huge problem.
Second phase: Lasers grow from the ground like weeds, and the machine starts charging at you. The lasers will only do chip damage, but since you’re at full health it won’t be a problem unless you really screw up. His charge is an instant kill though, so watch out. When Blocks spawns, you’ll want to use it, wait for him to charge, then get out of the way so he runs into the block.
Third phase: Sensor bombs spawn, and the boss remains stationary firing huge death-lasers at random intervals. This is the hardest part; his laser is huge and instant-death. You have to get the Stun, place it next to the boss, and lure a sensor bomb into hitting it. Remember high-school geometry: A circle with a smaller radius has a smaller circumference. If you need to circle him, do it close to him so you can outrun his turning rate. If you’re in the line of fire, immediately bolt in the opposite direction. It goes off randomly, so you never know when he’ll shoot. If you have to go past in the other way, wait for him to fire than slip right past as soon as possible.
To finish the fight, just crawl inside the oven and use stun one last time. If it weren’t a robot, this would be absolutely brutal.

The only difference with the boss between difficulties is how many enemies spawn – the hardest difficulty has at least twice as many spotlights, lasers, and sensor bombs.
10. SPEEDRUNNING
Hey! If you’ve made it this far, you probably enjoy the game and want to get better at it. Most people reading this guide probably hadn’t thought about speedrunning, if they’ve even heard of it at all. Speedrunning is exactly what it sounds like - trying to run through a game or challenge as fast as you can. It’s another way to enjoy a game, with higher levels of tension and excitement. I really want to emphasize this, because many people are intimidated because they don’t think they can be the best, or because they want to just play casually. Nobody was the best at anything when they first started, it can take days or weeks to create a establish a firm understanding of a game’s mechanics, systems, and interactions. Furthermore, it’s very possible to speedrun casually. You don’t have to be emotionally invested, playing night and day for hours on end, to speedrun; you just have to have fun with it. Speedrunners aren’t some elite otherworldly breed of gamers, they’re ordinary people who just want to play games they love in a different, more competitive way. If you’re at all interested, even a little, I strongly urge you to at least try it; all you need is a desire to improve.

Not The Robots is an especially friendly game to newcomers. Firstly, roguelikes are already easier to run since the RNG elements can level the playing field. On top of that, it boasts a tremendous skill ceiling, and consequently there’s no best possible time. Furthermore, the game actually has a speedrun mode, which streamlines everything! [DISCLAIMER: Speedrun Mode is a WIP and has not been added yet] Speedrun mode has a bunch of features and options ; there is an on-screen timer which tracks your progress and ignores loading times, it can optionally force a Sprint/Sprint+ to spawn on the first floor, and there are other features, too!

Here are a bunch of resources at your disposal:
  • Not The Robots official speedrun leaderboard:[www.speedrun.com] There are several categories and even a separate section for challenges and operations. If you want to submit times to the leaderboard, you have to include a video. This leads into the next resource...
  • Open Broadcaster Software:[obsproject.com] OBS is a lightweight and easy to use program for recording and streaming video. A 15-minute video is a little over 100MB, so you can record plenty of runs without wasting an absurd amount of space. It can display multiple sources, so you can add overlay images, text, and even other other windows.
  • LiveSplit:[livesplit.org] LiveSplit is a program to time runs with. Speedrun mode already tracks the in-game time more accurately, so this isn’t necessary, but LiveSplit saves all your times. This means you can compare your personal time to your average, and it can show the “best possible time” by taking the best time for all individual segments. (In this case, the segments would be buildings - so you can see what your best time for each building is!)
  • NohBoard:[sourceforge.net]Optionally, NohBoard is a neat program which highlights keys you press. You can overlay it on top of video to show your movement, and stuff. Worth mentioning.
  • Not The Robots Community Hub: This is where pretty much all of the community is. Unfortunately, the community is rather small. If you have more general questions or want to discuss anything, you should post here. The devs are very welcoming!
11. MISCELLANEOUS SECRETS
WARNING: THIS SECTION CONTAINS SECRETS AND SPOILERS. (DUH)

Inputting the Konami Code (up, up, down, down, left, right, left, right, b, a, escape) will have different results depending on where you input it:
  • In the title screen, "Not The Robots" in the top left corner changes to other names
  • By doing it in the campaign starting screen, you are able to do an infinite campaign
  • In the Operations menu, you unlock the special operation "Mashy Smashy Bomber Bot"
  • In the Challenges menu, you unlock "The B-Sides." It's a second variant of all 20 challenges which are harder or cooler.
  • At the credits, you get a short and casual encounter with the drinking bird.
  • At the "erase progress" option, inputting it unlocks all content, including all 15 operations and challenge 21.

If you press 6 and 8 at the same time while playing, you enter tripod mode. It's a camera mode which hides the UI and gives you additional control of the camera, including camera height and whether or not it follows the player. Input 6 and 8 again to return to normal.

One of the random loading screen tips alleges that Scary Thierry will attack the player if he or she reloads the campaign too many times. This is a reference to Rick & Morty's Scary Terry.

12. CLOSING
Hey, you - you reading this: You're a cool guy :)

I should probably add some pictures and stuff to break everything down.


If you don’t have Not the Robots, here’s why you should get it

Special thanks:
Eli Piilonen (AKA 2DArray) and David Carney for making this game
Eli Piilonen again, for reviewing & fact checking this guide
Really_Tall, TehSeven, Magfmur, and anyone else for kickstarting the speedrunning scene
other people
4 Comments
DarkVégéto_31 14 Mar, 2020 @ 5:04pm 
Thank you guy, very good guide !
:swdcranky:
Ahn't May 6 Sep, 2016 @ 1:05pm 
An incredibly useful guide. This has exactly what I like and want out of a rougelike guide: Numbers. Much like Binding of Isaac, I like knowing the precise values of what is needed to perform actions, and this guide really helps. The only numbers lacking are the number of points that the types of furniture give, but it would be extremely tedious to list down details for every different piece of furniture.

Aside from that minor detail, props for making such a detailed guide to an excellent game. By the way, perhaps you could give a strategy on either luring or listing a safe option to destroy a Sentry.
pup  [author] 12 Feb, 2016 @ 11:19am 
@SuperSuit You cannot eat them, however you can destroy them by closing the elevator on them.
DizzyChimera 12 Feb, 2016 @ 7:36am 
Does not seem to include how to defeat sentries? I saw a tip that implied you could eat them...