Depth
141 betyg
The In-Depth Guide for Aspiring Shark Players (UPDATED: Stash Update (07/17 2015)
Av Raptor Jesus
This guide is intended to help players around some of the intricacies and advanced tactics and decision making involved in developing from a good into a great shark.

   
Utmärkelse
Favorit
Favoritmarkerad
Avfavoritmarkerad
1. Introduction
UPDATE 07/17/2015
  • added map description & teamups for the new map, Stash
  • added more YouTube videos of me playing, including one as Mako on Stash


UPDATE 06/24/2015
  • added new section about the weapon mods and how to counter them
  • added section for Thresher including Skill Order & Gameplay tips
  • added section for the newest map, Quarry
  • Reworked the Map & Teamup Section to account for current strong/weak picks, the new map and addition of the Thresher. Split into 2 Parts because of text limit

UPDATE 05/05/2015

  • added description and Shark Matchups for the newest Map from the Chivalry vs. Depth Update, Hillside.
  • Reworked the General Info Section. Split it into 2 Parts because the text limit was reached.
  • Added a new section on how to play when ahead/behind (found in Part 2 of General Info)
  • Added a new section on how to remove vision tools and the impact of Shark Shields (found in Part 2 of General Info)


Hey everyone!


My name is Raptor Jesus, and I am a top 50 shark player who has invested around 80 hours into the game playing almost exclusively shark. I have been top 10 from time to time, but given that I do not always have time to play, I can't really keep up the grind to stay situated there. Either way, I was thinking I could contribute to the community and to the influx of newer players since the last update and sale last weekend by writing a guide about the intricacies of decision making when you're playing shark.
WARNING: Wall of text. There is no TL;DR for this guide, but I tried to highlight the important information using Bold and underlined text, so if you don't feel like reading everything you can just skim through it.


As stated in the description, I am not trying to cover the basics of gameplay and I also do not wish to create tier lists for skills or anything. If you are interested in a general overview and some useful information about the base stats of the sharks, head over and check out the guide made by fellow shark and top rated player KCKKryptonite. When I started playing his insight helped me a lot, so head on over there if you want to have a rundown of the skills and some detailed data about win percentages on different maps. In fact, I strongly recommend you do that before reading my guide). Here's the link: http://gtm.steamproxy.vip/sharedfiles/filedetails/?id=340145824

One of the most important things to remember in Depth is that as a shark, you definitely have the ability to carry a game single-handedly. It may not always been easy and you are destined to lose the occasional game, especially against experienced divers or well coordinated groups. But it is entirely possible for you to carry all on your own, which is why you should focus, first and foremost, on your own play and strategies and not spend any energy on flaming or even considering fails of your fellow shark mate.

DISCLAIMER: I don't want to imply that my way to play is the only way, that I know everything or that there is nothing better/alternative. My remarks come from experience and reflect what I think works best (for me, and maybe for others too). It's okay to disagree :)


Below are some end of game screenshots that should prove my point:


2. Getting to Know the Enemy
Face/Off

One of the most important factors in playing well in this game is knowing exactly what your shark can and can not do, which includes knowing it's strengths and weaknesses. An integral part of this is to understand your enemies, the divers, and how they (do not) see you.

Since vision and movement is decidedly different when playing shark versus playing diver, the way to find out whether or not you can hover next to that one entrance or how far you have to swim away in order for them to lose vision of you, therefore, is to play as diver and get eaten a couple of times.

There are only a few divers in this game who excel in seeing you from very far away, and almost all of them are top 10 in the Diver Score Leaderboard. SeanXD, for instance, is a true nightmare for a shark player because he tends to float in open water and see you from far away and end you. Only the most experienced divers can do this, however, and the average run of the mill diver is very confused by the limited range of vision, the general darkness of the levels and last but not least, the speed of the sharks.

That's why I advise all of you to test the waters as diver for a couple of games. You will quickly see how easy you get disoriented as a diver by sharks dashing by you and how difficult it is to actually see them coming (meaning how late you actually see them even when they come straight at you) and this will help you plan your moves as a shark a lot better.

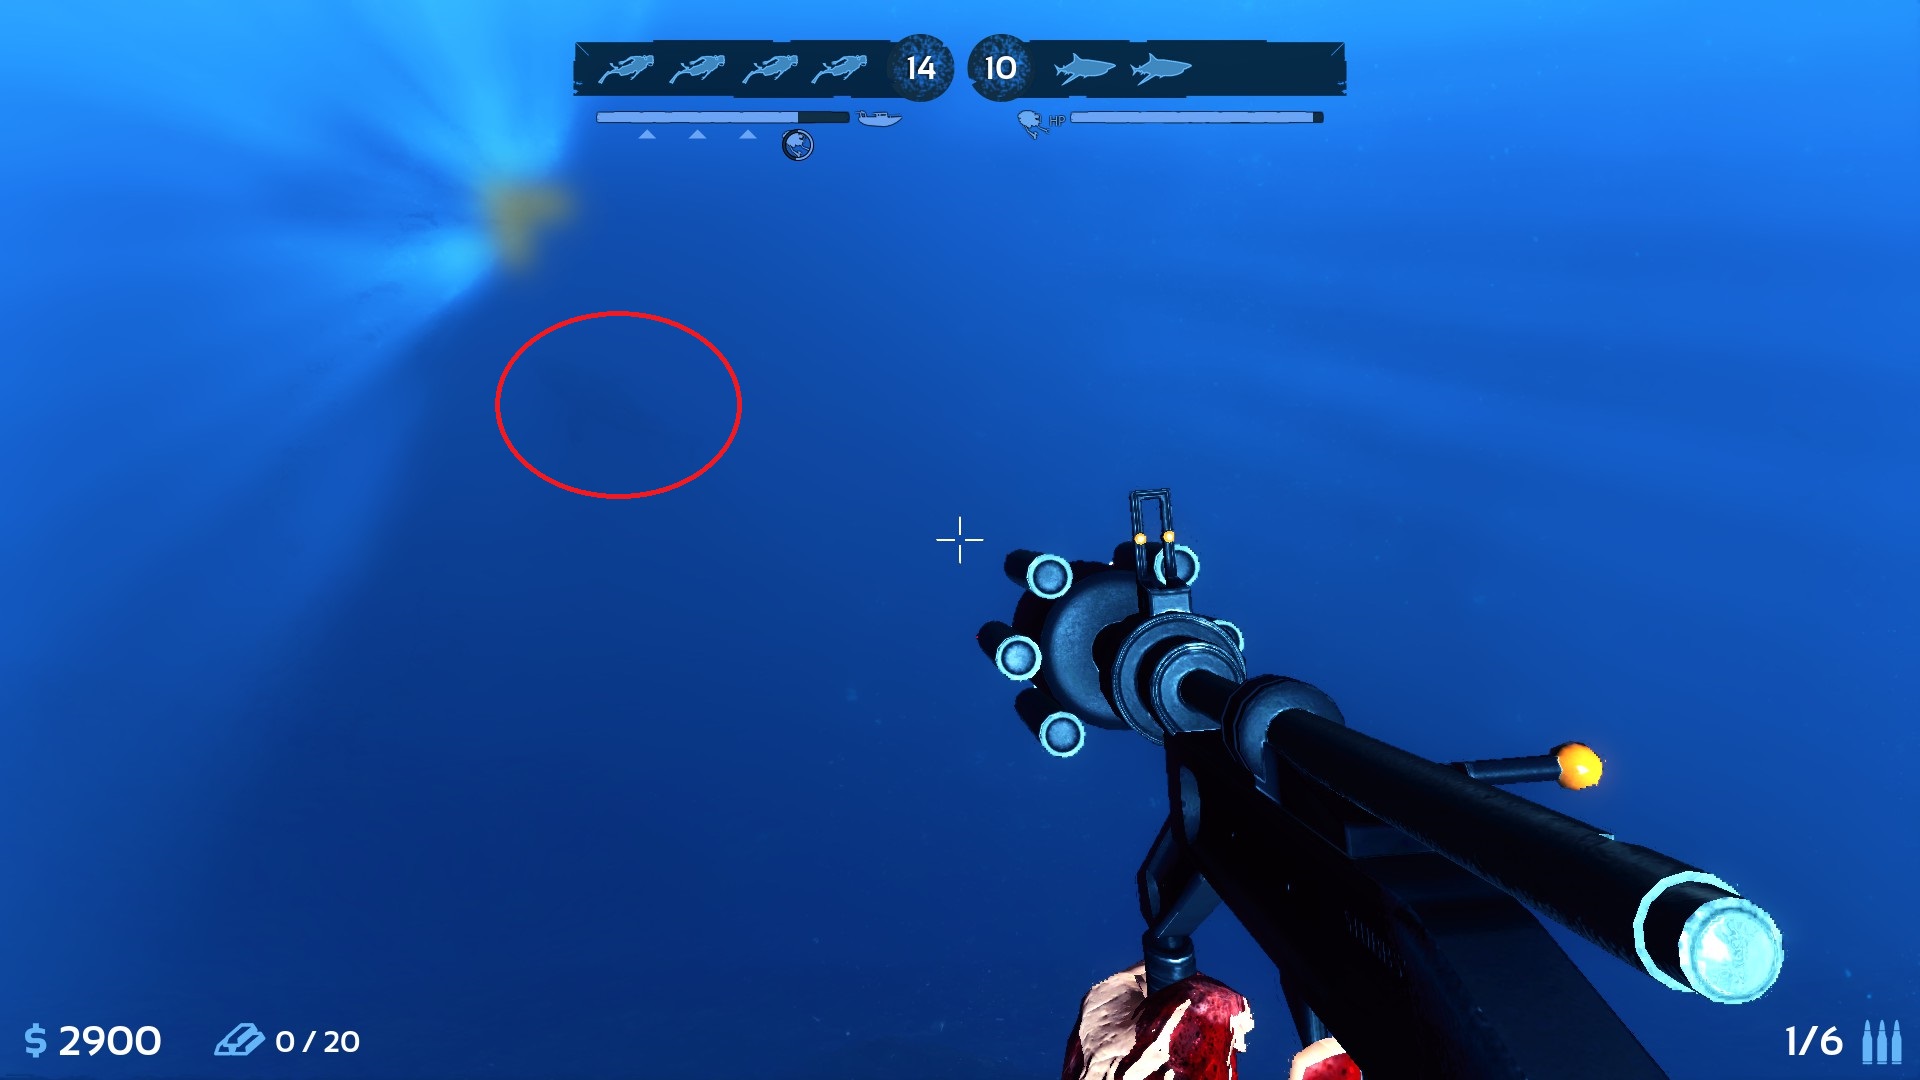
Check out this example from one of my diver games. Can you spot the shark?


Okay, in case you absolutely can't find it, here's the solution:

This is a Great White by the way


As you can see, it's really not easy for divers to spot you, whereas as a shark this single diver in the ocean is basically like a big red beacon of meat for you to snack up. Use this to your advantage, for example by changing the direction from which you approach the diver. If you can tell he is looking in your direction, swim downwards or upwards and attack from there, or circle around and try to get him from behind!
2.1 A Word About Weapon Mods
I feel that I should say something about the newly introduced weapon mods and how they affect the sharks, what to do to counter them and such.

There are 5 different mods that the divers can use to make your life as a shark harder: Poison, Bleeding, Splitting Ammo, Stronger Nets, Slowing-Harpoon. I will go through each one of them and tell you how they affect your shark and what you can do against them.

The skill that counters almost all of these mods is Placoid Scales (30 Points). I do not recommend buying it at a specific time in the later sections of the guide because the need for this skill is completely situational. If you find all of your enemies using poison, bleed and the like and you can't get a kill, then get it early. If they're not using it at all or you don't have a problem despite them using it, you can opt going for other skills instead.

Poison
Poison is annoying, but can be dealt with if you know what you're doing. You recognize it by a sizzling sound, your screen getting a greenish hue and your life bar turning green and diminishing slowly. You can instantly cure yourself of this by eating a seal, if you manage to reach one in time. The duration of the poison is calculated relative to how many times you have been hit, i.e. the more times you got hit, the longer it takes for the poison to vanish (which may or may not kill you in the process). Poison is designed to be an anti-tank damage over time mod, which should deal with the large HP pools of sharks like Hammerhead and Great White. This means, however, that as a Mako you can die pretty easily from it, since the initial bullet damage is often enough to put you in the low health region. There are two ways to reliably counter poison: Placoid Scales (see above) and Blood Feast. When you're poisoned, the poison will keep ticking until the effect of Blood Feast kicks in, at which point your health bar will start filling up but remain green, meaning that the general healing of the skill is reduced. It will keep ticking until the effect wears off (or you eat a seal).

Bleeding
Bleeding is harder to spot. You can see thick clouds of blood around your shark and you will hear a gurgling sound when trying to Sprint or Dash, with your health bar dropping rapidly when you do. When this happens, move normally (don't dash, don't sprint!) and you won't lose HP. However, smart divers will know this and might chase you down because you're significantly slower now. This skill is of course a hard counter to the fast sharks such as Mako and Thresher, but it affects and annoys all sharks equally. The agile sharks just get punished much harder for dashing while bleeding because of their low overall health. The way to counter this? Blood Feast and good gameplay ;)

Stronger Nets
This is an upgrade for the net gun which makes the nets more durable and thus harder for you as a shark to shake them off. Effectively this means you will be held in place for a significantly longer time. There is no real way of countering this other than Placoid Scales (although I have to admit, I am not sure if the skill actually applies here, so take this with a grain of salt) and shaking your mouse like a madman. The only shark not to be affected too much is the Great White, because level 3 of his passive enables him to ignore nets. If you're any other shark, try to avoid the nets as good as possible through good movement or try always grabbing the net gun-diver first.

Slow-Spears
This is an attachment for the spear gun (and pistol, I think?) and basically it's a spear with a parachute that deploys and stops your shark in his tracks when he tries to dash. You will barely be able to move forward. The tricky thing about this is: Divers can mod spears twice, because the Parachute-Attachment goes to the back of the spear, which means they can still apply a poison or bleeding mod to the front. If you get hit by a slowing poison spear, you're going to have a bad time. Again, the only chance are the scales or Blood Feast. And you have to hope that they don't follow you, which good divers probably will. The upside however is that it is pretty rare for the average divers to use it. Lucky us.

Splitting Ammo
This ammo splits up into several bullets, which on their own do less damage but of course spread out, making it more likely for the diver to hit something. This ammo is good against fast moving sharks and those who are hard to hit, like the Thresher (that wiggle, so distracting!). There's no real counter to it (scales won't help, as there's no effect attached to the bullets), but this type of ammo is also rarely used by average divers. And even if they do, if you play well you won't be bothered by it. Nothing to worry about here.
3. Getting to Know Your Shark: General Info
WHO IS YOUR SHARKY, AND WHAT DOES HE DO?

The next step in learning how to shark is of course getting acquainted with the sharks themselves, your razor-teethed, ferocious apex predators of the deep sea.

General Knowledge

If you trade 1 for 1 as a shark, it is usually worth it.
This does not mean you should always go ham and die though. If you can manage to get away with your life, always try to do so.

It is wise to watch the divers and how they move.
Doing this enables you to predict what they might do next, for instance swim next to a tunnel, window, or hole where you could dash through and grab them. Always go for exposed/isolated/stupid divers if possible. Make sure to use C and Space to move the shark upwards, downwards without having to move the mouse or change the shark's general line of sight or getting out of the diver's vision!

These two screenshots should give you an idea of spots you can use to observe the divers safely. If you see an opportunity to get a diver, you can go for it, or you just wait.


The diver on the left is currently grabbing treasure, as can be seen by his posture and looking at the ground. Notice how STEVE is situated to the right, so if he wants to bank the collected treasure, he has to swim towards STEVE, which you can use to dash through the tunnel, grab him and swim through the room and out the other side. Also notice how my shark colleague is visible at the far end of the picture, he was doing the same strategy, just from the other side.


In this example, notice the location of the divers. The one on the bottom left is the one I would go for in this scenario because the cave they are in has a back exit which I could swim into once I have him. Alternatively, you could try to grab one of the other two divers because their attention is currently focused on my fellow shark, who is trying to get out of the cave alive. This can be used to your advantage!

Mines are your friend. Embrace them.
While this might sound weird at the start, the logic behind this statement is simple. Mines are incredibly annoying if you swim into them, but they also pose a very high risk for the divers. Many divers stupidly stack mines in confined spaces, which you can use to your advantage. One common strategy divers use is to put mines into all the entrances. This doesn't stop you if you're a good shark. Just swim into position and dash above or below them. This usually triggers the mines and if you timed your dash right, you do not even take any damage. It works easiest with the Mako, but the other sharks can do it just as well. Make sure you don't touch the mine! Many divers make the mistake of hiding behind mines only to be blown to pieces after a shark swims past them. This is extremely devastating for the divers because one mine can kill the entire team, which is always worth it, whether the shark survives it or not. Also, every mine that explodes without killing a shark is a waste of money for the divers that delays them from buying better guns.

Second, mines are your friend also because they can help you save a botched kill attempt. Say you grabbed a diver and are trying to kill him with your mouse movement, but you are taking a lot of damage and realize that you probably will die before you get the kill. You remember that one mine that someone put up next to the door? Just swim or even dash INTO it. This kills you, but it also kills the diver, which is better than anything else you would have gotten in that situation. You also have a chance at getting even more kills if other divers swim close to the mine or there are several mines that set off a chain reaction. The mines also damage and disable STEVE if they are too close to him, which also gives you points.

There is no rush. Patience is a virtue
What this means is that sometimes, you just can't get any kills no matter how hard you try. This can have a number of reasons, such as divers with good aim, good protection through shark shield, mines, buoys and flares or just you having a bad day. Don't try to force it at this point. Wait patiently and stay near, so divers know you are waiting but can't see you. This will deny them from going around searching for gold and getitng a bigger bankroll. Wait until STEVE is done and then try to go in when he is in transition to the next room. It's almost always a guaranteed kill if you swim towards the moving STEVE and pull a diver into the different direction (for example in the tunnels in Olmec or Crude!). Because you are quite fast (or tanky, depending on the shark), most divers can't react to this surprise attack fast enough to prevent you from eating one of them.

3.1. Getting to Know Your Shark: General Info Part 2
Always take away their vision
. This point is quite simple. Whenever there are sonar buoys somewhere, swim right up and eat them. You can also do this when you have already entered a room and can't get a kill, but don't want to waste a life or your time in there. Remember, most divers are easily disoriented. The only reliable way of establishing vision are flares, since those can't be eaten by you. Anything else should be fair game and you can and should prioritize removing them. This also goes for Shark Shields. Those things are quite useful because they can make a room a death trap if the divers play it smart, place mines in the entrances or even next to the Shield and position themselves in the corners of the room. BUT, most divers don't really do that. A Shark Shield is quite expensive (500-600 $ I believe), which is a lot of money for the divers, especially at an early stage of the game. If you manage to destroy the shield quickly after it has gone up and manage to survive, you scored an important point by hurting the divers money reserves. That's 600 $ they have to wait for and which they could have used to buy better guns or different vision tools Since the Chivalry vs. Depth Update, Shark Shields spawn automatically if the divers are behind more than 8 lives. That's annoying, but as you can easily destroy the shield, you should always try to do just that. Especially because the auto-shield means you are ahead by 8 lives, which should enable you to easily remove it.


Always use your time
Let's say you find yourself in a situation where you can't enter the room the divers are in (because it has shark shield, ♥♥♥♥♥♥♥♥ of flares, buoys or whatever). You decide it is wise to wait until they move to the next room, which is wise, but whatever you do, DO NOT JUST SIT THERE. As soon as you played the maps a couple of times you get a sense for the route STEVE will take. Prepare the next room by ramming everything you could use as an escape route. This means breakable ceilings, walls, floors, doors. Whatever you can find. One plus side to this is that it gives you points for your score. The even bigger advantage, however, consists in a room the divers HAVE to go into that YOU prepared to your liking. Opening up walls and doors means you have more than one option to dash through and drag that helpless diver outside to his doom. It also makes the divers feel less safe or seduces them into swimming close to the holes, where you can easily pick them off. You don't even have to destroy all the walls, some you might even want to leave partially intact, so you can ram and destroy them with one hit and burst into the room. The divers sometimes do not notice this and will sit in front of that wall, which you can use to get a surprise grab and possible kill.

Always change direction
This applies to any shark, albeit some of them are better at it then others and it is harder to do without the use of Powerful Tail. In general though, you should try to move with your shark at all times. If you managed to grab a diver, thrash your mouse to kill him while simultaneously pressing Shift and using the mouse and the WASD buttons to swim into a different direction. Be creative. Try to swim out of windows, behind pillars or walls, up, down, to the side or whatever. Also be ready to DASH as soon as you get the kill (if you still have stamina, that is. If you run out, try to at least use Shift and swim faster with the stamina regen that is going to kick in, it can make the difference between life and death). You can tell when this will happen by the indicator-crosshair turning into a dark red. If you dash, try to change direction as well! Dash into the ground or into the ceiling. What is important here is to change direction and make it harder for the divers to hit you, which is hardest when you do not swim in a straight line. This is even more important late game, when the divers have Harpoons or Assault Rifles. Try to get out of the line of fire/sight as fast as possible and get behind any cover you can find. The best way to do that is to change direction as rapidly as possible, imagine as if you're moving in zigzags. It's hard to visualize this with screenshots, so I might upload a video of it at some point (if I can figure out how to record/edit etc). Or you're welcome to just watch my Broadcast. Every time I play I'm also streaming, so you can just hop in and watch it via the Steam Broadcasts :)

Learn the differences between being behind and being ahead
This is especially important against skilled, disciplined divers. When a game goes well, you will quickly be ahead like 5-6 lives, which is already pretty comfortable lead. However, remember that the divers have their powerspike (in terms of how fast they can kill you and how well they are equipped) towards the end of the game.When you're ahead 6 lives or more, it is okay to waste a life of your own, whether it's because you tried something new and it failed or you swam in just to remove a shark shield.However, always try to get a kill. Don't waste lives, ever, if you can avoid it. This is important because giving up a mid-game lead of 5-6 kills because you start getting cocky and go in without regenerating HP or try fancy/troll stuff and die can quickly turn on you when the divers start getting better gear and kill you when you were hoping to get something and survive.
When you're behind, patience becomes an even bigger virtue than usual. If you're even on lives, don't waste any life without getting something for it. It can cost you the game. Let's say you're both at 10 lives and the divers still have 1 room to go. If you start rushing into the room they're currently in, which might be full of sonar buoys, flares, or a shark shield and they're positioned well, every unnecessary death will push you closer to the edge of losing the game. If you're behind, that is even more so! If you have less lives than the divers, try to wait and only go for 100 % secure kills! Do not waste any more lives trying to do something fancy. If they have buoys and flares, try to stay far away or in a corner where it's absolutely certain they can't see you and hit you with a harpoon or assault rifle. Wait for your shot. This comes most of the time when they're transitioning to another room or making their way back to the cage. Remember: As shark, you are strongest in open water. If you're behind, use that transition phase to get as many kills as possible without dying. Swim in, grab one, kill him, swim out. Rinse, repeat. Don't go in without full HP or at least 75 %. (except maybe if you're Great White with E acitve, or Hammerhead) Try to analyze the direction the divers are looking and swim in opposition to it. Do some fake attacks, where you come from a direction they don't expect, but don't hit anyone. Another strategy here is to ram and disable STEVE, which is something you can do to buy yourself (or your shark colleague) more time to grab helpless divers. But don't do it too often and don't do it if you're not sure you can get away with it. If you die in the attempt, it's not worth it, unless they're literally seconds before reaching the magnet that grabs STEVE and wins them the game.
I know this might sound very hard to adopt and use in a game, but from my experience, 60 % of this playstyle is a matter of experience and intuition. Once you've played enough games, you will know what to do, almost instinctively. If you notice your fellow shark wasting lives or not waiting like you do, communicate with him. Tell him "let's wait until they leave the room". If he won't listen, wait anyway and know that you're going to have to carry even harder. It's going to be tough, but it is not impossible!


4. The Mako
Killing at the speed of light

Let's start this out with the Mako, who is basically my favorite shark but who is also not an easy shark to master due to his extreme vulnerability. If you make mistakes as a Mako against even half decent divers, you are a dead fish 95 % of the time, which is why I would not recommend to spam Mako if you are new to playing shark. It is really not easy.

First, you need to know that the Mako is the fastest shark in the game and has the biggest stamina pool but only gets this for having the smallest health amount. What this means is that you need to play around your strengths perfectly, which in case of Mako means you need to abuse your speed as much as you can.

With the stamina of the Mako you can dash (right click) approximately 3 times. Important to note here is that the Mako loses stamina a lot faster when "sprinting" (which means accelerated swimming with Left Shift) than other sharks, which is why as Mako, you should always dash rather than swim. If you run out of stamina, move normally for a few seconds until it is regenerated. Compared to the other sharks, the Mako's stamina regenerates relatively slow, but that's because his overall pool is bigger.

His passive, when activated, marks the diver you are looking at with some bloody mist. If he is killed by you or your fellow shark during that period, you get 5 extra points for the kill. Basically the mechanic rewards you for doing your job well and accelerates your powerspike.

At the start of every game, dash towards the divers as fast as you can. Many divers tend to be afk or to idly swim away from the group to pick up treasure, not knowing or understimating how fast the sharks will actually reach them. This is almost always a guaranteed first blood for you and if you're fast, you can get up to 3 kills in the first 1-2 minutes of the game, which already puts you to a great start. However, this depends on how many times you get stabbed or maybe shot when doing it, so make sure you have at least 50 % life if you want to go in for a second kill. If not, you should go hunt a seal and regenerate health before going back in.

In general, you should not dive into a room where the divers are huddled up in one spot or occupy the corners, unless you are a) really confident in your play and control your shark perfectly and/or b) you coordinate your attack with your fellow shark.

If you manage to get out and notice a diver is following you, check your HP status. IF you think you have enough life to kill that foolish diver, don't swim away from him++. Turn one corner, turn your shark around and wait behind that corner until the diver swims into your line of sight. Then dash at him and try to destroy him. If you do it correctly, easy double kill.
Another possibility of outplaying the divers if they follow you is to swim away from them, but rather than just running away, turning a corner and circling back. A lot of times the diver will swim after you, but he is much slower than you, which can make it possible for you to circle around and come up behind him, catching him by surprise. This requires some knowledge of the different paths available on the map and also, sometimes, some preparation (by destroying doors/walls beforehand), but it is extremely satisfying. Show those divers who the is the hunter and who is the hunted!

Whatever you do, always remember that you are fragile and will die fast if the divers get a clear shot on you. The Mako is not a shark with which you can chain kills like it's nothing because the mere knife stabs you get while killing a diver already hurt you quite a bit. The ability to earn Double to Pentakills depends heavily on having Blood Feast and evading, which brings us to the topic of skills.


Skills

Do not buy any skills at the beginning of the game. Both the "cheap" skills you have access to at the start are not worth any of your points. Save them for a bigger purchase a few rounds later. By using the new passive with E and killing divers, you rack up those points pretty fast. If you find yourself having problems getting kills, go for Powerful Tail instead and build up from there. Remember that the most important aspects for Mako are speed, evasion and quick kills.

In general, I always rush Blood Feast because it enables me to survive close encounters with divers, turn around and get an extra kill if a diver is stupid enough to chase me and split from the group, and saves a lot of time because you don't always have to swim away and find those seals.

The following table illustrates how a standard game on Mako goes for me:

Skill Name
Buy Order
Blood Feast
1
Powerful Tail
2
Hangry
3
Nimble Finned
4
Blood Rage
5

The first 4 skills basically represent your core skills on Mako. If you have them, you have all the capabilities to carry the game and kill a lot of people. What comes after this is optional. I wouldn't recommend buying Adrenal Glands on Mako, since you won't survive long enough to make use of it. If I still have points to spend after I got the first 5 skills, I usually go for the Hammerhead and the Razor Fins, but it really doesn't matter that much anymore.

If you find yourself having problems getting Blood Feast, try to get Powerful Tail and build from there. If you still have problems after that, add Hangry and Nimble Finned. The most important task you have as Mako is get kills while not dying. If you get more than 1 kill with one life, you are very close to carrying the game already.

I also don't think evolving the passive is worth it. You don't really need the extended duration if you time it just right. You can just activate it right before you grab a guy and still get the bonus. Save your points.


Here are three Youtube Videos of me playing Mako. One is on Galleon, by far the hardest map to play Mako on. Only do this if you want a challenge (i would say against good divers your chance of winning is around 20 %, depending on your fellow shark)


5. The Tiger
Stalk the Shadows
Up next on the list is the Tiger shark. This shark is basically an allround pick and is quite well balanced. He has an equal amount of health and stamina, which means he inhabits the middle position between the fast and vulnerable Mako and the slow but incredibly tanky Great White or Hammerhead.

As always, the first thing to get familiar with is his movement. The Tiger regenerates stamina quite fast after dashing (faster than Mako even, because of his smaller pool), which is why you can dash approximately 2 times before you have to wait for a few seconds before dashing again. Try using both the shift and the right click movement and see what suits you best, but in general I would always opt for the dash, since it is just faster.

The next very important mechanic is his passive. When you trigger it with E, the Tiger turns basically invisible and is incredibly hard to see. Also, and this is important, he can not be detected by buoys or flares, which makes him the perfect sneak agent. Even if the divers have buoys and flares everywhere in the room, the Tiger can still swim right through the door, take a pick, and drag a helpless diver to death. It requires some practice, especially since at Level 1 the stealth doesn't last that long, but since most divers do not use a lot of vision tools early, you should be just fine. The cooldown of the passive is quite low, so I recommend you use it whenever you can.

At the start, follow pretty much the same strategy as you would with Mako, which is to get to the divers as fast as possible and try to get a kill. The Tiger will be somewhat slower because of his stamina limit, but you should be able to get there within a few seconds of the Mako if you do it right.

General strategy when playing the Tiger is pretty much the same as with Mako, although your passive gives you a bit more leeway in terms of when to swim in. If you activate it shortly before, you can just swim in without using any stamina, pick a target, dash at it, kill it, and possibly get out before the divers notice.

As with the Mako, if a diver follows you, remember that you are much stronger if you get him without him hitting you first. As Tiger, it is possible to get a kill with about 40 % HP if you are not shot in addition to the knife stabs you'll get from your victims. Use this knowledge to destroy any diver who thinks he can chase you for a revenge kill.

Skills


Skill Name
Buy Order
Blood Feast
1
Powerful Tail
2
Hangry
3
Blood Rage
4
Nimble Finned
5

The skills you should definitely get on Tiger are Blood Feast and Powerful Tail. If you have all of the above, you're already a beast to be reckoned with and the rest can be spent freely. Experiment around a bit or take what you think the situation requires. I do not think an early Nimble Finned is worth it because of the low stamina, it is however a good pick if you already have Blood Rage in addition, which enables you to dash around almost as fast as a Mako would.

Another important aspect not in this list is the passive. You should definitely maximize the passive, but when you do so depends on how the game goes. I would always go for Blood Feast first if I can, but if you find the enemy has a lot of buoys and flares and you just can't get a kill, consider leveling up the passive. I usually level the second stage of the passive after I got Blood Feast, Powerful Tail and Hangry, then see how the game goes.


Here's a video of me playing Tiger on Devil's Head. There might be more to come soon.

6. The Great White
They're gonna need a bigger arsenal


The Great White is the tankiest and physically strongest shark in the game. What this means is that he can take a lot of punishment (i.e. damage) before going down, but only for the tradeoff of having the smallest stamina pool and a quite long delay between dashes. It is harder for a Great White to rack up kills without taking damage because he is not as mobile as other sharks, but he makes up for it by being hard to kill, which enables you to get kills if divers are reloading or focusing a different target, but also opens up windows for your fellow shark to capitalize on if they focus you.

First off, the topic of movement again. The Great White loses a lot of stamina when dashing and it regenerates at a painfully slow rate between dashes. You can only dash once before you have to regenerate stamina to do it again. That is why he is the only shark on which I would recommend the Shift-Sprint as means of transportation close to the enemy. The reason for this is that if you use the dash all the time, you will arrive near the divers without any stamina left to do a kill-lunge, which can cost you valuable windows of opportunity to snack easy kills. Use the right-click dash to get away from spawn, but start shift-sprinting when you're getting closer to your target. The upside of his small stamina pool is that it regenerates quickly, but you have to stop using stamina completely for 0.5-1 second before it kicks in. As with the other sharks, do a couple of test lunges and sprints and watch your stamina bar to get a feel for how you need to manage your stamina resources.

As game stages go, because of his big health pool, the Great White is strongest early to mid game, when the divers are not well equipped yet and do not use nets to tie him down. You should abuse this. At later stages you can still take a considerable amount of damage if you activate your passive before going in. The last stage of the passive also enables the Great White to ignore nets, which is a nice bonus to the increased damage absorption it gives. I recommend leveling the passive at least 2 times, with the third being situational and depending on how your game goes.

Skills


Skill Name
Buy Order
Adrenal Glands
1
Hangry or Passive Level 2
2
Blood Feast OR Blood Rage
3
Ignore Pain OR Blood Rage
4
Passive
5

Before last patch and the rise of the Hammerhead, the Great White was the only shark that could profit from skilling Adrenal Glands, which only makes sense on a shark that has enough health to withstand damage. Because the stamina pool is limited, I recommend getting Adrenal Glands first because it gives you stamina and rewards you for tanking the enemy, which in turn potentially opens up possibilities for kills.

Getting Hangry second will allow you to dash around more often after spawning and thus be faster near the enemies. I sometimes even get Hangry first so I can be faster in the early game when the divers are at their weakest. This makes sense especially on big maps like Quarry, Galleon and Fractured.

Blood Feast is a very useful skill as well, but I wouldn't buy it first because as Great White you often get 1-2 kills (or even 5! :D) but won't make it out alive because you don't have the stamina to dash to safety, which is why the skill would be waste early on. Buy this skill only if you can make it out of rooms alive, otherwise it is not worth the points. You can alternatively get Blood Rage and Adrenal Glands first, which should make it easy to dash outside, but given that all three of those skills are pricey, it's not always possible to get them. You should decide which skill to take by analyzing the skill of your opponents (measured in how often you die when going in).

Last but not least, the passive. I mentioned earlier that I would recommend getting evolving it at least to stage 2, but I think it is very valuable even at stage 3. It does depend on how well your game goes whether or not you need it, so it is kind of a matter of intuition when to skill it or not. For instance, if you notice the enemy responds to your presence by using nets on you, get level 3 passive asap, because with it you can just ignore nets altogether, countering their efforts.
Generally I would always buy some of the expensive skills (50 + 60 points) if i can afford them, because having those makes it easier to get the 20 you need for upgrading the passive or other lower skills.

If you get the combination of Adrenal Glands, Hangry, Blood Rage and Blood Feast, you are already a serious problem for the enemy.


Here's a video of me playing Great White on Olmec

7. The Hammerhead
Hit 'Em with the Hammer

The Hammerhead is the newest shark in the game, but he is a very good addition in my opinion. His playstyle differs greatly from the other three sharks and because of his gameplay mechanics he is the perfect pick for confined spaces (i.e. maps like Galleon, Devil's Head, Crude, Cove).

The Hammerhead has the second biggest life pool in the game, which means he is almost as tanky as the Great White. While you do not lose any health from using the primary kill mechanic, which is grabbing divers and swimming into walls/doors or whatever obstacle you can find, the Hammerhead's damage when thrashing its head is the lowest in the game. If you don't smash your head into a wall, killing a diver takes forever and you will probably even die to knife stabs before you succeed.

In terms of movement, the Hammerhead seems to use less stamina for a dash, which means you can dash approximately 2 times before your pool is empty. A mechanic countering this, however, is the fact that he has a long cooldown between dashes, which at first makes him feel very clunky. Nevertheless you should use dash to get towards the enemies fast.

With the Hammerhead, it is more important than ever to keep moving when you grabbed a diver, as you absolutely need to hit a wall in order to kill the diver fast. The downside of this is of course that you sometimes awkwardly wiggle next to a wall if you didn't hit it in the right angle, which can lead to your death. The biggest upside of this mechanic, however, is the fact that you can dive into a room full of divers even with 30-20 % health and get at least 1 (or sometimes more) kill if you time your dash right and hit the diver into a wall with full speed, because that way they die almost instantly.

As Hammerhead, you are frequently starved for stamina, which is why it is important to level your passive. Activate the passive before entering the room, as hitting walls with it activated grants you small amounts of your stamina that you can use to dash and kill another victim in rapid succession to the first, if you do it the right way. On Max level, the passive even grants you small amounts of health when you hit obstacles, which,combined with its low cooldown, makes it possible to regenerate life without Blood Feast or eating seals. Just activate it and ram those walls until you're above 60-70 %, which usually suffices to get in and get a kill.


Skills

Skill Name
Buy Order
Powerful Tail
1
Hangry
2
Nimble Finned
3
Blood Rage
4
Blood Feast OR Adrenal Glands
5

As I mentioned, the Hammerhead feels somewhat clunky due to the delay on the dash and the mechanics of having to swim into walls. Because of that, I personally prefer to buy all the mobility skills early on, because they enable me to get kills more reliably and will help to get my shark nice and strong pretty fast. Hangry is used so you can dash more frequently and get kills faster and Nimble Finned counteracts the long delay on the dash. If you have Nimble Finned, it is barely recognizable.

Because the Hammerhead can easily get kills even with low life, Blood Feast is not that much of a priority. It is fairly common on this shark to go inside a room, get 2-3 kills by ramming them into walls and die after, which is totally worth it. You can however, consider playing a more careful style once you have the increased mobility. I would recommend getting either Blood Rage or Adrenal Glands, as both give you the much needed stamina. If you find yourself having problems to rack up the points to score either of those skills, just spend the 40 Points to level up your passive to level 3.
8. The Thresher
Get your hands off my treasure! (SMACK)

With the Whiplash update, the newest addition to the shark family is the Thresher shark. Strength-Weakness-wise he is situated somewhere between Mako and Tiger, which means he is agile but also quite weak. He sticks out because he has a flat nose and a really long tail, which he can use to slap people (by using E). His damage from thrashing is rather weak (similar to that of Hammerhead, but not quite as bad), but he makes up for the long time it takes to kill by wiggling about like he is having a seizure, which makes him extremely hard to hit, and also damaging nearby divers if they get touched by his enormous tail. Also, using his E near divers temporarily disables their flashlights, which is why the Thresher is great for teamplay, as he distracts the divers and opens up a window for your fellow shark to come in and wreak havoc in the confusion.

In terms of movement, you can freely dash around with the Thresher about 2 times before having to wait for a short period. His stamina pool is rather big so there should be no problem to get to the divers fast at the beginning. Make sure you have stamina left before engaging the divers however.

In terms of tactics, the Thresher shines most when he is able to slap people with his passive (E), and by "wiggling" in more than one enemy, damaging all of them. His passive can be leveled to destroy structures and consumables/shark shields and, this is important, you can even kill people that you already have in your mouth by pressing E, enabling you to finish them quicker. E has a relatively short cooldown period, so it's more than likely you will get it again while still having a diver in your mouth.

Because of his damaging tail, the Thresher shines most in confined, tight spaces, like Devil's Head, Fractured or Cove. Galleon works as well, but is the hardest map overall, and difficult to play with a shark who has a small HP pool. Always try to hit several divers with the tail (and timing it right is kind of difficult at the start, because of the third person perspective, which makes it hard to calculate the right distance of the tail when it lashes forward). This can be done both in a sense of "drive by", where you don't actually want to grab a diver but just slap them with the tail, doing damage and distracting them. It is possible to kill a diver just with the passive, but you have to hit them several times. Or you can go for a kill, in which case you should try to slap the diver you want to grab, because that already diminishes his HP (to around a yellow-orange color HP bar, when at E is at level 3) and enables you to kill him fast and (possibly) get out without dying.


Skills

Skill Name
Buy Order
Powerful Tail
1
Razor Fins
2
Passive Level 2
3
Hangry or Passive Level 3
4
Passive Level 3 or Hangry
5
Blood Feast
6

The skills for the Thresher are decidedly (and refreshingly) different from the rest of the sharks. I always get Powerful Tail and Razor Fins very early, followed by maximizing the passive and then going for Hangry and for Blood Feast (the rest is pretty much free to choose). The reason for prioritizing Powerful Tail and Razor Fins is because it enables you to do two things: a) make the shark even harder to hit because he now wiggles and dashes around and b) make it possible for you to dash into other divers while wiggling, and because of Razor Fins damaging them WITH YOUR WHOLE BODY. It is possible to get a quadra kill just by slapping grouped divers with E while dashing through them or dashing/wiggling into them while pressing E. The Thresher does indeed do that much damage.

The passive is of course leveled to maximize damage and after that you can take Blood Feast or Blood Rage in order to be even quicker. As with any shark since the new Update, Placoid Scales are an option if you find yourself being killed too often by Bleeding/Poison.


Here's a video I recorded while playing the Thresher on Devil's Head (more might be coming soon)


Here's another, more recent video, in which I give detailed explanations for the Evolutions and playstyle:


9. Shark Teamups & Maps
Work with Your Teammate and Give them HELL

Another important element when it comes to winning games is to know the territory and the intracacies of the maps. Depending on which map you find yourself on, there are different choices for shark teams that are viable. I'll give you a rundown of the different maps and what Sharks I usually choose there. If you are interested in how the win percentage is on each map, consult Kryptonite's guide (linked in the Introduction).

As a general rule of thumb: Consider the strengths and weaknesses of your shark AND those of your fellow shark. Unless you are both very skilled shark players or your enemies very bad, it doesn't always make sense to run a double Mako composition, especially against skilled divers. Try to find a good balance between kill potential and tank potential.

Antiguo

This is a map with failry big rooms and a lot of entrances, and escape routes. I personally love to play Mako here, but I think Tiger is just as strong. On this map you could get away with double Mako, but I think the strongest teamups here are

  1. Mako-Tiger or Hammerhead-Tiger or Tiger-Thresher
  2. Hammerhead-Great White or Thresher-Hammerhead/Great White
  3. Mako-Hammerhead
  4. Double Tiger or Double Hammerhead
  5. Mako-Great White or Mako-Thresher


Cove

This map consists mostly of caves, but the divers have to traverse an open area with a crashed plane twice, which is why you can also get away with Mako on this map. IF you pick Mako here, however, you need to be quite good at it and abuse your speed, otherwise you can easily get stuck in the smaller cave rooms and die. That's why it's crucial to prepare rooms by destroying walls and ceilings so you can get in and out quickly. Since the caves aren't that big, the second strongest shark here is the Tiger, as you can easily avoid all detection and grab quick kills if you use your passive well.

The strongest teamups here are

  1. Mako-Tiger (or double Mako, depending on skill level) or Tiger-Thresher
  2. Hammerhead-Tiger or Hammerhead-Thresher
  3. Double Hammerhead or Hammerhead-Great White
  4. Double Tiger
  5. Mako-Hammerhead or Tiger-Thresher
  6. Tiger-Great White


Crude

This is a sunken oil platform with extremely tight rooms and a lot of destructible walls. If you are very skilled you can get away with Mako here, but only if you manage to get in and out fast or drag divers through openings. Tiger and Hammerhead are the reigning champions on this map, as both can deal with divers that huddle up in rooms with a lot of detection devices.

  1. Tiger-Hammerhead or Thresher-Hammerhead/Tiger
  2. Double Tiger or Double Hammerhead
  3. Great White-Thresher or Thresher-Hammerhead
  4. Great White-Mako
  5. Tiger-Mako


Devil's Head

This is a flooded mine, which means it is very dark but also consits mostly of tunnels and tight, confined rooms with a lot of breakable walls and doors. Depending on the divers you can get away with Mako here, since the rooms are dark and there's a lot of obstacles and the Mako is hard to hit as is. However, if the divers are good you are going to have a bad time, so if you don't feel absolutely confident, pick a tankier shark. Because the rooms are so small, Hammerhead is the best choice here, with Tiger coming in second.

  1. Tiger-Hammerhead or Thresher-Hammerhead/Tiger
  2. Double Hammerhead or Double Tiger
  3. Great White-Hammerhead/Thresher
  4. Great White-Mako or Hammerhead-Mako


Fractured

You're in a massive sunken container ship that features 4 rooms that range from big (first) to medium (second and fourth) and small (third). There is one transition area where the divers are in the open which represents ideal opportunities for Mako. In general the Mako is a good pick here, as there are many tunnels and entrances that you can dash through to get in and out fast. As always, the confined spaces also make the Tiger and the Hammerhead viable. The Great White is an allround pick as always, but he doesn't have to be picked here.

  1. Mako-Tiger or Tiger-Hammerhead/Hammerhead-Thresher
  2. Tiger-Great White or Hammerhead-Great White
  3. Thresher-Tiger or Thresher-Mako
  4. Thresher-Great White
  5. Double Mako


Olmec

This is an old Aztec ruin that features a lot of large rooms as well as a numerous transition phases where the divers have to traverse the open waters. This is a beautiful map for Mako as well as Tiger, with the Hammerhead and Great White being viable as well.

  1. Mako-Tiger or Double Mako or Hammerhead-Tiger
  2. Tiger/Mako-Thresher or Hammerhead-Thresher
  3. Double Tiger or Hammerhead/Great White-Mako
  4. Mako-Hammerhead or Hammerhead-Tiger
  5. Double Hammerhead


10. Shark Teamups & Maps Part 2
Galleon

The wreck of a sunken Spanish galleon, this map features 3 very small and tight rooms, and 3 longer transition phases where the divers are completely in the open. This map is perfect for the Hammerhead and the Great White, with Mako and Tiger having a lot of problems in the phases where the divers are huddled up in the ship. If you play Mako you need a lot of patience and should only go in if you can drag a diver through a hole into the open water or you have to be very patient and wait for a transition phase.

  1. Double Hammerhead or Hammerhead-Great White
  2. Great White-Thresher or Hammerhead-Thresher
  3. Hammerhead-Tiger
  4. Double Great White
  5. Hammerhead-Mako or Great White-Mako.


Hillside

This newest map features a sunken castle with several very tight rooms and a lot of doors, windows, ceilings to smash through. The rooms aren't exactly as small as they are on Galleon, but still there are a lot of obstacles that you can dash against and be blocked, which is why you need to play this map very carefully. I have died numerous times because I frantically dashed into a pillar or some kind of ledge and got stopped in my tracks with no stamina. This is, once again, a map where the Hammerhead shines, but Tiger and Great White can dominate just as well. I would not recommend playing Mako here unless you are a very experienced Shark player and have played more than a few rounds as Mako, as the small rooms and tight spaces require very good movement if you want to get out alive. Similar to Galleon, only go in if you can securely get out again, especially as Mako. This does not apply to Great White and Hammerhead that much, as they are naturally tanky and divers tend to get disoriented themselves. There is one short passage where the divers have to cross over a courtyard and are in the open (it is between the first and second room), try to use that to your advantage. This means timing your attacks right, you don't want to be dead while they make the transition and miss the opportunity for easy kills! I'm guessing there will be another transition-open water phase once the divers return to the spawn, but to be honest, none of my diver enemies have made it to that point yet. I'll update that later once I know more ;)

  1. Double Hammerhead or Hammerhead-Great White
  2. Thresher-Tiger or Thresher-Hammerhead/Great White
  3. Hammerhead-Tiger or Double Tiger
  4. Double Great White
  5. Hammerhead-Mako or Great White-Mako. Tiger-Mako can work as well


Quarry


This is a community map which was made by one of the top players in this game, Gameo. It features a flooded quarry with a lot of up/down movement for the divers and a load of different tunnels and breakable walls. To be honest, I haven't played it enough to know every route you can take as a shark. It is definitely a confusing map, although when you have found your way around it it can be quite fun. Most of it takes place inside the mineshafts, so there are a lot of tunnels and small areas, which make this map really good for Hammerhead, Thresher and to some extent Great White (he is always a solid pick). Tiger should be mentioned here as well. Since the rooms are very small and the entrances are mostly tunnels, it is easy for the divers to establish vision with buoys and flares and cover all their sides. Because of that, I really like playing Tiger here, as the cloak from his passive enables him to get in easily and sometimes even to vanish from the diver's vision and hide behind a corner of the rooms. Mako is going to have a hard time here, but can be pulled off by a skilled player.

Teamups:

  1. Hammerhead-Tiger or Hammerhead-Thresher / Double Hammerhead
  2. Thresher-Tiger or Thresher-Hammerhead
  3. Thresher-Great White or Great White-Hammerhead


Stash


This newest addition to the map circus is set on an old nuclear submarine base. It features a lot of very spacious rooms, one vertical transition for the divers (between room 3 and 4), and lots and lots of grates that you have to destroy as a shark in order to get in and out cleanly. People have complained to me that the map is way too hard because they can't destroy the grates without being seen, but honestly, it's just a matter of doing it the right way. You can hit those grates (especially in the first room) by just swimming against the line where it touches the solid stone and still damage it (this also goes for walls and doors on any other map!). Playing this map requires one important piece of information, which is that these rooms have a lot of vertical space you can use as a shark which, despite giving you the feeling of being trapped, allows for you to hide long enough to escape a lot of times. In room 3 for example, you can hide at the broken staircase in the back of the room after killing a diver. They can't see or hit you, but you are in the room and can wait for the Blood Feast to kick in or until you see an opening. What can be problematic on this map are shark shields (always annoying, but even more so here, because the size of the rooms makes it hard to know where divers are), and the general power of flares and buoys. The divers can sit in a relatively safe room if they use buoys and flares correctly, and there's not much the shark can do about it. In this case, I recommend to just rush straight into the room, as oftentimes divers don't look in the "right" direction and won't even notice the short flash of a red-outlined shark.

As for sharks that work well here, the obvious answer is of course Hammerhead, because despite the size of the rooms, there are enough obstacles you can ram into. I also had a lot of fun playing Mako and Thresher here, because they are so fast it's easy to disorient the divers by dashing around and their speed often allows for you to get in and out easily. Also divers tend to group a lot on this map, which is perfect for an instant quadra kill with the Thresher ;) Because of the long ways to get to the divers, Great White is my least favorite here, as it takes forever to get to the buffet without Hangry.

Teamups:

  1. Hammerhead-Mako or Hammerhead-Thresher / Mako-Thresher
  2. Double Mako or Tiger-Thresher/Mako or Double Hammerhead
  3. Thresher-Tiger or Great White-Mako/Thresher/Hammerhead


If you want to find out how exactly to go about destroying grates in the first room, you can watch this video of me playing Mako on stash:


Temple

Temple is a very special map I would say, which is partially due to the fact that the starting area is really wide and there is direct sunlight there which makes the waters very clear and sharks easier to spot. This gradually gets worse when the divers proceed into the Aztec Temple, where they have to sit in numerous small rooms, tight passages and dark caves. The tight spaces later on make vision tools quite effective, which is why sharks need to learn the different ways of entering rooms and mechanics (= going in and out fast without bumping into stuff) play an important role. A lot of the rooms later on have high ceilings and a lot of vertical space, which allows you to maneuver easily if you know how to control your shark. Divers tend to wander off in search for the gold, which also makes it easier to pick them off here, and there are quite a few breakable walls and ceilings. Use those to your advantage. Because of the map geometry, I would say that the tanky sharks (Great White and Hammer) as well, to some extent, the Tiger have the best chances here. The Mako has trouble if he gets stuck in a room and focused down (meaning you need to be a skilled Mako if you want to pull it off) and the Thresher also might die easily due having little room.
11. Extended Video Section
I started recording videos of my gameplay a while ago and added some of them to the relevant sections of the sharks. Since I haven't gotten around to updating the Guide with the newest evolutions and maps yet but had some free time on my hands tonight, I decided to do a couple of commented gameplay videos. I have never done this before and I didn't follow a script or any kind of plan, so please bear with me. Most of the things I say here are just coming off the top and therefore I might sometimes lose my meaning or break off a sentence (this will surely improve with practice).

I will use this section to add videos with commented gameplay, and I'll try to make sure that I include at least one video for every shark (A longterm goal would be to have one video for every shark on every map, but these are quite a few videos to do and so I won't promise that this will happen very fast (if at all)). As always, leave me a like or a comment if the video helped you, if you have constructive criticism or just want to chat. Thanks for watching!


Here's a video of me playing Mako on Temple. I tried commentating the gameplay and explaining my plays and decisions while playing.


This is me playing Great White on Temple. This was a close one!


In this game I played the Bull Shark. Still trying to figure out the proper evolutions

12. Closing Remarks & Misc.
This is the end of my guide, for now. I am still testing out different builds and different strategies on the maps and I will definitely add some stuff when I get around to it, nerfs or patches happen or new content is added to the game. I also might expand the guide with screenshots for different game situations and different sharks, but right now I don't have those yet. Depending on how well this guide is received by you guys, I might do it :)

If there are any questions you might have, criticism of the guide, or if you disagree with my strategies, buy orders and descriptions and want to debate about them, just leave me a comment below. This is the first guide I have ever written, so it might not be perfect just yet. Any tips are much appreciated!


If you liked the guide or found it helpful, please remember to rate it! Any favorites are also very much appreciated!! Thank you! :)


Blessed be my readers!


Sincerely, Raptor Jesus


41 kommentarer
5 jun, 2024 @ 10:50 
S
Raptor Jesus  [skapare] 5 sep, 2020 @ 3:29 
For Blue, if i remember correctly, I went one of the two routes:

Either:
Max E, then powerful tail, hangry (core abilities), then go whatever feels good, usually Blood Rage, Nimble Fin, the Reset Ability (forgot it's name ;D)

Or:
Rush powerful tail, hangry, then max E, then go for Blood Rage, nimble fin, blood feast etc.

Because Blue is based on Mako, it's strengths really are the speed/quickness of its attacks. YOu can of course play a more laid back style and support other teammates, but since my shark mates in random queue mostly suck, I have to/want to carry myself, so I skill whatever is needed to do so
Raptor Jesus  [skapare] 5 sep, 2020 @ 3:29 
Hey @CptHuriGame

I know, I know. The guide is very outdated by now. Have to admit I kind of stopped playing, got burnt out somehow. But I still come back occasionally and i can still destroy games, so that's nice.

Perhaps I'll update it again soon, but since my guide was kind of sidelined by the other big guide written by several of the top 100 players, I wasn't too motivated.

CptXero 5 sep, 2020 @ 1:02 
I was hoping to see blue since i main that shark. i find blue is a great way to support teamates and to chain kills as mako with good coordination.
Raptor Jesus  [skapare] 27 maj, 2019 @ 5:33 
This guide is quite outdated by now bro, I wouldn't recommend the same stuff I did back then today, one example being Mako E.
Subway Shark 27 maj, 2019 @ 2:38 
sorry dude you should read it, its not just longer it also increases its points, at level 3 youre getting a marked target for 25 evo points, pair that with vitalized frenzy and every kill is 25 points, you can get every movement ability, and health regen by the late game
Subway Shark 27 maj, 2019 @ 2:37 
you lost me at "dont evolve your makos passive"
Barnie Blaha 13 aug, 2017 @ 15:53 
wtf lad, i want your hud

where is the secret to your hud

:awkward:
Raptor Jesus  [skapare] 9 aug, 2017 @ 17:24 
Sean is when of the best, if not the best, divers in this game. It can help you but it can't replace experience and being able to read the game. It takes practice, and games against groups of high level divers are diver-favored generally. Even small mistakes are punished hard

The guide is a bit outdated though and I should update it, but haven't got the time to do so right now.
Soap 8 aug, 2017 @ 15:16 
When i went against SeanXD none of this helped