Realms of the Haunting

Realms of the Haunting

32 ratings
All Maps
By Hamakei
This guide contains all the maps that can be found within Realms of the Haunting, stitched together for ease of viewing. Oh, and a map for the "brains" maze.
   
Award
Favorite
Favorited
Unfavorite
Introduction
For the most part, this guide just contains the maps that can be found within the game, but stitched together to make their navigation somewhat easier. I've also added some trivia to explain certain sections of the map or to point out interesting bits and pieces.

Though it's never stated directly within the game, we can assume that it was Florentine who made these maps, as he is the only character explicitly stated to be French, or at least to have lived in France for a period of time, and many of the comments on the maps are in French.

This would also explain why certain sections of the game are unknown to him, as they would require the shrive to explore.

We'll start with the mausoleum, since whilst you are in the house first, it's a fairly linear path down to the mausoleum and it isn't until later you have free reign of the house.
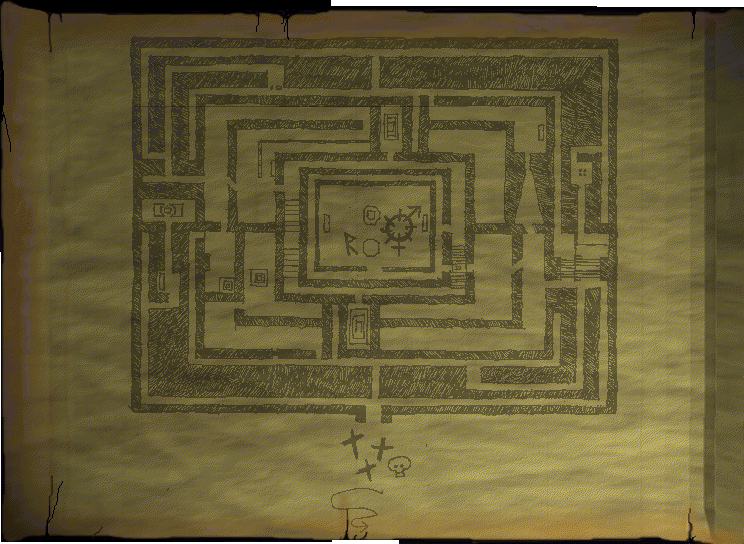
Mausoleum

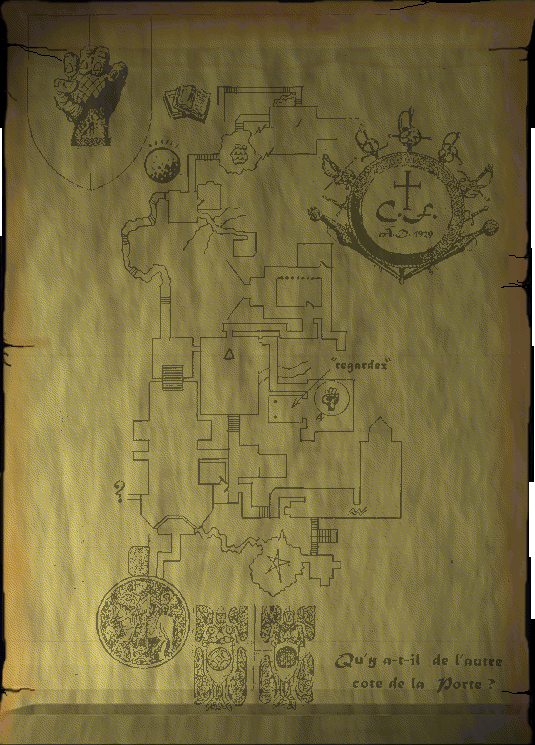
This map is found in the secret room behind the "globe door" in the mausoleum.

The mausoleum is located underneath the study, and it's entrance can be found behind the bookcase to the right of the desk. The study entrance is at the very top of the map.

It's curious to note that the secret passageway you have to take to return to the study is already on the map, so the creator was already aware of it and the cave-in.

The secret sitting room accessible by putting the sphere in the doorway is also on the map, as is the downstairs room where you encounter the shotgun shells.

The area where the shrive is collected is located off the left of the map, with only a question mark to denote it's location. This must be because Florentine was never able to proceed down the passageway as he did not have the branding Adam did.

What else? Erm... oh yes. The secret door that goes down to the celler and comes out by the branding room is on the map in the bottom-right, and Florentine has marked the map with "regardez" (look) where the "words of power" are located.

The shrine where you first encounter Aelf is off the bottom of the map. As you need the shrive to proceed through the double-doors, Florentine would not be aware of this. (The annotation reads "What does he have on the other side of the door?" or perhaps "What is on the other side of this door?")
House
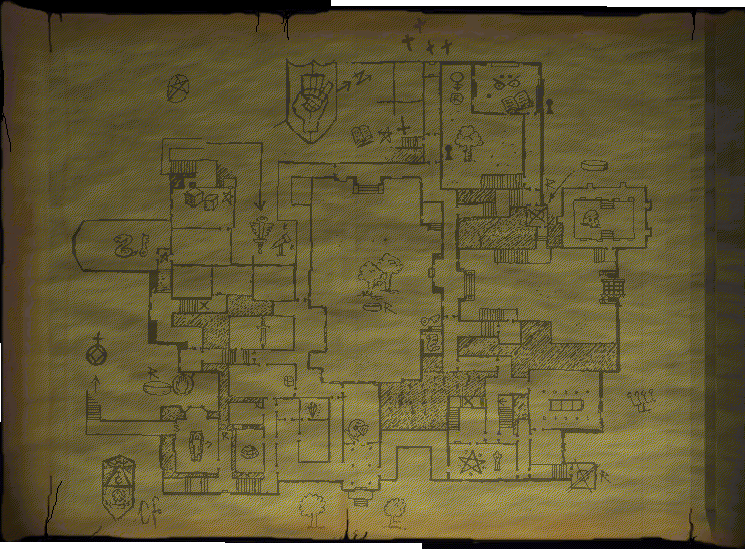
Found in a secret room adjacent to the dormitory. Move the chest to open the locker room, then push the brown tile down to open the secret door.

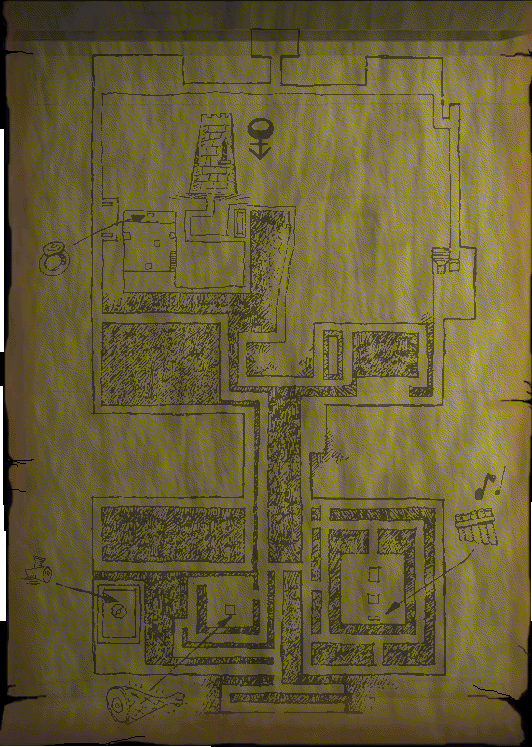
This is a big one, and it's probably good you don't get the full run of the house to begin with otherwise it could be a little intimidating. Note that whilst the house from the outside has multiple floors, you'll spend almost the entire time on the ground floor, with a couple of exceptions. I'll refer to the top of the map as N for ease of reading, even though the map says that's NW.

Okay, first of all, the front door is at the bottom of the map. The only place you can go to begin with is the foyer and then up to the study (denoted by the sarcophagus) in the bottom-left. The secret passageway down to Hawk's prison is marked. If Florentine didn't want people to know about it, why leave his map lying around? The sarcophagus will open when you place all the serpent statuettes around the base - to begin with you won't have them all - you'll have to complete the caverns and observatory first.

Once you have Florentine's cane, you can place it in one of the two slots on the side of the sarcophagus - one takes you to the observatory and one takes you to the mausoleum. Coincidentally, both these places contain a statue you may be missing.... :)

Once you return from your trip to the mausoleum, some of the glyphs break off and give you access to the lower-left of the house. From there, you can collect the Helmet (in the room just N of the entrance) - wearing this will give you access to a hidden cut-scene. The green crystal in the fireplace needed to get to the Gnarl's Realm is marked just to the left of there, and the green dome (which looks suspiciously like the Soulstone but isn't) is to the right of the study. The room above that where you collect this map is opened by shifting the chest in the dormitory two rooms up (the chest is marked on the map).

N of this room is an optional room marked by what looks like a sword. If you enter here, Rebecca will have a vision of Gaul arriving at the front door. Once you've seen this, a playing card will appear at the front door although it doesn't do anything. There is some ammo in here, and a couple of healing potions on top of the bookcase opposite the door.

To the left is your first plinth to access the Tower. This takes you half-way across the universe before depositing you...in the central courtyard of the house. The central courtyard is fairly simple, just collect the key in the pool of water, collect the scroll in the side room then leg it back to the plinth.

Once you've got the scroll, the rest of the left-side of the house opens up and you can get to the chapel (marked by the serpent and key). You need a statue to activate the moving platform to get the key, so I hope you didn't leave them all in the study. The key opens the little room with the lever N of here, and once that's done, the path to the Caverns and Observatory is opened up (marked by the angel wings).

When you're done with the Caverns, and the Observatory, you will then proceed under the study to catch your first glimpse of Hawk. Once you've said hello to Belial, return to the house and the right side will open up.

It's not too difficult to get lost in the house as a lot of rooms loop back round to the same few corridors, and many of them look alike. If all else fails, use the central courtyard as a guide.

The room with the pentagram is where you'll summon the beastie by lighting the candles. It's death gives you the white statuette which opens two doors [marked by keyholes]. It's possible to skip one of them entirely and go straight down to the Temple of the Morning Star (at the top, where the book and pentagram can be seen), but it also opens the door to the library at the top-right (where the eyes are). You don't HAVE to come here, but there's a few goodies to be found [including a map, I think] and also a "security spirit" to annoy.

Other interesting things to be found are the blunderbuss (located in the room with skull in the top-right, just N of the main gate). This is a very useful weapon, because whilst it's moderately powerful, it never runs out of ammo, and recharges much faster than your other "energy weapons". You have to kill the nasty in there before the secret compartment opens.

Dotted around the map are deactivated plinths. The one in the bottom right triggers a little cut-scene where Adam claims he doesn't know what "dysfunctional" means, but the one in the top-right doesn't do much. In the garden between the library and the stairs down to the Temple is a plinth which is also deactivated, but this one has a surprise and an interesting cut-scene so it's worth a visit.

Erm... the dining room in the bottom right (N of the deactivated plinth) has a couple of goodies on the table as well as some skeletons, and there is also a collapsed stairway N of the pentagram room. Go up the stairs as far as you can and look in the cupboard for a couple of items.

The door at the very top of the map in the centre presumably leads to the area where you burn Florentine's journals later on, but it never opens so don't waste your time trying.
Tower (incomplete)

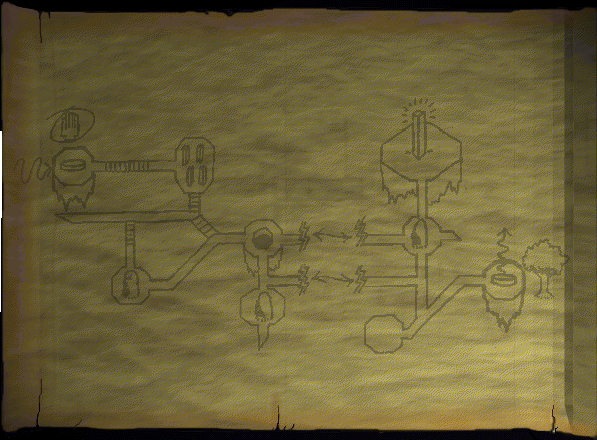
This map is complete, but that's what the item is called in-game so, yeah. Found on top of a bookcase in the room one up from the spinning sword lock.

This section is incredibly linear so you shouldn't even need the map. Check the Kudurus as you pass - I think one of them has a healing emblem you can use, and you won't be returning to this part of the tower again.

The entrance from the house near the chapel is on the left, and the entrance back to the house courtyard is on the right. Seriously - why bother with interdimensional travel when Adam could have just smashed a window?

Oh yeah. Don't fall off. Insta-kill.

This map is a curiosity, as there's something about it that's different from all the other ones. Give in? It's in pseudo-3D, unlike all the other ones, which suggests that somebody other than Florentine made it. Hmm..
Caverns

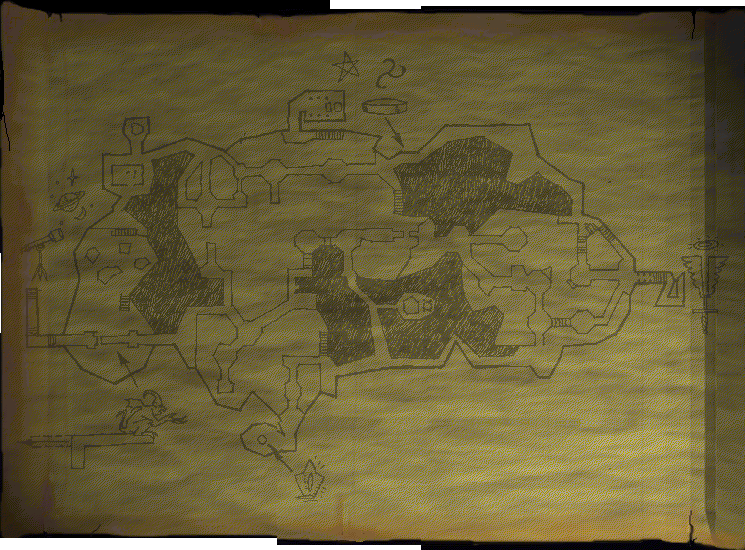
This map is found on a table in a room adjacent to the "typewriter" room. Can only be reached after you've been to the mausoleum.

The "caverns" are an area underneath the house, reached from the chapel (top left on the house map) after passing through the room where you first hear Hawk. They lead eventually to Florentine's observatory.

The entrance to the house is on the right hand side, where the angel wings are. This is presumably a reference to Hawk, which means that Florentine would have been aware that his spirit was lingering here despite the lock being far away.

The entrance to the observatory is on the left hand side, where the telescope is. In between are lots of dead ends and nasty regenerating monsters which can fly.

To quickly get through here, take a left and hug the wall until you get to the RED crystal (at the bottom of the map). Collect this, then backtrack to the cavern, take a left, follow the path round to the offering plinth, give it the crystal, and get out of there. You may end up stuck at the dead-end platform. In which case just turn round and hug the left wall.

It is possible to fall off the platforms, and if you don't drown there are stairs marked on the map to bring you back up again. There are also pools of green acid, and these will kill you very quickly if you touch them.

There are a few extra items to be found here if you want to take your time. First off is the BLUE crystal, found in a nook etched into the side of once of the walls alongside the ammo. Take it if you want, but DON'T present it as an offering. It will not be appreciated, and served no other purpose in the game. You'll come across a similar item in Raquia, but it's not the same item.

There is a teleporter in the centre of the map, in a room located inside the rock formation. This doesn't take you far, just to the room at the top, where you can collect a few items such as health and ammo. The little graveyard at the top left is also worth a look for collecting a few goodies.

You will not be returning through here, as a cave-in once you reach the observatory will prevent that. It is possible to return to the observatory later on though once you have Florentine's cane, as putting it into a slot in the side of the study sarcophagus will return you there. (It's in one of the nooks next to the big rectangular pool right by where you found a serpent).

It seems that the cave-in is coincidental though, as unlike the cave-in near the entrance to the Mausoleum, this one is not on the map.
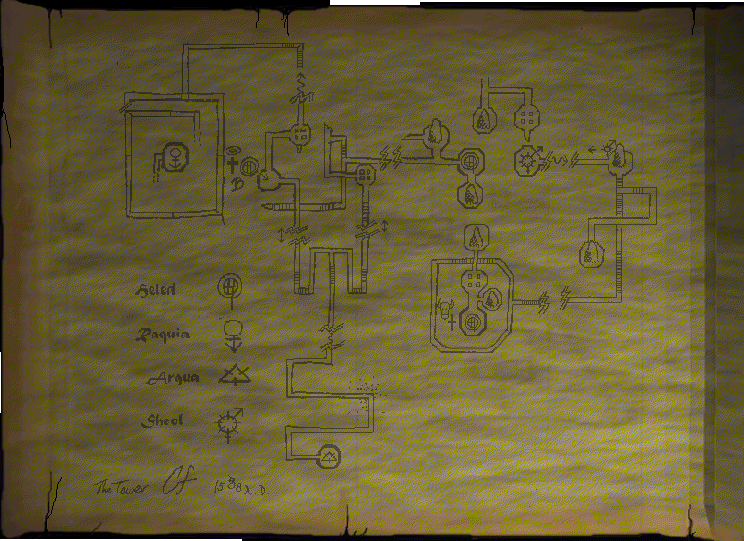
Tower (complete)

Found in Florentine's library within the house

Note that despite this map being called "complete", it doesn't actually include the Heled<->Heled section you'll have already traversed by this point in the game. Florentine lies! But then, what's new?

This map is apparently from 1588AD. Must be acid-free paper to have lasted over 400 years.

Anyway, there are two parts to this map. They can both be seen from each other in the game, but can't be reached directly. A "section" is an area contained entirely between light-doors.

The main body on the left is where you'll be spending a good deal of the game. The entrance from the Temple of the Morning Star is on the right hand side, where the Heled symbol is flanked by two rocks. There is nothing else in that section save a shimmery portal to pass through.

Various Kudurus have healing emblems on them, but you will be coming through here a few times so don't waste them. At first they will be guarded. Harmless beasts unless you get too close. Later on, they will have been killed and nasty things will be roaming the tower instead. They drop a healing potion when killed. There are also flying red bats which can be taken out with a fully charged Aelf's Sword.

The central section has a couple of bridges, and it is possible to take a short-cut if you're careful and know where you're going.

The entrance to Raquia for the Key of Tears is on the left, and is surrounded by a long, boring, rising pathway.

The entrance to Arqua for Eternity is at the bottom, and is reached by an even longer, boring, non-rising pathway.

The Heled entrance marked by the cross (centre) is deactivated at first, but becomes activated once Hawk is released. It'll take you to Adam's father's church, IIRC.

The other section on the right is reached from the Graveyard Maze, and is fairly simple. Follow it round, pass by the Sheol plinth (which won't work at this stage as you don't have Eternity) and make a small jump to the top section, where you will find your missing items. The Sheol gate will then work.

Oh, incidentally, the plinths to Sheol and Arqua have the item you need for entry etched on the base. Only Arqua will actually give you a verbal warning though, telling you whether or not you have the rite of passage. Raquia doesn't have a etching though..
Raquia Maze

Found on a table in Florentine's Observatory

Raquia Maze is one of the few mazes in the game you'll have to navigate twice (I don't count the Tower as a maze). The first time on your way to the tower, you may notice various items such as hedge-trimmers and squares etched into the floor. These do nothing, but once you have the Key of Tears, watch out. All the traps which lay dormant upon you entering will spring to life on your way out. These include:

  • Hedge-trimmers which try and give you a close shave
  • Trap-doors which open beneath you, causing fall damage
  • Metal spiked railings which spring up underneath you
  • Walls of spinning death which chase you down the passageways (Might only be one of these)
  • Hedges which lower and raise themselves in order to offer shortcuts. These don't hurt, but you may get disorientated and lost.

It is vitally important you collect all the items shown on the map BEFORE you approach the tower, as it is possible to get stuck otherwise. On my first playthrough, I got to the tower without the jewelled haunch, and without it there is no way to appease the robotic lion. Oh, and the gates shut behind you so you can't go and get it later.

The map is fairly straightfoward, and except for the nasties mentioned above (which only activate on your return) and the big hole in the ground in the top-right (but you shouldn't ever go that way) there isn't much that can hurt you.

Collect the earplugs first (help yourself), then the jewelled haunch (push the button next to the bench to lower the platform), then the panpipes (time your jumps), then lastly the spirit ring (time your jumps again).

As long as you keep the tower in sight, you shouldn't get too lost.
Graveyard Maze

The graveyard is fairly uninteresting, and apart from some sudden drops if you're not paying attention and some awkward right-angled turns where monsters can be lurking, there isn't very much to do but make your way to the plinth in the centre.

Of course, this map is glitched in the game, and you can put on the masks anywhere to get to the tower, including as soon as the chapter starts (Once you've burned Florentine's journals and gone through the gate to the next chapter).

The plinth will take you to a new section of the tower, on the right side of the "Complete" tower map.
Sheol maze
Ah-ha. This section is just cruel as the game-designers have you hunting for 16 brains through a maze whilst being chased, but don't bother to give you a map.

Apparently people have tried mapping the area before but AFAIK nobody seems to have posted one online yet. So I thought I'd have a go. Sorry for the poor quality - I'm working on a nicer one which I'll use to replace this when it's ready.


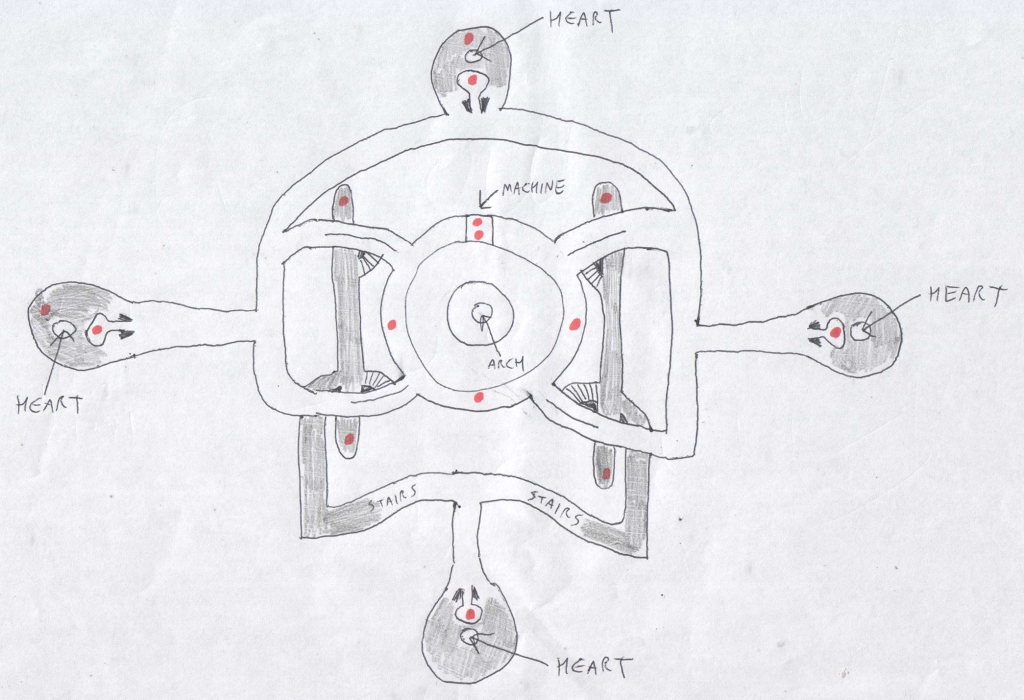
The shaded section is below floor level, and the 4'o'clock and 8'o'clock entrances both lead to bridges which overlook the lower section. The 2'o'clock and 10'o'clock entrances go over the lower section but don't have a bridge. Red dots are brain locations.

When speaking to people about this game, this seems to be the one section that has people absolutely tearing their hair out, as you can spend ages randomly going round and round in circles having no clue where you are. Personally I hated the third section of Sheol with all the puzzles more, but there you go.

Anyway, the objective is to collect 16 bright red brains (ick) and feed them to the machine which lowers the central plinth and allows you access to the archway again.

2 of the brains are found by the machine - one in front, and one hidden behind it.
3 of the brains are found lying around in the central area - just follow the outside wall without going into the tunnels and you'll find them all.
11 are hidden in the tunnels.

The tunnels themselves are comprised of a large tunnel, roughly semi-circular, which connects all four entrances [they are in twos but join up a few paces in so I'm counting them as one] from the central chamber. The entrances are at roughly 10'o'clock, 2'o'clock, 4'o'clock and 8'o'clock, with the machine at 12'o'clock. This semi-circular tunnel connects to three "Heart Chambers", roughly at 3,9 and 12'o'clock.

In addition, there is also a lower-level, which is where people seem to get very confused. The lower area is accessed by going down the steps just inside any of the four entrances (only one of the pair of entrances has steps, always the one facing towards the centre of the map. You can also jump off the bridges from the lower entrances, but that isn't recommended as you can get easily lost doing that, plus it hurts!

The lower-level has two passageways that run N-S on both sides of the central chamber, running underneath the entrance passageways. In addition, at their Southern end, they have off-shoots which run around and down to another underground "Heart Chamber". You'll know when you're approaching it because the passageway has a series of very wide steps leading up and then back down from it.

All these twisty, winding passageways contain 11 brains. 5 of them are in the overground "Heart Chambers" mentioned before at 3,9 and 12'o'clock. They all contain a brain on the pedestal, and two of them (12 and 9) also contain one on the floor of the chamber.

4 more brains can be found in the underground tunnels - one at each of their N ends, and one at each of their S ends.

1 more brain can be found on the pedestal of the underground "Heart Chamber".

This leaves one brain to be found. You have to manipulate the hearts to get this one, and it's not straight forward. The first time you come across a heart, you can look at it. Left-clicking doesn't do anything. The second time you come across a heart, you can left-click on it and Adam will comment on energy flowing through him. After that, you can click on any heart and Adam will say "descend." Once you've descended two (I think) hearts, the 16th brain will appear on the floor of the underground "Heart Chamber". I think it's two and always the underground chamber, but it's possible the game will vary this.

Hmm. On my most recent playthrough, there was already a brain on the floor of the underground heart chamber. Perhaps I just missed it. That would make the "descending hearts" mechanism optional...

Anyway, when you've fed the machine a nasty will be summoned. Killing him and searching the body grants you a scroll, which lets you back into the arch.
Other mazes
There are other sections of the game some may consider a maze or to be otherwise confusing, but they don't get maps.

Raquia tower
To get from the ground to the clockwork room you have to follow a rather confusing set of corridors, but just hug either the left or right wall and you'll find your way there eventually.

Halls of Doppelgangis
The halls are just two circles, one inside the other. The inner one doesn't contain anything useful, so just concentrate on the outer circles, smashing mirrors as you go. Don't forget the standalone room opposite the throne, which isn't connected to the circle.

Kaleidoscope
The room with the moving floor in the third section of Sheol can be a little confusing, but just hug the right-hand wall and you'll find your way to the button eventually!

Anything else?
4 Comments
Hamakei  [author] 14 Jul, 2017 @ 12:57pm 
A www...that's very kind of you.

I did ponder a lot of things when playing...I like how not everything is answered in the game.

But...I apologise my other guide is perpeptually unfinished. Steam ate half the text and I lost a lot of my incentive to rewrite it :/
Nilex 14 Jul, 2017 @ 12:45pm 
Another RotH guide by you :)
I like how you added a lot of your own side-notes rather than just sticking few .jpg one above the other. They're are very good too. Reminds me of old times when I used to walk to high-school with my friend and we shared our common experiences of the game we played at a time. There was no internet back then so it was the only way to broaden your own view of the game. And it made it that much more enjoyable to play too.
This guide is written is such a way that it evokes very similar emotions in that I play a portion and then come back to this to see how you played and hear your thoughts. Fantastic stuff.
¸מטסﬣ 15 Jan, 2017 @ 5:51pm 
cheers
MW2K 2 May, 2016 @ 1:42am 
Awesome. Thanks so much for this.