TinyKeep

TinyKeep

91 ratings
100% Achievements guide +Tips
By yah
100% achievements guide with some gameplay tips.
   
Award
Favorite
Favorited
Unfavorite
Introduction
I found that half the fun of TinyKeep is discovering the secrets and such, and I wouldn't want someone to straight out spoiler me of these things. Even if you're just going for the achievements, I'd tell you to consider trying to find out how to get them by yourself.

On the forums you can even find the developer on quite a few threads, making sure to give some crazily criptic advice on getting some of the achievements, and never being too obvious about it (awesome btw).

But hey, here we are.

Major spoilers below, be warned.

Level names
In this guide I often refer levels by their number, but this is not specified when going through the game normally (unless you know it by heart). Below is a list of level names and their respective numbers.
  • 01 - Pershdal Dungeons c.948
  • 02 - All Locked Up With Someplace To Go
  • 03 - A Bone of Contention
  • 04 - Orcward Silences
  • 05 - Sticks, Stones and Broken Bones
  • 06 - Funeral Finale
  • 07 - Sulphur So Good
  • 08 - Knock Knock
  • 09 - Alternate Demonsion [locked at first]
  • 10 - Freedom

  • 11 - Deja Vu
  • 12 - Something Wicked This Way Comes
  • 13 - The Lesser Of Three Evils
  • 14 - Elevated Expectations
  • 15 - Clash of the Titans
  • 16 - Bigger, Better, Bonier
  • 17 - Axe To Grind
  • 18 - To Hell And Back Again
  • 19 - Slay The Queen, Save The Dragon [locked at first]
  • 20 - I Have A Bone To Pick With You
Progress-related achievements
These are easiest achievements to get, most of them being story or progress-related, and unmissable if you're throughout during the game, which means exploring the whole area of all floors, and killing+looting all enemies at least once for the gold.

All of the achievements below can be gotten within the first 10 levels of the game.

———————————————————————————————————————————
The First Of Many
— Die the first time
Pretty straightforward, but can actually be missed at your first playthrough if you're THAT good.

———————————————————————————————————————————
Warrior
— Find a Sword
Find and grab a sword; the first level always has one, if not, the second does.

———————————————————————————————————————————
Defender
— Find a Shield
Same as the sword one: if not found on the first level, the second level will surely have a shield.

———————————————————————————————————————————
Violent Escape
— Kill your first hostile
Grab a sword, kill a dude. Prisoners might also count for this.

———————————————————————————————————————————
Saviour
— Release your first prisoner
Find a prisoner, go near their cage and press USE on the door to free them. Prisoners are found at the first type of dungeon (levels 1-3) calling for help.

———————————————————————————————————————————
Big Ballin'
— Defeat the first boss
The first boss (swordsman or archer) is located at level 2. Make him spawn by reading the letter on the exit gate, then kill him by any means necessary. Bosses are highlighted by a red beacon circling them.

———————————————————————————————————————————
Invasion
— Release the horde
Level 3 is the first level to feature an Invasion, which is mandatory to be triggered to progress. The achievement is awarded as soon as you start up the Invasion by using the skull pedestal.

———————————————————————————————————————————
Coinage
— Discover a treasure chest
A treasure chest room can be randomly spawned in the levels 1 to 3, and are easily identified by a small area containing nothing but a chest surrounded by 8 floor traps. Jump above the traps and claim your loot.

———————————————————————————————————————————
Penitent
— Sacrifice gold to the gods
Use a simple shrine, often found at the end of levels 1 to 3. Requirement: 15 gold, will award you with stat buffs and minor skills.

———————————————————————————————————————————
Big Spender
— Sacrifice gold to the higher gods
Same as Penitent, but for this you'll need to use a shrine that requires 100 gold to use, at least once. This kind of shrine will award you with a special skill.

———————————————————————————————————————————
Piñata
— Discover the hidden stash of gold
Thrones may spawn on any of the floors but special ones and on the first level. When you find one, simply beat up the skeleton that sits on it and you'll be awarded some coins + the achievement.

———————————————————————————————————————————
Crystal Cleanser
— Destroy your first crystal
Crystals are scattered throughout the whole game, and there is a total of 10 crystals. Always make sure to check every nook and cranny of each floor before proceeding to the next one. For this achievement, only one crystal needs to be found and destroyed. Check Sword of God's description for more detailed info.

———————————————————————————————————————————
Archaeologist
— Ascend to the overgrown surface
Reach the 2nd dungeon type (level 4).

———————————————————————————————————————————
Unstoppable
— Beat Level 5
Simply complete level 5 - Sticks, Stones and Broken Bones.

———————————————————————————————————————————
Dirty Cheat
— Disregard the principles of permadeath
After you complete a level, you have direct access to it from the character creation menu, which allows you to skip the levels prior. By simply starting a game at any level but the first one you're awarded with this achievement.

———————————————————————————————————————————
A Beautiful Moustache
— Grace the dungeon with an air of elegance and sophistication
At the character creation screen, create a Male character then switch heads until he has a moustache, any color. Right after you begin the game, the achievement is awarded.
Secret-ish achievements
Achievements listed below are a "tad out-of-the-way", so they require a bit of effort to get. These are mostly related to levels 11-20.

———————————————————————————————————————————
Magic Blocker
— Deflect a magical projectile
For this you'll need the skill Magic Blocker, which is acquired from a 100g shrine. After obtaining it, simply put up your shield to block one green bubble cast from either skeleton mages, the Chieftain or the final boss. Keep killing and exploring everything on the floors to have enough gold, then keep using 100g shrines until it finally gives you the required skill.

———————————————————————————————————————————
Portal
— Reach the Alternate Demonsion
Enter the portal from which the Demon boss comes out, at level 8 or 18 (pictured below). The portal closes up quickly (roughly 24 seconds), so you'll need to ignore all enemies (including the boss) and make a run for it. The boss room is always near the exit gate, as in, always to the north. Getting access to the Demonsion is a required step to get the Mother of Dragons.

———————————————————————————————————————————
Mother of Dragons
— Befriend a Baby Dragon
After entering the portal on level 8 or 18, you'll be transported to the Alternate Demonsion, in which you can find a room with the Baby Dragon trapped above a shrine and surrounded by 3 floating flaming rock clusters that instakill you. Evade the clusters and simply touch the Baby Dragon to free it. He's a familiar that follows you and shoots fire on enemies on NewGame+.

———————————————————————————————————————————
Elevated Expectations
— Discover the secret shop entrance
Gather 500 gold before entering the level 10, then use the special shrine at the east-most spot of the map (requires 500 gold) to receive the Lost Manuscript. With the manuscript in hand, you can enter the secret shop which you first found at level 4, which means you'll need to choose the "do-over path" when dealing with Maggie. So, grab the sword, keep playing until level 14 and find the structure pictured below: examining it and entering the passage nets you this achievement and leads you to the secret shop. Having access to it is a required step to get Brains.

———————————————————————————————————————————
Maggie's Wrath
— Incur the wrath of Maggie
At level 10 - Freedom, ignore Maggie and keep hitting the USE button on the sword next to her. She'll get angry; you'll get the achievement and some déjà vu. Getting this achievement is a step towards getting all the other ones listed below.

———————————————————————————————————————————
Lord of Time
— Master the ability to bend time
You can achieve this by using the Manipulate TIme skill obtained from a 750g shrine. This type of shrine can be found on levels 12 and 13. After you buy it, use it by pressing the SPECIAL button and you'll get the achievement.

———————————————————————————————————————————
Blade of Fire
— Discover the Flaming Sword
A special shrine gives you the Blade of Fire for 750 gold. This type of shrine can be found on levels 12 and 13.

———————————————————————————————————————————
Acid Bath
— Find a use for that damn acid cauldron
After acquiring the Blade of Fire, find the cauldron again and examine it to imbue your sword with magical liquid and get the achievement. The damn cauldron can be found on Level 13.

———————————————————————————————————————————
Brains!
— Resurrect from the dead
In the secret shop (see Elevated Expectations) there's a special shrine that gives you the skill of resurrection for 1000 gold. Buy it and later die once to trigger the achievement.

———————————————————————————————————————————
Sword of God
— Unlock the Final Weapon
First, you'll need to destroy all 10 crystals. You'll find 7 of them on the normal floors, two of them on the Alternate Demonsion (check Portal's description to get info on how to access these levels), and the last one is dropped by the final boss at level 20. Once a crystal is destroyed in a run, it'll stay destroyed for good, among all runs, and you can visit a level, destroy its crystal and quit: it will count. After destroying them all, visit the party (by killing the final boss) and you'll find the sword near the exit with all 10 crystals surrounding it. Examine it to unlock the Sword of God and the achievement. This powerful sword can be used on NewGame+ and it's granted to you right from the start.

The levels that contain crystals are: 03, 05, 08, 09 (demonsion), 12, 14, 14 (inside the secret shop), 18, 19 and 20. As you have so little time to get to the Portal on levels 08 and 18, you'll probably need to go through these levels more than once to get all crystals.

———————————————————————————————————————————
Developer Access Only
— Access the developer's office
After killing the final boss at Level 20, you'll enter the party, on which floor you can find a different, modern door. Tip: "Access denied. Only Phigames and TinyKeep staff are permitted entry!" Solution: when starting a new game, input Phi Dinh as your character's name. Also remember that you can start from levels you completed, in this case, level 20. Entering the room awards you the achievement.
Ending-related achievements
All different endings in one section.

———————————————————————————————————————————
You'll Miss Me When I'm Gone
— Leave Maggie behind in the dungeon
On level 10 - Freedom, ignore Maggie (she needs to be alive) and go through the shining door to escape.

———————————————————————————————————————————
Backstabber
— Give your friend and ally what was coming to her
On level 10 - Freedom, kill Maggie.

———————————————————————————————————————————
Party
— Witness a Dungeon Party
Kill the final boss on level 20. After the credits you'll enter a special place and get the achievement.
Special runs achievements
Achievements that require you to finish the game (at either level 10 or 20, your choice) with different handicaps. They're ordered by rarity at the time this is being written. All of them can be accomplished on New Game+ if it's unlocked.

———————————————————————————————————————————
Meagre Vegan
— Complete the game without eating a single piece of food
You can't pick up any piece of food or potions. Remember that at the end of every floor your health is replenished. Escaping the dungeon at level 10 is enough for this achievement. This can be achieved in conjuction with the New Game+ achievement, so you can skip on worrying about this achievement if you plan on finishing the game on NG+ mode.

———————————————————————————————————————————
You Can Block?
— Complete the game without a shield
Simply don't pick up a shield and end the game on level 10. Beware that shields spawn at least until the level 5, picking it up WILL deny you from getting this.

———————————————————————————————————————————
Immaculate Challenge
— Complete the game without being hurt at all
Be untouchable, be the wind, never get hurt and end the game on level 10. Read the tips section down below. Probably the hardest achievement of the whole game, as of yet.

———————————————————————————————————————————
These Glorious Few
— Complete the game without using a shrine once
Special run: the least demanding run of all of them. If you speedrun it, you probably won't have enough currency for any shrine uses, thus making this pretty easy not to screw up. Trying to use a shrine without enough money won't forbid you from this achievement.

———————————————————————————————————————————
BigKeep
— Complete the game in New Game+ mode
Basically another special run, this time with no healing options: no food, no potions, 10g shrines won't grant you Body Fortification (which fully heals you), 100g shrines won't give you Regeneration nor Blood Exchange, and you will NOT get healed at the start of every floor. In other words, pretty difficult. However, if you get the Baby Dragon and Sword of God achievements beforehand, this becomes a simpler task... unless your dragon needs glasses, like mine does, and shoots a wall trying to snipe some fire-proof demons 3 rooms far away on level 8, which sets you on fire for the third time and takes away the 10% of life you had and you die and you rage and %#FC!$% and you go outside to take a walk and you come back to reset your data and get rid of him, which ends up being so worth it as you finally get this on your first try.
This story thingy can't be reproduced anymore, as the developer have added a fire immunity to the player when assisted by the Baby Dragon. Yay!


———————————————————————————————————————————
Pacifist
— Complete the game without directly killing any enemies
Now this is where the game gets quite fun. As you're not allowed to kill anyone directly (as in, with your sword), you'll need to circumvent all enemies, and lure bosses into traps. See the tips section below for more help.
Tips for speedrunning / special runs
Basic - movement
  • Sprinting = greatest ally.
  • Jumping = 2nd greatest ally, you don't wanna get stuck on debris or corpses while a boss pursues you.
  • Always take advantage of the nature of the camera of the game + your display's resolution. Widescreen monitors display more to the sides of the character, and so tilting the camera 45° degrees or becomes the most effective way of using it.
  • With the 3 tips above, the default thing that someone would see on a run is the camera tilted with the character sprinting diagonally and jumping like crazy.
  • Sprint+dodging > blocking. Might be riskier if you don't master it.
  • Never run backwards. Sprinting forward and moving the camera to dodge attacks is the best option.
  • Remember that blocking or being damaged might reset your sprinting, so make sure to re-press your sprint key. Forgetting this might cause rage-inducing situations when fighting melee bosses.
  • You can easily jump across floor traps and on top of arrow traps to evade them, but the same thing can be done by most chasing enemies (although with less finesse). When being chased, jumping floor traps, stopping immediately and facing the enemies with your shield up is f-u-n.
Basic - levels
  • You always start at the south-end of the floor and the exit is always at the north. This is best observed on a 100% fulfilled map, even though there aren't any markers for entrance/exit.
  • Remember that completed levels are available to selection at the character creation screen. You can always replay some difficult floors (namely 5 and 6) to get prepared before a full special run of the game.
  • On the 1st dungeon type, you can find prisoners which make for great distractions, be them allies (fights against enemies and follows you), enraged (fights everything, including you) or useless (scared scapegoat who flees to random places). So every time you hear them asking to be freed, and if he/she's in your path, do so. Sadly they're only useful for the floor on which you find them, as they despawn when you exit it.
  • On levels with colored doors, getting close enough to one gets the room behind it marked on your mini-map. When looking for the wand keys, going for the exit and making your way back is an easy way to find the first one.
  • Make sure to read the note at the start of each floor to get rid of it, especially after starting the 2nd dungeon type. You never know where you may end up while you escape in panic from 8 enemies + boss, and suddenly grabbing a note during your kiting might throw you off.
  • Gold becomes useless from the level 15 and beyond.
Special runs
  • Unless you're playing on NG+, when you start a new floor your health is fully replenished, so keep the mindset of making a run for it. This is helpful when trying for the no-healing run.
  • Huge swords can go through walls, creating the possibility of killing some door-hugging baddies. Useful to remember when trying no-damage runs.
  • Luring and kiting are keys to successful runs, and obligatory for Pacifist.
  • For no equipment runs: both sword and shield are randomly scattered somewhere in every floor, up to level 5 at least. If you grab a sword, you can just not use it and proceed with the Pacifist run, but if you catch a shield, the no-shield run's achievement will be voided.
  • There's no need to play after level 10 to get the special runs' achievements, so make sure to just escape, and not to mess with Maggie's sword.
Bosses
  • A chest room is one of the fastest ways to kill the boss on level 2, and so is running counter-clockwise around rotating spikes traps when being chased.
  • As his name implies, the archer boss at level 2 isn't affected by fire. The same can't be said by the swordsman.
  • During the Chieftain boss battle, making skeletons stand between you and any archers is a nice way to thin out their numbers, and also a viable but slow way to bring death to the boss himself when out of better options. This tactic shines with blocking while standing in a tight hallway. Even if the Chieftain makes the battle harder with his self-healing ability, he needs to flee and get alone for a second before being able to heal, so chase him down and hope that he runs into a trap with the best timing possible (you can also be god-like and continue to use archers against him, dodging the arrows just in time).
Screenies
  • Here's luring the level 2 boss to a treasure chest room.

  • Here's two freed prisoners earning their freedom.

  • An explanation on how wall traps are crooked to the side they're gonna spring to.

  • And how these traps can be silly sometimes.
"Running with hunger, shieldless, for peace"
Here's a quick playthrough of sorts up until the level 10, with a few tips and what you should watch out for on each floor. This was written special runs in mind (no-equipment, New Game+, Pacifist, etc).

Levels
1. Pershdal Dungeons c.948 - Just run, but always try to grab a sword: as long as you don't damage enemies with it, you'll be able to achieve Pacifist, while maintaining the choice of directly attacking the boss on Level 6 if not enough suitable traps are spawned. In the end, finishing a botched Pacifist run is better than dying.

2. All Locked Up With Someplace To Go - First boss, need to touch the exit gate to read the letter and spawn the boss, which can be either an archer (easier to deal with) or a swordsman. Before going for the exit though, make sure to find and memorize the location of suitable traps to kill the boss with, like rotating spikes or floor traps. If you're lucky, luring him into a chest room (room with chest surrounded by 8 floor traps) is the easiest way to kill him. Fire can also be used against the swordsman (hug and jump towards a fire pedestal to knock it down and create a pool of fire), but it's ineffective against the archer.

3. A Bone of Contention - First level with colored doors and an invasion. You gotta get 3 colored keys to get access to the invasion trigger (skull on pedestal), so that a big skeleton smashes the exit's locked gate. The big skelly is a mighty enemy, but if you learn to bait and dodge his swings, it shouldn't be hard to skip fighting him. Furthermore, you can always take advantage from his eventual roars, allowing you to blaze through much more easily. After starting the invsaion, be fast enough to get to the exit before the "The Invasion has begun" message pops up, and you'll know you're ready to speedrun the later levels.

4. Orcward Silences - Yay! Second dungeon type, not much to be said though, as the exit is already open. Keep on running, be careful of traps and most of the time watch out for possible Rock Monsters (the invincible dark rocky golem creatures) right behind the first door at the start. Also keep in mind that, from now on, doors take a bit longer to open, so plan ahead if you're being chased.

5. Sticks, Stones and Broken Bones - This is where a run actually starts, in which the game separates the men from the rats... or just the lucky from the unlucky, really. Pretty much a sum of what has been seen up until this point and more: colored doors, invasion, invincible golems + loadsa orcs near the skull pedestal. As always, try to find suitable traps before triggering the invasion, and when doing it, lure the orcs away from it first, so that you have more room to escape (opening two or more doors to the room with the skull pedestal always helps). Mind the golem: try not to get trapped between it and a slowly-opening-door when running from it. I must say that this floor is the hardest for no-shield pacifist runs.

6. Funeral Finale - Second boss, Chieftain! Like the archer from the 2nd floor, he's invulnerable to fire, but unlike him, he's already spawned at this tiny floor, hidden behind a door ready to strike, so find traps right away. While the level 5 might be the floor that most requires ability from the player, this boss requires skill plus something worse: luck. The best way I found to kill him was by wearing him down with enemy arrows (make him stand between you and archers while baiting and block his attacks) then utilizing wall spikes traps to finish him off.

The only requirement to using wall traps efficiently is knowing to which direction it will spring (it's a bit crooked to the side it will fling itself — see tips section above), then either waiting for him at the other end (while avoiding the other skeletons so they don't trigger the trap prematurely), or blocking his attacks and walking forward to slowly push him into the trap (which might be hard if he has backup).

But sometimes the traps spawn in weird places, or not enough/none of them spawn at all; and sometimes the trap isn't 100% effective for some reason. To top it off, when the Chieftain is about one hit from death, he can flee and heal himself when he gets alone, however this can be countered if you chase him close enough: he won't heal and, if lucky, might spring some other traps in his way. Just as said: luck.

In the end, if after all this you run out of traps to kill him with and if you have a sword, this is where you make your decision to either ragequit or say goodbye to Pacifist. If the latter, the best way to attack him would be to make some distance and enter his line of sight to lure him into creating a green bubble, during which you can easily hit him 3-4 times without being punished. After defeating and getting his key, going near the exit gate will make a demon spawn and explode it (why even get a key, right?): just hug the gate before it explodes and run past him when it spawns.

7. Sulphur So Good - Loadsa fire! Loadsa orcs! Teleporting demons! And goblins! And kamikaze-demons! And you, to the exit! Kamikaze-demons' explosions are one-hit-kill, watch out. Also, you might start the floor on fire... yeah, that happens. Apart from that, there's not much that can be said about this floor, it's pretty straightforward.

8. Knock Knock - Keep on steady; if you got here in one piece then you're set. For some reason this floor is quite clean of enemies and, as anticlimactic as it can be, there's no need to deal with the boss: the exit is open, run past him, don't get set on fire in the way and...

Freedom!
Closing notes
There we go. If this guide has helped you out, don't forget to rate it. And if there is any way that I can make it clearer, do comment.
35 Comments
Silver Kestrel 7 Apr, 2021 @ 3:24pm 
- Getting set on fire with the fireproof power-up with not void the run. In addition, getting set on fire by an enemy on fire, the environment, or your dragon will not void your run either.
Silver Kestrel 7 Apr, 2021 @ 3:18pm 
-Ignore power-ups . You don't have time to worry about gold. The fireproof from the dragon and the god-sword is all you need. Getting regeneration / arrows-to-ether / and the kills restore health power-up can all make it difficult to determine if you took damage and voided your run. Save yourself some stress and avoid them completely.
Silver Kestrel 7 Apr, 2021 @ 3:18pm 
-Don't attempt until you have the god-sword and baby-dragon Both are needed. The god-sword makes it easy to keep enemies at arm’s reach and wipe out multiple enemies. I never had much luck hitting things through doors so YMMV on that tip. The baby-dragon give you the only power-up you must absolutely have for this run which is fireproof. It's far too frustrating to have to reload if you don't get it randomly from a shrine and you don't have time to collect enough gold on this kind of run.
-Arrow to Ether power-up will void your run if it triggers . This was the second thing I had difficulty with. I would seemingly finish a no-hit run not realizing I had been "hit" since arrows to ether triggered.
Silver Kestrel 7 Apr, 2021 @ 3:18pm 
Amazing review, thank you for all the effort for writing it up! I'd like to add a few comments and tips for the Immaculate Challenge (no-hit run). It took me forever and I couldn't find any additional advice than what was in your guide so I thought I could give back by sharing my tips for it.

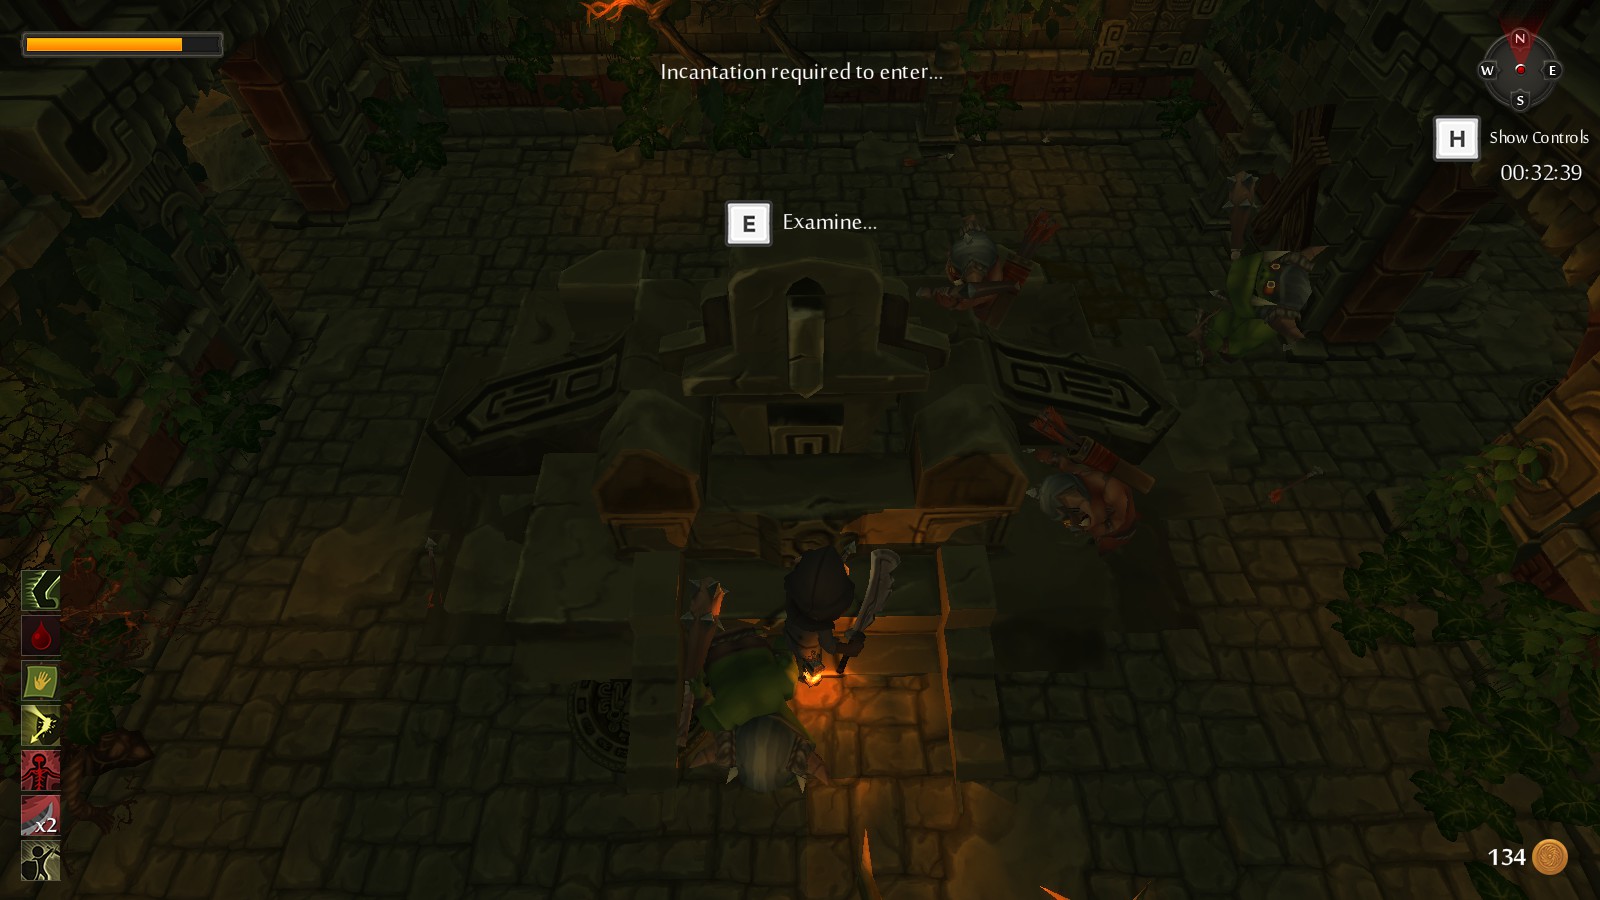
-Don't dawdle be aggressive and run for the exit hard. This was the biggest thing holding me back as I tried to go slow. Don't try and collect any gold either ignore it completely. Your only focus is the exit and not being hit.
-Reload from the menu if hit . I thought it had to be a straight untouched run for the longest time, but you can reload the level after being hit and you can just retry from that level without ruining your run.
Will Hunter 3 Mar, 2019 @ 2:55am 
Very helpful guide thank you ! :-)
therob 14 Aug, 2016 @ 11:50pm 
w00t! I finally got the Magic Blocker achievement on the version of Chieftain in the 2nd half of the game. :ananas:
therob 14 Aug, 2016 @ 6:17pm 
Thanks for the reply, yah! I'll maybe give it another go when I get a chance. Thanks again.
yah  [author] 14 Aug, 2016 @ 12:55pm 
@therob
Yes, I was talking about Maggie on lvl 20 when I mentioned the "final boss". I obtained this achievement from her the first time, and from the Chieftain when I went for some fact checks. I remembered about skeleton mages after I've had concluded the guide, and just assumed you could also get the achievement from them, as they use the same exact spell as the bosses mentioned.

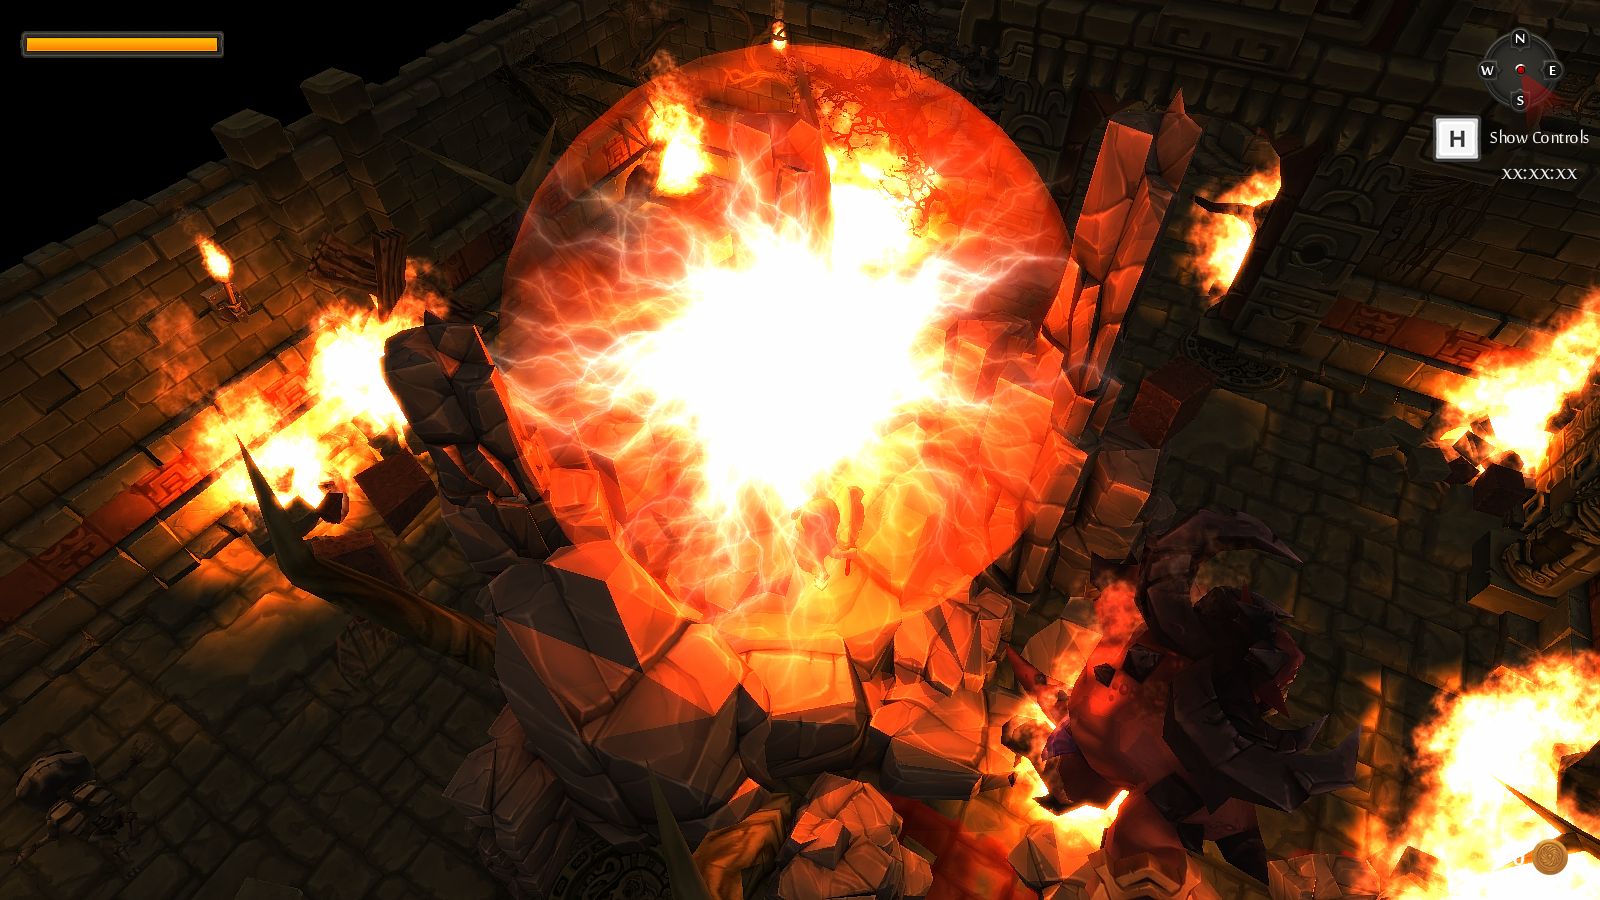
The green orb spell is part of the final boss' pattern, so unless Phi has changed it since I last played it shouldn't be hard to see it (she casts three of them near her at the same time). And for the Chieftain, he casts it when you're far away and still in his line of sight.
therob 13 Aug, 2016 @ 10:37pm 
:riddle: The user below named Unholy said that he needed to do the Magic Blocker on the final boss to get the achievement. I'm also having trouble getting it from the mages or Chieftain. I'm wondering who is considered the final boss? Is it the one on level 8, hidden level 9, or is it Maggie at level 20? Either way, I haven't seen any of those 3 shoot the green orbs. Also, why isn't the achievement working on the mages or Chieftain? Or does it? :riddle:
Unholy 19 Jan, 2016 @ 8:12pm 
For anyone using this guide and trying to get the Magic Blocker achievement, skeleton mages and the Chieftain did not work for me, I had to reflect the last bosses magic to get it.