Dog Sled Saga

Dog Sled Saga

60 ratings
General Game Guide (Outdated, Sorry)
By Kin.rawr [DooM Dance]
An overview of the entire game based on what I've gotten to see so far. Not a ton, but enough that I feel I can provide a decent starting guide since there are currently none.

-Currently Outdated-

I'm not sure when/if I'll have a chance to get back to this game and update the guide. Please feel free to note anything of importance in the comments and I'll get to it eventually.
   
Award
Favorite
Favorited
Unfavorite
Getting Started
When you begin, you'll be asked to select a musher. Nothing special there, pick whichever fits you best. First is a guy, second is a gal.

Dogs For Hire

Next, you'll be asked to select 3 dogs. Ideally, get one of each personality: strong, steady and obedient. Should you not like the selection it gave you initially, close out the game entirely and you'll be given a different selection to choose from. I personally only go for huskies and malamutes because it seems wrong to have any others.

Note: You'll never know who will be "natural" or just "able" skill level at a position, but getting one of each personality type will ensure they don't all have no skill at the same position and you can buy more dogs later if any end up being mediocre, or you can just start over.

Once you hire a dog you'll get the chance to name it immediately. If you can't think of a good name and don't care for their current name you can always change their name later when viewing their details in the kennel. It's the very last option.


Race Info Screen

Once done selecting your dogs, you'll get to race immediately, but you don't have to. If you don't want to race just yet for some reason, click "Not Yet" or click outside of the race box to be sent to the kennel screen. Don't skip this first race though, there's really no reason to do so. Your first race will guide you through the basics of how to be a champ. For my own tips on racing, see the "Racing" section below.


Raleigh

After each race, a guy named Raleigh will give you tips and information on your dogs, but only one peice of info at a time. Some of these tips unlock information slots on your dogs, so you always want to get those first when available (look for the key symbol). Next priority is happiness, skills and faults (no particular order unless you have a preference) because those will not only show up on your dog from now on, but it will also show up on the dog purchasing screen before you buy a dog so you know what you're getting yourself into.
Dog Details - General & Happiness
The "Dog Details" screen can be seen by clicking on your dog while viewing the kennel.


First up, the "General" section. This simply tells you about your dog. Pretty straightforward what that info means.

Names of the dogs can be changed at any point by scrolling down to the bottom of the "Dog Details" menu. You can either select a random name or input your own!


Next, the "Happiness" section. Happiness is very important because it means the dog's fault will be less common the happier it is. Some faults are pretty irritating to deal with, while others aren't so bad. You can increase happiness by giving the dog its favorite thing or by letting it rest if it's been racing a lot, but it can also go down if you let it have too much time off.

Favorite things are important to pay attention to in some cases, while others occur so often that you don't need to worry about looking out for them. For example, my currently best trained lead dog is only happy at night. My best trained middle dog is only happy with fame. Both are not easy to get on a regular basis (so far), which means happiness has gone down for them. Perfectly timed catches is a good example of a super easy one to get.

Happiness can cap at some points too, but I haven't figured out for sure what causes it. My guess so far is that if they stay at one level of happiness for a certain length of time or have a certain level of exhaustion or don't get raced much then happiness will cap to a certain level. Maybe all of the above.
Aptitude


Aptitude indicates which position a dog is best at. "Natural" is the highest, meaning the dog has a natural ability for a certain position. "Able" is a neutral amount of ability in that position. "None" is, of course, no skill, but you can still put the dog there if you absolutely have no choice.

Personality
Lead
Middle
Wheel
Obedient
+
+
-
Steady
-
+
+
Strong
+
-
+

There is no way to tell what position a dog will be natural in before training them up, but you can tell what they will not be good at based on their personality, as shown above. Again, the best bet when starting out is to get one of each personality type to guarantee you'll have all of your positions filled with at least "able" aptitudes.
Skills


Skills activate at random and how often is based upon the skill level of the dog. Skill levels up simply by racing the dog and feeding it during the race. Perfect throws will skill up the dog faster. Barking is a sign that it will use its skill. If a dog doesn't race for a while, the rate of skill increase and the skill level itself can both decrease, as well as happiness.

Skill
Description
Charge Up
Feeding extra food can give them a speed boost.
Speed is of course useful on all dogs, but ideally you want this on your lead dog as it will help you maintain the towline as well.
Competitive
Can lay on the gas when an opponent is within spitting distance.
Very useful all the time because you will be near opponents quite often. Probably best on a lead dog if you can help it because any sprinting forward will also pull the tow line forward, rather than closer to another dog for possible tangling.
Good Catch
Can lunge out of position to catch stray throws (as long as they're still within that dog's vicinity).
Only useful while you're learning the game really, or if you get easily overwhelmed at certain points because of obstacles or the amount of dogs you need to manage. It can kinda mess the towline positioning up, so really try to avoid this skill if possible. My best lead dog has it currently and it's not as horrible there, but having it on a middle dog would make things a bit rougher.
Light Eater
Can enter an energy efficient mode, tiring slowly.
Useful no matter what, but in 3 dog races it's not necessary because keeping track of feeding is easy enough. 4+ or with many obstacles is where this skill is great.
Second Wind
When tired, the dog can will itself to recuperate.
Useful when you're learning and may be bad at throwing yet or during situations where you're having a hard time keeping up with a dog's hunger.
Speed Boost
Can sprint like a maniac for a brief period of time.
Seems to be working well on my wheel dog, but it would be most useful on the lead dog because it will pull the towline forward for all dogs, rather than loosening it in one spot if on a middle or wheel dog.
Tangle Free
Can avoid a loose towline to avoid accidents.
Only really useful if you're bad at keeping track of your dogs or in very complicated races where you can't feed on time or otherwise control the towline because of obstacles or lack of food.
Faults


Faults occur most often if your dog is not happy. They'll yelp during a race and you can expect the fault to follow, but most of the ones I've found so far are easy to manage in most situations.

Skill
Description
Bad Catch
The dog will lose all mouth-eye coordination.
This one kinda sucks and might be further irritating if you happen to have it on a dog that likes perfectly timed catches.
Bottomless Pit
The dog will become overwhelmed by insatiable hunger.
Pretty irritating, especially if it happens during a race that's difficult as it is because of obstacles and whatnot. Luckily my wheel dog has it so it's easy to spam him with food (unless I'm out, ugh) and he's happy all the time so it's a rare occurance.
Choke
The dog will lose their gusto when near an opponent.
So far hasn't been too irritating, but might be in a harder race.
Drop Speed
The dog will throw in the towel and needs to be dragged when their fault kicks in.
This one sure seems like a pain in the butt. Would be less horrible on a lead dog, but still pretty sucky.
Greedy
The dog will become impatient and jump the gun at restocks.
Shouldn't be too much of a problem except on difficult races where restocks are very limited or you need to feed a lot because it's tiring.
Tangle Prone
The dog will become very clumsy with the towline.
Would be quite irritating to deal with, especially if you're newer to the game and aren't good at managing your towlines or even for a skilled towline manager if the race is difficult. I imagine this would be especially irritating on a middle dog because it could muck with the other dog's lines as well.
Too Proud
The dog will stop showing when they're struggling.
Really not that bad to deal with as it doesn't last an awful long time and once you figure out the pattern your dogs are in as far as feeding timing goes then it really doesn't matter if they show it or not, you can still predict perfect throws like a champ. Would probably be hard for someone new to the game to deal with, though.
Wavering
The dog will fall in and out of line rapidly.
This one is kind of a pain in the butt when keeping the towline perfectly straight isn't an easy task at the moment due to obstacles or the amount of dogs you have to manage. Luckily, it doesn't last very long and if you can keep your towline relatively straight then it won't hurt you when it activates.
Racing

Race Info Screen

Winnings: 3rd place and higher gets a prize.
Weather: The only special thing to note here is that some dogs like certain weather, so keep track of this section and try to get those dogs into their happy zone when you can.
Challenge: How hard you can expect the competition to be.
Team Size: Yep, you guessed it, how many dogs you get to use.
Length: The longer, the better, as that gives you more opportunity to feed your dogs and have happy things happen to them.
Snow Quality: The worse the quality the more tiresome it can be on your dogs, so if all of your dogs are exhausted or will become that way after the race then you may want to skip it unless the restocks are excessive, which reduces the fatigue they'll get.
Restocks: How often you will get to refill your food bag. 1 whole bag icon seems to equal 2 restocks, but may depend on the race length.
Wind: How often you can expect heavy winds. Wind pushes on your dogs and it seems to effect food as well, but you don't have to worry about it throwing off your aim, it only seems to slow down delivery.
Obstructions: Rocks that you'll need to jump over. Hitting one will slow you down quite a bit, so always jump over it, even if your dogs are hungry.
Track Foliage: Trees that block food from being thrown. If your dogs are getting close to needing food it might be a good idea to feed them before the tree comes, even if it will mean losing a couple perfect throws. At the very least, get some food ready to throw immediately after it passes.

Note: both the rocks and trees counter seems to be lying right now. Many times it has said 1 or none and I've ended up with 2 or 1 respectively. You get plenty of warning before they actually appear though, so it's not a big deal, just don't let your guard down.


Tips and Tricks
This section will just include some tips not noted by the game that I've found to be super helpful.

  • Perfect throwing times are when your dogs have slightly quickened breaths.
    It's a noticeable difference compared to normal breaths, but can take some getting used to initially when you aren't sure what to look for. The progression goes no visible breaths -> slow breaths -> quick breaths (perfect throws go here) -> gasping for breath.
  • Pay attention to the exhaustion rates shown before the race start.
    If a dog has a "low" exhaustion rate then food requirements will happen a lot less often as compared to a dog with a "dangerous" exhaustion rate, who will need to be fed almost constantly. Plan your throw order with that in mind. Only newly hired dogs in hard or high tier races should ever have a dangerous or similar exhaustion rate. You can try switching these dogs to different positions because if a dog is somewhat skilled or has an aptitude for one position it may not exhaust as easily.
  • Time your feedings on purpose.
    This means you can mess up initially if you need to by feeding one or two dogs sooner than perfect so that they all get into a certain order that you can easily keep track of. Some of your dogs might naturally tire faster, but if they all tire at the same time you will not be able to get a perfect throw out to all of them and will probably end up letting some tire too much, slowing you down. It's better to feed too soon than too late.
  • Whenever you're not throwing food, spend your time adjusting the towline forward.
    You never know when you might not have a chance again and if many obstacles or faults occur right in a row you're likely to find yourself with a tangled up towline. It's not the end of the world if you do get a tangle, but it will slow you down significantly and you'll find that once you master the towline you'll start doing a lot better in races.
  • Rocks will come whenever you're ready for them or at a certain point if you never ready up.
    This means that if you have your dogs fed and prepared you can initiate a jump as soon as the icon appears by clicking quickly, or you can hold out and feed everyone really fast and then initiate the jump after. You don't have a ton of time though, so if you're racing with 4 and 5 dogs you might need to skip a couple, even if you perform food throws perfectly. Smashing into rocks slows you down a lot.
  • Don't take on difficult races if you don't have to.
    "Difficult" meaning tons of obstacles, bad quality snow, very few restocks during a very long race, or a few obstacles/bad snow mixed with a short distance. Challenge level doesn't matter much, it just means opponents will be easier or harder, but even when it's very hard a race can still be worth doing if it won't overly stress your dogs.
    "Have to" meaning you're desperate for cash and/or your dogs are really itching for a race because you've already skipped too many. If the latter is true, keep in mind that exhaustion can make them unhappy too and can mean they will miss many races after, so skipping a very hard race is really almost always the best course of action.
    The reason for avoiding these races is because they put uneccesary strain on your dogs for very litte reward, if any. The less you can feed them, the less skill they will gain. The less time events can happen, the less they might gain happiness from it. The harder the race is, the more tired they'll be, potentially reducing happiness and making them too tired for the next race which might be an important one or would have been much easier to do well in.

Any other tips or input, feel free to leave a comment!
Career
Fame

"If cool things happen during the race, cameras from the crowd will flash, and your dogs can get famous. Famous dogs attract sponsors!"

Sponsors will give you various boosts. The boosts available are sled, towline, food bag and extra funding per week. I think there's one other as well, but I can't think of it right now and it's not a stat you can see.

So far it looks like you have to get one of each upgrade in order to reach the next tier of upgrades. I haven't gotten very far there yet so I'm not sure.


Note: So far this is the only career entry that I've found, but my journal says 1/2, so there's one more coming yet.
Conclusion
Pretty basic guide for a pretty basic (but super fun) game. I am missing a few things in certain sections as you can see, so if anyone has that info they can leave a message here and I'll add it in. Credits for said information will be added in this section. Leave a comment for any other suggestions about things I could add or change and I'll see what I can do.

Credit for "Competive" skill information: [2SRAF] Airo
Credit for "Tangle Prone" and "Greedy" faults information: Tigerwolf1226
Credit for "Drop Speed" fault information: Unnuk
29 Comments
Kitari 16 Mar, 2019 @ 1:25am 
I need help - I've unlocked everything in the journal, besides the last day, and the middle part of 'Racing', and i don't know what I can do to find the 'Racing' part.
Victoria Dragonsteel 7 Feb, 2018 @ 8:25pm 
ok so I have unlocked every day except the last one but im already on day 1717. Is there a ending or will the last day never be able to be unlocked?
SEN 29 Dec, 2016 @ 12:48pm 
Additional observations;
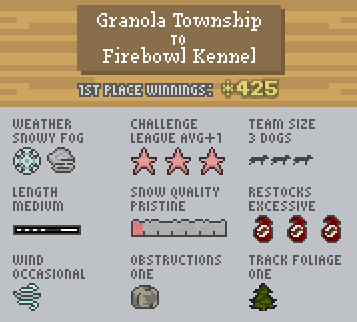
> When your dogs are gasping for breath, it adds an additional fatigue blip/dot at the end of the race!
> You can potentially bait out fame by timing your snack throws. If there's an obstacle you have to jump over, throwing a snack while jumping and having a dog catch it will net them a fame! Additionally(?) if two dogs get a perfect at almost the same time, one of them could get some fame!
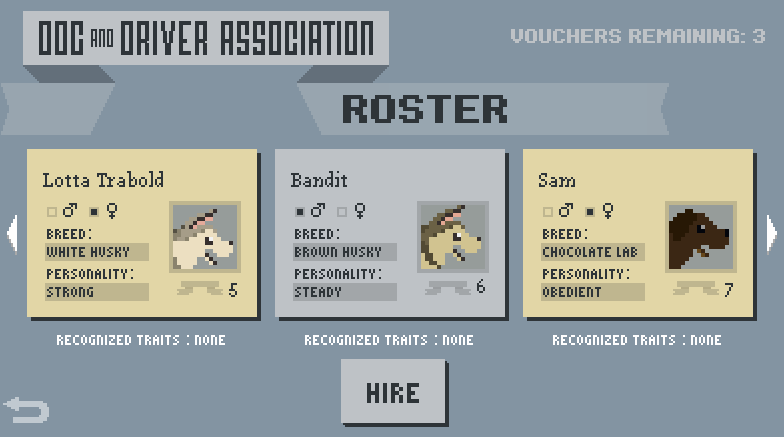
> You can only pet a dog inside the kennel (and it may be hard to do) and the happiness might only update once you run a race with them/a new day begins.
> they're good dogs brent
SEN 29 Dec, 2016 @ 12:28pm 
Hey! Not sure if it's been reported yet, but there's a favourite for petting! I'm not sure how to fulfill this properly for my lead dog, but I found out you can pet your dogs in the kennel by pressing and holding on the dog's head, then stroking them in one movement! Might also work at the end of races? Gonna test it out! :o
Kin.rawr [DooM Dance]  [author] 27 Dec, 2016 @ 4:21pm 
Dunno, haven't played the game for a long time and that's a newer feature. When I get the chance to play again I'll update the guide.
A Glitch 27 Dec, 2016 @ 10:57am 
I see there's a build-a-dog achievement for breeding, how do you do/get that?
Kin.rawr [DooM Dance]  [author] 22 Dec, 2016 @ 7:50pm 
If they don't get enough rest they will perform worse (higher fault chance, higher hunger rate), possibly some other effects I'm unsure about. This is just off the top of my head as I haven't played the game in a while.
HebaruSan 22 Dec, 2016 @ 7:35pm 
How does the "Rest" mechanic work? There seems to be a Rest bar in the dog stats with some number of red flags that increase when a dog spends a day without training. What effect does this have?
Wifighoul 17 Dec, 2016 @ 11:11am 
HELP my data disapeared for no reason! I lost all my dogs who i loved, and i was on leauge 4!
magnumpuppy22 25 Dec, 2015 @ 5:16pm 
Best skill/fault/favorite comb ever, I have a st. Bernard that has the good catch skill, the bad catch fault and the dog loves consecutive catches. pretty easy to keep this one happy.