Gunfire Reborn

Gunfire Reborn

Not enough ratings
How to: Endless Journey! Feat. Lyn
By LunaticOwO
So you might have reached a point in Gunfire Reborn where you're like, "I wanna try out Endless Journey!". You do a really decent loop, enough to get the Achievement tied to the game mode and after said run you had a thought: What if I can make Endless Journey truly endless?

Short answer is: You can! And with this guide, I will do my best to guide you through each way you can increase your odds of achieving Endless Journey infinity, featuring Lyn.
   
Award
Favorite
Favorited
Unfavorite
Why Lyn?
Now you might be asking, why choose Lyn over someone like Tao for example? The simple answer is that her kits, particularly her Frost Burial, is incredibly efficient at clearing normal monsters in a room, plus it bypasses Immortal monsters and Second Wind modified monsters, trivializing that particular Demonic Aura Diffusion.
This makes her one of the best heroes to run Endless Journey with and Frost Burial will be one of the key components of her build for this game mode.
How far can you take Lyn in terms of scaling?
When it comes to choosing your Endless Journey run using Season 5 (Arcane Talisman) buffs, you can definitely get away with rocking Lyn for Endless Infinity up to Lone Wolf 4-Player Scaling, but forget about True 4-Player Scaling featuring three other Spiritual Puppets (I've not had much luck with this yet using Arcane Talisman at least.); your best bet for that would be to go with Season 4 (Star Link) Buffs as that is the ultimate season for Endless Journey runs.
Prerequisites: Weapon
Disclaimer: These are the weapons that worked best for my own experience of doing Endless Journey run with Lyn using Season 5 buffs at Lone Wolf 4-Player Scaling, and the addition of Poisonous Ghost and Phoenix Roar was recently explored (Around stage 8000 during my personal Endless Journey Run) and therefore leaves room for more exploration. I do firmly believe there could be better rolls or weapon/inscription choices that I may not have explored upon so feel free to explore yourself and share your own experience when you discover something yourself!

For selection of weapons, you will want to have the following as your main weapon of choices during Endless loop proper:


and any off-hand fire-element weapon of your choosing for Elemental Advantage Gemini, stored in Temporary Backpack for later swap-arounds.

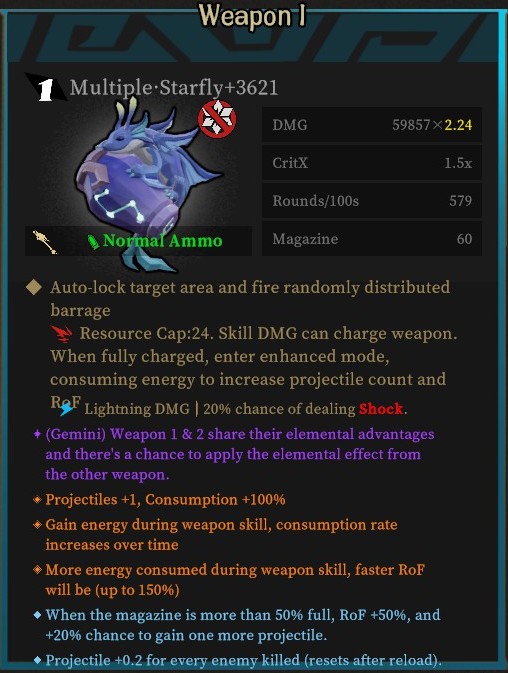
When it comes to the Starfly, ideally you will want to get one with these specific rolls and affix:

However, come the introduction of Assemble Talisman and its insane capability to rapidly proc Power Gems with the Starfly, you can theoretically get away with having only the first and third exclusive inscriptions with slight modifications to the gems you choose, adding Weapon Recharge Power Gem so that Starfly's Weapon Skill has continuous uptime should the second exclusive inscription be not present.

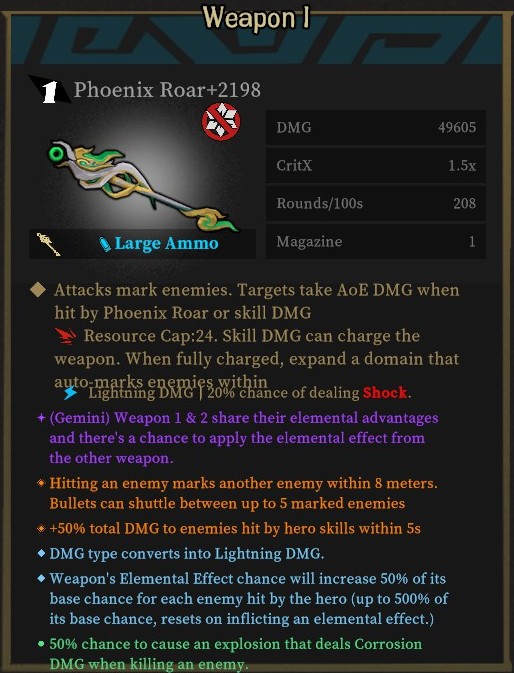
As for Phoenix Roar, this is what I got:

I did not have any specific rolls to look for with the Phoenix Roar, but I suppose the important thing is the first exclusive inscription. I have also been told anything that increases projectile count is beneficial as well.
I personally took one with a Lightning convert rare inscription because the thought process at the time was for me to passively do lightning damage as well while doing Poisonous Ghost weapon skill slashes to supplement with Miasma stacks.

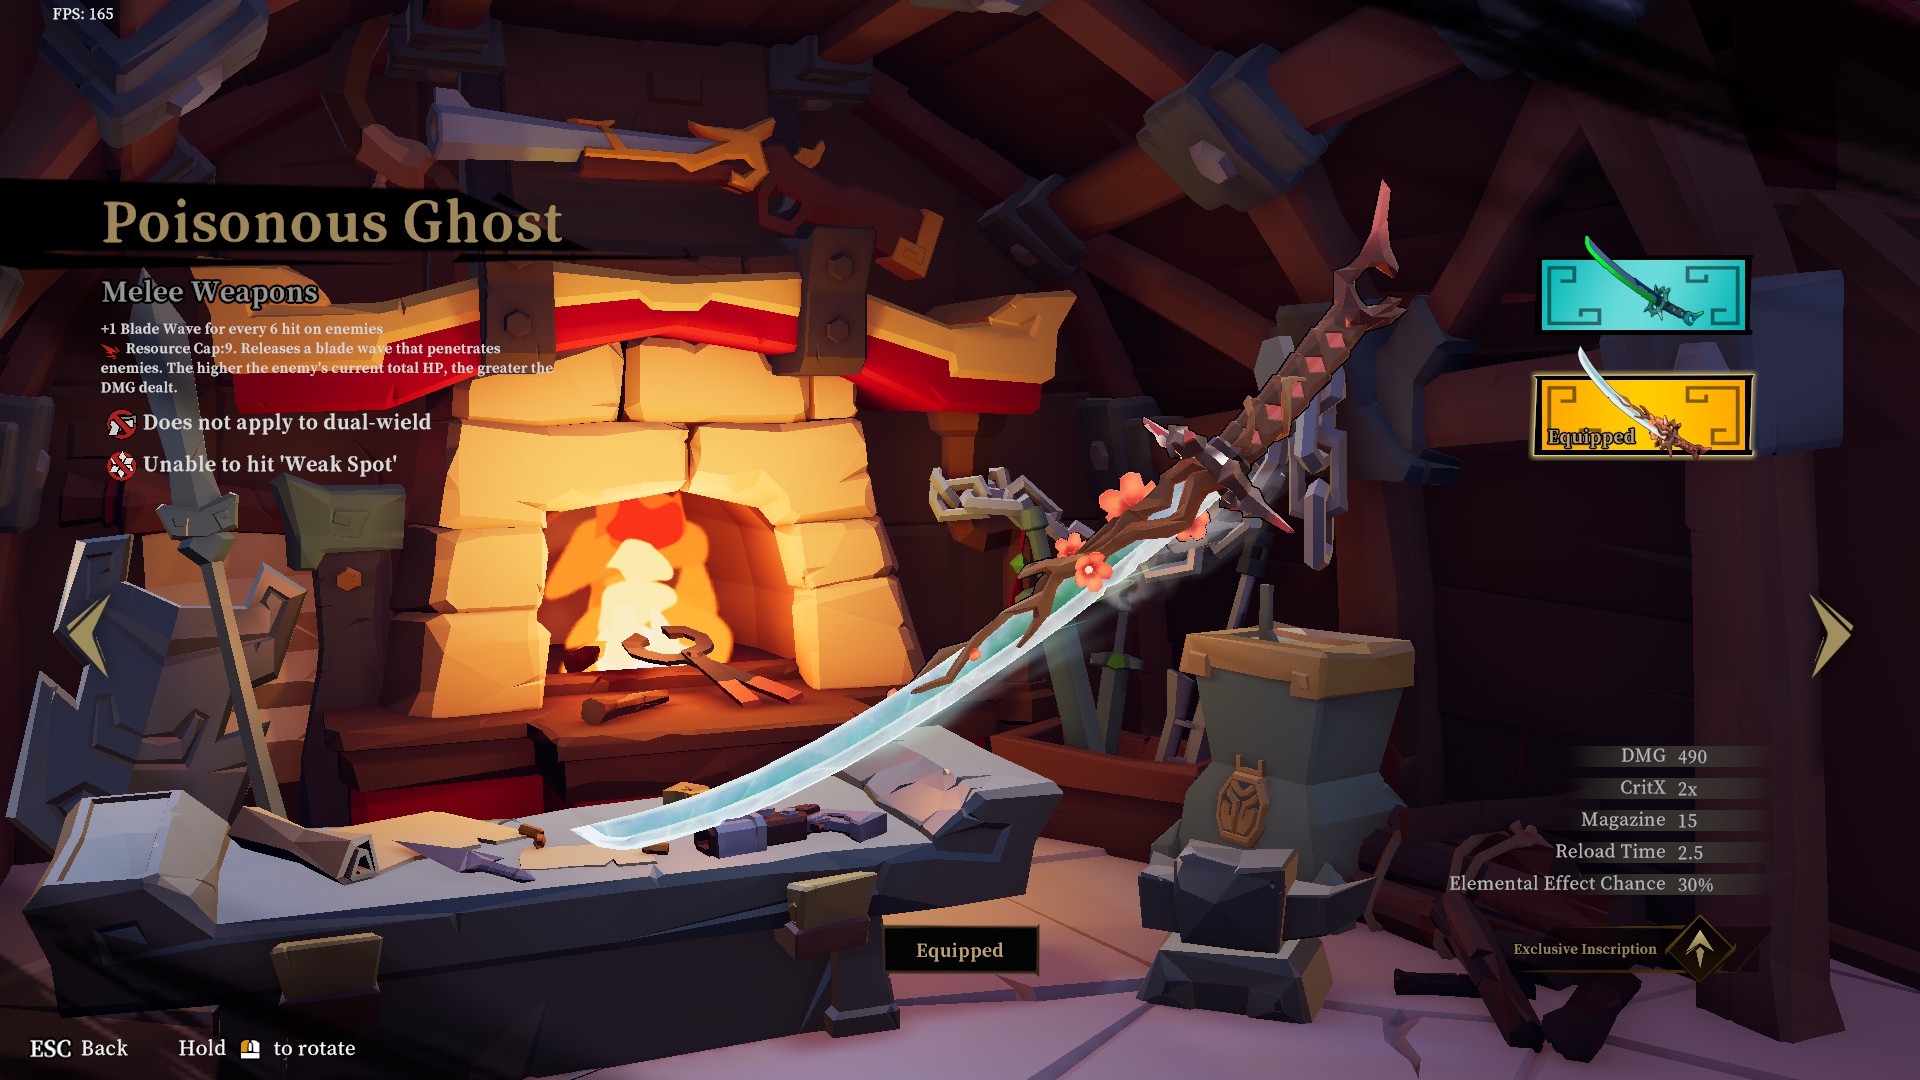
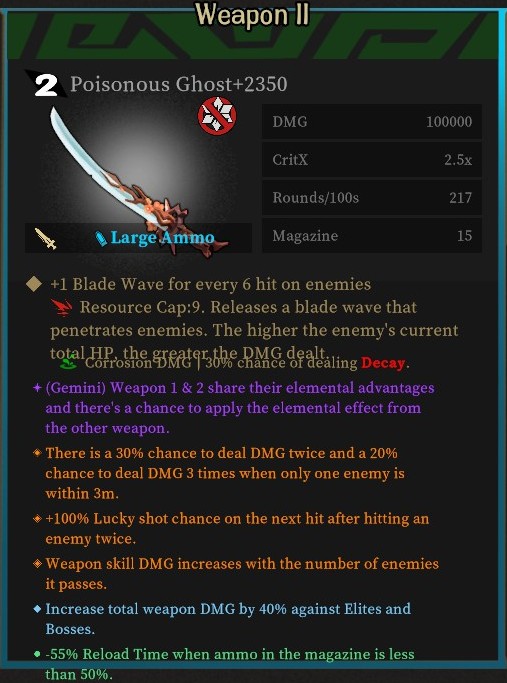
As for Poisonous Ghost, this is what I got:

But really the only important rolls you will want to look out for are the first and third exclusive inscriptions; as far as I know, the rest of this weapon's inscriptions won't affect the casting speed nor the True DMG of the Poisonous Ghost's Weapon Skill and so they're not as important for this weapon's intents and purposes later in the run.

And of course, having Transcendent Arsenal enabled in the Bizarre Dream for the ability to temporarily backpack extra weapons and grabbing any god-roll weapons you have of the above-mentioned from the Arsenal Guard.
Ascensions
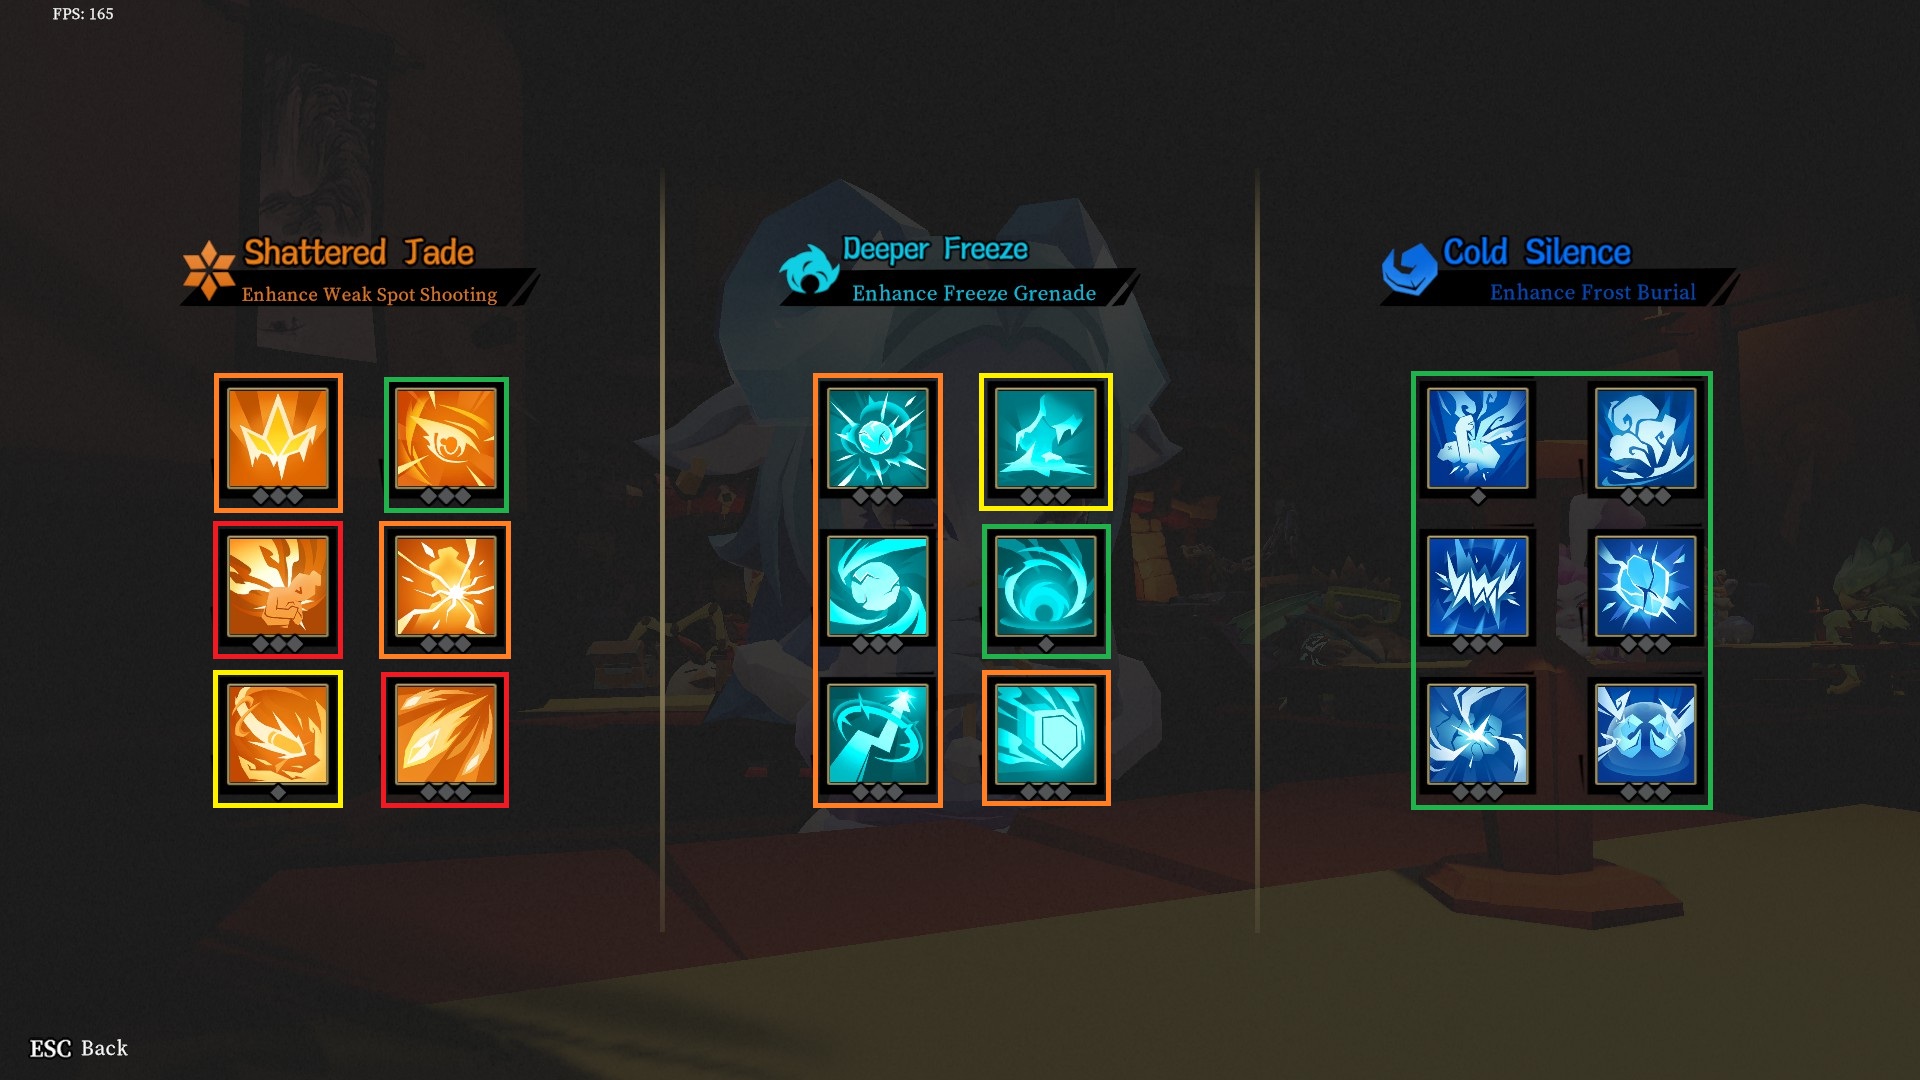
For Lyn's Ascensions, here's a guide on what to look for during your travels and Golden Goblet interactions in the run:
Where:
  • Green - First priority
  • Yellow - Second priority
  • Orange - Third priority
  • Red - Completely Unnecessary, but might as well take them with enough stacks of Enhanced-Reascend and It Takes Two scrolls

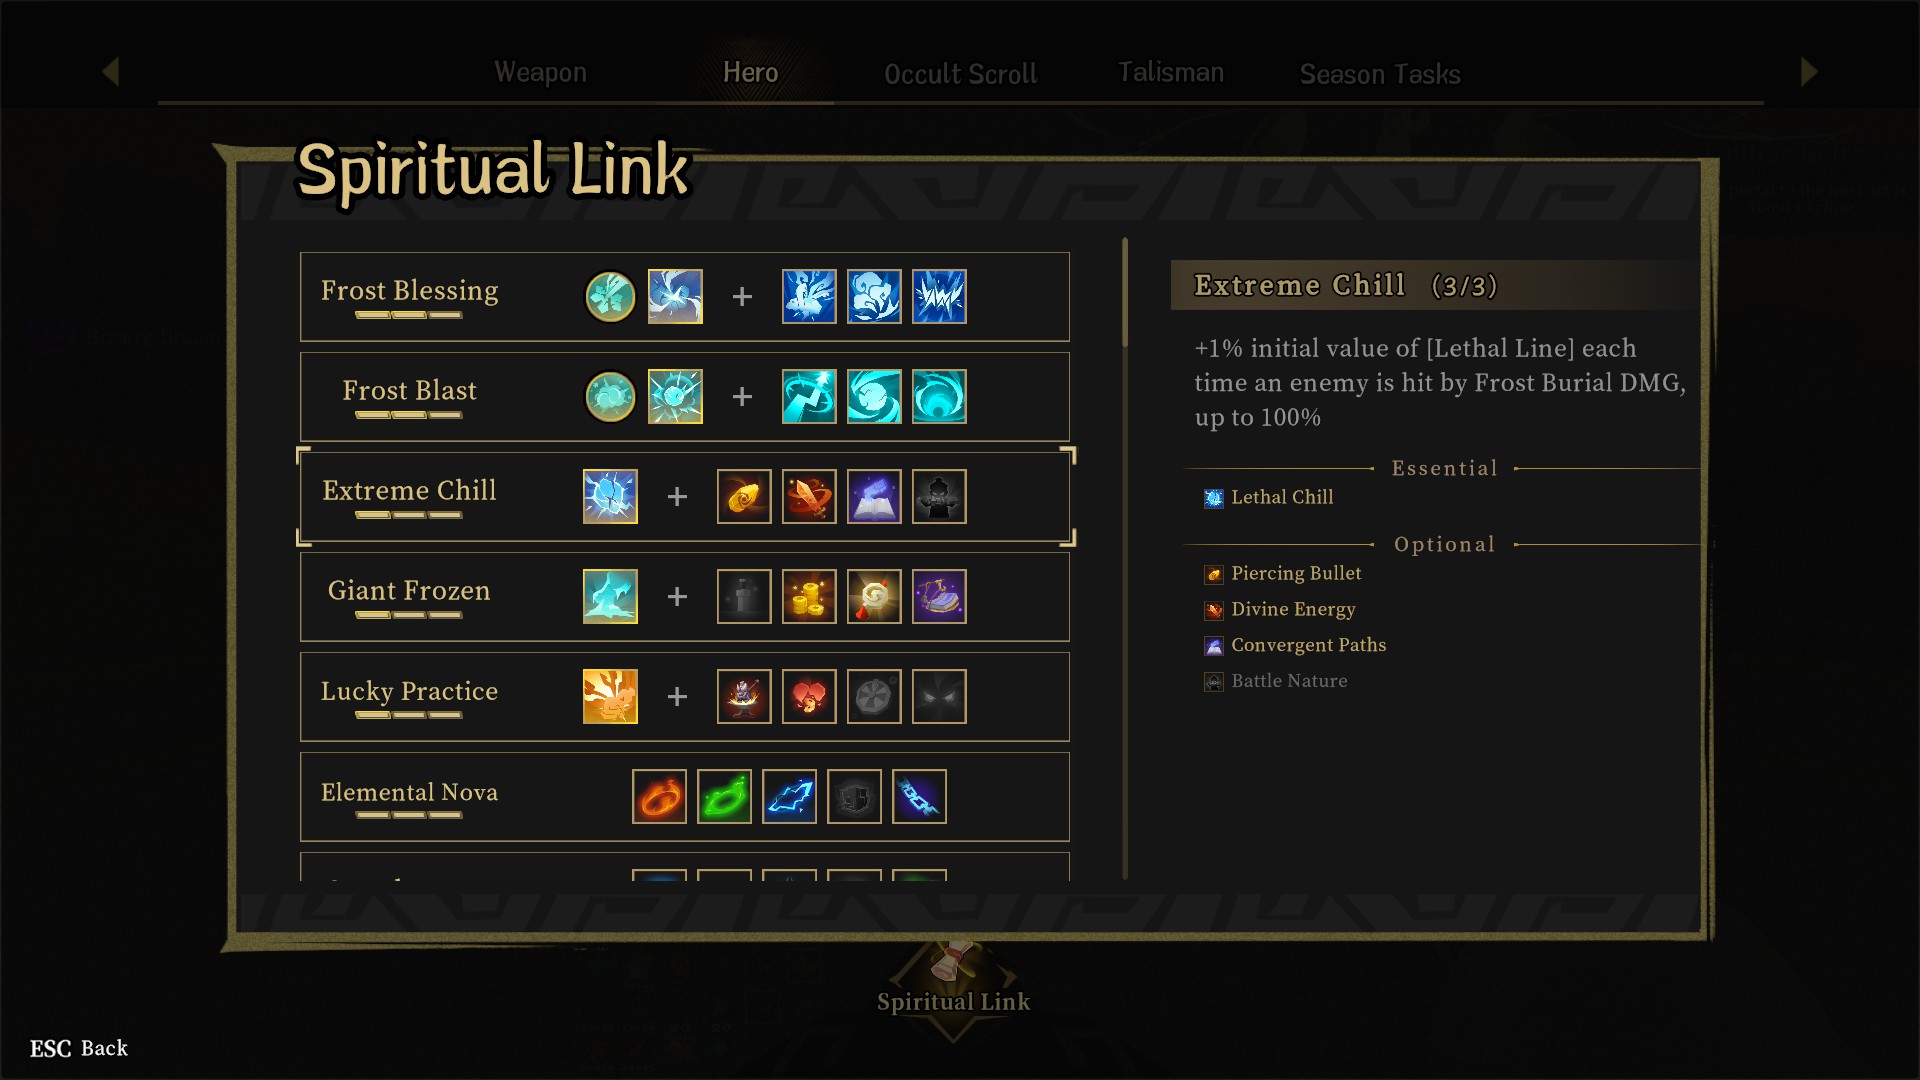
Of course you're going to want to focus on completing all the blue ascensions as much as possible, and you should be fine however you want to prioritize this particular ascension block. One thing of note is that you will want to have Lethal Chill maxed out during Endless loop proper, ideally with the Spiritual Link Extreme Chill activated as well.
Spiritual Blessings
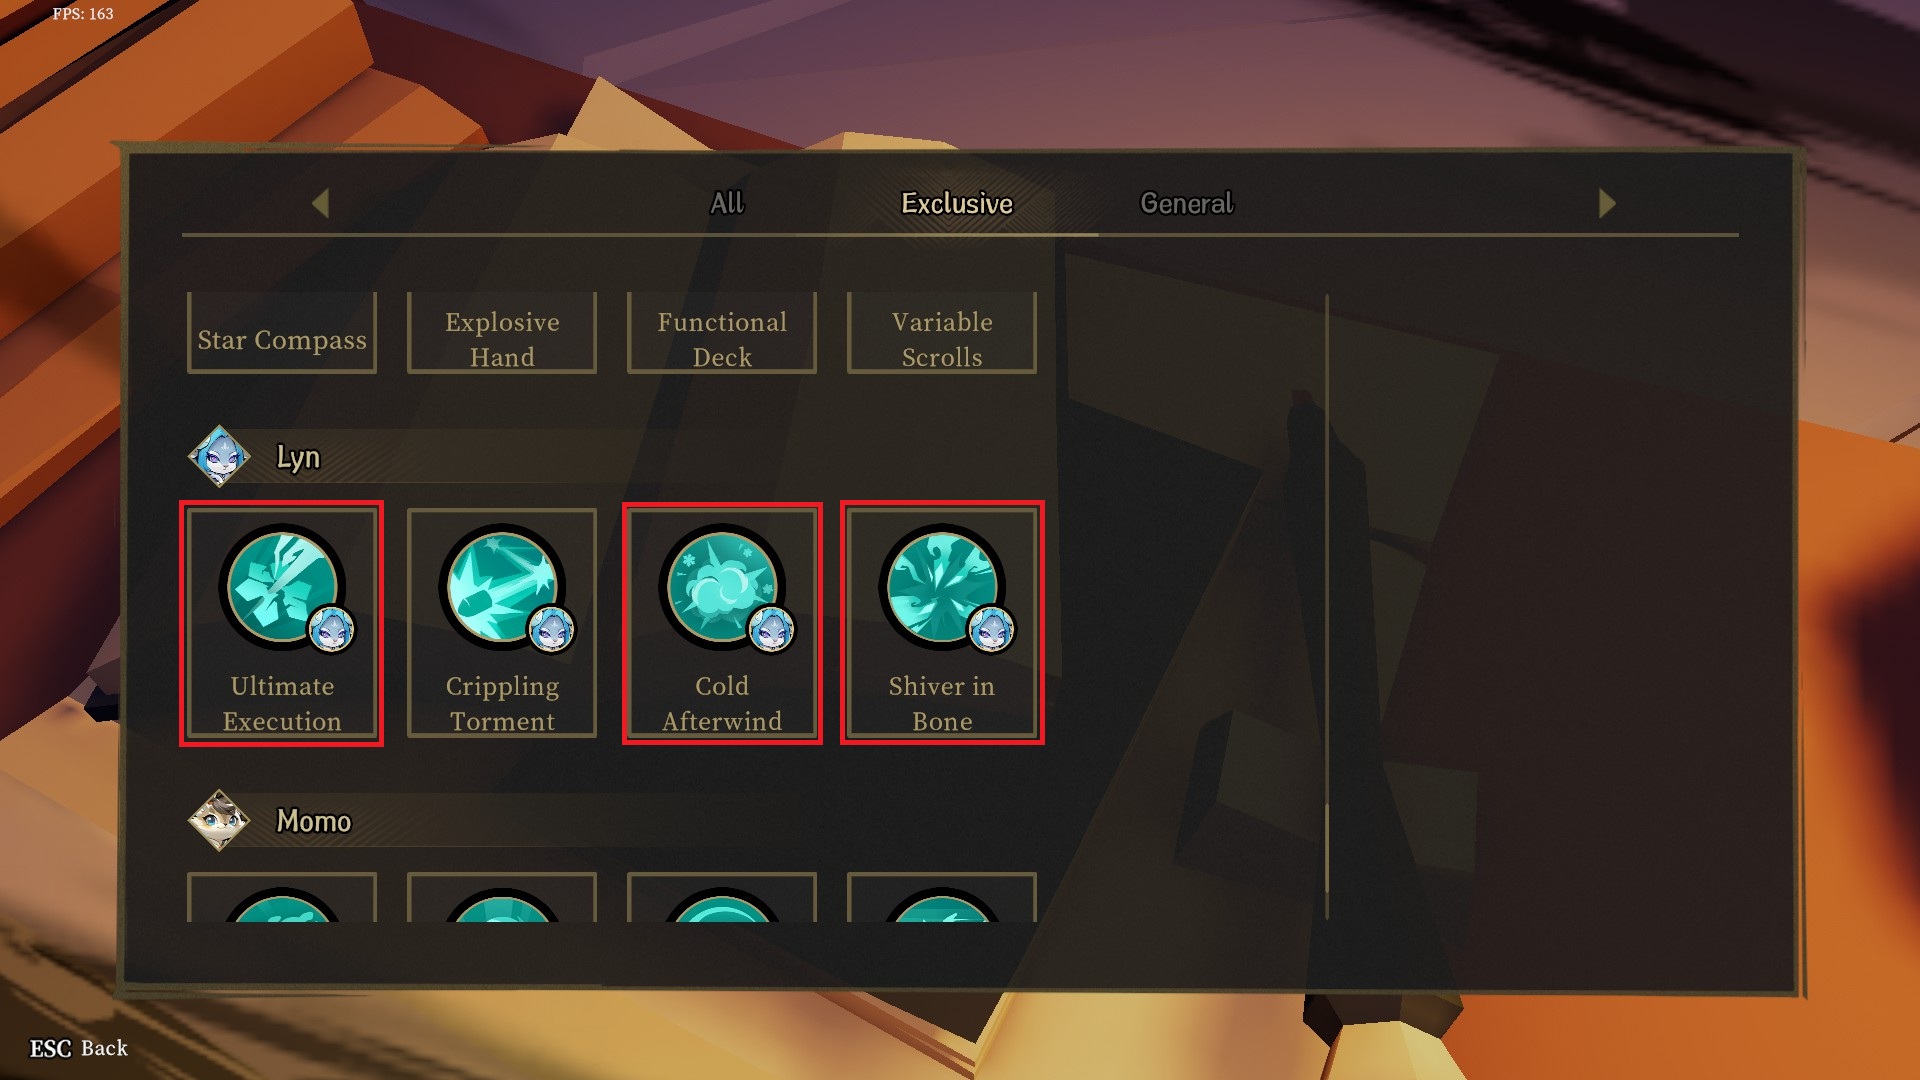
As for Spiritual Blessings, you should be rocking these three by the time you've got your entire build set up:
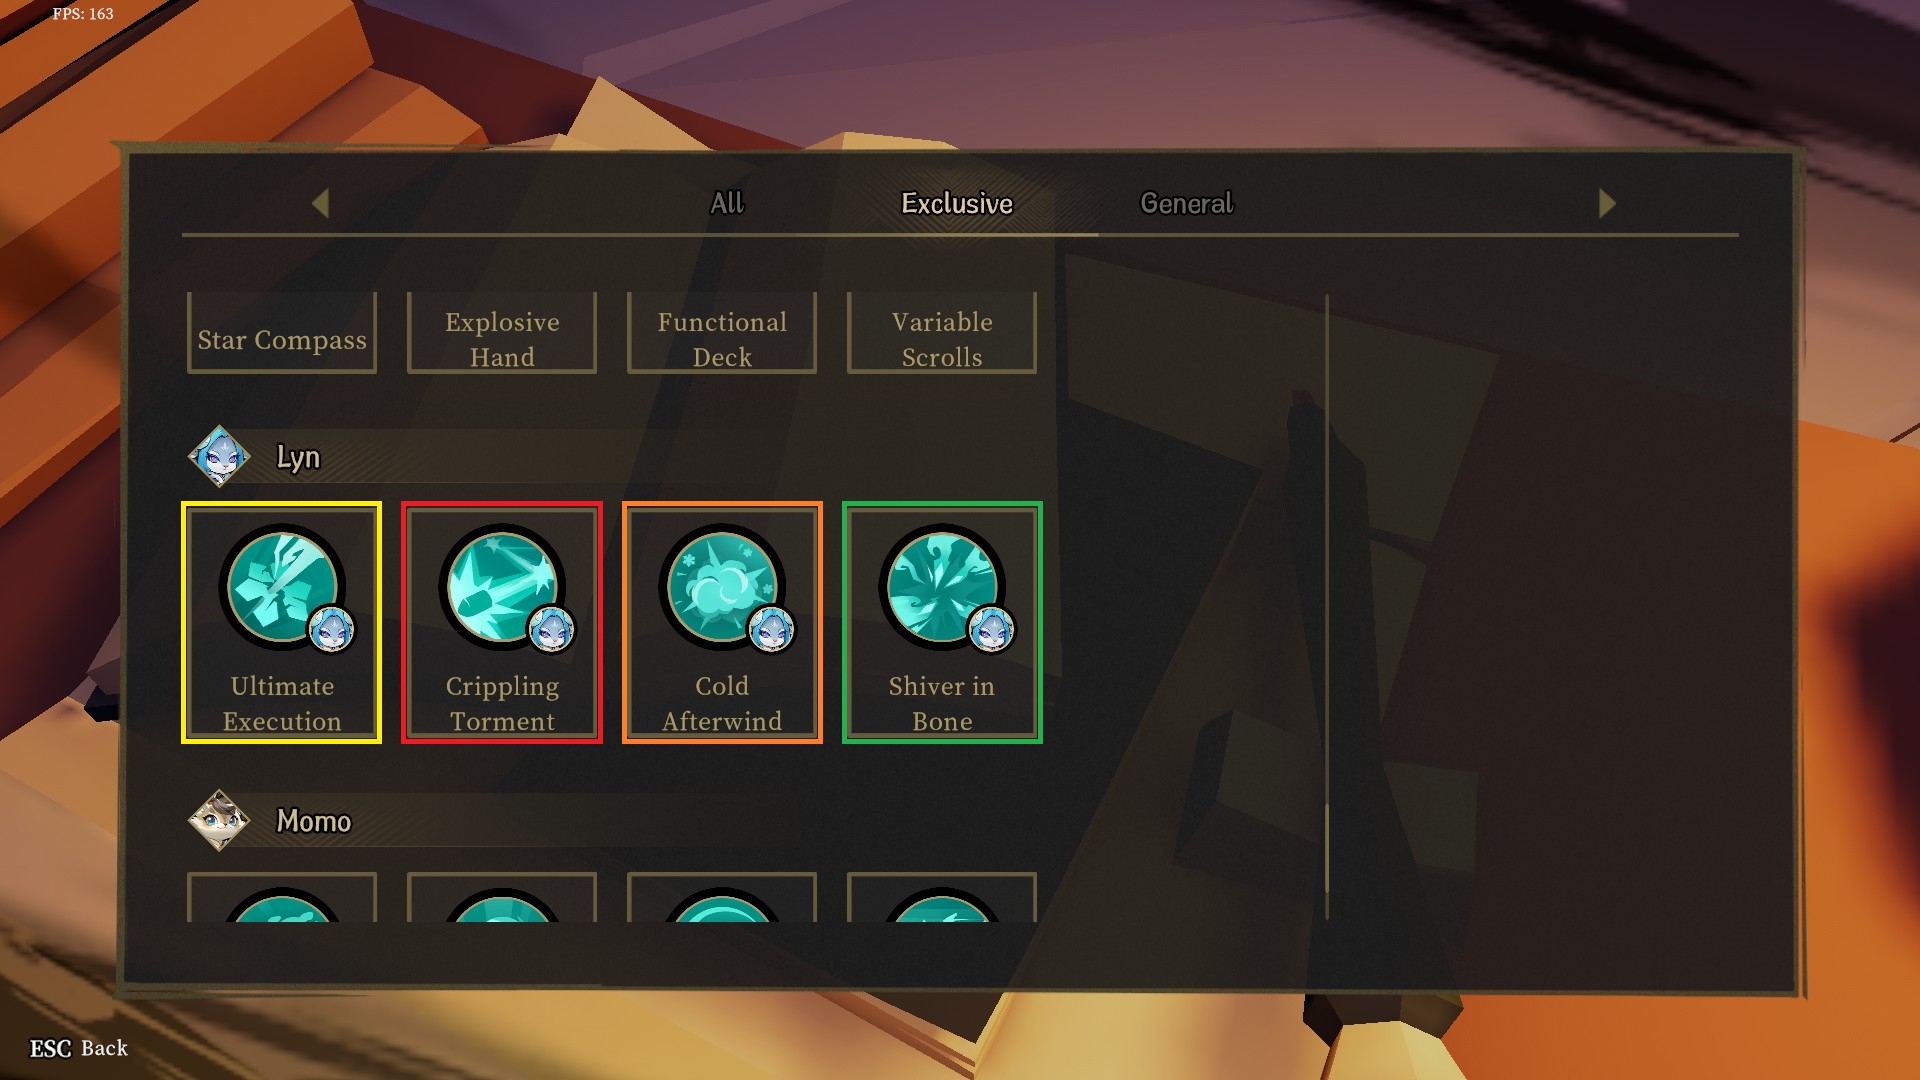
Otherwise, here is the priority list of which to take first from Lyn's list of exclusive Blessings:
Where:
  • Green - First priority
  • Yellow - Second priority
  • Orange - Third priority
  • Red - Completely Unnecessary
Shiver in Bone makes it so that weapon sources that do not intrinsically deal Weak Spot damage, like Starfly for example, have a chance to Unbalance enemies on hit. This is huge for our intents and purposes of mainly rocking a staff as our weapon of choice for the majority of the run.

Ultimate Execution makes it so one additional enemy can also be executed once the main enemy you are executing is Unbalanced, and the cherry on top is that once you got the Spiritual Link Frost Blessing activated, it adds an additional third enemy to execute once Ultimate Execution procs.

Cold Afterwind makes it so that the explosion of Frozen Grenades also have the ability to shatter Weak Spots, with a chance to cause a chain reaction. Useful for when your setup is at a point of completion you are using Phoenix Roar for clearing rooms of normal enemies.

You can temporarily omit Cold Afterwind for something else that you might need more of in terms of Spiritual Blessings whilst still setting your build up for whatever reason it may be, but before Endless Proper, you will want to at least have Shiver in Bone and Ultimate Execution together for the room clear efficiency.
Personally, I like to take Battle-Scarred at the very start of my run just so I can almost guarantee not getting downed in the first two Acts. Then by the time I reach Jokul, I should have a build going to where I can simply replace Battle-Scarred with something else that is much more useful.

For your Lone Wolf Spiritual Blessing, you cannot go wrong with either Occult Booster or Counterviolence, whichever you might prefer more from the two.
Star Link
Should you choose to do your Endless Journey run using Star Link season (Season 4), the set-up is significantly simpler as all you really need is the 1+4 pack, with the Primary Link of choice being Streaking Meteor.

The four starting Secondary Links can be whichever you may need more of for Pre-Endless, I personally went with the four shown above. Later on this isn't going to matter much because of how the 1+4 pack works; you're bound to get every single Secondary Link and may even find yourself disabling some should they become activated.


The main carry of this particular seasonal build will be True DMG dealers such as Keen Strike and Crippling Torment. Combined with Lyn's kit, you can easily dominate Endless Journey even at true 4-Player Scaling.
Arcane Talisman
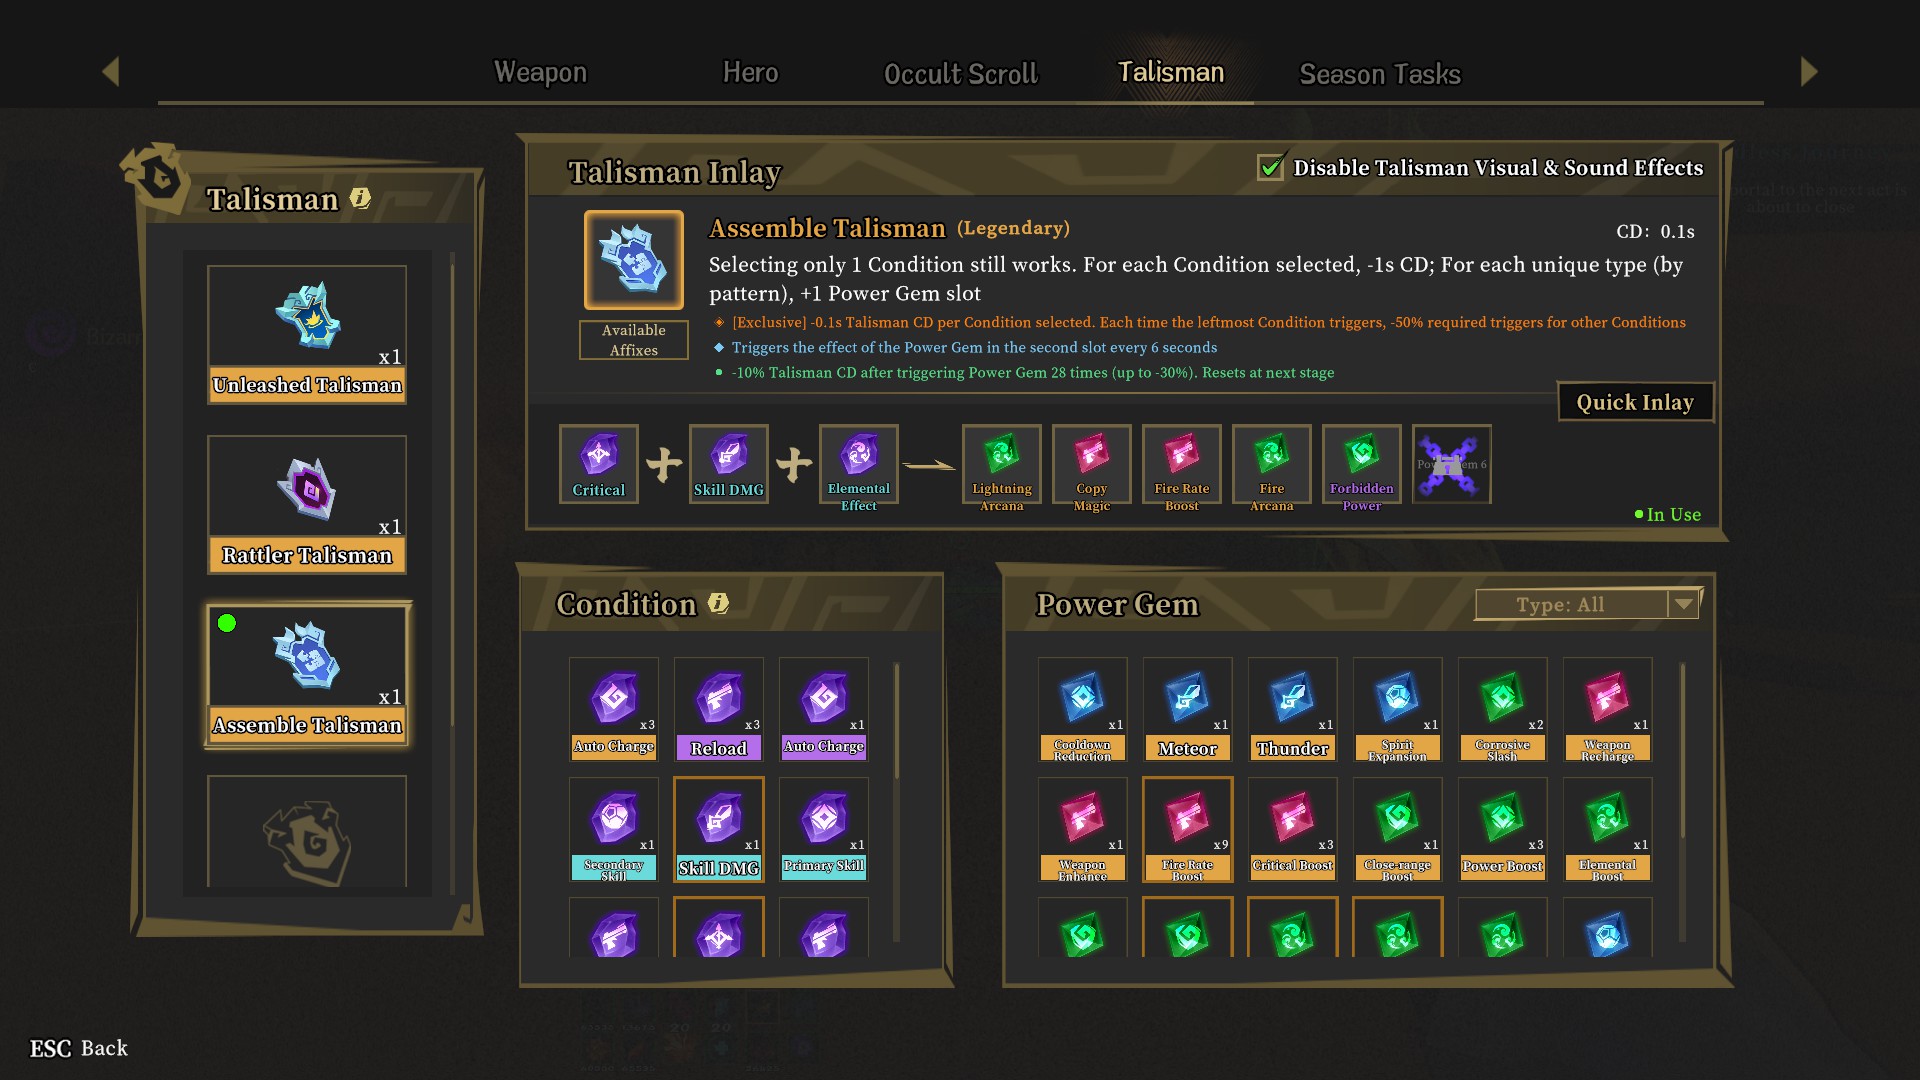
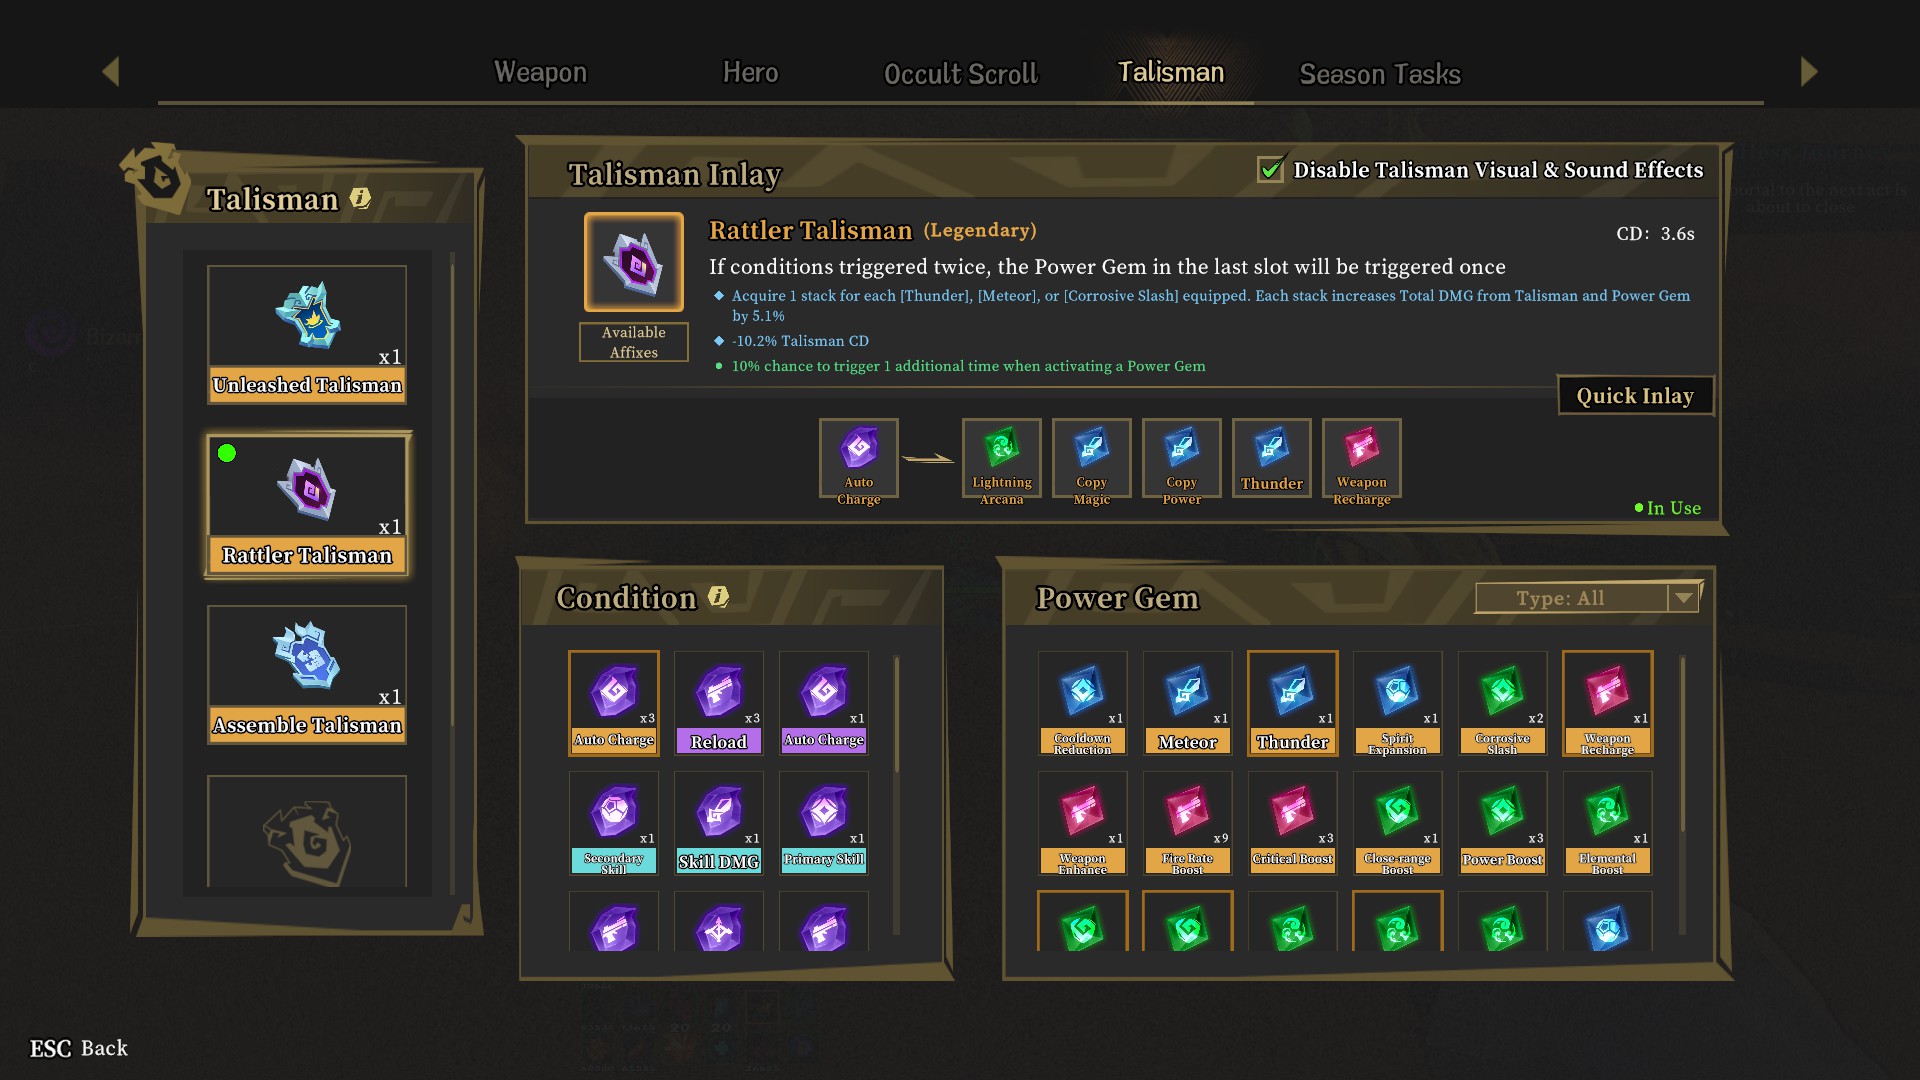
When it comes to Talisman choices, what I ultimately needed was one option to have as many stacks of Rate of Fire as I can for shooting certain bosses with the Starfly -- namely Ichthyosaurus Offspring and Gluttony (more explanation on these later in the guide), and the ability to have sustained uptime with my Weapon Skill Resources for both Phoenix Roar and Poisonous Ghost.

For such purposes, I personally went with these two respectively:

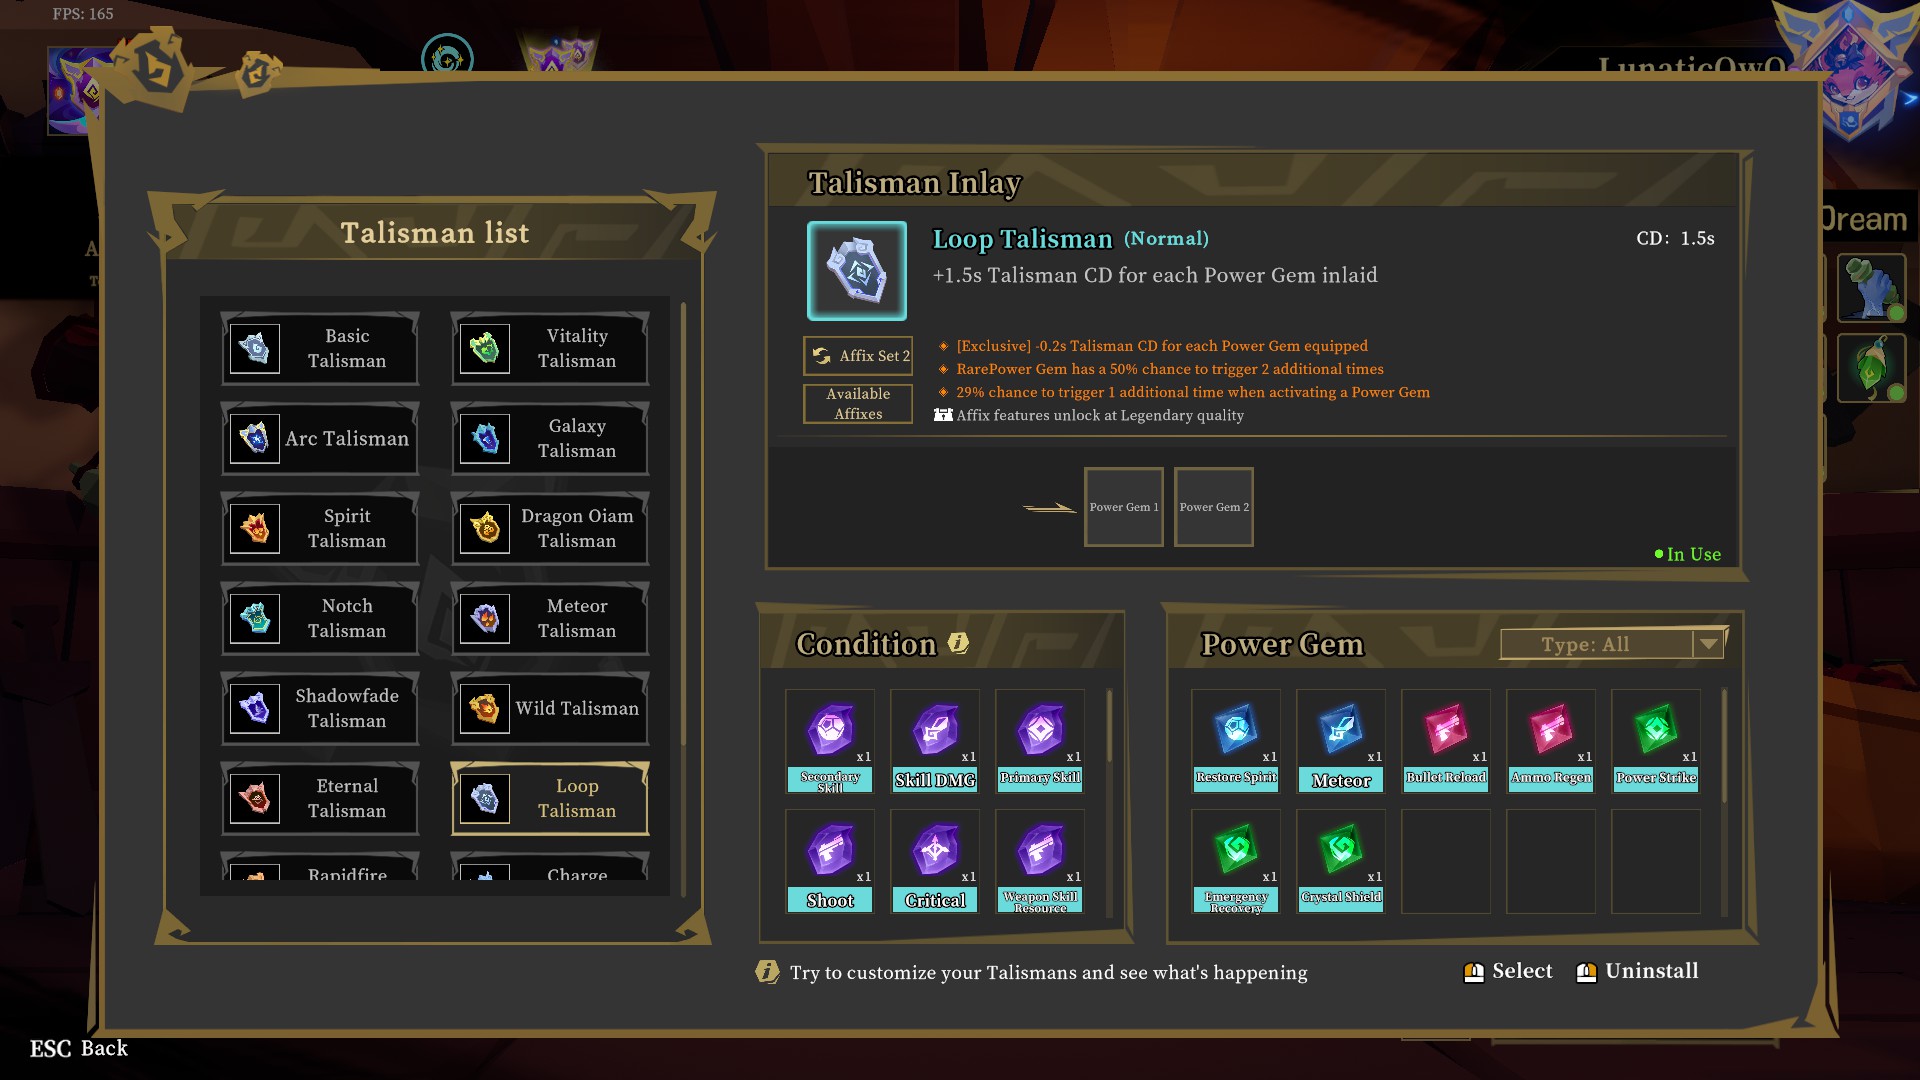
You can also have something like a god-roll Loop Talisman and do the Extra Slots Blessing, Forbidden Power Power Gem trick; incredibly useful for things like gaining stacks and stacks of Copper, which can come in handy later on.


Talisman Choices are entirely up for exploration depending on your needs, so feel free to deviate from my Talisman and Power Gem combination choices to explore on this one yourself!
Pre-Endless
Now we move on to the Pre-endless section of this guide, where it can generally apply to any heroes and make a run thrive with them, at least up to a point where enemies' health scaling is low enough to where capped damages still deal substantial damage.

Ascension Fusion can be whatever you think would be beneficial for your run, should one of your preferences appear on the list of choices. I have had ones where it wouldn't even benefit me in the long run but the run can still thrive with Lyn, so you can even opt out of Ascension Fusion if you really wanted to.

When it comes to Interdependent Fortunes, these are also entirely up to you, just that I would not recommend anything that gives monsters a delay on taking DMG or have a cap on the maximum %DMG they can take (This is why I highly advise against taking Monster-Spirit Feline even though it can be huge for Endless Journey runs).

The main thing here is that as early as pre-endless, you should be building your damages up to damage cap as soon as possible. There are Key notes you need to look out for to increase the odds of getting your damages to cap quickly and making your endless run successful at gaining and sustaining time.
  • Normal Dual-Edge (Important that this is Normal and not Enhanced specifically for Lyn. This is due to Lyn's specific talent Frost Blood, which lets her gain 2% Weapon and Skill DMG for every -1% DMG Resistance she currently has.)
  • Extravagant Consumption
  • Any and all possible ways of making copper fast, ideally one that caps every stage, for Extravagant Consumption stacks. i.e. stacking small things such as Devil's Covenant and Copper Miner, performing a complex combination of Flesh & Bones + Veteran + Priced HP + Enhanced-Paranormality (As a bonus), and so on.

    -As a quick aside, this is also where the idea of Extra Slots Blessing, Coin Cow+Forbidden Power god-roll Loop Talisman mentioned earlier could come in handy.

  • Enhancement Lover, because who doesn't love spending all their money on weapon enhancements when you gain them back so quickly; works wonders with the above-mentioned Talisman set-up while at Pole Monarch buying area!
  • Any ways of increasing your Lucky Shot Chance, Enhanced-Evil-Devouring Sword and stacks of Cursed Scrolls for example.
  • Any ways of dealing Crit damage through normal hits, be it through something as small as Enhanced-Casual Gunmanship's 20% chance, 100% guaranteed through Deadly Counter + Bloody Ammo/Fire Enthusiast (No Flame Shard nor Painkiller Blessing), and anything in between.

    -Crit hits are also a primary requirement to make Keen Strike work, should you be rocking Season 4 Buffs.

Other things worth noting as well include:
  • Any form of increasing your odds of survival to counteract the stacks of negative DMG Resistance you will be getting.
  • Stacks of It Takes Two, Enhanced-Reascends and Blessing in Disguises whenever you get the chance to see them, because having all ascensions leveled up is always a nice feeling, even if two of them are useless.

Now it's not the end of the world if you haven't yet completed all these set-ups come Endless loop proper, but this should give you an idea of things to keep in mind as you continue to make your build thrive moving forward through the Endless loops.
Endless Proper
Now here comes the Endless Proper section of this guide, which I will be separating into two parts: The short-term of Endless Journey (First 100 Stages) and the long-term of Endless Journey (Stages 1000+).
First 100 Stages
This stage is the continuation of getting your build to come together and pray to the RNG gods that your run will be blessed, because it's not every time you are going to get runs going even with every know-how you may have of the game. This is due to two crucial things that is nearly out of your control: Bad wave encounters and the frequency of Act 1 (Tomb) encounters.

Bad Wave Encounters
Each of the three acts have their own form of worst waves, while some are mid or not-the-worst-but-still-bad. Only Fjord has a good wave room but that's about it and it's only one good wave room.

Anxi Desert has the worst offender of them all and it's this room in particular, just to give an idea of a bad wave room.

Thankfully, this can be save-scummed should you encounter a bad one, and all it takes is a quick Alt+F4 and reboot of the game to get a different roll of stages that is thankfully not a bad wave. It's a technique I find myself doing a lot of so there's no shame in doing that as well especially if you're desperate for time.

Frequency of Act 1 (Tomb) Encounters
Yes, it is possible that you can get absurdly unlucky and not get a single Tomb in your loop for a while, and typically that means GGs for your run as the Reincarnation 10 changes to Elite Gathering scenes have made it much more painful to even sustain time by the end of an Act; you have to clear out a certain amount of normal monsters in the Elite Gathering scene first, and only then will the Elites start appearing. Tomb is an exception as it remains to give the old Elite Gathering setting of just encountering the Elites, thankfully. It should come without saying that the lower you set your Lone Wolf setting, the less punishing these new changes to Reincarnation 10 Endless become.

If luck does not strike you that badly in the first 100 stages of Endless, Lyn's combination of Ultimate Execution, maxed-out Lethal Chill and with the Extreme Chill Link enabled should see you clearing rooms of normal monsters and most Elites with efficiency, supplemented by Shiver in Bone to make monsters unbalanced nearly instantly with how fast the Starfly fires, gaining more and more time in the process. This is also where you can just about Starfly everything and not have to worry about swapping around weapons for maximizing time saved per stage.

Once you get past 100 stages almost hitting every single damage cap and noticing that you are continuously gaining time, you should be fully set for the long haul!
Stage 1000+
At this point in the run, it will eventually become more and more noticeable that some enemies can get stuck outside of Frost Burial's Line of Sight, exposing a side effect to Lyn's ability to Unbalance and freeze monsters in place; this is the time to consider using Phoenix Roar for clearing rooms of normal monsters by the edges to mitigate said problems -- to a degree at least.

You may have also noticed that I skipped over the entire 100 to 1000 range, because that is still early in the Endless run to where the health and DMG Resistance scaling is barely noticeable with a build that is fully set-up, hitting damage caps and everything. Unless of course, you decide to rock Endless Journey at True 4-Player Scaling as it's expected of monsters to get their health scaling significantly faster with it.

But with the use of Star Link season, your Secondary Links by the 100s to 1000s range should have scaled accordingly to where Keen Strike procs rapidly enough that the enemy health scaling remains barely noticeable, even at 1000 stages and beyond.

Otherwise, enemies become more and more resilient to weapon and skill damage caps by this point in the stage; this is where uncapped True DMG dealers like Frost Burial, Miasma and Poisonous Ghost will start becoming your significant damage dealers of the run.

Certain Elites have their Lethal Lines capped at 50%, which starts becoming more and more noticeable the longer it takes to kill enemies with Starfly and Miasma alone due to ever-increasing health scales.
I call these Elites Stubborn Elites and here are the list of Stubborn Elites you will encounter in the run:

Tomb
  • Elite Beetle
  • Elite Horsehead
  • Elite Spearman
Desert
  • Elite Bandit Hermit
  • Elite Coyote
Fjord
  • Elite Catfish Warrior
  • Elite Corrupt Monk
  • Elite Kappa
  • Elite Monk
Jokul
  • Elite Thunderous Stalker

Whenever an Elite Invasion is about to happen, swap to Poisonous Ghost the moment it is starting, slashing Stubborn Elites the moment they pop out using Weapon Skill to get their Total HP low enough to below-Lethal Line levels; this usually takes 2-3 slashes with Poisonous Ghost + Fish or Bear Paw which significantly saves time fighting them vs. doing it with Starfly alone.

Unfortunately this strategy is not as effective for boss encounters (Except Golem), and letting Starfly fire off while keeping bosses frozen in place using a mixture of Lyn's kit and Thunder Step-Spamming is still the better option for boss fights.

While most bosses do not require absurd levels of Rate of Fire, there are two particular bosses where rubberband-inducing levels of Rate of Fire is absolutely necessary to save time in their fights, those two would be Ichthyosaurus Offspring and Gluttony. This is where Assemble Talisman comes into play especially when their health and shield/armor caps are met.
  • For Ichthyosaurus Offspring, the set-up would be to convert Starfly to Fire damage through Spiritual Link and with Poisonous Ghost as off-hand Elemental Share for Corrosion; it will also serve as a backup plan in case the game still screws the fight over by letting the worm bury down in the sand. Assemble Talisman is equipped with the same set-up as shown in the Talisman section, re-equipping Forbidden Power so that the CD is set back to 0.1s.

  • For Gluttony, the set-up would be to convert Starfly to Lightning damage through Spiritual Link, with any Fire weapon as off-hand Elemental Share. Same thing as above when it comes to Assemble Talisman as that specific Talisman seems to have a side effect bug because of how said Talisman works.
Closing Remarks
And that's about it for this guide! I would like to give a huge thanks to the Gunfire Reborn Discord community and especially to Teaa and CommanderCH.

Teaa has played a huge role for inspiration and motivation for me to do these kinds of Endless Journey runs myself, as they were one of the original gamers in pursuit of pushing Endless Journey to its limits, learning a lot from them as well! Later on in the run you will realize that your true enemy is not the monsters you face, nor the capped and uncapped damages you have to consider, but the mental capacity to keep pushing forward and setting milestones.

CommanderCH also played a role in this because back when I decided to give Endless Journey attempts a shot again during Season 3, not all of the ideas for how to build Lyn at the time were all mine as some were borrowed from them, like the usage of Starfly in most fights to Unbalance enemies while having a free hand to execute enemies through Frost Burial. Not to mention I totally took one of Lyn's specific Talent Frost Blood for granted at the time and I didn't read how it worked, I just maxed everything out when she came out and didn't even bother to read like a dummy LMAO.

A simple desire of a past, clueless newbie self to learn how Gunfire Reborn's gameplay works inside out wanting to really love this game, led me from one rabbit hole to another and it's shaped how I tackle not just Endless Journey runs, but also normal Reincarnation runs in general, having fun while doing it.

To those who have read this and became inspired as well to give Endless Journey attempts a try, I wish you luck and happy grinding!

4 Comments
LunaticOwO  [author] 28 Aug @ 7:00pm 
Whoops I also forgot to mention, those two staff weapons are the weapons that allow you to deal damage to monsters all while using Lyn's Primary skill.
LunaticOwO  [author] 28 Aug @ 6:58pm 
So for why I chose weapons that don't hit weak spots, I chose staff weapons like Starfly and Phoenix Roar because they're the kind of weapons that you can shoot with that don't require a whole lot of aiming.

Plus for the instant execution build, I really only need to make monsters Unbalanced through Shiver in Bone, not through shattering Weak Spots.
Not_A_Furry 28 Aug @ 4:39pm 
Is there a reason you chose weapons that don't exploit weakspots?
JEnriqueLOL 19 Aug @ 6:58pm 
best guide in the world :GunfireRebornlaugh: