Blue Prince

Blue Prince

Not enough ratings
Fighting the random - Drafting Strategy Tips
By sazandorable
Tips for fighting and manipulating the RNG (the randomness factor in what you draw) to draft the rooms you need, for the struggling architect.
   
Award
Favorite
Favorited
Unfavorite
Introduction
The number one complaint brought up by players not enjoying the game is the randomness and the rogue-lite element. People who express this in the forums then get told to "git gud at drafting", that it's a "skill issue" and that they just need to use "strategy". But how is that possible, when so much of the game is random???

I get it. I really do. So here, this is for you: a guide to git gud at your drafting skill and to be strategic with the random. It is possible, I promise, and hopefully it will help enough to make you get the sparkle of "oooh I get it now!!" and enjoy the game, the way I and those other players are. It can be REALLY fun and easy, I promise.


(The other big issue is puzzles; this guide will not address puzzles, check out the bunch of other good guides other people have made to help with puzzles.)


First of all: you need to understand and accept what game you are playing. You are not playing Gone Home, The Sims or a Zelda. You are playing a game which was conceived and designed around specific gameplay mechanics; that is the way it is intended to be played and enjoyed. If, while trying to play it as though it had different mechanics, you are not finding it enjoyable or well-designed, the reason for that does not lie with the game itself.

When I was little, I played my dad's video games on his computer, like Diablo II. I liked the game's music and graphics and the pretty Sorceress. I did not like the combat, which I was not good at. I mostly ran around talking to characters, cast some spells from afar, and tried to progress in the dungeon while avoiding monsters.
As you can imagine, this was not a particularly fulfilling way to play the game, because Diablo II was never meant to be completable -- or even fun -- without fighting monsters. It was designed around central mechanics, such as exploring dungeons, levelling up, and fighting monsters. I don't have to like Diablo II, and it's okay to not like fighting monsters, but anyone will agree that the sentence "Diablo II was a bad game because I couldn't have fun in it without fighting monsters and it didn't let me build a cute house and farm turnips" is ridiculous. That isn't a problem with the game itself, but with me applying my expectations to a game that is not remotely the same genre.

This is true for a lot of video games, including Blue Prince.

So to start with, here are some basic definitions of, in my opinion, the central mechanics and features of the game, and explanations for why they are essential for the player to accept as features and to interact with in order to enjoy the game.


Rogue-lite

"Rogue-like" refers to the video game Rogue and its central features of randomness, perma-death, replaying until you git gud, etc. There's debate around the exact definition and which elements are necessary to qualify as a True Rogue-Like blablablah, so there is also the derived and more forgiving term "Rogue-lite", which is the more appropriate term in the case of Blue Prince.

The biggest Rogue-like element in this game is the daily resetting, and its application to both the level and to the player:
  1. The house will be different every run.
  2. Anything the player gains today will not be available in the next run.

Accepting this and playing within the frame of this mechanic means, for instance:
  • Seeing the value of each run, despite the loss. Each run will teach you things, from discovering new rooms, items, or interactions, to figuring out how to solve a puzzle or a code that you will now solve faster in the future, to learning lore about the world or the story of characters.
  • Accepting "failures" and "mistakes". They are not permanent. There will be another run.
  • Playing every run to its end to see what you get this time, without trying to get one single Perfect run and giving up when you don't. This run will end and you will try again -- but you have learned things.
  • Trying things out. You are not committing to this choice forever. You can see what happens if you put this room in this spot, spend this item on this contraption instead of another, play without your favourite item because this shop didn't have it in stock today, or try out this combination of experimental house features rather than that one.

However, one of the things that make Blue Prince a Rogue-lite and not -like... is that this resetting is not completely absolute. There are a variety of unlockable upgrades that are permanent and stick through each day, as well as some punctual opportunities to gain or keep a couple of things from one day to another under some conditions.
I say this because simply knowing this can help! It means that just playing a run, even without the goal of beating the game this time, gives tangible progress that will make the next run easier (and the goal of beating the game more attainable).
It is possible to get to Room 46 in one day, but not expected.

Accepting this means for instance:
  • Playing a run without the goal of reaching Room 46 today, but trying to unlock something else for now.
  • Knowing that even though something the game asks you to do seems absurdly difficult right now, it must be possible, and it will be much easier one day in the future.

For instance, you might see things with ridiculously high prices: 5 gems, 13 steps, 400 coins!
This doesn't make Blue Prince a bad game stupidly designed because it's so obviously impossible to get 400 coins in one single day.

Instead, think of it this way: it's something the game asks of you, so it must be possible.

So, how can you make that happen?


Perhaps you can reduce that price. Perhaps you can transfer money from one day to another. Perhaps you can start the day with money. Perhaps there is a room that gives you a heckload of money. Perhaps there is an item, an experiment, a room effect, a special power that increase the money you get. Perhaps there is a way to make this room's effect and that room's effect interact in a fun way.
Perhaps you can't do that today, but you can work on making it easier tomorrow.
Look for ways to make that possible, and you will, I hope, I think, start having fun.

In short: understand the terms of the game, and engage with it, on its terms.


RNG

"Random Number Generation": another common component of Rogue-likes and -lites. Basically, every so often the game rolls a die and gets a number and gives you one of many different possible things based on the outcome. This is what makes every play-through different.
In Blue Prince, the most obvious use of this is the random floorplans you draw with every door opened. But there are many other instances of it: whether or not you will find an item in this room, which item, how many, etc. Which components you get for an experiment today. Which items are affected by this power. Etc.

Random means out of your control and not your choice. This is obviously a source of frustration when you've been planning a strategy and it gets Ruined at the Last Minute by a Bad Random Pull.

Accepting this means for instance:
  • Just psychological acceptance: seeing the loss of a precious item as just a challenge to play without it as a crutch again, a reason to play another run to try and get it again, etc.
  • Planning for bad luck: keep plenty of possible paths open in case you draw dead-ends here.
  • Being flexible: if your usual strategy doesn't work today, try something else. Might learn something new!


But... there are ways to manipulate the RNG to get the thing you want.

Here they are.
Leading principles
There are 5 "architecture books" (Drafting Strategy magazine, issues 1-5) to be found around the estate that give general and specific tips. I recommend reading them in detail if you find any of them, as I've found all of them very correct and useful (even when I thought I already knew the topic, such as room types).
Here are three of, in my opinion, the biggest principles from these books:


1. Always draft a room you don't know, even if it doesn't sound interesting or useful.
Maybe not right now if it'll screw you over, but I see a lot of players complain that they got stuck on a puzzle for ages only to eventually learn that the solution was in a room they have never drafted because it sounded useless.
Nothing in the game is completely useless. Some elements may have a one-time-only use, such as books you don't necessarily need to reread over and over, but every room has, or can have, something useful. Perhaps not now, and only when you also unlock a different room or have a specific item in your inventory! But you need to see the room in order to know this in the first place.

A lot of rooms also have additional functions that their descriptions don't announce (such as ability to rotate floorplans drafted from this room, or interactions with other rooms), or contain critical hints, can spawn super useful items, etc.
Investigate everything at your disposal. When you stumble into a new room, check it out.


2. Sometimes, you just don't have all the information to use or solve what you're looking at just yet. Make note and move on.
Accept this, with the knowledge from above: nothing in the game is completely useless. This weird painting or empty room will eventually make sense, but perhaps you just haven't seen the hint or unlocked the upgrade yet.
Sub-tip: revisit old stuff! There's plenty of discreet or convoluted puzzle hints or room functionalities that didn't seem important at the time that I completely forgot about, and suddenly made crystal-clear sense days later, after I got additional information.

Some rooms will seem useless in early game and you might forget about them and automatically rule them out as an option without even thinking about it. Don't forget about them completely: you might realise their interesting abilities or synergies much later, once you've unlocked or discovered new stuff.
Nothing is completely useless: do not just rule things out forever.

(Yes, even the Lavatory: it's a room that counts for effects that rely on Red Rooms, without actually hitting you with a negative effect.)


3. A room drafted is a room out of your pool.

Short version: you won't be hit with three dead-ends in your draw to try and get into the Antechamber if you already drafted all those dead-ends 5 ranks ago.

Long version: it's often a better strategy to spread out and fill up your lower ranks than to charge ahead towards Rank 9, especially if your strategy depends on pulling a specific room. Take your time and the opportunity to build a solid "foundation" in your lower ranks, getting rid of dead-ends, stocking up on resources, triggering useful effects and building lots of rooms necessary for later effects.

For instance, there's no use drafting the Servant's Quarter if you don't have any Bedrooms drafted, or the rare Chamber if you don't have the 2 rooms it affects nor any space left to draft them.
Or if you absolutely need to draft a specific room, you have a much higher chance to pull it from a drafting pool you have reduced down to just 20 remaining options, than if you just drafted a straight line and have 50+ rooms left in your pool.

How do I get that rare room right when I need it nearly every time?
Well, to start with, I make sure I don't draw all those other rooms instead.
Concrete general tips
  • Stock up on Gems and Keys.
    Yes, money is important too, but mostly in that it can get you keys and gems. Being out of coins will almost never stop you in your tracks and end a run; being out of gems or keys often will.

    Simple rules of thumb are to avoid spending gems if you don't especially need that room right now, and to always take a room that gives you gems.


    Related to this point...


  • Do not avoid dead-ends.
    All 3 big principles apply here: dead-ends drafted early on in your run won't be popping up to clog your options later (barring special circumstances).

    On top of that, lots of dead-ends have critical uses, more or less hidden. A lot of my puzzle-solving time is in fact spent chasing specific dead-end rooms, and I only know they contain what I need because I've drafted and explored them before.

    Don't automatically rule out drafting dead-ends ever: just be strategic about where you do draft them. Grid corners are good spots for them, and you might find or create a nice niche to slot one out of your way between two mostly-filled-up ranks.

    And wrapping up to the above tip, dead-ends often give you useful resources to keep drafting!


  • Avoid wasting doors.
    Doors are a limited resource, too, and a valuable one. Avoid drafting a many-doored room into a dead end, as drafting it removes it from your pool and thus from your options later on. You might be getting stuck unable to draw a 4-doors room in rank 8 simply because you have none left in your pool.


  • Don't neglect the power of backtracking.
    Though Steps are also a limited resource and can be a precious one on some runs, there are many ways to be just swimming in them. A few permanent or temporary upgrades give you extra steps at the start of the day, and the Running Shoes, while not very useful in small houses focused on efficiently getting to the Antechamber, are incredibly helpful for sprawling and serpentine estates. For instance, if you get your beeline cutoff at the last second, they will allow you to make it back to the entryway and start a new path from a leftover unopened door. They also make back-and-forth trips trivial, for instance to Shops, to your Outer, Dining or Conference rooms, to gather anything Spread or something that finally just spawned in a room you drafted 5 Ranks ago...


    But you can't control how to get the Running Shoes, right, because of the RNG?
    Well. Yes, you can, somewhat.


  • Learn where to find the thing you want.
    It's not all equally random. Some items will spawn more often in specific rooms: the Running Shoes are often found in sports room like the Weights Room or the Gymnasium, while you'll never find a Coin Purse there but often in the Parlor or a Bedroom. If you need a Shovel, pick a Green Room over a Walk-In Closet, it's much more likely to be there -- and while you're at it, pick the Veranda over the Patio, so that even if you don't find it this time, you're more likely to find it next time. The Guest Room doesn't guarantee an item in its description, but in practice, will often have 1 Gem or Key -- or even a Keycard! -- on its side table.

    Many special items, like the Running Shoes or Shovel, can be Ordered to be stocked at the Commissary some later day through the Staff Services on a Terminal.

    If it's a specific room you're looking for, many of them need to be unlocked first (permanently or for the day), or can only be drawn and drafted in some spots of the map, never others. Maybe you can never seem to draw the Archives on Rank 9 not just because the RNG hates you, but because it cannot spawn there in the first place, ever.

    And the best way to learn these trends is to play a lot!


  • Think about timing.
    Consider your parameters of the day, and strategise accordingly.

    Some daily parameters to take into account: the Observatory's effect, the Outer Room if you have access to it, whether you get a Keycard or the Utility Closet early in the run and thus might want to raise the likelihood of Security Doors instead of lower it, whether you have triggered an effect affecting the rarity of specific rooms...

    Some rooms are more or less useful depending on when and where they are drafted.
    For instance, the Corridor is just another hallway on the low ranks, but can be a life-saver on ranks 8 or 9 where nearly every door is locked: sometimes it can be useful to avoid drafting it early on!
    Inversely, the Great Hall is a pain most of the time, but there are ways to open all its doors for free, such as drafting the Foyer or having a special item. You may also find a map of its setup of the day...

    This is especially true with many Experiments from the Laboratory, and I recommend starting your daily Experiment as soon in your run as possible so you can fully benefit from it.
    For instance, common Experiment triggers are "eating an apple", "digging up trash" or "opening a security door". Thus, I will often leave alone (and make note of the location of) any apples, dig spots or security doors I encounter if I don't need them, until I've started my Experiment for the day. Meanwhile, I will pick the security door trigger on days when I have a Keycard and raise the Security level.
    Sweet bonus to using an Experiment a lot: when you get access to the Shelter's terminal, triggering an experiment many times (usually 4-5) will let you activate Emergency Mode, unlocking all doors for the entire day!


  • And finally: keep playing!
    Again: this game is a rogue-lite, accept and embrace that. Perfect days are rare, but so are days without any progress at all. At the very least, you've likely got a new star for the Observatory, ordered or unlocked something for tomorrow, discovered new rooms, new items or their spawning possibilities, or even just learned something.
It gets easier: future upgrades
If what you're trying to do seems just impossibly difficult, shelve it for later and just keep playing, until it seems easier.

There are LOTS of upgrades, reveals, secrets, or even just tricks to learn, that can make a single action much easier to perform later in the game.
Here is a slightly spoilery list of some things that eventually become possible:
  • Increasing your odds of drawing a specific colour or type of room: choosing the colour of rooms you're more likely to draw today, choosing the colour of rooms you're going to draw right now, a room that will only draw dead-ends... Check out the Secret Passage, Furnace or Greenhouse, Observatory constellations for dead-ends or 4-doors rooms, upgrades to the Cloister, and in laaaate game try to get the Scepter item and Authority of the King power.
    For many multi-rooms multi-steps tricks, the game increases the odds of getting what you need without telling you explicitly; for instance, drafting the first room will increase your odds of drawing the other room(s) needed (this is the case for the Boiler and any room that has tubing, once the power is activated). You might pass on using Tomorrow rooms because they're rare and you almost never draw them, but many are more likely to be drawn the next day once you have drafted them (such as the Coat Check and I believe Mail Room).

  • Getting lots of rerolls: rooms or powers that give you lots of dice, a couple rooms that let you reroll one or many times when drafting from them, multiple items that let you reroll once for every draw (with conditions), a room that lets you reroll in exchange for gems up to 8 times for each room and a power that lets you do that infinitely (until you run out of gems), a power to reroll in exchange for stars, ... Check out the Drawing Room, the Classroom, the Study, the Laboratory, the Shrine, the Observatory with some help from the Planetarium, and try to get the Paper Crown item.

  • Getting lots of money: at least two rooms just give you tons of money for drafting them, there are huge rewards for achievements post-entering Room 46, a room that allows you to transfer all your remaining money and gems to the next day, multiple opportunities to get an "allowance" which gives you money at the start of every day (and can stack to get REALLY HIGH), a couple ways to have a sale for some shops... Check out the Vault, the Treasure Trove, the Casino, the Office, the Freezer, the upgrade for the Bunk Room, the Observatory, and solve any puzzle box with coloured tiles you stumble across, and try to get the Coin Purse item and Lucky Purse contraption.

  • Getting gems: you can upgrade rooms to give you 2 gems or more, there is an upgrade that gives you 2 gems at the start of every day, there are multiple ways to skip or axe forever the gem price of some rooms, some rooms have a secret safe that give you a gem every day if you figure out the code once ... Check out the the Trophy Room, the Ballroom, the Armory, and try to get the Lucky Rabbit Foot item and Jackhammer contraption.

  • Getting lots of keys: one weird and very funny trick gets you like 25 keys at once, and there are multiple ways to start the day with keys, to unlock rooms or trunks without using up keys, a way to unlock all doors for the entire day, items that unlock doors some or all of the time, ... Check out the Locksmith, the Foyer, the Kennel, the Showroom, the Armory, the Shelter, and try to get the Hammer, Morningstar, Lockpick kit or Master Key items and Electro-Magnet and Picking Sound Amplifier contraptions.

  • Dealing with security doors: there is a way to disable all security doors, and a way to lower or raise their frequency (you might want to raise it if you have disabled them or if you have a keycard!). There are also at least 2 ways to start the day with a keycard. Check out the Security Room, the Shelter in combination with the Lab, the Showroom and the upgrades to the Billiard Room, and try to get the Moon Pendant item.

  • Getting specific or rare items: there is a room that lets you trade items for each other, a way to order specific items from a selection for the Commissary to stock in the future, a way to stock one item to retrieve another day, there are variations on some complicated & rare items that become much easier to get later, items costs that seem ridiculously expensive become trivial later when you start getting a lot of money, ... Check out the Trading Post outer room, Coat Check, Showroom, Armory, Mail Room upgrades, any room with a terminal, and try to get the Lucky Rabbit Foot and Moon Pendant items.
How To Get The Room You Want: Prepping
1. Check the drafting location.
This is the number one issue you may not know you're having, and also one I keep forgetting about at the last second even now.

Some rooms have explicit speshful shiny unique requisites, and we'll tackle them, but a much more discreet rule governs where any given room may or may not be drawn and drafted: its doors.
Although you can absolutely draw doors into walls, brick yourself in, and create dead-ends from multi-doored rooms, this only applies inside the house. Not to the perimeter.

No room can have a door leading to the outside. (*in normal circumstances; there is a small number of very special exceptions.)

Consequences on otherwise completely normal rooms:
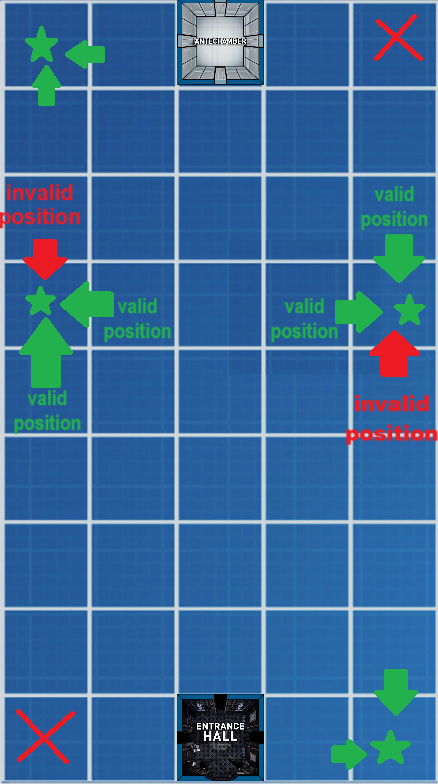
  • Straight-line rooms can be drafted on the perimeter of the house (ranks 1 & 9, columns 1 and 5), but only with the correct orientation: they may only run parallel to the outer walls, and will never be drawn if you are drafting on the perimeter from the inside of the house.
    They cannot be drafted in corners, since this would automatically hit an outer wall.
    See this image for the invalid positions of straight-line rooms (in red):


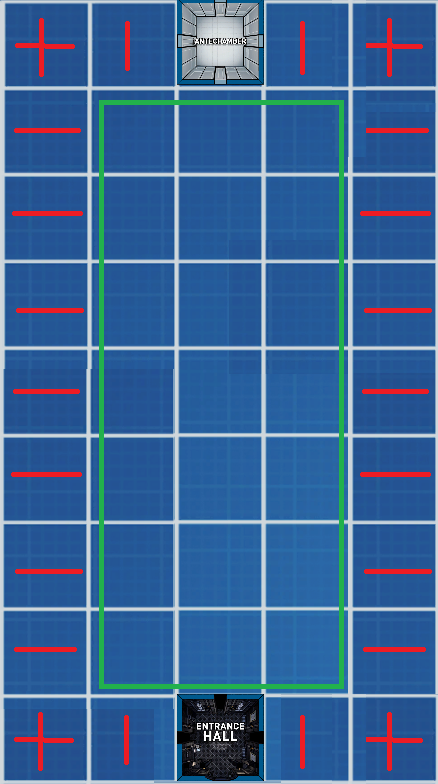
  • 4-way rooms cannot be drafted on the perimeter of the house at all. You can only draw them to draft inside the "centre" of the house (highlighted in green in the above image).
    It's not crappy luck and a hateful RNG that won't let you draft the Passageway on Rank 9 -- it will never happen!

    L-shaped corner rooms and 3-doored T-shaped rooms usually can be drawn on the perimeter, as they can pick which door you are opening from and rotate to avoid the outer wall, and dead-ends can also usually be drafted absolutely anywhere. The exceptions are:

  • Rooms with an outside wall can only be drawn on the perimeter with the correct orientation.
    (This concerns mostly Green rooms, though not all of them. The gardener's log mentions part of this, citing the rooms that can only be drafted in the East or West wings, but does not go into the details of orientation.)
    E.g., the Terrace only has one door, but the wall that door faces must be an outside wall; thus, you can only draw the Terrace when you are standing in column 2 or 4, from a door facing towards the outside. But in that same location, you will never draw the Veranda, because it runs parallel to the outside, with its doors to the north and south; so you must be standing in either Wing and drafting to your north or south to draw the Veranda.
    Finally, the Patio is an L shape corner and cannot lead to the outside, so it can be drawn when you are in columns 2 or 4 (from its inside door), but only north from you in column 1, and only south from you in column 5. This also means that unlike other corner rooms, the Patio can only be in 2 of the 4 map corners.


2. Check the drafting prerequisites.
Most blueprints have none, but there are a surprising amount of rooms that can ONLY be drawn in specific circumstances. You might just not have found the hint around the estate that tells you why you can't ever seem to draw this room!

All rooms included to my knowledge:
  • As detailed above, the Green rooms Terrace, Patio, Veranda, Greenhouse: can only be drafted into column 1 or 5 (the West and East wings) AND from a compatible door orientation: they need to have the correct wall facing the outside.
  • Morning Room: as above, PLUS you need to have added it to your drafting pool for the day, usually by eating Bacon & Egg if you were lucky enough to have in on the menu in the Kitchen. It is an L shape corner but its outside wall is the opposite way around as the Patio.
  • Conservatory: not only must you first find and add this blueprint to your drafting pool, but it can then only be drafted in one of the four corners of the grid map.
  • Secret Garden: only from opening a locked room with the Secret Garden Key, AND like the above Green Rooms it will only fit a lock when drafting into column 1 or 5 (the West and East wings). Due to having 3 doors, it will also not be draftable in map corners. If you have triggered all doors to be unlocked, you can't draft the Secret Garden today anymore.
  • Garage: only on the West Wing (column 1). The Garage is a rare exception that can rearrange slightly the location of its door; I have been able to draft it from its south and from its east side, not sure about north.
  • Her Ladyship's Chamber: only on the West Wing (column 1) AND to the south of your location. Consequently it cannot be drafted on the top left corner.
  • Master Bedroom: The in-game hint only says it can only be drafted on the East Wing (column 5). I have however also been able to draw and draft it in other columns on Rank 9 multiple times. Unclear if it can also be drafted on the top left corner (so on Rank 9 but in the East Wing).
  • Gift Shop and Gallery: pretty sure those two only unlock after reaching room 46 once.* (not 100% sure)
  • Room 8: only from opening a locked room with the Room 8 key into Rank 8.
  • Pump Room, Locker Room and Sauna: only after having drafted a Pool.
  • Bookshop: only when drafted from Library (unlike the Pool, having a Library is not enough: you must be in the Library).
  • And 15 more special rooms whose floorplans are not in your original directory must be unlocked or found via exploration or puzzle first (plus the Conservatory, for a total of 16 rooms).


3. Check the price.
Being able to draft your room is your number one priority at all times.

If it costs gems, make sure you have enough at all times to pay for it when you finally pull it. Before you even start hunting it down, start by stocking up on gems, for instance by drafting dead-ends that give you gems. Some room upgrades raise the amount of gems they give you, such as the Storeroom and Parlor. You can also focus on getting lots of keys or a sledgehammer and opening trunks. If it's very expensive, see if you can skip that price in some manner: if it's a Green Room, draft a Veranda first.
There is a late-game item that cuts the gem price of a room of your choosing, permanently.

If it's a room that hurts your amount of Steps, double-check that drafting it won't take you down to 0 and end your day the second you finally step inside! Careful of unexpected effects such as the Aquarium counting as a Red Room and triggering an Experiment.


4. Check the rarity.
If your desired room is Unusual or Rare, you can try and play with that in multiple ways:

- Embrace it: drafting a Solarium makes you more likely to draw Unusual and Rare rooms. Drafting from the Library will draw "more unusual" floorplans (not sure the exact rarity levels covered), and a Nook upgrade will let you always draw the Library (including a second time!).
Tips combination: before you go try and draw your desired room from your Library, draft all the Unusual and Rare rooms you encounter, even if you don't need them, so that you are reducing the amount of options that will be available for the Library to pull from.

- Change it: there are ways to change the rarity of a room. The Conservatory (secret floorplan you need to find first) lets you adjust the rarity of 3 randomly selected rooms every time you draft it. The Gear Wrench lets you do this for any Mechanical room... when you draft it, which is an annoying pre-requisite but is still really useful for rooms you might need to draft on multiple runs, such as the Boiler or Pump rooms.
How To Get The Room You Want: Let's Go!
4. Time to manipulate!

Late game, you can get the power to choose a color to draw more often (including blue!), so definitely use that if you have it!

Is your room...
  • ... red, orange, yellow, green or purple?
    Draft a Secret Passage (and bring reroll options!).
    Get a Prism Key, draft a room of this color on a high Rank and hope it's got a locked door.

  • ... red?
    Draft a Furnace.
    Consider drafting the Shelter or otherwise getting protection (or bonuses!) from Red Rooms, such as the Paper Crown and/or the Blueprints Crown to reroll bad first draws, a Knight's Shield, or Experiment triggers or effects.

  • ... green?
    Draft the Greenhouse, and maybe a Terrace if you're aiming for an expensive one.

  • ... a dead-end?
    Go for it on a day you have observed the Draxus constellation in the Observatory.
    There is also a very risky upgrade option for the Cloister that will guarantee you draw dead-ends, and give you plenty of dice to pick the one you want.
    You will often draw dead-ends when drafting on the perimeter of the house, because this will rule out 4-way rooms from your drafting pool, and corners will also rule out single line.

  • ... a 4-way room?
    Go for it on a day you have observed the Southern Cross.
    You'll never draw it while on the perimeter of the house, but it is a good idea to fill it out so you remove other options from your drafting pool!
    Keep in mind you can only draw your 4-way rooms on the inside of the house, so they are not options for entering the Antechamber except from its southern door.
    Get a Silver Key; often obtainable from the Billiard Room's puzzle, the Locksmith shop, the Trading Post, Lost and Found, and the Music Room. (Note that while you can only have one of this key at the same time, it can be obtained again in the same run once it's been used!)

  • ... not a dead-end?
    The Compass will somewhat increase your chances, depending on your location and direction.

  • ... Unusual or Rare?
    Draft a Solarium.
    You may also focus on getting the Conservatory (in one of the 4 map corners only) until you can modify its rarity.
    If your room is also Mechanical and you'll need it again in the future (hello Boiler Room), try getting a Gear Wrench from the Tool Shed, Trading Post or Lost & Found.

  • ... containing steam power tubing? Draft a Boiler Room and ACTIVATE it. Direct the power the way you need to go, and then start drafting. Not only will you see your power line, but as long as you keep it going uninterrupted, you are now more likely to draw rooms with tubing -- whether or not they actually use it, so this includes: Garage, Lab, Pump Room, Laundry, Furnace, but also: Passageway, Security, Locker, Dark Room, Archives, Weights Room. (/!\ A power connection does NOT negate the effect of red rooms and does not light up the Dark Room.)
    This fact is the life-saver for the puzzles that require connecting a room to steam power -- counter-intuitively, it's much easier when you draft (and activate!!) the boiler room FIRST. You can even more easily get a bunch of them in one run, as multi-directional rooms will send the power on all ways!


Wait, what's that last one? 'Cause I need to get Steam Power in my Pump Room.
A very commonly cited frustration source -- and yet, you can make it happen. Here is the secret to how you force the house to let you do it easily.

FIRST, draft a Pool.
You won't draw it in corners, but that aside, it can be drawn pretty much anywhere. It doesn't need to be nearby the rest of the operation, it just needs to exist so you get the Pump in your drafting pool.

SECOND, draft the Boiler Room
, ideally with a lot of space around both of its other doors.
Solve the room's tubing puzzle, activate the steam power and direct it towards one of your free doors.
Again: This makes you more likely to draw rooms that have connected tubing. Not only does tubing show in highlighted blue lines if you don't know what rooms have it, but having your steam power activated actively increases the likelihood of compatible rooms. So you do it this way around, rather than drawing a Pump Room first and trying to bring power to it.

NOW, you try and draft a Pump Room.
It doesn't need to be right next to the Boiler Room, only to be connected.

You can keep the connection going with other rooms that have tubing, and any room that has 2 or more doors will send the power down each of these rooms.
Those rooms are:
- Locker Room
- Laboratory
- Security
- Passageway
- Dark Room
- Archives
- Weights Room
For this reason, it can be worth the risk to draft a Furnace in order to draw those last 3 and their many doors, and you might want to try this on a day you have the Shelter!

On the other hand, you will have to deal with three problematic rooms:
- Garage
- Laundry
- Furnace
Those three all also use steam power and will thus come up in your draw often while you are connected to it, but they are dead-ends and will not send power to their neighbor rooms. (Powering the Garage this way will have the same effect as the Utility Closet; the Laundry will offer 3 more laundering options; the Furnace will give you a normal key (very underwhelming).)

Thus, it's a good idea to try and draft those 3 dead-ends early on to get them out of your drafting pool, while avoiding the 7 useful multi-directional tubed-up rooms until you've started the power and need them to help you keep going until you draw the Pump Room.

If you do end the connection, you can go back to the Boiler Room and redirect the power to the remaining door (if there is one) and try again.
Once power has been activated, it won't be cut anymore even if you mess with the Boiler Room's system again, so you can get to, open, and connect that one annoying door no problem.


Other tips also apply: you can use the Conservatory on any of these rooms, and the Gear Wrench on both the Boiler and Pump Room, as well as the Lab and Security. Best not to go for it on a day you have Draxus, but the Southern Cross will help you draw the Passageway, Archives and Weights Room. Make sure you have 1 gem for the Pool and another for the Boiler Room. Fill up your low ranks and lower the amount of rooms in your drafting pool before you go for it. If you're up in high ranks, make sure you have enough keys, as well as a Keycard as Mechanical rooms are likely to have security-locked doors.
Conclusion
I genuinely hope this guide helped and that you will find more -- or any -- enjoyment in drafting your daily Mount Holly!

Please feel free to comment if you have a drafting problem that this guide didn't address, a strategy or room-specific question, or if you have your own information or strategy tips to share that I didn't include or got wrong!
4 Comments
sazandorable  [author] 26 May @ 1:51pm 
@Grawl
Oh, my bad, double-checking what came out when on what, looks like I mixed up my memories -- baby me definitely played some games on my dad's Atari (I remember Lemmings for sure), but Diablo (the first one, actually) must have been one of the first games I actually played on whatever computer he later got, then. But I also remember the pretty Sorceress, which seems to have been the one from Diablo II. Sorry for the mix-up due to having been a literal child at the time 😌
jk guys 24 May @ 4:12pm 
Thanks for the guide, but this just confirms that most of us complaining about the RNG were right to do so. Most of us are aware of pretty much all of these strategies.
Kituss 21 May @ 11:54pm 
This is a great guide that should be sent to anyone complaining about the RNG - while there are valid complaints to be made (getting safe deposit keys can be a hassle even when you're doing everything correctly, for example), most are uninformed and from people not trying to meet the game on its own terms.

Blue Prince could not exist without being a roguelite and the drafting mechanic has tons of little complexities that you eventually get to master, which is a very unique feeling! Thanks for the guide :)
Grawl 19 May @ 9:53am 
"When I was little, I played my dad's video games on his Atari computer, like Diablo II."

Diablo 2 is my favorite game for the Atari computer.