Arma Reforger

Arma Reforger

38 ratings
U.S. Mortar Guide
By InfiniteKarma
This is a comprehensive beginner's guide on how to use mortars. It teaches everything you would need to know from top to bottom. Basic navigation and math skills are recommended for this guide but I do dive into that as well.
4
2
   
Award
Favorite
Favorited
Unfavorite
Introduction
Welcome to my first ever steam guide! Hope this helps. Any feedback would be appreciated! :)

The purpose of mortars is to provide efficient and effective indirect fire support to your allies. With a skilled mortar team, you can turn the tide of a battle and bring devastation to your enemies. In this guide, I will explain everything you need to know about the current iteration of U.S. mortars.

The United States army is provided with the M252 Mortar. It fires 81mm shells up to 2900 meters. Between the United States army and Soviet Union mortars, the Americans have the advantage. While the Soviet Union mortar has 82mm shells, it's maximum range is 2300 meters and its compass and protractor may also be harder to read for newer players. However, the 82mm shells are significantly cheaper than 81mm in Conflict.

When it comes to establishing a mortar team, three members are recommended: two crewman and one spotter. One of the crewman will aim the mortar and keep it steady when firing, the other will load the tube with shells. Whenever the tube is fired, it is not uncommon for the range and azimuth of the mortar to be thrown off. That is why one of the crewman must keep realigning it back into place whenever it gets misaligned to retain relative accuracy. The spotter's job is to observe where shells are landing and communicate adjustments to the mortar crew if necessary. It is also the spotter's job to seek out other targets in the event an opportunity arises.

If you don't care to learn how to shoot a mortar and want to use them with the easiest method, head over to the Conflict & A.I. section.

Shell Types
In ARMA Reforger, we are given access to four shell types:
  • High Explosive/Fragmentation (HE)
  • Smoke
  • Illumination
  • Training


HE Shells have the biggest blast radius and the most structure damage. A healthy amount of these bad boys can level an entire town. They're best used to bombard enemy bases or hinder enemy advances.
  • Ranges vary from ~50 to 2900 meters
  • Rings vary from 0-4
  • In Conflict mode, these require Captain rank and cost 50 supplies each


Smoke Shells emit a cloud of smoke upon impact. These are best used to cover allied infantry advances or obscure the vision of enemy armor since HE shells are not very effective against armored vehicles.
  • Ranges vary from ~100 to 2400 meters
  • Rings vary from 1-4
  • In Conflict mode, these require Corporal rank and cost 10 supplies each


Illumination Rounds work similarly to 40mm flares and emit a bright light from the sky. Flares are great for aiding allied assaults or exposing encroaching infantry.
  • Ranges vary from ~100 to 2400 meters
  • Rings vary from 1-4
  • In Conflict mode, these require Corporal rank and cost 5 supplies each


Training Shells are a good way to practice without destroying everything in the vicinity. When these hit the ground, they leave behind a small dust cloud which shows where it landed.
  • Ranges vary from ~50 to 2900 meters
  • Rings vary from 0-4
  • In Conflict mode, these require Corporal rank and cost 1 supply each


Every shell excluding the illumination round can and will kill someone if it directly lands on them. Which means that you can hypothetically still kill enemies with training rounds for cheap if HE shells seem too expensive.

The mortar pit itself cost 400 supplies and requires Sergeant rank to place.

Tools
Before we begin with the first step in our explosive journey, we must first ensure we have all the necessary tools to get the job done. There are a few essentials:
  • Map
  • Compass
  • US Ballistics Manual
  • ALICE Medium Backpack
  • Mortar Shell Storage Containers
  • Clothes (optional)


Map

The map is the most useful navigation tool in the game. It has many unique functions and today, I will teach you how to use it to its fullest potential. In regards to mortars, the map is used to pin point our mortar pit's location and find the distance and azimuth of our target from the mortar pit's position.

There are various useful additions the map offers us. For mortars, we only need three:
  • Protractor (top left)
  • Pencil (center)
  • Cursor (also center)

The protractor allows us to measure milliradians and degrees on the map. It also provides a one kilometer ruler to measure distance.

The pencil helps us draw lines on the map. This is used in tandem with the protractor.

Our cursor informs of us of its grid (which isn't as relevant in this case) and elevation.


Compass

The compass tells us the radians and degrees of the direction we are looking. The outer section (black) tells us the radians; the inner section (red) tells us the degrees. You can use whichever one suits your preference. The cap also comes with a line to show us exactly what we're aiming at. The compass, in this case, is used to find two points of reference to pin point your (mortar pit's) location. The in-game field manual has a section on this in Navigation -> Land Navigation. However, I will still reiterate it.


US Ballistics Manual

The US ballistics manual, or as I call it, the mortar sheet, tells us the general shell dispersion, elevation in milliradians per 100 meter distance, time of flight, milliradian adjustment required per 100 meter difference in elevation, and time of flight adjustment for every 100 meter difference in elevation (this last part is not worth paying mind to).

The sheet provides all of this information for every 100 meters of range. You can change the shell type and ring count by inspecting the book and looking on either side of the page.


ALICE Medium Backpack

The ALICE medium backpack is worn by the loader to hold additional mortar rounds on their person. This makes firing faster and more efficient. We use the ALICE medium backpack instead of the IIFS large combat field pack because their capacity is the same.

The weight difference of the bags themselves is negligible when carrying shells and in Conflict, the IIFS large combat field pack cost 15 supplies as opposed to the 5 supplies it takes for the ALICE medium backpack. Both bags can carry up to three usable shell containers.

However, the IIFS large combat field pack is capable of carrying up to seven shells on its own without any containers and is technically cheaper by 5 supplies this way. If you want maximum shell capacity on your person, though, be sure to stick with the aforementioned setup.


Mortar Shell Storage Containers

The mortar shell containers are intended to increase the shell capacity inside backpacks. They can also enable ease of use when traveling with live shells instead of supplies inside vehicles. Each container can carry up to three shells. Depending on the shell types you are carrying, you may only be able to carry eight shells as opposed to nine total in your backpack (plus one in hand).

Navigation
Before you can find your targets, you must find yourself first. This is where the compass and map come in. Fortunately, the map tells us our general location even if we have no clue where we are. However, you should still know how to find your general location without it.


We must find two points of reference (POR), or even three to be more accurate, to zero in our location. First, find two recognizable landmarks or identifiable features that you have a clear line of sight of from a set position.

In my case, I see a farm to the north and a town to the northeast. I can estimate that from the location of the farm, the town must roughly be around its southeast. This will help me determine which farm I'm looking at on the map.


After taking a look on the map for all known farms, you can see my general area. There was also a sign nearby the farm that read "Chotain" which confirms my observations. And although it's not shown, I have three buildings right behind me which helped me narrow down the position even more.


Points of Reference

Now, onto the good stuff. Since I have a farm building and am right beside three buildings to my south, I can use these two landmarks as points of reference to zero in my location. Personally, I like to use radians to find the azimuth of my chosen PORs.


As seen in the image, the silo beside the farm is one tick after the first radian. Every radian equates to 100 milliradians. That means every tick in between equates to 20 milliradians (there are four ticks between each radian). So our POR (the silo beside the farm) is 120 milliradians.

Protractor

The next step is to pull out the ol' handy dandy tractor to draw a line from its azimuth, as I will show you shortly. But first, let's learn how to read the protractor. Although it looks complicated, the U.S. protractor is very easy to read. As it says on the top left side of the protractor, the outer scale is radians, the inner scale is degrees. Just like the compass. The ruler spanning horizontally and vertically is used to measure distance up to one kilometer.


First, we must put the center of the protractor as close to the center of our POR as we can. I like to use the yellow lines of the cursor to be more accurate.


Then we must draw a line from the 120 milliradian mark across the POR. I suggest you draw the line far enough to cross where you believe your position is. Otherwise, the line will be too short when they're supposed to intersect.


Repeat this process with the next POR. I will choose one of the houses behind me. As you can see in the image below, the lines intersected and I found my position as best as I could. It is imperative that your mortar position on the map is accurate or else your future calculations will be off.

Editor's Note: In this step of the process, I manually adjusted my marking on the map because it looked inaccurate to where I was in-game but that threw my shots off slightly as you will see in the results later.

Aiming
Here's where the real mortar guide begins. Whether you are marking your own targets on the map or have a spotter marking them for you, they should be marked for your convenience and the safety of your teammates.


Scenario

In this example, I have setup a Soviet base outside Entre-Deux (it's fairly accurate to the Conflict location). The scenario is that the Americans are trying to push the base after reconfiguring the radio tower but are facing heavy resistance from garrisoned infantry. This is a condensed base but there are still multiple targets we can prioritize here. Like the good samaritan we are, we are going to aim for the field hospital because Warcrimes R Us.


Finding Target Azimuth

The great thing about mortars is that they're considered indirect fire which means they don't have to be highly accurate. We should still try to achieve relative accuracy when possible though. Now that we have a marker that is known to be spot on because I have a great spotter (aerial view in GM mode), we have to find the coordinates from our mortar pit's position.

Similarly to how we did with the PORs, we will put the center of the protractor on our location.


We will then draw a line from our location across the target. Do your best to make the line align with the marker for directional accuracy. In the bottom left image, the line appears to be off but that is only because the map is zoomed out. When zoomed in, the line is dead on. In the bottom right image, we can see that the line hits the 61.2 radian mark which translates to 6120 milliradians.


Ranging

Now comes the hard part. As shown in the image below, you will want to align either side of the ruler with the red line. At longer ranges, try to keep the ruler and line as parallel as possible. Be sure to also start the ruler from your location. It should be sandwiched between both 0 markings.


From our position, we are over a kilometer out from the target which is the length of the protractor's ruler. In this instance, we draw a line on the 1000 meter mark and start the ruler from there. The kilometer line marking does not have to be as long as I did it; the length is only for demonstration (my wife knows that best).


We can see the target marking lands between the 940 meter and 950 meter lines. If we account for the additional 1000 meters, the total range will be 1945 meters.

Mortar Calculations
Boom botta bang, that's how we do this thang (forgive me). Now that we have our distance, we need to translate the meters into milliradians. This is where the real fun part comes in. You'll need your US Ballistics manual for this.

Rings

For the purposes of this guide, I will be utilizing training rounds to represent HE shells. All shell types have rings. These rings increase the shell's velocity which increases distance and flight time. When aiming the mortar or using the mortar sheet, you will be given the option to change shell type and ring count (or "shell charge" as it's called in in the mortar UI).

Ring count matters because more of them allows you to shoot up to certain distances but more importantly, too many can add unnecessary flight time to the shell. We wouldn't want to give our enemies a chance to survive because we had an additional 10 seconds of flight time, right? Righttt..?


Mortar Sheet

The three columns we especially need to pay attention to are:
  • RANGE
  • ELEV
  • D ELEV PER 100M DR

The range and elevation columns translate meters to milliradians. The other column accounts for the elevation difference per 100 meter drop. For our range, we will be at least 1095 milliradians because that's 1900 meters (we are 1945 meters out). Keep in mind that meters and milliradians are inverted. This means that as distance goes up, milliradians go down, and vise versa.

Fortunately, our distance happens to be close to a 50 meter number. This helps us because it makes it easier to estimate the milliradians between the 1900 and 2000 meter distance. **I should note that I have never used a real mortar before or been in the military for that matter so take my method of guestimating with a grain of salt.**

If you take a look at the sheet, the milliradians for 1900 and 2000 meters is 1095 and 1051 respectively. This part takes some quick math skills or a calculator but the difference between 1095 and 1051 is 44 mils. Since our range is about halfway between 1900 and 2000, we can adjust by half the 44 milliradian difference. That means we subtract ~22 mils from our 1095 milliradians (which equates to 1900 meters) because we are adding range (which decreases milliradians). So now we're at 1073 mils.

Accurate Formula

After making this guide, I created a solid formula for this inspired by Ironbeard. This is complicated math stuff so if you feel the previous section was too much math, skip this. I will be using my example here for the numbers as reference. **Keep in mind that any sections related to formulas moving forward were made after the initial creation of this guide.** The formula is as follows:

(x < t) - (y > t) = g

or

(x < t) [milliradians of distance less than target] - (y > t) [milliradians of distance greater than target] = g (difference in milliradians between x and y)

In my explanation, this gives you the 44 mils between 1095 and 1051. For reference, this is the difference of 2000 and 1900 meters in milliradians.

The next step would be dividing g by 100 (or 44/100 = 0.44 mils/m). Then we multiply the distance after x (45 meters since our total distance is 1945 meters) by 0.44. So simply 45 x 0.44 which gives us 19.8 milliradians. Pretty close to my estimation of ~22 milliradians.

So in reality, our mils for distance was 1075.

Elevation

Now we must account for elevation. In most cases, you may not have to worry about elevation at all but it is good to pay mind to. In this example, I have specifically positioned my mortar to be at least 100 meters shorter than my target. Accounting for elevation can be important because if you are lower than your target by a substantial amount, you may hit short; if you are higher than your target, you may overshoot. The mortar fires its shells in an arc. Visualize what would happen if the origin point of that arc was raised. The end of the arc would potentially hit over the target.

In order to find your elevation difference, simply hover your cursor over your location and the target's. In this scenario, my elevation is 85 meters while the target's is 220. This is at least a 100 meter difference in elevation (135 to be exact) which definitely qualifies for factoring in elevation changes.


If we take a look at the elevation drop column, it tells you that the milliradian adjustment per 100 meters at a 1900 meter range is 22 mils. Since we are nearly 150 meters lower than our target, I would adjust by 28~ mils down. We are decreasing mils again since our target is higher than us which constitutes an increase in range. Now we're at 1043 mils.

Elevation Formula

You can also use the formula:

h x d = e

then

c + / - e = r

or

h (height difference) x d (milliradian adjustment per 100 meter range) = e (elevation mil adjustment on range)

then

c (target distance in milliradians before elevation adjustment) + / - e (elevation mil adjustment on range) = r (total milliradians)


In other words, since our elevation difference is 135 meters, we would multiply 135 x 0.22 = 29.7 and then 1075 - 29.7 = 1045.3

As stated before, we are decreasing mils again since our target is higher than us which constitutes an increase in range. Also keep in mind that I used my newer range of 1075 mils as opposed to 1073 for the sake of accuracy and consistency.
Firing
The actual fun part. The part I'm sure everyone has been looking forward to (except your enemies). We can finally send hell from above to our foes. Be sure to have your coordinates set on the mortar itself before you begin firing.

The bottom of the mortar UI shows what your azimuth (direction) is; the left shows your distance; the right shows what your built-in mortar guide is set to. This is good to change because it can help with quick adjustments if you have to increase/decrease distance from your last coordinate.


Now that our mortar coordinates are set, we can let it rip. If you are firing alone, keep in mind that the mortar tube will become misaligned after each shot. While the change isn't always a big deal, it can lead to inaccuracy or even friendly fire if allies are nearby your target.

If you have a buddy with you, either you or him should keep realigning the mortar tube back to its designated coordinates.

Loading

The loader, as described in the Tools section, should have a backpack (ALICE Medium Backpack or IIFS Large Combat Field Pack) with three mortar cans in it.

Before sending the shells down the tube, be sure to change its ring count if necessary. You can do so by inspecting the shell in your hand. In this case, I have three rings. All shells default to four. When you change the ring count on a shell, it automatically saves it for when you grab more. On PC, you adjust rings by holding 'F' and using scroll wheel to change them.


When you are ready to fire, head to the tip of the barrel and send it.


Results

Since I don't have anyone to keep the mortar steady, 2/8 shells hit inaccurately. My accuracy was slightly off by 10 meters but that's still pretty good for my initial barrage. Point A is where most of my shells landed; Point B is where the outliers landed after the misalignment. Adjusting 3-5 milliradians to the right would've likely hit my ethical target.


Corrections

For this section, I will use a snippet from Ironbeard since this is something I learned after initially creating this guide and feel the video explains it well. Skip to 15:18 for the relevant section.

https://youtu.be/PH4kEx_x4w8?si=M1akLkn7LIZuOSgQ&t=918
However, I will still summarize it. After you have fired your salvo, your spotter must accurately mark where the shells landed (assuming you missed). You will then measure the distance between the shots and your intended target. You can use the protractor's ruler for this.

Draw a line from your mortar pit's position to the shots. Put the center of your protractor on your location and see the azimuth difference from where your shots landed to where you are trying to hit. Adjust accordingly. Remember that every radian is 100 milliradians.

The formula for this would be:

(x < t) - (y > t) = g

or

(x < t) [milliradians of distance less than target] - (y > t) [milliradians of distance greater than target] = g (difference in milliradians between x and y)

then

g x a = b

or

g (difference in milliradians between x and y) x a (distance between shots and intended target) = b (distance between shots and intended target in milliradians)

then

y + / - b = w (new milliradian range after correction)
Illumination
Before I move onto using AI for mortars and Conflict mode, I want to touch on illumination rounds quickly. Illumination rounds are unique from the other three because they don't impact the ground. The shells have a fuse time that can be adjusted the same way the rings are (via inspection). The fuse time is set to an automatic time by default based on the distance you are firing. The automatic timer does not account for elevation. Based on my observations, the best way to adjust the time is to consider your elevation difference. Every 10 meter difference warrants a 0.1 second change. Keep in mind that you can only change the fuse timer in 0.5 second increments.

If your elevation is higher than the target, you increase fuse time to make it ignite closer to the ground; if your elevation is lower, you decrease fuse time so it ignites higher than it would've. You must have already calculated elevation for this method to work properly.

You can also account for the flight times as another calculation method.

Conflict & AI
For those who want to use mortars but don't have any desire to shoot them yourself, this is the section for you.

AI Mortars

The current iteration of mortars and AI allows you to command AI to fire mortars with HE shells even if you are not a high enough rank. That means that you can technically get HE mortars up and running as early as Sergeant rank. The mortar pit, living quarters, and ability to spawn AI all require Sergeant rank.

If your rank requirement is met:
  1. Spawn AI from a living quarters. You can recruit them with the command menu (you must be the leader of your squad).
  2. Build a mortar pit. It can be built either from a command tent or build truck. It costs 400 supplies.
  3. Have your AI hop on the mortar with the "Get In" command (you only need one per mortar pit).
  4. Find a target and use the "Artillery Fire" command (it looks like three mortar shells falling).

Keep in mind that AI can only shoot HE shells as of this writing.

Supplies

Mortars are expensive. HE shells cost 50 supplies each, smoke costs 10, illumination costs 5, and training rounds cost 1. Be sure your mortar(s) won't sabotage your team by being a huge resource hog.
Game Master & AI
In Game Master, we have a few ways of using mortar shells. We can place individual shell strikes, barrages, and command AI to use a mortar.

GM Mortars

The Effects Module filter at the bottom of the Traits category will give you all the GM mortar strikes you need. Although it cannot be seen in the image, illumination rounds and even 40mm illumination flares of all available colors are also provided for you.


AI Mortars

If you wish to use AI to fire mortars, you can do so by putting an AI soldier on the mortar with the "Get In" command or by placing them directly on the mortar. You will then use the "Artillery Fire" command as seen below to order a mortar strike.


Command Properties

However, GM artillery commands are not active until you change their properties. After you place one down, open its context menu (right click) or double left click it (on PC) to access its properties. You will be given several options on how many shells you want to fire and what shell type.

By default, the command will be set to Hold. You can adjust it from 1-5, 10, 20, 40, and unlimited. Keep in mind that the AI may not fire if the command is out of the mortar's max range


One trick I like to do is set multiple artillery commands at random areas of the battle zone and set a randomized number of shells there from 2-5. This will make the mortar AI switch targets after each salvo. In my testing though, they appear to only switch targets when you are near or looking at them in GM view but this may be due to being in a private session.
Advanced Tactics
This section is a bonus. There are two things I have to share here:
  1. Sweeping Barrages

  2. Preset Coordinates

Sweeping Barrages

This part is more theoretical as I haven't done this in practice yet but I believe it to be a solid strategy. The best way to do a sweeping barrage is to set a start and end coordinate. Establish where the barrage will start and gradually shift to the end coordinate. This will take a lot of practice but will be really useful for anyone intending to use smoke.


Preset Coordinates

This is a well-known strategy in the military. The best method to be efficient is to have coordinates prepared before you ever have to use them. If you take the time to find the coordinates for certain positions around a likely contested area, you will greatly reduce downtime when swapping targets.

Your coordinate map doesn't have to look like a discombobulated Olympics logo but it's good to have multiple coordinates ready for use.

A good spotter will utilize this by informing the mortar crew which target to switch to based on where enemy traffic is. A great spotter will be able to account for downtime and flight time so the shots hit the intended target accurately.

A useful tip, which I did not show in the following image, is to place markers next to your targets with their respective coordinates to save you time. You can also rename the markers themselves with the coordinates.

Conclusion
This guide should be thorough enough to teach you everything you need to know about using a mortar. The Soviet Union mortar works more or less the same way but the written text is in Russian and the protractor and compass are a bit different.

Shout out to my unit the 7th Legion[discord.com] led by Dizz Tactical. This guide was made for them but Discord forums have character limits that could never hold all of this information.

If you have any suggestions or questions, feel free to share. Hope this helped!

5 Comments
Bushboy 27 May @ 3:20am 
Learned a lot. Especially about (mili)radians. I found it frustrating though for one thing. There's chapters to skip through, but a few of IMPORTANT numbers in the calc depended on having read previous chapters that I personally skipped through since I already had a grasp on them.

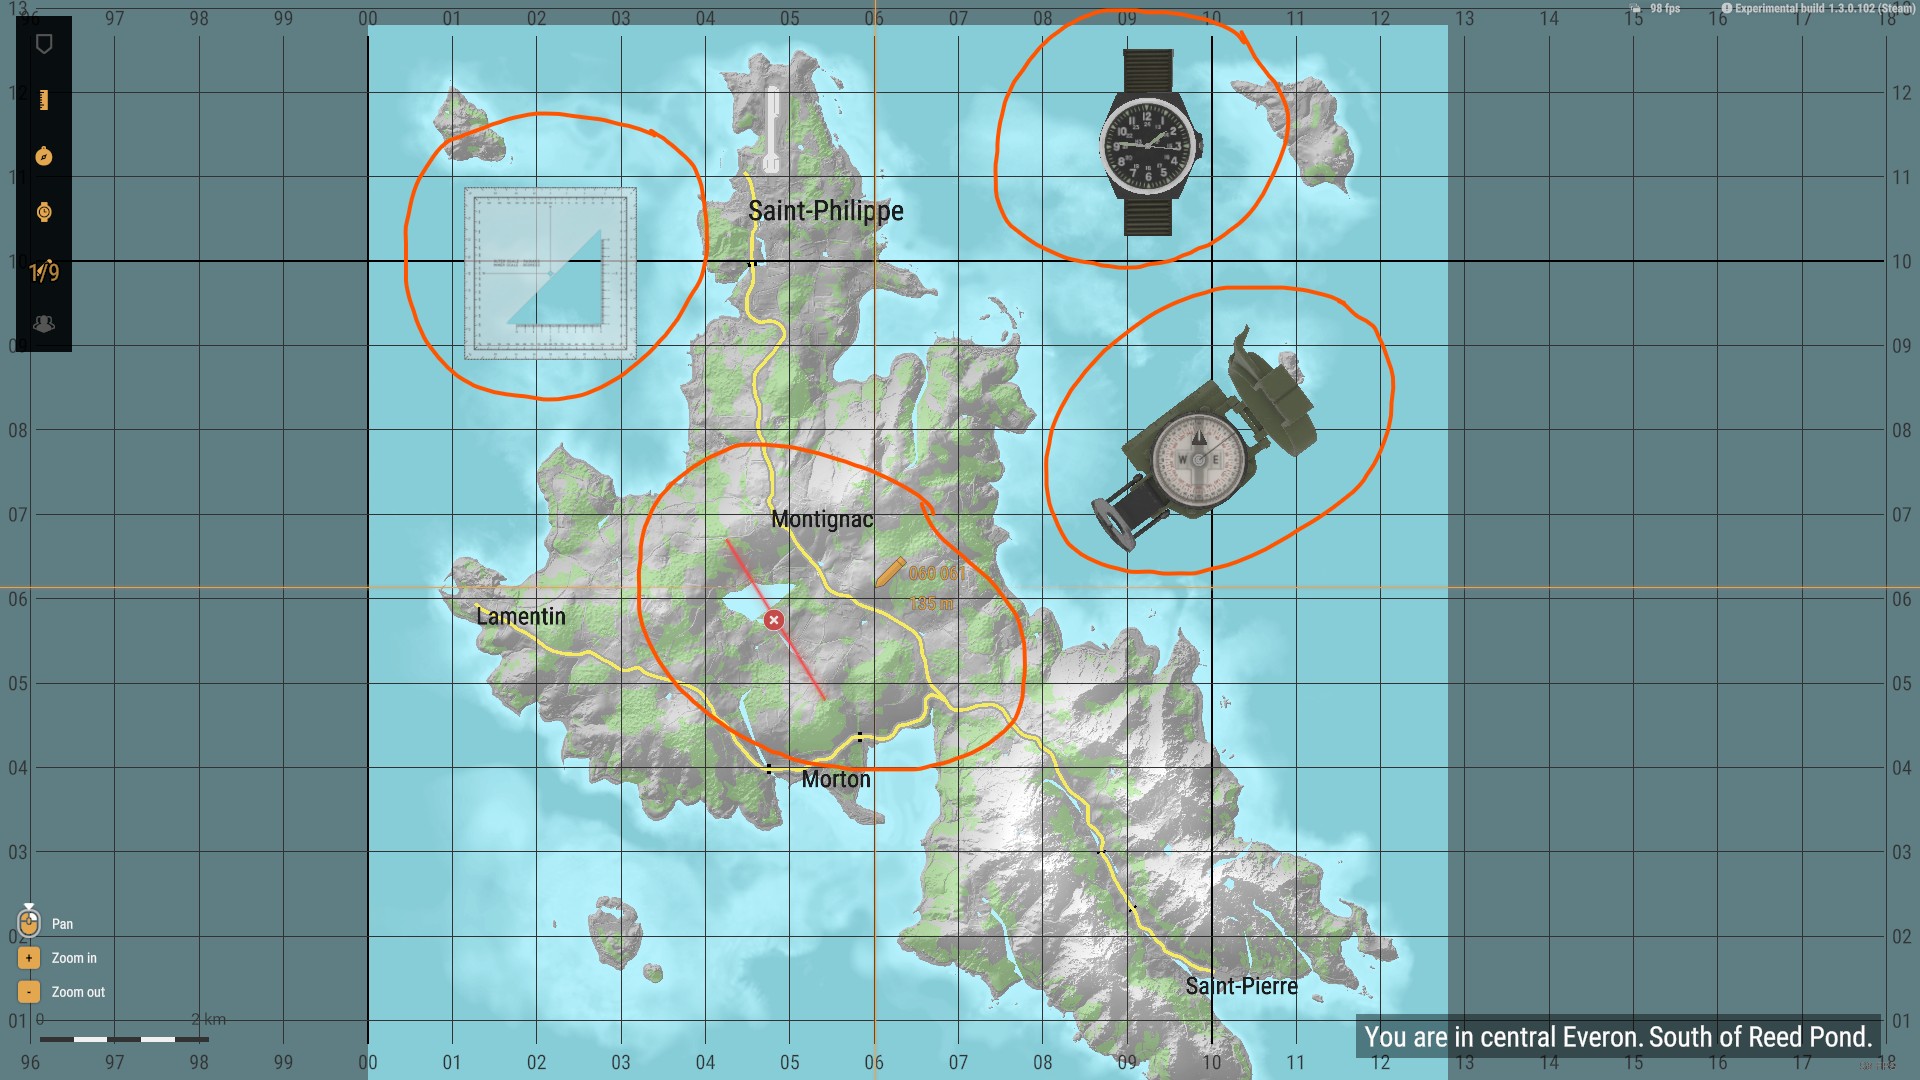
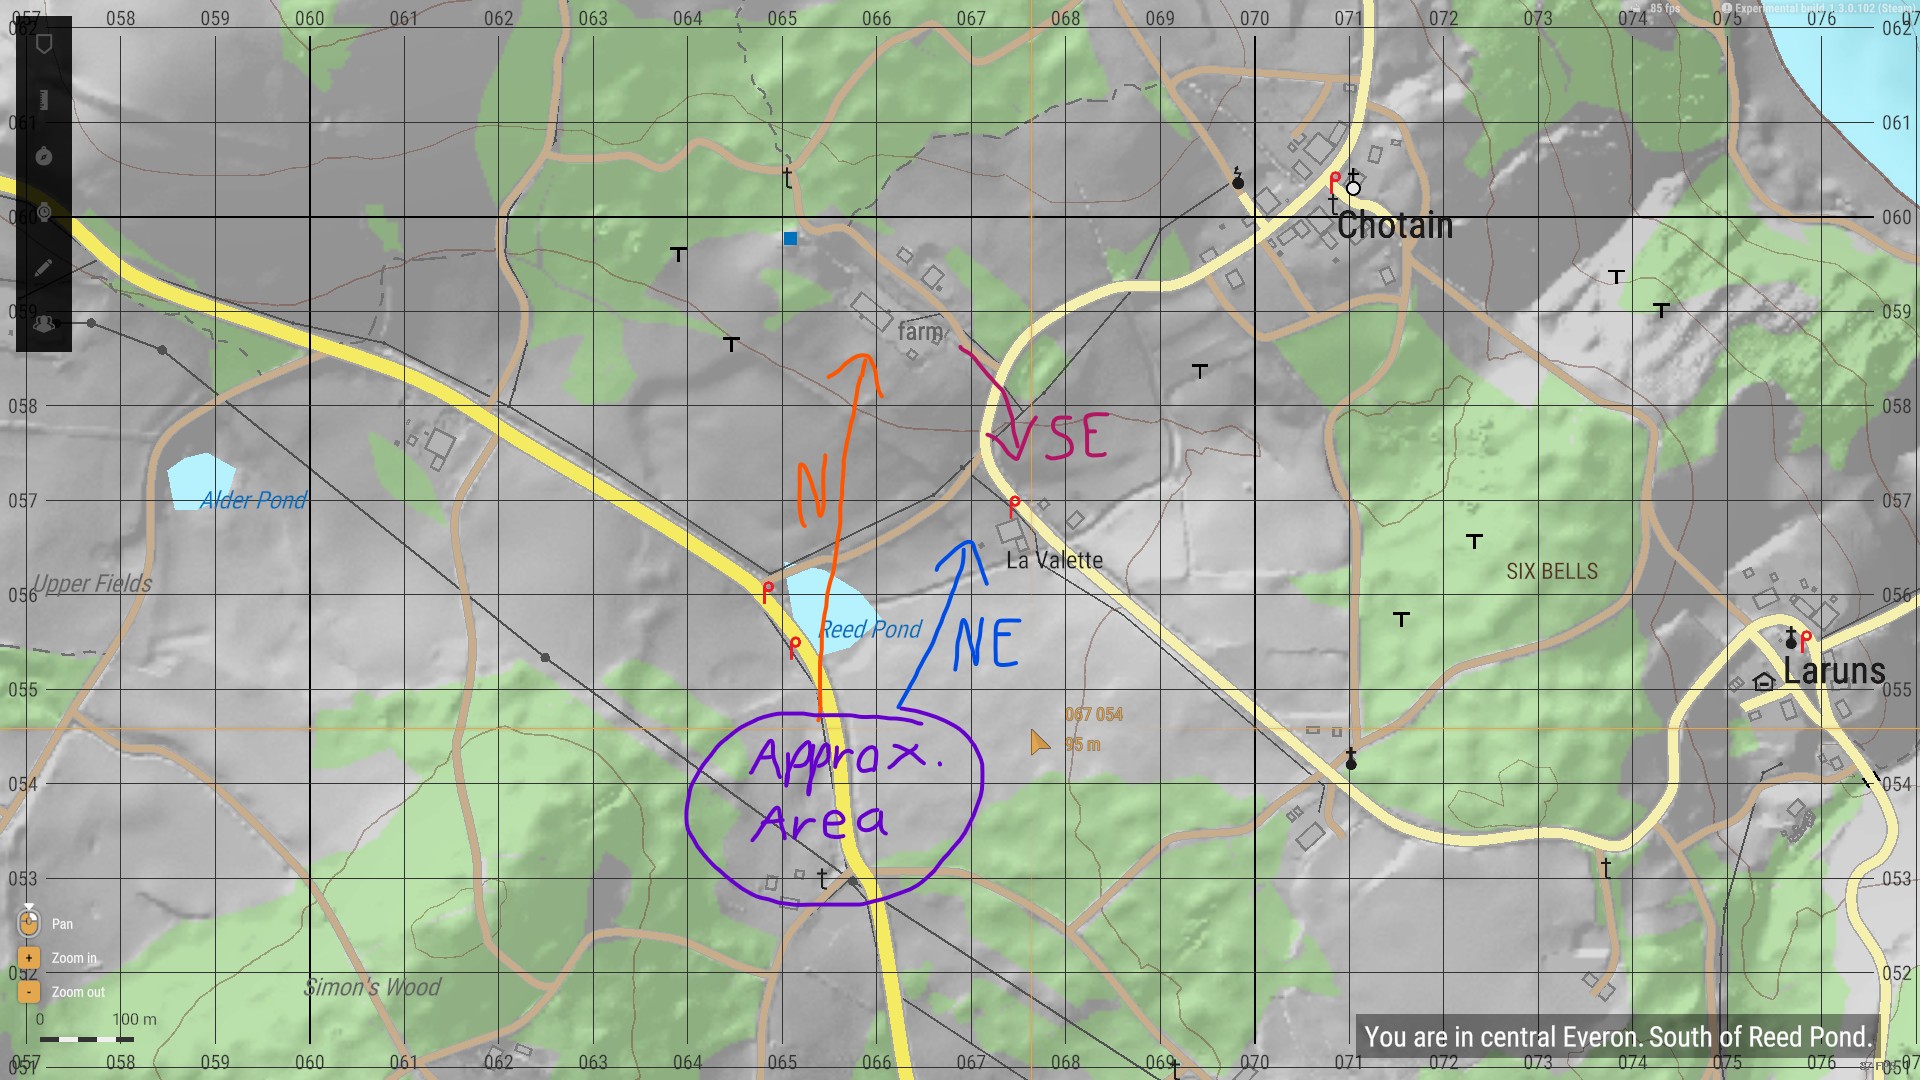
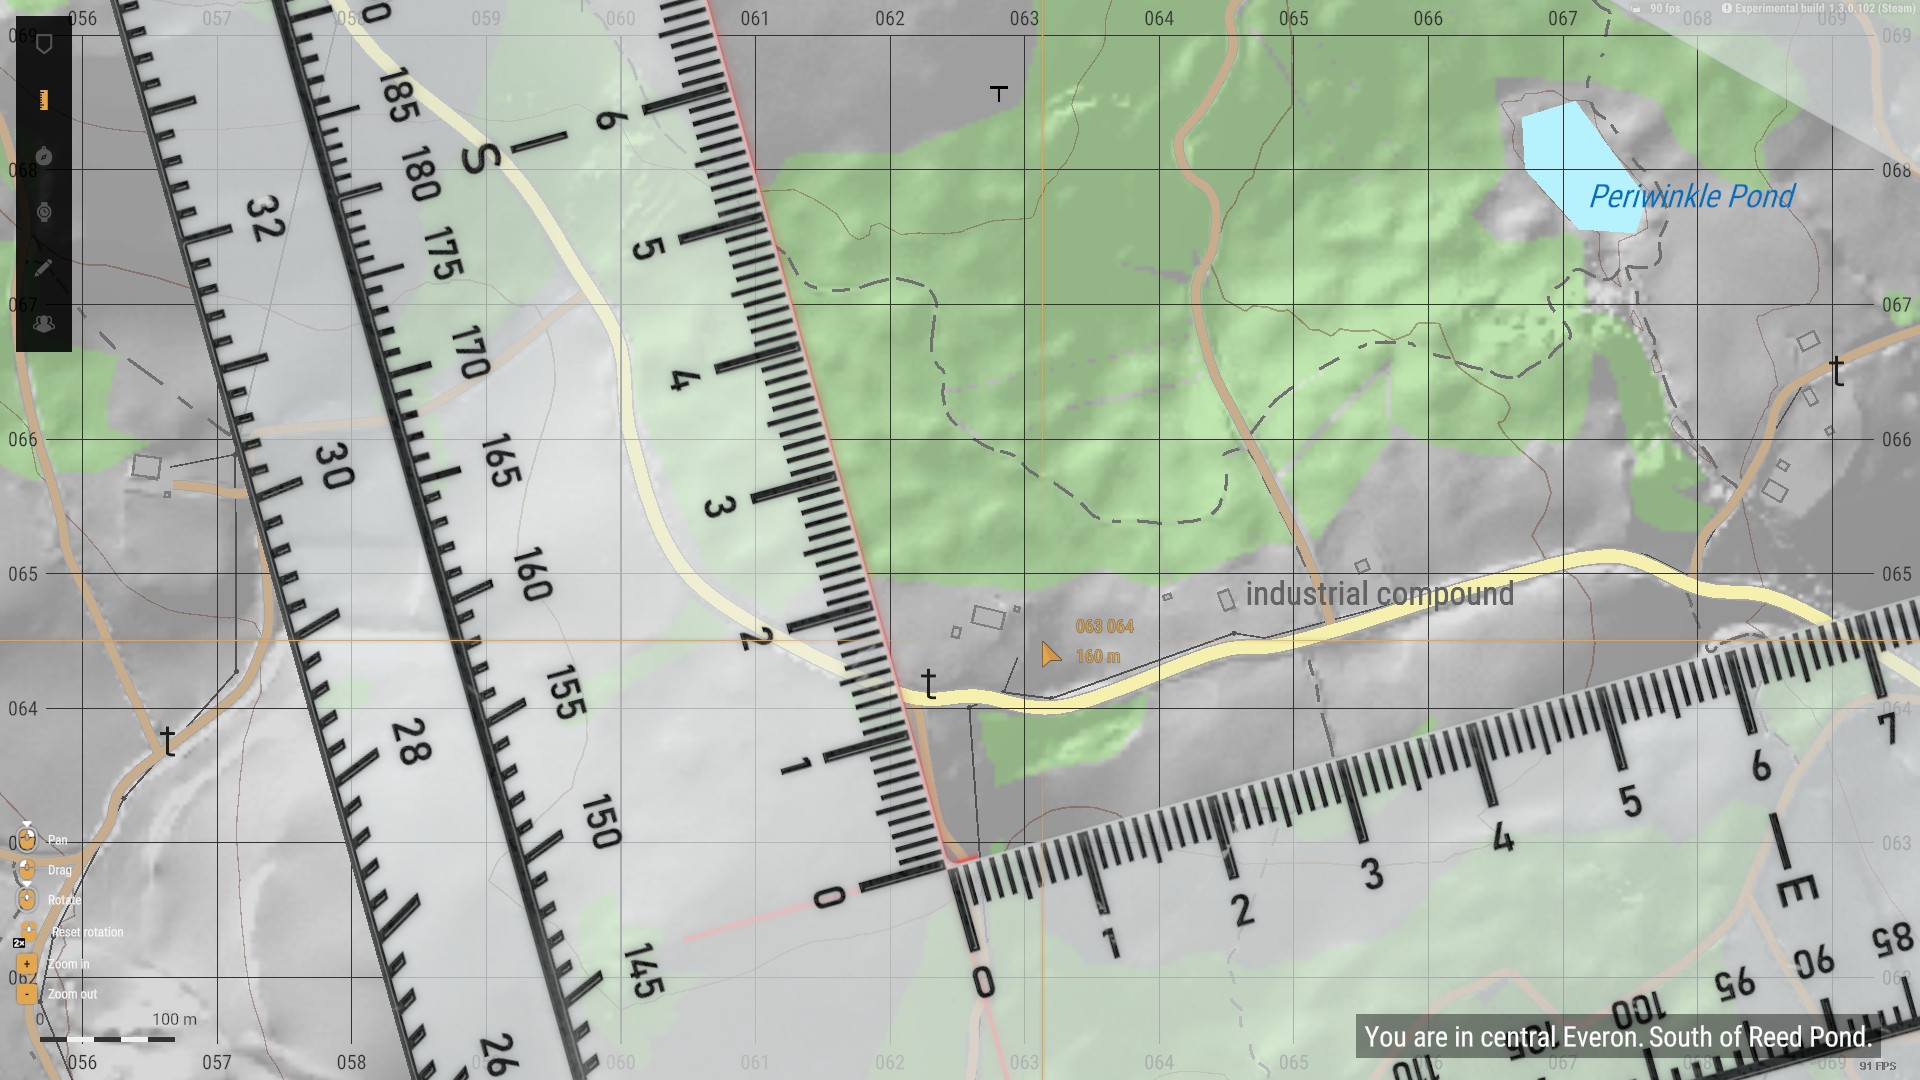
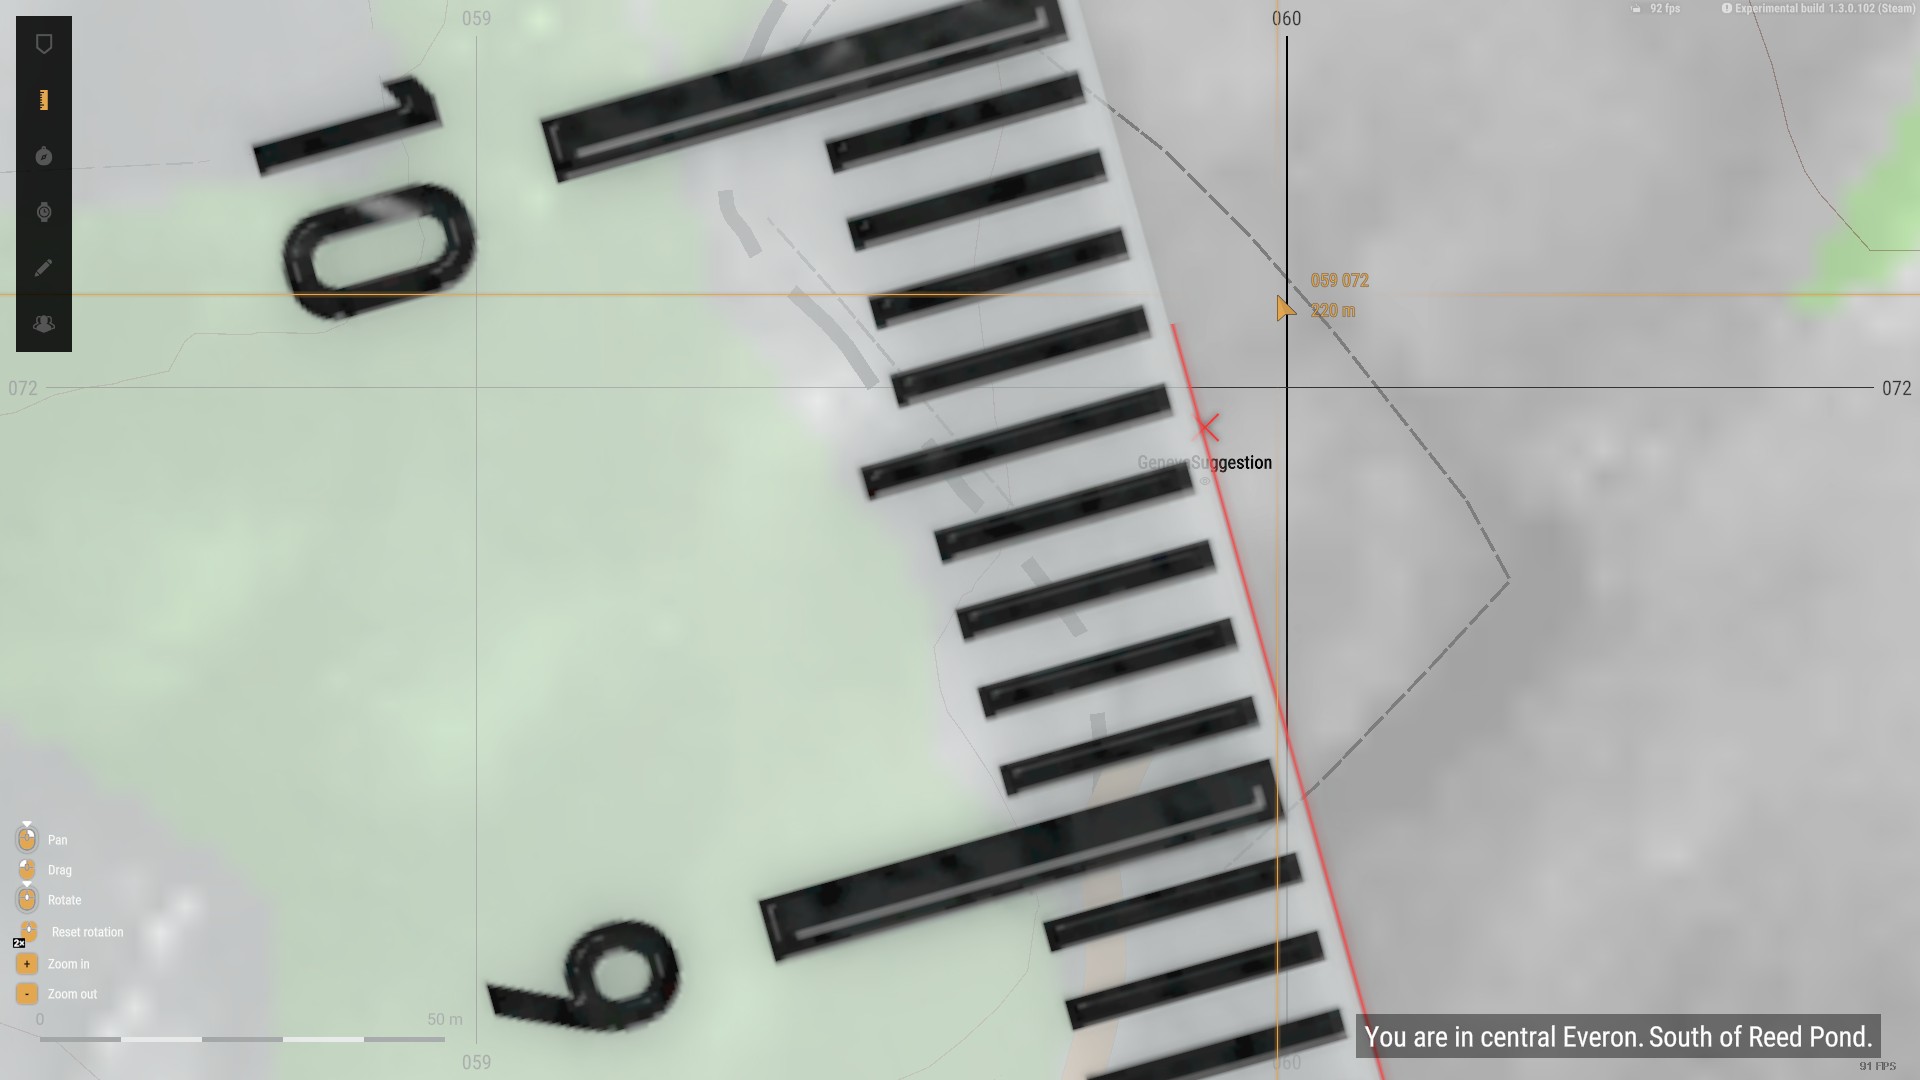
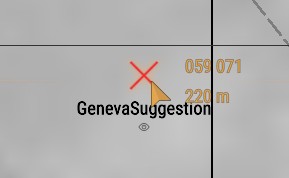
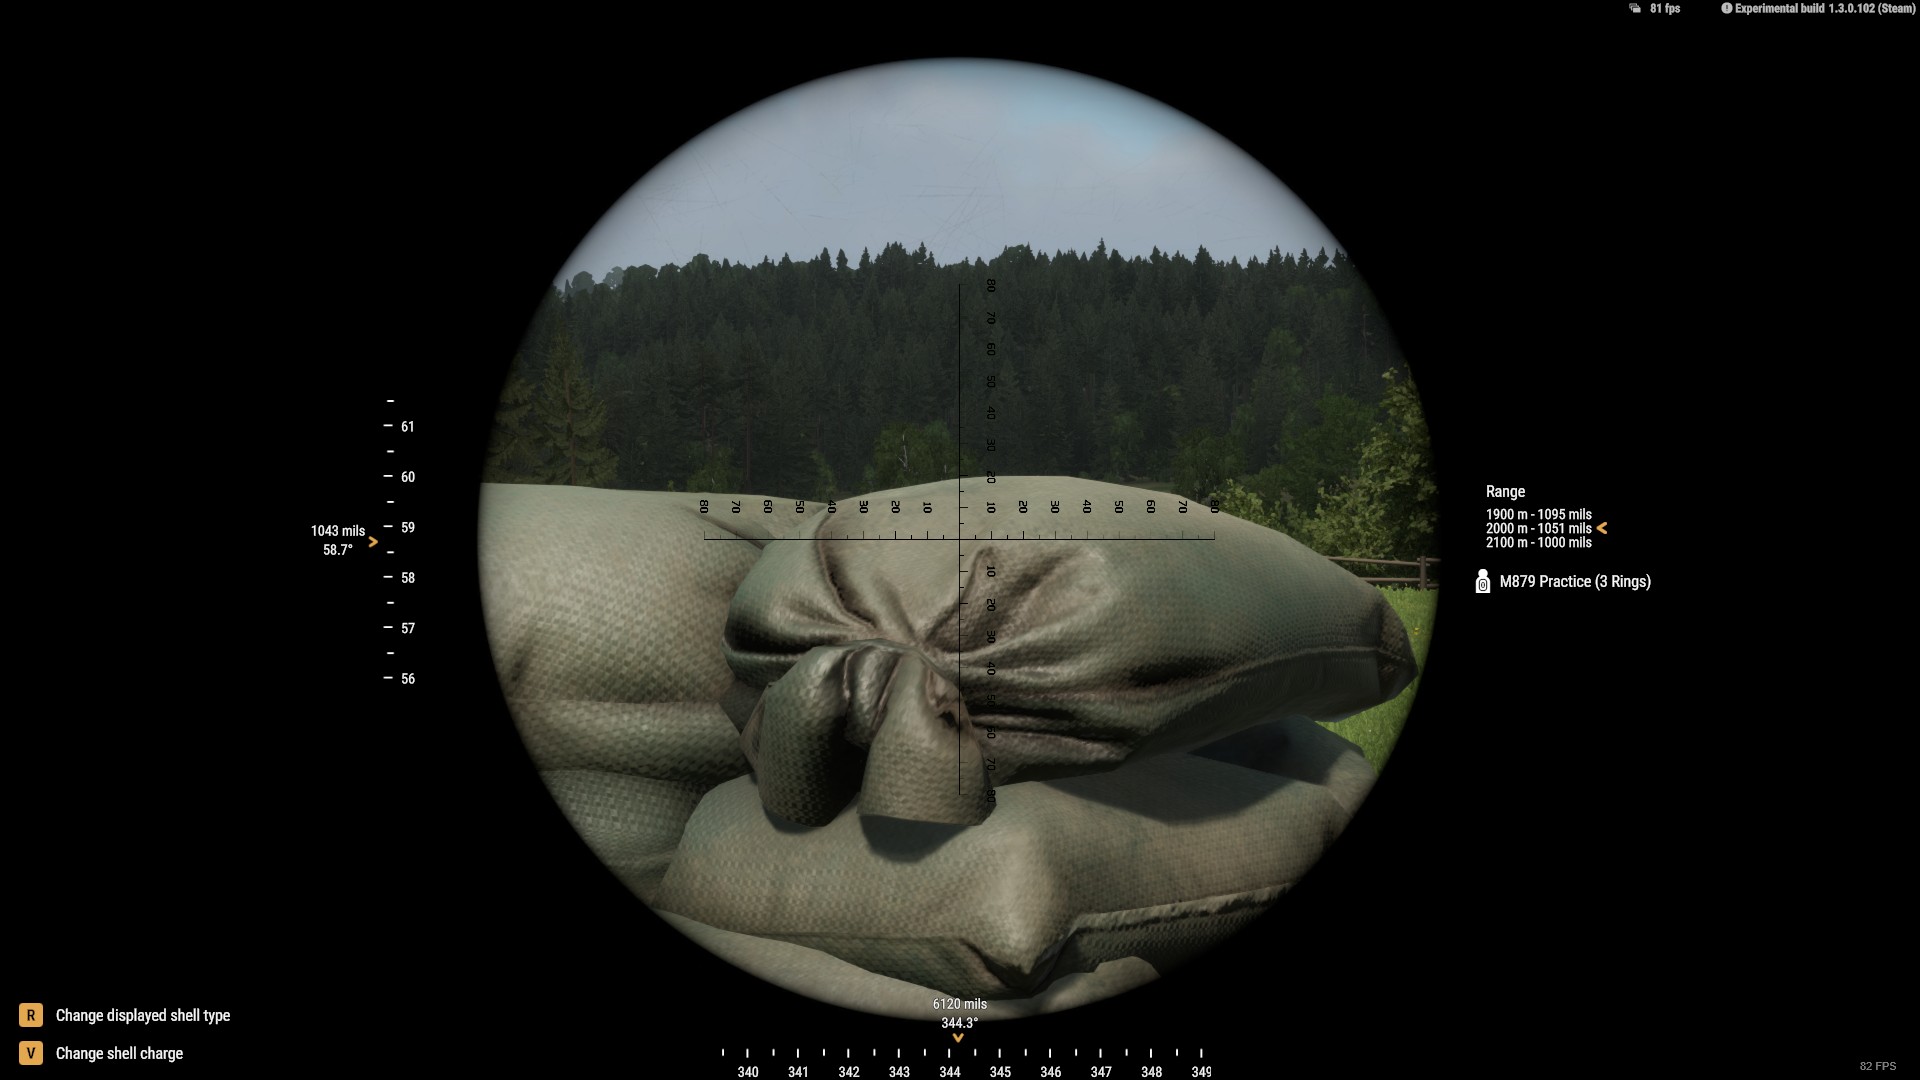
Which led me so confused trying to figure out the formulas. Just a nudge in the writing like a school book. Saying where you got "total distance 1945 from 'Chapter: Navigation'."

Or something I don't know. Either way I got it now, thank you for the guide pimp
DizzTactical 9 May @ 11:21pm 
Legendary guide. :steamthumbsup:
PecTAB 17 Apr @ 8:03am 
Good guide! I couldn't find anything in the in-game tutorial since it looks like its locked behind other tutorials that I have to first re-take again... Doubt it goes into as much detail as this.

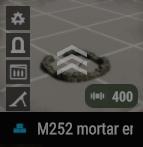
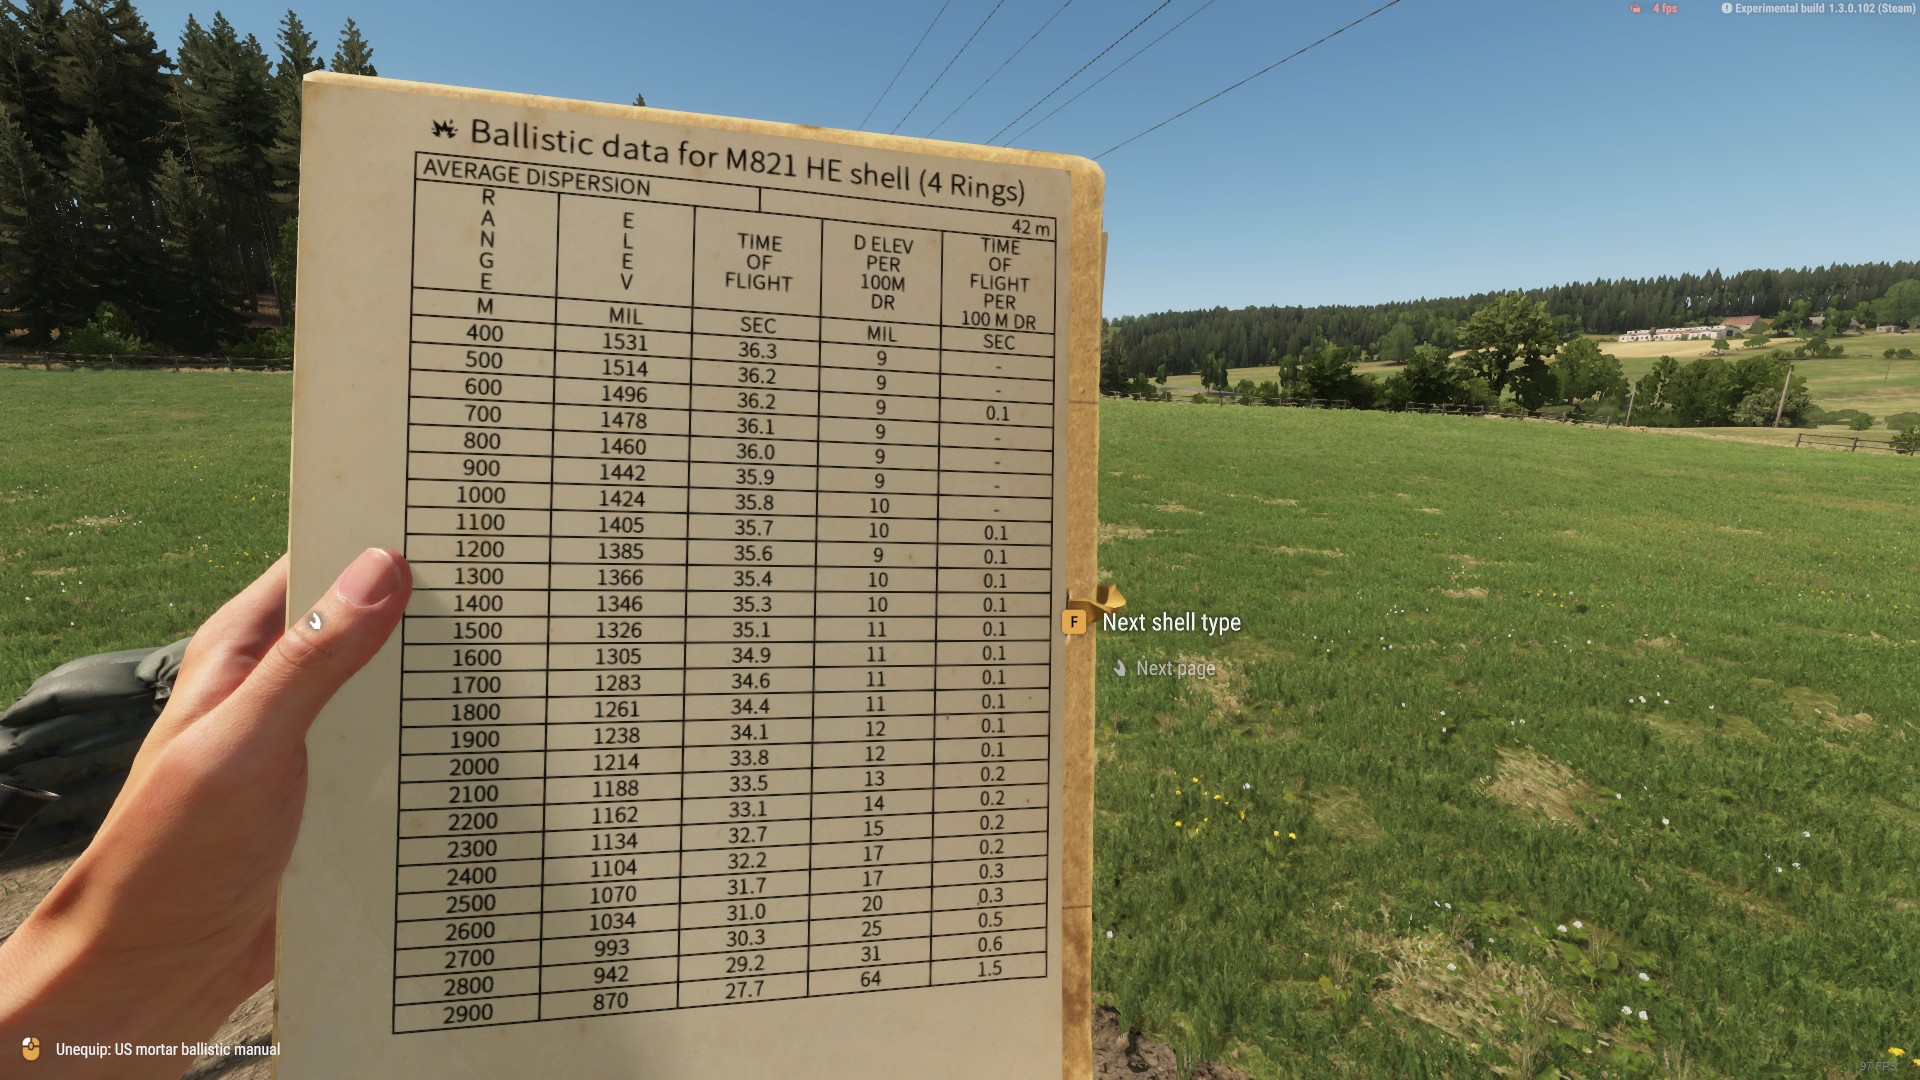
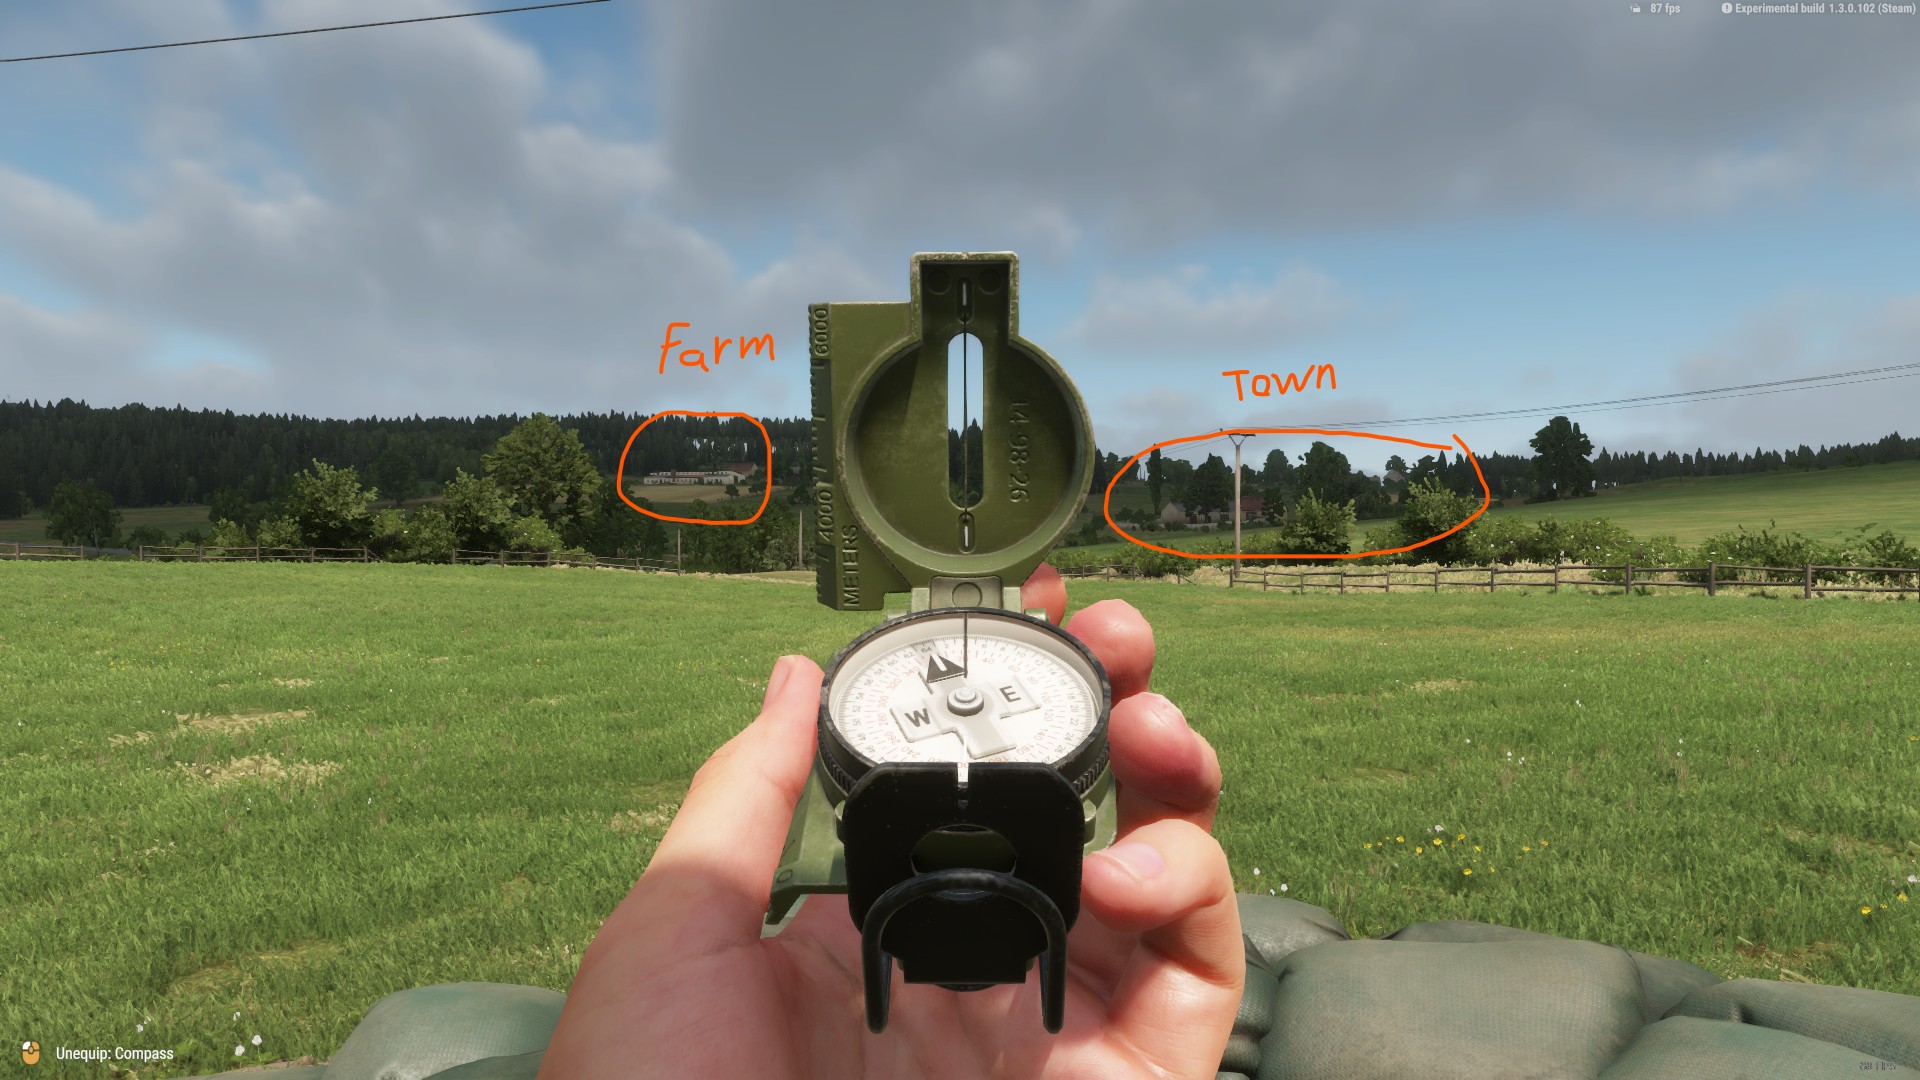
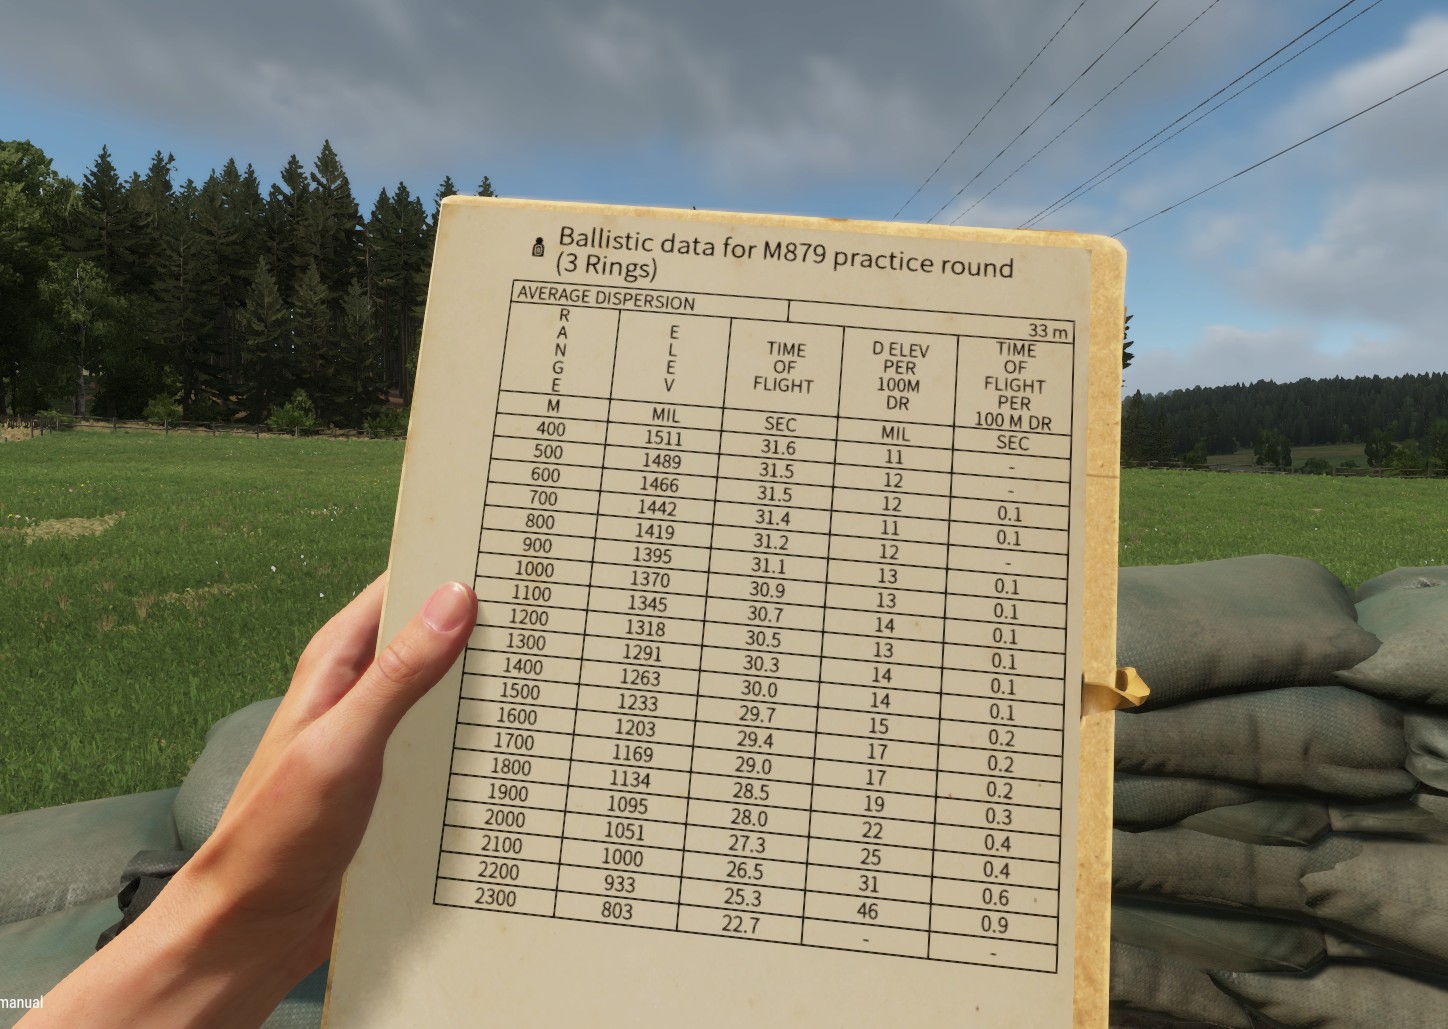
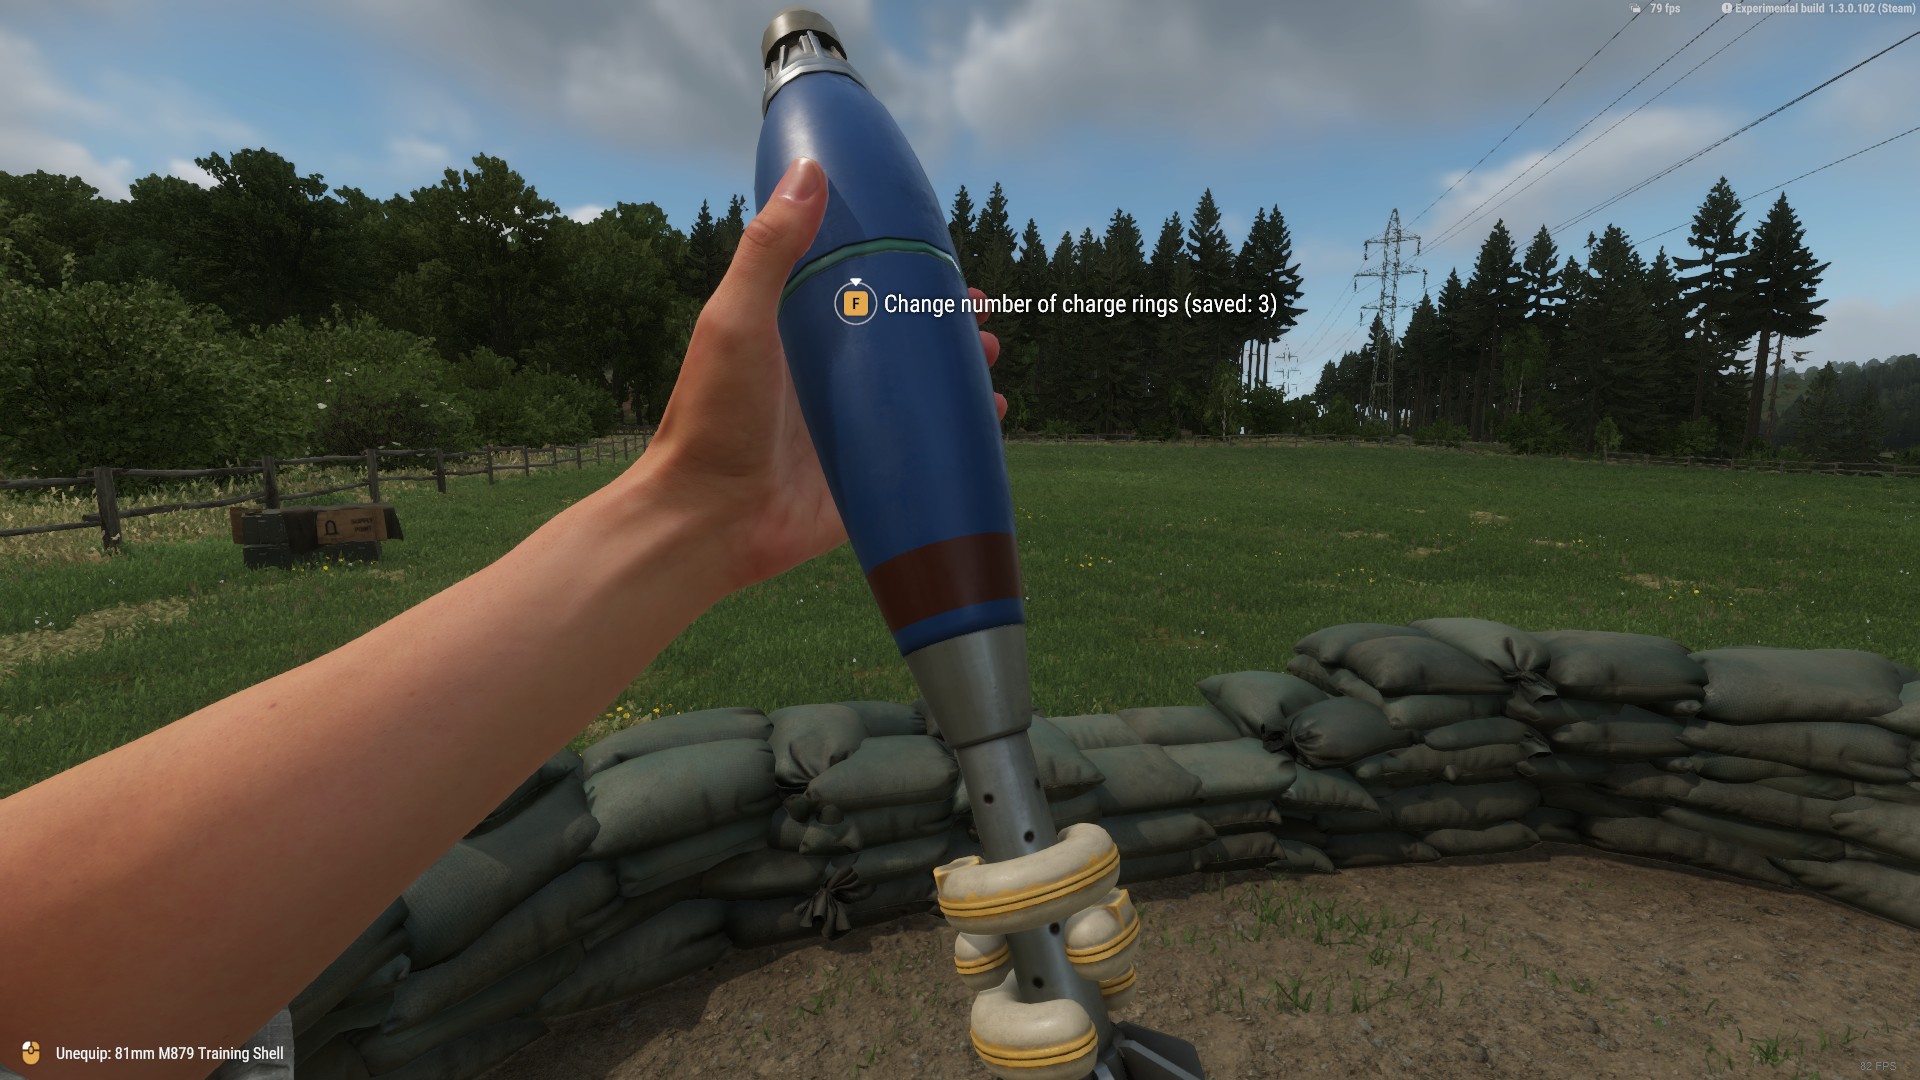
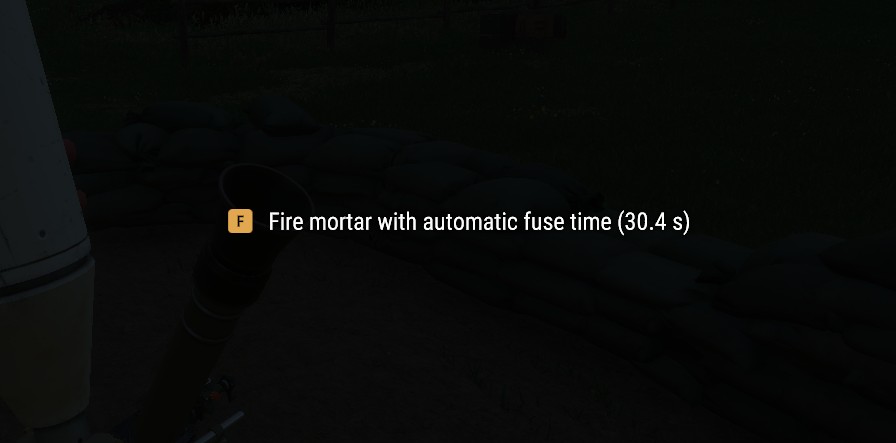
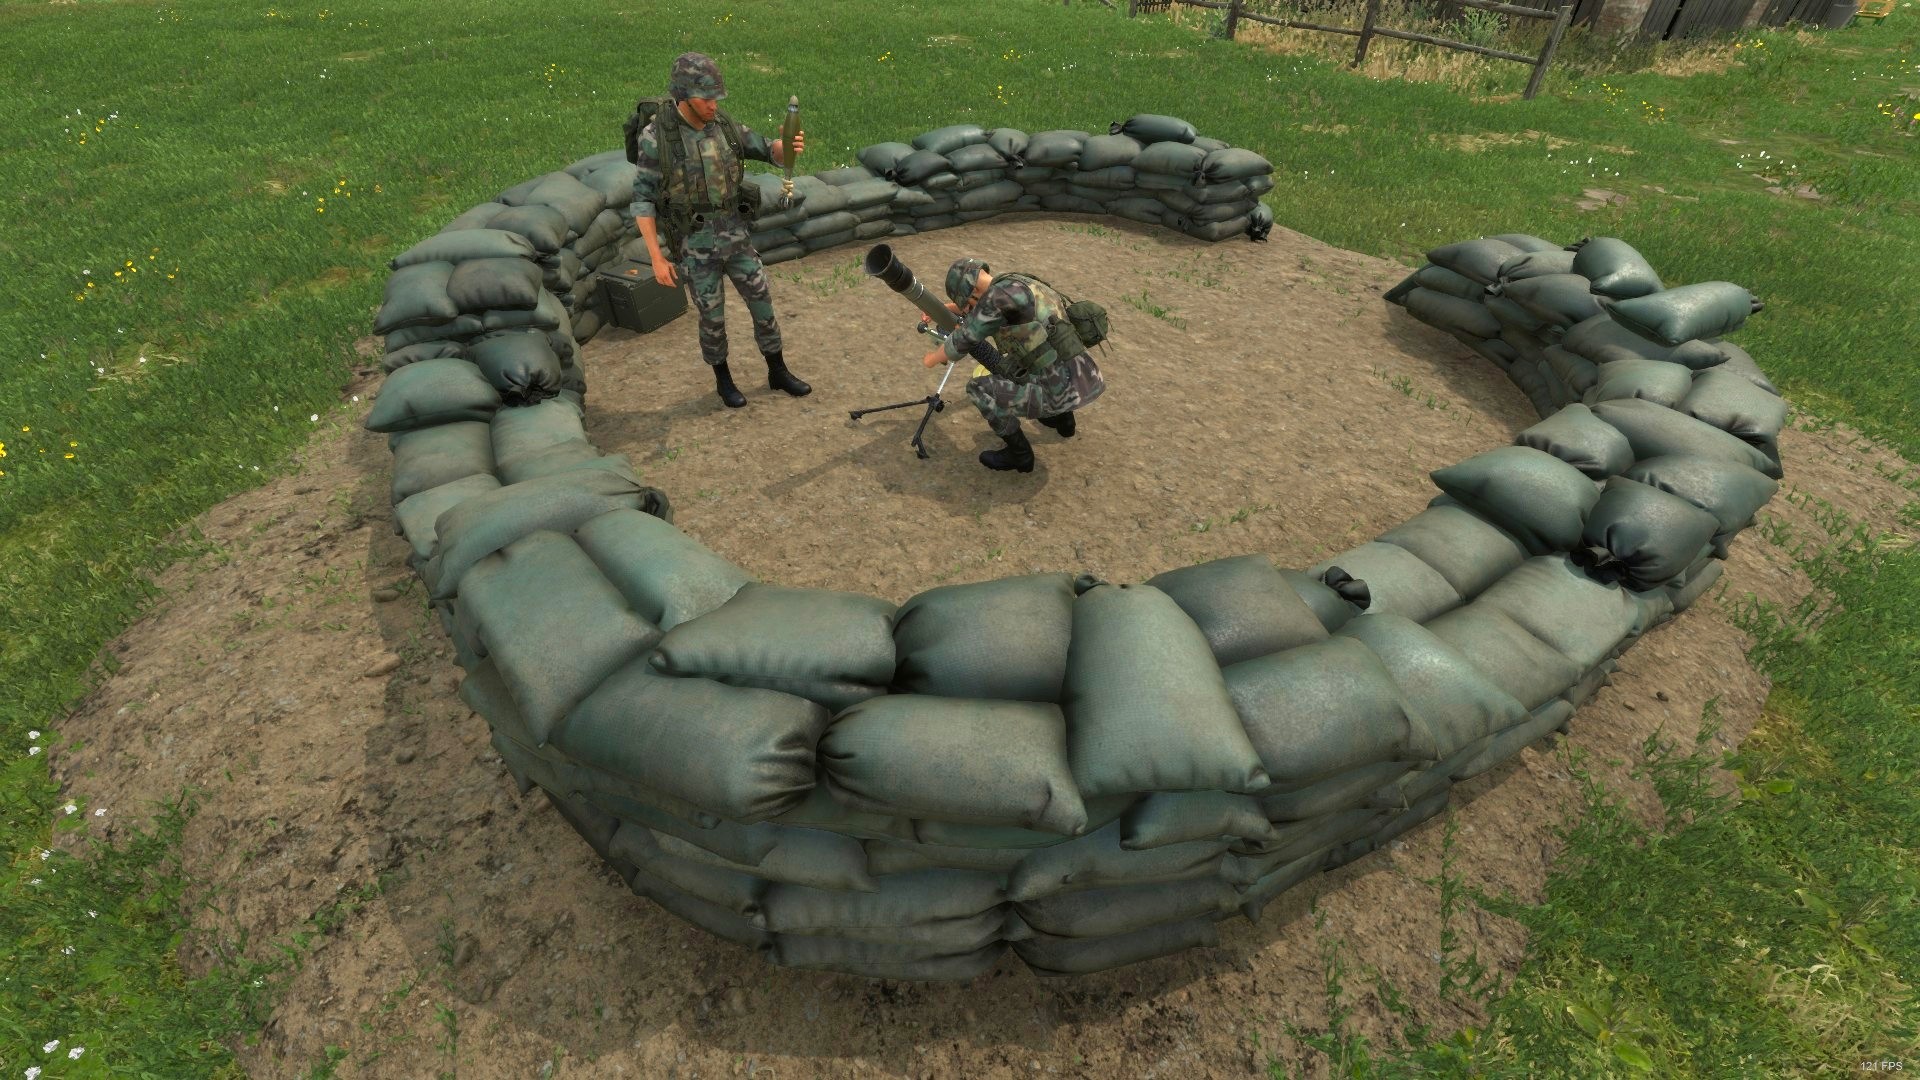
Best part about the guide was that it answered what I've been struggling to find the answer to, I couldn't find any info on changing the rings and the game has no on-screen prompts for the scroll wheel part:
"On PC, you adjust rings by holding 'F' and using scroll wheel to change them."
broxyc 31 Mar @ 11:50pm 
Pretty sure they changed the AI so you now do need cap to tell em to fire
Larissa Meow 30 Mar @ 12:25am 
Awesome Guide bro! :cqlol: