GIRLS' FRONTLINE 2: EXILIUM

GIRLS' FRONTLINE 2: EXILIUM

Evaluări insuficiente
Everything To Know About Attachments
De către Scout
Find out how to make the most of your attachments and avoid mistakes.
3
   
Premiază
Adaugă la preferate
Preferat
Elimină din preferate
What does this guide explain?
This guide will go over everything regarding weapon attachments and how to best utilize them. This is an important aspect to improving your doll's stats in the mid to late game, and it's important you understand exactly what you need and how to most efficiently grind them.


DISCLAIMER: If you're brand new to the game, I do NOT recommend you focus on earning attachments right now from the Supply Missions. This is something you should focus on at the mid-game at the earliest (around Commander Level 40), and when you can consistently earn gold-level attachments which are the only ones worth considering.


What Are Attachments? (The Basics)
Let's start with the basics in case you don't know.


Weapon attachments are accessories you can put on your doll's weapons. Each weapon will have 4 slots you can fit attachments into, no matter what weapon type it is. Attachments have a random set of stats that can be boosted to further power up your dolls.


Every weapon type will ask for attachments that match the weapon itself, you can tell what weapon type it's for by the words in brackets here. In this case, this is for Assault Rifles.


Attachments also have sets associated with them, which will give special bonuses depending on the set. Each set has an icon, and requires you to have all 3 slots have the same set in order to activate the effect.


But wait, what about the 4th slot? Well, for every weapon type, the Muzzle (or Blade Edge for melee users like Krolik) do not have sets associated with them, and are entirely independent. So thankfully, you only need to worry about the other 3 slots to complete a full set.


We'll go over all the sets and their effects in a later section.


You can view all the stat boosts your doll has gotten from your attachments by simply clicking the "Attachments" tab when viewing their weapon. This is a handy overview to have when you want to compare and contrast.


Where (And When) To Obtain Attachments
Before we get into the nitty gritty, let's discuss how to earn these things.


Method 1:Targeted Study Supply Missions


This will be your most common method of obtaining attachments. You will battle enemies when playing these for the first time, and you'll have the privilege to auto-battle that difficulty when you clear the stage with 3 stars.


It is worth noting, you'll notice the tabs showing the weapon acronyms. Each tab has different levels you must clear, and they will ONLY drop attachments of the weapon types it says. So, the individual groups are:

- Assault Rifles and Shotguns

- Submachine Guns and Machine Guns

- Sniper Rifles and Blades (AKA Melee)

- Handguns


This does mitigate the RNG of the types you want by a fair bit, so that's certainly helpful.


When you choose to challenge or auto-battle, you'll select what set you want from the drops. If you obtain an attachment with a set attached, it'll always be the one you selected. It's not a guarantee you will obtain an attachment with a set, though.


Higher difficulty levels will have increasingly higher chances of obtaining gold-level attachments, which is the highest rarity. We'll go over rarities in detail later, but just know, I STRONGLY recommend you clear the highest difficulty levels you can so you have the highest chances at golds. Gold is the only rarity that will matter in the long run.


Method 2: Boss Fight & Peak Value Assessment


Boss Fight and Peak Value Assessment are more difficult modes that have gold attachments as recurring rewards.

In Peak Value Assessment, you must clear special levels that are much longer and complicated than the rest of the game. You only need to clear a level once, and you move onto the next until there are no more levels to do. With each level you clear, in addition to the first-time clears, you will earn a recurring combination of Collapse Pieces, Sardis Gold, and gold attachments. These rewards you earn stack on top of the ones earned from previous levels, so the farther you go, the more you'll earn.

You can obtain these recurring rewards weekly without needing to do anything other than claiming the rewards.


In Boss Fight, you try to defeat a boss that gets stronger with each difficulty you clear. Higher difficulties also require you to have up to 3 teams to win in 3 separate combat instances of the boss. On top of that, the higher difficulties also have special objectives or mechanics.

You can do Boss Fight 3 times per week, and winning/auto-battling will award you with a currency called "Segment Marks". Higher difficulties award more Segment Marks. You can auto-battle the highest difficulty you fully cleared, but you must manually win each difficulty the first time. As a side note, if you think you're gonna lose, you can exit out of the stage and your entry ticket won't be consumed.

In the shop, you can purchase specific boxes that contain gold attachments of a specific set. This is different from the other boxes as you can choose what set you desire most.


Method 3: Platoon & Trading Post Shops


If you've joined a platoon, you're able to purchase a handful of crates per week. These crates give you a random gold attachment with a random set.


As for the trading post, you can also buy the same item. You can purchase 20 each month, and obviously, they refresh monthly. This shop uses a currency called "Withdrawl Reciepts" which you earn from pulling in the gacha, or dismantling low-rarity weapons.


Method 4: Event Rewards


This obviously is going to vary depending on the event, but generally, you have multiple chances to earn gold attachments during events. Usually you buy it from the event shop, or you complete a short challenge to earn them.


Method 5: Boundary Push

Boundary Push is an alternative mode where you control your dolls in real-time trying to collect supplies while sneaking past and stealth killing enemies. There are R, SR, and SSR crates to collect, and SSR crates contain numerous gold attachments; these are almost always surrounded by boss-tier enemies, and you either need to defeat them or stealthily collect them without being detected.

You need a team of 4 dolls, and once you finish a run, the dolls you used are on a 15 hour cooldown before you can deploy them in Boundary again, and you can't back out once you begin a run, so make sure you're prepared.

The supplies refresh weekly, and you can see the current status of the ones you collect on the left side when on the Boundary menu.

There are three difficulty levels which determine enemy level and difficulty of the maps. You need to play on the hardest difficulty to be able to collect the max amount of weekly supplies.


While you can collect the supplies yourself manually, the "Crystal Collection" menu allows you to deploy your dolls to automatically collect the supplies for you. They can collect the rewards for up to 15 hours at a time, then you need to claim what they got in order to reset the timer (you can collect them anytime, you don't need to wait till the 15 hours are up)

You can still use the dolls you deploy here on manual runs of Boundary, so don't worry about that. You can also deploy more dolls at once as your depth level increases, which you earn EXP for that by collecting the supplies.


Note: For some reason, the attachment icons don't show what set it belongs to when you obtain them, but they all come with sets, them not showing is likely a visual bug. You can see the set by clicking on each attachment's icon.


Rarity and Stats
Now we'll actually be talking about the attachments in detail.


Firstly, the rarity. Attachment rarity are, in order from least to most rare: Green, Blue, Purple, and Gold.


I mentioned this in the previous section, but to reiterate, only concern yourself with obtaining gold attachments Why? Well, the main reason is that gold is the only tier that has percentage-based stat increases instead of flat stat increases. Purple rarity and lower do not have percentage-based stats. Gold attachments also have higher maximum stat caps.


Look here for example, the "Attack" stat up top is a flat stat increase, meaning it only increases the doll's stat by that fixed number. However, the "Attack Boost" stat instead increases the doll's stat by the percentage is says, based off of the relative base stat (aside from Crit Rate/DMG which increase by fixed amounts). This almost assuredly increases the doll's stats far more than the flat stats, especially when they stack up together. This is why you should only go for gold.

And you probably figured this out, but anything that says "[Stat] Boost" is a percentage increase compared to just the stat name itself.


Here's the list of possible stats:


  • Attack
  • Attack Boost
  • Defense
  • Defense Boost
  • Health
  • Health Boost
  • Crit Rate
  • Crit DMG
Attachment Sets, And What Sets To Go For
Let's talk about the sets for a bit.


As I mentioned earlier, there are multiple sets that give special bonuses upon completing a set. The specific set a doll will want will vary depending on their kit, so you should know what set to go for in advance before spending your stamina.


I'll be listing out all the sets first, then talk about the sets you'll want to generally focus on for most dolls.


List of Sets:


  • Freeze Boost, Corrosion Boost, Ballistic Boost, Burn Boost, Hydro Boost, Electric Boost - All different sets that serve the same purpose. Damage of the appropriate phase element is increased by 20%.
  • Phase Strike - If the enemy has a phase element debuff (i.e Frozen, Overburn, etc), damage dealt to them increases by 15%
  • Phase Resonance - If the character exploits an enemy's phase weakness, they get the "Phase Boost I" buff BEFORE attacking, which increases phase damage by 10%. This effect increases to 20% if exploiting two phase weaknesses at once (i.e ammo type and element).
  • Ultimate Pursuit - Increases the damage, healing, and shield strength stemming from ultimate skills by 5%; This effect will permanently increase by an extra 5% upon each ultimate use, max 4 stacks (20% total).
  • Emergency Repair - If the character uses an Active Skill to heal an ally to full HP, that healed ally will additionally gain 2 stability index. Only happens once per turn.
  • Allay Support - If the character uses a defense-oriented skill (i.e Groza's Skill 2 or Sabrina's Ultimate), all allies gain the "Area Defense II" buff which reduces AoE damage taken by 20%.
  • Double Strategy - If the enemy is not taking cover, targeted damage against them increases by 10%. If the enemy IS in cover, AoE damage against them increases by 10% (AoE damage is any skill that can hit more than one enemy).


Clarifications on set effects

The descriptions of these sets are mostly self-explanatory, but some aspects about them can be potentially misleading or confusing, so I figured I'd clarify those here.

- As a reminder, a "Phase Weakness" is the little icons above enemies that show what ammo type and element they are weak to. So for Phase Resonance, the character gains that buff if they exploit either the ammo type or element weakness, and obviously deals more damage if exploiting both.

- Regarding Emergency Repair, keep in mind that the extra stability gained will only be applied if the character used an ACTIVE SKILL to heal. This means certain fringe cases like Cheeta's healing from her Passive ability does not grant the extra stability.

Additionally, if you use an AoE heal from someone like Centaureissi or Cheeta, it will only recover stability from ONE character, not all. The target with the lowest stability is prioritized.

- Regarding Ultimate Pursuit, be aware that the damage, healing and shield increase only applies if they come from the ultimate directly. So for example, Sharkry's ultimate WON'T trigger the set damage bonus because the only thing the ult does is give her a buff; it doesn't actually deal any damage itself. Examples of characters that do work with this set are ones like Suomi, Colphene, and Vepley.

- Regarding Phase Strike, a phase element debuff is any debuff that is tangential to an element. You can always check which ones are valid by clicking on the debuff's name and seeing if the description labels it as a Burn debuff, Freeze debuff, Hydro debuff and so on.

For example, with Overburn, you see here at the end it specifies it's a Burn debuff. Inversely, Non-elemental debuffs like "Movement Down" are NOT eligible for Phase Strike's damage increase.


- Regarding Allay Support, you can always check if a doll has a defense-oriented skill by clicking the skill icon and seeing what categories it's labled under. For example, you can see that Groza's Skill 2 has "Defense" as one of it's labels, meaning it's eligible.


Pointers and What Sets To Go For

So, you have a lot of choices on what sets to use, but it's not as intimidating as it looks. The first thing you might be thinking is what sets you want most.

So, because of the very RNG nature of obtaining attachments and it being a pain to have ones with ideal stats, you want to be as efficient as possible when grinding them out. Because of this, Phase Strike is the most efficient and ideal set to go for most of the time. What are the reasons for this?

Mainly, it's that the condition of applying a phase element debuff on enemies is very easy to do, and is very consistent compared to the other sets. As long as an enemy has at least one of those debuffs, that extra +15% damage is guaranteed with no strings attached. Not only that, but the elemental damage the doll deals is irrelevant, so you don't need to factor that in. The only thing you need to keep in mind is having at least one doll on the team that can apply a phase element debuff. Most dolls are capable of this, but not all of them are, and some can more consistently apply them than others.

Dolls that only deal physical damage such as Vepley, Papasha and Littara will very likely not have phase element debuff applications in their kit since physical damage is not classified as an "Element". And, other dolls might not apply debuffs at all such as Peritya and Colphene.


With that being said, Phase Strike isn't always the all-in-one solution as some dolls will greatly prefer other sets instead.

Firstly, let's discuss the elemental boost sets like Freeze Boost. Because those sets grant +20% extra damage instead of +15%, those technically can be better than Phase Strike, but the effectiveness of this depends on the doll. As you probably know, almost all dolls deal a mixture of physical and elemental damage in their kits. Also, with some rare exceptions, out-of-turn actions like Action Supports, Wise Supports, and Counterattacks almost always deal physical damage. So because of that, despite someone like Qiongjiu dealing Burn damage on her active skills, her entire kit and effectiveness revolves around her Action Supports which are physical. This means Burn Boost would be a bad set for her to equip.

So their kit might not be designed around their element. The other thing you should consider is how consistently the character can deal their element's damage. Characters that have relatively strong or permanent uptime on their elemental attacks like Makiatto, Klukai, and Tololo w/Fortification upgrades are good examples of wanting the Boost sets.

As for physical damage, characters that only deal physical damage like, again, Vepley, Papasha and Littara definitely want Ballistic Boost and is their best in slot. Because they ONLY deal phys damage, they will have 100% uptime on taking advantage of ballistic boost, bar none.


Now about the other sets. These are admittedly more niche cases, and their effectiveness is on a case-by-case basis. However, when a character takes full advantage of those sets, they can end up being very effective. I think Suomi is a good example of this, as her ult is the most important part of her kit, and you want the shield strength to be as strong as possible.
Phase Strike 101 + Dolls That Have Them
I mentioned in the previous section that Phase Strike is the most ideal set to grind for most dolls. If you haven't already read that section, I recommend you do to get all the details, but to reiterate:

Phase Strike's effect is: If the enemy has a phase element debuff on them, they take +15% damage. This is something you can consistently trigger with the right team, and most dolls can take advantage of this as long as you have someone that can inflict phase element debuffs.


I previously had a whole section explaining all phase debuffs in detail, but i ended up making another guide entirely because it felt too bloated here. So I do recommend you also read my other guide about all the ins and outs of phase strike and phase debuffs if you feel like you don't know all of the ones that exist or how dolls trigger them.


https://gtm.steamproxy.vip/sharedfiles/filedetails/?id=3433531776
Calibration and Precision Boost Chips
This is the complicated part. So, how do we increase our attachment's stats?


We do that by "Calibrating" them. When you calibrate an attachment, the stats will randomly increase by certain values.


In order to calibrate, you need to toss in other attachments of any rarity until you have the required points to perform a calibration. Obviously, the higher the rarity, the more points they give. Also, if you sacrifice an already-calibrated attachment, that will also be worth more points than usual.


Every time you perform a calibration, it costs 20,000 Sardis Gold. You want to stock up as much of this as possible, because you will chew through your gold if you perform even a couple dozen calibrations, even if you have hundreds of thousands. Never neglect your Sardis Gold and always take any opportunity to get more.


Before we talk about the enhancement process, I want to touch upon the base stat values for a second.


This attachment has been completely untouched. Do you see the little vertical white lines in the middle of the bars on each stat? That represents the maximum base value a stat can have. You'll notice each bar is filled out by a different amount.

Basically, when you get an attachment, the base stat value of each stat will be randomized. That vertical white line indicates the maximum base value the stat can have. Why does this matter? Because the percentage increases from stat enhancements will be based off the base value of the stat. So higher base numbers mean higher maximum enhancements.

For an example of this, let's say an attachment has a 2% Attack Boost as a base stat. If that stat increases by 100%, it'll then become a 4% boost. Now, if a stat is at 4% base value and that increases by 100%, it'll become 8%. It can make quite a difference if all your combined attachments add up depending on your luck.

Now to be clear, this isn't something you should be stressing over unless you're well into the endgame and have been playing for quite a while. These won't make or break your doll's performance, but it is worth keeping in mind to be able to squeeze out as much stat boosts as you possibly can, and you should be aware of this.


Now I wanna discuss the actual stat enhancement. Like I said, the stats on the attachment will randomly be increased by a certain value. The stat increase range can be anywhere from +10% to +200% That percentage is based off of the base value of the stat. For example, if your Attack Boost stat is 3% initially and it increases by 100%, then it upgrades to 6%.


So yes, in a perfect world, every stat would get a 200% increase... But you should know how unlikely that is, especially if you come from Hoyoverse games.


As you can see, upon first performing a calibration on an attachment, the stats get increased, no strings attached. However, if you're not satisfied with the results, you can re-calibrate it as many times as you like; though you will need to toss in more attachments and Sardis Gold to do so. Now don't worry, you can revert back to the original results if you aren't satisfied with the new calibration.


When you re-calibrate, you can see how much each stat increased or decreased from the original value. In this case, we ended up getting a good result as Attack and Crit DMG increased by quite a lot. Meanwhile Crit Rate stayed the same, and Defense dropped. The only part that I cared about was the crit stats, so I'm happy with this outcome, and will overwrite the original calibration with this new one.


Lastly, we'll be talking about Precision Boost Chips, which are these:


Firstly, it's gonna cost you extra Sardis Gold when you calibrate using these chips. The cost increases the more chips are used in the calibration.


You earn these in various ways. You have the choice of using these chips before you calibrate an attachment. What these do is guarantee the stats will be boosted by at LEAST +100% value; the number of stats with this guarantee is equal to the amount of chips you use. If you use less than the maximum amount, the enhanced stats will be random. This more or less guarantees all your stats will at the very least be middle of the road at 100% when the maximum value is 200%. It's recommended you use this upon first calibrating an attachment if it's a particularly good one.


However, you should be aware that if you use chips to re-calibrate an attachment that has a stat at OVER 100% value, it's possible that the stat can decrease in power. Because don't forget, all the chips do is guarantee the stat will be 100% bare minimum, that doesn't mean you can't get a decrease in possible stats. So it's basically more of a gamble if you use chips to re-calibrate. It doesn't mean you should never use chips for re-calibration, but just weigh your options and choose them wisely.


Also, you'll see these arrow icons to tell when you've used chips to obtain the current stat boosts shown.

Extreme Calibration
Believe it or not, there's a surefire way to get +200% stat boosts for all doll's attachments. Too good to be true? Nope, it's true, but it will take a while.


What you gotta do is perform Extreme Calibration.


Extreme Calibration lets you manually select which substats to upgrade on a given attachment, up to +200%. All it costs you is more Sardis Gold, and a unique item called Targeted Calibration Chips.

However, in order to perform this in the first place, each substat boost needs to be at LEAST +100%. You cannot do extreme calibration if this condition isn't met.


When you're in the menu for extreme calibration, you'll press the + icons to decide which substats to upgrade. Each instance of an upgrade (as in, every time you press the + icon) will cost 1 Targeted Calibration Chip and 50,000 Sardis Gold.

If the base stat value is not already at it's maximum (i.e where the white line is), then using the chips will upgrade the base value until it's full. Afterward, the percentage stat boost will be increased by 10% with every chip used until it's at 200%.

Also, be aware, once you perform extreme calibration on an attachment, you can NEVER perform a regular calibration on it again.


Needless to say, this guaranteed outcome comes at a great cost. Targeted Chips are very rare, and you will not obtain them often. Not only that, but 50k Sardis Gold per upgrade adds up very fast. You want to be absolutely certain the attachment is worth upgrading and has really good substats.

Not only that, but ideally, you want to try and get the substat boosts to be as close to 200% as possible in order to mitigate the amount of targeted chips used upgrading it. It's up to you on what your standards will be in regards to this, but try your best to get them as high as possible before using these.
5 comentarii
Scout  [autor] 14 iun. la 14:15 
I think in the vast majority of cases, the only other useful sets would be the elemental + physical damage boost ones since those are unconditional and do a bit more damage than Phase Strike, and the Emergency Repair set for those who's main role is healing, as sometimes the extra stability can go a long way.

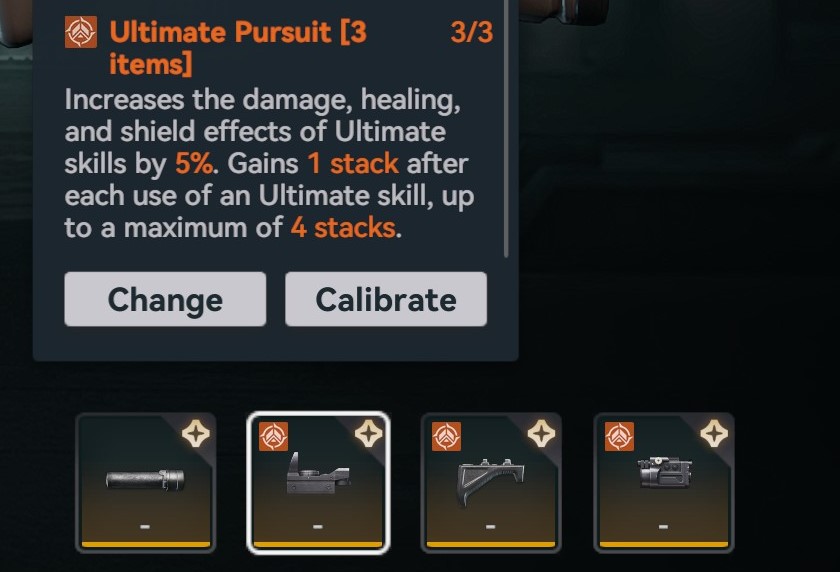
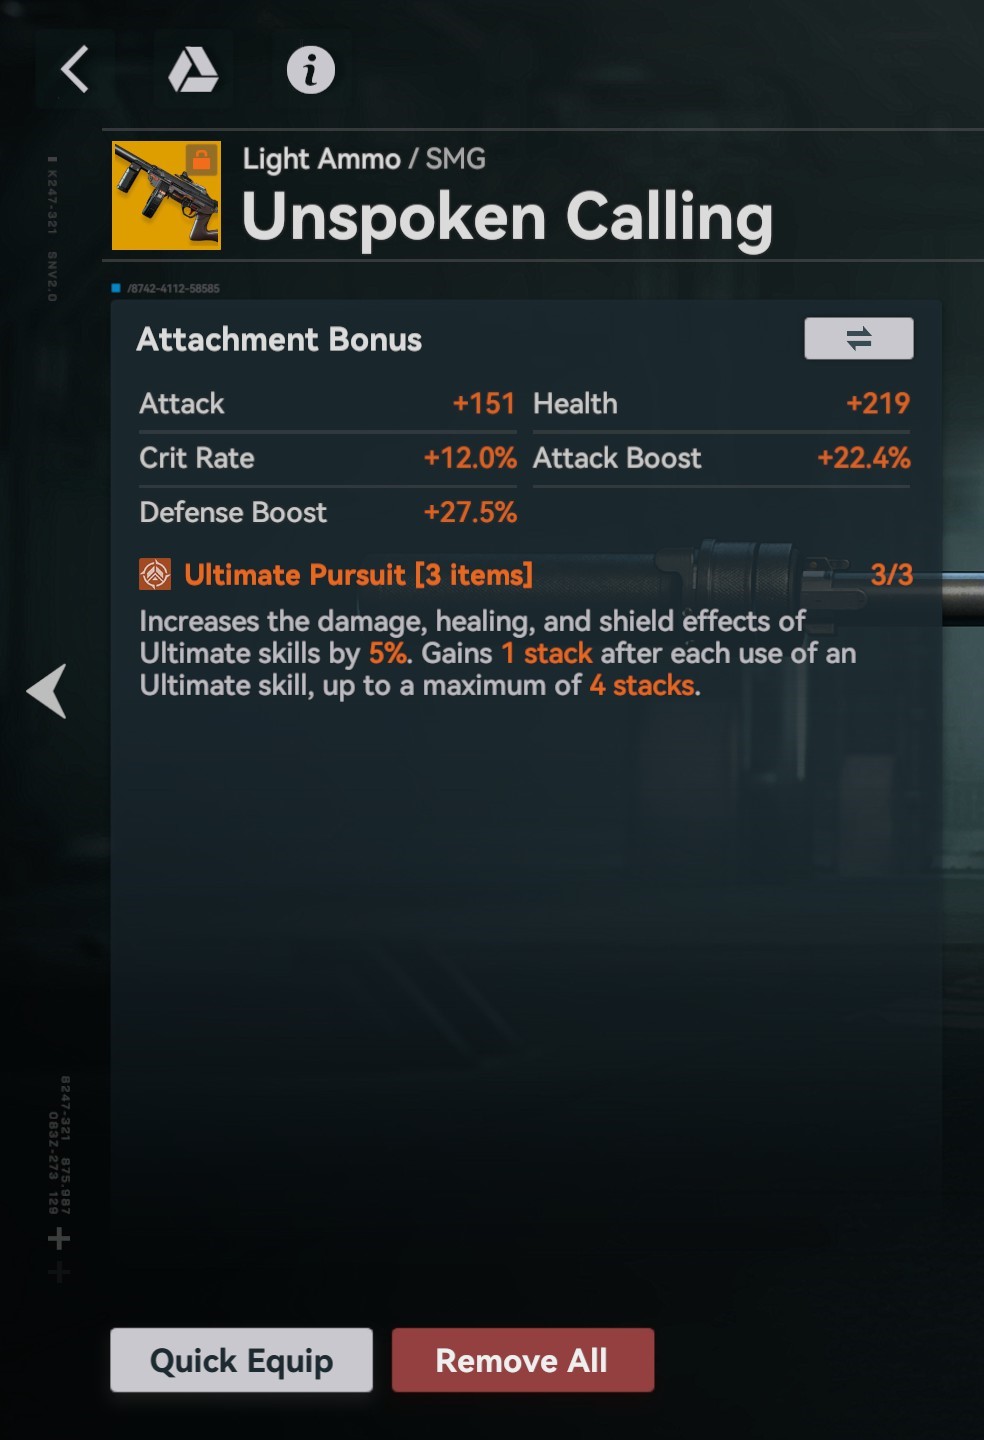
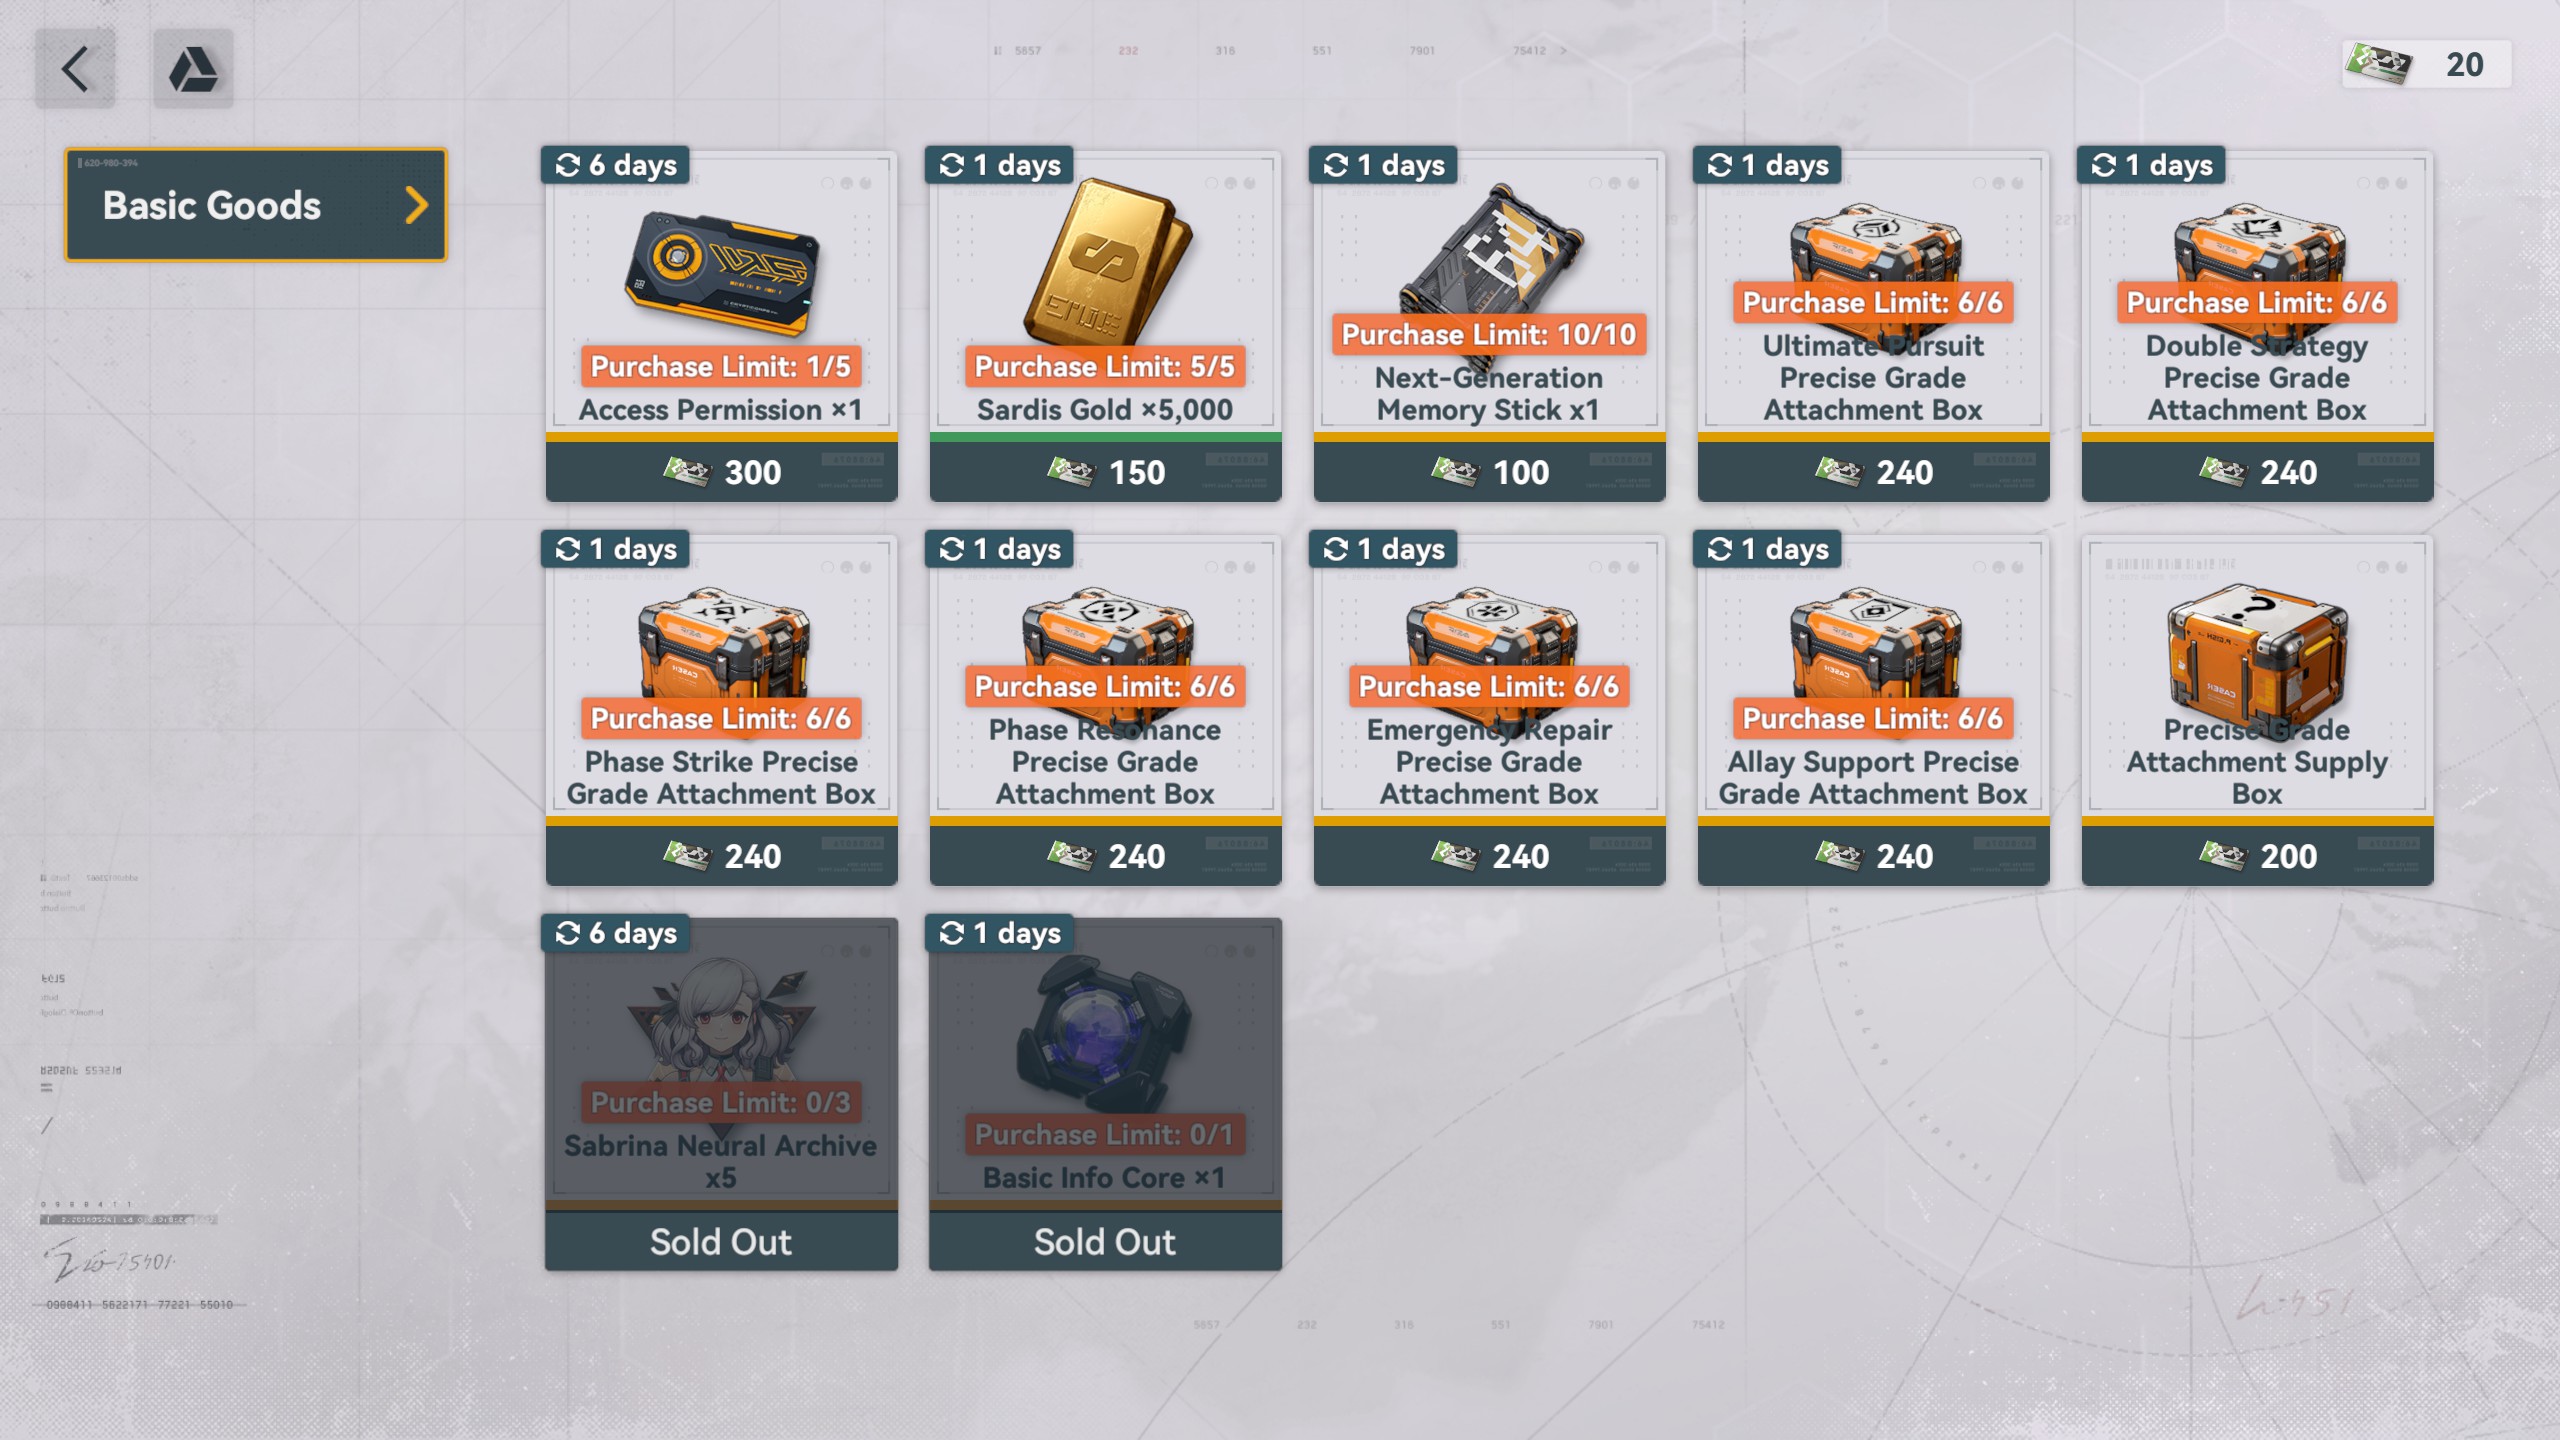
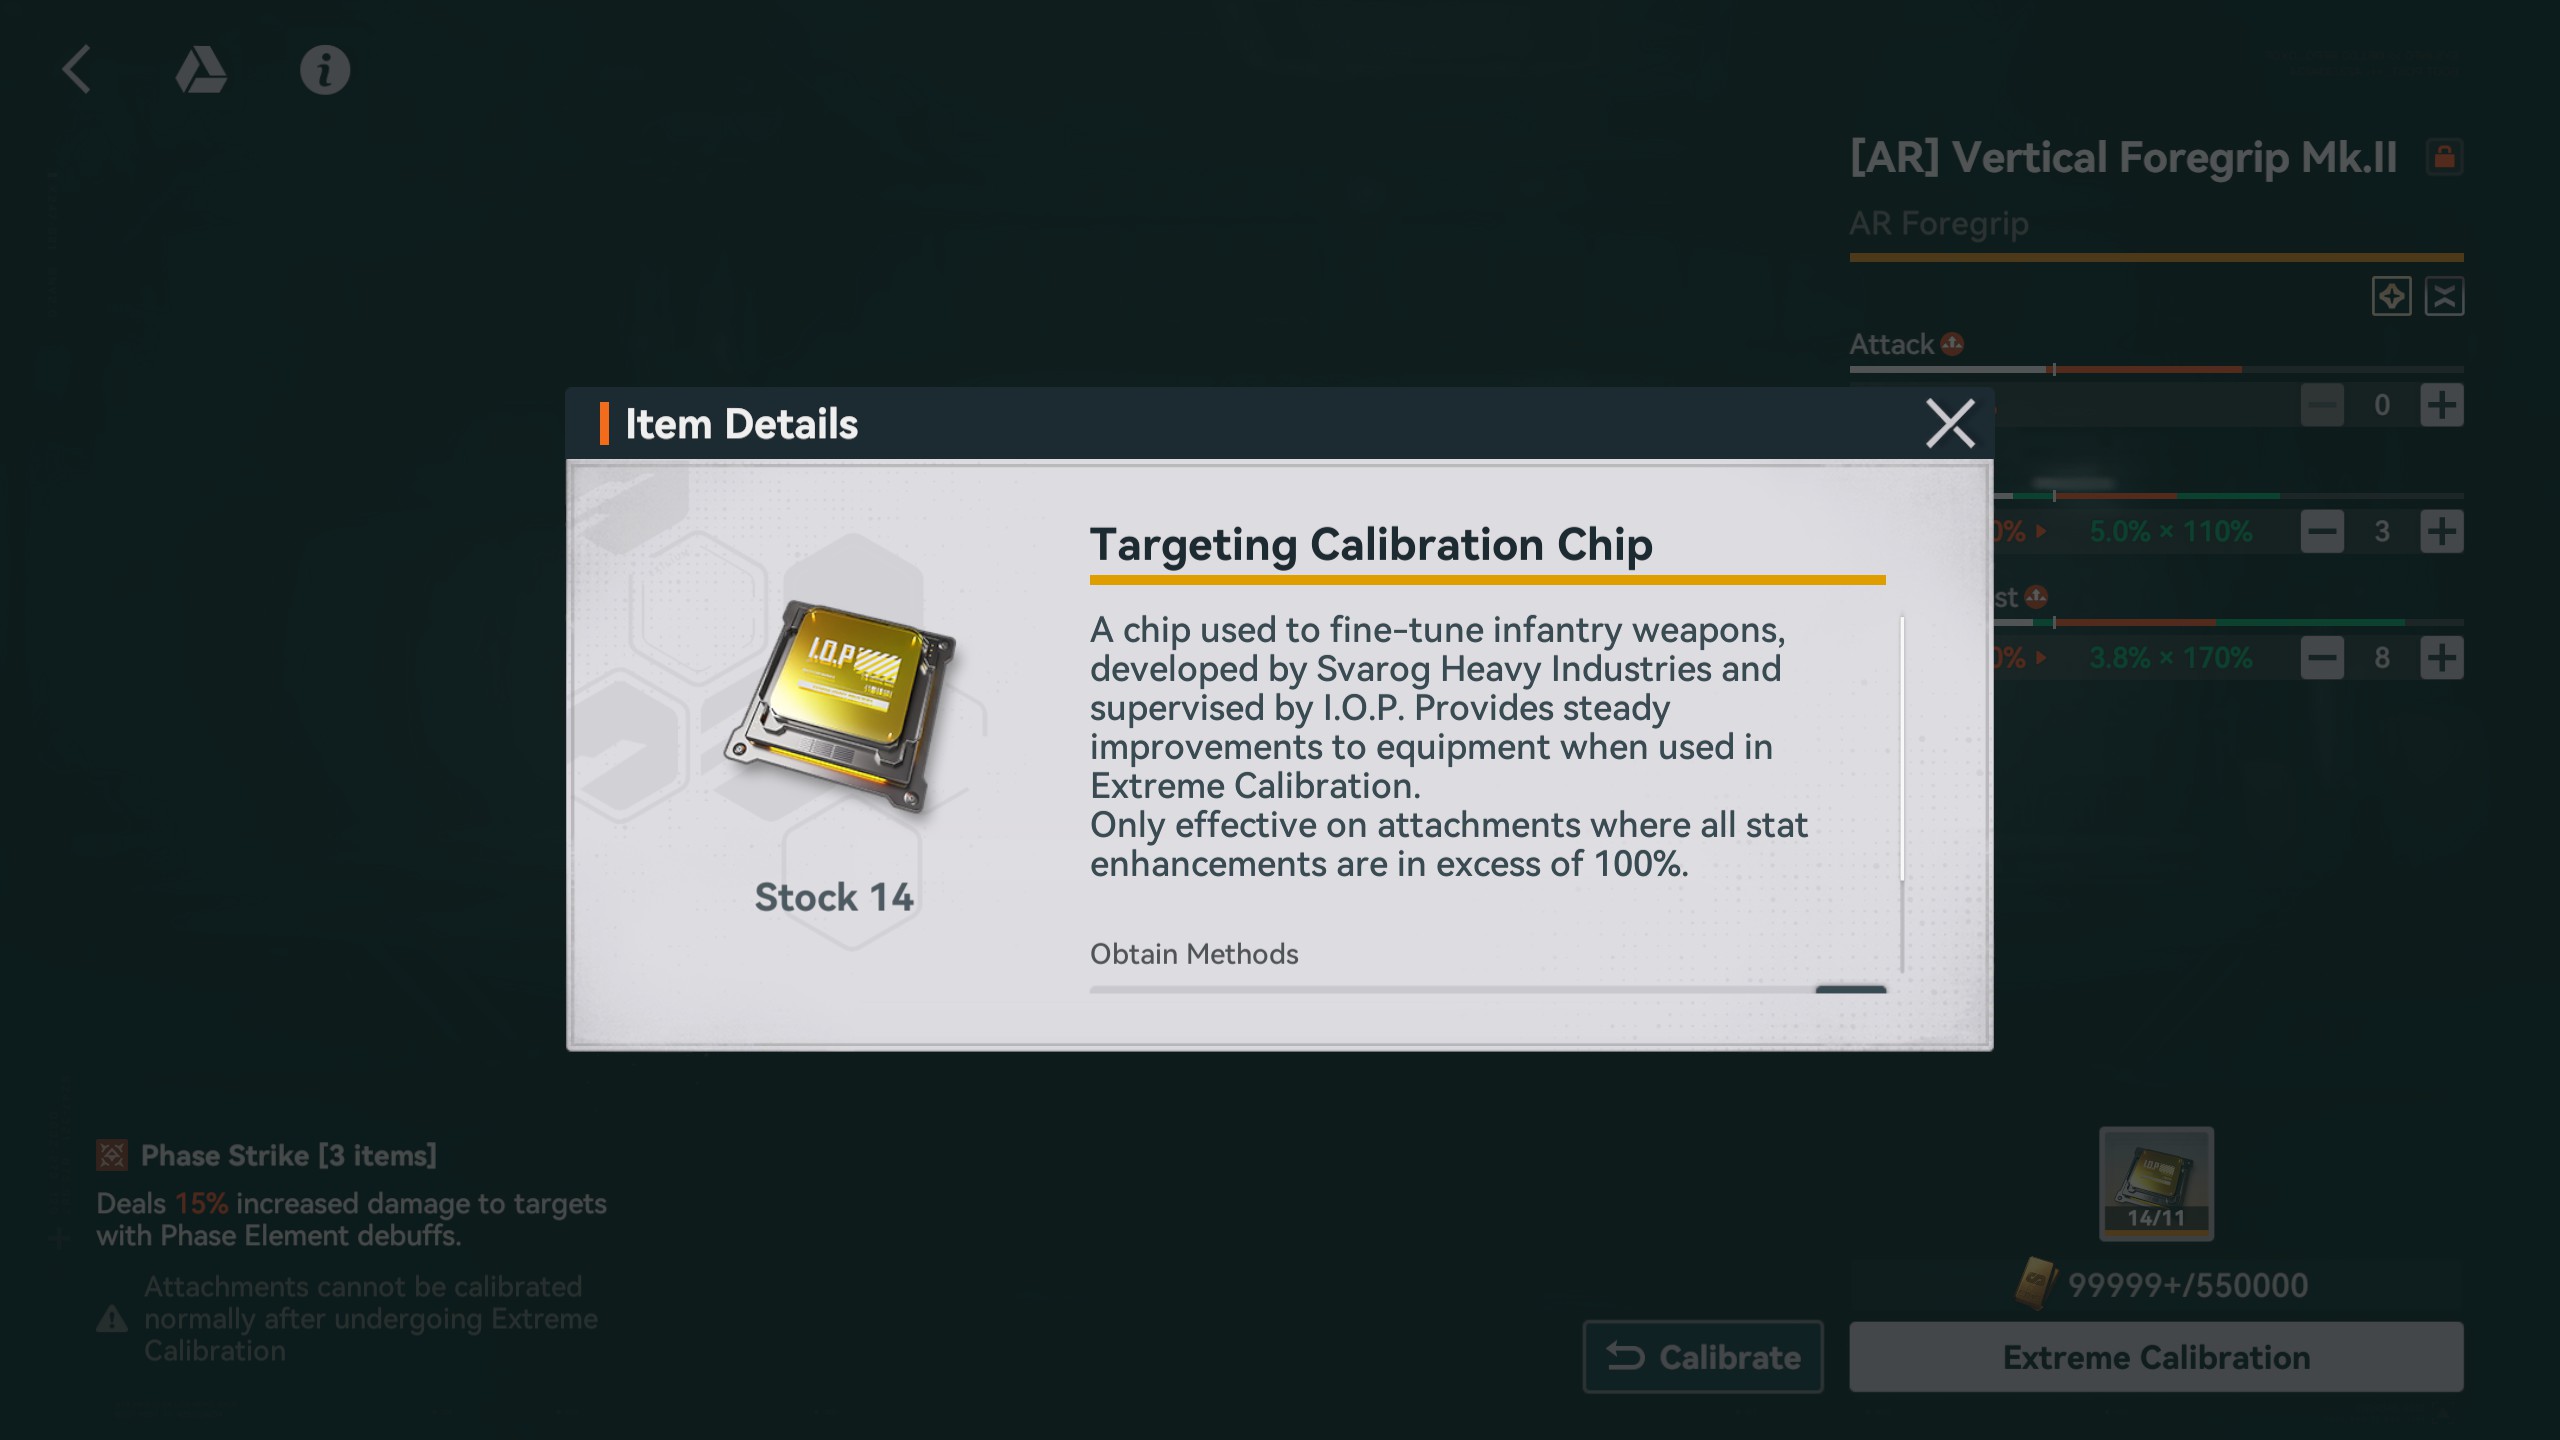
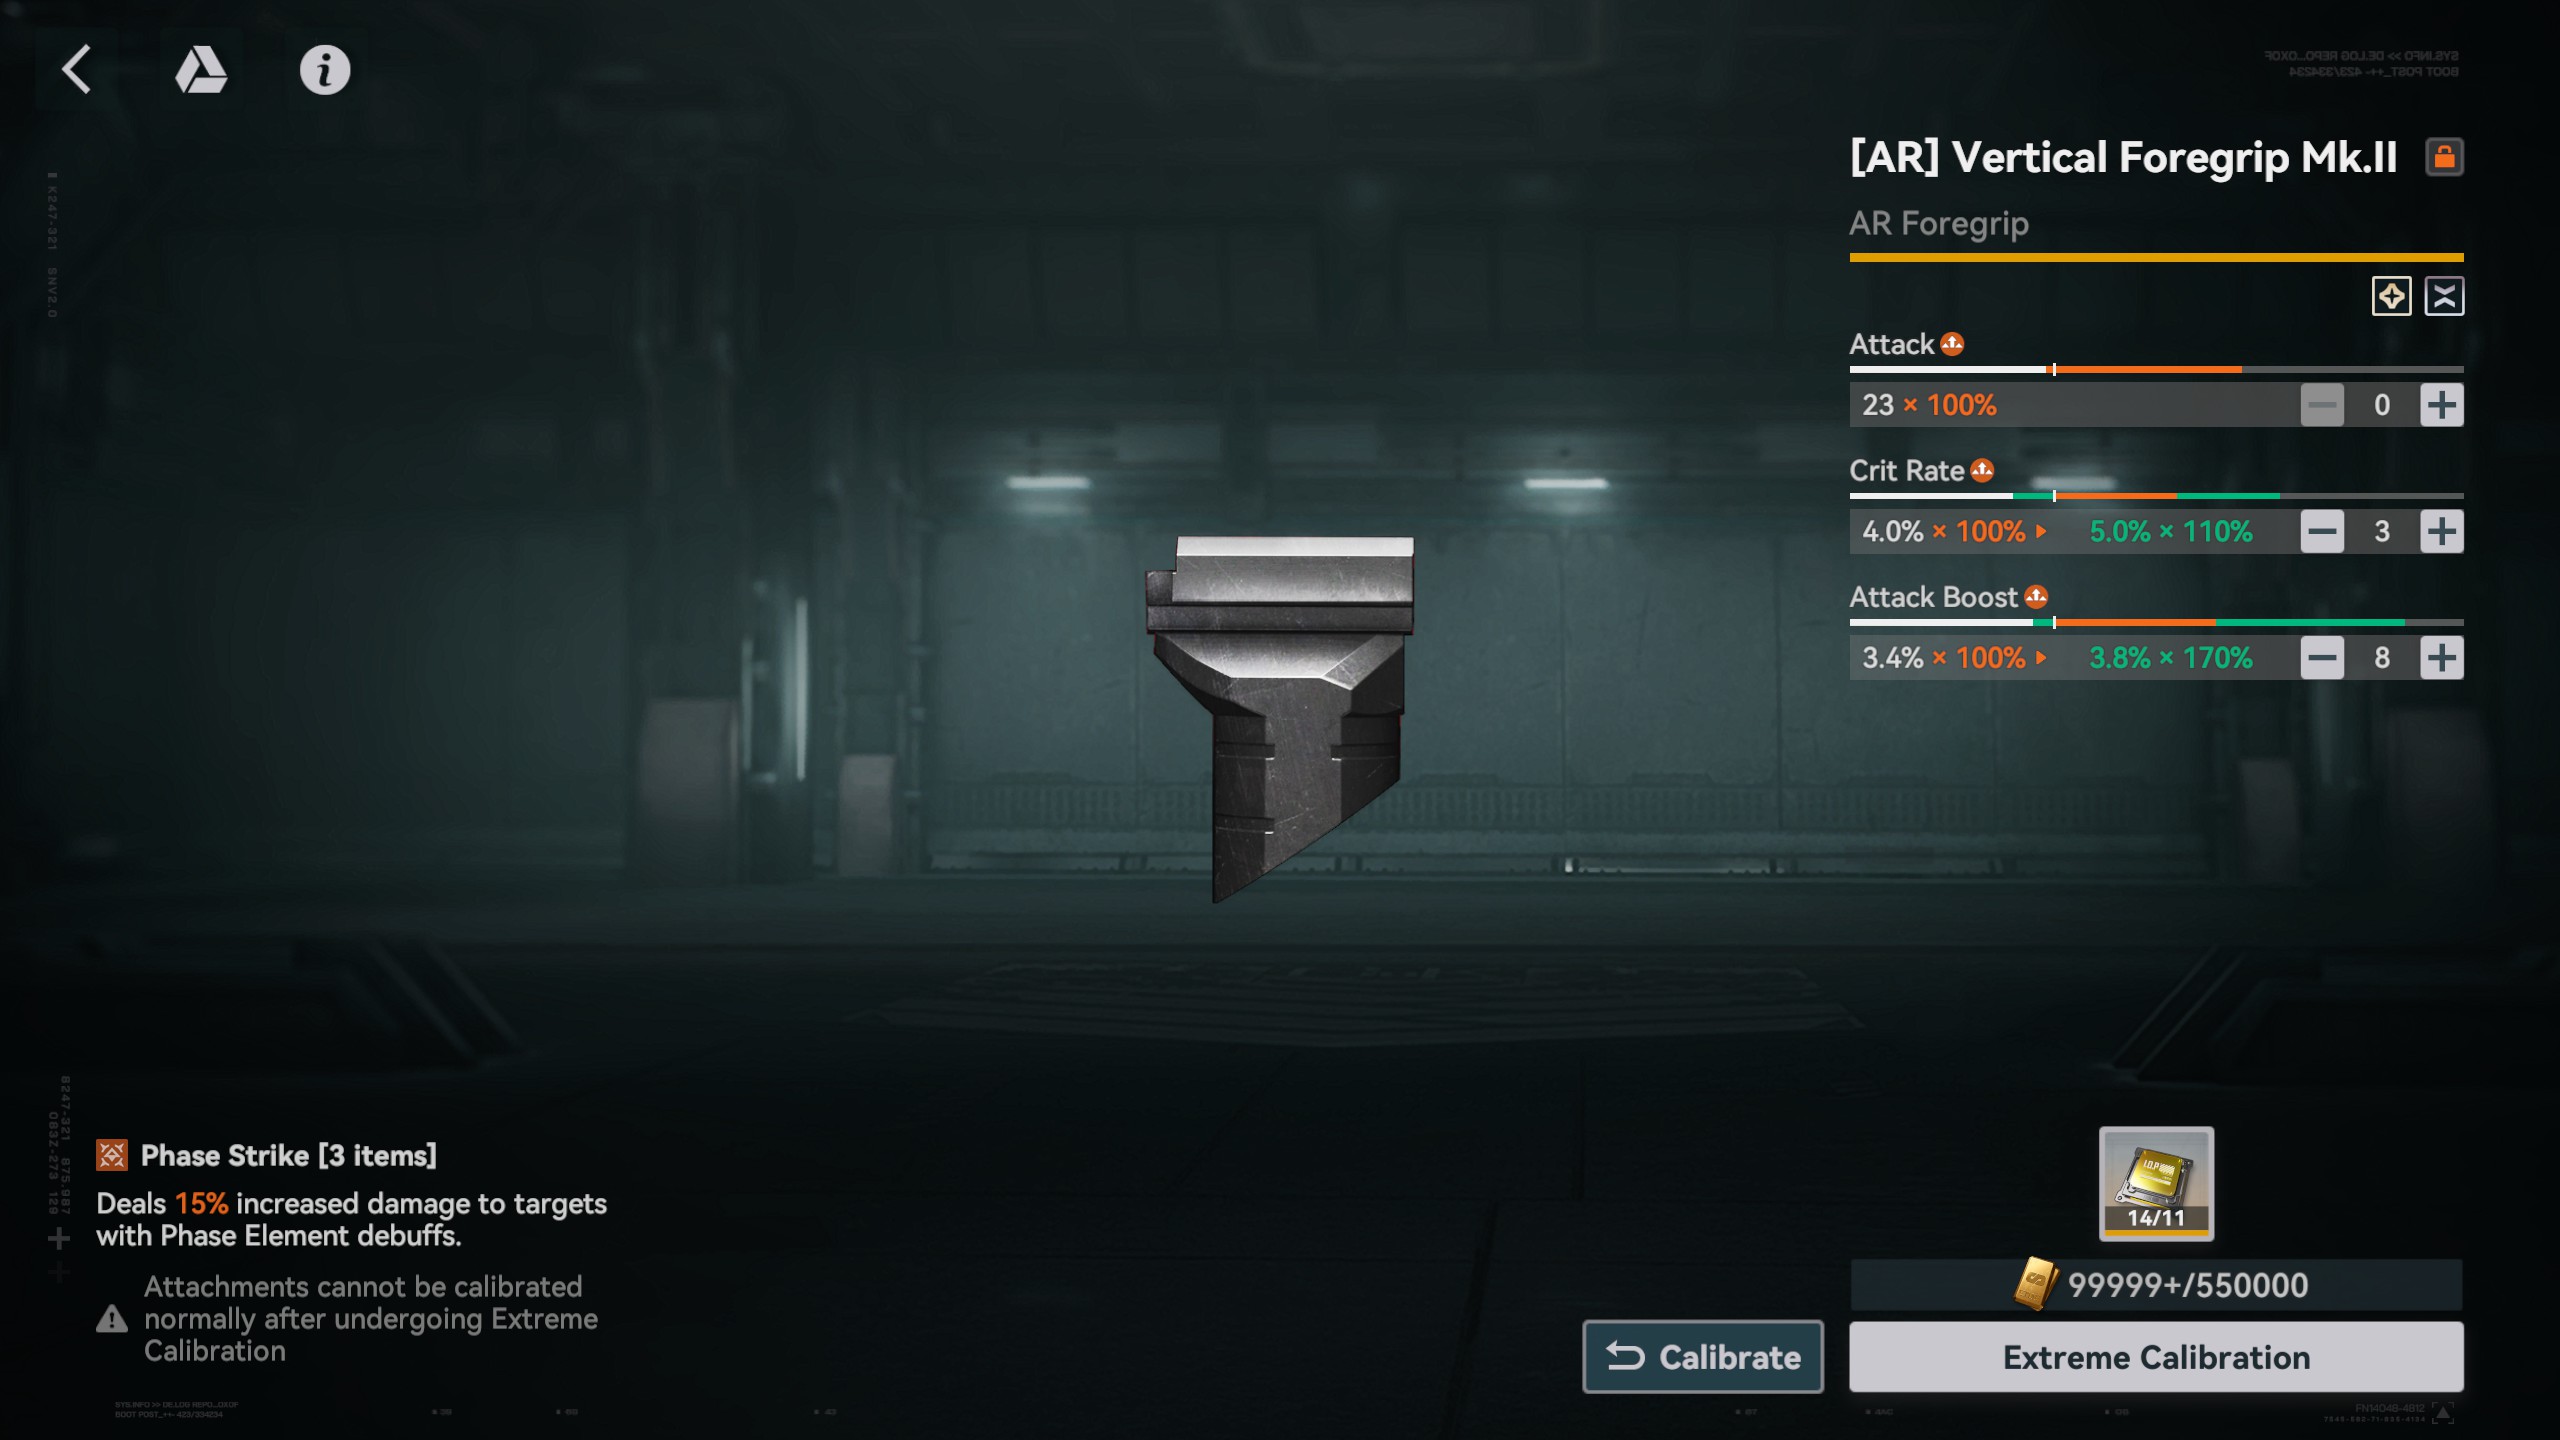
Allay Support is certainly a good choice for dolls that can trigger the effect as some bosses have very punishing attacks that hit a wide area. Ultimate Pursuit also can have it's potential fringe cases for dolls who's primary method of healing or attacking is their ult, but so far, I've only found Suomi is the only suitable candidate for that out of the dolls we have now. Maybe future ones will change that.
kelenas_sarkeen 14 iun. la 8:02 
In regards to the Attachment Sets; you explained why Phase Strike is the most generally useful, but are there any sets that are just flat-out bad, due to being very situational and/or overshadowed by sets with similar but more powerful or easily used effects?

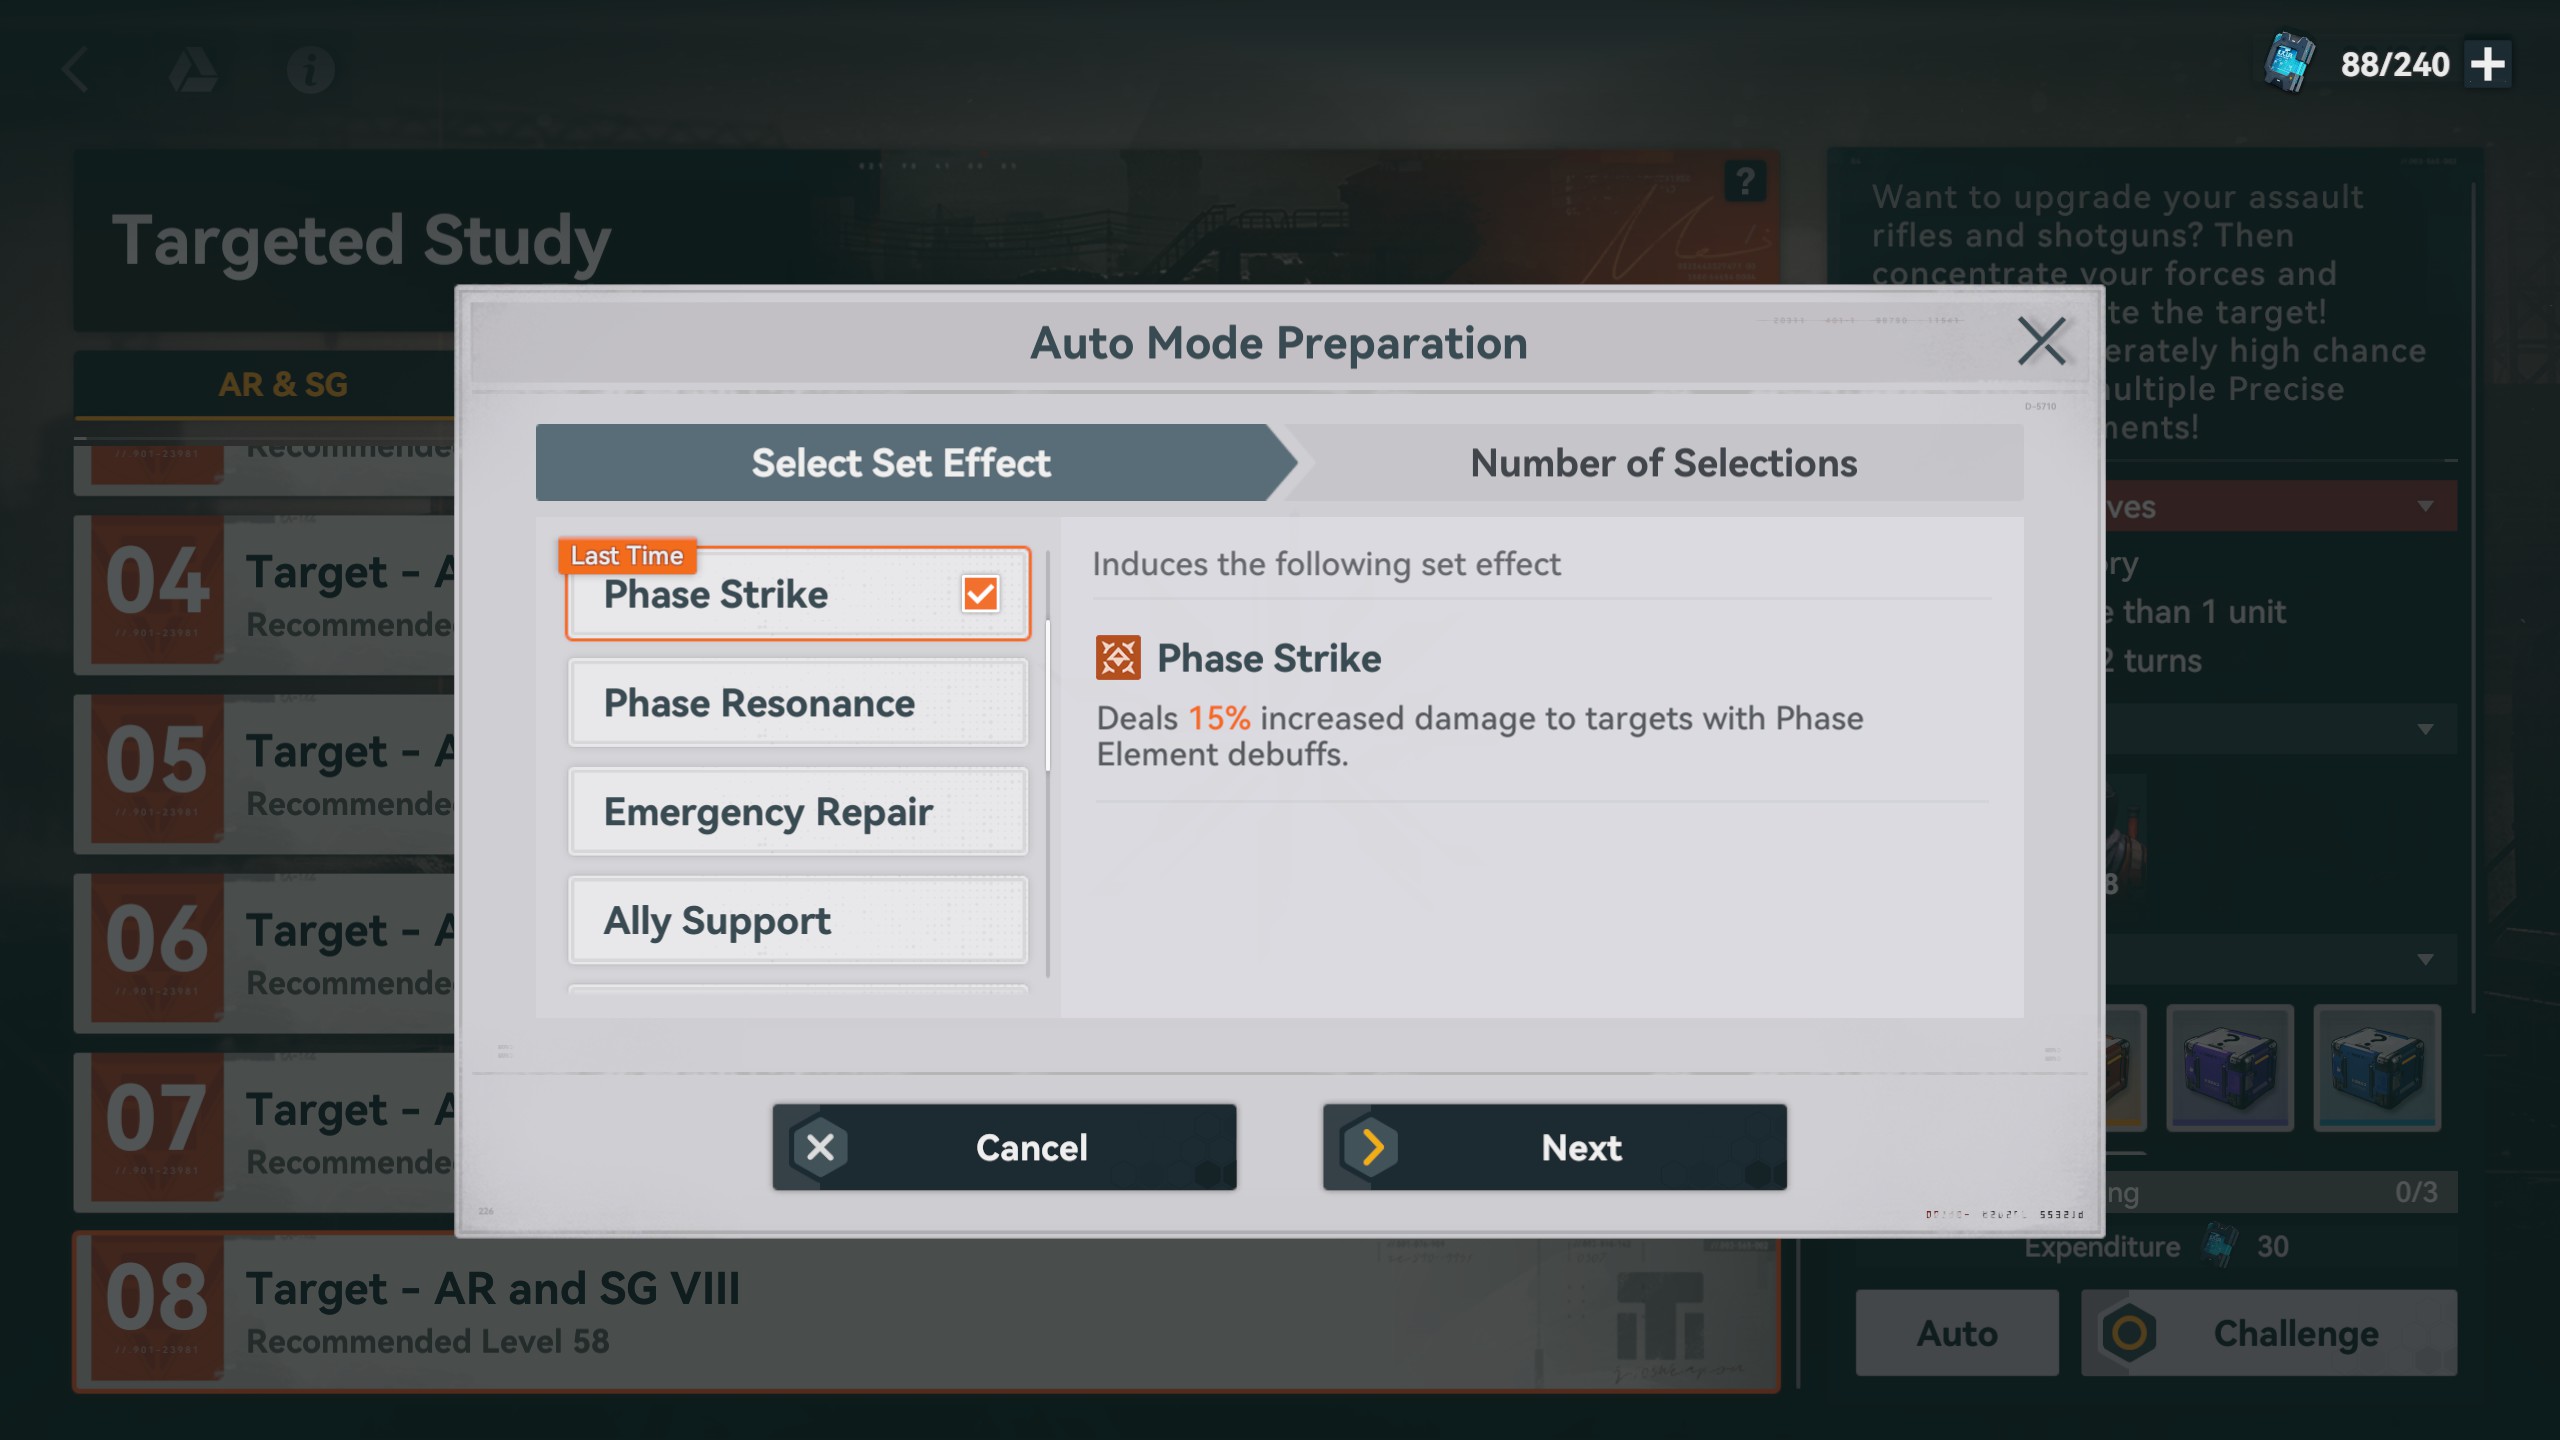
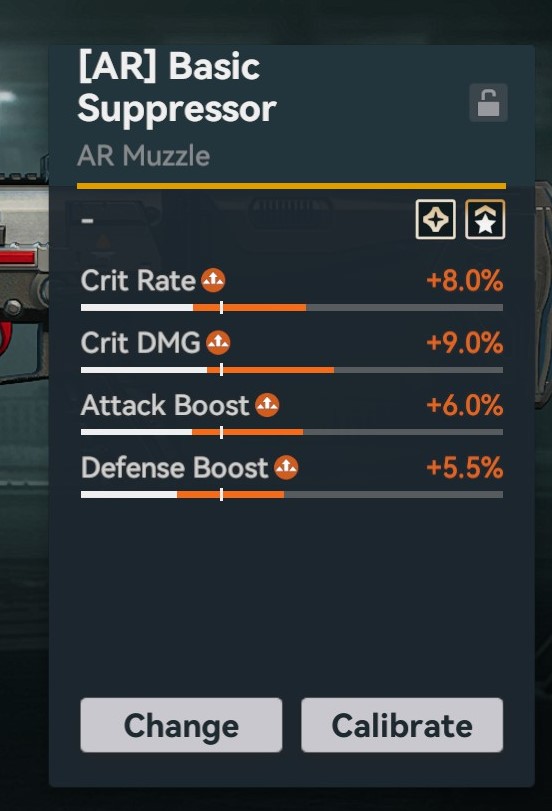
Based on my experiences and my reading of the effects, it seems like Double Strategy and Phase Resonance, seem like they are both very conditional requiring both the enemy target and attacking doll to meet a number of conditions while providing less bonus-damage than the Phase Strike or elemental Boost sets. And Allay Support relies on the enemy attacking with AOE attacks, which many don't have.
Scout  [autor] 17 mart. la 15:16 
But beyond the first calibration? It depends on how much you need from the doll with their upgrades. If it's something strict like having a good crit ratio, it might be better to save them for situations like that.
Scout  [autor] 17 mart. la 15:15 
This is solely, my opinion, but if you have an attachment that has at least two good pairs of stats (like Crit Rate/DMG and Attack Boost for example), and it's from a set you know you'll be keeping, I'd use chips on them the first time to get good stats right away. However, I wouldn't waste them on an attachment you're only temporarily holding because it's not part of a set you want. Like if you want a Phase Strike set but you have an Electric Boost one as a backup, don't waste chips on that electric one.
Bebek 17 mart. la 10:25 
What is the endgame strats to get desired boosts? Assume that I have collected plenty of precision chips and gold. Do I go all in with chips, or I go all in without chips relying on probability alone?