Path of Exile 2

Path of Exile 2

217 ratings
Kupo's Infernal Minion Witch Guide: Summon, Burn & Conquer
By Kupo
Master the Flames with the Infernal Minion Witch – Summon Raging Spirits & Burn Your Enemies to Ash! 🔥
Dive into the chaos of Path of Exile 2 with this unique Witch build focused on fiery destruction, minion mastery, and a powerful infernal playstyle. With gems like Summon Raging Spirits, Flame Wall, Skeletal Arsonist, and Unearth, this guide will show you how to summon relentless, fiery allies while dominating the battlefield with infernal might. Whether you're new or a veteran, this build offers explosive gameplay and powerful synergy for the dark arts.

Learn how to set up, gear, and optimize your build for efficient, fiery destruction.
Master your minion army and unleash waves of flame and fury on your enemies.
A comprehensive look into mechanics, gameplay tips, and how to dominate Path of Exile 2's challenges.
Following this guide will bring you to mapping (endgame) in no time. Let your minions do all the work.
If this build is nothing for you, you can still check out the Tips Section which is universal.
Should you find useful what lies ahead, I would be very grateful for an upvote.
23
4
4
8
2
3
3
2
2
   
Award
Favorite
Favorited
Unfavorite
Guide Changelog
Find out what has changed since your last visit.
Newest to oldest. See the relevant chapters for all details.
  • Added endgame build chapter which is just showcasing what I am running currently, comfortably
  • Added general mapping tips (for newcomers and returners) in the Tips section
  • Added info about /global 6666 in introduction
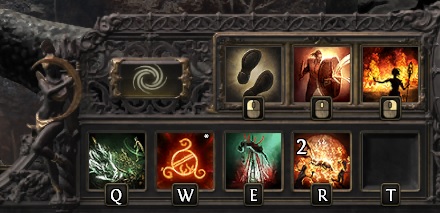
  • Swap Support Gem Last Gasp for Immolate on SRS and added Sketal Warrior Weapon
  • Updating and adding viable Support Gem alternatives and additions
  • Added offensive Hound skilling options, and Skeletal Storm Mage Addition
  • Added shield as viable in gear section
  • Added Heft Support Gem and Detonate Dead as optional
  • Added mapping gear section
  • Added Tips for efficient progression chapter
  • Added a quick note about recent nerf, tl;dr: It's not so dramatic
Introduction

Welcome, Exile, to the Infernal Minion Witch guide—a fiery journey through Path of Exile 2’s dark and chaotic realms. If you’re looking to embrace the power of necromantic summons and unleash infernal destruction upon your enemies, you’ve come to the right place. This build focuses on a seamless synergy between minion mastery and infernal flames, utilizing skills like Summon Raging Spirits, Flame Wall, Skeletal Arsonist, and Unearth to create a relentless and overwhelming force on the battlefield.

At the moment, this style of minion-based infernal gameplay represents one of the most effective and fun strategies available, especially given that other skeleton-focused builds currently lack viability. After experimenting with multiple builds, pulling from personal experience and various resources, this guide aims to offer you a reliable path to dominate content while focusing on a strong summoning army backed by fire-based destruction.

This guide is meant to be concise yet comprehensive—offering insight, tips, and mechanics to help new players or those exploring this style of play. Whether you’re a beginner learning the ropes or a veteran looking for an efficient summoning and infernal synergy, this guide should give you a strong foundation to make your journey easier.

Let’s light the path with flames and spirits, and carve out your path to dominance.

Summoner Ingame Chat
There is a specific global channel for summoner players. Use "/global 6666" to join it. You will find all the help and talk about minion related builds, gear and so on (not only this build). Be warned however, it is pretty crowded and spammy at times, so you may as well prefer to turn it off in the heat of the moment.
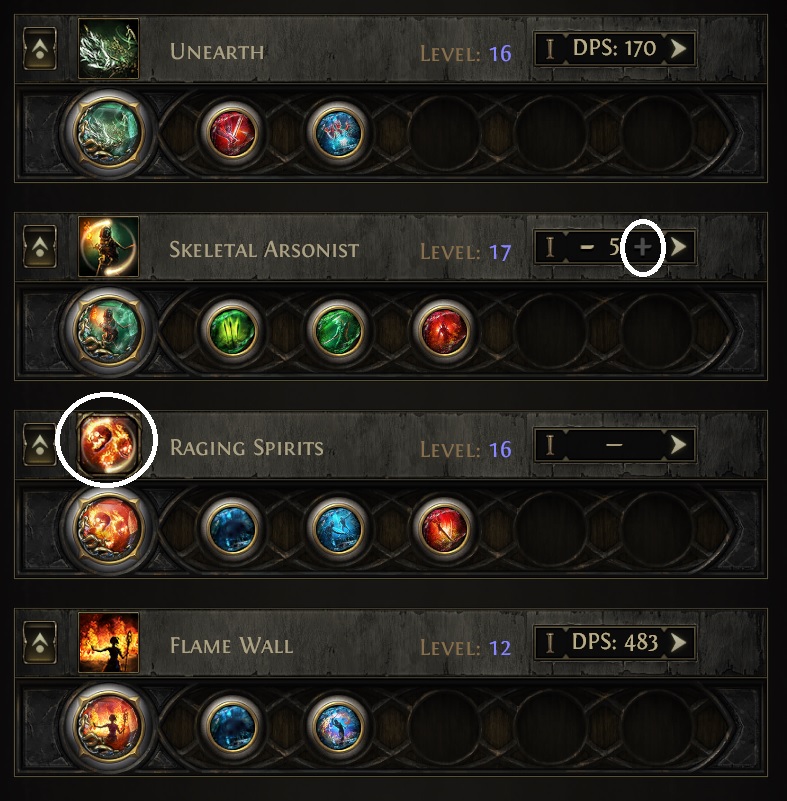
Gems - Core Skills
Below is a breakdown of the primary skills you’ll focus on during your journey with the Infernal Minion Witch build. These are the foundation of your playstyle, dealing the majority of your damage and enabling you to summon minions and control the battlefield. Each skill relies on specific gems that you'll unlock as you progress, so ensure you're aware of their uses and synergies.

Important: I can't find the support gem??
Some support gems are not in the recommendation window. You need to go to "all gems" and search for it there. The recommendations aim to not overwhelm new players and only show a few selected ones which may or may not be viable by a starter.

Unearth (Skill Gem - Level 1)
This skill is essential from early on and remains a key part of your minion-based infernal strategy throughout the game. While it starts simple, it has important mechanics for summoning and corpse manipulation.

Why Use Unearth?
  • Unearth deals damage in a cone in front of you while also reviving corpses into skeletal minions.
  • These revived minions aggressively hunt nearby enemies and block foes' advances.
  • They despawn after a certain duration, so recasting Unearth is vital, especially when dealing with tough Rare or Unique enemies or bosses.

Recommended Support Gems
  • Execute (Level 1): Boosts damage against low-life enemies as they approach, or as they die. This is excellent for maximizing your pressure.
  • Minion Instability (Level 1): A great synergy with Unearth for additional area damage when your minions perish.
Learn to manage corpses around you as a resource, don't use more Unearth if you have the maximum amount of bone constructs or don't need that many to have some spare ones lying around for the sudden rare monster appearing or boss fight.

Skeletal Arsonist (Skill Gem - Level 3)
These are your primary source of sustained damage. They are permanent minions (as long as you maintain the required Spirit Reservation) that throw fire projectiles at enemies.

Key Notes:
  • They require Spirit Reservation, so ensure you use every free spirit you have after others mentioned later to spawn more of them. Up to 6.
  • Their projectiles are great for sustained pressure but these Skelis can despawn if you move too far away. Keep an eye on their positioning and avoid straying too far.

Recommended Support Gems
  • Scattershot (Level 1): Doubles the number of projectiles fired, leading to massive damage. A must-have. Sacrifices a bit of damage and cast speed in return.
  • Heft (Level 3): This boosts their physical damage. But we do fire damage? - You might want to say. Because of their mechanic they convert their physical damage to fire damage and thus give way more DPS.
  • Martial Tempo (Level 1): Increases attack speed by 25%, improving your damage output and minion responsiveness. Use this only if you have a 3rd gem slot available or can't have Heft yet.
  • Fire Infusion (Level 1): Grants additional fire damage at the cost of cold and lightning reductions which don't bother them anyway. Use this only if you have a 4th gem slot available.

Summon Raging Spirits (SRS) - (Spirit Gem - Level 4)
This is your second main source of damage, spawning rapidly to overwhelm enemies. They are ignored by enemies, so they don't block and are not attacked directly (but damaged by AoE). They die or despawn very quickly.

How to Use?
  • SRS are short-lived, fire-based minions that automatically swarm enemies on spawn.
  • They require Spirit Reserve, so you’ll need to ensure this is activated. Otherwise it does nothing.
  • Only fire-based spells can summon SRS, which is why we will use Flame Wall all the time.

Recommended Support Gems
  • Last Gasp (Level 1): Increases the lifespan of your SRS by a critical 4 seconds after dying. This is a must-have as they’re very fragile and easily destroyed by AoE.
  • Feeding Frenzy (Level 2): Grants your SRS 30% more damage. Also increases damage taken, but this is not important after getting last gasp.
  • Elemental Focus (Level 3): A potential third option if you’re looking to scale your fire damage later in your progression: 25% more damage.
  • Immolate (Level 3): When you have the Infernal Hound with support gems, use this do get 30% extra damage.
  • Fire Penetration (Level 2): A potential fourth option if you’re looking to scale your fire damage later in your progression 30% fire pen - But it's useless against enemies who don't even have that high fire resistance.
  • Fire Mastery (Level 3): A potential alternative to increase the skills level by 1.
Be sure to swap out Last Gasp after earlier acts, because it does not affect "dying" as of short duration in general. So when you have some life on them, you can use this slot for extra damage.

Flame Wall (Skill Gem - Level 1)
Flame Wall is a utility and damage skill rolled into one. It's essential for improving your damage output and enabling SRS spawning.

Why Flame Wall?
  • Summon SRS: When you cast Flame Wall, up to 5 SRS can spawn depending on your casting area. This allows you to rapidly summon minions without needing corpses or mana spamming.
  • Increases Skeletal Arsonist Damage: Your minions attacking through Flame Wall receive increased fire damage, making it highly synergistic with their mechanics. Always make sure that there is a flame wall between your skeletal arsonists and whatever they are attacking!
  • Low Mana Cost & Easy Use: Flame Wall costs very little mana, can be cast frequently, and doesn’t require corpses, making it reliable in all encounters.
  • Your Main Skill: While you won’t use this for every moment early on, it will become your core skill as you progress into endgame.

Recommended Support Gems
  • Arcane Tempo (Level 1): Speeds up your cast speed, which is crucial for avoiding casting failures during combat or early game.
  • Fire Mastery (Level 3): A great way to boost your Skeletal Arsonists’ damage while they fire through the wall. Not a priority but worth it if you have the resources.
  • Fortress (Level 1):You can also use this as an alternative or addition to have a circle flame wall. So your Skelis stand still and you cast directly on them, they will have the flame wall buff 360 in all directions. It may be more comfortable, but not really needed.

Skill Summary
Skill
Level
Primary Purpose
Recommended Support Gems
Unearth
Level 1
Revives corpses into skeletal minions.
Execute (Level 1), Minion Instability (Level 1)
Skeletal Arsonist
Level 3
Primary source of sustained fire damage.
Scattershot (Level 1), Martial Tempo (Level 1), Fire Infusion (Level 1)
Summon Raging Spirits
Level 4
Rapidly summons fire-based minions for burst damage.
Last Gasp (Level 1), Feeding Frenzy (Level 2), Fire Penetration (Level 2)
Flame Wall
Level 1
Buffs your damage & summons SRS easily.
Arcane Tempo (Level 1), Fire Mastery (Level 3)

Don't forget to activate and increase where necessary.
Additional Skills, Weapon and Ascendancy Skill
This chapter covers the additional skills and Ascendancy abilities that complement the core Infernal Minion Witch playstyle. These skills add utility by ensuring you have access to the right tools for difficult fights.

Flammability (Curse Skill)
Flammability is an essential curse for reducing the fire resistance of strong enemies like Rare monsters and bosses. This allows you to deal significantly more fire damage to key targets.

Why Use Flammability?
  • Reduces enemy fire resistance, making it easier to take down strong enemies or bosses.
  • Helps synergize with your Skeletal Arsonists and Summon Raging Spirits by boosting their damage output.
  • Requires careful balancing—keep it up consistently without overusing it due to its high mana cost.

Recommended Gem Support Options
  • Persistence: Increases the duration of Flammability, allowing you to keep it up for longer periods against tough enemies.
  • Focused Curse: Reduces the cast delay, ensuring you can reliably hit enemies with Flammability even under pressure.
  • Heightened Curse: If you have a 3rd slot or don't need persistence (because no mana problems) you can use this to increase the effect.
  • Hex Bloom: [Situational] Curse now spreads on death. Useful for encounters with many minions, but we want to use this mainly for hard enemies/bosses which often come alone most of the time.

Pain Offering (Skill)
Pain Offering is a powerful utility skill that relies on corpses or one of your Skeletal Arsonists to provide a substantial damage buff to your minions.

How Does Pain Offering Work?
  • Pain Offering grants a damage buff to your minions when cast near them.
  • It only lasts 6 seconds, making timing and placement very important.
  • Can be destroyed by incoming enemy damage, so positioning is key to maintaining uptime.
  • Has a medium aura range, allowing you to use it strategically during engagements.
Support Gems are not really needed, so focus on other Skill Supports first.If you have too much support gems, pick the following:
  • Inspiration: Less mana cost. This spell is very expensive. If you see yourself often on low mana when using this, you can take this.
  • Expanse: Way more Area of Effect for the bonus aura while getting a cooldown of 6 seconds. The spell also lasts 6 seconds (if not destroyed). So a no brainer
  • Font of Rage/Blood: Should you have another slot open, this might be an option to get some life regen or increased attack speed for you and your minions.

Optional: Skeletal Storm Mage/Cleric
Should you reach high amounts of spirit and have reached 6 Arsonists, it may be a viable option to mix things a bit up. You can use a cleric if you see your Arsonists dying often, if not, I wouldn't recommend it. Instead you can use one or two Storm Mages that will synergize with the ignite by your hound with these support gems:
- Stormfire, Coursing Current, Conduction

Optional: Detonate Dead
In case you don't really like Unearth or have too many corpses lying around anyway, you may take this skill with you. It consumes 1 corpse (2 with spell echo) and does some good damage. If you don't need the minion block from Unearth, this may be a viable choice.

Weapon Skill: Malice
Malice can be an easy passive damage increase for you and your minions It weakens enemies nearby by raising your crit chance and synergizes perfectly with your build's playstyle.

Why Malice?
  • Functions as an effective debuff skill, weakening enemies around you for better damage.
  • Doesn't require special support gems—simple to use and effective on its own.
  • Nothing to worry about, it is just there without spirit cost or cast needed.
Support gems are not really needed, but feel free to experiment.

Weapon Skill: Skeletal Warrior
If you don't feel comfortable with Unearth or want more Meatshield (or simply Skelis) in general, this is a good alternative. You can also stay even further away which would result in no benefit with Malice.
You will get 2 Skeletal Warriors and can use Support Gems on them based on your level.
As these don't deal that much damage in general, it is a good choice to put supportlike debuffs on them, for example: Overpower (Stun), Ruthless (Stun), Devastate (Stun> Armour Break), Maim (Slow), Demoliser (Armor Break), Splinter (Armor Break)

Ascendancy Skills: Summon Infernal Hound
The Ascendancy skill Summon Infernal Hound is a cornerstone of survivability and ignition-based area control. It acts as both your meatshield and an offensive tool for ignition damage.

What is Summon Infernal Hound?
  • Summons a powerful hound that attacks enemies, drawing attention and protecting you.
  • Ignites enemies within the hound's area, adding burn damage over time to key targets.
  • Works exceptionally well as both defense and offense, offering both in combat situations.

Recommended Support Options
Always take this one:
  • Magnified Effect: Expands the hound's area of effect, allowing it to ignite a larger number of enemies.
For an early tanky meatshield build, choose some of these:
  • Meat Shield: Increases the hound's survivability by drawing enemy attention and making it harder for enemies to target you.
  • Elemental Army: Should your hound still die and does not have his resistances capped (check details in the gem info), you might want to use this.
  • Minion Mastery: If your doggo has enough life or resistances, or you unlocked another slot, you may pick this for overall improvement.
When you progress and see that your hounds resistances are capped anyway, you may instead use a more offensive approach (still take Magnified Effect!):
  • Fiery Death: Enemies ignited by your hound have a good chance to explode on death dealing AoE damage to enemies around them. An additional passive damage source.
  • Wildfire: Already ignited enemies spread these in their range too after a short period to make everyone in the pack ignited (and possible to explode).
  • Culling Strike: If you still have enough open slots and want more damage, this helps with rare and unique monsters to last hit them when a threshhold is reached.

Skill Summary Table
Skill
Type
Primary Purpose
Recommended Support Options
Flammability
Curse Skill
Reduces enemy fire resistance for higher damage output.
Persistence, Focused Curse
Pain Offering
Utility Skill
Buffs your minion's damage through corpses or Skeletal Arsonists.
N/A - No specific support required.
Malice
Weapon Skill
Weakens nearby enemies, improving survivability and control.
N/A - No specific support required.
Summon Infernal Hound
Ascendancy Skill
Functions as a meatshield and ignites enemies nearby.
Meat Shield, Magnified Effect
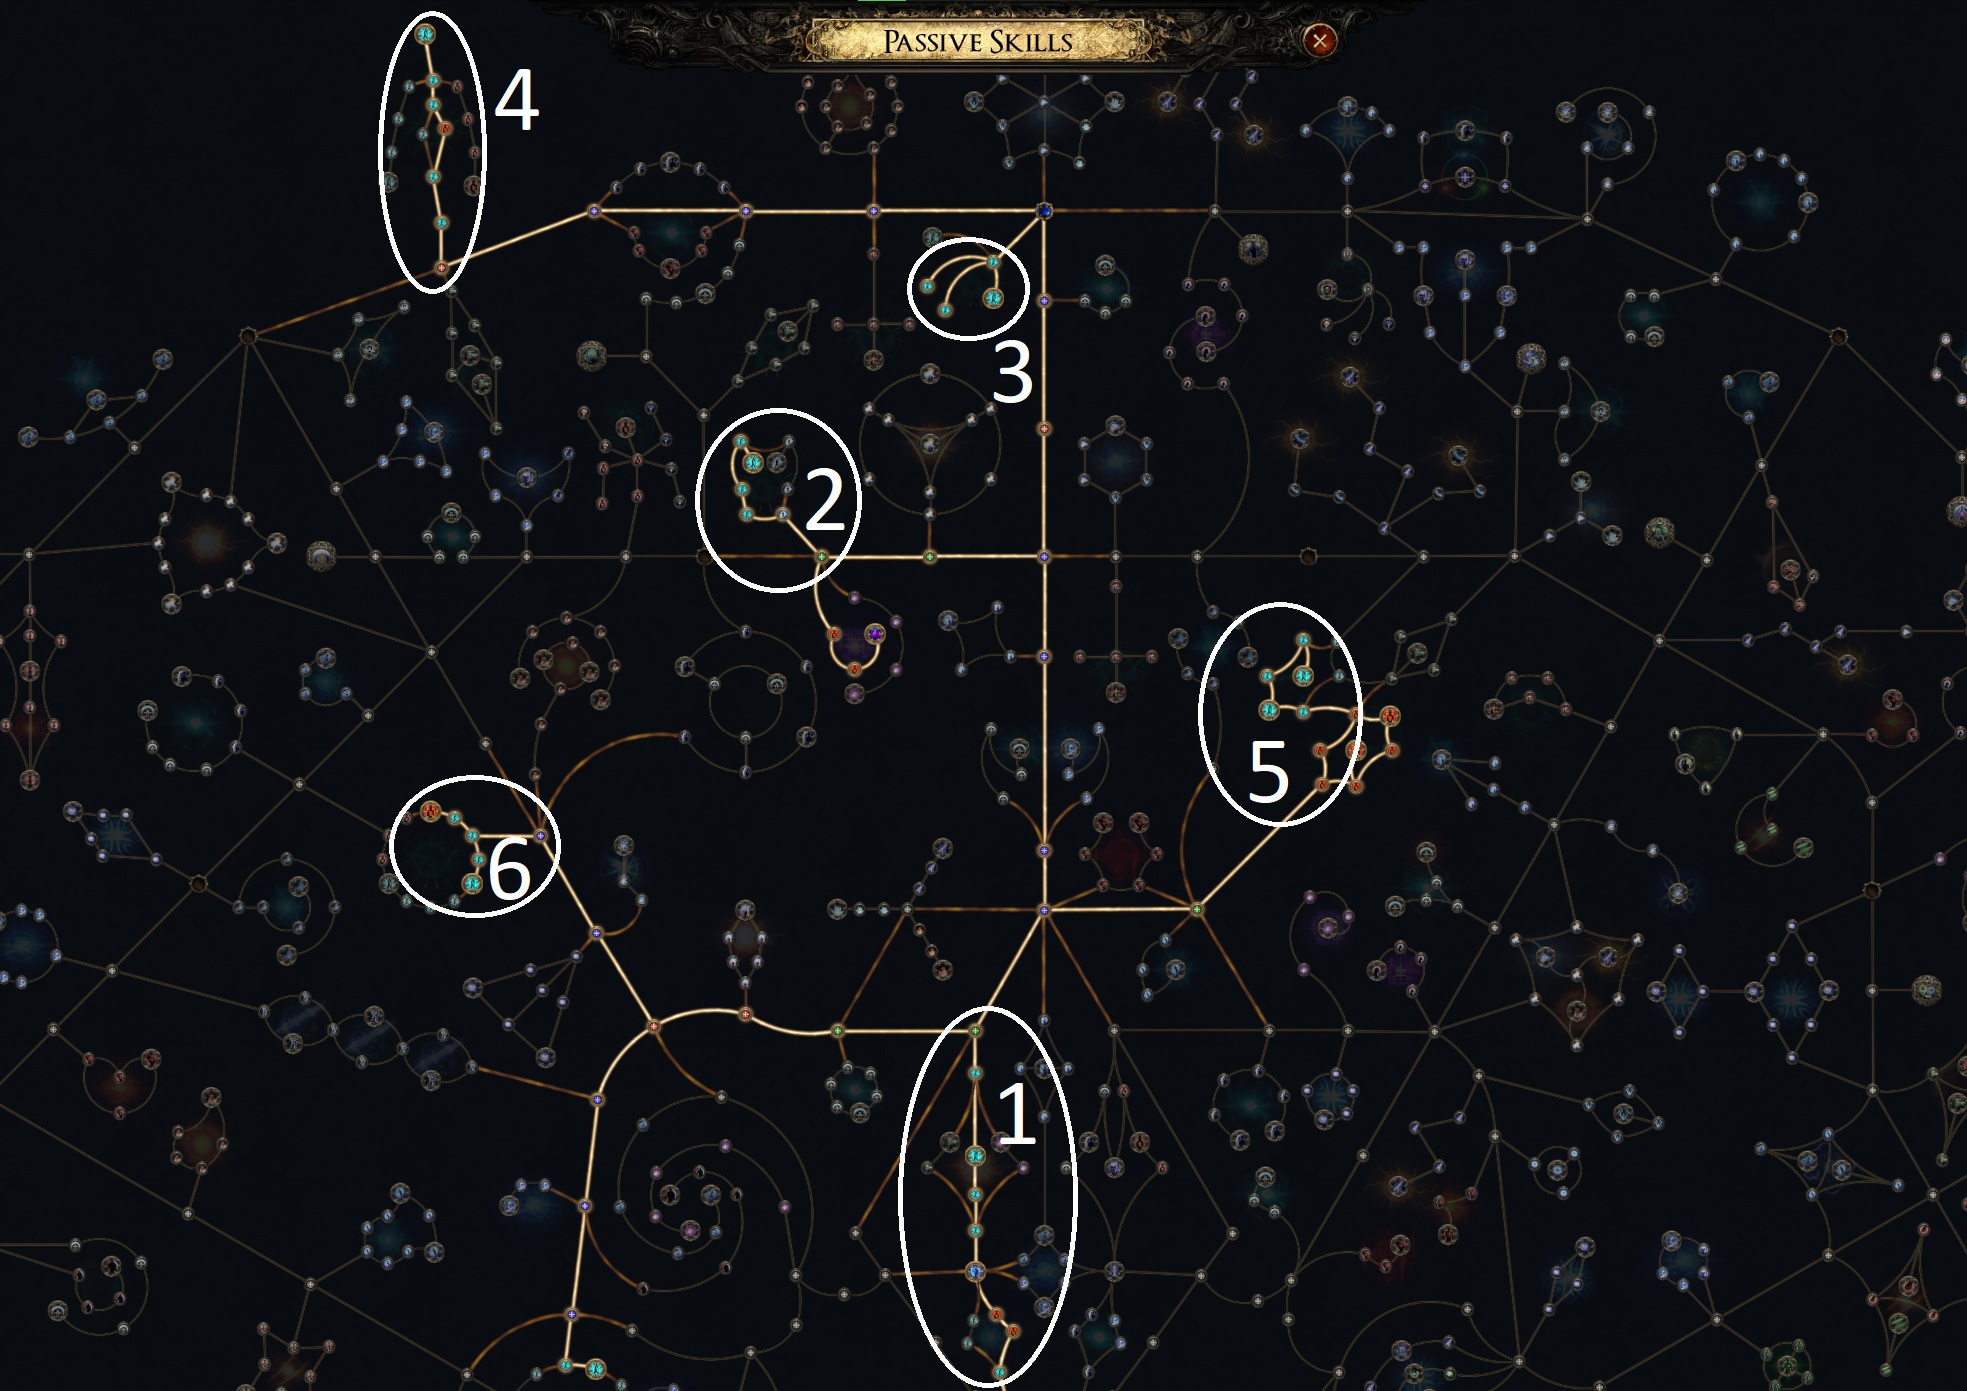
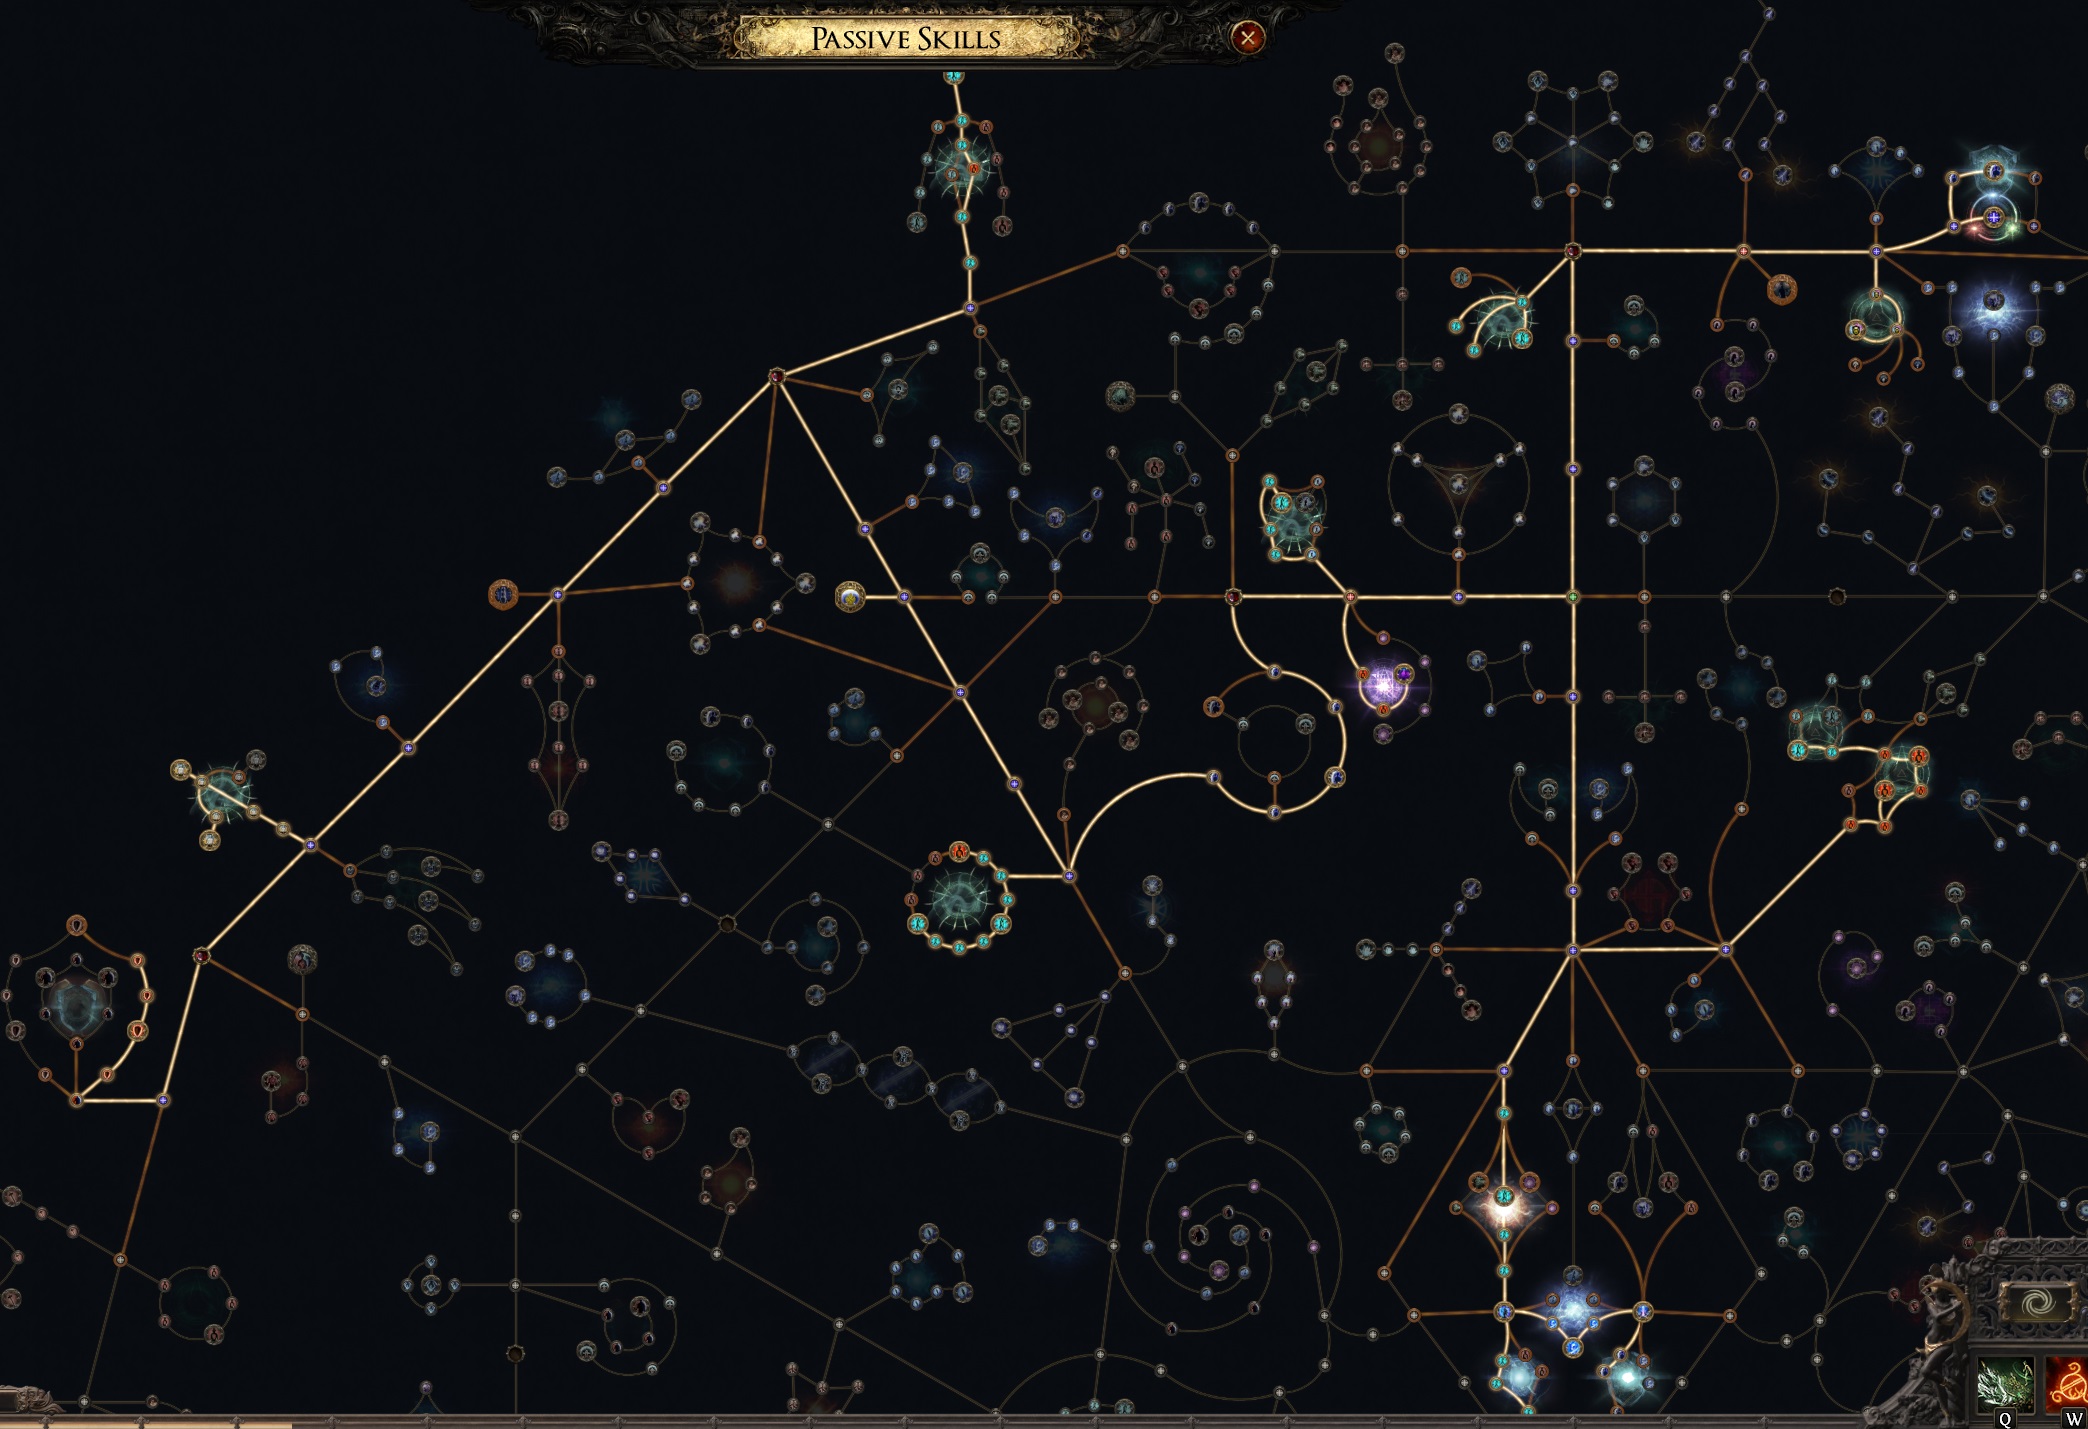
Early Passive Skill Tree
The passive skill tree is vital for improving your minions' power and ensuring your build runs smoothly. Below are guidelines to help you plan your path and prioritize progression.

Key Focus Areas for Passive Clusters
  • Minion-related clusters should be your primary focus. These will significantly enhance your offensive power and minion performance.
  • I've highlighted the offensive clusters you should aim to reach early on. These nodes will provide the best boost to your overall damage output.
  • There is no single “perfect path” through the tree. The numbering of clusters is merely a suggestion based on efficiency and common progression routes.

Pathing Tips
  • The passive skill tree allows flexibility. If you find yourself needing additional stats to equip better gear, consider grabbing nodes leading to future clusters.
  • There are no huge mandatory power spikes that must be reached at all costs—take a flexible and strategic approach.
  • The early game example shown in the screenshot (referenced below) is sufficient through Act 1-3 and focuses primarily on offensive clusters without heavy emphasis on survivability.

When to Shift Priorities
  • Once you’ve reached most of your offensive minion clusters, focus on improving minion and player survivability.
  • However, if you find yourself dying often, this could signal that you should assess your playstyle rather than just relying on passive tree changes.
  • Adjust your passive priorities as you become familiar with the mechanics of combat and encounters.


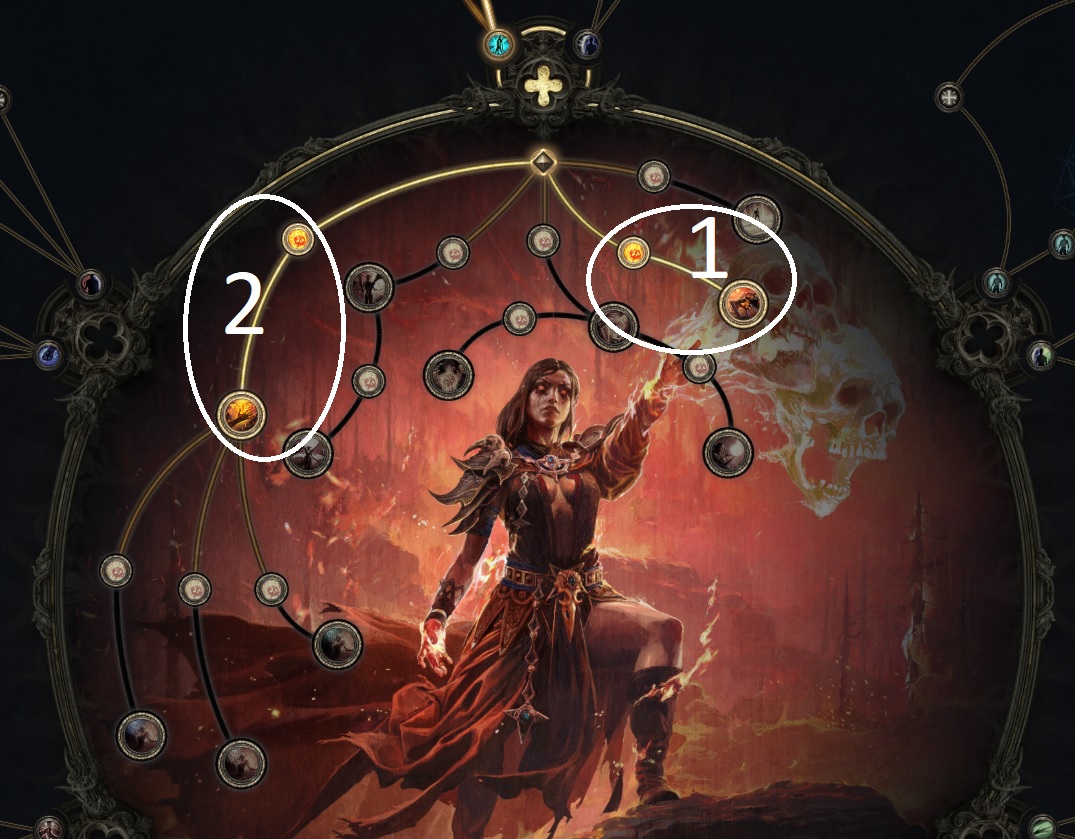
Ascendancy Points
As you progress through the game, you’ll earn Ascendancy points to allocate into your chosen Ascendancy skill tree. Here’s how you should approach these points for this build:

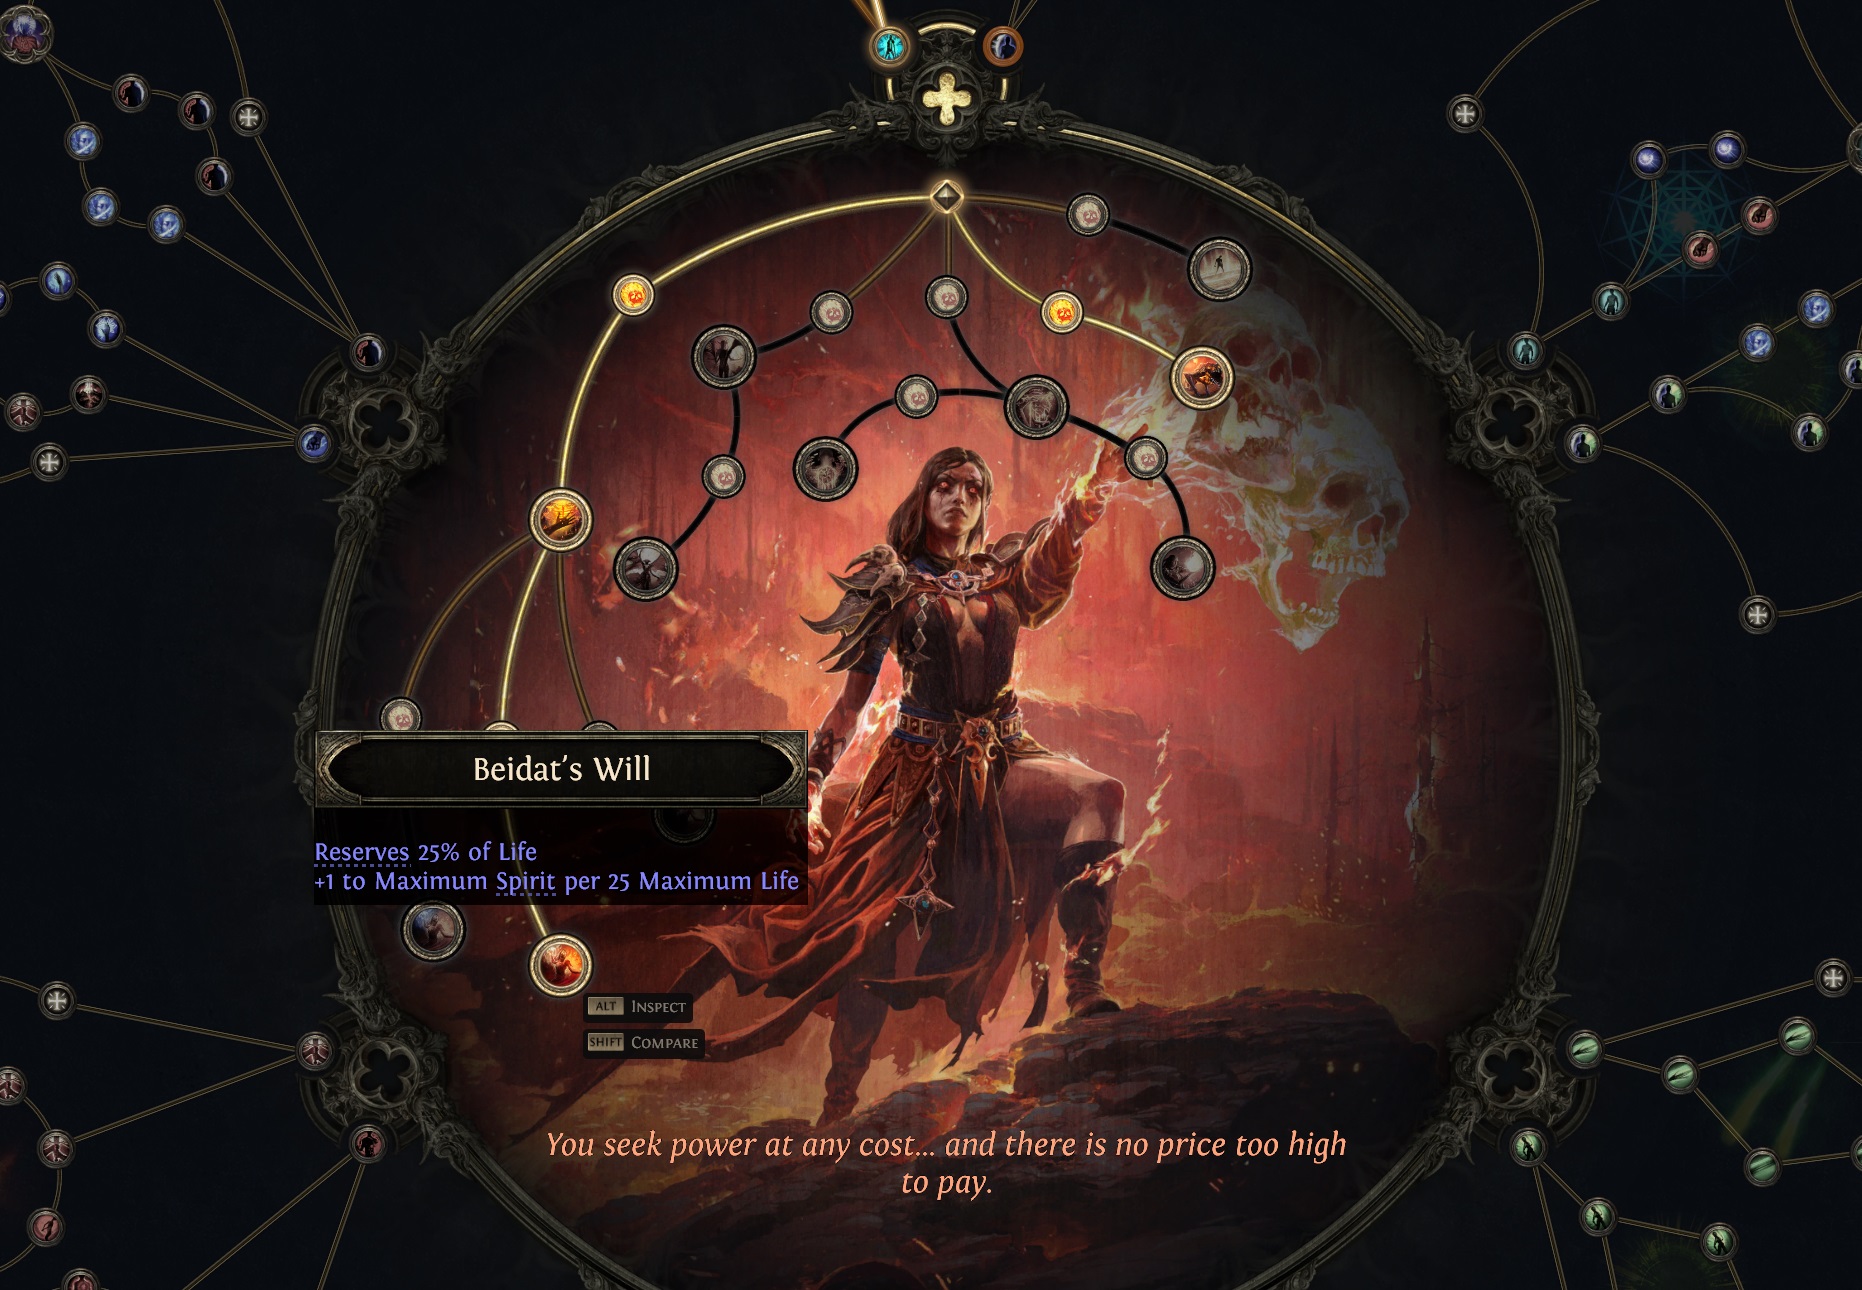
  • The first 2 points should go into Summon Infernal Hound. This is your main meatshield and ignition source, offering both defensive and offensive support. It's a must-have early to ensure you can effectively mitigate damage while maintaining consistent pressure on enemies.
  • The next 2 points can be allocated into Altered Flesh, depending on your late-game plans. Altered Flesh provides additional bonuses and scaling that can help with survivability if you decide to focus on scaling defensive or utility-based options later in the game.
  • While these 2 points are not essential in the early game, they are a great choice if you plan for a longer-term scaling strategy. Always adapt based on your gear, playstyle, and objectives.


You can always refund passives, this will cost you a few thousand gold and will be done by the Hooded One introduced in Act 1.
Gear and items (Starter)
Your choice of gear plays a significant role in shaping the effectiveness of your build. Below are helpful notes on the core items, key stat priorities, and general guidelines to help you optimize your equipment choices.

Core Items
The weapon is a fundamental part of this build, with specific requirements and priorities. Here are the most important core items:

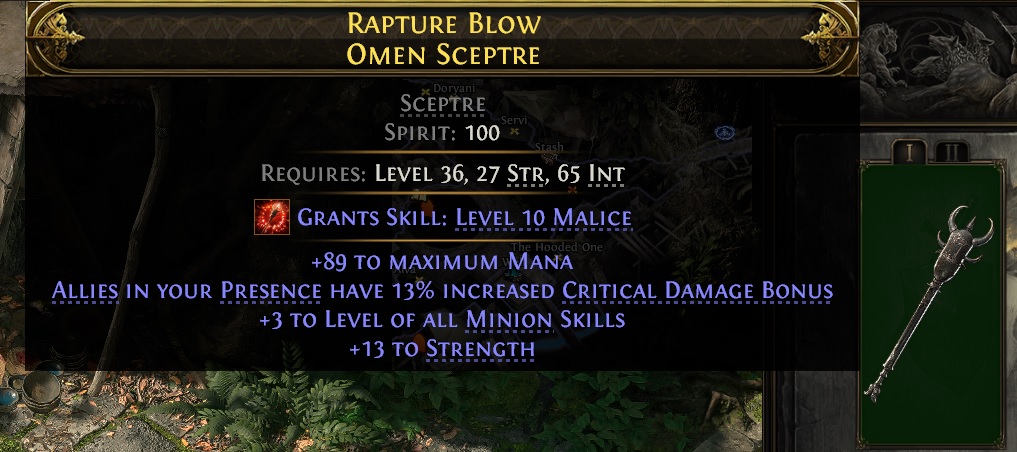
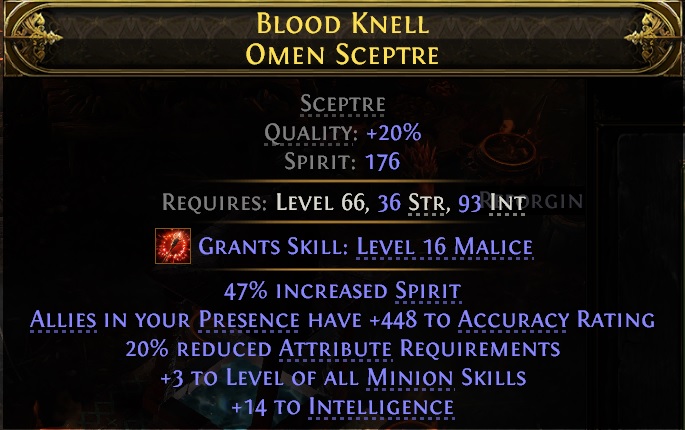
  • Weapon: An Omen Sceptre is the primary weapon choice due to its access to the Malice skill. Other sceptres provide less utility.
  • Weapons with +3 to Minion Skills are the optimal choice, as they boost the level of all your minion-related skills, providing tremendous value.
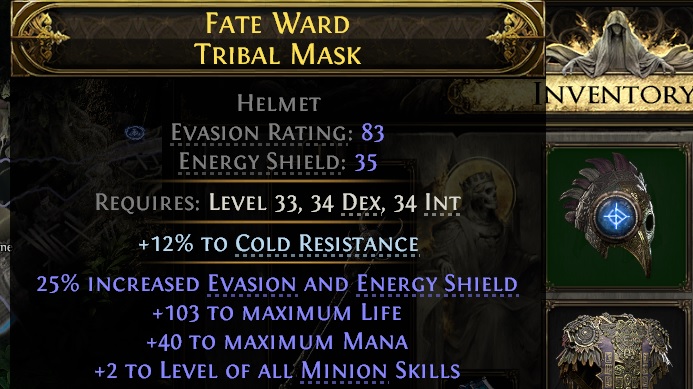
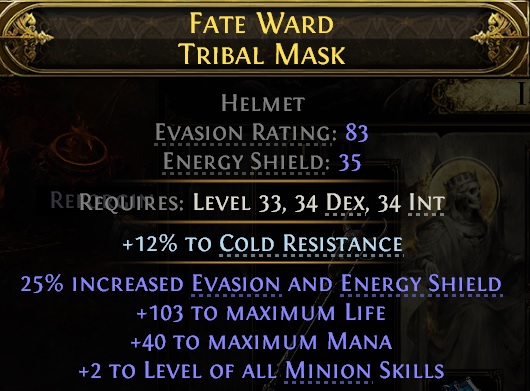
  • Helmets with +2 to Minion Skills are similarly valuable for scaling your minion skills efficiently.
  • If you can’t reach the ideal weapon or helmet stats immediately, +2 and +1 bonuses are sufficient alternatives for earlier levels.
  • Don't stress yourself for this. Skills are the most impactful things to achieve, this will be helpful but you will success without best in slot gear easily.

Weapon Affix Priorities
When searching for weapons, either by trading or crafting, prioritize the following affixes:

  • Buffs for Allies in Your Presence: These include:
    - Increased cast/attack speed
    - Increased damage
    - Increased crit chance
    - Increased bonus crit damage
  • Spirit Reservation Increase: This allows you to summon more Skeletal Arsonists and maintain sustained pressure.

Starter example


Boots
When looking for boots, prioritize:
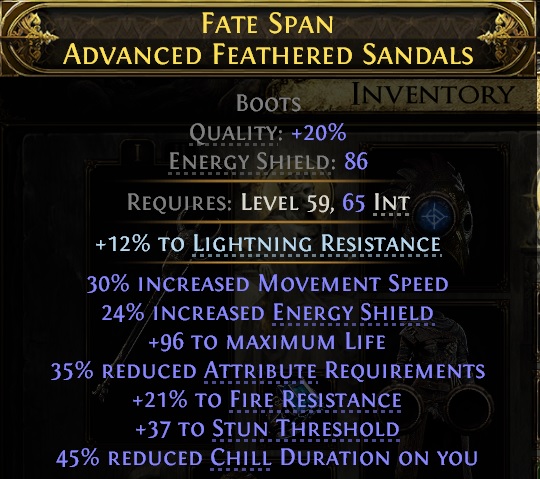
  • +20% Movement Speed: Movement speed is vital for both mobility and positioning during combat.

General Gear Guidelines
Here are the universal gear priorities to aim for:

  • Spirit: Aim to maximize your Spirit pool to increase the number of summons and reserve management.
  • Elemental Resistances: Always aim to cap your elemental resistances (and include Chaos resistance if possible).
  • Max Life and Max Mana: These stats increase your survivability and resource pool.
  • Energy Shield: A nice amount of energy shield can provide additional defensive layering.
  • Stats from Gear: While useful, gear stats should only be prioritized after you've already allocated relevant stat nodes in your passive skill tree. They can create issues when swapping out gear if overly relied upon.

Crafting and Trading Tips
When pursuing gear, whether by crafting or trading, consider these strategies:

  • Identify Sceptres and Omen Sceptres: Always identify sceptres and Omen Sceptres you come across. These have the potential to roll useful affixes or minion scaling bonuses.
  • If you are not afraid, you can use Transmutation, Augmentation, Regal, or Alchemy Orbs to try and hit beneficial affixes on your sceptres.
  • If you prefer trading, it can be much easier to simply buy the desired gear for 1 Exalted Orb each. This does require time spent either selling items or advancing into Act 2-3 to earn Exalted Orbs as currency.
  • Always confirm that the level requirements are met when trading to avoid wasting time or resources.
  • Artificer's Orbs can upgrade good armor by adding sockets for rune bonuses like additional resistances.
Mapping Gear Optimization
As you transition into mapping, your gear needs to adapt to ensure a smooth and efficient progression. Below are recommended upgrades and considerations for your gear as you prepare for this critical phase. When numbers are shown, these are general guidelines, of course you should aim for higher if possible.

Helmet and Sceptre
  • Minion Skills: Aim for a helmet and sceptre with +2 or +3 to Minion Skills. These provide essential scaling for your summons and dramatically increase their effectiveness.
  • Sceptre Stats: Prioritize sceptres with:
    High Spirit Increase (+50%) to boost summon capacity.
    Minion Buffs like increased damage, cast speed, or crit chance.
  • Malice Skill Scaling: Ensure your sceptre has a high level of Malice Skill for optimal damage output.
  • Stat Requirements: Double-check that you meet the attribute requirements for these items. Investing in stat nodes or gear upgrades may be necessary.
  • For the helmet, fill with useful stats (shown further below).
You can upgrade the quality of the Sceptre to gain way more Spirit, use it!

Boots
  • Upgrade to boots with +30% Movement Speed to keep up with the faster pace of maps. This mobility is crucial for dodging mechanics and maintaining positioning.
  • Also fill with useful stats as mentioned below.

Off-Hand: Focus (or Shield)
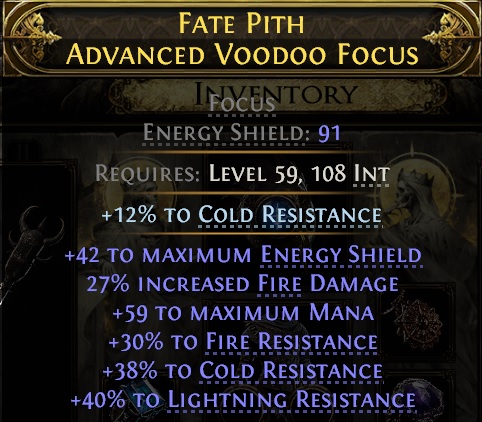
  • Don’t neglect your off-hand. A Focus item is highly versatile and can roll stats like:
  • Elemental Resistances: These help you cap your resistances more easily.
  • Mana and Energy Shield: For extra defensive layers.
  • Rune Slots: To further customize your build with runes offering life or resistances.
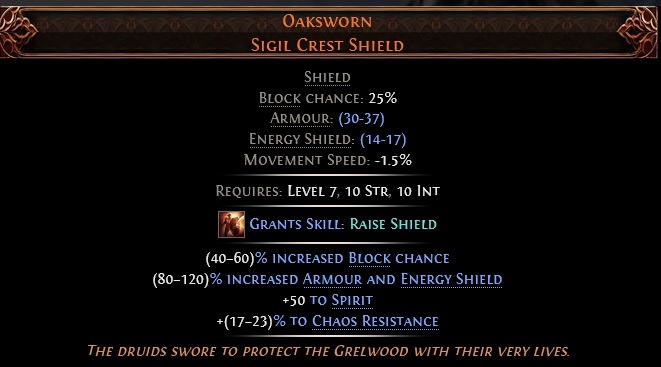
You may as well pick a shield with high block chance, max life and resistances instead. This is a good option if you find yourself dying often or don't want it to happen in the first place. With ever more difficult maps and trials this may be the better option to be less glass canon.
There is also a unique shield you can get for a 1-3 exalted orbs (try to get around 35-40% block chance though):


Body Armour
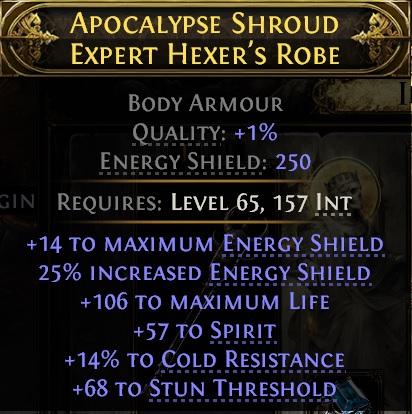
Look for body armour with:
  • High Spirit Increase (+50) to maximize summoning efficiency.
  • Max Life: For survivability.
  • High Energy Shield: Adds a critical defensive buffer.
  • Resistances: Focus on elemental resistances to hit cap, and aim for chaos resistance if possible.

Elemental and Chaos Resistance
Ensure that your elemental resistances are capped at 75% for Fire, Cold, and Lightning. If possible, also aim for Chaos Resistance, which can make a significant difference in survivability during mapping.
Regularly check your resistances via the Character screen (C) whenever you swap gear.


Rune Slots
Equip rune slots on all gear that you plan to use long-term. Useful Rune bonuses can provide:
Additional resistances to help reach cap.
Max Life for increased durability.

Amulet
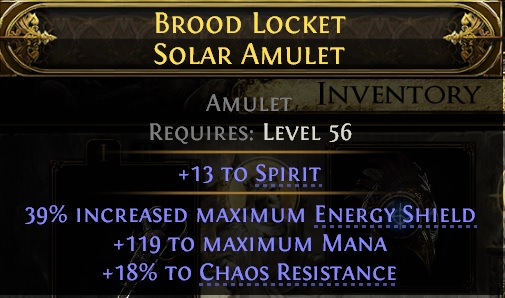
Your amulet is an incredibly flexible piece of gear. Look for stats such as:
  • +15 Spirit to boost your summoning capability.
  • +35% Increased Maximum Energy Shield for survivability.
  • Resistances, Life, Mana, or Missing Attributes based on your build’s needs.
    Use the amulet as a flexible solution to plug any remaining gaps in your stats.

Trade Tools
Leverage the search function on Path of Exile Trade2 to locate the perfect gear for your needs.
Use filters to find pieces with specific stats like Spirit, resistances, or rune slots.
Many items suited for mapping can be purchased for just a few Exalted Orbs, making this an efficient way to optimize your setup.

Example gear
Endgame Build&PlayStyle (My current build)
While you see various options in this guide, it may be of interest to you what a final build could look like. Personally I like to see where my build should go, what I have, and what is missing.
For the start, campaign and early mapping other things might be more optimal.
But in this chapter you will find plain information about my current state which will change now and then.

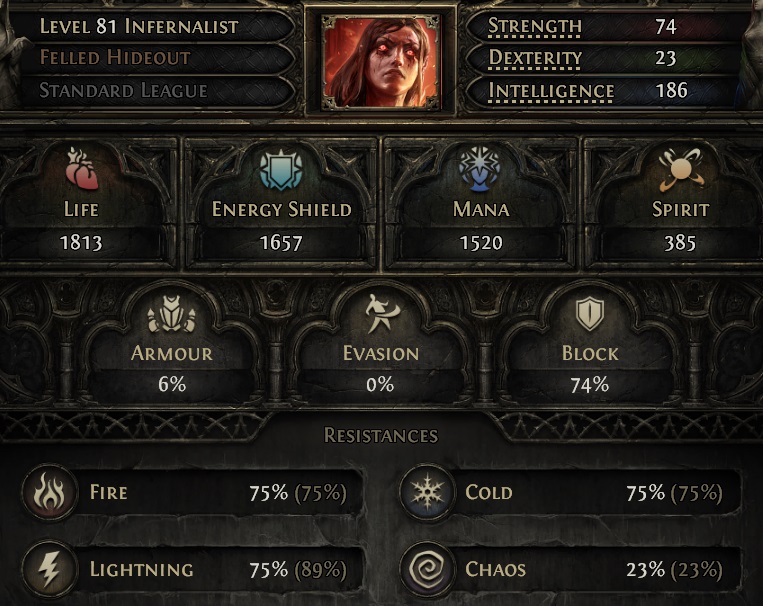
Stats

Passives


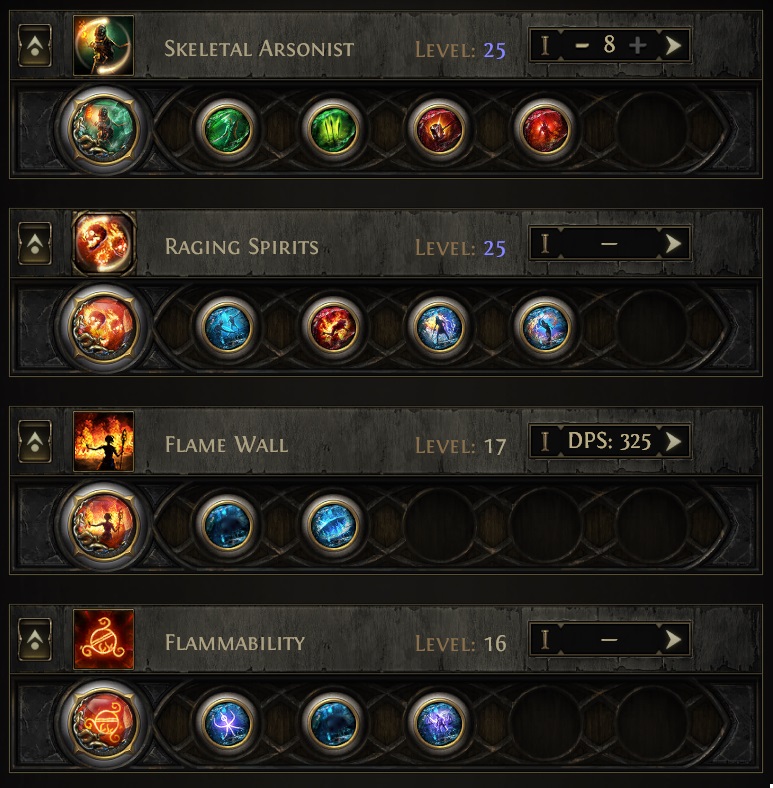
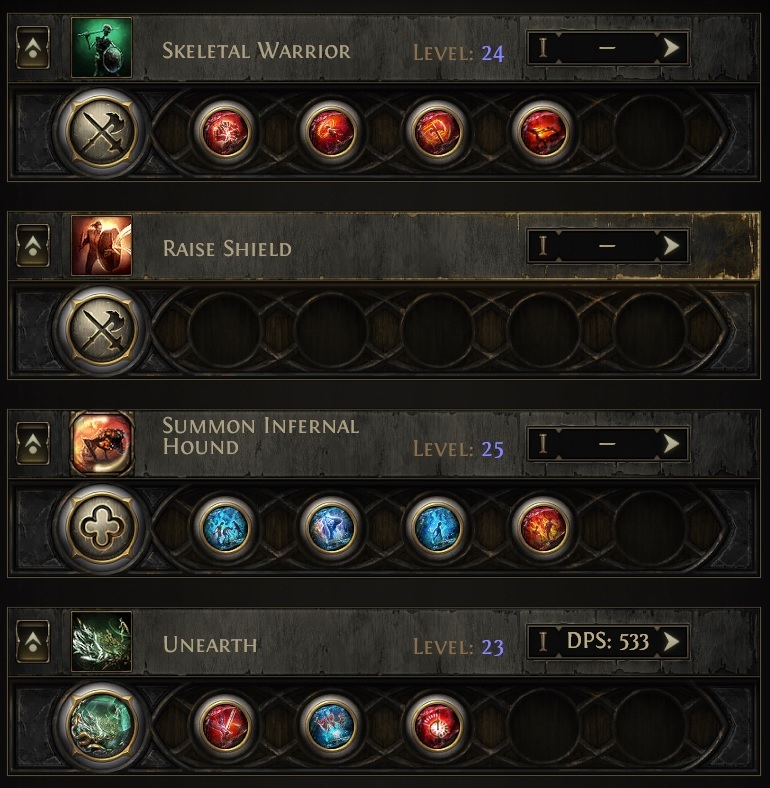
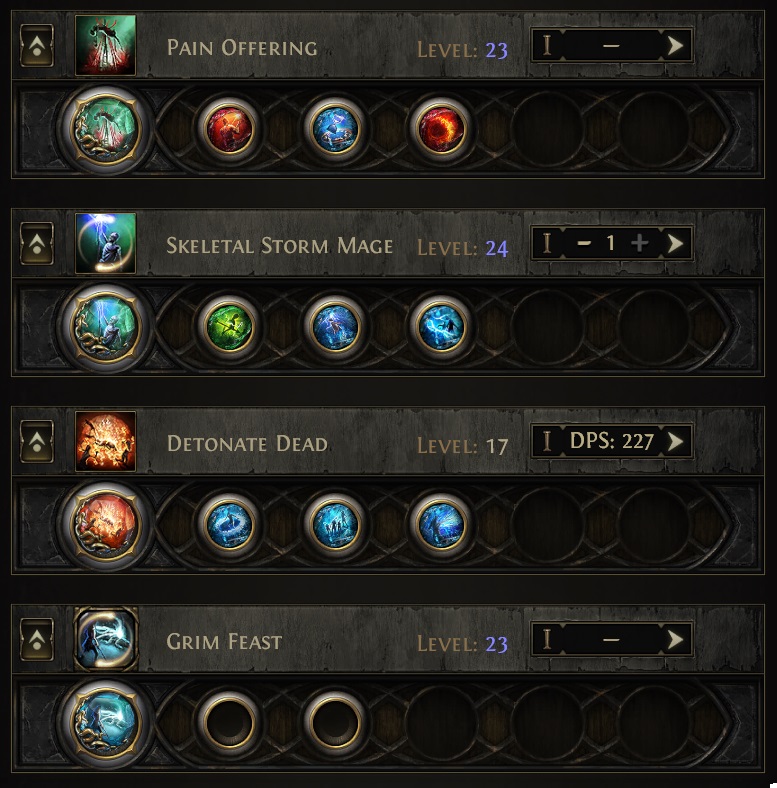
Gems
Skeletal Warrior: Demolisher, Overpower, Ruthless, Devastate
Summon Infernal Hound: Wildfire, Strip Away, Fiery Death, Fire Exposure
Unearth: Minion Instability, Execute, Persistence
Skeletal Arsonist: Scattershot, Martial Tempo, Heft, Fire Infusion
Raging Spirits: Feeding Frenzy, Immolate, Elemental Focus, Fire Mastery
Flame Wall: Arcane Tempo, Fortress
Flammability: Heightened Curse, Focussed Curse, Hex Bloom
Pain Offering: Inspiration, Expanse, Font Rage
Skeletal Storm Mage: Conduction, Storm Fire, Coursing Current
Detonate Dead: Spell Echo, Magnified Effect, Unleash
Grim Feast


Gear
Only short notes of relevant attributes in order of importance. Take all numeric values with a grain of salt as these are the values I would aim for when upgrading. You can obviously take lower values to go on a budget as I did myself until T16.
I generally try to avoid bases that require more Strength than my Sceptre (~50-60) and Dexterity in general to have as few as possible (only for Gems).

Rattling Sceptre with
  • +3/4/5 to Level of all Minion Skills,
  • Allies in your Presence deal 50-100% increased Damage,
  • Allies in your Presence have X% increased Attack Speed,
  • 50-90% Increased Spirit,
  • 90-180 to Maximum Mana (if playing Mind over Matter),
  • + to Strength/Intelligence.

Armour in general with
  • Elemental Resistance until cap reached,
  • to Maximum Life,
  • to Maximum Mana (if playing Mind over Matter),
  • Chaos Resistance,
  • to Strength/Intelligence/Dexterity for more useful passive point allocation.

Specifics:
  • Helmet gets +2 to Level of all Minion Skills
  • Boots get +30% increased Movement Speed
  • Shield with very high total block chance (because every block chance increase passive is based on shield value)
  • Body armour gets extra Spirirt >50 and the most possible Energy Shield
  • Amulet gets +2 to Level of all Minion Skills, Spirit, Increased Maximum Energy Shield and Block Chance Annointment (Defensive Reflexes or Flashy)
  • Belt with +1/+2 Charm Slots (I use Stun/Freeze immunity charms)
  • Flasks still don't matter

My personal Endgame Playstyle:
  • Put up flame walls for arsonist projectile damage buff and SRS spawn
  • If more damage needed or large amounts, Pain Offering
  • If large amounts and corpse lying around, detonate dead
  • If enemies with large health pool (rare/unique), flammability
  • If I may be in danger because of rapid large amount spawning (various mechanics), Unearth until max amount, then Detonate Dead Spam
  • If I am in danger and no more mana, Shield Ability and pray in front of monitor
  • Use the minion move/attack bind to try to get them where I want them
Playstyle & Strategy
Understanding your playstyle and strategy is crucial for mastering this build and progressing smoothly through the game. This chapter will outline key mechanics, tips, and priorities to ensure you’re always on the right path.

Unlocking Core Skills ASAP
The core skills are essential for building the foundation of your infernal minion playstyle. Your first priority is to unlock them as soon as possible:

  • Until you have access to your full core skill set, make use of Bone Constructs and any other gems you find that fit your playstyle.
  • If you have spare low-level uncut gems, feel free to experiment with them. They can provide early flexibility and utility but aren’t mandatory.
  • Don’t stress too much about completing every optional fight or side challenge until you have your core skills unlocked. Some optional enemies can feel very challenging early on—feel free to skip and return later.

The real challenge comes at the end of Act 1, where you’ll ideally have all the core skills you need to proceed and deal with any skipped challenges.

Master Unearth and Corpses
One of the most important mechanics to master early on is Unearth and how it interacts with corpses. Learning this skill effectively will be vital for the later game:

  • Unearth isn’t just a skill but a key mechanic for creating minions and applying pressure.
  • Pay attention to the number of corpses you control at a given time. Managing corpses effectively is critical for smooth transitions during difficult fights.
  • When entering a hard fight, gather all corpses you can reach after the fight begins to ensure you always have enough for Unearth.
  • Leave corpses for later use when possible, especially when preparing for tough fights or boss encounters.

Mastering Unearth revolves around timely corpse management and efficient usage during tough encounters.

Keeping Skeletal Arsonists Alive
When you unlock Skeletal Arsonists, they become one of your primary sources of damage. Learning how to manage them properly will be another skill to refine:

  • Always keep an eye on your Skeletal Arsonists to ensure they don’t despawn or die unnecessarily.
  • Avoid letting them get attacked unless you’re in a boss fight with no corpses left to Unearth.
  • Properly positioning your Flame Wall so they fire through it will give them bonus damage and will synergize well with their playstyle.

Keeping your Skeletal Arsonists alive and functioning is a balance of good positioning and careful play.

Flame Wall Placement and Strategy
Once all core skills are unlocked, Flame Wall becomes a central part of your strategy. This skill allows you to manipulate enemy movement, deal damage, and synergize with your Skeletal Arsonists:

  • Place Flame Walls in strategic locations to burn enemies and allow Skeletal Arsonists to fire through them for bonus damage.
  • Keep in mind enemy ambushes and movement patterns—adjust your Flame Wall placement accordingly.
  • You can spam Flame Walls liberally, especially in heavy combat situations. They cost very little mana and are an effective tool for crowd control.

Flame Wall placement requires both strategy and attention, especially during large fights with multiple enemies.

Summon Raging Spirits (SRS) Management
One of the most important aspects of combat is ensuring you have 10 Summon Raging Spirits (SRS) active at all times—especially during the most difficult fights:

  • SRS are one of your most consistent sources of damage, so you want to maintain 10 active at all times during heavy engagements.
  • Managing Unearth and SRS together is a skill that requires attention, timing, and practice.
  • Learn when to prioritize cursing enemies with Flammability or applying Pain Offering to ensure their uptime remains as effective as possible.

Debuffs & Pain Offering Timing
Once you’re comfortable with the core mechanics and SRS uptime, you’ll want to focus on the following:

  • Debuff enemies with your curse (Flammability) strategically, ensuring it hits key targets for optimal damage.
  • Pain Offering has a limited duration and can be destroyed by enemy damage. Learn when to refresh it and when to prioritize other actions.
  • Balancing these mechanics—maintaining SRS uptime, managing Unearth, applying debuffs, and activating Pain Offering—is a skill that takes time to master.

The challenge here is simple in theory but requires practice.

Curse timing: Hitting enemies consistently with Flammability without wasting mana.
Pain Offering uptime: Ensuring the skill stays active while surviving enemy mechanics.

Getting these mechanics right will be the key to mastering this build.


It can feel overwhelming at first, but each skill and mechanic will become second nature with experience.

Summary of Key Playstyle Focus Areas
  • Unlock the core skills as fast as possible and avoid stressing over optional content too much until then.
  • Master Unearth, corpses, and minion control.
  • Keep Skeletal Arsonists alive and position them effectively with Flame Walls.
  • Learn to always maintain 10 SRS up during key fights and combat situations.
  • Manage debuffing (Flammability) and Pain Offering effectively by learning when to refresh and optimize uptime.
Tips for Efficient Progression
1. Don’t Hoard: Use, Sell, or Trade
While it’s tempting to hold on to every rare or unique item you find, resist the urge. Low item-level gear quickly becomes obsolete and holds little value to others. Instead, use items that enhance your build, sell them for currency, disenchant them for crafting resources, or trade them for something you actually need. A clutter-free stash is crucial for long-term success and staying organized.

2. Optimize Loot Runs
If you’re hunting for gear upgrades, take the time to fully clear each map. Open every chest, smash every pot, and inspect destructible objects—these often yield valuable items. Rare monsters are another key source of high-quality loot, so make them a priority during your exploration.

3. Know When to Skip Loot
If your build is optimized and you’re comfortably ahead of the curve, don’t waste time on unnecessary loot or side encounters. Skip minor enemies, camps, and even optional bosses if they’re not critical to progression. Your ultimate goal is to reach the mapping phase as soon as possible, where the real rewards lie.

4. Pathfinding Tips
To efficiently navigate maps:
Circle the outer perimeter first to locate all exits. This approach ensures you don’t miss anything vital.
If speed is your priority, run straight from the map entry point in the opposite direction—this often leads to an exit. By mastering this strategy, you’ll save time whether exploring or rushing to the next objective.

5. Save Passive Points
It’s not mandatory to allocate passive skill points immediately after leveling up, especially if your build is dominating the current content. Bank your points and spend them strategically to unlock powerful clusters when you need them.

6. Delay Quest Reward Choices
If you’re unsure which reward suits your build, there’s no rush. Simply close the reward window and revisit it later when you’ve done more research or finalized your build’s needs. This flexibility ensures you don’t waste valuable options on short-term gains.

7. Use Checkpoint Portals
The latest updates allow you to click on discovered checkpoints within the same area to teleport between them. This feature is a huge time-saver for backtracking or exploring efficiently.

8. Safety Portals for Boss Fights
Before engaging a challenging boss, drop a portal nearby. If you die, you can instantly return to the fight without retracing your steps. This small prep step can save you a ton of frustration and downtime.

9. Manage Gems Wisely
If you find a gem upgrade or replacement but want to keep the old one, you can remove it from its slot without losing progress. Be sure to:
Re-slot your support gems after reinserting the new gem.
Update your action bar to reflect the changes. This flexibility allows you to experiment or trade unused gems while maintaining your build’s performance.

10. Efficient Map Clearing vs. Rushing
Decide early in each area whether you’re clearing for loot or rushing for progress:
Full Clears: For players seeking upgrades or currency.
Rush: When you’re well-equipped and eager to advance. Switching between these modes based on your needs ensures you’re making the most of your time.

Mapping General Tips
If you are not familiar with this mechanic yet, here are some quick tips to keep in mind:
- The map will close when you die. Do not die.
- You can reforge 3 Maps (Waystones) of the same tier to the next higher tier.
- Towers are no big deal, do them with the least worth waystone you have.
- Should you find tablets, you can put them in towers for bonusses of maps around them.
- You can and should upgrade maps (Transmute, Augment, Regal or Alch)
- You should always use the highest Tier Maps you have and can run without dying. No need to bother with lower maps.
- For better survivability choose your defenses well. Get your block chance to 75% or take an Evasion approach.
Updates & latest patches
Todays patch introduced slightly higher Skeletal Arsonist Sprit Reservation. While this may cost you up to one of your Skeletal Arsonists until you upgrade your gear, it does not heavily impact the build and just tones it a bit down. It is still very up to date and I can confirm that with the showcased items, gems and passives you can easily clear Act1-6 without any problems.
Inspiration - Kay Gaming's legacy
We want to take a moment to pay tribute to the amazing content creator Kay Gaming. Her YouTube series on Path of Exile 1 minion builds has inspired countless players over the years. Her insightful guidance, engaging personality, and passion for minion-focused builds have left a lasting impression on the community.

This guide doesn’t intend to replace her videos or unique approach but rather serve as a companion—one that is written with the same goal in mind: helping players find their path and master creative mechanics through minion-focused builds.

So if you’ve come here and aren’t familiar with Kay Gaming’s channel, we wholeheartedly encourage you to check her videos out! They’re a great way to complement this guide, especially if you’re a visual learner or simply want more ideas, tips, and updates on summoner mechanics.
https://www.youtube.com/@KayGaming

Happy summoning! 🔥💀
to be continued: Whats next
If this guide proves to be a useful resource for you and the community, I might expand it in the future with additional content to further support your journey through Path of Exile 2. Here’s a glimpse at what could come next:

Future Chapters to Look Forward To
  • Advanced Gear Crafting Strategies: A more in-depth look at how to optimize gear progression using crafting mechanics, valuable orbs, and trading strategies.
  • Endgame Scaling Options: Tips on how to scale your Infernal Necromancer build into endgame mechanics, including boss fights, mapping strategies, and optimal ascendancies.
  • Mapping and Boss Encounters: How to handle map content, encounter mechanics, and boss mechanics while maximizing your infernal minion synergy and survival.
  • Skill Variants and Experimentation: Exploring other potential gem combinations, ascendancy points, and playstyle tweaks for players who want to get creative with this build.
  • Community Suggestions and Shared Builds: We’ll explore incorporating feedback from readers and other players who share their variations or upgrades to this build.

If you find this guide helpful and want to support its continued development, feel free to reach out with feedback, questions, or ideas. Your input could shape what comes next for this guide!

Apart from giving feedback i also encourage you to rate this guide, that would be very great!

14 Comments
Kupo  [author] 30 Aug @ 4:30am 
Probably not. If another guide will arise from me, it will probably be spectres. Didn't have the time to catch up though. Sorry!
flamedance58 30 Aug @ 1:39am 
Any chance of this getting updated?
Death's Assassin 12 Jun @ 3:56pm 
R&F, Super Star & Treasure. Thank you. :aofsummon:
WageringWaffle 31 Jan @ 6:19am 
Hey, don't know if you're still using this build but if you are can you update the passive skill tree to show what else i should get? or put markers on it as i'm hitting lv 80 now

Thanks for the great guide, used it for my whole play through
Kupo  [author] 25 Jan @ 11:45am 
@KIIICK Hi there, great to hear! There is a possible modifier on life flasks that it does heal your minions partly instead of you, or you do have a specific belt that has this modifier. Check both and consider swapping them if it is a problem. Feel free to experiment and use a wand as long as you can go for it, there may come the point that you will die or lose life quickly a lot. In that case you may consider shields. Thx for your feedback!
KIIICK 25 Jan @ 5:09am 
Awesome guide. Im following it and kind having fun as well. I have a question about the health, whenever I use potion it is being transferred to minions instead of healing me, do you happen to know the reason why. Also, I kinda added a small adjust of bringing a wand instead of shield as I love to play offense as well. (maybe i will change it as i progress). Thank you for this guide.
Kupo  [author] 26 Dec, 2024 @ 3:31pm 
Hi Guss4242, and thx for the feedback. I use block chance to get the 75% block chance total. If you have enough block chance, you can use blue jewels with Minion modifiers (attack speed, damage etc.)
Guss4242 26 Dec, 2024 @ 2:21pm 
Good guide Kupo I take fun to play it, I see you use ruby JEWEL in your passive tree, witch stat are you looking on these one?
Kupo  [author] 24 Dec, 2024 @ 8:51am 
@kanemi Thanks for the positive feedback, I appreciate it! There are of course other viable minion builds out there, you can also always optimize. This is meant as a starting resource for people who are new to the game, or want something they can orientate on until they find their very own build. Storm Mage is in terms of damage usually on the same level, but has less visual irritation. It also instantly hits with no throwing delay. Ice is only really good for freezing. You can drop arsos for both, however it is not mandatory to do so in my opinion. Clearing T15 content without problems with this build.
kanemi 24 Dec, 2024 @ 8:25am 
Arso is good but there is so much you can do...
After u reach t10 you proly drop arso for storm/ice..

But still have to reach that level myself to see how bad it is.

Great guide, Thank you!