Let's School

Let's School

39 ratings
How to: Headmaster 101
By Terratrill
A complete guide for Let's School.

-How to build a school
-How to operate a school
-How to manage classes
-How to beat the competition
-and more!
2
3
   
Award
Favorite
Favorited
Unfavorite
Introduction
So you've been thrusted into the position of headmaster, but your only work experience so far has been working the register at your local burger joint?
Are you worried that you will be the one getting schooled instead of the kids?
Well then look no further!
My name is Terra and i'll teach you how to bring any run-down dump into a world-class institute of academic ascendancy!

This guide will be looking at every aspect of the game imaginable.

I'll be focussing on keeping this as clear-cut and easy to understand as possible.
Most of this guide will be information about aspects of the game, but sometimes I will give some tips or advise on how you could proceed.
(any advice/tips given will be like this. feel free to ignore if you want to go a different way.)

This guide will be focussed on Career Mode. (sorry sandboxers)
Setting up your game
First things first, before starting a run you gotta set the parameters of your new school/run.

Whenever you press New Game --> Career Mode a menu pops up.


This menu shows you the map you're selecting as well as some other important things to note:

Climate
This isnt actually just a fun little detail, it DOES have some impact on your game since it determines the average temperatures during any season. This will impact your need for temperature regulators like Fans, boilers & A.C.

Nearby Plots
This shows how much you can expand. every school starts with 1 plot of building space, with the possibility to expand into the surrounding area, this just shows how many plots are availlable on the map.

Map
This is the name of the currently selected map, it also shows you a nice overview of how your school area looks. Currently there are 3 maps availlable:

Sakura Valley (1 big square)
Peony Springs (the plots are devided over 3 'islands' seperated by a river)
Snow Cotton Town (cold, on the side of a cliff also currently the smalles with 1 plot less)

(Whatever map you choose ultimately is up to you however, the Snow map does have a slightly more difficult climate, so if it is your first playthrough i'd recommend another)

Game Speed
This is arguably the most impactful one of the bunch. This setting decides how long it takes for a class to go up in grade. this difference is huge since that can mean you either have your first graduates in Autumn year 1, Summer year 2 or Spring year 3. this has impact on your graduation rewards since it determines how frequently students graduate, and therefore give bonusses.
you'll notice the difference at the start the most, since it limits your amount of applications a year (more on that further down the guide (Admissions)

(Personally I think Fast (once a week) is incredibly fast and makes for shorter games where Prolonged (once every 4 weeks / a year) is really slow. However, for roleplaying a full year would make more sense due to real life schools doing a school YEAR and not a school season.

HOWEVER, i would not recommend picking Prolonged for your first playtrough since this will limit your amount of students at the start of the game, and thereby your funds.)


When you're happy with your chosen map & speed, click Next Page. This opens up a new menu with more settings:

Like the previous menu this one also affects parts oif your game

Game Difficulty
This is just to quickly select a preset of rules going from easy to hard. if you edit any of the other settings below after selecting a difficulty then the difficulty will automatically be set to Custom

Starting Fund
Literally just how much money you start with, not sure what to explain here
More = Easier start
Less = Harder start

Exam Difficulty
This will affect how many points students must have in their respective topics before passing an exam. Lowering these will make it easier for students to pass the exams, which means you' ll need less Teacher skill / special facilities

Management Difficulty
We will go in depth about management in the similary named section, but in short: any facility costs a certain amount of 'management points' the more points needed, the less 1 manager/teacher can handle without proper departementisation.

Satisfaction Difficulty
Sitting on rust buckets simply won't do for the students, but by lowering the satisfaction difficulty they might just accept a worn down chair instead of requiring the mega-comfort-3000X-Utra-Chair-Deluxe
Students have many needs, but lowering this means you can have less of something (for e.g. entertainment) and it should still keep 'em happy.

Asset Price Depriciation Rate
This affects how much money you get back when you sell/destroy something.
for e.g. you buy a chair for $1000. now if you sell this chair with 80% refund you'll get $800 back. You'll be upgrading/renovating a ton in this game, so lowering your refund % can definately slow down the wheels of progress.

(For starters I would recommend either Easy or Normal. normal isnt too hard to do if youre decently familliar with resource management & keeping income high & expenses low)


After pressing confirm you'll be launched into a character creation screen:

Now im not gonna explain to you how this work to save myself from typing a ton. it should be clear enough on how it works. just 1 small tip: pressing Next is gonna finish the character creation screen, so click on the tabs to switch to hair/clothing, etc!


When you're happy with the look of your headmister and you click next, you'll be dropped into one final menu: your school emblem & uniform

Again, create your emblem/uniform and once ready, click Done!

After that we get a short video, you can select to enable the tutorial after, but hey, who needs that tutorial when you got this trusty handbook ;)
(DO enable it tho if this is your first time playing since it will go the controls, and some of them can be a bit unusual)
Congratulations! you've succesfully set up your game.
Now its time to set ourselves up for success :)
Resources
In this game you have a couple of resources you need to manage. Some are staff specific, like their skills and stress levels, but some others are school wide. This part of the guide will cover the school-wide resources (you can go to the staff section for the other ones :) )
The resources we use are:
  • Money
  • 4 subject specific contribution points.

Money is an obvious resource, you have daily expenses you need to cover and building new walls/rooms/furniture costs additional funds.
Next to that you might have to spend money for events during exploration or for community investments.

The subject contribution points are used for either investing in communties or as additional cost for constructing wonders. They can also be used to trade with other schools for items/money
Building a School
So, you're now in game and looking at that shoddy run-down building you must be thinking:
hmm, this needs to change, I need to build something better. Well then, allow me to help.

I will assume you know the controls of building. This guide is more of a focus on how to build succesfully & efficient.

There are a couple of ways to build in this game. whenever we open the build menu we get 4 options.

  • Facility
  • Furniture
  • Buildings
  • Enviroment


We will go over these tabs in the order of which you would normally use them.
The Buildings Tab
First things first. we need to build some walls that will hold our facilities.
This tab holds all things related to the exterior of your school:
  • Walls
  • Doors&Windows
  • Staircases
  • Roofs
  • Structures
  • Hollow out function
  • Pillars


Walls
Let's start with getting this out of the way:
NOT ALL WALLS ARE CREATED EQUALLY!
Yes it's true for 1 big reason: disasters.
Each type of wall has 4 features:
An unique look
Price per Square (though you build the wall blocks in a 2x2 style)
Earthquake-resistance
Fire-resistance


Price
This is just how much you pay for each 'block' that you want to build of that respective wall.

Earthquake-Resistance
Where the look part might be subjective since everyone is looking for a different style of wall, there is an objective difference in the other stats. In Let's School your school can catch fire, but earthquakes are also something that can will occur in your game. Earthquakes slowly scale up in strength, starting from something around 1.4 all the way up to somewhere just above 8. The lower your walls earthquake-resistance, the more damage will occur to your school. this means that an earthquake of 6.3 could do either massive damage to a school with a resistance of 2, or do almost no damage to a school with a resistance of 8.

Fire-Resistance
Sometimes a school catching on fire due to ...mysterious reasons. however, when it happens its better to be prepared. One way you can be, is by building with fire-resistant walls. This reduces the amount of damage taken by the school whenever a fire starts. Walls either are or aren't resistant, there is no number attached to this unlike earthquake-resistance.

There are only 4 combinations of these 4 wall stats:

Name
Price
Quake-Res.
Fireproof?
European Wood
Brick and Wood
Simple Wood
100
2
No
European Brick
Glazed Brick
Red Brick
250
4
Yes
European Castle
Glazed Brick and Concrete
Simple Concrete
500
6
Yes
European Palace
Retro Steel
Modern Steel
700
8
Yes
From left to right:
Simple Wooden Wall
Brick and Wood Wall
European Wooden Wall

From left to right:
Red Brick wall
Glazed Brick wall
European Brick wall


From left to right:
Simple Concrete Wall
Glazed Brick and Concrete wall
European Castle wall


From left to right:

Retro Steel wall
Modern Steel wall
European palace wall


Doors&Windows

Doors and windows though under the same category aren't equally important.
Any room you build must be connected via a door to either another room or a hallway, which in turn must have an entrance to the outside. So make sure to always have a door to any room! this prevents students/staff from getting stuck and eventually punching a hole through your wall.

Windows however are not a requirement for rooms. they do however give visbility score to the room theyre connected to which can be cheaper than installing a bunch of lights.
High level windows also give a decoration score to a room, which in turn can increase efficiency whenever a room reaches a high enough value.

Staircases

There are 4 types of 'staircases':
  • Indoor
  • Outdoor
  • Elevator
  • Underground Walkway

The only difference from the indoor & outdoor staircases are that they must be build in their respective area and that indoor stairs curve, where outdoor ones are a simple straight line.

Elevators are the smalles of all stair types and are basically an instant way for students/staff to traverse however many floors they need, provided that there is an elevator part above or below the elevator installed.
(I would absolutely recommend changing your stairs to elevators once unlocked they save time on travel, which helps efficiency and prevents students from missing classes if they have to climb 8 floors to go from the ground floor to their next class. only keep aestethic stairs if you must)

The underground walkway is an absolute must for players who dont like multiple floors and would rather have a 'wide' school. they require at least 2 to function but any you build will be all connected and act as 'fast travel' points for your students/staff. by building these they can instantly go from 1 corner of the map to the other which saves so much time when going from 1 class to another if they are far apart.

Roofs

Roofs are in essence just flavour builds/decoration. There is no need for them, but they can make your builds look nicer. just select the roofing height you want, select the shape and then roof colour / wall type and build away!

Structures

Structures are just types of decoration you can place, students dont need pathing placed outside to be able to walk, but it can elevate your schools exterior looks to the next level

Hollow Out Function

This ones an odd one. it basically allows you to remove flooring from a second(or higher) story floor to create a mazzanine (a balcony but one on the inside of a building) picture for reference:

Pillars

Another feature that is mostly decoration its just here to make your school look nicer.

HOWEVER! if you own the Water Town DLC this feature gets some actual functional parts since this is where you can find bridges to build over your created waterways/ponds as well as some extra walls that you can build without having to create a room. keep in mind that these walls are not walls that can support structures but are just meant to section of some areas.
Facilities & Furniture
Now that we have some walls it's time to make use of the now empty husk we have created.

The Facility Tab
If you select the facility tab you will see all the room types that you can currently build. This tab will expand over time due to you completing research which unlocks new room types / furniture.

This Guide will take you trough the step by step process to create a classroom. Keep in mind however that these steps are identical for any room type, only the essential furniture changes depending on what needs need to be met in that room type. (For example: you can't build toilet stalls in a classroom, and you cannot build desks in a bathroom.)

Now then, Lets build a Classroom!
Select the classroom room type and click and drag to create your classroom. dont worry if it isnt the exact shape you want just yet, we can change it once we have the first square of the room down!.
once you created your intial room shape your screen should look something like this:


The first part we will be focussing on is the menu on the right.

we see a couple things here:

  • The name of the room
  • an icon that represents this room
  • if the room can be used (the open/close at the top right)
  • our daily expenses for owning this room
  • Its efficiency
  • a purple arrow with a number (this means management cost)
  • a list of requirements


Lets ignore most of these for now and only focus on the requirements.
we can see that our classroom needs a couple more things before we can use it.
simply place the required furniture and make sure it has a door for entry/exit. Keep in mind however that the green area in that appears when youre placing a teacher desk/lectern is the part that you should place the student desks. any desks outside this area will not be able to be used, and reduce the max amount of students that can be in this classroom.

If everything went well then the menu on the right should slightly change and the close at the top right should automatically switch to open! if so, congrats you made a basic classroom!


You can now save your room by pressing the checkmark at the op of your screen. but this doesnt mean our room is now good to go. its functional yes, but it is still missing at least 2 things to make sure students/staff can use it effectively troughout the year:

  • Lighting
  • Temperature Control


Lets switch to a different menu on the right. select Scoring details and you should see some extra information:
Clearly we can see that the room still kind of sucks. its ugly as hell and your students will be blind as a bat inside. not only that, but unless its nice outside your students will either freeze or burn up from the summer or winter weather.

You should also see a facility score now. this represents the rooms 'level' by leveling up a room its walls/floor will change (you unlock new walls&floors whenever you level up a new room type for the first time) and the efficiency of the room will improve. keep in mind that daily upkeep goes up along with the room level!.

Lets make this classroom absolutely top notch!
A general rule of thumb when you try to create great rooms: use the highest level of furniture you have unlocked. you might start out with ugly shabby desks for the students, but higher end furniture will also give you bigger bonusses which makes reaching max room level easier than ever!

We should focus on the lighting score first, since this will help us with improving the Aestethics score as well. Lets install some lights (and windows if this room is connected to the outside wall) untill the score is at least in the green area, but if you can, keep going all the way until you max it out at the far right of the blue part.

Great! now our students can see even spot the most minute details of your classroom.
Lets add some temperature control to your room to make sure this room will stay a pleasently warm space all troughout the year.

When youre done with that, make sure to add some cleaning supplies in the room as well. It might start out as a spotless room, but your students will try everything in their power to prevent it from ever being as clean as it started out as.

Now, we should have our bases covered so that this classroom will be perfectly funtional troughout the year! (building-wise at least)
Now your classroom might look something like this:

However, with the use of some high level furniture we could max out our score. This will require some research but when you're further into the game we can have an amazing classroom that will improve our teachers efficiency from 100% to a nice 135%

You can also edit the floor and walls of your classroom by selecting the indoor tab. this will not effect any stats, this is just purely for looks. Any wall or floor that you have previously unlocked will be available permanently for any room youre trying to build.

You dont have to max out every stat to reach the max facility score, so keep in mind that once you reached max room level, there is no reason to further invest your hard earned money to decorate the room except for decoration's sake.

If you follow these tips and get some research done you could end up with a classroom looking like this one:
Feel free to explore your own creativity and build the classrooms you wish you had when you were back in highschool!
(Quick pro tip for the real Min/Maxxers under us: you can cram your rooms full with stuff without getting a big penaly, as you can see in the picure above i used the big desks which require 3 squares each, this means there is technically 0squares of walking space between the desks but this doesnt bother the students at all, they can just walk trough the entire room no problem! you can do this to save space in the long run by being able to keep your classrooms smaller than usual)

The Furniture Tab

Lets take a quick look at the furniture tab. This tab can be used to place any furniture anywhere even outside rooms. However please keep in mind that if you move a room completely, that any furniture placed via the furniture tab instead of the room edit menu, will stay in place! So only really use this tab to place furniture in your hallways or other area's outside of rooms/facilities!
This tab basically treats your entire school as one big room, so there isn't much else to cover which we haven't already gone over before
Making a class
So, you've made a building, build a great classroom but now what? so far we've gone over the building side of things. Now it is time to go over the People/management side of things.

Lets start by selecting our fabulous classroom:


we can see on the menu on the right 2 important things that are missing from our class:

  • A homeroom teacher
  • Students!


Lets start with the homeroom teacher to make sure our students have someone to keep them in check.
all we have to do is select the homeroom teacher button and select someone who has a work status of idle. badabing badaboom, now we've got someone for their homeroom. Its a good idea to keep an eye out on their management skill. higher number = better in this case. we will go over that more later in the management section of this guide.

Now it's time to add our students. Just do the same as we did just now, but click the student list instead of the homeroom button on the menu on your right.

And that's it? Class done and done? no no no my dear Headmasters, we have to add a schedule! otherwise our students will just loaf about!

How to make a Schedule

Click on the schedule tab (the calaender icon) whenever you're focussed on the class of which you want to edit the schedule. (you can also use the schedule button on the left to view every class schedule.


As you can see we have an empty class schedule,except for the standard morning meeting. You can see that if we hover over one of our students that with this current schedule they will horribly fail their exams, and we cant have that!

Lets take a look at what these students need

we can see that these students need lessons in humanties and science (green and blue) so lets add these to the schedule!


There we go! now they should not just pass their exams but also ace them as well! (which will give us some bonus rewards for being so amazing ;) )

How to make an even better schedule

But okay, thats only the basis of a schedule. After doing some research you will unlock new morning activities as well as some special courses! lets take a look at those.

There are 2 things we can do to enhance our schedule. change the morning activity and add special courses.

Morning Activities

Changing the morning activity can give your students a boost during the day for one specific type of lesson (Humanties/Arts/Science/Sports). This means that our students' stats should increase even faster if we give them lessons of that particular topic. You can easily check if your morning activity boosts a certain topic: if a scheduled lesson has purple arrows, that means it will be boosted thanks to that morning activity!

however, there is one other (two actually if you have the DLC) that you can do.
Clean-up will have the students clean the school using the cleaning supplies that you've placed during their morning period.
Eye Exercise will reduce/remove the low lighting debuff for the day if. (whenever students/staff enter a place thats too dim their happiness will drop and their movement speed is halved. This prevents that.

(DLC only)
Water Towns: Tai Chi in the morning will help with weight-loss of your students, this will help prevent them from getting the 'chubby' trait thanks to weight increasing foods from your cafeterias.
Fantasy Castle: Circle Time as morning program does ... (no idea, will update when i know what it does)

Special courses

Special Courses are 1time only scheduled extracurricular classes that help in a variety of ways.
Socialising helps with mood
Fire/earthquake drill helps them be better prepared during an emergency. This in turn reduced the amount of assistance students require during that emergency.
Ethics: can help those pesky troublemakers to behave (at least for a little while)
Eye Exercise: No idea actually, if you do know please post it in the comments :)

These courses need to be placed over another course in the schedule, it basically 'overrides' the regular schedule to have them take that special course instead. this means that if you want this to be a weekly thing, that you will have to add this every week!

this is due to students staying in 1 single class their entire school career. The schedule you make will the that classrooms schedule until the end of time. (or until you change it)
A big warning however! The homeroom teacher will also always be the one teaching the special course, so if that teacher was scheduled to teach another class, then they will have been swapped out for another teacher, or worse, no teacher at all! so make sure you have extra/ backup staff on hand.

(1 big tip that i can give to new Headmasters is that when you add students to your classes, make sure that they all share the same goals! it is way easier for a class to reach full marks if they only need to focus on 1 or 2 topics rather than all 4. an easy way to do this is by having each and every area in their own classrooms. that way you can devote the entirety of that class' schedule to achieving that groups specific goal.)
Exams
Each week at the end of the 5th day your students will take an exam. The result of this exam is determined by the student's skills if they meet/exceed the threshold then they will pass their exams.

Passing their exams does not automatically mean they 'age up' to the next year, this only happens every x amount of weeks determined by what you decided at the set-up of this school.

If students pass an exam you will recieve a bonus based on the student's aspiration. a higher level aspiration gives you greater rewards, due to the increased difficulty compared to easier aspirations.

If students get a full mark then you'll recieve an extra bonus next to the regular reward. This bonus also scales with aspiration level.

Each students career consists of 3 'years' this does not have to mean full years, just 3 terms of whatever you have set at the start. this means students will stay at your school for either 3 months, 9 months or 3 years.

If students pass their final exam they will graduate from your school, and they will leave the campus. (but this doesnt mean goodbye forever for all of them)
Delinquency
Believe it or not my dear Desciples, but not all students are angels...

Some students are easier to manage then others, and none are completely immune to acting up in class or around school.

Those meddling kids
Delinquency comes in many forms, but all forms can be tackled in pretty much the same way: send one of your minions Staff to dissolve the situation. usually this gives the students from that situation a demerit and increases their discipline.

At the start you will have to manually assign staff to deal with the situation. you can automise this by making sure there is security coverage everywhere on your schoolground, this means that teachers can spot delinquency automatically and resolve it without any need for your intervention.
Demerits
Students who act up can recieve a demerit. after reaching 3 demerits you get the option to expell that student. This will permanently remove them from your school. Currently there is no penalty to expelling students. (but there is no downside to keeping them either... after all, why would you want to throw away a source of income?)

Contraband
Sometimes after solving an act of delinquency your staff might confiscate certain items. these items will be marked as contraband. You can hand this contraband over to the...lovely...lady at the gate every friday between 12:00 and 16:00. if you give her the contraband she will reward you with PTA points, which can be exchanged at her 'shop' for consumable items with unique effects.
Your Staff
Now it might be time to familliarise ourselves with our staff, we can't stay a mysterious, dangerously handsome/beautiful Headmaster forever! (at least not forever mysterious)

Luckily for us, any headmaster has the incredible ability to read people so well, that we can know almost everything about them. At least everything about them that is relevant to us. let us look at some examples:

Teachers

Here we see some of this teacher's stats. Lets go over the important ones:

  • We can see the subject they teach (humanties in this case)
  • Their salary (the money icon with the red number next to it)
  • Their Stress level (keep it cool & low if you can)
  • Discipline (like students, we gotta keep them in line)
  • Their satisfaction (a happy worker is an efficient worker)
  • and most importantly, their 4 stats


Lets quickly go over these parts:

Subject
This is just the subject they teach, this will never change and just shows you what classes they can give.

Stress
Stress can make them freak out and worsen their other stats. keep this low by keeping an eye on management as well as giving them a staffroom thats not to far away.

Discipline
Lower discipline does... I dont really know yet its one of those hard to figure out ones. if you do know, post it in the comments and ill update this guide! crediting the one who figured it out of course :)

Satisfaction
The lower this is, the more chance they will ask for compensation like pay increases or other solutions. this decreases if their needs aren't met.

The 4 main stats
Now this is the real interesting part. Each teacher has 4 stats represented by an icon:

  • Teaching Skill (book icon)
  • Research Skill (spyglass icon)
  • Learning capability (glasses icon. Yes, its a pair of glasses, not a bike)
  • Management Skill (suit&tie icon)


Teaching Skill
The teaching skill is a direct reflection of how well they teach their subject. a high number means that students in their lessons will recieve higher skill increases. Certain higher level classes also require a minimum amount of skill to be able to be taught. (next to a special classroom as well)

Research Skill
This skill only applies when you want to use this teacher as a researcher. if their occupation is researcher, then this skill will basically work the same as the teaching one: higher number = faster research.

Management Skill
How much they can manage if put in a management position. this is an incredibly important skill to make your school run smoothly, so we will go over this skill in its respective part of the guide.

Learning capability
The most telling skill of a teacher. YOU SHOULD FOCUS ON GETTING A HIGH NUMBER HERE WHEN HIRING for 1 big reason: your staff can be trained in the other 3 skills up to a certain level. How high is that level? simple, whatever number you see here*
(There is a way to improve this skill actually with a building on the dispatch map, we will go over this further down in the guide, under the exploration part)

It can go over, but that would vastly increase both time, and cost for training, so you're better off keeping them close to this number. lets train this guy for example.
You can see here that training this guy 3x will take him 2.9 days total costing $4210 not too bad for such a high value already!

Holy Moly what the... for the same training of 15 points total (3x training) it will take him 31.1 days, and $44.724! Yes you could say that this is because it is a higher level training skill, and youre partially right, it does slightly increase costs/time, but these numbers are so extreme because this would train him well over his Learning Capability. this is why whenever you hire its better to hire someone who has a low level in everything, but a massive learning capability, then someone who is good at all stuff, but is already at their limits. its going to save you actual millions if you focus on recruiting only people with a big number here.

Where to employ:
The two big area's that you want teachers for are:
  • Homeroom Teacher
  • Researcher

As homeroom teacher we need to focus on their teaching and management stats.
Higher teaching stat: more effective lessons. Teachers prioritise teaching their homeroom class. if you have 3 classes that have humanities at the same time, and one of them is their homeroom class, then they will teach their homeroom class(if they are a humanities teacher of course otherwise they cant even teach that subject). unless you yourself go in and force a schedule change.
The management skill comes into play whenever we have an especially unruly bunch. more on that in the management section.

As researcher we just need their researching skill. They can still teach classes, so dont ignore that skill either, but if you have a ton of better teachers in that subject they will most likely stay focussed on just researching. Like mentioned before: higher research skill= faster research.

Supporting staff

Teachers are not the only type of staff that you'll be employing at your school. we have a variety of supporting staff that we need, namely:

  • Security
  • Administrators
  • Medical staff
  • Salespeople
  • Chefs

Most types of supporting staff have 2 skills:
Learning capability (this works in the same way as for teachers)
Their job skill (basically their version of the teaching skill, the only difference between these are the icons used)

Security guards also have a management skill, but that is due to them needing a head guard who needs that skill for them to operate.

all supporting staff can only fulfill 1 singular role in a specific facility:
  • Security = Security (big shocker, i know)
  • Administrators = office
  • Medical staff = infirmary
  • Salespeople = shops
  • Chefs = food facilities (think cafeteria, food stall)

    There is no need to really go in depth here, since this is about as deep as a kiddie pool.

    Keep in mind when recruiting that certain positions might require certain certificates! Staff naturally gains these over time, but sometimes you can hire someone who already has that specific certificate.
Management
Now that we got our class(es) set up and roaring to go, it is time to look at our management. At the start of your school you as a headmaster might be able to oversee everything yourself directly, but as schools grow, so does the management required for it to stay operational. You're (probably) only human after all, so at some point you wont be able to handle it all alone. Don't worry! this part will go over:
  • What the heck is the management stat even
  • What it do tho
  • The 'Tree of power'©
  • Compartimentalise!

What is the management stat? (and what do i need it for?)

Let's start with getting the basics down. There are 3 types of staff that can have the management skill:
  • Teachers
  • Administrators
  • Security guards

Each uses the management stat the exact same way, the diffrerence lies in where they can be employed.

Management, Where do i use it?

This skill is basically used in positions of management to give X amount of points of what they can manage. If the amount they need to manage exceeds their skill/capacity then it will give them and the entire department & the area's they manage extra stress & dissatisfaction, so make sure to never exceed the management limit! The positions where the management stat is used in, and who can be employed in those positions are:
Room
Position
Staff
Classroom
Homeroom teacher
Teacher
Management Office
Director
Administrators
Teacher
Security Office
Guard Chief
Security Guard
Research Room
Research Chief
Teachers

The Tree of Power©

management is used to alleviate management pressure for the one who keeps this school running, you! We can see how much management someone is handeling and their max capabilities. we can access this via the management tab on the left of your screen (The blue icon with 3 squares linked via a white line)
Lets take a look at what your School's management tab might look like:
This is how an early game management tree might look, and though a bit messy, its alright! but it won't stay forever like this. as you can see, every facility gives a certain amount of.. let's call it management stress in this guide. Currently this headmaster can handle up to 100 stress thanks to his skill, as well as a decently good Headmasters office. Almost all rooms give 5,10 or 15 Management stress with some exceptions. Since I want this guide to be as complete as possible, i've decided to go nuts and actually give you the complete run down of how much management stress each room gives.
Name
Management Stress
Advanced Wonder
20
Arcade
5
Assembly Hall
5
Bathrooms
5
Basic Wonder
10
Bike Shed
5
Cafeteria
10 (empty)
15 (filled)
Car Park
5
Chinese Dessert Shop
5 (empty)
10 (filled)
Classroom
5 (empty)
10 (filled)
Computer Room
0!
Dessert Shop
10 (empty)
15 (filled)
Dormitory Hall
3 (empty)
8 (filled)
Employee Breakroom
5
Food Tent
5 (empty)
10 (filled)
Guidance Office
10 (empty)
15 (filled)
Headmasters Office
0 (improving actually increases Max Stress cap.
Helipad
5
Infirmary
10 (empty)
15 (filled)
Playground
5
Research Room
5 (empty)
10 (filled)
School Store
5 (empty)
10 (filled)
Security Office
5 (empty)
10 (filled)
Showers
5
Special Classroom
10
Student Council
1 to 5
(1 for the room, 1 per council member)
Student Dorm
Variable (depends on the student(s)
Student Lounge
0
Supermarket
10 (empty)
15 (filled)
Tea Room
5
Training Room
5 (empty)
10 (filled)

As you can see, Having even just 1 of each is gonna mean a TON of management stress, At some point your Management Tree might look like this:
uh oh, not only is your research department having too much management stress, your headmaster is as well!

If it was only the research department that was not managed well enough, then we could add extra management power from above, this increases the max management stress a facility can work with, but it adds management stress to the department that is managing that facility (in this case the headmasters office, which is already past it's Cap.)

So how do we fix this? By Compartmentalization!
Compartmentalization
This is where our tree really starts to grow. By building (and staffing) a management office we can actually put some of the management stress from our headmaster to either a teacher or administrator. they can take up a certain amount of management stress (depending on their skill level) whilst only taking 5 management stress themselves to manage! Plus, you can even add some nice extra perks for a little boost!

Think of it this way: let's imagine the management stress as apples. You can only hold up to 5 items, so you can only hold five apples right? what if instead of holding the apples we get some bags, each capable of holding 5 apples. now we can carry 5 bags of 5 apples for a total of 25 apples! (talk about efficiency!)

This is basically the idea. lets show an example from a well compartimentalised school:
Look at that! This smart Headmaster only has 40 management stress because they have compartimentalised everything! now they only have 4 departments they have to oversee (as well as 2 classrooms, but oh well)
So is this a small school? no,no think again! lets open up the education department for a better vieuw.

HOLY SMOKES! thats 21 classrooms and 1 research room, thats a lot of stress, but thanks to Compartmentalization all that management stress is devided over 6 departments, who report to 1 overseeing department.
yes you can have managers manage managers! and you should! for all these classrooms give our Headmaster a whopping 5 management stress. That is literally as much as managing a single bathroom. (who knew middle management could be this easy?)

By using Compartmentalization you can basically build a school with an unlimited size! (as long as this school has a big enough management team!)

(I had to put this as a seperate thing in the guide, since my management part was too long for steam ;-;)
Research
Like any game that gives off even the smalles scent of 'strategy / management game' we have a tech tree.

We already went over what the Research skill does, and how to improve it (check the 'Staff' part of this guide in case you missed it) But let's take a look at the tech tree.

The Tech Tree

The tech tree is basically split up under 4 categories, with 4 'levels' or 'locks'.
At the start of your research journey you only have a limited amount of things you can research. This is because the School Reform technologies at the top server as a sort of Lock. Only when you have finished researching those locks will you be able to research the tech below it.
In this image i added some red lines to show you what is locked behind each School reform Tech.

However, as you can see we dont have enough researchers/ research skill to even be able to research this Reform. you can check how much a certain tech requires/advises for it to be researched:

Please keep in mind however that this is only an requirement for the Reforms. oddly enough the suggested proficiency is nothing but a suggestion for any other research. You will however obviously have a slower speed since your research skill isn't as high as it recommends

So to be able to research a certain tech we need to meet 3 requirements:
  1. The required School Reform tech must be researched already
  2. The previous tech('s) must be unlocked (you can check which by following the white dotted lines)
  3. We must have enough research skill, by adding all of our researchers skillpoints together
As you can see, whenever you finish a technology you unlock a multitude of new items. oftentimes furniture, but sometimes a new room, service, wall type or even new lessons/ morning programmes!
(99% of these rewards are always the same, oddly enough however, the unlocked structure seems to be randomised, to a certain degree. Your school will always be build of a level 1 type wall (the wooden ones) where School reform 1 unlocks a Lv.2 type wall, school reform 2 a Lv.3 wall, etc The specific wall however is randomised. you can see which walls are which level under the building section of this guide. This seems to be the only 'random' reward for research)

During the game you will slowly unlock technologies over time, but dont just delete your research room and fire your researchers when you unlocked it all! They can still be of use.

Unlimited Research

After you've completely exhausted the entire tech tree there will be a couple of repeatable technologies. Each giving a certain reward. The Reward (depending on the tech) can be:

  • Money
  • Contribution Points
  • PTA Points
  • Management Stress Cap. for the Headmasters Office

Exploring the Area
Well now, At this point you should have a great school! amazing classes, impeccible staff, an army of directors, and yet we only have like 25 students? time to broaden our horizons and go on some exploration!

Let's open the map by, well selecting the map icon on the left of your screen.
You have to have finished researching School Reforms 1 first!
Once open you should see something like this:
Not a lot honestly, but we can change that! we can send our minions Students with their homeroom teacher to explore the map and unlock new areas!
Simply select an area and a teacher to send and they're off!
Students will leave the school premise whilst on their adventure, this means that you will not recieve income from this class from either daily tuition fee or them buying things from your school's facilities. They will still get the subject points for their grades as if they are in their class following the lessons!

Teachers will still remain on the premise oddly enough and are able to teach their subject to any class, homeroom or not.
If we take a look at the picture we can spot 2 circles on their trajectory. each circle on their path is an event waiting to happen! these events can have positive or negative outcomes, which will be determined by either spending money, pure luck, or a skill check by using the average of all students from that class of a certain subject.
The map is devided in 3 'islands' keep in mind that each island requires another School reform to be researched!

After exploring a bunch you will come across other schools, stores, the Learning skill school, Schooltrip locations, construction companies and maybe most importantly: new communities!

Lets quickly go over each type of building you come across:

The learning skill school
This building is the only way to improve a staff member's learning skill. you can send em via a solo dispatch team to travel to this school and undergo training. the cost varies on the amount of people travelling as well as current skill level.

Stores
There are a variety of stores scattered across the map. They sell single-use items that can give your students a temporary, or sometimes permanent boost!

Construction companies
Like stores, but they sell new types of doors, windows and walls. Keep in mind that higher level buiding materials are found on later area construction companies.

Schooltrip Locations
These locations are great to send dispatch teams to later on when you've explored every area, they can give the school rewards like extra funds or subject contribution points.

Other Schools
Your 'rivals' as it were. They will try to recruit students from communities around them, which can reduce your recruitment numbers! However, when befriended you could trade money, contribution points, new skills,uniforms or even special teachers!

Communities
These are the real goldmines! here we can set up admission offices and recruit new potential students!

Lets take a closer look at two of these
'Rivaling' Schools
On the map there will be a total of 8 other schools. these schools are randomised from a certain pool of potential schools. each with a specific focus and set things they can trade. lets take a look at one of these schools.
This is a trade overview with one of the schools. The 4 main area's are: Your school's inventory, the rival school's inventory. The trade deal (in the middle) with their acceptance below and finally their opinion on you (the bar above).

if you want to trade with a school, keep some things in mind:

  • The trade acceptance must always be at least 0! you can see if it is by checking the bar below, if it is any shade of red the other school will not accept the deal.
  • To be able to trade Subject points you must have a reputation of at least 44% percent with the other school.
  • To be able to trade a special teacher or items/uniforms you must have a reputation of 75%+
(I would recommend never trading/ giving exchange students. you will not gain any income/reputation gain from that student anymore basically as if you never had that student).

Communities
A community is a new opportunity for you to gain a new batch of students, with their own aspirations, tuition income, skills and (de)buffs. Here we have a detailed overview of a community. we can see our reputation with the community, the amount of students we get per schoolperiod (this school has it so that students go up a year every 4 weeks, this can be different for you depending on what you set at the start). the daily tuition gain, their attributes and their aspirations.

Each Community has a Max amount of students that can apply to your school. the amount that applies however, is decided by your reputation of that area, for example, let's say a community has a max of 25 potential students. If our reputation is 80% in that area, then we have the formula of 25x0.80=20 so we will have 20 students that will apply to our school.

You can improve your reputation via 2 different ways:
  • By making sure students from that area get full marks on their exam.
  • By investing into the community directly.

However, reputation does decrease over time and other schools will sometimes invest in communities you have students from, this can inmediatly decrease your reputation by a significant amount. so keep an eye on your reputation in these area's.

A quick way to do that is by opening the ratio vieuw. you'll get a vieuw that looks like this: Your school is always depicted by the colour blue. Grey means not part of any school and the other colours represent other schools. you can check which school it represents by looking at the background of each headmaster in the rival school list.

Investing
You can also invest in a community. There are 6 options for you to chose from, but these boil down to 3 unique effects.
Lets start with one fact: each investment gives you an increase in reputation from that specific community. (the first four give 1% i think the other two give more but im not certain on that, ill update the guide once i know exactly how much % reputation increase these give)

The first four are investments that cost Subject points. Once you've invested in that subject the students will start with a slight increase in that skill. it simply means that whenever a student enrolls in your school that their starting stat in that subject is now 1 point higher.

Investing in their Aspiration will increase their aspiration level. this will increase their required total points for passing their exam but your rewards for getting a pass or full marks increases as well. If you invest you can choose out of 2 new aspirations of the next level. thereby potentially gearing that community to a different subject your school might be more specialised in.

Finally we have the Fundraiser, Investing in this will raise this communities wealth, meaning that students will pay a higher tuition fee, which increases your passive income in turn.
How to 'Win' the game
Let's get 1 thing out of the way first. There is no 'definitive' ending to the game, you can keep going even after achieving a 'victory'

That said, let's take a look at the 'end goals' given out by the game. like a minute into your run you might come across this popup, which forces you to select a goal:These 4 options each provide a different way to 'win' the game. Its just here to give you an area to focus on, either by focussing on giving amazing education to a smaller group, to create a big school with lots of students, which focusses more on meeting their needs and keeping them happy, to build an amazing looking school or to have the best basketball/pop club of all the schools.

Don't stress too much with choosing however! your choice does not lock you out of achieving the other victories. you can quite literally switch at any point. just click the school level button at the top middle part of your screen and select victory goal. you get a detailed overvieuw of all victory conditions.as you can see, you actually work towards achieving all 4 at once the one you selected is just the one that you keep track of on the right side of your screen. if you ever want to switch which one you'd like to track, simply tick the square on the one youd like to track, its that simple!

(This does mean you can even 'accidentally' win with a certain victory without even really noticing! so check back sometimes to see how your progress is going on all victory types!)
Final Thoughts
If you managed to get trough the entire guide, congratulations! i have nothing left to teach you and you are now fully qualified for your position as Headmaster.

In all seriousness though, I created this guide because when i started playing i went through the tutorial and got a basic grasp of the game. However there was a lot of stuff i had to figure out myself, and it was slightly frustrating to discover that the wiki pages were almost completely blank. That's why i took it upon myself to pool all the information I know together into 1 single area which turned into this guide. I understand that it might be a long guide this way, but i tried to make sure that i went over every detail so that you too can understand every detail about the game so that you may enjoy this school adventure as much as i do. Feel free to come back to this guide any time you need specific information, because (hopefully) it might be in here!

I want to thank you all for taking the time to read this guide, and feel free to leave any question/feedback in the comments below. I'll try to keep this guide well updated for as long as i plan to enjoy this game. (which by the looks of it is going to be a while)

Hopefully you've picked up a couple tricks and skills along the way
~Your Headmaster,
Terra
FAQ
This section will be devoted to answering any questions that get repeated in the comments. I will try to frequently update this area so that you dont have to sift trough all the questions and can maybe find an answer here! :) I'll credit everyone who might've given a good answer to a question before i was able to.
5 Comments
Terratrill  [author] 26 Apr @ 11:24pm 
@Heyymdall I would recommend building as many as you think you need! Think of management a bit like this:
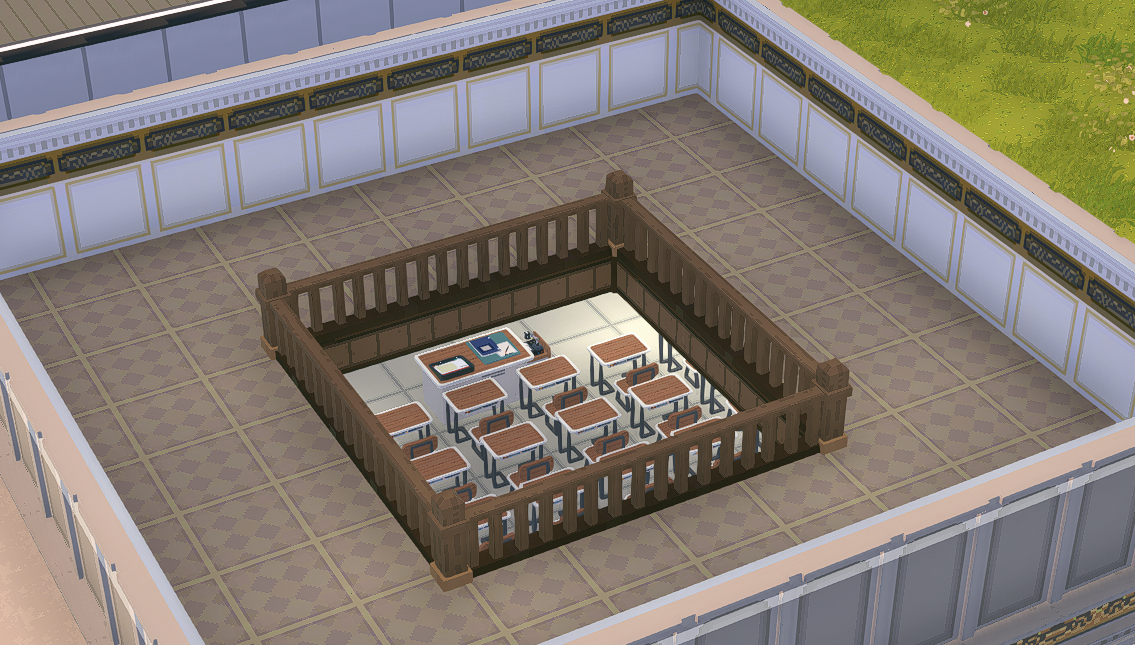
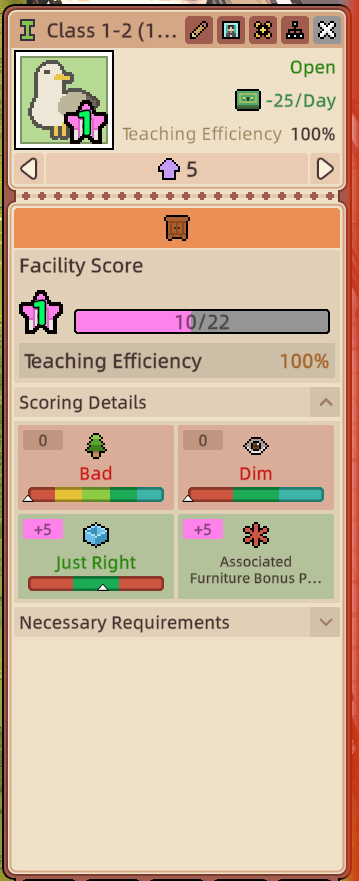
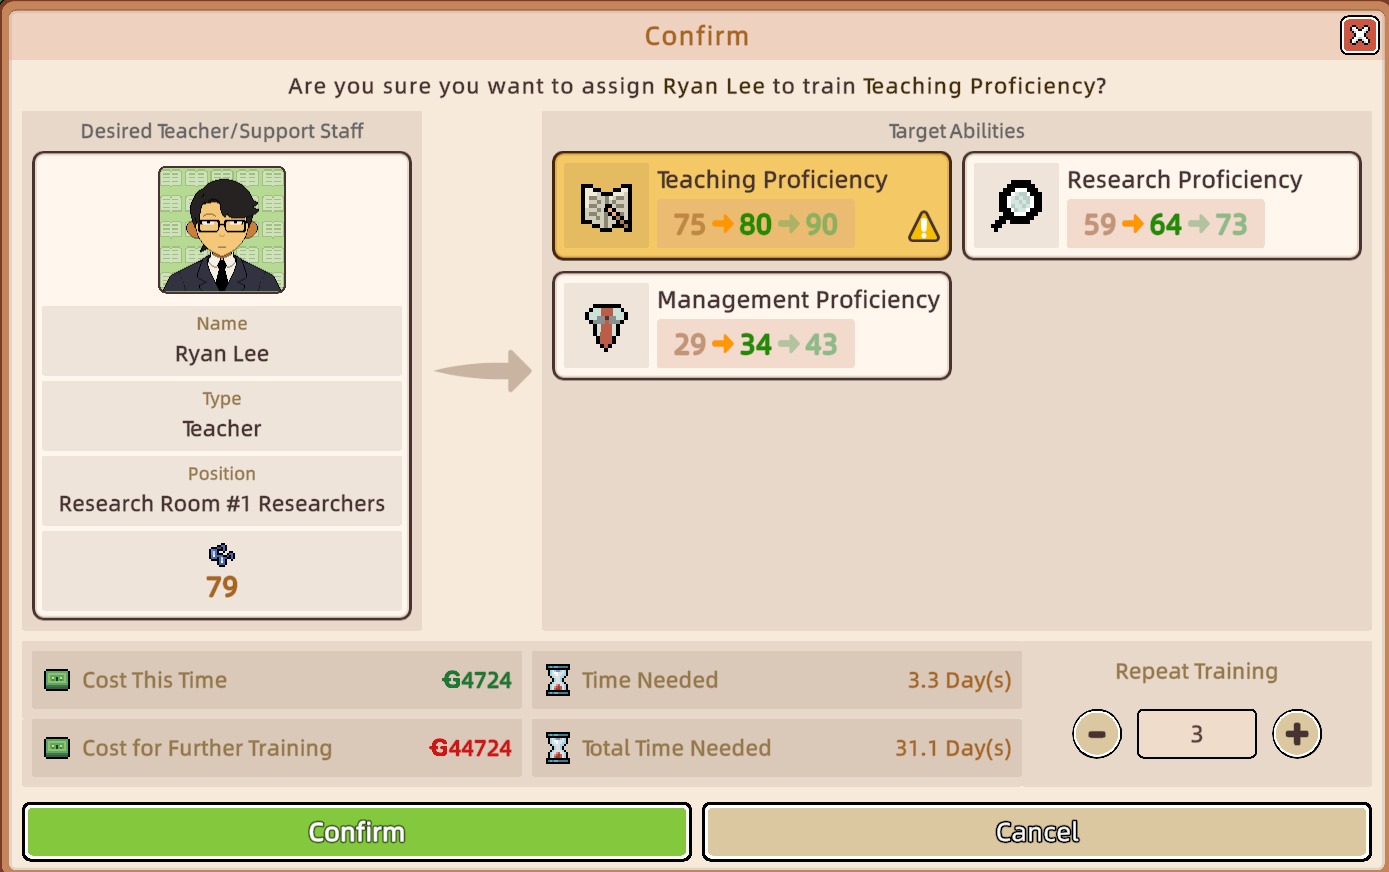
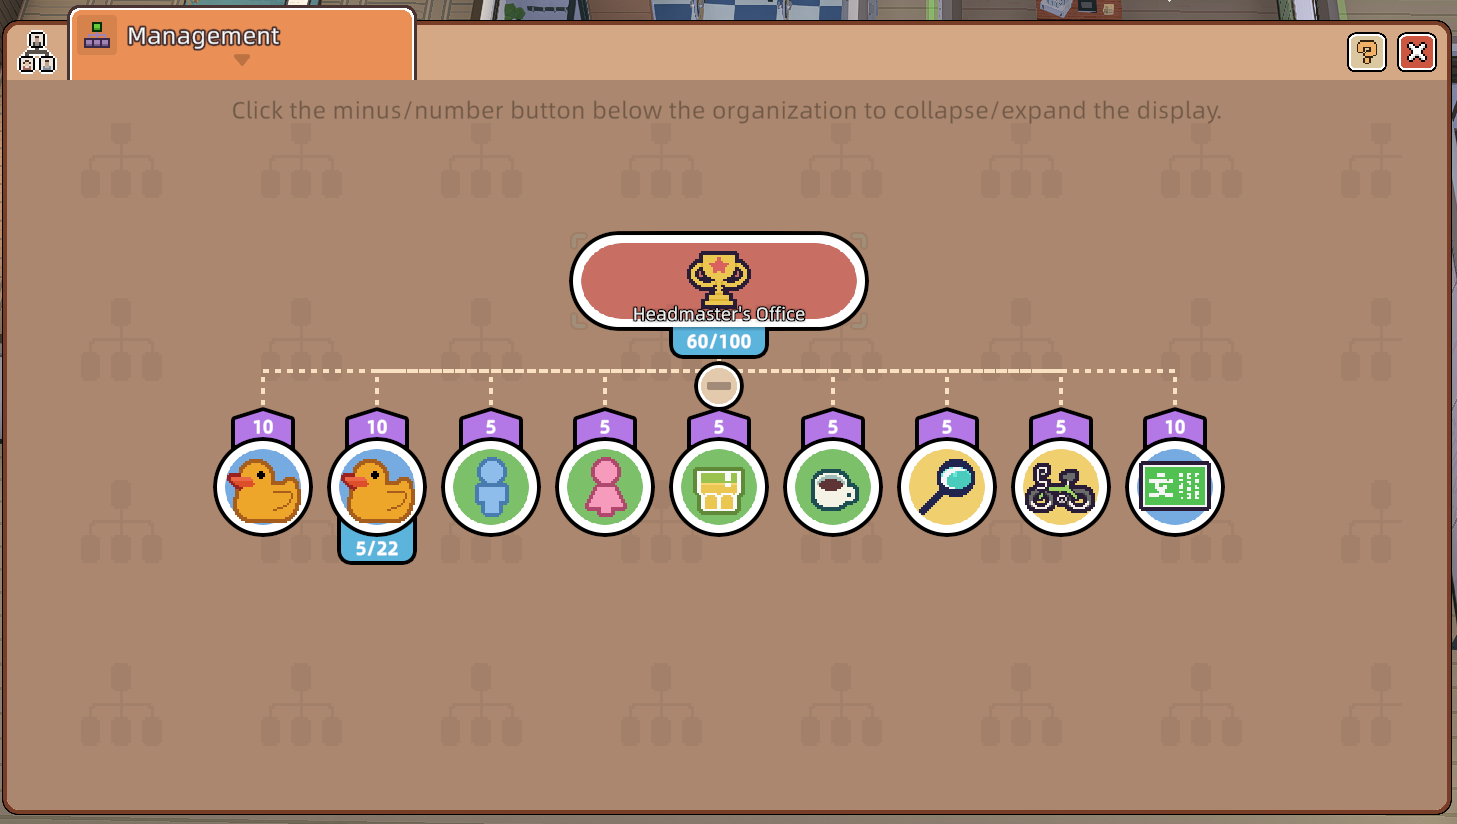
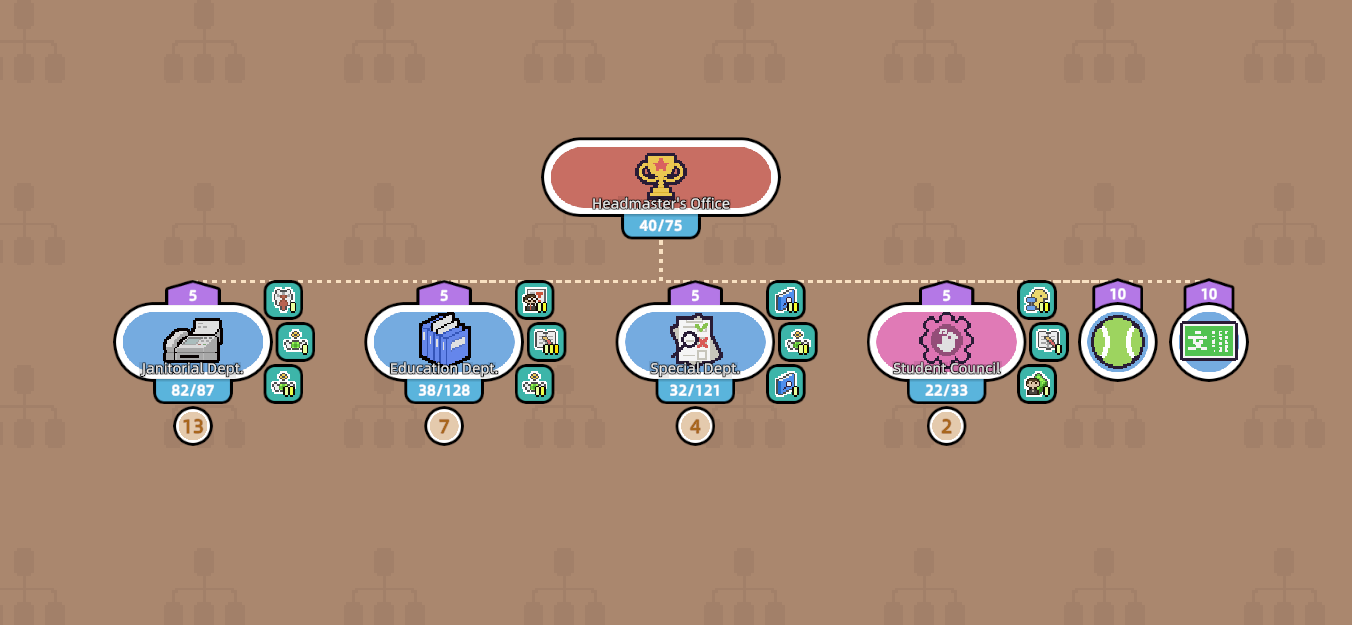
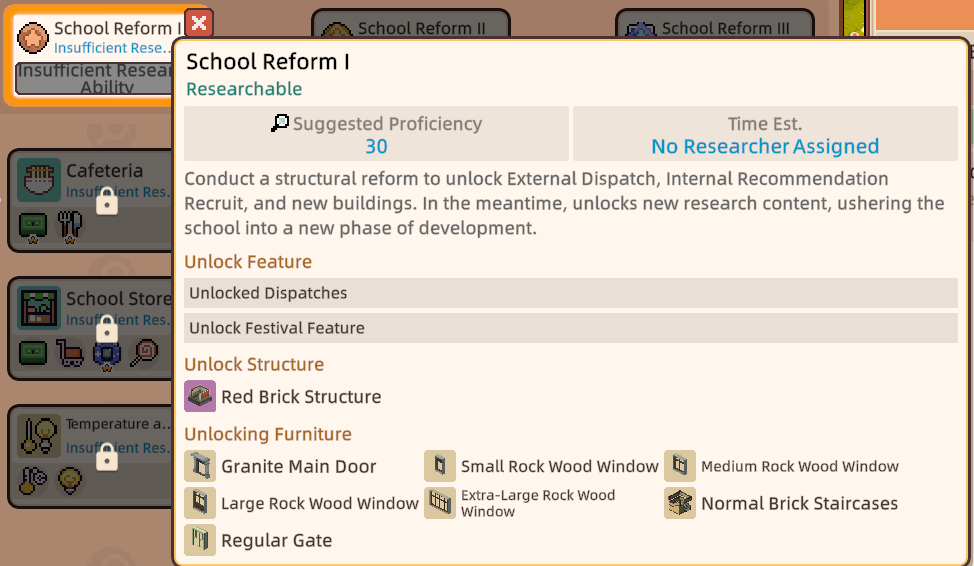
Every room (classroom, bathroom office, etc) & employee/ student costs a bit of "power"
a management office or the headmaster has a certain "power cap" thats increased by their management skill.
if you go over a managers power cap, then you'll get issues (like using too much energy causes power outings!)
However, a management office can be like a seperate segment that reduces the "power" used by everything it manages in a sense for the headmaster.

lets say an office costs 10 "power" to manage, and has a "Power cap" of 60 then you can put any buildings under the office up to 60 "power" However, instead if that all costing 60 power for anything above the office, it only costs 10 now, and therefore your headmaster (or office above that) can manage much more!

Hope this helps! if not ill try to do a different explanation!
Heyymdall 6 Apr @ 5:47am 
does it mean that compartmentalization should build 2 or more management office to split all departments ? please help i still struggle in stress management
Egyszerűen Joe 17 Feb @ 6:25am 
Thanks! It helped a lot!
Terratrill  [author] 2 Sep, 2024 @ 1:32am 
Ill start working on that one! thank you for the suggestion @TheRealRws :)
TheRealRws 28 Aug, 2024 @ 3:26am 
Would love a section about clubs!