Eiyuden Chronicle: Hundred Heroes

Eiyuden Chronicle: Hundred Heroes

79 ratings
SUPER Easy Trading Guide
By Faelim
Straightforward and VERY EASY to read "what to buy/what to sell" for each town, as well as a few other tables with additional info and details for people who want 'em. This is the easiest way to recruit the Trading character, Hogan, as well as get the achievement for earning more than 1,000,000 baqua from trading.
4
   
Award
Favorite
Favorited
Unfavorite
Just the facts, ma'am!
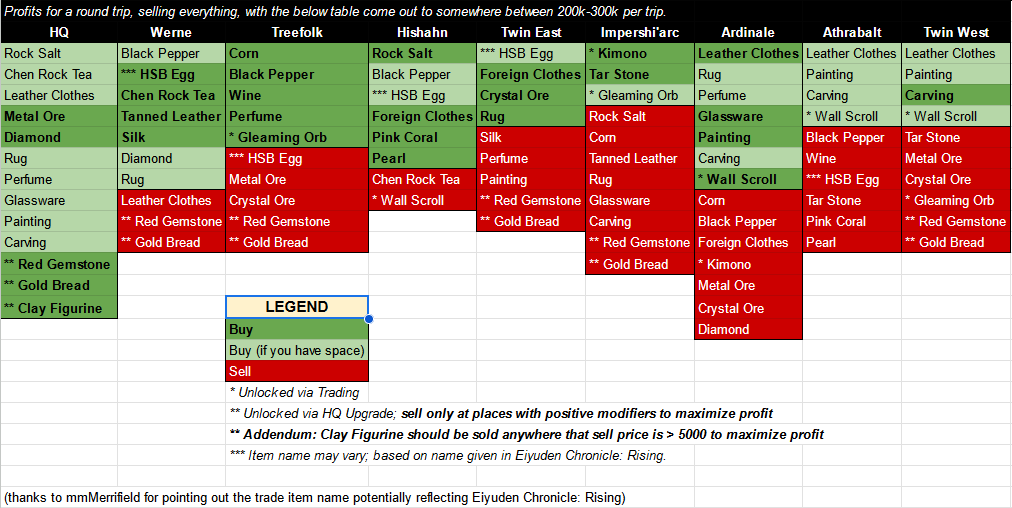
For those of you who just want to know what to buy/sell and don't want to get bogged down by the details, this is what you're looking for:


So long as you buy the items highlighted in green, and sell the ones highlighted in red at each of the respective locations, you will earn maximum profits. If you're short on inventory space, buy only the items highlighted in dark green, but if you have lots of space (~15-20 slots), buy everything in green.

Note: Ignore the arrow modifiers on the in-game items (see addendum below if HQ Trading is fully upgraded), this guide is based entirely on the local prices for each location and will net you profit regardless of the arrow modifiers. You will still make money even if you buy when a place's price is high (blue arrows) and sell when another place's price is low (red arrows).

Addendum to the above note: The final 3 items unlocked by upgrading the HQ (Red Gemstone, Gold Bread, Clay Figurine) should ONLY be sold where there's positive arrow modifiers to maximize profit. Clay Figurine modifiers are HIGHLY volatile and should only be sold when selling price is greater than 5000.

Profits for completing a full trade circuit as shown above (with a few return trips to sell) falls between 200k-300k.

In only a handful of trade trips, you too will be part of the Top 1%.
I want the details though!
If you're looking for more information, such as how I got to the above table, you can see the remaining spreadsheet and tabs here:

https://docs.google.com/spreadsheets/d/1nzUK6TxpPJ5M2SCtMrzxLKwNXUoqRsrKG8DuwXa6Jmw/edit?usp=sharing

The spreadsheet has tables for all the numbers.

Enjoy!
15 Comments
AetherRose 2 Jan @ 4:42am 
Thanks for taking a recruitment quest that was super frustrating and making a joke out of it. Your guide was a HUGE relief!
Miesmann - allkeyshop 7 Aug, 2024 @ 12:49am 
thanks i finally got trading npc recruited... those arrows ups and down are missleading..
Magri 19 May, 2024 @ 12:56pm 
Appreciate the guide. Wasn't enjoying the trading system and it was nice to be able to just power through it with no thought
Faelim  [author] 19 May, 2024 @ 12:17pm 
@ Raelic - Thanks! Yeah, the added HQ items are a bit of a pain compared to the rest of them.

@ Marcus - It's not, no - each location has their own price for each item, and that value alone is generally substantially different enough to make some places a clear profit to sell at. The arrows are just to add some variability to the trading, but in reality, they can be safely ignored in almost every scenario.
Marcus Butthurticus 18 May, 2024 @ 1:42am 
I thought the down arrows would indicate a lower price and the up arrows a higher price. Is t his not how it works?
Faelim  [author] 11 May, 2024 @ 5:55pm 
@Iggi - In all those circumstances, they're actually identical selling prices (with the only variance being whatever random modifiers you're getting when you go to the locations). I debated keeping places that were "close enough" (such as Treefolk for Pink Coral), but decided instead to just leave it at the best value since I figure most people will likely ultimately be using this guide when they can reach all locations anyway.

@mmMerrifield - I will definitely be adding them, yes! I got really busy and haven't had much time to play in the past week and a half, but hoping to update shortly!
mmMerrifield 11 May, 2024 @ 4:20pm 
I was curious if you were going to add the prices of the trading specialties items available to buy from the HQ?
Iggi 11 May, 2024 @ 10:38am 
I've noticed you have some overlap with where to sell items, such as Crystal Ore (selling in 3 places), Metal Ore (3 places), HSB (2 places), and Black Pepper (2 places), I think that's it. So the question is are these numbers just so close to each other that it doesn't matter in terms of profits, or is there possibly 1 city that would technically be better for these items to sell at?
Faelim  [author] 7 May, 2024 @ 5:02pm 
My suggested buy/sell is to be as close to zero risk as possible, so I'm not really sure what contributed to the scenario as you're describing it. You should always be making more than 200k on a round trip regardless of the modifiers.

That said, I'm always willing to adjust my information if I'm wrong. If you can provide in-game screenshots of any of my suggested buy/sells ultimately leading to a loss, please share and I will adjust my info accordingly.
Faelim  [author] 7 May, 2024 @ 4:53pm 
That shouldn't be the case. The values indicated as "Buy", whether as optimal or suboptimal, should always run you a profit regardless of the +/- variation in values, short of some pretty extreme +/- values (<80% or >120%). I only indicated "Buy" for the items that are guaranteed to make you a profit regardless of the modifier.

If you took "Corn", for instance, the base buy price for it is 160 at HQ and 100 at Treefolk. The highest base sell price, at 200, is at both Impershi'arc and Ardinale. The only place I suggest to buy it is Treefolk, even though you COULD hypothetically turn a profit by buying at HQ. The reason I only suggest Treefolk is that:
a) the profit margin for buying at HQ and then selling at either top selling price is trivial and not really worth it anyway
b) if the buy price has a +15% modifier (184) and Impershi'arc/Ardinale have a -10% modifier (180), you'd end up selling at a loss