Our Adventurer Guild

Our Adventurer Guild

188 ratings
Advanced Tips and Mechanics
By Pure_Poetry
Advanced tips for both new and experienced players, including hidden mechanics. #Best Builds #Team Composition #Strategy #Tactical #Level-up #Pro tips #Expert tips #Let's Play
17
7
6
12
5
4
5
2
2
2
   
Award
Favorite
Favorited
Unfavorite
Introduction
This guide humbly aims at covering the main aspects of the game and gives advanced tips for both new and experienced players, including hidden mechanics (and minor spoilers).

It is divided into 3 sub-guides :
  • I. Guild Management and Party Building
  • II. Advanced Game Mechanics
  • III. Events, Walkthrough and various tips.
Steam limiting the size of each section, each sub-guide is actually sub-divided into 2 to 4 sections.


I recently completed a "NIGHTMARE RUN" (ie : custom settings with all difficulty sliders at maximum difficulty from day 1), on Ironman, permadeath and with the doomclock ON (granting enemies extra bonus level over time). I had to use every trick in the book to move forward as fast as i can (due to doomclock), so do not hesitate to take a look as it displays many very advanced strategical or tactical elements of the game to survive :


I also made three extensive videos about the best Builds / Traits to look for / How to level up / Best Skills / Team Composition and such. It is complementary to this guide (as some things are better said in a video than in writing imho). Feel free to comment wherever you prefer.

1st video is halfway through my 1st Let's Play Series, with all classes analysis and various tips (except T3-classes and Tavern Titles). It is unfortunately more than 3h long (the game has many layers and is deep) but you can use timestamps to jump to any desired section :


Second video is after the 1st Let's Play Series end, with a tactical analysis of the A-Team, T3-classes builds and Titles analysis :


Third video is a Class Tierlist :


I hope you'll find what you are looking for in either this written guide or in the videos.

Cheers
Party Building (Part I - Guild Management / Hub)
Mood Management :

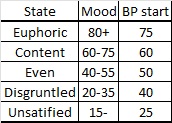
Adventurers have a “mental state” depending on their mood value. This will also determine their BP on quest start.


Any adventurer that is “Unsatisfied” has a 30% chance to leave the guild during the night (with max 1 leaver per night).
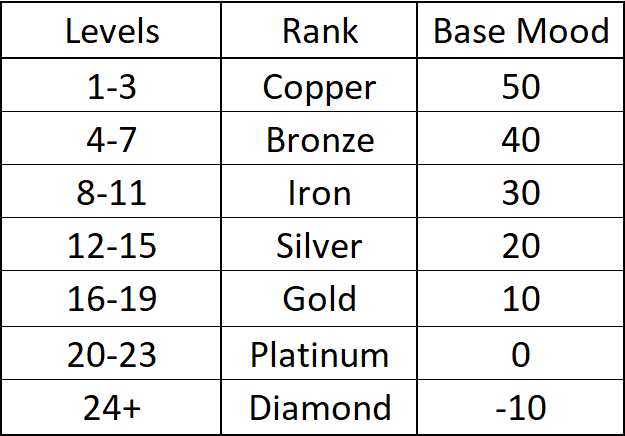
Each adventurer will have a base mood depending on their level (higher level adventurers will be a bit more “picky” while beginners will just enjoy being part of the guild)


To help keep adventurers happy, 4 guild upgrades (3 room upgrades + 1 meal upgrade) add a bonus to base mood

  • Standard rooms +0 Mood
  • Upgrade 1 +15 Mood
  • Upgrade 2 +30 Mood
  • Upgrade 3 +40 Mood
  • "Better Meals" gives an extra +10 Mood

Each quest or assignment will consume adventurers mood. So does being healed in the temple :


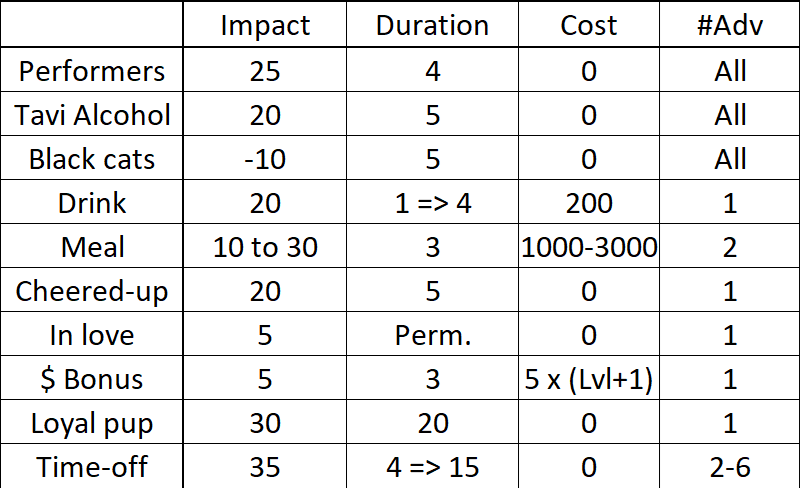
Various events can modify their mood


Buildings :

Temple :

Heal : try to avoid using it early and mid-game. It is usually better to wait and pay wages than paying multiple heals that will also lower adventurers mood.
Quest bonus/prayer (temple guild upgrade) : some cheap bonuses (200 gold) but that are random and not very useful. Up to you.
Possible bonuses are:
  • +25% max stamina
  • +4 skill checks
  • +10% xp
  • +25% loot
  • +10% Death Resist

Forge :

- Try to acquire the uncommon equipment asap to replace your common starting equipment
- Rare, Epic and Legendary equipment will have bonus sockets in which you will be able to place gems (requires a guild upgrade at "Acknowledged" rank))

Important note : There is no need to have more than (up to) 6 adventurers equipped at anytime in the campaign. You will never need to send more than 1 party the same day. You may need more than 6 full sets to match various builds, but you don't need (and should not) have every benchwarmers equipped all the time.

Merchant (Me’can) :

You can sell all the items you do not use (at 50% value). For instance, you can sell all Uncommon equipment once you have sufficient rare equipment to equip any party. You can also buy some random accessories each week.

Tavern :

- You can recruit new adventurers each week. Keep and train the good ones. For the D or E-Tier soldiers (ie : poor traits and/or poor stats), you can either :
1. Send them on minor but time consuming assignments (like “gather resources”). It will more than enough pay for their wages
2. Unequip & sell their equipment for 20 gold and then sack them while paying a 50 gold fee to prevent mood loss for the remaining adventurers (note : sacking fee increases with level, so do not level up adventurers you will sack later on)
- Drink with guild master: You can either pay 200 gold and have the adventurer unavailable for 1 day for +20 mood or pay them a bonus of 5x(lvl +1) gold to increase their mood by 5 for 3 days (cumulative). As a consequence, it is usually better to pay bonuses to lower lvl adventurers (up to lvl 9) and offer them a drink later (if you can afford to have them unavailable for 1 day).
- Meal (Guild upgrade): Improve mood and the relation between 2 adventurers. Currently this feature appears overpriced.
- Titles (Guild upgrade): Apply them ASAP to your A and B teams. See paragraph below.

Injury management

Adventurers will be injured for a few days if they lost HP on their previous quest(s) (or sometimes in assignments). It works as follows :
  • Any HP lost will add up towards the timer (regardless of intermediary healing during the quest)
  • Linear progression
  • Capped at 100% of the total HP pool of the adventurer, including items (ie : if you suffer 200 damage on a 80 base + 20 items HP adventurer (that you healed in the meantime), you will be capped at max recovery time). If he takes 50 dmg, he'll stay 50% of max injury time on the bench
  • Max recovery time can be reduced by guild upgrades or temporary event (ie : healing rates can be improved)
As a general rule of thumb, considering all the secondary quests and assignments, having a roster of c.30 adventurers is advised (with A-team for main quests and E-team for herb gathering...).
Party Building (Part II - Adventurers and combat 1/2)
Adventurer Management :

Team composition :

Always have at least one member of your A-team within the party until mid-game. This will make sure you can apply any reward from positive events to the said adventurer, instead of having it “wasted” on a D-Tier adventurer you’ll likely replace soon. Ideally 2 of them depending on their attributes and classes.

This depends on your playstyle but I personally enjoy having :
  • 1 bard leader (SP/BP regen, with born leader trait if possible for +10% Chain attacks)
  • 1 knight (to be turned dragon knight). Melee DPS
  • 1 ranger (to be turned beastmaster). Crowd control, sniper kills
  • 1 high mage (to be turned witch) : Elemental and AOE damage
  • 1 bishop (to be turned saint) : Heal, buffs, AOE
  • 1 extra high mage or 1 paladin (mass auras)

Note that you start limited at 4 adventurers per party, and that you'll be able to send up to 5 and later 6 adventurers per party (at "Respected" rank via a guild upgrade).

Growth rates per class :

Attribute growth per level up is determined for each stat with base class growth and various traits or equipment.
Each letter gives the base potential growth per Attribute.
S = 110
A = 90
B = 75
C = 50
D = 20


(This table was last edited with patch 1.60, where Guardian WIS growth went from D to C and Paladin's from C to B)

An attribute growth of 130 will have 70% chance to give you a +1 and 30% chance to get you a +2 on each level-up (note : can be above 200).
A star on an attribute gives a base +30 stat growth

When you change class, you :
- Pay a little training fee
- Become unavailable for 1 day
- Keep the skills shared by both classes
- Get refunded the skillpoints you invested in your previous class that your new class does not have (and will have to pay for the new skills you'll want)

The attributes requirements for each class is as follows :


Tier 3 classes will only be accessible to 1 adventurer per roster, and have high attribute requirement(s). They usually unlock after specific scripted quests mid-late game.
However, it is currently possible to use your only resurrection potion (7* quest) on a formerly deceased T3 adventurer while you already had trained a second T3 of the same class to ultimately get 2 T3 of the same class. You can even use the "set to 40 [attribute]" legendary gear to promote a lvl 1 adventurer to a T3 class (might be patched at some point, or maybe not)

Key takeaways :
  • Since you can choose to re-roll once each lvl-up, the base attribute growth is roughly improved by +25% (ie : if you choose to re-roll any roll that is below 50/100, the average roll you’ll ultimately get is 62.5/100 over the course of a playthrough, although this does not apply equally to all attributes as some might for instance be equal to exactly 100% growth, which you can't improve via a re-roll)
  • Try to upgrade your class ASAP, since it increases attribute growth. It may even sometimes be worth saving a level-up until a certain point (ie : potion of +1 to reach class upgrade threshold)
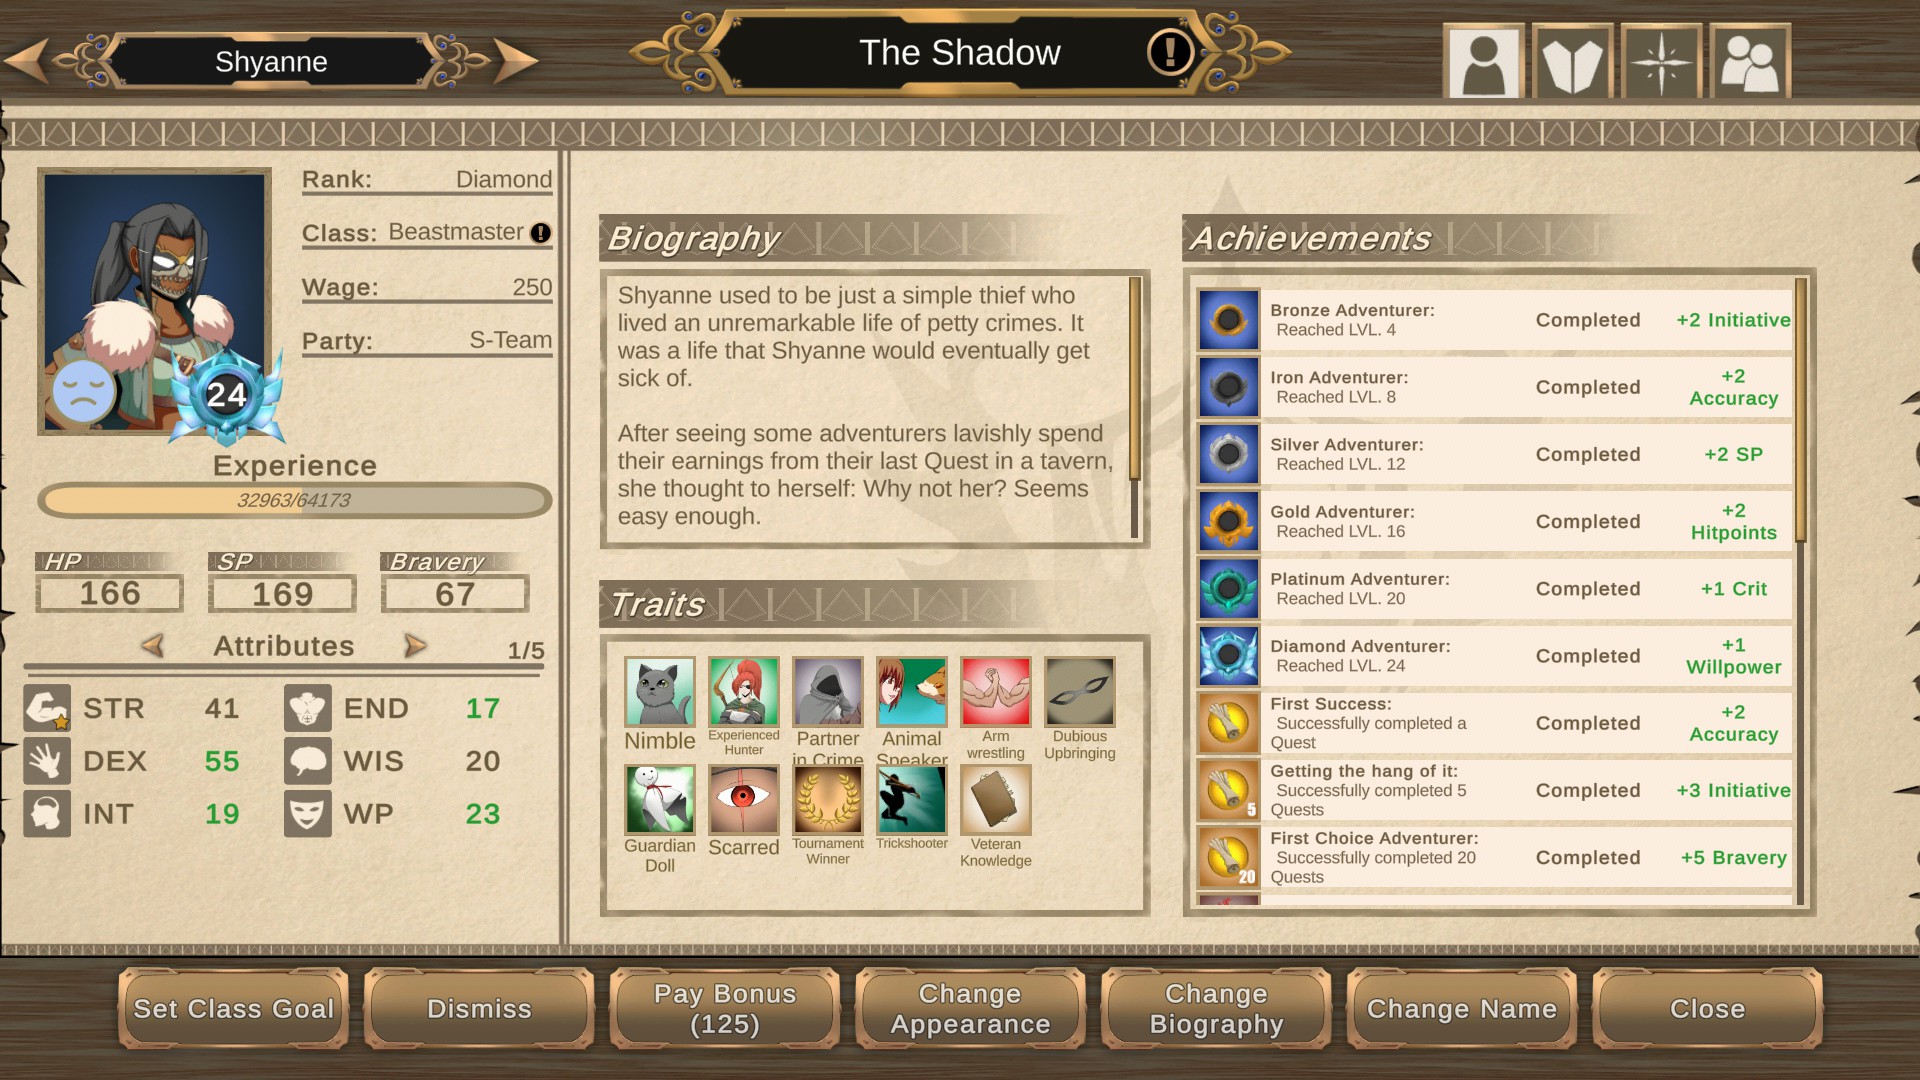
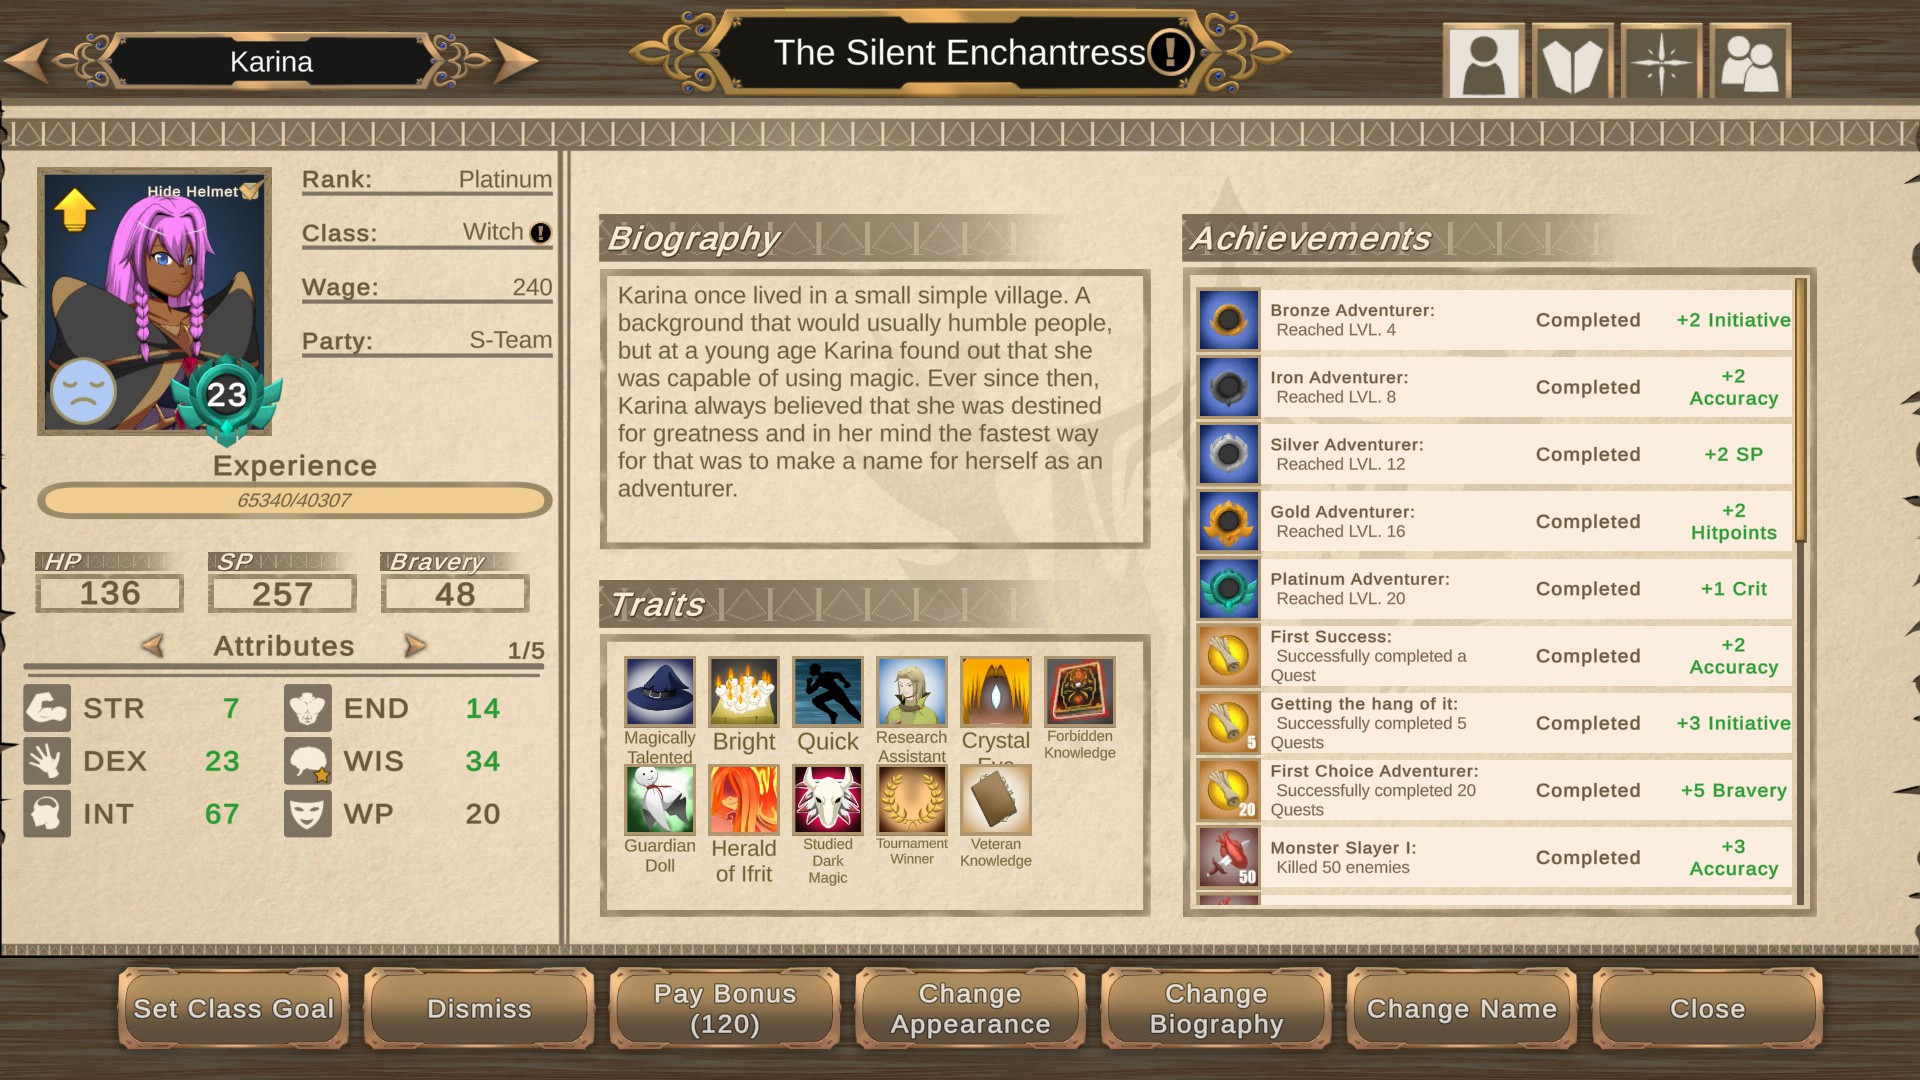
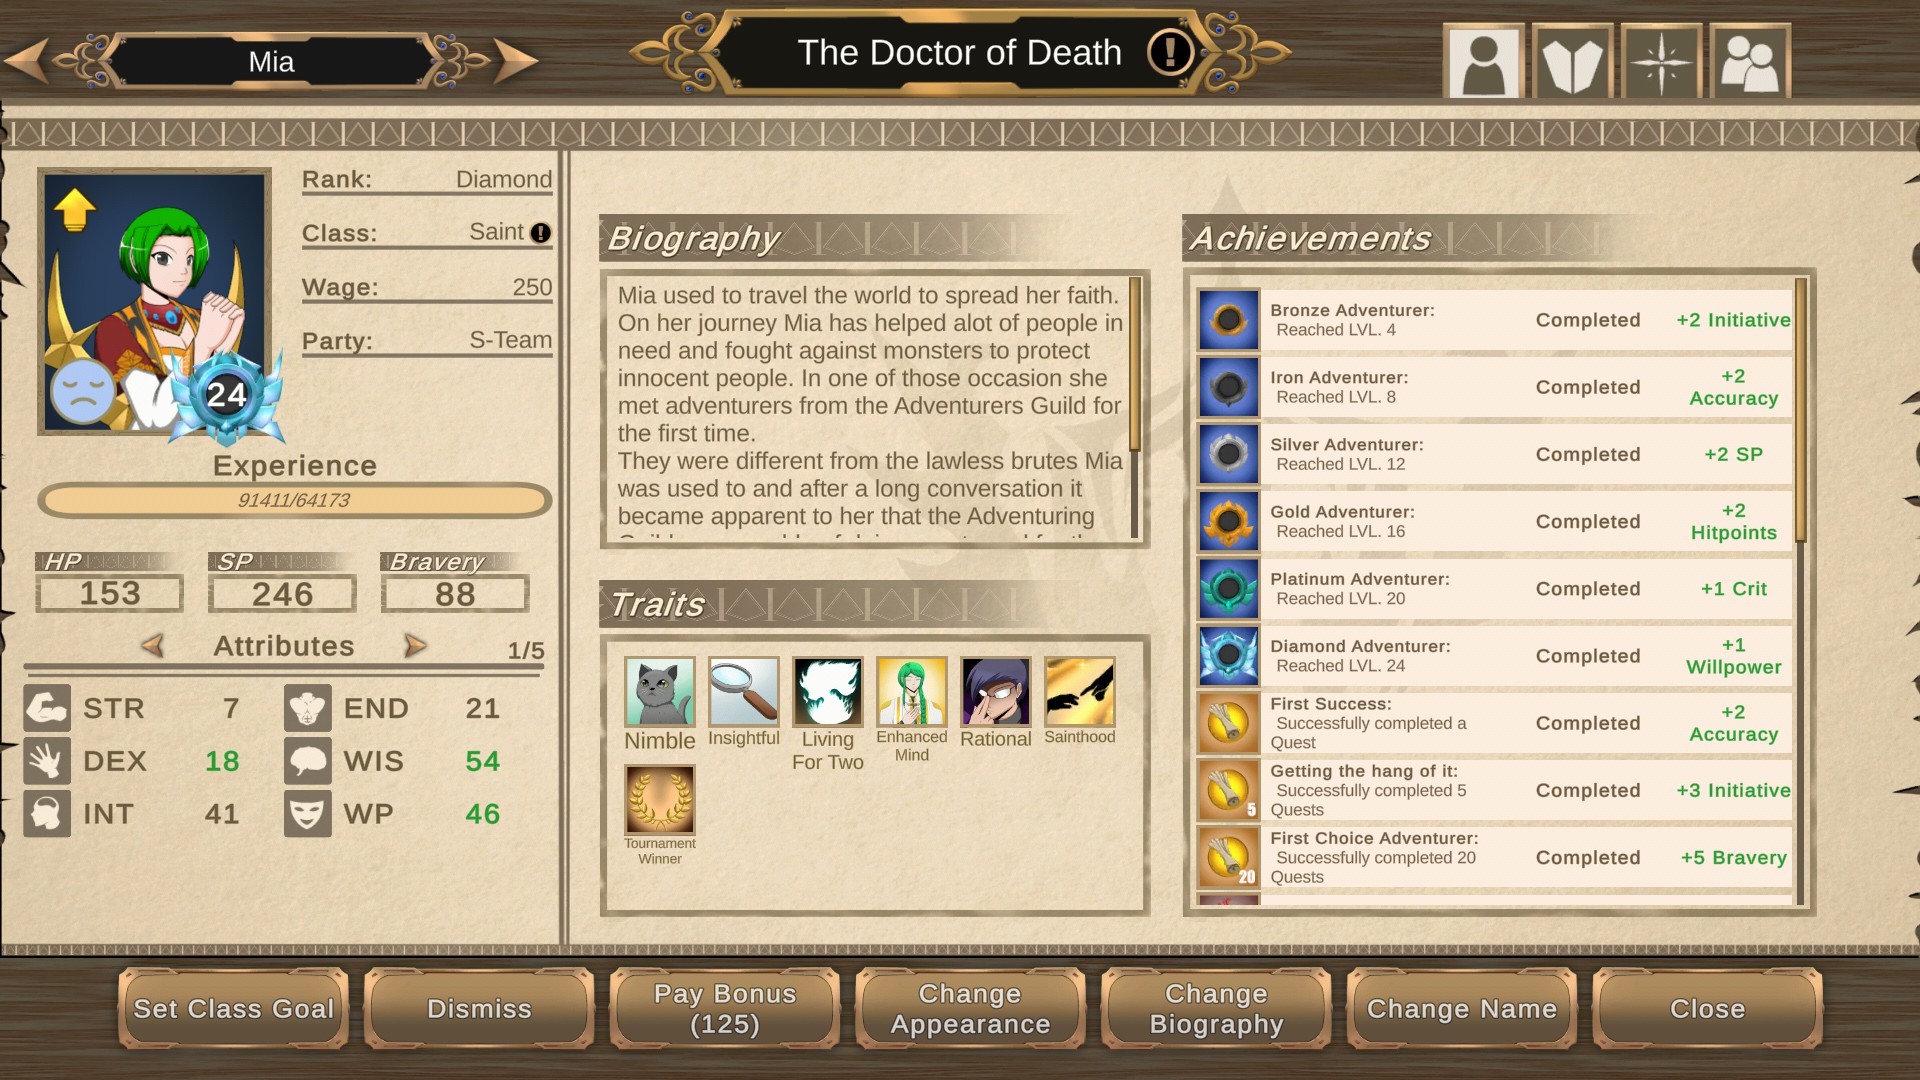
Here are some decent adventurers by the lategame from my 1st ironman playthrough to give you a rough idea of where some adventurers can evolve.


Note : These were on my 1st playthrough. With better knowledge of the game, You can get 100+ on some attributes by day 100 (see end of my Nightmare Run).

Skillpoints :

Adventurers start with 1 skillpoint already allocated in their base attack. They then get some extra skillpoints when leveling-up with the following pattern :

+1 skillpoint at level 2, 6, 10, 14, 18, 22
+0 skillpoint at level 3, 7, 11, 15, 19, 23
+2 skillpoints at level 4, 8, 12 ,16, 20, 24* (new "rank")
+0 skillpoint at level 5, 9, 13, 17, 21

* Before v1.32, you'd only get 1 SKP at lvl 24.

You can still level-up above 24 but won't get extra SKP.

There are 2 ways to "respec" your adventurers :
- Via a class change (costing 2 days and up to 2300 gold). All the skillpoints that were not on skills shared by both classes will be refunded.
- Via the "Confession booth" (unlocked about mid-game via a proposal) costing 500g per skill, refunding ALL skills.


Advanced individual trainings

Adventurers can benefit from individual trainings from the instructors in the Guild (in the early campaign : Falken, Astrid, Rogue, Majika and Eden) . These trainings :
- provide stats growth AND/OR stats increases
- can only be received by 1 adventurer at a time (ie : the resulting trait is unique and should it disappear from the guild the training will become available again soon).

Since they provide stats growth, I heavily suggest applying them ASAP to your A-Team members once you identify them to maximize their efficiency.

Note : Unique traits from events (like Crystal Eye, Ifrit, strange memories...) are also supposed to come back if the adventurer who has it dies/leaves/is fired/etc... (ie : the event will become available again).
The only exception seems to the wolf pup event.

You can find most events in the 3rd big part of this Guide.
Party Building (Part III - Adventurers and combat 2/2)
Traits

The “Talented” trait is very powerful. It gives :
- +20 growth per attribute
- +20 growth per talent (netting +50 per talent instead of 30)
- At least 2 talents (unless the adventurer is scouted)
==> +220 total guaranteed attribute growth (unless scouted). It is also unfortunately very rare.

For the other traits :
- "Magically talented" and "Educated" are absolutely OP for mages and priests
- "Kind" / "rational" for priests (or those from mages)
- "Sadist" is S-Tier for any damage dealer (due to BP regen), especially for melee and archers (due to STR growth). It is worth noting that ANY INSTANCE OF DAMAGE will yield 2BP. So casting a 2x2 fireball on 4 enemies will yield 8 BP + 8 next turn if you also burned them. Also, having your weapon enchanted will net you 2 BP per type of damage, multiplied per number of enemies targeted (Hi there cleave with elemental enchantments).
- "Strong" or "Soldier training" for any frontliners
- "Mana Core" for SP burners who can't regen properly, archers/rogues especially (+10% SP regen/turn is sick... you just unleash hell every turn)
- Any main stat growth trait for each class (ie : +30 strengh for warrior, etc...)
- "Born Leader" / "Pretty" / "Kind" for a bard
- Quick : dex growth, ini bonus and especially the +1 mov range is fantastic for anyone !

Party Management :
  • Once you can create parties, try to put everyone into one of them to help improve relationships between adventurers
  • You'll be able to teach "Teamwork trainings" to any parties that match the specific requirements (requiring good synergies that are based on good relations, having a party leader or not (that is also unlocked through a proposal) and also minimum levels for each members of the party).
  • Note that you can rearrange parties before starting the quest. An adventurer who did not participate in the training can still benefit from the teamwork skills if he joins the said party with some given skills just before the quest, granted you still match the requirements (synergies and levels).
  • This can be used to do the trainings with some benchwarmers (that still have to match the requirements) while your A-Team does something else, and have then your A-Team members join the said party and still benefit from the teamwork skills.
  • Teamwork trainings to look for : Increasing chain attack by +10%, "Move Together" if your leader has great movement (with traits, armor, accessories and titles, you can get your whole team to 8+ movement), and "Groupies" if your leader is a bard.
  • If a whole party is doing a quest, the leader will be granted a skill "Rally" costing 3AP & 10SP that will grant his allies some BP. Formula is (15+40%*(leader's WP))*[80%-120% range] BP, +/- modifiers, mapwide.

Titles

You can assign "titles" to your adventurers at the tavern via a guild upgrade (near lvl 12). Here is a recap table of the titles, their effect and a personal opinion on which class should get which title. If you have comments on this, please let me know in the comments :

.
Episode 126 of my 1st Let's Play series gives details on this.

UNIQUE characters :

There are currently 5 unique characters you can obtain throughout the campaign. Each have a nice additional personal skilltree.

In order of appearance :

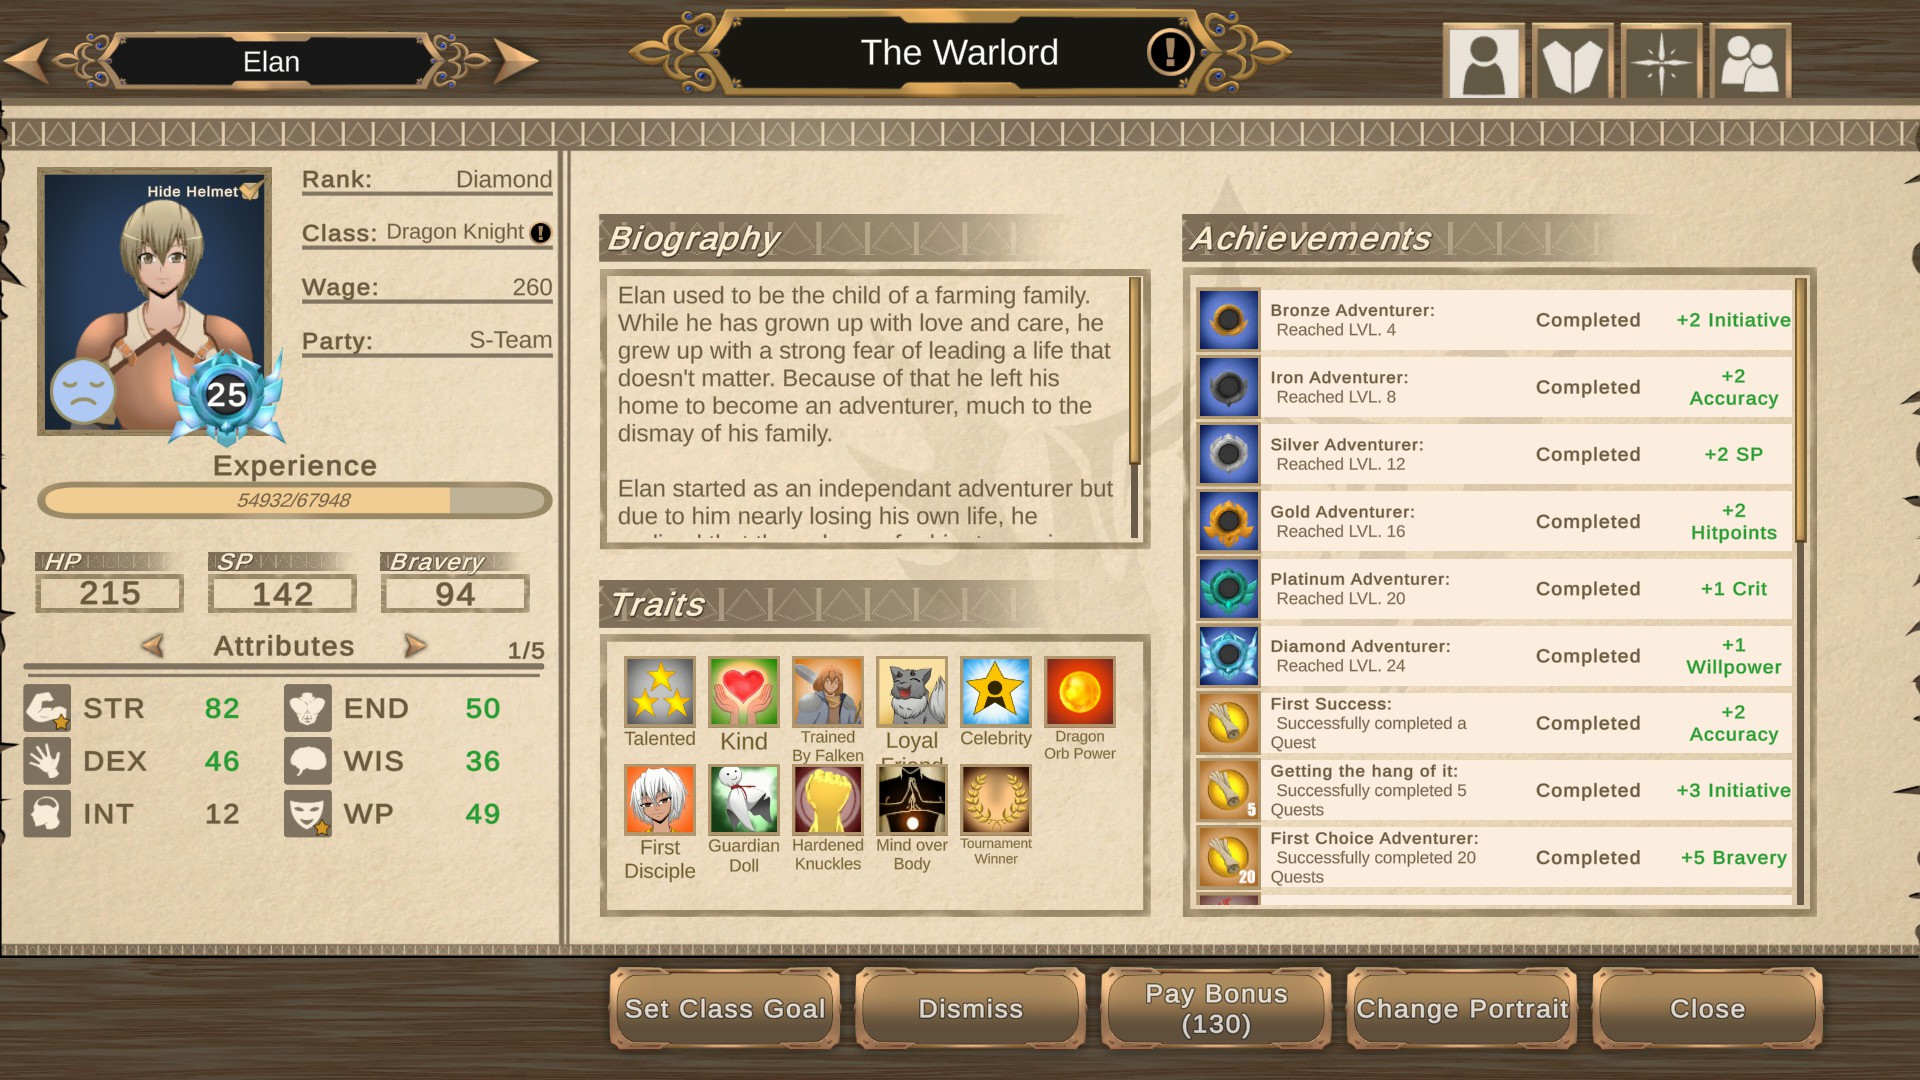
- ELAN from the "Lost Son" story quest (2-star difficulty) : follow the footsteps the best you can (it is a timed mission, walking too much will have him dead by the time you reach him) and come with a priest and/or a health potion in your inventory.
Elan is an absolute beast due to his unique stats skills
Best classes : Knight/Dragon Knight, Monk or Paladin

- Alissa : She will naturally come pretty early in your guild. Just let her take her time to make a decision and she will join you after "A village in Need" mission (3-star difficulty)
She is a A-Tier mage
Make sure you have her with you for the Bandit King quest later (she will request to come) to remove her negative trait
Best classes : Witch or a tanky Saint (or High-Mage)

- Daryl : You can convince him during "A village in need" to stay with you to defend the village (requires Elan or a WP-Check). Regardless of the skillcheck, he will join you some days after that mission.
He is pretty good but you can sometimes get better archers than him. His unique trait "Lone Wolf" can make him a tremendous forward frontliner though.
Best class : Ranger / Swordmaster

- Misasa : During the "Bandit King" Quest, you can convince her to join you to fight against the bandit king (Alissa will do that by default if she is in your party). She is a A/B-Tier rogue (S-Tier if you saved some personal training assignments for her) that will join the guild a few days after completing that mission.
She has a 7*-story quest to remove her "Mark of Belphegor" trait. In order to be able to complete it successfully, she must do this quest alongside at least 1 "Best Friend" or "Lover", and other members being at least "Friends".
Best class : Assassin then Reaper. Eventually ranger.

- Selene : She is a mouthful B-Tier priest encountered in the 5-star difficulty mission where you save Majika's son.
Best-class : Bishop (Save Saint for one of your A-Tier)


Team & relationship management :

Regarding relationships, you'll get random events at the hub that will increase or decrease relationships between adventurers (in addition to fights or quests that will also modify them). To help improve relationships :
  • Being in the same party (that you can unlock via a proposal) increases small "chit chat" relation bonuses
  • Be mindful of some traits that will not help ("boring" for instance, that clearly specifies it, or some sneakier ones like "tiny", as the character may get bullied)
  • Some other combo might help (like a "sadist" with a "loves pain", who will happen to have some "fun times" together *cough*)
  • As mentioned previously, you should have a dozen of lvl 1 lackeys to do the time-consuming low rewards assignments. You can also use them to randomly soak some relationship events and later sack the lackeys that got randomly hit by multiple negative ones. This will ultimately maintain a better average relationship value in the guild.

Lovers :
Any 2 adventurers who have >50 relationship have a small chance every night to become lovers. Their sexual orientation has to match. As per the .ini config file, it appears 90% of the random adventurers are straight, 5% bisexuals and 5% homosexuals.

Relationships have an impact on the bonus chain attack chance of your adventurers as well as on the chance of them dis/encouraging each others (applying various mal/bonus) :

Chain attacks :
Rivals or worse = +0%
Aquaintances = +5 %
Friends = +15%
Best Friends = +30%
Lovers = +50%
(Lovers (+50) with a "Born Leader" (+10) leader (+5) and the adequate team training (+10) can reach 75% chain attack chances !)

Note : Completing the 1st Ice Bride quest with 2 lovers grants them the "True Love" traits that sets the CA odds to 100% between them.

(Dis/)Encourage :
Nemesis = +10% (discourage)
Rival = +5% (discourage)
Friend = +5%
Best Friend = +10%
Lover = +25%
Party Building (Part IV - Classes Tierlist)
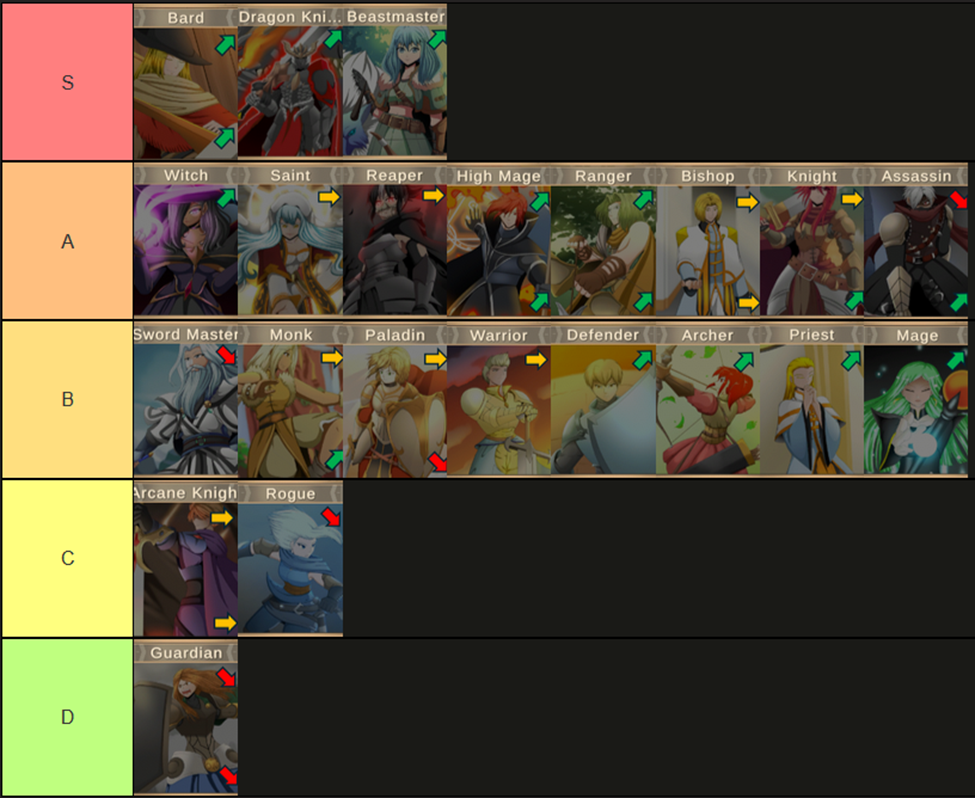
General comments :

The following Tierlist is a personal opinion based on multiple Ironman playthroughs including one at absolute custom max difficulty (see my 2nd Let’s Play Series). It is based on v1.50, although classes balance has not changed since v1.0.

Ranking and comparing classes is a tricky exercise, as it depends a lot on how far you are in the campaign, which title you combine them with, their current level (some classes take time before they shine), your playstyle, and especially your difficulty settings.

As a result, I humbly complement my ratings with the following indicators for how classes perform :
  • Base ranking is supposed to work for Hard or Very Hard difficulties
  • At the top right, how classes perform vs even higher difficulty settings
  • At the bottom right, how they perform later in the game (= at high level), except for T1 and T3 classes that are respectively not supposed to be used late or early game.
Also, As T1 and T3 classes are not meant to be compared the same way, I chose to apply the following rule :
  • T1 classes get a +1 rating (ie : C-rating becomes B-rating)
  • T2 classes are rated “as is”
  • T3 classes get a -1 rating penalty

As a result, if you find let’s say a T2-High Mage and a T3-Witch rated equally, that still means the Witch is better overall, and that the class upgrade roughly works as intended, as the Witch got a -1 penalty.

It is also worth noting that on very hard or above difficulty, since enemies have high accuracy and high damage (up to +50 and +100% respectively, and even more if you activated the doomclock), positioning becomes key and trying to kill enemies while staying out of their attack range (/counters) is key as well. Notably, this implies that :
  • Melee characters : they tend to be weaker in higher difficulty. Counter over counter attacks will have them killed and it is better to kill enemies while they are away without any possibility to attack to prevent One-shots (OS).
  • Dodge : Dodge builds tend to be weaker, as enemies have +Accuracy and will rarely miss.
    Moreover, if they happened to hit, being OS can be painful (no pun intended).

Tierlist results :


You can find my audio comments in the following video (that was done before any update resulting from comments here or in the said video) :


EDIT : About a week after this video/Tierlist, Dev updated Defender, Guardian and Paladins (see v1.53 update changelog), and later once again with v1.60. Those changes brought Guardians to a C rating, defender and paladins to a B+ rating.

Inputs welcome :-D !

Advanced Mechanics (Part I)
Damage, resistance and penetration :

For elemental and physical damage :

- pen (penetration) lowers res (resistance) but won’t make it go below 0
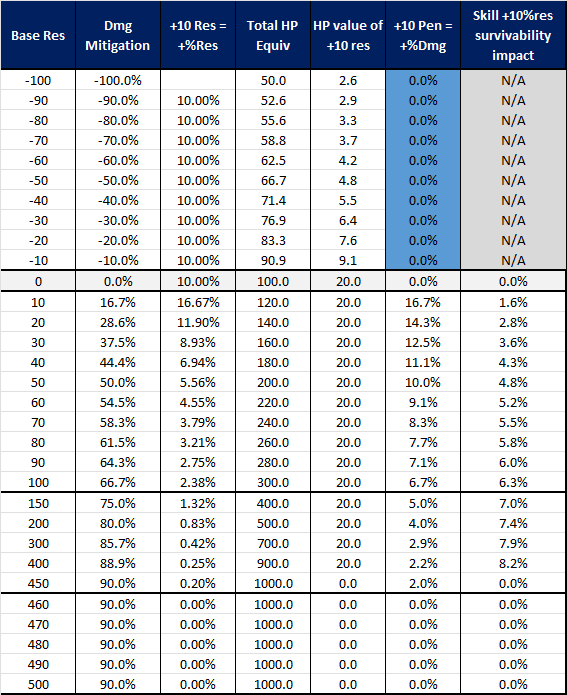
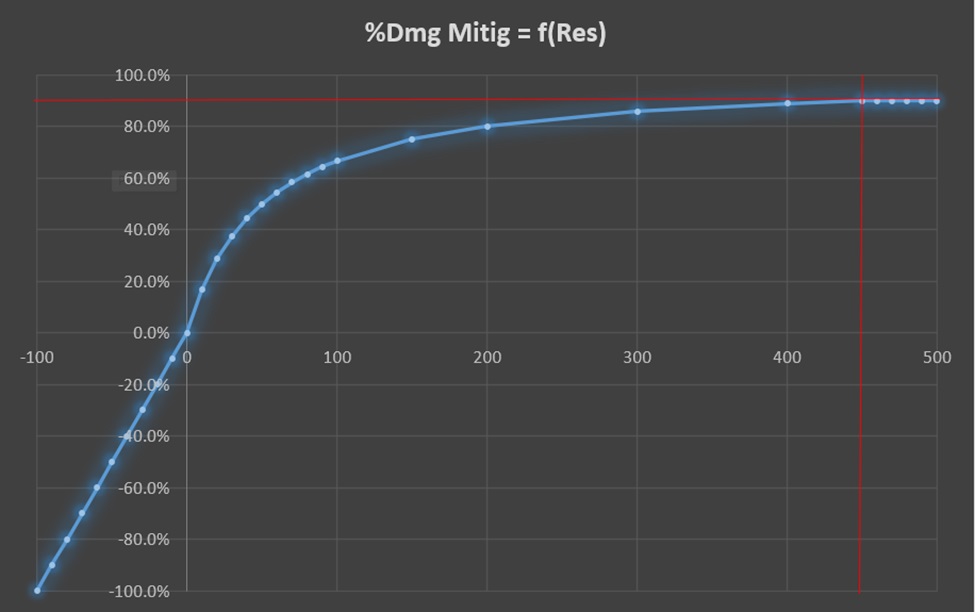
- if resistance > 0, then totaldamage = damage* (50/(50+resistance)), capped at 90% damage reduction (reached at res = 450)
- If resistance < 0, then totaldamage = damage*((100-resistance)/100)
This leads to the following table/graph and the subsequent key takeaways :

.

Key takeaways:

Having +10 res (and positive res) = having +20% BASE HP vs that damage-type
Having +10 Pen = making +2% dmg vs 400 res, +4% at 200, +7% at 100, +11% at 50 and +16.7% at 10 (0 below 0) ==> Having pen to bring res close to 0 is very powerful

As there is a 90% damage reduction hard cap, complete damage immunity can't be achieved with resistances. Some bosses however have skills that make them immune to one damage type that may even heal them.

Note 1 : Multiple DR are MULTIPLICATIVE. If you have a base DR of 20% (coming from an item or gems for instance) and 100 PHR, and someone hits you with a 100 base damage physical attack, you'll receive 100 * 33.3% (from 100 res) * 80% = 27 damage

Note 2 : "True damage" is unaffected by resistances

For ailments (like poison, bleed, or getting burned, staggered, etc...)

Resistances are in this case a flat reduction of the chance to get the debuff applied in the 1st place (and won’t lower any damage if it is applied). So if you have 50 poison resistance and face a 80% poison base attack, then you'll have a 30% chance to be poisoned. In those cases the debuff chance can be reduced to 0.

Initiative :

Character initiative dictates who plays first. To randomize a little bit, each turn a number between 1 and 10 is added to it (so order might vary between characters with close ini each turn)

Waiting on turn N halves your BASE initiative (not the d10 roll) on turn N+1. Rounded up
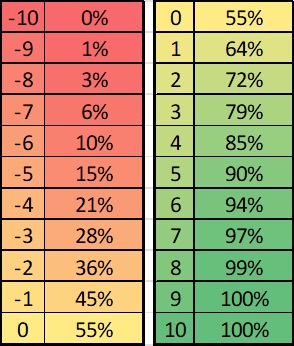
In case of a draw, dev stated that the adventurers would play 1st. This leads to the following odds table of playing 1st depending on your ini difference with some enemy :


Dodge and Block rolls :

Most skills can either be dodged or blocked. The skill accuracy will be lowered by that value. If the skill can be both dodged AND blocked, only the best value is rolled (from the defensive POV).

Critical hit chances

Looking at the battle log, you can see that when someone attacks, there is only 1 roll for both the hit and the crit (and not one for the hit, and if successful, one for the crit). This roll is then compared to BOTH the hit chance AND the crit chance (if any)

This MATHEMATICALLY means that for instance a 50% crit chance, with a 50% hit chance, will ALWAYS result in a crit if the hit connects (resulting actually from my perspective in a 100% crit chance in this scenario).

So technically a character has a dedicated "%crit per hit" of "%crit / %hit chance", and not just "%crit", making the display %crit chance higher than what it really is.

In a nutshell, this means that +X crit chances are a bit more rewarding than what it seems "a priori", but also that they have diminishing returns (ie : getting from 95 to 100 crit is almost useless as hitchance very rarely exceeds 95% for instance, although it grants extra reliability).

Also, be mindful of enemies who will have low hitchances against you, as should the hit connect, they will also likely crit, resulting in a "double nasty surprise"...

Superior Dodge ("Grazed")

Same thing than for Critical Hitchances, characters with the "superior dodge" skill (ie : that grants 1% chance per 2 points of dodge, capped at 50%, to only take 50% damage) will have more chances of having this skill to trigger than it looks, as there is also only 1 roll happening.

ie : if you have 100 dodge, you'll have 50% chance to take only 50% dmg. However, if the enemy has only 50% chance to hit you, you'll ALWAYS only take 50% dmg, making this skill extremely useful and much more likely to proc (in this case, guaranteed to proc). Beware as this is the same thing the other way around for enemies with that skill (Lephoz and swordman looking enemies mostly).

All about “Bravery” :

Bravery seems an abstract concept for many players, as it is used in many layers of the game. So I’ll try in this paragraph to clarify multiple aspects of any concepts including the “Bravery” keyword.

1°) Adventurers mood determines their “Bravery Points” (BP) on quest start (see values in the table near the beginning of this guide)

2°) BP can be consumed via “Bravery Actions” (red actions at the bottom right, like “Beyond Limit”), or via “Bravery Skills” from your skilltree (like “For the Guild !”). It is an extremely useful resource.

3°) All adventurers have a dedicated “Bravery” Value in their character sheet, mostly determined by their level and their WP. This Bravery value is important for
- Surviving Death rolls (see dedicated paragraph below)
- Gaining more BP via positive actions (BP gains are increased by 1 every 20 Bravery, unless specifically stated like with the “Sadist” trait)

4°) In combat, BP can :
- Decrease if you take a hit
- Increase if an enemy is killed
- Decrease or increase depending on relationships between adventurers (adv. Cheering up on another)
- Decrease or increase via various skills (ex : “Rally” for increase, or any bravery skill for decrease)

5°) Adventurers current BP value also grants them a “Bravery state” than can grant them the following (de)buffs at any time :


*Once an adventurer reaches 0 BP, he gets the "Shaken" debuff for the remainder of the quest (in addition to the Bravery state). This debuff reduces accuracy, dodge, block, PAB, MAB by -20%. In addition, BP cannot exceed 50 anymore, the adventurer may skip its turn, and the adventurer is guaranteed to die should his HP reach 0.

Note : The craftable Greatsword of the Champion grants "Courageous Heart" that doubles positive bravery states effects

Surviving Death Rolls (DR):

Whenever a character reaches 0 or below HP, he gets a DR at [50%+ Bravery% + (any modifier) - 20% per previous DR in that battle], unless he is suffering the "Shaken" status obtained once he reaches 0 BP, in which case the roll is guaranteed to fail. If the roll succeeds, he loses 10 BP and stays alive at only 20% HP
Advanced Mechanics (Part II)
Damage Rolls :

To put it simply : all damage values within the expected range are equally likely to be the final damage value (no gaussian distribution).

Note 1 : Crit multiplier is 150% +/- modifiers (was 200% before v1.20)

Note 2: Damage = Base damage * crit multiplier * damage multiplier.
Note 2.1 : Critical Mastery adds +50% to critical multiplier (hence crit multiplier becomes 200%, not 1.50*1.5 = 225%)
Note 2.2 : However Sneak attack is a dmg multipler (of 1.5). So if you CRIT a SNEAK attack of let's say 10 dmg, you'll do 10*(150%+50%)*(1.5) = 30 dmg, not 10*250% = 25

How to choose which gems to use

As mentioned above, Barrett will at some point be able to insert gems into sockets in armors and weapons of rarity rare or higher.
For weapons, there are 3 main types of gems to consider :
- +2 PAB, +3 Crit or +10 Phys penetration
- +2 MAB, +3 Crit or +10 Mag penetration

So how to choose ? In a nutshell :
- Pick Phys or Mag pen until you overall get to c.40 pen (unless you'll never attack)
- Then if your MAB or PAB <30, pick the +2 PAB or MAB
- Then pick +3 crit (unless your spells can't crit, in which case stick to +2 MAB for casters)

Positioning, height and surrounds

  • Every skill you cast more than 1 tile away from your target will suffer a (1-distance)*10% accuracy reduction.
  • Every enemy surrounding one of your adventurers will have him get a penalty of -20 Accuracy for any ranged attack (cumulative), unless the said adventurer has some dedicated skills to prevent it.
    Note : Zombie corpses count for surrounds. Be careful
  • Targeting a character that is surrounded will come with a +5 Accuracy bonus per surrounding character
  • Any height (dis)advantage will net you a 10 Accuracy increase/reduction per level of height. There is also an archer skill that grants +10% damage per level

Skillchecks :
You'll face many skillchecks throughout the game. Here is a table of your base odds to succeed a skillcheck depending on what is the minimum roll you need and how many attempts you can afford (note : a 1 will always be a critical failure and a 20 a critical success)


(De)buff order :

(De)buffs are applied from oldest to newest. For instance, enemies who have a regeneration skill by default will regenerate BEFORE they suffer any recently applied poison.


Miscellaneous :
  • Slow/Haste spells not only cancel each other but are applied in addition to the other (the 2nd cancels the 1st AND is applied)
  • "Block" skill lasts until the END of your character next turn, so if you want to make it last longer, wait next turn.
  • On the other hand, "Heroic Dodge" stops as soon as your character next turn STARTS. No point waiting or trying to abuse it during your own turn.
  • If you want to flee the battle, you can try to do so at each of your adv turn with a 50% success rate by consuming their turn. Note you can still ask an adventurer to roll for an escape EVEN THOUGH HE HAS 0AP left, so do not waste an opportunity to hide or move back before trying to flee with each adventurer. Keep in mind that even with 6 adventurers, there is still c.1.5% chance that you'll get to round 2...
  • "Shadowstep" and "Light Arrows" are flat additive mods, not x. (having both ends up doing 100% dmg, not 91%). Same for Steady Aim +30%
  • Steady Aim +30% bonus is still applied after shadowstep (ie : shadowstep is not considered a "movement") !
  • Weapon enhancements (blessings) and traps will also be dec/increased by +X% or-X% physical attacks (from shadowstep or light arrows). As a consequence, try to use traps AFTER shadowstep but BEFORE activating Light Arrows
  • "Iron Skin" trait for Elites is applied before elite status (so is *1.5). Applied skills go from right to left
  • "Mark Target" keeps enemies in bushes revealed
  • There is no height limitation on item uses (antidotes can be thrown 100m high)
  • Maniacs can be baited with an ally inside 2-range of a decoy. The 3-tiles aura of the decoy will taunt the maniac leaving him idle after he teleported (Same for any other enemy actually). Use this trick wisely to bait any melee enemies
Walkthrough / Missions progession (Part III)
Missions :

Complete Let's Play Series :

You can find any information on a specific quest on this playlist :
1st Let's Play Series Above Very Hard difficulty (up to +100%HP enemies, +100%HP damage and so on)
https://www.youtube.com/playlist?list=PLwtXBJSNRgmKMF4h6T45ORzA1i3iqja6-

You can use CTRL + F to search for a specific keyword (titles are usually explicits as to what quest you can find in each video).

Quest Name <=> Episode Number

Lost Son : 14
A village in need : 23
Duel vs Bai in Arena : 25
Necromancer Lair : 28
Rogue Friend (Luana) : 31
The Routed Army : 35
Troll hunting : 38
Scholarly Pursuit : 40
BANDIT KING Quest : 49
RECAP / Overexplain : 50
Road Slasher : 54
A simple Task and Storm Talon hunting : 55
Spider Queen : 57
Save Majika's Son : 59
Divine Hunt : 61
Snow White Ice Bride : 66
First Dragon : 69
ARENA (Falken's former team) : 72
EPIC Ultra demon fight with B-Team : 75
The 3 Disciples : 76/78/79
The wandering Swordman : 77
Burn the Witch : 80
The Reaper (From the Shadows) : 82
Flower of Eternity / Beastmaster : 83
Misasa's Soul Story Quest : 89
Astrid's First Love : 93
Father and Daughter (Nora and Eden) : 102
Sins of the Past (Zoldak) : 103
Siege defense : 105
VORATHAX : 124
Emperor : 125
Final Recap (Part 2 of Episode 50): 126

If you are looking for a crazier challenge, you can watch my 2nd playthrough on Nightmare difficulty (all sliders maxed out from day 1, with doomclock ON) :
https://www.youtube.com/watch?v=pbKZ-xxiIBw&list=PLwtXBJSNRgmIbKEbNl-a1pF0FdfRGvyc0&index=1

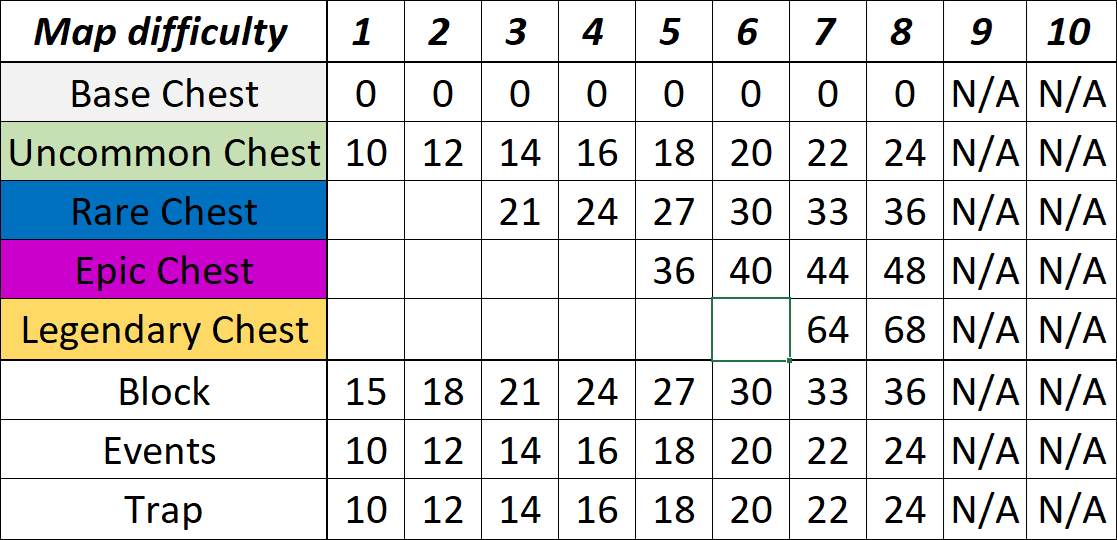
General skillcheck progression (for chests, traps, events…)


- Each chest has a rank (common / uncommon / rare / epic / Legendary). Uncommon and higher appear at map difficulty 1/3/5/7
- You're always guaranteed to get 1 item of the chest rarity, but can't get anything higher (same as vs Elite mobs)
- chest rank x map difficulty determines both the lock difficulty and the value of what's inside the chest. It will be filled until that value is reached
- You can't get armor/weapons in chests (except specific scripted chests). It will mostly be accessories and consumables

(note : some events have dedicated skillchecks)
Events and quest tips (Part I)
Note 1 : Events have a cooldown that makes you unable to encounter them twice in a row (if the 1st encounter was "successful"). This may result in rare occasions on some maps having no events because that map-type has all the possible events on cooldown.

Note 2 : Most events are repeatable (You can for instance have multiple arm wrestlers in your roster), and some are not (Ferdinand or Old grimoire for instance). Events flagged as [Unique] won't pop-up again after first COMPLETION (AFAIK). If you COMPLETE them twice, let me know in the comments, thanks.

Forest maps :

Enemies are mostly lightning based and/or with high dodge
Best events are :
  • Fountain : Grants either +1 WP to some adv. if you leave it alone (except for "Greedy" or "Selfish" characters who just lose BP instead) or +1 skillpoint for 1 adv if you consume it
  • The abandoned tent with a book gives "Veteran Knowledge" trait which gives +5 acc +2 crit +2 dodge to reader (INT check)
  • Excalibur (=Ferdinand) [Unique] 10 Str check for Uncommon Sword (+7 PHB). Upgradable.
  • Bandit Camp : Grants +1 Dex and some loot to 1 Adv if you sneak in, OR can lead to a fight for bigger loot.
  • Arm wrestling: requires someone with minimum 10 STR in party for any member to be able to compete (Or either someone with “Strong” or "Arrogants traits). Then gives +40 Str growth. An adv. who already has the trait will instead get +1 STR.
  • [Unique] Oathkeeper : A lady in a house will request your adventurer to do a few mundane tasks for here. If you accept, she will give you a rare unique "Sword + Shield" called Oathkeeper. Note : can be found on 1-star map (which is awesome) and failing some skillchecks still yield the reward, albeit with some HP and BP losses.
  • [Unique] Try to have a “Kind” person in the team (for pup event which will cripple your adventurer with a bad trait for a few days until it becomes an EXCELLENT trait). Not having a "Kind" adv may result in an injury while trying to save the injured wolf and may grant a suboptimal trait "hates animal" that instead grants +10% dmg vs Animal tag.
  • Successfully solving Me'can riddles can grant a +20 WIS growth trait ("Loves riddles"). Note that the event itself is [UNIQUE] but that you might be able to get the trait on multiple adventurers should you have different adv. answering the multiple riddles. Your adventurers are not guaranteed to get the trait for each successful answer.
  • Wisdom check to follow wolf footprints. Gives the adventurer +1 Wis for success and a dire wolf fight follows. Farmable for WIS growth early game

Cave :

Enemies are mostly vulnerable to Ice.
Starting at 4-star difficulty, cave maps will have gems to collect in abundance (to upgrade weapons and armors)
Events :
  • Basilisk egg event : Shady merchant shows you an egg. Call the BS (or pay 2000 gold), get an egg which will later become a very nice summonnable basilisk. The basilisk level will depend on the level of the adventurer carrying the basilisk.
  • Crystal eye [Unique] : Do the int check for 1 wisdom and then an endurance check for a new trait "Crystal Eye" that gives 5 accuracy, 2 dodge and the skill "Crystal Eye" which grants passive "True sight"
  • Saving people that try to hunt monster. It gives the one adventurer who convinces the people to go away +3SP (WP Check)
  • Alluring tent, which tempts the adventures to take rest. A successful WP check gives +1 Willpower to 1 adventurer

Old Fortress

Those maps grant a lot of valuable goods but few craftable resources (no wood or ore). Enemies are vulnerable to holy and fire, and usually ice and phys resistant

Best events :
  • Dog Rescue : +1 WP for some adventurers (seems random) + 2000xp + 20 BP if search and rescue dog OR +1 WP for 1 adv if scorecheck to make children leave or moraleloss if search and abort.
  • Dead bodies : Pilfer (rob) the bodies : some adv may get a perk for increased loot (random) and battle follows. Burn them ==> +8 morale for everyone.
  • Hooded figure/necromancer [Unique] : sneak attack (8 dex) = lose morale, get the book. Approach & burn = nothing. Approach & talk = get the book => Gives you one the best item of the game : the “Lost grimoire”, because it provides +30 Int growth (prior to v1.2). You can then cycle it between your adventurers before each level-up to get huge benefits . Since v.1.2 the Int growth has been reduced to +20 and is now a guildwide-buff, alongside a -5 mood debuff, so that you don't need to cycle the item anymore before level-ups. This guildwide (de)buffs will disappear if you toss the grimoire away
  • [UNIQUE] Strange Memories : You see a lifeless body on the floor. You can walk back and nothing happens or take a closer look. If you take a closer look : All adv get c.-10 morale and 1 Adv gets the "Strange memories" trait = +20 stats growth (except wisdom) ! The said adventurer may also become unavailable for a few days at some point in the playthrough.
  • Ghost seeking help : A ghost will try to talk with you. Successfully rolling a INT check will net you +1 WIS. There is also a similar event that will grant you a random ring.
  • Soldier rescue : You can save the last member of a party and have him to join you after a WP check. This soldier always has the "Survivor" trait, very high starting attributes and usually two talents
  • Vampire transformation [Unique] : gives a potion for vampirism trait: 10 str/dex grow, 30 lifesteal, 10 phy/ice res, -10 fire res. Claims to have other side effects that the vampire didn't disclose Apparently the drawback is that your character will trigger hub events where he'll bite other adventurers and reduces his relationship with them by -30 (Event screenshot, courtesy of "squabzilla") : https://gtm.steamproxy.vip/sharedfiles/filedetails/?id=3305330309. If you encounter other drawbacks, plz use the comment section, thanks
  • Dangerous Event : A statue with Rubis is discovered. If one of your adventurers is greedy, he'll immediately try to get them but break the statue and get a permanent bad trait that will make him fail 5% of his actions for the rest of the campaign. You can also just take the 2 rubies (2 x 1000 gold) and suffer a temporary debuff for the rest of the quest, or just leave (there may have an other outcome I haven't tried because playing on Ironman I try to avoid the permanent curse no matter what).


Events and quest tips (Part II)
Tundra :

Most enemies are ice and melee-based and have a lot of HP

Events :
  • Spirit warrior : An old Jotun wants you to duel him (see episode 106) : you can duel him and gain a trait that grants +10 STR/DEX/END growth. Repeating the event will grant a skillpoint, and chossing to have the whole party attack him (instead of dueling) will grant +2HP to each adventurer.
  • Blizzard : One of your adventurers spots a shadow during a blizzard. You can try to follow it and get that adv. to 1HP, then do a WP or End check. If you fail nothing happens and you stay at 1HP, if you succeed you can find a magnificent white wolf that will heal back the adv and grant him 50 Ice resistance and +20 End growth.
    There is also the option of not following the shadow. Choosing that option makes you go through the blizzard with an END check. You don't need to succeed it, those that fail only lose BP. That option gives EVERY adventurer 2 HP and 2 SP as well as 2500 exp
  • Jotun sword : A statue with an Epic Sword is spotted. You can leave it and nothing happens, or you can take the sword. There is then a chance of an ambush attack by Jotuns.
  • Jotun fight : you can meet two Jotun tribes fighting and observe from afar. Succeeding a Dex check lets you observe successfully an grants 10k xp to the party.

Ashenland :

There is a nice [UNIQUE] Ifrit that is looking for its future herald, and that will put to the test one of your adventurers and grant one of the following :
  • Best outcome 100 FIRE PENETRATION BONUS (requires a character with at least +40% Fire empowerement) OR
  • +1 AP and +2 move and Empower 3 turns while setting the character on fire (seems to require Hotblooded trait, TBC) - Thanks to @glenn3e OR
  • + 30 fire res and a skill called "Blazing Glory" : 80-120 fire damage to self and all units in a 1 tile range (seems to require "deathwish", thanks @jlogan314)

    The chosen character can also fail the trial (notably if <40% Fire empowerement and no related trait), resulting in a fight with many fire elementals. The event can reappear the next day if failed.

General events (cross-maps) :
  • Hunting questline : 4 Events (1 in each maptype, but Old Fortress) where a mysterious hunter sends you an arrow with a message asking you to kill some nearby beasts. Every event yields a nice unique accessory reward should the hunt be successful. Completing the 4 yields a steam achievement and you'll then receive nice legendary daggers (focused on bleed).
  • Moon ore : collect 3 moon ore and you'll be able to craft a nice unique legendary 2 handed-sword ideal for arcane knights. The 3 events can trigger a fight with cultists/demon.
  • Demon summoning : you can spot a pentagram on the ground and prevent cultists from summoning a demon. The demon will actually appear and you'll fight it as well (can be any of the 7 demon lord type). You'll then get an essence of greater demon item that can be used to craft a "skill potion". Beware as the summoned demon might be OP (see episode 75, The demon was level 25 with >2000HP on a 5-star difficulty quest)
  • Injured traveler : You find an injured traveler that requests help. Do a wisdom check to reveal that's a trap. Cultist fight follows.
  • Shady Priest : Help him 4 times and he will reward you with a legendary "shield + sword" ideal for paladins.

Scripted missions tips / Story quests :

General tip 1 :
Try to bring your A-team for any story mission. Rewards in terms of attributes/traits/etc... could otherwise be wasted on a D-Tier adventurer. This is especially true for the story mission where you meet Falken's former team.

General tip 2 :
Some story quests can be failed on purpose to benefit from a N+1th try and farm dedicated items/traits. For instance :
  • The Necromancer story quest can be failed to farm the "Forbidden Knowledge" trait multiple times
  • The Road slasher quest can be failed. It has a choice where you can go the left way. In there, you have to fight a Bird Bull Leader which ALWAYS drops Monster Blood Type S (STR). Since you never truly need to finish this quest, you can keep it forever as a way to farm strength potions.
  • The tournament quest can be failed as well after acquiring the "Hardened knuckles" (+20 physical penetration), the "Trickshooter" (-20% SP Cost Bow Skills) and the "Mind over Body" (reduces damage by 10%) trait, making all these three farmable. The "Tournament winner" trait can't be farmed that way.

- "Lost Son" : Keep a health potion or bring a priest + follow footsteps the best you can (it is a timed mission, if you walk too much to get to the lost son, he may die… and he is a S-Tier adventurer :-D !)
- Rogue mission : bring rare key (or 21 skillcheck) + bring mass melee with high HP (madmen ambush with mass TP&crit)
- Paladin/necromancer story mission : bring high INT mage for events and traps.
- "Lost Expedition" (Majika Son 5*) : It is a very easy map, with possibly 0 fight, but with a 36 int check that everyone can try in a row).
- "Ice bride story quest" : try to bring lovers for that mission. They'll then get a new trait "True Love" that will guarantee chain attack with their lover as well as granting +10 Death resist.
- "Find the witch in the forest (Lephoz)" is an ambush trap with elevation ==> Get “Teleport” or “Fly” on melee adventurer(s)
- "Witch mission" : doors sequence = RLLCRLC + bring a legendary key (1st legendary chest encountered)
- "Sins of the Past" (7*) : bring between 1 and 3 very high mobility melee or spellcasters to kill the phylacteries. You can also get the "Living for two" trait granting +3% dmg res and +3 WP (Requires "Saint" or "Crystal Eye" trait)

General Ironman Permadeath Tips
You are about to start an Ironman permadeath playthrough. Good, that is imho the way to go.
However, here are a few humble tips to consider :
  • Get some good sleep. Do not play too early in the morning or too late at night
  • Never play drunk. Ever.
  • You had a bad day at work ? Oh, too bad, RNG does not care...
  • You are overleveled and are doing a small time quest/battle : DO NOT GET OVERCONFIDENT ! Death usually comes when you lower your guard.
  • Death is part of the game, deal with it.
  • Take your time, think things through. There is no timer. If you are not fully satisfied with one move, take your time to see if there is not a better one.
  • Plan ahead. Do not stop your thinking process at move N or N+1 only. Plan further.
  • Do not take useless risks. Some fight appears too hard ? Flee !
  • Beware as fleeing is not guaranteed to succeed !
  • If you see an event you really want, camp and get BP before trying
  • Always, always check the skills of the enemies before you. Especially the Elites/Bosses. Do not be caught unprepared.
  • You are about to kill a nasty boss or elite that would otherwise be able to do your team a lot of damage next round ? Don't forget you may just have 95% to succeed. Over the course of a playthrough, you WILL miss multiple 95% in a row. Do not take any chances. Burn some BP to make it 100%.

If you haven't activated the doomclock custom setting :
  • You can take as much game time as you want to gather the best adventurers. Farm as much as you'd like.
  • Your party got wiped ? That's OK. Any unique trait can be reapplied (apart from "loyal friend" and some that were granted in already completed unique story quests), and you can rebuild any party to recover from your losses.

Also, if you intend to complete a Nightmare Run (or similar, aka above Very Hard), some humlble further tips :

  • Early on, get an adventurer with "Strong" trait in every forest mission, until someone reaches STR 10 (for Arm Wrestling Event)
  • Apply all personal trainings before getting to lvl 2
  • If you raised skillchecks difficulty, be sure to have at least :
    1. A high WP bard (to grant 30% of his WP to other teammates' skillchecks)
    2. Someone with very high WIS, or you'll walk into a LOT of undetected traps
    3. A high DEX ranger (or any other class) to open chests and remove traps (or you'll lose a lot of income)
  • Get full range team for "A village in need", or just one melee max
  • Aim for 3 couples in A-Team if possible for true love trait and other romance benefits (= statistically, 3 females, 3 males)
  • You can still try to flee at 0 AP
  • You can then even come back and fight the remaining (injured) mobs
  • Beware of Lephoz scouts who can use shadowstep to tp above a hidden blocking adventurer
  • Beware of Elder Lephoz that can cast chain lightning attack, so should the basilisk or any other summon come in range, they can target "safe" adventurers while bouncing on the summon first !
  • Careful about enemy beastmaster "Chase them" skill granting +1 move. Your adventurers might suddenly be targetable
  • The doomclock can bring new traits to enemies. Notably, the Ancient Tree Spirit from the "A simple task" story quest to collect flowers for Fran, on a loooong map with bushes originally designed to help you hide and move toward him hidden... will gain "True Sight" once he gets to level 20 (note : now all bosses get true sight at lvl 20) ! So be careful as he has he can get a mapwide ranged attack, twice per turn (see episode 85 of my second playthrough (Nightmare run)) ! Mine was able to do 62-94 dmg +bleeding *2 per turn with 270 accuracy...
  • Counters trigger from the new position if enemies were moved ( => DO NOT cast earth surge toward your caster for instance)
  • On the same note, using skills like "Slice and Dash" will trigger counters if you stop next to a melee enemy with counters (ie : only the tile you moved to is computed)
  • Do not pick "Counter" skills on your melee adv. On very high difficulties, your melee adventurers will lose any counter over counter fight
  • Icy tile traps won't fully stop the enemy if he slides. He can still land anywhere on the 8 tiles around the trap.

Feel free to comment if you think something needs to be (further) explained or if you have any insights to share (and thanks to the many people who contributed to this).
Feel free to point any mistake (sorry for broken English, I'm not native)
Feel free to leave a comment/reward/like also if you found this guide useful ;-).

Good luck, Guildmaster.

194 Comments
Pure_Poetry  [author] 15 Sep @ 2:24am 
Thanks, that's what I thought, it's random for each good answer :steamthumbsup:
LTA Wanky Doodle 14 Sep @ 5:05pm 
My apologies. I just re tried it again, and it seems it's a chance per riddle for each adventurer. I just happened to only get it on the last one 3 times.
LTA Wanky Doodle 14 Sep @ 4:55pm 
For the Forest "Like Riddles" trait, I quicksaved and had 3 different adventurers answer successfully. Only the last one got the trait.
Pure_Poetry  [author] 5 Sep @ 12:30am 
Thanks.
I've encountered that one, but it does not seem to be a very important event. If someone knows all the possible outcomes or if there's one that is critical, I'll add it for reference
sjpaladin 3 Sep @ 10:47am 
There is a tundra event where you can dig up a Jotun grave or not, with the suggestion it might be disrespectful, but that they are buried with their weapons. I dug up the grave and had to make a willpower check to fight off ghosts. Even with a success I lost a bunch of BP and then got a large number of gems (three types). Was it worth it? I guess, money is not that important when you are at the end of the game. If you were poor and had a decent WP, it would be worth it.
Pure_Poetry  [author] 18 Aug @ 6:20am 
Thanks ! Edited !
lvl 10 witch 17 Aug @ 8:36pm 
Great guide! Only thing I've noticed thats wrong is max chain attack chance (ignoring True Lovers) is 75% but you said it was 70%. 50% for being lovers, 5% for having a team leader, 10% for Born Leader, and 10% for the training. Screenshot showing 75%
Pure_Poetry  [author] 29 Jun @ 10:30am 
Can you share a screenshot of a non-NG+ game where you have 2 non-resurrected adventurers with that trait ? Tx
Jhoss 29 Jun @ 7:57am 
The crystal eye event is not unique!
Pure_Poetry  [author] 16 Jun @ 5:15am 
@Silver : AFAIK there is a random roll for each good answer. Each adventurer can get the trait (and sometimes more than 1 or none).

Also @All : guide content updated as per v1.6 changelog. Cheers