Frostrain

Frostrain

95 ratings
프로스트레인 추천 빌드 & 업적 공략 Frostrain Build Recommendation & Achievements Guide (Kor/Eng)
By 이카루스 | Icarus
해당 가이드는 프로스트레인의 초심자에게 간단하지만 강력한 빌드를 추천하고, 그 운용법과 이와 연계된 업적 가이드를 제공합니다.
This guide provides easy & strong build for Frostrain newcomer, how to use that build, and achievements guide using that build.
4
3
2
2
   
Award
Favorite
Favorited
Unfavorite
개요 Overview
이번 가이드는 제시해드리는 추천 빌드에 맞춰 진행됩니다.

해당 빌드 외에도 충분히 다른 빌드/방법으로 업적을 획득하실 수 있습니다

This guide goes along with the provided recommendated build.

This is not the only answer and you also can achieve most of the achievements with the other builds.
추천 빌드 Build Recommendation
이 빌드는 아카데미(파란색) + 총보급 관리국(백회색) 빌드입니다.

해당 빌드는 기관사가 누구냐에 관계없이 사용이 가능한 빌드지만, 필요한 카드를 초반부에 빠르게 뽑아내는 것이 핵심인 빌드이기에 카드 보급시에 선택지를 4장 지급하는 [조미미 기관사]를 기용할 것을 추천드립니다. 행복도가 추가로 필요하다는 페널티도 해당 빌드가 행복도를 급격히 펌핑하는 빌드라 전혀 문제될 것이 없습니다. 만약 해당 기관사가 아직 언락되지 않았다면 [임석대 기관사]를 기용하는 것도 가능하지만, [최순자 기관사]의 경우 카드 뽑기의 선택지가 2장밖에 주어지지 않아 운이 좋지 않은 이상 해당 빌드가 크게 성공하기는 힘듭니다(최종 목적지까지 생존하여 승리하기 자체는 어느정도 가능). 그럼에도 열차에 추가로 차량을 2대 더 장착 가능한게 해당 빌드에 큰 도움이 될 것 같아도 사실상 게임이 끝날 때까지 추가 2대의 효과에 이득을 볼 정도로 게임이 오래 지속되지 않습니다.

아카데미는 2장 이상일 때, 4 사이클 마다 아카데미 카드 1장이 주어지고, 4장 이상일 때, 1 사이클 마다 아카데미 카드 1장이 주어지는 팩션입니다. 총 4가지의 아카데미 차량이 풀 업그레이드(5층)가 되면 그 다음부터는 ‘상아탑’ 카드가 무제한 지급되는데, “상아탑”은 아카데미 팩션의 종결 카드로 풀 업그레이드 시 각 사이클 당 행복도를 무려 180이나 채워주는 차량이므로 사실상 해당 빌드의 핵심입니다.

여기에 총보급 관리국 팩션의 1단계 효과를 함께 적용시킵니다. 총보급 관리국은 사이클이 진행되는 시간을 줄여주는 효과로, 3장은 2초 감소, 6장은 7초를 감소시켜줍니다. 특히 "엔진관리국" 카드를 사용하여 아카데미 팩션의 "열차설계실"과의 동력 시설 시너지로 열차의 속도를 상승시킵니다. 단, 해당 빌드는 아카데미 팩션이 메인이므로 총보급 관리국 팩션은 초반에 나오는 3장만 사용합니다. 추후에 등급이 더 높은 카드가 나오면 교체해주셔도 무방하지만 실질적으로 그런 차량카드가 나오는 후반부에는 총보급 관리국 카드를 다른 카드로 대체하므로 해당 교체가 이루어질 경우는 드뭅니다.


This build is an academy (blue) + Central Supply bureau (white gray) build.

This build can be used regardless of who the conductor is, but the key is to quickly pull out the cards you need at the beginning, so I recommend using [Ms. Joe] who provides four options when distributing cards. The penalty of needing additional happiness is that the build pumps happiness rapidly, so there is no problem at all. If the conductor has not yet been unlocked, it is possible to hire [Mr. Lim], but in the case of [Mrs. Choi], it is difficult for the build to succeed much unless you are lucky because you are only given two options to draw a card (although it is possible to survive and win to the final destination with this build with a bit more luck than the other conductors). Nevertheless, even though the ability to mount two additional vehicles on the train seems to be of great help to the build, the game does not last long enough to benefit from the effect of the additional two until the game is over.

The academy faction has the ability(effect) of there are more than two Academy cars, one academy card is given every four cycles, and when there are four(the maximum), one academy card is given every cycle. If a total of four academy vehicles are fully upgraded (fifth floor), unlimited "Ivory Tower" cards will be given after that, and "Ivory Tower" is the end-game card of the Academy Faction, which is a vehicle that fills 180 happiness per cycle when fully upgraded, so it is actually the core of the build.

We will add to this, the step 1 effect of the Central Supply Bureau Faction. The Central Supply Bureau Faction reduces the cycle time, reducing the cycle by 2 seconds in level 1 effect(3 cars) and reducing the cycle by 7 seconds in level 2 effect(6 cars). Especially, using "Dept of Engine control" card may have synergy with "Train Design Room", the TrainPower facility of Academy faction brings higher speed of the train. However, the build is mainly about Academy Faction, so only level 1 effect of the Central Supply Bureau Faction are used. If you get a card with a higher rating in the future, you can replace it, but in the latter half of the game, the Central Supply Bureau Faction card is usually replaced by a different card, so it is rare for that to be replaced.
추천 경로 Route Recommendation


해당 루트는 최적 루트가 아닐 수 있으며 얼마든지 개선될 수 있습니다

This route may not be the best route and can be improved further on.
빌드 운용법: 초반부 Build up: Early Phase

해당 빌드의 핵심은 아카데미 팩션을 최대한 빠르게 발동시키는 데에 있습니다. 단, 아카데미 팩션의 “열차설계실” 카드는 골드 등급으로 게임 중반부부터 드랍이 되니 “인쇄소(언론 시설)”, “암호학실(오락 시설)”, “도서관(문화 시설)” 중 2장을 최대한 빠르게 열차에 장착 시켜서 1단계 효과라도 발동시켜야 합니다. 4 사이클이라는 다소 긴 시간이 걸림에도 주기적으로 들어오는 아카데미 카드의 나비효과는 의외로 든든하며, 특히 1단계 효과에서 운이 좋을 경우 드물게 “열차설계실”이 초반부에 지급되는 경우도 있어서, 이 경우에는 게임 승리는 물론, 일부 고난이도 업적을 달성하는데 아주 좋은 경우라고 할 수 있습니다. 이 경우에 해당한다면, 아카데미 팩션의 2단계 효과를 유지하면서 열차가 레벨업 할 때마다 총보급 관리국 카드를 추가하여 최종적으로 첫번째 효과(3장)를 발동 시켜주시면 됩니다.


아카데미 팩션의 1단계 효과가 발동 되었다면 다음으로 해야할 것은 총보급 관리국의 1단계 효과 발동시키기 입니다. 총보급 관리국에는 총 6종류의 차량 카드가 있으며 그 중 무엇을 기용해도 무방하지만 그 중 “엔진관리부(동력 시설)”는 되도록 기용하시기 바랍니다. 해당 차량 카드는 실버 등급이라 시작하자마자 등장할 가능성이 있는 카드임에도, 같은 동력 시설이자 아카데미 팩션 소속인 “열차설계실” 카드와 시너지를 일으켜 열차의 속도를 점진적으로 상승시켜주는 효과를 줍니다. 해당 차량은 게임 후반부에 총보급 관리국 팩션의 차량들을 제거하기 시작할 때도 최대한 나중에 빼주면 좋을 차량 카드이며, 특히 [광속열차]업적을 노린다면 필수적인 차량카드입니다.

만약 총보급 관리국 팩션의 1단계 효과를 빌드업하던 도중에 아카데미 팩션의 차량 카드 3종류를 획득했다고 해도 열차에는 2종류만 장착하고 총보급 관리국의 차량 카드 3종류를 열차에 장착하는데 주력하셔야 합니다. 단, 상기하였듯이 총보급 관리국 팩션의 1단계 효과를 발동시키기 전에 아카데미 팩션의 차량 카드 4종류가 조기에 모두 모였다면 그 즉시 총보급 관리국 팩션의 차량을 일부/전부 열차에서 제거하고 아카데미 팩션의 차량 카드를 모두 장착시켜서 2단계 효과를 발동하시기 바랍니다.

아카데미 팩션의 효과로 손에 들어오는 아카데미 카드들은 나오는 즉시 바로바로 업그레이드를 해주며 정리해주시면 됩니다. 카드 뽑기에서 나오는 카드들도 아카데미 팩션의 카드를 1순위로 뽑아주시고, 이미 보유하고 있는 종류의 총보급 관리국 팩션 카드들, 특히 “엔진관리부”를 우선적으로 뽑아주시는 것이 2순위(보유하고 있지 않은 종류의 총보급 관리국 카드는 해당 없습니다), 그마저도 없다면 가장 등급이 높은 카드를 뽑고 바로 폐기시켜 추가적인 보급을 노리시면 됩니다.


The heart of the build lies in invoking the Academy Faction as quickly as possible. However, since the "Train Design Room" cards of the Academy Faction are gold-rated and dropped from the middle of the game, two of the "Printing House", "Cryptography Lab" and "Library" should be loaded onto the train as quickly as possible to activate the level 1 effect. Despite taking a rather long four cycles, the periodic butterfly effect of the Academy card is surprisingly robust, especially when lucky with the level 1 effect, the "Train Design Room" is rarely given in the beginning, in which case some difficulties, as well as game victories, can be a great case for achieving high-level achievements. If this is the case, maintain the level 2 effect of the Academy Faction and add a Central Supply Bureau Faction cards each time the train levels up and eventually activate the first effect (3 cards).


when the level 1 effect of the Academy Faction has been activated, the next thing to do is to activate the level 1 effect of the Central Supply Bureau Faction. There are a total of six types of vehicle cards in the Central Supply Bureau Faction, any of which can be used, but the "Dept of Engine Control" should be used as much as possible. Although this vehicle card is of silver grade, it is possible to appear as soon as the game starts, but it creates a synergy effect with the "Train Design Room" card, which is the same TrainPower facility and part of the Academy Faction, to gradually increase the speed of the train. This vehicle card better be remain even when the other Central Supply Bureau Faction cards are removed, especially if you are aiming for a [Super Rapid Train] achievement.

Even if you have acquired three types of vehicle cards from the Academy Faction while building up the level 1 effect of the Central Supply Bureau Faction, you should focus on installing only two types of Academy faction vehicle cards on the train and three types of vehicle cards from the Central Supply Bureau Faction. However, if all four types of vehicle cards from the Academy Faction were gathered early before the level 1 effect of the Central Supply Bureau Faction was activated, immediately remove some or all of the vehicles from the Central Supply Bureau Faction from the train and install all of the vehicle cards from the Academy Facts to activate the level 2 effect.

If you get your hands on the Academy Faction, you can upgrade and organize all the Academy faction cards as soon as they come out. The top priority for the cards from the card draw is the one from the Academy Faction, and the second priority for the types of Central Supply Bureau Faction cards you already have, especially the "Dept of Engine Control" cards (not applicable to those you don't have), and if you don't have that, you can pick the highest-rated card and discard it immediately for further resupply.
빌드 운용법: 중반부 Build up: Mid Phase

아카데미 팩션과 총보급 관리국 팩션의 각 1단계 효과들이 발동되었다면 게임이 중반부로 접어들며 슬슬 아카데미 팩션의 레어 차량 카드인 “열차설계실”이 스폰될 것입니다. 해당 카드가 스폰되자마자 1순위로 획득하신 뒤 필요하다면 총보급 관리국 팩션의 차량들을 일부/전부 열차에서 제거하신 뒤 아카데미 팩션의 차량 카드들을 열차에 장착시켜 아카데미 팩션의 2단계 효과를 발동시킵니다.

해당 효과가 발동되며 본격적으로 열차의 사이즈와 행복도가 급격히 불어나기 시작합니다. 보급으로 들어오는 카드 뽑기의 우선순위는 여전하지만, 아카데미 팩션의 카드 다음으로 “중앙행정부” 카드를 우선해서 뽑아줍니다. 중앙행정부 카드는 당장 장착하지는 않지만 후반부에 총보급 관리국 팩션의 차량들을 열차에서 제거하면서 대신 장착시켜 사이클이 도는데 걸리는 시간을 다소 줄여주는 역할을 합니다.


If each of the level 1 effects of the Academy Faction and the Central Supply Bureau Faction were activated, the game would be in the middle of the game and the "Train Design Room", the rare car card of the Academy Faction, would be spawned. As soon as the card is spawned, you'll get the top pick, remove some/all of the Central Supply Bureau Faction cars from the train if necessary, and mount the Academy Faction vehicle cards on the train to activate the Academy Faction's level 2 effect.

The effect is then triggered and the size and happiness of the train begin to skyrocket. Although the priority of drawing cards remains, the "Executive Branch" card comes second only to the "Academy Faction cards. The Executive Branch card will not be used immediately, but rather reduces the cycle time after removing the cars from the Central Supply Bureau Faction cars in the latter part of the game.
빌드 운용법: 후반부 Build up: End Phase

아카데미 팩션의 차량들이 최대로 강화되고 “상아탑” 카드가 지급되기 시작하면 2장을 받은 즉시 “인쇄소” 차량을 2층짜리 “상아탑” 차량으로 교체해야 합니다. 5층짜리 인쇄소보다 2층짜리 상아탑이 더 많은 행복도를 주는 한편, 상아탑도 아카데미 팩션의 1종류로 판정되어 “암호학실”, “도서관”, “열차설계실”과 함께 “상아탑”이 열차에 장착되면 아카데미 팩션의 2단계 효과가 유지되기 때문입니다. 물론 인쇄소가 아니라 다른 아카데미 팩션 차량을 교체해도 효과는 유지되지만 아카데미 팩션 중 가장 낮은 행복도를 주는 인쇄소를 굳이 남겨둘 이유는 없습니다.
단, 나머지 3종류의 아카데미 팩션 차량은 그대로 남아있어야 합니다. 만약 추가로 교체가 이루어진다면 상아탑 차량을 2개 장착시켜도 결국 종류 자체는 3종류라 아카데미 팩션 2단계 효과가 해제되어버리기 때문입니다.
또한, “인쇄소”차량을 열차에서 제거했다고 해도 절대로 폐기해버리면 안됩니다. 그렇게 하면 더이상 아카데미 팩션 효과에서 나오는 카드가 상아탑으로 고정되지 않고, 인쇄소가 다시 지급되기 시작합니다. 이 경우 인쇄소를 다시 5층짜리 풀 업그레이드 시키기 전까지는 상아탑이 지급되지 않으니 폐기하지 않고 패에 계속 보유하고 있을 것을 절대로 유의해야 합니다.


첫 상아탑 차량이 5층을 달성했다면 그 뒤를 이어 계속해서 상아탑 차량을 열차에 추가해줍니다. 만약 공간이 부족하다면 그 시점에서는 게임이 후반부로 진입하였을 것이므로 총보급 관리국 팩션의 차량 3종을 제거해줍니다. 만약 “중앙행정부” 카드가 있다면 “중앙행정부”와 “상아탑”(몇층이건 상관 없습니다)을 열차에 장착해주시고, 중앙행정부 카드가 없다면 “엔진관리부”를 제외한 총보급 관리국 팩션 차량을 제거해나가며 상아탑 차량을 열차에 추가해줍니다. 차량 제거 후 공간이 남는다면 플레이어 재량에 따라 예를 들어 3층짜리&2층짜리 상아탑 차량을 연이어 추가하는 등 아직 업그레이드 중인 상아탑 차량을 연달아 추가해줘도 되지만 3층짜리 2개보다는 4층짜리 1개가 행복도를 더 주는 등 무조건 업그레이드 해주는 게 이득이니 이 점을 유의하시며 운용하시면 됩니다.

이 지점까지 왔다면 이미 게임을 끝냈거나 끝내기 직전일 것입니다. 보통 두번째 상아탑이 5층이 되기 전 게임이 끝나므로 마지막에 방심하여 열차의 노선을 정해주지 않아 엉뚱한 곳으로 가버리고 게임이 터지는 것만 주의해주시면 됩니다.

일부 업적을 위한 빌드 변형은 해당 업적란에서 따로 설명하겠습니다.


Once the Academy Faction cars have been strengthened to the maximum and the "Ivory Tower" cards have been supplied, the "Printing House" must be replaced with a two-story "Ivory Tower" car as soon as it is received. While the two-story Ivory Tower offers more happiness than the five-story Printing House, the Ivory Tower is also a type of Academy Faction and maintains the level 2 effect of the Academy Faction when the "Ivory Tower" along with the "Cryptography Room," "Library" and "Train Design Room" are installed on the train. Replacing other Academy Faction vehicle cards, of course, will work, but there is no reason to leave Printing House, giving the lowest happiness among Academy Facts.
However, the remaining three types of Academy Faction vehicles must remain intact. If additional replacements are made, even if two ivory tower vehicles are installed, there will be three types, which will eventually release the level 2 effect of Academy Faction.
Also, even if you remove a "Printing House" from the train, it should never be discarded. That way, the cards from the Academy Faction effect will no longer be fixed with the Ivory Tower, and the Printing House will start to be given again. In this case, you should be absolutely aware that the Ivory Tower will not be given out until you upgrade the Printing House to a full five-story level, so keep it in your hand without discarding it.


If the first ivory tower car has reached the fifth floor, we will continue to add ivory tower cars to the train. If there is not enough space, the game will be in the final phase, so remove all three of the cars from the Central Supply Bureau Faction. If you have a "Executive Branch" card, attach a "Executive Branch" and a "Ivory Tower" (no matter how many floors it is), and if you don't have one, you will remove Central Supply Bureau Faction vehicles, except the "Dept of Engine Control", and add an Ivory Tower car to the train. If there is any space left after the removal, you can add a series of Ivory Tower cars at the discretion of the player, which are still under upgrade, such as adding a series of three-story & two-story Ivory Tower cars, for example, but the benefit is that you upgrade unconditionally, such as one four-story one gives you more happiness than two three-story cars, so keep that in mind.

If you've come all the way to this point, you've already finished or are on the verge of finishing the game. Usually, the game ends before the second ivory tower reaches the fifth floor, so you can't be careless at the end and decide the line for the train to nowhere, so you just have to go to the wrong place and watch out for the game breaks down.

Build variants for some achievements will be discussed separately in the achievements section each.
빌드 운용법 요약 Summary of how to run this build
1. 아카데미 팩션 카드 중 2종을 모아 레벨 1 효과 발동
2. 총보급 관리국 팩션 카드 중 "엔진관리실"을 포함한 3장을 모아 레벨 1 효과 발동
3. 아카데미 팩션 카드 4종을 모아 레벨 2 효과 발동(필요시 총보급 관리국 팩션 카드 제거)
4. 아카데미 팩션 카드 전부 최종 업그레이드
5. 2층 이상 상아탑을 "인쇄실" 차량과 교체 장착
6. 상아탑을 계속 건설하며 최종 목적지에 도착


1. Collect two of the Academy Faction cards and attach to the train to activate the Level 1 effect
2. Collect three of the Central Supply Bureau Faction cards including "Dept of Engine Control" and attach to the train to activate the Level 1 effect
3. Collect four types of Academy Faction cards to activate the Level 2 effect (remove the Central Supply Bureau Faction Card if necessary)
4. Fully upgrade of all Academy Faction cards
5. Replace the "Printing Room" vehicle with the two-story or more "Ivory Tower" card
6. Continuing to build the Ivory Tower, reaching its final destination
업적 가이드 개요 Introduction of the Achievements Guide Part
해당 업적 가이드는 제시된 추천 빌드를 기반으로 작성되었습니다.

필자는 해당 빌드로 달성하였으나, 만약 달성에 어려움을 느낀다면

새로운 빌드를 사용해보시는 것을 추천드립니다.

이 경우 엔진의 자녀들 팩션 혹은 붉은 서리 기사단 팩션 빌드를 추천드립니다.


The achievement guide is based on the recommended build presented.

I achieved it with that build, but if you feel difficult to achieve it

I recommend you try the new build.

In this case, I recommend the Children of the Engine Faction or the Red Frost Templars Faction Build.
기초 업적 Basic Achievements

최후의 기관사
The Last Conductor

게임을 시작하세요.
Start the game.

게임 시작하면 됩니다.
Just start the game.


열차 수집가
Train Collector

카드 10장을 획득하세요.
Collect 10 Cards.

카드 10장 획득하면 됩니다.
Just draw 10 cards.


행복하지 않아서
Not Happy at All

행복도가 고갈되어 패배했습니다.
Run out of happiness points and lose.

패배하시면 됩니다.
Just lose the game.


잡일담당
Chores are on Me!

태스크 버블을 100회 터트리세요.
Pop task bubbles 100 times.

열차 운행 중 차량 하단에 뜨는 하얀색 팝업을 클릭해 터뜨리기를 100회 하시면 됩니다.
Click the white popup which spawns under the train cars 100 times.


엔진은 신이고 난 무적이야
The Engine is Invincible

엔진을 +9까지 개선하세요.
Improve the Engine to +9.

추천 빌드를 따라 생존하면서 거점들을 거쳐서 레벨업을 진행해주시면 됩니다.
굳이 게임에서 승리하지 않아도 레벨 10을 달성한 순간 달성됩니다.
Follow the recommended build and visit the nods.
Whether you win or not, once you hit the level 10, the achievement unlocks.
기관사 업적 Conductor Achievements

우리들의 일그러진 영웅
Our Twisted Hero

임석대로 승리하세요.
Win as Mr. Lim.

여담: 소설 "우리들의 일그러진 영웅"에서 나오는 주요 인물의 이름인 "엄석대"가 연상됩니다.
엄석대 또한 강렬한 카리스마로 반을 사로잡았던 인물이었습니다. 하지만 결국 몰락해버린 인물이었는데...?
Trivia: in korean version, his name is "Lim Seok-Dae", which is quite similar with the character "Um Seok-Dae" from the famous korean novel, "우리들의 일그러진 영웅(Our twisted hero)". He was also a person who captivated his classmates with strong and ice-cold charisma. But eventually he was fallen from his throne...?


할머니는 안단다
Granny Knows Best

최순자로 승리하세요.
Win as Mrs. Choi.

네, 할머니는 언제나 알고 계십니다. (우리 강생이 과일 한 조각 더 먹으련?)
Yes indeed, our grannies always know the best for us. (How about another piece of cookie, sweetie?)


쇼 앤 프루브
Show & Prove

조미미로 승리하세요.
Win as Ms.Joe.

순하게 생겼지만 알고보면 얼어붙은 세계의 지배자
Sweet look, but turns out that she's the ruler of the frozen world
방문 업적 Visitation Achievements

ILOVE
You Mainacs! You Froze It All!

얼어붙은 여신상을 방문하세요.
Visit the Fallen Goddess Landmark.

게임 중반부로 접어들면서 북/남 루트 중 선택해야 하는 지점에서 북쪽 루트를 선택 뒤 해당 방향으로 계속 진행하다 보면 얼어붙은 여신상 랜드마크가 나옵니다. 해당 랜드마크를 방문하면 됩니다.
At the mid phase of the game, when you decide the route of north or south, choose north route and keep going that way. You'll be able to find the Fallen Goddess landmark on the way north. Visit that landmark.


랩쳐는 아닙니다
Not Rapture!

해저도시를 방문하세요.
Visit the Underwater City Landmark.

게임 중반부로 접어들면서 북/남 루트 중 선택해야 하는 지점에서 남쪽 루트를 선택 뒤 해당 방향으로 계속 진행하다보면 해저도시 랜드마크가 나옵니다. 해당 랜드마크를 방문하면 됩니다.
여담으로, 랩쳐는 "바이오쇼크"라는 유명한 게임의 배경이 되는 수중도시 이름입니다.
At the mid phase of the game, when you decide the route of north or south, choose south route and keep going that way. You'll be able to find the Underwater City landmark on the way south. Visit that landmark.
Trivia: Rapture is the main background underwater city of the game "Bioshock".


만악의 근원
Where It All Started

연구소를 방문하세요.
Visit the Contaminated Lab Landmark.

게임 후반부, 가장 남동쪽(오른쪽 하단)에 위치해있습니다. 해당 랜드마크를 방문하면 됩니다.
At the end phase of the game, it locates at the far southeast(lower right). Visit that landmark.
팩션&시설 업적 Factions&Facilities Achievements

어린 양
Lamb of God

한 게임 내에서 열성을 100 획득하세요.
Earn 100 Zeal in one game.

엔진의 자녀들이라는 팩션의 효과를 활성화 시켜서 열성을 얻어내야 합니다. 아예 해당 팩션 빌드를 따라가는 것이 정석이나, 추천 빌드에 어느정도 익숙해져서 클리어에 무리가 없다면, 총보급 관리국 카드 대신 엔진의 자녀들 팩션 카드를 장착해가며 열성을 얻어내는 것 또한 가능합니다. 다만 2레벨 효과가 발동되지 않으면 열성이 모이는 양이 다소 불안정할 수 있으니 전반부에는 레벨 1 효과를 유지하다가 게임 후반부에 나오는 "선전소" 카드를 가져가서 레벨 2 효과를 완성하는 편이 좋습니다.

You need to get zeal by activating the effect of the Children of the Engine. It's the norm to keep up with the factual build, but if you're used to the recommended build and don't feel difficult to clear the game with it, you can also get zeal by installing the Children of Engine Faction Card instead of the Central supply Bureau Faction Card. However, if the level 2 effect is not activated, the amount of enthusiasm gathering can be somewhat unstable, so it is better to maintain the level 1 effect in the first half and then take the "Propaganda Station" card from the second half of the game to activate the level 2 effect.


오랜 친구
Old Foe

통신 시너지를 활성화 한 채로 승리하세요.
Win with communication synergy activated.

해당 빌드를 활용 중에, "통신소" 카드와 "퍼스트 룸" 카드를 보유하고 있다가 최종 목적지에 도착하기 직전 열차에 장착 시킨 뒤 게임에서 승리하면 쉽게 달성할 수 있습니다.
여담) 설국열차를 모티브로 한 게임인만큼 영화에서의 "꼬리칸"과 "머리칸"간의 통신을 오마주한 것이 보입니다. 해당 업적의 영문명인 Old Foe는 사실 "오랜 적"이라는 뜻입니다.

While using that build, you can easily achieve it by holding a "Communication Station" card and a "First Room" card, mounting it on the train just before you reach your final destination and winning the game.
Trivia) Since this game has the motive from the movie "Snow Piercer", this is the homage of the communication between "Tail car" and "Head car". The korean name of this achievement is "오랜 친구", which actually means "Old Friend".


도파민 중독
You Make Your Own Luck

오락 시너지 2레벨을 활성화 한 채로 승리하세요.
Win with level 2 entertainment synergy activated.

해당 빌드를 활용 중에, 오락 시설 카드를 보유하고 있다가 최종 목적지에 도착하기 직전 열차에 장착 시킨 뒤 게임에서 승리하면 쉽게 달성할 수 있습니다. 하지만 5장의 카드가 필요하므로 패에 자리가 부족해 원래 열차에 장착해야 할 총보급 관리국 카드들을 포기하고 그 자리에 오락 시설들을 일부 장착한 채로 진행해야 할 경우가 생길 수 있습니다.

While using that build, you can easily achieve it by holding an Entertainment Facility cards and placing it on the train just before you reach your final destination and winning the game. However, because of you need five cards, you may have to abandon the Central supply Bureau Faction cards that were originally fitted to the train and proceed with some Entertainment facility cards in place through the game.


위대한 탐험가
The Great Explorer

탐험가연맹 시너지를 활성화하고 36개 지역을 방문하세요.
Activate the Explorer's Guild synergy and visit 36 nodes.

해당 빌드를 활용 중에, 탐험가연맹 카드 총 3종을 최대한 빠르게 총보급 관리국 자리에 채워넣고 열차를 운행해야 합니다. 탐험가연맹 효과가 발동되어야 거점 방문 카운트가 진행되며, 만약 이 과정이 늦어서 최종 목적지까지 거점이 부족하다면 승리를 포기하고 다른 거점으로 가는 식으로 달성도 가능합니다. 해당 업적은 방문 거점 카운트가 36이 되는 순간 달성됩니다.

While using this build, you should fill your position with a total of three Explorer's guild Faction cards as quickly as possible. Only when the Explorer's Guild effect is activated will the nod visit count be carried out, and if the process is slow and you lack nods to your final destination, you can give up your victory and go to another nod. This achievement is achieved as soon as the base visit count reaches 36.


바벨탑
Tower of Babel

상아탑을 5성까지 강화하세요.
Upgrade the Ivory Tower to 5 stars.

해당 빌드를 사용하다보면 자연스럽게 획득 가능합니다.
Using this build may unlock this achievement naturally.
생존&승리조건 업적 Survive&Victory Condition Achievements

광속열차
Super Rapid Train

36일 이내에 승리하세요.
Win the game within 36 days.

해당 빌드를 사용하되, 추천 루트 중 [광속열차]용 루트를 따라 (종류 상관 없이) 동력 시설 카드를 하나 더 추가하여 운용합니다. 동력 시설 카드를 업그레이드 할 필요는 없으며 동력 시설 레벨 2 효과만 유지하면 어렵지 않게 달성할 수 있습니다.

Use this build, but (Regardless of type) add one more TrainPower Facility card along the [Super Rapid Train] route among the recommended routes. There is no need to upgrade the TrainPower Facility cards and it is not difficult to achieve by maintaining the TrainPower Level 2 effect.


-4444

45일차를 맞이하세요.
Reach Day 45.


-6666

49일차를 맞이하세요.
Reach Day 49.

이 두 업적, 특히 [-6666]은 해당 빌드로 달성하려면 다소 운이 따라줘야합니다. 엔진의 자녀들 / 붉은서리 기사단 팩션 빌드를 사용할 경우 보다 수월하게 달성이 가능하지만 그럼에도 해당 빌드에 익숙하시다면 마냥 불가능한 업적도 아닙니다.
아카데미 팩션의 레벨 2 효과가 조기에 발동되어 최대한 많은 양의 행복도를 쌓아놔야 합니다.


이 경우 눈폭풍을 피해 최종 목적지 직전의 빨간 네모 구역에서 버티다가 맵이 완전히 눈폭풍에 잠식되었을 때 최대한 상아탑을 올리며 버티면 됩니다. 승리하지 않아도 달성 가능하며, 행복도가 0이 되었어도 일정기간의 패배 유예기간 동안 49일차에 들어서면 달성 가능합니다.(49일이 시작하자마자 패배하는 경우 포함)

These two achievements, especially [-66666], need some luck to be achieved with this build. It's easier to achieve with the Children of the Engine / Red Frost Templars Faction build, but if you're used to this build, it's not an impossible feat.
The level 2 effect of the Academy Facts should be activated early to build up as much happiness as possible.


In this case, you can stay in the red square area just before your final destination to avoid the snowstorm, and when the map is completely encroached by the snowstorm, you can hold on to the ivory tower as much as possible. It can be achieved without winning, and even if the happiness level is zero, it can be achieved by entering day 49 of the defeat grace period for a certain period. (Including when you lose as soon as day 49 begins)


쾌락열차
Happy Train

행복도를 2만 이상 보유한 채로 승리하세요.
Win the game with more than 20,000 happiness points.

해당 빌드가 조기에 완성되었을 경우 너무 지체하지 않고 바로 최종 목적지로 향하면 쉽게 달성 가능합니다.
If that build is completed early, it's easy to achieve by heading straight to your final destination without too much delay.
만약 이 가이드가 유용했다면 If this guide was helpful
만약 이 가이드가 유용했다면 유튜브 채널 방문 한번 부탁드립니다.

감사합니다.

한국어: https://www.youtube.com/channel/UCzwA2ECXptF5MsqXYUtUf9g

영어: https://www.youtube.com/channel/UCZgQaoJB7gTLID8hBJLx3PQ


If this guide was helpful stop by this youtube channel.

Thank you.

Korean: https://www.youtube.com/channel/UCzwA2ECXptF5MsqXYUtUf9g

English: https://www.youtube.com/channel/UCZgQaoJB7gTLID8hBJLx3PQ

15 Comments
이카루스 | Icarus  [author] 17 Aug @ 7:18am 
@Queenofdragons6
Children of the Engine Faction is based on Zeal counts, which is doing nothing while it's alone, but when you attach Tier 4 car "Propaganda Station", it'll produce happiness based on your zeal counts.

Red Frost Templars Faction is based on training stats, which is also doing nothing alone, but with lvl 1 synergy (3 cars), it will convert all the training stats into happiness for every 5 cycles.

However, I never played with these factions so that I cannot suggest you specific build for it. Apologies.
Queenofdragons6 17 Aug @ 12:38am 
Very nice.

"the Children of the Engine Faction or the Red Frost Templars Faction Build."
What build is that?
WinnerOfLife 23 Nov, 2024 @ 11:00pm 
오 1트만에 깨벌임...
Konsterter 6 Oct, 2024 @ 9:22am 
> 36 days is actually impossible

Tried it, everything works OK for me.

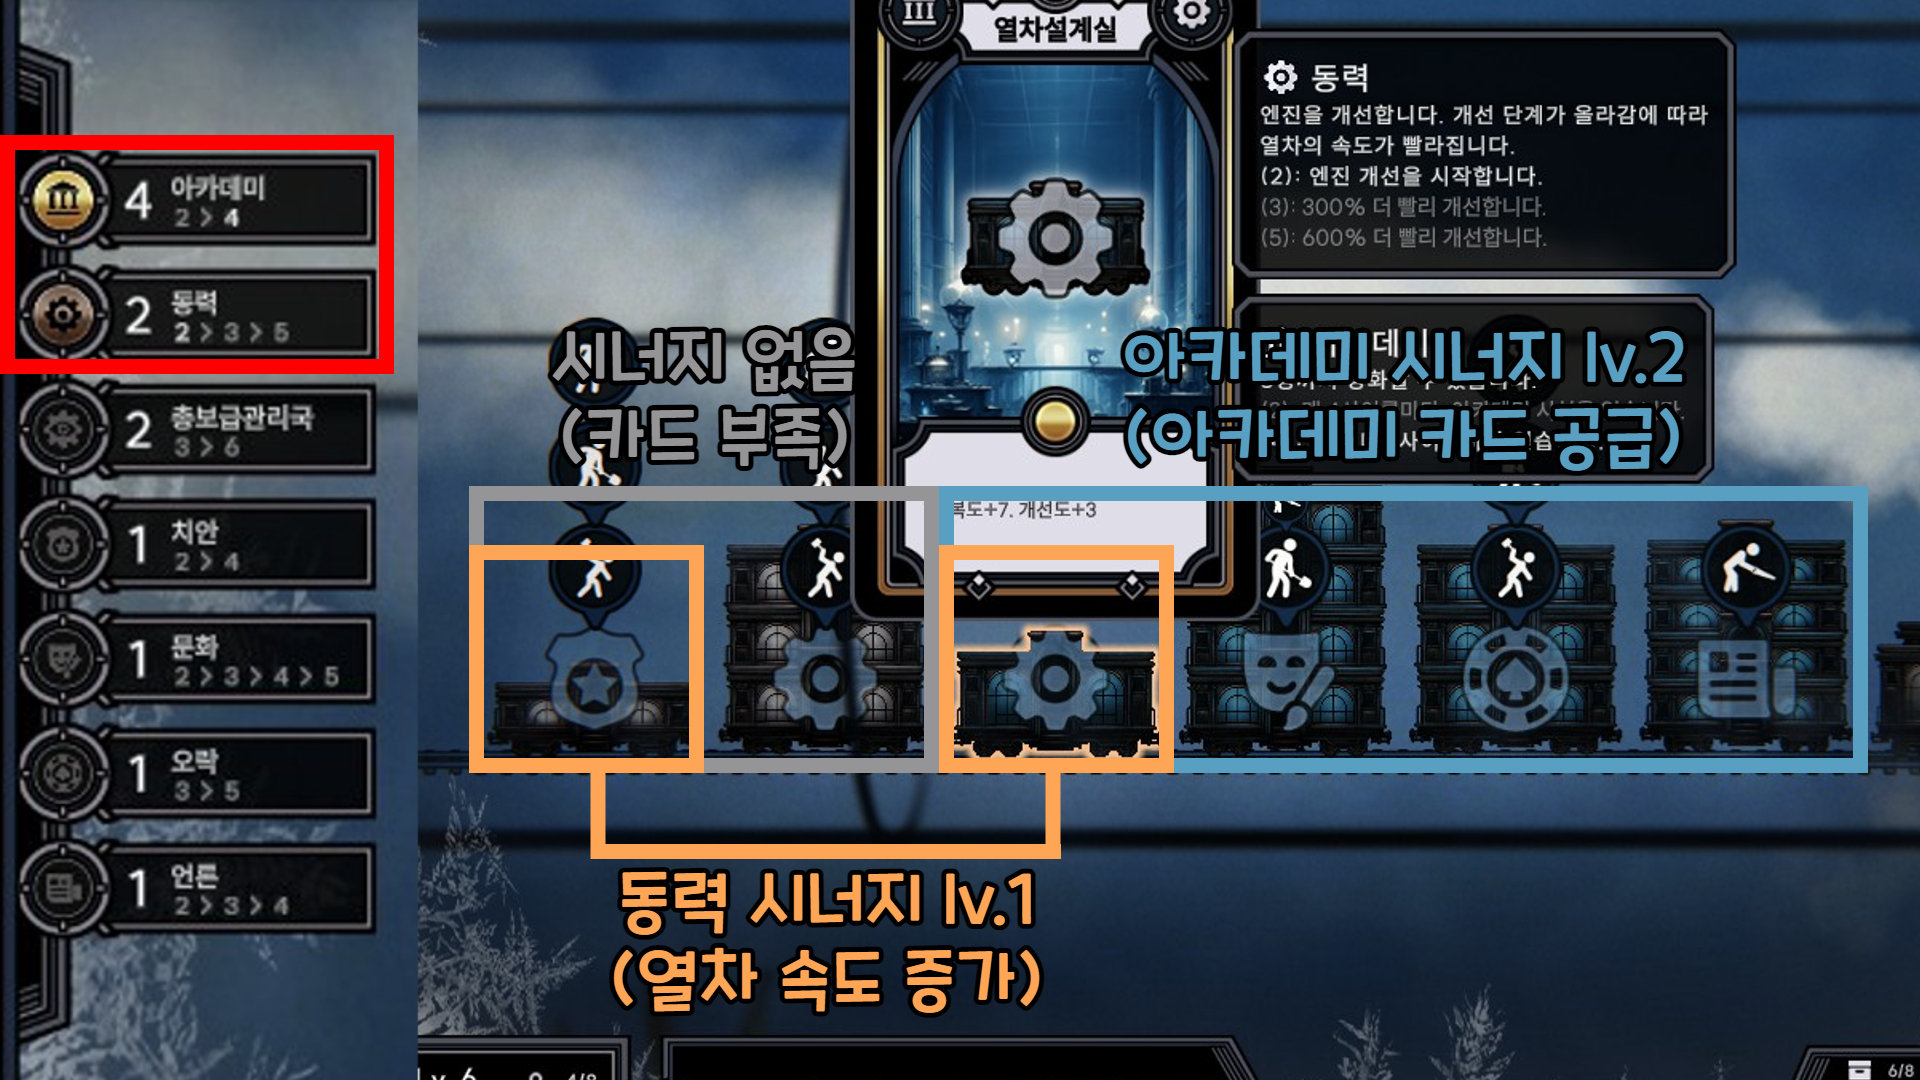
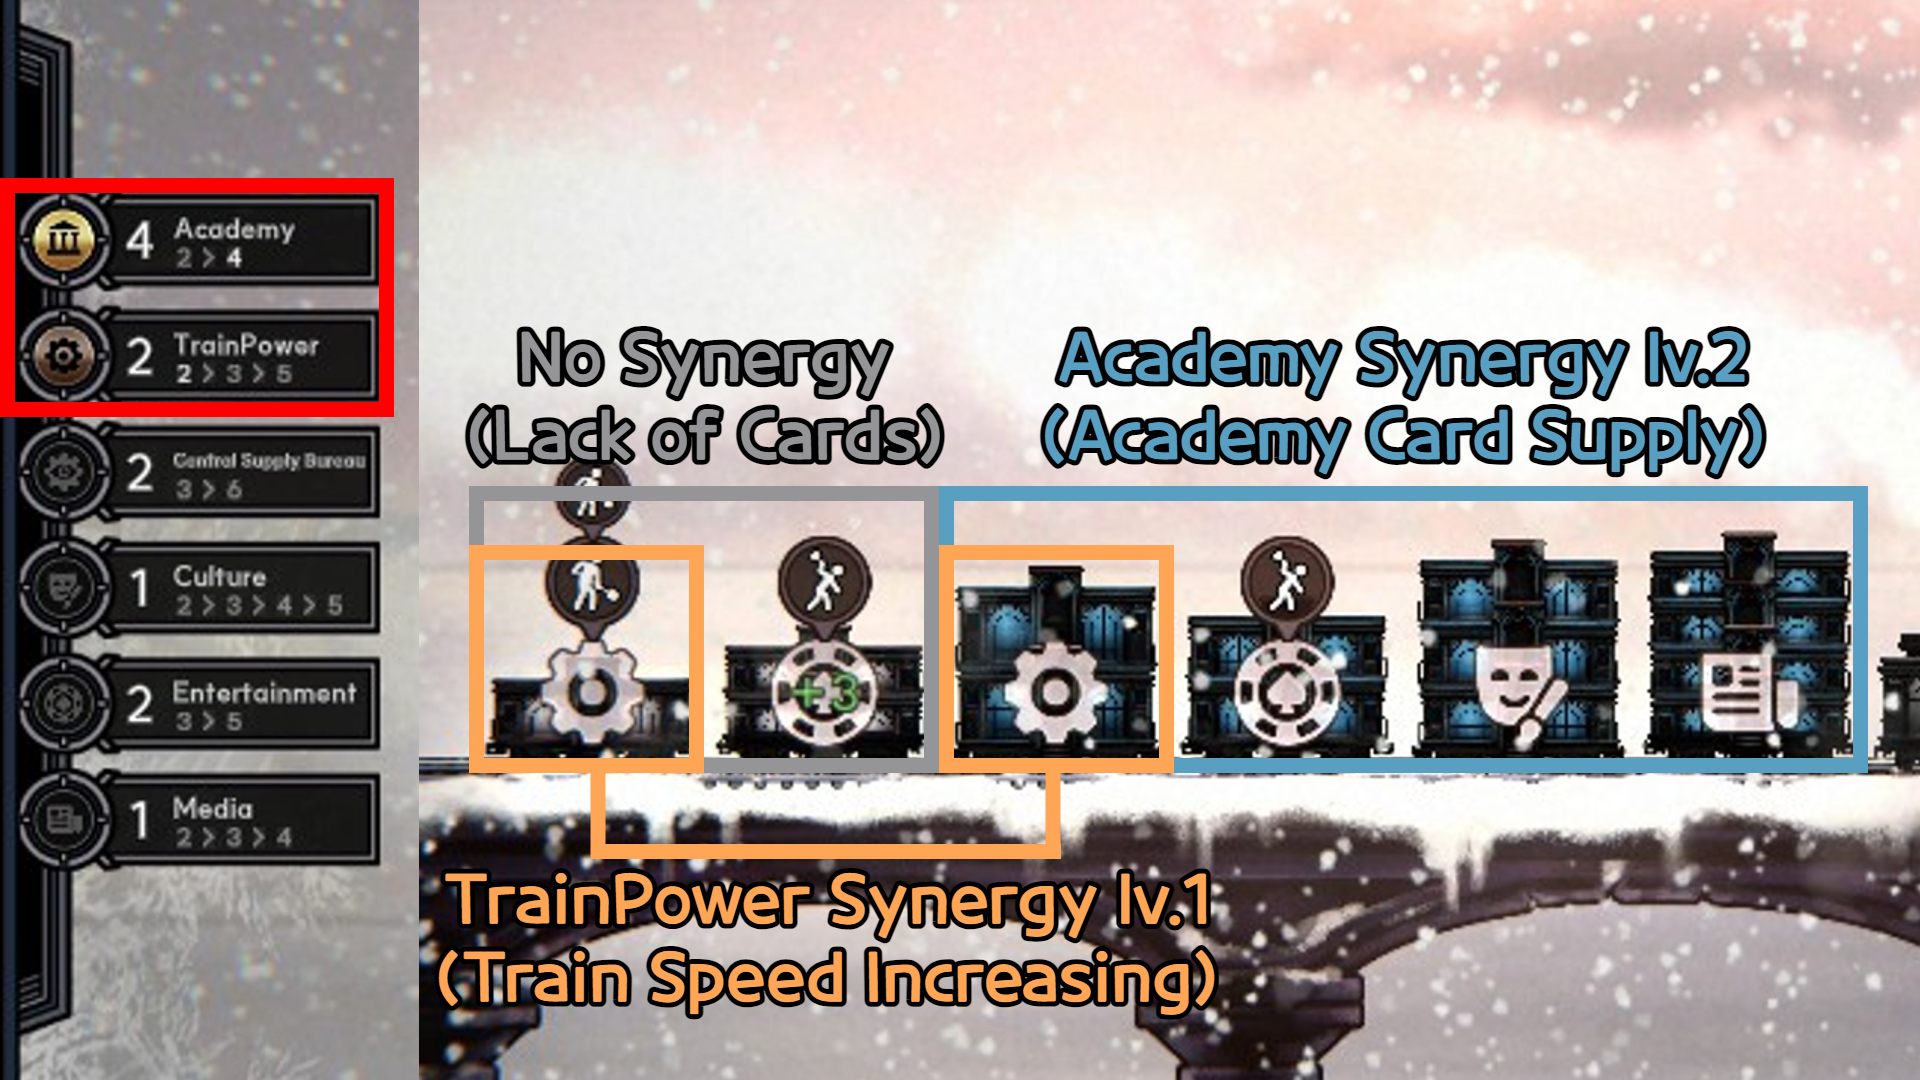
You should stack blue trains till you get 4 ones, then upgrade engine. Everything works.
Fvoarin 7 Jul, 2024 @ 11:37am 
36 days is actually impossible, I have every single other achievement apart from that one. Even with following this guide perfectly for that one. Has something changed in how the game works? Cause by the end I only have 7 slots available and the happiness production is nowhere near enough
210508 21 Jun, 2024 @ 11:42am 
공략잘봤습니다.
chengcy 25 Apr, 2024 @ 6:24pm 
2. The difficult achievement for me was The Great Explorer. It requires luck to get the explorer cards early and to survive late game using these weak cards. I found the more stable way is to use the granny conductor so that we can still have academy build while activating the explorer synergy. The first underwater city is where we can realistically get the gold explorer card, tier 3 cards don't really spawn before that. If I don't get the gold explorer and complete the build at the first underwater city, I reset.
chengcy 25 Apr, 2024 @ 6:24pm 
Good guide, the map and recommended route is very useful.

Here are some of my own suggestions:

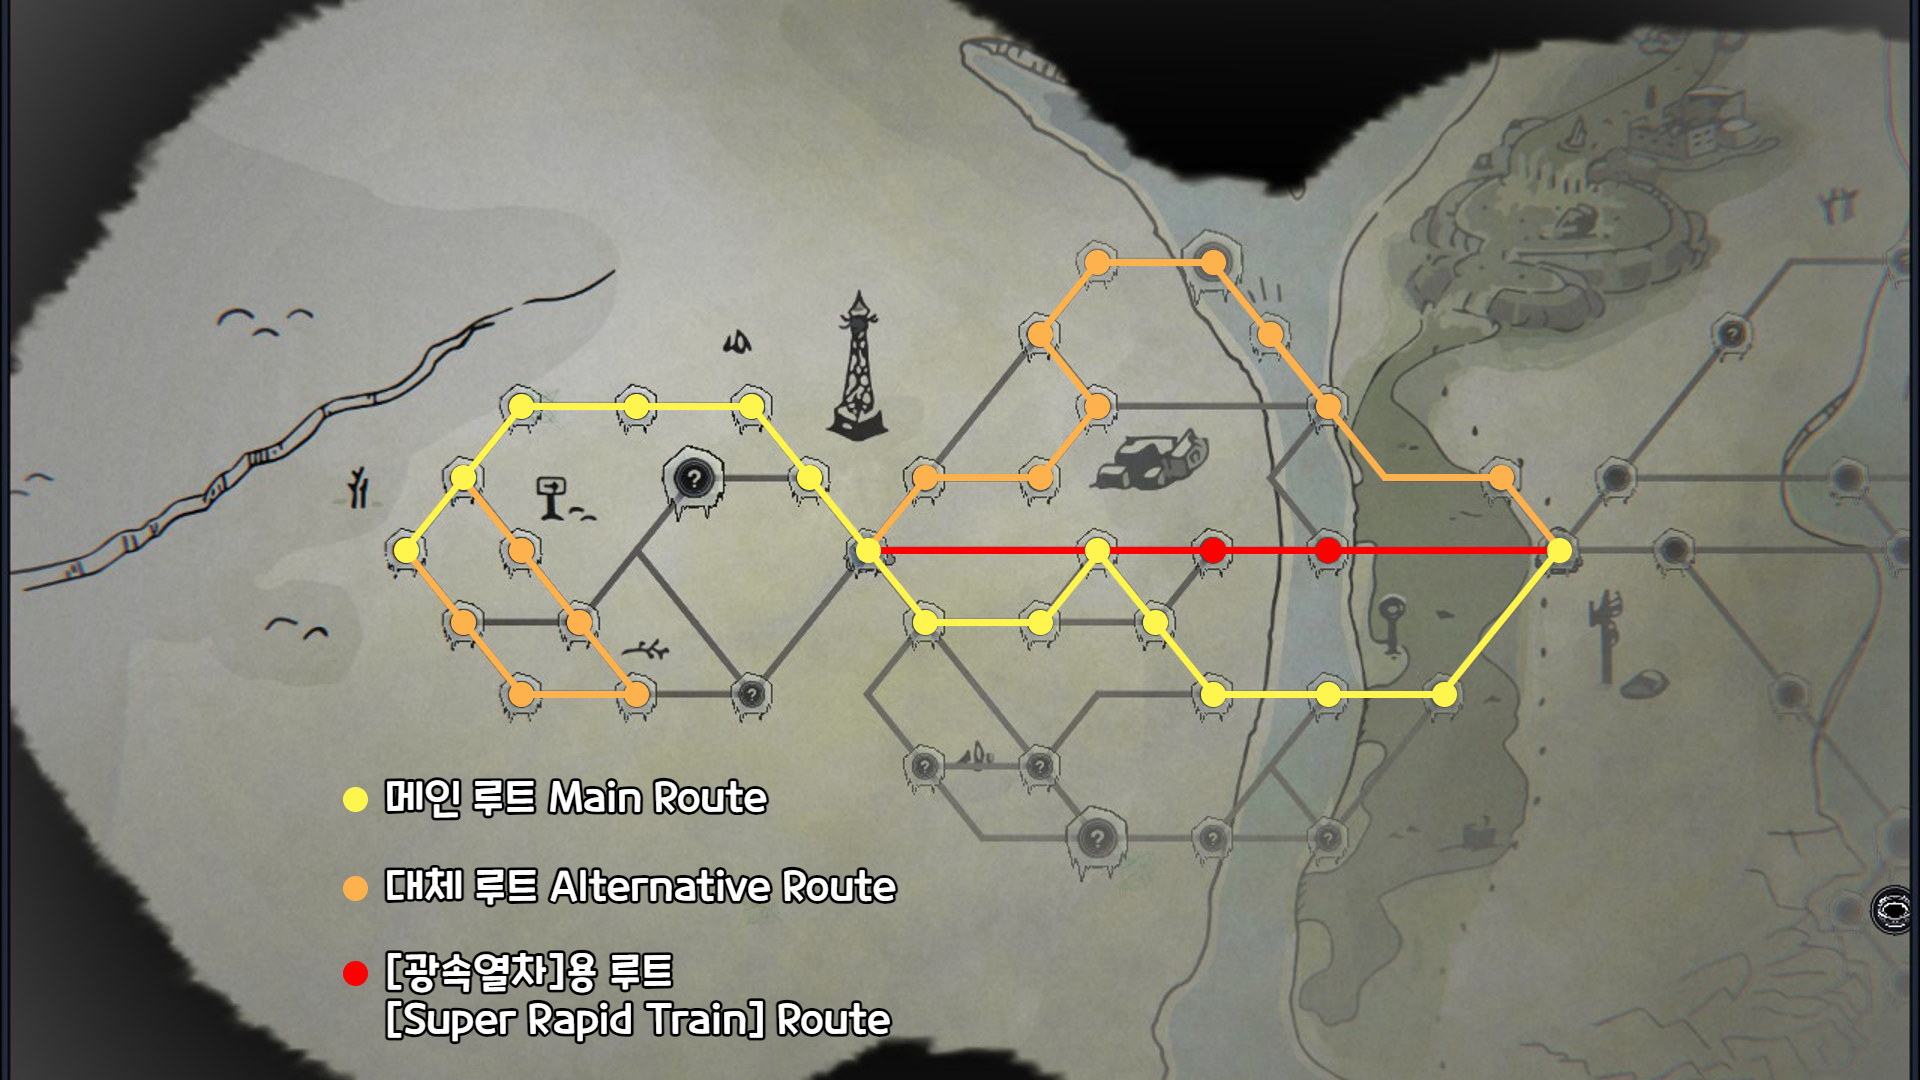
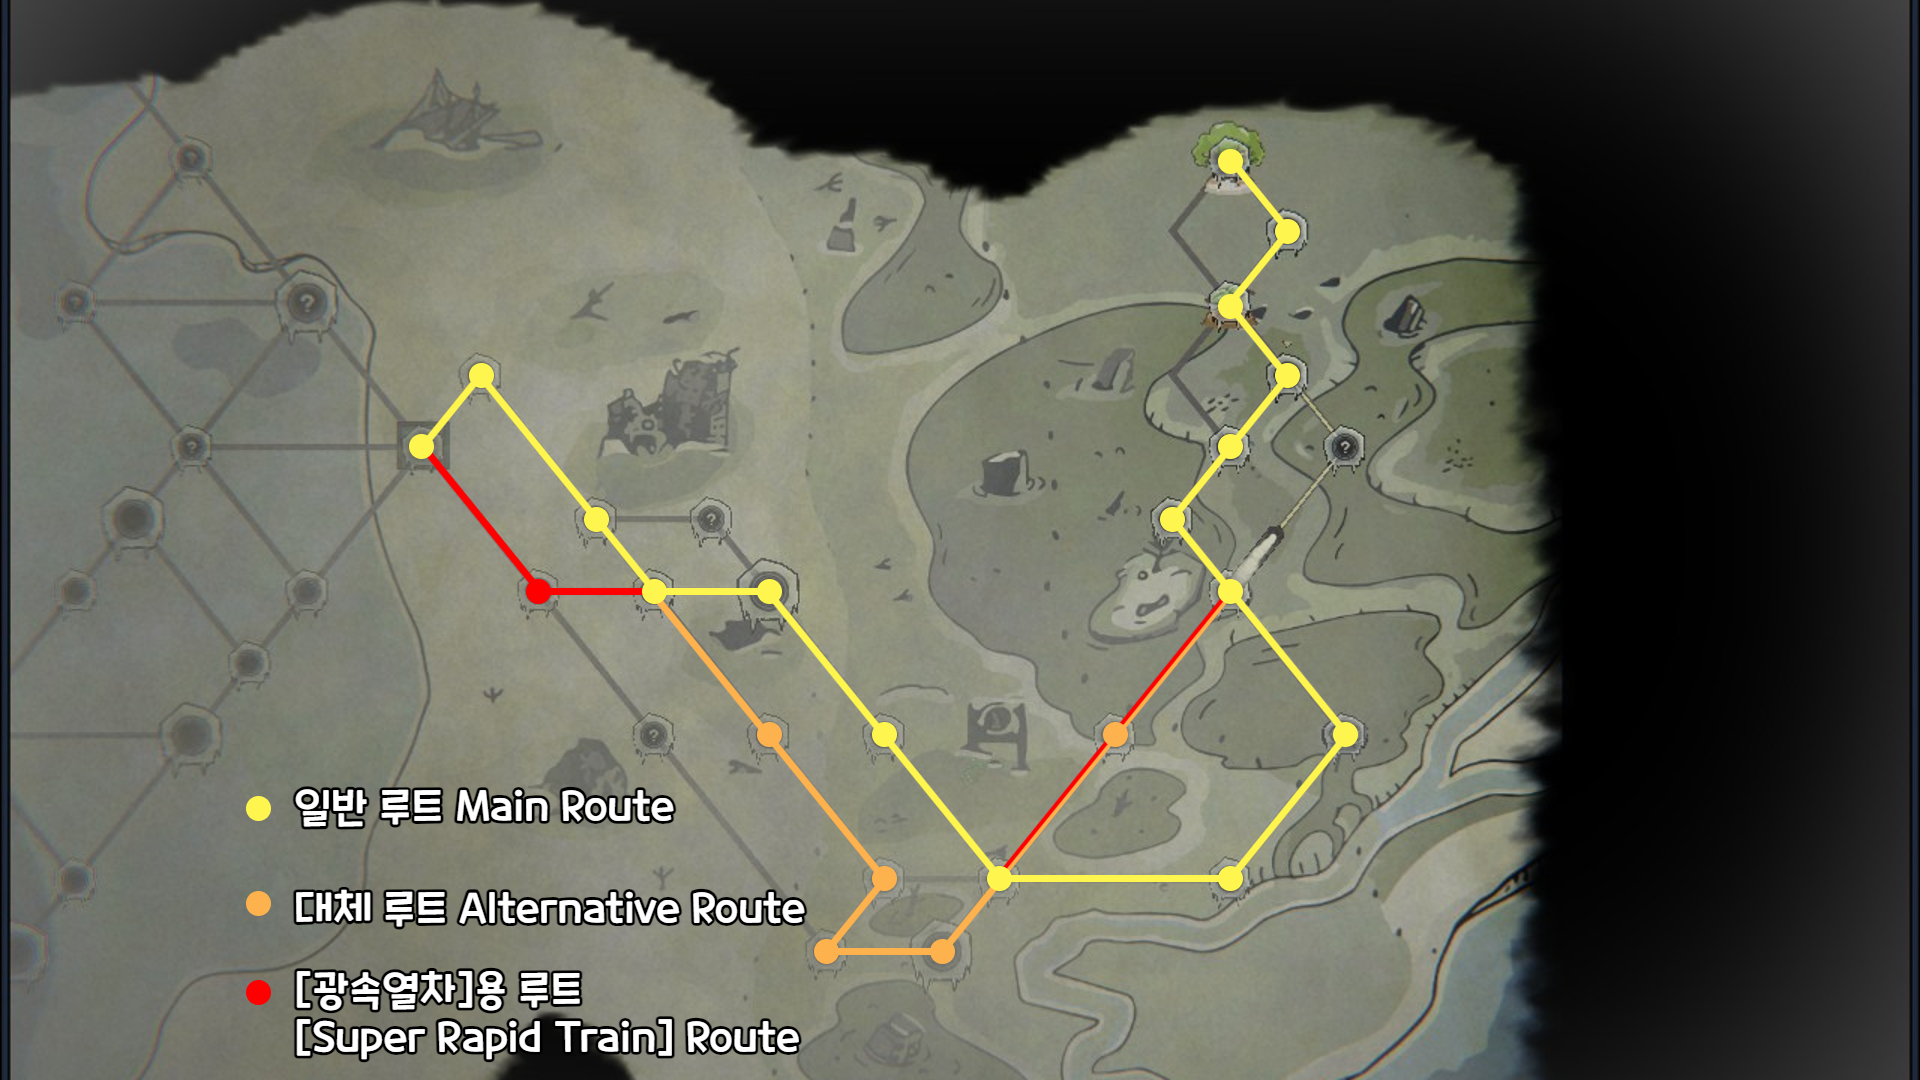
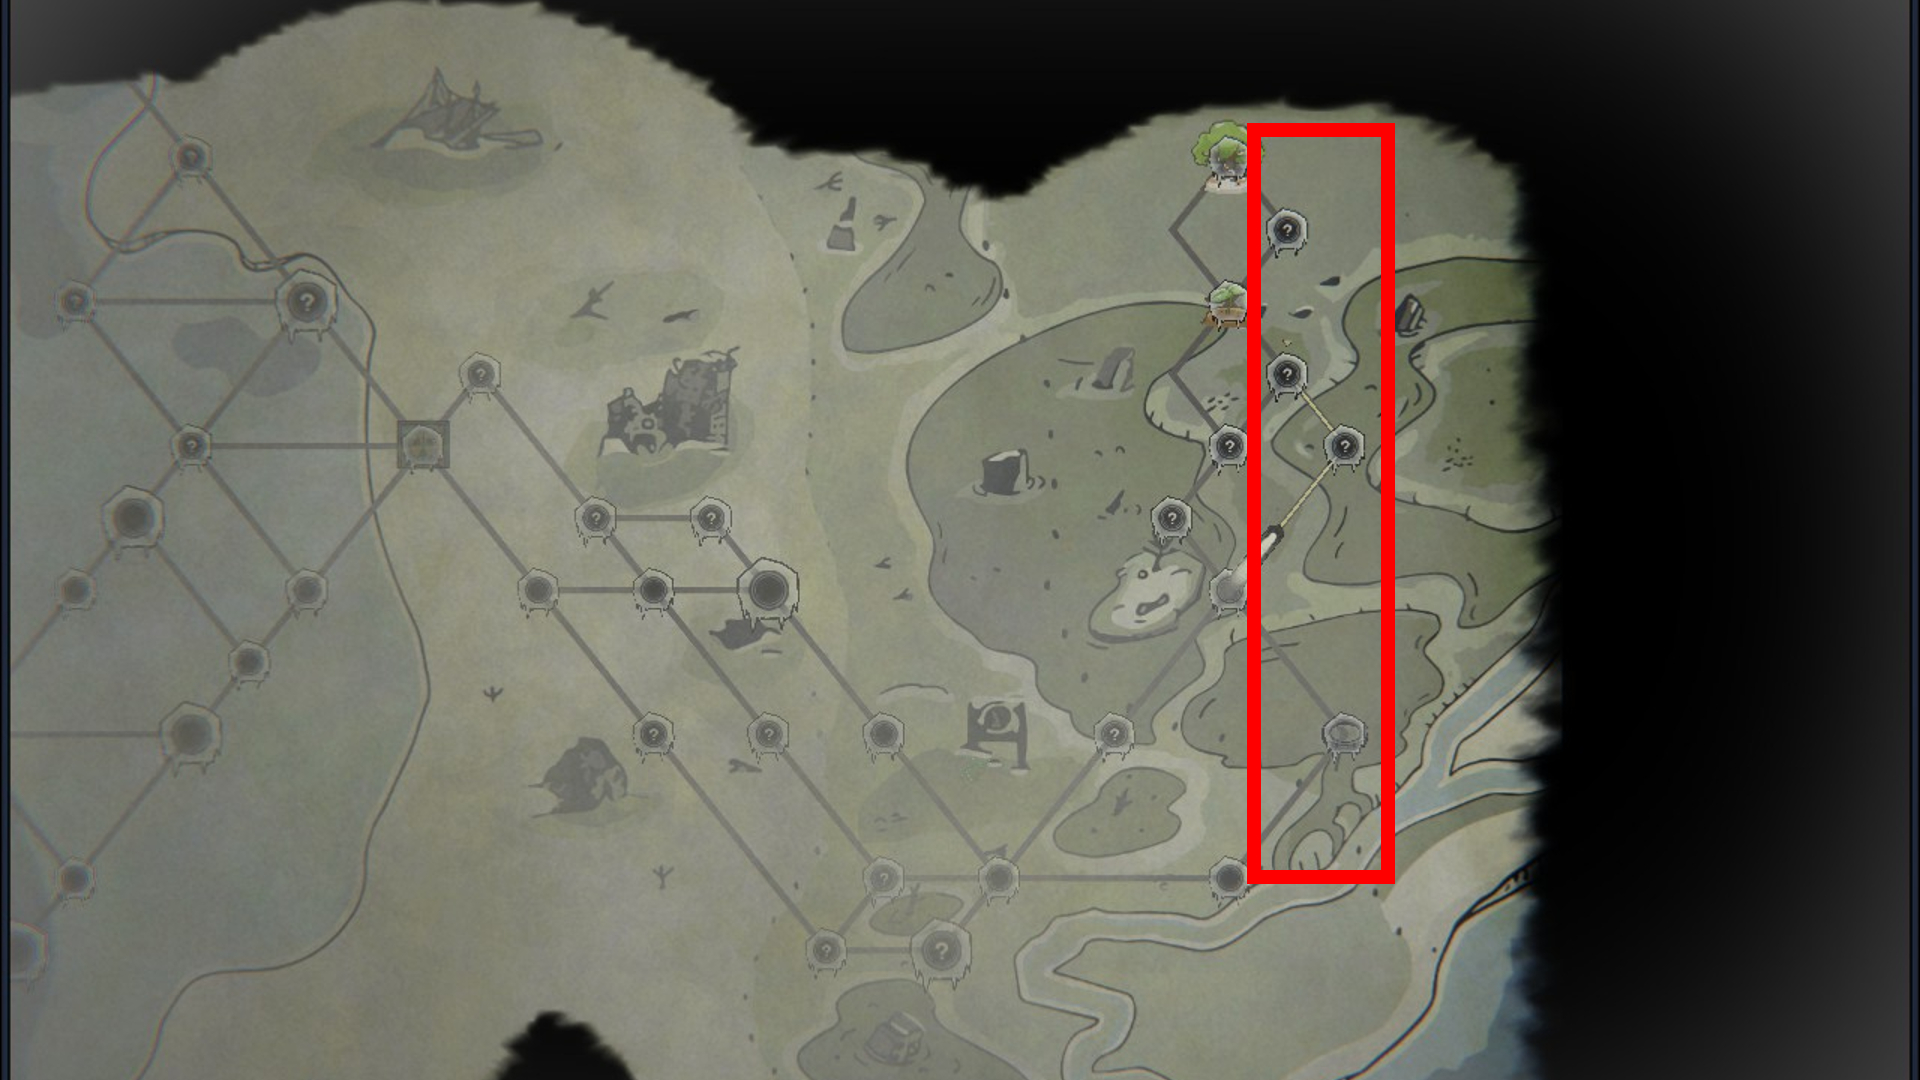
1. The -6666 achievement and Happy train can be done together. I disagree with staying inside the last zone because of the pollution effect -100 per second. Instead, it is better to go once to the end zone just to collect high level cards, after that go back towards the storm. Storm effect is less than pollution effect.

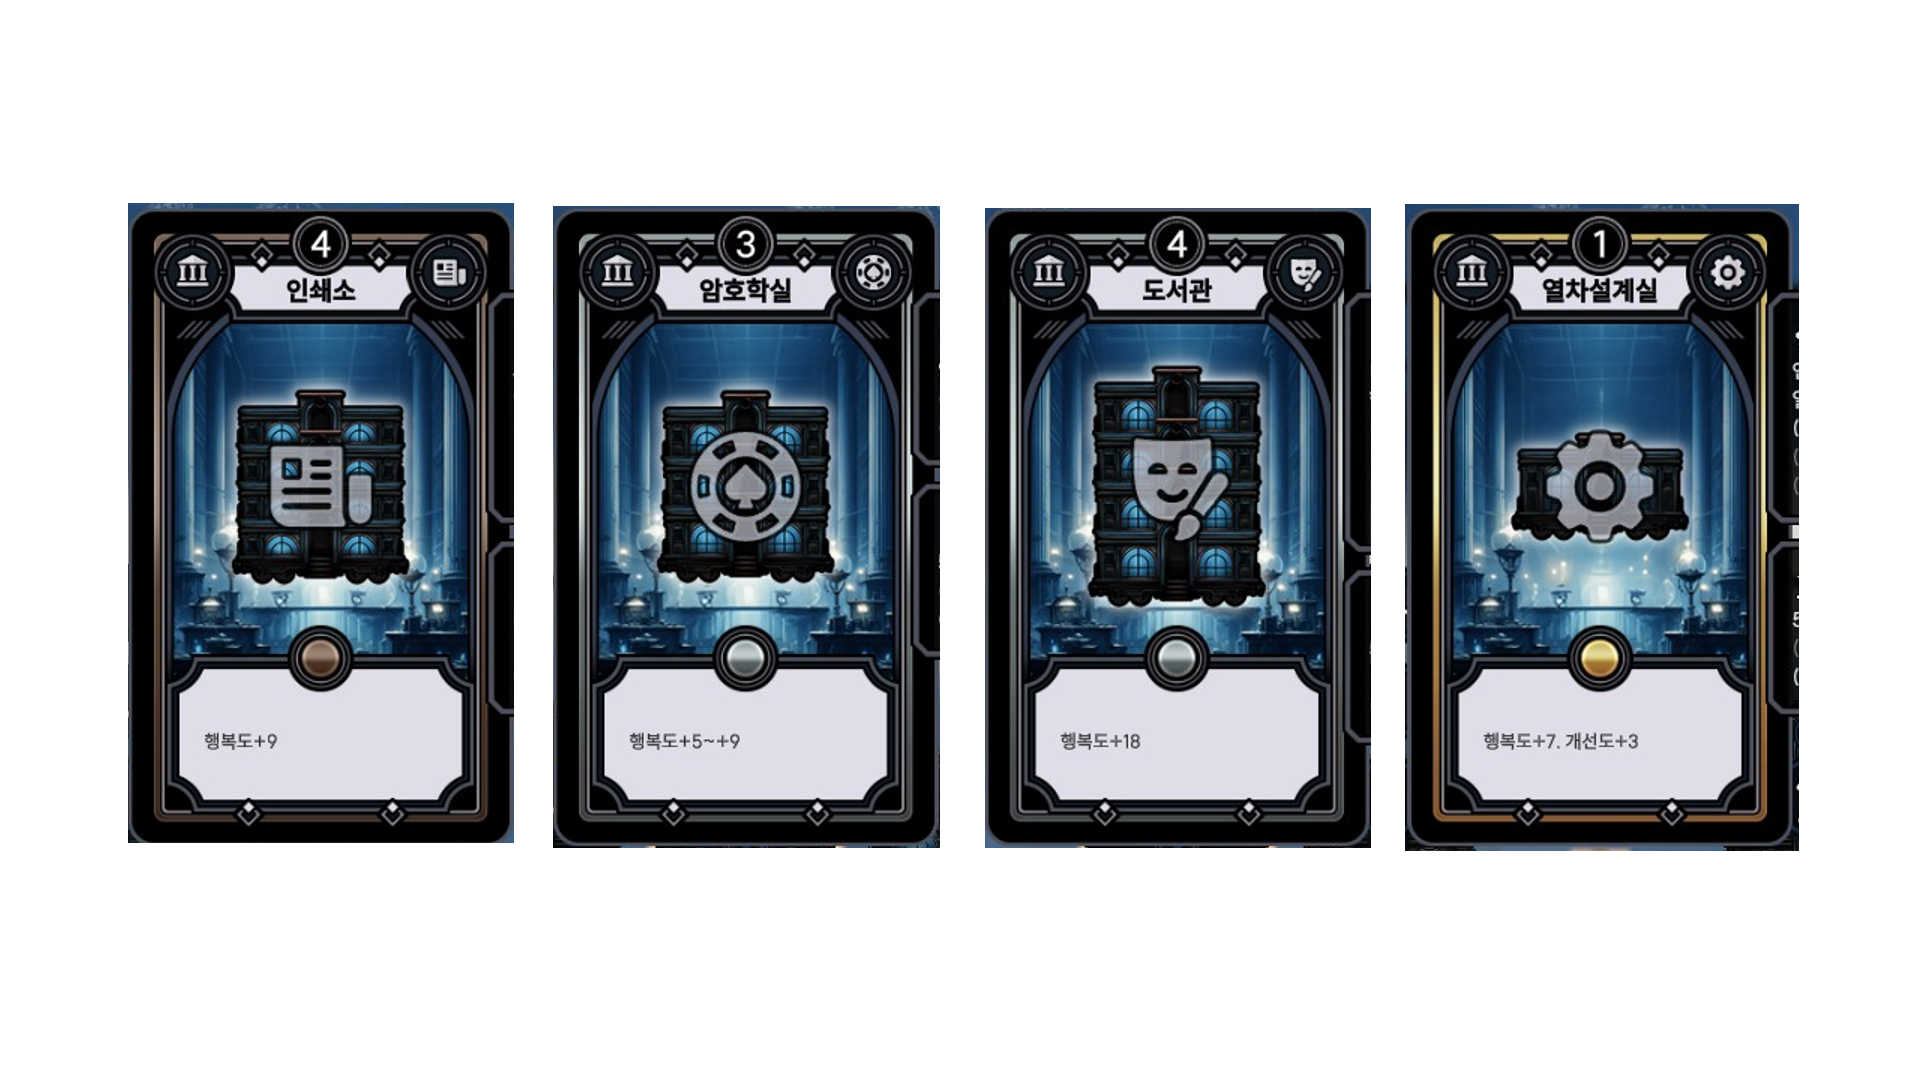
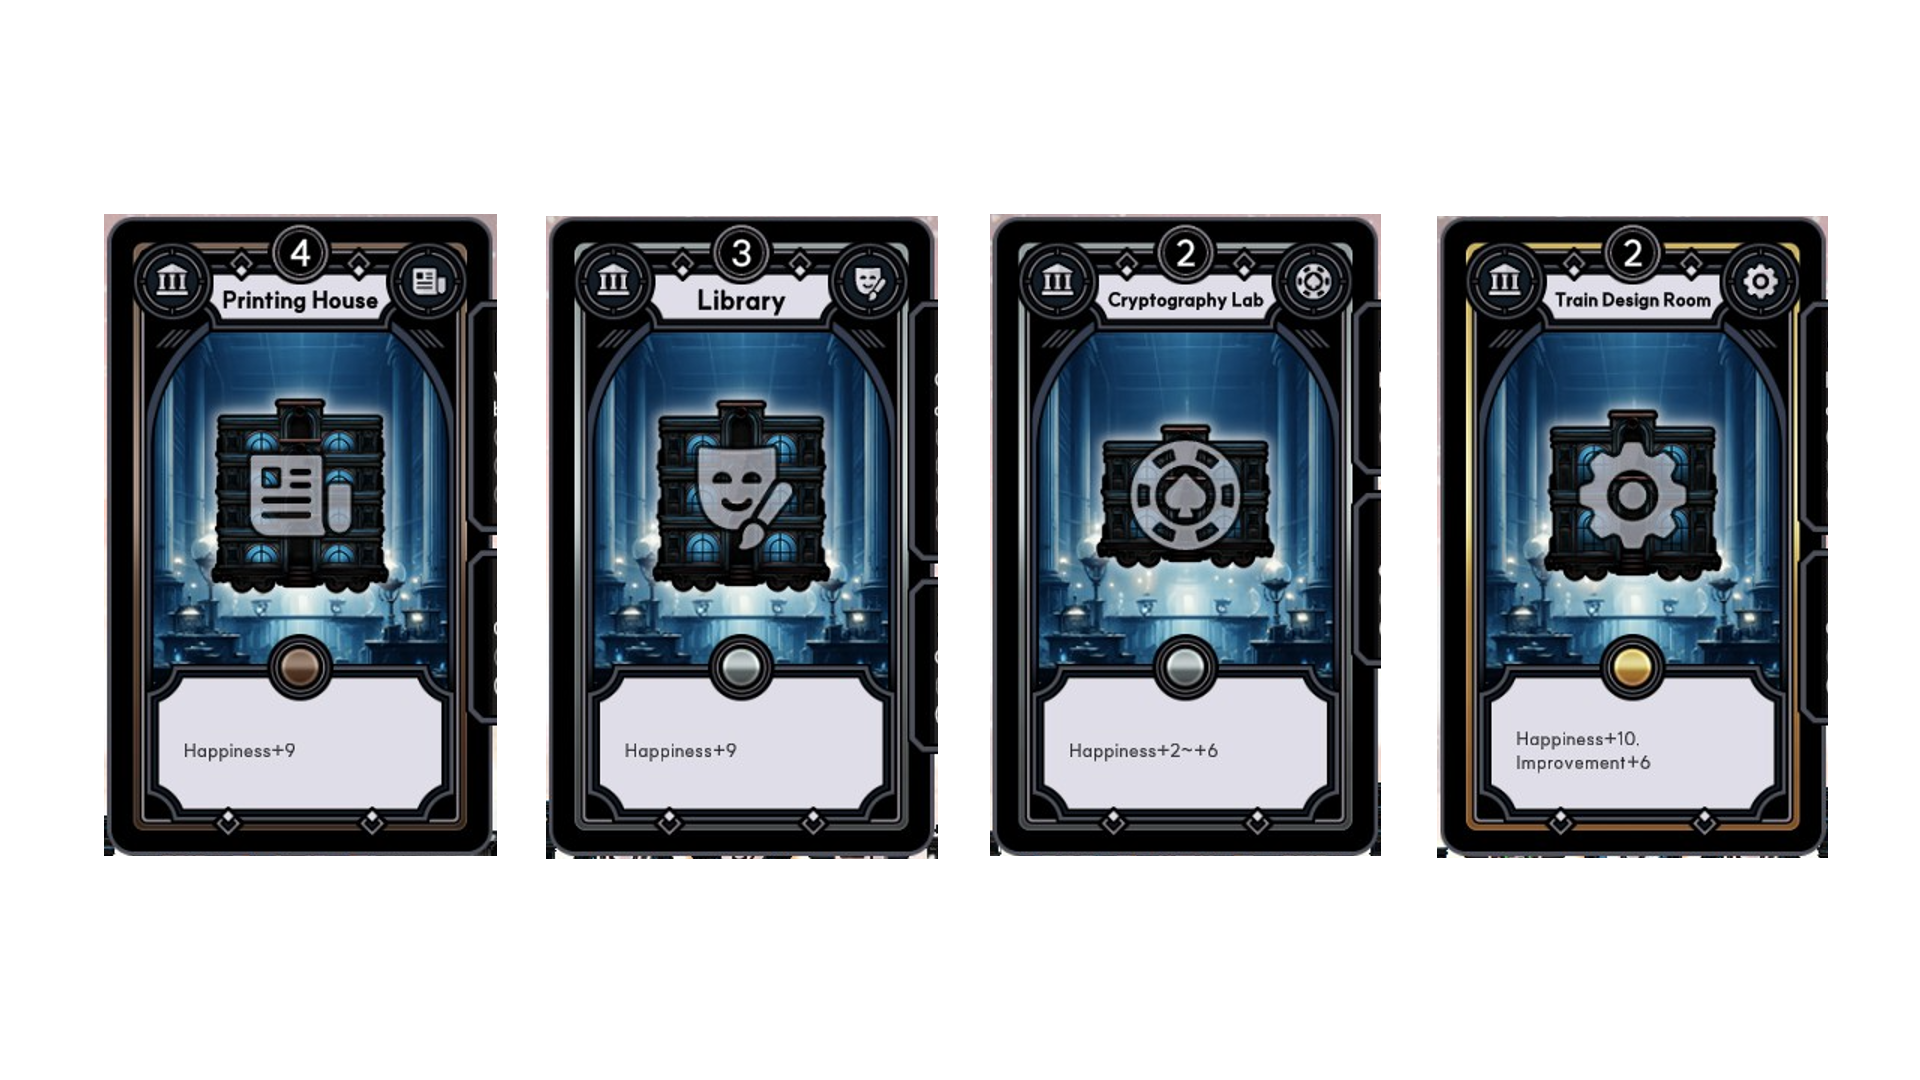
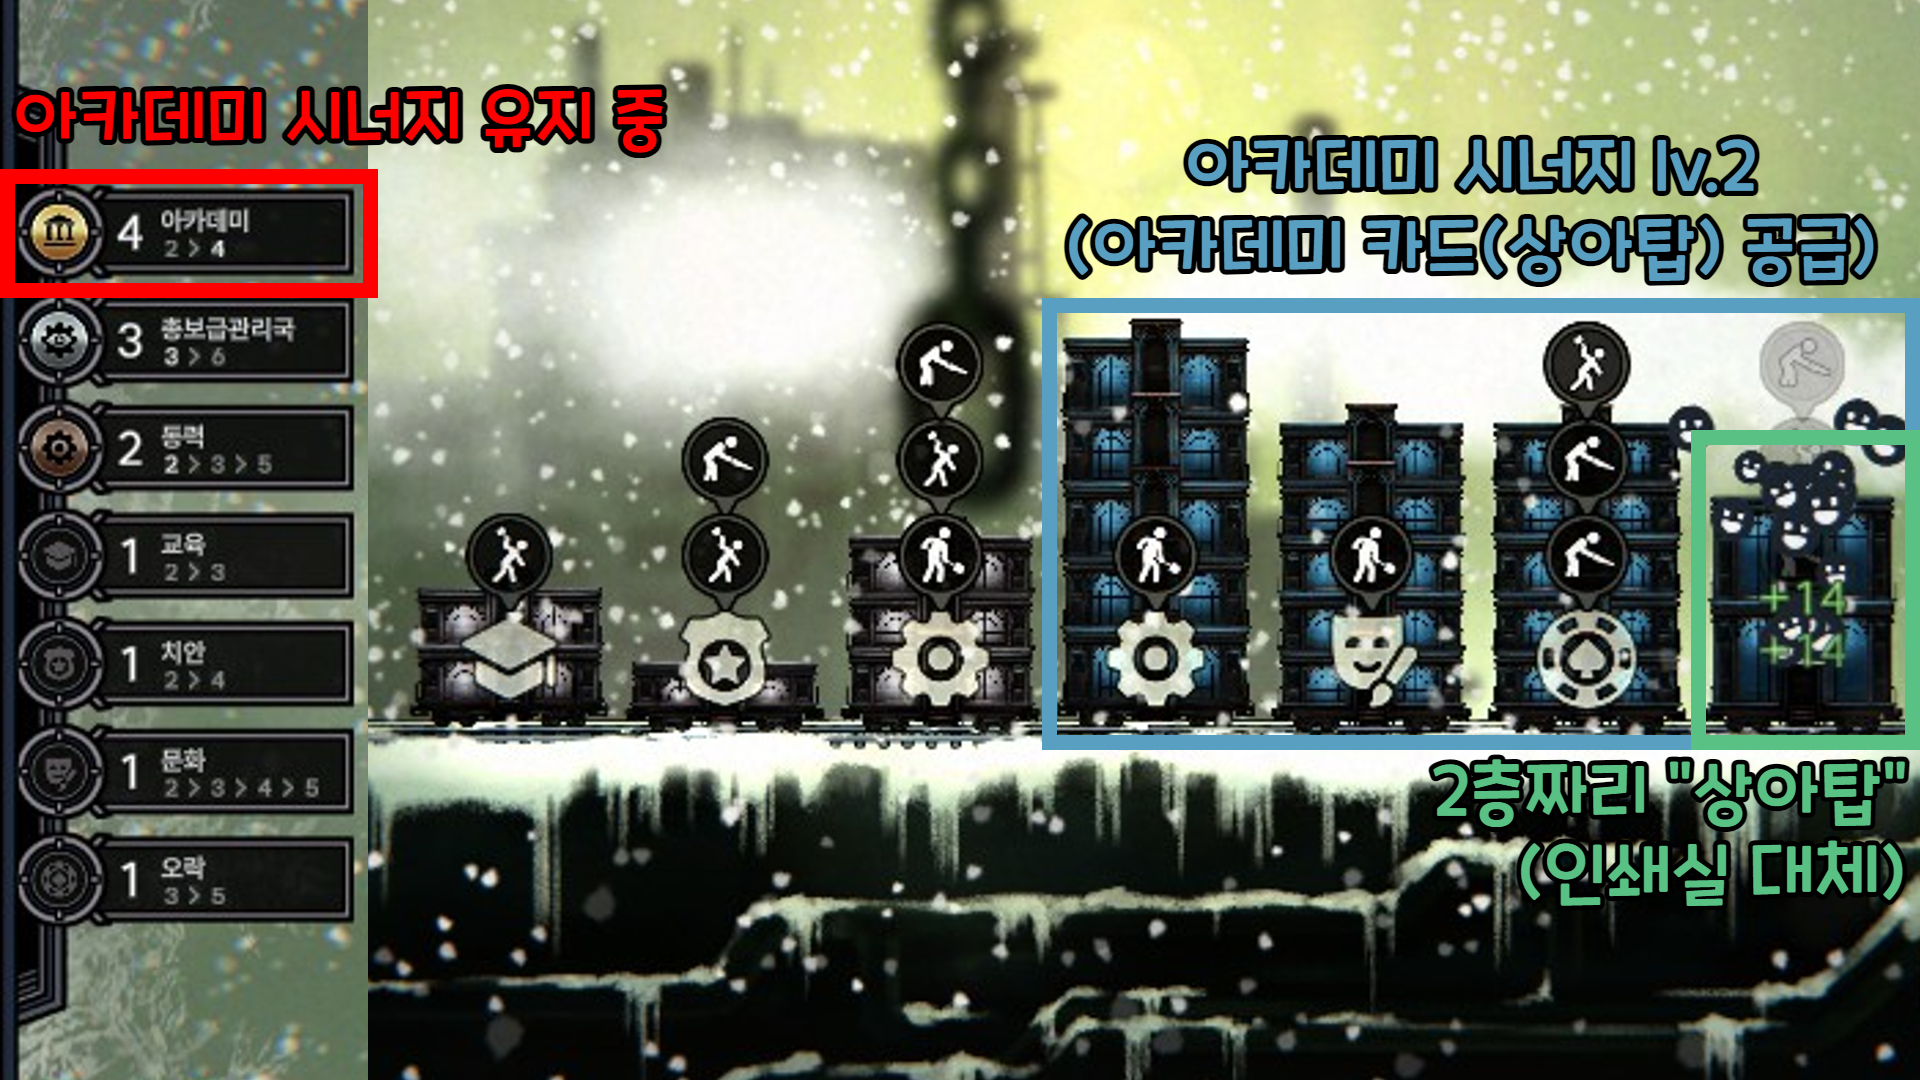
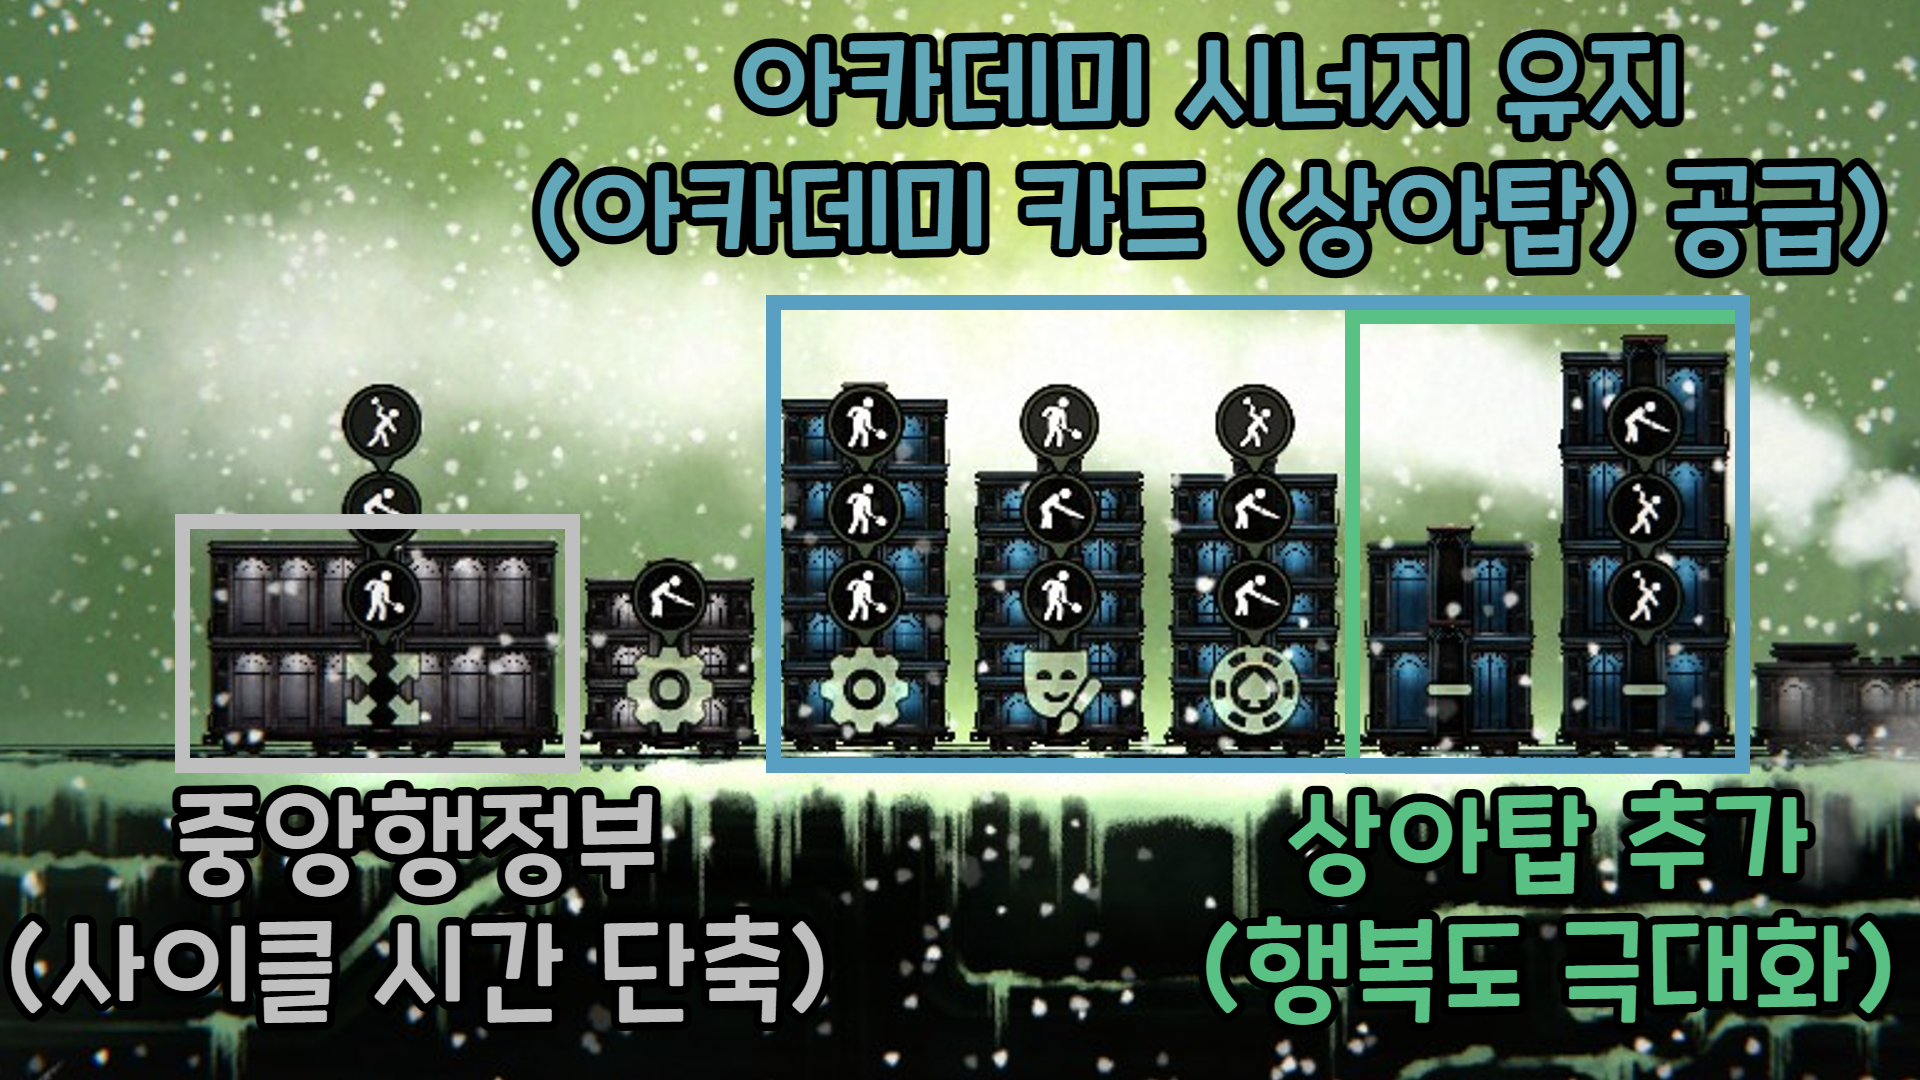
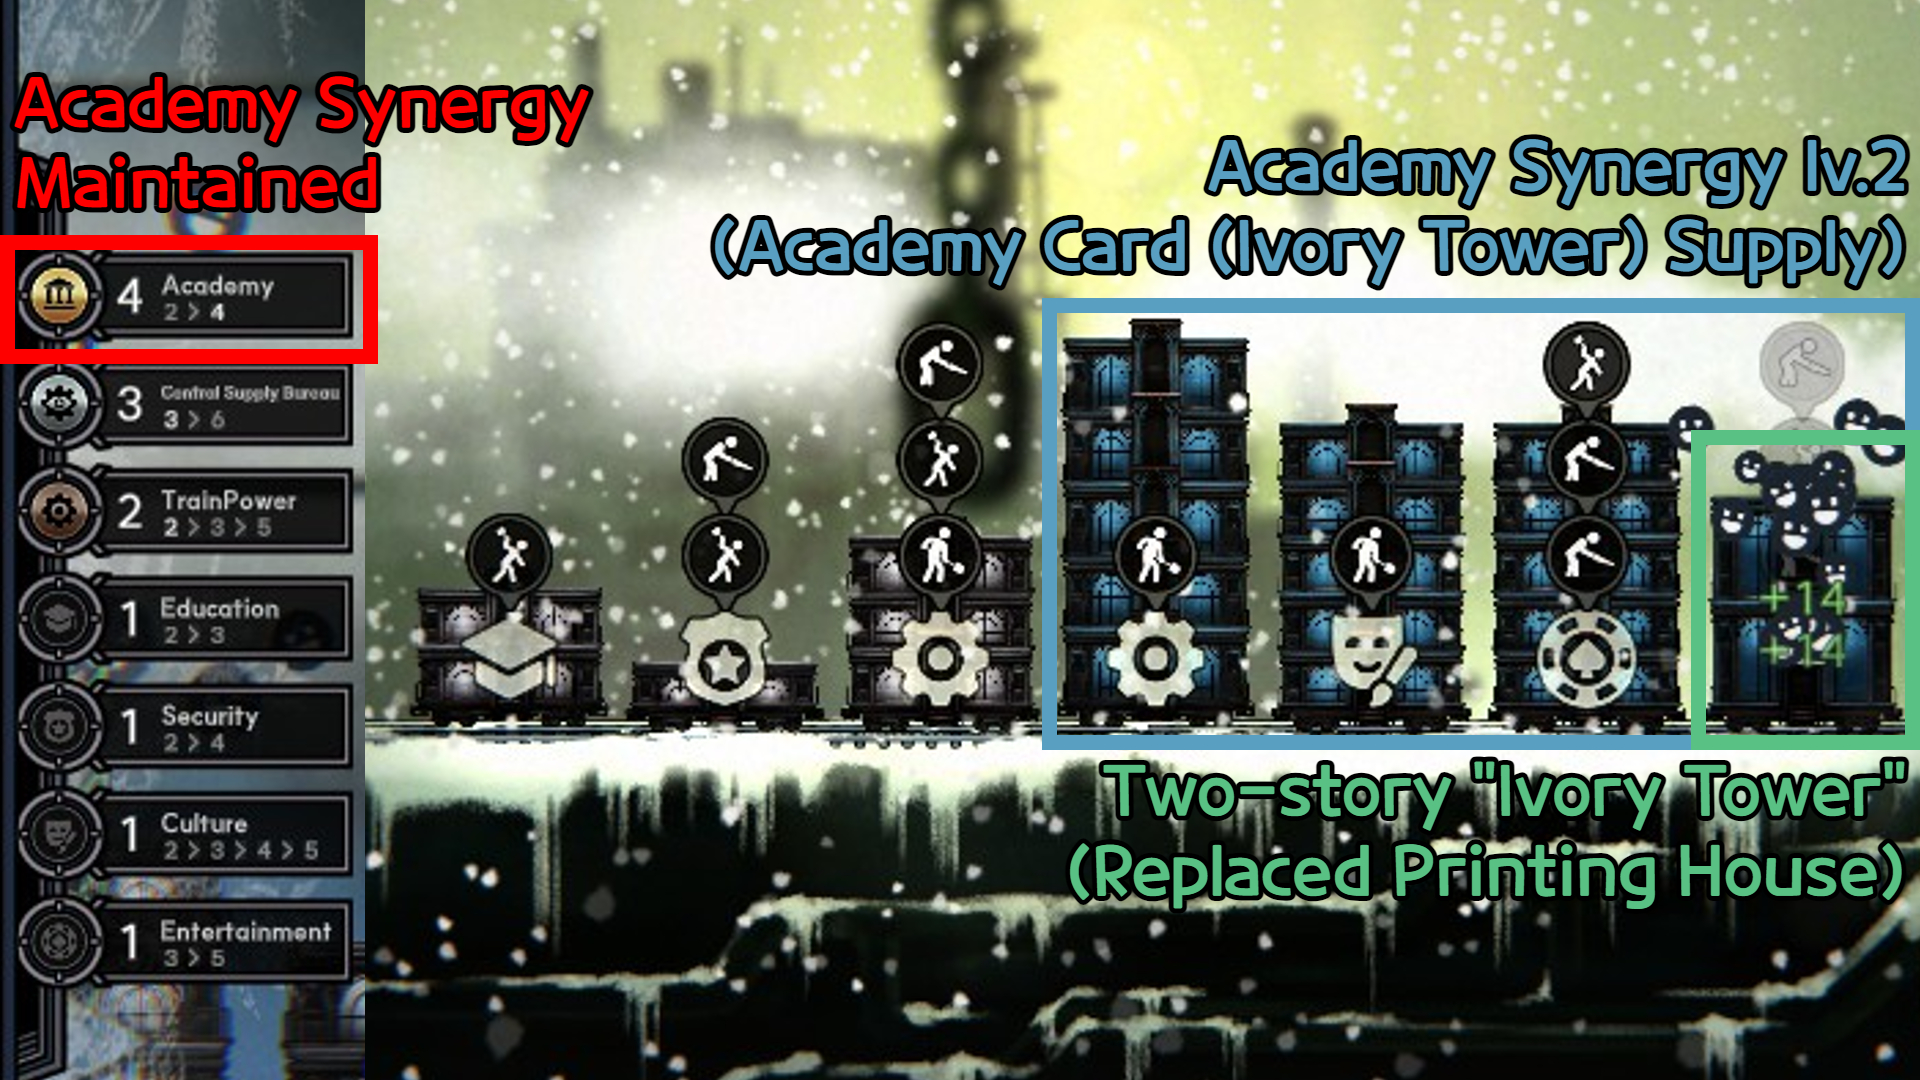
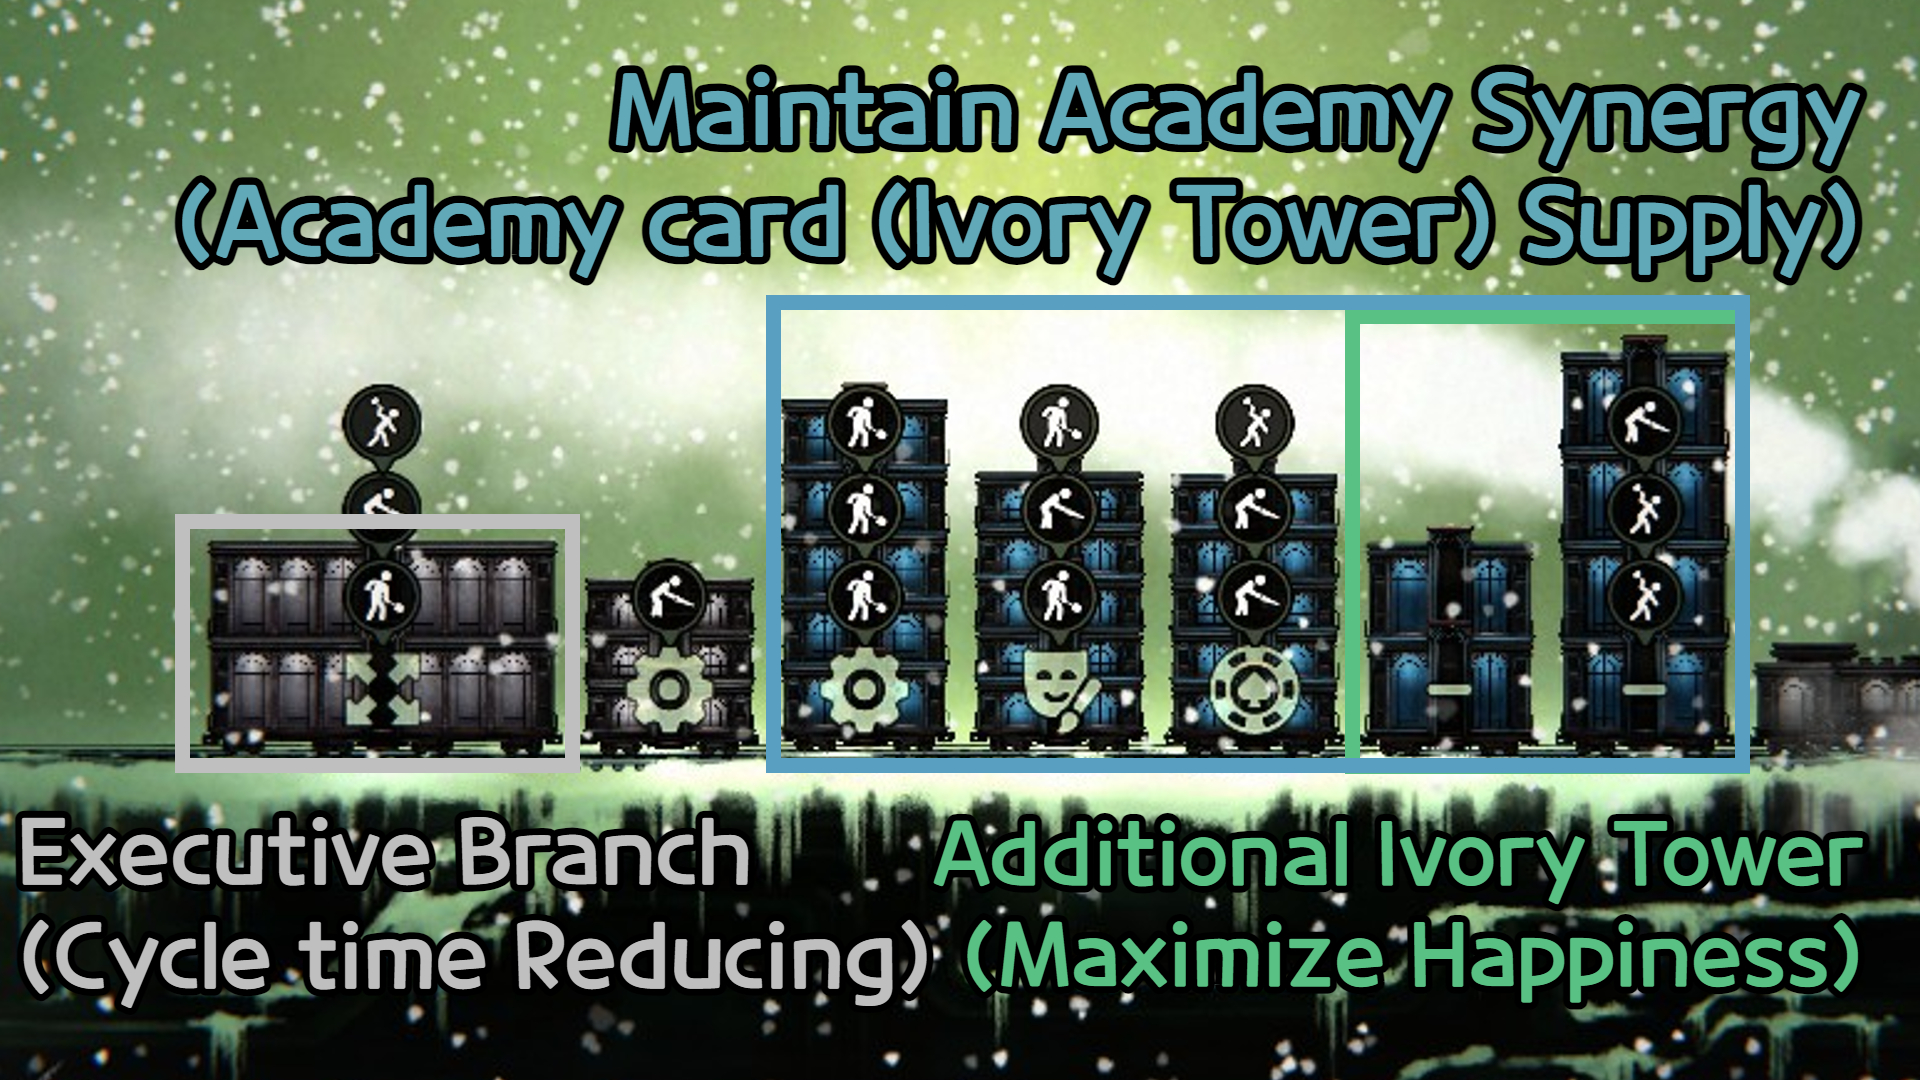
Academy build is great for midgame survival but the core build here should be zeal. Once the zeal builds up, it can easily gain more than 6666 happiness per second, there are screenshots of players who have millions of happiness. Using this strategy, I got the achievement first try without needing much luck.
Omni 7 Mar, 2024 @ 5:15pm 
good job and great guide
Woori 6 Mar, 2024 @ 8:28pm 
와 쩐다 감사합니다 :steamhappy: