Kingsvein

Kingsvein

Not enough ratings
Class Basics - Skills, Passives, Upgrades, and Synergies
By Timbert
This guide covers the basics of Kingsvein classes, skills, passives, etc.
Eventually, I will add my thoughts on each skill / passive / class, etc, as well as thoughts on party composition.
3
   
Award
Favorite
Favorited
Unfavorite
Roadmap
  • Currently, this guide lists the most basic elements - skills, passives, and character upgrades provided by each class, as well as your starting choices.
  • The next step will be to provide commentary on each skill / passive and general thoughts on the suite of skills provided by a full class. Completed!
  • After that, I'll add the XP cost to unlock each skill / passive, as well as for each rank of each skill. No longer planning to do this.
  • Eventually, I'll add notes on party composition for the default difficulty (Vanguard) and the hardest difficulty (Ruin). Partially complete.
Miscellaneous
Terms and definitions
  • aoe - Area of Effect. An aoe X targets all tiles within X of the center tile. An aoe 1 targets 5 tiles in a cross/plus.
  • cone - A cone 1 targets a tile and then the three tiles past it in a T shape. A cone 2 becomes a cross/plus shape. A cone 3 additionally targets the far corners, for a total of 7 targeted tiles.
  • cardinal directions - Some skills, such as basic spear attacks and the Knight's Charge ability, can only target tiles in straight lines Nort / South / East / West of your character, and cannot target diagonally.
  • line of sight - Skills that use line of sight cannot shoot past units or obstacles, such as crossbows and the Mystic's Flame ability.
  • STR - The Strength stat, increases the damage you deal with physical weapons (other than shields).
  • MAG - The Magic stat, increases the damage you deal with spells and trigger stones you hold in your hand (but not Trigger Stones used as weapon augments, unless you have Mancer's Stone Savant).
  • Ability Crest - these are consumable items you will find throughout the game (total of 12). You can use up to 2 ability crests on a character to add an additional skill slot. Just like your normal classes, you can freely change your ability crest selection (both the selected class and the selected skill). You cannot choose the same class with both ability crest slots.
  • Wisp node - these are a frequent enemy in the game, that typically have 1 HP and can possess / revive corpses with half health. Any time you kill a possessed enemy, a wisp will come out. As a result, it's helpful to have tools for hitting multiple enemies or flooding the field with hazards they'll mindlessly wander across.

General Combos
  • Invisibility: There are 4 ways to turn invisible. Wisp Slayer’s become invisible if they get a kill, Chisel’s Low Profile passive, and Eidolith’s have the Fade skill and Counter Fade passive. These all work well with Stealth Sense to increase you STR and MAG.
  • Dark Augurs make great damage sponges, since they can use most of their MP pool to protect their HP and then recover half their MP when they run out. Using a combination of Melder’s Perfect Focus, Ashen’s Burning Focus, and Crysolith’s Cold Focus with a skills that have a wide range of MP costs (and in particular, skills like Gatekeeper’s Gate: Anchor and Dragoon’s Spellstrike that don’t cost an action but do cost MP, or Mancer’s Echo Cast that lets you cast a spell twice) you can modify the MP costs of your skills to allow you to more easily finagle emptying your MP pool once it hits 10.
  • Blind + Delayed aoe - Blind reduces movement (and attack range) to 1, which allows you to easily center a delayed AOE (such as Ashen's Inferno) on blinded enemies.
  • Blind + Push - A blinded enemy can move 1 and attack adjacent, giving them a threat range of 2 tiles. To reduce make yourself safe, blind enemies from range (Pneumatic Crossbow + Chisel's Gouge, for instance) or push the target 2 tiles after blinding (such as using 2 shields and Vanguard's Shield Push with Chisel's Gouge).
  • Bleed + Push + Ice: Bleeding targets take 2 damage (3 damage with a particular accessory) each tile they move or are moved (NOTE: there's currently a bug preventing bleed damage from proccing from multiple instances of pushes on a single attack). Pushed targets don't expend push distance when moving along ice, so freeze the ground (with Crysolith abilities, Gatekeeper's Gate: Blizzard, or Ice Triggers) and get huge push distances. Inflict Blind to keep the enemy from being able to retaliate.
  • Movement reduction: You can reduce enemy movement to 0 by stacking different effects (but not the same effect), such as Chisel's Chain, Vanguard's Blockade, etc. Of particular note is Mancer's Echo Cast, to re-cast non-delayed spells after a delay, and Crysolith's Chilling Curse - if there's only one living enemy in the delayed spell aoe at the end of your character's turn, that enemy gets -1 movement. Combine that with Melder's Stalagmire or Crysolith's Deep Frost to reduce one target's move by 2 on this turn, and the delayed cast will inflict -1 movement at the start of the next turn.

Elements
For the most part, enemies don't seem to have elemental weaknesses / resistances. Instead, elements interact with the environment in a few ways.
  • Fire damage creates Fire hazards on empty tiles. Fire hazards also create light, which doesn't have any mechanical benefit, but does make it easier to see the battlefield in dark areas (especially if you don't want to carry a lantern).
  • Cold damage creates ice on all tiles they damage (except for open air).
  • Lightning damage electrifies blood, dealing 1 damage to all contiguous bloody tiles. Lightning damage can also activate inactive Sigils / Fortifications and trigger a few mechanisms. For purposes of lightning damage, all tiles with arcwile (looks like copper wires) spread lightning damage to each other as if they were electrified blood.
  • Ruin damage doesn't seem to have any unique effects.

Tiles
  • Rubble costs 2 units of movement to walk over, unless you can jump over it. Boulders and Clumps (the green tetris shapes) can never be pushed onto rubble, but anything else can.
  • Hazards (Fire or Spikes) costs 2 units of movement to walk over and also deal 2 damage for each tile moved over. Like Rubble, Hazards can be jumped over. Hazards are removed whenever they deal damage. Spikes are also removed if they take damage, while Fire can be removed by Cold damage. There are a few passives and accessories that increase Hazard damage dealt during your turn, or decrease the amount of hazard damage taken.
  • Blood is created whenever a creature takes physical damage. If a blood tile takes Lightning damage, all contiguous blood tiles take 1 Lightning damage - this can only happen once per blood section per action.
  • Ice is created by Cold damage and inflicts -1 jump while on ice (meaning most characters can't jump over hazards while on ice). If a unit is pushed / pulled over ice, ice tiles don't get counted for stopping movement (but do get counted for calculating Bleed damage). Additionally, Ice tiles will temporarily remove the movement penalty of Rubble. Fire damage removes ice while creating a Fire hazard.
  • Sigils / Fortifications grant +3 STR (Power Sigils), +3 MAG (Magic Sigils), +3 Move (Movement Sigils), or halve physical damage taken (Fortifications). Several skills can create Sigils / Fortifications, and they are all destroyed by Fire damage. While Cold damage will create Ice that visibly obscures a Sigil / Fortification, they still apply to units standing on them.
Weapon Attacks
This is just a concise section of interesting things you can do to augment your weapon attacks.
  • Weapon augments can increase the effectiveness of your weapon attacks. Ore barbs have a 60% chance of adding 1 damage, while Corpryst barbs always add 1, and Mythril barbs add 2. Trigger stones used as weapon augments deal 1 damage of the relevant element (see sections on Elements and Tiles). Other augments (such as Sticky Gland and Vix Horn) apply an ailment. All augments only apply to the primary target of an attack (typically the tile you click on). Damage from weapon augments isn't scaled by the attack used, so they'll deal the same damage from Knight's Bide as they will from Knight's Counter. However, Fragile adds +30% damage from all sources, and each damage source gets rounded up, so Fragile will take a Trigger Stone's 1 damage and increase it to 2.
  • Knight's Opportunist increases weapon damage outside your turn: meaning Knight's Counter / Ready / Bide, Marksman's Snipe, attacks caused by an ally using Marshal's Strike! / Shoot!, and Titan's Meteor Slam.
  • Knight's Counter lets you retaliate when hit (if the attacker was in range when they started the attack), letting you spread blood and trigger your weapon's augments. The damage is negligible without Knight's Opportunist. Be careful of friendly fire with Counter, particularly with spears.
  • Marshal's Spear Banner lets you heal allies you hit with basic spear attacks, making Knight's Counter much safer with spears.
  • Chisel's Flanker increases damage when an ally is adjacent and directly opposte to the enemy from you. Combine with Marshal's Spear Banner to heal your ally when hitting them with a spear.
  • Chisel's Timed Hits can increase damage with a timed event. There's a small visiual indicator when you get this right. It appears to modify your damage after all other calculations, including damage from weapon augments (rounding up, so it always increases damage by at least 1), so this has a bigger effect for Knight's Bide than Chisel's Blind, for instance.
  • Fanger's Trapper increases damage by 40% if the target can't move, whether because their movement was reduced to 0, they're surrounded by your allies, or all tiles in their movement range are occupied by corpses. In particular, there are a few bosses that are permanently stationary, where this would be very useful. See notes on Movement Reduction below.
  • Dragoon's Twin Fang and X-Strike both trigger the augments of both weapons.
  • Dragoon's Giant's Reach gives additional reach to your weapons, letting spears / flails rival actual ranged weapons in range. For Chisels, the STR loss is unimportant compared to the increased flexibility. Similarly, Mancer's Stone Savant gives Trigger Stones a range of 3 (and can be unlocked after only 1000 XP, vs 2150 XP for Giant's Reach)
  • Swarm's Eye's Vix Mark makes all of your weapon attacks create a 1 HP Vix Fly behind the target, which is great for wasting enemy attacks, triggering Chisel's Flanker - but since Vix Flies don't block movement, it doesn't help trigger Fanger's Trapper.
  • Mancer's Stone Savant, in addition to enabling Chisels to use their abilities at range, also increases the damage of Trigger Stones used as weapon augments, based on half of your MAG and the relevant Blaze / Ruin Adept for the trigger stone in question. With 2 trigger stones in a Volskarn weapon, you effectively increase your damage by each point of MAG and [x] Adept. Using the unique Trigger Staff (3 augment slots) gives you even more bang for your buck. You can add Ashen's Burning Focus to further increase weapon damage. Trigger Staff + Volskarn Weapon + Stone Savant + Burning Focus + Dragoon's X-Strike gives you at least +5 damage from your augments for an extra 25% MP cost, and leaves you one final passive to play with (Chisel's Timed Hits might be the best choice for further increasing your augment damage).
  • Ashen's Bright Spark, with a Lightning Trigger, adds your Blaze Adept to the area damage of electrified blood you cause with attacks and delayed abilities (but probably not with Knight's Counter). Because it costs increasing amounts of stars to increase a single upgrade, this lets you spend the stars between both upgrades and have similar single-target damage, or focus entirely on Blaze Adept to have superior area damage. Additionally, you deal increased damage if you push enemies through Fire hazards.
  • Crysolith's Fell Shards increases your weapon damage by 2 against targets on Ice while also spreading Ice to nearby tiles (and possibly dealing minor splash damage to enemies).
Starting Choices
Main Character "classes"
  • Wisp Slayer - +4 HP, +1 MP. Once per turn when you kill an enemy, get an extra action. This does not allow you a second movement. Good for killing Wisp nodes that spawn from Possessed enemies, or with ranged attacks / buffs. Doesn't work with delayed abilities.
  • Wisp Stalker - +2 HP, +2 MP, +1 Move. Once per turn when you kill an enemy, gain +1 MP and become invisible for 1 turn. The Stealth Sense upgrade allows Invisibility to grant +STR / MAG. Doesn't work with delayed abilities.
  • Dark Augur - +1 HP, +2 MP. Regain 50% of your MP whenever your MP reaches 0. Damage is taken from your MP pool before your HP pool, except for your last 10 MP. (Example: If you currently have 15 MP and take 20 damage, the first 5 will be subtracted from your MP, and the remaining 15 damage will come from your HP). Works great as a frontline tank not using much MP, or as an MP hog who never runs out. There are plenty of options for spending 10+ MP in a single turn, effectively granting this class infinite MP.
  • (unlocked after beating the game once) Wisp Crusher - +4 HP. All of your push distances are increased by 1. Pushing bodies and objects increases the push distance by 2. Gain +1 STR / MAG for 1 turn when you are pulled or pushed. (Combine with Titan's Brute passive and all related synergies for massive damage)
  • (unlocked after beating the game once) Wisp Lancer - +2 HP, +1 MP. When you end your turn while riding, heal your mount +1 HP and give it an extra turn. Gain +2 STR / MAG for 1 turn when you dismount. Lets you move in, attack, and move out (while mounted) every turn, or use your mount's shove/drag an extra time each turn (while you take potshots with a crossbow, for example).

Wyvern classes
  • Wyvern - +2 HP, +3 MP. 4 movement.
  • Winged - +1 MP. You can jump over enemies as if they were terrain obstacles. 4 movement.
  • Charger - +3 HP. +2 Move in straight lines. -1 Move along diagonals. (6 movement in straight lines, 3 movement otherwise)

2 Chosen Companions
  • Junkstone - +20% XP gain.
  • Corpryst - +2 HP, +1 MP.
  • Voltraced - +4 MP.
  • (unlocked after beating the game once) Shriverock - -3 HP, +1 Move, +1 Jump. (Extra jump helps with exploration and bypassing terrain hazards during combat)
  • (unlocked after beating the game once) Sigil-scarred - -2 HP, -2 MP. Gain +STR equal to 1/2 your MAG. Gain +MAG equal to 1/2 your STR. (Get extra juice out of anything that increases both your STR and MAG, like Teamwork, Stealth Sense, Channeler, etc.)

Zavarde is a Corpryst, but has an additional unique passive that inflicts -2 STR / MAG for 2 turns to Possessed targets he hits with delayed weapon attacks.
Remir is a Scurio, and gets +1 Move if she hasn't acted yet and takes -25% ice damage.
Weapons
There are fewer base weapon types in Kingsvein than in the other Rad Codex games. Swords, Spears, Flails, Shields, Bows, Crossbows, Clubs, Gauntlets, and Triggers. There are also fewer tiers of weapons: Rusty / Junkstone, Ore (+1 dmg), and Corpryst (+2 dmg).

  • Swords get +1 damage.
  • Flails can attack any of the 8 surrounding tiles.
  • Spears can attack two tiles in any of the cardinal directions. Basic attacks hit both tiles in range, while most skills require you to target a single tile - which has the benefit of allowing you to hide behind an ally while stabbing your foe. Marshals have the Spear Banner passive which prevents you from ever hurting an ally with a spear and additionally causing your basic spear attacks to heal allies in range.
  • Shields do a set amount of damage (not tied to your STR), increase your maximum HP, and push 1 tile on hit. If you dual wield shields, Vanguard's Shield Bash passive lets you push 2 tiles on hit.
  • Bows are 2-handed weapons that can target any tile (other than those blocked by walls) between 2 and 3 tiles away.
  • Crossbows get +2 damage, and can target any tile between 2 and 3 tiles away (but follow full line of sight restrictions). Additionally, you can't shoot a crossbow a second time until you have reloaded it. Marksman has the Quick Reload passive which automatically reloads your crossbow if you make a melee attack, reload a crossbow in your other hand, or use a delayed ability.
  • Clubs get +50% damage from your STR stat (making good use of the Knight's Brave skill), but can't have their damage increased by character upgrades.
  • Gauntlets have no inherent bonuses, and are usually weak, but come with buffs to STR / MAG (and usually penalties to MP). Titans can spend stars to upgrade gauntlet damage.
  • Triggers Stones (if you equip them in your hand directly) count as non-physical melee weapons, but scale off of your MAG and Blaze / Ruin Adept instead of STR. Mancers have a passive that turns them into ranged weapons.

There are a number of unique weapons of each category that have additional attributes, such as the Pneumatic Lance - a 2-handed crossbow without a minimum range that counts as a melee weapon for skills.

Special consideration for Crossbows:
Crossbows have to be reloaded aftering being fired, which can be mitigated by A) wearing a Bandolier to swap expended crossbows, or B) using Marskmen's Quick Reload passive. You can also find a Scope, which can be used as an augment or an accessory, which increases your crossbow damage if you haven't moved this turn. While mounted, your mount's movement doesn't count as your movement, so its free damage without any loss to mobility. If your crossbow dude is also your dedicated Wyvern-rider, they can eschew HP and dodge related equipment, and instead opt for more MP and miscellaneous effects from equipment, while spending all of their stars on Archer, Ranged Expert, or Blaze / Ruin Adept (if using Mancer's Stone Savant). If you're using skills that cost enough MP, you could take Melder's Perfect Focus passive to reduce MP costs (since you'll always have full health). Additionally, Marksman's Artillery passive further increases the damage bonus from Ranged Expert.

Quick Reload will reload your weapons if you A) reload one crossbow, B) make a melee attack, or C) prepare a delayed ability. This leads into three approaches for your character:
  • Double Crossbows: You can shoot twice before having to reload by casting a delayed spell (Mancer's Echo Cast really opens up your options) or just passively reloading. Alternately, if you have a loaded crossbow, using Marksman's Snipe will expend one crossbow while loading the other.
  • Mixed Crossbow and Melee: You can shoot once before having to use a melee attack. This lets you mix ranged and melee-only skills on a single character, like Marskmen and Chisel. Since some of your attacks don't rely on the scope, you don't require your Wyvern as a mount for mobility, so your mount is more flexible in combat. (Be aware that Dragoon's Twin Fang will not reload your crossbow with Quick Reload)
  • Bandolier: With a bandolier equipped, you can freely swap your weapons each turn in combat, which lets you combine the above two approaches.
Knight
The Knight is the basic melee class all your characters start with (except your Wyvern, but they can eventually get access to the Knight and Mystic).

The Skills
  • Bash - 0 MP - Deal 30-70% weapon damage and push the target 2 tiles. Melee weapon only.
  • Charge - 0 MP - Move 1-3 tiles in a straight line and then make an attack at 80% weapon damage, ignoring your weapon's normal range. Melee weapon only.
  • Bide - 0 MP - Delayed - Prepare a delayed attack for 250-300% weapon damage. Melee weapon only. The attack is cancelled if you move, teleport, get pushed or pulled, etc. As an exception to the standard rule, this ability will hit all tiles in a spear's range.
  • Ready - 1 MP - Attack the first enemy that enters a tile in melee range for 60-80% weapon dmg. Melee weapon only. The attack is cancelled if you move, teleport, get pushed or pulled, etc.
  • Brave - 1 MP - Give yourself or an adjacent ally +1-3 STR for 2 turns.

The Passives
  • Counter - When hit by a melee attack (dodging doesn't count), retaliate with a 25% weapon damage attack. As an exception to the standard rule, this ability will hit all tiles in a spear's range. If you are pushed by the attack, you'll retaliate from your end position (meaning you'll probably be out of range).
  • Opportunist - Weapon attacks you make outside of your normal turn (Counters, delayed attacks, and reacting to Marshal abilities) deal +50% weapon damage.
  • Stoic - While preparing a delayed weapon attack, you are immune to pushes and pulls.

The Upgrades
  • Endurance - Increase maximum HP.
  • Sword / Spear / Flail Skill - Increase damage you deal with a particular weapon group.

Skill suite
Bash is great for repositioning enemies (particularly pushing Blind enemies, or into goop / water to remove them from the fight) and triggering Bleed or impact damage.

Charge, Brave, and Bide are all good options for turns when your melee character would otherwise be out of range. Charge lets you still get a hit in, Brave buffs one character's damage for 2 turns, and Bide might make an enemy reconsider moving somewhere.

Bide can also be used for massive damage when baiting enemies into moving to a specific spot or reducing their movement to 0.

Ready is slightly more reliable than Bide (Ready hits before the enemy has the chance to push / kill you), but deals significantly less damage.

Combos
Bash works well with the Titan’s Brute passive for higher push damage (see Titan for more).

To use Bide offensively, you really want to reduce the target’s Move to 0 (see General Combos for more). You can increase Bide’s damage with Opportunist and (when used this way) Fanger’s Trapper passive. You can also bait an enemy into Bide's area by providing exactly 1 tile from which they can deal damage.

By itself, the damage from Counter is mediocre. Add in the Opportunist passive and weapon augments for much better damage. Anything else that increases the damage of your weapon attacks would also be good here (see General Combos).

Opportunist works well with Bide, Ready, Marksman’s Snipe, and Titan’s Meteor Slam, Counter, and an ally using Marshal’s Strike! and Shoot! Skills.

Brave gets more mileage if you use it on an ally that hasn't acted yet this turn, since it won't expire until the end of the next round. Additionally, it works best with skills like Bide that have more than 100% STR scaling.

Ability Crest vs using the full skill suite
Bash has great utility that can find a use in almost any fight.
Brave can be useful to pick in parties focusing on STR damage.
Charge can help give melee characters a range enhancement.

If you’re building toward Bide, it might be worth using the full skill suite so you still have access to Bash and Brave.
Chisel
Unlocked with 250 XP in Knight. Your Wyvern cannot unlock this class.

The Skills
  • Lacerate - 1 MP - Deal 50% weapon damage and inflict Bleed for 2 - 5 turns. Targets 1 tile in your melee weapon's range. If a bleeding unit moves, it takes 2 damage per tile moved at the end of its turn.
  • Gouge - 1 MP - Deal 50% weapon damage and inflict Blind for 2 - 5 turns. Targets 1 tile in your melee weapon's range. Blind units have their movement and attack range reduced to 1.
  • Sunder - 1 MP - Deal 50% weapon damage and inflict Fragile for 2 - 5 turns. Targets 1 tile in your melee weapon's range. Fragil targets take +30% damage.
  • Chain - 0 MP - Pull a target up to 3 - 4 tiles away (cardinal directions only) to you, and inflicts -1 Move for 1 turn.
  • Shatter - 4 MP - Deal 80% weapon damage, plus and additional 30-40% for each negative status effect on the target and each of your allies adjacent to the target. Targets 1 tile in your melee weapon's range.

The Passives
  • Venom - your weapon attacks inflict Poison for 4 turns. Poisoned targets take 1 damage at the end of their turn. Poison can stack twice.
  • Flanker - Weapon attacks deal +25% damage to enemies when an ally is behind them.
  • Timed Hits - Deal +30% weapon damage if you press the 'Use' button just before damage is dealt.
  • Low Profile - Become invisible for 1 turn when you end your turn adjacent to 3 visible allies and no enemies.

The Upgrades
  • Evasion - +1% dodge chance.
  • Sword / Spear / Flail Skill - +1 damage with the relevant weapon group.
  • Stealth Sense - Gain +1 STR / MAG per rank while invisible and for 1 turn after. If you have any ranks in this, you can see the vision ranges of enemies within 6 tiles when you press the 'Highlight All' button.

Skill suite
Almost all of Chisel’s skills synergize with each other. Lacerate + Gouge let you ignore an enemy while it slowly shambles around, losing HP. Shatter deals extra damage for each status (with extra benefit from Sunder inflicting Fragile). Chain is great for pulling bleeding enemies, pull allies to safety, or pulling out an enemy to kill from safety, etc.

Combos
See General Combos for notes on how to use Bleed and Blind. Chisels are served well with spears and flails, and Dragoon's Giant's Reach passive lets them Blind enemies while staying completely safe.

All of Chisel’s skills, with the exception of Chain, require a melee weapon. There is a unique crossbow, the Pneumatic Lance, that counts as a melee weapon for skills, letting you debuff enemies in a range of 3. See notes in Weapons on using crossbows.

Using Gate: Anchor before moving in to use Lacerate / Gouge can leave the enemy debuffed and leave you safe from the enemy’s retaliation. Similarly, your Wyvern can sometimes pull you to safety. Another Chisel using Chain can pull you out of harm's way after you've acted with no penalty, as the movement reduction will expire before your next turn starts

Chain works well with Vanguard's Blockade passive to pull an enemy out of position and inflict -2 Move. In my testing, Blockade triggers before Gate: Anchor, which lets you use this combo without subjecting yourself to retaliation.
Additionally, Chain (particularly when upgraded) is a great way to proc Bleed damage on enemies.

The Venom passive works well with control-based Chisel play – if your gameplan already involves applying Bleed + Blind and waiting for the enemy to die without being able to hit you, Venom speeds that process up. It also adds an extra debuff to pump up Shatter damage.

The Flanker passive is easily activated if another ally has Swarm's Eye's Vix Mark.

I could be incorrect on this, but it appears that timed hits (and by extension, Flanker) modifies the final damage you deal. This makes it less useful on weak attacks like Gouge, but great on strong attacks like Shatter or Knight's Bide.

Low Profile is a little tricky, positioning-wise. You have to have 3 allies already adjacent to a single tile before you end your turn. Since you’re so close to allies, it is very possible for you to accidentally get caught in AoEs targeting those allies. However, it is the cheapest way to trigger the STR / MAG buff from Stealth Sense. Eidolith’s Projections count as allies, and can be easy ways to trigger Low Profile’s invisibility. If you just want the +4-8% dodge, go for Swarm's Eye's Vixling passive instead.

And finally, the best combo for a Chisel is another Chisel. And even better than two Chisels is three. Four Chisels might be overboard - and 12 is definitely too many for any sane player, but when it comes down to it, maybe you really just want to Shatter something repeatedly. When you want to focus-fire someone, have Zavarde use Chain + Blockade to inflict two unique movement debuffs and put the enemy adjacent to Zavarde. Then have Remir move adjacent and use Sunder + Venom to weaken the enemy further. Finally, have your main character use Shatter for a total of 338-416% damage (80% base, while two adjacent allies and 4 debuffs get multiplied by +30-40%, then all that is multiplied by Shatter's +30% damage buff). For tough enemies that survive, you can either toss in Crysolith's Despair (since that also cares about the number of debuffs) or a strong single-target delayed ability like Knight's Bide / Marskmen's Snipe / Mancer's Judgement with Sticky Gland.

Ability Crest vs using the full skill suite
Adding Gouge to any character allows for a good dash of battlefield control, and Sunder or Shatter can help dish out the damage, so all three are good choices for a ability crest – but there’s just so much stacking synergy in Chisel’s skills that it’s hard to turn down the full set.
Mystic
The Mystic is the basic mage class all of your characters start with (except your Wyvern, but they can eventually get access to the Knight and Mystic).

The Skills
  • Flame - 3 MP - 3 fire damage to 1 target in line of sight. Range 3 - 5.
  • Arc - 3 MP - 2 lightning damage to 2 - 4 targets. The 1st target has a range of 2, and each following target must be exactly 2 tiles away from a previous target.
  • Burst - 3 MP - 3 physical damage to a target in line of sight. Range of 3 - 5, cardinal directions only. Push 1 to all tiles adjacent to the target.
  • Bloodspike - 3 MP - Creates Spikes on a tile (2 damage). If the tile is currently occupied, deal extra ruin damage (up to 5) based on the amount of blood already on the tile. Range 2 - 4.
  • Absorb - 0 MP - Dispel all status effects on the target and terrain effects on the tile, and recover 1 - 3 MP for each effect dispelled. Range 3.

The Passives
  • Draw Power - Deal +1 fire per adjacent flame and +1 ruin per adjacent blood pool (max +2 damage).
  • Warmage - Deal +1 fire / lightning / ice / ruin damage to adjacent enemies.
  • Leylines - When you end your turn on a Sigil or Fortification, gain its bonus for 2 turns.

The Upgrades
  • Focus - +1 maximum MP.
  • Blaze / Geo / Ruin Adept - +1 damage with fire/lightning, physical, or ice/ruin magic.

Skill suite
You have Arc for killing off multiple weak targets, Absorb to cure ailments / remove debuffs / remove terrain effects / refill MP, and then 3 mediocre damage spells with optional uses as either hazard creation (Burst / Bloodspike) or ranged push (Burst).

Combos
Arc combos with Ashen’s Fireburst passive (lightning damage causes Fire tiles to explode for 3 fire damage), Gatekeeper’s Antipode passive (lightning damage can melt ice, and melting ice deals damage to targets on that tile), and the Spellcatcher unique shield (reduce fire/lightning damage by 20% and gain +1 MAG for 1 turn when taking fire/lightning damage). Ashen’s Bright Spark passive can further increase the damage that Arc deals when electrifying blood pools.

Draw Power works well with spells like Ashen’s Inferno and Gatekeeper’s Gate: Pyre that deal fire damage in a large area, which will leave lots of extra fire tiles behind to give you +2 fire damage on future turns. Another good way to take advantage of this buffed fire damage is with Mancer’s Stone Savant passive and a weapon with multiple fire triggers.

Draw Power also works well with anything that deals physical damage to adjacent enemies (such as normal attacks, Melder’s Stalagmites, or Dragoon’s Spellstrike), which creates blood pools. However, most spells that deal Ruin damage also have a habit of removing that blood, so consider using Mancer’s Stone Savant passive and a weapon with multiple ruin triggers.

Leylines is really nice for the battles that have pre-placed Sigils and Fortifications, but you can also create Fortifications with Vanguard’s Fortify and Marshal’s Hold!, a Power Sigil with Titan’s Sanctify, or a Move Sigil with Dragoon’s Launch.

Ability Crest vs using the full skill suite
Absorb is a great pick for anyone who doesn’t have a particular need for an 11th skill, as it’s always great to have a dispel in your back pocket for an unexpected situation.

Arc’s multi-target nature can help fill some holes in other spellcaster toolboxes, or serve as a cheap option to neutralize multiple Wisp Nodes at once.
Vanguard
Unlocked with 400 XP in Knight.

The Skills
  • Smite - 0 MP - Deal 50-70% damage to the three tiles in a wide line in front of you, and deal 50% damage. Requires a melee weapon.
  • Barge - 0 MP - Deal 60-100% damage to an adjacent tile, push 1 tile, and move into the targeted tile (if possible). Requires a melee weapon.
  • Revitalize - 3 MP - Revive an ally (skipping their turn this round) or heal an ally for 4-7 HP. Range 1.
  • Cover - 1 MP - Grant an adjacent ally Negate for 2-4 turns and switch places with them. (Negate cancels the first instance of damage a target would take). Range 1.
  • Fortify - 1-3 MP - Push 1 on the tiles on opposite sides of you, then create Fortifications for 6 turns on each tile. Fortifications reduce physical damage taken by 50%, and are destroyed by any amount of fire damage.

The Passives
  • Counter Push - When hit by a melee weapon, push your attacker 2 tiles.
  • Shield Bash - Use your shield to push the primary target of adjacent weapon attacks 1 tile.
  • Blockade - When you end your turn, inflict -1 Move on adjacent enemies for 1 turn.

The Upgrades
  • Endurance - +X max HP.
  • Sword / Spear / Flail Skill - +X damage with the relevant weapon group.
  • Healer - Heal targets an additional +X HP with abilities, items, passives, etc.
  • Defy Death - Lose X less max HP when KO'd and recover +X HP when reviving or being revived. If you have any ranks in this, you get a 20% chance to automatically revive with 1 HP instead of fading out.

Skill suite
Vanguard is about controlling positioning and defense. Smite pushes 3 targets, while Barge pushes 1 and leaves you adjacent at the end of your turn. Revitalize, Cover, and Fortify allow you to keep allies alive longer. Revitalize can be easily replaced with healing items (combining Bandage + Ulsac creates a Poultice which may heal more and also cures ailments, although the revive portion of Revitalize is much rarer from items).

Combos
Smite and Barge both have a built-in push, so benefit from most of the same things as Knight’s Bash. Because Barge moves you back adjacent to the pushed enemy, you can still get effects that care about adjacent enemies to trigger when you end your turn, like Blockade, Marshal’s Fighting Spirit, and Eidolith’s Absorb Aura.

Shield Bash adds push 1 to your attacks against adjacent enemies if your off-hand weapon is a shield. So if your primary weapon is also a shield, then you’ll push the target 2 tiles. If your attack has a push, like Smite, then you’ll push 3 tiles (or 4 with Knight's Bash). Combined with Titan’s Brute passive, you can dish out a lot of damage. However, Shield Bash makes it hard to take advantage of Blockade (or other effects that care about adjacent enemies at the end of your turn).

Blockade is a Movement reducer, so check the General Combos on how to take advantage of that. Chisel's Chain works particularly well with Blockade. Additionally, Gate: Anchor triggers after Blockade reduces movement, allowing you to use this combo safely.

Mystic’s Leylines passive make Fortify's Fortifications protect allies even after they move off. Alternately, Knight's Stoic passive lets you place Fortifications where an ally is currently standing without moving them.

Ability Crest vs using the full skill suite
Smite or Barge are good choices to grab by themselves. If you're building around using Cover or Fortify to protect your party, you might want to take the full skill suite.
Fanger
Unlocked with 300 XP in Knight and 300 XP in Chisel.

The Skills
  • Fang - 3 MP - Create a Fang (destructible terrain hazard, looks like a round cactus) within 1-3 tiles (cardinal directions only) that lasts for 6 turns. If the tile is currently occupied, deal 3 physical damage and push the target 2 tiles and create a Fang if the tile is now unoccupied. When a Fang is damaged, it deals 3 physical damage to all adjacent tiles and pushes them 2.
  • Caltrops - 3 MP - Create spikes in a cone of size 2-4. Spikes are difficult terrain and deal 2 damage. Spikes are removed if stepped on or damaged.
  • Razorwire - 3 MP - Target a tile within 2-4 tiles (cardinal directions only). Pull 1 on the closest creature on each side perpendicular to the line within 2-3 tiles, then inflict Bleed for 1 turn on the target tile and the adjacent two tiles.
  • Whiplash - Deal 2 physical damage, push all tiles adjacent to the targeted tile 1, then pull the target 1. Range 2-4 (cardinal directions only), requires line of sight.
  • Sharpen - Target 1-3 Spike tiles and/or allies. Targeted Spikes become Shar Spikes (deal 2 damage and inflict Bleed for 3 turns). The targeted ally's first weapon attack within 2 turns inflicts Bleed for 3 turns.

The Passives
  • Impaler - During your turn, add 1/2 your STR to the damage of Fangs and Spikes.
  • Sharpener - Your spikes deal half your Geo Adept extra physical damage. Also, creating Spikes on top of Spikes creates Sharp Spikes (deal 2 damage and inflict Bleed for 3 turns).
  • Trapper - Your weapon attacks deal +40% damage to enemies that cannot move anywhere.

The Upgrades
  • Evasion - +X% dodge chance
  • Sword / Spear / Flail Skill - +X damage with the relevant weapon group.
  • Archery - +X damage with bows and crossbows.
  • Geo Adept - +X damage with physical magic.

Skill suite
All of the skills are just slightly too clunky, in large part because the abilities don't start with enough range to be worth using and because everything costs slightly more XP and MP than what feels comfortable. You don't want to place Fang adjacent to you. Caltrops in a cone 1 don't really slow most enemies, Razorwire leaves you in range of enemies. And then Sharpen feels like a wasted skill.

Having said that, you have a strong ranged push with extra utility with Fang, area denial with Caltrops (particularly with the Sharpener passive so they inflict bleed), a ranged pull with both Razorwire and Whiplash. Everything works well for destroying Wisp nodes.

Combos
Fang works great with push combos. If a character with with Titan's Brute passive pushes an enemy 4 tiles (the maximum I've found) into an adjacent Fang, you'll deal 21 damage in addition to the intital attack damage (at the cost of taking 2 damage from the enemy being pushed back into you). That damage can be further boosted by the Impaler passive. (I need to test whether Fangs set up on either side of the enemy in this setup would deal 30 damage, or if the first Fang stops counting as an obstacle when the second Fang explodes).

If you really want to slow down enemies while whittling away at their health, have two characters use Caltrops in front of your enemies. If the second character has the Impaler passive, then the Spikes will inflict Bleed, and the enemy will take a decent chunk of damage at the end of their movement. There are a number of fights where enemies approach from two sides, so this is one way of letting you divide and conquer.

Ability Crest vs using the full skill suite
All of the Fanger skills seem like they’re just slightly too finnicky for their own good, so I couldn’t get the same oomph out of the full skill suite that I could from a Chisel or Gatekeeper, for instance. In light of that, any of these skills (other than Sharpen, which I often forget exists) are decent options for rounding out any character’s toolkit. Fang in particular works well for someone wanting to get a little pushy.
Marksman
Unlocked with 250 XP in Knight and 400 XP in Chisel.

The Skills
  • Ricochet - 2 MP - Deal 40-70% damage to two targets in your ranged weapon's range. The second target must be exactly 2 tiles away from the first target.
  • Bombard - 3 MP - Attack a target in your ranged weapon's range +0-2 and push all adjacent tiles 1.
  • Recoil Shot - 0 MP - Attack a target in your ranged weapon's range +0-2, pushing it forward and yourself backward.
  • Backscatter - 1 MP - Deal 80-100% damage to one target in your ranged weapon's range (cardinal directions only), then the same damage to two targets at 45 degree angles back toward you. The backward shots travel 2 tiles.
  • Snipe - 0 MP - Delayed - Deal 180-200% dmg to one tile in range. Uses your ranged weapon range +2-4. The attack is cancelled if you move, teleport, get pushed or pulled, etc.

The Passives
  • Shrapnel - Ranged weapon attacaks deal 1 physical damage to enemies adjacent to the primary target.
  • Quick Reload - When you reload or make a melee attack, reload all equipped weapons.
  • Artillery - Gain +1 attack range with bows and crossbows at the cost of -1 Move.

The Upgrades
  • Evasion - +X% dodge chance
  • Archery - +X damage with bows and crossbows.
  • Ranged Expert - +5*X% weapon damage per tile between you and the target.

Skill suite
Snipe is a good option for triggering combat, when baiting enemies into attacking you from a particular tile, or with movement reduction.

Ricochet and Backscatter are good for hitting multiple enemies and killing Wisp nodes, particularly with the Artillery passive (which only triggers against the first hit). Ricochet will typically be easier to hit multiple targets with while Backscatter deals more damage.

Bombard deals damage and pushes everything around a target. This is great for moving pushable boulders from the “wrong side” and has some decent battlefield control possibilities. At higher levels, the bonus range also makes it very easy to hit exactly what you want.

Recoil Shot is a ranged, damaging push that can help you maintain distance while you wear down an enemy.

Combos
See General Combos on Movement reduction for ways to take advantage of Snipe during combat. Outside of combat, one point in the Stealth Sense upgrade can help you see where you can stand without triggering combat to guarantee you get that first hit off.

Ricochet + Shrapnel lets you deal some damage to lots of enemies, spreading blood tiles. Stone Savant + Bright Spark can increase the damage to your primary targets while possibly electrifying the blood for extra crowd damage.

See the Weapons section for thoughts on how to build around Quick Reload.

Artillery (particularly with Bombard) gives you so much range, and the movement penalty can be avoided by riding your Wyvern (or just ignored). If you do dedicate your archer to the back-line / mounted combat, you can avoid putting stars in HP / Evasion and instead invest them in Archery, Ranged Expert, or (with Mancer's Stone Savant and a Volskarn Bow / Crossbow) Blaze / Ruin Adept.

Ability Crest vs using the full skill suite
When grabbing a single skill, Richochet or Backscatter are great for dealing damage to multiple targets, while Bombard is great for increasing your range and pushing around enemies.
Melder
Unlocked with 300 XP in Mystic.

The Skills
  • Mend - 4 MP - Delayed - Revive the target and/or heal it for 8-14 HP and cure all negative effects. Range 3.
  • Growth - 4 MP - Create a Growth for 6 turns in an unoccupied tile and heal all adjacent units 2-4 HP. Anyone ending their turn on a Growth heals 5 HP. Range 2.
  • Stalagmire - 3 MP - Inflict -1 Move on a target and surround it with spikes. Range 2-4.
  • Quake - 4 MP - Delayed - Deal 6 physical damage in a 5x5 square in 2-4 tiles. Doesn't deal damage to the caster or to units on tiles with blood pools.
  • Soilshift - 1 MP - Push 2 on all tiles in a 3-tile wide line than extends up to 3-5 tiles away from you (cardinal directions only).

The Passives
  • Perfect Focus - While at full HP, -1 to all MP costs.
  • Meld Clay - The amount your abilities heal is increased by half of your Geo Adept.
  • Overgrowth - You and adjacent allies recover 1 MP when you have full HP after you are healed.

The Upgrades
  • Focus - +X max MP.
  • Geo Adept - +X damage with physical magic.
  • Healer - Heal targets an additional +X HP with abilities, items, passives, etc.
  • Regeneration - Whenever you are healed, you recover an additional +X HP.
  • Defy Death - Lose X less max HP when KO'd and recover +X HP when reviving or being revived. If you have any ranks in this, you get a 20% chance to automatically revive with 1 HP instead of fading out.

Skill suite
Mend is a powerful single-target heal/revive + dispel, while Growth heals in an aoe and leaves a tile that heals over time.

Stalagmire and Quake are situationally useful for slowing enemies down. Stalagmire can be cast directly on enemies or in front of your team. Quake has such a big area that enemies might pull back entirely to avoid the effect.

Soilshift gives you a push 2 in a decent sized area. While it doesn’t deal any damage innately, the wide area of the push gives it a lot of versatility.

Combos
All healing effects benefit from the Healer and Regeneration upgrades, as well as Overgrowth and the Meditation upgrade. Growth, because it heals in an aoe and then continues healing every turn, works wonders with Overgrowth and Meditation to keep your party’s MP at decent levels if you’re able to keep their HP maxed out. There are also a few pieces of equipment that increase all HP and/or MP recovery received. If an ally is in need of MP, have them stand 2 tiles away from your Melder and cast Growth between them. Then have your Melder stand on top of the Growth tile and end their turn. If both characters have Overgrowth and maximum HP, they’ll recover MP three times. If only your Melder has Overgrowth, then the other character will only recover MP once and the Melder will recover MP twice. If you need more help healing allies and are investing in Geo Adept, Meld Clay can help with that.

Similar to the Growth + Overgrowth combo, constantly healing your characters to maximum HP lets them use Perfect Focus to decrease the MP costs of their skills by 1. As a special note, if your main character is a Dark Augur, they’ll usually have maximum HP even while they’re getting pummeled. Mounted characters don't take any damage (but will still receive healing), so Perfect Focus and Overgrowth combo well with a dedicated mounted character.

Quake doesn’t need as much help as most delayed spells, since it’s a sizable 5x5 square. For an enemy in the center, -1 Move is all it takes normally to keep them in the aoe – assuming they don’t take any physical damage. You can have another character use one of the skills that dispels terrain effects to remove the blood, or use Mystic’s Bloodspike, Ashen's Catalyze, Crysolith's Desecrate, or ice damage to remove the blood. For a party with few sources of physical damage, Quake gets easier to use for damage.

See General Combos for taking advantage of Soilshift's ranged push, and for how Stalagmire can be used for movement reduction.

Ability Crest vs using the full skill suite
In a party using Overgrowth tactics for MP recovery, Growth makes a good choice.
In parties using Bleed / Blind tactics, Soilshift is one of the best push effects.
But if you're doing that, consider having at least one person with the full skill set.
Ashen
Unlocked with 500 XP in Mystic.

The Skills
  • Inferno - 4 MP - Delayed - Deal 8 fire damage in an aoe 1 within a range of 3-5.
  • Thunderbolt - 4 MP - Deal 4 lightning damage to a target in a range of 2-4. Push 1 on all tiles adjacent to the target.
  • Flamelash - 3 MP - Deal 3 fire damage to 2-4 consecutive tiles, starting from an adjacent tile or a Fire tile within 6 tiles of you.
  • Extinguish - 4 MP - Deal 1 fire damage + 2 for every Fire tile within 2 tiles of the targeted enemy, OR restore 4 MP for every Fire tile within 2 tiles of the targeted ally. Put out all Fire tiles within 2 tiles of the target.
  • Catalyze - 2 MP - Deal 4 lightning damage to a tile, electrifies the blood, and then converts all contiguous blood to Oil. Oil inflicts -1 Move to any unit starting on the tile and deals 4 fire damage when dealt fire damage.

The Passives
  • Burning Focus - gain +2 MAG, but increase MP costs of all skills that cost at least 1 MP by 1.
  • Bright Spark - During your turn or delayed abilities, Fire hazard and electrified Blood damage to enemies is increased by Blaze Adept.
  • Fireburst - During your turn or delayed abilities, any flames struck by lightning explode, dealing 3 fire to adjacent tiles.

The Upgrades
  • Focus - +X max MP.
  • Blaze Adept - +X fire/lightning damage.
  • Meditation - Gain +X more MP each time you recover MP.

Skill suite
You have Inferno and Flamelash to deal area damage and create Fire hazards on empty tiles, which you can then use with Extinguish to either deal good damage or restore a lot of MP to an ally.

Thunderbolt, like Marksman's Bombard, deals damage and pushes everything around a target. This is great for moving pushable boulders from the “wrong side” and has some decent battlefield control possibilities.

Catalyze is yet another way to deal electrified blood damage, but it also turns blood into Oil for decreasing Move for potentially the entire field (and can be ignited for extra damage).

Combos
Anything that spreads fire to a lot of tiles can set up powerful Extinguishes, like Inferno / Flamelash, Gatkeeper’s Gate: Pyre, or dealing fire damage to oil (either after Catalyze or to an oil jar). Alternatively, these skills can be used to create swathes of the battlefield that enemies have trouble moving through, and increases the distance you can use Flamelash from.

Fireburst works well with Mystic's Arc or Gatekeeper's Gate: Lightning to spread Fire hazards (particularly off of a previous turn's Inferno or Gatekeeper's Gate: Pyre). Since it doesn't seem possible to have Fire hazards on a Blood tile, you can't use electrified blood to trigger Firebust.

With Bright Spark, Lightning damage double-dips on Blaze Adept ranks whenever you electrify blood.

Catalyze works well with a team that can deal physical damage to a lot of targets to spread blood initially and leave them slowed by the Oil. With just 1 other source of movement reduction (other than Crysolith abilities, which will wipe out the oil), you can guarantee an Inferno hit against most types of targets while also dealing extra damage from igniting the oil. Additionally, you can find accessories that prevent all movement-decreasing effects, so you could use Catalyze to just flood the field with oil for a movement advantage.

Burning Focus is one of a small number of ways to increase your MAG, which makes it useful by itself. But for Trigger Stones in weapons with Stone Savant (or just using a Trigger Stone as a weapon), you get the damage bonus on regular attacks without spending MP. You can combine Burning Focus with Melder’s Perfect Focus and/or Crysolith’s Cold Focus to offset the increased MP costs, or use Melder's Growth / Overgrowth and Meditation to recover your MP.

Ability Crest vs using the full skill suite
Ashen's skills are pretty synergistic, so you might want to just take the full skill suite.

If your party has Gatekeeper's Gate: Pyre or Eidolith's Void Beam, or even another Ashen, then Extinguish by itself has a lot of utility.
In a physical party that isn't using Crysolith's Desecrate, Catalyze provides another method for turning blood tiles into area damage.
Thunderbolt is another decent choice because it helps push around boulders outside of combat while having decent damage and utility in combat.
Marshal
Unlocked with 400 XP in Knight and 300 XP in Vanguard.

The Skills
  • Strike! - 5 MP - Command allies to melee the target if possible, dealing 50% damage. Repeated uses deal reduced damage. Range 2-4.
  • Shoot! - 3 MP - Command allies to shoot the target if possible, dealing 90% damage. Repeated uses deal reduced damage. Range 2-4.
  • Rally! - 3 MP - Heal 1 HP to allies in an aoe 1 and cure their negative status effects. Range 2-4.
  • Move! - 1 MP - Swap the position of allies and grant them +10-20% dodge for 2 turns. Range 3-4 for the initial target, second target must be within 2 tiles of the initial target.
  • Hold! - 3 MP - Create a Fortification for 6 turns. Fortifications reduce physical damage taken by 50%, and are destroyed by any amount of fire damage. Range 3-5.

The Passives
  • Spear Banner - All your spear attacks miss allies, and your basic spear attacks heal allies instead.
  • Fighting Spirit - When you end your turn, heal +1 HP per adjacent enemy.
  • Strategize - When you end your turn, adjacent allies gain +1 Move for 1 turn.

The Upgrades
  • Endurance - +X max HP.
  • Sword / Spear Skill - +X damage with the relevant weapon group.
  • Healer - Heal targets an additional +X HP with abilities, items, passives, etc.
  • Teamwork - +1 STR / MAG per adjacent ally with Teamwork (up to a maximum based on number of ranks).

Skill suite
Strike! and Shoot! allow your party to get off extra attacks. Move! can also help get in extra attacks in cramped spaces.
Rally is helpful for clearing ailments and topping off HP.
Move! and Hold! are both defensive options, the first helping with retreating, while the latter is better for chokepoints.

Combos
As discussed in Knight’s Opportunist section, Strike! and Shoot! are good ways to take advantage of that passive.

Much like Melder’s Growth, Rally! combines well with Healer / Regeneration upgrades and the Melder’s Overgrowth passive / the Meditation upgrade to do everything you want: heal HP, MP, and cure negative statuses. Without investing in Healer (for the Marshal) and Regeneration (for everyone else), Rally! won't contribute much HP, though.

If you Move! an ally that has Vanguard’s Blockade, you get to inflict -1 Move on the enemy and then potentially get your ally out of retaliation range.
Additionally, you could have Zavarde Blind an enemy with a sword strike, use Move! to make Zavarde and Remir change positions, and then have Remir either push the enemy away or simply retreat out of the now-Blind enemy's threat range.

If an ally has a crossbow and Marksman’s Quick Reload, you can use Strike! to let them reload it (if they're in melee range).

Spear Banner lets you use spears with abandon, no longer worrying about whether its worth hitting your ally with an attack or not. Instead, you start asking yourself if it’s worth healing two allies with one attack (or three, with Dragoon’s Giant’s Reach passive) rather than attacking. Much like other healing skills, Healer / Regeneration / Melder’s Overgrowth passive / Meditation all increase the viability of heals. Spear Banner + Strike! and/or Knight’s Counter passive gives more triggers for potentially healing allies. Additionally, it lets you more easily take advantage of the Teamwork upgrade by standing behind an ally and stabbing them plus the enemy behind them for increased healing / damage.

Ability Crest vs using the full skill suite
In general, Marshal’s skills mostly require building around, so only take the whole skill set if you’re building your party to take advantage of at least 2 or 3 of the skills.
Titan
Unlocked with 400 XP in Knight, 300 XP in Chisel, and 150 XP in Vanguard.

The Skills
  • Rock Blast - 2 MP - Deal 3 physical damage to a non-adjacent target in range 3-5 (cardinal directions only). You can instead target certain walls (such as junkstone, ore, and meldstone walls) that are 1 tile thick with an empty tile behind them to break the wall and target in a cone 2 - 4 that deals 6 physical damage. This is one of 2 ways in the game to break these types of walls.
  • Wave Crash - 2 MP - Pull all targets in a straight 4-tile long line 2 tiles, then attack the adjacent tile for 70-90% weapon damage and push 1.
  • Meteor Slam - 3 MP - Delayed - Deal 150-200% weapon damage to a tile in range 2 (cardinal directions only), then 7-9 damage to adjacent tiles, create Spikes, and push adjacent tiles 2. This skill scales with STR and weapon skills for the direct attack, and 1x your MAG and Geo Adept for the damage to adjacent targets.
  • Suplex - 2 MP - Swap places with an adjacent target, and deal physical damage equal to 1 + 1-3 per difference between your STR and the target's.
  • Sanctify - 1-3 MP - Push 1 on all adjacent tiles, then create a Power Sigil on your tile for 6 turns. A Power Sigil increases STR by 3 while standing on it.

The Passives
  • Brute - During your turn and your delayed abilities, push damage to enemies is increased by +2.
  • Vengeful - Gain +2 STR while below 50% HP.
  • Full Power - Deal +1% more club, fist, and shield damage for each HP you have over 5.
  • Undying - When you prepare a delayed weapon attack, become unable to go below 1 HP for 1 turn. Cannot be reapplied for 2 turns.

The Upgrades
  • Endurance - +X max HP.
  • Evasion - +X% dodge chance.
  • Flail / Fist Skill - +X damage with the relevant weapon group.
  • Geo Adept - +X damage with physical magic.
  • Defy Death - Lose X less max HP when KO'd and recover +X HP when reviving or being revived. If you have any ranks in this, you get a 20% chance to automatically revive with 1 HP instead of fading out.

Skill suite
Rock Blast and Wave Crash both give you a ranged attack option. (Rock Blast also opens up exploration options without relying on the Megasledge)

Meteor Slam and Suplex both let you land a strong hit that requires setup, although Meteor Slam probably still deals less damage than Bide and Suplex just won't work against the toughest enemies (especially on harder difficulties).

Sanctify gives you some breathing room and creates a Power Sigil to pump your STR.

Combos
Wave Crash pulls a target up to 2 tiles before pushing it 1, which procs Bleed for additional damage.

Look at General Combos for tips on how to reduce a target's movement to 0 to take full advantage of Meteor Slam.

Suplex damage can be increased by wearing STR-boosting gauntlets in your weapon slots, the Vengeful passive, Knight’s Brave skill, the Channeler / Teamwork / Stealth Sense upgrades, Sanctify + Melder’s Leylines, etc. The Sigil-scarred option for your companions (unlocked after you beat the game once) gets to double-dip on the benefit from Channeler / Teamwork / Stealth Sense in terms of boosting your STR. If you don’t have Leylines and you choose to Suplex an enemy while standing on your Power Sigil, make sure you push the enemy off (or hit them with fire damage) before they get to smack you with +3 STR. I think you can get to 15 or so STR, which would annihilate many non-boss enemies, but using the Megasledge (or even a Junkstone club) with that much strength would already probably deal enough damage.

Alternately, you can use Suplex to set up Fanger's Flanker passive or Chisel's Shatter skill for allies who act after you.

The Brute passive is a massive damage increase for push strategies. Push a target 4 tiles into an adjacent Fang, and it'll take 21+ damage. Push an enemy into an adjacent enemy, and you'll deal 12+ damage to both of them. Swarm Eye's Vix Mark passive will create a temporary ally behind a target for your next ally to push the target into. Since Brute's additional push damage only applies to enemies, you can have an ally walk behind the target and only deal minimal damage to them. There's a bug with the damage calculation for push stacking: if you have multiple sources of push (such as using Bash with two shields and Vanguard's Shield Bash), if there is a single open space behind the enemy, they'll usually only take collision damage for a single push instance (while they'll take the full expected damage if they're adjacent to an obstacle).

Full Power is one of the few ways of increasing damage from shields, which also take advantage of Brute for damage.
Additionally, Full Power can further amplify a STR-boosted club.

Ability Crest vs using the full skill suite
You're unlikely to want more than one skill from this class.

Rock Blast if you don't want to equip the Megasledge or if you want a flexible ranged option.
Wave Crash for a Bleed team.
Meteor Slam for teams specializing in movement reduction and don't want to use Knight's Bide.
Suplex if you can pump your STR really high.
Sanctify if you and your physical attackers have Leylines.

Dragoon
Unlocked with 400 XP in Knight, 400 XP in Chisel, 500 XP in Mystic, 300 XP in Vanguard, and 300 XP in Marksman, for a minmum of 1900 XP to unlock the Dragoon, making it the most expensive class to unlock.

The Skills
  • Twin Fang - 5 MP - Deal 60-80% of your main-hand weapon's damage to one tile in your main-hand weapon's range (cardinal directions only), then move adjacent to that tile and deal 60% of your off-hand melee weapon's damage to the same tile. If you have a two-handed ranged weapon, your second hit will be with your fist.
  • X-Strike - 4 MP - Attack for 55-65% damage with each of your equipped melee weapons in an X shape adjacent to you. The target tile is hit by both weapons.
  • Storm Assault - 5 MP - Deal 50-70% weapon damage to all targets your weapon can reach in a 270 degree arc. Melee weapons gain +20% damage.
  • Spellstrike - 2 MP - Using this ability doesn't cost an action. The next time you cast a non-delayed spell that targets a unit in range of your melee weapon, deal 50-70% of your weapon damage in addition to the spell's normal effects. This does not trigger any weapon augments, passives, or innate weapon effects (such as trigger stones, Vanguard's Shield Bash passive, or the push innate to shields).
  • Launch - 2 MP - Leap to a tile in range 3-4, leaving behind a Move Sigil. Move Sigils grant +3 movement.

The Passives
  • Tempest - At the end of your turn, and when you use an ability that moves you, deal 1 physical damage to adjacent enemies.
  • Giant's Reach - Gain +1 attack range with melee weapons at the cost of -1 STR. The increased attack range does not add to diagonal reach - spears can attack all 3 tiles in a line, swords and the like can target one tile in range 2 (cardinal direction only), and flails can attack any tile in a 5x5 cube except for the four corners. Non-spear weapons are limited by line of sight. This doesn't change the range of Stone Savant.
  • Weapon Master - Gain +STR equal to your lowest Sword / Spear / Flail Skill.

The Upgrades
  • Endurance - +X max HP.
  • Sword / Spear / Flail Skill - +X damage with the relevant weapon group.
  • Archery - +X damage with bows and crossbows.

Skill suite
Twin Fang and X-Strike both let you attack with both of your weapons, triggering the augments of both. Twin Fang gives you more distance (if your primary weapon has range, like a crossbow / javelin / spear), while X-Strike requires two melee weapons and hits 5 tiles in an X shape.

Storm Assault lets you hit multiple enemies at once, but only triggers your weapon augments on the selected tile.

Spellstrike lets you add some of your weapon damage to your spells, but doesn’t trigger weapon augments.

Launch lets you jump to another tile, leaving behind a Move Sigil to help your allies move farther on future turns.

Combos
Twin Fang and X-Strike let you potentially trigger 5 weapon augments (Trigger Staff + Volksarn weapon), making even better use of Stone Savant than anything else. While you trigger the augments of both of your weapons, you only trigger passives like Vanguard’s Shield Bash or Crysolith’s Fell Shards on the first attack.

Storm Assault deals extra damage with melee weapons. Pneumatic Lance counts as a melee weapon, so you can shoot a wide swathe of tiles at for 90% damage with a single action. This will not trigger Marksman’s Shrapnel passive, despite the Pneumatic Lance’s basic attack triggering it.

Spellstrike works with Pneumatic Lance in (almost) the best possible way: it adds a portion of Pneumatic Lance’s damage to every tile targeted by your spell in range of Pneumatic Lance, and it doesn’t *actually* shoot the crossbow, leaving it loaded. However, if the Pneumatic Lance isn’t loaded, then it doesn’t have a range, so it doesn’t get to add any damage to your spells.

Based on the wording of Mystic’s Leylines, using Launch won’t give you +3 Move for several turns unless you walk back to the Move Sigil you created and end your turn on it.

See Weapon Attacks for thoughts on using Giant's Reach for melee skills at range.

Ability Crest vs using the full skill suite
Twin Fang or X-Strike are great damage-focused additions to any character focused on weapon damage. While you do get a little more flexibility if you have both of them, you can typically just choose one and be fine with it. If you’re interested in the flexibility of Storm Assault or Spellstrike even on a Stone Savant + Bright Spark character, then that is worth grabbing the whole skill set to make sure you still get Twin Fang / X-Strike.

Spellstrike is a good addition to anyone who primarily focuses on spell damage and isn’t using the Stone Savant + Bright Spark combo, particularly if you’re not using the Pneumatic Lance for anything else (like Chisel skills or Storm Assault).
Swarm's Eye
The Swarm's Eye combines ranged attacks with disposable minions.

Vix Flies
Vix Flies are summons created by the Swarm's Eye. They each have 1 HP, 2 STR / MAG, 2 move, and 5 MP. They don't block movement or projectiles, and they usually cannot be activated until the turn after they are created.

They aren't particularly strong, and will die to any instance of damage (unless you used Negate on them), but they still have purposes. They can distract enemies, saving damage that would have gone to your party. They count as allies for Chisel's Shatter skill and Flanker passive. They can sacrifice themselves to neutralize a fire / spike tile. They can prevent an enemy from standing adjacent to your front-line, preventing non-spear melee attacks. They can mop up Wisp Nodes.

The Skills
  • Divebomb - 7 MP - Summons 3 Vixflies that dash in a straight line to attack the first target they hit. Range 2 - 4. The first Vixfly is summoned in front of you, while the other two are summoned to your sides, and they attack in what is effectively a wide line - but each stops after encountering a creature (which they attack).
  • Swarm - 3 MP - Summon a Vixfly and inflict Poison and Itchy for 3t on non-Vixflies adjacent to it. Range 2 - 4. Poison deals 1 Ruin damage every turn (and stacks twice for a single instance of 2 damage). Itchy increases each instance of Physical and Ruin damage by 1.
  • Vix Shot - 0 MP - Destroy an adjacent Vixfly to shoot an attack for 150% - 200% damage and inflict Itchy for 3t. Uses the range of your ranged weapon.
  • Piercer - 4 MP - Fire a piercing shot in a straight line. It deals +10% - +20% damage for each target (ally or enemy) it passes through, but doesn't deal damage to allies.
  • Evixerate - 7 MP - Shoot for 30% - 60% damage. Two Vixlings (which do not stay on the field) attack in an X pattern centered on the target, dealing physical damage. Any Vix flies adjacent to the target also attack it, including any created by this attack (if you have the Vix Mark passive). Uses the range of your ranged weapon. Each Vixling attacks in a 5-tile long diagonal line. The primary target of the attack takes damage from the initial attack, both Vixlings, and up to 4 Vixflies.

The Passives
  • Vix Mark - Weapon attacks summon a Vixfly for 6t behind the primary target (if it can). It acts next round.
  • Spellswarm - When you cast a non-delayed magic spell, the nearest Vixfly becomes able to cast it. Each Vixfly can only learn one spell.
  • Vixling - A tiny Vixling accompanies you, granting +8% dodge and inflicting Itchy for 3t on adjacent physical attackers.

The Upgrades
  • Evasion- +1% dodge chance.
  • Archery - +1 damage with bows / crossbows.
  • Geo Adept - +1 damage with physical magic.
  • Teamwork - +1 STR / MAG per adjacent ally with Teamwork (up to a maximum based on number of ranks).

Skill suite
Divebomb, Piercer, and Evixerate let you deal moderate damage to several targets.
Swarm applies Poison and Itchy (which can be replicated by Chisel's Venom passive and the Vix Horn weapon augment).
Divebomb and Swarm both create Vix Flies.
Vix Shot and Evixerate deal good damage to a single target, but require well-positioned Vixflies to allow Vix Shot or to pump up Evixerate.

Combos
Knight's Counter or an ally using Marshal's Shoot! or Strike! can trigger extra instances of Vix Mark for cheaper summons. If you push the target 1 tile, the Vix Fly will try to spawn on an occupied tile and get cancelled - but if the attack pushes the target 2 or more tiles, you'll still spawn the Vix Fly behind the target's original location without counting as an obstacle for the push.

All of the expendable Vixflies can help waste enemy turns or provide damage bonuses for Chisel's Shatter skill and/or Flanker passive. Be aware that the Vixfly isn't summoned until after your attack completes, so the attack that summons the Vixfly won't get those benefits. Also, since Vixflies don't block movement, you need way too many of them in order to activate Fanger's Trapper passive.

If you really like the idea of summons, user Mancer's Projection with Vix Mark / Divebomb to create more Vixflies each turn. Be aware that Divebomb doesn't count as a spell, so Mancer's Echo Cast won't duplicate it.

Itchy, from the Swarm skill and Vixling passive, increases each instance of physical / ruin damage. If an Itchy target is surrounded by 4 Vix Flies, a Volskarn weapon attacking with Evixerate deals a total of 9 hits. Mystic's Bloodspike deals 2 hits. A character with 2 shields, Vanguard's Shield Push passive, Crysolith's Fell Shards passive, and using Knight's Bash / Vanguard's Smite gets up to 5 hits if the target's push movement is blocked by, say, a Vix Fly (the initial hit, the innate push from the shield, the ruin damage from Fell Shards if the target is on ice, the push from Shield Push, and the push from the skill). Several Dragoon skills give a second attack which allows for 11 damage instances (2x from skill, 2x from shield's innate passive push, 1 from Fell Shards, 1 from Shield Bash, 5 from weapon augments).

Spellswarm is a bit limited, since Vix Flies only have 5 MP, but not useless. If Zavarde has Vix Mark, he can make a new Vix Fly every turn - then, if Remir has Spellswarm, she can double every spell she casts (assuming your enemies don't keep killing the Vix Flies). Also, the Melder passive Overgrowth can be used to give surviving Vix Flies a little more MP to possibly eke out another cast. Some interesting spell ideas:
  • Absorb - dispel enemy buffs, ally debuffs, and terrain effects. Teaching this to a Vix Fly allows you to use Sunder on bosses that become immune to it at the end of their turn - use Sunder at the start of the round, then have your Vix Fly clear it off with Absorb at the end of your turn.
  • Soilshift - at 2 MP, a Vix Fly can cast on two separate turns (or three, with one instance of Overgrowth), pushing around a huge chunk of the field.
  • Stalagmire - Drop spikes, limiting enemy mobility options. At 3 MP, Overgrowth lets a Vix Fly cast this on two turns, letting you further gum up the battlefield.
  • Fade - The above combo lets you make 2 allies invisible every turn, or save up several Vix Fly casts and make a larger chunk of your team invisible all at once. At 3 MP, Overgrowth lets you get up to 3 casts per turn.
  • Ice Lance - create ice and push enemies. 3 MP, so Overgrowth can give you extra casts.
  • Deep Frost - Deal damage and lower enemy Move, allowing you to get off delayed abilities more easily.

    Ability Crest vs using the full skill suite
    Divebomb is a good pick for a melee character to spend MP on to make summons to waste enemy turns.
    Piercer is a good pick for a ranged character who wants some bonus damage.
    Evixerate combos well with Divebomb and Swarm, so you probably want to take the full suite for best use of that ability.
Mancer
Unlocked with 300 XP in Mystic and 400 XP in Melder.

The Skills
  • Judgment - 4 MP - Delayed - Deal 8 lightning + 8 fire damage to one tile in rang 4-6.
  • Doom - 5 MP - Target gains the Doom status, which deals 16 Ruin damage after 3 turns. Range 2-4.
  • Bless - 3 MP - Target gains the Bless status, which heals 16 HP and cures all negative status ailments after 3 turns.
  • Decree - 3 MP - If the target's HP and MP are within 7-10 of each other, swap them. Range 4.
  • Echo Cast - 0 MP - Toggle ability - Your next non-delayed spell is additionally cast as a delayed spell. The delayed spell's cast costs 0-2 MP less.

The Passives
  • Stone Savant - Trigger stones wielded in hand have range 3, and trigger stones within weapons are affected by half your MAG and Blaze / Ruin Adept.
  • Defiance - While preparing a delayed ability, you take 25% less damage.
  • Dark Omen - When you end your turn preparing a delayed ability, inflict -2 MAG to enemies in its area for 1 turn.

The Upgrades
  • Focus - +X max MP.
  • Blaze / Ruin Adept - +X damage with Fire/Lightning or Ice/Ruin magic.
  • Healer - Heal targets an additional +X HP with abilities, items, passives, etc.
  • Channeler - Gain +X STR / MAG while preparing a delayed ability and for 1 turn after.
  • Defy Death - Lose X less max HP when KO'd and recover +X HP when reviving or being revived. If you have any ranks in this, you get a 20% chance to automatically revive with 1 HP instead of fading out.

Skill suite
All of the skills are difficult to get the best use out of.

Judgement is a single-target delayed damage spell. Doom is easier to hit, but takes longer (and some bosses will remove the ailment before it triggers).
Bless is a very slow, pro-active heal.
Decree is highly situational, and I'm not sure what the best use for it is.
Echo Cast lets you cast a non-delay spell a second time after a delay, which can open up interesting opportunities.

Combos
Look at General Combos for tips on how to land Judgement using movement reduction.

See General Combos for notes on how to use Stone Savant to increase weapon damage, or for using melee skills at a range.

With Defiance, you reduce the damage you take while casting any delayed ability, including Echo Cast and non-spell delayed actions like Knight's Bide.

Dark Omen counts as another debuffs for how much damage Chisel’s Shatter does, making it good for many bosses.

While you can Echo Cast any non-delayed spell, you’re looking for things that are better than just directly casting a delayed spell like Judgment or Gatekeeper’s Gate: Lightning. In my investigation, it seems like Echo Cast counts most things that scales off of MAG as a spell (such as Fanger’s Fang and Caltrops), but also includes some other skills, like Mystic’s Absorb while excluding things like Fanger’s Sharpen and all Gatekeeper skills. You can combine Dragoon’s Spellstrike and Echo Cast onto the same spell – the original cast will add a portion of your weapon damage, but the delayed cast won’t. This, combined with Ashen’s Burning Focus passive (and maybe Gatekeeper's Gate: Anchor), allows for Dark Augurs to spend frankly ridiculous amounts of MP in one turn to trigger their MP recovery.

If the spell you use Echo Cast on is tied to your position (like Melder's Soilshift, Mancer's Flare, or Crysolith's Ice Lance), allies can push/pull you (or your Wyvern can pick up up and move you somewhere else) to change the location of the initial and delayed casts.

Interesting choices for Echo Cast include:
  • Mystic’s Arc – As a multi-target spell that electrifies blood, you can deal decent damage with the initial cast (especially with Ashen’s Bright Spark) and then enemies will try to avoid the targeted tiles during their turn, but probably won’t be smart enough to avoid the blood (which will electrify again).
  • Fanger’s Fang – Create a Fang at an enemy's position, pushing them away. When the delayed spell casts, push and damage the first Fang with the second one. It's highly luck-based as to whether the second cast will cause the first Fang to do anything useful. Alternately, create a Fang, Bash someone into it, the Fang pops. Enemies will avoid the tile because it’ll deal damage, so you get to create another Fang there before your next turn comes around, letting you trigger it again.
  • Fanger’s Caltrops – Especially with Fanger’s Sharpener passive, you can create a swathe of damaging difficult terrain this turn, deal additional damage if any enemies move into it before your next turn, and then inflict Bleed on any enemies who move into it on following turns. You can find options to further increase Spike damage to make this deadlier.
  • Melder’s Soilshift – Combined with Titan’s Brute passive, you can deal up to 6 damage to a large chunk of enemies on the initial cast, and / or move them out of position (and possibly clumping them up) at the end of their turn, which lets you Soilshift them all into each other again.
  • Melder’s Growth – Your initial cast can only target an unoccupied tile, but the delayed cast will still complete and trigger the aoe heal. You still only have one Growth effect in the tile, though. This is mostly interesting to trigger Melder's Overgrowth.
  • Ashen’s Flamelash – Any enemies you target with the initial cast will try their best to move out of the way, meaning the delayed cast will leave fire hazards, which can be a new starting point for next turn's cast.
  • Marshal’s Rally! – You can double up on all the normal synergies for twice the HP / MP restored.
  • Mancer’s Bless / Eidolith's Fade – cast the spell on an ally that hasn’t acted (or yourself), move the ally somewhere else, and then move a second ally into the original target tile and you’ll end up affecting two allies per turn. Fade also triggers Stealth Sense for a damage buff.
  • Crysolith's Deep Frost - As an aoe 1, you can hit with both instances on a Blind enemy or someone with 2 or less movement. If you have Crysolith's Chilling Curse and are targetting only a single enemy, you can lower a lone enemy's movement by 2 (guaranteeing the delayed spell will hit against most targets).
  • Crysolith’s Desecrate – If there's enough blood / ice, enemies won't be able to avoid the damaging tiles (although they are smart enough to try) on the delayed cast. As mentioned in various places, delayed spells with large areas can be great for messing with the enemy AI. Just be aware that if the enemies deal physical damage to any of your allies who are adjacent to ice, they’ll take damage from Desecrate, too. If you deal physical damage to enemies on the ice after the first cast, they can take the increased Ruin damage from converting blood on the second hit as well.

Ability Crest vs using the full skill suite
Echo Cast has lots of utility for other spellcasters (particularly Dark Augurs who need ways to spend their final 10 MP as quickly as possible).
In a party with lots of movement reduction, Judgement is a good pick.
Everything else is a little too finicky.
Eidolith
Unlocked with 500 XP in Mystic, 300 Xp in Melder, and 300 XP in Ashen.

The Skills
  • Flare - 3-5 MP - Deal 4 fire damage to an adjacent target and inflict Blind in aoe 1 (including you).
  • Void Beam - 5 MP - Delayed - Deal 6 fire damage in a line up to 4-6 tiles long. The final tile of the beam blinds for 2 turns. Tiles adjacent to the beam are pushed away from the beam. If you are moved, the beam location moves with you.
  • Null Void - 3 MP - Dispel all status effects and terrain effects and inflict -2 MAG for 3 turns in an aoe 1. Range 2 - 4.
  • Fade - 3 MP - Make an ally in range 1 - 3 invisible for 1 turn.
  • Projection - 7 MP - Create an illusory duplicate of yourself with no armor / accessories, -5 max HP / MP, and -2 STR / MAG that lasts for 3 turns. It doesn't get to act the turn it was created, and cannot be healed. Range 1-3. If you have enough max MP, your Projection can also cast Projection.

The Passives
  • Counter Fade - When hit by a melee weapon, cast Fade on yourself.
  • Inner Eye - Blind lasts 1 turn longer on you. Deal +20% damage while Blind. Deal +20% damage against Blind targets.
  • Absorb Aura - At the end of your turn, steal 1 MP from adjacent enemies.

The Upgrades
  • Focus - +X max MP.
  • Blaze / Ruin Adept - +X damage with Fire/Lightning or Ice/Ruin magic.
  • Stealth Sense - Gain +1 STR / MAG per rank while invisible and for 1 turn after. If you have any ranks in this, you can see the vision ranges of enemies within 6 tiles when you press the 'Highlight All' button.

Skill suite
Flare deals damage in melee and Blinds both you and the target, but you'll recover from Blind before your next turn (unless you have Inner Eye).
Void Beam is good for area denial, creating a lot of fire hazards and pushing things around. Additionally, you can use this to interact with certain semi-secret areas.
Null Void is the only aoe dispel your party has access to, but with the debuff to MAG be mindful about targetting your spellcasters.
Fade lets you turn a target invisible for a turn. It’s not foolproof, since area effects can still target them accidentally, but enemies won't target them.

Projection creates a weaker copy of yourself without your armor and accessories, but with all of your skills and upgrades. Meaning that your Projection can create a Projection of itself, and so on, until the weakest Projections don’t have enough max MP to do it again. That degeneracy is limited to an extent by the fact that Projections don’t get to act on their first turn, and the skill itself has a 3 turn cooldown.

Combos
Flare inflicts Blind on yourself, so you can either wear an accessory to make you immune to Blind, or lean into it and use the Inner Eye passive and an accessory to increase your MAG while blind to buff your damage.

Normally, when talking about delayed spells, the discussion revolves around how to limit the enemy’s mobility to keep them in the area. With Projections and Void Beam, though, you can instead just focus on filling the entire battlefield with delayed spells, leaving no safe area for enemies to stand and causing complete chaos. [Further research needed] I don’t know what order delayed abilities go off in. Is it in the order that you used the abilities during your turn, or the reverse? If you go with this strategy, it may be helpful to figure that out so that you can try for tricky plays like having both Zavarde and Remir cast Void Beam such that the first cast pushes the second character so that their cast gets moved to target an enemy that thought they were safely standing next to Void Beam’s damaging tiles. This is probably overly complicated, but the complete insanity of a Void Beam party could be fun for a little while.

Absorb Aura + Meditation lets you get more MP back per turn, which is particularly good for Dark Augur survivability in melee.

Counter Fade is the easiest way to trigger invisibility on yourself to activate the STR / MAG buff from Stealth Sense.

All of the immobilizing strategies discussed before are helpful for landing Void Beam’s main damage.

Null Void is good for removing enemy buffs, and has little negative effect on allies who simply don’t use their MAG score. Additionally, there are accessories that increase your STR while your MAG is lowered. And you can always just use Null Void again to cure the MAG penalty...

While your Projections have less STR / MAG, certain forms of damage (like push damage with Titan's Brute passive, or Bright Spark) aren’t impacted at all. If you focus on one or more of those, you can create high damage-dealing copies to gum up the battlefield. Additionally, Projections count as allies for things like Chisel’s Shatter skill or Flanker passive. Dark Augur Projections are significantly harder to kill than others, and can bypass the inability to heal by recovering MP.

Ability Crest vs using the full skill suite
Projection is a great skill for anyone to pick up, particularly for character who ignore their STR / MAG scores, as long as they can afford the MP cost.

If you’re going to be using Void Beam, you might as well also pick up Projection (so that you can have at least twice as many Void Beams per turn), so you’ll want the full skill set for that.
Crysolith
Unlocked with 500 XP in Mystic and 400 XP in Ashen.

The Skills
  • Ice Lance - 4 MP - Deal 3 ice damage and push 1 in a 3x1 wide line adjacent to you or a range 2-4 line.
  • Deep Frost - 4 MP - Deal 2 ice damage and inflict -1 Move for 1 turn in an aoe 1. Range 2-4.
  • Dark Ice - 5 MP - Delay - Deal 7 ice damage and freeze the tile solid for 3 turns. Range 3-5.
  • Desecrate - 3 MP - Deal 4 ruin damage to all contiguous tiles with blood and/or ice. Deal an additional 4 ice damage to all of those tiles with blood, and convert it to ice. Range 1-3.
  • Despair - 2 MP - Dispel all status effects and terrain effects on a tile in range 3. Deal 2 ruin + 1-3 ruin damage per dispelled effect.

The Passives
  • Cold Focus - While standing on ice, reduce all MP costs by 1. At the end of your turn, gain +3 MP per frozen creature. There is one fight where this will refill your MP every turn.
  • Fell Shards - If the primary target of your weapon attack is on ice, deal 1 ice damage to adjacent enemies and 2 ruin damage to the target.
  • Verglas - At the start of combat, gain Negate for 2 turns, and negate status isn't removed when you would take only 1 or 2 damage.
  • Chilling Curse - When you end your turn preparing a delayed ability, if there is only one enemy within its area, create Ice under them and inflict -1 Move for 1t.

The Upgrades
  • Focus - +X max MP.
  • Ruin Adept - +X ice / ruin damage with magic.
  • Meditation - Gain +X more MP each time you recover MP.

Skill suite
Ice Lance, Deep Frost, and Desecrate are all area damage. Ice Lance can push up to 5 tiles when fully upgraded. Deep Frost is good for movement reduction. Desecrate chains together blood and ice tiles to damage a lot of enemies - probably some allies too, but does it really count as friendly fire if only ice is involved?

Deep Frost is a delayed spell to let you ignore one target. Since the frozen target only takes Ruin or Fire damage (and fire damage thaws the target), there aren't many situations where this is helpful compared to other single-target delayed spells.

Despair is a damaging dispel, useful for stripping the occasional buff from an enemy or as a finisher for a Blind / Bleeding / Sundered / Poisoned / Itchy / etc enemy.

Combos
Cast a long Ice Lance at an adjacent Bleeding target to get a long push for a large Bleed damage proc.

Deep Frost + Chilling Curse + Mancer's Echo Cast will, when only a single living enemy is in the aoe at the end of your character's turn, reduce that enemy's movement by 2, easily allowing you to hit them twice with Deep Frost (and any other delayed aoe you want to throw in).

See General Combos for tips on how to land Dark Ice. If it hits, you can either ignore the target for 3 turns or toss ruin damage at the icicle until it dies. Toss Doom (or poison from Chisel’s Venom passive) on the target you’re putting on ice and they might just die before thawing out without any further attention from you.

Desecrate works well if you can flood the field with blood (such as from a Marksman’s Ricochet + Shrapnel) and/or ice (such as with Ice Lance, Deep Frost, or Gatekeeper’s Gate: Blizzard). You can then keep Desecrating the same patch of ice every turn (even better with Echo Cast) to take down a swarm of enemies.

Ability Crest vs using the full skill suite
Ice Lance and Deep Frost are great bread-and-butter skills, with Desecrate and Despair being good conditional skills if you take the whole skill set. If you have a Gatekeeper in the party tossing out Gate: Blizzards, you might want to just grab Desecrate to keep up a steady stream of aoe damage.

In the few cases where you want to use Despair to strip off enemy statuses before their turn starts, that skill is also a good pick for an ability crest slot.
Gatekeeper
Unlocked with 500 XP in Mystic and 400 XP in Ashen.

The Skills
  • Gate: Anchor - 1 MP - Teleport to the target at the end of your turn. Doesn't cost an action. Can't be used after acting. Range 2-4.
  • Gate: Stalactites - 5 MP - Deal 2 physical damage in an aoe 1, and create Spikes in the center tile. Range 2-4.
  • Gate: Pyre - 6 MP - Create a Pyreclot that deals 1 fire damage to adjacent tiles. After a Delay, deals 9 fire damage in 2 tiles. Range 2-4. Dealing ice damage to a Pyreclot disables its second explosion. This doesn't count as a Delayed spell, so it doesn't trigger the Channeler upgrade.
  • Gate: Blizzard - 6 MP - Delayed - Deal 7 ice damage in an aoe 2. Range 2-4.
  • Gate: Lightning - 5 MP - Delayed - Deal 6 lightning damage in two aoe 1 areas that are adjacent to each other. Deal +6 lightning damage if the target is adjacent to at least 2 tiles in the area of effect. Range 2-4 for the first aoe. The second aoe must be exactly 3 tiles away from the first.

The Passives
  • Massacre - Your magic deals +10% damage per enemy adjacent to the target.
  • Antipode - During your turn, melting Ice deals fire damage equal to your Blaze + Ruin Adept, and you can melt Ice with lightning damage.
  • Element Master - Gain +MAG equal to half your lowest Blaze / Geo / Ruin Adept skill rounded up.
  • Gate Hand - You can interact with objects far away from you, even during combat.

The Upgrades
  • Focus - +X max MP.
  • Blaze / Geo / Ruin Adept - +X Fire/Lightning, physical, or Ice/Ruin damage with magic.
  • Channeler - Gain +X STR / MAG while preparing a delayed ability and for 1 turn after.
  • Meditation - Gain +X more MP each time you recover MP.

Skill suite
Gate: Anchor lets you move up and do stuff recklessly close to the enemy while remaining safely outside of enemy threat range - and some fights have an inaccessible nook you can Anchor into safely while lobbing spells out.

Gate: Stalactites and Gate: Pyre are your options for immediate effects and terrain control. Stalactites happen to have piddling damage, while Pyre will hit Blind targets hard and create a huge swathe of fire to slow down enemies.

Gate: Blizzard and Gate: Lightning are your delayed spells. Blizzard is better against a few Blind targets near each other, while Lightning deals great damage against someone reduced to 0 movement.

Combos
Gate: Anchor is great for everything *except* letting you end your turn by healing on a Melder’s Growth. In my testing, I tossed an anchor on Growth A, then ended my turn on Growth B. Somehow, when my turn ended, I didn’t receive healing from either Growth.

Gate: Pyre is great at flooding an area with flames to let you get off a strong Ashen’s Extinguish on your next turn. With Ashen’s Fireburst passive and a lightning spell like Gate: Lightning or Mystic’s Arc, you can also explode a lot of fire tiles for extra damage. If you Arc all 4 tiles surrounding a target, you’ll deal 12 damage (or more if Fireburst scales off of Blaze Adept).

Antipode works great with a combination of physical damage dealers, Crysolith's Desecrate, and any source of Lightning damage. Create ice through any means (like Desecrate or Gate: Blizzard). Make blood on the ice, then use lightning damage to electrify the blood and melt the ice while dealing fire damage. Optionally, use Desecrate to turn all the blood back to ice to set the combo back up again - or melt the ice with Ashen's Catalyze, and use a fire spell to ignite all the oil.

With liberal use of pushes (and ice, to facilitate the pushing) to force enemies together, or terrain hazards to make enemies bunch themselves up, you can get extra damage out of the Massacre passive. Melder's Soilshift is particularly useful in bunching up enemies.

In order for Element Master to tie Ashen's Burning Focus for damage, you'd need to spend 24 stars total for 2 ranks each in Blaze / Geo / Ruin Adept. Incidentally, 24 stars would get you rank 4 in a single [x] Adept. See Upgrades for a description of how many stars it takes to rank up each upgrade, as well as a rough estimate of how many stars you can expect to earn in a playthrough.

Dark Augurs make good use of the Gatekeeper spell list. Gate: Anchor lets you tweak your MP expenditure each turn, while the Gate spells are expensive enough to quickly eat through your final 10 MP.

Ability Crest vs using the full skill suite
You could definitely get by with just picking one of Gate: Pyre / Blizzard / Lightning, but then you lose out on access to Gate: Anchor. And having access to all three of the powerful elemental gates lets you use the right one for each situation. For anyone not focusing on expensive elemental aoe spells, Gate: Anchor is a great pick for a hit and run playstyle.
War Beast
The Skills
  • Shove - 0 MP - Push 1 on a target in 1-2 tiles, then move forward 1 tile.
  • Drag - 0 MP - Pull 1 on a target in 1-2 tiles, moving backwards.
  • Saddle - 0 MP - Pick up an adjacent ally, causing them to mount you. If you are already mounted, instead drop the mounted ally in a space adjacent to you.
  • Chomp - 3 MP - Deal 75-125% damage and inflict -1 STR / Move for 2 turns. Range 1.
  • Dash - 4 MP - Move 1-2 tiles. This doesn't consume an action.

The Passives
  • Cavalry - While you have a rider, take -25% damage.
  • Free Spirit - While you have no rider, gain +1 STR / MAG.
  • Combat Supplies - At the end of your turn, recover 1 MP. When you are KO'd, your rider gains half your MP and Negate for 3 turns.
  • Treader - Take no damage from walking on Fire or Spikes, and your Move and Jump cannot be reduced.

The Upgrades
  • Endurance - +X max HP.
  • Focus - +X max MP.
  • Regeneration - Whenever you are healed, you recover an additional +X HP.
  • Clever - Unlocks the Knight and Mystic classes. You do not qualify to unlock any other classes even if you meet the XP requirements. Knight and Mystic skills and passives cost +50% XP.

Skill suite
Shove, Drag, and Saddle all let you maneuver an ally without damaging them. Shove and Drag can also be used to reposition enemies, and the loss of Wyvern damage isn’t particularly important since, without Free Spirit and Knight’s Brave, your wyvern just won’t deal much damage with attacks in the first place.

Dash can serve to help a wyvern get in position better, particularly when you want to adjust the position of an enemy / ally but don't want to end your turn next to them.

Combos
With Treader, you can safely walk across fire / spikes to open up paths for the rest of your party. You can hold Shift (by default) to manually choose the route you'll take, which can force you to walk through fire instead of jumping over it.

Cavalry makes you a better tank. Since your rider can’t be targeted by enemies, this is really good for keeping a squishy character alive (or someone with Melder's Perfect Focus unharmed). Additionally, with Combat Supplies you can prepare for a tactical / inevitable demise for your wyvern to restore the rider’s MP and further protect them from the first damage source they take. As a note, your Wyvern doesn't lose max HP on death, which makes this a strategy you can use frequently.

Free Spirit is mediocre, and doesn’t work when you’re tanking for an ally. However, if you combine it with Knight’s Brave or Mystic’s Draw Power / Warmage passives, you might be able to turn your wyvern into a decent damage dealer - but the lack of a weapon, better spells, or ranking up Blaze / Ruin Adept means it'll never fully compete with Remir or your Diecasts.

Knight / Mystic passives
You Wyvern's physical damage is too low to make Counter / Opportunist / Stoic worthwhile.

Draw Power + Warmage can bump Flame from 3 damage to 6, or increase Bloodspike's conditional damage from 7 to 10, if there's enough adjacent fire/blood while an enemy is adjacent. The situations where they help are just too rare to be worthwhile.

Leylines, at least, is something that you can build around. It's probably not worth running Titan's Sanctify to create a Strength Sigil specifically for your Wyvern unless you have a dedicated rider who also runs Leylines (and probably uses ranged weapons), but the Fortification created by Vanguard's Fortify / Marshal's Hold! combine with the Cavalry passive to reduce physical damage by about 63%, which is a sizeable increase in survivability for your Wyvern (and thus for whichever character is currently riding it).

Wyvern builds
Since your wyvern can’t use ability crests and only has access to 3 skill sets, this section is different than for other classes.

War Beast + Knight
Shove / Drag / Saddle are great for repositioning, and Brave can buff your allies before they act to give them 2 turns of bravery. The added push distance of Bash has marginal utility over Shove. Charge can help get to distance Wisp nodes. Bide and Ready are effectively useless on your Wyvern.
By the time you unlock Knight for your Wyvern, the damage output is near worthless unless you run Free Spirit, use Brave, and throw in Leylines + Titan's Sanctify to bring your STR up to 9. At that point, you're spending two actions to let your Wyvern deal similar damage to your actual warriors for one turn.

War Beast + Mystic
Shove / Drag / Saddle / Burst are great for repositioning. Arc helps mop up multiple Wisp nodes. Absorb can remove blind / other ailments from allies and buffs from enemies. This is my favorite combination.

Knight + Mystic
Bash / Burst are good for repositioning, but Bash slightly hurts your allies and you lose out on the flexibility of Drag and Saddle for maneuvering allies. In exchange, you get both Brave and Absorb for full-on utility.
This is my least favorite combination.

War Beast + Nothing
A special mention here for a class 'combo' to focus on increasing your Wyvern's HP as much as possible.
You have Shove / Drag / Saddle for repositioning, Cavalry + Combat Supplies + Treader, and can spend 6+ more stars on HP compared to learning the Clever upgrade and spending enough XP in Mystic to learn all the skills at rank 1.
Your Wyvern might be able to tank better with Leylines + Fortifications than going this route, but I'll at least mention it.

Wyvern passive combos
For a fully support Wyvern, your best options are likely Cavalry + Combat Supplies and either Treader or Leylines.
Treader is particularly important if you create a lot of Spike or Fire hazards, while Leylines is good if you make good use of Sigils / Fortifications.
Upgrades
For every 300 XP you gain with a class, you'll gain a star with that class. You can spend stars in the UPGRADES tab of your character sheet to increase stats and gain abilities that persist regardless of your selected class.

Upgrade List
  • Endurance - Increases maximum HP. Available to Knight, Vanguard, Marshal, Titan, Dragoon, and War Beast.
  • Focus - Increases maximum MP. Available to Mystic, Melder, Ashen, Mancer, Eidolith, Crysolith, Gatekeeper, and War Beast.
  • Evasion - +X% dodge chance for physical attacks. Available to Chisel, Fanger, Marksman, Swarm's Eye, and Titan.
  • Sword Skill - +X base damage with swords. This scales with your skills' percentage increases to damage when making a sword attack. Available to Knight, Chisel, Vanguard, Fanger, Marshal, and Dragoon.
  • Spear Skill - +X base damage with spears and javelins. This scales with your skills' percentage increases to damage when making a spear attack. Available to Knight, Chisel, Vanguard, Fanger, Marshal, and Dragoon.
  • Flail Skill - +X base damage with flails. This scales with your skills' percentage increase to damage when making a flail attack. Available to Knight, Chisel, Vanguard, Fanger, Titan, and Dragoon.
  • Fist Skill - +X base damage with unarmed attacks and gauntlets. This scales with your skills' percentage increase to damage when making a flail attack. This upgrade is cheaper than the Sword / Spear / Flail version by 1 rank (first rank is 1 star, second rank is 3 stars, third rank is 5 stars - other upgrades cost 3 stars for the first rank and 5 stars for the second). Available to Titan.
  • Archery - +X base damage with bows and crossbows. This scales with your skills' percentage increase to damage when making a bow or crossbow attack. Available to Fanger, Marksman, Dragoon, and Swarm's Eye. (Why isn't this called Archery Skill, or Ranged Skill?)
  • Ranged Expert - +5*X% weapon damage per rank per tile between you and the target. Available to Marksman. This should also work with spears / flails, particularly with Dragoon's Giant's Reach passive.
  • Blaze Adept - +X to base damage with Fire / Lightning spells. This is scaled by your skills' fire or lightning scaling modifier (Mystic's Flame is 100%, Ashen's Inferno is 200%, Eidolith's Void Beam is 150%). This also scales damage of Fire / Lightning triggers with Mancer's Stone Savant passive, as well as Fire hazard and electrified blood damage (during your turn) with Ashen's Bright Spark passive. Available to Mystic, Ashen, Mancer, Eidolith, and Gatekeeper.
  • Geo Adept - +X to base damage with physical spells. This is scaled by your skills' physical scaling modifier (Mystic's Burst is 100%, Titan's Meteor Slam is 100% [for the adjacent damage only]). This doesn't increase the physical damage dealt by Spikes (such as Mystic's Bloodspike, Fanger's Caltrops, or Gatekeeper's Gate: Stalactites) unless you also have Fanger's Sharpener passive (which increases Spike damage by 50% of your Geo Adept). Increases your healing effectiveness at 50% if you have Melder's Meld Clay passive. Available to Mystic, Fanger, Melder, Titan, Swarm's Eye, and Gatekeeper.
  • Ruin Adept - +X to base damage with Ice / Ruin spells. This is scaled by your skills' ice or ruin scaling modifier (usually 100% for most skills, but Mancer's Doom is 200%, and Eidolith's Null Void appears to scale the MAG penalty by 50% of Ruin Adept). This also scales damage of Ice / Ruin triggers with Mancer's Stone Savant passive. Available to Mystic, Mancer, Eidolith, Crysolith, and Gatekeeper.
  • Healer - Heal targets an additional +X HP with abilities, items, passives, etc. This is scaled by your skills' preservation scaling modifier (200% for Melder's Mend and Mancer's Bless, 100% for Melder's Growth and Marshal's Rally!). Available to Vanguard, Melder, Marshal, and Mancer.
  • Regeneration - Whenever you are healed, you recover an additional +X HP. I don't think that the preservation scaling modifier of the skill impacts how much benefit you get from Regeneration. Available to Melder and War Beast. Max 3 ranks.
  • Meditation - Gain +X more MP each time you recover MP. Available to Ashen, Crysolith, and Gatekeeper.
  • Channeler - Gain +X STR / MAG while preparing a delayed ability and for 1 turn after. Available to Mancer and Gatekeeper.
  • Defy Death - Lose X less max HP when KO'd and recover +X HP when reviving or being revived. Additionally, you have a X*20% chance to automatically revive with 1 HP instead of fading out. Available to Vanguard, Melder, Titan, and Mancer. Max 3 ranks. I'm uncertain if this reduces each instance of max HP loss from death or if it reduces the total HP loss from death (if you die 10 times at rank 3, will you have any max HP reduction?).
  • Stealth Sense - Gain +1 STR and MAG per rank while invisible and for 1 turn after. If you have any ranks in this, you can see the vision ranges of enemies within 6 tiles when you press the 'Highlight All' button. Available to Chisel and Eidolith. Max 3 ranks.
  • Teamwork - Gain +1 STR and MAG for each adjacent ally with Teamwork (limited by the number of ranks you have). Available to Marshal and Swarm's Eye. Max 3 ranks.
  • Clever - Unlocks the Knight and Mystic classes. You do not qualify to unlock any other classes even if you meet the XP requirements. Knight and Mystic skills and passives cost +50% XP. Available to War Beast.


The effectiveness of Sword / Spear / Flail / Fist Skill, Blaze / Geo / Ruin Adept, and Healer on a given skill can be seen by looking at the top-right corner of the skill description box. For [weapon] Skill, crossed swords get converted into the relevant weapon type based on what weapon you're attacking with.

Looking at Knight's Bide, we see that (without upgrading its rank) it adds 250% of your weapon skill.

Looking at Mancer's Judgment, we see that it adds 200% of your MAG, and 200% of your Blaze Adept (half to the fire damage, and half to the lightning damage).

Star Costs
  • Endurance / Focus / Evasion all follow the same pattern: 1 star for each rank 1-5, 2 stars for each rank 6-10, 3 stars for each rank 11-15. I don't know if there's a limit on how much you can upgrade these.
  • Weapon Skill / Element Adept / Archery / Healer all follow the same pattern: 3 stars for the first rank, and each rank costs 2 more stars than the previous. Fist Skill is the exception, where rank 1 only costs 1 star. I don't know if there's a limit on how much you can upgrade these.
  • Ranged Expert costs 2 stars for rank 1, and each rank costs 2 more stars than the previous. I don't know if there's a limit on how much you can upgrade this.
  • Channeler costs 1 star for rank 1, 3 stars for rank 2, and 5 stars for rank 3 (for a total of 9 stars).
  • Stealth Sense / Regeneration / Meditation cost 2 stars for rank 1, 4 stars for rank 2, and 6 stars for rank 3 (total of 12 stars).
  • Defy Death / Teamwork cost 2 stars for rank 1, 3 stars for rank 2, and 4 stars for rank 3 (total of 9 stars).

For reference, after completing the game on my most recent run, most of my characters had earned about 40 stars (my Junkstone characters had earned around 48). Based on how stars are allocated, most of my characters had 7 or so unspent stars. Numbers may vary based on how you spend essence crystals, how many secrets you find, and how many of the repeatable random fights you farm.
Party Composition
When starting the game, you have a few choices, but only the main character's starting 'class' has a noticeable impact on your first playthrough of the game.
(The companion choices for subsequent playthroughs can have a bigger impact, since one might let you bypass certain environmental challenges earlier than expected while the other is a glass cannon.)

Much more important than your starting characters are the classes / passive skills you use, as well as the ways you manage your equipment. As for some general thoughts:
  • Make at least one character who can deal at least a little damage to several tiles at once, as this lets you kill Wisp nodes that spawn from killing Possessed enemies. Some options include Mystic's Arc, Vanguard's Smite, and Marskmen's Ricochet skill and Shrapnel passive.
  • Make at least one character capable of inflicting Blind or otherwise lowering enemy movement, as this lets you stay out of the threat range of the toughest enemies more easily.
  • Pushing is a vital skill in this game, so try to have several characters capable of pushing enemies / allies. I find a particular joy in pushing enemies into the effects of their damaging delayed abilities. If you're pushing enemies already, you might as well apply Bleed to make it deal some damage.
  • Have at least one character who can dispel effects. Mystic, Eidolith, and Crysolith all have different methods of dispelling.
  • Pay attention to consumable items, particularly early on, and experiment by dropping items on others in your inventory to see what kinds of interactions you can get. If you drop Ulsac on Bandages, you'll make a Poultice (which heals more and cures ailments). If you use Shears on cloth, you'll create an intermediate material that you can use the Shears on again to make a Bandage.

An example party, from my RUIN mode playthrough. I mostly didn't take advantage of the second ability crest slot for most characters, so I won't mention it.
  • Dark Augur.
    Crysolith | Gatekeeper | Mancer (Echo Cast).
    Cold Focus | Burning Focus | Chilling Curse.
    Equipment focused on max MP. Carried my exploration-related weapons.
    Primarily used Ice Lance on bleeding targets, Echo Cast + Deep Frost on isolated targets, Gate: Pyre on Blind targets, or Gate: Lightning on 0 movement targets.
  • Zavarde.
    Vanguard | Knight | Titan (Wave Crash).
    Brute | Giant's Reach | Shield Bash.
    Used a mix of HP and Evasion equipment and the Negate Mail. Dual wielded shields.
    Used Bash for 12 collision damage, Smite to kill multiple Wisp Nodes, Cover to protect someone from an impending attack, or Wave Crash against Bleeding targets.
  • Remir.
    Melder | Chisel. (Tried Swarm's Eye and Fanger for a while)
    Venom | Quick Reload | Vix Mark.
    Used the Pneumatic Lance and a spear (with a bandolier to swap between them). Focused on Evasion equipment.
    Used the Chisel skill set almost exclusively. Rarely used Melder or Swarm's Eye skills.
  • Junkstone (both companions had the same build)
    Chisel | Knight (Bash). (Tried various options, but never used much outside of the Chisel skills)
    Venom | Blockade | Giant's Reach.
    Used a spear and a flail. Let Remir have the best Dodge items, and focused on HP / Dodge. One of them had the Blade Brace for increased Bleed damage.
    Used the Chisel skill set almost exclusively.
  • Winged Wyvern.
    War Beast | Mystic.
    Treader | Cavalry | Combat Supplies.
    Spent most combats using Shove / Drag / Saddle / Burst to reposition allies and enemies, or killing Wisps with Arc.

My general strategy in each fight was typically:
  • Turn 1: Inflict Blind or Bleed on 3 targets, then toss out Gate: Pyre.
  • Turn 2+: Zavarde bash something to death. Spread more Bleed / Blind. Ice Lance a bleeding target for good damage. Wyvern mops up stray Wisp nodes.

Against a big, scary target supported by normal enemies, I'd typically use Blind / Ice Lance to keep the threat out of reach, then apply Bleed and use 2-3 Chains and Wave Crash to pull an enemy away from the pack in order to kill it. Rinse and repeat until only the big target was left, at which point I'd apply Blind + Bleed + Poison + Sunder + Itchy + whatever else I had from weapons / augments / accessories to apply other ailments before hitting the target with a couple of Shatters and possibly a Despair.

For bosses that gain immunity to various ailments after a turn, I did my best to not apply any movement reduction on the turn where I was blinding them, and relied on pushes (particularly Ice Lance) / pulls / etc to keep my party out of the massive delayed effects these enemies typically had access to.

When possible, I'd maneuver enemies into the damaging delayed effects of other enemies (mostly the area effects - it was too hard to get people into range of Bide / Snipe / Judgement).
19 Comments
Timbert  [author] 30 Apr @ 7:23am 
@neruosis51 I haven't opened the game in almost a year, so my memory's pretty lacking on whether there's anything in the base game (and I know that a few new items have gotten added since then), and I haven't done anything with mods. Sorry for not being any help there.
neurosis51 29 Apr @ 10:40pm 
@Timbert Big sad. I found out already, but thanks for confirming it. It's super not worth investing in. Btw, are there any swords with spear length in the vanilla game or the various weapon expansion mods?
Timbert  [author] 29 Apr @ 1:48pm 
@neurosis51
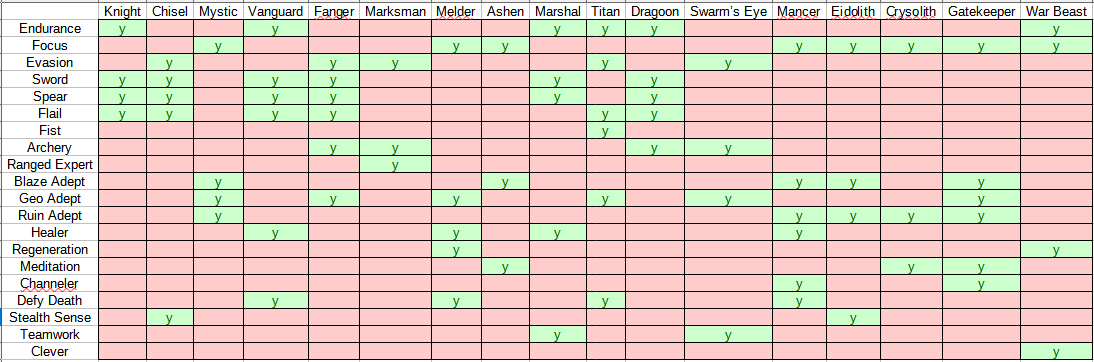
If you don't want me to tell you that the game counts skills that you haven't increased as your lowest skill, I won't. I'll just say that your fears are true.
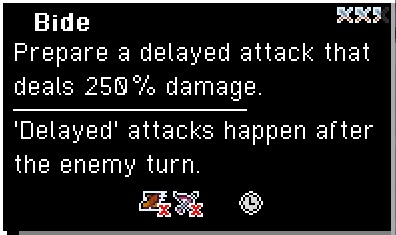
This skill would severely outperform all other damage passives if it simply doubled the single weapon skill that you invest points in. Instead, it's designed to help if you're using multiple weapon types instead of focusing on a single weapon. Looking at what I said about Element Master (which works the same, except for magic damage types), Weapon Master probably isn't worth the investment given the length of the game.
neurosis51 28 Apr @ 8:38pm 
I'm not sure if weapon master is working. I have +2 on spears and I'm not seeing the strength go up when the passive is equipped. Don't tell me the game counts the 0 of other weapon skills you haven't invested in when deciding what's your lowest skill.
Quickpawmaud 10 Sep, 2024 @ 7:01pm 
It is in the general combos section
Quickpawmaud 10 Sep, 2024 @ 7:01pm 
Small error in the beginning you say Wisp Slayer's passive gives invisibility but it is actually Wisp Stalker.
Forefall 28 Jun, 2024 @ 6:24am 
Deep frost shouldn't stack, as status effects from the same source dont' stack.
Timbert  [author] 4 Feb, 2024 @ 8:15am 
Good catch! I added the 5 MP cost to the listing above.
Yosharian 3 Feb, 2024 @ 9:36pm 
Storm Assault doesn't have an MP cost listed, but it appears to have one in-game.
Yosharian 27 Jan, 2024 @ 2:02pm 
Oh. Well that's odd. I stand corrected!