Fable Anniversary

Fable Anniversary

91 ratings
100% Achievement Guide: Fable Anniversary
By Cynic 0055
This is a comprehensive 100% Achievement guide detailing a step-by-step walkthrough to take you from 0 all the way to 100%. If you are looking for a particular Achievement or Collectible, use Ctrl+F & type it into the search bar for more direct help.

I run support & debug help on all my guides. If you have any questions, problems, or find errors in the guide itself, do not hesitate to leave me a comment & I will get back to you as soon as I am able to. Happy Hunting!
3
8
2
3
   
Award
Favorite
Favorited
Unfavorite
Introduction:


Achievement Breakdown: (50)
Story Related: (16)
Missable: (2)
Secondary Objectives: (6)
Collectibles: (8)
Slay: (7)
Miscellaneous: (11)


This is a fairly easy, quick, & fun 100%; all Achievements can be earned in a single playthrough if you play on Heroic Difficulty. There are a few Missable Items & Achievements you will need to watch out for, so Save often in case you miss something. I will flag all of this & more ahead of time! The bulk of the Achievements can also be earned after completing the Main Questline as well.

There are a couple different Collectibles we will need to find as we play. For the most part, they are nothing crazy & pretty standard. The most noteworthy will be opening the 12 Demon Doors. The Demon Doors will require very specific tasks done in front of them before they open. Most are very easy, but some have extremely specific & potentially Missable tasks. A caveat in the Achievement however, is that we can use the Middle Finger Expression in front of any Demon Door to unlock the Achievement without doing their required task. It is a cheap bypass that is very much allowed for the Achievement; we earn the Middle Finger Expression by becoming Moderately Evil through Evil Deeds or by beating the Main Questline & unlocking all Gestures.

For the Horde Mode Achievement we need to collect 10/15 Legendary Weapons. Some are easy to earn, others are harder to earn as they are locked behind Demon Doors.

As we play through the game, there are a few Items we will want to hoard as they will save you time needing to hunt them down when we need them. These Items are: Pies & Beer (to quickly gain weight), & Crunchy Chicks (to quickly gain Evil Points). These Items will make opening a few Demon Doors much easier if you are already prepared. There are many more other specific Items we need, but I will talk about them as they become relevant as we need much less of them.

For those interested, here is an organized list of all the Achievements/Secret Achievements. This is how I derive my Achievement Breakdowns & the first reference I create before I begin my 100% journeys.
https://gtm.steamproxy.vip/sharedfiles/filedetails/?id=3116491104

*Guide contains major spoilers.*
Sequence 1: Chicken Chaser
1. Area: Oakvale, Heroes’ Guild, Guild Woods
2. Books: 12/25
3. Weapon Types: 2/12
4. Achievements: 3/50
-----------------------------------------------------------------------------------------------------

When we start a New Game, be sure to switch the game from Chicken Difficulty to Heroic Difficulty so we can earn the Great Balls of Fire! Achievement for beating the game on this Difficulty… We lose out on Resurrection Potions, so Save often!

There are two Legendary Weapons we need to collect that are Alignment dependent. To get the first one, I recommend trying to max out your Evil then maxing out your Good afterwards; if you want to be Good first it will just reverse the acquisition order. Once the two Legendary Weapons are obtained, you can be whatever Alignment you prefer.

Oakvale:

Main Quest #1 – Birthday Gift: Our story begins in Oakvale, on our sister’s birthday no less. We need to buy her a birthday present, but have no money to do so.

Complete Good deeds around the village to earn Gold from our Father, Bron, as a reward… or earn Gold directly for doing the deeds the Evil way. Note that none of the Good or Evil Points will be permanent in the Prologue.

Once you have accumulated at least 3 Gold, speak with the Trader, & purchase Chocolates as a present.


Achievement #1 – From the Smallest Acorn: Every tall oak tree needs to have its acorn moment, this is yours.
Story Related. Complete Main Quest – Birthday Gift to unlock the Achievement.

Heroes’ Guild:

Main Quest #2 – Melee Combat Test: The mysterious mage, Maze, will take us in to see the Guildmaster & we will begin being trained to be a Hero. In the morning, we do a brief combat Tutorial & then need to kill 10 Beetles that are found in the nearby Guild Woods.

When you are ready, leave your childhood behind & begin apprenticing as a Hero that will involve a time jump.

Main Quest #3 – Guild Training: When we awaken in our bed, a few years later, we will need to once again meet up with the Guildmaster out in the courtyard. As of now, we have officially started the game & we will be earning Alignment Points as well as Renown.

Book #1 – A Love Story: Before we go meet up with the Guild Master, we can now take our time & explore around a little bit; we don’t need to race Whisper. In our bedroom, begin rummaging through the six Bookshelves to collect some Books.

We need to collect all 25 Books in the game to deliver to the Bowerstone Teacher to earn an Achievement as well as a Collectible…

The Book “Three Haikus by Miko the Bard” is not required for donation & can be sold. If you are ever in doubt about which Books are not safe to sell, just refrain from selling any until we donate all the unique ones…

Book #2 – The Tale of Maxley: While still on the second floor, head down the hall to enter into the Northern bedrooms where there will be another three Bookshelves. Rummage through them to collect this Book.

Book #3 – The Pale Balverine: Backtrack to where we were previously & now make your way downstairs into the central room of the Guild. From here, there will be four doorways we can pass through. Go through the leftmost doorway to enter the Guild Library which will have 17 Bookshelves in it. Search through them to collect these Books.

Book #4 – Creatures of Albion Book III: Collected from the Heroes’ Guild Library.

Book #5 – The Arena: Collected from the Heroes’ Guild Library.

Book #6 – Creatures of Albion Book I: Collected from the Heroes’ Guild Library.

Book #7 – The Dragons: Collected from the Heroes’ Guild Library.

Book #8 – The Tale of Twinblade: Collected from the Heroes’ Guild Library.

Book #9 – The Northern Wastes: Collected from the Heroes’ Guild Library.

Book #10 – The Old Kingdom: Collected from the Heroes’ Guild Library.

Book #11 – Creatures of Albion Book II: Collected from the Heroes’ Guild Library.

Book #12 – The Other Land: Collected from the Heroes’ Guild Library.

The Book “The Hierarchy of Weapons, is not donatable for the Quest.

Book #13 – Jack of Blades: Now go back into the central hall & exit through the rightmost door out to the Heroes’ Memorial past where Dylan the Shopkeeper is. Follow the memorial along & we can climb up to Maze’s Tower where we will walk in on him speaking with another Hero, Scythe.

We can collect this Book off a Bookshelf in Maze’s Tower.

Main Quest #3 – Guild Training: When you are done exploring around, speak with the Guildmaster & we will begin our next stretch of combat Tutorials.


Achievement #2 – As Quiet As A Whisper: Defeat Whisper in a battle without losing any health.
Missable. After we learn to strike & block, we will be tasked with fighting Whisper in an “actual” battle. We must defeat her without taking a single point of damage.

It is pretty simple. Essentially, spam attack until she blocks or flips over you where you will want to get ready to block yourself. After she is blocked, continue to attack her. Rinse & repeat. We will unlock the Achievement if we defeat her perfectly; if you take damage, just choose to Repeat the Tutorial at the end.

There are two more opportunities to unlock this Achievement later on, but this is easiest of the battles we can have with Whisper & the ideal time for the Achievement.

Main Quest #3 – Guild Training: Continue to complete the Archery & Will Tutorials; we will earn the Lightning Spell. For the But You’re A Wizard, Hero Achievement we can either collect all 18 Spells or have all 12 different types of Weapons in our Inventory at once. Purchasing Spells costs a lot of Xp; it is much easier collecting all the Weapons.

Weapon Type #1 – Longsword: Earned through the Combat Tutorial.

Weapon Type #2 – Longbow: Earned through the Archery Tutorial.
Do not sell these Weapons.

Guild Woods:

Main Quest #3 – Guild Training: When you are done being an apprentice, speak with the Guildmaster for one more time jump to our final year of training. Enter into the Guild Woods & our final test will be to face Maze in combat.


Achievement #3 – The Graduation: Graduate from the Heroes Guild to become a real Hero.
Story Related. When Maze is defeated, leave the woods & speak with the Guildmaster to graduate as a fully fledged Hero. Complete Main Quest – Guild Training to unlock the Achievement.
Sequence 2: Hero For Hire
1. Area: Heroes’ Guild, The Library of Arcanum, Picnic Area, Lookout Point, Bowerstone – South
2. Books: 19/25
3. Weapon Types: 2/12
4. Silver Keys: 2/30
5. Demon Doors: 1/12
6. Achievements: 7/50
-----------------------------------------------------------------------------------------------------

Heroes’ Guild:


Achievement #4 – The Drinking Game: Drink until you vomit, or 'help' a friendly Villager get drunk.
Before we set out into the world, there are a few things we can do first. To start, go over to the Heroes’ Guild Mess Hall & speak with Alfie. Check his Inventory, & purchase at least two bottles of Beer off him for 10 Gold a piece; you can make a Save beforehand if you want to reload to save your money.

With the Beer, Hotkey it & approach any NPC in the Guild. Lock on to them, & we can see a drink symbol on our Hotkey; hand the NPC two bottles of Beer & they will get drunk, unlocking this Achievement.

Demon Door #1 – The Library Arcanum: “Your path is dark. Only a light will reveal it. & you are not bright enough”.

Approach the Demon Door & go into your Equipment – Items tab. Amongst the different rewards we will have gotten from the Guildmaster upon graduation, one will be a Lamp. Use the Lamp & light it in front of the Demon Door to open it.

The Library of Arcanum:

Book #14 – Making Friends: Inside the Demon Door, we can find this Book on a table in the center of the Library.

The Book of Spells we can collect from one of the Bookshelves is not donatable.

Heroes’ Guild:

Main Quest #4 – Wasp Menace: Before we leave the Heroes’ Guild, pop into the Guild Hall & accept this new Quest from the Map Table. With it, head out the front gates & leave to Lookout Point.

Picnic Area:

Main Quest #4 – Wasp Menace: In Lookout Point, we will encounter a man asking for our help. Follow him over to the Bowerstone Picnic Area. When we arrive, we will see Villagers getting attacked by Wasps; go in & kill them all… the Wasps, not the Villagers.

With the Wasps killed, we will then need to defeat the Wasp Queen boss who is not too difficult.


Achievement #5 – Project Ego: Show all available witnesses a Trophy in the Trophy Mini-Game, or decorate your home with a Trophy.

With the Wasp Queen killed, we will have obtained the Wasp Queen’s Trophy. While still in the Picnic Area (though this can be done anywhere) go into Equipment – Items & Use the Trophy to equip it. Doing this will prompt a small mini-game & we will be told how many witnesses are in the vicinity.

Run around & use the Trophy on your Hotkey to show it to all witnesses; there should only be three here in the Picnic Area at the moment. The Achievement will unlock if all witnesses marked in the mini-game are shown the Trophy.

Lookout Point:

Silver Key #1: Return back to Lookout Point & walk over to the four-way crossroads with the statue in its center pointing to Bowerstone. At the start of the path leading back to the Heroes’ Guild, we can see some Thorn Bushes blocking a hidden trail.

Destroy them, & we can see a Silver Key; there are 30 Silver Keys we need to find in the game.

Bowerstone – South:

Main Quest #5 – Maze’s Information: Travel over to Bowerstone – South now where we will enter our first major city center. Speak with Maze in front of the Tavern & we will learn that our sister is still alive…


Achievement #6 – Beauty Or the Beast: Reach the maximum of your chosen attractiveness; ugly or beautiful!
Before we go & start wasting all our Gold, we can quickly snag this Achievement quite easily; make a Save beforehand if you want to reload afterwards. To start, put on your full set of Apprentice clothing.

Now go over & find Scarlett the Barber; she lives in the building marked orange on our Mini-Map. Purchase the Normal Haircut, the Normal Beard, as well as the Sheriff Moustache. The combination of all these things will put us at 100 Attractiveness & unlock the Achievement.


Achievement #7 – What Are Ya Sellin'?: Make a profit from selling to a Trader, or steal an item using the "Steal" expression from a Trader.
At the entrance to Bowerstone – South, during the daytime, we can find Derek the Marketkeeper. Sell him something like a Will Potion to earn a good chunk of Gold to unlock the Achievement.
This Achievement can be earned a variety of ways & is guaranteed to unlock for us at some point over our playthrough.

Spade: We can purchase a Spade from Derek as well for 200 Gold. Steep, especially this early on, but we will need the Spade for many Quests & Collectibles to come!

We do technically need a Fishing Rod as well, but we will receive one for free shortly.

Book #15 – The Repentant Alchemist: Enter into Chew the Tailors residence & head up to the second floor. Go into Stealth, & loot the Bookshelf at the top of the stairs to collect this Book. To steal, we need to have no one witness us or we will be caught by the Guards; the eye beside our Mini-Map will tell us how many people can currently see us. The eye cannot be fully open, but half open is fine.

If it is too late out, you may need to sleep at the Tavern to pass time until morning.

Silver Key #2: While we are here, exit out onto the Tailor’s balcony & we can find a Silver Key out in the open.

Book #16 – Windbreaker Rule Book: Enter into the residence across the street from the Tailor’s & head up to the second floor. Go into Stealth & search the Bookshelf against the far wall to find this Book.

Book #17 – Eyes of a Killer: Go into the residence that is beside the Barbershop, & we can steal this Book from a Bookshelf on the first floor.

Book #18 – The Guild of Zeroes: From the entrance to Bowerstone Quay, head left along the walls to find an isolated residence. We can steal this Book from a Bookshelf directly in front of us when we enter; there may be a woman in here, so you really need to be careful!

Book #19 – You Are Not a Bad Person: We can find this Book in the same building as the previous one on another Bookshelf here on the first floor.

Book Donation: At the far North end of Bowerstone – South, we can find the Schoolhouse. If the time of day is right, we can find Mr. Gout, the Teacher. This is the NPC that we need to bring all 25 Books to for an Achievement as well as a Silver Key.

It should be noted that there is such as thing as “Evil” & “Good” Books. Depending on if you give him six of these types, you will earn a different Will User Hat; you can only earn one type of Hat but it is not needed for any Achievements.

If you care about the Hat you get, hold off on donating. If you don’t care, then feel free to begin donating the Books we have collected to Mr. Gout.
Sequence 3: You Received A Quest Card
1. Area: Heroes’ Guild, Greatwood – Entrance, Fisher Creek, Orchard Farm
2. Books: 19/25
3. Weapon Types: 3/12
4. Silver Keys: 4/30
5. Demon Doors: 1/12
6. Achievements: 11/50
-----------------------------------------------------------------------------------------------------

Heroes’ Guild:

Main Quest #6 – Protect/Attack Orchard Farm: Return back to the Heroes’ Guild & we will have a new Main Quest with two alternate paths depending on your decided Alignment. Protect Orchard Farm if you want to be Good & Attack Orchard Farm if you want to be Evil. There are no major implications to either decision outside of the Alignment Points you will be earning; you will still be welcome in Orchard Farm if you decide to attack it.

When you go to take the Quest, be sure to select Take Quest & Boast.

As crazy as it sounds, select the No Protection Boast for this Quest so that we can unlock the That’s A Real Lunker Achievement. This Achievement can be earned an alternate way which we will also be completing regardless for other Collectibles if you do not want to attempt this.

If you have the Xp for it, I strongly recommend obtaining the Heal Life Spell as soon as possible. It will help us immensely on Heroic Difficulty.

Greatwood – Entrance:


Achievement #8 – Get Rich Or Die Tryin’: Earn 10,000 Gold from property rental, or die.
Pass through the Greatwood Entrance & make a Save once we enter as we are about to let ourselves die. For this Achievement, the alternate way to unlock it is to literally die be it by accident or on purpose. Let the Bandits kill us to unlock the Achievement… or die naturally against them by accident as the Bandits difficulty can be surprising.

If you are not playing on Heroic Difficulty, you need to use up all your Resurrection Potions & die for real to unlock the Achievement.

Fisher Creek:

Fishing Rod: Before we head to Orchard Farm, let’s first pop into Fisher Creek; it is the North Western exit of the Greatwood Entrance. When we first arrive, we will need to save a Fisherman from a group of Wasps.

Save him from the insects, & we will receive this free Fishing Rod as a reward.

The Book “A Hero’s Journey” is not donatable.

Golden Fish: With the Fishing Rod, go & approach the river. The first Pool we can spot is to the left of the dock; use the Rod when prompted & catch the Golden Fish. Catching this Fish will earn us an invitation to join in on the Fishing Competition later on; this an important Quest as it will earn us a Silver Key!

Silver Key #3: Head over to the North side of the Fisherman’s house & we will find four Pools here. We can find this Silver Key in the third Pool from left to right.

Moonfish: We can catch a guaranteed Moonfish in the furthest Pool to the right; we need the Moonfish to earn the Hero of Time Achievement. Hold onto it for now, we will unlock the Achievement after completing our current Main Quest; do not consume it yet!

Orchard Farm:

Main Quest #6 – Protect/Attack Orchard Farm: Head to Orchard Farm now, & we will begin the Quest once we enter. Either assist the Guards in fighting off the Bandits or lead the Bandits & defend them while they steal crates.

If you chose the No Protection Boast, we will complete this Quest naked…

Whisper Encounter: Whisper will have decided to take the opposite Quest as you & will also either be protecting or attacking Orchard Farm.

If you have not already done so, we have an opportunity to defeat Whisper without taking damage to unlock the As Quiet As A Whisper Achievement.


Achievement #9 – Becoming A Man: Pay a visit to Orchard Farm to see if you can be of help or hindrance.
Story Related. Complete Main Quest – Protect/Attack Orchard Farm to unlock the Achievement.


Achievement #10 – That’s A Real Lunker: Win 1st prize in the Fisherman's Competition, or complete the Boast for doing any Quest naked.
If you accepted the No Protection Boast before we began the previous Quest, we will also unlock this Achievement. The No Protection Boast is available for other Quests, but they get progressively harder & harder making it much more difficult to complete.

If you did not earn this here, we will instead earn this by winning 1st prize during the Fisherman’s competition later on…

Upper Dress: Before we leave Orchard Farm, we can collect a few random Items we will need for later. With our Spade, walk along a fenced in path near the main residence to find a Buried Treasure at a grave. Use the Spade to dig it up, & we will collect the Upper Dress; for an Achievement, we will need to obtain a full set of woman’s attire. Do not sell this.

Treasure Hunt Clue 5: Head East through Orchard Farm towards the fishing pier, & we can spot a Chest off our left before we enter the orchard. Loot the Chest for this Treasure Hunt Clue.

Frying Pan: Now that we have this Clue, we are able to skip the entire Quest it pertains to & immediately collect the Frying Pan. Turn around & head back towards the barn. Outside the barn, on the West side, we can see a stack of three hay bales close to the barn wall. Hotkey your Spade, & begin digging in the space between these hay bales & the barn wall to collect the Spade from a hidden Buried Treasure. You must have at least 1 Treasure Hunt Clue to collect this.

Note that if you skip the Quest & collect the Frying Pan early, it will deal 0 damage. That is no problem for the Achievement we need it for, but if you wanted this Weapon to beat the game with (not sure why though) then that will not be an option…

Weapon Type #3 – Mace: The Frying Pan will count as a Mace type Weapon. Because it cannot be sold, all other Mace Weapons we can acquire can safely be sold.

Silver Key #4: As our final business here, head West through Orchard Farm to the fishing pier past the orchard. At the end of the pier, we can find a Pool; fish it, & we can collect a Silver Key.

Greatwood – Entrance:


Achievement #11 – Out of the Frying Pan: ...Into your face! Express your feelings through the medium of Frying Pan.
With the Frying Pan collected, equip it, & attack any enemy we find with it to earn the Achievement; this will work even if it does 0 damage.

Tattoo: While we are in the Greatwood – Entrance, clear out whatever enemies load in (you may need a couple of resets to get a loadout you can take on) & wait for Traders to arrive afterwards. Check the Traders, & there is a high chance one might be a Tattoo Artist. Give yourself at least one Tattoo; we need to do this for The Ultimate Warrior Tattoo Achievement.
Sequence 4: The Hero's Journey
1. Area: Bowerstone – South, Guild Woods, Heroes’ Guild, Lookout Point, Greatwood – Lake, Greatwood – Gorge, The Arboretum
2. Books: 19/25
3. Weapon Types: 4/12
4. Silver Keys: 6/30
5. Demon Doors: 2/12
6. Legendary Weapons: 1/10
7. Achievements: 16/50
-----------------------------------------------------------------------------------------------------

Bowerstone – South:


Achievement #12 – The Ultimate Warrior: Treat yourself to a beard, haircut & Tattoo, the 'Toupée & Tattoo Society' demands it.
With a fresh Tattoo, & if you have not already done so, go to the Barber & get a new haircut & beard to unlock this Achievement; you can even purchase the same hair/beard you already have.

If you had no luck tracking down a random Tattoo Artist, keep your eyes out for one as we play; there is an actual fixed Shop we can go to in Knothole Glade later on…


Achievement #13 – The Hero of Time: Eat a Moonfish in Bowerstone – South during the day, or a Golden Carrot at night.
Make a Save before attempting this Achievement just in case. If you caught a Moonfish while in Fisher Creek, go to Bowerstone – South during the daytime & consume it to unlock this Achievement. We can collect both Moonfish & Golden Carrots as random loot elsewhere in the world…

Rose: If you do not already have a Rose, be sure to buy one before we leave town as we will need it to open a Demon Door later on... alternatively you can buy Chocolates or Perfume, but Roses are the cheapest.

Guild Woods:

Silver Key #5: Return to the Heroes’ Guild & make a pit stop into the Guild Woods. Now that we have a Fishing Rod, head over to the Pool at the South end of the woods & we can fish out a Silver Key from it.

Heroes’ Guild:

Assassin Gloves: Go over & see Dylan the Shopkeeper now. We can pick up the Assassin Gloves from him for 100-230 Gold depending on your Guile Skill or public outlook. We need a full set of Assassin gear for the A$$ Creed Achievement.

Main Quest #7 – Trader Escort: At the Map Table, we can accept our next Main Quest… & one of my favourites at that. Accept the Quest, but on Heroic Difficulty, do not accept any Boasts… this will be very difficult as it is.

Consider doing the Hobbe Killing Contest Quest first…

Lookout Point:


Achievement #14 – Hero, Their Health Is Low: Heal a Follower on an Escort Quest. No, not *that* kind of 'escort'.
Regardless of which Quest we accept, check over the Boasts for it in Lookout Point (or just travel there if you skipped Boasts). Around the area, we can most likely find a Trader who will give us a Side Quest to take them to Orchard Farm. Accept the Quest, & if you have the Heal Life Spell, lock on to them & Heal them to unlock the Achievement.

If you do not have the Spell yet, Save your game, & Hotkey a Health Potion to give to them; they do not need to be hurt.

This can be done to any NPC in the game at any point, but they have to be actively Following us…

Greatwood – Lake:

Silver Key #6: With the new Main Quest accepted, it is time for us to travel to Darkwood. To get there, we will need to pass through Greatwood.

As soon as we enter Greatwood – Lake, head up the hill immediately off our right to find a Silver Key at the top of it.


Achievement #15 – Feed the Troll: Give a Troll a taste of its own medicine.
Before we cross the first bridge in Greatwood Lake, make a Save. If it is daytime, cross the bridge & a Troll will emerge from the ground. To unlock this Achievement, we must time our attack to launch one of the Troll’s thrown projectiles back at it. Stand a little ways away from it so it uses this attack.

There are many Trolls in the game we can attempt this Achievement against…


Achievement #16 – Get It Off Your Chest: Open your first Silver Key Chest to reveal the amazing surprise inside!
If you have been following along with the guide, by this point we will have obtained at least 6 Silver Keys. Right by where we killed the Troll, we can spot a 5 Silver Key Chest; open it to unlock the Achievement.

This Chest will give us an Elixir of Life. Note that Elixirs of Life as well as Will Master’s Elixir are permanent buffs to our total Health & Will! Drink them whenever you collect them…

Greatwood – Gorge:

Demon Door #2 – The Arboretum: “This is the deal. You perform an act of great evil in my sight, & I’ll pop open”.
At the Southern end of the area, we can find our next Demon Door. To open this one, we need to do something Evil in front of it, or rather, we need to produce a certain amount of Evil Points in its presence. There are a few ways we can do this. We can kill Villagers or consume Crunchy Chicks.

If you have a high enough Renown, use the Follow Gesture on nearby Traders in Greatwood to get them to come with you. Alternatively, since it is highly unlikely they will come with you, we can potentially purchase Crunchy Chicks from them; we can also purchase them from the Heroes’ Guild or Bowerstone – South if they are in stock.

Collect at least 11 Crunchy Chicks, Hotkey them, & consume them all (making sure we are close to the Demon Door) to gain access to the Demon Door. This Demon Door can be opened at any point during the game…

The Arboretum:

Legendary Weapon #1 – Wellow's Pickhammer: We will obtain our first of ten Legendary Weapons from the Chest inside this Demon Door.

This is a very powerful Weapon for our current Level & will carry us until we collect the next Legendary Weapon…

Weapon Type #4 – Pickhammer: Wellow’s Pickhammer of course counts as a Pickhammer. Because it cannot be sold, all other Pickhammers we acquire can be sold for Gold.
Sequence 5: Where the Sun Won't Shine
1. Area: Rose Cottage, Greatwood – Caves, The Butterfly House, Hobbe Cave – Focus Chamber, Darkwood – Entrance, Darkwood – Marshes, Darkwood – Lake, Darkwood – Camp, Darkwood – Chapel of Skorm, Ancient Cullis Gate
2. Books: 19/25
3. Weapon Types: 6/12
4. Silver Keys: 10/30
5. Demon Doors: 4/12
6. Legendary Weapons: 2/10
7. Achievements: 16/50
-----------------------------------------------------------------------------------------------------

Rose Cottage:

Silver Key #7: When we enter Greatwood – Cullis Gate, do not continue on down to Darkwood – Marshes & instead take the alternate pathway into Rose Cottage. At the top of the hill close to the Rose Cottage itself, we can see a circle of flowers with a large dirt patch in the center. Use your Spade in the dirt patch to dig up a Buried Treasure containing this Silver Key.

Demon Door #3 – The Secret Haven: “I never open on a first date. My heart has been broken too many times before. I could only let someone who really loved me through”.
To open this Demon Door, we need to give it a Gift. It can be any Gift at all such as a Rose, Perfume, Chocolates, even a Wedding Ring. What doesn’t seem to work, is giving it Gems such as Jet, Rubys, Sapphires, etc. Fake Wedding Rings also do not seem to work either.

Greatwood – Caves:

Demon Door #4 – The Butterfly House: “I need to see your Combat Multiplier get higher before I swing ajar”.
As soon as we enter the Greatwood – Caves, we will encounter a Demon Door & a Troll. Make a Save before we do anything! To open this Demon Door, we need to speak to it when we have a Combat Multiplier of at least 14; the Troll can get us to 8-10 Combat Multiplier depending on our Physique & or Speed Level.

Kill the Troll, & destroy the Thorn Bushes blocking our path to the West of the Demon Door to enter the Hobbe Cave – Entrance. Enter into the Hobbe Cave & kill the Hobbes here as adeptly as you can to build up a good Combat Multiplier. Killing the Mage Hobbes first then luring all the melee Hobbes to exit to then kill with your Bow/Crossbow is the easiest way to build a very high Combat Multiplier.

Once they are all dead, exit the cave & kill the Troll again. You will lose around -7 Combat Multiplier leaving the cave. If the Troll gives you around +8-10 Combat Multiplier, you need to leave the cave with at least a +5-10 Multiplier to get up to +14 for the Demon Door. When the Troll is dead, & you have +14 or higher, sprint to the Demon Door to open it. If it is not high enough, re-enter the cave to farm more Hobbes to boost your Combat Multiplier higher.

This Demon Door can be opened at any point in the game. With a -7 in mind when travelling between areas, this Demon Door can be earned if you deliberately leave behind a “Recall Sign” by teleporting from in front of the Door, to a place you know you can accrue a large Combat Multiplier. If it gets beyond +25, teleport back to the Demon Door to open it…

The Butterfly House:

Legendary Weapon #2 – Cutlass Bluetane: Open up Demon Door #3 & we will enter the Butterfly House. Open the Chest here to collect our next, very powerful Legendary Weapon.

Again, if you cannot manage to open the Demon Door now, that is fine. After beating the Main Campaign, you can grind this Demon Door at deliberately if you still need to…

Weapon Type #5 – Cleaver: The Cutlass Bluetane counts as a Cleaver type Weapon. Since we cannot sell it, this will be a permanent Cleaver in our Inventories; all other Cleavers can be safely sold.

Hobbe Cave – Focus Chamber:

Silver Key #8: Enter the Hobbe Cave, & navigate your way through it down to the main Focus Chamber. In the back corner, we can find a circle of mushrooms; stand in the center of it & use your Spade to collect this Silver Key from a Buried Treasure.

Darkwood – Entrance:

Main Quest #7 – Trader Escort: Enter into Darkwood & we will be joined by our two Trader charges. Shortly as we walk down the path, we will see a third Trader who has been attacked. Take him with you or leave him behind.

Darkwood – Marshes:

Demon Door: When we enter Darkwood Marshes, we will see a Demon Door. Do not speak with it while we are escorting these Traders though! The Demon Doors task is defeating waves of Hobbes it will summon; protecting the Traders from them at the same time can be difficult. We will return here after we bring them to Barrow Fields.

Darkwood – Lake:

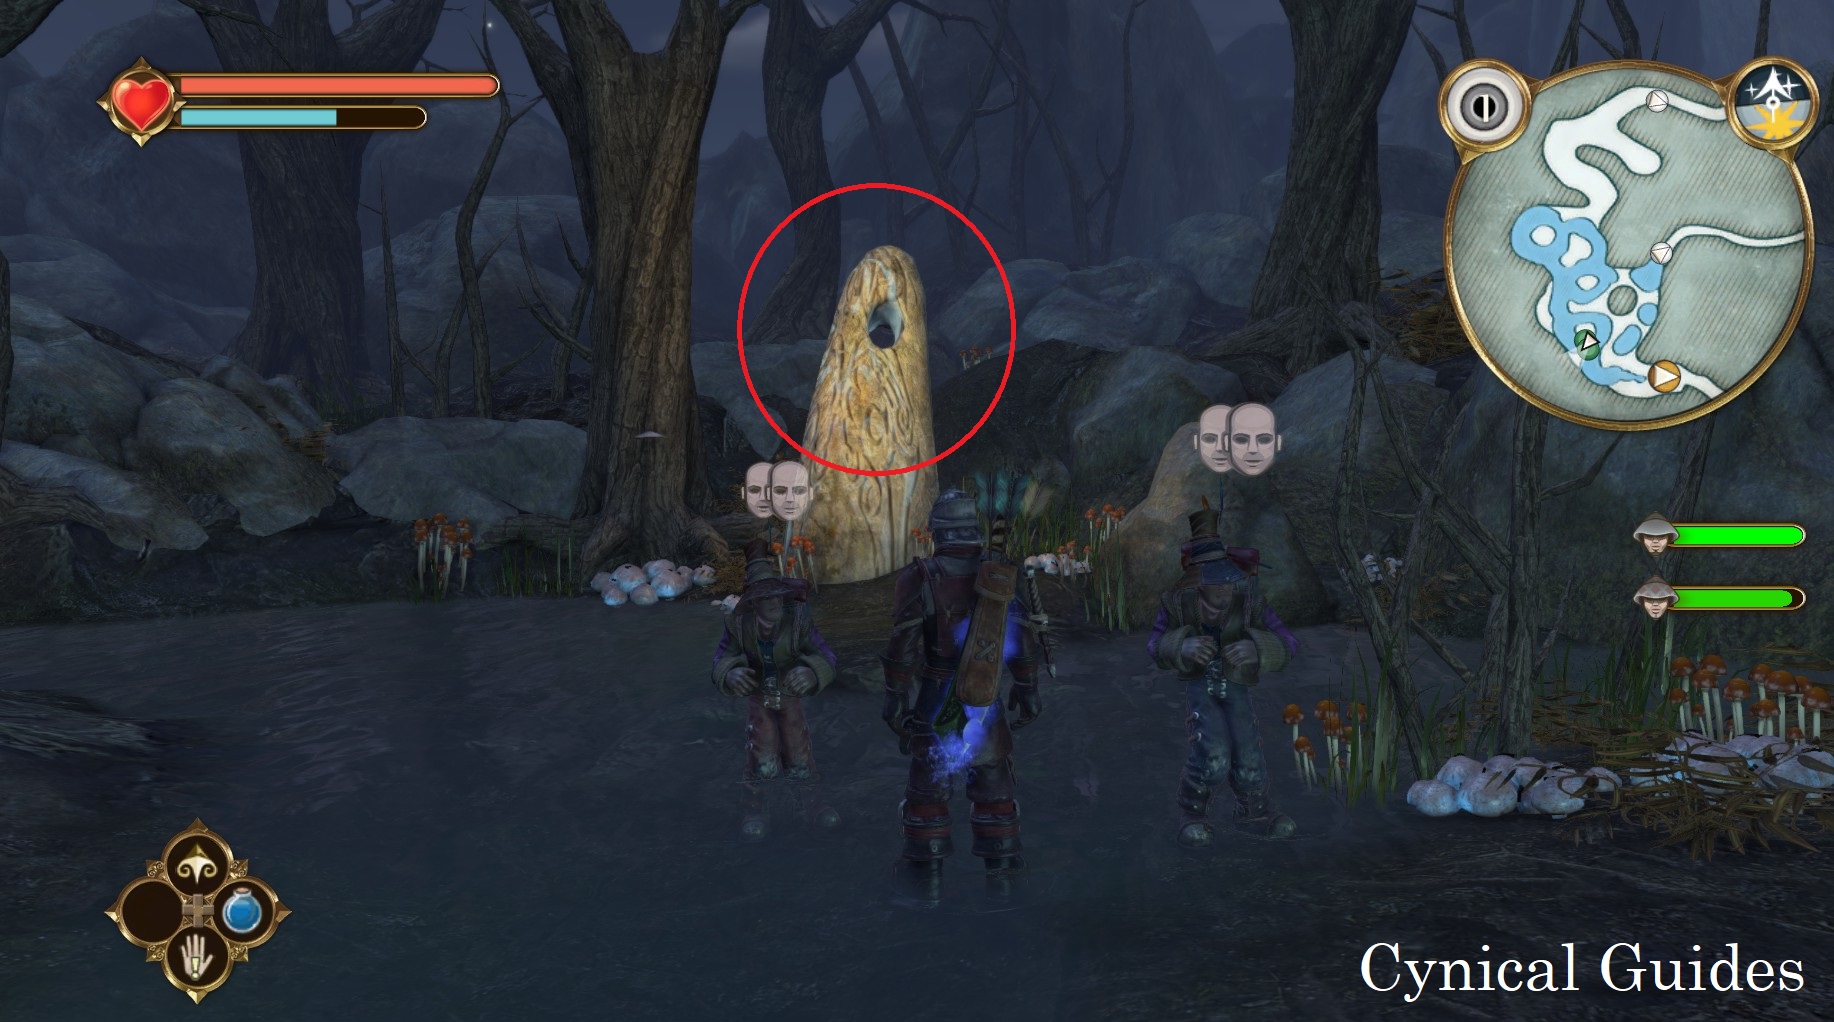
Silver Key #9: Enter Darkwood – Lake & make your way down to the flooded section of the area. At the South Western corner, we can see a strange runed pillar that has a hole in its top. Manually aim your Bow/Crossbow & fire a projectile into the hole & a Silver Key will appear on the ground in front of it.


Darkwood – Camp:

Weapon Type #6 – Axe: When we first enter the Trader’s Camp, look off your left to see a Chest; open it to collect a Steel Axe. Until we find a Legendary Weapon that is an Axe, refrain from selling this one…

Darkwood – Chapel of Skorm:

Assassin Shirt: Before we carry on, let’s make a quick pitstop over to the Chapel of Skorm. To the left of the Chapel entrance, we can find the Assassin Shirt in a Chest behind it. Only the Assassin Trousers & Boots left…

Don’t sacrifice the Traders in the Chapel & head back to Darkwood Camp to continue onwards to Barrow Fields.

Ancient Cullis Gate:

Silver Key #10: At the far West end of the area, we will cross two bridges. While standing in the middle of the second bridge, look off the edge to see a Pool; fish the Pool to collect a Silver Key.
Sequence 6: My Hero
1. Area: Barrow Fields, Grey House, Darkwood – Marshes, Darkwood Sanctum, Hobbe Cave, Darkwood - Bordello
2. Books: 19/25
3. Weapon Types: 6/12
4. Silver Keys: 11/30
5. Demon Doors: 7/12
6. Legendary Weapons: 2/10
7. Achievements: 19/50
-----------------------------------------------------------------------------------------------------

Barrow Fields:

Main Quest #7 – Trader Escort: Take the Traders (if they still live) down to the Trader camp near the entrance to Oakvale.

Demon Door #5 – The Old Kingdom Spring: “Oh no, not again. Another bony adventurer seeking to plunder my riches. I’m not interested in your meager frame. Get some meat on you! I want beefy! Blubbery! Plump! Porcine! Stop being a slave to public perception, & treat yourself. Pies, Meat, Beer, anything; but lots of it! Eat yourself large, & you’ll be welcome here!”
Before we carry on to Oakvale, we can clean a couple things up that we missed. First, head back up the hill from the Trader camp in Barrow Fields & we can find a Demon Door at the Southern end of the area. To open this one, we need to get reach the Obese Weight Class which will also unlock the Definitely Not On Rails Achievement.


Achievement #17 – Definitely Not On Rails: Visit every region (excluding Demon Doors), or increase your waistline so that you don't have to.
We need to gorge ourselves on Red Meat, Pies, & Beer to gain weight. If you need more of these Items, search the Shopkeepers in Bowerstone – South & the Heroes’ Guild.

For reference at how much Food this takes: it took me 16 Pies & 8 pieces of Red Meat to go from Slim to Obese. I would recommend Red Meat as your primary source as we can get some Might Xp from doing so.

With the Achievement unlocked, we can now open the Demon Door. To lose weight, we just need to stop eating any Food (just use Heal Life or Health Potions for healing) & play the game for 1-4 real world hours. We will lose weight over time. Sprinting or attacking will not make us lose weight faster. We just have to “weight” it out… ha ha…

Grey House:

Ages of Skill Potion: Head up the path in Barrow Fields & we can find the entrance to the Grey House. Enter inside the area & go into the decrepit manor at the top of the hill, loot around & we can collect an Ages of Skill Potion.

Not that we specifically need a Skill Potion, but we need to have an Ages of “X” Potion to unlock the Combat Evolved Achievement. Do not consume this yet!

Silver Key #11: Now head down to the North East end of the area where a Demon Door is. To the left of the Door, we can find this Silver Key in a Pool.

This Demon Door requires us to be married to a very specific NPC to open it. Because of decisions we are forced to make in this 100% run, we will be needing to do this anyways; we will be returning to this Demon Door near the end of the game to open it…

Darkwood – Marshes:

Demon Door #6 – Darkwood Sanctum: “Beware, traveler – I block the way to all but the most combat-hardened. If you request, my Guardians will test your mettle in combat. Meet their challenge, & the reward I hide is yours”.
Return back to the Darkwood – Marshes to where the Demon Door was & accept the Door’s challenge. Defeat the 5 waves of Hobbes & the door will open.

Darkwood Sanctum:

Dark Will Users Outfit: We will receive this Armor set from the Chest inside the Demon Door. Do not sell any pieces from this outfit! This is a very important outfit needed to unlock a different Demon Door; this is outfit one of three needed for it.

Hobbe Cave:
Return to the Heroes’ Guild & we should have enough Renown to accept the Hobbe Cave Quest. I recommend choosing some Boasts for a huge payout…


Achievement #18 – The Swinging Sword: Hit 3 enemies simultaneously with a single Flourish like you're a real swinger.
You may have unlocked this Achievement quite a while ago since we unlocked Flourish during Main Quest – Protect/Attack Orchard Farm. To Flourish, you need to attack an enemy a few times until your Weapon glows blue, then hold down the attack button to do a preset 2-3 attack combo.

For the Achievement, we need to strike 3 individual enemies during a single Flourish. The Hobbe Cave is a great place to earn this Achievement with how many enemies there are, but this can technically be done anywhere.


Achievement #19 – Combat Evolved: Use an "Ages of “X” Potion with a Combat Multiplier of 20 or more.
At the end of the Hobbe Cave Quest, as we are leaving to report back to the Grandmother, we will encounter a massive horde of Hobbes in the Hobbe Cave – Entrance. If you attack non-stop, you should build up a Combat Multiplier well above 20. As soon as it is, go into your Inventory & drink any Ages of “X” Potion to unlock this Achievement.

This should be your practice in general when consuming Ages Potions as we can really earn a heck of a lot of Xp this way.

If you couldn’t manage a Combat Multiplier that high, don’t worry. Just hold onto at least one of these Potions & keep your eyes on your Multiplier constantly as we playthrough the game; Rock Trolls in Knothole Glade are great targets for a high Combat Multiplier.

Darkwood – Bordello:

Demon Door #7 – The Desolate Abbey: “It’s a hard life being a stone door. You know when I last had a physical relationship? No? Try ‘never.’ So, I’ve decided to live vicariously. Now, I only open to “men of the world”, and I’m afraid you haven’t even left the house yet. Come back when you’re a real stud”.
With Main Quest – Trader Escort complete, we will be able to access the Bordello; we can find its entrance in Darkwood – Lake. Enter into the area, & we can find a Demon Door behind the brothel. To open it… we need to have sex at least 10 times. Now, while this does not have to be with the lovely ladies inside, they are here & convenient. Have the weekend of your Hero’s life.

The lady’s all cost different prices ranging from 50-2000 Gold a… tussle. Hate me all you want, but Polly… is only 50 Gold & we can open the Demon Door for a cheap 500 Gold. Amelia is 100 Gold, so it would be 1000 Gold to open the Demon Door.

If you don’t have the coin to spare, you can always chip away at this or alternatively wait until you are married.

Redhead Wig: Regardless of if you are grinding for the Demon Door, sleep with at least one of the ladies so we can gain access to the second floor of the Bordello. After our toss in the sheets, enter Stealth mode & make sure no on is looking; there is a Cabinet up here that contains the Redhead Wig.

This Wig is one of the pieces of gear we need to unlock the I Did This For A Cheevo Achievement. Do not sell it!
Sequence 7: Homecoming
1. Area: Bowerstone – South, Oakvale, Memorial Garden, The Clifftop Path, Abandoned Road, Twinblade’s Camp
2. Books: 23/25
3. Weapon Types: 8/12
4. Silver Keys: 14/30
5. Demon Doors: 7/12
6. Legendary Weapons: 2/10
7. Achievements: 21/50
-----------------------------------------------------------------------------------------------------

Bowerstone – South:

Weapon Type #7 – Crossbow: Now that we have the Redhead Wig, we can go collect the other Items needed for our Achievement. Speak to any Blacksmith & purchase a Crossbow (unless you already have one); a Yew Crossbow is fine & it is the cheapest.

Hold onto this Crossbow for our Weapon Type Achievement as well…

Dress: Now go to the Tailor & pick up a full Dress outfit; we should already have the Upper Dress at least. We need: Upper Dress, Dress Gloves, & Lower Dress; there are no Shoes.

Lastly, go to the Barber & give yourself any beard; we cannot be clean shaven.

Anywhere:


Achievement #20 – I Did This For A Cheevo: Perform a Headshot with a Crossbow whilst dressed as a woman wearing a beard & the Redhead Wig.
Equip your Crossbow, Dress outfit, & the Redhead Wig. Now go to anywhere that has Bandits… or travelling Traders. If you are fighting a Bandit, choose one that is ranged to make it easier.

Once you find your target, manually aim your Crossbow & begin taking Headshots at them. The closer you are, the more accurate you will be. When you kill the enemy & their head flies clean off, you will unlock the Achievement.

Oakvale:

Main Quest #8 – Maze’s New Information: At long last, we can finally go to Oakvale now & meet up with Maze.

Book #20 – The Trials of Aarkan: Now we are back to stealing from people’s houses. For this Book, head over to the upper West end of Oakvale. To the left of the Marital Home for sale, enter into the residence beside it; we can find this Book on a Bookshelf on the second floor.

Book #21 – The Oakvale Raid: Head over to the East side of town now & we can find four residences here. Enter the first house we come across which will be off our right, & we can steal this Book from a Bookshelf inside.

Book #22 – The Ugly Guide: Go to the two-story house across the street now that has the beautiful overlook of the ocean; we can steal this Book from a Bookshelf on the first floor.

Book #23 – The Sock Method: In the same house, head up to the second floor & we can steal this Book from a Bookshelf as well.

Quest – Chicken Kicking Competition: At the top of the trail leading down to the beach nearby, we can see a man asking for our help. Assist him, & get rid of his ghost problem on the beach by helping the ghost make amends with his widow. It is very important to complete this part of the Quest, & help the ghost, or it may lock us out of earning the next Silver Key!

Go to the Southern beach & go to the left side of the dock; right alongside it, on the left side, we can find a Buried Treasure of 500 Gold. Give the Gold to the widow who can be found looking out to the ocean close by & return to the ghost to release him.

Tell the Chicken Master that we removed the ghost to progress this Quest…

Oakvale – Memorial Garden:

Silver Key #12: Because we helped the ghost, we can now dig up his Buried Treasure. Go to the Memorial Garden in Oakvale & stand in front of the large statue of the Hero, Scarlet Robe, who wields a Greataxe. Stand slightly to the left of the statue’s front & we can find a Buried Treasure; it can be a bit finicky.

Dig it up, & we will receive a Silver Key.

Weapon Type #8 – Greataxe: We will also receive an Obsidian Greataxe along with the Silver Key; hold onto this for now.

Oakvale:

Repeatable Quest – Chicken Kicking Competition: Now that Oakvale has been reset, make your way down to the Eastern beach & we will be able to official enter the Chicken Kicking Competition; it costs 50 Gold to enter & is a Repeatable Quest.

Silver Key #13: To earn a Silver Key, we need to win the second place prize; second prize is 150 Points. We only have five attempts to score Points, once you have 150 (but not 250) you can basically give up & make bad kicks.


Achievement #21 – Fight Cluck: Become the Fist Fighter's World Champion, or win the Chicken Hat in the Chicken Kicking Competition.
To earn this Achievement, we need to win the first place prize which is 250 Points. Focus on running kicks to land in the 50 to 100 range; we can go well beyond 250 Points if you want.

If you want the ♥♥♥♥-A-Doodle-Do Expression, earn only 50 Points for the third place prize.

Assassin Boots: Now it is time to go. Head down to the beach at the South West end of Oakvale. Close to the exit to The Clifftop Path, we can pass around some wooden rubble to find these Boots in a Chest. All we need is the Trousers now.

The Clifftop Path:

Main Quest #9 – Find the Bandit Seeress: Collect the Quest Card from the Heroes’ Guild & return back to Oakvale. Enter the Cliffside Path & sneak through the Bandits; it is easiest to kill them all then position yourself close to the gates to hide.

Abandoned Road:

Bandit’s Outfit: As part of the Main Quest, we need to obtain a full set of Bandit Armor. Coincidentally, we also need the full Bandit outfit to open the same Demon Door we needed the Dark Will User outfit for… two out of three outfits collected now.

That exact Demon Door is actually the one we find here in the Abandoned Road. The final outfit we are missing is a full set of Bright Plate Armor… which will run as ~18,000 Gold to purchase all of it. So long as we do not sell the outfits, we can chip away at the Bright Plate Armor set over the course of the game.

Twinblade’s Camp:

Silver Key #14: In the far South corner of Twinblade’s Camp, we can find a Chest that contains 500 Gold. Right beside that Chest, we can see a prompt for digging up a Buried Treasure. Do so, & we will obtain a Silver Key.

Bandit Camp Pass: There are two ways of obtain one of these to continue: buy one for 1000 Gold or earning a score of within the target time limits playing Spot the Addition in the nearby Tavern with the Gamesmaster.

If you are playing the game, you do not need to bet any more than 1 Gold at a time.
Sequence 8: Bless Us With Blood
1. Area: Twinblade’s Elite Camp, Twinblade’s Tent, Darkwood – Chapel of Skorm, Heroes’ Guild
2. Books: 23/25
3. Weapon Types: 8/12
4. Silver Keys: 14/30
5. Demon Doors: 7/12
6. Legendary Weapons: 3/10
7. Achievements: 25/50
-----------------------------------------------------------------------------------------------------

Twinblade’s Elite Camp:

Assassin Trousers: When we enter Twinblade’s Elite Camp, head to the Southern side where we can find three Assassins standing near a bonfire. In their camp, we can find a Chest containing the Trousers.


Achievement #22 – A$$ Creed: Whilst dressed as an Assassin, be silent but deadly.
Now that we have the final piece of the Assassin outfit, put it all on four pieces& simply use the Fart Expression to break some wind & unlock our Achievement.

Twinblade’s Tent:

Main Quest #9 – Find the Bandit Seeress: Choose how you want to enter Twinblade’s Tent through his Elite Camp, then make your way inside. Defeat Twinblade, & we will meet the Seeress…


Achievement #23 – The Bloodline Part I: Find the whereabouts of your sister, she's very important to the future of Albion.
Story Related. Complete Main Quest – Find the Bandit Seeress to unlock this Achievement. Decide Twinblade’s fate then walk back into Twinblade’s Elite Camp to finish the Quest…

Darkwood – Chapel of Skorm:


Achievement #24 – Choosing My Religion: Donate a total of 100,000 Gold to the Temple of Avo, or Sacrifice 10 people to the Chapel of Skorm.
Now that we have Twinblade’s Camp unlocked we can now work towards this Achievement. We will be Sacrificing Bodyguards to simplify this Achievement. To save time earning a Legendary Weapon from these guys, try making sure to do your Sacrifices at nighttime or ideally as close to midnight as possible for a higher boost to the Evil Points we gain; ideally 150+ Evil Points.
First, go to the Chapel of Skorm. Now use your Guild Seal to travel to Twinblade’s Camp where we can hire a Bodyguard here for 20 Gold; technically we can hire Bodyguards in Bowerstone – South & Oakvale but they are not worth as many Points.

Sleep until it is dark, then teleport to the Chapel to Sacrifice them. If possible, try waiting until the time is close to midnight for an even higher Points yield.

A random factor that effects increases your Point modifier, is actually how Good you are. If you are already Very Evil, it is the lowest Point modifier you can have which is really stupid.

To respawn the Bodyguard, we need to sleep for a full day since the Bodyguards death. You may need to teleport around a few times before they will appear again; passing time in a location a Bodyguard I found does not seem to work.

Accumulate 10 Sacrifices, unlocking the Achievement.

Legendary Weapon #3 – Skorm's Bow: This is a tedious Weapon to earn & ideally you earned it while farming the previous Achievement; if you are already max Evil, you will be unable to earn the Bow until we reach the Temple of Avo. If you didn’t get the Bow & are not max Evil, re-hire the Bodyguard at Twinblade’s Camp, wait for night, & go to the Chapel; if you have a Moonfish, they can help instantly make it night. Once this is all set up, make a Save!

Every 150+ Evil Point Sacrifice has a chance to give you Skorm’s Bow; if you can manage a Sacrifice over 600+ Evil Points the Weapon is guaranteed.

For a quick clock tutorial, it can be found in the top right corner of our Mini-Map. The clock has two halves: daytime & nighttime. The clock turns clockwise. For midnight, you wan the two halves to be perfectly horizontal of each other with nighttime on the top; if the two halves are vertical of each other, it is 6:00.

If you are too Evil & just cannot get enough Points for the Bow, do not worry; when we reach the Temple of Avo, we can farm Good Points to offset our Evil & attempt the strategy again then. I will re-describe earning Skorm’s Bow then so you do not miss it. Alternatively, this can be your 1/5 Legendary Weapons that you end up skipping…


Achievement #25 – For Every Choice, An Achievement: Become holier than Avo, or more evil than Skorm!
We will earn this Achievement by bringing our Alignment to 100 Good or 100 Evil. In this case, I do recommend Sacrificing people until you are maximum Evil; try to earn Skorm’s Bow if you can, but if not, it isn’t a big deal.

When we go to the Temple of Avo, we will be working towards a different Legendary Weapon. For that Weapon it costs Gold Donations & the more Evil you are the less Gold it will cost; a difference between $35,000 Gold & $320,000 Gold if you are full Good to be exact… We can collect Skorm’s Bow afterwards…

Heroes’ Guild:

Main Quest #10 – Maze’s Request: Head to the Heroes’ Guild & speak with Maze about what he wants to discuss with us. We must find the Archaeologist…

Passive Income: If you have not already done so, & you have some coin to spare, consider purchasing the two Marital Homes for sale in Bowerstone – South & Oakvale. We can then rent out these homes & earn some passive money every few days when we return to the areas. We earn rent every day for a maximum of three days; we must manually collect it.

With maxed out Decorations, we can earn 645 Gold in Bowerstone & 2790 Gold in Oakvale every three days; different Trophies displayed in the homes have different monetary bonuses!
Sequence 9: The Cost of Legacy
1. Area: Witchwood – Cullis Gate, Witchwood – Stones, Heroes’ Guild, The Temple of Avo, Witchwood – Lake, Knothole Glade, Witchwood – Arena
2. Books: 24/25
3. Weapon Types: 9/12
4. Silver Keys: 17/30
5. Demon Doors: 8/12
6. Legendary Weapons: 4/10
7. Achievements: 28/50
-----------------------------------------------------------------------------------------------------

Witchwood – Cullis Gate:

Main Quest #11 – Find the Archaeologist: Now it is time to travel overseas to Witchwood; use the Cullis Gate or Guild Seal to teleport.

We will have to fight a Rock Troll shortly. If you have not unlocked the Combat Evolved Achievement, make a Save & attempt it here!

Witchwood Stones:

Silver Key #15: When we enter the area, we will see a Demon Door off our right. Across from it, will be some water with a Pool in it; fish the Pool to collect this Silver Key.

Weapon Type #9 – Greathammer: Down the path towards the Witchwood Stones, we can see a Chest blocked off by brambles off our right. Loot the Chest to collect an Obsidian Greathammer; do not sell this until we have a Legendary Weapon to replace it!

Main Quest #11 – Find the Archaeologist: To reach the Archaeologist, we need to open the nearby Demon Door; this is a Story Related Demon Door & does not contribute to the Open Saysamemiddlefinger Achievement. Head down the path to the Witchwood Stones & we need to strike the Stones in the correct order to spell a word. Every slash will say a letter; the Demon Doors name is H.I.T.S.

Enter into the Witchwood Cavern after opening the Demon Door & we will find the cranky Archaeologist.

Heroes’ Guild:

Main Quest #12 – White Balverine: Before we carry on to Knothole Glade, quickly teleport back to the Heroes’ Guild to collect this Quest.

The Temple of Avo:

Donating to Avo: In the Temple of Avo, we are able to Donate Gold to the God which will earn us Good Points. Similar to the Chapel of Skorm, if we earn enough Good Points through Donations we can earn a Legendary Weapon, Sentinus.

The more Evil you are, the more Good Points you will earn. From max Evil to max Good, the Donation range to earn the Legendary Weapon is $35,000 Gold & $320,000 Gold. I strongly recommend maxing out your Alignment to Evil before wasting any money Donating. Save up the $35,000 Gold & be Evil before coming back here!

The Sword In the Stone: Above the Temple to Avo, we can see some people gathered around a Sword in a stone. Try to remove it, & you will not be able to. Now that we have done our first attempt, we need to Level up our Physique by 5, Health by 2, & Toughness by 3.

Chances are, your Physique is already beyond 2. If this is the case, the only other way to remove the Sword is to have +7 in all three of our Might Stats; make this your new priority for Xp… We will also earn the That’s My Man! Achievement doing this.

Witchwood – Lake:

Silver Key #16: Enter Witchwood – Lake now & head up the path a little ways. Before the path narrows, we can see a large gargoyle like statue off our left. Stand at the base of the statue & we can find a Buried Treasure that contains this Silver Key.

Knothole Glade:

Main Quest #12 – White Balverine: Head South to Knothole Glade & immediately we will find it under attack by Balverines. Drive them off along with the White Balverine & speak with the late hunter’s wife; the White Balverine will attack us again when we search around the North end of town for her.

Drive it off one last time & go to its lair around Witchwood – Lake. Track it down & slay it; the Silver Augmentation we acquired from the hunter’s wife is useful, but not mandatory.

Kill the White Balverine & return to the Knothole Glade Chief to complete the Quest.


Achievement #26 – Under A Full Moon: There's something going on in Knothole Glade under a full moon. Cliché? Never.
Story Related. Complete Main Quest – White Balverine to unlock the Achievement.

Book #24 – The Balverine Slayer: Now it is time for us to rummage around through the town for loot. We can steal this Book from a Cabinet from the house directly across the street from the Marital Home for sale.

Silver Key #17: Pass in between the Marital Home & the residence beside it to see a strange circle of ferns behind it; dig up the Buried Treasure in the center of the circle to collect this Silver Key.

Demon Door #8 – The Hidden Copse: “If you can hurt my face with an arrow, I’ll crack wide open for you”.
There is a Demon Door that can be found outside of town. To open this Door, we need to deal some significant damage to it with a single shot from our Bow or Crossbow; Obsidian quality should do. Then you will want to acquire the Multi-Arrow Spell, at least Level 2. Use the Spell, then stand in point blank range of the Demon Door’s face; shoot your arrow & it should be strong enough.

Darkwood – Lake:

Legendary Weapon #4 – Arken's Crossbow: We will now take a quick random pit stop to Darkwood – Lake before we continue. Now that we have 15+ Silver Keys, we can open up a Silver Key Chest found across from the entrance to Darkwood – Bordello that contains this Legendary Weapon.

We can now safely sell all other Crossbows.

Heroes’ Guild:

Main Quest #13 – The Arena: Report back to the Heroes’ Guild & collect this new Quest Card; there is a Missable Achievement attached to this Main Quest!

Before we begin this Quest, make sure you have a good supply of Health Potions!

Do not accept the No Protection or No Damage Boast; this will make that Achievement impossible to earn on Heroic Difficulty!

Witchwood Arena:


Achievement #27 – Are You Not Entertained!?: Complete all 8 rounds of the Arena without taking a break.
Missable. For this Achievement we need to complete all 8 of the rounds in the Arena without leaving once. This means that we must do them all back-to-back. After each round, always make sure you say “Next round”; round 3 is probably the hardest of all of them…

Defeat the boss on round 8, Arachanox, having never left the Arena to unlock this Achievement.

Main Quest #13 – The Arena: Complete the 8 rounds of the Arena, & we will then have to defeat Whisper at the very end. Kill or spare Whisper; the decision will not affect anything other than our Alignment… & our conscience. This is also our final fight with Whisper & the last chance to earn the As Quiet As A Whisper Achievement.

Note that killing Whisper will give us a bonus purse of $10,000 Gold.


Achievement #28 – Gladiator, Ready!: Take on the might of everything that Albion has to offer. Well, almost everything…
Story Related. Deal with Whisper as you choose to, & learn of our mother from the Jack of Blades; complete Main Quest – The Arena to unlock the Achievement.
Sequence 10: Moral Duality
1. Area: The Temple of Avo, Darkwood – Chapel of Skorm, Knothole Glade, Witchwood – Lake, Abandoned Road, The Bitter Shrine, Fisher Creek
2. Books: 24/25
3. Weapon Types: 10/12
4. Silver Keys: 18/30
5. Demon Doors: 9/12
6. Legendary Weapons: 6/10
7. Achievements: 28/50
-----------------------------------------------------------------------------------------------------

The Temple of Avo:

Legendary Weapon #5 – The Sentinus: With all the money we earned from the Arena, we should have well over $30,000 by now. Before we begin Donating Gold, be sure you are as Evil as possible; Sacrifice at the Chapel of Skorm or demolish Crunchy Chicks if you have to.

At maximum Evil, we can acquire this Legendary Weapon for the smallest sum of Gold. If you are maxed out Evil, donate $35,000 Gold in a straight shot donation & we will receive this Legendary Weapon. If you need to do multiple installments there will be “interest” added on for how Good you are. It is the fastest just to save up the $35,000 Gold at a max Evil Alignment to acquire this Weapon.

Prices range from $35,000 – $320,000 Gold. This may be 1/5 Legendary Weapons you end up skipping as well…

Weapon Type #10 – Greatmace: The Sentinus counts as a Greatmace type Weapon; we can safely sell all other Greatmaces we acquire.

Darkwood – Chapel of Skorm:

Legendary Weapon – Skorm's Bow: Now that we have access to The Temple of Avo, we can reduce our Evil Alignment to become more Good to earn Skorm’s Bow if you have not already done so. Skorm’s Bow works in reverse as The Sentinus; the more Good you are, the more Evil Points we will generate from a Sacrifice. Make sure you are at least above -75 Alignment; donate more Gold if you need to increase it.

Now step outside & recruit the Bodyguard here or go to Twinblade’s Camp to recruit the one found there; it must be one of the “thick” looking Bodyguards.

With the Bodyguard, get to the Chapel of Skorm & pass time or wait until midnight making sure you Save before you Sacrifice them.

At under -75 Alignment, Sacrificing a “thick” Bodyguard, & Sacrificing them close to midnight, we should earn over 150+ Evil Points at least; if you do not earn Skorm’s Bow, reload & try again. The more Good you are, the higher your Evil Point yield will be. Keep reloading at 150+ Evil Points until you earn Skorm’s Bow.

Knothole Glade:

Bright Plate Leggings: We have one last expensive purchase to make before we are free to use our money however we wish. Speak with the Blacksmith in Knothole Glade, & depending on your current Guile Skill, we can purchase them for $7000-$8000 Gold.

Bright Plate Boots: We can purchase the Boots from the same Blacksmith for $1000-1300 Gold depending on your Guile Skill.

Witchwood – Lake:

Bright Plate Chest Piece: Unfortunately, the Chest Piece & Gauntlets are not sold here, so we must track down traveling Traders; Witchwood – Lake is the best spot, but technically anywhere with traveling Traders has the chance to carry these Armor pieces.

From the Temple of Avo, pop in & out of Witchwood – Lake to spawn Traders. Unfortunately, this will also respawn the enemies. Alternatively, you can clear the whole area of enemies & then wait for the Traders to manually walk in; this can be time consuming though.

When you eventually come across a Trader who sells Armor, purchase the Bright Plate Chest Piece for $7800-$8200 Gold depending on your Guile Skill.

Bright Plate Gauntlets: Can be purchased from the higher level traveling Armor Traders for $1800-$2200 Gold depending on your Guile Skill.

That is the last piece we need of the set; there is no Helmet.

We can purchase the entire Bright Plate Armor outfit from the village of Snowspire at the very end of the game should you need to.

Abandoned Road:

Demon Door #9 – The Bitter Shrine: “What? Oh. You’re not one of them, are you? My eyesight’s not what it used to be. One was a gallant knight. His plate armor was so shiny. Probably what did my eyes in? Then there was an evil mage, wore the darkest magical robes you ever saw. The last was a rogue – a bandit bit like the chaps here”.
When you have collected the full Bright Plate Armor outfit, return back to the Abandoned Road from Twinblade’s Camp & go to the Demon Door. Put on the Bright Plate Chest Piece, Gauntlets, Leggings, & Boots to imitate the first character.

For the second character, we need to put on the full Dark Will User’s outfit; the Dark Will User’s Hat is not required oddly enough. Lastly, put on the full Bandit outfit (including the Bandit Bandanna for this one) to imitate the final character to open the Demon Door.

The Bitter Shrine:

Legendary Weapon #6 – The Dollmaster's Mace: Loot the Chest in the Bitter Shrine having opened the Demon Door to collect this Legendary Weapon.

This Weapon is of course a Mace; we can now safely sell all other Maces we are carrying. If you cannot open the Demon Door, this may be 1/5 Legendary Weapons you skip.

Fisher Creek:

Repeatable Quest – Fishing Competition: If you have not already done so, return to Fisher Creek & we can speak with the Fisherman to enter into the Fishing Competition.

Silver Key #18: Go to the waters nearby, & even though there are no Pools, begin Fishing. As we fish we will catch… Fish… of varying Lengths & Weights. I do not 100% know the breakdown for all three prize ranges as the first Fish I caught ended up being 58g which won first place. All prizes are retroactive, so if you earn first prize, you will also earn the second & third place prizes.

This Silver Key is earned by winning the second place prize.

If you have not completed a single Quest with the No Protection Boast, earn first place in the Competition to earn the That’s A Real Lunker Achievement.
Sequence 11: Thunder Struck
1. Area: Bowerstone – North, Bowerstone – South, Oakvale – Memorial Garden, Windmill Hill, Headsman’s Hill, Headsman’s Cave
2. Books: 25/25
3. Weapon Types: 10/12
4. Silver Keys: 22/30
5. Demon Doors: 10/12
6. Legendary Weapons: 6/10
7. Hero Dolls: 1/7
8. Achievements: 29/50
-----------------------------------------------------------------------------------------------------

Bowerstone – North:
Since we impressed Lady Grey so much with our victory in the Arena, we can now enter Bowerstone – North.

Book #25 – The Tailor's Tragedy: Our final Book can be found inside the first residence off our right when we enter Bowerstone – North. Steal it from a Bookshelf on the first floor.

Hero Doll #1 – Thunder: In the center of Bowerstone – North, we can enter a store run by a man named Drago. Speak with him, & scroll over to the Items tab of his stock to purchase our first of seven Hero Dolls for $200 Gold.

The Doll of our own character is not needed for the Achievement… we are not good enough apparently.

The Shopkeeper also sells an obscenely expensive Legendary Weapon called, the Solus Greatsword… this should definitely be 1/5 Legendary Weapons you skip.

Quest – Investigating the Mayor: There is a prisoner we can speak with close to the Bowerstone Jail. Completing this Quest, & turning the evidence over, will result in Lady Grey being removed from her position as Mayor. Doing this prematurely will void Collectibles & Achievements for us; if you plan on turning her in, wait until we are finished with her first! Otherwise, complete the Quest but do not turn over the evidence.

Quest – Mayor’s Invitation: This is a very important Quest we need to complete. To start, purchase a Black Rose for Lady Grey from the Shop here in Bowerstone – North for around $300 Gold. Give it to her.

Next step will be owning a Marital Home. If you do not have one yet (even though you should) buy the one found in Bowerstone – South as it is the cheapest. Even if it is being Rented out, this is good enough for Lady Grey.

She will then task us with finding her lost necklace. Speak with Villagers around Bowerstone – North & we will be told it was stolen by some people last seen in Oakvale…

Bowerstone – South:

Silver Key #19: With our final Book collected, donate it to the Teacher in Bowerstone – South. With all 25 Books donated, we will acquire this Silver Key as a reward.


Achievement #29 – Education Rules the Nation: The children in Bowerstone have no books to read! You don't want illiterate children, do you?
If you have been following along with this guide, we will unlock this Achievement after we donate the last Book to Mr. Gout.

Oakvale – Memorial Garden:

Quest – Mayor’s Invitation: Go to the Memorial Garden in Oakvale & we can see two Traders off to the side. If we get too close to them, they will stop talking. Run around the wall behind them, enter Stealth mode & walk a little ways away, then sneak back over to the wall undiscovered to overhear them speaking.

They buried the necklace in between two boats on the Oakvale beach. Go to the Southern beach & there will be two boats to the right of the dock; stand in between them & we can dig a Buried Treasure to collect Lady Grey’s Necklace.

Bowerstone – North:

Quest – Mayor’s Invitation: Return back to Lady Grey & give her the necklace. Our final task to win Lady Grey’s hand in marriage, is to defeat Thunder in a duel. Pass through the Bowerstone Jail & we will find Thunder outside where he will challenge us to a fight at Headsman’s Hill.

Windmill Hill:

Silver Key #20: To get to Headsman’s Hill, we must first pass through Windmill Hill. Head up the first hill & we can see a house off our left. Enter into the small fenced garden & we can find a Buried Treasure in a circle of flowers; dig it up to collect the Silver Key.

Silver Key #21: Head up the next hill, & we can spot the windmill off our right. In behind the windmill, will be another circle of flowers that has a Buried Treasure in its center; once again, dig it up to find a Silver Key.

Headsman’s Hill:

Quest – Mayor’s Invitation: When we arrive at Headsman’s Hill, we will have to defeat Thunder in a fight. Like all good bosses, Thunder has a phase 2, & at half health will bull rush us & knock us down to a lower level of the area.

Silver Key #22: While we are down in the second arena for Thunder’s boss fight, do not chase him into the cave for part three just yet. Behind us, we can find a Pool that we can fish a Silver Key out of.

Headsman’s Cave:

Quest – Mayor’s Invitation: Chase after Thunder now & defeat him once & for all to obtain his helmet as a Trophy. Do not teleport out of the cave!

Headsman’s Hill:

Demon Door #10 – Gibbet Woods: “Only by defeating another Hero in combat will I open for you. Got that? I mean, how simple are you?”
Exit the cave back outside & speak with the Demon Door here. Since we defeated Thunder, we can now open this Demon Door.
Sequence 12: Found You In White
1. Area: Bowerstone – North, Bowerstone – Manor, Grey House, The Lost Garden, Heroes’ Guild, Knothole Glade, Prison Path, Lychfield Graveyard, Old Graveyard Path, Circle of the Dead
2. Weapon Types: 11/12
3. Silver Keys: 26/30
4. Demon Doors: 11/12
5. Legendary Weapons: 9/10
6. Hero Dolls: 1/7
7. Achievements: 34/50
-----------------------------------------------------------------------------------------------------

Bowerstone – North:

Quest – Mayor’s Invitation: Return to Lady Grey, & when we speak with her, we will have the option of marrying her. You must say Yes! Do not say no! Congratulations.

Marriage comes with its own stresses. Lady Grey can divorce us! It happens faster if you are in the negative for Attractiveness & Alignment. If you are Attractive & Good, she will most likely never leave you. If you are “Ugly” or Evil, appease her by giving her/ Gifts & positive Expressions regularly.

Bowerstone – Manor:

Silver Key #23: Now that we are married to Lady Grey, we can enter the Manor. Head to Lady Grey’s Bedroom & loot the Bed to collect a Silver Key. This counts as stealing so make sure you are not spotted!

Legendary Weapon #7 – Katana Hiryu: Behind the Bed, we can see a 15 Silver Key Chest; open it to collect this Legendary Weapon.

Weapon Type #11 – Katana: This Legendary Weapon is of course a Katana; we can now sell all other Katanas safely.

Grey House:

Main Quest #14 – Finding Theresa Again: Go to the Grey House, & link up with Theresa for a new lead…

Demon Door #11 – The Lost Garden: “Single men not allowed. You need a ball & chain. A posh one with a title”.
Now that we are married to Lady Grey, go to the Grey House & speak with the Demon Door there. It will only open if we are married to her, making it highly Missable.

The Lost Garden:

Legendary Weapon #8 – Ronok the Axe: Enter through the Demon Door & we can loot this Legendary Weapon from the Chest inside.

If you did not marry Lady Grey (or somehow she already left you), this just becomes 1/5 Legendary Weapons you cannot collect.

Bowerstone – North:


Achievement #30 – Marital Relations: Receive a Gift from your spouse, or Flirt with an admirer in front of your spouse.
Return back to Bowerstone – North & make sure Lady Grey is outside. Now simply follow her around & wait until another woman who is in love with you is nearby; if no one is, you need to make yourself more Attractive…

Lock on to this woman (or man technically) & use the Flirt Expression on them with Lady Grey nearby to unlock the Achievement.

Alternatively, you could wait to receive a Gift from her… but it’s a real process.

Heroes’ Guild:

Legendary Weapon #9 – The Murren Greathammer: Head to the Heroes’ Guild now & go outside to where the combat training circle is. Nearby, we can find a 20 Silver Key Chest; open it, & we will receive this Legendary Weapon.

Main Quest #15 – Rescue the Archaeologist: Go to the Map Table & accept Theresa’s Quest Card to rescue the Archaeologist from Bowerstone Jail.

If you have not already done so, be sure to also accept Quest – Break the Siege & complete it.

Knothole Glade:

Repeatable Quest – Archery Competition: With Quest – Break the Siege complete, we now have unlocked the Archery Competition. Leave & return to Knothole Glade to enter it.


Achievement #31 – Arthur or Robin?: Pull the sword from the stone, or earn the top prize in the Archery Competition.
Earn the top prize in the Archery Competition to unlock this Achievement; we will also be pulling the “sword from the stone” as well technically…

Prison Path:

Main Quest #15 – Rescue the Archaeologist: Exit Bowerstone – North to Bowerstone Jail & a Guard will tell us that Minions have captured the Archaeologist.

Fight your way through the Minions to reach the Prison Path where we will only have 5 minutes to get down to the harbor below to free the Archaeologist. You should have enough time to kill all the enemies along the way, but if you are worried, you can just sprint through them all down to the final fight at the end.


Achievement #32 – A Family Friend: Rescue the Archaeologist, & find the secret entrance into Bargate Prison.
Story Related. Complete Main Quest – Rescue the Archaeologist to unlock the Achievement.

Lychfield Graveyard:

Main Quest #16 – The Graveyard Path: From the Headsman’s Hill, we can enter the Lychfield Graveyard. When we go to speak with the Gravekeeper, we will overhear that he has stashed a set of rare Armor around the graveyard. We will need to dig up all the pieces of the outfit to pass through the Demon Door…

Be sure to collect Nostro’s Helmet from his home before we carry on.

Silver Key #24: Enter the cemetery now & head left. Past a first plot of graves, we can see a small pond at the Southern end that has a Pool in it; fish the Pool to collect this Silver Key.

Nostro’s Sword can be found in a Buried Treasure in the next plot of graves close by.

Silver Key #25: Past where we dug up Nostro’s Sword, we can enter a small mausoleum close by to the left. Loot the Sarcophagus inside it to collect this Silver Key.

Silver Key #26: Exit the mausoleum & head over to the next plot of graves nearby to our left. In the center grave that looks semi-dug up, we can find a Buried Treasure that contains yet another Silver Key.

Nostro’s Set: Cross the bridge into the second half of Lychfield Graveyard & we can: fish Nostro’s Shield out of a Pool in the river & Nostro’s Armor from a Sarcophagus in another mausoleum.

Main Quest #16 – The Graveyard Path: With all four pieces of Nostro’s set collected, head to the top of the graveyard to find Nostro’s grave & give him back his lost relics.

The Demon Door we open is Story Related & does not pertain to the Achievement…

Old Graveyard Path:

Xp Farming: When we enter the Old Graveyard Path we will face infinitely spawning Hollowmen. Should you desire it, you can farm them indefinitely to earn an insane amount of Xp; the higher your Combat Multiplier, the more Xp you’ll get. A good time to use any stored Ages of “X” Potions too…


Achievement #33 – I Am Legendary: Earn enough Renown to be known in Albion as "Legendary".
Depending on how much farming you do here on the Old Graveyard Path, you may earn this Achievement. We need to become Rank 7 Renown to unlock it.

If you have completed all Quests available at the Heroes’ Guild, then you should at least be Level 6 Renown. We cannot lose Renown. We are guaranteed to earn this Achievement by the end of our 100%; just keep completing Quests & killing enemies to earn Renown…

Circle of the Dead:


Achievement #34 – Fishing In A Graveyard: Go fishing & digging in a graveyard, as if it's a completely normal thing to do.
Story Related. Complete Main Quest – The Graveyard Path to unlock this Achievement.
Sequence 13: Hero, Your Health Is Low...
1. Area: Bargate Prison, Cliffside Path, Heroes’ Guild, The Temple of Avo, Greatwood – Cullis Gate, Darkwood – Weir, Bowerstone – North
2. Weapon Types: 12/12
3. Silver Keys: 27/30
4. Demon Doors: 11/12
5. Legendary Weapons: 10/10
6. Hero Dolls: 1/7
7. Achievements: 40/50
-----------------------------------------------------------------------------------------------------

Bargate Prison:

Main Quest #17 – Rescue Scarlet Robe: Enter into Bargate Prison & begin fighting your way through the passages to locate your mother.

Cliffside Path:

Silver Key #27: When we exit outside the first stretch of tunnels, pass through the way off our left & head up the hill. Near the top, there will be a small side path leading up off our left to a Chest & a ring of mushrooms; dig the Buried Treasure in the ring to collect this Silver Key.

Bargate Prison:

Main Quest #17 – Rescue Scarlet Robe: Re-enter Bargate Prison now & fight through the Guards that will come to stop us. Free Scarlet Robe, & fight all the way back out… or try too.

We will not get far before Jack of Blades catches us, & locks us into a cell ourselves… I hope you said goodbye to Lady Grey. But don’t worry we will be getting out… soon?

Main Quest #18 – Prison Escape: Participate & win the leg race we are made to run by the Guards, & we will be taken to the Warden’s office. While he recites… something… to us, sneak behind him to look at a combination code on the wall near him then use it to open one of the locked ledgers. No matter which book we choose, it will be empty…

After a pretty unexpected & terrifying time jump, we will find ourselves still in Bargate Prison. Win another leg race & we will be reunited with the Warden in his office. Sneak behind him yet again to view a new combination then unlock a different one of the ledgers & we will acquire a Prison Cell Key. With it… break the (Censored by Steam) out of here, man!

As soon as we are out in the main yard, head up the stairs & enter the Prison Barracks where we can collect all our stolen belongings. Retrieve Scarlet Robe, & this time, successfully backtrack your way out of Bargate Prison. Near the exit, we will need to slay a Kraken boss; shoot the tentacles to expose the core, Fox!


Achievement #35 – The Bloodline Part II: Now it's your mother that has gone missing, so it's time to find her too. Families, who needs 'em?
Story Related. Complete Main Quest – Prison Break to unlock the Achievement.

The Guildmaster after you have been missing for an entire year “Your Guild Seal has been re-activated! Your back!”

Also… the Guildmaster two seconds later “You’ve received a new Quest Card!”

Heroes’ Guild:


Achievement #36 – That’s My Man!: Level up a complete Abilities tree, be it Strength, Skill or Will.
For this Achievement, we need to max out all Abilities to Level 7 in either Strength, Skill, or Will. Strength or Skill are the best choices, with Strength being the easiest; do not choose Will as we need to Level all max out all 18 Spells if we do!

If you did some farming in Lychfield Graveyard, you may have earned enough Xp to max out Strength; if not, chip away at this or farm it at the end of the game.

Turncoat & Summon Spells: While we are Leveling, if you are able to, purchase at least a Level 1 Summon & Turncoat Spell as you can; we need both these Spells for two Achievements. Summon Level 1 costs 1732 Xp & Turncoat Level 1 costs 3320.

The Temple of Avo:

Legendary Weapon #10 – The Harbinger: With all three Strength Abilities maxed out, we can now remove the sword from the stone.


Achievement #37 – Horde Mode: Some weapons are Legendary, & we feel it's worth you collecting at least 10 of them.
There are 15 Legendary Weapons in the game giving us a bit of lee-way with this Achievement. Since some Weapons are not optimal to obtain, I will include the locations of the other five Weapons to give you some options… two are found in Silver Key Chests making them very easy to collect.

Greatwood – Cullis Gate:


Achievement #38 – There Is No Spoon: Use the power of mind control on an enemy, & have them kill one of their allies.
Before we continue, we may as well earn some quick mop up Achievements. With the Turncoat Spell, teleport to the Greatwood – Cullis Gate & find some Bandits (or Wasps, any enemy works). Cast the Turncoat Spell on them & let our possessed enemy kill one of their allies to earn the Achievement; it may take a few tries, but this is a pretty simple Achievement.

Darkwood – Weir:


Achievement #39 – The Summoner’s Tail: Summon a powerful creature to fight by your side.
Now for a slightly less simple Achievement. How the Summon Spell works is, you summon a low tier enemy like a Wasp. If that Wasp kills a Bandit, it becomes a Bandit. If it kills a Balverine (the tier of summon needed for the Achievement) it becomes a Balverine. All increasing your Summon Spell Level does is increase the duration, not any damage.

Technically, you are supposed to slowly level your Wasp summon up by killing Bandits & work up to something like a Balverine… but there is nothing actually stopping you from going straight to Balverine.

Head to Darkwood – Weir or Witchwood – Lake, & get a Balervine to spawn; it is easiest to manage if there is only one. Weaken the Balverine & then simply let your Wasp summon kill it; if you accidentally kill it, just leave & come back until you respawn the Balverine. Cornering the Balverine & holding Block can be helpful keeping it in place for your Wasp to attack it.

Shout out to SquareHeadKillr of Xbox Achievements for the original strategy; it simplifies the Achievement significantly.

What your summon kills permanently becomes its new form if it is a higher level; by the end of the game, my summon actually became a blade-staff wielding Minion since I used it often enough…

Bowerstone – North:


Achievement #40 – But You’re A Wizard, Hero: Learn one of each Spell type, or own one of each Weapon type.
The only Weapon type we should be missing right now is a Greatsword. Go to any Blacksmith & just buy one. With it, we should have all we need to unlock the Achievement.

The 12 Weapon types are: Crossbow, Longbow, Longsword, Katana, Cleaver, Axe, Mace, Pickhammer, Greatsword, Greataxe, Greathammer, & Greatmace.

Legendary Weapon – Solus Greatsword: We can purchase the Solus Greatsword from the Shopkeeper in Bowerstone – North for $68,000 Gold to $80,000 Gold depending on our Alignment; the more Evil you are, the more expensive the Weapon will be.

If you are insanely lucky, you may even receive it as a Gift from Lady Grey while married to her. But don’t count on those odds… trust me, boy did I try…
Sequence 14: Jack of Blades
1. Area: Darkwood – Ancient Cullis Gate, Hook Coast, Heroes’ Guild
2. Silver Keys: 28/30
3. Demon Doors: 11/12
4. Hero Dolls: 1/7
5. Achievements: 42/50
-----------------------------------------------------------------------------------------------------

Darkwood – Ancient Cullis Gate:

Main Quest #19 – Gateway to Hook Coast: When your side business is taken care of, travel to the Ancient Cullis Gate in Darkwood. Slaughter the spawning Hollowmen until the Cullis Gate has enough souls in it to power up.

Hook Coast:

Main Quest #19 – Gateway to Hook Coast: Once we arrive, the Old Abbey we are supposed to go to will be blocked off; meet Scarlet Robe back at the Heroes’ Guild, in Maze’s Quarters.

Heroes’ Guild:

Main Quest #19 – Gateway to Hook Coast: When we get to Maze’s quarters, our mother will be taken away by a Minion ambush. Before we leave, collect the Arban’s Thaumaturgica Book off a nearby table.

Go to the Guildmaster, & we will receive the ultimate Quest Card from him… the final one; accept it if you are ready to beat the game (there is a lot more to do in Post Game & we are locked out of nothing).

Hook Coast:

Main Quest #20 – Return to Hook Coast: As the Quest name states, return back to the Hook Coast & disable the barrier at the Old Abbey. Here we will find Theresa & Maze. Maze has betrayed us.

Silver Key #28: Fight Maze across Hook Coast, & he will eventually enter the old lighthouse. Break the door down to enter, but do not chase Maze just yet. Instead, we can loot a Cabinet on the first floor to collect a Silver Key.

Legendary Weapon – The Murren Greataxe: At the very top of the lighthouse, we can loot this Legendary Weapon from a 15 Silver Key Chest.


Achievement #41 – There’s Always A Lighthouse: Would you kindly rid Albion of its greatest traitor.
Story Related. Complete Main Quest – Return to Hook Coast.

Heroes’ Guild:

Main Quest #21 – Try to Stop Jack of Blades: Return to the Heroes’ Guild to speak with the Guildmaster, then pass through the Cullis Gate to be taken to Witchwood – Cullis Gate. Confront Jack, but he will escape.

When we chase him through his portal, it will take us to Orchard Farm. Head down to the Greatwood – Lake next to find Jack at the next Focus Site. The following Focus Site will be found in the Hobbe Cave, with the final Focus Site found in the Gibbet Woods.

Main Quest #22 – Battle Jack of Blades: Chase Jack through his final portal & we will be taken right back to the Heroes’ Guild!? Confront Jack of Blades in the Chamber of Fate & defeat him. It is a two part boss fight that is more annoying than enjoyable unfortunately.

Once he is defeated, we will have to make a decision on what to do with the Sword of Aeons. Keep it & slay Theresa to collect a Legendary Weapon, or destroy it & spare your sister. The choice is yours.

Legendary Weapon – Sword of Aeons: If you kill your sister, you will be able to keep the Sword of Aeons. Should you destroy it, you will receive a Quest to retrieve the “Good” equivalent of this sword which is also a Legendary Weapon…

I will spoil this right now, killing Theresa is not cannon, & she plays a massive role in Fable 2… For those who have played Knights of the Old Republic 2, she is literally Kreia!


Achievement #42 – A Wild Jack Appears: From the Void to the Guild, it's time to fight the big bad guy.
Story Related. Complete Main Quest – Battle Jack of Blades to unlock the Achievement.
Sequence 15: The Lost Chapters
1. Area: Lookout Point, Heroes’ Guild, Hook Coast, The Lost Bay, Snowspire Village, Necropolis, Bleached Bone Island
2. Silver Keys: 30/30
3. Demon Doors: 12/12
4. Hero Dolls: 1/7
5. Achievements: 46/50
-----------------------------------------------------------------------------------------------------

Lookout Point:

Main Quest #23 – Prophet of the Fire Heart: Though there is a year time jump after we defeated Jack of Blades, we will jump right back in the action with another banger Quest Card from the Guildmaster. Go to Lookout Point & we will witness a message from the Hero, Scythe, at the Boasting Platform of all places…

Close by, there will be a new Demon Door we can interact with; this is a Story Related Demon Door & does not contribute the Achievement. Enter the Demon Door & we will have to solve 5 movement puzzles. The Mystery of Day & Night to be exact… We are timed so follow along if you don’t want to mess around with it yourself:

Puzzle #1: Up, Down, Up, Up, Down, Up, Right, Left, Up, Right, Right, Right.

Puzzle #2: Right, Up, Right, Left, Down, Up, Left, Up, Up, Right, Right, Right.

Puzzle #3: Up, Up, Right, Up, Down, Right, Up, Down, Right, Down, Down, Left, Left, Left.

Puzzle #4: Right, Right, Right, Up, Up, Up, Left, Left, Left, Down, Down, Right, Up, Right, Down, Down, Left, Left, Up, Up, Up.

Puzzle #5: Up, Up, Up, Right, Right, Right, Left, Down, Up, Down, Down, Up, Down, Down, Up, Down, Right, Left, Left, Left.

Heroes’ Guild:

Legendary Weapon – Avo's Tear: If you through away the Sword of Aeons, we can instead get this Legendary Weapon by completing the Quest – The Hidden Sword. Search Maze’s Bookshelves for his notes then read all plaques at the Heroes’ Guild Memorial to receive it.

Hook Coast:

Main Quest #24 – The Ship of the Drowned: Go to the Hook Coast & place the Fire Heart in the lighthouse at the top. Defend the Fire Heart from the approaching Summoners with Briar Rose to summon the Ship of the Drowned.


Achievement #43 – Winter Is Coming: Travel to the Northern Wastes, because it sounds like just the place you'd want to visit.
Story Related. Complete Main Quest – The Ship of the Drowned to unlock the Achievement.

The Lost Bay:

Silver Key #29: When we arrive at The Lost Bay, we can see a ruined building off our right. Head around to the far side of the building & we can spot a grave with a Buried Treasure in front of it; dig it up to collect this Silver Key.

Snowspire Village:

Main Quest #25 – The Oracle of Snowspire: Travel across the Northern Wastes until you reach Snowspire & meet up with Scythe.

There is no notable loot here in the village needed for Achievements, which isn’t to say that there is no loot here you might be interested.

The Tailor here does sell a full set of Bright Plate Armor if you still need it…

Necropolis:

Main Quest #25 – The Oracle of Snowspire: Enter into the Necropolis now & this Quest will begin in full. Search around the quarantined city for the four Glyphs. As we dig up Buried Treasure, some may be traps so be careful! One is dug up near the start, two are dug up close together across the bridge, & the last one is found at the very end after defeating a scripted ambush.

Silver Key #30: Close to where the Demon Door is, look into the river & we can spot a Pool tucked in beside a broken bridge; fish our final Silver Key out of it.

Do not open this Demon Door yet! It requires us handing over all our Silver Keys permanently; there are still two Silver Key Chest we should open first!


Achievement #44 – You Are A Super Player: Find all 30 Silver Keys. In unrelated news; the Fable Anniversary Strategy guide is available now!
If you have been following along with the guide, you will unlock this Achievement after collecting the final Silver Key.

Archon's Battle Armor: Across the river from the Demon Door, there is a 25 Silver Chest that contains the entire set of Archon’s Battle Armor; the best Armor in the game!


Achievement #45 – Are You Listening To Me?: Few things are smarter in Albion than a talking stone door, so imagine a door that knows the YMCA.
Story Related. Complete Main Quest – The Oracle of Snowspire to unlock the Achievement.

The Lost Bay:

Legendary Weapon - The Avenger: Near the ocean in the top North East corner of the area, we can find a 30 Silver Key Chest that contains this Legendary Weapon.

The Necropolis:

Demon Door #12 – Bleached Bone Island: “I never wanted to be a Demon Door. All this waiting around. All the riddles. It’s no life. Oh, if only I’d been born a Silver Key Chest. I just love those little Silver Keys. So shiny…So silver…I’d do anything for some of my own. Give me yours, please? I’ll let you through & everything.”
With all Silver Key Chests opened, we now have no more need for our Silver Keys. Return to the Demon Door & hand all 30 of them over to it to open the door.


Achievement #46 – Open Saysamemiddlefinger: Open all 12 Demon Doors, or show a closed Demon Door what you think of it.
If you have been following along with this guide, we will unlock this Achievement after opening our final Demon Door.

Alternatively, you could have earned it much earlier if you used the Middle Finger Expression on any of the Demon Doors along the way…

Bleached Bone Island:

Legendary Weapon - Bereaver: We will receive this final Legendary Weapon from a Chest inside this Demon Door.

Snowspire Village:

Main Quest #26 – The Oracle’s Knowledge: Take the four Glyphs to Scythe & we will speak with the great Oracles.
Sequence 16: No Matter the Cost
1. Area: Archon’s Shrine, Archon’s Folly
2. Hero Dolls: 1/7
3. Achievements: 49/50
-----------------------------------------------------------------------------------------------------

Archon’s Shrine:

Main Quest #27 – The Souls of Heroes: Travel now to Archon’s Shrine to speak with Briar Rose. She will reveal that not only is Jack not defeated by that we will also need to harvest the souls of other Heroes to open the Bronze Gate.

Travel to Knothole Glade & we will find Thunder. To obtain the “King of the Arena” Soul either collect one from the Arena ground at Witchwood – Arena… or kill Thunder right here & now for it.
Report back to Briar Rose & we will face our next Soul ultimatum. We can either travel to the Memorial Garden in Oakvale to claim Scarlet Robes Soul or kill Briar Rose for hers’ to obtain “The Heroine” Soul.

Return to Briar Rose… or stay in Archon’s Shrine having killed her. Now we need “The Oldest Soul”. Go to the Heroes’ Guild & we will find our new lead. Go to the Lychfield Graveyard to collect Nostro’s Soul… or murder the Guildmaster in the Guild Woods… “Guildmaster… your health is low”.

With the final Soul obtained, go back to Archon’s Shrine to complete the ritual.


Achievement #47 – Making Tough Decisions: Behind the Bronze Gate lies your destiny, & all it needs is the death of your closest allies.
Story Related. Complete Main Quest – The Souls of Heroes to unlock this Achievement.

Archon’s Folly:

Jack’s Mask: As a pre-warning, when Jack is defeated, we will have a decision to make about his Mask: destroy it or wear it. If you put Jack’s Mask on, you cannot take it off & you are unable to put on any either Helmet! While this is technically fine, it has the potential to void two things if you have not done them yet.

One is Demon Door #9 along the Abandoned Road as we will be unable to put on the Bandit Bandanna. The other is the I Did This For A Cheevo Achievement as we cannot put the Red Hair Wig on. Be sure these are done first before entering Archon's Folly if you desire to wear Jack’s Mask!

Main Quest #28 – The Final Battle: When you are ready, pass through the Bronze Gate & enter Archon’s Folly. When we arrive, we will confront Jack of Blades for the second time… only now in a monstrous reincarnation… He deals a lot of damage, but is ultimately an extremely easy final boss.


Achievement #48 – (#SPOILERS): It's time to defeat the super awesome boss, the one you will see if you unlock this Achievement.
Story Related. Complete the final Main Quest – The Final Battle to unlock the Achievement.


Achievement #49 – Great Balls of Fire!: Complete a truly heroic feat.
Story Related. If you have played the entire game on Heroic Difficulty, we will unlock this Achievement after beating the final Main Quest & the credits begin rolling.
Sequence 17: Life of A Retired Hero
1. Area: Twinblade’s Camp, Knothole Glade, Bowerstone – South, Hook Coast, Snowspire Village, Oakvale
2. Hero Dolls: 7/7
3. Achievements: 50/50
-----------------------------------------------------------------------------------------------------

Twinblade’s Camp:

Hero Doll #2 – Twinblade: Now we get to live the life of a retired Hero. Apart from any business you have left over, as part of the guide, we only have one more task to do. Collecting the final five Hero Dolls. To earn these five, we need to earn High Scores in all the Tavern Games. Some are easy, others are not; don’t bet more than 1 Gold to keep things simple.

Since we already know what we have to do for this game, head to Twinblade’s Camp first & speak with the Gamemaster. To earn the Hero Doll prize, we need to beat the game in 25 seconds or less.

For this Tavern Game, we can actually cheat using the Slow Time Spell. Purchase the Spell to the highest Level you can, cast it before playing the game, & will make things infinitely easier.

Knothole Glade:

Hero Doll #3 – Scarlet Robe: Now we go to the Knothole Glade Tavern to play Sort the Cards. This is a super simple Tavern Game. When the Cards flip over, you must quickly click on them from lowest to highest & flip them over; for the purposes of the game: Ace=1, Jack=11, Queen=12, & King=13.

There are 7 Rounds & each Round adds a new Card from the starting three.

To earn the Hero Doll, we must beat the game in under 25 seconds; we can use Slow Time to simplify the game…

Bowerstone – South:

Hero Doll #4 – Briar Rose: Next we shall go to the Bowerstone – South Tavern & speak with the Gamemaster to play Card Pairs. For Card Pairs, it is simply matching the same Cards together. Each Card has a duplicate on the board (King, Queen, Jack, 10, 9, etc.). Flip over the different Cards memorizing their locations then flip the same Cards over to pair them; there are 12 Cards we need to pair.

To receive this Hero Doll, we need to complete the whole game in 30 seconds or less. This game takes practice & luck with where the Cards appear. It took me around eight attempts to get it down with four of them being 31-33 second; the one that I won with I did in 19 seconds because 90% of the pairs were right beside each other.

We will be unable to use Slow Time to cheat during this Tavern Game. There is a hack though that you may or may not find useful. If you press the (X) button on controller (or whatever your melee attack button is for mouse/keyboard), it will pause the game & timer. Flip over one Card, pause & write it down, flip over the next, pause & write it down…

Hook Coast:

Hero Doll #5 – Maze: Now we go to the Tavern in the Hook Coast to play Shove Ha’Penny. This game is different from the others & there is no time limit. For this game, we need to push Coins along a board to earn different scores, kind of like darts meets curling. The goal is to try to create the highest score possible with our 4 Coins.

To earn the Hero Doll, we need to earn a score of 30+. Once you memorize the strength to push your Coin into the 10 zone, this becomes pretty simple. Just takes a bit of practice. I found this game the most fun out of them all.

Snowspire Village:

Hero Doll #6 – Scythe: Our final Hero Doll will be collected from the Snowspire Tavern. Coin Golf builds off what we learned in Shove Ha’Penny but is much less forgiving. Like Golf, we need to push our Coins along a board to the “Holes” in as little moves as possible. For this prize, we need to reach all 4 Holes in under 10 moves.

Play through the game a few times not worrying about par just to learn the maps & get a feel for your Coin. For Holes 1 & 2, they can be done in two moves each; one move to get around the obstacles & another move to get into the Hole. For Hole 3 it may take two-three moves depending on how quickly you can get the Hole in sight. That leaves Hole 4 with either three-four moves available for it.

It took me over fifty tries to win this game with most of my attempts frustratingly quitting on the Hole 1 if I took more than two moves on it…

Oakvale:

Hero Doll #7 – Whisper: Now, we saved the hardest Tavern Game for last. Head to the Oakvale Tavern to play Coin Golf. Unfortunately… it is more Coin Golf. Though we get an extra move (its 11 move maximum for the Hero Doll), the map set up is 10 times worse than what we had in Snowspire.

This is a pretty challenging game to play & will take multiple tries to get right. You basically need to get the feel for the game first, then memorize the location of each of the end zones to get there the most efficiently. There is no set “strategy”. While using two moves per round is ideal, you get a tad of leeway with the harder Holes. You can also have some lucky shots that speed you along as well.

Holes 1 & 2 should be beaten with two moves each; one shot to get around the objects, then the last one getting it in the Hole. Hole 3 may take 2-3 moves depending on how quickly you can get the Hole in view. That leaves you with 4-5 moves to beat Hole 4.

I found this Tavern Game the hardest, taking me over 50 tries to memorize; you would have thought the Snowspire game would have me practiced enough... Video guides are essentially useless as well, as apart from learning where the Holes are & "seeing" how many moves to use... it doesn't help at all not knowing how hard to push. Practice & luck is basically all you can do...

Bowerstone – South:


Achievement #50 – Fable Heroes: The Bowerstone Teacher is on the lookout for Hero Dolls, help him find all 7 of them!
With all 7 Hero Dolls collected (your own Hero Doll does not count), go to Mr. Gout at the Bowerstone school & he will approach us himself. Donate the 7 Hero Dolls, & we will in return receive the Jack of Blades Doll also unlocking our final Achievement of the game!
Conclusion:
Fable is a pretty simple & fun 100%; it only took me around 30 hours to complete it. There are multiple ways to earn some of the harder Achievements leaving only the Silver Keys & Hero Dolls that we have to earn naturally. With Microsoft having obtained this IP, let us pray they have the sense to re-release Fable 2 & 3 to Steam!

If this guide helped you achieve 100%, rate the guide or let me know in the comments. Helps me know if I am doing things right!


100% Complete!
Thank you for choosing Cynic, & I will see you in the next guide!

If you are interested in a little bit of patronage, support my projects & consider buying me a beer. If not, no worries; my guides are, & will always be free content. Achievement Hunting is my passion, & writing these guides is a way for me to give meaning to a life long hobby!
https://www.buymeacoffee.com/cynic0055

If you enjoy my style of writing guides, be sure to check out my profile for a full list of my works.

15 Comments
Cynic 0055  [author] 25 Jul @ 6:37pm 
Hey Arctixaa, Thanks for bringing this up; I will definitely want to mention something if the only way you could complete it was editing a text.

By waiting "too long" do you know what specifically that was? Was it beating a certain Main Quest? It is a Repeatable Quest so in theory it should be able to be replayed indefinitely, but I very well could be wrong about that.
Arctixaa 25 Jul @ 5:01pm 
Great guide! I 100% this years ago on the xbox 360, but for the life of me as much as I love this game I couldn't remember a dang thing. This guide was fantastic.

I will mention one issue I ran into was the fishing competition. There is a glitch that if you wait "too long" you can no longer enter it. At the very least make sure you talk to him before you leave the area just in case! I had to go in and change a text file in order to get that silver key. Dont know if you want to add this to the fishing section or by the area you mentioned the key.
LungFish 14 Jul @ 7:57pm 
Great guide. Easy to follow.
Rough Games 11 Jul @ 1:09pm 
Cynic, Excellent guide. I played the second and third fable games when I was a kid and wanted to 100% the first game. I was very happy to see a guide this detailed. Thank you very much.
Cynic 0055  [author] 13 Jun @ 9:29am 
Hey Zoutje, Nope, no DLC required. The DLC for this game just add new Armor & Weapons (not very good ones at that) of other NPCs/Heroes in the game.

The Anniversary edition already has the Lost Chapters DLC built into it, which does have attached Achievements to it. :crunchychick:
Zoutje 13 Jun @ 1:54am 
I saw that the game is on sale. Are the DLC required for the 100%?
Cynic 0055  [author] 8 Jun @ 11:11am 
Hey wortwortwort, Thanks for bringing this up, I made a note beforehand in the Chicken Kicking Contest Quest. :goodhero:
wortwortwort 8 Jun @ 8:54am 
It should probably be mentioned for the silver key in memorial garden to not skip the steps in the ghosts quest line because it can glitch and not spawn the key
Kenami 24 May @ 11:27am 
Amazing Guide! Just achieved my 100%. Thank you! :steamthumbsup:
Prawie 16 Apr @ 5:43am 
Absolutely wonderful guide, you are truly the best at making them ^^
Thanks! :ok_ay: