Bronzebeard's Tavern

Bronzebeard's Tavern

26 ratings
Guide – Beginner to... all we know🍻
By Metall90
This guide will help you better understand the game and develop tactics with your companions. The guide is written based on my personal experience combined with that of my friends, and your feedback, which I will seek to incorporate with each update of the guide.
   
Award
Favorite
Favorited
Unfavorite
Presentation
Hi! I'm trying to create this guide to help new players understand some parts that may not be super easy for everyone to grasp. Feel free to jump to the sections you need by clicking on the corresponding chapters on the right. Help me improve it! Remember, Just a heads up—I'm not a native speaker, nor am I a developer, so I might not be clued in on ALL the game's hidden mechanics. But fear not! In the weeks (years?) ahead, as updates roll in, I'll do my best to fine-tune the guide. Together, we'll navigate this gaming adventure like pros!

Before starting a game, find friends (playing alone won't be as fun as in coop). This game is reminiscent of Overcooked, and if you're familiar with it and have played enough, for you, it will be easier to understand some mechanics.. You're aware that at a certain point, it becomes somewhat competitive, and you wouldn't want performance to be an issue. I've noticed that there's a bit of visual change from low to medium; however, beyond that, not so much. You'll gain few fps... feel free to test it out! burp 🍺
Host, join and
Sssimply awesome! Just whip up a snazzy tavern name and a secret password – remember, watch out for those pesky caps! If you're diving into some local LAN action, make sure that √ is shining bright. If not, cruise over to the lobby size; they throw around the suggestion of 3 to 6, but you're the boss—pick based on how many pals you've gathered on your Discord, assuming they're not all hiding from you!

JOIN A GAME Even more simple x2! Either let your friend with the hosting magic send you an invite, or take the scenic route through the main menu: hit play → server. There, you'll spot a constellation of servers belonging (also) to your fantastic friends.

In the top left corner, you'll spot two numbers: the first one tells you how many members are cozy in the mine cart, and the second one indicates how many players strolled into the lobby just like you. The maximum player count (which can go up to a thrilling 8) depends on the settings your hosting maestro chose before summoning the players. Easy-peasy!
LOBBY, CONTROLS
LOBBY, CONTROLS
Get comfortable with the controls, jump onto rooftops for parkour fun, and fine-tune your mouse look, Graphic settings, keys (that It doesn't work very well for me and my friends... dunno). At the moment, you have unlimited stamina, but during the actual game, a stamina bar will appear in the bottom left.

To ready up, all players must enter a Mine Cart, and then a 5-second countdown will commence. After the cutscene, the tutorial will begin. For me and my friends, it wasn't easy to grasp (maybe because we're not native speakers), so it took us a while to understand. You can follow it, or hit F3 to skip it all. Test it out on your own or... read this GUIDE!
HUD &...
  • TOP Left (of the screen duh) → you can see TODAY’S FORECAST. Look at which creatures you’ll encounter, along with their respective percentages (so you can plan your purchases and menu - I'll explain later). Additionally, you can find TODAY’S SALES! It changes daily, so buy as much as you can and stash it away in crates for a rainy day, because it's on sale, mate!

  • LOWER left → bills (money that you'll pay 100% at the end of the day, so be sure to meet it!), the money your team currently have, and the ability to spend as you like. You can also monitor your stamina, which depletes quite fast with running and more diving!
    From the new update (February 9th), you can also see your personal money, which you'll need to buy skins that are just outside the tavern. Each day everyone get's the same amount of money, but one of the team that amount +3bucks. Some hats/skin you can get from Patreon codes, Discord server, or other means. There are guides for these right here on Steam, as well as for achievements.

RIGHT
  • TOP right → TAVERN STATS: if you press Tab, you will see the team tavern (you and your friends who are in the same server), the store stats, including star rating (higher is better), and the Tavern Power bar (the room with the charcoal and fire called HEART). You can also view funds, and on the right, all the keys. Always a good reminder! With Q, you can check tickets, but…
  • BOTTOM right → you can efficiently see tickets here at the bottom when you start the day (and if you have some!). If you're not in the day, you'll see the opening tasks. This is helpful to determine if you can afford an upgrade or if your menu doesn't support the "today’s customers," so you can adjust your tactics.

TOP CENTER6 → Ready to start the day? You'll see this only before the day starts. Press F4 to ready up, and you'll see your icon and name as ready. There, you'll also see all other players who did the same. You can always unpress it until the day starts, of course.
SERVICE and dishes
Go to the Service Bench and press E. The customer will follow you to a chair, which you can freely choose. Then, press E again. At this moment, they may eventually place an order. HOWEVER, NOT ALL CUSTOMERS PLACE ORDERS! And not everyone who orders will do so just once! Take their orders (some Tickets) and place them on the ticket rack using E or... aim and throw them with a left click!


On the right of the Ticket rack, you can see the Dishes🍽 on the left, and opposite to this, you'll find the sink where you can wash all the dishes. You need to bring them from the tables and press E here for...washing them.
KITCHEN! DICTATE MENU

Here it is! Welcome to your KITCHEN🔪. At the beginning, you'll have 2 stoves to cook and empty crates marked with a "?" where you can place raw food (or cooked!) that you purchase. BUT BEFORE THAT, let's talk about the MENU! Click on TAVERN SPECIAL (wich you can see on my right), with 'E' (to access the menu). Each day, you need to make it. From the selection on the left, click on an available bundle, and read the information in the center of the screen under INCLUDES, including the required ingredients. Then, add to the menu what you like. Before making a choice, be wise and follow the discounts of the day. Remember, the more items on your menu, the more diverse dishes you'll prepare in the same day, making it more challenging. So, choose one for each race or two if you want to take on a more difficult (and sometimes more expensive) day. On the right, you can remove items from the menu if you change your mind, except for the base bundle, of course. It's free, so... Press the 'X' in the top right to exit from the menu.
RESTOCK
Where you see "Restock here", you can purchase what you need for your daily menu. On the right, you can find the items needed for your menu; click on them to add them to your "cart." Press 'Purchase' when you've reached 10 items or when you are satisfied (Alternatively, press "clear" if you accidentally clicked on foods you're not interested in). You can open the restock as many times as you want, so buy as much as you like or can. After the purchase, one or more crates will come out. As for dishes, just move close to them and approach the empty crates marked with a "?". Use a long press on 'E' or go to the crates of that food to add it. You can move crates with a long press of 'E' and swap them even if they are not empty. Now, you can take and refill food. You can also dispose of items in the TRASH, such as food (and get some money back if not prepared), and hammers, or wait for them to disappear.

PS: Don't worry if you run out of a certain food during the day; you can still buy it, but for a price: either less than 30 seconds or a few bucks for instant delivery.
COOK AND SERVING
After the ticket is hanging on the ticket rack (Duh...), you'll see at the bottom right what customers want. It's time to cook, blend, or take crude snack/crude ale and... SERVE! For cooking food, just take it from the crates and place it on one of the two grills you have. Wait for the first bar if the customer wants normal cooking or also the second bar (which is the last one) if it has a black drawing. In my experience, they usually are drakes. No dish is required; it will appear automatically when you serve it to the right customer. READ THE NAMES! You'll manage pretty fast, dude.
BLENDERs
Here we are with this board... Finally, they update it! (Even though it's aesthetically simpler and clearer to see, I'm not sure if it's easier to understand, unfortunately for new players ofc)
NOW BEGIN TO BLEND YOUR FRIENDS! (Just kidding, you can't... in the game)

To start understanding how it works, let's begin with an example. Take the ingredient requested, for example, the first at the top (raw grogium), then add it to the blender with 'E' without cooking. Wait for it to blend (it has a progress bar), and in the meanwhile, you can take crude ale. With that in your hands, you can take and automatically mix it... and DONE! You have the first mug on the top right.
A fast example with the second mug, so with the 2nd ingredient, in this case, raw pampoo.

Raw pampoo → blend it → crude ale → take from

And you have the 2nd mug! You can also prepare some before starting and leave them in the blender(s), if you are sure to have only that or if you have more than a couple of blenders. Remember, you can always throw it away if you need an empty blender that already has something in it, but you'll waste the cost of the product.
Other Tacticts
After the first few days and having understood how the game works, you'll need to start collaborating and communicating, and depending on who you are/how you play, develop your tactics. I can give you some suggestions, though! If there are 3-4 of you, one person can cook, and another can serve the tables. Typically, the third person is better off helping with tables and occasionally putting coal in the energy room below, if in four, same but with more help in kitchen. If you are so few, do NOT take the tavern space upgrade; it will be a big problem! I Whoever is in the kitchen should also be responsible for replenishing the food crates when they're empty and putting food in the blenders when needed. I'll repeat it again: if you have enough blenders and know that in percentage there will be more of one race or another (you see it in the top left), you can already prepare half of what you think is more likely. The person serving customers can tell others the race that is coming, and the chef (who may have arranged the crates downstairs optimally, as well as the menu... fewer ingredients, fewer problems!) can start anticipating. Remember that food CAN be thrown! If the chef is alone, to optimize time, instead of going back and forth, they can use the space where orders are also placed to throw food to the service area. Don't lose the food, and by passing over it, remember that you always have to interact with "E" to deliver to customers. Don't dive or punch them, they'll get annoyed.
If you are 5 or 6 players, I recommend buying the tavern upgrade as soon as you can, which gives you more space. But remember! The food will have to travel a longer distance! However, it can be helpful to better separate the races and facilitate deliveries.

Originally posted by Thorm Irongut:
Cooked food can be put into crates, this is really helpful for prepping burnt food for the dragon people (you can do this before you start your day)

Food wont spoil on your back, keep one of the cooked menu items on your back and replace it when you serve it (mouse scroll to switch between held items).

It looks like the customers in the silver coloured seats pay 1.5X and the gold coloured 2X for their orders.
Upgrade and remember the past
Remember to upgrade. I won't say more about upgrades because they will likely change it in the coming days. However, read about upgrades in the room between the kitchen and the power/charcoal room. In that room, you can also grab a hammer that
Originally posted by ethonk:
is combat-focussed only. Not required to fix the seats nor do they fix it faster but the hammer has a larger radius of attack and at twice the damage compared to regular fists to all sources (ice walls and enemies).
However, hands work well enough. Help me add things to this guide, organize, or check for errors. Have fuuubBUUUUUUUUURRRP. Sorry, too much crude ale...
Here the scary board:
11 Comments
MrWarTitan 24 May, 2024 @ 6:02am 
how do you get more staff?
Metall90  [author] 27 Apr, 2024 @ 2:36am 
Tantrum, you just can't swing the hammer
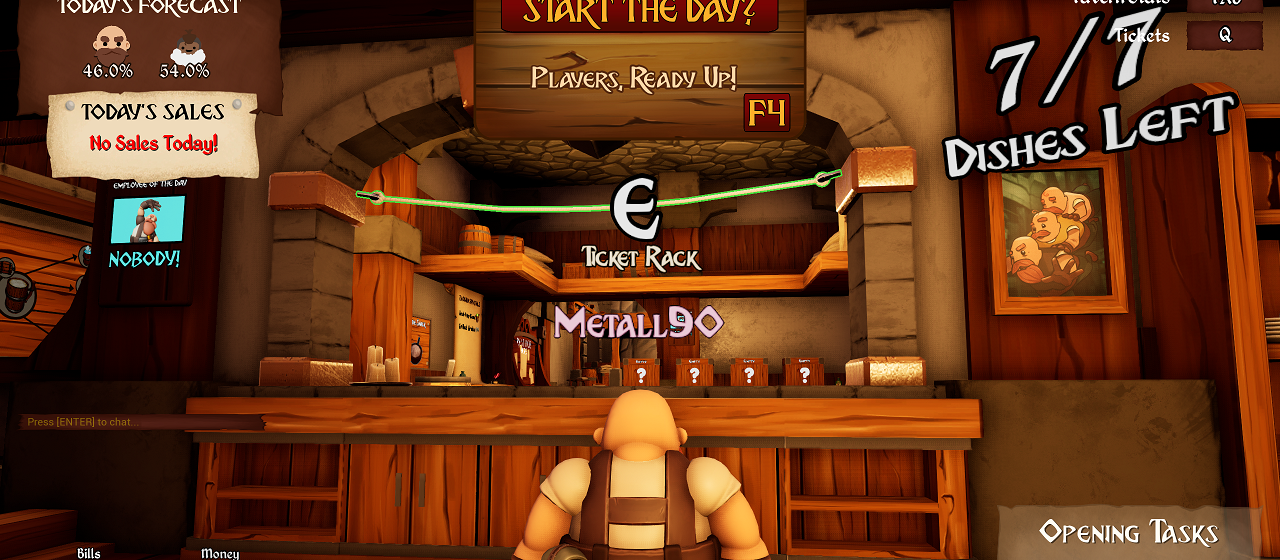
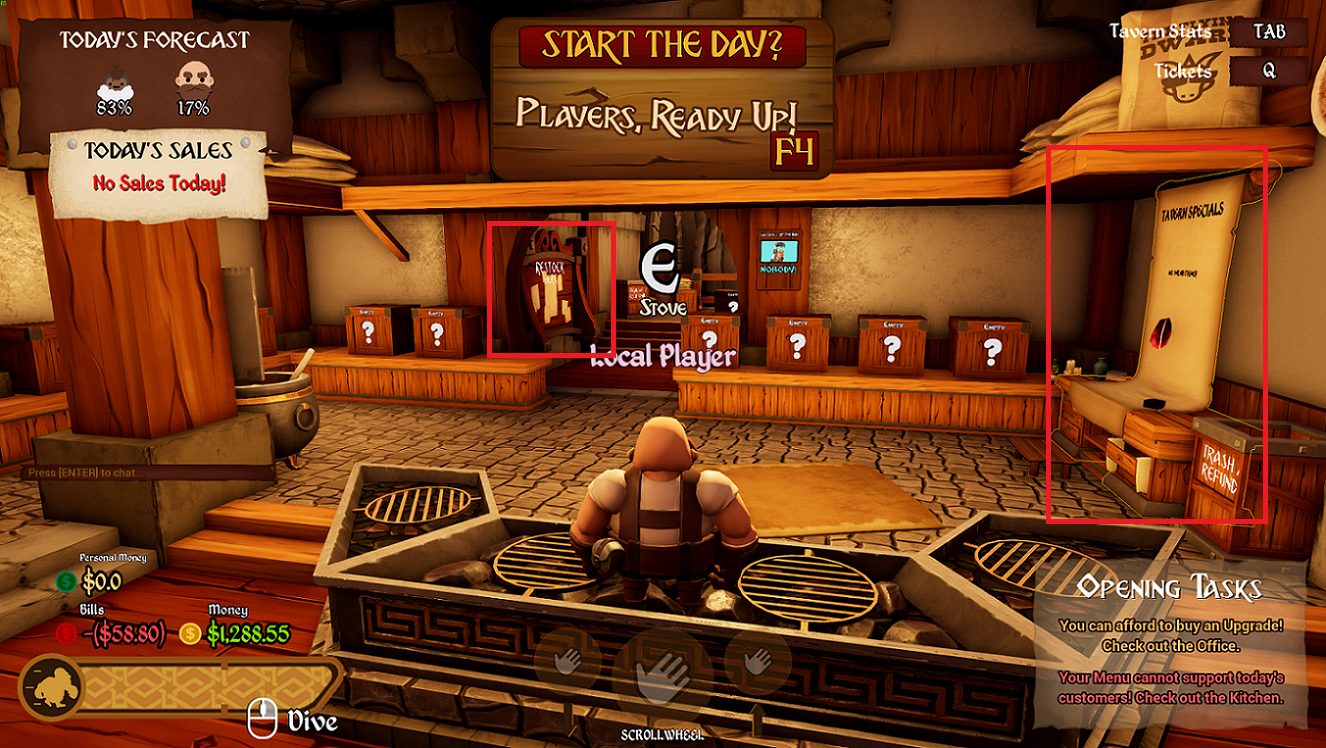
noyrq, there is npc with a chest follow this path:to the "receptions" (where you accept people and then move them to their seats) go to the LEFT. So it'is in the super big room where all dwarfs do their animations with kart, mining... stuff like that
Noyrq 25 Apr, 2024 @ 9:21pm 
how do i use personaly money?
TANTRUM27X 14 Apr, 2024 @ 6:52pm 
So, is there a way to swing the hammer? Or do you really only throw it?
夜9 26 Jan, 2024 @ 5:02am 
Metall90 Thank u :3
Metall90  [author] 25 Jan, 2024 @ 3:52am 
At the moment, you just start a game and you'll have that save. developers are working also on having different saves.
夜9 24 Jan, 2024 @ 8:18am 
How do i join my saved tavern?
Eoka Enthusiast 30 Dec, 2023 @ 2:31pm 
After playing about 5 hours my friends and I were able to come up with a few pieces of advice.

Cooked food can be put into crates, this is really helpful for prepping burnt food for the dragon people (you can do this before you start your day)

Food wont spoil on your back, keep one of the cooked menu items on your back and replace it when you serve it (mouse scroll to switch between held items).

It looks like the customers in the silver coloured seats pay 1.5X and the gold coloured 2X for their orders.
Eoka Enthusiast 30 Dec, 2023 @ 2:26pm 
The "power and charcoal" room is called the Hearth.
ethonk  [developer] 23 Dec, 2023 @ 2:40pm 
The hammer is combat-focussed only. Not required to fix the seats nor do they fix it faster but the hammer has a larger radius of attack and at twice the damage compared to regular fists to all sources (ice walls and enemies).