The Invincible

The Invincible

139 ratings
The Invincible 100% Complete Written Achievement Guide/Walkthrough
By CarbonCarl
This is a complete step by step guide through the story going from start to finish collecting all achievements for 100% completion. Achievements 29/29.
7
6
18
4
2
   
Award
Favorite
Favorited
Unfavorite
Introduction

Hello everyone.

Welcome to my 100% achievement guide and complete walkthrough for The Invincible.
This guide is all in order so you can start the game and work your way down from the top of the guide and collect the achievements as you go along.
I have also linked some of my videos to certain achievements if you need any extra help, but otherwise they're not required.
I have tried to make the guide as straight forward as possible so you find it easy to understand and follow but otherwise feel free to offer any feedback and I'll do my best to fix and update it.

Please give the guide a thumbs up if it has helped you out and thank you for taking the time to stop by. :)


Please begin the guide and work your way down from the first achievement below in Part 1.


My Social
Additional Info
  • Check out my The Invincible Review.
  • This guide contains spoilers.
  • Images have not been added but can be if enough requests.
  • Video guides have been added next to some achievements just to help if needed.
Support my guide
  • Rate it and give it a thumbs up
  • Leave comments or feedback
  • Share it with friends
  • Follow me and my Guides
Part 1


Your journey starts here...

I remember everything!
Yasna got all memories from the past events.
Important - For this achievement we must begin progress at the start of the game and we will fully complete this at a later time.
https://youtu.be/dvdIgeUXL3A?si=HYebdgQAzOS_RGQR
You will need to find all the memories as you go through the story, so start the game from the first memory and continue up to memory 3 using the list below. After memory 3 ignore the remaining memories and move on to The Camp achievement further down.

  • Memory 1.
    At the very beginning of the game at the start point head to the nearby water reservoir which should be on your left side as you head towards The Needle. Click the icon in the water and and after that a second icon will appear which will trigger the first memory. Now move on to the second memory.
  • Memory 2.
    Continue the story through and past the sandstorm, at this point you will reach rocks that you need to climb and at the very top you will look into the sky and see R3-03, simply click it to activate memory number two. On to the third memory.
  • Memory 3.
    Immediately after the second memory you will make your way to the camp which is just around the corner and gain you The Camp achievement. As you enter the camp there will be a tent on the very left side nearest you, inside will be a cylinder containing a fish; click on it to activate the third memory.

Now skip the remaining memories and we will collect those later in the guide; I will highlight them when the time comes. Continue the story below.


The Camp
Yasna reached the camp
NOTE: Memory 3 + Crew member 1 found here

When collecting memory 3 you should also gain this achievement, this will trigger when you first enter the camp not long after memory 2.


At this point you should have the achievement above and all 3 memories, so from here continue below and we can begin 2 new achievements at the camp.


Krauta is alive
Yanus rescued Krauta
NOTE: This is part of the 'I Leave No Man Behind' Achievement below.

When at The Camp you will find Krauta in the far tent, this is when you get in contact with Novik who will be with you for the rest of the story. Novik will get you doing a few tasks inside the tent and then you can head out. When outside the tent Novik will try to make you find the other crew members but we don't want to do this, so go through the dialogue and when the option comes be sure to select 'I'm not leaving Krauta alone like this'. This will ensure we rescue Krauta and also be our first crew member saved for the next achievement. Be aware this achievement won't pop until we reach memory 5 later in the story.


I leave no man behind
Yasna managed to evacuate all her crew-mates to their ship
Important - This is another achievement we won't gain right away but must start progress from this point.
NOTE: This will also gain you the 'Krauta is Alive' Achievement.
https://youtu.be/qb7ZJ0KDtCc?si=ZQ79KII9EM4r321g

This achievement requires you to save all 4 crew members as you play through the story, your first crew member is Krauta which you should have gained progress on already.

  1. Crew Member 1: Krauta.
    Complete the Krauta is Alive achievement above as it counts towards both achievements.


    Once everything above is complete you can now exit the camp and proceed into the excavation site, here you will find two crew members and memory 4. So lets start by collecting memory 4.


    • Memory 4.
      After you're done with The Camp area move on to the excavation site and in the central section below the metal structure will be a mining drill making a loud noise, simply click it to activate the fourth memory.


  2. Crew Member 2: Koval
    Important - Be sure to select 'I have to go back for Marit' when taking Koval back to the lander otherwise Marit can be missed and this achievement will fail.

    Now that you have memory 4 you can go in search of the other two crew members at the excavation site. You will likely find Marit first but we will need to move on and find Koval instead, this is where you need to select the correct dialogue which allows you to return for Marit afterwards.

    You will find Koval at the top of the excavation site still alive with pages of his notes all over him and after a bit of dialogue Novik will tell you to take him back to the lander which will secure his evacuation. Once we drop Koval off at the lander be sure to select 'I have to go back for Marit' otherwise there's no way to go back for her and ultimately this achievement will fail.

  3. Crew Member 3: Marit
    If you selected the correct dialogue above when taking Koval back to the lander then you can now go back for Marit and bring her back to the lander to also secure her evacuation.


    Now you have one more crew member left to find later in the story, so for now continue on to The Teleprobe Achievement further down and I will highlight the final crew member when the time comes.

Part 2
Continuing on from the excavation site...


The Teleprobe
Yasna reactivated the flying teleprobe
After finishing at the excavation site and putting your crew members into the lander move on into the next area, here will will get a blip on the tracker and it turns out to be a teleprobe that needs reactivating. You will reactivate it as part of the story and in turn gain this achievement. Now we move on.


Volcanologist
Yasna came very close to extremely hot lava
https://youtu.be/Vrmr4wO9qJ0?si=1-nR_GM8Tas3O7XV
After reactivating the teleprobe you can drop down from the platform using the rocks and then use your detector to follow the path along the right side, this allows you to mark the numbered points on your map as part of the mission and eventually you will reach a small lava flow next to Point 3. This should be on your left side as you face up towards Point 4.
Walk up to the lava flow and you will be able to jump over it to gain this achievement.
If instead you want to go directly to the lava flow then you can drop down from the teleprobe and take the left path and eventually the lava will appear straight in front of you.

Whilst still in the volcanic area with the lava flow make sure you have mapped out Point 1,2 and 3 and make your way to Point 4 at the very top of the rocks. At Point 4 the probe will lead you along the path to Point 5 where you will encounter the black trees and allow you to move into memory 5.

  • Memory 5 - Unmissable
    When you finally reach point 5 at the black trees continue ahead and into the tunnel, this will trigger memory 5 which this time you will need to navigate through as part of the story and can't be missed. This will leave you with one more memory to collect which will come later. Lets move on below.

  • Achievement Completion - Krauta is Alive
    If you have followed the guide from the start and didn't miss anything then when exiting memory 5 you should now get the 'Krauta is Alive' achievement. This is the one you did earlier at the camp when choosing not to leave Krauta alone.

The City
Yasna entered a strange, metal city
NOTE: When reaching the city take the right side path only to gain the next 2 achievements.

After exiting memory 5 you will continue your search for crew member 4 which is Gorsky and find a rope leading down to a lower area. You will use the rope and end up getting stuck half way down and after several bits of dialogue you will eventually get to the ground and move onwards. In the next area you will come across a huge hole and metal structures all around with Gorskys flag up top, at this point the achievement should pop as you are introduced to what we call 'The City'.
Now you need to be careful and read everything below including the next achievement before progressing.

  • IMPORTANT
    First you need to make sure you take the right side path lower down that goes around the large hole and back up for the next couple of achievements, DO NOT take the left path through the gap in the wall or the next set of achievements will be missed and you will have to reload back to one of the chapters. Also DO NOT cross the bridges up top until you have read through the achievements below.

Ubiquitous holes
Yasna risked falling, constantly collapsing into fragile structures
WARNING: Do not go past the first bridge that you fall through, it will trigger a save point and you won't be able to reload the checkpoint to get the next achievement.

Assuming you have correctly taken the right side path at The City you will reach the first bridge up top that you fall through. This achievement is very easy but you must be careful not to cross the bridge to the opposite side otherwise it will save the game and lock out the next achievement which means you would have to reload a chapter, so lets avoid having to do that.

You will first fall through the bridge which is unavoidable, from that point walk around the bridge and keep falling through until the achievement pops, this should be around 5-7 times but as mentioned make sure you don't cross to the other side.
Once the achievement pops pause the game and reload the last checkpoint from the menu which should bring you back out in front of 'The City'. If all done correctly then again take the right side path and go back up to the bridge, this time follow the next achievement below carefully.


No more mistakes
Yasna avoided further falling through fragile, metal structures.
NOTE:To gain this achievement reload your save via the menu from the previous achievement and it should take you back in front of 'The City' below.
https://youtu.be/ou30pcEjnxE?si=-0NaGDDMvv_cajHs
Assuming once again you have correctly taken the right side path at The City you should now be back at the first bridge and what we need to do this time is avoid falling through both this bridge and a second bridge further along. So let's start with the first bridge:

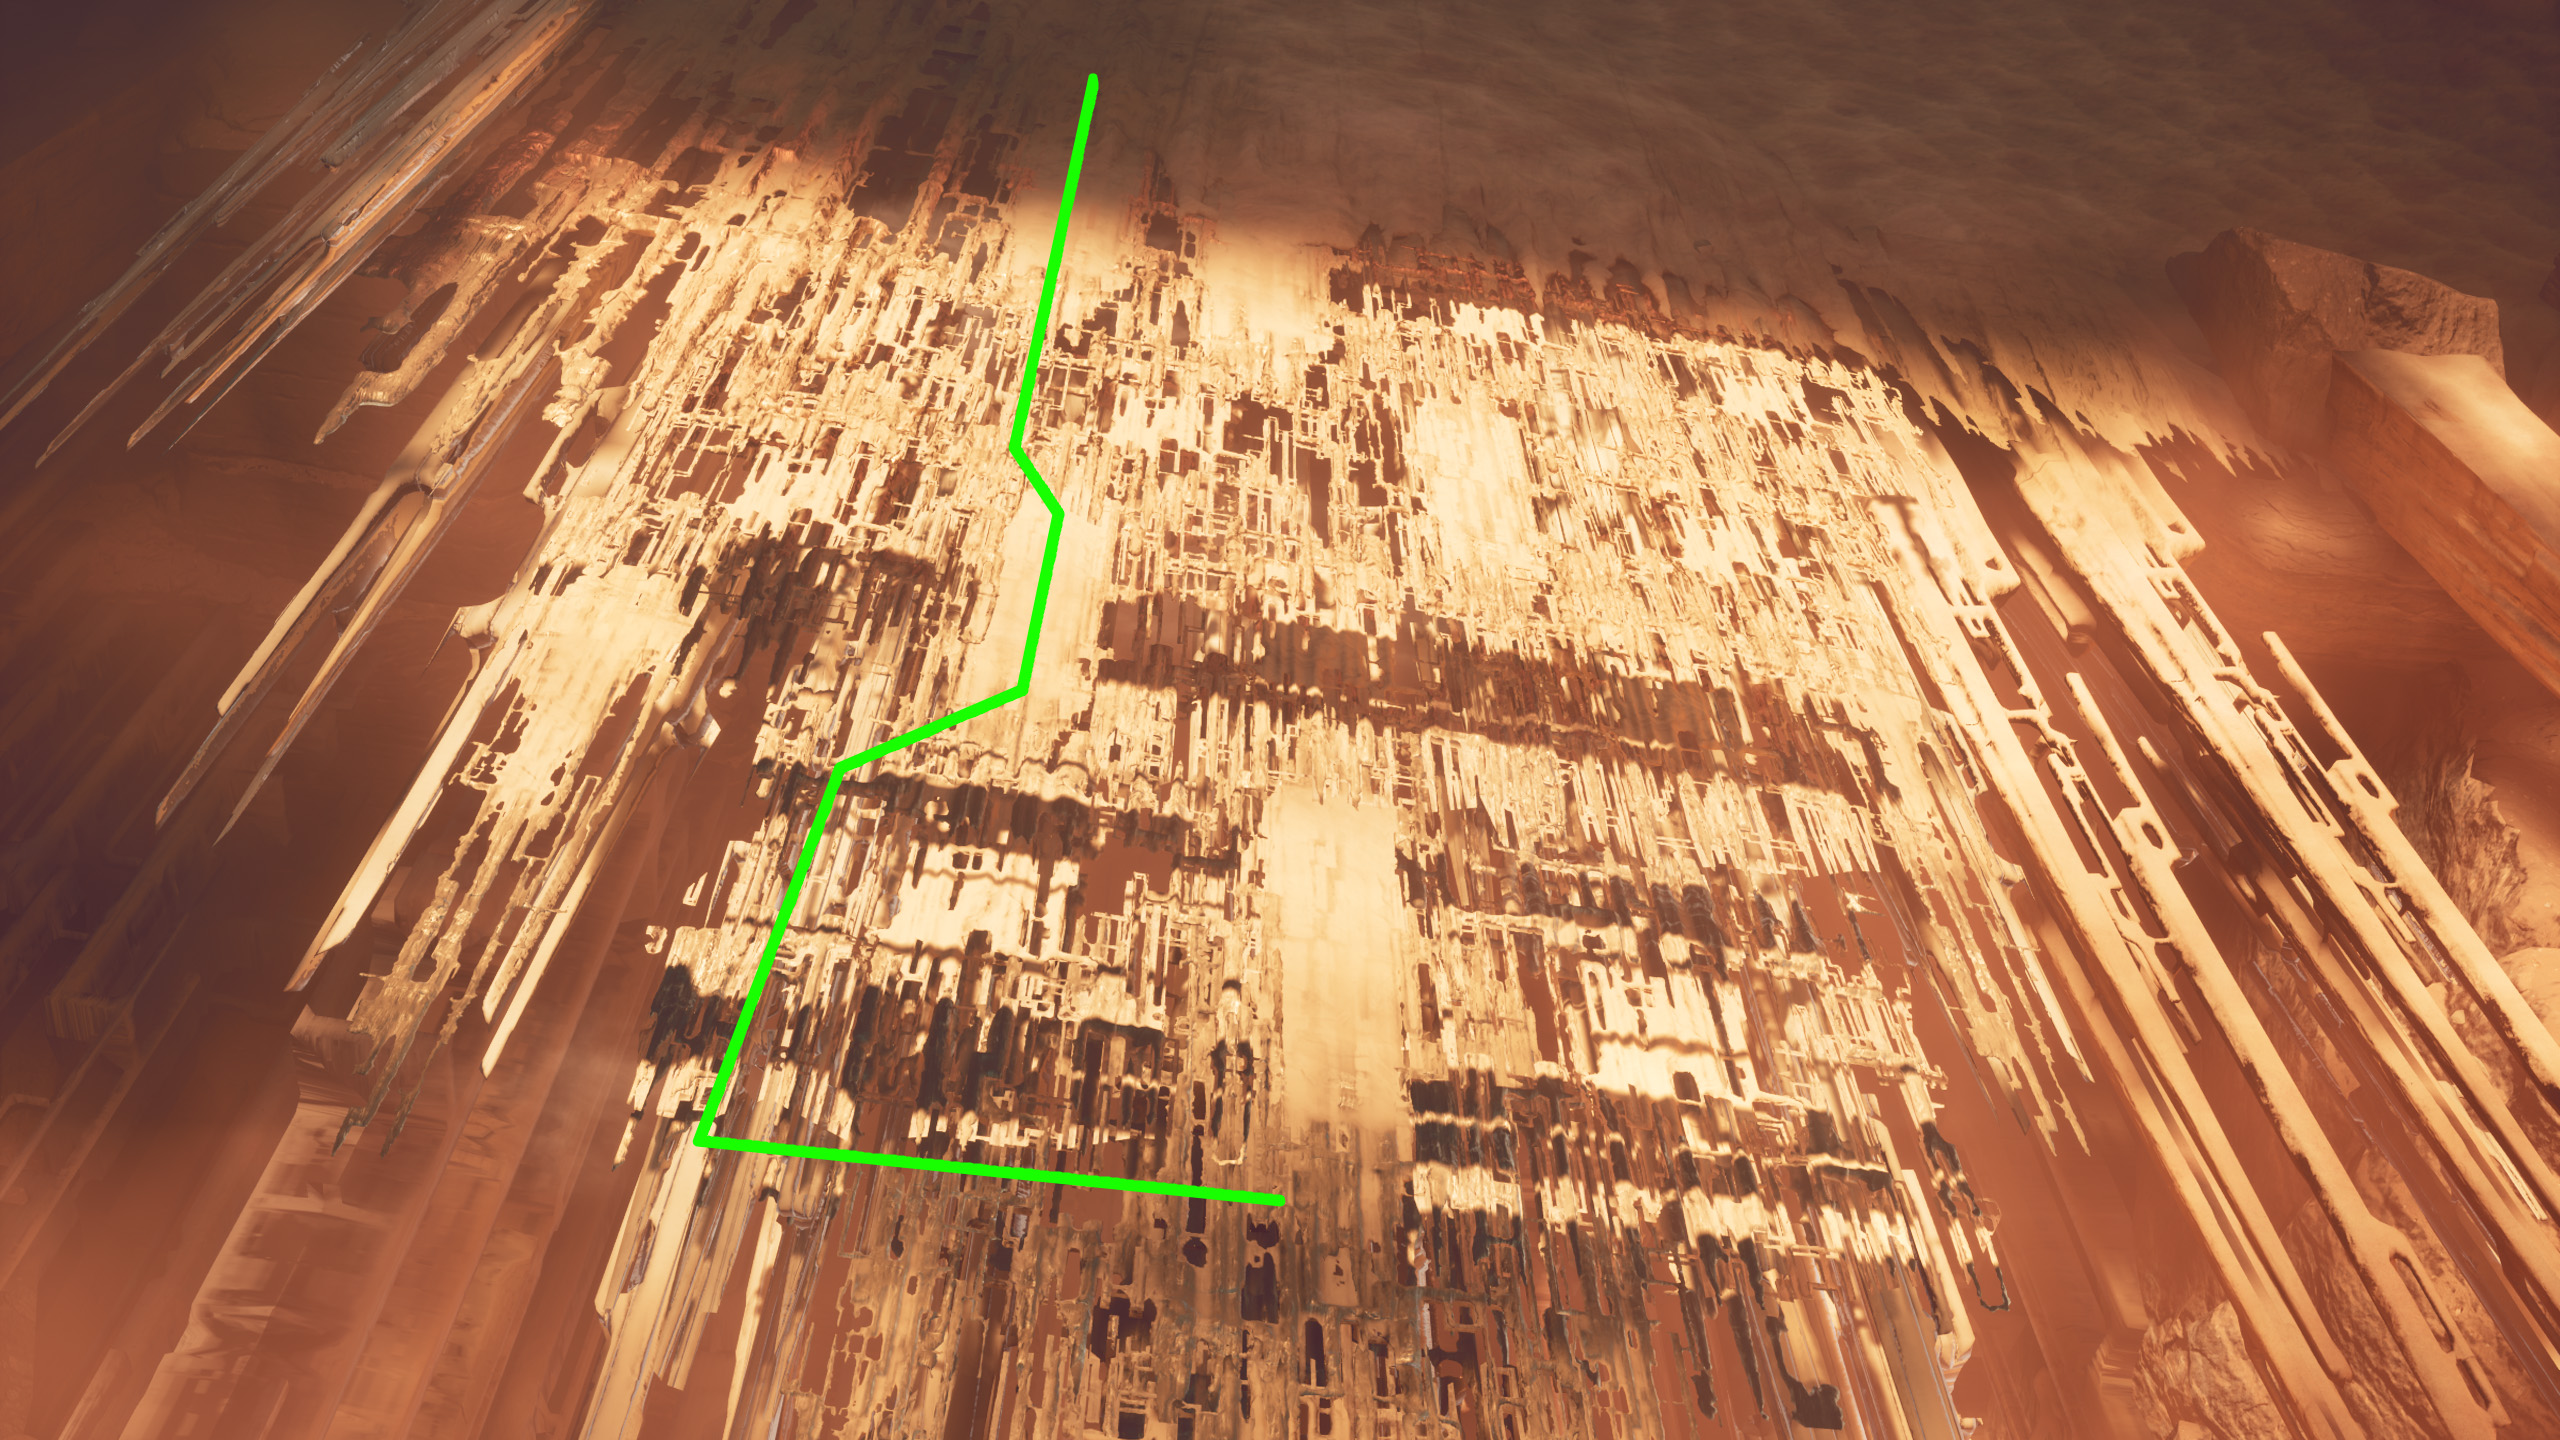
  1. First bridge - To help with this i have added a screenshot below and video guide above.
    At this bridge like before you will first fall through which is unavoidable and won't affect the achievement, but from that point on you can't fall again. You will need to use your detector and stick to the dark patches avoiding the bright green surface to reach the opposite side, if you make it to the other side without falling again then you should be fine to hit the save point and be able to move on to the second bridge.
    Use the image below to see the direction to take on the first bridge or use my video.
    If you do fall through a second time remember not to go to the opposite side otherwise it will overwrite your save point and you won't be able to try again without reloading the chapter, so simply reload your save the moment you make a mistake and try again.


  2. Second bridge
    After completing the first bridge you should now hit a save point and move on to this bridge. At this bridge it's super easy and all you need to do is hug the right side at the very edge as you walk across. Don't worry about falling off the edge as you can't fall off anything with the invisible walls. Once you reach the opposite side climb up and the achievement should pop providing you did everything correctly. If you make a mistake on this bridge then reloading the save should be fine and allow you to try again. If you want to be sure then you can use my video guide above to help you out. Worse case scenario you can reload the chapter which may be a little far back.

Now continue the story until you find the final crew member Gorsky who is not far ahead.

Part 3
  • Crew Member 4
    After completing the bridges at 'The City' you will now make our way through and find the final crew member number 4 Gorsky, here we will need to select the correct dialogue to ensure he is evacuated along with the others.

    Proceed to pull Gorsky out of the ground and as you go through the dialogue select 'I have to get him oxygen first' then next select 'I'll give him mine' and click his oxygen pipe, then finally select 'Here you go Gorsky. [Give your oxygen]'.
    It's up to you if you tell Novik and either way you will carry him away.

  • NOTE: Be aware you will not get this achievement until you reach the alliance field base later in the story, again I will highlight when the time comes.

The Alliance
Yasna discovered a presence of enemy units on the surface of the planet
After finding Gorsky you will fall back down into the depths and make your way through a series of tunnels and try to regain contact with Novik. Along the way you will encounter a large Antimat robot making it's way through the walls, at this point you will get your first look at the alliance and gain this achievement.

  • IMPORTANT
    Now this next part is very important as it gives you two paths to take. Each path allows different endings for the achievements so once we have finished all endings and achievements on one path we will need to reload back at this point using the chapter select and take the other path to get the remaining achievements etc. Don't worry, I will let you know when you need to do this. Lets continue below.

From the last achievement continue the story and after finding your first vehicle you will eventually be back outside and need to scope out the landing spot for Novik. From this point you will move along and have to choose a path to take, either the Road to the Landing Zone or Road to the Alliance Base.

Make sure you take the Road to the Alliance Base.
You will choose this path first as it allows you to get two endings that involve the hopper/lander and will also allow you to complete the 'I Leave No Man Behind(No Exceptions) achievement. So again take the Road to the Alliance Base and you will return here later in the guide.


The field base
Yasna reached the field base set by the alliance
After taking the Road to the Alliance Base you will gain this achievement when you arrive at the base not too far ahead, this can't be missed. Both paths will take you here regardless.

  • Achievement Completion - I Leave No Man Behind
    Now we finally get to complete this achievement evacuating all 4 crew members providing you followed the guide correctly.
    When you reach the alliance field base for the first time head into the control room and collect the Alarm Print that's sticking out the machine next to the map. Go through all the dialogue and after finding out it's Gorskys ID number on the print this achievement should pop.

  • NOTE: You must choose Road to the Alliance Base when selecting a path otherwise the hopper/lander crashes and your crew members won't be saved.


Flying Objects Operator
Yasna operated and landed at least two different probes
NOTE: For this achievement we will begin here and fully complete it at a later time. https://youtu.be/S3WBsPEN5go?si=ftwF1QsORP2VW6Vo
Whilst in the control room where you found the Alarm Print, on the opposite side is a screen you can use to operate one of the probes. Activate the screen and go through the channels until you find the probe that is still functional then simply navigate it and land it on the landing platform outside. Use the furthest platform away from the control room which is on the opposite side of the open vehicle next to RV-04. If you can't land there yet then land it in the normal spot to the left of the open vehicle for now.
We will find the second probe later in the story to complete this achievement and as always I will highlight this when the time comes. Also as a backup there is a third probe I will point out too.


Got lost again
Yasna stopped her journey to play the Ping game and achieve a high score.
https://youtu.be/Q5R0VcwIcMg?si=yTasfLbL3jefJSN4
After reaching the first alliance field base and assuming everything above is complete you will head to the top floor in the control room and drop the nearby shield, this will allow you to get back in the vehicle and follow the convoy path shown on your map.
Following the convoy path you will come to Digging Site A and on your way in you will see a couple of small buildings on your right side next to a small satellite dish.
Head inside using the ramp and take the first left into the bunk rooms and just past those you will find another room with a computer inside that allows you to play the game called PING. It's essentially Pong.
Play the game and get a high score of at least 20 for this achievement.


Now it's time to continue along the convoy path until you reach the fork in the road where Novik asks which route you want to take, either the side path or continue the main route. Take the side path which will take you to a tunnel and after going through the tunnel you will begin your convoy check list.

Part 4
Convoy list
Yasna located every single person and object from the convoy list.
NOTE: Memory 6 + Necroevolution achievement will be completed during this
https://youtu.be/EMmx2Pgqcgk?si=6cUCHiOCS3MZcleA
  • IMPORTANT
    As you work through the convoy list you will find two sections that you need to focus on for the Necroevolution achievement, you will need to make sure you select the correct dialogue during these parts. I will highlight this when the time comes.
    You will also find the final memory 6 at the very end once the convoy list is complete.
    If you use my convoy list video guide please be aware I did not add the necroevolution achievement into it, so stick to this written guide for that one.

After taking the side path to the very end, go through the tunnel and from there you can start working your way through the list below. If you're wondering where the convoy list can be found, it should now be on your map in the top left corner. So work your way down the list below.

First Area: This is the area with the 2 large robots right after exiting the first tunnel.
  • Niemki - Dead body at the front
  • MAG-03 - Main large robot in front
  • MAG-04 - Second large robot that's mostly buried
  • Hofmann - Dead body at the back
  • SMU-27 - Go through the smaller tunnel/path on the right side between Niemki and MAG-03, through there is the building with the name tag on the top of it. You must grab this one before proceeding with the mission as there's no return after this.


Once you're sure you have everything so far, move on through the next tunnel following the story where you will continue the list but also find the first part of the necroevolution achievement.


The Necroevolution
Yasna named all metal structures discoveries as a form of the Necroevolution

Second Area: This area is where the robot is walking in circles.
IMPORTANT: First part of The Necroevolution achievement is in this area
This is the second area of the convoy list where the robot is walking in circles, so you have to make sure you work on the convoy list and begin part 1 of the Necroevolution achievement.

  • ARK-03 - The robot walking in circles, grab before Batke as this is missable.
  • Batke - Dead body at the other end near the metal trees and Necroevolution achievement dialogue. Be sure to get close and turn the body over asap.

When you first enter this area immediately click the robot for ARK-03 and do not search the area. We need to avoid as much dialogue as we can as it can trigger the next scene which can stop us getting Batke. As soon as you've clicked the robot move further down the path to the very end where you will find Batke, turn him over and click his helmet to mark this down on your convoy list.

Now we need to focus on the first part of the necroevolution achievement and to do this go through the dialogue with Novik about the bushes.
Novik will get you scoping the trees and looking at the roots etc and when he asks you if you think it's a form of life or not be sure to select 'It is possible'. This completes the first part of the necroevolution achievement, so now you can continue the convoy list.

Once you have completed everything in this area you can go through any remaining dialogue and follow the robot back into the tunnel to where you first started, from there you will be able to move to the third area.


Third Area: This is the area you go to after the robot shoots a hole through the wall and chooses not to kill you.
IMPORTANT: Second part of The Necroevolution achievement is in this area

After encountering the Antimat that almost kills you go through the hole it made in the wall and proceed with the list below, starting from the top and working your way down.
  • SMU-88 - First vehicle buried in front right after going through the hole.
  • Sokolny - Inside the same vehicle as above, look through the broken glass dome top.
  • ATR-12 - The vehicle further along with the body sitting inside.
  • Dobrov - The dead body inside the ATR-12 vehicle.
  • Osterhas - Dead body to the left of the damaged transporter
  • TMU-85 - This is the damaged transporter itself, you can see the black plants growing on the top of it.


Before continuing the list we can now complete the Necroevolution achievement


  • Achievement Completion - The Necroevolution
    After completing everything listed above head inside the damaged transporter and open the rear door, inside you will need to drop a flare which will allow you to grab the ARK-16 robot at the back.
    Now you can complete the Necroevolution achievement by clicking the crushed containers on the floor and selecting the correct dialogue, so choose 'Well I have a Lead' and then wait for the dialogue and finally select 'More and more so' and you should now complete the necroevolution achievement. Continue on with the list below.

  • ARK-16 - Inside the damaged transporter at the back of the dark room, clickable after opening the door and throwing in the flare.
  • LMU-54 - The last vehicle buried next to the giant shield just past the damaged transporter.


Once everything above is complete move towards the large shield and click the transporter dialogue so that you can make your way around the side path and get under the shield. The side path entrance is back near the damaged transporter opposite the dead body outside.


Final Area: This is both the side path leading to the shielded area and the main shielded area itself.
NOTE: Memory 6 is found at the end of this area.

As you walk around the side path you will find more to check off the list, so continue the list below.
  • FTP-02 - This is the drone we encounter on the way through the side path, can't be missed and will automatically mark for us so no need to click it.
  • Mierwa - Dead body found along the side path just after the drone.
  • TMU-88 - Large active vehicle waiting for us to board on the left as we exit the side path.
  • Stelinak - Dead body towards the back of the area buried in the sand.
  • EBT-05 - This is the vehicle we enter to drop the shield, this will auto mark on the list.
  • Antke - Inside the vehicle that we use to drop the shield is a helmet, click that for the final person on the list.

That should complete the convoy list and gain you the achievement. We can also move on and collect the final memory number 6 to complete the 'I remember everything' achievement.

  • Achievement Completion - I remember everything - Memory 6
    After dropping the shield and completing the convoy list you can now make your way into the TMU-88 vehicle and follow the dialogue. Whatever you choose doesn't matter here as all options will lead you into the final memory number 6 and complete this achievement.

Part 5
After exiting your final memory you will investigate the crashed balloon and then make your way back to the alliance field base looking for the hideout, at this point we can now complete yet another achievement.


  • Achievement Completion - Flying Objects Operator
    When you get back to the alliance field base head back into the control room and now you should have access to a second probe using the screen. This time fly the probe and land it on the nearest platform to the control room and immediately you should get the achievement.
    If you have trouble with this then make sure one probe is on the landing pad to the left of the open vehicle and another is on the right side of the open vehicle next to RV-04, don't use the two left landing pads. If you're still unsure then raise the height of the probe and it should highlight on screen which landing pad you need to go to.
    As a backup there is a third probe further in the story, I will highlight this when the time comes for those that might need it. Alternatively you can check my video guide to help out with this.


Survivors
Yasna met survivors from the Alliance.
At the alliance field base you will find the hideout up in the rocks. Make your way up to the hideout and at the top of the rocks you will get caught by one of the alliance members who will take you to the hideout himself. It's a slow walk but at the hideout you will gain this achievement.


  • IMPORTANT
    At this point you're going to need to go through the hideout twice for two achievements, which means after the first achievement you will need to reload to a chapter closest to the beginning of the hideout. So lets do the first achievement and then I'll highlight when to reload your chapter.


On her own
Yasna chose not to cooperate with Rohytra.
Now that you're in the hideout proceed through the dialogue with Rohytra and when you mention condor he will ask if you finally admit what you were up to. Select 'We were exploring this planet nothing more' and you will continue to explain you're a scientist etc for then he will change the subject and offer a drink, when he offers you a drink select 'No thanks' and at this point he will no longer trust you. Continue the story and shortly after you will be able to escape the hideout which is when this achievement will pop.

  • IMPORTANT
    Now that the first achievement at the hideout is complete you will need to reload to a previous chapter and get to the beginning of the hideout again. Once you have reloaded the chapter and made it back to the hideout, begin the next achievement below.


Beyond Divisions
Yasna kept her open-minded attitude towards people from the opposite faction.
After reloading your chapter you should have made it back to the start of the hideout, so once again proceed through the dialogue with Rohytra.
When Rohytra asks why you came here or asks if you finally admit why you came here then this time select 'we were supposed to find out what you're here for', at this point you will go through dialogue and show him the slides of your team. He will once again offer you a drink and this time take the drink selecting 'Thank you that's what I need'. He will now trust you and after waking up and proceeding with the story you will gain this achievement.


You can now continue and stick with this save, no need to reload any chapters etc as this is the better path anyway. From here exit the hideout and continue the guide below.

  • Achievement Completion - Flying Objects Operator - Backup Probe
    For those that missed this achievement earlier or had issues then this is your last chance to get it.
    Once you exit the hideout in the vehicle you will head to condor and along the way you will come across Alliance Field Base 2 with a few buildings/structures and several Arkan robots roaming around. If you head to the back of the field base you can reach the lower section near the cliff edge or there's a small gap in the middle which will also lead you to the lower area.
    When at the bottom section next to the cliff edge you will find another probe and screen you can use to land the probe on the platform and it should secure this achievement. If you already have this achievement you can completely ignore the field base and continue heading to condor.


Follow the story all the way through now until you finally reach Rohytra not long after finding the dead alliance members, this is where you get to kill some flies.


Fierce Fight
Yasna eliminated more than 50k microbots.
When you finally catch up to Rohytra he will be in one of the vehicles preparing to fight the cloud and setting up the shield, from this point he will eventually hand you a Dirac Emitter that you use to shoot down the flies and help defend.
When the cloud approaches point the Dirac Emitter at them and spam the fire button, keep doing this until the achievement pops. Try aiming for the bigger clusters of flies but overall I think there's plenty of time to get what you need.
If you fail this then fear not as you can just reload your save from the menu which should take you back to when Rohytra gives you the Dirac Emitter. From there try again otherwise move on with the guide.


The Condor
Yasna entered one of the most powerful space units of the Alliance.
After escaping the cloud of flies in the flying saucer with Rohytra you will wake up next to the condor, the huge ship right next you. Go along the ramp and enter the condor and this achievement should pop.
From this point on it's all about the ending achievements, so follow along carefully from the bottom of condor.

Part 6
Just as a reminder, if you followed the guide correctly then you should have taken the road to the alliance base earlier in the story. This path allows you to get all ending achievements except 'The Invincible', but just to make this guide easier to follow you're going to be focusing only two achievements for the alliance base path and the remaining achievements you can get when reloading the chapter and taking the landing zone path.
Either way you will need to take both paths so it will take the same amount of time. So now begin below.


I leave no man behind (no exceptions)
Yasna compromised her safety to save the Alliance people.
Assuming you took the alliance base path earlier in the story you can begin this achievement, so once you reach the condor head up to the top floor where Rohytra is located and then follow the dialogue below.

  1. At the bridge go through all the dialogue with Rohytra selecting whichever you want, ideally being in agreement with the bombs until you come to the Necroevolution theory. DO NOT choose the 'Necroevolution theory [discussion]', instead select 'There's no point speculating'.
  2. Now when Novik asks if you agree about them being invincible select 'There is a chance of success, but it's small.'
  3. Rohytra will then ask if it's worth trying with smaller charges, select 'It won't hurt to try'.

    After the remaining dialogue you can activate the launch control switches and you will find out the cloud didn't die so now is the time to escape. After more dialogue head over to the controls to open the dome and then make your way up to the landing pad.
    You will find the dome controls near to the radio transmitter where you spoke with Novik when you first entered the bridge, look for the handle that's in the downward position on one of the computers.

  4. At the landing pad grab the hatch handle and at the next dialogue select 'I was supposed to wait for Rohytra' and just stand there and wait, do not touch anything else and you will be consumed by the cloud and gain this achievement.


That's the first one out the way, now reload your save from the menu which should start you at the bridge again and then move on to the next ending below.


Evacuation
Yasna kept an operating lander and used it to evacuate from Regis III.
After reloading your save follow from the dialogue below.


  1. At the bridge go through all the dialogue with Rohytra selecting whichever you want, ideally being in agreement with the bombs until you come to the Necroevolution theory. DO NOT choose the 'Necroevolution theory [discussion]', instead select 'There's no point speculating'.
  2. Now when Novik asks if you agree about them being invincible select 'There is a chance of success, but it's small.'
  3. Rohytra will then ask if it's worth trying with smaller charges, select 'It won't hurt to try'.

    After the remaining dialogue you can activate the launch control switches and surprise surprise you will find out the cloud didn't die so now is the time to escape. After more dialogue once again head over to the controls to open the dome and then make your way up to the landing pad.

  4. At the landing pad grab the hatch handle and at the next dialogue this time select 'Damn, you're right' and then pull the hatch handle, from this point the door will close and you will set off into the sky and gain this achievement.


That completes the first 2 endings, we can now move on to the remaining endings and achievements.

Part 7.
  • IMPORTANT
    Now you will need to reload your chapter way back at the cross roads just after the city and this time choose Road to the Landing Zone path. This will cause the hopper/lander to crash and allow you to get all remaining achievements/endings that's needed.

  • After reloading your chapter and going to the landing zone you will now need to work your way through the remaining story once again until you're back at the bottom of condor, this is frustrating and time consuming but is required if you want the last achievements.

At the bottom of condor before heading to the bridge, make sure you collect the Syringe from the med bay on the first floor. This is required for one of the endings and collecting it now means you won't have to reload back to the bottom of condor later.


Peacemaker
Yasna convinced Rohytra to stop further attacks on the Cloud.
Once you're inside the condor on the bottom floor grab the keycard from the left side of the elevator and move up to the first floor, at the first floor will be a medical bay on the opposite side of the room which contains a keycard and Syringe. We will need the Syringe for one of the endings and the keycard just gets us to the top floor.
To get them both enter the medical bay and go straight ahead through to the Lobby at the very back and then take a right into Block H. Follow Block H to the very end and into the Hibernation Chamber room, inside will be the Keycard on the nearside left table and the Syringe on the far left table next to the window.

You will not be using the syringe on this ending, so once you're at the top floor bridge with Rohytra follow the dialogue below.

  1. At the bridge go through all the dialogue with Rohytra selecting whichever you want, ideally being against the bombs until you come to the Necroevolution theory. DO NOT choose 'There's no point speculating' instead select 'Necroevolution theory [discussion]'.
  2. Then shortly after select 'In short? This is how evolution works'.
  3. Now when Novik asks if you agree about them being invincible select 'I fully agree. We shouldn't attack'.
  4. Rohytra will ask what else we can do if not attack, select 'Evacuate from here'

Rohytra will be done with one press of a button left, but he won't be able to do it and will stand down. You should now gain the achievement and move into the hibernation chambers for one of two endings there.


In the hibernation chambers there are two achievements for two endings to collect but we can only get one before having to reload the save from the menu, so continue below.


Another Giant
Yasna lived to see the arrival of the Invincible.
NOTE: You will gain this achievement if you take the peacemaker path.

After taking the Peacemaker path Rohytra will be resting in the hibernation chamber and he will ask you if you're still wondering if you should go to the nest, be sure to select 'No I'll stay here' and a few days later you will be looking out the window and you will eventually see The Invincible arrive. Click the Invincible as it comes in to land to gain this achievement.
Once the achievement pops you can either immediately reload the last save from the menu or wait for the story to end and then reload the save from the menu. Once you're ready go ahead and reload your save from the menu and run the peacemaker path again until you reach the hibernation chamber once more, then move on to the achievement below for the next ending.


Innate curiosity
Yasna decided to continue deepening the knowledge on the Necroevolution.
NOTE: You will gain this achievement if you take the peacemaker path.

Once you're back in the hibernation chamber with Rohytra he will again ask you if you're still wondering if you should go to the nest, so this time select 'I decided to go' and some time later you will appear at the nest. Follow the nest to the very end and you will gain this achievement.


After completing the above achievement simply reload your save from the menu again and move on to the next achievement below, this is where you will get to use the syringe.


Strong objection
Yasna forced Rohytra to stop further attacks on the Cloud.
If you followed the guide correctly you should already have the syringe, this is what you collected from the medical bay on the first floor when you made your way up to the bridge.
So for this one follow the dialogue below.

  1. At the bridge go through all the dialogue with Rohytra selecting whichever you want, ideally being against the bombs until you come to the Necroevolution theory. DO NOT choose the 'Necroevolution theory [discussion]', instead select 'There's no point speculating'.
  2. Now when Novik asks if you agree about them being invincible select 'I fully agree. We shouldn't attack'
  3. Rohytra will ask what else we can do if not attack, select 'Evacuate from here'
  4. Rohytra will end the discussion and Yasna will say he won't stand down so for the next dialogue select 'I'm sorry I can't let you do it' and then click on Rohytras neck to inject the syringe and gain this achievement.


After completing the achievement and ending above, reload your save back at the bridge from the menu and this time follow the dialogue below for the final set of achievements.


Violent solution
Yasna supported military actions towards the Cloud.

  1. At the bridge go through all the dialogue with Rohytra selecting whichever you want, ideally being in agreement with the bombs until you come to the Necroevolution theory. DO NOT choose the 'Necroevolution theory [discussion]', instead select 'There's no point speculating'.
  2. Now when Novik asks if you agree about them being invincible select 'There is a chance of success, but it's small.'
  3. Rohytra will then ask if it's worth trying with smaller charges, select 'It won't hurt to try'.

After the remaining dialogue you will activate the launch control switches, watch the bombs drop and gain this achievement along with the next achievement.


NOTE: The next achievement is only available if you took the Road to the Landing Zone path where you witnessed the hopper crash. If you followed the guide correctly then you took the correct path.


The Invincible
Yasna witnessed devastating power of the Cloud.
NOTE: You will gain this achievement if you take the Road to the Landing Zone and follow the Violent Solution ending.

After following the violent solution dialogue the cloud will not be defeated and in turn overrun the ship, this is where you will then witness the devastating power of the cloud and gain this achievement.


The End
Yasna finished her story on Regis III
I have put this achievement at the very end but by now most if not everyone should have automatically got this. If you didn't then you will gain this achievement from completing the game using any ending, just let the story ending run to the very end and this should pop. The End.

45 Comments
CarbonCarl  [author] 3 Aug @ 12:14pm 
Thank you Mz Cookies!
Mz Cookies 3 Aug @ 6:39am 
Brilliant guide, super easy to follow. Thanks so very much!
CarbonCarl  [author] 20 Jun @ 4:46pm 
I will look into that and see what I can do :)
skyler.mccullough 20 Jun @ 11:26am 
Can you make Guide for the slide photos and Voyager Update ones?
CarbonCarl  [author] 18 Jun @ 5:07pm 
@Uncle Bezos Ohh that has definitely been updated then yes. I haven't played in some time so I guess quite a bit has changed. Thanks for letting me know!
Uncle Bezos 17 Jun @ 8:09pm 
Looks like there was some kind of update since you made this video. I don't believe Marit is missable anymore - I played it through a few ways and the dialogue in your video never pops after dropping off Koval. Instead, whenever you find Marit, you fail to save her, then the option to grab the body shows up right there. This happened both if I found her first or if I dropped Koval off first.
CarbonCarl  [author] 7 Jun @ 4:06pm 
Thank you for using the guide and I really appreciate the feedback! I will update the guide asap to rectify that issue. :)
Vanadeis 7 Jun @ 4:41am 
This guide is amazing, you have put a lot of effort and details into it so thank you :) Only thing I was having trouble with was getting the "peacemaker" achievement - turns out that if you have take the "landing zone" path in the story, you need to finish the convo by "let's wait for the invincible" >_> I had to restart twice before I figured it out.

Otherwise, awesome guide. My thanks :)
CarbonCarl  [author] 31 May @ 4:46pm 
You're very welcome. Thank you too!
AttacKChief 31 May @ 3:42pm 
Thank you so much for this guide <3