DAVE THE DIVER

DAVE THE DIVER

165 ratings
MARINCA (All fish) Completionist Guide
By eagertuna0
This guide will walk you through each page of the MARINCA to help you find the fishes that you're missing. It also goes over special conditions for catching certain fish, and explains how to get ⭐⭐⭐ quality fish.

To use this guide, start by jumping to the section of the MARINCA that you're looking to complete. It may also be helpful to read the "Completionist Basics" section if you're a new player.

This guide contains minor unmarked spoilers such as boss names/looks and pictures of fish from late-game areas.
5
   
Award
Favorite
Favorited
Unfavorite
Completionist Basics
To get maximum quality (⭐⭐⭐), most fish require you to tranquilize them or catch them in a net, with the exception of large fish. The 'Large Net Gun' is one of the best early-game weapons for catching high quality small fish.

It is impossible to be a true completionist without first beating the game (as some fish are endgame). If you're having trouble finding a fish, wait until you beat the game as some fish do not start spawning until after certain events.

Not all fish spawn in every dive. Be patient. It may take many dives before you catch certain fish.
[Area] Blue Hole Shallows
Summary
Overall, most Shallows fish are straightforward to catch. Often the hardest part of catching these fish is their small size (can be hard to see) and the number of fish in the shallows. Many fish will not spawn in all dives, and may require you to check multiple times for the fish (some fish took
me nearly 10 dives to find). Some fish also require raining weather to spawn.

Because this area is so expansive, this can be the hardest section to complete.

To get ⭐⭐⭐ quality fish, you must first tranquilize the fish or catch it in a net.

Full MARINCA
Find the location of your missing fish in the image, and then scroll down to the table below for names/notes.

Fish Chart (corresponds to above image)
Clownfish (15cm)☀️
Comber (15cm)☀️
Cardinal Fish (6cm)☀️
Sea Goldie (20cm)☀️
Pyramid Butterflyfish (18cm)☀️
Yellow Tang (20cm)☀️
Blackspot Seabream (30cm)☀️
Orbicular Batfish (6cm)☀️
Blue Tang (30cm)☀️
Rainbow Wrasse (20cm)☀️
Lagoon Triggerfish (30cm)☀️
Small Spotted Dart (60cm)☀️
Yellowback Fusilier (40cm)☀️
Ornate Wrasse (20cm)☀️
Longfin Batfish (60cm)☀️
Mediteranean Parrotfish (50cm)☀️
Redtoothed Triggerfish (50cm)☀️
Black and White Snapper (35cm)☀️
Green Humphead Parrotfish (150cm)⬆️☀️
Barrel Jellyfish (80cm)☀️
Fried Egg Jellyfish (30cm)☀️
Whitetip Reefshark (210cm)⬆️🌓
Starry Puffer (80cm)🌓
Moray Eel (100cm)🌑
Red Lionfish (38cm)🌓
Titan Triggerfish (70cm)🌓
Blacktip Reefshark (150cm)⬆️🌑
Copper Shark (230cm)⬆️🌑
Box Jellyfish (100cm)🌑
Bluefin Tuna (250cm)⬆️📅☀️
Yellowfin Tuna (150cm)⬆️📅☀️
Flame Angelfish (15cm)☀️
Sheepshead (150cm)⬆️☀️
Emperor Angelfish (40cm)☀️
Stingray (100cm)🔍☀️
Marbled Electric Ray (80cm)⬆️🔍☀️
Whiteleg Shrimp (8cm)☀️
Striped Catfish (30cm)☀️
Purple Sea Urchin (20cm)⭐🌓
Shortfin Mako (270cm)⬆️☀️
Zebra Shark (240cm)⬆️🌑
Marlin (230cm)⬆️📅☀️
Thresher Shark (320cm)⬆️☀️
Baby Humpback Whale (550cm)📷☀️
Pink Dolphin (450cm)📷☀️
Manta Ray (400cm)📷🌑
Loggerhead Turtle (350cm)📷☀️
Red-Lipped Batfish (40cm)📷🌑
Truck Hermit Crab (???cm)👑🌑
Mantis Shrimp (???cm)👑🌑
Great White Shark Klaus (???cm)👑🌑

Key
⬆️ - Large: Large fish must be killed before you can cut their meat off of them. To three star these fish, you need to tranquilize them or catch them in a steal net, and then recover them with the Recovery Drone (see appendix for more information).
🔍 - Hidden: These fish are hiding in the ground! You'll need to approach these fish for them to appear (you will a red "enemy" mark where these fish are hiding when close enough).
📅 - Event: These fish will not start appearing until after an event takes place. Just continue playing through the game and the events will happen eventually.
📷 - Photo: Instead of catching these fish, you must take a photo of them. Photo fish are always three star.
👑 - Boss: To get these cards, you must defeat a boss.
☀️🌑🌓 - Day/Night/Both: Indicates when the fish can be caught (see "Completionist Basics" section for more information)

⭐ - Special: See below for notes on these cards!
Purple Sea Urchin: You must obtain gloves (in the normal story) before you can catch this fish. They spawn more frequently at night.
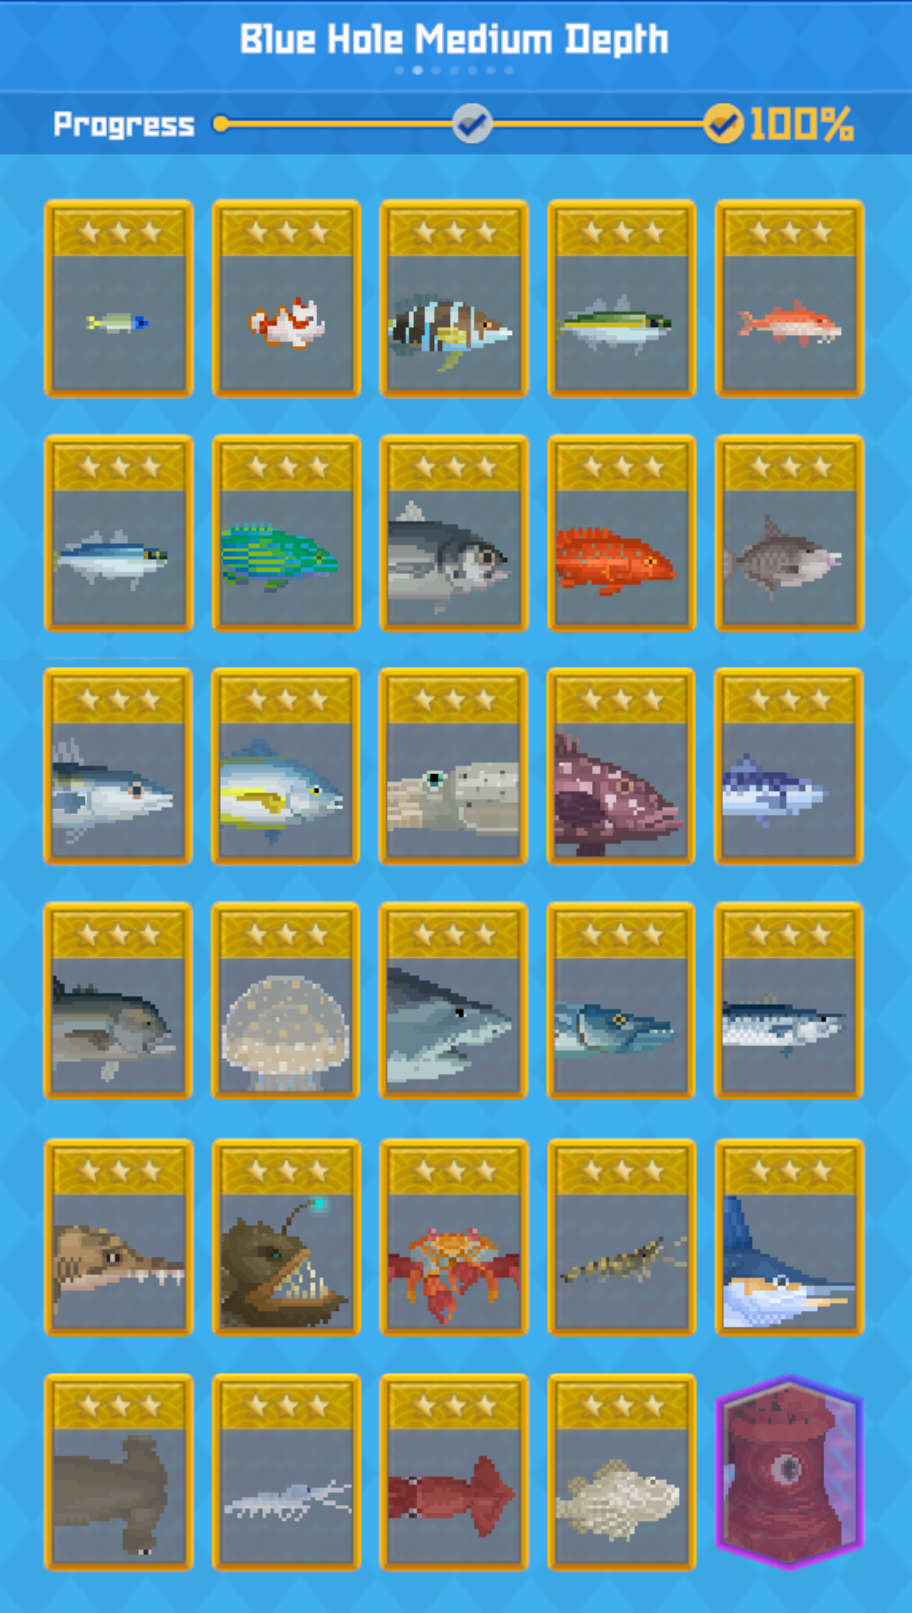
[Area] Blue Hole Medium Depth
Summary
Overall, the Blue Hole Medium Depth is a area full of new challenges with significant biodiversity. It's one of the harder areas to complete and adds some new challenges (e.g., Sally Lightfoot Crab) to your completionist quest.

To get ⭐⭐⭐ quality fish, you must first tranquilize the fish or catch it in a net.

Full MARINCA
Find the location of your missing fish in the image, and then scroll down to the table below for names/notes.

Fish Chart (corresponds to above image)
Bluehead Tilefish (15cm)☀️
Clown Frogfish (15cm)☀️
Painted Comber (25cm)☀️
Bigeye Scad (30cm)☀️
Striped Red Mullet (30cm)☀️
Mackerel Scad (40cm)☀️
Harlequin Hind (40cm)☀️
Bigeye Trevally (60cm)☀️
Coral Trout (60cm)☀️
Grey Triggerfish (50cm)☀️
Atlantic Bonito (75cm)☀️
White Trevally (60cm)☀️
Cuttlefish (25cm)☀️
Dusky Grouper (120cm)☀️
Atlantic Mackerel (65cm)☀️
Giant Trevally (150cm)⬆️☀️
White Spotted Jellyfish (50cm)☀️
Tiger Shark (650cm)⬆️🌓
Great Barracuda (170cm)🌓
Narrow-Barrel Spanish Mackerel (90cm)☀️
Longnose Sawshark (210cm)⬆️🌓
Atlantic Anglerfish (65cm)🍇☀️
Sally Lightfood Crab (50cm)📅❓⚓☀️
Black Tiger Shrimp (8cm)⚓☀️
Sailfish (285cm)⚓☀️
Smooth Hammerhead (280cm)⬆️⚓☀️
White Shrimp (8cm)🌓
Humboldt Squid (220cm)🌑
Devil Scorpionfish (30cm)🔍🌑
Giant Squid (???cm)👑☀️

Key
⬆️ - Large: Large fish must be killed before you can cut their meat off of them. To three star these fish, you need to tranquilize them or catch them in a steal net, and then recover them with the Recovery Drone (see appendix for more information).
❓ - Large-like: While these fish aren't the same as large fish and have some nuances, catching them with maximum quality must be done in the same way as catching large fish (with steel nets only -- no tranquilizing). Otherwise, drop a rock on these fish for one star quality.
🔍 - Hidden: These fish are hiding in the ground! You'll need to approach these fish for them to appear (you will a red "enemy" mark where these fish are hiding when close enough).
📅 - Event: These fish will not start appearing until after an event takes place. Just continue playing through the game and the events will happen eventually.
⚓ - Shipwreck: These fish are located inside the Shipwreck (which is unlocked during normal gameplay).
🍇 - Stalactite Cave: These fish are located inside the Stalactite Cave (where the strong currents are).
👑 - Boss: To get these cards, you must defeat a boss.
☀️🌑🌓 - Day/Night/Both: Indicates when the fish can be caught (see "Completionist Basics" section for more information)
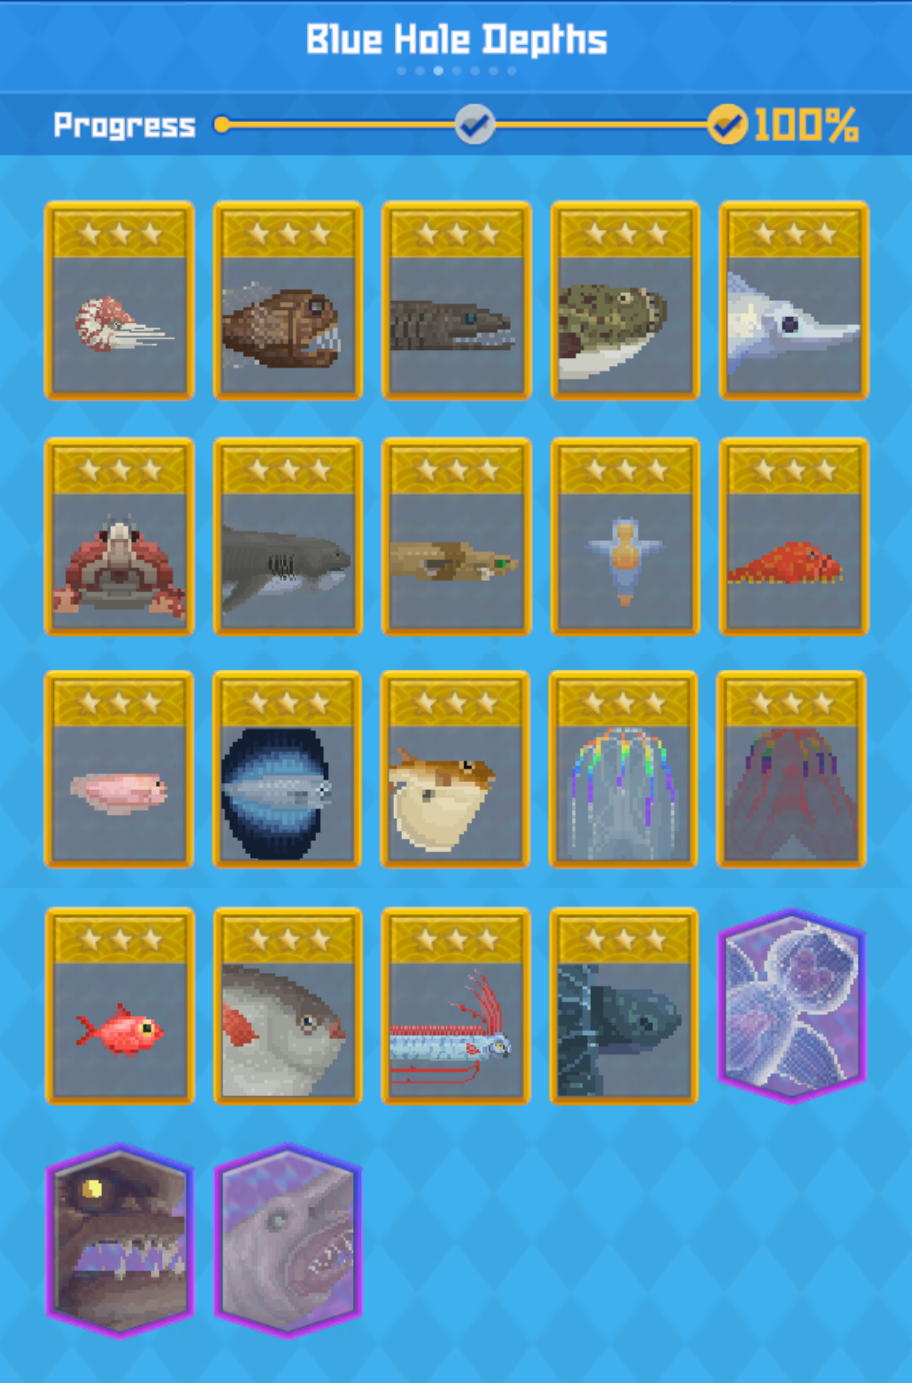
[Area] Blue Hole Depths
Summary
Overall, the Blue Hole Depths tends to be one of the easiest areas to complete due to the lacking biodiversity in this area. By the time you get this deep, you should also have a basic understanding of the game's mechanics and some useful guns for catching fish!

This section does not include a "☀️🌑🌓" annotation because this area cannot be accessed at night. All fish are daytime fish.

To get ⭐⭐⭐ quality fish, you must first tranquilize the fish or catch it in a net.

Full MARINCA
Find the location of your missing fish in the image, and then scroll down to the table below for names/notes.

Fish Chart (corresponds to above image)
Chambered Nautilus (25cm)
Fangtooth (15cm)
Frilled Shark (210cm)⬆️
Bluespotted Stargazer (70cm)❓
Rhinochimaeridar (150cm)⬆️
Spider Crab (200cm)❓
Megamouth Shark (350cm)⬆️
Cookiecutter Shark (50cm)
Clione (8cm)
Sea Toad (30cm)
Salmon Snailfish (51cm)
Pacific Fanfish (61cm)
Threetooth Puffer (54cm)
Comb Jelly (60cm)
Blood-belly Comb Jellyfish (60cm)⭐
Red Bream (15cm)
Opah (350cm)📷
Oarfish (1100cm)📷
Leatherback Turtle (200cm)📷
Clione Queen (???cm)👑
Giant Wolf Eel (???cm)👑
Goblin Shark (700cm)👑

Key
⬆️ - Large: Large fish must be killed before you can cut their meat off of them. To three star these fish, you need to tranquilize them or catch them in a steal net, and then recover them with the Recovery Drone (see appendix for more information).
❓ - Large-like: While these fish aren't the same as large fish and have some nuances, catching them with maximum quality must be done in the same way as catching large fish. Otherwise, drop a rock on these fish for one star quality.
📷 - Photo: Instead of catching these fish, you must take a photo of them. Photo fish are always three star.
👑 - Boss: To get these cards, you must defeat a boss.

⭐ - Special: See below for notes on these cards!
Blood-belly Comb Jellyfish: These fish can be particularly hard to catch because they often blow up before you get them! My favorite way to catch these is hitting them with a Tranquilizer Rifle (which has a chance to instantly tranquilize them). Once they're knocked out, you can easily pick them up -- maximum quality!
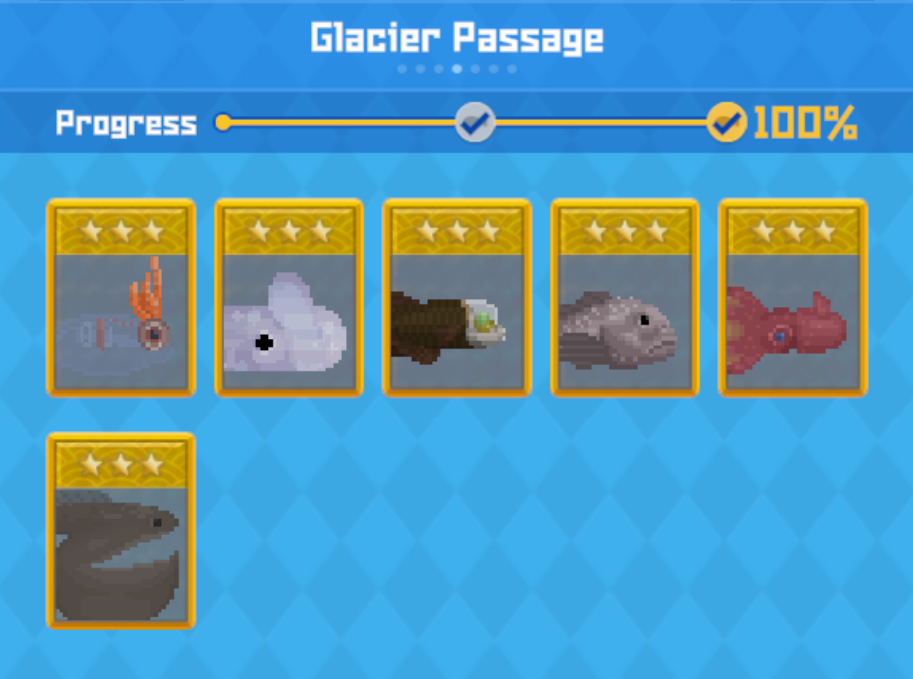
[Area] Glacier Passage
Summary
Overall, this is the easiest area to complete because there are very few fish in the Glacier Passage. If you don't complete this page when you're in the area for the story missions, come back to the Glacier Passage and swim down through each level of the passage. You should pass every fish (though there is only one Pelican Eel per dive).

This section does not include a "☀️🌑🌓" annotation because this area cannot be accessed at night. All fish are daytime fish.

To get ⭐⭐⭐ quality fish, you must first tranquilize the fish or catch it in a net.

Full MARINCA
Find the location of your missing fish in the image, and then scroll down to the table below for names/notes.

Fish Chart (corresponds to above image)
Peacock Squid (25cm)
Dumbo Octopus (43cm)
Barreleye (15cm)
Blobfish (60cm)
Vampire Squid (62cm)
Pelican Eel (100cm)

Key
Nothing to see here! This area is pretty straightforward.
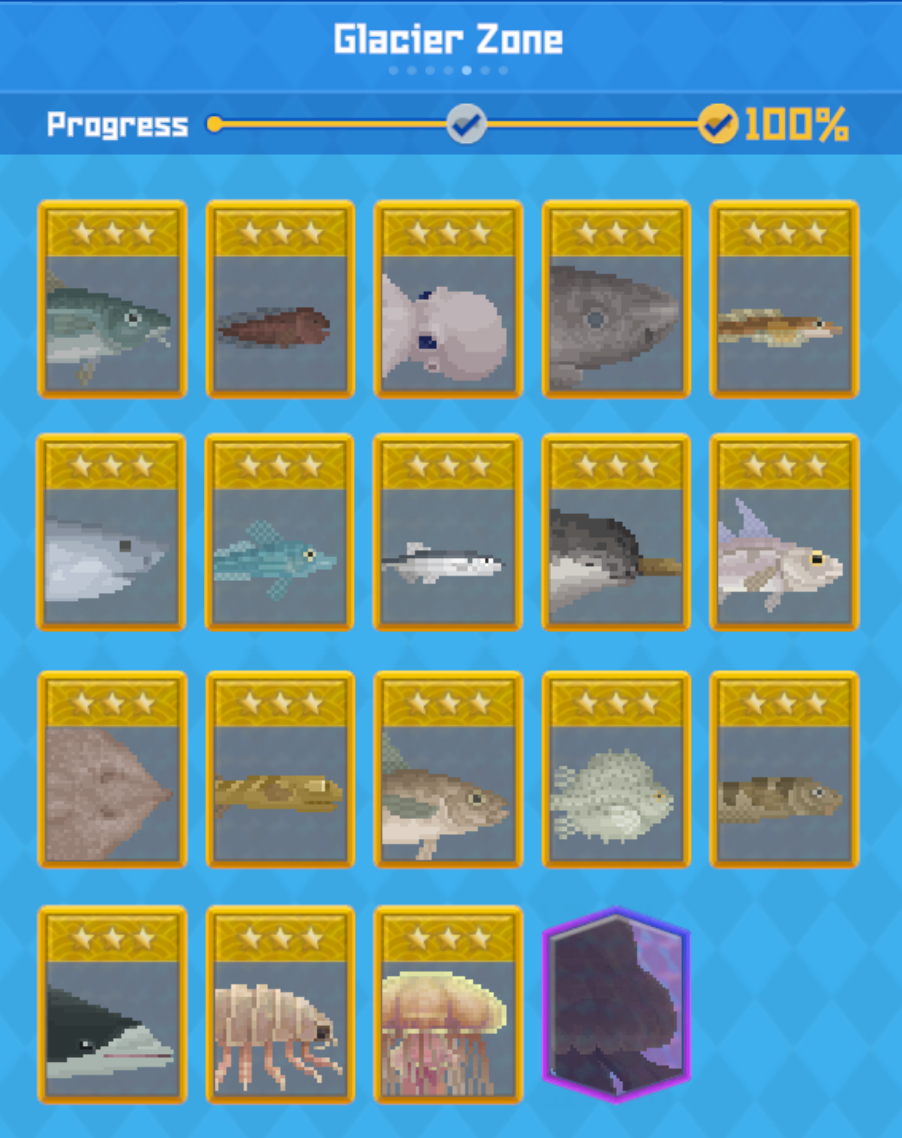
[Area] Glacier Zone
Summary
Overall, the Glacier Zone is pretty easy to navigate and complete. The main challenge in this zone is that many of the fish are extremely tanky, so I prefer tranquilizing them with a Tranquilizer Rifle instead of catching them with the harpoon.

Some of these fish only spawn in the Glacial Caves (which you will access during the story). The second Glacial Cave does not have any unique fish in it because it can only be accessed once.

This section does not include a "☀️🌑🌓" annotation because this area cannot be accessed at night. All fish are daytime fish.

To get ⭐⭐⭐ quality fish, you must first tranquilize the fish or catch it in a net.

Full MARINCA
Find the location of your missing fish in the image, and then scroll down to the table below for names/notes.

Fish Chart (corresponds to above image)
Arctic Cod (45cm)
Gelatinous Snailfish (20cm)
Antarctic Octopus (75cm)
Greenland Shark (670cm)⬆️
Polar Eelpout (30cm)
Porbeagle Shark (400cm)⬆️
Ice Fish (52cm)
Capelin (23cm)
Narwhal (300cm)⬆️
Haddock (95cm)
Starry Skate (120cm)⬆️🔍
Arctic Telescope Fish (20cm)1️⃣
Alaska Pollock (70cm)1️⃣
Lumpfish (60cm)3️⃣
Stub-nosed Spiny Eel (120cm)3️⃣
Southern Right Whale Dolphin (220cm)📷
Bathynomus (50cm)1️⃣📷
Lion's Mane Jellyfish (3000cm)📷
Phantom Jellyfish (???cm)2️⃣👑

Key
⬆️ - Large: Large fish must be killed before you can cut their meat off of them. To three star these fish, you need to tranquilize them or catch them in a steal net, and then recover them with the Recovery Drone (see appendix for more information).
1️⃣ - First Glacial Cave: This fish only spawns in the First Glacial Cave (accessed regularly during the story).
2️⃣ - Second Glacial Cave: This fish will be accessed when you enter the Second Glacial Cave in the story mission. Play through the story to obtain it.
3️⃣ - Third Glacial Cave: This fish only spawns in the Third Glacial Cave(accessed regularly during the story).
🔍 - Hidden: These fish are hiding in the ground! You'll need to approach these fish for them to appear (you will a red "enemy" mark where these fish are hiding when close enough).
📷 - Photo: Instead of catching these fish, you must take a photo of them. Photo fish are always three star.
👑 - Boss: To get these cards, you must defeat a boss.
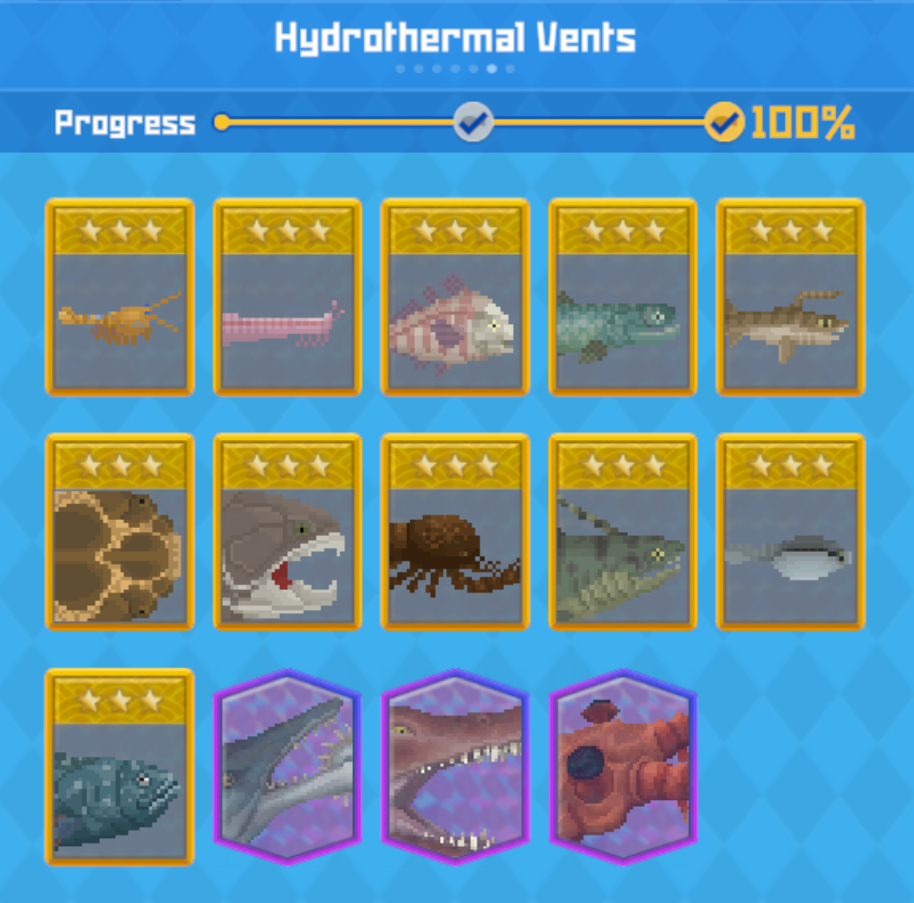
[Area] Hydrothermal Vents
Summary
Overall, the Hydrothermal Vents area is an easy area to complete because it is so small. You must beat the game to unlock all fish in this section (as the final boss is one of the boss cards).

To get ⭐⭐⭐ quality fish, you must first tranquilize the fish or catch it in a net.

Full MARINCA
Find the location of your missing fish in the image, and then scroll down to the table below for names/notes.

Fish Chart (corresponds to above image)
Waptia Fieldensis (7cm)
Pikaia (16cm)
Allenypterus (17cm)
Qingmendous (33cm)
Falcatus (25cm)
Drepanaspis (100cm)⬆️🔍
Dunkleosteus (400cm)⬆️
Megalograptus (100cm)🚩
Xenacanthus (200cm)⬆️
Arandaspis (20cm)📷
Coelacanth (150cm)📷
Helicoprion (???cm)👑
Kronosaurus (???cm)👑
Yawie (???cm)🚩👑

Key
⬆️ - Large: Large fish must be killed before you can cut their meat off of them. To three star these fish, you need to tranquilize them or catch them in a steal net, and then recover them with the Recovery Drone (see appendix for more information).
🚩 - Divine Tree Control Room: These fish are located in the Divine Tree Control Room (which can be accessed at the very end of the game).
🔍 - Hidden: These fish are hiding in the ground! You'll need to approach these fish for them to appear (you will a red "enemy" mark where these fish are hiding when close enough).
📷 - Photo: Instead of catching these fish, you must take a photo of them. Photo fish are always three star.
👑 - Boss: To get these cards, you must defeat a boss.
[Appendix] Seahorse
Summary
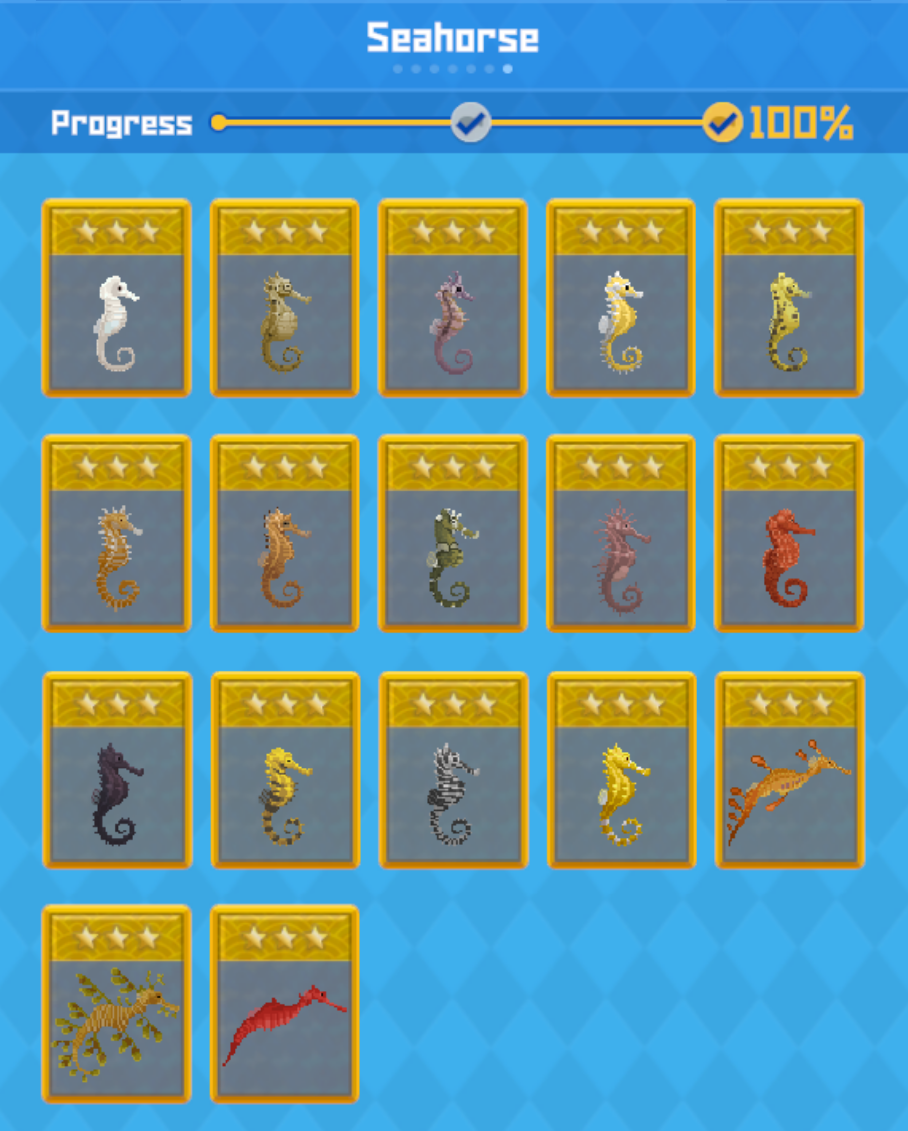
This isn't really a seahorse guide because it's pretty hard to use words (or even images) to explain where seahorses are. However, I will include a standard list of seahorses so you can see what they look like and can keep an eye out for them. Consult your MARINCA for information on what depth to search for the seahorses at.

All seahorses only spawn during the day.

If you would like a seahorse guide, let me know in the comments and I'll consider making one. I can also try to help you in the comments if you're looking for a specific seahorse.

Seahorses are always ⭐⭐⭐ quality.

Full MARINCA
Find the location of your missing seahorse in the image, and then scroll down to the table below for names/notes.

Seahorse Chart (corresponds to above image)
White Seahorse (16cm)
Big-Belly Seahorse (35cm)
Crowned Seahorse (10cm)
Dwarf Seahorse (5cm)
Giraffe Seahorse (10cm)
Hedgehog Seahorse (10cm)
Jayakar's Seahorse (14cm)
Lined Seahorse (17cm)
Long-Snouted Seahorse (21cm)
Pacific Seahorse (19cm)
Spotted Seahorse (30cm)
Tiger-Tail Seahorse (18cm)
Zebra Seahorse (15cm)
Spiny Seahorse (17cm)
Weedy Seadragon (43cm)
Leafy Seadragon (35cm)
Ruby Seadragon

Key
No notes for this section!
[Appendix] GYAO!
I haven't beat GYAO! yet so I don't have a full image here, but here are the GYAO! basics:
  • During regular gameplay, you will unlock the GYAO! app on the phone. This also will add a new MARINCA page.
  • Each GYAO! animal will live for 10 years (10 in-game days). If you take care of them, you will unlock the entry in the MARINCA (and achievement progress) after 4 years. After that, you can allow your GYAO! animal to die for faster progress.
[Appendix] Large Fish - ⭐⭐⭐Quality
Prerequisites
To catch maximum (⭐⭐⭐) quality fish, you must first have unlocked the Salvage Drone (in the normal story). If you haven't gotten to this point yet, you'll get need to wait and can catch ⭐⭐ fish in the meantime.

I also highly suggest upgrading the Salvage Drone to the maximum tier. It's worth every penny.

The Challenge
The hard part about catching maximum quality large fish is that you can't tranquilize them with the Hush Dart, nor can you catch them in a regular net.

Your Options
  • (My favorite early-game option) Upgrade an Underwater Rifle into a Tranquilizer Rifle. When you shoot fish with this, there will be a 40% chance of it tranquilizing the fish. Once tranquilized with this method, you can use the Salvage Drone on the fish.
  • Cobra randomly sells a Steel Net Sensor Trap (after the Tuna event occurs in normal gameplay). This can be used to catch large fish in a net. Once caught, they can be recovered with the Salvage Drone.
  • A few end-game guns (i.e., Modified Hush Dart and Steel Net Gun) can tranquilize/net large fish. Once you tranquilize/net the fish, simply use a Salvage Drone on it! This is the easiest way, if you've unlocked those guns.
[Appendix] Questions, Errors, Comments?
If you see an error, have any questions, or feel that this guide could be improved in any way, please make a respectful comment and I'll fix it quickly!

I'm also happy to answer questions or take suggestions for future guides in the comments.

I take pride in this guide and put significant time and effort into it, so I hope this is helpful to you and that I can help if you have further questions. I'd also appreciate if you can rate this guide to help others find it -- plus, it makes me feel good when I see people using the guide. Thanks for reading!
44 Comments
eagertuna0  [author] 16 Dec, 2023 @ 4:42pm 
@Lt.Col. Anon Xer0, thank you for that, but I've reviewed your guide and it looks excellent. It has a different format than mine with more details so I highly suggest it for anyone looking to get some more information on a specific fish: Link here: https://gtm.steamproxy.vip/sharedfiles/filedetails/?id=3016209612

Great work, @Lt.Col. Anon Xer0! I love the guide!
Lt.Col. Anon Xer0 15 Dec, 2023 @ 12:40pm 
I've updated my Marinca guide for the dredge update if that's any help.
Posting a link here would be rather inconsiderate though.
eagertuna0  [author] 19 Oct, 2023 @ 9:30am 
@Kiedra, this is very very very late but I believe that they only spawn in the rain and are tiny so they can be hard to spot!
eagertuna0  [author] 19 Oct, 2023 @ 9:29am 
@The Space Rat Sorry for the delayed reply, but I appreciate the kind note! While I'd love to update the guide to include recent updates, unfortunately, I've been very busy lately and haven't had a chance to play the updates or update the guide (e.g., I wanted to expand the seahorse section too). Realistically, I think this guide may be abandoned to time given that I haven't had time to update it (but if anyone would like to offer to update it, I'd be happy to add them as a collaborator on the guide).
The Space Rat 13 Oct, 2023 @ 5:33pm 
Actually, addendum to that - now that nocturnal fish have their own section, do you plan to update to include that as well?
The Space Rat 13 Oct, 2023 @ 11:12am 
Great guide, helped me out a lot with completion. Any plans to add a crab pot section?
Kiedra 5 Aug, 2023 @ 6:06am 
Any idea where in the shallows and under what conditions (eg tall plants everywhere) Pyramid Butterflyfish can be found?
Draeka-666 4 Aug, 2023 @ 1:57am 
I'll try right now ^^
Thank you so much !!
eagertuna0  [author] 3 Aug, 2023 @ 5:30pm 
Hi @BOTH kiso, thanks for the confirmation! I'm glad that you caught the fish successfully!
eagertuna0  [author] 3 Aug, 2023 @ 5:30pm 
Thank you, @Draeka-666, I appreciate the note!

That's a great question regarding "large-like" fish as they are the most awkward to catch. I'd suggest using the Steel Net Sensor Trap to catch these fish (it's not the easiest but you can generally lay the trap and then lure the large-like fish into them).

The Steel Net Sensor Trap can be randomly purchased from Cobra after the Tuna event and is fairly common (available roughly half the time).

I hope this helps and that you're able to catch the fish. Feel free to reach out with further questions.

Best of luck and happy diving!