Total War: WARHAMMER III

Total War: WARHAMMER III

114 ratings
ATWH: Basic Unit Guide
By (Steelclaw) and 1 collaborators
A basic army composition and unit tactics guide targeted at new players, and applicable to all factions. Part of the Art of Total Warhammer guide series.
4
3
3
4
2
   
Award
Favorite
Favorited
Unfavorite
Introduction
This guide is the first part in a collaboration series between Bod and Steel, using the experience we have gained playing the Total War: Warhammer series. It certainly isn’t the only way to play, but we hope our insight is useful to others.

The idea of this guide is to give a new player the unit knowledge to build an army, and the confidence to command the units chosen in battle. The guide is an introductory overview, and most topics addressed here will be expanded on in more detail by later guides.

This guide presents generic unit information that can be broadly used for all factions. While there will be some faction exceptions, we find this method a solid baseline.

We normally break an army down into 4 components: lords and heroes, frontline troops, ranged troops, and damage dealers.

Video format: Link coming soon™
More ATWH guides: also coming soon™
Lord and Hero
These folk are your named Heroes and Lords - leaders of armies and exceptional fighters, each individual comparable in power to an entire unit of infantry. It is possible to rename them, giving them titles befitting their noble deeds! (Or their shameful displays.)

Melee:
  • Taking a melee Lord is a solid option - Lords are more powerful than Heroes, so this will give you the best melee stats!
  • If you have a wizard Lord, taking a melee Hero to back up the squishy is good.
  • Duel enemy Lords; try to do so surrounded by your own troops and not the enemies.
  • If you have direct-fire ranged troops (guns), use this guy to intercept enemies running for them. With just 1 individual in a mass of enemies, your lone warrior won’t take much friendly fire!
  • Most melee Lords and Heroes unlock mounts as they level up. Mounts change a character’s stats (e.g. gain armour and speed, but lose shield) and size. Mounted characters cannot climb walls, although flying mounts can land on walls.

Wizard:
  • If you have a melee lord, grab a wizard Hero as soon as you can, so you can make use of the winds of magic.
  • Wizards are not suited to melee combat, especially not against heavily armed and armored enemies. Their power comes from the spells they cast - use them in melee only as a last resort.
  • If you’re not sure what flavour of wizard to choose, pick Lore of Metal (if your faction has access to it). Its starting spell rains giant armour-piercing metal shards in an easy-to-place circle, and does a lot of damage for how cheap it is.
  • Area-effect damage spells are the easiest to use – just target big blobs of infantry.
  • Target enemy troops already engaged in melee to prevent them from dodging your damage spells.
  • All wizards in an army draw from the same reserve of magic, so adding more wizards to your army won’t let you cast more spells, just different spells (and on separate cooldowns).
  • Some circumstances (such as overcasting a spell) may apply a miscast chance. When a wizard miscasts, the spell still occurs normally but the wizard takes damage.
  • Most wizard Lords and Heroes unlock mounts as they level up. In contrast to melee characters, the fastest mount is usually best, since it allows your squishy wizard to avoid melee and quickly reposition to cast spells where they’re needed.

Other Heroes:
  • Bod likes to fill up on a full set of faction heroes in the long run, especially for co-op support armies, but it isn’t really necessary.
  • Other heroes typically provide less universally useful abilities, such as buffing allied units or sniping single enemy targets.
Frontline
These guys are there to dictate where the battle happens, either by drawing your enemy to your lines or by moving to the enemy.

Shieldwall: Shielded units with swords, axes, maces, or whips; 5-6 squads works well.
  • These make for the best generic frontline troops. Sword (and equivalent) units attack faster than spear units, and shielded units get more melee defense as well as protection from missiles.
  • Unshielded units do not usually make for good frontlines, and serve better as flanking damage-dealers. There are some faction-specific exceptions to this rule (such as Beastmen’s Bestigors).
  • Try to surround enemies with your troops and don’t keep sending in melee behind one another.
  • Running other, softer units through your frontline to “peel” off pursuing enemies is useful! Your soldiers will allow allies to pass through their ranks, but will do their best to block enemies.

Spear (and shield): We’d normally take 3-4 squads of spears (6-8 for factions that don’t have shieldwall units, to fill out your frontline). Shielded spears are always preferable to unshielded ones, but not all factions are allowed them. Halberds and polearms are solid alternatives (and stronger than unshielded spears), especially when they come with shields.
  • Hold these in reserve (at your rear and flanks) to defend from cavalry and other large units.
  • Plug gaps in the frontline.
  • If no large enemies are present, run around to flank and stab the enemy in the kidneys.
  • Keep in mind that while spear troops are better against larger units (cavalry, monsters, and such), using spear troops to tie up larger units and then using ranged to deal damage is the best way to deal damage to large units. Your ranged troops can easily shoot over the heads of your spears to shoot those guys on horses, or giants, or whatever!
  • When your spears are being charged by large enemies (cavalry, chariots, or monsters), try to ensure that they are standing still when the charge hits them. Standing still allows them to brace. Spear infantry gain significant defensive bonuses against larger enemies while bracing.
  • Can also be used to “peel” enemies off softer units.
  • When using spears to respond to a threat, you will usually want to send the closest idle squad. If this leaves you with uneven spear coverage (e.g. two squads on the left and none on the right), reposition other squads to cover gaps.
Ranged
Where most of the above unit classes exist to protect your backline, ranged infantry are your backline - or at least the bulk of it. Their purpose is to deal damage.

Around 6 squads is a good target to aim for. Not all factions have access to ranged troops – those which don’t should instead spend the army space on additional frontline troops and other damage dealers.

Ranged infantry come in two forms, direct fire (guns, flamethrowers, etc.) and arc fire (bows, crossbows, etc). This distinction is important!

As a rule of thumb, aim to have the majority of your ranged troops be mid-range (as archers, crossbowmen, and handgunners are). Close-quarters ranged such as blunderbusses and flamethrowers are difficult to use in large numbers. Sniper-range guns tend to put out fewer shots than their mid-range alternatives.

Both: There are things to keep in mind regardless of whether your troops have a gun or a bow.
  • Don’t shoot your own guys in the back! Only shoot over your own troops into enemies they're in melee with if the enemies are a bigger target.
  • Try to focus enemy melee infantry first as they run in (if dangerous), as shooting cavalry and monsters is easy during the melee.
  • Try to shoot guys who don’t have shields, so as not to waste shots.
  • When you get the chance (especially with direct fire, doubly so for close-quarters ranged), flank and shoot along the lines, for good damage on enemies. Your melee guys' shields will protect them!
  • Your ranged troops are fragile, and cannot do their job while being attacked, even by a single enemy. Protect them from enemy melee with your own melee.
  • Focusing fire on one enemy unit at a time will reduce enemy combat effectiveness faster than if you split your ranged units' attention. Enemies taking fire tend to retain most of their combat effectiveness until the last 25% or so of their health bar.
  • When a ranged squad overlaps any other squad, its firing effectiveness is drastically reduced as units from different squads block each other’s line of fire. Try to avoid this happening.
  • Guard Mode (toggled via a button on the UI) prevents your ranged units from trying to chase enemies which retreat out of range or line of sight.
  • Skirmish Mode (also toggled via a UI button) will cause your units to automatically retreat from any enemies which get close to them. We don't recommend it since it overrides player commands, and will cause your units to run away even from enemies which are safely on the other side of allied lines.

Arc fire: Bows, crossbows, and the like. Position them behind the shieldwall. Defend your archers with your shield men!
  • Easier to use, though lacking in AP damage (apart from Celestial Dragon Crossbowmen, and some elf units).
  • Shooting enemy archers works well when melee is all engaged
  • Try to keep each squad’s formation as close to a square as possible – this allows your archer line to turn and shoot sideways without overlapping other units.
  • Arrows do not move as fast as bullets, so shooting at targets which keep changing direction will cause you to miss a lot of shots, wasting time and ammo.

Direct fire: Guns, blowpipes, and flamethrowers. Unnoticed hills are the biggest thorn in your side with these guys!
  • Zoom in behind the squad and make sure they have a clear line of fire.
  • When putting them on a hill, try to make it so all the troops are on the downward slope and not on the other side of the peak from the enemy.
  • Don’t put them behind your shield troops, unless the elevation gives them a clear line of fire (e.g. by your ranged being on higher ground)! (Or the enemy has mostly monsters.)
  • Using small, single entity units (like lords and heroes) to block for your direct-fire ranged works really well. Lots of enemies to hit and not many allies!
  • Not as good at shooting onto city walls as arc fire troops.
Damage Dealers (Part 1)*
*We also consider ranged units to be damage dealers - but they get their own section because they're an essential part of most armies, and replacing them all with other damage dealers may create an army which is ineffective or very difficult to play.

You should have 2-4 spaces left in your army to pick up some of the real army-defining units, such as artillery, cavalry, giants, and dragons!

DPS Infantry: infantry who are focused on damage-dealing rather than survivability. Usually unshielded; often armed with either dual weapons or great wepaons.
  • Best used for attacking enemies in the sides when those enemies are already engaged
  • A good default position is behind your shieldwall near the left and right ends, protected but ready to flank when needed
  • Lack of shields makes them more vulnerable to ranged attacks, as well as lowering melee defense.
  • Dual weapons get a bonus versus infantry so are better at cutting down mass, lightly armoured troops
  • Great weapons have armour-piercing attacks for taking down tougher units.

Skirmishers: ranged units designed to harass enemies without the protection of line troops. Usually fast, with loose formations, and able to fire in all directions, even while moving. The commonest type of skirmishers are horse archers.
  • You can get a lot of use out of skirmishers before the battle lines ever meet, by approaching the enemy army and shooting them as they march on you (or as you march on them).
  • Run away, don’t fight in melee. Your skirmishers can still shoot just as well while retreating.
  • Skirmishers’ biggest fear (besides being caught in melee) is enemy ranged infantry, which can outshoot them. Try to keep your skirmishers in range of the enemy, but not in range of their archers or gunners.
  • Horse archers can be used in melee as weak shock cavalry. This is often worth doing after they run out of ammo, or against enemy artillery, or to chase down routed enemies.
  • The skirmish mode button is designed to help archers and skirmishers avoid melee, but doesn’t work nearly as well as manual oversight.
  • Skirmish Mode is somewhat more useful on skirmishers than on line archers, since they do generally want to be actively moving away from enemies. It won't protect your skirmishers as intelligently or consistently as manual management, but it's better than nothing if you don't have time or attention to babysit them.
  • Skirmish Mode is somewhat more useful on skirmishers than on line archers, since they do generally want to be actively moving away from enemies. It won't protect your skirmishers as intelligently or consistently as manual management, but it's better than nothing if you don't have time or attention to babysit them.
  • Some skirmishers are unmounted, and can only outrun infantry. These foot skirmishers fare better against enemy archers (and can substitute for some of your ranged infantry squads), but should never be deployed unprotected near enemy cavalry – their loose formation and poor melee stats make them incredibly vulnerable to cavalry charges.

Artillery: the big guns – cannons, catapults, mortars, ballistae, and basically anything very long-ranged. Like ranged infantry, artillery can be direct fire or arc fire.
  • Not just good for ranged damage; can also be used to force the enemy to approach your lines, allowing you the defensive advantage of choosing where to fight.
  • Keep it behind your lines at all times. Most artillery is even more fragile than ranged infantry, and too slow to flee effectively.
  • Most artillery projectiles hit every enemy in an area. Target high concentrations of enemy troops for best results.
  • Enemies in loose formations will take less damage. Fast-moving enemies such as cavalry may dodge artillery shots entirely.
  • Be aware of your artillery's firing arc (visible when you target an enemy or hold ALT while the artillery piece is selected) and target to avoid friendly fire. Artillery is not perfectly accurate, so allies near the target are at risk, as well as those along the path of the shot.
  • Check whether your artillery is specialised for a specific type of enemy, and target accordingly. Dedicated anti-infantry artillery often performs very poorly against single targets, and vice versa.

Cavalry: covers both conventional horsemen and more exotic alternatives such as monstrous cavalry or squads of fast-moving monstrous beasts.
  • Swing around the sides of the battle lines to prey on enemy archers and artillery.
  • Charge enemy units from the sides and rear when they are already engaged in melee.
  • This is because cavalry charges are less effective against enemy infantry who are bracing (indicated by a shield icon in the enemy unit's tooltip if you hover over it). Units cannot brace while moving or fighting, so distracted enemies make for the best targets.
  • Keep your cavalry behind your own lines when not in use, for safekeeping.
  • Avoid prolonged melee against enemy infantry or heavy cavalry. If you want your cavalry to keep fighting the same enemy, pull them out and have them charge back in (they’ll deal more damage when charging).
  • Avoid enemy spears/polearms/halberds entirely.
  • Chase down routed enemies to prevent them from rallying. This is an especially useful thing to do with light cavalry, since they cannot survive spending as much time in melee as their more armoured counterparts.
  • Be aware of your cavalry’s surroundings before charging. If your cavalry charges, then gets charged from behind by enemy cavalry or infantry, they will be trapped and take heavy damage.
Damage Dealers (Part 2)
Chariots: small squads of fast-moving vehicles designed to cut through and disrupt infantry lines.
  • This troop type needs a lot of attention on the battlefield, they aren’t just a fire and forget!
  • Charging into enemies and mowing them down, followed by a move order on the opposite side to push on through, is a great way to use these.
  • They cause lots of damage just by running people over! Who'd have guessed?!
  • While chariots can easily push their way through infantry, they are usually stopped dead by anything bigger, so avoid large targets.
  • As with cavalry, chariot charges are less effective against enemies which are bracing.
  • Choose chariots' targets carefully. Make sure there is a clear path on the other side so your chariots don’t get bogged down.
  • Chariots' ability to knock back enemies and push through formations is greatly affected by elevation - they will mow through easily when going downhill, but can be bogged down if they try to charge uphill.
  • Some chariots have missile attacks. These usually fire a few high-damage shots, so are better used against individually tough enemy units such as lords, monsters, or chariots, and not against individually weak but numerous enemies such as infantry.

Flyers: what it says on the tin. Usually very fast.
  • Used very much like cavalry, but you can fly over enemies, allowing you to strike from behind easily and on short notice.
  • Use caution when fighting enemies in the air (unless you have clear air superiority)!
  • Landing in your own troops (especially idle spearmen) is a good thing if your guys are struggling to win aerial combat.
  • Must be out of combat for a short time before taking off from the ground. If enemies chase them, this can be problematic.
  • Generally vulnerable to ranged attacks. Try to avoid enemy ranged unless actively attacking them.
  • Some flyers have abilities which can only be used while in the air and not in melee, e.g. dragon breath.

War Beasts: animals without riders. Fast like cavalry, but weaker in melee.
  • Writing this guide has made us consider just how little we use war beasts!
  • Dogs may be a man’s best friend, but not in Total War: Warhammer. While they have a use (chasing down routed enemy troops), they will generally lose in one-on-one melee against anything that fights back. Pack tactics can help compensate for this!
  • Larger war beasts – such as lions, spiders, or bears - tend to fare better in melee, but still benefit greatly from ganging up, and shouldn’t attack enemy melee head-on.
  • Generally, they can be used like cavalry, with the caveat that smaller war beasts aren’t specifically weak against halberds/spears (but tend to be weaker in general).

Monsters: massive single entities like giants and dragons, and also monstrous infantry like trolls and ogres.
  • Good at fighting mass infantry
  • Best used while covered by your own troops – this is especially true of monstrous infantry, who fight best when deployed overlapping your shieldwall
  • Flexible role – can be used to block enemies or deal damage
  • Keep away from enemy spears and halberds
  • Vulnerable to ranged attacks due to being big targets
  • Large size and resulting ability to push through infantry makes them excellent at disengaging from anything they can outrun, even if surrounded
  • Some can fly. Advice on flyers applies.
Misc
If you have an open spot in your army, consider adding one of these. More than two per army is usually a bad idea.

War Shrines: large single entities which provide benefits to nearby allies.
  • Their primary purpose is to provide buffs, but some also have powerful attacks and/or large health pools (such as when mounted on a Mammoth).
  • Check the small circles at the bottom of the unit information to see what buffs they bring.
  • If you hover over the buff on the unit information (while in battle), it will show you the buff's range of influence.
  • Try to keep near the thickest of the fighting to buff as many troops as possible.
  • Spear units are good at destroying shrines. We assume it's down to them essentially being chisels on sticks!
  • Most war shrines are large and slow, making them easy targets for enemy missiles even when surrounded by friendly troops. Distract or neutralise enemy ranged units, or pull the war shrine back out of their range, if it comes under heavy fire.
  • Some war shrines have abilities which only function while they are in melee. Try to make sure they are fighting on the frontlines without letting them get surrounded by the enemy.
Final Notes
  • The images provided with each unit type are examples, not a complete list.
  • The game is filled with an assortment of wondrous monsters and creatures. The best thing to do is to try out what you think looks cool!
  • Be sure to check what a unit is good at fighting (be it anti large, or anti infantry) and have it kill what it is good against.
  • Units have “mass” which means some are better at pushing than others - larger units have higher mass. Troops of the same size cannot easily push through each other, but smaller troops will part around bigger troops. Bigger units are better at disengaging from melee, and at disrupting enemy formations.
  • If you found this guide useful, please give it a thumbs up so that more people see it! :)
  • A reference image showing a standard army formation is available below.
11 Comments
Bod  [author] 5 Mar @ 12:05am 
Hey Kilmisterjr.

Glad it was helpful for you! We have been talking about doing more guides recently. For battle talking about formations, positioning, and how it is best to encourage the enemy to come to you (break there artillery!). Also some world map stuff, starting with basics.

As a quick front line tip...

- Positioning is key, If you can, try to find terrain to put to a flank. This will encourage the enemy to "blob" on one side.

- Use your strongest defenders on this side where they will blob.

- Try to make a V with your troops. Then you can shoot over the heads of your lads with archers into enemy kidneys, or charge lads in to there side if no more infantry are running in (Just be sure to hold melee until they are all in).
kilmisterjr 4 Mar @ 3:47pm 
Just getting the hang of melee basics, and this is an excellent start guide- thank you! Still getting pyric wins with normal game settings prior to this reading. You hit all the major aspects on style and capabilities that will make the battles more immersive. Of course the factions are way more diverse, but there is a time and place for that; not in a "basic" guide. Thank you! [hat tip]
Bod  [author] 28 May, 2023 @ 2:02pm 
Also to SuperBoy

I believe you can play many of the factions is a more diverse way than you are describing, especially when considering allied recruitment. Even though the guide doesn't state any form of play style specifically, there is nothing to prevent you taking this information and playing in your preferred way for each faction.

With Greenskins recently I've had a lot of fun with a Night Goblin Warboss (to buff the Gobbos!), leading an army with a Goblin Big Boss, Goblin Shaman, 6 Goblin spears (armour scrap upgrade), 6 Goblin archers (heavy ammo scrap upgrade), 2 Goblin Rock Lobbers, 2 Goblin Wolf Rider archers and 1 Skaven Warp-fire Throwers. I have actually been playing them in a defensive manner, drawing my enemies to me, crushing them under my gobbo rocks!
While not the most powerful army, it is super fun and super cheap!
Bod  [author] 28 May, 2023 @ 2:02pm 
Hey SuperBoy!

Thank you for taking the time to read and post!

I would say that taking this approach with any faction will take you far, though I appreciate there are some faction specific things that aren't mentioned.

We wanted to make a guide that would allow folk something to use until we have finished making specific faction guides.

I disagree with your view on line troops. If used properly they can be the backbone of your army, though they won't carry it. Some factions' frontline units, like Vampire Counts' Grave Guard, can fight like legends. Generally speaking you want them to hold the line until your damage dealers can come and mop up, think of them as tar pits to slow down the enemy!
I would also point out Bretonia can buff there units, due to stacking armour from armouries, allowing them to build in power with your faction.
(Steelclaw)  [author] 28 May, 2023 @ 1:20pm 
(2/2)
It's also pretty unreliable - I've seen cavalry archers not start running in time to escape charges from slower cavalry.

It's rarely correct for ranged to be running rather than firing, unless they're skirmishers. Even when one squad is dived, you're usually better off holding still and having the other ranged units shoot into whatever jumped them than running.

Plus, it's confusing for new players when they try to control units in skirmish mode, because skirmishing units will ignore orders and run when and where they want to.

Focus fire: a good idea, we'll make a mention of it!
(Steelclaw)  [author] 28 May, 2023 @ 1:19pm 
(1/2)
@soulmindproductions Thank you very much for your feedback! Regarding the second half of your comments...

Skirmish: we should definitely mention it, but I disagree that it's generally useful. It makes your line archers panic and retreat from enemies which will never reach them through allied infantry, and it can cause skirmishers to freak out uncontrollably when they're being approached from multiple angles, and run towards other enemy units.
Bod  [author] 28 May, 2023 @ 1:05pm 
Still to soulmindproductions!

RE: Formation
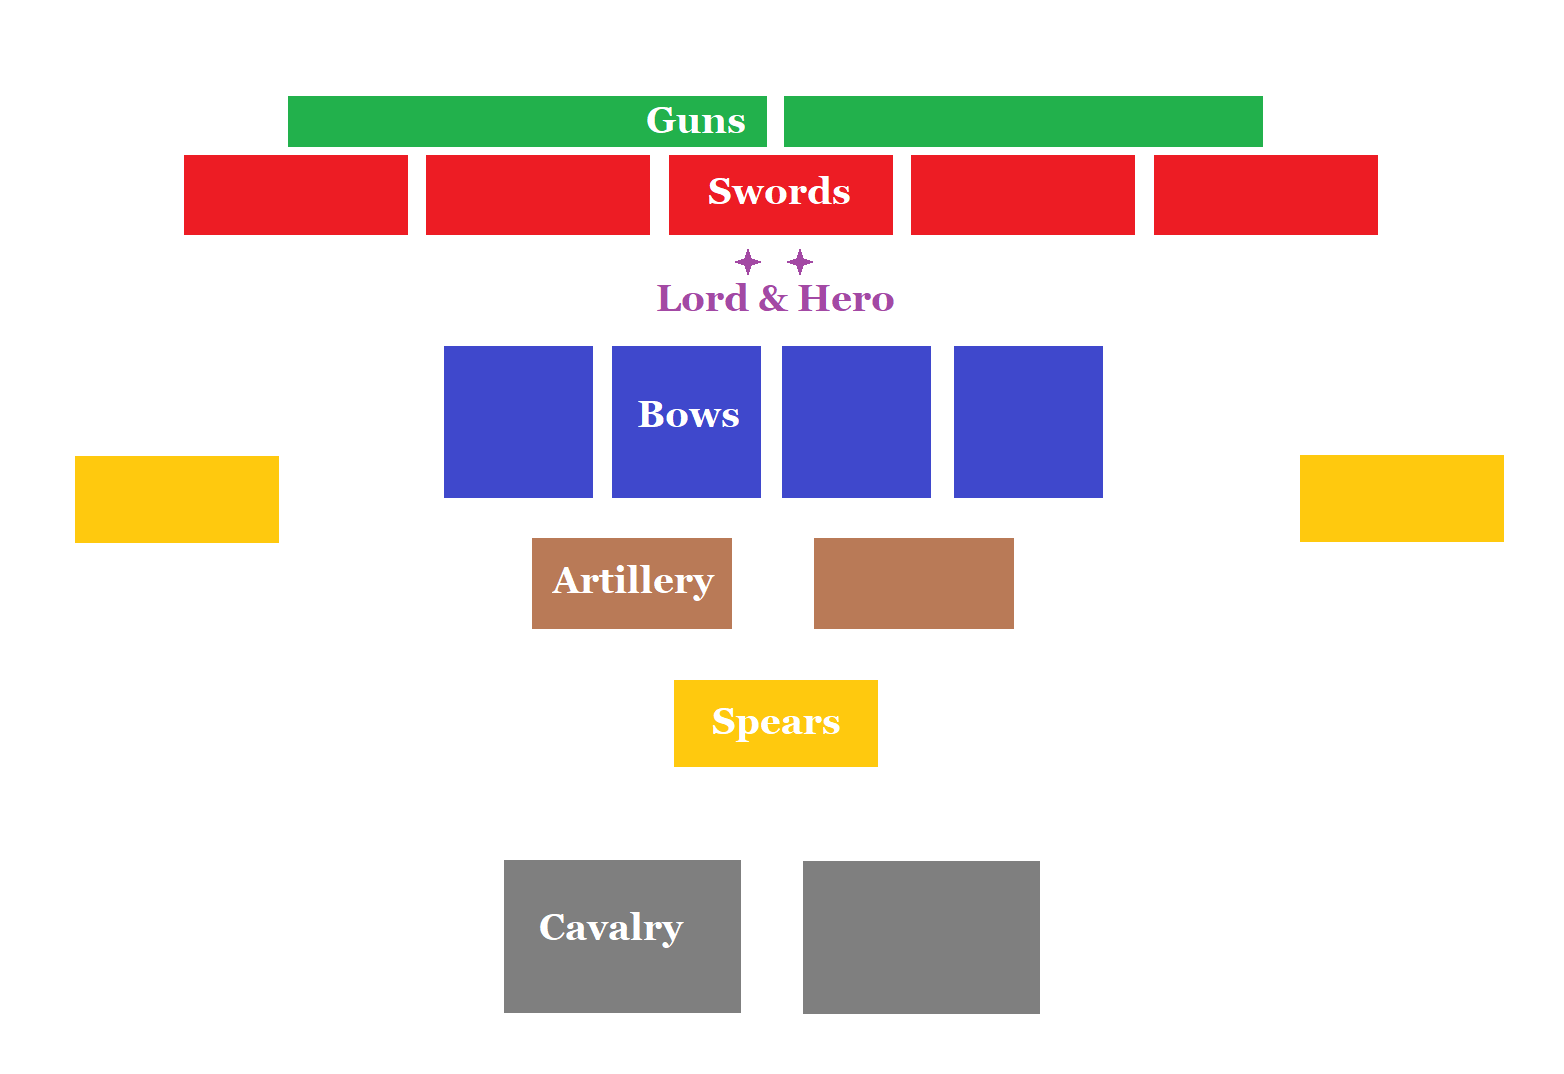
Without going to much into gun positioning and formation, we felt this was a solid starting position. A guide on formations is to come! We wanted to separate that guide, as it will also cover terrain which can affect placement.

Spears in reserve is important to protect from cavalry and large stuff. By holding those positions, you can take short, direct routes to intercept the faster units.
It also keeps healthy/fresh troops for extended combat if needed, so they can plug any gaps that show up in the front line.
Bod  [author] 28 May, 2023 @ 1:04pm 
Heya soulmindproductions!

Thank you for taking the time to read and comment, super informative!

RE: Gun positioning.
With them being placed as they are, I would push through my front lines in a long thin line to save on time. After which, use column to move to the edges and shoot the enemies in the kidneys!

Checker-board is a good strategy, but prevents line spells from wizards being as effective. Line spells can rack up a lot of kills! I would however say I do checker-board with Vampire Coasts gunners and ghosts or vampires due to the melee's low model count :D:

Given the opportunity, I'd put a rock to one of my flanks to prevent the enemy getting around, then leave a gap on that side (around a squad or 2 wide). Place the lord in the centre of the gap, and the guns a short distance behind him.
This allows your guns to shoot at tons of enemies around you one lord. This works especially well for flame units!
GoH:OstfrontRANDOMCRASHTRASHGAME 27 May, 2023 @ 9:37pm 
Your frontline units in late game are super weak.
Especially - non progression for some factions (Bretonnia, Empire etc)
Some factions are jack of all trades (High Elfs, Lizardmen, Tomb Kings, Wood Elves, Skaven), some are defencive (Dwarves, Pirates), some are only "aggressive" (Greenskins, Dark Elvs, Vampires, Demons, Norsca)
Your composition is only good for Empire, High Elves, Cathay, maybe dwarves.
sigmars_disciple 27 May, 2023 @ 9:22am 
- Speaking of which, I think you should explain skirmishing and when to turn it on (answer: leave it on by default and if you ever turned it off at some point for a good reason, remember to turn it back on) and when off. Turn it off temporarily when a weakened unit is approaching or you need a riskier, more effective solution than skirmish. Let's say you have 3 units of archers who will fare badly against the approaching chariots.... If they can almost eradicate them with 2 volleys of "forced shooting" - then this can become a powerful move for a limited amount of time.
- Maybe the concept of "focus fire" (e.g. to take out a lord or monster) also needs to be covered