Mega Man Battle Network Legacy Collection Vol. 2

Mega Man Battle Network Legacy Collection Vol. 2

Not enough ratings
MMBN 4-6 character building guide // Still Wip
By Applethal
This is a follow up to my first guide that focuses on the first 3 games. Much like my first guide, this one acts the same way but with more twists, since the gameplay in the 4th to 6th game has been deeply altered, there will be more to cover than speaking of chips and navi cust programs.
This guide will cover folder and navi cust building, as well as showcase some depth in regards to some new mechanics.
Again, there will be a table showcasing all the codes and which chip they synergize with, the classic rule applies as always: pick a code and adapt your folder to it, of course there will be some codes to avoid, I will try to show which codes you should focus on.

Update 26/04/2023: I have just finished the structure of this guide, there are lots of things to fix up about it. Stay tuned! Consider reading my guide that takes care of the first 3 games
2
   
Award
Favorite
Favorited
Unfavorite
general knowledge
Things have gradually changed since the third game. To balance things up, many features have been removed and were replaced with new tools to work with.

The biggest change here is the removal of style change, it was replaced in favour of adding double soul, more unto that later.
Starting from the 4th game, you may no longer manually add chips, the adding button has been replaced with the soul system support.
Other than that a new PVP exclusive mechanic has been introduced:
Time Freeze Counter is a technique introduced in MMBN4. By executing a dimming chip right when your opponent starts their own, yours will gain priority as long as you are the last one who executes the screen freezing chip. This is a great option in case you find yourself stuck, and invokes the need of having some defensive chips in order to counter the opponent's, namely invis.


The version differences go beyond the chips, some elements of their respective stories are altered and by extension the items and souls that you receive. Here, your version's choice does shape your playstyle by a big margine due to the exclusivities that come along with each version.

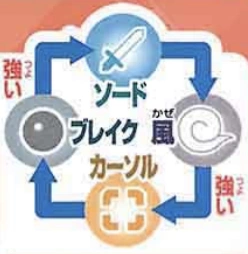
The elements did not change at all, the cycle is still the same. However, a new cycle was born in the 6th game


Just a quick interpretation: Sword > Wind > Cursor > Break. You may ignore this cycle until you start playing the 6th game.

Another big change is the emotions window present in battle. It alters itself during battle in accordance of your performance, it does play a very small role in building your folder. Let me explain:

There are 5 main emotional states that Mega man can achieve in battle, there is another but due to it being a gimmick of the 6th game and unrelevant to the topic, I won't bring it up:

Normal, anxious, dark, rage and full synchro. I am going to focus more on the 2 latter emotions because it puts some emphasis on builds; a full synchro state can be achieved by counter hitting an opponent with a non-dimming chip, for those who are unfamiliar with the timing of each enemy, it would be encouraged to make a folder build containing multi hit attacks to increase the chances of getting full synchro due to its benefits.

Dark mega man can be achieved by selecting dark chips and having a low karma, this playstyle restricts you from having access to the good karma chips, however, some of the DS chips are quite good in both PVE and PVP.


Now unto the souls mechanic, I can sum things up and say: They are great, but not every one of them.
On average, I see people running 4 souls at most, the classic rule of building a folder with max 2 to 3 codes still applies and sadly, it's hard to make a "good" folder that satisfies the idea of allowing you to draw all of these souls in battle, other than that, you might want to consider the following:
Since the souls can last a maximum of 3 turns (5 with some navi cust programs), I think you will most likely end a fight with 3 transformations at best, I would like then to bring up this nice mechanic that is not explicitly said about double souls:
Upon transforming, if Mega man is flinching while on the cust screen ( due to opening the screen while having received an attack), he receives I-frames for a split second, allowing him to carry on and move to a next panel to dodge. This is super useful if you do not run a super armor setup.


Overall, the same folder building rule apply here: Find a balance between damage, area coverage and support.

These are the tools that I use to aid myself for my builds:

Navicust simulator [murkland.github.io]
For frame data I use[wiki.n1gp.net]


Now let's kick things off!


About the emotions bug
The following information is for people who aim to work themselves through a strategy that involves bugging the emotions window in these games.
Old veterans might know it, but for the newcommers, by intentionally putting a program that influences Megaman's dialogues through the L button (Example:. Humor program). In battle, your emotions will shift rapidely and randomly instead of fullfilling a proper condition to triger them.

If you really care about data, here are some facts that I took from the Rockmanexezone:[www.therockmanexezone.com]

The outcome of an emotional shift is influenced by the current emotion that Mega man has, this table sums up the odds for BN5 and BN6:


Current emotion
BN5
BN6
Normal
  • 7/9 Worried
  • 1/9 Angry
  • 1/9 Full Synchro
  • 14/16 Tired
  • 1/16 Angry
  • 1/16 Full Synchro
Anxious / Tired


  • 7/9 Normal
  • 1/9 Angry
  • 1/9 Full Synchro
  • 14/16 Normal
  • 1/16 Angry
  • 1/16 Full Synchro
Angry
  • 7/15 Normal
  • 7/15 Worried
  • 1/15 Angry
  • 7/16 Normal
  • 8/16 Tired
  • 1/16 Full Synchro
Full Synchro
  • 7/15 Normal
  • 7/15 Worried
  • 1/15 Full Synchro
  • 7/16 Normal
  • 8/16 Tired
  • 1/16 Angry


Side note here: By running an evil Mega man setup, you can not conduct this strategy, as evil Mega man's emotions will always be locked to one window. As of yet, I have no data on BN4, hopefully I can find something.
Battle network 4 - Double souls and differeces
The version shenanigans start to get deeper in comparison to the third installment:
Souls / Version
Red Sun
Abilities
Blue moon
Abilities
Soul 1
  • Guts buster: Reminiscent of guts style, mashing the B button will give you I-frames while rapidly shooting buster shots
  • All non-elemental and ground chips gain +30 ATK
  • Charge shot: Guts punch
  • No slipping on ice panels
  • Charging a non-dimming aqua chip will double its damage
  • Charge shot: Aqua shot
Soul 2
  • Upon transforming, a + set of grass panels will spawn on both sides of the field
  • Standing on lava panels heals +50 hp
  • Charging a fire chip will fire a 150 dmg flamethrower
  • Charge shot: Flamethrower
  • Non-elemental chips get +10 Atk
  • +5 cust screen passive
  • Charge shot: Die-bomb
Soul 3
  • Using any chips will heal your HP by +10% of your Max health.
  • Charge shot: Roll Arrow
  • Buster shots pierce shields
  • Unleashing a charged non-elemental chip pierces shields
  • Doubles the dmg of charged breaking chips
  • Charge shot: Metal fist
Soul 4
  • Upon transforming, auras and barriers will be removed.
  • All wind chips gain +10 ATK
  • buster shots are override with air shot that deal 5 dmg.
  • installs float- and air shoes
  • Charge shot: Wind racket
  • Gains immunity against all status effects
  • Stacking a wood chip before a non-elemental chip will allow the former to absorb the ATK stats of the latter and consuming it.
  • Charge shot: Twister
Soul 5
  • All non-dimming Elec and elementless chips paralyze enemies.
  • Charge shot: Zap ring
  • Confuses upon transforming
  • recycles your last inserted 2 chips, including dark chips.
  • Charge shot: Poltergeist
Soul 6
  • Your cust screen now has a shuffling ability, this can shuffle your unused chips for up to 3 times.
  • Upon transforming, Invis and popup will be removed
  • Charge shot: Scope gun.
  • Charging a sword chip will allow Mega man to step 2 rows ahead and use it to attack.
  • All sword attacks will cause opponents to flash
  • Pressing ← + Buster will invoke a shield that reflects damage, this will override all navi cust programs that offer Mega man an ability that uses the same input.
  • Charge shot: Wideswrd


Using double soul while Mega man is locked into an animation (including receiving damage) will restore him to a neutral state, making it a good option for escaping or resetting combos.
Sadly you can not use the regular chip system to insure a double soul on the first turn.

Some souls require you to invest in more utility than the others to cover up their needs and capitalize on their buffs. Proto soul users would like to have a folder with lots of area grabs, while Thunder soul would work great with multi hitting chips.
The souls roster is designed in a way that makes it so that each soul is countered with one that its opposite version offers. I can with safety say that Junk, Roll, Search Thunder souls are high tier souls. With the introduction of the souls system, it would be best to have a folder that focuses on 3 souls at most depending on your game version.

Now unto the Giga chips:


Red Sun exclusive chips
Blue Moon exclusive chips
RedSun
Blue Moon
HolyDrem
SignlRed
Bass
BassAnly
BugCharg
BugCurse
BlakBarr
DeltaRay

The following should cover some notes that I could gather on all the chips:

Red Sun/Blue moon: Both start at 200 dmg and can be upgraded all the way to 500 for Red Sun and 600 for Blue Moon by winning 100 pvp matches with their opposite respective version. The red sun meteors deal 50 null damage each and cannot be buffed, the final attack pierces guard and cracks panels. On the other hand, Blue Moon hits through anti damage and has an uninstall effect and gets rid of the following upon hit:
  • Undershirt
  • Floatshoes
  • Airshoes
  • Super armor
  • Shield
  • Reflect
  • Antidamage
Bass and Bassanly: Bass Anly can be countered by holes, while Bass is superior due to its multi hitting propriety, making it a good candidate for ATK boosting chips. Sadly, the F folder in this game is weak and even with the * chips having some good utility, you would not make a folder around the Bass chips on their own.

Signal red: This chip is busted, but requires some setup investements to ensure the best results. It has only 100 HP and locks your opponent from using chips for aprox. 7 seconds. Its vurnability justifies the need to have some area grabs, it would be smart to put it on your opponent's back row if possible.

Holydream: Unlike the aformentioned chips which may want accomodations, this one does need 1 in the form of sanctuary. The combo is fun, but the investement and the damage are outclassed by the other gigas, especially since geddon is a meta chip.


Battle network 4 - Navi cust
All in all, everything said ignores the navi cust programming part. Thankfully, you do not have to deal with the part colour incompatibilities anymore, but you are allowed to only have 4 at most in your board. Sadly the mod tools and the ability to compress said programs have disappeared
With that said, let me cover up the programs that I think should be discarded:

Part
Part's name
Part
Part's name
Part
Part's name
Battery
Bodypack
Jungle
2
Collect
Oilbody
Sneakrun
3
Hubbatch
Soulclen
Fish
Speed +1
Speed +1


If you plan to relay on the passive buffs of a double soul, make sure that you equip a NCP that accomodates your folder to favour your chances of getting their corresponding chips.
I won't be speaking here much about the obvious parts, but here are some cool details you might want to know:


  • Speed modifiers: Investing in speed is honestly not worth not even a small chunk of the grid, the game is centered on charging and using chips. Speed+ parts do not contribute much to the button mashing considering the frame data.
  • Bodypack: Though it offers a compact part that bundles some good parts, I think that its size does not allow you to make a flexible build, especially if you run a Red sun build. Wind soul substitutes half of what this part offers for a limited time, and by the time you add it, you would not have enough space for other parts.
  • Hubbatch: The form of the NCP speaks for itself, if you manage to install it, you may then be able to only fit the following : Attack+1, Speed+1, Charge+1, SpeedMAX, ChargMAX,HP+50, HP+100, Rush, BugStop, Humor. Other than that, your HP gets cut to half, this is not recommended in PVP and cannot be remedied with a bug stopping program. Sadly this game does not come with a compression ability but you might want to run it in PVE.

Note: The double souls do not receive buffs from the buster. The buster damage for every soul is static and can never be buffed.

About bugfig:
Bugfix does exactly what you would expect from its name, sadly it is a mega chip which means you are limited to how many copies you can have with it + its nature as a mega chip puts you in a pick your poison situation: Do I sacrifice a mega chip slot for it ?
I can not comment much on this dillemma, but I like the fact that this strat exists.
Battle network 4 - Dark Mega build
With the introduction of dark chips, some did experiment with building folders that work around them. In the following, I will be pointing some information on the theory of their builds. Most of the information here are taken from therockmanexezone[www.therockmanexezone.com]

The following table should sum up the proprieties of dark karma Mega man:


Mega man DS
Proprieties
  • The emotions window will always be set on Evil, this means no potential access to Full synchro
  • No access to the double soul system
  • Stepping on a holy panel removes it
  • Can use Evil-chips but no good chips**
  • Upon receiving the final hit before being deleted, Mega man goes berserk*
  • Permanetly loses 1 HP after each battle when using dark chips, going all the way down to 501.
  • Each turn spawns a new set of 2 dark chips in your cust screen. Their spawn rates depend on your HP values***.

* : berserk Mega man can only trigger once per battle. If you have undershirt equipped, it will absorb the final hit before triggering the effect, making it a good choice for the NCP setup. Berserk Mega man will use your commonly used chips and program advances through out your gameplay, this is a tricky part where you may "train" the AI into abusing the best chips for the best results. The more often you use a chip, the more likely the AI will unleash it.

***: Now let's talk about the BN4 dark chips. Using any of these during combat will trigger a bug. Some of these chips will have a variable dmg value:


Chip
Damage and spawn rate per HP%
Bug
Dark sword
Dmg: Highest HP value of an enemy
Spawn rate:
1-49%: 3/64. 50-100%: 12/64
Forced movement to the front
Dark Bomb
Dmg: 200
Spawn rate: 1-49%: 3/64, 50-100%: 12/64
Forced movement to the back
Dark Stage
covers the area with holes on your side and poison panels on the enemy's. Spawn rate: 1-49%: 2/64. 50-100%: 8/64
Custom - 1
Dark cannon
Dmg: Max HP - Current HP.
Spawn rate: 1-49%: 24/64. 50-100%: 0/64
Buster stats level down to 1. In PVP the buster shot will have flowers, setting the opponent's emotion window to angry
Dark recovery
heals +1000 HP
Spawn rate: 1-49% 24/64. 50-100%: 0/64
level 3 HP bug in battle and during the cust screen
Dark Lance
Dmg: Highest HP value of an enemy / 2
Spawn rate: 1-49%: 3/64. 50-100%: 12/64
Level 1 custom HP bug
Dark Spreader
Dmg: 400
Spawn rate: 1-49%: 2/64. 50-100%: 8/64
Spawns a poison panel on the last panel Mega man visits
Dark Vulcan
Dmg: 20 x 24 hits
Spawn rate: 1-49% 2/64. 50-100%: 8/64
Confusion bug

Notice how the RNG is designed to favor comebacks, DS Mega man builds would want to have some HP coverage NCPs. Essencially, float shoes and undershirt are a must. Sadly you can not counter the bug side effects of the dark chips using Bugstopper. Since Blue moon players will have access to only 1 Giga chip, Giga+ NCPs would render the build much more weaker, considering that Deltaray and Bass are great in comparison to the rest and that the former is blacklisted from the build.


** : Going for a DS build will restrict your folder yet give you access to new options, the following table showcases the chips that you may and may not use respectively:


Categories
Can't use
Can use
Can't be used by berserk DS Mega man
Standard chips
GunSol, Barrier, Barr100 and Barr200, HolyPanl, BugFix, RollArrow, GutPnch, HawkCut, NumbrBl
Static, Hole
LifeSync, SloGauge, FstGauge, ColorPt, CopyDmg, Atk+10, Navi+20
Mega chips
GunSolEX, every navi chip except Shademan v1 and Laserman v1
Anubis, ElemDark, BlakWing, DarkLine, DS Navi Chips
Atk+30, BugFix, DblPoint, FullCust, BugChain, PrixPowr
Giga chips
DeltaRay, HolyDrem
BugCurse, BlakBarr, BugCharg
Duo
Program advance
P.Driver
Dark Neo
GigaCan3, H-Burst, MagShok1, MagShok2, MagShok3, BodyGrd, PoisPhar, P.Driver

Static and hole are both available in the * code, making them a viable choice for any DS build, Static has a great hitbox and paralyzes. Blakwing might want some area grab investements.

About holes: The more holes you have on the field, the more powerful the DS chips become, sadly these holes can eliminated quite easily just by having and opponent with high karma walking on them. These holes are meant to boost the DS navi chips, with some gaining +5 while others having a bonus +10 per hole. I think DS navi chips with multi-hitting attacks would benefit greatly from this (i.e. SearchmanDS), especially since dark line and hole are both on the * code, making them easily chained with DS navi chips after their execution.

Considering the cost vs benefits, the new array of tools do speak for themselves. The Giga chip bugcharge does power up with each passing turn once it becomes available on the cust screen.
Dark barrier on the other hand is good for stalling, as it keeps regenerating each time it goes away. Blue moon offers only 1 Evil Giga chip; BugCurse is in my opinion not viable for combat.
This makes RedSun superior for DS builds, not only for the Gigas but also for its access to searchmanDS and rollDS, even though you still can trade these.


I briefly spoke about Berserker DS Mega man. It's a clutch mechanic that the player can not control. After taking the final hit, Mega man will start moving in random spots while occasionally spamming random chips and shooting buster shots. Pressing A while having chips or P.As in this state will cause Mega man to use them.
The Table above lists some chips that Berserk Mega man won't use. On the other hand, the game computes each chip you did use since the start of your gameplay and ranks them by usage. The more you use a chip, the more likely it'll be used in this state. In order to greatly benefit from this, it would be best to spam the best chips/P.As during your normal playthrough, and if possible have someone trade your wanted chips at the start of each save file to maximize your chances. It appears that the legacy collection introduced changes to challenge the AI manipulation[www.therockmanexezone.com], but the general rule here stays the same.

Overall, DS builds are a nice option and do add more depth to the creativity. According to the page, setting a build for PVP may only require 3 consecutive fights with the following setup:

  • Use a dark chip
  • Trigger berserk
  • use another dark chip in the same fight


NCP wise a combination of undershirt, superarmor and HP ncps are what you need. Buster mods in BN4 are not to be recommended, I have seen people running float shoes against the poison panels but the NCP shape makes the decision hard to justify.
Battle network 4 - code sorted chips
As you go through this table, you will notice that things are much more compact in comparison to BN3, many chips have been removed and some had some adjustments:


Chip's code
Chips compatible with the code
A
AirShot, Anubis, AquaMan, AquaMnDS, AquaMnSP, Barrier, Binder2, BlakBarr, Counter3, ElemSand, Guard1, GunSol1, Lance, MagBolt3, Recov10, SidBmbo3, TwnFng1, WindRack
B
AntiRecv, Ball, BigHamr1, BlueMoon, BugBomb, BugFix, BurnMan, BurnMnDS, BurnMnSP, Counter2, CustSwrd, DublCrak, Geyser, GunSol2, HeatShot, MagBolt1, MagBolt3, MiniBomb, ProtoMan, ProtoMDS, ProtoMSP, Recov80, SidBmbo1, Static, Thunder1, TripCrak, TwnFng1, Vulcan2
C
AntiSwrd, Binder1, Bub-V, BugChain, BugCharg, BugCurse, ColdMan, ColdMnDS, ColdMnSP, ElemLeaf, Guard2, GunSol3, Heat-V, HeatShot, HiCannon, MagBolt1, MagBolt3, Mine, MokoRus1, Recov150, SandRing, Silence, TwnFng1, VarSwrd, WhitWeb2, WideBlde, WideSht1
D
AirHoc1, AntiRecv, AntiWatr, Barrier, BigHamr3, BlkBomb, Bub-V, BublSide, CircGun2, Discord, ElemLeaf, FlmLine2, GrabRvng, Heat-V, HeatBrth, HeatShot, HeatSide, HiCannon, LifeAura, MagBolt1, MegEnBom,
Snake, WhitWeb1, WideSht1
E
AirHoc1, AreaGrab, Binder3, BoyBomb1, Bub-V, BublSide, ElemDark, EnergBom, Fanfare, FlmLine2, GrabBnsh, Heat-V, HeatSide, HiCannon, LongSwrd, M-Cannon, MagBolt2, NrthWind, Recov50, SloGauge, Sword, Tornado, Vulcan1, WhitWeb2, WideSht1, WideSwrd
F
AirHoc1, BublSide, Counter1, FireMan, FireMnDS, FireMnSP, FlmLine1, FlmLine2, Guard3, HeatSide, M-Cannon, MagBolt2, Recov120, Recov30, SidBmbo3, Slasher, TwnFng3, WoodPwdr
G
AntiRecv, BigHamr2, BoyBomb3, BugBomb, CircGun2, Fanfare, FlmLine1, GodHammr, Guard2, GunSol1, GunSol2, GunSol3, GutsMan, GutsMnDS, GutsMnSP, Lance, LongBlde, M-Cannon, MagBolt2, MokoRus2, Static, TwnFng3
H
AntiElec, Blizzard, BlkBomb, CircGun1, Counter2, ElemIce, FlmLine1, Geddon3, HolyDrem, Magnum, Mine, Recov200, Recov30, SidBmbo2, Slasher, SloGauge, Thunder2, TwnFng3, Vulcan2
I
AirHoc2, AntiSwrd, Barr200, Binder3, BoyBomb2, ElemLeaf, FstGauge, MokoRus1, Repair, SidBmbo1, Thunder3, VDoll
J
AirHoc2, AntiNavi, BigHamr2, Blizzard, BoyBomb1, CircGun3, ElecShok, FlmLine3, Geddon1, GrabRvng, Jealousy, JunkMan, JunkMnDS, JunkMnSP, MegEnBom, PopUp, Recov120, Recov300, Recov80, TimeBomb, VarSwrd
K
AirHoc2, AntiDmg, AntiFire, ElemFlar, FlmLine3, Geddon1, GrabBnsh, HeatBrth, KendMnDS, KendMnSP, KendoMan, MetaGel, MokoRus2, PanlGrab, TimeBomb, WhitWeb3, WideBlde
L
Boomer1, Boomer2, Counter2, DrkLine, DublCrak, ElecShok, ElemSand, FlmLine3, Geyser, Guard1, LaserMan, LasrMnDS, LasrMnSP, LongSwrd, MiniBomb, Recov10, Recov50, Spreader, Sword, Thunder1, TimeBomb, Tornado, TripCrak, WhitWeb1, WideSht2, WideSwrd, WindRack
M
AntiDmg, AntiNavi, AntiWood, AreaGrab, Boomer1, Boomer2, BoyBomb1, CircGun3, Counter1, GunSol1, MetalMan, MetlMnDS, MetlMnSP, MokoRus1, Muramasa, Recov200, Silence, Snake, Spreader, WideSht2
N
AntiSwrd, Boomer1, Boomer2, Counter3, ElemFlar, EnergBom, Fanfare, Geddon2, GrabRvng, LifeSync, NeoVari, NrthWind, NumbMnDS, NumbMnSP, NumbrMan, Recov10, Spreader, WideSht2
O
Barr200, BigHamr1, Binder1, Binder3, Guardian, HeatBrth, MokoRus3, PanlGrab, Recov80, SidBmbo2, TwnFng2, VDoll, Vulcan2, Vulcan3, WhitWeb3
P
Barr100, Bubbler, CustSwrd, ElemFlar, GrabBnsh, Guard2, PopUp, Repair, Thunder1, Thunder2, Timpani, TwnFng2
Q
Barr100, Bubbler, ElemIce, FstGauge, Geddon3, LifeSync, Magnum, Recov120, TwnFng2
R
AntiDmg, BigHamr1, Bubbler, CircGun3, DublCrak, Guard3, Lance, LongBlde, Recov30, RedSun, Repair, Roll, RollDS, RollSP, SandRing, ShotStar, SidBmbo1, Silence, Slasher, Snake, TripCrak, WhitWeb1, WindRack
S
AirShot, AreaGrab, Binder1, Boomer3, BoyBomb2, CustSwrd, ElecShok, ElemSand, GunSol2, LongBlde, LongSwrd, Recov50, SandRing, SerchMan, SidBmbo2, SignlRed, Snctuary, SparkMan, SprkMnDS, SprkMnSP, SrchMnDS, SrchMnSP, Sword, Thunder2, Vulcan1, WideBlde, WideSht3, WideSwrd
T
AntiNavi, Ball, Binder2, Boomer3, BoyBomb3, CircGun1, CircGun2, Counter1, Discord, EnergBom, Geddon2, Guard3, GunSol3, MetaGel, MiniBomb, MokoRus3, NrthWind, Recov150, Thunder3, ThunMan, ThunMnDS, ThunMnSP, Timpani, TopMan, TopMnDS, TopMnSP, Tornado, WideSht3, WoodPwdr
U
AirHoc3, Barr200, Boomer3, FstGauge, Geddon3, MokoRus2, SidBmbo3, WideSht3
V
AirHoc3, AirShot, Ball, BigHamr3, Blizzard, BoyBomb3, Counter3, Discord, ElemIce, Geyser, Guard1, Magnum, SloGauge, SuprVulc, VarSwrd, VideMnDS, VideMnSP, VideoMan, Vulcan1, WhitWeb3
W
AirHoc3, Barr100, BigHamr2, BlakWing, BoyBomb2, Geddon1, MegEnBom, Recov200, Thunder3, Vulcan3, WindMan, WindMnDS, WindMnSP, WoodMan, WoodMnDS, WoodMnSP, WoodPwdr
X
Bass, BassAnly, ShadeMan, ShadMnDS, ShadMnSP
Y
Binder2, Geddon2, LifeSync,
MokoRus3, PanlGrab, PopUp, VDoll, Vulcan3, WhitWeb2
Z
Barrier, BigHamr3, BlkBomb, BugBomb, CircGun1, DeltaRay, MetaGel, Mine, Recov150, Static, Timpani
*
AirHoc1, AirShot, AntiRecv, AntiSwrd, AreaGrab, Atk+10, Atk+30, Ball, Barrier, Binder1, Blinder, Bubbler, BugBomb, BugChain, BugFix, ColorPt, CopyDmg, Counter1, Counter2, CrakOut, DblPoint, Discord, DrkLine, DublCrak, ElecShok, ElemSand, EnergBom, Fan, Fanfare, FlmLine1, FstGauge, FullCust, Guard1, Guard2, Guard3, GunSol1, HeatBrth, HeatShot, Hole, HolyPanl, Invis, Lance, MiniBomb, Navi+20, NrthWind, PnlRetrn, PopUp, Recov10, Recov120, Recov30, Recov50, Recov80, Repair, RockCube, SandRing, SidBmbo1, Silence, SloGauge, Spreader, Static, Thunder1, Timpani, TripCrak, TwnFng1, Vulcan1, WhitWeb1, WhitWeb2, WhitWeb3, WideSht1, Wind, WindRack, WoodPwdr

Though I lack the experience as of yet to comment on what good codes to pick, I am pretty sure Anti-damaging chips were all over the place. The condition that imposes the good quality of a folder still holds as of yet from the old games:

1- A maximum of 3 codes shared across the folder
2- Have some defenses, I recommend having about 7 chips composed of heals and protection
3- Utility is great to have, most of the good chips support the * code but are hard to acquire
4- Offense: In PVP, expect super armor to be everywhere, leave the multi hitting chips for PVE and enjoy having the best variation of Airhock while it lasts thanks to its damage and code compatibility, small spoiler: it gets nerfed in the next game. Overall, focus on having good damage and hitboxes as always.
Battle network 5 - part 1
Nerfs and buffs were thrown here and there as of yet. The biggest change is the fact that dark chips can be collected throughout the playthrough, a maximum of 3 dark chips can be assigned to a folder. They have a clean purpose to serve in this game unlike the past one where you may now use their benefits without suffering any damage to your karma stats.
Not only that but you also gain control over the dark chips that you wish to use, unlike in BN4 where you had to deal with some randomness over the dark chips that you'd receive

Much like BN4, BN5 comes with 2 versions, both come with plot differences.


You may notice a pattern here where almost the same soul elements/proprieties are split between the two versions here, so what gives ?

Souls / Version
Team colonel
Abilities
Team Protoman
Abilities
Soul 1
  • Charging a breaking chip will double its damage
  • Using any chip will cause Mega man to be invincible until the recovery frames of the chip revert you to neutral
  • Charge shot: Royal wrecking ball
  • Charging an elec chip will double its damage
  • Magnet panels effect you not
  • Pressing ← + B will affect opponents who share the same row as you with a gravity effect that disallows them to move.
  • Charge shot: Mag bolt
Soul 2
  • This soul installs anti damage and float shoes while it is active, any Navicust containing a feature that requires the ← + B input will be disabled until the soul timer ends.
  • Charging a sword type chip will teleport Mega man behind the enemy before using the chip
  • Your mobility's speed is increased
  • Charge shot: Long sword
  • Air shoes and Float shoes are installed within this soul form
  • Using a wind chip will cause the next wind or elementless chip to have its damage doubled
  • Charge shot: Tornado Arm
Soul 3
  • Gains immunity against status effects
  • The entire arena will be filled with wooden panels
  • Standing on a grass panel not only will heal you, but will also allow you to double the damage of a wooden chip but will cause the panel to dissipate
  • Charge shot: Tomahawk Swing
  • Standing on a lava panel while having a chip loaded will allow you to absorb the lava panel and increase the chip's damage by +10 ATK.
  • Charging a fire chip will launch a Bomb towards the nearest opponent that deals double damage
  • No charge shot, instead your buster does a multi hit rapid attack that hits the unit and damages the opponent behind it by 1 row
  • Charge shot: Metal fist
Soul 4
  • Non-elemental chips get +10 Atk
  • The cust screen will contain 10 chips after transforming while the soul is ON.
  • Charge shot: Die-bomb
  • Your cust screen now has a shuffling ability, this can shuffle your unused chips for up to 3 times.
  • Upon transforming, Invis and popup will be removed
  • You gain the ability to see the chips loaded by the opponent
  • Charge shot: Scope gun.
Soul 5
  • Enables you to hide in sea panels, your mobility on ice panels suffers no sliding
  • Charging an aqua chip will double its damage
  • Charge shot: Shock song
  • The last 2 custom screen slots will be reserved for a set of capsules that you will receive randomly at each turn. Each has its own effect and can be equiped to a chip that you load
    • Pink capsule: Recovers HP
    • White capsule: paralysis
    • Yellow capsule: confusion
    • Black capsule: Blinds
    • Purple capsule: Causes an HP bug
  • Charge shot: Capsule bomb
  • Charge shot: Poltergeist
Soul 6
  • Obstacles on the enemy's field will be change to soldiers that will attack opponents that share the same row as the obstacles.
  • gains arm change: a custom screen ability that warps your buster's shots into the a given non-element chip with a damaging value
  • Charge shot: Screen divide
  • Charging a sword chip will allow Mega man to step 2 rows ahead and use it to attack.
  • Pressing ← + Buster will invoke a shield that reflects damage, this will override all navi cust programs that offer Mega man an ability that uses the same input.
  • Charge shot: Wideswrd

Again, search soul proves to be superior and is now better thanks to the new buff, allowing you to see the opponent's chips; Proto soul received a nerf in regards to his ability to stun opponents upon slashing them as this could result into locking them in place for a turn. Number soul is back and keeps it vanilla, no changes.
Though all these look super interesting, some of the souls' abilities are quite situational in my honest opinion, especially when it comes to panels, because as far as it goes, only Tomahawk soul can allow you to influence your field. In Battle network 5, no chip can fully cover your field with a given panel that allows you to use your soul abilities. The only panel chips that correspond to this statement come in the from of a grenade that you can shoot 3 panels ahead; if shot from the very back of your panel, it will cover only the last column of your field, provided no one stole your area with area grab. My point is: Do not focus on the souls' corresponding field abilities, you can't change your field to use them unless you use tomahawk's soul.

If only Knight soul came with super armor, I would honestly recommend building a folder over it, this makes the one of the following secret forms superior than the base form that mega man comes with:

Team Protoman's cross
Abilities
Team Colonel's cross
Abilities
  • Mega Folder -2
  • Your buster can now shoot in 3 directions
  • HP + 200
  • Super armor installed
  • Charge shot: Shooting buster
  • Mega folder - 2
  • Your buster can now shoot in 3 directions
  • Max HP +20%
  • Float shoes installed
  • Charge shot: Helz Rolling

Be careful as these form changes are permanent. As said earlier, Silver bass cross is superior for its super armor, but the great question lies: is it worth having a mega folder handicap ? it all depends on your folder and your build.

Battle network 5 - part 2
Now comes the new mechanic introduced in this game: Chaos unison.
By sacrificing a dark chip, you can transform into the chaos form that corresponds to one of the souls that you have collected. Each dark chip has its own form, which you can easily tell just by looking at its element/propriety. It's meant to allow you to pull the dark chip's abilities in a safe manner that keeps your karma healthy.


The chaos unison is a high risk high reward feature, you may use this ability not only for its intended purpose, but to also gain an extra double soul turn. All the dark chips are great, but there are ones which are not always optimal:

  • Colonel's chaos unison which summons a unit that paralyzes opponents; unless you can keep it safe, I don't think it would be of great use due to its vulnerability
  • Tomahawk's chip hits only the back rows, this transformation is best used just for the other benefits
  • Knight's drill has a very small hitbox and its recovery/active frames are slow.


Lastly and before I speak about the Navicust and folder builds, I need to highlight something real quick:

The PVE gimmick of this game's story progression is the liberation missions, I highly recommend a flexible build, namely having maybe 2 folders to work with, one for the liberation missions and one for the normal stages.
The liberation missions contain battles that put you on a time limit composed of 3 turns, turns which you can't shift in between by your own. I will try to point later some folder ideas for both the normal playthrough and the liberation missions, for now, I bring up the Navicust chapter of this guide:


Compression is back, new parts came in but, I think some are not worth it:

Part
Part's name
Part
Part's name
Part
Part's name
Part
Part's name
Speed+1
Speed MAX
Soul clean
Auto heal
Autorun
Chivarly
Humor
Millions
Collect
Jungle
Oilbody
Fish
Battery
First barrier
Body pack
Sneakrun

Much like the previous games, speed parts do not enhance the mashing. Bodypack is this time a hard choice where I decided to throw it, but please consider it this time, because unlike the past game and thanks to compression, the upper part of the program gets cut, allowing you to fit it in the upper left corner, but because I run a folder where I barely need float and air shoes, I end up not needing the entire bundle.
As for barrier and considering the nature of the PVP scene in this game, it might be viable only in PVE, especially if you try to hunt for the SP chips.

Now let's check out folder building.
The rules are still the same, but: if you plan to run a good karma mega man, the dark chips codes should not really matter since you will use the said chips to transform and not to use them unless you run a dark mega man folder.
Again, new changes came and some were removed and some old existing ones had some buffs and nerfs, mainly Airhock where they removed its numerical series and reduced its damage. As far as I am concerned, the S chips code is powerful here, giving you access to great chips and great P.A. combos

Chip's code
Chips compatible with the code
A
AirSpin3, AntiElec, Anubis, AqWhirl2, AreaGrab, Astroid1, Blinder, Boomer, BugBomb, CircGun, CusVolt1, DrilArm1, Geddon3, GrasSeed, Guard1, GunDelS1, HolyPanl, HotBody1, IceSeed, Katana3, Quake1, Recov10, RedWave, Skully2, TankCan1, Timpani, Voltz3, Vulcan2, WideBlde
B
AirSpin2, AntiRecv, AqWhirl1, Barrier, BlizMan, BlizMnDS, BlizMnSP, BoyBomb3, BugCharg, CrsShld1, Discord, ElcReel2, Guard2, Katana2, LifeSync, MiniBomb, ProtoMan, ProtoMnDS, ProtoMnSP, Quake2, RainyDay, Recov50, Recov80, Slasher, SpShake2, TankCan2, Thunder, VarSwrd, Vulcan2, WavePit, WindRack
C
AirSpin1, AntiDmg, Astroid3, BoyBomb1, BugCurse, CannBall, CircGun, CloudMan, CloudMnDS, CloudMnSP, Colonel, ColonelDS, ColonelSP, CosmoMan, CosmoMnDS, CosmoMnSP, CrakBom, CrossDiv, CrsShld2, CusVolt2, ElcReel1, Guard3, HotBody2, Lance, LongSwrd, MegEnBom, MoonBld3, Pulsar3, Recov10, Recov30, Silence, Skully1, Snake, Spreader, SpShake2, Sword, VarSwrd, Vulcan1, Vulcan2
D
AntiSwrd, AntiWatr, AqWhirl3, Blinder, CrsShld3, DarkDril, DethPhnx, Django, DjangoDS, DjangoSP, DrilArm2, ElemRage, GrabBnsh, Guard1, GunDelS3, HiCannon, Katana1, LavaSeed, LifeAur, MrkCan2, MudWave, MudWave, NrthWind, RedWave, ResetBom, SeaSeed, SideBub1, Spreader, SpShake2, Sword, TimeBom2, Tornado, Vulcan1, WavePit, YoYo
E
AirSpin1, AntiFire, Astroid2, CustSwrd, CusVolt2, DrkSonic, ElcReel3, ElemRage, EnergBom, FireHit3, HiCannon, LongBlde, Magnum, MoonBld1, MrkCan3, Pulsar2, RedFrut1, SideBub3, Spreader, TankCan1, Vulcan1, WavePit, WideSht2, YoYo
Battle network 5 - part 3
Chip's code
Chips compatible with the code
F
AntiDmg, AqWhirl1, Bass, BassAnly, BoyBomb1, CircGun, CrsShld1, DarkMetr, Fanfare, FireHit3, GrabRvng,
GridMan, GridMnDS, GridMnSP, HiCannon, HotBody1, M-Cannon, MetaGel, MrkCan2, Pulsar1, Quake3, RedFrut2, RedWave, TankCan3, TimeBom3, WideSht2, WindRack, WoodNos1, YoYo
G
AirSpin3, AntiWatr, BigHook, CusVolt2, CusVolt3, FireHit3, Geyser, GunDelS2, GyroMan, GyroMnDS, GyroMnSP, M-Cannon, MiniBomb, MoonBld2, Pulsar2, RainyDay, Skully3, SpShake1, WideSht2
H
AirSpin2, AqWhirl2, Blinder, BoyBomb2, BugFix, CactBal1, DrkRecov, FireHit2, FstGauge, Geddon2, HolyDrem, Katana1, LavaSeed, M-Cannon, Mine, ParaBom, Quake3, Recov30, Recov50, RedFrut3, RedWave, SideBub2, Skully2, SloGauge, SpShake1, TimeBom1, TimeBom2, TimeBom3, Voltz3
I
AqWhirl3, CactBal1, DarkInvs, DrilArm3, FireHit2, Recov200, ResetBom, Slasher, SpShake1, WoodNos3
J
AirSpin3, AntiRecv, CactBal1, Discord, DrilArm1, FireHit2, HotBody3, Jealousy, JustcOne, Katana3, SeaSeed, Silence, Voltz2, WindRack, WoodNos2
K
AntiFire, ElemRage, Guard1, IceSeed, KnightMan, KnigtMnDS, KnigtMnSP, LavaSeed, MegEnBom, MrkCan1, Quake1, Recov120, Recov80, RedFrut1, Skully1, Voltz1, WideSwrd
L
AreaGrab, Barrier, BlkBomb, Boomer, CactBal3, CustSwrd, DrilArm2, ElcReel3, ElemRage, GrabBnsh, Guard2, Lance, LavaSeed, LongBlde, MiniBomb, MoonBld3, MudWave, Quake2, RainyDay, Recov10, Recov30, RedWave, SideBub2, Sword, Sword, Thunder, Timpani, Tornado, Vulcan3, WavePit, WideBlde, WideSht1
M
AntiDmg, AntiNavi, AntiWood, Astroid2, CactBal3, CrsShld2, CusVolt3, DarkThnd, Geddon1,
Geyser, GrasSeed, Guard3, GunDelS3, HotBody3, LongSwrd, MagnetMan, MagnetMnDS, MagnetMnSP, Meddy, MeddyDS, MeddySP, MetrKnuk, MrkCan1, Muramasa, Pulsar2, SeaSeed, Snake, TankCan3, Vulcan3, WideSht1
N
AntiElec, AqWhirl1, CactBal3, ElemRage, GrabRvng, HolyPanl, LavaSeed, MetaGel, MoonBld1, MudWave, MudWave, NapalmMan, NapalmMnDS, NapalmMnSP, NumbrBl, NumbrMan, NumbrMnDS, NumbrMnSP, ParaBom, Quake3, RedWave, SideBub3, Silence, Skully3, Static, Sword, TimeBom1, Vulcan3, WavePit, WideSht1
O
AirSpin1, AntiSwrd, AqWhirl2, CrsShld3, ElemRage, FireHit1, Geddon3, Guardian, GunDelS3, LavaSeed, Magnum, MoonBld2, MudWave, Recov50, Recov80, RedFrut3, RedWave, ResetBom, Sword, VDoll, Voltz1, WavePit
P
AntiRecv, Astroid3, Barr100, BoyBomb2, CusVolt3, DrilArm3, EnergBom, Fanfare, FireHit1, Geddon1, GrabRvng, HotBody1, LavaSeed, LongBlde, Mine, ParaBom, Phoenix, Poltrgst, Pulsar1, Quake1, SideBub3,
TankCan1, Thunder
Q
AirHoc, AntiWatr, Astroid1, BoyBomb3, CactBal2, Discord, ElcReel2, FireHit1, FstGauge, Guard2, IceSeed, NrthWind, Recov150, SideBub1, SloGauge
R
AirHoc, AntiSwrd, AqWhirl3, BlkBomb, BugBomb, CactBal2, CrakBom, CrsShld2, CustSwrd, DarkCirc, ElcReel3, GrabBnsh, HotBody2, Katana2, Lance, LifeSync, Meteors, MrkCan3, OmegaRkt, Pulsar3, Roll, RollDS, RollSP, Slasher, TankCan3, Tornado, WoodNos1
S
AirHoc, AntiWood, AreaGrab, Barrier, BoyBomb1, CactBal2, DrilArm2, ElemRage, Geyser, Guard3, GunDelS1, HotBody3, Katana1, LarkMan, LarkMnDS, LarkMnSP, LavaSeed, LifeSync, LongSwrd, MrkCan1, MudWave, Pulsar3, RedWave, SearchMan, SearchMnDS, SearchMnSP, ShadeMan, ShadeMnDS, ShadeMnSP, ShadoMan, ShadoMnDS, ShadoMnSP, SideBub1, Skully1, Snctuary, SpShake3, Static, SuprVulc, Sword, Sword, TimeBom3, WavePit, WideSht3, WideSwrd, WoodNos3
T
AntiFire, AntiNavi, Astroid1, BugBomb,
CannBall, DarkTorn, DarkWide, Geddon2, MetaGel, Mine, MoonBld3, Pulsar1, RedFrut2, SpShake3, TankCan2, TimeBom1, TmhwkMan, TmhwkMnDS, TmhwkMnSP, ToadMan, ToadMnDS, ToadMnSP, VDoll, WideSht3, WoodNos2
U
Astroid2, GunDelS1, GunDelS2, HolyPanl, RedFrut3, Skully3, SpShake3, Voltz2, WideSht3
V
AntiNavi, Boomer, CrakBom, CrsShld1, CusVolt1, ElcReel1, Geddon3, Magnum, MoonBld2, NeoVari, NrthWind, Skully2, Static, Timpani, VarSwrd, Voltz3, WideBlde, WoodNos3
W
AirSpin2, Barr200, BlakWing, BoyBomb2, DrilArm1, DrkLance, ElemRage, EnergBom, FstGauge, Geddon2, GrasSeed, HotBody2, Katana2, MudWave, RedFrut2, SideBub2, SloGauge, WoodNos1
*
AirShot, AntiDmg, AntiElec, AntiFire, AntiWatr, AntiWood, AreaGrab, Attck+10, Attck+30, Barrier, Blinder, Boomer, BugBomb, BugFix, BusterUp, CannBall, ColorPt, CopyDmg, CrakBom, CrakOut, CusVolt1, DarkInvs, DarkPlus, DblPoint, Discord, DublCrak, ElemRage, Fan, Fanfare, FstGauge, FullCust, Geddon1, GrasSeed, Guard1, Guard2, Guard3, GunDelS1, HolyPanl, IceSeed, Invisibl, Lance, LavaSeed, LifeSync, MiniBomb, MudWave, Navi+20, NrthWind, NumbrBl, PanlGrab, PnlRetrn, Recov10, Recov30, Recov50, Recov80, RedWave, RockCube, SeaSeed, Silence, SloGauge, Spreader, Sword, Thunder, Timpani, TripCrak, Vulcan1, WavePit, Wind, WindRack
Y
AntiElec, Astroid3, BblWrap, BoyBomb3, CusVolt1, ElcReel2, ElemRage, GunDelS2, LavaSeed, MrkCan3, MudWave, Quake2, Recov300, RedWave, Sword, TankCan2, Voltz1, WavePit
Z
AntiWood, BlkBomb, CannBall, CrsShld3, DeltaRay, DrilArm3, DrkSword, ElcReel1, Fanfare, Geddon1, Katana3, MegEnBom, MoonBld1, MrkCan2, RedFrut1, Snake, TimeBom2, VDoll, Voltz2, WavePit, WideSwrd, WoodNos2, Z Saver


Depending on your ethics, a great folder should abuse the chaos unison mechanics, especially if you run Team protoman where you'd have access to Magnet chaos and its notorious dark thunderball and Search chaos's Dark circle.
Battle network 6 - part 1
Oh boy we made it at last to the last game. The Cybeast games are the most well documented in terms of PVP/PVE builds.

With the dark chips being nasty in their plays, capcom removed them and incorporated a new system to reshape the double souls into something better, starting from the final game: You may no longer require a chip sacrifice in order to transform and you may stay transformed as long as you are not damaged by an elemental weakness attack.

This is a huge buff and it makes folder building even better and more focused on the balance that you'd have to focus on. Another big change is a buff to navi cust: You may now place parts outside the grid by one panel. This is a big one especially for those who run bug stop as it allows for more part combinations to be made.
The third and biggest change of them all is the Cybeast transformation. I will start this topic by setting up the differences between the 2 versions of the game, because unlike the past games: The forms that you acquire in the 2 versions do help shape a vision towards what you should expect, unlike in BN4 and 5 where you had forms with abilities spread across the spectrum; in Cybeast Falzar, you receive forms that are more focused on utility whilst Gregar specializes in damage. With these mentioned changes, it becomes even harder to decide on which version is superior, so much so that I might say that finally PVP came to a balance.

New to the series is the Chips tagging mechanic; you may select 2 chips whose combined data size does not exceed 60 mb, once selected, these chips will always appear together on the cust screen. This is great if you seek to easily draw some specific chips when you are trying to execute a combo. But: Be careful as this is a bad idea if you run a shuffle navi cust setup, as they will always appear together, hindering 2 out of the 5 slots that you attempt to shuffle.


let's focus now on the forms that each version provides.

Crosses / Version
Cybeast Falzar
Abilities
Cybeast Gregar
Abilities
Cross 1
  • Charging an non-screen dimming fire chip will double its damage
  • installs Attack+1, which can also stack with your Navi cust attack buffs as long as you do not have a buster bug
  • Charge shot: Fire Arm
  • Cybeast charge: Flame breath
  • Charging an non-screen dimming Aqua chip will double its damage
  • Using any non-screen dimming Aqua will heal Mega man for 5% of his max HP
  • Ice panels do not hinder your mobility
  • Charge shot: Bubble shot
  • Cybeast charge: Typhoon
Cross 2
  • Non-screen dimming elementless chips may be charged to receive a paralysis effect buff
  • Non-screen dimming elec chips receive a +50 ATK buff
  • Charge shot: thunderbolt
  • Cybeast charge: Thunder breath
  • Charging a non-screen dimming wood chip double its damage
  • Gains immunity to status effects
  • Charge shot: Tomahawk swing
  • Cybeast charge: Tomahawk boomerang
Cross 3
  • +50 ATK to all non-screen dimming sword attacks
  • Charging a non-screen dimming sword chip will launch a sonic boom that has the hitbox of the chip
  • Charge shot: Wide slash
  • Cybeast charge: Cross slash
  • Non-dimming Wind chips gain 10 attack
  • Pressing ← + B will pull opponents to you, removing their barriers and auras too.
  • Air shoes installed
  • Charge shot: Tengu racket
  • Cybeast charge: Tengu charge
Cross 4
  • All Cursor chips gain 30 attack.
  • Hitting a unit with an elementless chip while their HP has 4 in any of their digits will instantly delete them, bosses however get an HP poison bug.
  • Charge shot: Erase Delete Beam
  • Cybeast charge: Killer tail
  • Non-dimming Breaking chips gain 10 attack.
  • Charging a breaking chip will cause stones to fall down on the enemy arena upon usage
  • Super armor installed
  • Charge shot: Ground Drill.
  • Cybeast charge: Ground rush
Cross 5
  • Non-dimming fire chips can be slowly charged for up to +100 ATK
  • While the transformation is active, your cust screen's size increase by +1 with each passing turn. If your navi has a custom screen bug, the effect gets delayed by 3 turns.
  • Charge shot: Charge Tackle
  • Cybeast charge: Charge bite
  • Pressing ← + B while there are obstacles on the field will allow Mega man to suck them and shoot them for 200 damage.
  • Trash Chute: In the cust screen, selecting chips and throwing them will send them to the back of the folder and generate newer chips.
  • Charge shot: Scrap Reborn
  • Cybeast charge: Dust shooting
Battle network 6 - part 2
In the general knowledge section I listed a couple of tools that I highly recommend, namely the navi cust simulator. Its name speaks for it, as it is compatible with the last 3 games.

Before I start this section, I need to bring up again the new mechanic that was brought to the 6th game; the mechanic in question is the ability to position the programs outside the grid by 1 panel, doing it like so will cause bugs. Make sure to abuse it as much as you can once you obtain bug stop, however, if you plan to intentionally cause an emotions window bug while you still haven't received bug stop, it would be best to consider using this method to cause the bug.
By placing programs outside the grid, you may squeeze everything inside and be able to successfully install everything that suits your needs.


At any rate, programs that came from the old games had many changes in their shapes, colours and compressed forms.

Part
Part's name
Part
Part's name
Anti-damage
Autoheal
Buster pack
Collector
Jungle, Battery, Fish and Oil
First barrier
Mega folder 2
Body Pack
Millions
Folder pack 2


Just like the past builds, let me pin point and explain my opinions on these NCPs that I have listed:

  • Rapid/Speed boosting programs are not to be recommended
  • Bodypack bundles 4 NCP programs, 2 of which are not needed if you run Falzar. If you run Gregar, I think Floatshoes and Super armor are all what you need.
  • First barrier takes so much space even after compression and rewards you with a one time protective layer. Great only if you attempt to hunt the bosses.
  • Mega folder 2 may be super but the nature of the games' library makes it so you would need 5 to 6 at most Mega chips, Mega folder +1 is enough and this one does not leave enough room for better programs
  • The past argument works as well against Folderpack, it bundles custom +2 and Megafolder +2. if it would've bundled Cust+1 and Cust+2 I would recommend it.
  • Anti-damage is a bad for what it rewards you with: It makes you vulnerable to enemies after the shurricane in PVP, provided they don't dodge it. In contrast however to reflect, this one allows you to have less combinations, while reflect, not only has great recovery frames, but also sends instant damage that is hard to dodge and does not leave you vulnerable.

Funnily enough, I have seen people running NumbrOpn and shuffle, the former takes up so much space and leaves your grid open only for small programs after applying bugstopper. I see people in tournaments preferring to stack cust +1 and +2 together instead.
Battle network 6 - part 3
Here come the chips!

Code
Chips compatible with the code
A
AirWheel2, AntiRecover, AntiSwrd, AquaMan, AquaManEX, AquaManSP, AquaNeedle3, AquaSword, BambooLance, Barrier, CrackShoot, Discord, DisMatch, DoorThunder1, ElecDragon, ElecPulse2, ElecPulse3, Engetsukunai, FirePunch3, Grass seed, HolyPanel, IceSeed, MachineGun1, Recovery10, ReflectMet1, RiskyHoney3, SandWorm1, SenshaHou1, SloGuage, SpreadGun2, StealthMine, TrainArrow1, Vulcan3
B
AreaGrab, AuraHead1, BlackBomb, BlastMan, BlastManEX, BlastManSP, BubbleStar1, ColonelArmy, DoorThunder3, FirePunch3, GrabBnsh, GunDelSol2, HiBoomerang, HolyPanel, LongBlade, MachineGun3, MiniBomb, Protoman, ProtomanEX, ProtomanSP, ReflectMet2, RiskyHoney1, SandWorm2, SenshaHou3, Silence, SloGuage, SpreadGun2, StepSword, Vulcan1, WideBlade
C
AquaNeedle1, AuraHead1, BubbleStar2, ChargeMan, ChargeManEX, ChargeManSP, CircusMan, CircusManEX, CircusManSP, Colonel, ColonelEX, ColonelSP, CornShot2, DoorThunder2, DoubleShoot, EnergyBomb, FirePunch3, GunDelSol1, "HellsBurner3", IronShell2, Recovery50, ReflectMet1, RiskyHoney2, SpreadGun2, TimeBomb2
D
AuraHead1, AuraHead2, BurnSquare2, CornShot2, CrossDivide, DiveMan, DiveManEX, DiveManSP, Django, DjangoEX, DjangoSP, DustMan, DustManEX, DustManSP, FirePunch1, "HellsBurner3", IronShell2, Recovery10, RiskyHoney3, TimeBomb2, Vulcan1, Vulcan2
E
AuraHead2, BubbleStar1, BurnSquare3, CornShot2, DoorThunder1, ElecMan, ElecManEX, ElecManSP, ElecPulse2, ElecSword, ElementMan, ElementManEX, ElementManSP, FastGuage, FirePunch1, GunDelSol2, "HellsBurner3", IronShell2, LittleBoiler2, MachineGun2, Recovery30, ReflectMet3, RollingLog2, SummonBlack1, TimeBomb2, WaveArm1
F
AirWheel1, AntiNavi, AntiRecover, AquaNeedle2, AreaGrab, AuraHead2, AuraHead3, Barrier, BassAnother, BlackBomb, FirePunch1, FlameSword, Grass seed, "HellsBurner1", LittleBoiler1, MachineGun3, Magnum, Recovery120, ReflectMet3, RollingLog3, ThunderBall, TimeBomb1, TrainArrow1, VDoll, Vulcan2, WaveArm1, Windrack
G
AirRaid1, AirWheel1, AntiDmg, AntiElement, AuraHead3, BubbleStar3, BugBomb, ColonelArmy, CrackShoot, Discord, DrillArm, FlashBomb2, GroundMan, GroundManEX, GroundManSP, GunDelSolEX, HeatDragon, "HellsBurner1", LittleBoiler3, MachineGun2, MegaEnergyBomb, NoiseStorm, ReflectMet2, RiskyHoney1, SandWorm1, SenshaHou1, SloGuage, TimeBomb1, TrainArrow2, Uninstall, Vulcan3, WaveArm1, WoodDragon
H
AuraHead3, BambooSword, Barrier100, BlizzardBall, BurnSquare1, FlashBomb3, GigantHook, GolemPunch3, HakuShaku, HakuShakuEX, HakuShakuSP, HeatMan, HeatManEX, HeatManSP, "HellsBurner1", IceDragon, LongSword, MachineSword, PoisonSeed, Recovery80, SandWorm3, Snake!, SummonBlack2, Sword, TimeBomb1, WideSword
I
AquaSword, BubbleWrap, GolemPunch1, GrabRvng, KillerSensor3, MegaBoomerang, Recovery200, RollingLog1, SummonBlack1, Timpani
J
AquaNeedle1, Boomerang, CornShot1, ElecPulse1, ElecPulse2, ElecPulse3, ElementSword, FlashBomb1, Hubbatch, IronShell1, JudgeMan, JudgeManEX, JudgeManSP, JusticeOne, KillerSensor1, Recovery150, Recovery300, SandWorm3, TripleShoot, Windrack
K
AirRaid1, AquaNeedle2, Barrier200, Boomerang, BugFix, CornShot1, ElecSword, EnergyBomb, EraseMan, EraseManEX, EraseManSP, FlashBomb2, GolemPunch1, IronShell1, KillerSensor3, LittleBoiler1, Recovery80, RollingLog1, TrainArrow1, VariableSword
L
AirHockey, AirWheel2, AntiNavi, AquaNeedle3, BubbleStar2, CornShot1, DisMatch, DoorThunder2, ElecDragon, ElecPulse1, FlashBomb1, HiBoomerang, HiCannon, IceSeed, IronShell1, IronShell3, LittleBoiler1, LongSword, MachineSword, Magnum, MiniBomb, Recovery10, Recovery30, SandWorm1, SenshaHou2, Snake!, SpreadGun1, StepSword, Sword, TimeBomb3, Tornado, TripleShoot, Uninstall, Vulcan2, WaveArm2, WideSword, YoYo
M
AirHockey, BurnSquare2, DrillArm, ElementSword, Engetsukunai, FastGuage, GolemPunch3, GrabBnsh, GunDelSol1, HiCannon, IronShell3, LittleBoiler2, LongBlade, MachineGun3, MegaBoomerang, MegaEnergyBomb, MurasamaBlade, Recovery150, Recovery50, RiskyHoney3, SenshaHou3, Snake!, SpreadGun1, TimeBomb3, TrainArrow2, TrainArrow3, WaveArm2, YoYo
N
AirHockey, AirRaid3, AirWheel3, AssassinSword, BlizzardBall, ElecSword, GunDelSol3, HiCannon, IronShell3, KillerSensor2, MeteoKnuckle, NeoVariable, NumberBall, PoisonSeed, RollingLog3, SpreadGun1, TimeBomb3, VDoll, WaveArm2, YoYo
O
AirRaid2, AirWheel3, Barrier100, BigBomb, BlackBomb, BurnSquare3, FlameSword, GolemPunch2, Guardian, KillerSensor1, MegaEnergyBomb, Otenko, Recovery300, ReflectMet3, SummonBlack2, Timpani
P
AquaNeedle1, BigBomb, BugFix, BurnSquare1, CircleGun, CornShot3, DoorThunder2, Fanfare, FlashBomb3, GolemPunch2, IceDragon, PoisonAnubis, PoisonSeed, Recovery120, Recovery50, ReflectMet1, RollingLog1, SenshaHou3, StepSword, SummonBlack1, WideShot
Q
BubbleWrap, ColonelForce, CornShot3, DoorThunder1, FlashBomb1, GrabRvng, GunDelSol3, KillerSensor3, MachineSword, Recovery200, Recovery30, RollingLog2, SpreadGun3, WideShot
R
AirRaid1, AirWheel1, AntiDmg, AntiSwrd, AssassinSword, BambooLance, Barrier, BubbleStar3, ColonelArmy, CornShot3, DisMatch, DoorThunder3, DoubleShoot, FastGuage, FirePunch2, FlashBomb2, GunDelSol2, HeatDragon, IceSeed, MachineGun1, MegaCannon, Meteors, MiniBomb, RiskyHoney2, Roll, RollEX, RollSP, SandWorm2, SenshaHou1, Silence, SpreadGun3, ThunderBall, Tornado, Uninstall, Vulcan3, WaveArm3, WideBlade, WideShot, Windrack
S
AntiElement, AreaGrab, BambooSword, BubbleStar3, BugBomb, Discord, ElecPulse1,
ElecPulse3, Fanfare, FirePunch2, FlashBomb3, GrabBnsh, Grass seed, "HellsBurner2", HolyPanel, IceDragon, LittleBoiler3, LongSword, MachineGun2, MegaCannon,
NoiseStorm, Recovery120, RiskyHoney1, SandWorm3, SenshaHou2, SlashMan, SlashManEX, SlashManSP, SpreadGun3, StealthMine, Sword, ThunderBall, TrainArrow3, VDoll, Vulcan1, WaveArm3, WideSword
T
AirRaid2, AirWheel2, AirWheel3, AntiNavi, AquaNeedle2, BlizzardBall, Boomerang, BubbleStar1, BurnSquare2, CircleGun, CrackShoot, Engetsukunai, FirePunch2, GunDelSol1, HeatDragon, "HellsBurner2", MachineGun1, MegaCannon, Recovery150, StealthMine, TenguMan, TenguManEX, TenguManSP, Timpani, TomahawkMan, TomahawkManEX, TomahawkManSP, Tornado, WaveArm3, WoodDragon
U
AirRaid3, AntiElement, AquaNeedle3, Barrier200, DoubleShoot, DreamAura, ElementSword, GolemPunch2, "HellsBurner2", KillerSensor2
V
AntiDmg, AntiRecover, BubbleStar2, BugRiseSword, BugThisThunder, BurnSquare1, CircleGun, DoorThunder3, ElecDragon, GolemPunch3, HiBoomerang, LittleBoiler2, Recovery80, SenshaHou2, SummonBlack2, SuperVulcan, TripleShoot, VariableSword, WoodDragon
W
BambooLance, BambooSword, Barrier200, Bass, Dril
Battle network 6 - part 4
Code
Chips compatible with the code
*
AirShot, AntiDmg, AntiElement, AntiNavi, AntiRecover, AntiSwrd, AquaMan, AreaGrab, Attack+10, Attack+30, Barrier, BlastMan, BugFix, BusterUp, ChargeMan, CircusMan, Colonel, ColonelArmy, ColorPoint, ComingRoad, CopyDamage, CrackShoot, Discord, DisMatch, DiveMan, Django, DoublePoint, DoubleShoot, DustMan, ElecMan, ElementMan, EnergyBomb, EraseMan, Fanfare, FastGuage, FlashBomb1, FullCustom, GoingRoad, Grass seed, GroundMan, GunDelSol1, HakuShaku, HeatMan, "HellsBurner1", HiCannon, HolyPanel, IceSeed, Invisible, JudgeMan, LifeSynchro, LongSword, MachineGun1, MagneCoil, MegaCannon, MegaEnergyBomb, MiniBomb, Navi+20, PanelGrab, PoisonSeed, Protoman, Recovery10, Recovery30, Recovery50, Recovery80, ReflectMet1, ReflectMet2, ReflectMet3, Repair, RockCube, Roll, Silence, SlashMan, SloGuage, SpreadGun1, SpreadGun2, SpreadGun3, Sword, TenguMan, ThunderBall, Timpani, TomahawkMan, TripleShoot, VaccuumFan, VDoll, Vulcan1, WhiteCapsule, WideSword, Windbox, Windrack, YoYo
Y
AirRaid2, AquaSword, AssassinSword, Barrier100, BigBomb, BugBomb, EnergyBomb, GolemPunch1, KillerSensor2, NoiseStorm, Recovery300, ReflectMet2, RiskyHoney2, SandWorm2, SummonBlack3, TrainArrow3
Z
AirRaid3, AntiSwrd, BubbleWrap, BugFix, BurnSquare3, DeltaRayEdge, Fanfare, FlameSword, GrabRvng, LittleBoiler3, Recovery200, RollingLog2, Sanctuary, SummonBlack3, TrainArrow2


As of yet I am still trying to study the meta of this game, but people say the J folder is so great due to its access to Judgeman, a great chip with a good range and paralysis effect.

What I would do instead, for now, is to link you guys to these guys, they play lots of PVP and I trust them myself on delivering some good quality information in regards to building:


Conclusion
Thanks for reading, this is not the end though. This guide is always subject to changes, I am still trying to perfectly deliver better content in my first guide

I will continue from now on (26/04/2023) to work on my other guide, until then, this stays on hiatus until I finish the other.
3 Comments
Kimi Hiro 3 Aug @ 6:13am 
Speed parts is usually reserved for PvP than PvE where players would do Buster Blank Bugs. So its just spamming buster until it do charge shot damage. In PvP, charge shot can be countered with a chip and interrupted if have no super armor or you get uninstalled. Buster has no animation to give it away while charge shot are telegraphed.

In a patch card format, there are buster addition and charge shot addition where megaman's base buster and charge shot can do. Bug Fix will remove the jamming but keeps the buff. Its good in situation where your charge shot just cannot do consistent damage because it has short range and you ran out of chips during turns with slow gauge. Damage judge is a thing after all where even if both player survive, the side that deals more damage wins.
Applethal  [author] 28 Apr, 2023 @ 8:09am 
It's still being refined, I need to edit and add more infos as we speak, I am just taking a break now. Thanks for reading, I will continue on it after I finish the first guide.
VirtuaMonke 28 Apr, 2023 @ 6:00am 
This guide is aces. Thanks!!:steamthumbsup: