Curse of the Sea Rats

Curse of the Sea Rats

Not enough ratings
Curse of the Sea Rats - All Endings, 100% Secret Map, Bestiary, Gameplay Hints
By Kelrycor
You want to defeat Flora Burn and get to the true ending? This guide will help you find all four different endings, 100% secrets and all enemies for the bestiary. It will also tell you some good hints about the gameplay, the characters and specials that might help you through the game.
4
   
Award
Favorite
Favorited
Unfavorite
Preamble
This guide helps you to watch all the 4 possible endings and get the according achievements (for missables see the corresponding section). Two of which are bad endings, one a more neutral ending, and the last one being the perfect true ending.

I will also provide valuable information on some game mechanics and special items that can be found for those interested. In the map section you can also find different 100% maps that might help you as well.

Needless to say, this guide contains serious spoilers. You have been warned.
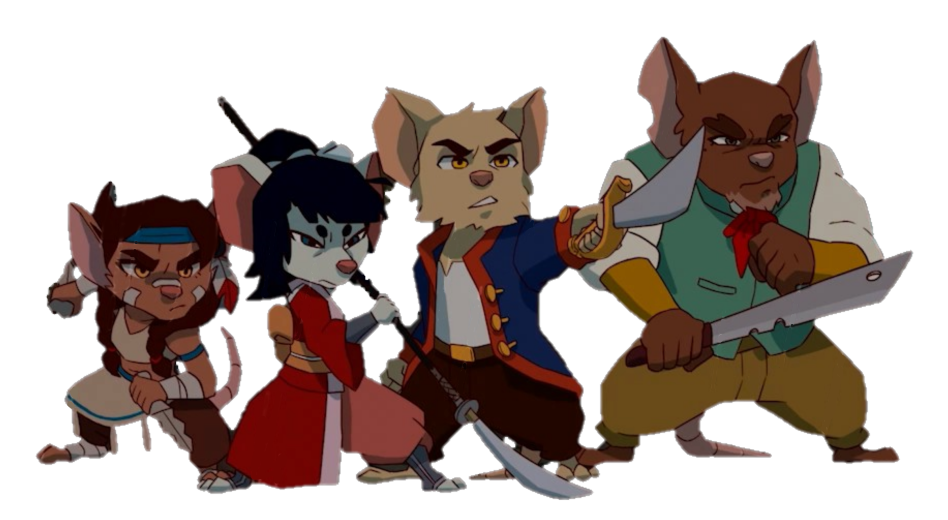
Group picture of all playable characters

This guide is currently updated for version 1.5.7. It will receive future updates if it is necessary.
Please let me know if I missed something important that changed because the patchnotes do not mentioned all of the (little yet important) changes.

Official patchnotes: 1.0.20, 1.1.2, 1.3.7, 1.5.7.
1 - Endings
The endings are connected to two main conditions:

1. freeing the Mysterious Pirate from the clutches of Short Fuse Jones
2. collect all golden tooths from Flora's crew and obtain Sammy (the speaking skullhead)


Anything else is not important, like freeing the imprisoned pirates or missing out the optional bosses, like the Necromancer or the Lighthouse Keeper. This is because only the crew member bosses of Flora drop the golden tooths which are needed to get Sammy. As Flora Burn does drop one tooth herself you can get Sammy only after triggering the endgame.

Speaking of the endgame. A temporary endgame run will trigger as soon as you freed the Mysterious Pirate and successfully beat Flora Burn in her first encounter at the peak of Samhain Summit. The map won't be easily accessibly anymore because a lot of barriers are placed around the map, and the teleport portals cannot be used again for quite some time. So if you have unfinished business left to do, don't fight her yet.

Hints: With version 1.3.7 and above, you will be able to erase barriers with the serpent magic and Dolores can unlock the portals again in her secret chamber when you reached the ship and spoke to her. You can only access her by unlocking the true ending conditions and beat Flora on her second encounter though.

To erase barriers, just press up when you stand before them after gaining the power to do so. You will keep your savefile at the last savepoint if you finished the game, so you are able to roam back and collect missed achievements or collectibles afterwards. That way you can 100% the game anytime and unlock the true ending as well afterwards.

1.1 - Missable achievements and perfect backup file
Missable achievements
The Mysterious Pirate - don't untie him if you want to see the bad ending for Timothy
This game does only know 4 permanently missable achievements, all but one of them are connected to the 4 different endings. Due to their story related progress in which you unlock them, doing the wrong order might end up in missing out up to 3 endings along with their corresponding achievements if you are a perfectionist in your very first playthrough.

Quit and reload if you noticed you have done something you might not wanted to and aim for getting all achievements in a single run:


Running like a cowardRunning like a coward - This one can be done right off the start of the game until endgame in Samhain Summit starts. I suggest to right do it asap. See chapter 1.3 for details.

Crystallized foreverCrystallized forever - This one you will miss as soon as you freed the Mysterious Pirate at Banba's Forest, so don't do this (reload if necessary). See chapter 1.4 for details.

Sailing the skiesSailing the skies - Most common ending players will unlock. Just don't collect Sammy at the cemetary from Dolores before fighting Flora again. See chapter 1.5 and 1.6

No one can beat meNo one can beat me (beat all bosses). There is one true final boss and one special KS campaign boss. The latter, Mamma Ratelli and her Barrelosaurus, will only spawn if you beat Fatso and Fatsie at Fódla's Bog before fighting Flora at Samhain Summit. This is due to the fact that she will occupy the former boss arena. So make sure you did so. See chapter 4.7 for details.

All other achievements, including the most elusive 'The Fighter' achievement, are not permanently missable and can be done after completing the game by just reloading the last savefile and backtravel.

Perfect Savefile

If you want a perfect savefile with which you can go for all 4 endings whenever you want to, don't untie the Mysterious Pirate after fighting Short Fuse Jones (or don't fight that boss at all yet) but collect any other golden tooths. Then save before the first Flora Burn encounter at Samhain Summit peak.

Make a backup of your savegame. For Steam Windows PC your savefile is located in the folder (just copy paste into file explorer)

%APPDATA%\..\LocalLow\Petoons Studio\Curse Of The Sea Rats\SaveData\

There you will find a subfolder with your Steam-ID. The files themselves are named SaveData0.game to SaveData2.game depending which saveslot you used (0 being the first slot).

With this save you can replace or duplicate your progression to another slot anytime. It is best to do this directly in the main menu, without the load game overview opened.

Though it is not mandatory to make such a backup for a 100% achievement singe run as long as you keep to these rules in order to unlock all endings:

1. do the coward ending the soon as possible
2. don't fight Short Fuse Jones (or untie Mysterious Pirate after the fight), fight Flora first
3. then untie Mysterious Pirate and avoid Dolores at the cemetry (shouldn't be hard)
4. after Beating Flora the 2nd time, backtravel and collect Sammy from Dolores

Just quit game and reload your last checkpoint if accidentally untied Mysterious Pirate or collected Sammy too early.
1.2 - Endgame maps
Endings preparation map (pre-endgame)

This map shows all crew member bosses needed for the golden tooths, the boss which keeps the Mysterious Pirate captive and should be avoid as long as you want to go for the bad endings, and where the endgame begins to trigger.

Map with all tooths you need to unlock the special ending
Endgame maze map

This map shows the blocked areas during endgames (red markers) and possible routes to the ship. And also where to find the special boss Mamma Ratelli with her Barrelosaurus, or Dolores for unlocking the portals again after triggering the endgame (only accessible under true ending conditions).

Map with posible routes during endgame run
Hints: the route top bottom is the fastest, but only accessible of you opened the secret pre-endgame. You will also miss the Barrelosaurus if you choose the fastest route. In general, using the waterfall slide passage is always the best option to go for to reach the ship faster.
1.3 - First Ending (Coward) - Don't accept the deal
Flora Burn victoryThe first ending you can basically already trigger right after the game started. Just don't accept the deal with Admiral Blacksmith to free Timothy to get your freedom back in return.

To do so, just return to the ship and speak to the guard multiple times. He will get annoyed at some point and says he only will let you through with the permission of the Admiral. Go speak to the Admiral to get it. He warns you about the consequences. Just don't care and board the ship anyway to go into jail and leave Timothy in the evil witches hand and an uncertain future.

Running like a cowardYou should unlock the achievement 'Running away like a coward' with it and the game ends without rescuing Timothy, loosing your chance for amnesty and awaiting your harsh trial in Britain.

Bug: On Switch version receiving the Blacksmith's Permit from the admiral may render you impossible to access inventory for the rest of the game. So I suggest not to collect it until you really want to go back onboard. Reload old save if necessary.
1.4 - Second Ending (Bad) - Loose Timothy
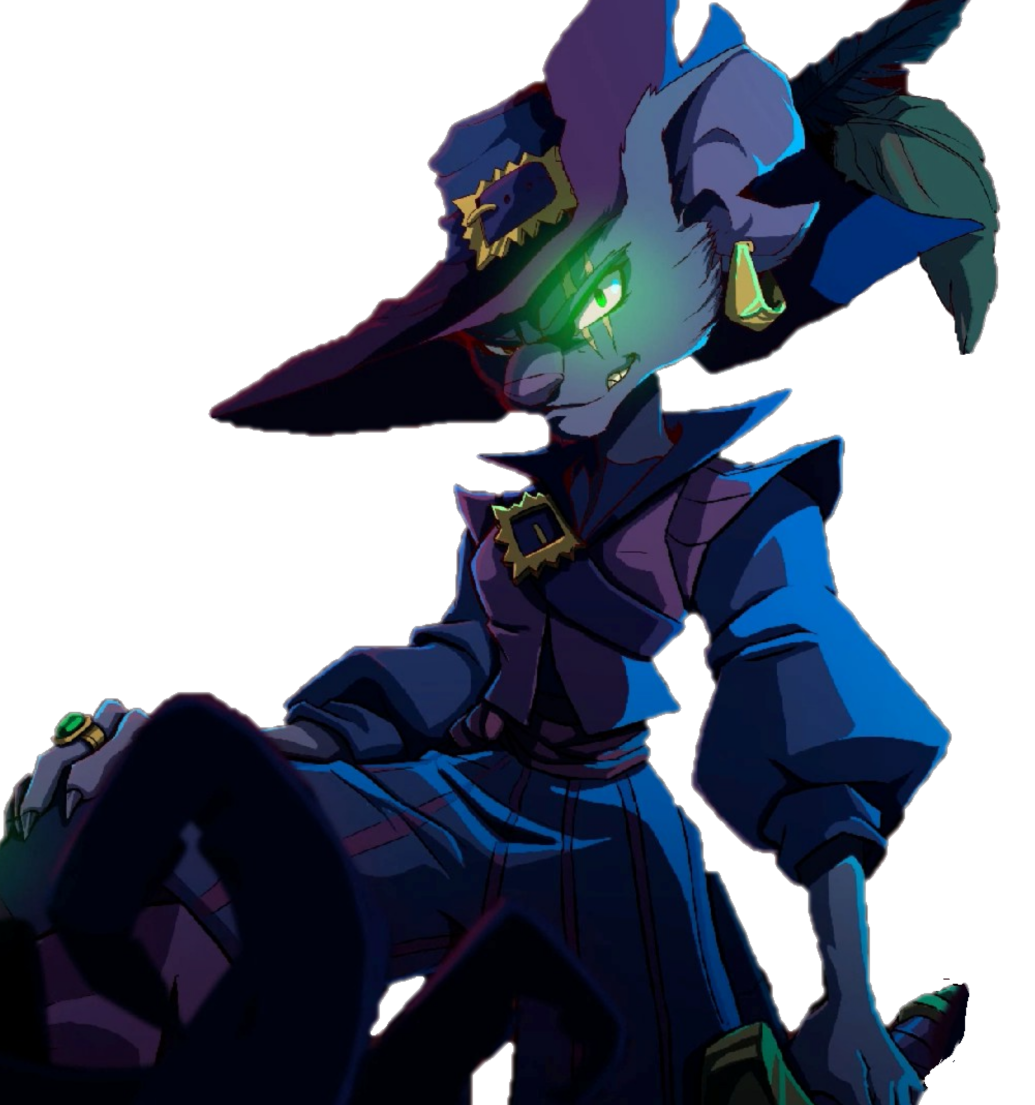
Lost TimothyYou battle Flora Burn in the first encounter, but without the help of the Mysterious Pirate.

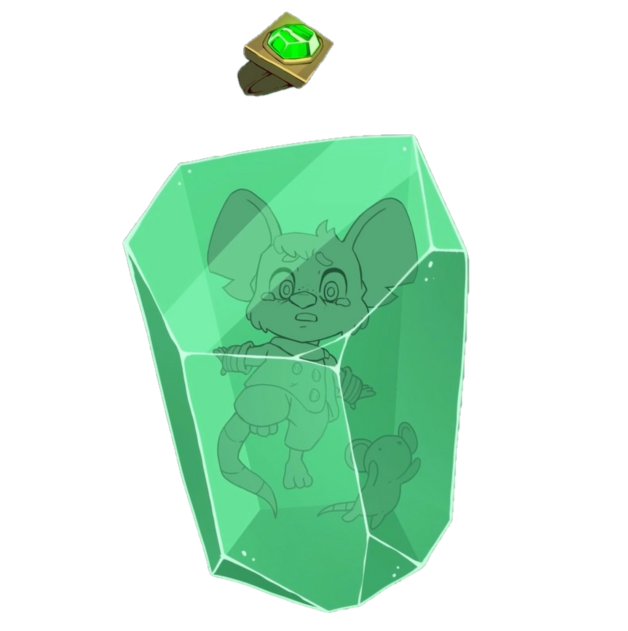
In this case Flora will act like she was defeated, but waits for the right moment to steal the amulet from you. Without it and any further help, you neither be able to free Timothy out of the crystal, nor you will receive the serpent ring, your only chance left to fight Flora again. You have lost to Flora's plan and her trap perfectly worked out. The game directly ends here giving you no chance to enter the endgame at all.

Crystallized foreverThis will unlock the 'Crystallized forever' achievement.


1.5 - Third Ending (Mediocre) - Loose to Flora Burn
You have to free the Mysterious Pirate by beating Short Fuse Jones and untied him. Then battle Flora Burn at the Samhain Summit. She will neithertheless steal your amulet, but the Mysterious Pirate will help you free Timothy out of the crystal and obtain the old serpent ring of Flora.

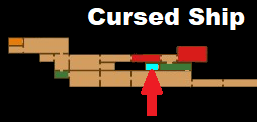
Flora total victoryThis will trigger the endgame in which you follow Flora back to the ship through a maze because a lot of ways are blocked by barriers Flora left for you to slow your down. Teleport potals are now inaccessible as well because the serpent ring does not have such powers and the heroes don't accept selling their soul for dark magic. Find your way around and walk. There are multiple paths, the fasted one going over the Home of the Morrigan area and using the Spider Cave - waterfall slide to LaChusa's Pit. But if you do so, you will miss the special boss fight Mamma Ratelli (a Kickstarter stretchgoal boss). If you play the game first, go over the Chu Chulainn Road, you automatically stumble over this boss then. Take a look on the endgame map in the map section to find a suitable route for you. Some are only accessible if you opened secret passages before or you obtained the necessary key for the door.

When you reached the ship, just fight your way through to Flora Burn. You will be able to beat her, but she will once again trick you. She will obtain the amulet and the ring this time, making her almighty at last. She will set off laughing with the now cursed flying ship. You will remain being rodents.

Sailing the skiesThis will unlock the 'Sailing the skies' achievement.

1.6 - Fourth Ending (True) - Beat Flora Burn and Long Fuse Jones
This time you will not only free the Mysterious Pirate after the boss fight with Short Fuse Jones, but also collect all 7 tooths before challenge Flora Burn personally. The Mysterious Pirate will return the favor and free Timothy out of the crystal and also helps you to get the much needed serpent ring. Now make your way to the cemetary to Dolores (above the temple entrance nearby) to recruit Sammy. This will then automatically lead you to the true ending.

Sammy, Flora's nemesisWith the last golden tooth from Flora Burn Dolores can revive her former lover Sammy to an undead flying skull being (a fun camo of Murray the talking skull from Monkey Island). You will also unlock the 'Golden Smile' achievement with it. Sammy will act as a companion that will randomly bite the enemies and has a big grudge on Flora for personal matters.

Hint: it may happen that Sammy disappears during your endgame run. You can just save and reload to get him back, or you just don't care about. The game will neithertheless take into account that he is with you and join you for the final fight against Flora at the end.

Fight your way to the ship to confront Flora again. This time, after you beat Flora, Sammy will prevent Flora from getting the amulet and the ring. Instead Short Fuse Jones will pick them up and will mutate to Long Fuse Jones in the process. But before you fight him in an extra 3 phased final boss battle, make sure to drop down and visit Dolores again if you want to unlock the portals again with her voodoo magic.

No more furNo one can beat meAfter beating Long Fuse Jones, Wu Yun, the ghost sensei, will recover your human forms and scatter the ring and amulet into different directions to prevent them from ever be claimed again. You will unlock the 'No more fur' achievement with it. Also the 'No one can beat me' (beat all bosses) if you faced Mamma Ratelli in the endgame run.

Note: With version 1.3.7 the post credits scene with a short teaser was removed (intended or by accident we don't know). However, with 1.5.7 it is displayed again and may be a hint we may get a sequel one day hopefully.
2 - Characters
First off, you can change characters anytime on any savespot. Later on you will get the transmutation ring if you beat Morrìgan (an optional boss) which grants you the power to switch characters on the fly. So don't bother, you are not nailed down to one character for the rest of the game. It is meant to use all characters to their full potential. Feel free to test them out by yourself and level them up depending on how urgently you need their special abilities for certain bosses or situations.

The following judgement is my personal one based on my experiences, the ingame abilities and stats of the characters. Note that they do not differ if you chose the (much easier) Jolly Roger or (harder) classic mode.

But still pick the character who pleases your overall gamestyle most or tactical switch to another if you plan to fight certain bosses or to cross a dangerous area (eg. using David's or Akane's dash in the Cliff of the Winds, or Buffalos ranged attack in the Moonlight Lough).

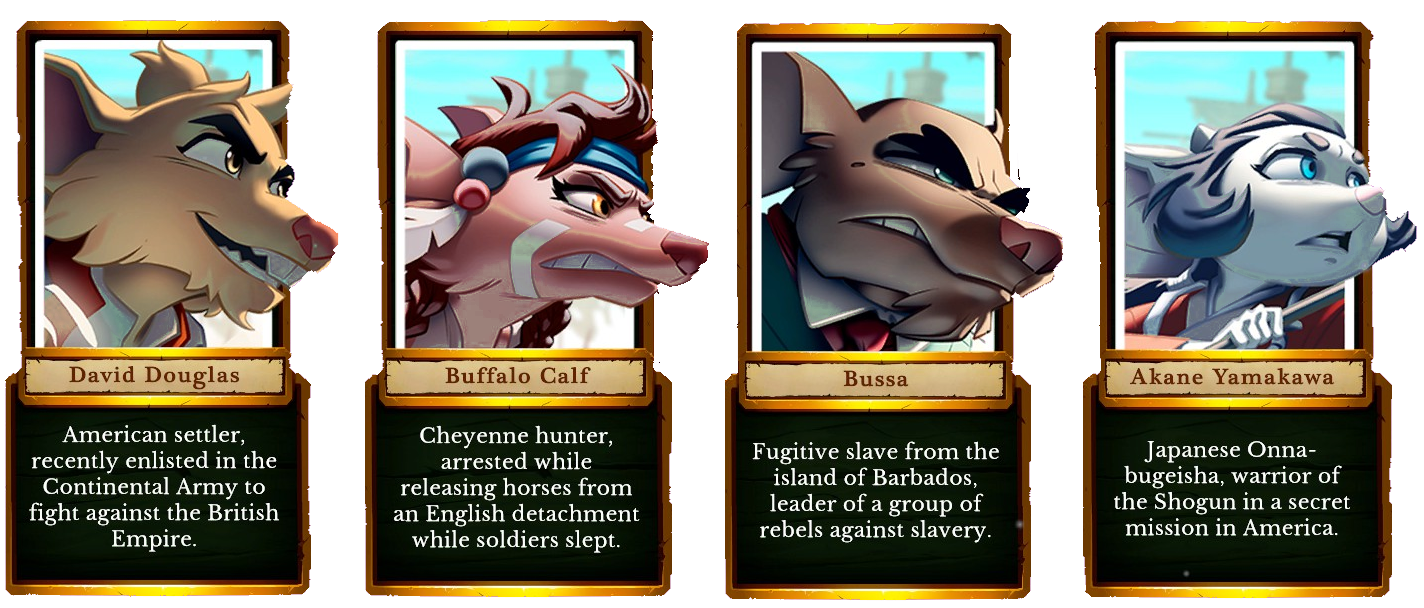
All playable characters


David
Buffalo
Bussa
Akane
Role:
balanced
ranged attack
tank
mage
Health:
⭐⭐   ·
   ·   ·   ·
⭐⭐⭐
⭐   ·   ·
DPS:
⭐   ·   ·
⭐⭐  ·
   ·   ·   ·
⭐⭐⭐
Defense:
⭐⭐   ·
   ·   ·   ·
⭐⭐⭐
⭐   ·   ·
Critical Hits:
⭐⭐⭐
⭐   ·   ·
⭐⭐   ·
⭐⭐  ·
Hitbox:
⭐⭐  ·
⭐⭐  ·
⭐⭐   ·
⭐⭐⭐
Ranged Attacks:
⭐   ·   ·
⭐⭐⭐
   ·   ·   ·
⭐⭐  ·
Dash:
⭐ ·   ·
⭐⭐⭐
⭐⭐   ·
⭐ ·   ·
Block:
⭐   ·   ·
⭐⭐   ·
⭐⭐⭐
⭐   ·   ·
Specials:
HP leech
burn magic
float dash
stealth
knife throw
invu frame
self-healing
blocking
attack dash
orb auto-refill
triple bounce
float dash
Based on score:
⭐   ·   ·
⭐⭐   ·
⭐⭐⭐
⭐⭐   ·
Ghost Ship:
⭐   ·   ·
⭐⭐⭐
⭐⭐   ·
⭐   ·   ·
Personal Rating:
⭐   ·   ·
⭐⭐⭐
   ·   ·   ·
⭐⭐   ·

    Hint:
  • DPS is judged on damage and attack speed
  • Defense and critical hits is a combined judgment of more than one stat

See the next sections to learn their specific strenghts and max stats. Some of them have to be unlocked by beating certain bosses or bought with spirit points later on to get the full potential of the character.
2.1 - David Douglas
General
  • Role:            All-Rounder, Good Beginners Character, Highest DPS Mage
  • Element:     Fire
  • Dash:          Floating Forward DashDavid Douglas
  • Hitbox:        Normal
  • Attack rate:  Medium
  • Defense:     Parry

Stats
Lvl 1
Lvl 50
Health*
113
704
Attack*
13
86
Defense
14
91
Magic Power
19
117
Magic Defense
11
71
Energy per Hit
20
20
Crit-Chance
3%
15%
Crit-Damage
150%
180%

* the milk bottle will gain you +50 HP and the blacksmith (not the admiral) +10 to attack permanently

Pros and Cons

Pros:

David has an straight floating dash making him a good beginners character. He has a vampiric life leech abilityon his base attack which will safe a lot of consumables. His fire magic is one of the top damage magic dealing attacks in the game due to the burning effect which can be unlocked later on. Also, David has also the funniest dialogues in the game.

Cons:

David has the lowest weapon damage but still with a fair attack speed due to his 4 hit combo you can unlock.

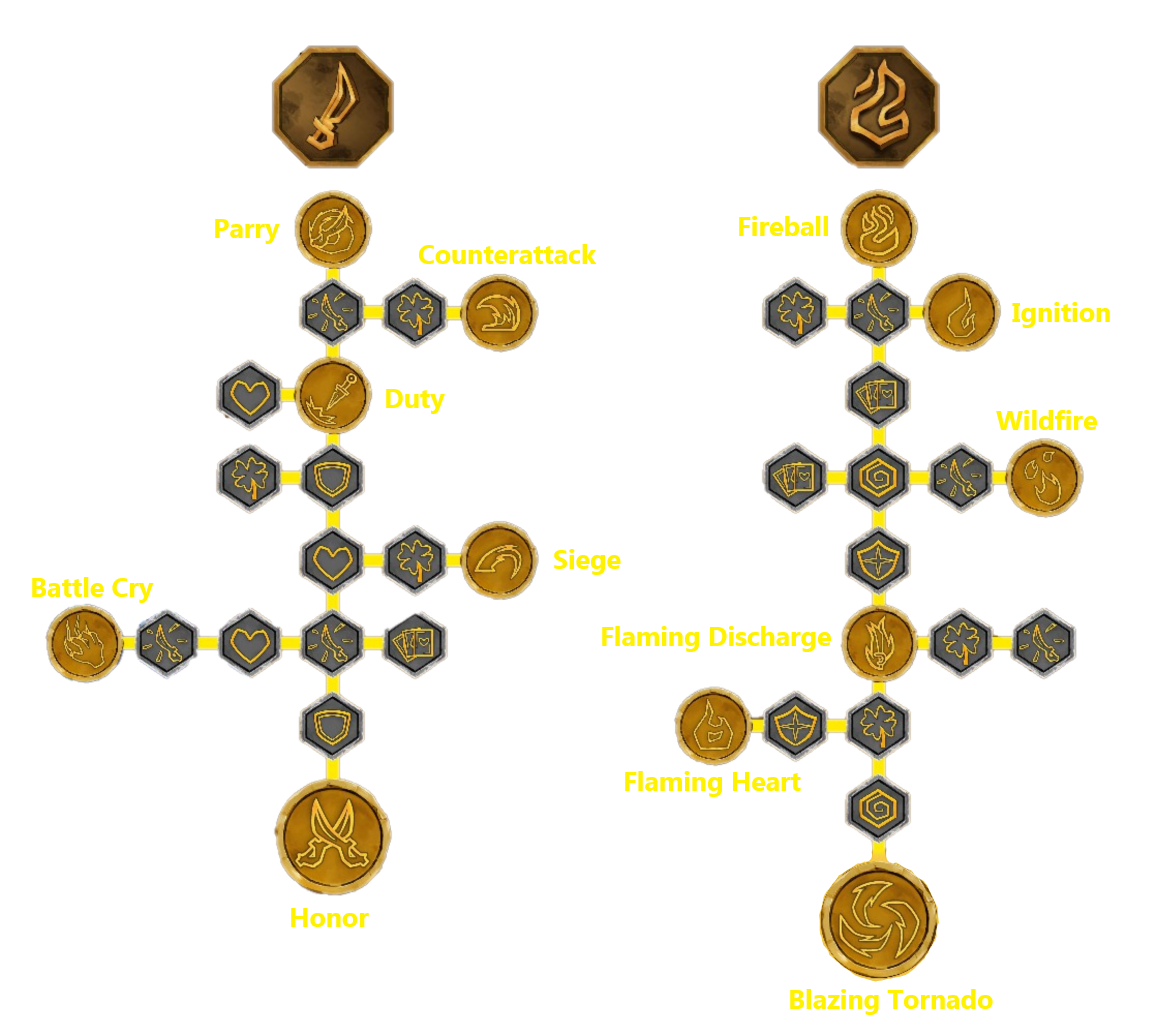
Skill Tree

All perks of David Douglas
Tree:
Ability:
Effect:
Weapon
Parry
Breaks enemy attack and incapacitate them
Weapon
Counterattack
+10% dmg against parried enemies
Weapon
Duty
Spin attack
Weapon
Siege
+1 combo attack
Weapon
Battle Cry
+5% life back damage dealt
Weapon
Honor
+10% more damage for 15 secs
Magic
Fireball
Fire shoot attack
Magic
Ignition
Recover 1 energy orb if you kill enemy with magic
Magic
Wild Fire
+20% burning damage each second for 5 secs on all magics
Magic
Flaming Discharge
Short ranged flamethrower
Magic
Flaming Heart
+20% magic power if life is full
Magic
Blazing Tornado
Elemental fire wave attack on all enemies
2.2 - Buffalo Calf
General
  • Role:            Ranged Combat, Stealth, Supporter
    Buffalo Calf
  • Element:      Air (Thunder, Wind)
  • Dash:          Rolling Dash (invu frame)
  • Hitbox:        Normal
  • Attack rate: High
  • Defense:     Dodge (Counterattack)


Stats
Lvl 1
Lvl 50
Health*
94
542
Attack*
15
93
Defense
11
66
Magic Power
19
122
Magic Defense
9
56
Energy per Hit
20
23
Crit-Chance
3%
15%
Crit-Damage
120%
128%

* the milk bottle will gain you +50 HP and the blacksmith (not the admiral) +10 to attack permanently

Pros and Cons

Pros:

Buffalo was balanced a lot during the recent patches, but she has still the fastest combo attack speed giving her still a fair DPS output. She is also great in ranged combat and stealth attacks to play things safe. She is a perfect supportive coop character with her electrocuting ranged attacks. Also her Dodge ablity is a better version of Parry as it directly counter damages enemies. Her rolling dash also has an invu frame that lets you roll through enemies and shots, making her pretty good if you are used to evasive characters. Playing out her rolls and ranged attacks make things pretty easy. She is a typical high risk big reward character with options to go ranged whenever necessary.

Cons:

Her specializations come with a big price. Buffalo has a weak defense and only little HP, so you need to be really careful with her if you go in for melee attacks (so use dashes a lot). She has also no own healing ability, means she has to rely on consumables or you have to use the transmutation trick to switch to Bussa to heal. Be careful with the aerial knives attack, they will stop her momentum midair completely. Buffalo is a fragile but good boss fighter in experienced hands. She lacks good platforming capabilities though and is because of this a character more suitable for experienced players.

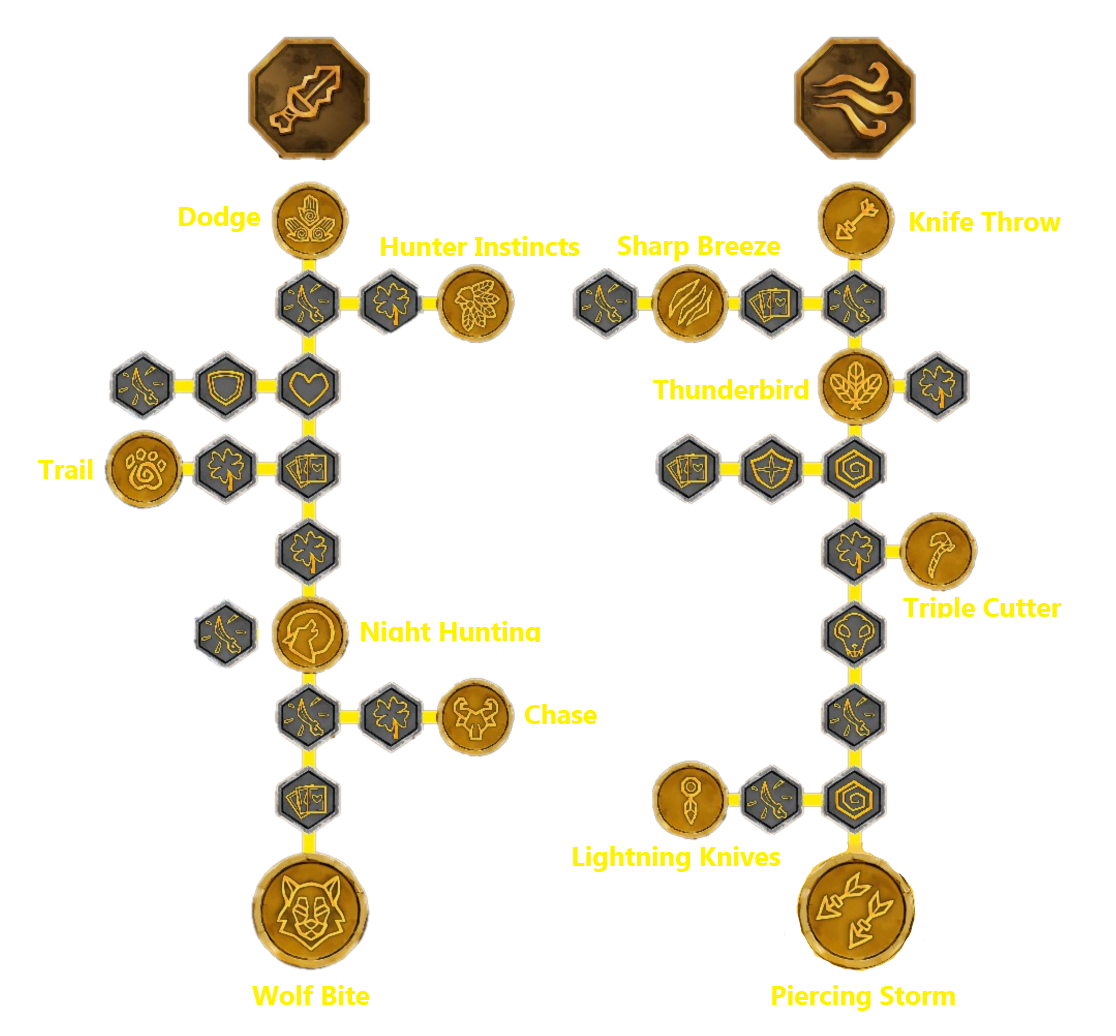
Skill Tree
All perks of Buffalo Calf
Tree:
Ability:
Effect:
Weapon
Dodge
Parry with damage the enemy
Weapon
Hunter Instincts
Attack from behind are always criticals
Weapon
Trail
+5% damage on enemies below 25% health
Weapon
Night Hunting
Invisible for 5 seconds
Weapon
Chase
+5% damage within the next 5 seconds after a kill
Weapon
Wolf Bite
Strong forward physical attack
Magic
Knife Throw
Wind shoot attack
Magic
Sharp Breeze
Knife Throw does up to 15% more damage on distance
Magic
Thunderbird
Controllable catapulted wind bash attack
Magic
Triple Cutter
Knife Throw is upgraded with a stronger Tomahawk
Magic
Lightning Knives
Knives electrocute enemies for 3 seconds
Magic
Piercing Storm
Elemental wind wave attack on all enemies
2.3 - Bussa
General
  • Role:           Heavy Tank
  • Element:     Earth
  • Dash:          Floating Attack
  • Hitbox:        Normal
  • Attack rate: Slow Bussa
  • Defense:     Steady Block (100% safe except boss attacks or contact damage)

Stats
Lvl 1
Lvl 50
Health*
132
776
Attack*
15
96
Defense
17
102
Magic Power
19
117
Magic Defense
17
107
Energy per Hit
20
20
Crit-Chance
3%
13%
Crit-Damage
150%
190%

* the milk bottle will gain you +50 HP and the blacksmith (not the admiral) +10 to attack permanently

Pros and Cons

Pros:

Bussa is an underestimated character. His best part is the unique block that ignores incoming damage and can be hold - no need to time anything like with the other characters. Also he has a lot HP and defense. This makes him an awesome boss killer as you can survive the nastiest attacks. He could be the gamechanger for the still missing harder game modes from the KS stretchgoals. His healing magic is also a good thing during map roaming, you will need much less items. With the patch to 1.5.7 he got also a floating dash, that does deal additional damage, making it the best dash form of all characters for the time being.

Cons:

He is mostly focused on defense, so he does not deal a lot damage. Unfortunetally the voice acting is sort of weird, the intended accent feels just off and not fitting. Breaks a lot of immersion in my opinion. Although he got constantly buffed over time, I just can't really like this character's playstyle anyway.

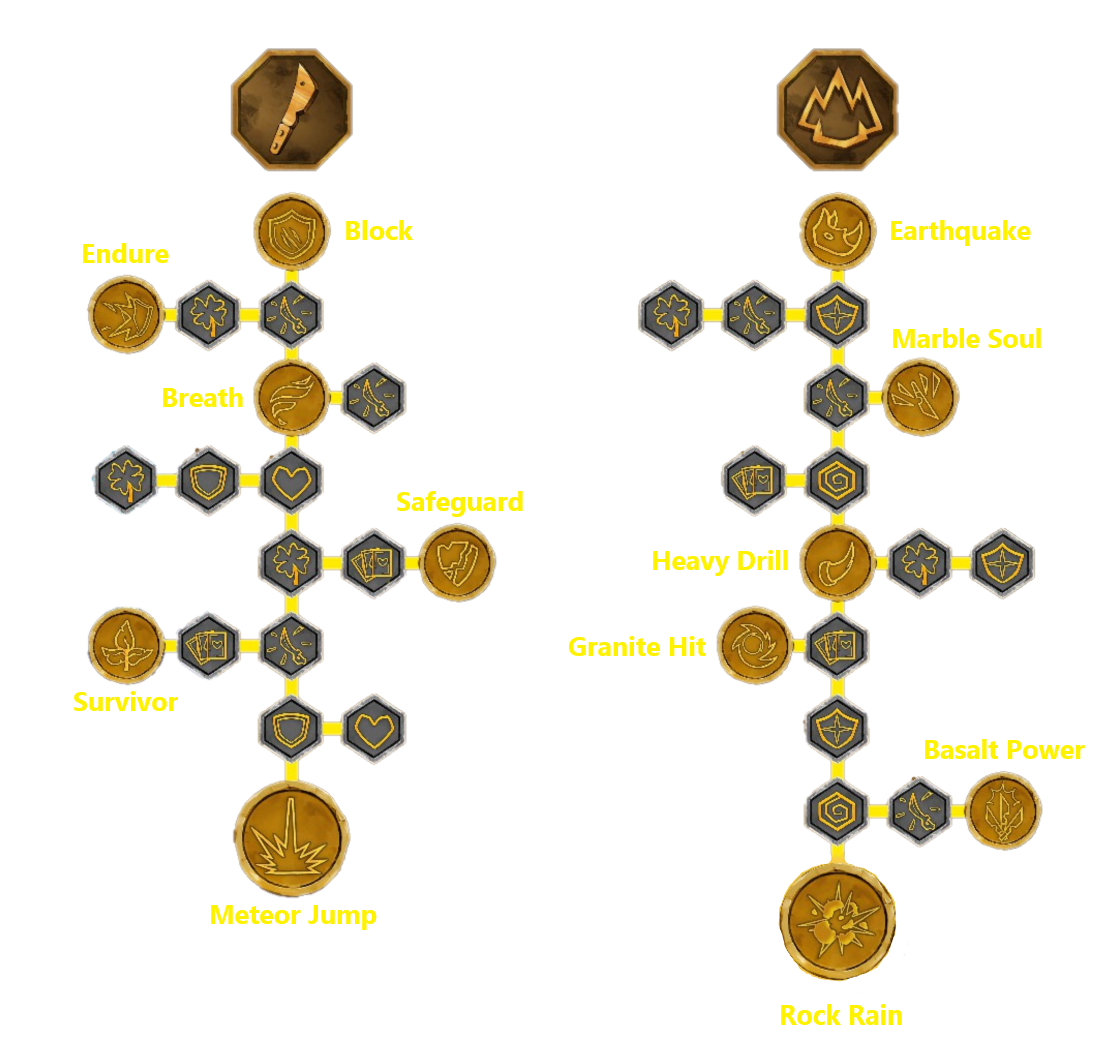
Skill Tree
All perks of Bussa
Tree:
Ability:
Effect:
Weapon
Block
Stationary block that makes you invulnerable (except enemy contact)
Weapon
Endure
If health is low you gain less damage
Weapon
Breath
Heal yourself +55 HP
Weapon
Saveguard
First block will heal you 2% of your life
Weapon
Survivor
Lethal strike lets you survive with 1 HP
Weapon
Meteor Jump
Physical attack that knocks enemies away
Magic
Earthquake
Creates a shockwave dealing magic damage
Magic
Marble Soul
If your health is below 25% you deal 15% more damage
Magic
Heavy Drill
Spin magic attack
Magic
Granite Hit
Last combo strike will break enemy armor by 50%
Magic
Basalt Power
If health is full +15% critical damage
Magic
Rock Rain
Elemental earth wave attack on all enemies
2.4 - Akane Yamakawa
General
Akane Yamakawa
  • Role:           All-Rounder, High DPS, Versatile Mage
  • Element:     Water
  • Dash:          Floating Forward Dash
  • Hitbox:        Big (upwards and w/ multistab)
  • Attack rate: Medium
  • Defense:     Parry

Stats
Lvl 1
Lvl 50
Health*
104
623
Attack*
17
107
Defense
13
81
Magic Power
19
117
Magic Defense
7
55
Energy per Hit
20
20
Crit-Chance
3%
13%
Crit-Damage
150%
190%

* the milk bottle will gain you +50 HP and the blacksmith (not the admiral) +10 to attack permanently

Pro and Cons

Pros:

Akane is a pretty versatile character. She has a the biggest weapon hitbox with upward attacks and the multistabbing move. And she does inflict extra damage if you use aerial attacks. In fact after Buffalo got nerfed, she is the top DPS character at the moment. She also can unlock an basic ranged attack that comes in handy a lot of times (though it seems to not trigger always). She is also the only character that can perform a triple bounce arial attack from above if you keep holding the down and attack button - this will inflict a lot of damage. She has like David a floating dash perfect for platforming parts.

Akane has the ability to auto-refill her energy (1 orb every minute). This gives her technically unlimited usage of magic attacks if she has the time to wait for it. This can be helpful with the boss Mamma Ratelli or Morrìgan because the magic attack Tsunami will hit them even when you cannot by normal means.
Also don't bother to abuse her to recharge your energy when you have the Transmutation Ring.

Cons:

Akane, like Buffalo, has no healing and therefore has to rely on item healing. The low defense and little health does force you to plan your attacks careful with her.

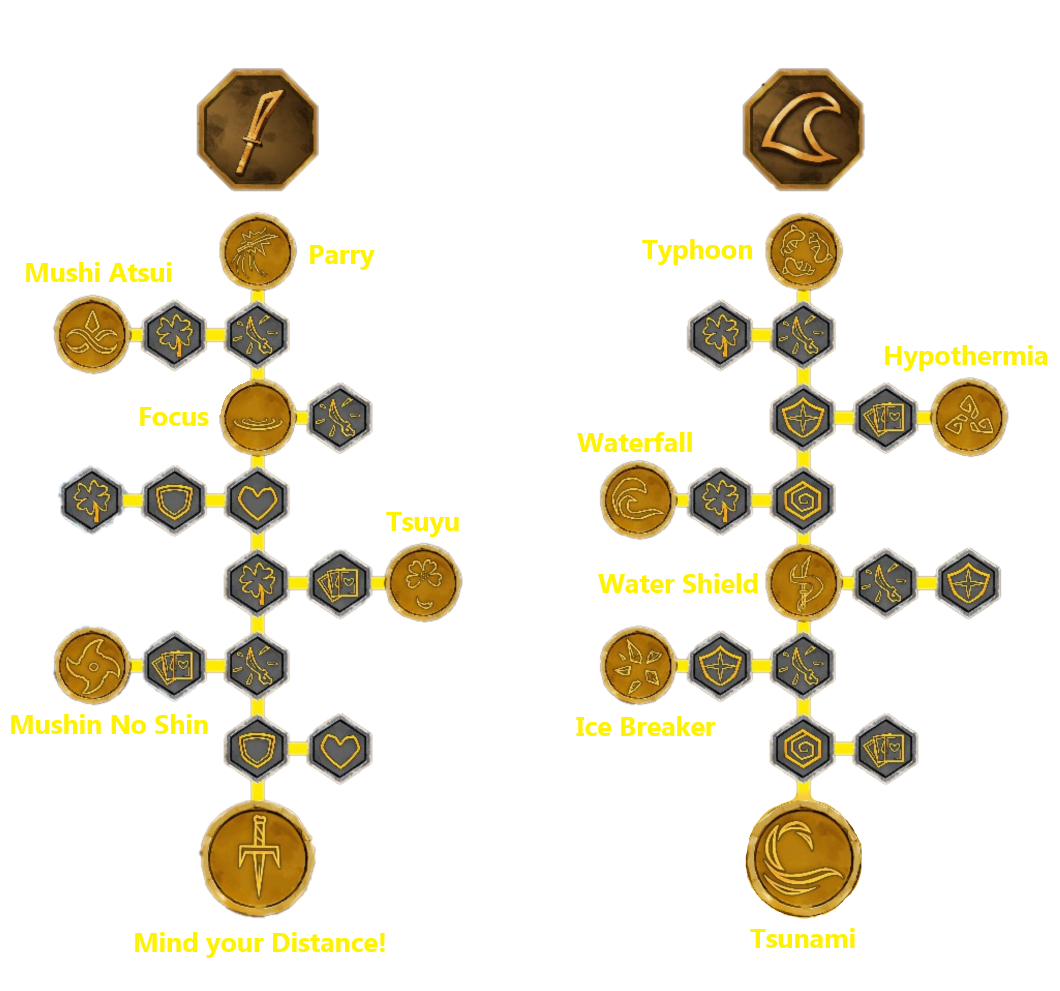
Skill Tree
All perks of Akane Yamakawa
Tree:
Ability:
Effect:
Weapon
Parry
Breaks enemy attack and incapacitate them
Weapon
Mushi Atsui
+15% midair damage
Weapon
Focus
+10% damage for 8 seconds
Weapon
Tsuyu
Midair attacks will release a water wave long range attack
Weapon
Mushin No Shin
While in Focus a kill will restart the magic ablity time
Weapon
Mind your Distance!
Physical damage water attack, gains 10% critical damage for the next 8 seconds
Magic
Typhoon
Magic forward attack
Magic
Hypothermia
Magic attacks reduces enemy defense
Magic
Waterfall
Auto-refills +1 energy per second (1 orb per minute)
Magic
Water Shield
Deals damage to enemies
Magic
Ice Breaker
Water shield will reduce enemy damage by 20%
Magic
Tsunami
Elemental water wave attack on all enemies
3 - Ghost Ship survival mode

This is a surival mode over 10 rounds (checkpoints), each containing multiple waves with enemies, one or multiple bosses at once to challenge your might. In addition the time will be taken to challenge you even more.

Your character is always level 1, but has basic abilities like magic lvl 1, dash or double jump. You will gain choosable perks, also some fixed item set and abilities over time. If you die, you have to start from scratch.

Tactical advices
  • learn the waves and train bosses before speedrunning
  • try out different characters, each character are strong/weak against certain bosses
  • use the buff items at boss fights, don't safe them too much
  • use the 2 milk bottles as healing items (+50 perma-health but 100% refill of HP as well)
  • try not to get hit too much, health is critical (except for Bussa)
  • attack/crit related perks are better for speedrunning (what dies fast does not deal damage)

Characters choices

David Douglas

Right off the start quite good, but without his usual perks like the vampiric attack he lacks the cutting edge to be a good speedrunning character. His strength is a good weapon hitbox and the standard magic attack that is always a good option for some quick ranged extra damage.

Akane Yamakawa

Although she is my favorite character in the story mode, she lacks critical abilities like the ranged attack or extra aerial damage. Her standard magic is not too useful, and the multistabbing stops you too long in the tracks that makes you vulnerable a lot. She has the same issues fighting bosses like David as she is as fragile as Buffalo but has much less options. The only very good attack is the triple-bounce on enemies, but that doesn't work on many bosses well enough to even things up.

Bussa ⭐⭐

Like formerly predicted, Bussa is very useful in hefty battles as he tanks a lot and can heal himself with his abilities you gain later. He does also deal good damage and his attack dash is pretty good. Unfortunetally his magic attacks are quite useless, and the awesome block does not work against bosses. Still he is the best choice if you want to win the survival mode.

Buffalo Calf ⭐⭐⭐

Although she went through some big nerfs, she is one hell of a high-risk-big-reward character that has lots of options. Even her standard magic attack is useful. She has problems to deal much damage and is very fragile though. But her evasive roll with the invu frame does pay off against bosses a lot. Melee attacks inflict more combo damage, but using ranged attacks or magic at the right time can be faster and keeps you from getting unnecessary damage. Her aerial attacks and non-floating far rolls makes her difficult to control, but if you get the hang of it, she is very powerful and has the best speedrunning capabilties at the moment.

She is actually the best character in my opinion for quick runs due to her unique advantages. My personal best is 11:07 atm and there is still enough space to enhance things. Though I think getting below 10 minutes is nearly impossible.

https://gtm.steamproxy.vip/sharedfiles/filedetails/?id=3459551762
4 - Secrets map, hints and miscellaneous
100% revealed secrets map

Complete map at 103% completion rate
Legend:
  • beige - normal rooms
  • golden - secret rooms (usually have to be force opened; 19 rooms in total)
  • red - boss room
  • blue/cyan - portals (have to be activated in exchange of spirit points)
  • green - savepoints (replensih health and orbs, buy upgrades, switch difficulty and character)

Note: In fact completion marker can exceed the 100% to 103% ish.


Specials map

Map with PoI
I marked everything important I mention in the sections below.

Full detailed map (external source)

If you want a more detailed one with nearly every information, this external map is one of the best I found so far. You will find the download link in the description of the video:

https://www.youtube.com/watch?v=GGRQ4IAbtpY
4.1 - Transmutation Ring
Transmutation ringDefeating Morrìgan in Home of the Morrigan will grant you the Transmutation Ring. A very awesome item. Like the Tasmanian Sword in the game 'Wonderboy Dragons Trap' you can change your character whenever you want. Use it directly in the inventory, or press the left analog stick on your controller. For keyboard players it is the TAB key. Careful, you will get stalled for a whole second.

Use this to your advantage. With fully upgraded characters, you can always auto-refill your energy switching to Akane, go for range attack with Buffalo, or heal yourself with Bussa whenever you see fit.

Hint: you need 3 stones to open the door to the Home of the Morrigan. See the map I provided. For one stone you have to visit Dan Black first to get to know that Charlie (a fun camo of Harold from Day of the Tentacle) has the stone to be able to obtain it from him.
4.2 - (Dull) Resurrection Ring
Ressurection RingFighting the optional boss Necromancer you will get the Resurrection Ring which will automatically heal you when you die. But it is a one use item. After this, it transforms into the Dull Resurrection Ring, rendering it useless until the Necromancer is fought and beaten again, and its power gets replenished. Technically, you can fight and defeat the Necromancer unlimited times as he is an immortal boss.

Tactical hints fighting the Necromancer

The Necromancer has 3 phases. The first one is easy, but the other two are working on platforms. if you fall off, you will die instantly. The second phase is the most difficult, while on the third one you just stay on the roating platforms, and use ranged attack or upward attack when beneath the boss.

During second phase I suggest you stay mostly on the big shield platforms as long as possible because the small one will vanish more quickely - and if you are still going to use them, watch and position yourself always close to the bigger ones to have always a kind of a safety net. Be aware that the giant hands of the Necromancer are also platforms themselves, ideal attack positions for Buffalo's ranged attacks.

Clever movement during the platforming parts is important to prevent a quick death, so characters with floating dashes are a good thing to use. And just don't rush it. The boss doesn't deal a lot of damage. Use long ranged attacks (Buffalo) or magic attacks (Akane) if you want to play it safe.

Also note that the blue plasma balls can be deflected with attacks (Akane's upward attack is shielding you perfectly).
4.3 - Permanent power ups
In general power ups work on all characters at once.

Milk Bottle (+50 HP)
Don't miss to drink the Milk Bottle from the farm house. It will grant you +50 max HP permanently.

Sharpened weapon (+10 attack)
Also get a Shilling (2 can be found, but you only need 1) and visit the lighthouse with it (the key to the lighthose is in LaChusa's Pit. If you use the left telescope on the top of the lighthouse, you will unlock the blacksmith (not Admiral Blacksmith). He will upgrade your weapon and raise your basic attack by +10 permanently if you talk to him.
4.4 - Explorer Googles (Bestiary)
Explorer GooglesWith the new version Petoons added the Explorer Googles that unlocks the bestiary to help you keep track of the enemies which you defeated during your acutal game run.

The fighterNo one can beat me There are two specific achievements related to the bestiary which needs you to defeat (not kill) every enemy ('The Fighter' achievement) and bosses ('No one can beat me' achievement) at least once.

You will get the googles by defeating Banana Rama, so you won't have them from the start. You can then access the bestiary over the inventory by selecting them. The 'Show Info' button currently don't seems to work and is displaying no informations at all.
Dummy Lvl 01
The enemies in the bestiary are sorted by type. Means it is difficult to predict the area they are to find by their respective position in the list. Many of them have multiple spots to be found and will hardly be missable, so I will just mention one possible spot for them just in case. Though there are a few pretty difficult to find or often ignored enemies I will mark with a star.

There are 2 bosses and 2 mobs not listed in the bestiary, but 2 unknown extra spots. While the missing bosses are mandatory to get the 'No one can beat me' achievement, it is not known if that goes for the mob enemies as well. So I will give them a (honorable) mention here just in case:


Name
Type
Location
Hints
Dummy Lvl 01
Pirate
Shipwreck Beach
Training dummy of Major Mallory
Mutant Rat
Rat
Cursed Ship
Big room before Flora's 2nd encounter
Mamma Ratelli / Barrelosaurus
Boss
Fódla's Bog
Special KS goal boss at Fatsie boss room
Long Fuse Jones
Boss
Cursed Ship
Final boss during true ending condition
4.4.1 Bestiary List (Part 1)
Name
Type
Location
Hints
Crab
Crab
Shipwreck Beach
Right of save room
Hermit Crab
Crab
Shipwreck Beach
Left of save room
Octopus
Octopus
LaChusa's Pit
Farer to the feft of the portal
Mussel
Clam
Shipwreck Beach
Far right of portal
Bat
Bat
Flying Rat's Cave
Above save room
Skull Crab ⭐
Crab
Flying Rat's Cave
Parry to defeat it (not possible w/ Bussa)
Powder Crab
Crab
Shellfish Rock
Right of Fatso's boss room
Inktopus
Octopus
LaChusa's Pit
To the feft of the portal (at ceilings/walls)
Kamikaze Bat
Bat
Flying Rat's Cave
Left of portal, does count if kills itself
Chicken
Bird
Fisherman's Cave
Common in upper area
Coal Tit
Bird
Ériu's Forest
Entrance area from Molly's Warehouse
Robin
Bird
Banba's Forest
Going up left from Shot Fuse Jones boss room
Parrot
Bird
Ériu's Forest
Upper areas, right of save room w/ elevator
Puffin
Bird
Cliff of the Winds
Everywhere
White Cat
Cat
Abandoned Lighthouse
Entrance
Black Cat
Cat
Abandoned Lighthouse
Above of save room (only spot)
Orange Cat
Cat
Abandoned Lighthouse
Right of save room
Spider
Spider
Spider Nest
Right of the portal
Silk Spider
Spider
Abandoned Lighthouse
Above portal
Giant Spider ⭐
Spider
Spider Nest
Miniboss, deep down, right side of the pirate camp
Venom
Spider
Spider Nest
Right of the portal
Wraith Berserk
Spirit
Ancient Ruins
Room above portal
Angry Mosquito
Insect
Fódla's Bog
Below Fatsie boss room
Fly
Insect
Fódla's Bog
2nd room right from the portal (kill Splitter Fly)
Splitter Fly
Insect
Fódla's Bog
2nd room right from the portal
Firefly
Insect
Moonlight Lough
Left from portal
Fat Firefly
Insect
Moonlight Lough
Left from portal
Worm
Worm
Ériu's Forest
Right from the portal
Worm Mama
Worm
Ériu's Forest
Right from the portal
Horned Bug
Beetles
Banba's Forest
Far above portal (middle right of the high room)
Big Bug
Beetles
Banba's Forest
Above portal
Hungy Plant
Plants
Banba's Forest
Left of the portal
Acid Spitter
Slug
Banba's Forest
High room left of portal
Acid Jetter
Slug
Banba's Forest
High room right of portal
Rat
Rat
Abandoned Lighthouse
Left of Entrance
Spiker Rat
Rat
Cursed Ship
Big room before Flora's fight on the ship
Skeleton
Skeleton
Ancient Ruins
Above portal room
Immortal ⭐
Skeleton
Samhain Summit
Cannot be killed, but counts when defeated
Skull Thrower
Skeleton
Ancient Ruins
Above portal room
Ghoul
Spirit
Home of the Morrigan
Left of the save room before boss room
Will-O-the-Wisp
Spirit
Home of the Morrigan
Right from the save room
Electric Specter
Spirit
Cursed Ship
Right from the leftern save room
Frog
Frog
Ériu's Forest
Entrance area from Molly's Warehouse
Toad
Frog
Home of the Morrigan
Above the save room.
Fish ⭐
Fish
Fódla's Bog
Water pool in 2nd room right from the portal
One-eyed Willy ⭐
Skeleton
Fisherman's Cave
Chest far right of Krabawaki boss room
4.4.2 Bestiary List (Part 2)
Name
Type
Location
Hints
Sword Pirate
Pirate
Shipwreck Beach
Left of save room
Sword Forest Pirate
Pirate
Banba's Forest
High room left of portal
Sword Zombie Pirate
Pirate
Cursed Ship
Right from the leftern save room
Sword Sleepy Pirate
Pirate
Fódla's Bog
right from the portal
Sword Chef Pirate ⭐
Pirate
LaChusa's Pit
Right below the boss room
Knife Pirate
Pirate
Shipwreck Beach
Far right of portal
Bomber Pirate
Pirate
Shipwreck Beach
Right of save room
Slingshooter Pirate
Pirate
Ériu's Forest
Entrance area from Molly's Warehouse
Swamp Pirate
Pirate
Fódla's Bog
Right from the portal
Shotgunner
Pirate
Fisherman's Cave
Big room 3 levels down the Lighthouse portal
Sniper Pirate
Pirate
Cliff of the Winds
Upper left big room from the portal
Gunner
Pirate
Fisherman's Cave
Right of Shellfish Rock portal
Hammer Pirate ⭐
Pirate
Samhain Summit
Long hallway down left of the portal
Big Rock Pirate ⭐
Pirate
Fisherman's Cave
Miniboss, left of hallway to Cliff of Winds
Big Colossus Pirate
Pirate
Fódla's Bog
Two stories below save room
Big Swamp Thing
Pirate
Ériu's Forest
Left of upper portal
Whale Hunter ⭐
Pirate
Cliff of the Winds
Lower left area behind the locked door
Bulb Pirate
Pirate
Cursed Ship
First room after entering the ship
Miner ⭐
Pirate
Flying Rat's Cave
Left entrance shaft at the bottom
Fatso
Boss
Shipwreck Beach
Very first boss fight
Krabawaki
Boss
Shellfish Rock
Below the portal
LaChusa
Boss
LaChusa's Pit
Boss room upper left from portal
Murat Reis
Boss
Flying Rat's Cave
Below the portal
Lighthouse Keeper
Boss
Abandoned Lighthouse
At the very top (no surprise)
Rama Cinnamon
Boss
Ériu's Forest
1st boss encounter at the top
Banana
Boss
Ériu's Forest
2nd boss encounter at the very top
Sharpie the Sharp
Boss
Cliff of the Winds
Right of the portal
Freddy Eightfingers
Boss
Spider Nest
Deep down, left side of the pirate camp
Short Fuse Jones
Boss
Banba's Forest
Far right of portal
Fatsie
Boss
Fódla's Bog
Far right of portal (same room Barrelosaurus)
Necromancer
Boss
Ancient Ruins
Far left from Tuatha Dé Danann Temple portal
Flora Burn
Boss
Samhain Summit
1st encounter, start of endgame
The Crow
Boss
Home of the Morrigan
1st boss encounter in the area
The Morrìgan
Boss
Home of the Morrigan
2nd boss encounter in the area
Flora Burn
Boss
Cursed Ship
2nd encounter
--- (not unlockable)
Unknown
Unknown
not needed
--- (not unlockable)
Unknown
Unknown
not needed
4.5 - Farming XP, gold and spirit points
General hints

Safe your level-up elixiers you usually find in secrets for higher levels. Best is to use them around level 35-40 before the endgame in Samhain Summit as max level is 50. Still keep some to make boss fighs easier (see chapter about easy boss fights). It is not mandatory to waste them, XP is easily farmed along the way. Also, for pure XP farming, it is not necessary to collect the money or spirits on the ground. XP is gained instantly the enemy dies.

The game uses adaptive enemy levels connected to story progression, so level of enemies may vary along with their respective XP, gold or spirit they drop.

Note: Jolly Roger mode enemy mobs only respawn if you reach a save room and not if you reenter the room. So farming in classic mode is much much faster and adviced. So switch temporarily if necessary.

Two of my favorite farming spots can be found here:

Perfect farming spots

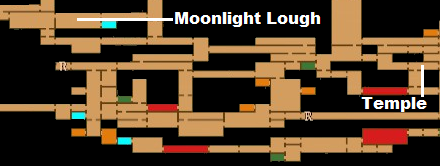
Moonlight Lough (Buffalo Calf)

This place is in general an awesome midgame farming point. If you use Buffalo Calf's long ranged triple knives attack to spread damage and detonate swarms of the lvl16 Fireflies, you will level up quickly while roaming through the area. You can also just leave and reenter the areas again to let the enemies respawn instantly to kill them even quicker.

Ancient Ruins (methode 1)

Better, especially for pre-endgame gold and level farming, is the temple (Ancient Ruins). Right above the Necromancer lair there is a room with quite a bunch of lvl22/24 skeleton enemies that can be eradicated quickly or easily with a ranged-combat character like Buffalo. Alternatively you can use area-of-effect magic to wipe them out quickly. Most effeciently with David's Tornado. Also his vampiric attack will provide constant healing while you clean the room. Just leave and reenter this area and keep killing. I prefer to enter the room from below and release the Tornado magic, then clean the rest with standard attacks.

Ancient Ruins (methode 2)

At the very same spot, if you are more lazy you can just drop down to the high chamber from above and kill that lvl30 Wraith Berserk for a huge amount of XP, gold and spirit points quickly as he uncloaks right next to you. Then just jump up to switch screen, drop down below and rince and repeat the procedure.

As long as you are able to kill it before it attacks you with 1-3 blows, it is super fast to get to level 50 with it.
4.6 - Easy boss fights
Bosses can be tough, especially when you are lower than LVL 30 and playing the classic mode with contact damage. While it is always an option to come back later when you are at higher levels, sometimes you just don't want to avoid them for gathering certain abilities or sidequest items.

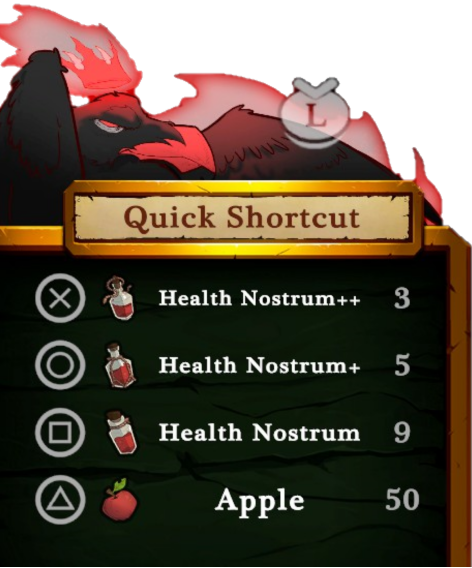
Shortcut menu (pre-patch with 50 apples instead of 10)But as long as you don't get robbed, money will never be an issue in this game. So shopping and using healing items during boss fights will make this game pretty easy.

While healing items can be collected, most of them are unique and should be avoided to waste them. But there are five healing items that can be bought unlimited times from the shop (some of them only later in the game). Always fill up your inventory with them before boss fights and assign them to the quick use function:
1. Healing Nostrum (100 HP, max 10)
2. Healing Nostrum+ (200 HP, max 5)
3. Healing Nostrum++ (400 HP, max 3)
4. Tasty Sandwich (150 HP, max 10)
5. Apple (75 HP. max 10)

They give you a whopping 5450 HP of extra time for brainless hack'n slaying while tanking damage. Use them aplenty in the boss fights to make them a real breeze. Only Mamma Ratelli and the Necromancer can still be still difficult due to their special fight mechanics.

And if you want to be real smug, keep your level-up elixiers (which can be found in secrets usually) for later, very difficult boss fights or final bosses. Every level-up comes with a free fill-up of all HP and energy for all players still alive and can also be assigned to the shortcut function. This makes them the best healing items in the game. You will get more than 10 in the game. Just don't waste them, but use them wisely on boss fights you have most troubles with.

So actually just recklessly hack and slay the bosses to death and use your expendable consumables regularly to keep you alive. See bosses tremble facing this almighty power they can't do anything about.

Remember that you can furthermore switch difficulty anytime to Jolly Roger mode if you need to at savepoints if you are stuck on a fight. Without contact damage most bosses are way more easy to beat. It will be possible to switch back to classic mode later. There will be no downsides for cheesing things via temporary difficulty change.

Hint: The game also supports a local hotdrop in/out coop mode for up to 4 players at once. And Petoons still didn't added a proper adaptive difficulty for coop mode. For every player joining the party things get more easy, especially because you can revive each other and have more overall DPS. Only downside is that you have to share your spirit points for purchasing abilities. But it will be still more beneficial to grab some friends to help you out and have more fun anyway.
4.7 - Special boss Mamma Ratelli
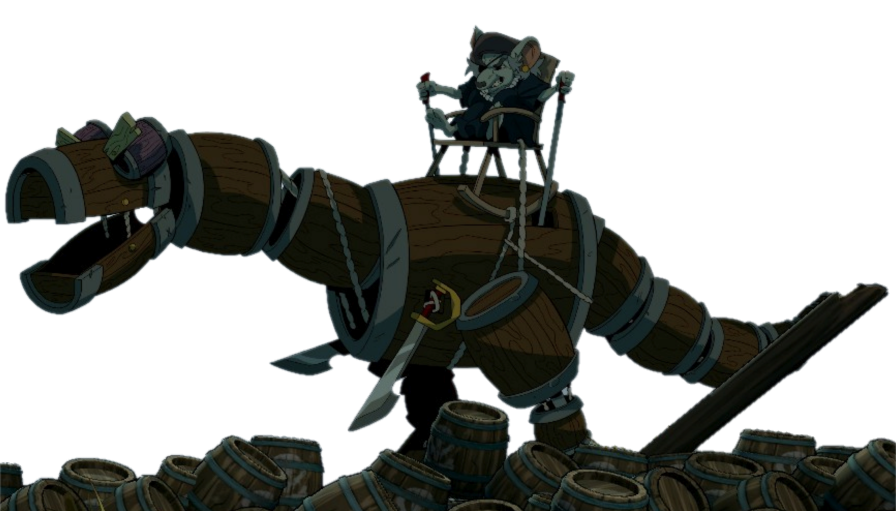
Fodla's Bog boss arena of Fatso and Fatsie, the very same room you will encounter the Barrelosaurus Mamma Ratelli (a fun camo of Mama Fratelli from The Goonies movie) and her Barrelosaurus is a KS stretchgoal boss added to the game. That's why this boss is no regular bossfight. You can only find her during the endgame and is missable. The very same boss area where you fomerly had fought and beated Fatso and Fatsie in the Fódla's Bog swamp. If you missed out Fatso and Fatsie she is permanently missable.

You can damage the Barrelosaurus with the red explosive barrels by attacking them. This does also apply to multiple barrels at once (easier to perform with David or Akane due to their bigger weapon hitboxes) and even hitting and repel them midair.

Mamma Ratelli with her BarrelosarusAlso you can damage the boss with the most powerful magic attack. This makes Akane a valuable character against Barrelosaurus. Her auto-energy refill ability gives you regularly a free magic attack. Keep in mind it got nerfed drastically with patch 1.3.7 (refill need 5 times more time).

If you have the Transmutation Ring from Morrìgan consider switching to David to do the Blazing Tornado fire magic attack - it is the strongest if you leveled him up. Then switch back to Akane. Be careful with the transmutation stall time. Don't get knocked off the screen by the flying barrels or you will die instantly.

If you play out your cards well the fight can be done in less than 60 secs.
4.8 - Secret shortcuts
With version v1.3.7 Petoons erased the insta-death ftom the game (except some boss fights) when falling off limits or pits. In fact, especially in the Lighthouse, Erius and Banba Forest you can fall off and land on lower levels. This can be used as a direct shotcuts anywhere you see fit. Basically you will always land in the section directly underneath or close by the room you fell off on the map.

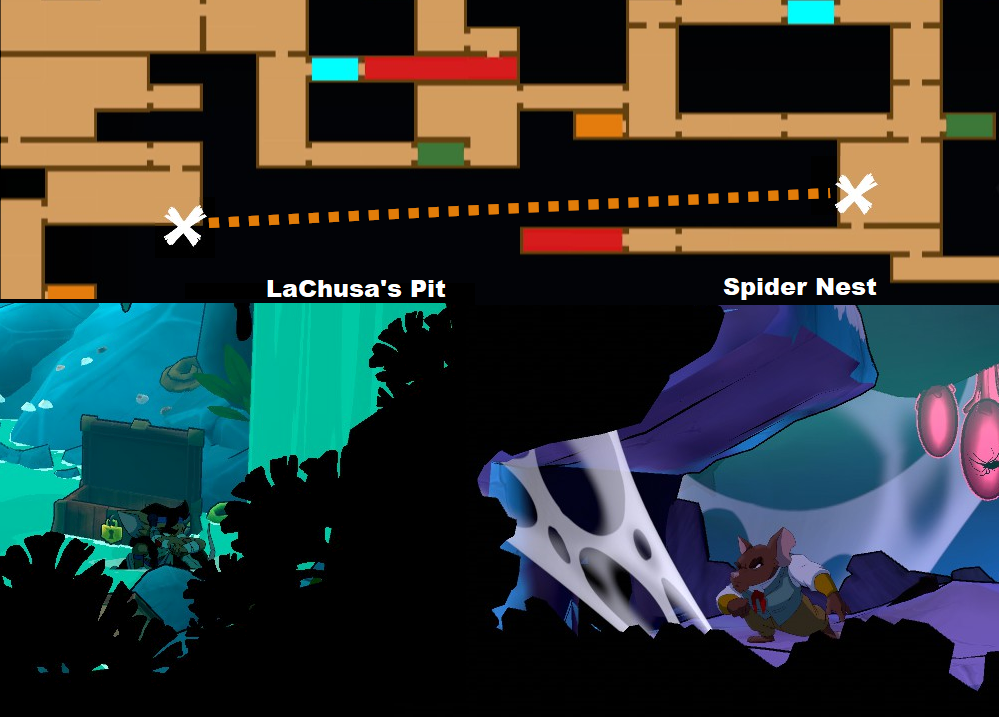
But there is one particular horizontal special shortcut passage behind the waterfall between the areas LaChusa's Pit and the Spider Nest that should be pointed out. To use this passage you have to crouch.

Special shortcut
This is super handsome to skip the Cliff of the Winds while travelling from west to east, and vice versa. During endgame it is always a good way to get back to the ship more easily. Especially the Home of the Morrigan route (if the secret was opened pre-endgame) it is in fact the fastest way which will also skip an optional boss fight.

Those shotcuts are perfect for any speedrunning purposes.
4.9 - Treasure Map
Treasure mapIn the corner room to the far east of the Ancient Ruins, Petoons added a Treasure Map in a chest that once was occupied by a Carrot Cake with the patch 1.1.2. This map does unreveal the locations of all buried treasures for the sidequest marked with 'M' in the Banba Forest.

Other treasures than that won't be revealed on the world map though.
4.10 - Portal Service
DoloresGrand reopening, thanks to Dolores!

One of the most criticized mechanics in the first released version was that once the endgame triggered, portals were closed for good and barriers were still spreaded around the world. This made backtravelling for collectibles very difficult and is against usual Metroidvania open-world principles.

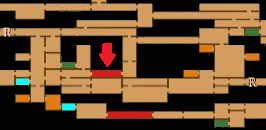
Petoons had a heart for their player fanbase and added Dolore's portal service with v1.3.7. She will replace Wu Yun's portals with her voodoo magic. Though she will be only available (for story reasons) before the very final boss if you met the true ending conditions.

Map where to find Dolores You will find her right after fighting Flora the second time and before the true boss battle by dropping down the floor. Access the left portal room and pay to activate her portal to set her voodoo service up and running. Enjoy having the portals back.
4.11 - Imprisoned Sailors
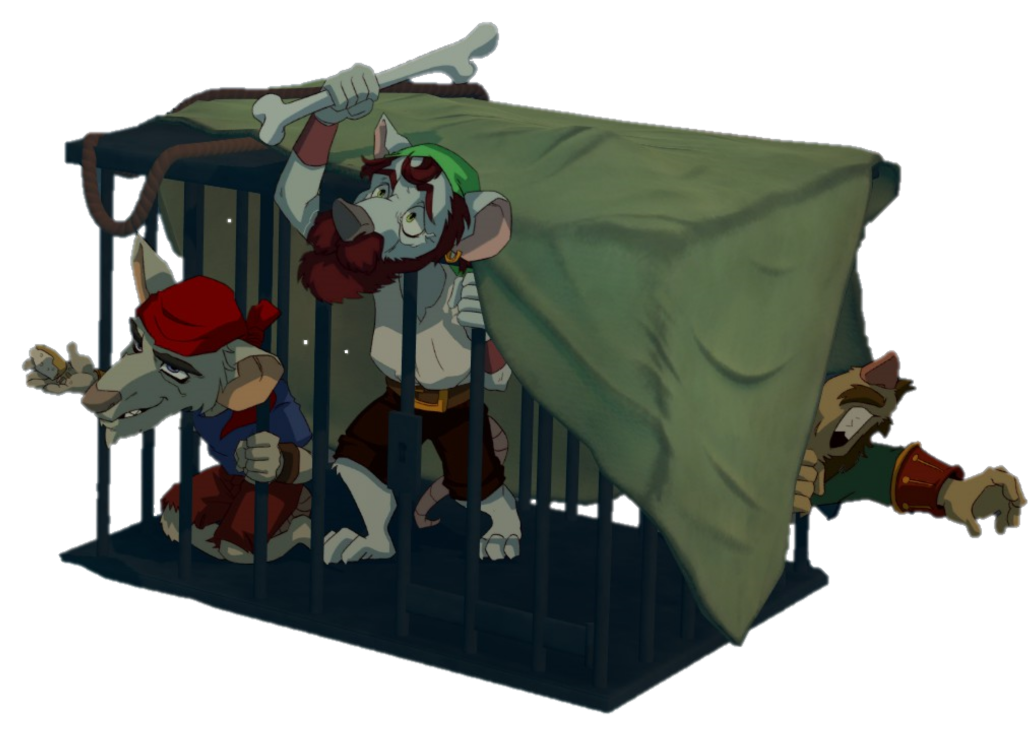
Poor fellas, can these eyes ever lie?In the Fisherman's Cave you will come across some imprisoned 'sailors' - that claim to be innocent. They will ask you to get the key from their canid guardian right next to them.

To do so you have to retrieve the old bone for the dog from a chest in the far upper section if Fisherman's Cave. You can then give them the key to open the cage. If you do so, however, they will knock you out and steal all your money.

There is neither a benefit for freeing those pirates, nor you will find them later on to get back your money once they ran off with it. As money can be farmed easily in this game this is no big issue though. But if you want to free them anyway, I suggest spending all your money in the shop before you do that.

However, if you gave the old bone to the dog, you will find the dog chewing on the bone later near Mollys Warehouse. So you may give the bone to the dog, but not the key to the pirates. One happy dog, and some scoundrels stay were they belong, best solution in my opinion.

Hint: In the game Hollow Knight there is a quite similar event if you trust people too easily. You will get ripped off by a banker as soon as you horded too much on your account. But in this particular case you can find him later on in the game and punish him to get back your money.
End
If you have any advises, additions or critics to this guide feel free to leave me a comment.
Done... zZz

Thank you for reading.


10 Comments
Isovsky 30 Mar @ 10:24pm 
Kelrycor, thanks, got him!
Kelrycor  [author] 30 Mar @ 12:26pm 
The Hammer Pirate can be found in Samhain Summit, in the long hallway to the right if the big room leading to the top to the fight to Flora.
Isovsky 30 Mar @ 11:49am 
Can anyone tell where can I find the Hammer Pirate?
Kelrycor  [author] 29 Mar @ 4:08am 
Awesome. I already updated the chapter. Should help a lot of other people. It seems that this particular enemy is pretty elusive :)
Hilda 28 Mar @ 8:43pm 
It worked, teleported to the bog, killed the fish and it popped the trophy right away. Thank you so much.
Kelrycor  [author] 28 Mar @ 3:36pm 
I just updated it as a quick stub, as I was not able to update the whole guide yet.

But it seems that the enemy after Toad is the Fish from Fodla's Bog. Go try to kill it and it should be added to the bestiary. Can you give me a heads up if the achievement pops properly for you? But I guess this is the case.
Hilda 26 Mar @ 11:53pm 
So I noticed you updated this guide and I've been waiting a long time for this update so I can finally get the platinum trophy for it. The Fighter achievement is what I'm missing, and with the new bestiary and seeing your update I thought finishing the game again would pop it. It didn't. All I'm missing is the one after Toad and the two bottom ones. After the ending and loading the game again the bottom two are still blank.
Kelrycor  [author] 10 May, 2023 @ 6:37am 
Thank you for the compliment, I really appreciate it. It took me about 8-12 hours to test and collect the information, and put everything together for this guide.

And keep up the good work at Petoons - I totally enjoyed the game :)
Looking forward to future updates of yours.
HereWeAre*******  [developer] 10 May, 2023 @ 4:31am 
Your guide is really impressive!
Rainbow Slash 18 Apr, 2023 @ 9:31am 
Если бы не это руководство. Я бы ни за что не смог бы открыть другие концовки. В игре персонажи не раскрыты (никто) и нет никаких предпосылок к другим концовкам (кроме как банально победить и проиграть). И еще эта замечательная пустая карта... Автору руководства rep+ :steamthumbsup: