The Elder Scrolls V: Skyrim Special Edition

The Elder Scrolls V: Skyrim Special Edition

540 ratings
2023 Skyrim SE 10th Anniversary Load Order Guide for 1.6.640
By Vlad 254
Consists of 510 Mods + 185 optional for an approximate total of 695. Includes Graphics, Gameplay, Immersion, new dialogue, and Bug Fixes - also contains optional mods for the Anniversary DLC. You should know your way around Vortex before using this guide, other than that this guide walks you through the process step by step..

Can be used with or without the Anniversary DLC and is clearly marked as such where applicable.

Looking for a smaller load order setup? See this guide
33
8
7
14
7
11
2
2
4
2
3
3
3
2
2
   
Award
Favorite
Favorited
Unfavorite
A Word
A Thumbs-up goes a long way towards keeping this guide from getting buried down low in the guide section on Steam and instead near the top of the list so others can easily find it.

“What we find in books is like the fire in our hearths. We fetch it from our neighbors, we kindle it at home, we communicate it to others, and it becomes the property of all.” ~Voltaire

Recommend it and share it.
This also keeps me motivated knowing the guide is helping people. Most importantly you should probably Favorite it so you can easily come back to this Guide.

Thank you

1/20/2024
Note: I do plan to eventually make a new load order guide although it will be a small one and won't be for a while.
Screenshots
A few screenshots
(select a screenshot to expand view)


Downgrading
I do not recommend downgrading your game for various reasons but the fact is the vast majority of mods have been updated for the latest game version (1.6.640) and keep in mind that most never required an update in the first place, not to mention that if anything the latest version runs better than any of the previous versions of this game.

I feel it's always best to run the latest version when it comes to modding Skyrim and the fact that some of the new mods that have come out in the last year require the latest version, we will most likely see this trend continue. Updates don't break your game but poor mod management will and that starts with protecting your game.

I know there's much drama on-line regarding downgrading and the bottom line is it's simply drama. And definitely ignore the comments you see in chat forums and user comments on mod pages suggesting you "roll-back" your game. There is absolutely no need to do so, especially for a new or relatively new mod user.

Solution
The best solution has always been protecting your game from updates and because we've been doing so since 2019 many of us have never encountered an issue due to Bethesda updating Skyrim Special Edition. So stop the madness from ever happening again by protecting your game. We'll cover the simple steps involved in protecting your game a bit further down in this guide where we prepare the game for modding.

And please, for your own good, stop watching those click bait YouTube downgrade videos ;-)
I highly recommend GamerPoets or Gopher's videos of which you'll find throughout my guides.

For an explanation of what constitutes the "Anniversary Edition" as pertains to modding (and vanilla) see the two sections in The Basics: Modding Skyrim SE guide starting with the section titled "Anniversary Edition Terminology ".
Caution
Please see the following thread before contemplating removing Creation Club Content
(I never remove any of mine - just patch them with the proper patches I have listed later in the guide then either use the CC content in game or ignore them)
Caution: Removing Creation Club Content
The above pertains to the 4 Free CC mods that now come with the base game.
However you can simply uncheck the Anniversary DLC in your Steam Library by going to the DLC section of your Library and selecting "Manage this DLC", then simply uncheck the box in case you decide you want to play without it. Just make sure you do so before you start modding your game.


Now let's make sure our PC can handle this game and has enough storage
RECOMMENDED PC SPECS FOR MODDING SSE 1.6.xxx (what some call "AE"):
Note: These are not SSE's minimum requirements for the base vanilla game
OS: Windows 7/8.1/10 (64-bit Version)
Processor: Intel i5-2400/AMD FX-8320
Memory: 8 GB RAM
Graphics: NVIDIA GTX 780 3GB /AMD R9 290 4GB
Storage: 30-45+ GB available space (including mods) depending on which mods you use.
New Mod Users
Yes this guide looks like a lot of reading, I think "a lot" is optional based on your level of experience with modding this game. Besides, modding will always be reading at least when it comes to successful modding. Or you can simply play hit and miss in the dark where in the end you spend more time backtracking and fixing your game than it would have taken to read everything in the first place.

And if you're a totally new at modding this game I highly recommend that you check out my smaller Vanilla Plus load order guide for 1.6.640 in order to get a feel for modding this game as well as a good feel for using a mod manager like Vortex.

You need a basic understanding of Vortex mod manager in order to use this guide. Once you're armed with that basic knowledge take your time and read through this Guide at least once before attempting to mod your game.

Also follow any linked information like mod manager video tutorials. Modding is not plug & play so there is some basic information to absorb and learn in order to successfully build a stable modded game. But if you don't skip any steps and do a little reading along the way you'll be fine.

The above pertains regardless of which guide you choose to follow or when modding on your own. This guide in many ways is the result of a group effort. Some of you know I'm in the Steam forums daily where I continue to learn and gather the information included here. There are also several of us in the forums daily for any questions you may have as you go. So sit back, relax, grab a beverage, take your time, and take breaks when needed.

Don't skip anything, remember to stop and test as you build your load order and you'll be fine.

Also see my Basics of Modding Guide for common knowledge among the modding community.
Windows Explorer
Make sure you can view your file extensions in your Windows folders properly
Since we will often be working in our Windows Explorer Folders when modding our game we will need to be able to see the file extensions.
By default, Windows Explorer will not show file extensions (Ex: .bsa .exe, .dll, .esp, or .txt)
I'll use Windows 10 as an example.

  1. Open Windows Explorer
  2. Select the View tab at the top
  3. Select Details
  4. Check the box next to File name extensions
  5. Check the box next to Hidden items
(File name extensions is the most important check box)

Windows 11: View / Show / File Name Extensions
Cleanup
REGARDLESS IF YOU HAVE PREVIOUSLY ATTEMPTED TO MOD YOUR GAME OR NOT
I HIGHLY RECOMMEND THESE STEPS BEFORE YOU START MODDING THIS GAME

For some users the new Anniversary update has caused some initial launch issues which can be avoided. After spending much time in the forums helping folks the following has been a sure fire fix for many. This is also something that I always recommended long before the AE update.

So if we're going to mod let's do it correctly right from the jump. By not starting with a true clean slate we are only asking for trouble which will in turn lead to frustration and many wasted hours of your time. Step 1, which is to Start Clean, is also something you should do after every unsuccessful attempt at modding your game. Heck I do it in between every new load order regardless. Steps 2 and 3 should be done rountinely.

1. START CLEAN - this is more than a simple uninstall/reinstall but it's quick. I also recommend installing Skyrim SE out of Program Files in order to get away from UAC: Read more Here
Follow this guide before continuing:
https://gtm.steamproxy.vip/sharedfiles/filedetails/?id=2743619856
2. REGISTRY - speaking of cleaning. This is a good time to clean your registry. You may already have a registry cleaner, if so and you haven't done so lately this would be a good time to do so. If you don't have one CCleaner has always done a good job for me. Get the Free Version here: CCleaner[www.piriform.com]

3. PHYSICALLY clean your PC by blowing out the dust from inside your computer is as important as anything else you'll do. I've seen users diagnosing their game for hours even days due to bad performance only to find out dust was bogging down performance. Here's an article on get rid of the dust collecting in your computer. How to Clean Your PC[www.lifewire.com]
Required files and driver updates
*Important game file in order to launch Skyrim SE (modded or vanilla) you may have it because it should come with the game but does not always install properly so *if prompted to repair* on Install choose "yes" otherwise of course install it:
Visual Studio 2015, 2017, 2019, and 2022[docs.microsoft.com] Take both the x64 and the x86 versions.
(we need x64 for SSE and we need x86 for Nemesis)
More imprtant info on Microsoft Visual C++
You can see the versions you have on your PC by going to settings on your computer and then "Apps" then "Apps & Features". You may see several. Do Not remove/delete any older versions of these redistributables. Leave them there as these files are not superseded when you download the next version. When you install software that needs code from the Microsoft visual C+ Runtime, it will install the version it relies on, if it is not already installed. Different software on your system requires different version(s) of this runtime If you uninstall any of these, some software on your system will stop working.
Long story short, these are nothing to worry about, they will not slow your system down and take up little space - best to leave well enough alone for the stability of your system!

Q: Should I remove the other Visual C++ files on my PC?
A: NO. I don't because Visual C is not an All-in-one file, each version supports different games even different programs that might be on your PC. Not to mention removing them won’t give you back nearly as much disk space as you expect, and remember they’re not impacting system performance if they’re not being used atm.

FAQ: Do I really need all those "Microsoft Visual C++" programs? A: YES [answers.microsoft.com]

NET 6.0[dotnet.microsoft.com] Need both the x64 and the x86 versions for, Vortex, Nemesis Animation Framework and the Synthesis Patcher.

UPDATE YOUR GRAPHIC DRIVERS
Nvidia[www.nvidia.com]
AMD[www.amd.com]
or read
Mod Sites
Let's get setup for downloading and installing mods
There are very few sites that I download my mods from. That said we need to make sure the sites we use are not only reputable but also that they carry the correct mod versions for the game version we are playing. This guide will walk you through the process of getting setup properly and then once we start adding mods will make sure you are installing mods that work properly for this game.

THERE IS NO STEAM WORKSHOP FOR SKYRIM SE

These are all Free mod sites and we need them for this guide
If you can mod it, they'll host it.
"Nexus Mods host 320,082 files for 1,360 games from 130,728 authors serving 28,003,702 members with 4,895,643,266 downloads to date. They support modding for many PC games.

1. *Nexus Mods - Register Free [www.nexusmods.com]
Nexus is the largest site for mods with over 28 million users & over 4 Billion downloads to date.

2. AFK Mods - Register Free[www.afkmods.com] This site hosts many of the best and well known mods and is run by Arthmoor one of the most reputable names in the modding community.

Important: Create your accounts for Nexus Mods, and AFK Mods before proceeding

These are also Free and do not require registration
each site includes a vital file we will be using:
Once we get started we will be downloading a couple of files from:
3. Mod DB (For "Forests of Dibella SSE" tree mod)
4. enbdev.com (for ENB binary)
5. skse.silverlock.org (for SKSE64)
6. My Google Drive I also have some files on my google drive. Some are too large to scan but I have scanned them all and thousands of users have downloaded these files for their load orders.

NET 6.0[dotnet.microsoft.com] Not a mod but we will need both the x64 and the x86 versions for, Vortex, Nemesis Animation Framework and the Synthesis Patcher.


Plugin Limit and Selecting Mods in this guide
As you mod your game please keep in mind that Skyrim has a limit of 255 plugins. Anything above this esp/esm limit and the game crashes. By installing every mod presented in this guide you'll be fine. You start off right out of the gate with 5 game plugins which brings us down to 250 available. ESL's do not count towards that limit. Don't overthink this at least for now because as I said using this guide will keep you below that limit while allowing more than 255 mods. Many of the mods I've chosen for this guide are "flagged as .esl" and these mods do not count towards that limit. Also keep in mind some specific mods in this guide can easily be manually flagged as .esl by you. There are only a very few included in this guide and I'll show you how to use Vortex to flag them in one click. Just make sure you follow the guide because you need to know which mods are safe to flag and which mods absolutely can not be flagged or your game will break. Want more info on this? See Article below.

The Golden Goose (from arthmoor)
Files with the ESL flag are given special treatment with their form IDs. Upon loading into the game, the form IDs are remapped into the FE mod index. This is now considered a special slot in SSE and should not be occupied by any mods in your load order. Not even the Bashed Patch or any other form of merged data.

As a result of this new support, the engine can allow you to bypass the previously hard limit of 255 plugin files. The theoretical limit now should be 4096 ESL flagged mods. Individual files flagged as ESL can in theory hold up to 4096 form ID records. In practice this ends up actually being 2048 form ID records because the engine reserves everything from $0x0000 to $0x07FF. All files using ESL flags must therefore contain their internal form IDs between xx000800 and xx000FFF. Anything exceeding this range is invalid and the game will either crash or you'll have severely corrupted data due to overruns.
Article[www.afkmods.com]

Tools & Tutorials
Don't Have a Mod Manager?
I suggest Vortex as this guide is setup for it.
(MO2 works fine as well if you know how to use it)

Vortex
Requires: .NET 6.0 Desktop Runtime[dotnet.microsoft.com]
How do I know if I have Net 6[support.cch.com]
Download VORTEX [www.nexusmods.com]
Video Tutorials
Here's the introduction video by Gopher
https://www.youtube.com/watch?v=3kbOteChLJE&t=188s
Here's there rest of Gopher's tutorial videos
#1 : Getting Started | #2 : Installing Mods | #3 : Scripted Installers | #4 : Plugins and Load Order
#5 : Dependencies and Conflicts | #6 : Profiles | #7 : Script Extenders | #8 : ENB | #9 : Fores(FNIS)
Encore (ENB)

You'll also need 7zip
*7zip [www.7-zip.org] Get 64bit. FREE

SSEEdit[www.nexusmods.com] You should be familiar with this tool and if not but want to mod seriously then you should eventually learn your way around SSEEdit A/K/A xEdit, an advanced graphical module viewer/editor and conflict detector.

Q: What is all this I keep hearing about using LOOT?

A: To keep this short simply think of LOOT as a guide and only a guide for sorting the order in which the game loads your mods. Vortex has LOOT's API coded into it thus will give you suggestions when it comes to conflicting mods as to which one should load last. But in the end it's ultimately up to you to set and apply those changes. Experience will dictate much here (sometimes it can come down to personal preference). In the mean time we always must read the information provided by the mod author and apply this to what Vortex/Loot suggests based on other mods in our load order. When ever I build a load order I take all of that into consideration then I thoroghly test in game and will provide that load order information where needed next to each mod in the guide. Take your time and think about what you're doing step by step.

Bottom line: Follow this guide and in the process you'll take important steps towards learning to mod this fantastic game. You'll be spending much of your time using Vortex so we start there.


Learn Vortex which is very user friendly but like anything else you first have to familiarize yourself with it. I suggest you watch Gopher's Videos which are extremely helpful. The Vortex UI has slightly changed but the principles remain. The time you spend with Gopher will come back ten fold.
#1 : Getting Started | #2 : Installing Mods | #3 : Scripted Installers | #4 : Plugins and Load Order
#5 : Dependencies and Conflicts | #6 : Profiles | #7 : Script Extenders | #8 : ENB | #9 : Fores(FNIS)

Anyone that tells you one mod manager is better than another - Vortex and MO2 were made by the same person. One is better at some things than the other. They are both outstanding mod managers

Dragging & Dropping a file to Vortex
Usually mods are installed via a mod manager by using the install with mod manager button on it's Nexus mods page. Sometimes this guide will tell you to drag and drop the file in Vortex if you can only download the mod manually usually this happens in mod sites other than Nexus.
To do this you drag it to the box at the very bottom of Vortex while in it's "Mods" section:
the rectangular box is located down below the "Get more mods" button


OR you can navigate to the file from the very top left hand side of Vortex
select the + and locate the mod/file in Windows Explorer and let Vortex do the rest
(see image below):


Mod mangers install your mods to the Data folder and the majority of mods will be installed with the mod manager directly from Nexus. However for some mod sites like AFK mods we need to use the above method. I prefer drag and drop in those cases. So if you manually download a mod that is required to be installed to the Data folder (this guide will note those instances) then the above methods can be used. Some mods do not install to the Data folder and must be installed manually and this guide will mark those as such. Follow the manual installation instructions on the mod page (or guide) where apllicable. If you're not sure ask.
Protect Your Game
Important
Make sure that when an update comes out for this game you won't receive it until you are ready as there is always a very high chance some mods won't function and you will not be able to play your game until the mod or mods are updated by that mod author.

Fortunately we can avoid this very easily. Simply take a minute to protect your game:
https://gtm.steamproxy.vip/sharedfiles/filedetails/?id=2872091273 And please do not start removing mods mid game at the first sign of problems (you won't find problems with this guide if you follow it but I'm giving you this for future reference).
Read more here.
Let's Get Started
This Guide is for SSE (Anniversary) version 1.6.640 and will work with or without the newest DLC.
This is clearly noted throughout the guide so regardless if you did or did not purchase the new Anniversary DLC you can use this guide. Simply follow the notes as you go.

Are you sure you're ready to start? Did you follow the previous sections? If so let's go...

Install order is important so please stick to that. It's also important that you do not skip any steps unless listed as optional. Download and install mods in the order they are listed. Pay strict attention to version numbers where applicable and follow any specific installation instructions including the Before/After rules as listed in this guide because often they are different than Vortex suggests, make sure you use the guide's rules.

Relax, grab a beverage and take breaks when needed. Rome wasn't built in day and either is a properly modded Skyrim. Take your time, haste makes waste.

Important:

Go to the Vortex "Plugins" section and make sure you can see the games base files.
The Plugins section should not be blank.
(if it's blank then from the "Mods" section of Vortex use the Verify Steam Files button up top)

*Important reminders!

Do Not use mods from the in-game mod menu with this guide
The in-game mod menu offers Bethesda Mods but the problem is that it also tries to manage the mods and the Bethesda "Mod Manager" is wonky at best. Matter of fact Bethesda doesn't even support it. So I stay completely away from it. But if you absolutely must have a mod from it then go into the "Extensions" section of Vortex and install the "Import from Bethesda" extension. Then proceed at your own risk.

Do not add your own mod selections unless you are an experienced mod user
Stick to the mods listed in this guide unless you are sure of what you are doing otherwise I really can't help you with any issues that you experience with your game.

Also pay close attention to the notes in this guide regarding Before/After "Rules" where added, as we often need to go against what Loot/Vortex suggests and in those cases it makes a huge difference in your game on the plus side. Remember Loot/Vortex, which relies on community feedback, is correct approximently 80ish% of the time, the other 20-25% of the time it is crucial that we follow the "Rules" as written in this guide which are based on various factors including but not limited to; logical load order, other mods that are in this load order, and of course extensive play testing.

*Please Note:
ALWAYS BE AWARE OF WHICH VERSION YOU ARE DOWNLOADING ON EACH MOD PAGE
What we are looking for is mods for game version 1.6.640 or mods that have "1.6.629+" in the mod name or version nomenclature or some confirmation the mod works for this (1.6.640) version of the game. If there are no notes, for example on texture mods there most likely will not be, then we are fine especially since I'll provide notes where I feel there may be some confusion.

First
From your Steam Library: Launch your game to the settings window only and choose "Options" where you'll make sure your Resolution is correct and your video card most likely will NOT be detected, this is normal so simply choose choose "Ultra", "High", "Medium" or "Low".

Make sure it looks like this by also selecting "Advanced" to open the 2nd window

expand this example graphic if needed[/i] Note: I play @2560x1440 but select your resolution
Select TAA and we want the boxes to look like the above example (with your resolution).

Select OK and Exit.

IF you purchased the $20.00 Anniversary DLC with the 70 additional Creation Club items
And have not yet installed the content you can launch your game to the main menu and install all the Creation Club Content. This should take a few minutes and once it's complete exit the game and continue on with this guide.

I'm leaving ENB for later and it's of course not a requirement
I give you a recommendation of what I normally use with this setup but you really do not "need" one. That said lighting goes a long way towards improving the look of your game and you can install an ENB whenever you like. I always install my ENB after I install my lighting and weather mods. This way I know what my game looks like without an ENB. I do recommend one that looks great with these mods and I explain why later. You'll lose between 5 and 20 fps (frames per second) with an ENB but this game although set for 60fps was originally made for 30. What we don't want is constant large spikes and dips. If you get 40ish you're fine.

IMPORTANT Reminder
Make Sure Your FPS is Set/Locked at 60 max
The game default is 60 fps so as long as you DO NOT change these settings iVSyncPresentInterval=1 which is found in SkyrimPrefs.ini located here: C:\Users\Owner\Documents\My Games\Skyrim Special Edition) and DO NOT use mods that intentionally change that you are fine. This is not a multiplayer shooter game and it was originally designed to run at 30 so you'll be more than fine at 60 (or 50, or 40) but the main reason you want your game NOT to run above 60 fps (I use 59) is that everything in the game is tied to the FPS including Quests, Timelines, NPC behavior, and the AI - not to mention things like animals and objects START FLYING AROUND as well as SOUND problems, water flickering, etc. For more info read. Ultimately, the Bethesda developers recommend not doing this. Even with a great PC, you could find that you encounter a bunch of problems with the game’s physics engine. Then there's the quests which don't care how great your PC is when it comes to how quests fire.


BEFORE YOU START - VERY IMPORTANT
Go in the Vortex Mods section and select the gear icon in the upper right hand corner and in the dropdown make sure you check "Dependencies". This way we always have access to each mod's "Rules" (just in case).
Regarding Cleaning Masters
This section is in regards to cleaning the game's master files.

To clean or not to clean
You'll actually be better off not cleaning your Masters or Creation Club Content.

For those of you that have cleaned or heard about cleaning master files in the past.
There was an issue in an update to xEdit's QuickAutoClean which the xEdit team later said they fixed but we don't feel it's been properly corrected. On top of that cleaning your Masters was never a "Must do" type of thing unless your load order was, say for example over 500 mods. The short of it is - Do NOT clean your Masters using xEdit's QuickAutoClean. This includes Masters from the Anniversary Edition content.

*However - Do Fix This with xEdit (NOT AutoQuickClean)
In the Dawnguard.esm there is a wild edit that blocks an official fix in the Update.esm
You can remove this wild edit with SSEEDIT (xEdit).
These steps are outlined step by step by GamerPoets at the mark 5:37 mark of this video.
I've also included a step by step text (.txt) version which you can find here[drive.google.com]
Anniversary DLC
Launch Skyrim SE & Download the DLC
This content is downloaded at the Main menu.
You should be greeted with a download prompt.
Select Download (see image)
Once complete exit the game.

Check in the Vortex plugin section to ensure the content is present. This should be 79 items although you'll notice the number showing at 78 since Skyrim.esm is number 0.
(Select Image above for full view)
If the content does Not appear in the Vortex Plugin section restart Vortex and if it's still not there select Sort now at the top of the Plugins section in Vortex and after it's finished sorting all of the content should appear. We are ready to proceed.

Your Steam and Bethesda accounts need to be linked. So in case anyone needs that info:
How to link your Bethesda and Steam account
Go to Bethesda.net.
Log in to your account up the top right.
Click your account.
Select Linked Accounts.
Click on the empty box and select Steam.
Start with Bethini
An excellent tool which is kept up to date by the folks from S.T.E.P.


Already have Bethini installed from a previous modding session? In this case simply jump to step 5 and run Bethini one time from Vortex as per those instructions.

*This is optional but Highly Recommended for those not well versed in .ini settings or what and how important they are. This mod will make a big difference in performance, lighting, and much more. On the other hand if you are completely comfortable changing the .ini's and know what you are doing then you probably don't need Bethini. Eventually you should familiarize yourself but for now Bethini is an outstanding start. We will also be adjusting some settings as required by the mods we are installing.

Important Step
In the last section we launched Skyrim SE from your Steam Library but only to the settings window where we selected "options" and chose your settings (Ultra or Medium etc). Now we should optimize them with Bethini.

Launch the game one last time from your Steam Library and this time run it to the Main Menu then exit the game. Now we are ready to tweak/optimize our ini files.
That will be the last time you'll launch this game from your Steam library.

Now that we have the above out of the way:

Setup
Bethini is a manual download - (install is also manual - but not to your game folder).

1. BethINI[www.nexusmods.com] Download the Main file to your desktop.

2. We will be adding Bethini to the "Modding Tools" folder we set up earlier. If you don't have a folder for "Modding Tools" create one now somewhere outside of your Skyrim directory folder.
(You can also put other tools in you Modding Tools folder such as xEdit and Loot etc).

3. Unzip the main file and place it inside the modding tools folder.

4. Once you've Download the "BethINI Standalone Version" & moved it to the modding tools folder you created you can run it from there thru the .exe or preferably from the Vortex dashboard by adding it there. Vortex users add it now so we can run it directly from Vortex -
MO2 users do not run Bethini from your dashboard. More info on MO2

Launch Bethini:
5. Then make sure "Bethini Presets" is ticked and check the "Recommended" box which will immediately prompt Bethini to make it's Recommended changes.
Now we can make a couple of tweaks before we save
Did you make sure "Bethini Presets" is ticked and check the "Recommended" box?
Make sure your screen Resolution is correct (example:1920x1080 or 2560x1440)
and if you want Med or High or Ultra it's selected properly
Make sure "Improved Shader" is off/unticked (because it's horrible)
Make sure to uncheck "Ambient Occlusion"
Make sure you select TAA for Antialiasing and make sure FXAA is off/unticked.
Make sure ProjectUV Diffuse Normals is enabled/ticked
You can untick 64bit rendering of targets as this is no noticeable visual change but can add FPS
Shadow Resolution - lower this to 2048 (4096 is too much) for some added FPS w/o visual loss
You can make NPCs use Ammo if you like
but DO NOT change FPS above 60 and DO NOT change Ugrids to load.
Other setting should left as is.
Then save which also closes Bethini.
Below are the important tweaks:
(select image to expand view)

Save will Exit Bethini. That's it - your .ini's are setup and tweaked - we'll be tweaking them further as we install mods. Matter of fact our first check is at the bottom of this section and you'll make changes if needed.


Eventually you should learn what these settings do. Until then this will make a huge difference in the way your game runs and looks.

need more help with Bethini? see the mod page.

Also, here are a couple of ini settings you need to double check. You can make changes to your ini's through Bethini by going to the tab and for example with the settings below you would select "Display" then find the matching line and change it there. or - Go to SkyrimPrefs.ini located here: C:\Users\Owner\Documents\My Games\Skyrim Special Edition
and add any of the lines below that are not currently present under [Display]:
Make sure they are under [Display] bTreesReceiveShadows=1 bShadowsOnGrass=1 bDrawLandShadows=1
Always remember to save your changes
Script Extender (SKSE64)
Just a note before we continue:
Regarding FPS. The most important thing is avoiding huge FPS spikes. For example if your FPS dips down in the 30 FPS range then jumps back up to 50 or higher. In these scenarios simply start off by capping your FPS to 30. Remember that this game was originally designed for Consoles at 30 FPS. I know some users are hung up on FPS but this is not a competitive shooter where you might need the advantage on your opponent. Heck on my old PC I capped my FPS at 30 and was extremely happy with the performance. So for example if you run an ENB on an older system an see low FPS don't hesitate to cap your FPS, you can do so through your ENB or your Nvida Control Panel or AMD.

I'm not going to get into a FPS debate lol, folks are going to believe what they believe but in IMHO FPS is a bit over rated in single player games. Btw, on my RTX 3090 I can run a 1,000+ mod list with a script heavy, 4K mod list and my game runs buttery smooth at a constant 60FPS but to be honest my game at 30FPS is every bit as enjoyable for me because I really don't notice a difference.

Time to install mods

First the all important Script Extender (SKSE64)

Vortex users: Can access SKSE64 directly from Vortex
Official Link for SKSE64
SKSE: Preliminary AE build 2.2.3[skse.silverlock.org]
Install "Current Anniversary Edition build 2.2.3 (game version 1.6.640)"
Let Vortex install it for you by following these steps (for video see the end of this section)
From Vortex Choose:
  1. From top right hand side (Bell) Choose "More" (if no option then launch game/exit/try this again
  2. Choose: "Open in Vortex" or now it's been changed to "Download"
  3. Choose "continue"
  4. *Current Anniversary Edition build 2.2.2 (game version 1.6.640)
  5. Let it install
  6. Add to Vortex Dashboard by following the next steps
After installing SKSE64
Let's add it to the Vortex Dashboard so you can launch the game from there:
  1. Go to your Vortex Dashboard
  2. In the Tools section find the Script Extender (or use the "+Add Tool)
  3. Select the 3 vertical dots
  4. Select Edit
  5. for Name if it's not already there type Skyrim Script Extender 64
  6. Under the Target location, direct it to your skse64_loader.exe
    (Ex: \steamapps\common\Skyrim Special Edition\skse64_loader.exe)
  7. Save
  8. Select the 3 vertical dots
  9. Select Make Primary
The steps above allow you to properly run SKSE from Vortex which you should always do!
(always be sure Steam is running in the background before launching)
OPTIONAL INSTRUCTIONS
SKSE64 installation (video) or manual installation instructions (text)
Video: Installing SKSE64 with Vortex:
(same steps as outlined above)
GO TO THE 4 minute and 5 second mark of this video https://www.youtube.com/watch?v=0prWgeGGnp8&feature=youtu.be
Manual Installation Instructions for SKSE64 (text)
Here[drive.google.com] (the old school method)


Important Reminder ALWAYS BE AWARE OF WHICH VERSION YOU ARE DOWNLOADING ON EACH MOD PAGE We are looking for either "1.6.640" or "1.6.629 and newer" or "1.6.629+" or "1.6.629 and later" or firm confirmation the mod works for game version 1.6.640. If there are no notes, for example on pure texture mods, then we are fine. This guide will instruct where needed.
Base Mods
So far we've installed Bethini & SKSE64 let's add our base mods.

The single most important requirement:
Take your time

[1] Unofficial Skyrim Special Edition Patch[www.nexusmods.com] (version 4.2.9a)
The USSEP now incorporates patches for Fishing, Rare Curios, Survival, and Saints & Seducers. "The goal of the Unofficial Skyrim Special Edition Patch (aka USSEP) is to eventually fix every bug with Skyrim Special Edition not officially resolved by the developers."

We will install Creation Club Patches for the Anniversary DLC (IF you purchased it) later.

[2] Address Library for SKSE Plugins[www.nexusmods.com] (version 8)
Install "All in one (Anniversary Edition)" (version 8). This mod Contains header file and a database to make SKSE DLL plugins version independent easily.

This Next Mod is a 2 part install - part 1 with Mod Manger and part 2 Manually
[3] SSE Engine Fixes (skse64 plugin)[www.nexusmods.com] version 6.1.1
A) Install (with Vortex) "(Part 1) SSE Engine Fixes for 1.6.629 and newer" (should be 2nd file)
+
[4] B) Manually Download "(Part 2) Engine Fixes - skse64 Preloader and TBB Lib".
  1. Place it on your desktop
  2. with either 7zip or Winrar / Choose "extract here"
  3. drag the 3 .dll's: "d3dx9_42.dll", "tbb.dll", and "tbbmalloc.dll"
    to your Skyrim Special Edition folder located in:
    SteamLibrary\steamapps\common\Skyrim Special Edition
Now you can delete the items you just placed on your desktop
+
NEXT: Settings for SSE Engine Fixes (I use these settings which I highly recommend)
Go to: \steamapps\common\Skyrim Special Edition\Data\SKSE\Plugins
open EngineFixes.toml with Notepad or Notepad++ (++ will show line #'s)
Line 11: Set MaxStdio to 8192 (Raises max file handle limit from 512 to 2048, which should fix "False Save Corruption" bug in most cases
Line 13: Set RegularQuicksaves to true (I don't use QuickSaves but this is a precaution)
Line 66: Set SaveGameMaxSize to true (Changes max saves from 64MB to 124MB for large load orders and/or long playrthrough's)

[5] Bug Fixes SSE[www.nexusmods.com] version 10 (This is an additional collection of engine bug fixes.)
Install (2nd Main File) "Bug Fixes SSE - Anniversary Edition (1.6.629.0 and later)" version 10

[6] Scrambled Bugs (Anniversary Edition)[www.nexusmods.com] version 21
A collection of engine bug fixes & patches.
Install (2nd Main File) "Scrambled Bugs - Anniversary Edition (1.6.629.0 and later)"
+
Next: Settings for Scrambled Bugs
Go to: \steamapps\common\Skyrim Special Edition\Data\SKSE\Plugins
open ScrambledBugs.json with note pad or notepad++ (++ will show line #'s)
Line 37: Set "blackSoulGems": to true (Trap only black souls in black soul gems)
Line 38: Set "underfilledSoulGems": to true (Trap only souls of the appropriate size)
Line 44: Set "equipBestAmmo": to true (Automatically equip your best playable arrows or bolts)
+
Also install:
(from the Optional files section of Scrambled Bugs)
[7] Install "Script Effect Archetype Crash Fix"
FOMOD: Make sure 1.6.318.0+ is selected.
+
(from the Miscellaneous files section of Scrambled Bugs)
[8] Install "Underfilled Soul Gems - Soul Gem Too Small" this is a lite plugin (FE) which changes the message we receive in-game due to our change in Line 38

We want the next mod's version from AFK Mods website as it's updated for 1.6.640
[9] Alternate Start - Live Another Life 4.1.9 [www.afkmods.com] Manual download then drop into the bottom of the Vortex mod section. provides a wide variety of role playing choices to start the game (including the vanilla start). Great for role playing and of course for testing as well.
Note: Vortex/LOOT will make sure this mod moves down in your load order as you install more mods.
+
Optional
[10] Alternate Start Voiced[www.nexusmods.com] Voice files for the mod Alternate Start LAL.


start up the game & make sure everything loads, runs & looks ok at this point

[11] powerofthree's Tweaks[www.nexusmods.com] v1.8.0
Install Main File "powerofthree's Tweaks"
FOMOD: make sure version (1.6.629+) is selected.

[12] powerofthree's Papyrus Extender[www.nexusmods.com] Install Main File (v5.5.0)
FOMOD: make sure version (1.6.629+) is selected
Extends Papyrus script functionality.

[13] PapyrusUtil SE - Modders Scripting Utility Functions[www.nexusmods.com]
Install "PapyrusUtil AE SE - Scripting Utility Functions" v4.4
Extends Skyrim SE Papyrus scripts (or SKSE/C++ plugins) with JSON based serializable data structures like arrays and maps.

[14] JContainers SE[www.nexusmods.com] v4.2.3.
install the 2nd file "SKSE 2.2.2 / SSE (SAE) 1.6.640"
Extends Skyrim SE Papyrus scripts (or SKSE/C++ plugins).

[15] Skyrim Priority - SKSE[www.nexusmods.com] Install 1st Main File "Skyrim Priority SE AE"
This mod makes Skyrim always take most of CPU usage Instead of you setting Skyrim SE as High Priority in Task Manager before each Launch. Prevents sudden lag caused by other processes.
+
Also, check out this video, you do not need to take these steps as the mod does it's job well. But these additional steps can improve performance further. And you can always revert back as is explained in the video.

[16] Vanilla Script (micro)Optimizations[www.nexusmods.com] v1.16a
Rewriting many of the vanilla game scripts with the goal of increasing efficiency. Replacing slower "convenience functions" with their faster native counterparts. Re-ordering condition checks to implement "fail fast fail early" approach. Caching of often-used values.
Vortex/Loot should auto place this directly below the USSEP in the plugins section of Vortex.

Only install on a New Game (which we should be doing anyway with this guide).
[17] Vanilla Scripting Enhancements[www.nexusmods.com] Install only BSA version.
Optimizes certain vanilla scripts with PO3 Extender to reduce script lag when using lots of mods. ie., this mod is geared towards fixing stack dumps/script slowness. Again, Vortex/LOOT should place this directly below "Vanilla Script (micro)Optimizations" and the USSEP in the plugins section of Vortex.

Optional - Do you play with a controller?
[18] Auto Input Switch[www.nexusmods.com]
Install 1st Main File "For Skyrim Special Edition 1.6.318–1.6.659" v1.2.0
Allows you to easily switch between your controller and mouse.


start up the game & make sure everything loads & runs ok at this point
Anniversary DLC Patches/Fixes/Textures
You do not need this section if you only have the base game which comes with Fishing, Rare Curios, Saints & Seducers, and Survival Mode which are all covered by the USSEP.

This is a bundle of patches (recommended by the USSEP Team) to fix the bugs in the Skyrim Creation Club content as well as resolve conflicts between Creation Club mods and the Unofficial Skyrim Special Edition Patch (USSEP).

Who needs this?
Anyone who purchased the Anniversary DLC for Skyrim Special Edition which includes an additional 70 CC mods. So if you ONLY have the base game which includes; Fishing, Saints & Seducers, Rare Curios, and Survival Mode, these patches are covered by the USSEP so you don’t need this patch (USSEP version history at the bottom of this section).

Mod manager install
[1] *Unofficial Skyrim Creation Club Content Patches [www.nexusmods.com] v7.2
FOMOD: make sure you select "Merged" which cover the entire Anniversary DLC.
For a list of fixes that are included in this patch see the "Logs" tab on the mod page. Also, the Bugs tab found on the mod page is where the mod author asks users to report issues so he can easily keep track of and work on them.

Terrain fixes
We will be adding "Grass Fixes for Creation Club Mods" later in the guide. This will fix the terrain issues around Tundra Homestead, Myrwatch, Hendraheim, Goldenhills Plantation, Fishing, and Saints & Seducers. However it's best placed after "Landscape Fixes for Grass mods". So we will install it later.

Optional Anniversary DLC Textures
Read:
The Following mod is Optional but you must own the AE DLC. I'm including it 1) because I feel it's needed and 2) because we will be using SPID and Base Object Swapper to distribute some of the armors to various NPCs throughout the game. This mod allows you to choose what you want through it's FOMOD and although I took everything you can choose what you want however I suggest at the very least you take the armors since we will be using some of them for other mods.

I use the Cleaned and Upscaled versions. That said you can instead only install the "Cleaned" version which greatly improves everything. Upscaled will improve the diffuse texture of the armors and weapons by a factor of 2x so you end up with 4K-2K in those instances.

Optional
[2] Creation Club Anniversary Cleaned and Upscaled[www.nexusmods.com] File size: 9 GB
Install "CC_Content_Anniversary_Cleaned_and_Upscaled"
in the FOMOD installer choose "Install Everything"
+
[3] then add "CC_Content_Anniversary_Cleaned_and_Upscaled_Update"
+
This is also Optional - it's a big file and covers the CC Ayleid Ruins.
add this 1 file (which was left out of the CC Upscaled mod):
[4] Anniversary Edition and Creation Club - Everything Upscaled[www.nexusmods.com]
Only use the file "Ayleid Ruins and Mania Tileset" File size: 2.28 GB
Rule: AFTER Creation Club Anniversary Cleaned and Upscaled (Vortex/LOOT is wrong)

Option to the Optional
OR - If the above CC Cleaned & Upscaled is too much for you read this spoiler.
OR - at a minimum use the Cleaned only versions which is a smaller file size.
so instead use: "CC_Content_Anniversary_Cleaned"
and then add "CC_Content_Anniversary_Cleaned_Update"

Utilities
Optional
Up to you on this next mod
I'm not setting this guide up for any particular body type but if you need this you'll know it.
[1] BodySlide and Outfit Studio[www.nexusmods.com] An easy to use tool for customizing bodies & outfits, creating new bodies & outfits, and converting outfits between body types.
Here's a Body Slide install video[staticdelivery.nexusmods.com] using Vortex.
For a more detailed walkthrough see this Video by Gopher using Fallout 4 as an example - same principles apply for Skyrim SE.
You can also see the FAQ's on the mod page for more info
(or see the BodySlide & Outfit Studio section of my SSE Help Guide for more info)

The rest of this section you do need for this guide (unless marked as optional).

[2] FileAccess Interface for Skyrim SE Scripts - FISSES[www.nexusmods.com] v1.4.1
Install "FileAccess Interface for Skyrim SE Scripts - FISSES (Anniversary Edition) BETA"
Easy to use interface to save&reload in-game variables (e.g. MCM settings) to/from file.

[3] ConsoleUtilSSE[www.nexusmods.com] v1.4.0
mod that enables papyrus scripts to execute console commands.

[4] Base Object Swapper[www.nexusmods.com] v2.5.1
FOMOD: Make sure it selects v1.6.629+
SKSE plugin and framework for swapping base objects and references, using config files.

[5] Spell Perk Item Distributor (SPID)[www.nexusmods.com] v6.5.2
FOMOD: Make sure 1.6.629+ is selected.
SKSE plugin that can be used to add spells/perks/items/shouts/packages/outfits/keywords/factions to every NPC in the game, using config files.

[6] Keyword Item Distributor (KID)[www.nexusmods.com] SKSE plugin that distributes keywords to weapons/armor/magic effects/ingestibles and other items, using config files.

[7] FormList Manipulator - FLM[www.nexusmods.com] SKSE plugin that allows you to add Forms to FormLists at game startup using configuration files In order to reduce the number of conflicts between mods. Created with CommonLibSSE-NG for Skyrim SE, AE, and VR.

Optional
[8] Quest Journal Limit Bug Fixer - Recover Disappeared Quests[www.nexusmods.com] v0.2.1 (Don't worry too much about version here as there is no .dll plugin) A utility to bring back quests that disappeared due to quest journal limit bug

Optional
[9] Sweeping Organizes Stuff - Use Broom to Clean Mess[www.nexusmods.com] v0.4 Use broom to clean up physics messes for example in case you accidentally fuz ro dah items all over your house.

[10] Fuz Ro D-oh - Silent Voice[www.nexusmods.com] v2.3
install 1st file "Fuz Ro D'oh"
adds support for unvoiced in-game dialog, also enhances the “Force Subtitle” flag in topic info records – When set, subtitles will be displayed for the info’s responses regardless of the global subtitle settings.
+
from optional files
[11] Install "Alternate Silent Voice Files" v1.1
RULE: AFTER Fuz Ro D-oh - Silent Voice

Optional One of my favorite mods.
I mainly use this to change armors for NPCs like Lydia where you can't give them a new armor
[12] Simple NPC Outfit Manager[www.nexusmods.com] Do not use on children or creatures!!
I use the 2nd file "Simple NPC Outfit Manager (Utility)" (only use 1 file)
Mod allows you to have direct control over what your Skyrim NPCs are wearing. Create custom outfits and equip them to any Skyrim NPC. Also has all vanilla Clothing and Armors to choose from. Powerful, functional, and lightweight. See below to remove restriction.
Remove Restriction: Outfit change dialogue is only available to all unique Skyrim NPCs
To remove the restriction use console command CCORestrictOutfitDialogue 0 See below for a mod that allows copy & paste for console commands
this will permanently remove the restriction (more info in my Pick & Choose guide or see mod page).

Optional
[13] ConsolePlusPlus[www.nexusmods.com] v1.2.0
Adds ability to Copy paste text from clipboard to console, using Ctrl+V


start up the game & make sure everything loads & runs ok at this point
Low priority early Loaders
Note: Low priority does not mean optional. These mods are a large part of the base for our load order. Low priority means parts of these mods can and will be overwritten (that's why they are early loaders) by other mods leaving parts of these mods active in the game. As we add more mods later the guide will let you know which mods should win any conflicts. Simply follow the guide.

These mods provide an excellent foundation as both a graphic base and also various fixes. These mods must be high up in the load order (low priority). They cover a large portion of the game.

[1] Static Mesh Improvement Mod - SMIM [www.nexusmods.com] FOMOD install Choose Everything
Going Forward: Always choose AFTER SMIM for "Rules" in Vortex on mods that conflict with SMIM. ie., anything we add from now on if asked should be marked to load AFTER SMIM
I'll remind you as we go.

[2] Static Mesh improvement Mod - SMIM - Quality Addon[www.nexusmods.com] Rule: After SMIM.
Improves many files of the great SMIM Mod, providing visual upgrades. We will be overwriting this where necessary as well.

[3] Noble Skyrim (NSM) [www.nexusmods.com]
use 2K version (or 1K Performance version for weaker systems)
RULE: AFTER SMIM . This mod gives all of Skyrim's architecture a complete new look. Also retextures, landscape, dungeons etc. Later we will let some mods override some parts of this mod. This and SMIM are our base.
+
Also add the first file from the update section:
[4] Install NSM - SMIM Patch we do not need the update file.
RULE: AFTER everything Vortex asks (See Vortex image below)
(Do not install the update file listed as the main file already includes the update).
Vortex Rules (Click image below to expand if needed):


[5] Navigator - Navmesh Fixes[www.nexusmods.com] A few navmesh improvements.
FOMOD: Select .esl Leave other boxes blank Then select Rift Watchtower and Broken Oar Exit
(See FOMOD images below)
This way we get all the changes listed in one .esl light master plugin. This will also allow other mods which change a navmesh with a purpose to overwrite these changes.
Click image to expand if needed:


this next mod corrects numerous graphic glitches around Tamriel worldspace.
[6] *Skyrim Landscape and Water Fixes[www.nexusmods.com]
FOMOD: ONLY SELECT the following (see image):
  • Landscape Fixes for Grass Mods
  • Navigator
  • Northern Marsh Bridges
  • ECPLW -ENB Complex Particle Lights for Windows
  • Lanterns of Skyrim II
  • *Tundra Homestead AE CC Content (*ONLY choose IF You Purchased Anniversary DLC)
  • *Alternative Armors Elven Hunter AE CC Content (*ONLY choose IF You Purchased AE DLC)
  • Hendraheim AE CC Content (*ONLY choose IF You Purchased AE DLC)
  • ELFX Shadows
  • SMIM
Image of SLaWF FOMOD installer:

Rule: AFTER SMIM.
+
Next: in the Plugins section of Vortex
disable these 5 plugins:
"Landscape and Water Fixes - patch - LoS II.esp"
"landscape and water fixes - patch-wizkid enb windows.esp"
"landscape and water fixes - patch - LFfGM.esp"
"landscape and water fixes - patch - northern marsh bridges.esp"
"landscape and water fixes - patch - elfxshadow.esp"
we will enable them later after we install "Landscape Fixes for Grass Mods" and "Lanterns of Skyrim" and "ELFX Shadows" and "Northern Marsh Bridges".

[7] Lightened Skyrim[www.nexusmods.com]
Only install the first file "Lightened Skyrim".
As you add mods we'll let anything that conflicts overwrite this (I'll remind you).
You'll gain FPS (VRAM) across Skyrim with no visual difference!
FOMOD: ONLY SELECT the following:
  • Yes, I use USSEP
  • All in one
  • Skyrim Landscape and Water Fixes


[8] Dynamic Things Alternative - Base Object Swapper[www.nexusmods.com] Rule: AFTER SMIM.
Interact with previously static items like archery targets, crates, mammoth skulls, taproots, firewood piles and more. Allows you to train (earn xp) on Archery targets and training dummies (you need to uncheck & check in the training section of the MCM to trigger it then training works as intended).
See mod page for a list of things you can now harvest and interact with in game.


start up the game & make sure everything loads & runs ok at this point
Fixes
[1] OnMagicEffectApply Replacer[www.nexusmods.com] use the "Effective" version
Only install the 2nd file "OnMagicEffectApply Replacer Effective".
Many mods use "cloak" spells to distribute various effects to NPCs, this is a call fix of OnMagicEffectApply event in different scripts. This mod works well with the next mod

[2] Mage Armor Script Fix[www.nexusmods.com] (v1.0) Fixes major lag/crashes when for example a group of mages are casting spells that give them armor protection (Oakflesh, Stoneflesh, Ironflesh, Ebonyflesh, Dragonhide). Saves FPS in those instances. This mod works well with the above mod..

[3] Equip Enchantment Fix[www.nexusmods.com] Install 2nd file "1.6.629 and newer" v1.3.6.
Fixes engine bugs where item enchantments don't apply when equipped or stop working while the item is still equipped. This is different than the enchant fix that comes with Scrambled Bugs.

[4] Enchantable Special Item Fix[www.nexusmods.com] FOMOD: Make sure Skyrim Special Edition is selected.
Fixes player-made enchantments not appearing on descriptions of special items that already have text in that section of the item card.

[5] Dragon Stalking Fix[www.nexusmods.com]
After install Mark Dragon Stalking Fix.esp as light in Vortex Plugins section.
Don't forget to Deploy Mods from Vortex Mods section afterwards.
Dragon corpses will no longer randomly fall out of the sky

[6] Mfg Fix[www.nexusmods.com] install version MfgFix for 1.6.629+
Fixes "mfg modifier", "mfg phoneme", "mfg reset" console commands and adds new command "mfg info" that shows all currently applied modifiers. also Fixes eyes blinking for player (eyes blinking can be configured in ini file). Fixes stationary eyes issue when using mods that dynamically change character's expressions
+
(same mod page as above - in the optional files section)
[7] Install MfgFix MCM to configure eyes blinking and eyes movement in game. Requires MfgFix same version as above 1.6.0 File is already a Light plugin (FE)

[8] Floating Ash Pile Fix[www.nexusmods.com] Fix floating ash piles by making them fall down to the ground. Mesh Fix Only.

[9] High Gate Ruins Puzzle Reset Fix[www.nexusmods.com] Fixes High Gate Ruins Puzzle not resetting properly, blocking off half the dungeon on subsequent visits.

[10] WIDeadBodyCleanupScript Crash Fix[www.nexusmods.com] Fixes a rare crash when saving due to wideadbodycleanupscript.

[11] Lights Out. Solitude Lighthouse Fix[www.nexusmods.com] During the quest Lights Out the play is tasked with turning the solitude lighthouse off. Unfortunately it does not get relit later on. This mod will fix that by relighting the lighthouse afterwards.

[12] Mannequins Behave[www.nexusmods.com] Install the file "Mannequins Behave ESL Flag"

[13] Tavern AI fix[www.nexusmods.com] Waiters will serve you only if they can see you. Innkeepers will show you rented room only once, you can ask them to show the room if you forgot where it is.

[14] NARC Remade - No Animals Report Crimes[www.nexusmods.com] FOMOD: Only select NARC (nothing else).
Tired of that chicken going up to the guards and being a nark? Annoyed because that one bear ratted you out? Upset because horses are snitches? This is the mod for you!

[15] Believable Crime Report Radius[www.nexusmods.com] A very simple change that reduces the crime report radius to 1000 units (14m) from the default 4000 units. (57m)

[16] Butterflies Land True[www.nexusmods.com] ONLY Install the No Formlist Changes version
This one: "Butterflies Land True - ESPFE No Formlist Changes Alternate Version"
BLT corrects & fine-tunes many Butterfly landing zones in Skyrim.
(later on we'll work on butterflies a bit more to fix a lot of the remainder indirect landing zones)


start up the game & make sure everything loads & runs ok at this point

[17] Actor Limit Fix[www.nexusmods.com] Only Install the 2nd Main File (version 9)
"Actor Limit Fix - Anniversary Edition (1.6.629.0 and later)"
Increases the number of actors that can move, make facial expressions, and have their lips synced to their voice lines at any given time.

[18] Animation Queue Fix[www.nexusmods.com] Fixes the queue getting overloaded when a lot of animations are queued for loading at once.

[19] I'm Walkin' Here[www.nexusmods.com] v1.7.0
Prevents NPCs from pushing you while you're walking or in a chat.
(if you have a pet following you and this does not effect them simply open the console (~) and make sure you click on the follower/pet, then type "setplayerteammate 1")


[20] Barter Limit Fix[www.nexusmods.com] Fixes a bug that can prevent the player from receiving gold when selling to a merchant if the merchant has more than 32,767 gold. This bug can similarly prevent the player from receiving items when buying from a merchant if the merchant has more than 32,767.

[21] Hearthfires Houses Building Fix[www.nexusmods.com] Restores proper models of some building parts and furniture in crafting menu and more. See mod page for details.

[22] NPC AI Process Position Fix - NG[www.nexusmods.com] v1.1.1
FOMOD: Select DLL + AI Overhaul Patch (see image).
Supports all game versions. Fixes the vanilla game engine bug that NPCs AI process positions could not be updated after you waiting/ sleeping/ fast travel. The AI Overhaul patch is an SKSE .ini file so no need to disable anything. We will be installing AI Overhaul later.


[23] PrivateProfileRedirector SE - Faster game start (INI file cacher)[www.nexusmods.com] The amount of seconds that this mod will reduce your start time by depends on the amount of enabled plugins you have, as well as other things using INI files such as ENB. It will be basically imperceptible when used on the vanilla game and will go up from there, shaving off 6 seconds for 50 or so plugins, up to 20+ seconds for 250+ plugins.

[24] Trespass[www.nexusmods.com] Sometimes fort soldiers display erratic behavior about trespassing, attacking followers (and usually when mounted) even though your character is an allie , this mod fixes the issue.

[25] Horses Simply Turn Better[www.nexusmods.com] Does what it says.

NEW
[26] Dual Casting Fix[www.nexusmods.com] SKSE plugin that fixes a vanilla bug which causes the game to treat dual cast spells as if they were single cast.


start up the game & make sure everything loads, runs & looks ok at this point
Nemesis
Nemesis is optional - Although we do have some Nemesis dependent animation mods as well as TrueHud and True Directional Movement later in the guide. You can install it now then pick and choose which animation mods you install as you go.

At this point we'll install Nemesis before we install our UI mods in case you want to add TrueHud which requires True Directional Movement, which requires Nemesis. Later in the guide we'll also be adding some animation mods which require Nemesis.

If you choose to install TDM, and even if you choose not to install TDM you can install Nemesis now as we'll need it later in this guide when we install animation and fix mods. Speaking of Fix mods we'll be installing one now as we install Nemesis.

For those not familiar with running Nemesis here are the installation steps. There's also an installation video at bottom of this page. Otherwise if you are familiar with the process then Install Nemesis and remember to tick "Retimed Hit Frames".

First
Make sure your Windows System Locale is set to English (Start - Windows System - Control Panel - Region - Administrative - Change System Locale - English [United States]), not in another language, or it apparently modifies handling of file names and file paths, which causes Nemesis to gain errors when using it. Nemesis was built to be compatible in an English-based System Locale only (for now).

Install Nemesis
[1] Project New Reign - Nemesis Unlimited Behavior Engine[www.nexusmods.com] Install with Mod Manager.

A. Now from the top left side of Vortex select "Dashboard" then in the "Tools" section select the plus sign (+) that says "Add Tool" and name it "Nemesis", then select "Target", navigate to the Nemesis folder: \steamapps\common\Skyrim Special Edition\Data\Nemesis_Engine now find the file "Nemesis Unlimited Behavior Engine.exe", select it then select "open", then select Save.

B. Run Nemesis
Now open Nemesis from that Vortex dashboard shortcut (up top) and once it opens select "Update Engine" you'll get some warnings because we have not yet installed animation mods so this is normal, dismiss the warnings and let the update run. Now select "Launch Nemesis Behavior Engine" and let it run then close Nemesis (x).

Important
C. Now select the "Mods" tab on the left side of Vortex and use the "Deploy Mods" function at the top of Vortex.

The Nemesis Engine is installed and setup.
Note: Nemesis also added a dummy FE (lite) FNIS.esp which we'll need later when we install the XPMSSE skeleton (XP32) because XPMSSE requires FNIS which we are not installing.

Let's install the mod "Retimed Hit Frames".
D. There is a fix mod I always use that we can install now and it does not require the actual mod to be installed (see sticky on mod page) however you should give them an endorsement anyway Retimed Hit Frames[www.nexusmods.com]. All we need to do is [1] check the box in Nemesis next to "Retimed Hit Frames" and [2] Run Nemesis as shown in the video (or see my notes down below), [3] Don't forget to Deploy Mods afterwards. Btw, this is the only mod that does not need to be installed before running Nemesis so do not attempt it with the other mods listed in the Nemesis app. In the future as we install Nemesis related mods they will appear in the list and we must check/select them in the Nemesis application at that time.

Reminder - Every time you add a Nemesis dependent animation mod
We must run Nemesis in the same manner (as steps 4 & 5) after the installation of each animation mod, the only difference is that we will be checking the appropriate box for whatever animation mod we are adding at that time (and we won't have the language step). I'll remind you as we go.

We'll be installing Animation mods later in the guide

Video for installing Nemesis
This video downloads Nemesis from GitHub however Nemesis is now on Nexus so we'll download and install it with Vortex like we do most other Nexus mods.
https://youtu.be/W9hrvc8ync4
Nemesis Going Forward
VORTEX USERS: AFTER CLOSING NEMESIS MAKE SURE YOU HIT THE "DEPLOY MODS" BUTTON WHILE IN THE MODS SECTION OF VORTEX AFTER INSTALLING NEMESIS FOR THE FIRST TIME AND ALSO AFTER EACH ANIMATION INSTALL (or uninstall).

To recap:
ALWAYS RUN NEMESIS AFTER INSTALLING A MOD THAT DEPENDS ON IT AS FOLLOWS
Step 1. Install Animation Mod that depends on Nemesis
Step 2. Open Nemesis
Step 3. Find the name of the mod you just installed in the list and tick the box next to it
Step 4. Select "Update Engine"
Step 5. Select "Launch Nemesis Behavior Engine"
Step 6. Close Nemesis (wait for it to stop running)
Step 7. Deploy Mods from the top of Vortex
SkyUI update
For those who came here for info on how to use SkyUI for game version 1.6.1130 (this guide is of course for 1.6.640) you'll need to add the following mod which adds the missing $SaveGameMissingCreationsCheck item to the SkyUI Gameplay settings menu (interface\quest_journal.swf).
SkyUI SE - Difficulty Persistence Fix[www.nexusmods.com]

The above add-on also includes the Flashing savegames fix. See the mod page for details.
Again, this info is only for game version 1.6.1130
User Interface (UI)
Ultra Widescreen users see the Ultra Widescreen section found at the end of this guide.
Then return here

[1] UIExtensions[www.nexusmods.com] Adds various custom menus to Skyrim for modder use.

[2] SkyUI[www.nexusmods.com] Install "SkyUI_5_2_SE"
Elegant, PC-friendly interface mod with many advanced features. SkyUI also gives us the MCM.

[3] Fix Note icon for SkyUI (SKSE64 plugin)[www.nexusmods.com] v1.2.6
Install 1st file: "FixNotesForSkyUI Skyrim AE

[4] Wider MCM Menu for SkyUI[www.nexusmods.com] Install "Opt. 1 - Wider MCM Menu for SkyUI"

[5] NL_MCM - A Modular MCM Framework[www.nexusmods.com] Modders Resource which is an object oriented module based extension of the SkyUI MCM scripts.

Optional
[6] Oblivionesque Category Icons For SkyUI SE[www.nexusmods.com]

[7] Stay At The System Page NG[www.nexusmods.com]

We have options here - please read.
[8] Remove QuickSave Button from SkyUI System Menu[www.nexusmods.com]
I use "Remove QuickSave and Help Buttons (1)" use that or the 1st file.
This mod Contains the much Needed "Flashing Game Save Fix" and it also removes the QuickSave button which I never use anyway. However, when we installed SSE Engine Fixes we enabled the setting that turns QuickSaves into regular saves so if you want to keep the QuickSave button then skip this and install the next mod instead which is SkyUI SE - Flashing Savegames Fix.
OR
If you must have your QuickSave then make sure you add: this mod[www.nexusmods.com] (SkyUI SE - Flashing Savegames Fix) instead. DO NOT use this mod & the Remove QuickSave Button mod together (and if using the WideScreen Fix you'll be able to get this fix on that mod page).

[9] Immersive HUD - iHUD Special Edition[www.nexusmods.com] v0.2b
HUD when you need it. HIDE when you don't. Get the best of both worlds. The usefulness of having a HUD with the immersion of having none.
Remember to: Set/Activate your "Key press Toggles" in the MCM (see image) once in game.


[10] Less Intrusive HUD II SE[www.nexusmods.com] allows you to tweak pretty much every element in the vanilla HUD and it does so IN GAME !
No separate .txt files, no more going in/out game to check your setting.
(see video link below for more info on use)
+
[11] Install "Less Intrusive HUD II SE - FISSES Patch -towatot" allows you to save a personal preset.

This video by Gopher will describe all the features including how to utilize both "Less Intrusive HUD" and "Immersive HUD" for those not familiar with these 2 mods.

[12] Dialogue Movement Enabler [www.nexusmods.com] v2.2.0
Install"Dialogue Movement Enabler (Anniversary Edition)"
Keeps your character from being locked in place during dialogue with other. Allows you to move around in Dialogue Menus.

[13] More Informative Console[www.nexusmods.com]
Install 2nd file "More Informative Console 1.1.0 AE (1.6.640 plus )"
edits the UI to show a great deal of additional information on npcs, items, and other objects when the console is opened, similar to the way MFG console worked for Oldrim.


start up the game & make sure everything loads & runs ok at this point

Important Reminder ALWAYS BE AWARE OF WHICH VERSION YOU ARE DOWNLOADING ON EACH MOD PAGE What we are looking for is mods for game version 1.6.353 or mods that have "NG" in the mod name or version nomenclature or some confirmation the mod works for this (1.6.353) version of the game. If there are no notes, for example on texture mods there most likely will not be, then we are fine especially since I'll provide notes where I feel there may be some confusion.

[14] MCM Helper[www.nexusmods.com] Install 1st file "MCM Helper SE"
Simplifies the creation of Mod Configuration Menus and extends them with powerful new features, such as persistent INI settings and hotkey registration. Mod authors will be able to write simpler, cleaner Papyrus scripts for their configs. Players will be able to spend less time in menus. We'll be needing this for "True Directional Movement". Also ENB's with full weather support require it.

[15] Better MessageBox Controls[www.nexusmods.com]
Fixes the clickable area of buttons so they are easier to click. Lets you navigate the message boxes with the keyboard. Use Left/Right controls, and Activate to select options (typically A,D and E but it should work if you remapped those controls to other keys).

[16] Better Dialogue Controls[www.nexusmods.com] This mod will be most useful for people who like to use both the keyboard and mouse, it fixes issues where the mouse just flat out prevents some keyboard controls from working as expected.

Just downloaded an Armor or weapon Mod? This next tool extension mod allows you to see the items in a particular mod's .esp/esl Which then is displayed on an item screen, you can then select items to add them to your inventory. Grab this great little mod:
[17] AddItemMenu - Ultimate Mod Explorer[www.nexusmods.com] Install the first file (v1.14)
+
now let's updated it for 1.6.640
[18] AddItemMenu - NG[www.nexusmods.com] adds supports for 1.6.40 Rule: AFTER AddItemMenu

[19] A Quality World Map[www.nexusmods.com]
Only choose one of the first two files in the list as they are Form 44 which is used for SSE.
So either choose "version 8.4CA" or version 8.4CM".
+
[20] You can also add the Optional File:
"A Quality World Map - Clear Map Skies" as an add-on.

Map Markers
[21] Pastel SkyUI Markers[www.nexusmods.com] Pastel Map Markers for SkyUI

Inventory icons
[22] Colored And Animated Celtic Icons For SkyUI SE[www.nexusmods.com] Name says it all.
Once in-game: From the MCM go to SkyUI, select the CELTIC THEME under General (see image)


Optional Skill Tree Retexture
[23] Skyrim SE Skill Interface Re-Texture[www.nexusmods.com] FOMOD: you choose from a collection of new textures to replace the vanilla skill tree interface textures.

Optional
[24] A Matter of Time - A HUD clock widget[www.nexusmods.com] The mod adds some widgets to the HUD which can display your choice of:
Current in game time can be displayed using a symbol & text
Current in game date can be displayed using text.
Real life time and date can be displayed.
And more - All Configurable thru the MCM (see mod page for more details).


start up the game & make sure everything loads & runs ok at this point
Settings Loaders
These mods will allow you to save your MCM settings for some of the UI mods in the previous section so that you don't have to keep resetting them as you test your game. We've already installed the requirements for the mods in this section.

A Matter of Time - A HUD clock widget - Settings Loader[www.nexusmods.com] Since this mod works in conjuntion with MCM Helper your settings are automatically save each time you exit the MCM.

Immersive HUD - Legacy Settings Loader[www.nexusmods.com] This one works off Papyrus so it doesn't automatically save. So when you're ready it's one click and they are saved.

I have a settings load for at least one other mod later in the guide after we install said mod(s).
True Direction Movement & TrueHud
*This section is Optional

[1] TrueHUD - HUD Additions[www.nexusmods.com] Completely reworked and improved! Very customizable actor info bars, boss bars, player widget, recent loot log and an API for other plugins to use. Required for the target lock reticle widget to work in TDM. Modular and customizable through MCM.
+
[2] We need this patch for Immersive Hud and TrueHud:
iHUD and True HUD Patch[www.nexusmods.com] Rule: AFTER "Immersive Hud".
+
[3] True Directional Movement - Modernized Third Person Gameplay[www.nexusmods.com] Install with Vortex
then OPEN/RUN Nemesis & tick ALL 3 TRUE DIRECTIONAL MOVEMENT boxes,
then select and run UPDATE ENGINE then select/run LAUNCH NEMESIS ENGINE BEHAVIOR,
then close Nemesis and from Vortex DEPLOY MODS AFTERWARDS.
IMPORTANT:
+ Once you're In-Game:
To allow the mod "Better Jumping" to work properly with TDM - Once in game open the MCM
a. Under 'Miscellaneous' deactivate: "override acrobatics"
b. On the 'Directional Movement' tab, set 'Mid-Air Rotation Speed Multiplier' to 1
(Note: If your character is a Khajiit or an Argonian consider installing this[www.nexusmods.com])

True Directional Movement (TDM) overhauls the third person gameplay similarly to modern action RPGs, entirely through SKSE. Move and attack in any direction. Includes a custom target lock component and an animated target reticle widget, target headtracking, projectile aim support during target lock, mount support and more! Modular and customizable through MCM.
Mesh Fixes
[1] Assorted mesh fixes[www.nexusmods.com] Rules: AFTER SMIM, and SMIM Quality Addon. BEFORE Skyrim Landscape and Water Fixes. Fixes various issues with vanilla Skyrim meshes that causes them to render incorrectly. We we will be allowing other mods to overwrite this mod as we go.

[2] Whiterun Mesh Fixes[www.nexusmods.com] Rule: AFTER Assorted Mesh Fixes, and SMIM.
Fixes various issues with meshes in Whiterun.

[3] Whiterun Objects SMIMed (and fixes too)[www.nexusmods.com] Rule: AFTER SMIM.
New meshes to fix some ugly Whiterun objects

[4] Unofficial Skyrim Special Edition Patch - Pie Fix[www.nexusmods.com]
Only install 2nd file "Unofficial Skyrim Special Edition Patch - Pie Fix"
Fixes an ugly model that once seen can't be unseen.

[5] SMIM Barrel Expansion - Mead Barrel - Oil Barrel - Butter Churn[www.nexusmods.com] High poly versions of mead barrels, oil barrels, and butter churns consistent with SMIM.

Optional
[6] Riekling Barrels SMIM[www.nexusmods.com] Makes Riekling barrel traps use SMIM barrels (makes perfect sense to me).

(We'll do mesh lighting fixes later in the guide)
Optional Starter Pack
*Optional: Need a good starting mod that adds a few items to your inventory?
These mod were made by Avrie with both load order testing and a headstart on playthrough's in mind. All are directly with the mod Alternate Start, Live Another Life (which we installed earlier).

Camping in the Woods start adds an extra sack full of starter gear next to the tent.

There's a Escape this Prison Cell start where you have to find the chest.

*The Breezehome in the Whiterun start adds base inventory items, crafting supplies, alchemy and enchanting table and much more (see note below). However if using this start do not purchase the Children's Bedroom which replaces the alchemy room otherwise you'll have a mess in that particular room. Btw: Later in the guide I list an optional basement for Breezehome which comes with all of the crafting stations.

All of the choices listed on the Quickstart mod page, with the exception of the Breezehome start, include the Squatter Shacks - Riverwood[www.nexusmods.com] mod which is not required as Avrie05 recieved permission from the mod author of the shack to include it in all of the Quickstart mods. Stop by and give him an endorsement as well. Both the Breezehome and the Riverwood shack starts are loaded with gear and other items.

Quickstart for testing guide based load orders[www.nexusmods.com]
Four (4) starts to choose from.
Only pick one start from this mod page.
OR
I'll place this next mod here in case you don't want any of the above mods. The Alchemical Primer book is included in all of the above Quickstart mods and it's an excellent book of recipes.

Alchemical Primer for Caravaniers[www.nexusmods.com] "Adds a lore friendly alchemy skill book that includes 8 of my best vanilla potion recipes for players new or trying to improve their alchemy skill. It can be found at two of the more open minded court wizards, an aspiring alchemist, and also in the inventories of the Khajiit caravans."

Note:
*IF you choose the Breezhome Quickstart for your playthrough you need to know in advance that once you start playing on a save you can not purchase the children's bedroom or you'll have a bad combination of both. Simply purchase the Alchemy Lab from the Steward along with whatever else you want.
Later in the guide I have an optional Breezehome basement mod which comes with all the crafting stations (but not all the ingredients and crafting supplies). I keep both but of course this means I can't ever house children in Breezehome. Just an FYI for you all (I'll remind you later in the guide).
Effects
[1] Enhanced Blood Textures[www.nexusmods.com] Install the 1st file "Enhanced Blood Textures" v4.0
FOMOD Choose: "SPID Compatible"
then for everything else choose "Default"
EXCEPT for the last choice choose "None".
(this mod also includes the much needed brawl bug fix)
+
(from Optional file section)
[2] Install "No Screen Blood" (if you like).
+ (if you installed no screen blood)
Go to the Vortex Plugin section:
and mark "dD-No Screen Blood.esp" as light, then from the Mods section Deploy mods.

[3] Sanguine - Enhanced Blood Retexture SE[www.nexusmods.com] Retexture of Enhanced Blood Textures.
First choose your Resolution to install.
FOMOD: Choose the "Even Darker" version
Rule: AFTER Enhanced Blood.
+
(from my google drive)
[4] Sanguine - EBT (default addon 2K)[drive.google.com] download then drag and drop in Vortex
Rule: AFTER Sanguine.
separate textures I extracted & repackaged for the decals/wounds for a much better color match
+
[5] GORECAP[www.nexusmods.com] Rule: After EBT.
This mod details the neck gorecap texture on a beheaded body.

[6] ElSopa HD - Dirt Blast SE[www.nexusmods.com] Much needed retexture of the impact dust. Choose either 1K (which is just fine) or 2K max.

[7] Improved Weapon Impact EFFECTS Correct Metal SE[www.nexusmods.com] Just A small mod to change that annoying dust to metal sparkles when weapons hit each other with something much better. As a bonus you can see where your arrows hit on a miss.
+
Go to the Vortex Plugin section:
and mark "SparklesSE.esp" as light, then from the Mods section then Deploy mods.

[8] Spider Webs and Particles for ENB[www.nexusmods.com]
Rules: AFTER Particle Patch.
High Quality Texture Replacer for the Spider Webs and Particles. Also makes the textures work better with ENB and ELFX.

start up the game & make sure everything loads & runs ok at this point

[9] R.A.S.S. Rain Ash And Snow Shaders - Wet Frost Cold Dust[www.nexusmods.com]
Player's and NPC's breath will react to cold.
YOU SHOULD TURN OFF EVERYTHING IN THE MCM EXCEPT "COLD" which gives the cold breath effect to your character & all NPCs. This way we get the same effect as the mod Wet & Cold. Keep this mod simple and I know you'll like it.
ONCE YOU'RE IN GAME OPEN THE MCM & SET UP LIKE THIS
(Click to expand image if needed)

(Otherwise see mod page especially if using an ENB)
+
[10] Wet and Cold Breath Texture for ENB (and R.A.S.S)[www.nexusmods.com]
(those who do not use ENB report this to be an improvement as well)
Only install the 2nd file: "Wet and Cold Breath Texture for ENB 1.0 (For R.A.S.S)"
Breath retexture modification for R.A.S.S. to better suit in ENB environment.

Optional
[11] R.A.S.S. Rain Ash And Snow Shaders - Wet Frost Cold Dust - Settings Loader[www.nexusmods.com] Save your MCM settings for R.A.S.S. so you don't have to reset them until (if and when) you want.

[12] TB's Improved Dust Particles[www.nexusmods.com]

[13] Deadly Spell Impacts[www.nexusmods.com] FOMOD: You Choose. Just remember what you picked here when installing mod #15.
Contains unique textures for fire, lightning, frost, and spit (Spider/Chaurus) spell impacts.
+
[14] Deadly Spell Impacts Transparency Fix for ENB[www.nexusmods.com] Rule: AFTER Deadly Spell Impacts.

[15] Deadly Spell Impacts 4K - 2K or 1K Cleaned and Upscaled[www.nexusmods.com] Choose your Resolution
Rule: AFTER Deadly Spell Impacts (4K or 2K), and DSI Transparency Fix.

Optional
[16] Arctic - Frost Effects Redux[www.nexusmods.com] FOMOD: Leave everything on default - take the patch! Rules: AFTER Particle Patch, ENB Light, Embers. and DSI Tansparency Fix.

Optional
Since we are using TAA you can try this if you have a couple of FPS to spare (might cost 2-5fps)
[17] TAA Deblur[www.nexusmods.com] SKSE plugin which sharpens texture detail when using TAA. Try it and see if you like it - just don't save your game until you decide if you like it and if not simply uninstall it.


start up the game & make sure everything loads & runs ok at this point
Important Note:
Regarding DynDOLOD

IF you've never ran DynDOLOD before this is probably not the time to start. I say this for several reasons but of course in the end it's up to you. Running dyndolod is a long process and can be complicated especially for a first time user. Because DynDOLOD 3 is relatively new you'll find less support for it in the forums not to mention the mod No Grass In Objects (NGIO) is not available for game version 1.6.640. Also I personally have limited use with version 3 of DyndoLOD, coupled with my new PC not completely setup for Skyrim and the fact I'll be playing Starfield when it releases on September 1st I'll be of little use to anyone who has questions.

Support forum for DynDOLOD and xLODGen
DynDOLOD & xLODGen Support[stepmodifications.org]

If you decide you want to run Dyndolod:
Remember that DynDOLOD should only be created AFTER your load order is completed.
Lighting
Featuring some great WiZkiD mods - Special shoutout to him

In the next 3 sections we will install lighting, weather, and enb, if you've used my other guides you know I usually like to install my enb after lighting & weather mods in order to get a sense of how my base setup looks without enb. That said you can of course install enb at any time.

1. Enhanced Lights and FX[www.nexusmods.com] v3.06
FOMOD Only choose: ELFX, SMIM Meshes, SMIM Lantern, and Torches. (see images)
DONOT CHOOSE THE ENHANCER OR HARDCORE IN THE FOMOD

RULES: AFTER All (ignore Vortex/LOOT Suggestions).
(ELFX Shadows includes its own ELFX Enhancer (or Hardcore) which we will be installing next)

Next: ELFX Shadows is a new Enhanced Lights and FX addon which aims to add spectacular lighting effects, break the limits of the Skyrim lighting engine (where possible), increase the number of shadowcasting lights per cell, all without causing the slightest light flickering issue.

2. ELFX Shadows[www.nexusmods.com] Install "ELFX Shadows" version 1.4
FOMOD: select Enhancer (if you'll be adding ENB otherwise it will be very dark inside, it will be dark with ENB but not as), & Realistic Water 2 patch. NOTHING ELSE
DO NOT Choose Parallax or Exteriors. (see images)

RULES: AFTER ALL (ignore Vortex/LOOT Suggestions).
+
*You'll see a Missing Master message in Vortex and/or LOOT.
From the Plugins section of Vortex disable: "elfx enhancer - realistic water two patch.esp"
I'll remind you to enable it later.

*SkyrimPrefs.ini
Go to: C:\Users\<Your PC Name>\Documents\My Games\Skyrim Special Edition
Open SkyrimPrefs.ini
You need to change or add the following lines (if they're not already) as follows:
[Display] <-- Make sure you're in this section. Add or change the following lines to read as:
bFloatPointRenderTarget=1 (You'll probably have to add this)
iShadowMaskQuarter=4 (this is most likely already set correctly)
Don't forget to save
(we will be making changes in enbseries.ini in relation to ELFX Shadows later after installing enb)

3. ELFX Shadows - Official Patches Hub[www.nexusmods.com] Install 2 files from here.
Install "ELFX Shadows Patches Hub" version 1.1.0
FOMOD select: USSEP, Arthmoor mod series/Alternate Start, Enhancer Edition
(DO NOT take Fake Lights for ELFX Shadows - Regular ELFX is fine).


Enhancer should be auto-selected if you chose it during the installation of ELFX Shadows.
Remember we did not choose "Enhancer" in The original ELFX installation process regardless of if we wanted it or not. When using ELFX Shadows you only choose Enhancer at that time, and of course only if you want it, and if you did not choose it then it won't be selected here and will show as None.

+
Now let's add a update patch for ELFX Shadows and the USSEP.
from the ELFX Shadows Patch Hub Update Files section
4. Install the "USSEP patch" version 1.1.0b
Rule: AFTER "ELFX Shadows Patches Hub (v1.1.0)"

5. ELFX Shadows - Hearthfire Light Addon[www.nexusmods.com] Install "ELFX - Hearthfire Light Addon"
This is an addon which captures ELFX Shadows and adds it to Hearthfire DLC Homes as an aesthetic addon since ELFX Shadows does not touch them by itself. Install with mod manager.

Optional fShadowDistance=10860.0000
The results of using this mod greatly improves visuals but will cost weaker systems about 2-5 FPS.
6. Enhanced Volumetric Lighting and Shadows (EVLaS)[www.nexusmods.com]
Install "EVLaS" Main File.
+
*NOT Running DyndoLOD? then go to the optional file section and ALSO install the "EVLaSS Skyrim Underside" file. IF you will be running DynodoLOD 3.xx then Do Not install EVLaSS Underside and instead make sure to enable underside generation in the DynDOLOD_SSE.ini. (see DyndoLOD 3.xx instructions)
SKSE plugin that dynamically adjusts the "fSunDirXExtreme" game setting to ensure better synchronization between sun shadows and the sun.

7. Lanterns Of Skyrim II[www.nexusmods.com]
LoS II - Lantern Workers (optional - up to you but I use it)
LoS II - Campfire {*disable it for now}
LoS II - SMIM patch
LoS II - USSEP patch
LoS II - Northern Marsh Bridges patch {*disable it for now}
LoS II - Cutting Room Floor patch {*disable it for now}
LoS II - ELFX Patch
+
*Go to the Plugins section of Vortex and disable the 3 plugins as *noted above
I'll remind you to enable them later.
+
Go to the Plugins section and re-enable the "landscape and water fixes - patch - losii.esp
(we disabled it earlier).

Fix the next mod in Vortex so it won't show as a Nexus update
OR DO NOT use the Vortex Nexus Update feature on this next mod - it's not a Nexus mod.
Simple to do. After installation, from the Vortex mods section find Embers HD - WiZkiD, double click on a blank area in that line, a panel pops out on the right. Under "Author" you'll see a pencil icon (edit), remove the link, for Author and for Uploader type WiZkiD, for source select "other" and for category select "Visuals and Graphics", then save.
8. Embers HD- WiZkiD Enhanced Edition XD - Inferno (ELFX Edition)[drive.google.com] This is my Google Drive file that has been scanned. Select "Download" then "Download Anyway".
Then Drag the the file to the bottom of Vortex in the download box and then install.

for RULES: After Everything it conflicts with. Outstanding work as usual by WiZkiD.

Now go to the plugins section of Vortex and select "Manage Rules" as shown below

Now make the following Rules (Select "Sort Now" after making each rule):
  1. embershd must load after elfx - hearthfire light addon.esp
  2. elfx - hearthfire light addon.esp must load after elfx shadows.esp
  3. Make sure elfxenhancer.esp loads after all of the above (should already be near bottom)
  4. Go to the top of the Vortex plugins section and use the "Sort Now" button
Now let's eliminate some flickering in the distance and reduce heavy particles.
Open SkyrimPrefs.ini (C:\Users\Owner\Documents\My Games\Skyrim Special Edition)
(you also can do this thru Bethini if you're using it) and set this :
[Particles]
iMaxDesired=6000
(1500 for lower end rigs or for less particles)


start up the game & make sure everything loads & runs ok
Weather
[1] Obsidian Weathers & Seasons [www.nexusmods.com] Only install "Obsidian Weathers - 1.07a" v1.07a
Obsidian is a collaborative work by the authors of Dolomite and Rustic Weathers; a hybridization of artistic styles that glorifies Skyrim for her beauty while preserving her dated modesty.
+
This next mod adds a MCM to the above mod.
[2] Alternate Obsidian Weathers MCM[www.nexusmods.com]
Use whatever version of Alternate Obsidian Weathers MCM - xxx you like since we have FISS, MCM Helper, and PapyrusUtil installed. (I'm using MCM Helper version)
See image below for in-game MCM settings
Changes take effect after sleeping


select image to expand view

[3] True Storms Special Edition - Thunder Rain and Weather Redone[www.nexusmods.com]
Install "True Storms - Main File 1.0.2" v1.02
a complete overhaul of the storm systems in Skyrim SE. THERE ARE SOUND SLIDERS IN THE MENU This great mod has been in my load order since day 1. Don't worry about the Vortex warning as we fix that with the next mod.
+
*now let's make it compatible with Obsidian Weathers
[4] Obsidian Weathers - TrueStorms Merged Compatibility SSE[www.nexusmods.com] A blended compatibility patch that completely integrates the intense storm effects, audio, and unique weathers from both True Storms and Obsidian Weathers. Comes in two separate versions for your visual preference.
FOMOD:
Main: Leave Blank - (Skip it by choosing "None").
Alternate: (w/Water Edge fix) You choose "Spectral" or "Luminous" (see below for details)
Compatibility: Leave Blank

Spectral blends True Strom's weathers with Obsidian's and gives the game a darker, eerier atmosphere and is basically a combination of all of this mod author's previous patching & blending. Luminous only carries over the audio and unique weathers of True Storms without touching anything else from Obsidian so you get both mods untouched and merged.

Recommended (not required) - This mod with Obsidian and True Storms is incredible.
[5] Storm Lightning for SSE and VR (Minty Lightning 2019)[www.nexusmods.com] v1.4.17
The purpose of this mod is stability and scalability. It can summon up to 50 sheet lightnings and 50 fork lightnings per second and up to 31 cells distance. This results in a more natural and enjoyable storm and realistic experience. There is also an MCM for additional settings (see mod page for details) So if you have any type of adverse reaction to light flashes you can easily edit this mod to your liking.
Only install "Storm Lightning for SSE and VR - Fomod Installer"
FOMOD:
1. Choose Skyrim Special Edition.
2. Next choose 1.6.640
3. Select ESP (DO NOT choose esl)
Next few sections are for Halo so your choice.
In the following order, and because I use an ENB (you'll notice a description for each selection in the FOMOD so when choosing read if they mention ENB or not and choose accordingly)
I went with:
4. Night Time: Too Dim Lvl 4 (Night Time: Halo On (Level 0)
5. Day Time: Too Dim Lvl 4 (Halo On (Level 0)
6. Night Fork: Too Dim Lvl 4 (Halo Too Dim (Level 4)
7. Day Fork: Too Dim Lvl 4 (Halo Too Dim (Level 4)
8. Thunder Delay: (Your Choice): I went with Realistic
The mod also has an MCM for additional in-game settings tweaking (such as lightning durations).
Rule: AFTER FISSES (they are the exact same 2 pex files).

[6] Thunder Sounds - WiZkiD Mix -[www.nexusmods.com] v1.1
Rule: AFTER Storm Lightning for SSE (Vortex/LOOT is wrong on this)
this mod mixes together the best thunder sound effects from Obsidian, True Storms and Storm Lightning, for an outstanding eargasmic experience!.


start up the game & make sure everything loads & runs ok at this point

[7] Splashes of Storms[www.nexusmods.com]
FOMOD: be sure "SSE v1.6+ (Anniversary Edition)" is selected
+
[8] Rudy fix for Splashes of Storms and ENB[www.nexusmods.com] Improved rain splashes and ripples.
FOMOD: I chose the 2nd option "ENB Intensity plus Wind (Preset)"(6 versions to choose from) and according Rudy it's the easiest to control - I installed it and left it as is. These are "tweaked splash meshes from the awesome "Splashes of Storms" mod. Now they can be controlled in the [PARTICLE] section in ENB UI.

[9] Rainbows Remade[www.nexusmods.com] adds rainbows and moonbows to the game.
Choose your Resolution (4K in this case will have little to no impact on your performance).
+
[10] Install "No Initialization Notification Patch" removes initialization notification every time a save loads.

[11] Shooting Stars SE[www.nexusmods.com] Shaders of Solstheim - Ash and Moss[/url] Shooting stars aka fragments of Aetherius appear in various sizes and fall from various positions in the sky at night (8:30pm to 6:00am). The general direction they fall in will change on a monthly basis. (also includes Meteor storms which only occur 2 or 3 times a year).

[12] ETHEREAL CLOUDS - Special Edition[www.nexusmods.com] Choose your Resolution.

[13] ETHEREAL COSMOS - Special Edition[www.nexusmods.com] Includes ETHEREAL AURORAS.
I use the "Vivid" version ETHEREAL COSMOS - Special Edition - Vivid (pick what you like)

From the Vortex Plugin section mark this mod as Light
[14] Yee - a new snowflake mod - Cathedral Concept[www.nexusmods.com] Rule: AFTER Little Things


start up the game & make sure everything loads & runs ok at this point
ENB
INSTALLATION & SETUP FOR ENB

Note: If you will not be using an ENB then you may be interested in the optional lighting control mod in the next section which is configurable once in game through the MCM

Now that you know what your game looks like without ENB you may want to add it - I do!

Note:You can lose anywhere from 5-25fps with an ENB depending on the ENB and it's settings
With any ENB, regardless of the version or mod author, you're definitely going to lose some fps
How much depends on your PC, your mods and of course which ENB you are using. For that reason and the fact I want to first see my game without the enb's effect as I mod it, I add my ENB after my lighting & weather mods.

a video I made for installing ENB (please note the version numbers for the mods are now different but the instructions are the same. Simply use the versions I indicate down below)
https://youtu.be/1tfbuaNZmvE
We've already installed the required SKSE & Obsidian Weathers earlier in the guide.

The first time you launch your game with an enb installed the load time will be a bit longer
This is normal due to caching - subsequent loads will be much quicker.

INSTALL THE PARTICLE PATCH
The particle patch is now on Nexus mods with enhancements.
[1] Particle Patch for ENB[www.nexusmods.com] FOMOD: Select "Loose Files" and "Yes"

WE NOW LEAVE THIS PLUGIN ENABLED.
Rules: BEFORE EVERYTHING Vortex asks.
This means we will always be overwriting this patch going forward.
+
Note: We will be installing a mod later in the guide to optimize the the Skeever Dinner Meshes.

[2] *ENB Binary [enbdev.com] Manual download/Manual install..
Select latest version
(as of 6/15/2023 is v0.494)
|
Download to desktop & unzip ONLY need 2 files from inside the folder named WrapperVersion
get - d3d11.dll & d3dcompiler_46e.dll - have your Skyrim SE folder open
This is a simple copy & paste or drag and drop to the Skyrim Special Edition folder located
here: SteamLibrary\steamapps\common\Skyrim Special Edition
If needed watch this installation video. Go straight to the 6:45 mark of this video

[3] *ENB Helper SE [www.nexusmods.com] v2.2.0
Install 2nd file "ENB Helper SE 2.2 for 1.6.629 and up"
This "helper" will assist Obsidian & Re Engaged in that each region in Skyrim will now have it's own type of weather, instead of a generic weather all across Skyrim + transition from one weather type to another is much smoother instead of the abrupt changes in a vanilla Skyrim.

[4] *Re-Engaged ENB for Obsidian[www.nexusmods.com] v9.4a Manual download & install
download "A. Re-Engaged ENB for Obsidian (ENB Weathers Supported) V9.4a"
and place it on your desktop, unzip it, and open the "Main" folder, choose your quality, open that folder, and install the contents to your Skyrim Special Edition folder as shown at the 5:23 mark of this video.
+
*Very Important: After installing Re Enaged (since we are NOT using Parallax) open enbseries.ini which is located here \steamapps\common\Skyrim Special Edition
and set these 2 lines to false:
  • EnableTerrainParallax=false
  • EnableComplexTerrainParallax=false
before you launch your game for the first time otherwise it will remain in the enbcache folder.

Godrays
Re Engaged ENB has it's own godrays so we can disable it in SkyrimPrefs.ini by setting bVolumetricLightingEnable=0, however if you're a fan of these rays you can then set them higher in enbseries.ini under [GAMEVOLUMETRICRAYS] by raising the intensity values. I would keep them between 1-3 for each time of day if you'll be changing them.

Also install this:
[5] Picta Series - Improved Sky Meshes [www.nexusmods.com]
Only install "Picta Series - Improved Sky Meshes" (1st file)

Optional for ENB users
[6] Cumulative fix for Eye Meshes[www.nexusmods.com] Fix underwater and black eyes issues when you use an enb.
I used the 2nd file "1. Alternate - Only black eye fix"

Note:
Depth of Field (DOF) strengths
Once in game if the distant background seems too blurred for your liking there is a separate folder in the Re Engaged folder named "Optional DOF Strengths", inside that folder are different DOF strengths along with instructions in the "About each DOF & Install.txt". You also can simply adjust this in game via a slider. Below is a screenshot of how I set mine.
I simply open enbseries.ini which is located here \steamapps\common\Skyrim Special Edition and under [EFFECT] set EnableDepthOfField to false

*Setting your FPS
You should lock your FPS just below 60
I would set it no higher than 59 fps (recommended)
to do this open enblocal.ini and under [LIMITER] set these 2 lines as follows.
EnableFPSLimit=true
FPSLimit=59.0

FPS DROP?
Experiencing huge fps drop around candles? (for example near the enchanting table)
set EnableNormalMappingShadows to false in your enbseries.ini

How to Tweak & Adjust your ENB Settings In Game by firemanaf
https://youtu.be/BD8o_7kTI-c
How to change your optional ENB DOF settings and Rain textures by firemanaf
For example Rain Textures is "off" by default because it shows up differently on different systems and you may want to turn it on and even try some of his optional rain textures. I marked this section of the video Here

Do you use Nighteye?
If you use Nighteye and because Re Engaged supports nighteye you can adjust it in game by using the ENB GUI. firemanaf made a video regarding this. Watch it here.

Also: If your game is too dark for your liking you can try increasing SKYLIGHTING and/or ambient lighting a bit under ENVIRONMENT. Use the in-game ENB GUI to verify you have the right settings. Open it with Shift+Enter once in game.

REMEMBER:
ENB's can in fact be switched midplaythrough Read

The first time you launch your game with an enb installed the load time will be a bit longer
This is normal due to caching - subsequent loads will be much quicker.

Don't forget to go back where you left off and finish the guide.
Optional Lighting Control
Use Only if you'll NOT be installing an ENB
Interior Vs Exterior Brightness Settings SSE[www.nexusmods.com] For those who don't use enb This mod adds separate sliders for Interior and Exterior brightness via SkyUi's MCM. This works great for adjusting lighting with sliders for indoors and outdoors with separate sliders for Dungeons and Dwellings.

Here's a view of the above mod's in game controls
In-game MCM lighting controls

expand view if needed
ENB LIGHT
This entire section is optional
Note: if you are running a low end PC ENB lights can be performance intensive so as always testing is important. Mid to high end PC's should be fine.

Your game will be darker with ENB Light.

Fix the next mod in Vortex so it won't show as a Nexus update
(OR simply never use the Vortex check for mod Update feature on this next mod - it's not a Nexus mod).
Easy to fix. After installation, from the Vortex mods section find ENB LIGHT WiZkiD Edition, double click on a blank area in that line, a panel pops out on the right. Under "Author" you'll see a pencil icon (edit), remove the link, then change Author and Uploader to WiZkiD, then for source select "other" and for category select "Visuals and Graphics", then save.
[1] ENB Light WiZkiD Edition.7z[drive.google.com] This is a file from my Google Drive.
Drag and drop it in the "Mods" section of Vortex.
RULES: AFTER All. Nothing should overwrite this at this point. Light on grass at night! Unlimited shadowed light sources!
NOTE: ENB LIGHT Requires the ENB Binary from the previous section.

[2] Rally's Candlelight and Magelight Fix SE - VR[www.nexusmods.com] v1.3
FOMOD Select: 60% - 60% - None

Rules: AFTER Particle Patch, and ENB Light

[3] ENB Lights For Effect Shaders[www.nexusmods.com] SKSE plugin that adds enb lights to all particle based effect shaders*. Supports effect shaders from all mods, no patches or conflict resolving needed.
+
Find "SKSE\Plugins\po3_ENBLightsForEffectShaders.ini" and set "Valid Actors = 2"
(should already be set to 2 - just make sure as this allows ghosts and atronachs ENB effect shaders)
Note: ENB lights can be performance intensive so you can control what actors receive ENB lights 0 - Player Only, 1 - Player And Followers, 2 - Everyone
+
Go to enbseries.ini (located in \steamapps\common\Skyrim Special Edition folder)
and make sure the following are set properly:
[EFFECT]
EnableComplexParticleLights=true

[COMPLEXFIRELIGHTS]
EnableBigRange=true

[4] ECPLW -ENB Complex Particle Lights for Windows[www.nexusmods.com] adds complex particle lights to the windows of all major cities, DLC2 Skaal Village, Solitude and Whiterun farmhouses
+
Go to the Vortex Plugin section
Enable the plugin: "landscape and water fixes - patch-wizkid enb windows.esp" (we disabled it earlier).

install the Scrambled bugs version of this next mod:
[5] Spiders of Solstheim - ENB Light[www.nexusmods.com] Make sure you use Scrambled Bugs version
Install "Spiders of Solstheim - ENB Light - Scrambled Bugs version"
+
READ: in the ScrambledBugs.json file line 42 "Attach Hit Effect Art" must be set to true. The json file can be opened and edited in any text editor like Notepad or Notepad++.
I recommend Notepad++ which allows you to see the line numbers.
The json file can be found here:
Go to: \steamapps\common\Skyrim Special Edition\Data\SKSE\Plugins\
open ScrambledBugs.json with notepad or notepad++
Find line 42 and set "attachHitEffectArt": to true (this must be done) then save & exit.
+
[6] Spiders of Solstheim - Transparency Fix[www.nexusmods.com]
Rule: AFTER Spiders of Solstheim - ENB Light - Scrambled Bugs version.


start up the game & make sure everything loads & runs ok at this point


(The next 2 mods mods also require Attach Hit Effect Art set to true

Optional
[7] Sprites or Specters - ENB Light[www.nexusmods.com] Make sure you use Scrambled Bugs version
Install "Sprites or Specters - ENB Light - Scrambled Bugs Version".
Rule: AFTER ENB Light
Adds ENB Light to Atronachs, Wisps, Wisp Mothers, Spectral Draugrs, Magical Anomalies
Find "SKSE\Plugins\po3_ENBLightsForEffectShaders.ini" and set "Valid Actors = " according to which actors should receive the effect. 2 is for Player, NPC's, Ghosts, etc. (0 is player only).
(should already be set as Valid Actors = 2 just make sure as this allows ghosts and atronachs ENB effect shaders) See mod page for details.

for Saints & Seducers
[8] Elytra and Bliss Bug ENB Light[www.nexusmods.com] Make sure you use Scrambled Bugs version
Install "Elytra and Bliss Bug ENB Light - Scrambled Bugs Version"
Rule: AFTER ENB Light

for Saints & Seducers
[9] Saints and Seducers Flora ENB Light[www.nexusmods.com] Rule: AFTER ENB Light

[10] Alchemy Ingredients ENB Light[www.nexusmods.com] Adds ENB Light & animations to Alchemy Ingredients. Fixes blood splatter on halo bug.

[11] JS Barenziah SE[www.nexusmods.com] Rule: AFTER ENB Light. A complete remake of the Stones and Crown of Barenziah now with ENBParticleLight. Choose 2k or 4k

[12] Particle Lights For ENB SE - Bugs in a Jar[www.nexusmods.com] Rules: AFTER Embers HD, ENB Light, and ELFX Shadows.

[13] Particle Lights For ENB SE - Ingredients[www.nexusmods.com] Rules AFTER Everything!

-Clean this mod after install with xEdit QuickAutoClean - then Deploy Mods
(there's a Non-ENB version on the mod page as well)
[14] Giant Campfires Cast Shadows- Giant Fire Lighting Fixed - OPTIONAL ENB Light Version[www.nexusmods.com] Install "EVE - Giant Campfires Cast Shadows - ENB Light Version"
Rule: AFTER Particle Patch

Particle Lights for ENB - Fire Traps[www.nexusmods.com]

[15] Particle Lights for ENB - Nordic Ruins Candles[www.nexusmods.com] Rules: AFTER ELFX, and SMIM

[16] Optimized meshes for ENB lights[www.nexusmods.com]
Install Main file "Optimized ENB lights meshes - Resources".
FOMOD: Just leave it on the default settings.
Rule: AFTER ENB Light, ENB Particle Lights Dwemer Lanterns, and JS Barenziah.
By default ENB complex particle lights will create lights for every candle flame on a mesh. This little mod aims to create a single ENB light for statics that contain multiple candles, such as chandeliers. The more candles, the brighter and larger radius the ENB light will get.
+ (from optional files section)
[17] "A - Vanilla and SMIM files" Make sure you install this.
Rules BEFORE Enchanting Station Candles, AFTER Everything else.
+
From the Mods section of Vortex
Step 1. Find the mod Optimized meshes for ENB Lights - A - Vanilla and SMIM files"
Step 2. Right click on it and select "Manage File Conflicts"
Step 3. under "Imperial" find the file "impcandelabracandle01.nif"
Step 4. Staying on that line and to the far right select the dropdown
Step 5. Now change it by selecting "Static Mesh Improvement Mod"
Step 6. Save/Exit window then Deploy Mods
(Select image below for a detailed look at steps 4-6)

Did you remember to deploy mods when finished?

start up the game & make sure everything loads & runs ok at this point
RDO-CRF-AIO-GDO
Installation order is often important and this section is definitely one of those times.

[1] Relationship Dialogue Overhaul - RDO SE[www.nexusmods.com] Adds over 5,000 lines of completely voiced dialogue for NPCs using the original voices. Friends, followers, spouses, rivals, and others have much more to say. All default voices now have follower dialogue. Also fixes dialogue bugs and restores cut dialogue that has never been heard before!

[2] Relationship Dialogue Overhaul - Update and MCM[www.nexusmods.com] Patch that adds MCM and all other stuff from 2.0 version of Relationship Dialogue Overhaul (Oldrim). Also includes some bug fixes.

This next mod is temporarily hidden. So for now as long as RDO loads after ASAL (which in this guide it does) so for noww we are fine.
[3] Misc Patches by skeevatons[www.nexusmods.com] Install "RDO - ASLAL Patch"

[4] Cutting Room Floor 3.1.14[www.afkmods.com] Villages that were supposed to exist have been brought back. Quests that were partially implemented have been completed. Various items have been restored that were still in the data files. NPCs have been brought back to the game and given homes where appropriate and more.
+
*Go to the Vortex plugin section and re-enable the "LoS II - Cutting Room Floor patch"
(we disabled it earlier).

[5] 2K Ring Of Khajit[www.nexusmods.com] Remodels the ring in 2K which is found in Nightingale Hall after the main thieves guild questline is completed.

from my google drive - Drag & Drop in Vortex (or use Vortex "Install From File(+)")
[6] Cutting Room Floor - Voiced NPCs[drive.google.com] Adds new dialogue for some NPCs from Cutting Room Floor that are currently silent (using xVASynth2).

[7] Cutting Room Floor - Alteration Armor Shield Spell Fix[www.nexusmods.com] Restores the glowy effect of Alteration flesh shield spells that were changed by the Cutting Room Floor mod.

[8] Cutting Room Floor - Landscape and Water Fixes[www.nexusmods.com] Adds proper ownership to all harvestables added by Cutting Room Floor.

Note:
We do not need patches for RDO - CRF and USSEP due to the load order we have setup for the Unofficial Patch, Relationship Dialogue Overhaul, and Cutting Room Floor.

[9] AI Overhaul SSE[www.nexusmods.com] Install the 1st file AI Overhaul 1.8.3 (NOT the SE version).
FOMOD: Choose "AI Overhaul 1.8 (Recommended)" NOT the Scripted version.
Vortex/LOOT places it high in the load order as an early loader. We will be adding mods to enhance the NPC experience.
+
AI Overhaul SSE - Official Patch Hub[www.nexusmods.com]
Grab the following 2 patches
[10] Install "AI Overhaul - Cutting Room Floor Patch " v1.0.3
+
[11] Install "AI Overhaul - RDO Updated Patch" v1.0

[12] Guard Dialogue Overhaul[www.nexusmods.com] More Dialogue, More Realism, More Respect. This Mod alters the Guard Dialogue, changing it from something that breaks your immersion in the world of Skyrim to something that actually increases it. All in the original voices and Fully compliant with Skyrim Lore.
+
[13] Guard Dialogue Overhaul MCM[www.nexusmods.com] MCM add-on for Guard Dialogue Overhaul
FOMOD: if you choose "Tweaked" You can use the MCM's GDOShoutWarning variable to control whether guards warn you about your shouting.
Otherwise this will be set to the default conditions which are:
Set GDOShoutWarning To 0 = Guards never berate you for shouting.
Set GDOShoutWarning To 1 = Guards berate you for shouting until you defeat Alduin. (Default)
Set GDOShoutWarning To 2 = Guards berate you for shouting forever.
(see mod page for more details)

start up the game & make sure everything loads & runs ok at this point
Nethers Follower Framework (NFF)
Optional - I'm putting this here for those that want a follower system that
allows more than one active follower in your party at a time (up to 10) and allows for your followers to ride horses, +more

Install with Mod Manager:
[1] Nether's Follower Framework[www.nexusmods.com] Nether's Follower Framework (NFF) is a multi-follower system that is light on game resources and allows for up to 10 companions at one time. It provides a wealth of additional features, including immersion and quality-of-life functions to allow you to adventure with a small team of characters and includes a follower horse riding mechanic. Requires: ConsoleUtil, PapyrusUtil (Both installed earlier in this guide) and suggests the mod "Fuz Ro D-oh - Silent Voice" (also installed earlier in the guide).
FOMOD: Only select the following
  • Skyrim Special Edition
  • Followers Avoid Traps
  • (Note: We do not need the dummy script since we are installing NFF on a new game)
  • Relation Dialogue Overhaul RDO
  • RDO Comments
  • Friendly Fire
  • Skill Boosts
  • Spell Magnitude Mod
  • ESP for Skyrim Special Edition (We want this for a patch we'll install later)
Important: Don't put Custom Followers like Inigo, Recorder, Kaidan, Sofia, Vilja, etc. under the control of follower framework mods like NFF or their brain will break as they have their own follower system. Same with the Dark Brotherhood as Cicero & the Initiates don't technically use the vanilla system at all, they have their own method of "Follow" "Wait" and "Dismiss". I also never add Serana to NFF until her quest is complete and I have her get cured then use her as a follower.

For those of you that might add a custom follower to your game, and by the way we will be adding Inigo later in the guide, NFF comes with a Token system where you give them a token and this protects them from you adding them by mistake.

However, the next mod uses SPID to automatically add a NFF Token to any custom followers that should not be placed under the control of NFF. You can see a complete list of the followers included on the mod page.

[2] SPID - NFF - Add Ignore Token to CustomAI Followers[www.nexusmods.com] Add NFF Ignore Tokens to custom followers that use their own AI

Horses
IF you have the Anniversary DLC installed there are some great horses in there. For example the "Dwarven Horse" comes with the "Forgotten Seasons" creation. The Dwarven Horse can sprint forever, literally! And it's also invincible, literally. And you can't lose the Dwarven Horse as he always stays where you leave him.

Also, the Unicorn comes with the "Wild Horses" creation. Unicorn is immortal and can sprint/gallop something like 10 times longer than a regular horse. Once tamed, the Unicorn becomes an owned mount. If you switch to a different mount, it will slowly make its way to the College of Winterhold courtyard.

But I don't have the Anniversary DLC
Let's not forget about Arvak (obtained durning the Dawnguard questline) who can be summoned where and when you need him including if he gets killed, and there's Shadowmere (obtaind durn the Dark Brotherhood questline) who has 1,637 HP and 198 Stamina.

Remember: Do NOT remove mods mid-game unless they fall under the category of mods that are safe to uninstall mid game. Please read the article.
Immersion - Dialogue
Optional
Read the mod page for What this mod does and does not do.
[1] The Choice is Yours[www.nexusmods.com] Stop quests from starting automatically. Pursue the quests you want, ignore the ones you don't. Make your choices matter. You talk to NPCs then decide. Also Courier will deliver letters in bunches then you decide when to open them.
Quest change details here[www.nexusmods.com] also read the description section of this mod's main page.
+
[2] kryptopyr's Patch Hub[www.nexusmods.com]
FOMOD: Page 1 Leave all on NONE. Page 2 Only select All of the CC items, Book Covers Skyrim, and Cutting Room Floor. Nothing Else.
See images below - (Click to expand if needed)

+
From Vortex Plugin section Disable "tciy bcs patch.esp" (I'll remind you to re-enable it later)
+
[3] *Misc Patches by skeevatons[www.nexusmods.com] Only install this patch if you installed all three of the mods it patches. If so then install the: "Guard Dialogue Overhaul - RDO - TCIY Patch"

[4] Misc Dialogue Edits[www.nexusmods.com] Install the Main File "Misc Dialogue Edits".
FOMOD: Only check "Alternate Start - Live Another Life".
This mod improves dialogue that other mods don't, contributing to make conversations in Skyrim as plausible and immersive as possible, while taking compatibility into account. Everything here is intended to feel like it could have been part of the vanilla game all along, but it also supports alternate start mods.

[5] More Dialogue Options[www.nexusmods.com]
FOMOD: Select Guard Dialogue Overhaul and Immersive World Encounters.
+
Then go to the Plugin section of Vortex and disable the
"more dialogue options - immersive encounters patch.esp" (I'll remind you when to re-enable)
This mod adds dialogue options in a simple and immersive way to improve various conversations in the vanilla game. The responses are all voiced by using the original voice files of the game. The new options are meant to feel like they should have been in the game all along (and imo they do).

Optional - this will make it much quieter in Skyrim as far as NPC force greets are concerned
(which imo is really needed in this game for various reasons).
[6] To Your Face SE[www.nexusmods.com] Install To Your Face AE" v1.0s

Mark as Light in Vortex - Deploy mods afterwards
[7] No More Standing Too Close SSE[www.nexusmods.com] Ever bump into a NPC while engaged in dialogue with them causing the conversation to abruptly stop? This simple mod avoids this so you can hear the rest of what the NPC has to say instead hearing "Huh?" and never finishing their thought. Talk about immersion!

[8] Hunters Not Bandits[www.nexusmods.com] Now compatible out of the box with RDO and GDO. With this mod NPC's will not use taunts or insults when fighting animals. Especially hunters will behave in a more realistic manner, as well as fixing the odd behavior where enemies could start using greetings and other unfitting dialogues right after they killed you.

Mark as Light in Vortex - Deploy mods afterwards
[9] Civil War intro scenes run only once[www.nexusmods.com] Much needed Fix Makes the scene with Ulfric and Galmar, and the scene with Tullius and Rikke, discussing Whiterun play only once (for the sake of immersion/sanity).

[10] Bandit Lines Expansion[www.nexusmods.com] Mod provides 500 new spliced lines to bandits, giving each bandit prototype their own personality and making each of your encounters with them more unique, personal and unexpected.

[11] Civil War Lines Expansion[www.nexusmods.com] Mod adds new lines to Imperials and Stormcloaks, giving them more personality and making them react to current events, their environment, the player, their enemies, their friends and more.

[12] Forsworn and Thalmor Lines Expansion[www.nexusmods.com] Mod provides new spliced lines to Thalmor and Forsworn, giving them more personality and making each of your encounters with them more unique, personal and unexpected.

[13] Vampire Lines Expansion[www.nexusmods.com] Mod provides new spliced lines to (mostly) vampires, giving them more personality and making each of your encounters with them more unique, personal and unexpected.

[14] Narrative Gameplay Consistent Dialogue Tweaks[www.nexusmods.com] v1.4
Install "Narrative Gameplay Consistent Dialogue Tweaks"
+
from optional files
[15] Install "NGCDT - The Choice Is Yours Patch"

Vortex will show this mod as "update available" just ignore it.
[16] Heimskr only preaches on weekends[www.nexusmods.com] Only Install the 2nd file (Not the esl version) Mods name says it all

[17] Saints and Seducers - Voiced Narrative (Creation Club)[www.nexusmods.com] Improves the narrative of Saints & Seducers questline with new voiced dialogues carefully generated by xVASynth2.
+
[18] Skunk's xVASynth Cleanup for Saints and Seducers - Voiced Narrative[www.nexusmods.com] Removes 98.7% of static, hiss, hum, tin, and other such non-vocal noise from the synthesized lines in Saints and Seducers - Voiced Narrative
I took the Louder version
+
Do Not use the FOMOD on this next mod
[19] kryptopyr's Patch Hub[www.nexusmods.com] USE THE INDIVIDUAL FILE
install "Saints and Seducers - Voiced Narrative __ TCIY"

start up the game & make sure everything loads & runs ok at this point
Game Play - Immersion - QoL
[1] Better Jumping SE[www.nexusmods.com] Install "Better Jumping AE v1.8.6"
+
You'll also need to set the jump height in a text file located HERE:
steamapps\common\Skyrim SpecialEdition\Data\SKSE\Plugins\BetterJumpingSE.txt
After install you can also get there from Vortex by using the dropdown to the far right of this mod then select "open in file manager" then open SKSE/Plugins and open BetterJumpingSE.txt
Text file also has instructions. (be careful not to set it so high that you can die from the fall).
See mod page for details if needed.

[2] Run For Your Lives[www.nexusmods.com] Let's protect shop owners and some other NPCs as well. Mod makes citizens in a village or city run indoors during a dragon attack.

[3] Rich Skyrim Merchants[www.nexusmods.com] FOMOD Installer you can pick 2x, 5x, or 10x

Optional
[4] Be a Milk Drinker - SPECIAL EDITION[www.nexusmods.com] For the clean and sober Dovahkiin! if you look behind the counter of every inn, you'll find that, despite their professing intolerance for anyone who drinks the wholesome drink that strengthens bones and teeth, they keep a small supply all ready to be sold... also places some milk bottles in homes and other areas around Skyrim.
+
[5] Be A Milk Drinker with USSEP[www.nexusmods.com] Adds Compatibility between Be A Milk Drinker and the USSEP.
+
[6] Milk Drinker Retexture[drive.google.com] This is from my google drive. 2K Retexture for Be a Milk Drinker.

[7] No Silly Physics Damage[www.nexusmods.com] You will no longer lose HP when walking on dynamic objects such as bones or when walking into a cart.

[8] Multiple Floors Sandboxing[www.nexusmods.com] This little tweak will encourage NPCs to climb stairs around them and explore their surroundings more.

[9] Left Hand Rings Modified SE[www.nexusmods.com]
FOMOD: SMIM, First Person, USSEP (see image below) and you choose for Blood Ring.
Vanilla game does not allow rings on the left hand. This mod fixes that. These rings can be crafted, enchanted, bought from merchants, and found randomly as treasure.


start up the game & make sure everything loads & runs ok at this point

Optional
[10] Talkative Dragons[www.nexusmods.com] This mod reuses some vanilla voice lines to make dragons speak during combat (like Mirmulnir in the vanilla game), so they feel like sentient creatures instead of just mere beasts. (Paarthurnax, Alduin and Odahviing have unique voices, so they won’t use those lines).

[11] Paarthurnax - Quest Expansion[www.nexusmods.com] A fully voiced, quite expanded new take on the quest Paarthurnax, giving both the Blades and Paarthurnax good reasons for their stances, and you, Dragonborn, the final choice. The mod page says you tell them to STFU but it's actually far less harsh if you so choose, actually quite civil. You can watch the video on the mod page if needed.
+ Optional
[12] Enigma Series -All In One- SSE[www.nexusmods.com] The total Remake of every unique dragons voiceline, All in one package! (+ you can also add the updated file for Odahviing if you like)
+
Enigma Series Compatibility Patches (Official)[www.nexusmods.com] we'll use 2 patches for the 3 mods we just installed:
[13] Install "Paarthurnax - Quest Expansion v1.11"
+
[14] Install "Talkative dragons Enigma patch"

[15] Gildergreen Regrown[www.nexusmods.com] With this mod the Gildergreen sapling in Whiterun will fully grow displaying all it's beauty regardless of which path you take during the quest The Blessing Of Nature.

[16] Nocturnal Moths[www.nexusmods.com] v2.3
FOMOD: Select Regular, and Lanterns of Skyrim II That's it!
(Do Not select MCM version). With this mod Exterior lanterns will have moths flying around them at night during favorable weather. Nice immersive touch.

[17] The Old Ways - Nordic Religion[www.nexusmods.com] New shrines and amulets for the Nordic totem gods.

[18] Carriage Drivers Are Alive SE[www.nexusmods.com] Install st file "Carriage Drivers Are Alive SE" v7.8
+
From the Plugins section of Vortex change the Group to "Late Fixes & Changes" then sort plugins.
+
Optional
Let's give their tents a decent tent retexture - also for Imperial camps
[19] 4K - 2K Imperial Tents Retexture[www.nexusmods.com]
Choose your resolution (if you want 2K you do not need main file)
+
Optional - if you want to remove the Imperial logo add this as well
[20] "Small Imperial Tent Without Skyrim Logo"

Note: This next mod can not be used with the "Hearthfire Multiple Adoptions" mod.
Optional
[21] Spouses Can Live Everywhere (SCLE)[www.nexusmods.com] Allows your spouses to live anywhere with the use of special power "Mark New Home" to determine where they should stay.
+
[22] Install "Spouses Can Live Everywhere (SCLE) PATCH - AI Overhaul"
(if you installed the mod "Spouses Can Live Anywhere)

[23] Simply Knock SE 1.0.3 Release [www.nexusmods.com] RULE: BEFORE "PapyrusUtil". Allows you to knock on locked doors of houses in Skyrim. Also good during traveling so you can ask to enter people's homes to get out of the environment.
We will be installing "Campfire" in the next section and this video is relevant for it as well
Although this video concentrates on Campfire the process is the same for Simply Knock (which we'll install next section) meaning we are deleting the file PapyrusUtil.dll so watch the video start to finish.
https://youtu.be/z-sg60dG-SQ So first make the Rule that Simply Knock must load before the standalone mod PapyrusUtil then open Simply Knock in file manager and inside it's SKSE folder delete the file PapyrusUtil.dll then deploy mods - Watch the video!!
+
must have
[24] Simply Knock SKSE64 DLL[www.nexusmods.com] install SimplyKnockSE SKSE64 2.2.3 DLL
Rule; AFTER Simply Knock SE
+
[25] Simply Knock - Tower Stone Fix[www.nexusmods.com] you also need this Fix.


start up the game & make sure everything loads & runs ok at this point

Remember: Do NOT remove mods mid-game unless they fall under the category of mods that are safe to uninstall mid game. Please read the article.
Campfire & Sunhelm
Although this section is optional - please read
If for some reason you decide you want to use the "Creation Club Survival Mode" instead of the mod "Sunhelm Survival and Needs" you should at least also take the mod "Survival Control Panel" which we also use with Sunhelm. So either way when it comes to Survival it's a great add-on.

Camping - Campfire
[1] Campfire - Complete Camping System[www.nexusmods.com] Important: From the Vortex Mods section find Campfire/ look all the way to the right / use the dropdown and select "Open in File manager" / and delete "PapyrusUtil.dll / close that out and now Deploy mods (up top) when prompted confirm. Done. Refer to the video from the previous section if you need help with this. Campfire is the most feature-rich stand-alone camping mod for Skyrim, created from Frostfall's immersive and detailed camping system. Campfire is also a modder's framework, allowing anyone to create their own unique camping equipment.
+
Now go to the Vortex plugin section and enable the LoS II - Campfire addon.esp

[2] Campfire - Torch fix SE[www.nexusmods.com] Fixes the torch mesh used by the backpacks added by the Campfire mod.

[3] CC Fishing Campfire patch[www.nexusmods.com] Allows cooking of fish from CC Fishing in Campfire.

[4] Tentapalooza for Campfire[www.nexusmods.com] Themed player tents, furniture, storage, follower tents and pet beds for Campfire. Options for vampires, shamans, relic hunters and more (also has a variety of different linked bags and chests you can place in the world).

Survival/Needs - Sunhelm
Sunhelm will automatically disable the Creation Club's Survival Mode.
[5] SunHelm Survival and needs[www.nexusmods.com]
FOMOD: Choose Campfire Skill Tree (we just installed the mod) and Skyrim SE. That's it.
SunHelm is an all in one survival and needs mod. It includes many features such as Hunger, Thirst, Fatigue, and even hypothermia mechanics all while attempting to stay as streamlined as possible. Sunhelm also incorporates Universal Water Fix directly into the main mod. Making mods like the universal water fix obsolete.

Let's stop here and add a tweak to Sunhelm while also patching some FormLists
[6] FormList Manipulator - Patch Collections[www.nexusmods.com]
FOMOD: Everything will be auto-selected for you so leave it as is.

[7] Survival Control Panel[www.nexusmods.com] You can enable or disable features such as Sleep to Level Up, Arrow Weight, or Lockpick Weight, regardless of whether you use a survival mod. It can also be used to assign Warmth values to your armors and cloaks for Survival Mode or mods that use the Warmth system, making it an excellent companion for them.

[8] Sunhelm Magical Heat Sources[www.nexusmods.com] Make magical heat sources with Wall of Flames spell or Flame Atronachs

Optional Sunhelm mods
The next 2 mods reduce the size of Sunhelm's food and cold widget icons. Then if you chose Immersive Hud's "Link all Widgets" in MCM you can turn all widgets on & off in one click.

[9] SunHelm Small UI Icons[www.nexusmods.com] Sunhelm Small food widget icons. Only for the 3 food icons.

Optional
[10] SunHelm Small Cold Icon[drive.google.com] (This is on My Google Drive just drag and drop in Vortex after download) This is for the Cold icon only.

start up the game & make sure everything loads & runs ok at this point

Optional
[11] WiZkiD Wells with real water[www.nexusmods.com] This mod adds real water inside all skyrim wells. Fill your waterskins.

Optional
[12] Featherstone's Repository (more wells)[www.nexusmods.com]
install "More Wells for SunHelm - Cutting Room Floor"
+
[13] install "More Wells for SunHelm - vanilla"
(the above 2 patches add a SunHelm bucket to all wells, not just those in the main cities; esl-flagged)

Goldenhills Well
[14] SunHelm - Creation Club Farming Patch[www.nexusmods.com] Adds a SunHelm Survival water refill bucket to the well at Goldenhills Plantation.

Optional
[15] 4K Waterskin for INEED LAST SEED and SUNHELM[www.nexusmods.com] Also available in 2K.
Make sure to use the file for "Sunhelm".

Clothing for Sunhelm Survival
just a few extra mods to keep you warm - obviously they are all optional
[16] FurArmorSetSE(FrostFall Aware)[www.nexusmods.com] Install Main file.
Adds Hat, Poncho, Gloves, Boots, Muffler, Earmuffs, ShoulderCape, Coat
Can be crafted at a tanning rack or with the mod we installed earlier "AddItemMenu"
+
[17] Install "Update 1.1.2(esp only) RULE: After FurArmorSet

Optional - install the Crafting Only version in the FOMOD - UNP or CBBE
[18] Keeping Warm - Scarves and Mufflers[www.nexusmods.com] Install Main File
FOMOD: choose "Crafting only", take Elianora's + New Scarf textures, UNP or CBBE.
"This cold is unbearable!" - Not anymore! Keeping Warm introduces scarves and mufflers to the world of Skyrim! Enjoy the comforting warmth of these neck-hugging, warmth-providing accessories for your character.
+
The next 2 patches do not have plugins (they are textures & meshes only)
[19] install "Fixed Normal Textures Eli and New Scarves"
Will fix shininess
+
[20] install "Havok-Enabled Ground Meshes try 2"

start up the game & make sure everything loads & runs ok at this point
Fishing (Base game)
First a couple of Fixes
[1] Beneath Bronze Waters Start Fix[www.nexusmods.com] One of the last quests in the Fishing creation questline is the "Beneath Bronze Waters" quest, during which you unlock the Dwarven fishing rod and get 2 new unique war axes. Unfortunately this quest can fail to ever start under certain circumstances (see mod page for details). This mod assures you'll avoid this particular issue.

This mod changes both spider aliases in the quest to optional, so no matter what happens during your playthrough, those 2 spiders won't cockblock you from getting the Dwarven rod.

[2] (CC Fishing) Rubbish Retrieval Bugfix[www.nexusmods.com] Rubbish Retrieval radiant quest was supossed to send you to either Markarth, Riften, Dawnstar or Morthal. However, due to an implementation bug, the possibilities of being sent to Dawnstar or Morthal are very slim. Rejoice yourself, because with this mod you will be able to experience this epic quest as it was originally intended.

The remaining mods in this section are optional

Optional
[3] Fishing - Voiced Narrative[www.nexusmods.com] Improved the narrative of Fishing questline with new voiced dialogues carefully generated by xVASynth2.
+
[4] Skunk's xVASynth Cleanup for Fishing - Voiced Narrative[www.nexusmods.com] Removes 95.73% of static, hiss, hum, tin, and other such non-vocal noise from the synthesized lines in Fishing - Voiced Narrative

Optional (If you fish at all in Skyrim this mod makes sense)
[5] Fish Anywhere With Water[www.nexusmods.com] Creation Club Fishing only allows you to fish at certain spots in the game. This mod allows you to Fish anywhere as long you are facing a nearby body of water.

Optional
Don't want to fish for some of the artifact rings?
[6] CC Fishing - No Artifacts from Fishing[www.nexusmods.com] Simple mod that disables being able to get some of the artifact rings from normal fishing and places them in the world instead.

Optional
[7] The Skillful Fisherman - Fishing gives skill (Creation Club Addon)[www.nexusmods.com]
only install "Skillful Fisherman - ESL Flagged"
Fishing in Skyrim now give a small amount of skill progression to One Handed and Alchemy.

Optional
[8] Temper Fishing Rods[www.nexusmods.com] Simply adds tempering recipes so you can improve the fishing rods from the Fishing creation. Now also enchantable! (also handy in case you get attacked while fishing or forget you have your fishing rod equipped when attacking)


start up the game & make sure everything loads & runs ok at this point
Goldenhills (CC content)
This section requires the Anniversary DLC (Farming)
CC Farming is one of my favorite additions from the Anniversary DLC but it needed some help.

Make sure you install mod #5

FYI
Farming can be a very profitable endeavor in Skyrim particularly at Goldenhills when growing Alchemy ingredients. I have a great mod I listed as Optional in the Quests section of this guide.

Optional
[1] 3D Ropes for Goldenhills Plantation[www.nexusmods.com] Replaces ugly 2D ropes with immersive and stunning 3D ropes.

Optional
[2] Carriage Service for Goldenhills Plantation[www.nexusmods.com] A simple mod that adds a Carriage Service to Goldenhills Plantation via a short "microquest". There is a very short mini-quest
(Make sure to pick up and take the note off counter in the Inn at the nearby town of Rorikstead).

Optional
Can be Marked as Light - Deploy mods in Vortex after marking as light
[3] Skyrim Goldenhills Plantation Road[www.nexusmods.com] Adds a road to Goldenhills Plantation from the main road.

Optional
Clean this mod in xEdit QuickClean - Deploy mods in Vortex after cleaning
[4] Signpost for Goldenhills plantation[www.nexusmods.com] This mod adds a signpost near the Goldenhills Plantation.

CC Farming - IMPORTANT PATCH for Landscape & Water Fixes
[5] Skyrim Landscape and Water Fixes CC Farming compatibility patch[www.nexusmods.com] This patch simply reverts the changes from SLaWF so that Rin's wooden sword is accessible and the Goldenhills quest can be completed normally.


start up the game & make sure everything loads & runs ok at this point
DAR (Base)
We Need these 2 mods for "Skyrim's Got Talent"
We'll also be adding a couple of other animation mods related to these files later in the guide.

[1] Dynamic Animation Replacer[www.nexusmods.com] This mod dynamically replaces the actors' animations depending on various conditions. Supports most actors, including creatures. Actors and animations added by mods are also supported. No ESP file.

[2] AnimObject Swapper[www.nexusmods.com] FOMOD: Make sure 1.6.629+ is selected
SKSE plugin and framework for swapping AnimObjects, using config files.
Immersion & Vanilla Tweaks
Important Note: We added the next mod earlier in the guide so that you could properly test, so at this time simply select "Reinstall" from Vortex and follow the steps below.

From the Mods section of Vortex find "FLM Patch Collection - FOMOD" slide your finger over to the far right and use the dropdown and select "Reinstall". Then follow the notes and images below.

[1] FormList Manipulator - Patch Collection[www.nexusmods.com] v1.5.4 FOMOD: Select Vanilla Fixes & Tweaks, Both ignite oil options, Cutting Room Floor, Unofficial Patch, (IF you have Anniversary DLC select Arcane Archers), Magical Heat Sources.
(see images below)


optional
Great if you want additional light in the game in various locations on the fly.
[2] Repaired Lanterns[www.nexusmods.com] Collect those clutter lantern chassis that are scattered though out Skyrim. Hammer on them at the forge to create a working SMIM lantern (Sometimes when dropped on the ground you have to pick them up and drop them again in order to be lit).

Skyrim's Got Talent
This is required for the next mod; Skyrim's Got Talent
[3] BA Bard Songs[www.nexusmods.com] FOMOD: Select AIO (adds drum, flute, and lute).
This mod adds bard drum, flute, and lute instrumental songs to the taverns. It does not REPLACE them, it ADDS them and they play at RANDOM!

Don't worry about the mod "Flute Animation Fix" - we'll be adding it later after installing XP32
[4] Skyrim's Got Talent - Improve As a Bard[www.nexusmods.com] Play instruments, get better, NPCs react to your skill dynamically, many new songs, lots of easter eggs, simple implementation. A compact, yet powerful Bard Gameplay Overhaul.
+
[5] Install "Free Movement for SGT" from optional files.

[6] Skyrim's Got Talent - Player Reactions Addon[www.nexusmods.com]
Install 1st file "Skyrim's Got Talent - Player Reactions Addon" v1.02
Rule: AFTER Skyrim's Got Talent. Make your character react to their horrible (or terrific) bard performance with animation. Embarrass yourself or Be proud of your skill!
+
from optional files
[7] Install Skyrim's Got Talent - Player Reactions Free Movement Patch v1.0

[8] New Bard Songs[www.nexusmods.com] Replaces most of the songs that bards are gonna sing in taverns with songs from Malukah, BardMichaelKelly and Xenadragons.

[9] The Northerner Diaries - Immersive Edition (music by Jeremy Soule)[www.nexusmods.com] use 2nd file
Only install "The Northerner Diaries - Louder Version"
That's right, this music is by Skyrim's composer Jeremy Soule that seamlessly adds a nice variety into the game's chillout/relaxing moments.

[10] A lute from Witcher 3[www.nexusmods.com] A replacer for vanilla lute.

[11] Favorite Misc Items[www.nexusmods.com] v3.7.1
allows you to favorite books/soul gems/keys and other misc items. Also we installed "Sweeping Organizes Stuff" so we can favorite the broom and we'll be installing "Skyrim's Got Talent" so we can favorite the Lute, Drum, or Flute if we like. (goes well with the next mod "Miscellaneous Equip Text Removal".

[12] Miscellaneous Equip Text Removal[www.nexusmods.com] removes the "You can't equip this item" text that occurs when you try to equip some items. This can be useful when you use the broom for "Sweeping Organizes Stuff" to clean up an area so with this mod when you equip the broom you won't see that message. Same principle for "Skyrim's Got Talent" when you want to play an instrument.

[13] Essential Favorites[www.nexusmods.com] FOMOD: Make sure 1.6.629+ is selected.
SKSE plugin that prevents favorited items from being sold, crafted, disarmed, disenchanted, or dropped. Will also be useful for the mod "Ars Metallica" which allows us to smelt down items, with this mod we shouldn't accidentally smelt down favorited items.

[14] Better FaceLight and conversation Redux - (SPIDified and ENB Light)[www.nexusmods.com] supports as many follower & NPCs you want.

start up the game & make sure everything loads & runs ok at this point
Combat Magic & Perks
Mark this mod as Lite in Vortex Plugin Section
[1] No Spinning Death Animation SE[www.nexusmods.com] I use the first main file which Removes spinning death animation and other death animation/pause for creatures. Use this version if you want to keep dragon animations.
OR use the Merged version to remove dragon spin death.

[2] D13 Faster GET UP STAND UP animation vanilla friendly SSE[www.nexusmods.com] Install BSA version.

[3] Better Combat Escape - SSE[www.nexusmods.com] improves the vanilla game combat escape/stopping mechanism, to prevent you from being stuck in combat state with super far away enemies.
+
[4] Updates BCE for 1.6.640
Better Combat Escape - NG[www.nexusmods.com] Rule: AFTER Better Combat Escape.

[5] VioLens - A Killmove Mod SE[www.nexusmods.com] FOMOD: Archive, Reaction, Premade Profiles.
Violens gives you in-game control over both Ranged and Melee Killmoves with control over the cinematic camera.


[6] Valravn - Integrated Combat of Skyrim[www.nexusmods.com] Valravn is configurable in the MCM so if there's an element you do not like you can change it in game. Valravn is a compact, script free, highly compatible combat overhaul that focusses on the strengths of Skyrim. Features include combat system rebalances, improved AI and increased relevance of Stamina.
+
[7] Valravn SPID Uncloak[www.nexusmods.com] Install "Valravn SPID Uncloak 2.1.1" (2nd Main File).
Valravn's uncloaked unfortunately does not function properly, so we have prepared a replacement for it. Eliminate Valravn cloak spells and distribute them with SPID instead.

[8] Real Bows (by DecimusMaximus for SSE)[www.nexusmods.com] 1st Main File is needed (alt file is an add-on if you also want it) Replaces the vanilla bow models with more practical and realistic models.
+
[9] Real Bows - Collision Fixes[www.nexusmods.com] Rule: After Real Bows. Bows from Real Bows are a tad too long. This mod fixes that. Fixes the mismatching collision meshes in Real Bows SE that cause many of the bows to clip through the ground.

[10] 45KO Slim Quivers[www.nexusmods.com] Rule: AFTER ENB Light.
More realism less clipping. Most arrow quivers are now replaced with a slimmer version of the quiver.

[11] Auto Hide Ammo[www.nexusmods.com] Auto-Hide your current ammo when there isn't a bow/crossbow equipped. Your ammo won't be actually unequipped, simply hidden. It will appear again the next time you equip something the game consider a bow / crossbow. And hidden once again whenever you unequip your bow.

[12] No magic ninja ai dodge[www.nexusmods.com] Install the 1st file / manual download / drop in Vortex. Prevents NPCs from doing magic flash steps to evade your arrows/bolts. (ignore the "NO DLC Required" files - those are for oldrim).

start up the game & make sure everything loads & runs ok at this point

[13] Odin - Skyrim Magic Overhaul[www.nexusmods.com] Odin is what magic in Skyrim should have been. It improves and fixes vanilla Skyrim spells, makes scrolls and staves viable, and adds new spells, scrolls and staves inspired by previous Elder Scrolls magic. The new content is balanced and seamlessly integrated into the game.

[14] Odin - Summons Redone[www.nexusmods.com] provides alternate visuals for several of the new summonable creatures from Odin - Skyrim Magic Overhaul by EnaiSiaion, replacing Odin's clannfear and daedroth with models and textures from 4thUnknown's Clannfears SSE and Daedroths SSE.

[15] Odin Cleaned Textures[www.nexusmods.com] Install 1st file "Odin Textures Cleaned"
Rule: AFTER Odin Summons Redone.
Cleaned textures of Odin to remove any bad artifacts and increase FPS by saving in B7 Format

[16] Odin - Misc Audio Tweaks[www.nexusmods.com] Some of the conjuration sounds are a bit too loud or repetitive, this mod fixes that.

Earlier we chose NFF's "No Team Magic Damage Core (Beta)" so we need this patch:
[17] NFF No Team Magic Damage Patches for Vanilla Plus Magic And Shout Overhauls[www.nexusmods.com]
Install Only: "NFF No Team Magic Damage - Odin Patch" version 1.0Odin

[18] Clairvoyance Fix[www.nexusmods.com] A small fix to the Clairvoyance spell that makes the trail update every second and more than halves the base Magicka cost, for your quality of life.

Optional
[19] Underwater Blast Spell[www.nexusmods.com] Useful for killing Slaughterfish under water. Adds a spell tome that adds an Underwater Blast Spell as a lesser power. It can be cast by using your lesser power/shout key. This allows it to be done without the use of your hands, which means you can use it underwater. It works out of the water as well, but is not very powerful.

[20] Vokrii - Minimalistic Perks of Skyrim[www.nexusmods.com] Vokrii is a lightweight "vanilla-plus" perk overhaul that improves build diversity, but respects the vanilla vision and balance. It is lightweight and uses clean scripting.
+
[21] install "Odin - Vokrii Compatibility Patch"

[22] Vokrii - Scrambled Bugs Compatibility[www.nexusmods.com] This patch edits several perks and effects in Vokrii to make them function normally with the "Apply Spell Perk Entry Points: Multiple Spells" from Scrambled Bugs.

[23] Vokrii J'zargo Expert Destruction Dialogue fix[www.nexusmods.com] with Vokri you can no longer answer J'zargo that you mastered expert level destruction spells, this fixes that.

Optional
[24] Vokrii Unarmed[www.nexusmods.com] Adds a few perks to the "Unarmed" tree for users that like to do a little bare fist fighting. See mod page for details.

A Fix (this always bugged me
[25] No Edge Glow - Magic and Transformations UPDATED ESL[www.nexusmods.com] Removes the glowing edges from magic effects, transformations, and enchantments.

[26] ElSopa - Quivers Redone SE[www.nexusmods.com] Rules: AFTER: HD Reflective Ebony Armor and Weapons, Stalhrim Refrozen, and ENB Light. New Meshes. No ESP. Performance Friendly.
+
[27] "Grab the Hotfix for your resolution"

Final Tweaks for Archery
Go to your Skyrim.ini (located in Documents\My Games\Skyrim Special Edition)
use these values and if a line does not exist then add it.
The first set is under the Combat section. The 2nd is under Actor.

[Combat]
fMagnetismStrafeHeadingMult=0.0
fMagnetismLookingMult=0.0
f1PArrowTiltUpAngle=0.7
f3PArrowTiltUpAngle=0.7
f1PBoltTiltUpAngle=0.7
f3PBoltTiltUpAngle=0.7

[Actor]
fVisibleNavmeshMoveDist=12288.0000

start up the game & make sure everything loads & runs ok at this point[/hr]
Animations (Nemesis + DAR)
This section is optional
Some of the mods in this section require DAR, some Nemesis, and some neither.

Earlier in the guide We Installed both Nemesis and Dynamic Animation Replacer (DAR).

If you are not familiar with animations or feel you don't want or need them you can skip this section.

Important - Let's first review how to properly install mods that require Nemesis
VORTEX USERS: AFTER INSTALLING NEMESIS FOR THE FIRST TIME AND AFTER EACH ANIMATION INSTALL MAKE SURE YOU HIT THE "DEPLOY MODS" BUTTON WHILE IN THE MODS SECTION OF VORTEX

STEPS
ALWAYS RUN NEMESIS AFTER INSTALLING A MOD THAT DEPENDS ON IT AS FOLLOWS
Step 1. Open Nemesis
Step 2. Find the name of the mod you just installed in the list and tick the box next to it
Step 3. Update Engine
Step 4. Launch Nemesis Behavior Engine
Step 5. Deploy Mods from the top of Vortex

We added "Retimed Hit Frames" earlier when we installed Nemesis
If you did not please go back to the Nemesis section of this guide and do so now.

NEMESIS ANIMATIONS
We'll keep Nemesis folders at a minimum by not installing a boat load of Nemesis mods. As a matter of fact we'll do the same with DAR dependent mods, which is keep the folders at a minimum.

Player Character Animations
1. Project New Reign - Nemesis PCEA[www.nexusmods.com] A complete revamped version of all other PCEA made from scratch. Nemesis PCEA's new design eliminates many bugs haunting other PCEA as well as greatly improves the performance. The day of Alternate Animation mods messing with your PCEA is over. 10 slots is not enough? Fear not, Nemesis PCEA supports up to 20 slots. (And yes, using this PCEA will give you animations in conjunction with SL Framework for LL mods)
RUN NEMESIS AFTER INSTALLING
Once in game select an animation pack from the MCM .

2. Ice skating fixed for real - No more attack sliding movement[www.nexusmods.com] Fixes the infamous long-standing vanilla issue where attacking while slowly moving will make you slide across the ground giving the impression of an ice-skater.1H and 2H covered, NPC and Player.
Tick the Ice Skating box inside Nemesis - RUN NEMESIS AFTER INSTALLING

This next mod requires Both DAR & Nemesis - we installed both earlier.
3. Enemy Magelock - NPC Magic Casting Commitment[www.nexusmods.com]
Run Nemesis as usual AFTER installation. Shows Null in Nemesis but works fine.
This actually effects NPCs but benefit the player. Enemy Magelock, Commits the NPC in place when they cast magic animations to avoid them cheesing at you by closing you down or running away when Casting, they are now fully committed to their cast to encourage skill based gameplay.

DAR ANIMATIONS
We'll keep DAR folders at a minimum by not installing a boat load of DAR mods.

DAR (for Player)
1. Goetia Animations - Magic Spell Casting[www.nexusmods.com]

2. Vanargand Animations - One Handed Mid Stance[www.nexusmods.com] Works well with the "One Handed Normal Attacks" animation we'll be adding at the bottom of this section.

3. Vanargand Animations - Sneak Archery[www.nexusmods.com] Works well with the "Sneak Archery" animation we'll be adding at the bottom of this section.


DAR (for NPCs)
4. NPC Animation Remix (DAR)[www.nexusmods.com] Scratching head animation, pulling pants, pondering, checking pockets in Riften and more... 22 idles for NPCs with appropriate conditions using DAR folders and big amount of less noticable animations to fix inconsistencies: prevents NPCs from standing synchronized, for example. Works with NPCs added by mods as well as vanilla. No esp/esl!

DAR (for followers - and spouse)
5. I'm Glad You're Here - a follower and spouse appreciation mod - SSE[www.nexusmods.com] Install Glad You're Here - Main File Allows the player to show their appreciation to their followers , spouse and adopted kids by dialogue and a hug animation. Fully voiced dialogue.
+
6. install Skyrim's Got Talent instrument patch from optional files

DAR (for children)
7. Lively Children Animations (DAR)[www.nexusmods.com] Makes kids childish: adds more than 10 idles and 10 dialogue gestures and other animations variants + secret bonus animation specifically to children. No esp/esl plugin - just Dynamic Animation Replacer folders. Safe to install or delete mid-playthrough - try and see for yourself!

We'll install Flute Animation Fix later after we install XPMSSE

No DAR, Nemesis, or FNIS Requirements for these mods
1. Vanargand Animations - Archery[www.nexusmods.com] Works well with the Sneak Archery animation we installed earlier. Without requirements, these animations will completely replace, while holding a bow, the Idle, walk, run, turn left/right, Sprint, draw arrow, drawn arrow idle, drawn arrow walk/turn, arrow release, equip and unequip, includes belt fasted quiver animations.

2. Vanargand Animations - One Handed Normal Attacks[www.nexusmods.com] Works well with the One Handed Mid Stance animation we installed earlier. These animations will replace vanilla normal attack animations for one-handed weapons while standing still or moving in any direction. No requirements.

See the mod page for details on usage in game for these next 2 mods.
3. Emote[www.nexusmods.com] Allows player emote and idle animations, with customizable emotions, that can be played at any time through up to 30 configurable hotkey configurations or by marking as a spell.

4. Dovahkiin can lean Sit Kneel Lay down and Meditate etc too[www.nexusmods.com]
use 2nd file "ESL flagged ESP (ESPFE/ESPL) version"
Adds the ability for the player to use certain furniture markers that are normally for NPC use only.


start up the game & make sure everything loads & runs ok at this point
Quests
Some new quests and quest fixes

[1] Leaps of Faith - A Misc Quest[www.nexusmods.com] Simple mod that adds yet another fun activity for your character to do in the world: 12 epic "Leaps of Faith" across Skyrim for you to discover and complete as you play. Jumping from one of these places will play a custom jumping and falling animation and give you a small (well-earned) bonus. Another great Jayserpa mod.

[2] Immersive World Encounters. FINAL SE[www.nexusmods.com] adds roughly 100 new random events and new quests, plus some unique characters and possible followers. Excellent mod.
FOMOD: Make sure to also select the "RS Children" Patch.
+
Then go to the Vortex plugin section and disable:
"immersive encounters - rs children patch.esp" (I'll remind you when to enable it)
+
Go to the Plugin section of Vortex:
and re-enable the "more dialogue options - immersive encounters patch.esp" (we disabled it earlier).

[3] College of Winterhold - Quest Expansion[www.nexusmods.com] Plays as if it was always part of the game by adding 7 new starter magic lessons/quests to make your College of Winterhold feel like an actual school of magic. Very well done. See mod page for more details.
+
[4] Optional add-on
You can also add the optional file "EASY MODE - Show Direct Quest Markers" that adds some quest markers if you like. Might even be a good idea unless you love to search.
We will also add a patch for RS Children later in the guide.

[5] Delay The Forsworn Conspiracy Quest updated ESPFE[www.nexusmods.com] Removes the forced greeting from Eltrys. The scene, where Weylin attacks Margret is still there, you can either save Margret or watch her die. Guards will come and people will be shocked as usual. But the quest will not start as long as you do not greet Eltrys personally. Now you avoid talking to him until you want to actually start the quest.

[6] Suffer at Kynareth's[www.nexusmods.com] Prevents the 'Wounded Soldier' and the 'Sickly Farmer' at the Temple of Kynareth from "walking" on the altars. Also replaces the outfit of the soldier to match the Whiterun garrison.

Optional setup The next 5 files/mods are for the quest "Blood on the Ice" in Windhelm.
After install mark this next mod as Light in Vortex Plugins section - Deploy mods & Confirm.
[7] Blood on the Ice Redux SE[www.nexusmods.com] Install "BOTI v2_1_1" 1st Main File
Ever wanted to catch the Butcher before he kills again? Then this is your mod. This mod allows the player to start the investigation BEFORE the Butcher strikes again. Be aware though, If you don't act quickly the Butcher will kill again.
+
[8] Blood on the Ice Redux - Voiced ESP-FE[www.nexusmods.com] We only need the main file.
+
Vortex might give you a Redundant message -
so disable it thru the pop-up but don't remove the mod we need the ESP enabled.
+
[9] Blood on the Ice Redux - Re-Voiced[www.nexusmods.com] make the voice more natural but it's still a bit fast, also blends in better with vanilla voice lines. This makes it good enough and certainly as good as it's going to get. The important thing is the quest runs properly and let's face it, Bethesda really butchered this quest ;-)
+
Optional - works with or without above mods
[10] Finding Susanna Alive - A Blood on the Ice Trigger Revision[www.nexusmods.com] Fomod should default to BOTI Redux (above mod). This mod changes how Blood on the Ice is triggered to ensure that you'll be able to meet Susanna the Wicked alive and well in Candlehearth Hall before the butcher strikes.


start up the game & make sure everything loads & runs ok at this point

Optional
Requires Anniversary DLC
[11] The Gray Cowl Returns - Voiced Narrative (Creation Club)[www.nexusmods.com] Improved the narrative of The Gray Cowl Returns quest with new voiced dialogues.

[12] The Notice Board SE[www.nexusmods.com] This mod adds new and alternative radiant (and side) quests. There are two kinds of notice boards: • Quest notes Notice board – always on a pole with candles • Messages Notice board – it’s the one without the pole. These notice boards can be found outside inns in every town of Skyrim. A patch for Raven Rock in Solstheim is also available.

[13] (2K) 4K Notice Board[www.nexusmods.com] I 2K or 4K you choose. Includes more notices

[14] The Notice Board SMIM 3D Ropes Fix[www.nexusmods.com] A mod that fixes the position of the board models from The Notice Board to avoid clipping with SMIM 3D ropes.

[15] AuraCrimson's Patches[www.nexusmods.com] Grab the "Notice Board_Riften Patch" only.

[16] Source of Stalhrim Quest Fix[www.nexusmods.com] Allows to seamlessly start the quest "A New Source of Stalhrim" if it gets stuck. For those who don't like using the console and find it unimmersive. Sometimes the quest does not fire properly, this mod will make sure the dialogue remains.

[17] Belethor's Sister - Quest[www.nexusmods.com] Find Belethor's Sister and take over Belethor's store while earning profits.

Optional
[18] Stackable Stones of Barenziah with Optional Quest Markers[www.nexusmods.com] ONLY use on a New game. Fixes Stones of Barenziah to stack properly in the player's inventory. Also adds optional quest markers to Stones of Barenziah.

Mark as light via Vortex
[19] Optional: Jiub's Opus[www.nexusmods.com] Simple mod that adds quest markers for the Soul Carin side quest "Impatience of a Saint".

Optional
See the mod page before installing this next mod. This mod makes farming at Goldenhills all the more profitable but the quest to obtain it is longer and then you'll need to spend $10,000 to aquire it. But for me it's well worth it.
[20] Creation Club Farming - Tweaks Enhancements and Quest Expansion[www.nexusmods.com]

Remember: Do NOT remove mods mid-game unless they fall under the category of mods that are safe to uninstall mid game. Please read the article.

start up the game & make sure everything loads & runs ok at this point
Models & Textures (read)
Note:
As you go forward remember this when you are deciding on 1K-2K-4K or even 8K textures. Indoors has very little if any bearing on the hit your system takes so keep that in mind if you're worried about performance issues (VRAM).

I usually choose mostly 2K for both inside & outside textures when modding on my RTX 2070. 4k is usually best used on things that are large, like mountains, dragons, city gates, etc. 4K for Weapons & Armors as well, or for items where seeing the fine details is important to you. I might also use higher resolutions (4K) on items that are going to be often in your view like weapons. Now that I have a RTX 3090 I use 4K more often and still have improved performance over my last rig. I should also mention that you do not need a 4K monitor to see the improvement that a 4K texture provides but that's another discussion and there are plenty of articles on that very subject on the internet.

If you are looking for the best of both worlds? A great middle choice is where you'll sometimes find a mod that includes a 4K-2K texture combo (e.g; 4K diffuse textures with half-sized normal maps).

An Excellent Read Regarding Texture Choices
Shutt3r, the mod author of the very popular Noble Skyrim Mod HD-2K wrote an excellent short article[forums.nexusmods.com] on texture choices. Check it out for more info on this subject. Highly recommended.

Final Note Before We Add Textures
You may have accessed this guide solely for the Models & Textures and if so it's important to know that we added both Noble Skyrim and SMIM as a base for our Models & Textures so in my opinion you should go back to the Early Loaders section of this guide and add them plus the patch for both before you start adding Models and Textures.

There also is a Bug Fix section you may should use as well as a User Interface section and a Mesh Fix section. Just wanted to pass that info on for consideration for those interested.
Models & Textures 1
This first mod was made for Original Skyrim (Oldrim) but it works fine for Special Edition as they are only textures (with no plugin), plus they were made by Gamwich, enough said.
So when you install it you'll get a pop-up message from Vortex telling you it's for another game.
Select "Skyrim Special Edition" and install.
[1] RUSTIC ALCHEMY and ENCHANTING TABLES[www.nexusmods.com] Select resolution (2K or 1K)
1st: Download with Mod manager/you'll get a popup. 2nd: Select Skyrim Special Edition.
Rules: AFTER Noble Skyrim, SMIM.

[2] Enchanting Stations Candles[www.nexusmods.com]
Replaces the ugly candles of the enchanting stations with rudy102's models and textures.
FOMOD: I picked version 1.2
Rules: 'AFTER Optimized Meshes for ENB Lights - A - Vanilla and SMIM'

[3] SD's Horn Candles SE[www.nexusmods.com]
Rules: AFTER ENB Light.
+
Next
Select "Open in File Manager"
Delete the "Meshes" Folder and close the window (yes delete the folder).
Deploy Mods from the top of Vortex.

[4] RUSTIC CLUTTER COLLECTION - Special Edition[www.nexusmods.com] Choose your resolution.
Rules: AFTER Noble Skyrim, and SMIM.

[5] Basic Dining Set Replacer[www.nexusmods.com] Rule: AFTER SMIM.
Just wow. The mugs alone are worth it.

[6] Rudy HQ - Miscellaneous SE[www.nexusmods.com] HQ meshes for a glazed pottery, silverware, common plates with a new HQ candles. Realistic apples, tomatoes, and potatoes.
FOMOD: Select - Rudy HQ Silverware for Rustic Silverware, Rudy HQ Imperial Candles,
Rudy HQ Nordic Ruins Candles, Rudy HQ Lanterns, Rudy HQ Glazed Pottery Vanilla Style,
Rudy HQ Brown Textures for Dungeon Pottery, Rudy HQ Apple Tomato Potato,
Rudy HQ Common Plates, 1K Textures for the Candles.

Rules: Make sure Rudy HQ is AFTER Everything

[7] JS Shrines of the Divines SE[www.nexusmods.com] Choose your resolution (1K, 2K, or 4K)
Rules: AFTER "Optimized meshes for ENB - A - Vanilla & SMIM"
Replaces vanilla divine shrines with completely remade, higher resolution versions.
+
[8] Optimized meshes for ENB lights[www.nexusmods.com]
Only Install "Rudy's HQ - Miscellaneous patch"
FOMOD: Select "JS Shrines", and SMIM
Rules: AFTER Rudy Misc., JS Shrines, ELFX, Particle Patch, SMIM, Enchanting Station Candles, Optimized Textures for ENB Lights - A - Vanilla and SMIM.
+
Finally let's patch Rudy's silverware
[9] Optimized meshes for ENB lights Rustic Rudy Misc Silverware[www.nexusmods.com]
Rule: AFTER Optimized Textures for ENB Lights - Rudy HQ Misc. Patch, Rudy HQ Misc., Particle Patch, and Optimized Textures for ENB Lights - A - Vanilla and SMIM.


start up the game & make sure everything loads & runs ok at this point

[10] RUSTIC RELIEFS[www.nexusmods.com]
Rules: AFTER Noble Skyrim, and Rustic Alchemy and Enchanting Tables.
textures are from Rustic Monuments & Tombstones, Rustic Nordic Murals, Rustic Standing Stones, and Rustic Word Walls.

[11] Skyland Whiterun[www.nexusmods.com] Rules: AFTER Everything. A complete texture overhaul of Whiterun utilizing real world 3D scanned textures.
+
Optional
If you want different Whiterun Braziers
[12] Some Braziers[www.nexusmods.com]
Install "Qwafee Braziers (Whiterun V1.5)"

[13] WiZkiD - Hall of the Dead Stained Glass Windows[www.nexusmods.com] Rule: AFTER Everything.
+
[14] Whiterun Mesh Fixes[www.nexusmods.com] We only need the patch from here.
Install the 2nd file "Whiterun Mesh Fixes - Wizkid's Hall of the Dead patch"
Rule: AFTER Whiterun Mesh Fixes, and Wizkid's Hall of the Dead Windows.

Optional
IF you installed the Breezehome Quickstart mod you need to keep that room as is (see below)
[15] Breezehome Basement (Crafting and Storage)[www.nexusmods.com]
It also adds a map marker for the house in Whiterun so you can fast travel to right outside the front door, and you can fast travel from the basement cell. There's a blacksmithing anvil, a smelter, a tanning rack, a grindstone, a workbench, an arcane enchanter, and an alchemy lab. All containers are safe, and there are several display racks and two new bookshelves. FYI: If you used the Quickstart mod for Breezehome listed earlier in this guide which also comes with the Alchemy lab upstairs you will not be able to buy the children's room from the steward, I mean you can but it won't work, you'll have a mess. This is just a reminder.

[16] Skyland Nordic Ruins[www.nexusmods.com] Rules: AFTER Everything.
This mod adds a complete overhaul to the visual of Nordic tombs, ruins, Orc longhouses, and other ruins found throughout Skyrim.

[17] Ruins Puzzle Pillar Retexture[www.nexusmods.com] Replaces the ugly, shiny Vanilla textures with upscaled, eroded 1k and 2k custom textures! NO ESP. Just install and enjoy.

[18] Overlooked Dungeon Objects Retextures[www.nexusmods.com] Pick your resolution.

[19] *WiZkiD Riften and Ratway[www.nexusmods.com] Do NOT use the Parallax version for this guide.
(Texture and Mesh replacer for the city of Riften and the Ratway, its underground area)
Rules: BEFORE FYX Mara Windows, ELFX Shadows. AFTER Noble Skyrim, Particle Patch, Assorted Mesh Fixes, SMIM, and ELFX.

Optional - Recommended
[20] Organic Riften Leaves[www.nexusmods.com] Quality textures for the leaves on the ground in the city of Riften which make a big difference. Available in 4K, 2K, or 1K.

[21] Skyland Windhelm[www.nexusmods.com] Rules: AFTER Everything.
complete retexture of all architectural and landscape meshes in and around the city of Windhelm.

[22] Stairs of Skyrim - Windhelm Bridge Stairs[www.nexusmods.com] Rules: AFTER Assorted Mesh Fixes. Replaces snow ramp with stairs. Fixes abrupt snow to stone seam.

[23] Windhelm Docks Pathways SE[www.nexusmods.com] This mod adds stairs and pathways connecting the Windhelm Docks area to both the main bridge into the city as well as a side path to Winterhold.

[24] Skyland - Solitude[www.nexusmods.com]
Rules: BEFORE "Assorted Mesh Fixes - SMIM - Really Blended Roads Patch".
AFTER Noble, SMIM, Assorted Mesh Fixes.
A texture overhaul of the city of Solitude & the Blue Palace along with surrounding areas
Models & Textures 2
[1] MD's HD Farmhouses[www.nexusmods.com] Rules: AFTER Noble Skim, Noble Patch, and SMIM.
Weather worn textures with 4k-2k options. Crafted with realism in mind.

[2] Skyland - Imperial Forts and Dungeons[www.nexusmods.com]
Rules: AFTER Noble Skyrim, Noble patch, SMIM.

Optional
[3] Fortified Imperial Fort Battlements (ESL)[www.nexusmods.com] Install Main File.
Adds crenellations to the tops of the imperial forts around Skyrim (think the Conwy Castle in Wales).

[4] CleverCharff's Fort Dawnguard 4K 2K[www.nexusmods.com] Rule: AFTER Noble Skyrim. A retexture of Fort Dawnguard in 4K or 2K. Optional file for black stone walls if you want it.

[5] Praedy's Castle Volkihar - SE[www.nexusmods.com] Rule: AFTER Noble Skyrim.

[6] Skyrim Remastered - High Hrothgar[www.nexusmods.com]
Make sure you install a "No Parallax" version.
Rule: AFTER Noble Skyrim. All new 2k and 4k HD textures generated from 3D scanned materials in BC7 compression.

[7] Skyland - Markarth[www.nexusmods.com] Rules: AFTER Noble Skyrim.
featuring dark old stone carvings, metalwork, dungeons, and more. Using real world references of Mayan ruins and old nordic carvings.
+
Mods 8, 10, and 12 are optional
[8] Dwemer Pipework Reworked[www.nexusmods.com] From the Old Files section use:
Make sure everything you install is from the Old Files not the Optional or Main Files.
"Dwemer Pipework Reworked 4"
(This is 4K so if you need 2K add the optional performance friendly rusty textures file and let it overwrite the main file)
Rules: AFTER: Noble Skyrim, Skyland Markarth, ELFX.
+
[9] Dwemer Pipework Reworked - Skyland Edition[www.nexusmods.com] FOMOD: You pick between v4 and v5

(Optional for ENB users)
Go back to the Old Files section of "Dwemer Pipework reworked and use:
(The glowing parts cast some light with ENB, also you'll have some glow without ENB)
[10] Install "Dwemer Pipework Reworked - optional ENB Lights"
Rules: AFTER "Dwemer Pipework Reworked" main file, and ELFX.
+
This darker glow will have an effect on the above file (also use the Old Files section)
[11] Install "dlc02 boiler with darker glow and ENB light"
Rule: AFTER "Dwemer Pipework Reworked - optional ENB Lights", and Dwemer Pipework Reworked.

[12] Improved Dwemer Glass[www.nexusmods.com] Rules: BEFORE Assorted Mesh Fixes. AFTER SMIM.

[13] Improved Dwemer Glass - USSEP Patch[www.nexusmods.com] Rule AFTER Improved Dwemer Glass.

[14] JS Dwemer Artifacts SE[www.nexusmods.com] Rule: AFTER Improved Dwemer Glass, SMIM.

[15] MD's Photoreal Mines[www.nexusmods.com] Rule: AFTER Noble Skyim, Noble Patch, SMIM. Photorealistic overhaul for the Mine textures

[16] CleverCharff's Caves[www.nexusmods.com] Rules: AFTER Noble & SMIM.
a great retexture of caves and ice caves.


start up the game & make sure everything loads & runs ok at this point

[17] RUSTIC COOKING[www.nexusmods.com] Rule: BEFORE Skyland Whiterun. AFTER Noble Skyrim.
retexture of the main cooking stations, the spit, stewpot, and oven. Includes retextures for the stew, cooked beef, cooked venison, and cooked goat. Also retextures cheese and cabbage.

[18] RUSTIC FURNITURE[www.nexusmods.com]
Be sure to grab one of the SMIM versions. (4K or 2K).
high-resolution retexture of the noble furniture, high chest, and display cases.
Rule: AFTER Noble Skyrim & SMIM.

[19] PELTAPALOOZA[www.nexusmods.com] You choose: Light for Low end PC / Full for High end.
Rules: AFTER MD's Farmhouses, Noble Skyrim, and Particle Patch.
improves and increases the pelts used in farmhouses and inns.

[20] RUGNAROK[www.nexusmods.com]
Rules: BEFORE ELFX Shadows, AFTER Noble Skyrim & ELFX.
Outstanding rug retexture.

[21] RUSTIC WINDOWS[www.nexusmods.com] Rule: Must be AFTER Noble Skyrim. This mod retextures the Skyrim and Dragonborn DLC windows in a lore-friendly way. The window glass has been revised to be thick, textured and insulating. The "opaque" nature of the glass has a purpose. 2K and 1K versions.

[22] WiZkiD Signs[www.nexusmods.com] FOMOD: Choose "Lanterns of Skyrim II users" and nothing else
Rule: AFTER SMIM
A new and complete retexture of all the Skyrim signs.

[23] WiZkiD Specific Signs[www.nexusmods.com] Rule: AFTER WiZkiD Signs. swaps all generic signs with specifically designed ones for each alchemy and general goods shops.

[24] WiZkiD Carriages[www.nexusmods.com] Rules: AFTER Everything. For 2K you only need the Optional file. Not only is this a replacer for all carriages with high quality textures but it also contains the Prisoner Cart Fix.

[25] Rally's Solstheim AIO[www.nexusmods.com] FOMOD: You choose. Rule: AFTER Noble Skyrim.
"Collection of all Rally's overhauls. Includes Raven Rock, Tel Mithryn, Riekling Outposts and clutter, Landscapes, Plants, Furniture, Shrines and Banners."

[26] Arri's Snow Elf Ruins Retexture Special Edition[www.nexusmods.com] 2K high quality retexture of Snow Elf architecture.

[27] Shaders of Solstheim - Ash and Moss[www.nexusmods.com] Light-weight ash and moss material shaders.

[28] Glorious Doors of Skyrim (GDOS) SE[www.nexusmods.com]
FOMOD installer: Choose your resolution / Select the "Rotation Fix" / and DO NOT take any of the Riften or Markarth doors. Take Everything else (WizKiD's Riften doors match his Riften overhaul perfectly and so do the Markarth doors).
Rules: AFTER Everything.
unique new door meshes, replacing 50+ door meshes ingame used in hundreds of instances

Optional
[29] Skyland Whiterun - Pompous Dragonsreach Door color patch SE[www.nexusmods.com] Door will now match the Skyland Whiterun color palette.

[30] Nordic Tent upgrade by Pfuscher[www.nexusmods.com] 2K or 4K you choose.

[31] NORDIC TENT 4K - 2K RETEXTURE[www.nexusmods.com] 2K or 4K you choose.

Optional
[32] HD Charcoal for Smelter - 2K and 1K texture replacer[www.nexusmods.com]
Make sure you choose a SMIM version.
Rule: AFTER SMIM


start up the game & make sure everything loads & runs ok at this point
Models & Textures 3
[1] Skyhaven HD by CleverCharff[www.nexusmods.com] Retexture of Sky Haven, interior and exterior all assets. Optional file for black stone walls if you want.

[2] ElSopa - HD Medieval Anvil[www.nexusmods.com] Pick your resolution.
Rule: BEFORE ENB Light. AFTER Everything else.
+
[3] Install "ElSopa - Medieval Anvil Embers HD Patch"
Rules: BEFORE ENB Light. AFTER Everything else.

[4] ElSopa - HD Iron Tools Redone[www.nexusmods.com]Rule: AFTER Anvil
+
Grab this Hotfix[www.nexusmods.com]
(from optional files)
[5] "ElSopa - Medieval Anvil Hammer HotFix"
Rules: AFTER HD Medieval Anvil

[6] FYX - 3D Coal in the Shovel[www.nexusmods.com]
Only nstall "B) FYX - 3D Coal in the ElSopa Shovel"

[7] Campfire - HD Axe and Cooking Pot SE[www.nexusmods.com]
Only install "Campfire - HD Axe by Xtudo SE"
Uses the Axe from the mod "ElSopa - HD Iron Tools Redone" which we just installed - also requires "Campfire" if you chose to install it earlier.

Optional
[8] Iconic's Weathered Dragonstone Retexture (4K-2K)[www.nexusmods.com] Pick your resolution.

[9] ElSopa - HD Better Bloody Rags SE[www.nexusmods.com]

[10] Renthal's workbench[www.nexusmods.com] Rules: AFTER Noble Skyrim, SMIM Quality Addon.

[11] Renthals's tanning rack[www.nexusmods.com] Rule: AFTER Workbench, SMIM Quality Addon.

[12] ElSopa HD - Grindstone SE[www.nexusmods.com] Rule: AFTER Noble Skyrim

[13] Point The Way[www.nexusmods.com] THIS IS ALSO A FIX. Road signs placed at major intersections that were either lacking signs, or were missing information indicating the full extent of where you could travel on a road. Some smaller towns & villages aren't even mentioned - despite Bethesda having created signs for them! Some were pointed the wrong way or had the wrong city being labeled have also been fixed.
+
perfect retexture to compliment Arthmoor's "Point the Way" road signs
[14] HD Road Signs - 2K and 4K[www.nexusmods.com] Choose your resolution for Main File.
RULE: AFTER Noble
+
Grab the two patches in the Optional Files section of the mod page
[15] "Cutting Room Floor Signs"
+
[16] "Point the Way - Kynesgrove Sign" (for the sign that Point the Way fixes).


start up the game & make sure everything loads & runs ok at this point

[17] Rudy HQ - Hay[www.nexusmods.com] you choose in the FOMOD Installer.
Rule: AFTER Assorted Mesh Fixes.

[18] Praedy's repository - SE[www.nexusmods.com]
Only install "Lava Replacer" You choose 2K or 4K

[19] Hot Lava - Heat Distortion[www.nexusmods.com] Only install 1st file "Hot Lava - Heat Distortion"
Rule: AFTER Praedy's repository - SE - Lava Replacer.

[20] RUSTIC ELDERSCROLL - Special Edition[www.nexusmods.com] Choose your Resolution.
+
Optional - writing inside the scroll
[21] "ELDERSCROLL SSE - FX" (pick resolution) retex of the reading the Elderscroll effect.

[22] Realistic HD Baskets Remastered[www.nexusmods.com] Check these out, it's been 4 years since I last used this.

[23] Iconic's Blackreach Crystals Retexture[www.nexusmods.com] Rule: AFTER SMIM

[24] Rally's Blackreach Mushrooms[www.nexusmods.com] pick one of the last 2 files.
Only install "Rallys Blackreach Mushroom (2K or 4K)" Pick your resolution.
Rules: Should not overwrite anything.

[25] High Poly Blackreach Mushrooms[www.nexusmods.com] Rules: AFTER ELFX, Iconic's Blackreach Crystals, and SMIM

[26] Blackreach Sun[www.nexusmods.com] Only install the last file Blackreach Sun

[27] Blackreach Tentacle Mesh Fix[www.nexusmods.com] Reduce texture seams and pixelation also adds collision.

[28] Steaming Hot Soups and Stews[www.nexusmods.com]
ONLY install: "Steaming Hot Soups and Stews SE - SMIM" (under optional files)
Rule: AFTER SMIM.

[29] High Quality Food and Ingredients SE[www.nexusmods.com] RULES: AFTER Rustic Reliefs, Rustic Cooking.

[30] Realistic HD Food Remastered[www.nexusmods.com] RULES: BEFORE: Rudy HQ Misc. AFTER Assorted Mesh Fixes, SMIM, WiZkiD Riften, 2K Ring of Khajit.

[31] Alternate Red Wine Textures for Realistic HD Food Remastered[www.nexusmods.com]
Rule: AFTER Realistic Food HD Remastered.
Retextures the Wine & Alto Wine from Realistic HD Food Remastered from green to red.

Optional
[32] Ultra HD Apple Pies[www.nexusmods.com] Pick your resolution.
Rule: AFTER Realistic HD Food Remastered.

[33] HD Bowls of Food and Ingredients SE (WIP)[www.nexusmods.com]
Rules: AFTER High Quality Food & Ingredients, ENB Light.

[34] Awesome Potions Simplified by Revoith[www.nexusmods.com] Install Main File
Rule: AFTER Realistic HD Food Remastered.
+
[35] also Install "No Drink Visual FX"
Convert to Light Plugin from Vortex Plugin section - Deploy mods
Rule: AFTER Awesome Potions Simplified
+
From the Plugin section in Vortex - Select "Manage Rules":

Set Rule as:
"No Drink FX.esp" Must Load After "Awesome Potions Simplified by Revoith.esp"
Save - then Sort Plugins

[36] Ice Wraiths Retexture 2k[www.nexusmods.com] 2k version ported over from the Classic Edition.
+
[37] Icy Wraith Teeth[www.nexusmods.com] Rule: AFTER Ice Wraiths Retexture.
An animated mesh replacer for Ice Wraith Teeth.

[38] Skyrim 3D Misc[www.nexusmods.com] Install the following:
Install "Skyrim 3D Misc - Giant Mortar and Pestle"
Rule: AFTER SMIM
+
[39] Install "Skyrim 3D Misc - Mammoth Cheese"
Rules: BEFORE Alchemy Ingredients ENB Light. AFTER SMIM.


start up the game & make sure everything loads & runs ok at this point
Models & Textures 4
RUSTIC SOULGEMS - Special Edition[www.nexusmods.com] There are two versions of the mod, sorted and unsorted. Unsorted is the way the vanilla game organizes things, where everything is listed alphabetically in the inventory. While the sorted version groups like items together. Therefore, all soulgems would be shown grouped together, and sorted by size.

[1] Sigils of Skyrim[www.nexusmods.com] I I only install the Banners (not the shields) as I like the next mod for shields. But it's up to you. . "retextures every banner in the game including ones from DLCs in a way to allow them to feel worn, desaturated (great with ENB), and changes the designs to fit the theme of each hold and faction."
Rules: AFTER Everything.

[2] Shields of the Holds - Guard Shields[www.nexusmods.com]

Optional
[3] House Telvanni Banners Restored - Cut Content Restoration[www.nexusmods.com]

Drop this file into the bottom of the mods section of Vortex
[4] Bring Out Your Dead 4.0.7[www.afkmods.com] a simple yet immersive mod which expands on the number of graves given to the unique NPCs in areas of the game that don't currently have them. This mod aims to correct this and provide for more uniform handling of everyone's dead.

Sepolcri - The perfect compliment to Bring Out Your Dead.
[5] Sepolcri - A complete Burial Sites overhaul[www.nexusmods.com]
Rule: AFTER WiZkiD Riften.
adds new gravestones models and textures, numerous details like urns, flowers, statues, cobwebs, candles and lighting to give each graveyard a more immersive, characteristic and atmospheric look.
+
[6] install "sepolcri - cutting room floor patch".

Optional Much improved Night Mother
[7] Night Mother[www.nexusmods.com] Replaces Dark Brotherhood's Night Mother

[8] DragonPriest Retexture - SE[www.nexusmods.com]
FOMOD: I checked Everything (all boxes) and ESPFE.
Rules: AFTER Rustic Clothing, SMIM. BEFORE Caliente's Beautiful Bodies Enhancer CBBE
This mod retextures the dragonpriest masks, staves, dagger, and the dragonpriests themselves as well as miraak's outfit and Solstheim's dragonpriests and masks.

[9] Book Covers Skyrim[www.nexusmods.com] I use Desaturated (remember your choice).
Rule: AFTER Noble Skyrim.
Book Covers Skyrim is a retexture of all the readable books, journals, and notes in Skyrim. It gives each book and journal its own unique cover and adds many additional paper styles to the notes.
+
[10] Book Covers Skyrim - Normal map FIX[www.nexusmods.com]
It fixes an inappropriate normal map from "Book Covers Skyrim" which in turn fixes the lighting on the inside of books. No .esp :)
+
[11] Business Ledger HD Retexture[www.nexusmods.com] This is a HD retexture of the Business Ledger.
+
[11a] From Vortex Plugin section re-enable the "tciy bcs patch.esp" that we disabled earlier.
+
[12] Cutting Room Floor - Book Covers[www.nexusmods.com]

Optional
[13] Book Covers Skyrim - Lost Library[www.nexusmods.com] BE SURE TO INSTALL SAME VERSION AS BOOK COVERS SKYRIM MEANING DESATURATED OR NOT. Adds 295 books from earlier TES games into Skyrim and re-covers them in the style of Book Covers Skyrim. New books will be found on a broad range of Merchants and relevant Loot Lists.

Optional
[14] HD Ruined Book Retexture 4k - 2k[www.nexusmods.com] A reworked, highly detailed retexture of ruined books in 4k and 2k. With Optional 4k and 2k book paper textures
+ in optional files
[15] paper retexture if you want
Rule: BEFORE "Book Covers Skyrim - Normal map FIX" (if you get a redundant message dismiss it and deploy mods because it's wrong, only 1 texture is overwritten)

Optional
[16] Burned Book Retexture 4k - 2k[www.nexusmods.com] A reworked, highly detailed retexture of ruined book in 4k and 2k. With Optional 4k and 2k book paper textures

Optional
[17] Unread Books Glow SSE [www.nexusmods.com] Tracks books from any mod or DLC. Books which you have not read yet will have a visible glow hence making them easier to spot (Different glow strength choices configurable in-game via spell). When you read a book for the first time, its glow will disappear. All copies of the same title are considered the same book, so once you've read one specific title you've them all.

And a couple of Fixes

Optional
[18] Brandy-Mug - Fence Consistency[www.nexusmods.com] The fence at this farm has no snow even though it's just outside of Windhelm. This simple patch fixes that.

The Windmills always seemed a bit lacking to me - Let's fix that

The 1st mod (Proper Windmills) moves the sail away from the entryway of each windmill which is useful for the 2nd mod (SMIM Windmills Resized). You can use both mods or just the Resized mod.
Optional
[19] Proper Windmills of Skyrim[www.nexusmods.com] We will use the textures and tweaks from this mod. (unfortunately it doesn't resize the sails as it says).
Rules: AFTER Noble, and SMIM
+
Optional
You can use this with or without the above mod (Proper Windmills)
This is the mod that actually enlarges the Sails
so we'll use the sizing meshes from this mod.
[20] SMIM Windmills Resized[www.nexusmods.com] Rules: AFTER Proper Windmills, and SMIM
(once again Vortex/LOOT has the rules all wrong - so as usual pay close attention to this guide)

Optional
[22] HD Linens SE[www.nexusmods.com]

Optional
[23] Better fur - Merchant's hat[www.nexusmods.com] We often come face to face with merchants, why not give their hats better fur.


start up the game & make sure everything loads & runs ok at this point
Models & Textures Armor
[1] RUSTIC ARMOR and WEAPONS [www.nexusmods.com] a hi-res retexture of select armors and weapons of Skyrim SE. 4K and 2K resolutions available. you do not need the mod "Rustic Forsworn as it's included in this mod

[2] RUSTIC CLOTHING[www.nexusmods.com] Rule: After SMIM BC7 compression texture overhaul for all vanilla clothing in the game.

[3] Guards Armor Replacer SSE[www.nexusmods.com] Install Main File
+
From optional File. Important for this setup
[4] Install "Minimal ESP"
Rule: AFTER Guards Armor Replacer.

These next 4 are also covered by the first 2 mods in this section. I use them but they are optional.
Some of them are also cover by the Rustic Clothing/Armor mod.
(I suggest you check out all the Armors from the same mod author (xavbio) as the next 4 mods)

Optional
[5] Imperial Armors and Weapons Retexture SE[www.nexusmods.com] Use version 1.1 under Old Files
FOMOD: I took everything BUT if you use the new version DO NOT take Amidian.
Rules: AFTER Rustic Clothing, CC Content_Anniversary_Cleaned(if you installed it).


Optional
[6] Glass Armors and Weapons Retexture SE[www.nexusmods.com] Rules: AFTER Elsopa Quivers, CC Content_Anniversary_Cleaned(if you installed it).

Optional
[7] Leather Armors Retexture SE[www.nexusmods.com] Rules: AFTER Rustic Clothing, CC Content Cleaned.

Optional
[8] Orcish Armors and Weapons Retexture SE[www.nexusmods.com] Rule: AFTER CC Content_Anniversary_Cleaned(if you installed it).

Anniversary DLC Armors
These next 3 are covered by the CC Cleaned & Upscaled mod we installed earlier however I really like the look for each so I use them. Up to you.

These Mods Require the Anniversary DLC
You of course need the Creation Club assets in order to use these mods.
So anyone who purchased the Anniversary DLC can use these 3 mods - male or female.
No CBBE here.

Optional
[9] Reshaped Elven Hunter Armor[www.nexusmods.com] This is only the Models (.nifs) and IMO much better. Up to you.

Optional
Requires Anniversary DLC
This armor can be crafted with the completion of the CC quest "Crypt of the Heart"
[10] Light Spell Knight Armor[www.nexusmods.com] Spell Knight is a Ebony Heavy Armor but this mod converts it to a Light Steel Armor. Requires the steel smithing perk.

Optional
Note: While this will darken the Scout armor set you'll also lose the upscaled & cleaned textures
[11] Alternative Armors - Leather Scout Retexture[www.nexusmods.com] Rule: After CC Cleaned & Upscaled. This is not included in the CC Content Cleaned & Upscaled mod and it needed it. So I use this. Ahh Much better.

Finish with this
[12] Believable weapons[www.nexusmods.com] Believable Weapons is a mesh replacer for 85 of Skyrim's original axes, maces, swords and warhammers. Now includes Saints & Seducers free anniversary update weapons. Now also changes the weapons from Saints & Seducers included in the free Anniversary update (much better).
FOMOD CHOOSE:
Full for - type of installation (includes Saints & Seducers)
Scabbards are up to you.
Believable for - Stalhrim
None for - Glass
for Other: Leave all blank
for Fixes: Sword of Jyggalag (this is a weapon Artifact from Saints & Seducers)
Rules: BEFORE Sprites or Specters. AFTER Everything else.

start up the game & make sure everything loads & runs ok at this point
Models & Textures Creatures
[1] Real Rabbits HD - Color Variants and High Poly Mesh with Fur[www.nexusmods.com]
Only Install "Real Rabbits HD - Diverse.

[2] Dynamic Animal Variants[www.nexusmods.com] (DAV) Install the the main mod -
+
install the following 2 patches:
[3] "Patch for No Spinning Death Animation"
[4] "Patch for Violens - A Killmove Mod SE"

[5] GIANT[www.nexusmods.com] Giant body and Giant outfit lore-friendly textures overhaul.

[6] DRAGON PRIEST[www.nexusmods.com] FOMOD: Select FULL.
Dragon Priests and Acolytes skin-outfit-armor texture overhaul.

[7] RUSTIC DAEDRA[www.nexusmods.com]
High resolution retexture of the elemental Daedra (flame, frost, & storm atronachs), as well as the Dragonborn Daedra, Lurker and Seeker, Dawnguard Ancient frost atronach, and the Dragonborn Ash guardian.
Rule: BEFORE Embers HD.

Optional
[8] Flame Atronach SE[www.nexusmods.com] This modification changes the design of the Flame Atronachs.
Rule: AFTER Particle Patch
+
Also Optional - want to reduce the hit on your system?
[9] Flame Atronach SE - My optimized textures[www.nexusmods.com]
3 options available (only pick 1):
A) 2K version or B) 1K version (original mod is 4K). or C) The My version reduces only the normal map, from 4K(22Mb) to 2K(5Mb). Leaving the two 4K(11Mb) diffuse maps untouched.
Rule: AFTER 1Atronach

[10] Draugr Upgrades and Improvements (Draugr and Skeleton Overhaul)[www.nexusmods.com]
+
from update files
[11] Install "Update v2.4.2"
Rule: AFTER Draugr Upgrades and Improvements
+
[12] Draugr Upgrades and Improvements - USSEP Patch[drive.google.com] install this DUI - USSEP Patch located on my Google drive. Drop it in the Bottom of the Vortex Mods section.

[13] Falmer Overhaul - New models and textures[www.nexusmods.com]

[14] HAGRAVEN[www.nexusmods.com] Rule: AFTER SMIM. Hagraven and Glenmoril Witches skin-outfit texture overhaul. Include the Hagraven Feathers Ingredient.

[15] WiZkiD Hagraven Clutter and Bones[www.nexusmods.com] FOMOD: Choose Resolution (NO Patch).
Rules: BEFORE Alchemy Ingredients ENB Light. AFTER Rusitic Alchemy and Enchanting Tables, HD Reworked Mammoths.

[16] SKELETON[www.nexusmods.com] FOMOD I take FULL. Skeleton and human bones (bloody and random) lore-friendly texture overhaul. Include some edited Skeleton sounds.

[17] SavrenX Gore[www.nexusmods.com] Rule: AFTER Skeleton, SMIM.
enhances burnt bodies & bloody skeletal

[18] HD Reworked Trolls[www.nexusmods.com] The mod brings Trolls (all variants, also from DLC) to the highest 4K quality with 100% lore friendly look. For a 2K version try the mod "Troll" by Kajuan.

start up the game & make sure everything loads & runs ok at this point

[19] HD Reworked Mammoths 4K[www.nexusmods.com] Rule: AFTER WiZkiD Hagraven Clutter and Bones. The mod brings Mammoths (and bones/skeletons) to the highest 4K (2K) quality with 100% lore friendly look.

[20] HD Reworked Bears 4K[www.nexusmods.com] These are actually 4K - 2K which makes a performance friendly HD but if you want strictly 2K try the mod "Better Bears".

[21] RUSTIC FROSTBITE SPIDER - Special Edition[www.nexusmods.com] Choose your resolution.

[22] Spider Egg and Sacs Retexture[www.nexusmods.com] Retextures the ruins spider eggs and egg sacs 01, 02, 03 ,04, & 05.
Rules: AFTER Particle Patch.

Optional
[23] SSE-SRO - Enhanced Spidersac[www.nexusmods.com] This mod only retextures Ruins spider sac 01 and you can pick your color.
Rule: AFTER Spider Eggs & Sacs.

[24] SABRECAT[www.nexusmods.com] Choose your resolution. FOMOD: Check both boxes.
a texture overhaul of the Sabre Cat, Sabre Cat Snow and Vale Cat, including the related clutter.

[25] MM - REAL ELKS[www.nexusmods.com] You choose from options for 1K, 2K or 4K textures.
A texture replacer for Elk and Deer

[26] Rally's Shaggy Cows of Skyrim[www.nexusmods.com]
FOMOD: 1. Choose Standalone, 2. Choose your resolution, 3. NO Patches needed.
New fluffy Highland Cows, with customized FUSA meshes and new shell textures.

[27] GOAT HD by Pfuscher[www.nexusmods.com]

[28] ElSopa HD - Strider And Netches SE[www.nexusmods.com] Retexture of the Strider And Netches on Solstheim. (Not included in Rally's AIO)
+
[29] ElSopa HD - Strider And Netches SE - FIX[www.nexusmods.com]

[30] Iconic's Gargoyle and Death Hound Retexture[www.nexusmods.com] Choose your resolution.
Rules: AFTER Noble, Praedy's Castle Volkihar.

[31] HD Reworked Dogs[www.nexusmods.com]
Rules: AFTER Iconic's Gargoyle and Death Hound Retexture (because Iconic's does not cover the regular dogs in the game)

Optional
[32] Wolves of Skyrim - wolf texture and mesh replacer[www.nexusmods.com] FOMOD: You choose.
Rules: AFTER HD Reworked Dogs (because this mod does a much better job on the Wolves and covers more wolves than HD Reworked Dogs).

[33] Butterfly Improved by zzjay - SE[www.nexusmods.com] Install "00 - Butterflies"
Rule: BEFORE ENB Light
+
[34]Also install: "01 - Saint and Seducers - Patch"

we added "Butterflies Land true" earlier in the guide now we need to add:
[35] Butterflies Unchained[www.nexusmods.com] install the Butterflies Unchained (ESL Version) Butterflies Unchained makes butterflies and moths behave more like actual animals, rather than basic resource points. They now roam freely to explore the world alongside you.

[36] Optional
WISPMOTHER[www.nexusmods.com] FOMOD: You choose.
This is a Wispmother skin and cloth texture overhaul. Her texture has a different size respect the main standard, the skin was 512x1024 and the cloth/veil was 128x4096 by default. These are just textures files, they do not take any slot in your load order.

start up the game & make sure everything loads & runs ok at this point
Models & Textures Dragons & Horses
Horses

[1] HD Reworked Horses[www.nexusmods.com] vanilla friendly reworked 4K/2K Horses

[2] Light Horses of Skyrim (Realistic body and fur)[www.nexusmods.com]
Only install "FOMOD_fixed glowing and too bright textures" (2nd file)
FOMOD: select the fur colors for each hold - then select esl-Flagged esp.
Rule: AFTER HD Reworked Horses

[3] Horse Shoulder Harness Retexture[www.nexusmods.com]
Optional File- 2K Horse Shoulder Harness v1.1 Rule AFTER SMIM, HD Reworked Horses

[4] Yee Haaaa Horse Saddle Retexture[www.nexusmods.com]
Choose 2K or 4K Horse Saddle from Main or Optional (You only need 1 file)
Rule: AFTER HD Reworked Horses
+
[5] Install 2K or 4K "Light Horses Of Skyrim Patch" (Dirt overlay if you like)
Rule: AFTER Light horses of Skyrim
+
For those who Purchased the Anniversary DLC
[6] Install a 2K or 4K "Wild Horses CC Patch"
Rule: AFTER CC Cleaned upscaled.
+
[7] Imperial Saddle Retexture[www.nexusmods.com] 4K or optional 2K. You need the main file then overwrite if you want one of the options. (dirt overlay option. Now has black and red variants).
Rule: After HD Reworked Horses.

Optional
[8] Craftable Saddles from Witcher 3[www.nexusmods.com] Only use Main File.
adds several models of saddles with different textures and saddle bags from game "Witcher 3", you can craft them in blacksmith's forge / "Leather" and after that cast built-in alteration spell "ElrianHorse: Change horse outfit" (spell is added to player automatically by mod) on any unmounted horse.

Dragons

[9] RUSTIC DRAGONS[www.nexusmods.com] The Main file is 8K - The "Reduced" is 4K
Rule: AFTER Awesome Potions Simplified

[10] HD Serpentine Dragon and Mesh Fix SE[www.nexusmods.com] Retex & a fix.
FOMOD: You can choose armor for the Serpentine dragons if you like.
HD retexture of the Serpentine Dragon, based on the previous works of Diostrocole and Bellyache.

[11] Crispy Dragon Bones[www.nexusmods.com] Crispy Burned Dragon Bones corpse replacer.

Are dragons attacking too often? Want more diversity in the dragons you encounter?
This mod covers both
[12] Diverse Dragons Collection SE (DDCse)[www.nexusmods.com] Not only will this mod allow you to control/change the frequency of which dragons attack but this mod also brings 28 new dragons, each with a unique model & texture + 7 ranks of strength for each dragon, creating a challenge that scales with your level Now fully customizable. See only the dragons you want to see!

Optional
[13] Splendor - Dragon Variants SE[www.nexusmods.com] Drastically increases the visual diversity of enemy dragons, while using only vanilla resources. Extremely compatible with other dragon mods.

start up the game & make sure everything loads & runs ok at this point
Locations Homes & Overhauls
Use this next mod's ESM Version if you'll not be running DynDOLOD (otherwise you don't need it).
If you will be running DyndoLOD and you see some shimmering, which can happen when you mod that area, check out this[www.nexusmods.com] file.)
Magical College of Winterhold[www.nexusmods.com] A lightly magical, aesthetic overhaul for the College of Winterhold! Also the ESM version is best if NOT running DyndoLOD
[1] Install "Magical College of Winterhold"
+
Creation Club Anniversary DLC USER ONLY
from the Update Files section
[2] Install "MCoW - Full AE Patch"
Go to the Plugin section of Vortex and enable both plugins.
+
from the Optional Files section
[3] Install "MCoW - AI Overhaul Patch"
+
[4] Install "MCoW - Cutting Room Floor"
+
[5] Install "MCoW - ELFX"
(Do NOT take the 'ELFX and Enhancer patch' as it will not work with this load order)
+
for Magical heat source for Sunhelm/Campfire
[6] Install "MCoW - Campfire or Frostfall Patch"
+
ONLY IF you do want the magical effect on the Courtyard statue that comes with "Magical CoW" then grab this "MCoW - Remove Magic From Courtyard Statue" file.

[7] Immersive College NPCs[www.nexusmods.com] FOMOD: I select Standard FaceGens and the ICNs LITE version which Reduces the number of Storm Atronach guardians and other NPC's at both the College and Saarthal for a nice college atmosphere while not killing your performance.

Optional - Adds a Lighthouse to Solstheim
This is for looks
[8] Solstheim Lighthouse[www.nexusmods.com]
Install the esl version. Adds a new Redoran style lighthouse to the Solstheim docks entrance, with a new custom-made mesh.

Adds a small Skaal Fishing Camp
[9] Solstheim - Skaal Fishing Camp[www.nexusmods.com] Adds a small fishing camp to the west of Raven Rock featuring a new Skaal tent mesh/textures. Haki and his wife sell seafood and other ingredients.

OPTIONAL COFFEE HOUSE
[10] The Coffee House[www.nexusmods.com] Rule: AFTER "Rustic Clothing".
Adds an Inn along the main east-west road running from Whiterun to Rorikstead, just where the road from Falkreath enters it. A comfortable place for the player to rest, eat, and warm up, as well as being centrally located - thus providing the player with a good base of operations. As a plus, it is compatible with just about everything."
+
[11] Install "PERFUME BOTTLES HOTFIX"

There are plenty of player homes spaced out well in Skyrim with the exception of Winterhold and Solstheim only has the one after you become thane. So below you'll find one for Solstheim you can use immediately and 2 choices for Winterhold.

Optional
Looking for a small home for Solstheim?
[12] Quaint Domicile[www.nexusmods.com] A quaint little home on Solstheim, on the hills just behind the temple. Room for player and their spouse, and one follower.

Optional
Looking for a small home for Winterhold?
[13] Quaint Shelter[www.nexusmods.com] An enchanter-mage themed small home just outside Winterhold with room for two people, with a few amenities.
OR (you can use both but they are fairly close to each other)
[14] A Proper Thane for Winterhold[www.nexusmods.com] After becoming Thane the only hold in Skyrim where you can neither purchase a house nor be given a housecarl is Winterhold. No longer! Complete your status by acquiring a modest house in Winterhold with all crafting stations, and a marriageable Breton houscarl with all of the skills of Marcurio! Requires a new game if you want everything to work as intended.

start up the game & make sure everything loads & runs ok at this point
Landscape
[1] Septentrional Landscapes SE - 2K[www.nexusmods.com] Rule: After Noble Skyrim.
Landscape textures made with 3D Scans. 8, 4 & 2K versions available.

[2] Nordic Snow (aka HQ Snow Texture)[www.nexusmods.com] Rules: AFTER Noble Skyrim, and Septentrional Landscapes.
These textures are 2048x2048 which is also the same as the original snow textures in SSE.

[3] Blended Roads[www.nexusmods.com] FOMOD: Really Blended Roads and for SMIM compatibility choose Really Blended Roads.
Rules: AFTER Noble Skyrim, SMIM, Assorted Mesh Fixes and Nordic Snow.

[4] Misc. Blended Road Fixes[www.nexusmods.com] Fixes small issues when using Blended Roads.

[5] Mesh Patch for Various Mods[www.nexusmods.com]
Install "Assorted Mesh Fixes - SMIM - Really Blended Roads Patch"
Rule: AFTER Assorted Mesh Fixes, SMIM, and Blended Roads, Skyland Solitude.

You may or may not want this next mod depending on how you prefer the snow to look on roads
so go in game and check - I installed it but after looking in game disabled it this time.
[6] Nordic Snow - Blended Roads fix[www.nexusmods.com] Rule AFTER Blended Roads

Optional
[7] The Dragon Bridge[www.nexusmods.com] Adds a real road to Dragon Bridge that matches Blended Roads nicely. (should already be marked as light).

[8] Northern Marsh Bridges[www.nexusmods.com]
IMPORTANT: Now go to the Vortex plugin section and re-enable 2 esp's we disabled earlier:
enable "los ii - northern marsh bridges patch.esp"
+
enable "landscape and water fixes - patch - northern marsh bridges.esp"
Make sure you re-enabled both of the above.

[9] Majestic Mountains[www.nexusmods.com] Install "1. Majestic Mountains Main File"
Rules: BEFORE ELFX Shadows, Skyland Whiterun. AFTER Everything else.
FOMOD Select: AE, Moss Rocks ESL version, and Do Not take Majestic Mountain's Sun Position. (Not only is it not recommended with ENB, we installed "Enhanced Volumetric Lighting and Shadows (EVLaS)" earlier which cover this).
Do Not use "Mesh Tangent Space Fixes" found in the update files

Go to your SkyrimPrefs.ini located here (you should have done this earlier but double check):
C:\Users\Owner\Documents\My Games\Skyrim Special Edition
and under [Display] set as follows:
bEnableProjecteUVDiffuseNormals=1 (if it's 0 change it to 1) you should have changed it earlier.


start up the game & make sure everything loads, runs & looks ok at this point
Don't worry about the way the snow looks at this point as we'll be concentrating on snow when we add those mods in the Snow & Ice section of this guide.

[10] Majestic Mountains Double-Sided Patch[www.nexusmods.com] Rules: AFTER Majestic Mountains, ELFX Shadows, SLaWF, SMIM.

[11] Skyrim - A Mountainous Experience[www.nexusmods.com] Rules: AFTER All. Made With Majestic Mountains in mind Improves and fixes many of the mesh issues found in the mountains of Skyrim.

[12] Majestic Mountains - More Accurate Collision[www.nexusmods.com]
Rules: AFTER ALL
+
[13] Install Optional File - Majestic Mountains - More Accurate Collision - AME Patch
Rules: AFTER ALL

[14] HD Stone Quarry and Clay Deposit SE[www.nexusmods.com] You pick resolution.
Rule: AFTER Majestic Mountains.
A HD retexture for the Stone Quarry & Clay Deposit resources added by Hearthfire DLC.
+
(from Optional files on same mod page as above)
[15] Install HD Stone Quarry - Majestic Mountains Patch
FOMOD installer: Choose "Main".
Rules: AFTER Majestic Mountains and HD Stone Quarry & Clay.

[16] ProjectedDiffuse Patch Hub[www.nexusmods.com] we only need 1 file.
Only install "ProjectedDiffuse Patch - Nordic Snow"
Rules: AFTER Majestic, Noble, Nordic Snow.

This is from my google drive (it's been scanned):
[17] LH'S HD DIRTCLIFF REMASTER - DLC2 - 2K[drive.google.com] Manual Download then drop in Vortex.
Rule: AFTER Rally's Solstheim

[18] Better Dirt Cliffs and Alphas[www.nexusmods.com] Rules: BEFORE ELFX Shadows. AFTER Noble Skyrim, SMIM, Ehanced Lights & FX, Assorted Mesh Fixes, SLaWF, CleverCharff's Caves.
Overhaul of the meshes & alpha channels involved in blending the top of the dirt cliff with the roots, and the roots with the wall. Covers SMIM meshes too.

[19] Stones of Solitude - Better Blended Rock Piles[www.nexusmods.com] Replace Solitude rock piles with better blended versions using Base Object Swapper.
+
a patch
[20] Stones of Solitude - Majestic Mountains Rocks[www.nexusmods.com] FOMOD: Choose Normal.
Rule: AFTER "Stones of Solitude - Better Blended Replaces rock piles"

From Vortex Plugin section Mark this next mod as Light:
[21] Skyrim 3D Rocks[www.nexusmods.com] Just install and enjoy.

[22] SB - Better Blending Helgen Mud[www.nexusmods.com]
FOMOD: I always use the most coverage option

Optional
[23] Improved Windstad Manor Fish Dock and Round Posts[www.nexusmods.com] 3D SMIM Ropes, Round Posts and some Visual Fixes for Windstad Manor (Hearthfire) Fish Hatchery.

start up the game & make sure everything loads & runs ok at this point
Grass & Trees
[1] Tamrielic Grass[www.nexusmods.com] Complete grass overhaul of all Skyrim biomes (tundra, rift, reach, pine forest, frozen marsh, volcanic tundra, snow, coast, lakes, ocean

Optional: I change iMinGrassSize in TamrielicGrass.ini to 60 (you can go to 70 but the higher you go the thinner the grass becomes. Increasing it to 60 or 70 will however increase performance).
You can access TamrielicGrass.ini easily from within the Vortex Mods section by using the dropdown to the far right of Tamrielic Grass and selecting "Open in File Manager" and then opening TamrielicGrass.ini and then change to iMinGrassSize=60 Then Save & close.

[2] Tamrielic Grass - Green Snow Grass Removal and River Fix[www.nexusmods.com]
Rule: AFTER Tamrielic Grass. A complete grass overhaul of all Skyrim biomes.

[3] Tamrielic Grasses - Kelp BE GONE[www.nexusmods.com] A simple ESPFE plugin to remove the protruding grass from Tamriel Grass.

[4] Landscape Fixes For Grass Mods[www.nexusmods.com] Change landscape to reduce grass clipping through objects and restore lost details. Improve performance by removing grass where it cannot normally be seen. Reduces overgrown sections of some roads.
+
From Optional Files
[5] *Install "Patches for Arthmoor's Town add-ons"
FOMOD: Select ALT Start and Cutting Room Floor.
+
[6] Install "z Vanilla Military Camps" + Mark as light via Vortex
+
***Now go to the plugins section of Vortex and enable the:***
"landscape and water fixes - patch - lffgm.esp"
which we had disabled earlier in the guide.

From the Vortex Plugin section mark this mod as Light
[7] Complementary Grass Fixes[www.nexusmods.com] Addon to LFFGM aimed at correcting clipping issues for particularly dense grass mods.

[8] Grass Fixes for Creation Club Mods[www.nexusmods.com]
FOMOD: if you purchased the full Anniversary Edition DLC Select All CC Mods
otherwise choose Custom and Select Fishing and Saints & Seducers.

[9] No Grassias - A Universal Grass Fix For Grass Mods[www.nexusmods.com]
Install 1st file "NoGrassias"
We don't want Extended or Ultimate due to the fact they remove too much grass which serves the purpose of hiding some of the game's terrain blemishes.
You can if you like add the Lite version which when used with the standard NoGrassias option will give a level of fix that is in-between NoGrassias and NoGrassias Extended by only remove grass from dirt areas. Your choice.
This is a grass fix for overgrown grass and grass clipping issues caused by grass mods adding grass to land textures that aren't suppose to have grass. It can be use to fix issues in areas that other mods do not fix.(ESPFE/esl flagged).

Optional
[10] No grass in caves[www.nexusmods.com] If you followed this guide's use of ELFX Shadow's Enhancer ONLY install the file "No Grass In Caves ELFX Enhancer Patch" otherwise use the 1st file. This is a simple mod to remove grass in a few of the vanilla caves.

Optional
[11] No grass in Cities[www.nexusmods.com] If you are struggling for FPS inside cities or just want some more FPS you can install this.


start up the game & make sure everything loads & runs ok at this point

No longer a need to Clean in xEdit - last update took care of that
[12] Happy Little Trees[www.nexusmods.com] FOMOD: I took = *"All Trees" (adds aspen trees), and for Add-on took "Tree size" which makes some trees larger/taller (you also can increase the size in xEdit), and for Alternate snow textures took "Alternate 1".
HLT is a nice little tree mod with skinned trees and a low performance cost.
Rules: AFTER Everything.

Note regarding optional HLT Tree Scaling
Happy Little Trees is shipped with a Treescale.esm. This plugin makes most green and dead pines 20 percent larger. But you can also set your personal tree size. Check the guide from the article section. How to scale Pines[www.nexusmods.com] check the comment by Wofrion on how tree scale works.

Important - Happy Little Tress Rule in the plugin section of Vortex
Go to the Plugins section of Vortex and make sure the unofficial skyrim special edition patch.esp loads after treescale.esm. If not then created a custom rule as outlined below:
From Vortex while in the Plugins section go to "Manage Rules" and set it as follows:
unofficial skyrim special edition patch.esp MUST LOAD AFTER treescale.esm
Select "Add" / then "Close" / then up top select "Sort now" / now go to the Mods section of Vortex and up top select "Deploy Mods" and OK the changes.


[13] HD Reworked Tree Bark - Happy Little Trees - 16k 8k 4k 2k[www.nexusmods.com]
Pick one main file either 1K, 2K, 4K, (or 16-8K).
FOMOD: Do Not select Aspens Ablaze

Rules: AFTER Noble Skyrim, and Happy Little Trees.

Optional
You don't need this but I use it along with Happy Little Trees (outstanding trees):
[14] Forests of Dibella 4K-2K[drive.google.com] brings a beautiful new set of tree and foliage replacements into the game so that if you're visiting one of Skyrim's more verdant regions, it's more beautiful than ever.

Optional
Want more trees? Diversity? You can install 1, 2, 3, or all 4 of the following (6 including 2 patches)
I use them all and they really bring Skyrim to life.
[15] Bent Pines[www.nexusmods.com] Install the Main File Bent Pines II (which is flagged as ESL).
+
[16] Install "Navmesh .esp by CakeofHonor"

Optional
[17] Wigfrid's Tundra Oaks[www.nexusmods.com] IF you'll be running DyndoLOD then disable the esp and re-enable when finished.

Optional
[18] Immersive Fallen Trees[www.nexusmods.com]
and
[19] Immersive Fallen Trees Patch[www.nexusmods.com]

[20] Paradise City for Vanilla Skyrim -- Great Trees for Cities SE [www.nexusmods.com] FOMOD: Do Not take Windhelm - I took the rest.
This mod turns many of the province's cities -- and the village of Rorikstead -- into leafy paradises.
+
[21] Paradise City Patch[www.nexusmods.com] Install "ParadiseCityPatch-SSE.zip"
+
[22] Tree Bark in High Definition[www.nexusmods.com]
ONLY Install "Compatibility for Paradise City" (1st Optional file)

[23] Happy Little Logs[www.nexusmods.com] Removes the 2D dead branches from Happy Little Tree's forest logs.

[24] TB's 3D Driftwood[www.nexusmods.com] Rule: AFTER SMIM.


start up the game & make sure everything loads & runs ok at this point
Plants & Flora
[1] Waterplants[www.nexusmods.com] Install first file "Waterplants - lily only"
+
Optional
[2] Waterplants Improved WI by Pfuscher[www.nexusmods.com] Rule After "Waterplants - lily only"

[3] Mari's flora[www.nexusmods.com] Pick your Resolution FOMOD: Your choices, the exception for ENB will depend if you're using an ENB otherwise pick "Vanilla".
*Rules: BEFORE Rally's Solstheim, AFTER Everything else.(Mari’s ENB meshes have ENB lights built in). Stunning work by Mari.

[4] Mari's Reach Ferns - Vanilla Mesh Tweaks[www.nexusmods.com] Rule: AFTER ENB Light

[5] Cathedral - 3D Thicket and Dead Shrub[www.nexusmods.com] A 3d replacer for the horrendous dead thickets and shrubs

[6] Thickets and Dead Shrub Swapper with Options[www.nexusmods.com]
Install "Thickets and Dead Shrubs with Options - FOMOD" (this file is 2K)
FOMOD: I took option 8.
If you want a different resolution you first must install the main file then overwrite with either the 1K or the 4K file (I left it as is).

Thorny Thickets[www.nexusmods.com] I simply do not like the thickets included with the other mods. These look much better.
Rules: AFTER Everything.

Optional
(Vanilla Juniper trees in Skyrim are horrendous)
[7] 3D Junipers - Trees and Berries[www.nexusmods.com] Rules: AFTER Mari's Flora, and SMIM.

Optional
[8] Cathedral - 3D Snow Berries[www.nexusmods.com] FOMOD: You choose.
Rules AFTER Mari's. A supremely optimized 3D replacer for the iconic snow berry plant of Skyrim.
+
[9] Cathedral Snowberries - Inventory - Wreath - Hearthfires Planter[www.nexusmods.com] FOMOD: You choose.
Rule: AFTER Mari's Flora.
Fixes issues with Cathedral Snowberries Inventory object, wreath, & adds to Hearthfires planters.

[10] Cathedral - Mushrooms[www.nexusmods.com] Rule: BEFORE Rally's Blackreach Mushrooms
+
[11] Better Blended Mushrooms[www.nexusmods.com]


start up the game & make sure everything loads & runs ok at this point


The next 2 mods require the Anniversary DLC:
[12] Skyrim Anniversary - Growable Plants[www.nexusmods.com] Allows the plants from various creations included in the Skyrim Anniversary Edition to be planted and harvested in Hearthfire Homes/planters.

Requires Anniversary DLC
[13] More Plantable Plants for Creation Club[www.nexusmods.com] FOMOD: You choose however DO NOT pick "Bittercup" as it requires CACO. This mod Adds plants from Creation Club Content ingredients: Goblins, Rare Curios, Saints and Seducers, The Cause, using FormList Manipulator - without scripts or conflicts with other mods. ESPFE.

Optional
A few hundred thousand people downloaded a Leek?? I'll let you decide.
[14] Scallions of Skyrim - High Polygon Leeks[www.nexusmods.com] Rule: AFTER Particle Patch

[15] Garlic - A Garlic Mod[www.nexusmods.com] FOMOD: Pick resolution.

This mod for the cabbage plant:
Sowables of Skyrim - Scrumptious Cabbages[www.nexusmods.com] Pick your resolution.
Rules: AFTER Rustic Cooking, HD Food & Ingredients.

This mod for the harvested cabbage:
[16] Cabbage - A Cabbage Mod[www.nexusmods.com] Rule: AFTER SMIM

[17] A Potato Plant[www.nexusmods.com] Rule: BEFORE Particle Patch

[18] KG's Frost Mirriam[www.nexusmods.com]

[19] KG's Elves Ear[www.nexusmods.com]

[20] Ice Wraith Teeth Collision Fixes[www.nexusmods.com]
FOMOD: Make sure you select the "Icy Wraith Teeth patch" since we installed that mod earlier. For the others selections you choose.
Rule: AFTER Icy Wraith Teeth.
Better collision for Ice Wraith Teeth. Fixes inconsistencies with the collision settings and provides new collision mesh geometry that makes it easier to select the ingredient. Optional higher poly mesh is included

Optional
[21] Clams HD[www.nexusmods.com] The vanilla clam textures are flat out ugly. This mod adds "Higher poly mesh and HD retexture for the clams".

[22] Insignificant Object Remover[www.nexusmods.com] FOMOD: select "Only Pebble Removal". That's it.
We installed other mods to address the thickets & dead shrubs by changing them for something else.

(Later in the guide we will install a Mesh Lighting Fix that covers plants)


start up the game & make sure everything loads & runs ok at this point
Snow & Ice
[1] Transparent and Refracting Icicle and Frost Atronach[www.nexusmods.com] FOMOD Installer: Choose #1. Outdoor Icicle refraction. For #2 we already installed Rustic Soul Gems but if you want fully charged Soul Gems to refract light choose this as well. For #3 we already install Rustric Daedra but if you want the Frost Atronoach's somewhat transparent you can choose your strength here then let this mod overwrite Rustic Daedra since it will only effect the Frost Atronoachs. For #4 Misc. this is up to you.
+
for ENB users
under the Miscellaneous files section
[2] Install "ENB Refract Icicle Patch"

[3] Skyrim 3D Icefloes[www.nexusmods.com] A simple mod that will replace the flat icefloes meshes with new 3D models.

[4] Simplicity of Snow[www.nexusmods.com] FOMOD: IF you purchased the FULL Anniversary Upgrade be sure to select "Nchuanthumz: Dwarven Home Patch."
uses your snow mod and is designed to minimize conflicts + removes snow from under roofs.
Rules: AFTER Everything
+
Now go to the Vortex plugins section and make sure the Simplicity of Snow - Dwemer Sanctuary Patch.esp loads AFTER the Simplicity of Snow.esp. Don't forget to Sort Plugins at the top when you are done.


+ Important - check
DOUBLE CHECK Make sure bEnableProjecteUVDiffuseNormals" in your SkyrimPrefs.ini is set to 1 Go to your SkyrimPrefs.ini and set this which is located here: C:\Users\Owner\Documents\My Games\Skyrim Special Edition and under [Display] set as follows (or if using Bethini you can change it in there under Custom): bEnableProjecteUVDiffuseNormals=1 (if it's 0 change it to 1) Note: if at anytime your snow is not matching up in game check to see if your .ini files may have reverted back to 0 by simply checking the above step (rare but this can happen).

[5] Majestic Mountains - Simplicity of Snow Patch[www.nexusmods.com] 2nd file only
Only install "Simplicity of MM Custom PD"

[6] Castle Volkihar Snow Patch[www.nexusmods.com] From Miscellaneous files:
Only install "CastleVolkiharHD - SimplicityOfSnow Patch"
Rules: AFTER Praedy's Castle Volkihar, Simplicity of Snow.

[7] Simple Snow Improvements - Skyrim (BOS)[www.nexusmods.com]

[8] Simple Snow Improvements - Snow Forts (BOS)[www.nexusmods.com]

[9] Simple Snow Improvements - Giant Obelisks (BOS)[www.nexusmods.com]

[10] Stretched Snow Begone Definitive Edition Stretched Snow on Walls & Bldngs Fix[www.nexusmods.com]
Install Main File "Stretched Snow Begone - Definitive Edition" (includes Ice 2 Snow update)
+
From update files
[11] Install "Stretched Snow Begone Base Object Swapper Update"

start up the game & make sure everything loads & runs ok at this point

For ENB users
[12] Actually flat flat snow drifts - fix hovering snow drift shadow with ENB[www.nexusmods.com]

[13] Footprints[www.nexusmods.com] Adds footprints to the player, NPCs, and creatures. With particle FX! Currently for snow and ash. Custom footprints hook for third-party mods w/ custom races.
+
IF you're using an ENB
[14] Install "Footprints - ENB" from Optional files.

Note: Footprints will not show in the snow until you finish the first quest "Unbound"

[15] Footprints Bright Snow fix[www.nexusmods.com] use 2nd file
Install "Footprints Bright Snow fix - Disabled particles"

[16] SPID for Footprints[www.nexusmods.com] Rule: AFTER Footprints. Uses SPID to distribute the footprints spells from the footprints mod, instead of the cloak spell of the original mod.

Now add this important fix:
[17] SPID for Footprints fix[www.nexusmods.com] Rule: AFTER Footprints and SPID for Footprints.
this fixes incorrect variable references and incorrect assignments to variables that no longer existed.

[18] Snowy Surfaces Sound Collision and Aesthetics[www.nexusmods.com]
FOMOD: Choose Majestic Mountain and Majestic Mountains Standard Mesh.


start up the game & make sure everything loads, runs & looks ok at this point
Mesh Lighting
[1] Fixed Mesh Lighting[www.nexusmods.com]
FOMOD: ONLY Tick the following
Some boxes will be auto-selected even though we did not install them. Leave those boxes checked. This is what the mod author said in regards to those boxes: "Don't worry you can leave them checked - patches I flagged as recommended can work without the base mods (these are mainly bug/UV fixing mods)"
First: start by choosing Modular
Next: UNTICK TREES (make sure it's NOT ticked), keep Flora, Ice, & Creatures ticked.
Next: Tick - Vanilla Flora, Assorted Mesh Fixes, 3D Juniper (leave everything else blank in this section).
Next: Tick - Ice (should already be ticked), Landscape and Water Fixes, Unofficial Material Fix (we want the UV fix even though we don't have the mod - in this case it works).
Next: Tick - Dynamic Things Alternative, HD Goat.
Next: Tick - [Bee Hives] Vanilla, [Hagraven] Vanilla, Dynamic Things Alternative, Unofficial Leave unticked: Material Fix. [Potions] Vanilla (Leave this UNTICKED).
Tick these: [Rag] Vanilla. [Effects] Vanilla (this is for the Camera).

Rules: AFTER Everything.
+
(from "Update Files")
for the Anniversary DLC (Adventurer's Backpack):
[2] Install "Fixed Mesh Lighting - Creation Club Backpacks"

[3] Wall mounted dead animals fixes[www.nexusmods.com] Main File
Rules: After Everything (yes including Fixed Mesh Lighting & ELFX Shadows)

Optional
IF you are still seeing some flora textures that seem a bit too bright to you try this file:
[4] No more glowing vibrant Thistle and textures SSE[www.nexusmods.com]

Optional
Do the mists bother you?
[5] No Exterior Mists[www.nexusmods.com]


start up the game & make sure everything loads & runs ok at this point
Character
Many of you have your own idea for body type so I leave that open with some options below:
We listed BodySlide & Outfit Studio[www.nexusmods.com] earlier in the Utilities section of this guide.

[1] RaceMenu[www.nexusmods.com] Install 1st file "RaceMenu Anniversary Edition v0-4-19-14"
(After installation Make sure both plugins are enabled in Vortex Plugin Section)
+
IF you'll be using high heels for your character or any NPCs - you'll need:
[2] RaceMenu High Heels[www.nexusmods.com]

Optional - if you want more sliders in Racemenu
[3] ECE Slider Addon for Racemenu[www.nexusmods.com] These sliders use the ECE sources with permission, so the shapes are identical to those found in ECE.
29 sliders in all adding new customization options to the Face, Nose, Eyes, Brows and Mouth.

[4] XP32 Maximum Skeleton Special Extended - XPMSSE[www.nexusmods.com] On install choose: Physics Extensions, - NEXT Racemenu, - NEXT Out of Sync. LEAVE EVERYTHING ELSE AT DEFAULT SETTINGS (leave it alone).
Rules: BEFORE

NOW RUN NEMESIS - IT WILL DETECT YOUR SETUP AND INSTALL A DUMMY FNIS PLUGIN - REMEMBER: 1. UPDATE ENGINE 2. LAUNCH NEMESIS BEHAVIOR ENGINE

*Optional
You should already know if you want and need this next mod which gives physics to your character
[5] CBPC - Physics with Collisions for SSE and VR[www.nexusmods.com] CBPC provides physics with collisions for characters. This mod features Breasts, Butt, Belly bounce and Breasts, Butt, Belly, Vagina collisions with NPC or Player hands, schlongs etc. It has configuration files to make collision spheres to fit your body shape. If you use a custom body, refer to the pdf guide to modify spheres to fit your custom body shape.
+
set FpsCorrection to 1 in the CBPCSystem.ini file so it will auto calculate your FPS.
You can access CBPCSystem.ini in Vortex "Open in File Manager" inside the SKSE/Plugins folder.
Or you can access it from your SSE Directory located here:
\SteamLibrary\steamapps\common\Skyrim Special Edition\Data\SKSE\Plugins

[6] XPMSSE - Nemesis - Papyrus Stack Fix[www.nexusmods.com] Vortex Rule: AFTER XPMSSE. Fixes XPMSSE script where it can't find the correct animation groups causing Papyrus Stack errors, when using ONLY Nemesis, without FNIS.

This is for Skyrim's Got Talent
[7] Flute Animation Fix[www.nexusmods.com]
FOMOD: install the animation for the XP32 skeleton in each case.
(see image)


Optional
[8] Two Popular Female Body mods you may like (or perhaps you'll stick with vanilla)
I'll let you pick your own body mod (if any) as the skin mods down below can be used for just about any setup including Vanilla. Just make sure you pick the skin mod that corresponds to your body type (eg; UNP, CBBE, Vanilla, etc.) Below we list but 2 popular choices:
FEMALE BODY *IMPORTANT: Only choose 1 Female Body Type you can't have both Caliente's Beautiful Bodies Enhancer -CBBE-[www.nexusmods.com] In the installer: Body shape is your choice, choose Underwear: None is nude (your choice), Outfit options check Vanilla, Eyebrow Options none, Miscellaneous is your choice. Optional Features leave unchecked. Grab the optional ESL flagged file and the Normal Map file and in Vortex for RULES choose AFTER the main file (Enhancer) for both. Note: Normal Map options v1.4 - not needed if you use a skin replacer. OR (ATT: Pick one body type ONLY) UNP Female Body Renewal - A female face and body replacer[www.nexusmods.com] (Includes skin but we will be overwriting the skin) Choose option but NO BROWS Pinup or Skinny | Static or TBBP (HDT can be quirky) | Nude or Underwear type | 2K or 4K (I choose 4K) | Scars? Pubic hair? | Dark red or Black | No Eyebrows

[9] Authentic Eyes[www.nexusmods.com] An eye texture overhaul with a focus on subtlety and realism.

[10] Cumulative fix for Eye Meshes[www.nexusmods.com]
Only install "1. Alternate - Only black eye fix"


start up the game & make sure everything loads & runs ok at this point

[11] Beards[www.nexusmods.com] FOMOD: You Pick (Full or Vanilla + Resolution) The most popular beard retexture mod for Skyrim, Beards - from Hvergelmir's Aesthetic series.

[12] Brows[www.nexusmods.com] FOMOD: You Pick (Full/Resolution) from Hvergelmir's Aesthetic series.

[13] Only choose one of the next 2 mods to cover any NPCs not covered by mods we'll be adding (or it can cover them all). DO NOT install both - only pick 1 of the next 2
Option 1
Vanilla hair - Salt and Wind[www.nexusmods.com] This will cover all the Vaniila hair styles for both your character (if you want) and the NPC's (which is why we are using it). Softer Salt & Wind textures for vanilla hairs - no .esp, textures only. Both KS Hair and Apachii Hair are listed down below (I add them as well).
OR
Option 2
This is an Oldrim mod but it works fine. Vortex will prompt you - choose Skyrim Special Edition
Superior Lore-Friendly Hair - HD textures[www.nexusmods.com] (my favorite)
I use "All-in-one NMM installer and BAIN Package - UPDATED v2.03"

[14] Tempered Skins for Males - Vanilla and SOS versions[www.nexusmods.com]

[15] Tempered Skins for Females - UNP CBBE and Vanilla[www.nexusmods.com] Rule: After Tempered Males (if you chose underwear AFTER Rustic)

[16] Mild Complexions[www.nexusmods.com] Rule: After both Tempered Skin mods Use the first file in the files section.

Optional - More H A I R Mods
You don't "need" these but if you're going to add them add them here. Yes you'll have more Hairstyles for additional choices during in game main Character Creation.
And if you like the "Salt & Wind" look as much as I do then make sure you install version 1.7 of the next mod (KS Hairdos SSE) along with the mod I list right below it.
[17] KS Hairdos SSE[www.nexusmods.com] Install v1.7 from Old Files
[18] KS Hairdos 1.7 Salt and Wind[www.nexusmods.com] Install Main File.
Rules: AFTER KS Hair.
+
[19] Install "KS Hairdos 1.7 - Salt and Wind hotfix 1.1" from the update section
Rules: AFTER KS Hair, KS Salt & Wind.

And for even more Hair choices for your character:
[20] ApachiiSkyHair SSE[www.nexusmods.com] Male & Female Hair-Styles.


start up the game & make sure everything loads & runs ok at this point
RS Children & Inigo
[1] RS Children Overhaul[www.nexusmods.com]
Install the 1st file: "RSSE Children Overhaul 1.1.3 with hotfix 1" ONLY THAT FILE
(No need for the separate Hotfix as it's included in the main file)
FOMOD: select - USSEP (Preset), and Facial Animations (Preset), (Bigger Heads if you like). (you can take the improved clothes for Aventus if you like). That's it.
Rules Should be no conflicts.
Overhauls the appearance of all children. Also adds some outfits and accessories (currently only for boys).

Now let's add the girls and improve on the rest.
[2] Realistic RS Children Overhaul[www.nexusmods.com]
Install 1st file "Realistic RS Children (4.5)"
Vortex/LOOT has the incorrect Rules for these (nothing new there) so as usual follow the Guide.
Rules: AFTER "RSSE Children Overhaul 1.1.3 with hotfix 1" AFTER "KS Hairdo's" and "KS Hair Salt & Wind"
+
[3] Install "Realistic RS Children 4.7 Update"
Rules: AFTER "Realistic RS Children" and "RSSE Children Overhaul 1.1.3 Hotfix"
+
from Miscellaneous files
[4] Install "RRSC - Cutting Room Floor Patch"
+
[5] RRSC v 4.7 - AI Overhaul v 1.7 - Compatibility Patch[www.nexusmods.com]
Install "RRSC v 4.7 - AIO v 1.7 Compatibility Patch"
+
Also: enable a patch we disabled earlier
Go to the Vortex plugin section and Enable "immersive encounters - rs children patch.esp"
IF You do not have it here's a separate patch DO NOT use both. This patch is on my google drive
RS Children Immersive Encounters patch[drive.google.com] DO NOT USE BOTH

+
A Patch for the College of Winterhold Quest Expansion we installed earlier.
[6] CoW Quest Expansion Patch for RS Children Overhaul[www.nexusmods.com]
From option files: Install "Patch for RS Children Overhaul"
Rule: AFTER "College of Winterhold Quest Expansion.

If you install the CC Farming Quest Expansion from the Quests section of this guide
[7] Creation Club Farming - Tweaks Enhancements and Quest Expansion - RS Children[www.nexusmods.com]
Only install the 1st file
Rule: AFTER CC Farming Tweaks and Enhancements


start up the game & make sure everything loads & runs ok at this point

[8] Prince and The Pauper SE[www.nexusmods.com] FOMOD: Choose Dovahkinder.
Rule AFTER Rustic Clothing.
(Do Not use the patch on this mod page - use the next mod instead)
A clothing overhaul for the children of Skyrim with more appropriate upper, middle and lower class distinctions.
+
[9] Prince and the Pauper - Realistic RS Children Patch[www.nexusmods.com]

INIGO

Do Not place Inigo under the control of Follower Framework Mods that includes AFT, EFF, or NFF
[10] INIGO[www.nexusmods.com] Let's welcome the best follower in Skyrim to our game. All that being said, DO NOT add any Inigo mods that alter his base records (like Inigo the Suave) due to the bug described in the next mod. If you do the patch will not work. Inigo is a fully voiced khajiit adventuring companion with over 7000 lines of unique dialogue - much of it about you. He'll level alongside you and avoid most traps. If you're sneaking he won't chatter and he'll whisper if you talk to him. He can run out of arrows. He's highly skilled in archery, one-handed, and sneak.
+
This is a cleaned esp - requires new game (which we all should be doing anyway)
[11] INIGO 2.4C UPDATE ESP FILE[www.nexusmods.com]
+
[12] Inigo - Bloodchill Manor patch[www.nexusmods.com] A must have or you will be blocked from entering Bloodchill Manor during the Quest "Guests for Dinner". Must be installed on a new game.

[13] Inigo Riding Patch[www.nexusmods.com] Install the ESPFE version. Prevents the "Inigo-not-riding bug" that can be triggered by taking any of his starting items from him when the user has both SKSE64 and RaceMenu installed.

This next patch is for both the above follower mod "INIGO" and "Sunhelm Survival"
[14] SunHelm Survival - Compatibility Patches[www.nexusmods.com] FOMOD: Select "Inigo" patch only.
Added foods will be recognized appropriately by SunHelm.

Optional
M'aiq is already part of the base game.
[15] M'aiq The Liar Anniversary Edition (aka Modder's Edition)[www.nexusmods.com] This mod simply "adds additional quirky not-quite-but-almost-fourth-wall-breaking dialogue lines to M'aiq the Liar celebrating 10 years of modding Skyrim."


start up the game & make sure everything loads & runs ok at this point
Lore Friendly NPC's

Let's Set-up Northbourne NPC's
This section is not difficult but you must follow it exactly. Your NPC's will look outstanding afterwards but will still look good without adding these mods so if you feel you're not up for it you can skip the entire section. Again it's not difficult but you must follow it exactly.

Northbourne Mod Requirements
We already have a Hair mod, Tempered Skins for both male and female along with Beards, Brows, The Eyes of Beauty, and Mild Complexions all of which we installed back in the Character section.

So here's what we'll also need:

[1] Expressive Facial Animation Female Edition[www.nexusmods.com] To avoid clipping with female mouth.

[2] Expressive Facial Animation Male Edition[www.nexusmods.com] To avoid clipping with male mouth.

We installed "Mild Complexions" earlier

READ
As you install the Northbourne series, after you install the first hold's npc's, Vortex will list conflicts because the Mod Author (MA) of course uses many of the same assets for all NPC's. This is normal. Just let each install overwrite the last. Also make sure Hair mods are Before Northbourne. I know Loot/Vortex sometimes does not always agree but I've been doing it this way for years with no issues.

Matter of fact if you don't follow as per my rule suggestions you will have issues like dark face etc.

[3] Northbourne NPCs of Whiterun Hold[www.nexusmods.com] Use version 2.2 under Old Files Rules: After ALL. Redesign for all 102 named male and female NPCs in Whiterun Hold (includes Riverwood NPC's)
[4] Northbourne NPCs of Falkreath Hold [www.nexusmods.com] Rules: After ALL. Redesign for all 60 named male and female NPCs in Falkreath Hold
[5] Northbourne NPCs of the Rift[www.nexusmods.com] Rules: After ALL. Redesign for all 125 named male and female NPCs in the Rift Region
[6] Northbourne NPCs of Winterhold[www.nexusmods.com] Rules: After ALL. Redesign for all 34 named male and female NPCs in the Winterhold Region
[7] Northbourne NPCs of Haafingar [www.nexusmods.com] Rules: After ALL. Redesign for all 104 named male and female NPCs in Haafingar Hold.
+
from optional files
[8] Install "Patch for Xander's Missing Hair Textures"
Rule: AFTER Apachii

[9] Northbourne NPCs of Hjaalmarch[www.nexusmods.com] Rules: After ALL. Redesign for all 27 named male and female NPCs in Hjaalmarch Hold (except children and beast races).

Serana is not included in any of the above and the mod author made a stand alone version which we will add in a moment. First some neded patches.

Northbourne Patches
We are now using the Synthesis patcher for AI Overhaul and Northbourne NPCs. We'll cover (download, setup, and details) in the next section of this guide.

Now we need a patch for Cutting Room Floor (CRF) and Northbourne - (if you installed CRF)
[10] Patches for Northbourne NPCs[www.nexusmods.com] Install "NB NPCs - CRF Patch AIO" patch.


start up the game & make sure everything loads & runs ok at this point

Serana
Only pick 1 of these next 2 Serana overhauls
[11] Here's two choices and each mod page has several more choices for Serana - only Pick One
[12] Choice 1. Serana - Daughter of Coldharbour[www.nexusmods.com] Rules: make sure this mod is AFTER everything your mod manager lists Made bythe same author as the above NPC overhauls.
OR (Only install 1 Serana)
[13] Choice 2 . Seranaholic by rxkx22 - SSE[www.nexusmods.com] UNP or CBBE.
Rules: should be none (but if there are Serana: AFTER All).

Optional Serana Hood "fix"
[14] Serana's Invisible Hood - no scripts and no NPC change[www.nexusmods.com] IF you like use this mod to Make the Hood of Serana invisible. She will still wear it, but you won't see it. In contrast to other mods - like Serana's Hood Fix and Serana Hood Removal - this mod does not modify any scripts or modify Serana herself. It only touches the "Serana Hood" item.

Optional Courier choices:
Only pick 1 of these next 2 courier overhauls
[15] The courier's look needs help imo. 2 choices are listed down below. only Pick One
Choice 1 (male). The Handsome Courier SE[www.nexusmods.com]
OR (Only install 1 Courier)
[16] Choice 2(female) Lilly - A fully-voiced female courier replacer[www.nexusmods.com] use the bsa version.

Optional - Marry Serana
Manual download then install with mod manager
[17] Marry Me Serana[www.nexusmods.com] You can marry Serana after completing the quest "Kindred Judgment". This is a simple mod. The mod just adds Serana to the vanilla marriage options. It's the same way that you marry any other marriable NPC.

[18] Serana Dialogue Edit - Skyrim Special Edition[www.nexusmods.com] An Overhaul of the Dialogue for Serana. This includes: Bug fixes, Custom Dialogue Branches, More Radiant Dialogue and Expansion into Hearthfire and Dragonborn.

Patch for RDO & Serana Dialogue Edit - patch and a few other mods.
[19] lilebonymace's patches and xEdit scripts[www.nexusmods.com]
1. Simply install the main file with Vortex
2. This patcher auto checks your load order and patches a few mods in this load order. Let it do it's thing and you're done.


start up the game & make sure everything loads & runs ok at this point

Pro tip In the unlikely (I highly doubt it will happen but just in case) event should you run into a naked npc in your travels simply open the console (with the tilde key), make very sure you click exactly on the npc (their name and information will appear), type "resetinventory" (without the quotes), hit enter, close the console (tilde key). Done.
Synthesis: Northbourne + AIO Patcher
This section will patch AI Overhaul with Northbourne NPC's

First let's install and setup Synthesis

1. Requirement (this is not a mod) If you haven't already done so go ahead and install
NET 6.0[dotnet.microsoft.com] We need both the x64 version and the x86 version. You should already have them from earlier in the guide.

2. Download Synthesis[github.com] (github)
or Download here[drive.google.com] from my google drive (for those confused by github's setup)

3. Install Synthesis patcher

4. reboot your PC

5. Launch Synthesis and select AI Overhaul (video and written instruction below)
Note: Vortex users - no need to create an empty mod as shown in video (that's for MO2)

Video Instructions https://youtu.be/s7luh0hMMAU
Now let's patch AI Overhaul and Northbourne NPCs
Synthesis AI Overhaul instructions[www.nexusmods.com]

Need more help?
Synthesis/Mutagen discord[discord.gg]

I doubt you'll encounter this but there's a mod that claims to fix the Face Discolor bug and it's track record seems to be excellent. I'm always a bit leary of such claims because other similar fixes have been know to revert the face to it's vanilla look. However, according to users of this mod it works like a gem. So I'll post it here. I did test it myself once and indeed it worked.
Face Discoloration Fix[www.nexusmods.com]


start up the game & make sure everything loads & runs ok at this point
Carriage Drivers (Clothing) + Patches
Important Note
On June 6th at 11:30 PM PST I removed 2 mods from this guide so if you installed them, remove them.
"More To Say" and the patch for it,"Sissel's Book Quest", both from the "Immersion - Dialogue" section of this guide (they were mods #6 & #7 in that section) due to a conflict with the Dialogue for the mod "Carriage Drivers are Alive". The mod "More to Say" was borderline to begin with because it simply reuses existing dialogue from the base game which can get reptitive therefore it's certainly not worth more patching as far as I'm concerned. You need to and can safely uninstall those 2 mods at this time because we do not want to uninstall mods on an existing save.

Continuing on...
First we need this for the mod "Carriage Drivers are Alive" we added earlier in the guide.
[1] Carriage Drivers Are Alive SE (NB Patch)[www.nexusmods.com] This adds 4 patches
Only Install "Northbourne NPCs Patch Pack"

let's give them proper clothing for their local weather
[2] Carriage Drivers - New Clothing SE[www.nexusmods.com] Only use optional file
Only install "Carriage Drivers - New Clothing SE by Xtudo - Carriage Drivers Are Alive"
A standardized vestment for the carriage drivers. Vanilla, Carriage and Ferry Travel Overhaul, Carriage Drivers Are Alive versions available. ESL.
+
[3] Install "Carriage Drivers - New Clothing SE by Xtudo - AI Overhaul patch"
We want this patch to load after the Synthesis patch
Go to the Vortex Plugin section select "Manage Rules" and make sure
"Carriage Drivers - New Clothing SE by Xtudo - AI Overhaul patch" Loads AFTER "synthesis.esp"


start up the game & make sure everything loads & runs ok at this point
Crafting & Harvesting
[1] Ars Metallica - Smithing Enhancement 2.0.6[www.nexusmods.com] A simple mod to expand on the crafting system in Skyrim. The crafting system is one of Skyrim's better features, but for thieves and archers, there's not much use for the system. Light armor is dead easy to come by in already finished forms, but arrows can sometimes be scarce in the types you may want. Lockpicks have been known to be somewhat scarce too, yet are relatively basic to construct.

[2] Umgak's Vokrii Compatibility Patch Compendium[www.nexusmods.com]
FOMOD: Select the "Vokrii - Ars Metallica patch"
Contains a loose version of Vokrii's MineOreScript.pex so that High Yield Mining will still work.

[3] Fully Harvest Hanging Carcasses and Coin Purses[www.nexusmods.com]
FOMOD: Select - CC Fishing, and Ars Metallica
Rule: AFTER SMIM

[4] Wiseman303's Flora Fixes - Revamped[www.nexusmods.com] we only need the patch since Fully Harvest Hanging Carcasses and Coin make this mod redundant.
Only install "WM's Flora Fixes - SMIM Patch"
RULES: AFTER SMIM, and Fully Harvest Hanging Carcass and Coin Purses

for Saints & Seducers
[5] Saints and Seducers - Ars Metallica Patch - Arrows only[www.nexusmods.com] Patches Saints and Seducers arrows to use Ars Metallica based crafting items in their creation.

for Saints & Seducers
[6] Saints and Seducers Bolts[www.nexusmods.com] This adds bolts for the Amber, Dark, Golden and Madness sets. Bolts may be crafted in the same manner as the arrows or you may take existing arrows and craft bolts from them.
+
[7] Saints and Seducers Bolts - Ars Metalica Patch[www.nexusmods.com]

[8] Saints and Seducers Material crafting fix[www.nexusmods.com] This mod fixes the issue with the Saints and Seducers weapons and armors appearing under the misc section in forges. Now instead Golden saint and Seducer armor appears under the daedric material. Maddness armor appears under Ebony and Amber under Glass.

Optional
[9] Smeltable Saints and Seducers Equipment[www.nexusmods.com] Allows you to smelt the new equipment found in the Saints & Seducers Creation into ingots if you have the respective perks. Includes Amber, Dark Seducer, Golden Saint and Madness weapons and armor.
+
[10] Smeltable Saints and Seducers - Craft Fixes Patch[www.nexusmods.com]

Optional
[11] Reforge Leveled Uniques[www.nexusmods.com] This mod allows you to obtain better versions of the leveled unique items in a Lore-Friendly way. With this mod you won't have to make sure you are at the appropriate level when starting a quest that rewards you with an artifact with multiple versions depending on your level. Lore-friendliness guaranteed. See the mod page for a list of the items covered.

Optional - Make butter in Hearthfire homes.
[12] Actually Useful Butter Churns - Base Object Swapper[www.nexusmods.com] Ultra low effort mod to turn useless Hearthfire Butter Churns into useful Butter Churns. No patches needed - uses Base Object Swapper.

start up the game & make sure everything loads & runs ok at this point
Realistic Water 2
[1] Realistic Water Two SE[www.nexusmods.com] Rule After Everything. FOMOD: Remember to take ENB Rain if running an ENB, I take smaller rain drops, your choice on Volcanic Water color and if you are running the Anniversary DLC take the Myrwatch patch.
+
Go to the Vortex Plugin section and enable "elfx enhancer - realistic water two patch.esp"
+
up to you so this next file is optional
[2] Realistic Water Two SE - Darker Gradient Textures - Rule: After RW2.

Now go back to the ElSopa Medieval Anvil page
ElSopa - HD Medieval Anvil SE[www.nexusmods.com]
in the optional files section.
[3] Install "ElSopa - Medieval Anvil Embers HD-RealisticWater Patch"
Rules: AFTER Everything
+
*Now you can disable the "Elsopa - Medieval Anvil Embers HD Patch" if you used that earlier.

[4] Animated Forge Water[www.nexusmods.com] Take the first file.
Then in the FOMOD installer.
Simply take one patch: "Elsopa and Embers XD"
THEN - you can disable the patch for RW2 that your mod manager shows as redundant. I set it up this way for those that don't use all the mods in this guide. Better safe than sorry.;-)

[5] Obsidian Weathers Watercolor Fix for RWT2[www.nexusmods.com]

*Final Steps for all ENB users
*Realistic Water Two Settings for enbseries.ini:
The core textures are designed to work out-of-the-box with ENBSeries water effects. Ensure your enbseries.ini file reflects the following:
your enbseries.ini is located here (we installed it earlier)
\SteamLibrary\steamapps\common\Skyrim Special Edition
You are looking for the enbseries.ini (not the enbseries folder)

Here's the settings
[EFFECT]
EnableWater=true

[WATER]
EnableLighting=true
EnableTemporalAA=true
EnableParallax=false
EnableDisplacement=false
DisplacementQuality=0
EnableTessellation=true
TessellationQuality=0

DisableDistantReflection=true
EnableSelfReflection=false
ReflectionAmount=0.8

EnableCaustics=true
CausticsAmount=1.75
EnableDispersion=true
DispersionAmount=0.66

EnableCloudsShadow=false
EnableShadow=true
EnableVolumetricShadow=false
VolumetricShadowQuality=2

FresnelMin=0.5
FresnelMax=0.75
FresnelMultiplier=0.7
Muddiness=0.8

SunLightingMultiplier=0.25
SunSpecularMultiplier=0.5
SunScatteringMultiplier=1.0

WavesAmplitude*=1.0

Don't forget to save before closing

Once in-game
Open the MCM for Realistic Water Two and tick "Disable hand placed ripples" for compatibility with Splashes of Storms which we installed earlier.
(select image to exapand)


Remember: Do NOT remove mods mid-game unless they fall under the category of mods that are safe to uninstall mid game. Please read the article.


start up the game & make sure everything loads & runs ok at this point
Campfire Add-on
Optional
WiZkiD "always thought it was ridiculous that those dead branches scattered here and there couldn't be picked up to start a campfire. With this Campfire addon its now possible to collect coastdriftwood and reachbranchpile and use the so obtained deadwood and branches to light a campfire. This mod works with all coastdriftwood and reachbranchpile, even those added by other mods."

Campfire Collectable Deadwood and Branches SSEEdit script and Base Object Swapper[www.nexusmods.com] This Campfire addon allows you to collect coastdriftwood and reachbranchpile and use the deadwood and branches obtained to light a campfire.

I'd recommend the xEdt version so that we don't have to many Base Object Swapper (BOS) dependent mods running. You'll need to install one file and use the other script file to run SSEEdit.

Instructions for the xEdit version:
1) Download and install the main file "Campfire Collectable Deadwood and Branches" with your preferred mod manager, it contains the main plugin ESL flagged ESP.
Note:the load order of the main ESP does not matter.

2) Manually download the other file "Campfire Collectable Deadwood and Branches SSEEdit script", unzip its contents and place inside the Edit Scripts folder of SSEdit main installation folder.

3) Open SSEEdit, make sure you load every mod. When all the plugins have been loaded, click with the mouse right button in the left column of the SSEEdit interface where all the plugins are visible, select the "Apply Script" option and choose the "Campfire collectable wood" script.
At this point you will be asked to choose a name, give it the one you prefer and then click "ok".
After a few seconds your personalized patch for your whole load order will be ready. Close SSEEdit to save the newly created file. Note: the patch will be an ESL flagged ESP.

Instructions for the Base Object Swapper version:
Simply Download and install the main file "Campfire Collectable Deadwood and Branches BOS" with your preferred mod manager. Requires Base Object Swapper which we installed earlier.


start up the game & make sure everything loads & runs ok at this point
DyndoLOD
For those that are interested in using DyndoLOD 3.0

DynDOLOD Should be added AFTER you Complete your Load Order

Here is a great guide for DyndoLOD 3.xx by Mephitic
https://gtm.steamproxy.vip/sharedfiles/filedetails/?id=2789657603
The above guide contains all links related to DynDOLOD
Ultra Widescreen users
I play at 2560X1440 and do not need to make any *special adjustments to do so. But before we get into the User Interface section of this guide I suggest if you are planning on playing at say for example 3440x1440 and are unsure of what you need to do use this section as a reference point. You should still follow the UI sections of this guide but you may need an adjustment that you are unsure of and this may help you.

See this mod page for instructions:
Complete Widescreen Fix for Vanilla and SkyUI 2.2 and 5.2 SE[www.nexusmods.com]

Guides with Additional info for Ultra Widescreen
Widescreen for Skyrim SE 1.6 and Anniversary Edition How to get Skyrim SE 1.6 and Anniversary Edition working on ultrawide monitors. This guide uses SkyUI, Complete Widescreen Fix, and several UI tweaks.

Running Skyrim AE in ultrawidescreen without stretching and cutting off the UI A quick guide to help set up Skyrim Anniversary Edition for ultrawidescreen usage, without stretching or cutting off the UI. This should be very simple and take about 10 minutes or so and the game will then run full screen - in ultrawide (21:9) aspect ratio - with readable text at the bottom of the UI.

And finally
Ultrawide Intro Video Fix[www.nexusmods.com] a fix for the the ugly grey bars that appear on ultrawide monitors in the intro sequence. Ultra scriptless, ultra easy installation, ultra wide. Includes a patch for "Ultrawide Logo Fix (24-10)"

Also you can check out Flawless Widescreen[www.flawlesswidescreen.org] which I know supports Skyrim I'm just not sure if it supports SSE since I don't use Wide or Ultrawide. (I play at 2560x1440)
Then proceed to the next section in this guide.
Saves
Use "Auto Saves" and "Quick Saves " at your own risk!

Buggy
So Hard save only and hard save often
Sure you can use them but beware of the fact than many have experienced game breaking bugs using anything but "Hard Saves" on this game, myself included.
Worse yet
Furthermore, when you come to a point in the game where you simply want to go back to a recent stage of the game, for whatever reason (ex: you encountered a glitch in the game or you missed that Achievement), there is nothing more frustrating than not being able to do so because your last several saves are AutoSaves or QuickSaves from hours ago. This happens because Skyrim continually overwrites these saves meaning a previous save may not be available to you other than that hard save you made 3+ hours ago and now you either lose all that playing time or live with it going forward.

This is how I set up the in game Menu (Just remember to hard save early & often)

And do not save over saves

I'm not going to write a wall of text in this section on why all of the above is critical or get into detail on how it happens (see link below for detailed info).

Then there's the Cloud / One drive. You need to disable this.

For detailed information on "Saves" and on "The Cloud" regarding Skyrim see the section titled "Cloud & Save Problems - One Drive" in my SSE Help Guide

Yes you'll see people telling you that they have gone years without using a seat belt and never had an issue but this is of course no reason for you not to use one.
YOU HAVE BEEN WARNED
Changelog
10/12/2023 11:45 PM PST
  • Reinstated "Dwemer Pipework Reworked - Skyland Edition" in the Models & Textures 2 section of the guide due to the mod author's update.

6/30/2023 10:15 AM PST
  • Replaced "Smooth Sky Mesh " with "Picta Series" in the ENB section. Picta series is a mod I've been using for the last few years and Smooth Sky Mesh is no longer available.

6/16/2023 11:00 AM PST
  • Added "Creation Club Farming - Tweaks Enhancements and Quest Expansion" to Quests
  • Added "RS Children - Creation Club Farming Patch" to RS Children section

6/11/2023 3:25 PM PST
  • Added "TB's 3D Driftwood" to the Grass & Trees section

6/10/2023 11:30 AM PST & 11:45 PM
  • Added "Qwafee Braziers (Whiterun V1.5)" to the Models & Textures 1 section
  • Added "DragonPriest Retexture" to the Models & Textures 4 section

6/08/2023 1:30 AM PST
  • Added "Obsidian Weathers Watercolor Fix for RWT2" to the Realistic Water 2 section

6/06/2023 11:30 PM PST
  • Removed "More to Say" from the Immersion - Dialogue section
  • Removed "Sissel's Book Quest" patch for the mod "More to Say"
  • Added "Prince and The Pauper SE" to the RS Children section
  • Added "Prince and the Pauper - Realistic RS Children Patch" to RS Children section

6/04/2023 3:57 PM PST
  • Added Patch for "Xander's Missing Hair Textures" to Lore Friendly NPCs

6/03/2023 2:45 PM PST
  • Added "Cumulative fix for Eye Meshes" to the Character section

6/02/2023 4:25 PM PST
  • Added "Dual Casting Fix" to the Fixes section
  • Added "Campfire Collectable Deadwood and Branches" as an optional add-on

5/31/2023 2:22 PM PST
  • Added "ENB Refract Icicle Patch" to the Snow & Ice section

5/30/2023 7:42 PM PST
  • Added "Belethor's Sister - Quest" to the Quests section
248 Comments
Vlad 254  [author] 13 Aug @ 7:16am 
@emersonparc - sorry for the late reply, I do not like this notification system. Anyway no i have not. You'd have to update the SKSE64 related mods, the Unofficial Patch, and check if anything else requires updating.
emersonparc 4 Jun @ 7:57am 
Hey Vlad, have you tested this on 1.6.1170?
abe 5 Sep, 2024 @ 3:14pm 
Amazing guide, I've never modded a game this far, and it went incredibly smoothly. One hiccup is that Rally's Shaggy Cows of Skyrim isn't compatible with Dynamic Animal Variants, which this guide also installs. The cows are incredibly cute, but DAV is also really nice... dilemma
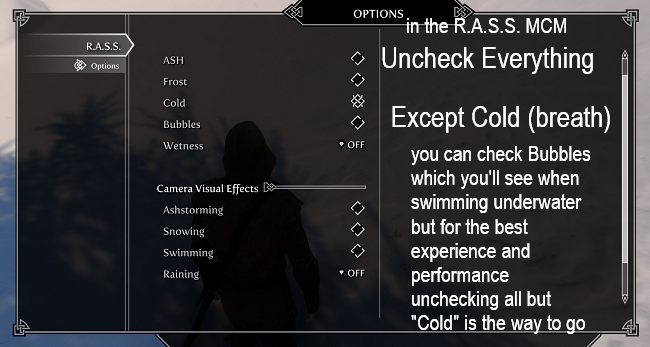
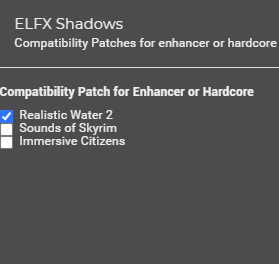
The incompatibility is unfortunately quite noticeable (e.g. you'll see a white cow with patches of brown fur)
Vlad 254  [author] 8 Aug, 2024 @ 6:47am 
@alexdoerofthings - hey alex and welcome back. this guide is for game version 1.6.640 so it's not up to date for the current game version. I know many are still using it but they are either still on 1.6.640 or they are looking over each mod that contains a plugin and using the appropriate version of those mods for their game version if that mod has been update for their game version.

So the answer is no thus I'm not supporting this guide. I leave it up as a reference as some have requested.
alexdoerofthings 23 Jul, 2024 @ 11:17am 
Been gone for a few years and I'd like to come back. @Vlad, I hope you're well. You do great work.

Is this guide up to date, as of 7/23/24?
Vlad 254  [author] 15 Jul, 2024 @ 7:04am 
@Masher - Apologies for not answering sooner. I've been so caught up in Starfield and the fact Skyrim SE updated I haven't checked here as often as i should.

I don't have any tips regarding motion sickness other than what you mentioned about adjusting FOV and the usual tips you see like taking breaks often, play in a well lit and ventilated room, sit farther back from the screen. Sounds like all the things we all should be doing. I take it you are doing all of that already. Oh and disabling camera bobbing although I'm not at all familiar with mods that do that, not enough to suggest any. Thanks for the kind words on the guide, I'm happy to hear it helps. Enjoy.
Masher 31 May, 2024 @ 10:43pm 
Getting into skyrim again after some years. Man, your guides are really helpful. Wish this exist years ago, would have saved me a few weeks. But i wanna ask, do you have any tips or settings for motion sickess? Few posts on the internet suggest play with the FOV, but still make me sick after half an hour. Getting old and need to use sunglasses suck.
Vlad 254  [author] 7 May, 2024 @ 12:29am 
@hyperenough, thank you and you are welcome.
Vlad 254  [author] 7 May, 2024 @ 12:28am 
@Liath_Luachra - it warns my heart to read your post, thank you for the kind words
Liath_Luachra 4 May, 2024 @ 5:10pm 
It takes time to install this load order, but it is worth it. Today I just had to stop once again and admire the visuals that vastly improve the experience for me. The first time I installed your curated list I installed everything and learned so much about modding in the process. The second time I tweaked the list--installed about 2/3s and added other mods I liked. Thanks to your meticulous instructions, I was confident doing this and it runs great.