Farthest Frontier

Farthest Frontier

202 ratings
Comprehensive Guide for Layout and General Gameplay
By Immortalits
An all aroud, detailed guide for building placement and research tree optimization.
7
6
6
2
   
Award
Favorite
Favorited
Unfavorite
Single-market residential layout
Here's the residential area layout, planned with a a single market at the center to provide bonuses and distribute neccesities for the homes in its circle.
The goal was to have a simple-to-build road system with enough homes with their 'required' short range decorations included to comfortably be able to upgrade to tier 4 town center (400 pop requirement being the key factor/ limitation in the previous version).
Fortunately the new tier 2 market distribution area is 3 tiles wider, which is an entire extra layer of homes. This layout specifically includes 75 homes (67 is the absolute minimum with all but 2 upgraded to tier 3 to get up to 400 population).
It is possible - if you want to try and experiment - to cram in ~5 more homes, maybe even more, especially if you exclude roads, as a guide, I had to consider simplicity too for it to be easier to follow.

Dual-Market Residential Layout and Production Core
This is the plan for a significantly larger final population (consider processing constraints!).
This plan also includes most of the production facilities in-game with a more or less optimized placement even cross for multi-layered processing.
It includes 2x63 homes (The main limitation factor was the Theatre capacity of 125 people homes - someone will NOT be entertained!)
Otherwise, the principles are the same, experiment as much as you'd like. I've originally managed to fit in 74 homes on each side, so there's plenty of space for more extreme populations.


The Production Core's smaller nodes can be separeted well enough, if you have a more limited space to set up your base, the main thing to watch out for in relocation plans, to have 9+ tiles space for the sawmill and similar buildings (the Compost Yard is 11+ tiles - people seems to dislike the smell of sh*t more, than loud noises).
Research Tree
Absolute first pick: Natural Philosophy
Affects the whole game, after ~4-5 research point, you're net positive already

Resource techs are a high priority to improve gathering speed, so Stonecutting and Silvaculture are a high priority too.

I'm not sure what's wrong with the townsfolk, but they're snorting clay and bricks, so start Mining through Stonecutting as soon as your population numbers allow at least 1 full clay deposit to be operational.

Also high priority to unlock Market Forces through Taxation, after the key resources.

Food wasn't that big of an issue for me, so outside of unlocking barns with Animal Husbandry, so you can slowly breed them, when you need them, there's no need to rush food techs in the first 10-15 points.

Only unlock Healer's Home through Nursing, if you have the income to support it or for some reason, you have significantly moret, han 2-3 sick people at a time.or they start to die from sickness.

When you're at tier 2 town center and stabilized the growth, look for Forging and Smithing through Production Logistics and Production Management, and look for an Iron source.

Around this point, start looking for Forestry, so you can upgrade the Work Camps and replant trees, so you don't have to micromanage them anymore.

Once you've built an Academy, Scientific Method is the same as Natural Philosophy, simply a must have.

Paper Press is also a great single point investment, although the building is quite expensive, a single worker can provide enough paper to sustain the Academy indefinitely. It's roughly a 30% research time cut, if they have paper available at the Academy.

The other Researches are not too crucial inthe city development.
Around 200+ pop, you should start investing into food techs, but I haven't entered Grains even with 400+ pop. These techs are more map dependent, on how early you should invest into them.

Personal Pick order:

T1 - Natural Philosophy, Stonecutting, Production Logistics, 2x Taxation
T2 - Mines, Market Forces, Nursing, Production Management, Forging, Smithing; Forestry, Animal Husbandry, Farming startup
T3 - Quarry, Woodworking, Trade Center, Convenience tax, Wagon upgrades, Heavy science
T4 - Heavy weapon production, then slowly grind out Citadells
General Gameplay
Early Game:

Although it's dependent on the map, I'm personally opening up with 2-3 hunters all the time for food and 1 forager. After rushing Fletchery, I'm going up to 4-6 (depending on ow many hunts are close) hunters, but after that, I'm often adding on fishermans and 2-3 foragers (also depends on the area).

Farm management:
I'm using 5x15 plots (first build 5x7 or 8, but not longer, then expand to the required direction by 7 or 8 tiles - important note, that you need to expand at least 7 tiles or you'll get the error of 'too small'). Based on my experience, it was enough to employ 3/8 workers on the fields. 3 5x15 plots makes it easy to create the rotations.

My preffered setup for slowgrowing fertility from the very start as a set and forget:
(other version is to set Maintenance; 2x Clover for 3-4 years, then start using the fields properly)

Flax-Hay setup:
- Maintenance; Hay
- Clover; Flax
- Pea; Clover; Turnip

Flax only setup:
- Maintenance; Flax
- Turnip; Clover; Turnip
- Pea; Clover; Turnip

Animal feeding (Hay only) setup:
- Maintenance; Hay
- Turnip; Clover; Turnip
- Pea; Clover; Turnip

So you get a bit more Turnip if you break them up on 2 separate fields - good when you grew 500+ pop.

Lategame Grain setup:
- Maintenance; Hay
- Clover; Wheat
- Vlover; Clover; Turnip

Naturally, there are other good setups, like a year of /Carrot; Beans/ or so, but these are working well for me.

Woodcutting:

After the storages are filled, you only need 1 Forester Camp (upgraded Work Camp) to sustain the need for firewood and other wood requirements for ~400 pop.

Mining:

The claysnorters must be appeased, so Mining is a tech rush for me personally, but can be delayed 2-3 picks after unlocking the potential to get mines. I was not able to generate enough clay to get any surplus until I've employed 3 full clay deposits and same goes for bricks with 2 Brickyards.
And this is also after the settlement is already at tier 3 mostly.
Before that, even these won't be able to mine enough for those maniacs.
Around 10-12 iron miners are enough for the fully employed Foundry and Forge (only tools and heavy tools, but with clear surplus production).
2 Charcoal kilns are great to have, just set up 2 Firewood Splitters early.

Storage Management:

In general, I'm mainly specializing one Stockyard for building materials, and the other for ores and heating materials.
The Storehouses are harder to set up, I like to use one for Hay around the grazing areas, the others are as you can see, in between the production and the residential area for optimized logistics and they store whatever production is close by and the required materials.
Important note, it's good to have a full Storehouse for arrows in the lategame just to be safe, if you plan to go survival mode, they'll start chewing through arrows like candy.

Defenses:

Don't bother too much with it, just get crossbows and constant supply of fur for the Tannery.
Hide coated hunters are perfect for the first 2-3 raids. 4-6 hunters can easily kill up to 20-30 raiders without loss, maybe ~50 with good micro and expectable loss of a few.
Around 10-15 years, you'll start to get raided a bit more heavily, I'm still fine with 12 archers from a Fort or two. 12-24 archers (with crossbows) are doing fine (with obvious losses expected against 40-60+ raiders), but I had no problems defending with slowly built up archer-only forces before jumping to the heavy infantry teck.
Don't even bother with Horses outside of roleplay, they're too expensive for what they provide. You can get 6 archers for the cost of a single Lancer... guess which one is more Valuable, but 2 Heavy infantry is also significantly more useful.
They're definitely not bad and it might just be my playstyle, but 1,5 extra fully employed Citadell with 12-12 split seems better, than 12 Lancers (or alternatively, 3 full archer eployed citadells).

Relics:
I found the best setup to be:
- Coin purse (a must for late game army) (20% upkeep cost reduction)
- Ashes of the Martyr (25% extra HP)
- Markovian's Blade (15% Soldier and Guard damage)

Tusk and Eye of the Hunter might also be great alternatives, especially Eye replaced for Blade, but I'm not sure about the effects - haven't datamined anything - Markovian's, based on the wording, might be the same bonus as the Eye for the army, since it says all soldiers, so it should also affect archers. If not, then naturally the Eye is probably better.
Lategame transition and setups:
Important notes for lategame preparation (T4-T5 homes):
- Get food production surplus and ~12-18 months of storage capacity, so you have a buffer.
- Prepare fields preemtively!
- Buy Food if you fall under 6 month even with the preparations

The jumps are quick and brutal in terms of food drain and say goodbye to your planks, bricks, and glass at T5 during the transitions. From 450 to 600 will be the most intense if you we just geting by with food, but it's managable. (Still, don't underestimate the 600-750 transition either.)
Triple Turnip + some extra rotations are realy good for burst food productions, you can even sacrifice some fertility to get extra if you've miscalculated something.

Once you max out T5 population:

Woodworking:
2 Foresters, 2 Sawmills and 2 Firewood Splitters are needed to keep up with the material burns, fortunately 1 Furniture Workshop is more than enough.

Food:
- 3 T2 Barns (6-6 handlers); 4 Chicken Coops (2-2 handlers) - (for T2 Bakery pastry massings egg requirements)
- 2 Cheesemakers with 3-3 people employed were able to use all the milk from the 3 Barns
- 2 sets of Wheat fields were enough for me to provide flour for 4 Bakeries at max capacity; they need 3-4 Windmills too
- Glass Recycling is crazy, once you unlock that, and set up a Guild Hall for Miners Guild, you will only need 1 full Deep sand mine and 8 people in the Glassmaker to provide a surplus of Glasses for everything in the town, including a fully employed Preserver and Apothecary
- Little space management trick for Barns and fruits: use 16x16 fields instead of 15x15 and put an Arborist inside, use the grazing area for fruit trees too, they fit perfectly; same goes with the 4 grazing areas for the chickens
- Honey... well, just spam those, Medicine and Pastry will burn it all, don't expect a too large surplus of it once you start using it

Industry:
- 1 Deep mine were enough in most cases... except Gold
- Paper is fine, after you've built up your reserves and you're only refreshing used up books; 1-2 fields on Flax are more than enough to keep up with clothing and everything
- Although I'm only using 4 Hunters on top of the Barns, Pelts are a bit scarce, soyou might want some trap-heavy hunters to get more pelts, maybe goats (haven't tried them), but it's managable with 2 Cobblers and 1 Tannery with some occasional trader extra
- 1 full Soap is also producing significant surplus if materials are provided for continuous work
- 4/8 Pottery is already producing surplus, so you won't need more than that, unless you want to also bump up clay miners to sell it to traders
- For all the iron and gold incoming from the mines, I'm using 3 smelters; 2 for iron only and 1 for iron-gold at 1-1 ratio

So at the moment with not too much surplus, 1 full deep iron, 1 full deep sand and 1 full deep coal were doing fine; 4/16 quarry and 8/16 Clay also seems to be fine, after heavy building phase is finished, but I like to keep around 2 Brickyards, because they work slow :/

This setup is able to field 4-5 full Barracks with 12-12 archer-heavy infantry setup, but it needs trader gold income occasionally, since the gold-flow otherwise slightly negative.
I personally get so much gold, that I'm often paying the attackers if it's an option, just to get rid of it.
Building capacity info
In case you want to expand the cores, here are some info about the building limitations.
I haven't tested if the Temple and Altar are providing the same or not (they provide spirituality).

Library - 100 Residences
Temple (T1) / Grand Temple (T2) - 100 / 120 Residences
Theatre (T1) - 125 Residences
Festival Pole (T1) / Paved Festival Pole (T2) - 80 / 100 Residences
Shrine (T1) / Altar (T2) - 18 / 18 Residences

Storehouse (T1) / Warehouse (T2) - 2000 / 4000 unit capacity
Stockyard (T1) / Large Stockyard (T2) - 1500 / 3000 unit capacity
Root Cellar (T1) / Brick Root Cellar (T2) - 1500 / 2500 unit capacity
Market-centered large module <> Old baseplan, concept remains valid <>
This is a rotateable module (around the theater, but can be redesigned for solo-use for smaller scale settlements too just by using the additional areas inside the / gray / lines, but naturally those are just guides.

The goal of this layout was to squeeze in the absolute maximum number of houses around a single market, school and healer. (which is 65 homes)
There is a lot of 'spare' area around the corners, where you can fit in any neutral facilities or even forts as you like.


In a rotated module use, the 4 sections support each other with the bakeries and other decorations/ facilities.

In a singular use, you should build a 3rd well and bakery roughly in a triangulated form around the houses to cover the whole.

NOTE: 2 Rat Catchers can't cover all the houses, you need a 3rd one in singular use and even in the rotated modul version, there might be issues, so you'll either need a 3rd one or just micromanage a single one in case of a rat infestation :)

44 Comments
Immortalits  [author] 21 Jul @ 9:40am 
Regarding answers for new questions, I'll try to answer for a while, but not sure how long the game will keep me here, Manor Lords is my current favourite of this game type and there's a big patch on the way there too.
Immortalits  [author] 21 Jul @ 9:40am 
Sorry for the large break, I got bored of the game, but I'm back for a refresh with 1.0 playtest, I'll refresh the guide further after testing the new and renewed mechanics, most importantly, the extended market range.
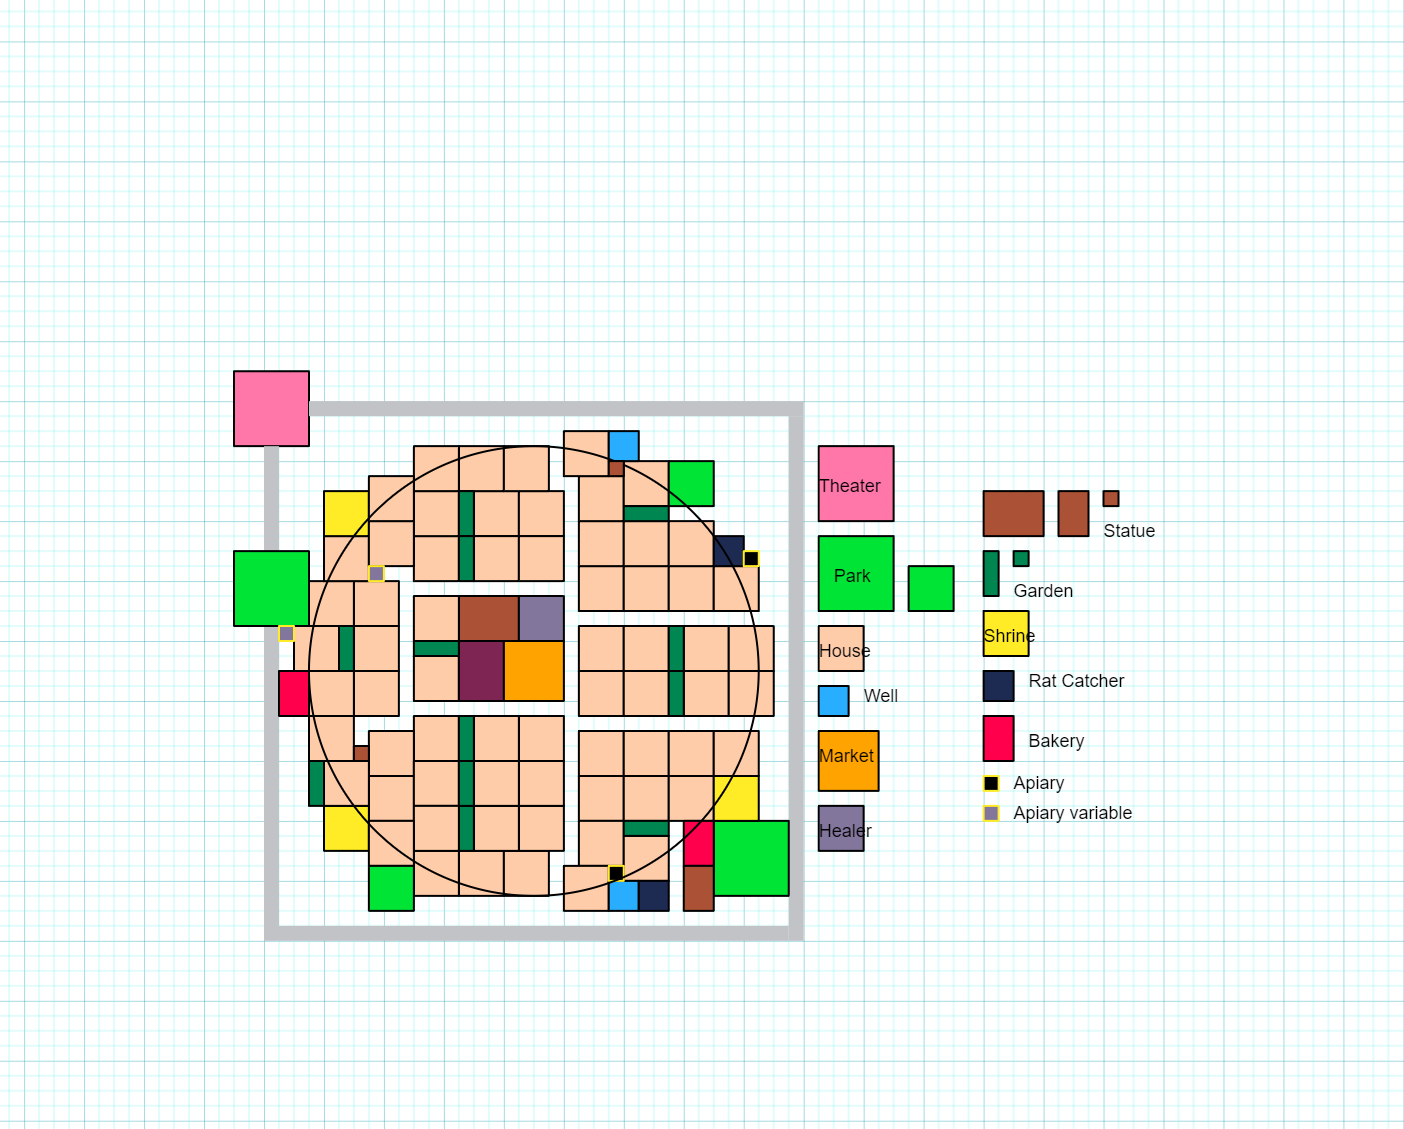
The game engine still strugles around 5-600 pop already, so I might not do anything with the rotational design.
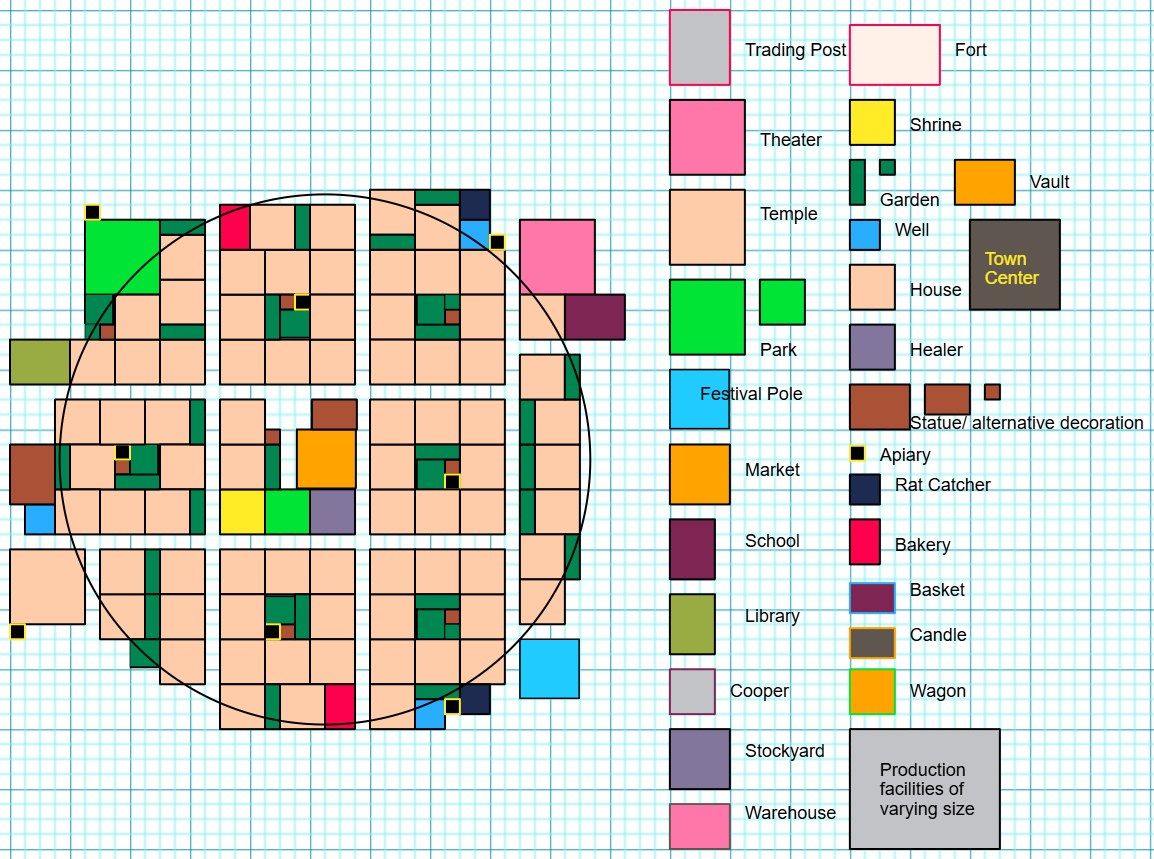
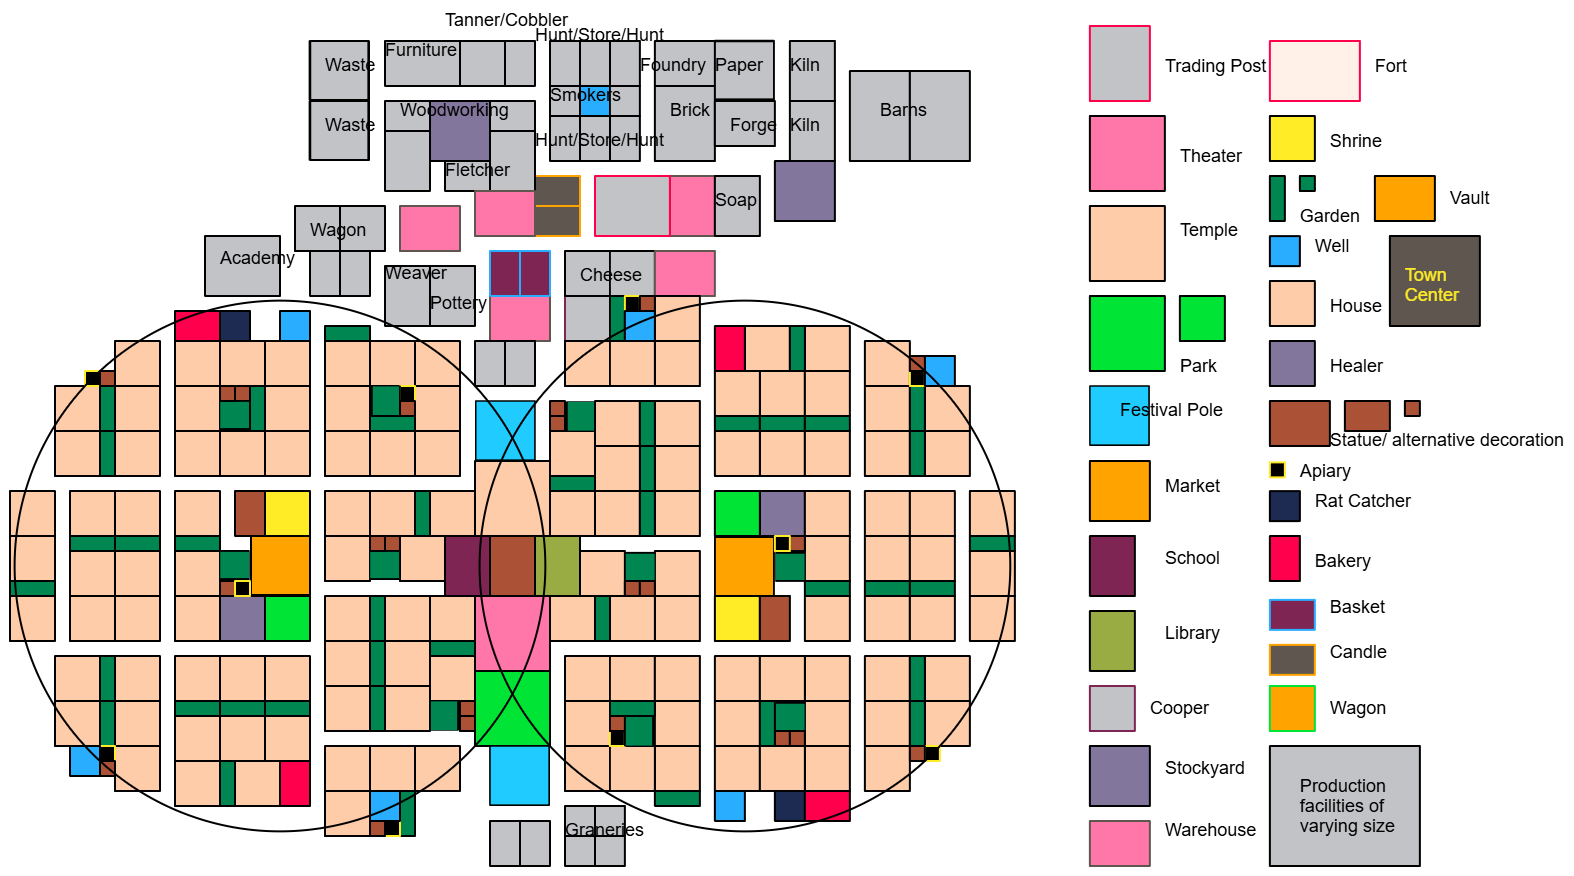
Goals: 1-market and 2-market designs, detailed production facility-layouts in small hubs, like the one at the single-market for candles+baskets, although they will be marked with text, rather then expanding the color-scheme to infinity, I'll probably make a doubled up version for them at close view, so the texts align better.
In addition, I'll make a simple guide for high quality research picks and an order, I think is well optimized for resource unlocks, but naturally, it'll be up to the map layout and player preference still :)
|FG| Grethor |IOA| 25 Jan @ 9:41pm 
If you read the description and compare it to the graph, the purplish building left of the market is the school. He just didn't put it in the Key.
Generaika 20 Jul, 2024 @ 12:06am 
man, this looks very natural and true medieval city
Eaglebows 7 Jul, 2024 @ 8:42am 
to Ascended Prime and AaronBlack547 : I suppose it's the school, in my city it works well
Cyberdrone 31 Mar, 2024 @ 10:41pm 
how to upgrade shelter?
Ramexises 1 Jan, 2024 @ 10:37pm 
Thanks for this. I got my first Tier 4 Town after using this design.
Ascended Prime 18 Dec, 2023 @ 12:14am 
Hi, you didn't include the school building when placing the buildings in the center of the diagram.
Copy 22 Nov, 2023 @ 5:37pm 
> you can't make plots 15 tiles long.
There is an "expand field" option on a built farm (on the left side of the panel). So you can start with 5x10 and then expand it with an extra 5x5.
AaronBlack547 16 Nov, 2023 @ 7:53am 
What is a building left of Market, under Statue? Theres no info about it on photo