Dragon And Home

Dragon And Home

30 ratings
Beginner's Guide
By mirandalyn
A simple guide that will answer most questions beginners have
4
   
Award
Favorite
Favorited
Unfavorite
Starting out
First off, let’s take a look at your screen. Notice that you have three bars at the bottom. You'll need to keep an eye on these!


Left Bar : Stamina. You burn stamina fast while sprinting. Be careful not to run out of stamina while swimming, or you'll drown! To regenerate stamina faster, press "U" to open the emotes menu and choose any emote on the top row.

Middle Bar : Hunger. If your hunger bar drops below 70, you will no longer passively regenerate health. If it drops to 0, you die, but you will respawn with 20 hunger. Most trees will drop apples when chopped down, which will give you 5 points in hunger. Most cooked meals require sitting at a table to eat, but give more hunger points, and some will give you buffs.

Right Bar : Health. Try to keep this bar as full as possible, of course!

Follow the beginning tutorial; it explains how to do the basics. Definitely pay attention to what it says. It goes through sprinting, climbing trees, etc.

The tutorial does not add that, while climbing, you can press A or D to move side to side, or double click A or D to go around a corner.

Your first craft is a stone axe. The quest line will give you more stone tools, so there's no need to craft them until you need them.

You can press "T" to pull up your quest log. Some quests don't auto complete, so you'll have to open this log to finish them and progress to the next quest.

Your personal inventory (backpack) is on key shortcut "B". You will use the craft button within your backpack to make most of your beginning items, such as newbie gear and tools (for tools be sure to check out the player tips section!) Unwanted items can be dragged from the backpack and dropped, but this will delete them so be sure you don't need them!

At any time, you can press "M" to open your map. It will show you way points and dungeons. The map cannot be used inside dungeons.

Press "F1" to toggle to mouse mode. This will enable you to click on things such as friend or trade requests.

Once you hit level 2 (and following the questline), you will receive side quests that will help you to level even faster. Press "T" to access the quest menu. You can also click on each individual quest for more information.

At level 4 (and following the questline), you get your own house. You will need this to craft! (See "Crafting" section)

You have new buttons on your HUD when inside a home, in the upper right of your screen. Press "F1" to unlock the mouse and click on these buttons.

The button on the left is "Workshop Building''. This is for building "offline". You can buy an item to transfer your work into your online home if you choose to do so.

The middle button, "Block Boundary'', will show you the building area for your home. This is helpful within a co-home to see boundaries.

The button on the right is "Home Teleport''. This button opens up the Home Portalstone. YOU WILL USE THIS A LOT! From here, you can see what players have listed recently for sale inside their homes, as well as anyone that has done work on their homes and players that have placed a special portal for the Chant Forest realm. DO NOT GO TO CHANT FOREST YET! The quest line will eventually take you there, but until then, you will die fast, and you will die often!

At this point, you can start visiting other homes as well. When you open the Home Portalstone, at the bottom is a bar where you can type in the target home. Co-homes always start with the letter "G". Single homes are only numbers.

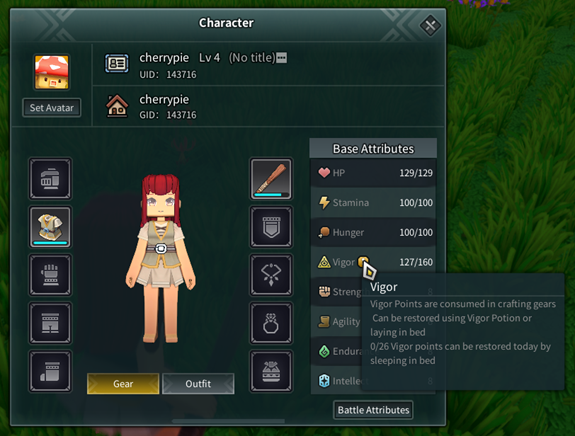
To determine a player's home, right click on their name and choose "Character Info". This will show their player UID as well as their home GID. You can type their home GID into the bottom bar and then click "Go Home". You will always have the option to return to your own home from any other home.

If you find a home you like, you can favorite it so you don't have to type the GID every time you want to visit.

In the upper right of your screen, there are two colored buttons. The green one on the left is to "toss a coin" for the home. This is a nice token to say thank you to the home owners, especially if they have helped you out, you like their decor, or they have good prices in their shops!

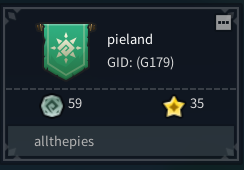
The yellow button on the right is the "Favorite" button. Click this button when inside another player's home. You can view your favorites by selecting the "Home Faves'' tab on the left side of the Home Portalstone. Each home will have a separate card. You can add a note to this card by selecting the three dots on the upper right corner of each card.


Players can have shops in their homes. Check these out! A lot of players have items for free that really help when you're starting out! It is also a good idea to put stalls in your own home and sell anything you have extra. More on how to do this in the "Crafting" section.

To build inside your home, press "F5" (to toggle view, press "F6"). Left click destroys blocks. Right click places blocks. Blocks you wish to place must be put on the hotkey bar. You have two bars, for a total of 18 slots, to place blocks. Blocks can be crafted on the artisan table or purchased from other players.


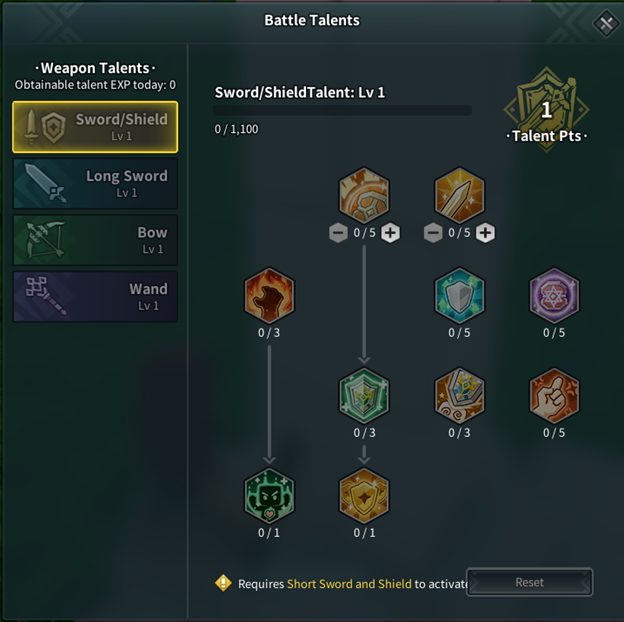
At level 10, you will begin to gain weapon talent experience from killing mobs. There is a cap to how much experience you can gain in one day. To see your progress, press “K”. Your total gained experience as well as your cap is on the top left, just under “Weapon Talents”. At max level (20), you must kill mobs that are at least level 14 to continue gaining experience.

Anytime you visit a new town or station, be sure to walk up to the teleportation crystal and activate it. This will save you a LOT of running around, but be aware, it costs WD each time you use it to teleport. Teleporting to homes is free.
Hotkey bar


In battle (default) mode, you have 5 item slots to keep food, potions, or any other usable items.
Your left and right mouse button will coincide with any skills you have on your weapon and offhand.

The Q and E hotkey buttons are for passive or active skills you have on your weapons and offhand.

Your X button will sheathe and unsheathe your weapon (or fishing rod if you have it equipped).

You have a separate stamina bar for dodging/rolling. This is set to the left shift key. Utilize this when fighting monsters! You can time their attacks and save your health. It is also a faster way to get where you're going, but you'll have to recharge it after 4-5 rolls.

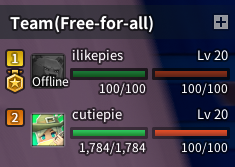
When you team up with other players, a box will appear on the left side of your screen. Here you can see player names, as well as their current health and stamina and any buffs they have running.


Key shortcuts
B : backpack inventory
C : toggle amble/run mode
F : pick up/activate items
H : home menu (cannot be used until level 5)
I : character info
K : battle talents
L : life skills
M : map
O : mount menu
P : friends list
T : quest menu
U : emotes menu
Y : achievements
Abbreviations
Some helpful abbreviations to know for chatting with other players:
CoS = City of Sand dungeon
AT = Ancient Temple dungeon
SA = Shaman Altar dungeon
ELK = Forest Shrine dungeon
OG or PG = Otherworld Garden (Paradise Garden) dungeon
DTC = Divine Tree Crevice dungeon
LFM = looking for members (teammates) for dungeons
BP = Breeze Plain
CF = Chant Forest
SD = Shadow Dragonite
WD = White Dragonite
Currency in DnH
White Dragonite (WD) : This is earned in game through quests. It is important to save as much as you can. It is used for teleport crystals as well as upgrading skills and repairing gear.


Shadow Dragonite (SD) : This can be earned through daily home quests. You can choose to take SD or WD as a reward for these. I recommend taking the SD, as you can always transfer it into WD, but you cannot transfer WD into SD. Note: You will receive less SD than WD for home quests.


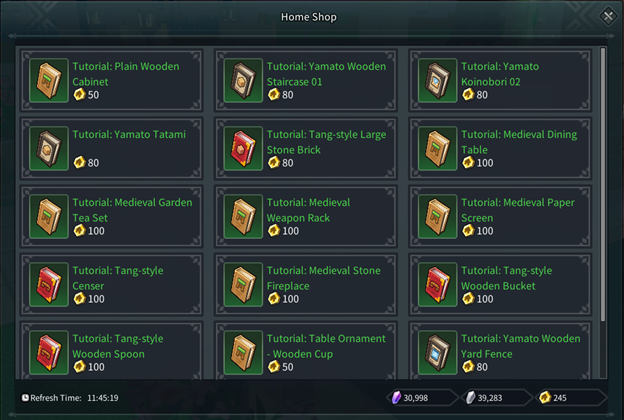
Home Coins (HC) : These are earned by doing home quests. You can exchange 1 HC in the Starshroud Shop for 200 WD per day. You can also spend HC in the Home Shop. Talk to Ivan and he will show you a store full of recipes! He will also show your HC balance.


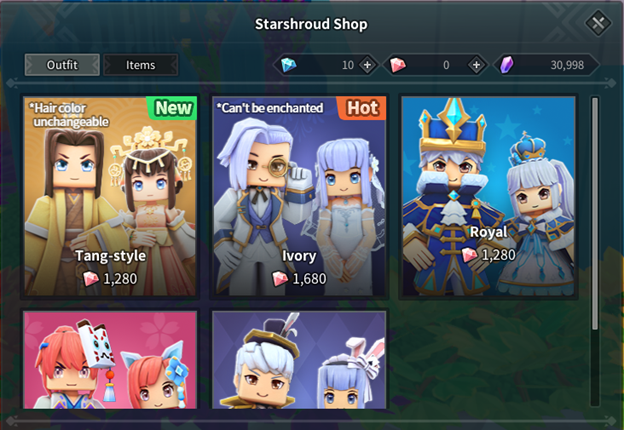
Starshroud Shop (key shortcut "F7"): This is the DnH cash shop. It can only be accessed from within a home. If you prefer to buy a costume (which gives customizable stats), max your home inventory, or unbind gear, you will have to purchase diamonds.


Diamonds (purchased through the Steam app).


Pinkstars (a 1:1 exchange from diamonds).


Crafting
When you enter your home the first time, you will have a rudimentary building with a crafting table. The quest line will walk you through using it for the first time. There are tabs at the top of the crafting table that separate the items by category.


Tools : Here you can craft better tools with higher durability.

Functions : This tab contains other tables necessary for crafting, as well as random items such as a mailbox, a safe box (for additional inventory, placed inside your house), and sales stalls. NOTE: YOU ONLY HAVE ONE INVENTORY, REGARDLESS OF HOW MANY BOXES YOU PLACE. It is helpful, however, to have multiple boxes placed strategically around your home for easy access.

Mount : Everything you need to craft for the animals you choose to tame and breed.

Planting : Everything you need for farming.

You can see what any item requires for crafting by selecting it. For example, sales stalls take 5 lumber each. Once you have the required items in your inventory, choose the quantity you want to make, and click "craft". The items in most tables will deposit directly into your inventory (exceptions to this are items made in the alchemy table or food cooked over a campfire). Furnaces, tanning racks, and looms require the corresponding profession to be unlocked. For more information on this, please see the "Life Skills" section.

Furnaces = Blacksmith
Tanning racks = Hunter
Looms = Tailor

In order to make the assembly and artisan tables, you must have copper ingots. You can either purchase these from other players with SD, or craft a furnace to make your own.

Once the furnace is crafted, the ore or rock is placed in the top slot, and fuel (any kind of wood) is placed in the bottom slot. A timer will appear in the center that tells you how long it will take to receive one product. It is a good idea to have a few furnaces going at the same time. You can also fill them up and leave them overnight; they will still run while you are offline.
Life Skills (key shortcut “L”)


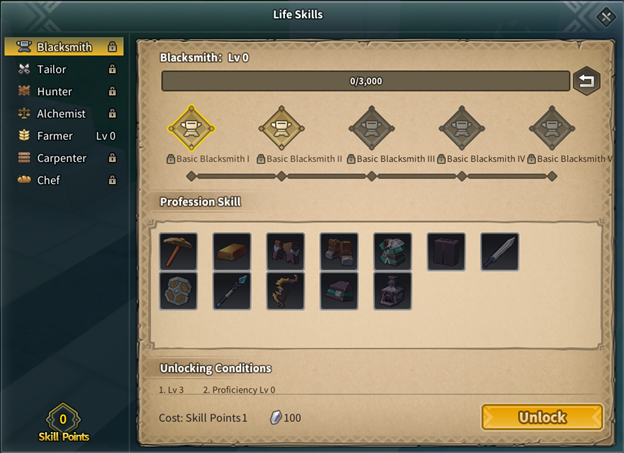
Unlock and level up your 7 life skills. The first four require skill points. You gain one skill point every two player levels, starting at level 5. These also require 100 WD to open. The current character level cap is 20, meaning you won't be able to max all four of these skills. A good recommendation is to unlock the basic level of each life skill and choose two that you want to max. Then, make a friend or two that have the other life skills, and trade with each other. You can also make new steam accounts, create new characters, and level up different life skills on each so that you have access to whatever you might need.

The first unlock takes 1 skill point, and every level afterward requires 2 skill points.
blacksmith
tailor
hunter
alchemist

The last three life skills do not require skill points, but they take considerably more WD.
farmer (100 WD)
carpenter (500 WD)
chef (500 WD)

If you choose carpenter, there are additional skills to unlock under this profession. These also cost WD (5,000 WD for each). They give you different styles of building materials, so if you prefer the building aspect, it would be worth it to explore which of them you like and work towards unlocking them. Some home quests also ask for certain building materials, but you can generally find someone that has already unlocked the profession to help you out with this.

Life skills are leveled by using them. Blacksmith, tailor, and hunter are leveled by crafting gear on the assembly table. Alchemist is leveled by making potions at the alchemy table. Farmer is leveled by doing the farming home quest each day. Carpenter is leveled by crafting items on the artisan table. Chef is leveled by making food.

Each time you level a life skill, you have to pay WD (and have skill points for the first four) to unlock the next level. Remember, you will only receive a maximum of 8 skill points to use on your professions, so choose wisely! If you change your mind, you can unlearn the profession and gain your skill point back, but you will lose any progress you've made on it, as well as the WD you spent to unlock it.

The developers have not yet unlocked higher proficiencies of professions. The highest proficiency in any profession is level 2.
Weapon Talents (key shortcut "K")


Once you reach level 10, you receive 4 points per kill (depending on mob and player level) when using a weapon. Once you have maxed the talent level, you have to find the NPC that will upgrade your weapon skill (the bottom of the weapon talent screen will tell you who to talk to). You can then choose which skill to put a point in. It is very important to do this before continuing to use your weapon, as once the current level is maxed, you will lose any further experience you gain. There is also a cap on how much weapon experience you can earn each day. This cap, as well as your daily progress, can be seen on the top left of the Weapons Talent menu.

Every 5 weapon talent levels, you will have to complete a short quest to reach the next level.
You can level up any and all weapons you choose.
Gearing up
Craft any gear specific to the class you want to play from the assembly table. Be aware that crafting gear requires both vigor and WD, as well as materials. Also, pay attention to the level of the gear you are making so that you will be able to equip it.

You can make multiple sets of gear and equip them on the same character.

Vigor regenerates very slowly over time. However, you can regenerate up to 73 points of vigor (based on player level) quickly by sleeping in a bed each day. You can also use a maximum of 5 vigor potions per day. Vigor has a cap. Be sure to use it as you gain it so as not to waste it!


Fishing
Within the world of DnH, you will find countless bodies of water. Most of these will spawn fish of all different varieties. Follow these steps to catch your first fish:

  • Equip a fishing rod. You can make this from your backpack. They will break eventually, but you can make a rod with more durability from the crafting table.
  • Right click to choose your bait and the depth you want your line to sit at. Worms are gained from using pesticide on crops, digging loam or stone piles, etc. Most shallow ponds are 0.5 - 1 block depths. Rivers can be much deeper and require you to adjust your depth to how deep the fish are swimming.
  • Make sure you see fish! In Breeze Plain (BP), avoid the red fish to start. They take a bit more to catch.
  • Once you have your rod set, simply left click anywhere on the water near the fish you want to catch.
  • When the fish is attracted to your bait, you will see your wooden bobber moving. Be patient!
  • The fish has taken the bait when you see and hear a splash. Left click your mouse and you've caught your fish!

In your backpack, you can right click on each individual fish and turn them into fish meat. Doing this saves backpack space. However, do not do this if you need fish heads or whole fish for a quest or recipe!

Back to those pesky red fish. The steps for casting your rod are the same. However, once you have hooked one of these buggers, you have to follow the directions on the screen to reel them in. These instructions are either "left click and slide left", "left click and slide right", or "right click release". There will be a yellow bar at the top center of your screen that shows how close you are to catching your fish. Once the bar disappears, you've got him! These fish give fish oil, which are needed for certain recipes (food and alchemy).

Fish, like all other food, have an expiration timer. Keep an eye on this. When the time runs out, your hard-earned fish meat will turn into spoiled food. Don't fret if this happens, however. Spoiled food can be made into fertilizer and pesticide for crops.
Farming
Farming can only be done on your own home plot. However, within a co-home and with permissions, you can plant on other players' crops, but you will not be able to harvest them.
It is also important to note that you can visit other players' homes to tend their crops for your daily farming quest. Let's start farming!

In your home, you will already have 5 farming plots. You can craft more in your crafting table, but you are limited to how many plots you can have in your home that is based on your farming level.

You can plant wheat, carrots, and potatoes on regular plots. To plant tomatoes or bok choy, you have to replace the loam in the plots with Breeze Plain loam (picked up anywhere in Breeze Plain).

Select the seed you wish to plant, put it on your hotbar, and right click on the plot. Each seed will give you three harvests. If you tend your seeds before they mature, you will receive double the amount of food. EDIT: As of the new patch, crops give 2 food per plot. Tending the crops has a chance to increase this number to 3.

To tend seeds, craft a watering can, fertilizer, and pesticide from the Planting tab in your crafting table. When crops require tending, an icon will appear above each plot that lets you know what your seeds want. Put these items on your hotbar, select the appropriate one, and press "F" over each plot. To fill your watering can, equip it on your hotbar and right click on any water source. A blue bar will appear below the watering can to show you it is full. Eventually, your watering can will break (this seems to be random), and you will have to craft a new one.

Once you progress to Chant Forest, there are 7 new varieties of seed. To plant any of these, you will need to replace the loam in your plots with CF loam. You will also have to have your farming life skill leveled up in order to plant these seeds.

As of the new update, there are 4 new varieties of seeds. These can be obtained in both Breeze Plain and Chant Forest. Hops must be planted in BP loam, the other three must be planted in CF loam.

All food expires, even when placed inside your box. You can check your expiration timer by hovering your mouse over each stack of food. If your food expires, it can be used to make fertilizer or pesticide.

Remember to claim your daily farming quest before tending your crops or you'll have to find another player's farm to do your daily!
Joining a Co-home (key shortcut "H")
To join a co-home, reach level 5 and add a friend that you want to live with. If you join an existing co-home, it is free. If you start a new one, it will cost you or your friend 5,000 WD. Your friend must be online to invite them to your home.

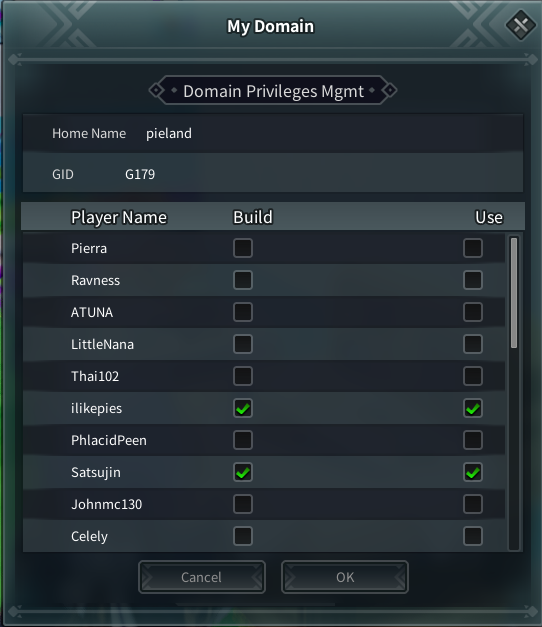
By pressing "H", you can give another player permissions inside your home. At this point in the game’s development, you cannot use another person's inventory chest or certain crafting items (furnace, looms, tanning rack, cooking pots, etc.), even if you have permissions.


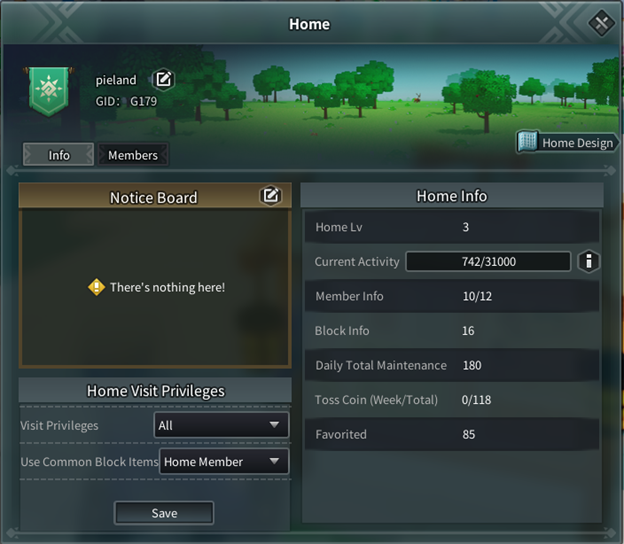
In order to level up your co-home and add more people, you must do your home quests daily. Check the bulletin board beside Ivan to view your home stats.


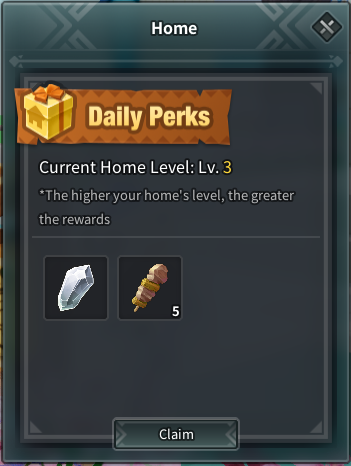
Once you are in a co-home, you can claim a daily co-home bonus. Visit Ivan inside your home. He gives you WD and a snack. The higher level your co-home, the more he will give you.

Home quests
Doing daily home quests are a great way to earn WD and SD, as well as leveling your character and your co-home. Check with Ivan (the owl NPC inside your home) each day. Different towns will have tasks for you to complete every day. Doing three or more of these quests in each town will finish the home quest for you. Be sure to claim your rewards and accept the next home quest before advancing to the next town.

Each home quest gives a reward of experience as well as in-game currency. You can choose SD, which you can later transfer to WD if you need more, but be aware that you will get less SD than WD for completion.

These quests currently reset at 7 p.m. CST every day.

If you get quests that you feel are too difficult to complete, you can return to Ivan, abandon the quest, and claim it again. This will change the quests the NPCs require. If you have already completed any of the quests, you will not be able to abandon that quest, so check the difficulty on ALL of your quests before handing any of them in.

The home coins (HC) you receive from completing your home quests can be spent in the Home Shop. Talk to Ivan to view the Home Shop. These options refresh after so many hours; there is a refresh timer in the bottom left corner of the menu.


Breeze Plain NPCs
A list of NPCs based on the town/landmark they reside in:

Hunter Hut
Barry

Dock
Kubo (east side)
Luka (west side)

Village
Kenan
Michael (in the house behind Kenan)
Ward
Mora
Iona

Watchtower (NOTE: There are two doors to the Watchtower. One is the obvious wooden door, the other is just to the left of the wooden door, a hole in the wall that leads to the top of the Watchtower and the other NPC.)
Tarah (through the wooden door, at the top of the stairs)
Luvina (at the top of the Watchtower)

Outpost (NOTE: To reach the top of the Outpost, go to the top of the wooden stairs and turn left. There is a narrow stone staircase in the northwest corner of the room. It continues up past Cole.)
Morrel
Cole
Larry
Rose

Research Lab
Hazael
Chant Forest NPCs
A list of NPCs based on the town/landmark they reside in:

Tree House
Ine Ma
Ine Gern
Kermit
Tree House Bear (he doesn’t appear to do anything yet)
Maple
ODoylei
Nul Aken

Swamp House
Hul
Saph
Soliana
Horn (he is at the bay but does have daily quests sometimes, his coordinates are 1120, 3629)

Snow Village
Giolla
Silea
Oebfirn
Suarid
Nul Ada
Yeva (in the chapel)
Jacob (in the chapel)

Light Church
Aron
Pallas
Rae
Taming and Breeding Mounts / Leveling New Mounts
To tame a mount, decide which one you want. There are several to choose from within both Breeze Plain and Chant Forest. You will need to craft the appropriate feed (at most ten) for your chosen mount in your crafting table. It generally takes 7 feed to tame a mount.

  • Horse = bran (wheat) or carrot feed
  • Ram = rapeseed pie
  • Tricky Oddbird = rapeseed pie, fish meal, or bran (wheat) feed
  • Yak = potato feed or cottonseed pie
  • Boar = potato or carrot feed
  • Deer = corn straw or pea feed
  • Bear = corn straw or silage feed
  • Bighorn Sheep = corn straw
  • Hippo = cottonseed pie
  • Wolf = minced feed
  • Tiger = minced feed
  • Fae Bird = pea feed or chili residue
  • Fae Hippo = silage feed

Steps to tame:

  • Craft a Plain Collar in your crafting table.
  • Place both the feed and collar in your hotbar.
  • Walk up to your chosen animal and right click on it with the feed. If it is an aggro animal, you'll have to dodge its attacks between feedings.
  • It will take between 7 and 10 feedings to tame the animal. Each time you successfully feed it, a smiley face icon will appear. When it is tamed, a message will display on your screen saying that the animal's mood looks great. When you see this message, right click on the animal with the collar and you have a new mount!

You can only have one mount on you at a time. If you decide to catch another animal, you'll have to either release your current mount (this deletes it) or place it in a stable within your home.

Stables are crafted from the crafting table. While there is a way to place food in the stable, it does not appear that mounts will eat from it. Mounts need to be fed directly by placing feed on your hotbar and right clicking on the mount you wish to feed.

To place a mount in a stable, walk up to the stable and press “F”. From the new menu, select “Place” and your mount will appear in front of you at its personal stable.

To interact with a mount placed in a stable, walk up to the stable and press “F”. From the new menu, “summon” will call the mount back to its personal stable. “Lead away” will place the mount on you for use. “Feed trough” is currently useless. You can also check the details of any mount you have placed in your home by selecting “F” while hovering your mouse over the animal. Then select “details”.

Mounts do not die, but they do starve. If your animal is laying on its side, simply feed it and it will stand up again. Feed your mount by placing its preferred feed on your hotbar and right click on the mount you want to feed. A mount can be fed a maximum of 5 times, but they only burn a small amount of food energy per day, so it is not necessary to feed them daily.

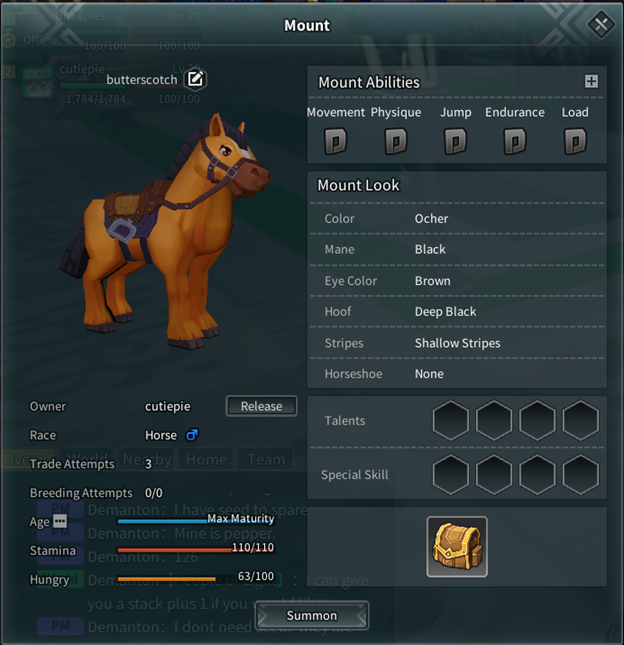
To ride your mount, use the key shortcut "O" and the mount menu will pop up. Select "Summon" and your mount will appera beside you. Press "F" while hovering your mouse over the mount, and choose "Mount". (We are hoping the developers will shorten this process with future updates.) To dismount, press "G".

Mounts have a separate stamina bar and can sprint fast. Utilize them to cross large areas faster, but be aware that they cannot swim. If you enter water deeper than a block depth, or if you are hit by certain attacks, you will be dismounted.

You can name any mount that you currently have equipped. Use key shortcut "O", and above the animal's portrait you will see a note icon. Click on the icon and a mount naming menu will appear. You can only name each mount once, so choose your name carefully!


You can add storage to your mount by crafting a Burden bag from the crafting table. Equip it on your mount by using key shortcut "O" and dragging the bag from your inventory into the "Burden" slot on the mount details menu.

Animals have a rating system, A to F, that details their abilities. Wild caught animals will have D or F ratings. To get a mount with a higher rating, it must be bred. This system is still under development, so it might be best to wait until it is finished before going to the trouble of trying to breed better ratings.

To breed two mounts, you'll have to have the same species, one male, one female. Gender is shown in the mount menu.

Craft a breeding nest from your crafting table and place it within your home. Walk up to it and press "F". This will give you the option to place the male or female animal. Remember, you can only have one mount on you at a time, so plan ahead by having your other animal nearby in a stable.

Once they are both placed, they will 'get to know each other' and a breeding attempt will occur in about six hours. However, breeding can fail.

After a breeding attempt, each mount will go on a cool down and will not attempt to breed again for several hours (this may be up to a day, I am unsure on this.) If you remove a mount from the breeding nest while it is on breeding cool down, you will not be able to put it back on the breeding nest until this cool down is gone.

If breeding is successful, a baby will appear between the two adults. You can remove the baby by pressing "F" on the breeding nest and leading away the "young mount".

Each mount has a limited number of breeding attempts. Some of them may not have any attempts at all, so be sure to check this before deciding to level up a mount for breeding.

I have noticed that swapping mounts around tends to speed up the breeding process. Just be aware of the breeding cooldown and have an empty stable available in case your mount cannot breed until a later time.

Leveling up a baby mount

  • Place your new baby in a stable.
  • You can feed each baby five times per day. After five feedings, they cannot gain any more age experience for that day.
  • When the age experience level is full, you will have to use Breeze Plain or Chant Forest nutrients (depending on the type of animal) to open the next level. These can be crafted with alchemy or purchased from other players.
  • When a baby's age experience is completely capped, it will grow to full size and you have another adult to use as a mount or breed.

Mount recommendations:
Hippos have more storage capacity than most mounts, but they seem to move slower.
Supposedly, tigers are the fastest mounts, but this has not yet been verified.
Conquering dungeons
Normal dungeons require 1-2 players. It costs 0 vigor to enter, and 30 vigor to open the reward chest after the boss has been defeated. You cannot enter a normal dungeon with less than 30 vigor.

Hard dungeons require 1-5 players. It is not recommended to try to solo a hard dungeon, as some have mechanics that need at least 2 players. They cost 15 vigor to enter and 45 vigor to open the reward chest at the end. You cannot enter a hard dungeon with less than 60 vigor.

Elite dungeons require 1-5 players. It does not cost vigor to run elite dungeons.

A well-rounded team is best for dungeons, namely, a damage class, a tank, and a healer. However, this is easier said than done, as healers are hard to find and there is currently a small player base. You may need to carry more than one set of gear into a dungeon. Some dungeons also require a ranged weapon to solve their puzzles.

Be prepared for lag within dungeons. You will get rubber-banded back into place, encounter invisible walls, and fall through platforms. Just look at it as an added challenge, and hopefully the developers will improve this issue in the future.

It is recommended to have gear with inlays before attempting dungeons, or run the dungeon with better geared players.

Different bosses require different gear inlays.

Forest Shrine / Divine Tree Crevice : Fire Attribute gear with Geonima soulstones (thunder defense)

Paradise / Otherworld Garden : Shadow Attribute gear with Goblin Assassin soulstones (shadow defense)

City of Sand : Water attribute gear with Goblin Foreman soulstones
Newbie tips
  • Following the quest line, you will leave the post station and reach the dock that will take you to the mainland of Breeze Plain. It will transport you directly outside of the Village. Be sure to activate the Teleportation Crystal! If you then open your map, you will see several icons marking important areas. It is a good idea to go ahead and activate the Teleportation Crystal in each of the following: Watchtower, Outpost, and Research Lab. You will have daily home quests for each of these once you reach level 8, and activating the teleports will save you a lot of time. The other icons are dungeons and do not have Teleportation Crystals (we are still begging the developers to add them).

  • When doing the quest line, you will eventually have a quest requiring you to kill goblins. You need to be AT LEAST level 8, with all available gear, before attempting this quest, or you can ask to team up with others for help. This quest is very difficult for new players!

  • If you get stuck, ask for help in world chat. The community on this game is very helpful!
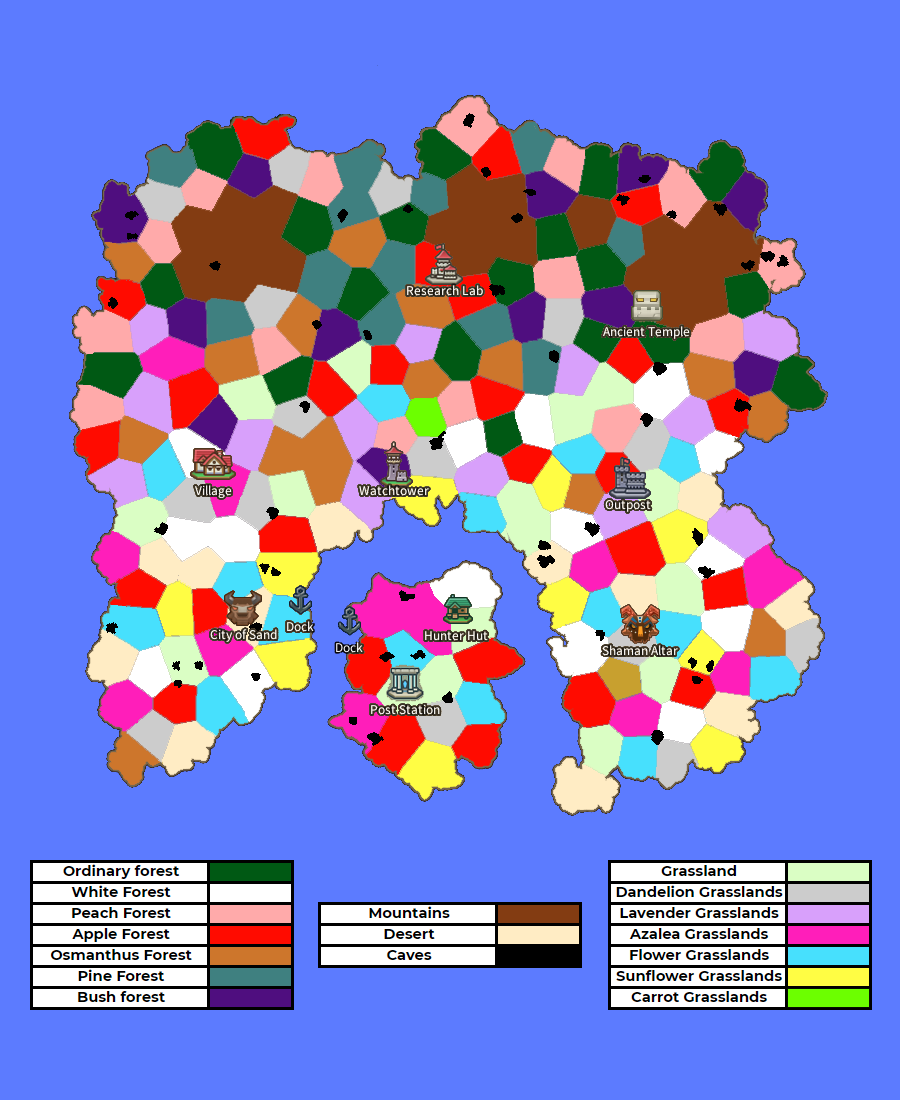
Map of BP Biomes
5 Comments
Merlin pfp 16 Apr, 2024 @ 9:03am 
started playing as wizzard how to get new spells ? are there more spells then the fire ball ?
can i view a list of spells somewhere ? i am lvl 12 by now and all i do is left click
FunkyToc 1 Dec, 2023 @ 2:14am 
very helpful =)
OxiniX 3 Jul, 2023 @ 3:23pm 
nice work mira, looks awesome.
mirandalyn  [author] 31 Dec, 2022 @ 1:47pm 
@tof200, absolutely! Thank you!
tof200 13 Nov, 2022 @ 5:27am 
Hi how are you? GG your guide, he is super nice.

It is to know if I could use your guide to make one in French versions?