Havsala: Into the Soul Palace

Havsala: Into the Soul Palace

57 ratings
Havsala: Into the Soul Palace - Full text walkthrough + 100% Achievements
By 🍒 Lilly (🌸◠‿◠)
In order to obtain all the achievements, you will need to do 2 playthroughs, each of them awarding two mutually exclusive achievements.
One of these playthroughs has to be hint-free, in the other one you will need to use at least 5 hints.
One of these playthroughs requires you to answer all the quiz questions correctly, in the other one you will need to fail them all.
One of these playthroughs must be done in one go.

This guide aims to obtain all possible achievements in the first playthrough (including playing it without hints and answering all the quiz questions correctly), and use the second playthrough as a "clean-up" run for the missing ones.

This guide is also available online on my website[lillycorner.com].
3
   
Award
Favorite
Favorited
Unfavorite
Chapter 1: Phryne
Front side of the room -> Desk
- bottom left drawer: pick up the bribe for the crow
- on the left leg of the desk there's a little compartment that you can open; pick up the note inside it

Front side of the room -> Left painting
- pick up the note behind the painting

Front side of the room -> Left bookcase
- read all the books; click on the highlighted pages to add notes to the diary
- click on the hanging plant to reveal a tetradecahedron-shaped cube, then click on door 4 to grab the nails
- top right shelf: place the books in the following order: green orange yellow pink blue (hint given by the previous painting); pick up the key that unlocks the glass showcase below this bookcase

- bottom right shelf: pick up the bribe for the crow
- use the key to unlock the glass showcase
- solve the glass showcase puzzle: move the tiles with an infinity sign in the following positions:
3 = horizontal infinity sign, 4 = vertical infinity sign and 5 = angled infinity sign
(the hint can be found in Page 10 of the Pythagoras book located on a shelf above, by counting the number of squares overlapping with the infinity signs); pick up the 3 flower-shaped discs

- scroll all way down: pick up the piece of the amphora

Front side of the room -> Amphora niche
- use the amphora piece to fix the amphora
- pick up the bribe for the crow

Back side of the room -> Left shelves
- safe: pick up the bribe for the crow
- pick up the oil lamp
- shelf with the butterflies: pick up the bribe for the crow

Back side of the room -> Right niche
- place the 3 flower-shaped discs on the puzzle area in such a way that you replicate the drawing from the bottom right corner; you can rotate the discs by clicking on them when they're outside the central puzzle area
- pay attention to the way they overlap in the image solution:


- after you solve the puzzle, pick up the the bribe for the crow and the metallic string.

Front side of the room -> Lyra
- place the metallic string
- click the strings in the following order:
134751 (1 is the leftmost, 8 is the rightmost)

If you solve this puzzle without mistakes from the first try you obtain the following achievement:
Perfect Pitch!
Solve the lyre puzzle on the first try
Missable

Idling for 5 minutes in this screen will trigger the following achievement:
You made Orpheus jealous.
Spend 5 minutes with the lyre without leaving
Missable

Back side of the room -> Tree
- pick up the apple and place it in the statue hand located where the flower-discs puzzle was; this unlocks the map puzzle on the other side of the room

Front side of the room -> Map
- set the coordinates to "Croton" (hint: Phryne text from your notebook) by dragging the top and right handles, change to year "345" with a "-" in front of it (hint from Page 2 of the Chronology book), then press the button

🃏 Tarot card #1
How many flower discs did you use to open the hidden compartment?
Correct answer: 6
(During your second playthrough, pick any of the other wrong answers)

Good bye, Phyrne
Complete Chapter One
Story
Chapter 2: Flavia
Front side of the room -> Desk
- read the diary; pick up the key
- use the key on the top left drawer of the desk; pick up the gems with the goddess' names

The diaries from the previous chapters are now placed in a box on the top left corner of the desk. Read one for an achievement (can be obtained anytime starting with Chapter 2)
Look back to see ahead.
Read any diary from previous chapters
Missable

Front side of the room -> Left bookcase
- read the 4 new books that spawned around the Cybele box
- place the gems with the goddess' names on the Cybele box like so (when they are in the correct position an icon will light up on the central hexagon); click on it to reveal a page from a book


Front side of the room -> Left bookcase -> Cybele puzzle (Part 1)
- take the axe from the right page (in front of the sitting lady) and give it to the man on the left
- move the tree to the right side in the stone circle
- drag all the purple items onto it (flowers, hanging ribbons, rainbow)
- in the end press the right arrow to go to the next page


Front side of the room -> Left bookcase -> Cybele puzzle (Part 2)
The objective here is to collect 6 coins.
First, give the bone to the dog for an achievement
It doesn't give a coin, but here's an achievement.
Give the book doge his bone
Missable

- click on the blue bird twice (left page)
- give the jug on the small round table (left page) to the man on the right wearing a cyan shirt
- give the mug from the corner of the table to the person wearing an orange toga (both on the left page)
- put the apple in the pig's mouth (both are on the table on the right page)
- give the chicken leg to the man standing in front of it, wearing an orange shirt (both are on the right page)
- click on the wine amphoras on the right side multiple times until you reveal a coin


Front side of the room -> Left bookcase -> Cybele puzzle (Part 3)
- move the sun in the hands of the lady sitting on a rock
- wait for the flute sound to end, and then pay attention to the beats made by her drum and the sounds made by the three musicians
- she plays a different sound for each musician
- wait for her to produce a beat, then click on the correct musician according to the sound of the drum; when you fail, she does a facepalm kind-of animation and the flute + demonstrative beats sequence is played again

Back side of the room -> Left shelves
- Calendar puzzle: place the nails in the following positions (hint from the note at the end of the Cybele puzzle) then pick up the Moon Goddess stone:


Back side of the room -> Tree
- place the Moon Goddess stone in the tree slot that is highlighted at the top
- inside the tree: use the oil lamp to shed some light and move the archers so that their arrows touch all 4 animals depicted on the amphora, then press on the leftmost archer (the only one that can't be moved); the correct configuration for the archers is shown below:

- after the puzzle is solved, pick up the meteorite piece (bottom right of the screen)
- go one screen back to the room and place it in the niche on the right of the tree

Front side of the room -> Map
- set the coordinates to Rome, "-", 160 (hint: Cybele book page from your notebook)

🃏 Tarot card #2
Which color was the hat of the priest collecting money in the book of Magna Mater festival?
Correct answer: Orange
(During your second playthrough, pick any of the other wrong answers)

Good bye, Flavia
Complete Chapter Two
Story
Chapter 3: Ision
Front side of the room -> Desk
- read the diary; pick up the key
- use the key on the top right drawer of the desk; pick up the Earth symbol and 3 bribes for the crow

Front side of the room -> Left bookcase
- read the 7 new books that spawned on the two bottom right shelves; the "Constellations" book contains a note that you can pick up

Back side of the room -> Ceiling
- place the Earth symbol in the middle, then rotate the rings so that the dividers between them fall into the the vertical space below the center.
- move the moon piece down and out of the puzzle

Front side of the room -> Balcony
- drop the moon box anywhere into the scene to open it; grab the key

Front side of the room -> Desk
- above the diary, insert the newly acquired key in the left key slot; pick up the note and "a thingy"

Front side of the room -> Map
- attach "a thingy" to the bottom part of the map, on the right side of the year counter
- click on the newly formed device (the time module) to pick it up and then on the small compartment under the map to reveal the missing part of the incomplete note; clicking any of the two parts in your inventory then on the rotating button that appears on the screen will merge them

Back side of the room -> Left shelves
- Safe: attach the time module and set the year to 1932 (hint: the year on M.'s note that you picked up earlier from the desk); pick up the telescope parts

Back side of the room -> Tree
- place the moon box in the highlighted slot

Front side of the room -> Balcony
The order of steps needed to obtain the two missing planets can be found in a note in your inventory. However, following the instructions only from the left side of the note will award an achievement.

For the achievement, follow these steps:
- install the telescope
- click on the telescope, move the levers till you find the Ursa Major constellation (the correct position can be seen in the image below):

- go out one screen, turn the headpiece to the Uranus symbol (brown)
- click on the 1st, 3rd, 4th and 6th lenses to move them down, leaving the 2nd and 5th lenses up
- click on the telescope to get the achievement
You've been tricked! Hehe.
Try solving the stargazing puzzle with the wrong instructions
Missable

Here are the correct steps:
- if you followed the steps to get the previous achievement, reset the lenses by pressing the button located right below them
- click on the telescope, move the levers till you find the Pisces constellation (the correct position can be seen in the image below):

- go out one screen, turn the headpiece to the Uranus symbol (brown) - if you followed the steps to get the previous achievement, it should already be set to this
- click on the 1st, 2nd, 5th and 6th lenses to move them down, leaving the two middle lenses up
- click on the telescope and pick up the Uranus tile
- go out one screen, press the button to reset the lenses (right below them)
- click on the telescope, move the levers till you find the constellation of Orion (the correct position can be seen in the image below):

- go out one screen, turn the headpiece to the Neptune symbol (dark purple)
- click on the 2nd and 5th lenses to move them down
- click on the telescope and pick up the Neptune tile

This achievement can be obtained any time, but since we're here, click on the raven 20 times...
Leave the bird alone
Poke the raven 20 times
Missable

Back side of the room -> Ceiling
- place the two missing planets on the puzzle board by inserting them through the bottom circle
- arrange them as follows, then pick up the sun disc:


Back side of the room -> Tree
- place the newly acquired sun disc; pick up the emerald tablet and place it in the niche on the right of the tree

Having placed all 3 sacred objects will trigger the following achievement:
Holy Triology
Place all three memoirs in the sacrarium
Story

Back side of the room -> Left shelves
- pick up the time module from the safe

Front side of the room -> Map
- place the time module, set the coordinates to "Alexandria", "+", 415 (hint: time and death of Hypatia)

🃏 Tarot Card #3
In the first version of the cosmos model on the ceiling, which planet around the earth did the sun appear as?
Correct answer: 4
(During your second playthrough, pick any of the other wrong answers)

If you answered all 3 questions correctly, you should now receive:
Vigilant Engrams
Ace the memory test
Missable

Good bye, Ision
Complete Chapter Three
Story
Chapter 4: M.
Front side of the room -> Desk
- (skippable in the second playthrough) read the diary; pick up the key
- (skippable in the second playthrough) use the key on the bottom right drawer of the desk; pick up the colored discs

Front side of the room -> Left bookcase
- (skippable in the second playthrough) read the new books that spawned, don't forget the two new ones on the left of the Cybele puzzle

If you clicked through all the books, you should now receive:
Literature is the most agreeable way of ignoring life.
Read all pages of every book in the library.
Missable

Back side of the room -> Left shelves
- (skippable in the second playthrough) place the colored discs on the wooden box puzzle from the top shelf (green on top, blue in the bottom left, red in the bottom right slot) to see their corresponding symbols, then pick them up again
- (skippable in the second playthrough) place the time module (from below the map on the other side of the room) into the safe and set the year to +1471 (hint: Corpus Hermeticum book translated by Salvino); pick up Salvino's diary and the tarot card inside (🃏 Tarot Card #4); read the diary until the end
- (skippable in the second playthrough) close the safe, set the year to +1525; pick up Ynes's diary and the tarot card inside (🃏 Tarot Card #5); read the diary until the end

Your dedication has not gone unnoticed.
Collect each tarot card
Missable

Hungry for more stories.
Read the diaries of Salvino and Ynes
Missable

- (skippable in the second playthrough) one shelf below the safe, click on the tarot card book and go to the end, where you see a page with one button: "Spread"; this will start a tarot reading and grant you one achievement:
Do you believe in fortune-telling?
Do a tarot reading
Missable

- (skippable in the second playthrough) repeat the tarot reading 4 more times.
I will not accept my fate!
Spread tarot more than 5 times
Missable

Front side of the room -> Animals painting
- (skippable in the second playthrough) place the colored discs like so:
red on the lion, green on the swan, blue on the wolf;
you can then see the following numbers:
13 = blue wolf (=Salt), 11 = green swan (=Sulphur), 8 = red lion (=Mercury)

Front side of the room -> Left bookshelf
- place the three symbols based on the previously discovered number links and then pick up the 3 pieces:


Back side of the room -> Tree
- place the Salt, Mercury, Sulphur symbols (ion this order from left to right) on the highlighted slots of the tree and pick up the diamond pieces

Back side of the room -> Left shelves
- wooden box: insert the diamond-shaped tiles and the colored discs; order the diamonds like from top to bottom like so:
green - silver - purple - yellow
(hint given by the number of knots and the colors of the threads on the right side of the balcony)
- open the inner slots of the newly revealed puzzle, then fill in the missing pieces located at the edges; pick up the brush and the paint

Back side of the room -> Floor
- place the paint, use the brush to draw the full pattern in one go, without releasing the mouse; pick up the stones for the 4 elements

Back side of the room -> Tree
- place the stones for the 4 elements in the highlighted slots

Fellow Soul
Finish the game
Story

If you didn't interrupt your playthrough, you should now receive:
One night stand
Finish the game in a single take
Missable

If you didn't use any hints, you should also unlock:
Do we need this achievement? No one can finish without a hint, right?
Finish the game without taking any hints
Missable
Second playthrough
The second playthrough requires replaying only the first 3 chapters.
Make sure to:
- pick wrong answers to the quiz questions
- use the hint 5 times (collect the bribes for the bird, as indicated in the guide and feed them to the raven on the balcony)

If you didn't play the game in one take yet ("One night stand" achievement), it's time to do so now (for this you will need to play Chapter 4 as well).

This playthrough should award you the following two achievements:

Need b12?
Give only wrong answers for each memory test
Missable

Someone should feed the bird.
Take more than 5 hints
Missable
13 Comments
mdog86 16 Jun @ 11:16am 
Thank you so much, I am entirely too stupid for this game lol
Ayyynchen 15 Sep, 2024 @ 10:18am 
Great guide, thank you so much :steamthumbsup:
Lûte the Goblin 6 Jun, 2024 @ 3:08pm 
How could you tell which animals were supposed to be shot and which were not?
Lûte the Goblin 6 Jun, 2024 @ 3:02pm 
How did you associate a sheep with Aries?
DarkteK 2 Apr, 2024 @ 8:42am 
Hi bro! First of all, thank you so much for this guide, it helped me a lot!

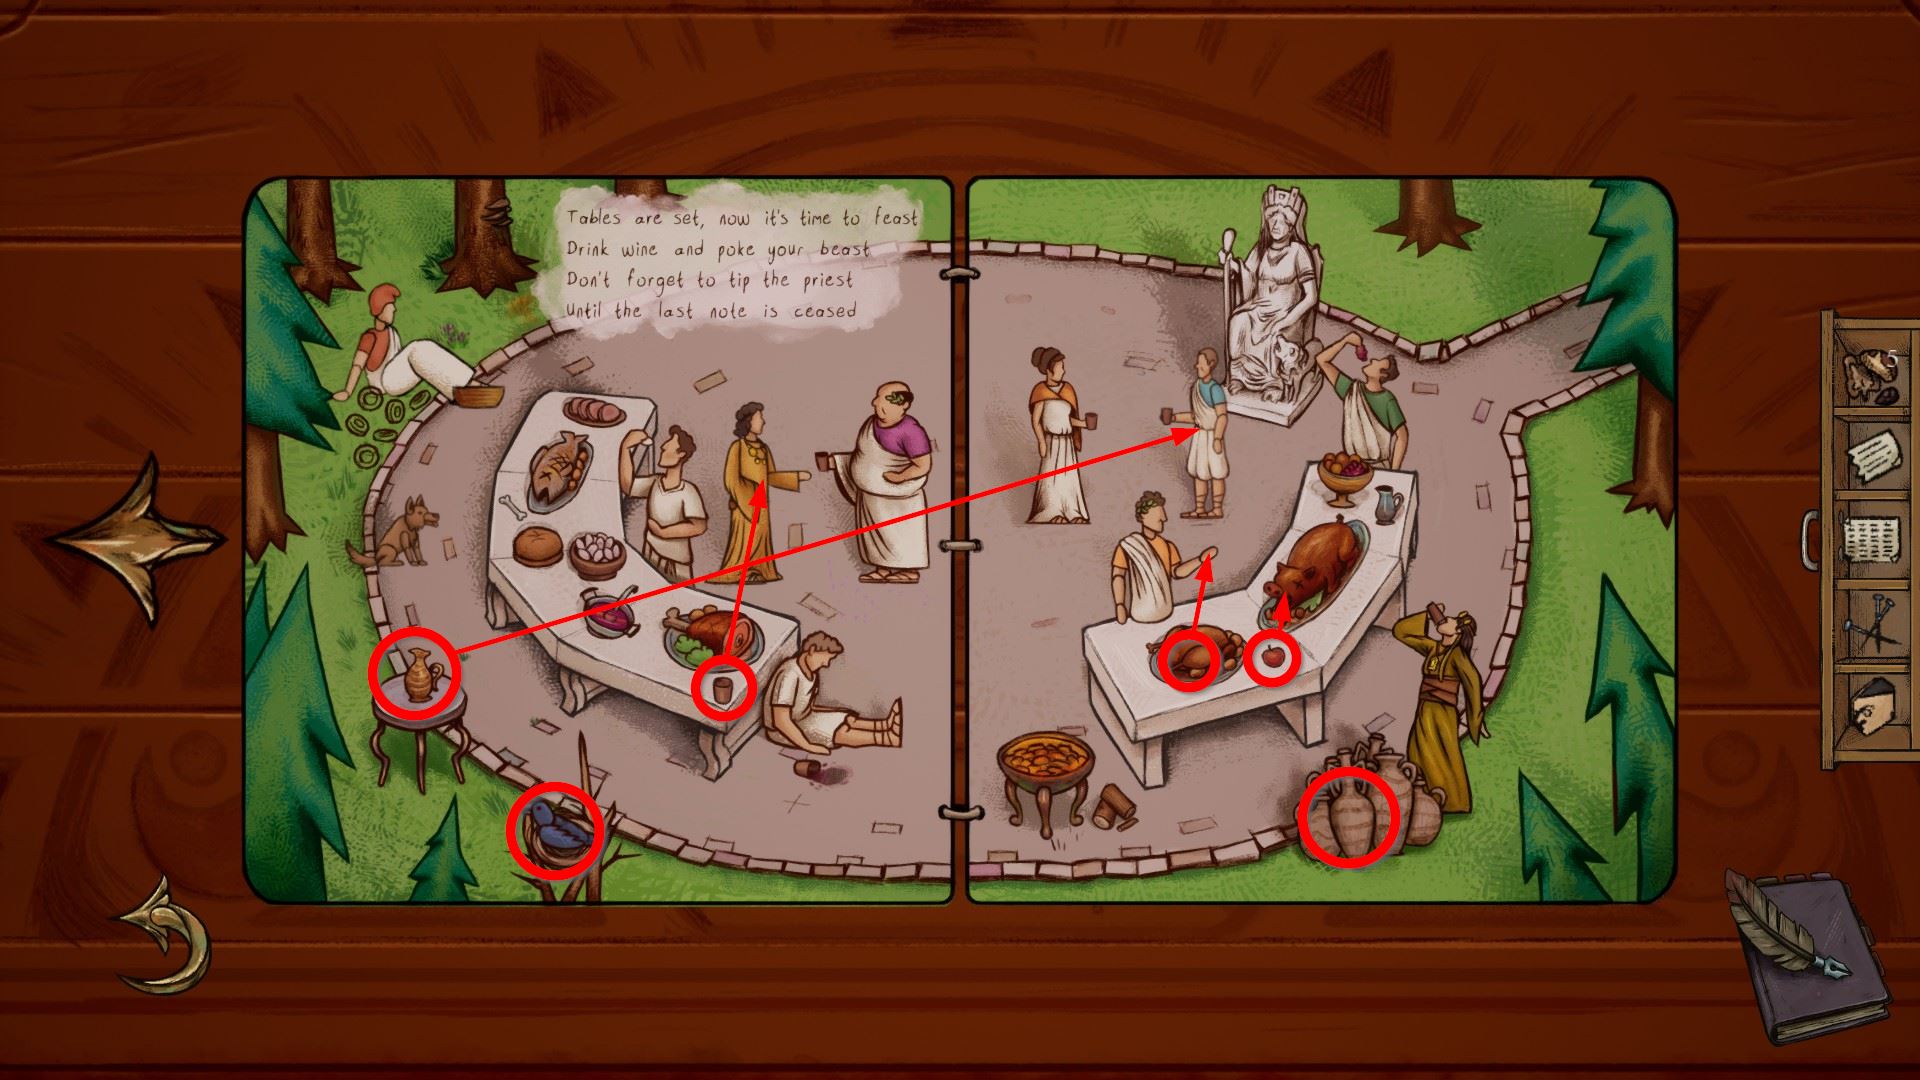
Just a tip here: It would be good to add some texts like " (skippable in the first playthrough)" for grabbing the crow's food. Also some texts on skipping the reading books for the second playthrough :B1:
Fbarok 3 Feb, 2024 @ 10:44am 
But I'll confirm this on my second try
Fbarok 3 Feb, 2024 @ 10:44am 
Thank you for this great guide Lilly, just on a side note I found out that in this part of the game:

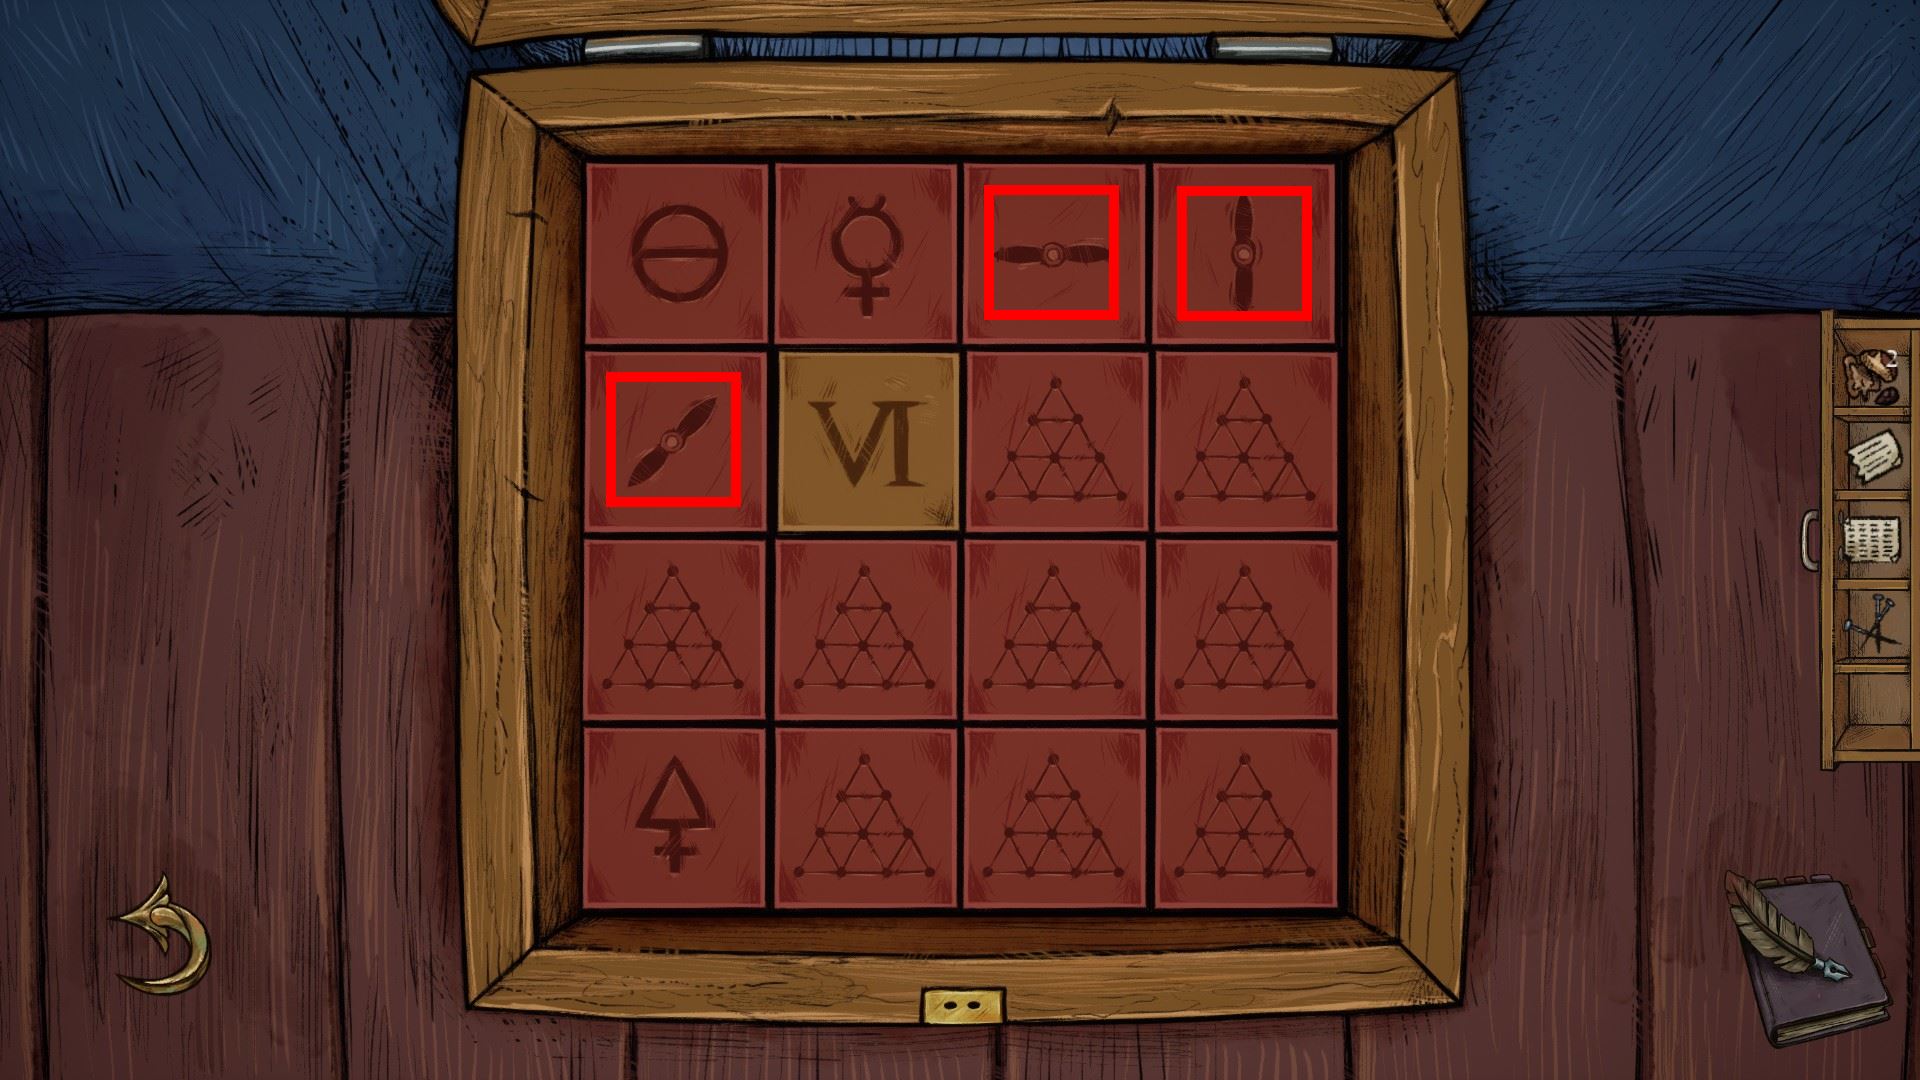
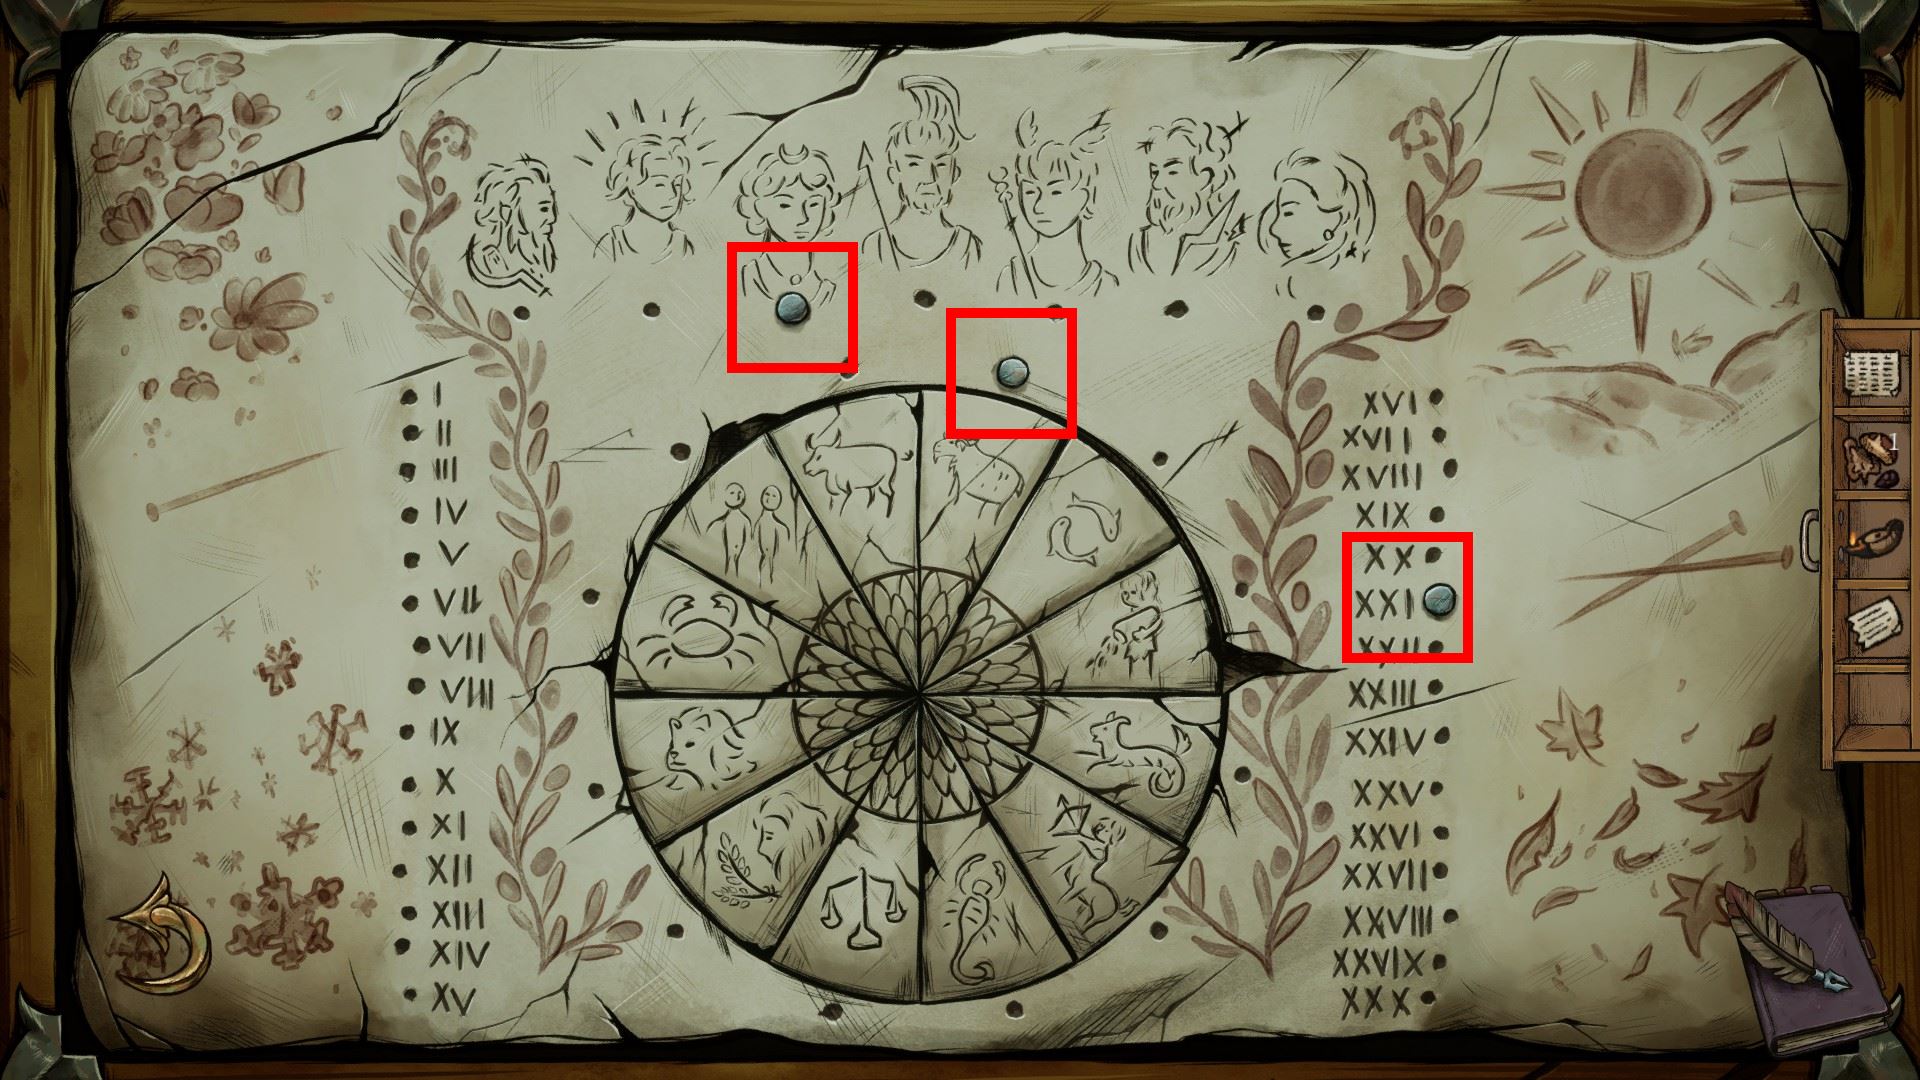
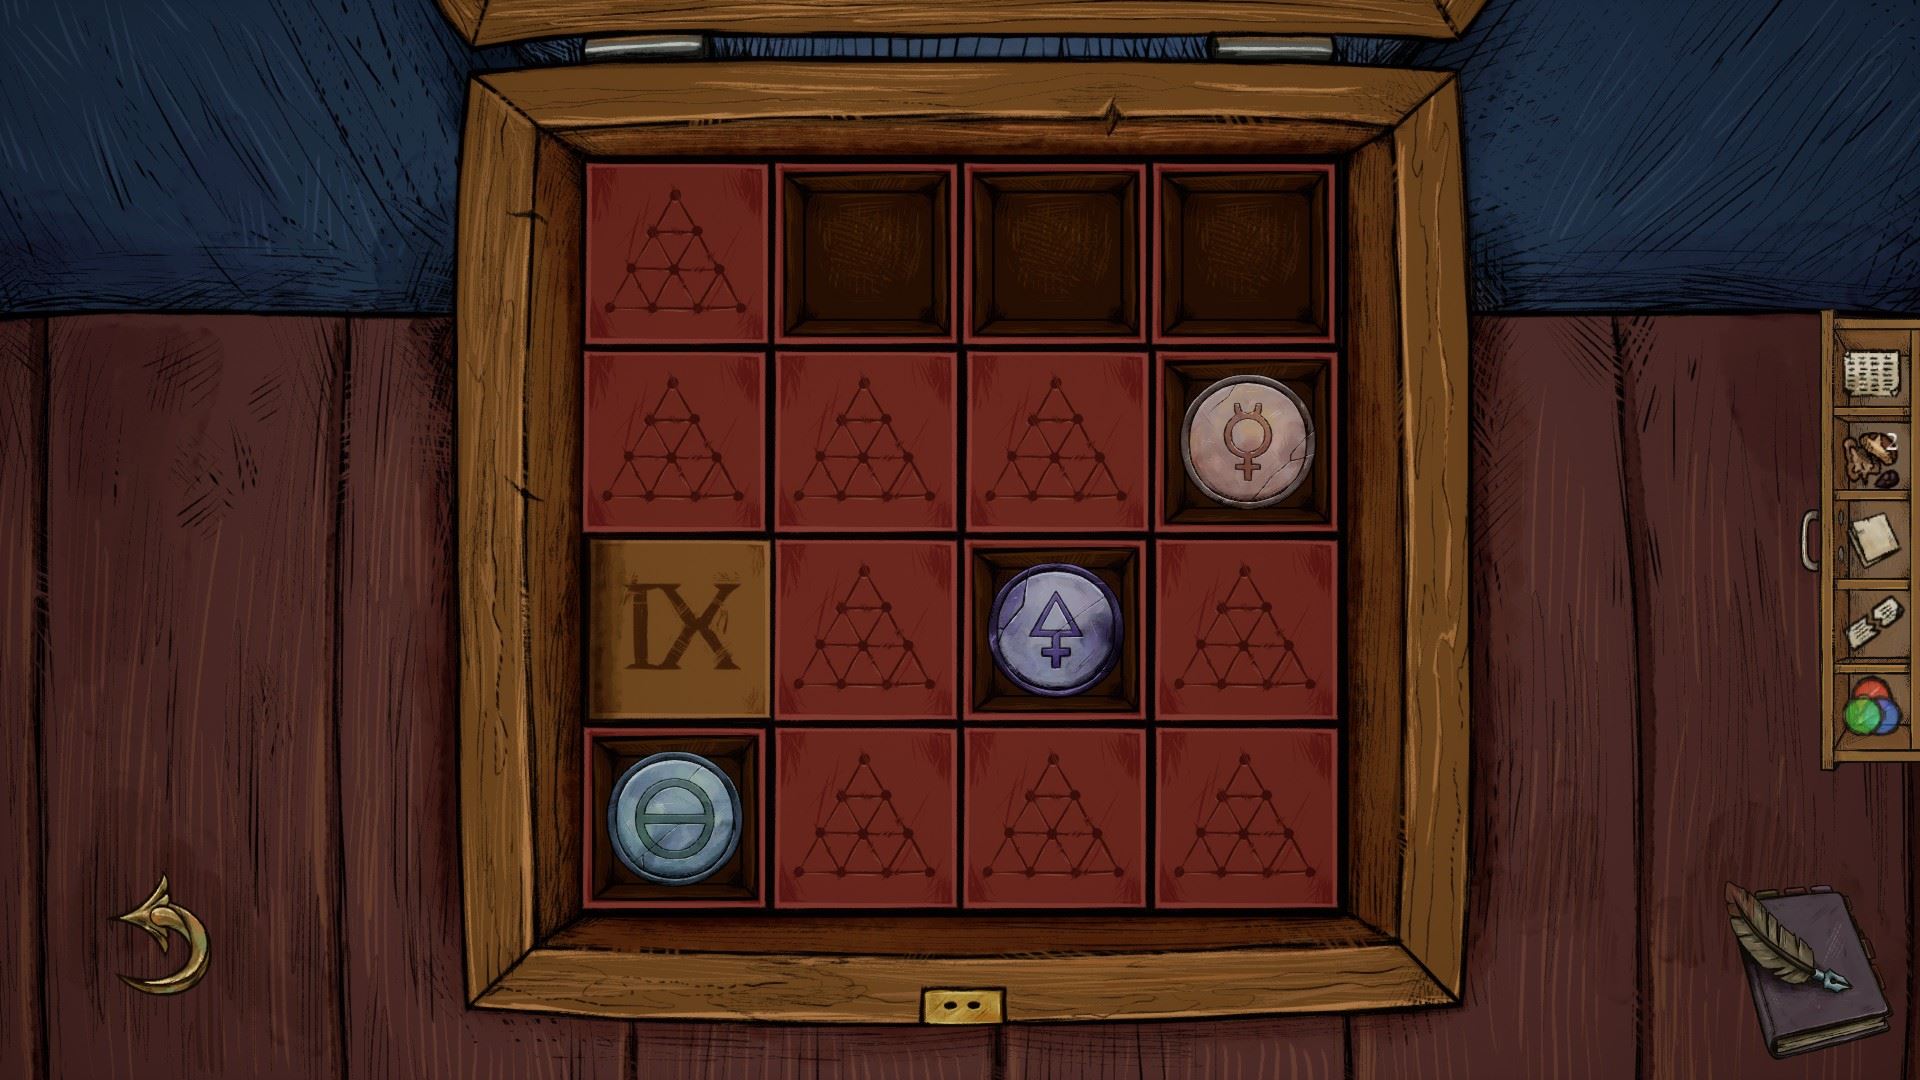
"Front side of the room -> Animals painting
- (skippable in the second playthrough) place the colored discs like so:
red on the lion, green on the swan, blue on the wolf;
you can then see the following numbers:
13 = blue wolf (=Salt), 11 = green swan (=Sulfur), 8 = red lion (=Mercury) "

The numbers are random, mine were different, and the numbers I got from just playing one lens over each animal weren't the right ones, I had to combines them to reveal the real number and for them to show behind the glass over the 3 color spots
🍒 Lilly (🌸◠‿◠)  [author] 18 Sep, 2023 @ 10:37am 
@NAG-Dreaghon: I meant that it might be different for each playthrough.

I updated that section according to your comment, I hope this helps.
Thank you.
Dreaghon 18 Sep, 2023 @ 7:56am 
In Chapter 2: Flavia, the Cybele book music isn't random. The tambourine player is playing a different sound for each musician. Could you make it clearer in the walkthrough that this is what you should be paying attention to and not the order of the musicians themselves? I was a little confused at first. Thank you.
🍒 Lilly (🌸◠‿◠)  [author] 3 May, 2023 @ 11:28am 
@moontiara: That's because Valve randomly decides to delete images from guides without any notice. Plenty of people already reported this issue, yet to this day no one cared to fix it.
I re-uploaded the missing image, thank you for reporting this.