Terraria

Terraria

40 ratings
Terraria Boss Ideas 13
By Okami Tomato
Been a while since I had one of these out, huh... and funnily enough the last one was also themed.

Usual disclaimers are that these are moreso intended for mods rather than vanilla Terraria, and that the only reason they're here and not the TModLoader guides is because the rest* of the series is here and I figured forcing people to keep jumping to different community tabs to find the next parts was more hassle than it was worth.
It is also under 'Guides' simply for layout reasons. This is not a guide to regular Terraria or a currently-existing mod (as of writing this, at least)

Also, yeah, spooky stuff ahead maybe, since it's themed around Boss Ideas 6 again.

Anyways, on we go!
2
2
   
Award
Favorite
Favorited
Unfavorite
[Prior Notes]
So, it has been a little bit since the last one of these, both because this one has had a lot of revisions and because I've had a lot of other things I needed to get done first, but alas here we are now.
Sprites were made basically since Boss Ideas 12 was made until the day before my birthday, so there's a range of quality. Been trying to fix that up, too, so they look nice :)

As stated in the description this is intended moreso for a mod rather than vanilla Terraria, since even with some of the eldritch and lovecraftian themes Terraria doesn't go this way with them.

Additionally, it's designed with the same lore/story as Boss Ideas 6, hence the similar theme. If you want a catch-up on Boss Ideas 6's stuff I'd check out the remake of the page... the old one's... well... old and outdated.


Further disclaimer that I might be a little rusty since it has been a while, sorry 'bout that


Anyways, onto the bosses
[Damage Reduction]
A feature planned since Boss Ideas 12, primarily based on the Binding Of Isaac's damage scaling that certain bosses and enemies possessed... coincidentally picked up by Calamity mid-way through Boss Ideas 13's production

Damage Reduction serves primarily to try and bridge some of the gap between tank and glass cannon builds by slightly dampening the latter's ability to shred bosses. Some of the bosses, starting Post-Plantera, will have a damage reduction effect:

Every second, the game checks how much damage a boss is taking, and should it notice too much damage it employs the damage reduction effect as a pseudo 'shield', reducing damage taken by the boss.

Each boss that has this effect has a 'base' value, a damage reduction factor active at ALL times, followed by a DPS tracker and a 'max' value, varying per boss. If the tracker is reached, additional damage resistance is applied, starting from 0.5% and capping out at a boss' 'max' value.

The DPS tracker plans for the average damage a boss is meant to take. If damage taken is below this value, no damage resistance is added. However, if it is above the value, damage resistance is added. The rate of addition is +0.5% DR every 1% the DPS tracker you are.
(Thus a boss with a 1000 predicted DPS taking 1,200 damage would try to add 20% damage resistance.)

This damage resistance can also wear off based on the player's DPS. If the player is dealing below-average damage after DR is applied the damage resistance effect decreases.
[Debuffs]
Any unique debuffs from the bosses, not already existing in Terraria:


Broken - 'Something otherworldly saps your strength, making you vulnerable'
Effect: Increases damage taken by 15%, reduces life regen by 3, and further decreases any damage reduction effects (e.g. Worm Scarf) by 10%


Lifebane - 'Bad blood.'
Effect: Drains the player's health by 10 health per second and halves the player's defence
Mini-Boss: HAZARD Soldiers

Appearance: Humanoid soldiers donning red and black armour. The main masks, gloves, boots and vests are black with faded red legs, sleeves and around the back of the head. The visors to the masks, as well as some other details, are a brighter red colour. Some of the Soldiers seem to be using jetpacks, though their physical appearance besides these are the same as the normal Soldiers.

Summon: Found rarely around the map and are neutral until attacked or the player gets too close. Most common on the outer thirds of the map, though they tend to avoid the ocean, and can spawn underground as well.
Once Hardmode is activated, Soldiers wearing jetpacks can also spawn
Post-Moon Lord increases the percentage of jetpack Soldiers further

Fought: Pre-Hardmode, Hardmode, Post-Moon Lord
Specification: Pre-Boss
Special: Power-Up Through Progression, Naturally-Spawning, No Spawn Item
Progression: No


Stats: (Pre-Hardmode/ Hardmode/ Post-Moon Lord)
Health:
-50 (75) (95) / 200 (275) (350) / 500 (700) (890) (HAZARD Grunt)
-60 (90) (110) / 275 (330) (420) / 625 (850) (1,080) (HAZARD Guard)
-100 (180) (225) / 400 (650) (830) / 1,400 (2,000) (2,550) (HAZARD Shotgunner)
-N/A / 200 (275) (350) / 500 (700) (890) (HAZARD Sniper)
-N/A / 150 (220) (280) / 350 (500) (640) (HAZARD Communicator)
Attack:
-20 (40) / 50 (80) / 120 (180) (Melee)
-15 (30) / 40 (60) / 100 (150) (Handgun Bullet, Rifle Bullet)
-25 (45) / 60 (100) / 150 (225) (Shotgun Explosive Shell)
-N/A / 200 (300) / 400 (600) (Sniper Bullet)
Defence:
10 / 25 / 50
-Piercing projectiles do not pierce Soldiers

Attacks:
All Soldier types generally keep a short distance from the player and fire at them when in-range. Each Soldier type has a different weapon type with different properties.
-Grunts carry handgun-type weapons and can be 'stunned' when attacked, stopping them from firing for 1 second
-Guards use a rifle-type weapon and fire in volleys of 3. They will crouch to fire and cannot be stunned when crouched, but can when moving
-Shotgunners have higher knockback resistance but move slower while trying to get closer to the player. They cannot be stunned
-Snipers don't need to get as close to fire and take a second to aim and fire even when in-range. However, their bullets do extreme damage and have high velocity. If damaged while aiming they will be stunned and have to re-adjust their aim
-Communicators do not fire, instead they try to keep a Soldier between themselves and they player while they try to use a radio to call for backup. They are stunned if damaged, though should they successfully call backup they can summon in Grunts, Guards and Shotgunners in Hardmode and all 5 Soldier types Post-Moon Lord. There is a cooldown of 2.5 seconds if a call is successful
Additionally, starting in Hardmode, all Soldiers have a chance to use jetpacks. This allows them to fly to position themselves, making them more mobile. Jetpacks become very common Post-Moon Lord

Expert Changes:
-All Soldiers perform their actions roughly 20% faster, such as preparing to fire again or a Communicator's call cooldown
-Soldiers are only stunned for half the time from being attacked
-Shotgunners and Snipers can attack from a greater range
-Communicators are faster and hide 'better'


Defeat: Explode into gibs

Drops:
All Soldiers have a slim chance to drop their armour as a vanity set, as well as one of three tiers of weapons depending on progression (e.g. Grunts can drop 3 tiers of Handgun, depending on progression). Communicators, however, do not have weapon drops.
Additionally, as bosses are killed, Soldiers can drop 'Files'; tablets that display lore for each boss from an in-universe perspective. This only applies to bosses already killed, does not apply to mini-bosses, and Files dropped previously have a reduced chance to drop again compared to unseen File types.
In Expert Mode they do not gain any new drops, due to only being a Mini-Boss. However, drop chances for their armour and weapons are increased.

Lore:
Armed guards that claim to work for a company abbreviated only to 'H.A.Z.A.R.D.'. Their motives are unknown, though their affinity for shooting you suggests bad ones.

Hints:
-In Pre-Hardmode, their lack of flight makes them susceptible to things like lava traps
-Homing weapons are strongly recommended, since their hitboxes are small and they can be surprisingly agile
-Minions do a very good job of dealing with them, especially the Communicators, since minion melee attacks ignore their piercing immunity
-Methods that work well against other archer-type enemies like the Pirate Deadeye and Skeleton Sniper can work reasonably well against HAZARD Soldiers as well due to their similarities
-The general threat order is the reverse of their listing.
--Communicators are the biggest threat due to their ability to summon an effectively-infinite number of minions, including other Communicators
--Snipers can deal extreme damage from long-distance, making them a constant looming threat should they spawn
--Shotgunners deal the 2nd highest damage among the group and act as tanks; being harder to kill on-average
--Guards fire frequently enough to be an issue and cannot be stunned when aiming, making them a potential issue at low health
--Grunts fire very slowly and have low health, generally making them easy pickings at any point beyond early Pre-Hardmode

Extra Info:
-While all Soldiers wear the same outfits, they can be identified by their weapon choices since they visibly carry their weapons on them at all times
[Added: 19/4/22]
The Broken (Pre-Hardmode)

Appearance: A red, rocky, skeletal creature. Its body, while humanoid, is jagged in a way resembling rocks. It has a skull-like head with two fangs and no visible lower jaw. It has a single, large right arm and 2 legs that end on points. Its waist has a hole in the front that reveals nothing but blackness inside.

Summon: Can appear under 2 circumstances; either through killing 50 Blood Zombies or Dripplers in Pre-Hardmode, or from using a Ruin Banner at night; made from 1 Tattered Cloth and some Grim Essence; a material dropped commonly during blood moons or uncommonly by regular night enemies.
The Broken has a unique spawn animation; rising from a red portal that spawns on solid blocks close to the player.
The boss will fly away if it reaches daytime, despawning.

Fought: Pre-Hardmode
Specification: Pre-EoC
Special: Gatekeeper Boss
Progression: All 'Arterion' Bosses


Stats:
Health: 1,500 (2,850) (3,634)
Attack:
-30 (75) (Melee)
-20 (35) (Blood Orb, Blood Zombie Hand)
Defence: 5

Attacks:
The Broken follows a set cycle during the fight, consisting of 3 attacks
-The Broken will move and vertically align itself with the player, floating beside them roughly 20 blocks away, while launching Blood Orb projectiles roughly once a second at the player. These are affected by gravity, but over a short distance the effect is minimal.
-After roughly 5 Blood Orbs fired the Broken will stop for a second, shriek, then charge directly at the player in an attempt to deal contact damage
-Finally, the Broken will dash towards the nearest solid ground and slam its arm downwards, causing red hands to rise from all nearby solid blocks (a 50x15 area with Broken at the centre). After this, the cycle repeats.

Expert Changes:
-Blood Orbs are fired roughly every 0.7 seconds, and 8 of them are fired before the first phase change
-The Broken will charge 3 times in succession as opposed to once, with a 0.8 second break between charges
-The area the Blood Zombie hands can spawn in is increased to a 60x20 area around Broken


Defeat: The Broken shrieks, rises slightly, and then dives downwards. Upon hitting solid ground, or the bottom of the world, it slams into a red portal and disappears with a thunderous noise.
-The status message 'Eldritch terrors have been disturbed' will appear, signalling that other 'Arterion' bosses may now be spawned
--This includes all bosses present on this page, aside from the HAZARD Soldiers and their Mech

Drops:
The Broken actually only has 1 drop, aside from a mask and trophy, being the Broken Shard. This is a material that, at this point in the game, appears to be useless...
In Expert Mode it grants the Medallion Piece; another material that is required for a later crafting recipe

Lore:
An otherworldly creature coated in a stone-like shell. The energy it exhumes is simply unnatural and doesn't match anything seen in these lands before...

Hints:
-Due to this fight being consistent, memorising the attack pattern is generally very easy to do
-A few rows of platforms can make dodging the first 2 attacks easier, and virtually invalidates the third attack
-This boss does not require rematching for any reason other than going for the trophy or mask drops, or if you accidentally lose the materials it provides, since it lacks any other drops.

Extra Info:
-Broken was the first sprite made for this page, dating back to July 2021 in the earliest records (Yes, this has been ongoing for some time now)
-Originally, this boss was going to be called The Broken One and had 4 fights throughout the game, however this was cut down somewhat for simplicity's sake
[Added: 22/4/22]
Hunchback

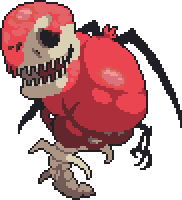
Appearance: A huge monster made of meat with an almost dinosaur-like body. It has a vaguely human face, with a set of human teeth in the mouth. Its left eye is droopy while the right eye is open almost as much as the mouth. It has a long neck attached to a large, rounded body with a short tail at the rear and bony spines trailing down the back. It has two legs ending on claw-shaped toes, though lacks any sort of arms.

Summon: Use the Churning Meatball at night. The Meatball is made using Shadow Scales or Tissue Samples and Grim Essence.
If it reaches daytime Hunchback will despawn in a similar manner to the Everscream; running away from the player while ignoring blocks.
During the fight there will be a very mild red tint on the screen, though this is purely visual.

Fought: Post-EoW/BoC, Intended Post-Skeletron
Specification: Post-Broken, Post-EoW/BoC
Special: No
Progression: No


Stats:
Health: 5,850 (9,500) (12,113)
Attack:
-50 (100) (Melee)
-25 (45) (Ooze)
Defence: 5

Attacks:
Hunchback will typically chase the player along the ground, using attacks to either grant itself more mobility or to provide it some extra range to hit the player. Its specific patterns alternate between 'passive' and 'aggressive' every few attacks.
Aggressive:
In this state Hunchback will charge and leap at the player, like a larger but less mobile Bone Lee. If it encounters another enemy in this state that has less than 500 max HP it will stop briefly to consume them, healing 2.5x the enemy's remaining health, before continuing its pursuit. It stops chasing the player when attacking
-It may perform a leap towards the player. The speed and distance is relative to the player's distance from the boss, acting as both an attack and mobility tool. This may be performed up to 2 times in succession
-It may fire a stream of red 'Ooze' projectiles at the player from its mouth; firing a constant stream for roughly 1 second
-It may try to bite the player; extending its neck extreme lengths to catch the player in a straight line, though the speed of the extension depends on the player's distance. This attack often takes roughly 1 second to complete and can happen up to 4 times in succession
After performing 3 attacks, it will enter its passive state
Passive:
Hunchback will now only slowly walk towards the player instead of running, though is still generally able to keep up with players. It will not eat other enemies in this state, and still stops when attacking
-It may roar, causing anywhere from 4-5 Dripplers or Blood Zombies to spawn nearby
-It may fire 3 arcs of red ooze projectiles at the player; each consisting of 3 blobs of ooze each
After only 2 attacks, it returns to its aggressive phase

Expert Changes:
-The 'Aggressive' phase's movement speed and jump height are increased
-The 'Aggressive' phase's lunge and bite attacks are roughly 20% faster
--The bite attack now only consists of up to 3 bites, though they are now predictive
-Consuming enemies now grants Hunchback 10x the enemy's remaining health as recovery
-The 'Passive' phase moves noticeably faster
-The 'Passive' phase spawns 6 Dripplers/Blood Zombies


Defeat: Hunchback begins melting and lets out a roar before lunging at the player one last time. Upon landing post-lunge, it will explode into gibs.

Drops:
A melee weapon, a bow, or a magic tome. The melee weapon acts similar to the Piranha Gun; launching a Hunchback head that bites down on enemies, the bow converts wooden arrows into an arc of piercing tooth projectiles, and the tome launches biting, mouth-like projectiles that pierce enemies and can hit the same enemy multiple times over. It can also drop Blood Moon items at an increased rate.
In Expert Mode it drops the Meat Maw; an accessory that grants 5 armour piercing, +5% crit chance, and +2 defence.

Lore:
A monstrous creature of flesh that arose during a blood moon. Its mass grew as it consumed more and more material; becoming a dinosaur-like beast, gorged and swollen. The teeth that line its mouth are troublingly human-like.

Hints:
-Piercing weapons can actually be quite helpful in this fight. They can deal with the passive mode's enemy spawns well, but also benefit from one of its aggressive mode attacks
--During the bite attack, its head and neck become their own hitbox, separate from the body, due to how the attack functions; this can be exploited by shooting at both the head and body, allowing you to hit twice per attack
-Drippler and Blood Zombie banners can be quite useful during the passive phase, as it allows the player to more easily control the spawns
--This boss can also be a good source of farming for the banners, too, since it can spawn blood moon enemies both outside of the blood moon and in a specified attack. It can also help in obtaining the Money Trough and Shark Tooth Necklace for similar reasons

Extra Info:
-Hunchback is technically the oldest design here, being planned as early back as the Boss Ideas 6 remake, though didn't see use due to the planned expansion for Boss Ideas 6 being scrapped
-Hunchback bears a resemblance to Dead Hand from the Legend of Zelda; both have human heads supported by long necks attached to large, round bodies.
[Added: 22/4/22]
Bloodsucker

Appearance: A large, fleshy worm creature. A large mouth is present on the front segment, as well as a smaller mouth on top. Blister-like growths and further teeth protrude on its head, but also on its body and tail segments. The body segments and the tail have larger mouths on them, and the tail has a row of teeth starting from the rear third of the tail and trailing down to the tip.

Summon: Use the Coiling Meatball at night. This Meatball, as with Hunchback's, is made using Shadow Scales or Tissue Samples, as well as Grim Essence.
It will despawn during the day by rapidly burrowing away.
During the fight there will be a very mild red tint on the screen, though this is purely visual.

Fought: Post-EoW/BoC, Intended Post-Skeletron
Specification: Post-Broken, Post-EoW/BoC
Special: No
Progression: No


Stats:
Health: 22,000 (40,500) (51,638)
Attack:
-50 (100) (Head Melee)
-30 (60) (Body Melee)
-25 (45) (Ooze)
Defence: 5
-+30% 'Piercing Resistance', applied per segment pierced

Attacks:
Bloodsucker, as with Hunchback, has both passive and aggressive phases, alternating between the two on a timer of roughly 20 seconds per phase.
Aggressive:
Bloodsucker will continuously burrow at the player, having both high speed and a fairly sharp turn radius
-Bloodsucker may charge at the player; turning sharply to face them before rapidly accelerating. It remains at this high speed until it reaches the point where it was aiming
-It may leap overhead, raining down globules of damaging ooze from its mouth every 0.4 seconds as it leaps
Passive:
The Passive phase still chases the player, but accelerates and turns noticeably slower and thus is generally easier to dodge
-It may spit 2-4 enemies from its mouth; a mix of Blood Zombies and Dripplers. It will try to find an open area near the player to do this as to avoid spawning enemies inside blocks
-It may chase the player more accurately for a couple of seconds, taking extremely sharp turns while doing so, before slowing and stopping. Once stopped it will fire an inaccurate barrage of numerous ooze globs from its mouth in the player's general direction before beginning to move normally again

Expert Changes:
-Bloodsucker's total number of segments increased from 25 to 32
-Both phases have increased movement speed and significantly improved acceleration
-The Aggressive phase's charge attack is now predictive
-The Aggressive phase's lunge attack releases ooze every 0.3 seconds, and now ends with Bloodsucker turning in mid-air and charging at the player as opposed to simply landing as before
-The Passive phase's minion attack now spawns 6 enemies
-The Passive phase's barrage attack has more projectiles


Defeat: Bloodsucker begins moving rapidly and then performs a lunge attack. At the end of the lunge, as opposed to burrowing, it will explode into gibs upon colliding with a solid block

Drops:
Drops a melee weapon, a ranger weapon, and a summon weapon. The melee weapon is a flail that, upon hitting enemies, embeds teeth into them that deal a damage over time effect before they despawn. The ranger weapon is a gun that fires teeth projectiles instead of musket balls; inflicting the same DoT effect as the melee weapon. The summon weapon summons a burrowing mini-Bloodsucker that gets longer and deals more damage the more minion slots used to summon it. It can also drop blood moon items at an increased rate
In Expert Mode it can drop the Red Scarf; an accessory that grants +5% damage resistance, +8% damage, and 5 armour piercing

Lore:
A creature that arose during a blood moon. Ever since it was first observed, it has been seen growing and mutating into a more and more disturbing form. Its many mouths grind and gnash their teeth as it hunts

Hints:
-Being a worm boss, it is especially weak to piercing weapons, even given its 30% resistance applied per segment
--Some of this comes from the fact the resistance is multiplicative, effectively making a piercing projectile's damage scale as: 100%, 70%, 49%, ~34%, ~24%, ~17%, ~12%, ~8%, ~6%, ~4%, ~3%, ~2%, ~1% three times, before only reaching a 0% rounding after 16 segments
---However, in practice, the damage would likely only reach 1 after around 6-8 segments due to the relative power of Pre-Hardmode gear
--Additionally, minions bypass this, making certain minions highly effective at defeating the boss
---This is especially true for its own minion drop, as every segment of the minion can hit the boss at once every time it gets an opportunity to attack
-Blood Zombie and Drippler banners, as with Hunchback are useful for the minion spawns
--Additionally, the banners, Money Trough, and Shark Tooth Necklace can be farmed from this boss due to its own drops and minions

Extra Info:
-Bloodsucker is seen as the counterpart to Hunchback. Both have similar spawn items and are fought at the same point in progression, both have passive and aggressive phases they cycle between, both have minion spawning attacks, and both gain a predictive attack in expert mode. Additionally, their drop pools both consist of 3 weapons, blood moon items, and an accessory in Expert that grants armour piercing
--In fact, the Expert accessories are parallels as well; both granting opposite offensive and defensive buffs each. Hunchback's are crit chance and defence, while Bloodsucker's are damage and damage resistance
[Added: 22/4/22]
The Forewarned

Appearance: A strange, spider-like creature, wearing a white smiling mask. Its torso is upright, with jagged rib-like protrusions at the sides. 4 spider-like legs extend from the base, spread out at its sides.

Summon: Can either appear naturally, or by using the Gazing Mirror at night. Its natural summon is uncommon and isn't signalled by a message, instead it lingers near the player and follows them from near the screen's edge, only attacking if provoked. Using the Mirror causes it to spawn, though still in the neutral state. Attacking, or letting them take damage from objects like boulders, initiates the fight

Fought: Hardmode
Specification: Post-WoF
Special: Naturally-Spawning
Progression: No


Stats:
Health: 20,000 (27,560) (35,139)
Attack:
-70 (110) (Melee) (Inflicts Blackout - 100%, Inflicts Darkness - 100%)
-45 (80) (Masks) (Inflicts Blackout - 50 (100)%, Inflicts Darkness - 100%)
-40 (75) (Blocks) (Inflicts Darkness - 100%)
Defence: 15

Attacks:
The Forewarned's movements are a lot more sporadic than a lot of other bosses, moving continuously and quite randomly around and near to the player, with the only consistent plan being that it sticks close to the player as much as possible.
It cannot fly, instead jumping to catch airborne players, and using a special ability to summon its own platforms to maintain height as needed. These platforms are made of a series of black blocks with white outlines, and are damaging on contact to the player.
The player's screen gradually darkens the further away from the Forewarned they are
The Forewarned itself has 4 attacks:
-It may jump straight upwards and disappear. After a brief moment it re-appears a distance above the player and drops down; trying to crush them
-It may perform a short hop and slam its legs down, causing several block-shaped projectiles to appear randomly in the sky and drop down
-It may begin laughing, causing transparent masks to appear around it. These masks chase the player for a while once summoned. Unlike its other attacks, the Forewarned can still walk during this attack.
-It may shriek, causing several formations of blocks to randomly appear near the player after a short delay. The places these blocks form is telegraphed by white silhouettes where they will spawn. These linger for up to 20 seconds before vanishing.

Expert Changes:
-The Forewarned moves faster in-general, as do the masks it summons
-The Forewarned gains an 'attack' where it suddenly runs horizontally towards the player at high speed. If in the air it summons a trail of blocks as it does so
-Both the block rain and block summon attacks account for the player's distance from the Forewarned. If it detects the player moving away from it, more projectiles are summoned in the player's movement path to cut them off
-Forewarned's masks are now guaranteed to inflict Blackout (Originally 50%)


Defeat: The Forewarned freaks out for a while, shrieks, and explodes into gibs with a crunching sound.

Drops:
A bow that converts wooden arrows into a unique arrow type that pierces and has a mild homing effect, a spear that summons phantom spears upon hitting an enemy, a magic tome that summons blocks to rain down on enemies, and a summoning staff that summons masks that orbit enemies while attacking them. It can also drop the Shade Tear that provides a buff to damage and defence while also creating shadowy spines around the player that both damage nearby enemies, but also thrust outward and deal more damage when the player takes damage. It also has a chance to drop vanity legs based on its own.
In Expert Mode it drops the Grinning Visage, an item that makes it so player crits only deal 1.2x damage, but in-turn crits release phantom mask projectiles that chase enemies and deal additional damage based on the player's weapon's base damage

Lore:
A mere man driven mad by knowledge, whose body has since been lost to something untold. Behind the mask it wears is a broken, weary form best kept hidden from the world.

Hints:
-Due to the Forewarned's movements being generally unpredictable, it is strongly recommended the player keeps a distance as much as possible
--This is especially true in Expert, due to its additional charge attack, which is best avoided by keeping away from, and diagonal to, the boss
--Be wary, however, as the boss has countermeasures against players staying too far away; the darkness effect normally, as well as the predictive attacks in Expert.
-The Ankh Shield/Blindfold's removal of the Darkness effect is recommended, since while the effect is weaker than its Blackout debuff, it lasts significantly longer

Extra Info:
-The face on the Forewarned's mask bears a resemblance to the Sonic CD 'Fun is Infinite' screen, which also showed a Sonic with entirely black, downward-tilted eyes and a large grin with visible teeth
[Added: 25/4/22]
The Broken (Hardmode)

Appearance: The Broken's second appearance, now making its name more appropriate. Much of its body is broken apart, revealing more of the strange, black innards only previously visible around its waist, with this strange black mass shifting rapidly as the Broken moves. Its skull has a crack over the left eye and cranium, the arm is split into three at either side of the elbow, its torso has two large tears through it, and the legs are also disconnected; the left one at the thigh and the right one at the knee.

Summon: Use the Tattered Ruin Banner; made using the original Ruin Banner from its first fight, combined with Souls of Night and Fright, and Ectoplasm. Unlike its original counterpart, it cannot spawn itself naturally.
As with its initial fight, it will spawn from a portal with a unique summon animation.
During the day it will despawn itself through a red portal, as it did during its first outing.
The sky darkens and gains a red tint during the fight.

Fought: Hardmode
Specification: Post-Broken, Post-Skeletron Prime, Post-Plantera
Special: No
Progression: Later Bosses


Stats:
Health: 44,400 (64,440) (82,161)
Attack:
-90 (150) (Melee, Arm Swing) (Inflicts Broken - 33 (67)%)
-75 (118) (Blood Orbs, Red Hands)
-70 (110) (Red Fireballs) (Inflicts On Fire! - 100%)
Defence: 20
DR: 5% Base, 20% Max, 1000 DPS

[All of this boss' attacks inflict Bleeding - 25 (100)%]

Attacks:
The Broken has two states in this fight, passive and aggressive, pulling from the two Pre-Hardmode bosses. However, the way in which it switches between the two is different; using an 'Aggression' meter.
The Broken starts out in a 'passive' state with an empty 'Aggression' meter. Over time it fills 2% per second, but also fills up by 1% for every 50 damage taken. Once full The Broken roars and then triggers its 'aggressive' state for 20 seconds, depleting the bar. Once the bar is empty, The Broken goes back to 'passive' mode and the cycle resets.
Its attacks are the same regardless of The Broken's state, however in 'aggressive' mode it charges twice before attacking, and has a faster attack speed. The Broken tends to keep near the player, chasing after them slowly and teleporting infrequently.
-It may pull its arm back and then slash at the player. The arm extends like a summoner Whip when swung, with a long-ranged, wide, but generally slow swing.
-The Broken may teleport above the player, hanging above them briefly, before diving downward up to 3 times in succession. Upon hitting the ground or teleporting up for another charge it releases red hands that branch out in all directions in a radius of roughly 10 blocks.
-The Broken may align with the player vertically before spitting a long stream of crimson-red fireball projectiles horizontally. While releasing the stream of fireballs The Broken's move speed is reduced
-The Broken may spit out a large clump of blood orb projectiles towards the player. Unlike their Pre-Hardmode counterparts these have grinning faces and have a noticeable homing effect as they travel
-The Broken may teleport to the other side of the player, mirroring its former location, and spit a wide arc of 8 blood orb projectiles towards them

Expert Changes:
-The rate in which the 'Aggression' meter depletes is decreased by 20% from 5/s to 4/s, making its 'aggressive' state last 25 seconds instead
-The Broken moves faster and teleports more frequently in both states, and most of the teleports are positioned based on player movements and speed to stop them simply running away from the boss
-The 'arm swing' attack, while slightly slower, has far greater range and a broader swing radius; allowing it to cover significantly more area
-The 'dive' attack also spawns red arms as The Broken descends with every dive. These only branch out 2 blocks either side of the Broken and are spawned every 3 blocks descended at both sides of it
-Blood Orbs move faster and have a mildly increased homing effect
-The Broken debuff from contact-based moves is roughly twice as likely to occur and Bleeding now has a 100% chance to proc with every attack


Defeat: The Broken roars, as when activating its 'aggressive' state, before diving downwards. Upon either approaching a solid object or the bottom of the world a portal will appear which it dives and teleports through. Throughout this animation it releases red particles from its body, and noticeably still deals contact damage.

Drops:
Can drop the Dead Hand; a summoner whip based on its arm swing attack that has high DPS but below-average minion buffs, a summoner staff that summons floating spectral faces that move towards foes and deal high damage taking up 2 minion slots each, a sword that launches homing blood orbs, a flamethrower that launches explosive fireballs instead of a stream of flames, and a magic tome that launches larger versions of the blood orbs that chase enemies rapidly and explode on inpact. It can also drop the Cracked Heart that reduces max health in exchange for increased defence, damage resistance and health regen while also buffing them further when below 25% health, or Writhing Matter that provides a damage and life regen buff that can be combined with several other accessories like the Star Cloak, Flesh Knuckles or Vile Powder.
In Expert Mode it can also drop the Blackened Pendant; an accessory that builds up a charge as the player takes damage that, when released by attacking with a full meter, buffs the player's damage and crit chance considerably for a short while. The Pendant also grants bonus damage while equipped, independent of the buff. It also drops the Second Medallion Piece; a material for an item later-on.

Lore:
The Broken's first encounter left it badly damaged, though it was not visible at first. Over time these cracks have appeared in its body, and it has grown more unstable and violent as a result.

Hints:
-Some prior knowledge of the fight can be obtained from the three Pre-Hardmode bosses, since many of the elements from this fight borrow from theirs
-Due to this boss having scaling damage resistance, and the first instance of it thus far, the player will almost certainly be forced to deal with at least 1 'aggressive' phase. It is recommended to practice the boss' attacks in the 'passive' phase first to at least have an understanding of its attacks before it makes them faster
-The Ankh Shield is recommended as to remove the Bleeding debuff caused by its attacks. This is more noticeable in Expert, where the Bleeding effect has a 100% proc chance

Extra Info:
-The whip dropped by the boss is named after the Legend of Zelda boss, the Dead Hand, which also had long-limbed arms ending on clawed fingers during its boss fight
--This is the second instance of this boss being referenced, the first being the Hunchback's design
-Noticeably, unlike most other bosses, light seems to hit the Broken from behind, as evidenced by its shading. Light also hit the first form of this boss strangely, but was less noticeable...
[Added: 26/4/22]
The Organist

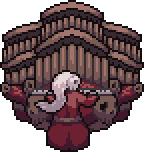
Appearance: A skeletal man at the seat of a large organ. Despite the Organist's skeletal frame, a head of long, white hair flows down neatly. The Organist also wears a dark red robe with lighter red wear at the top, a darker red patch down the lower middle, and a belt around the waist. The large organ he sits at has skulls engraved at the base and appears almost flesh-like at the red areas, though the pipes of the organ seem normal.

Summon: Use the Cursed Cacophony at night. While the boss is active the screen darkens slightly and the sky gains a mild red tint
Uniquely, should you reach daytime, a Solar Eclipse will occur; keeping everything dark even during the daytime. However, having things like Mothrons, Deadly Spheres and Nailheads spawn during boss fights is generally not recommended, so it is best to try and defeat it before daytime arrives regardless.

Fought: Hardmode
Specification: Post-Plantera
Special: No
Progression: No


Stats:
Health: 48,750 (64,500) (82,238)
Attack:
-100 (255) (Melee)
-50 (70) (Red Note)
-70 (100) (Phantom Note)
-60 (85) (Black Note)
Defence: 20
DR: 5% Base, 25% Max, 2000 DPS

Attacks:
The Organist has a unique battle layout; instead of chasing the player like most bosses, it traps them within a circular arena around itself, with the Organist at the centre. The circle is about 40 blocks in radius, giving a decent amount of dodging space
Attempting to leave the arena will cause the Organist to teleport to a position mirroring his original one, setting up a new arena as he does so, as well as causing all his projectiles to teleport with him; allowing the player to effectively 'teleport' themselves to an opposite side of the arena by reaching the arena border, though the effect is quite disorienting and fairly impractical
The Organist has two states; the more passive 'distracted' mode, and a more aggressive 'focused' mode
Distracted:
The Organist's standard mode. In this state it primarily uses the 'red note' projectiles, though can summon 'phantom notes' occasionally that are white instead of red, and chase the player after being summoned until they despawn
-He can fire a continuous stream of red notes at the player, releasing a single phantom note as the 5th projectile in the stream that lasts until the attack ends
-He can fire arcs of red note projectiles at the player; 3 per arc. Typically the arcs are fired every second. Phantom notes are also summoned every 3 seconds separately
-He can fire 6 streams of red notes in all directions. These streams rotate gradually, and a phantom note is released every second to pressure the player
-He can fire 'bursts' of red notes in all directions, each consisting of 16 projectiles. The 4 launched cardinally are noticeably slower than the others. Every burst also summons a phantom note separate from the burst itself
Focused:
A mode only taken every 4-5 attacks. In this state the Organist turns to the organ and plays more quickly. In this state he is immune to damage, though after finishing his 'performance' he will lose his invulnerability, rest for 3 seconds, and return to his distracted state
-In this state the patterns are harder to describe, though they are noticeably more complex and flower-like in some cases; with branching arms of notes that frequently cross over and intertwine with each other. All notes summoned here are black notes, which act identically to the red notes but in-turn deal increased damage
Noticeably, as the Organist loses health, he will attack faster in his distracted state; causing him to proportionally spend more time in the focused state. His time spent focused remains the same, regardless of health

Expert Changes:
-The arena the Organist summons is smaller; now only 30 a block radius
-All note types travel faster, though this change is more apparent for phantom notes than the others
-'Focused' mode always happens after only 4 attacks
-'Focused' mode summons a phantom note that persists until the attack ends for additional pressure


Defeat: The Organist screeches, looks upwards, and explodes into a white glowing 'cloud' of particles that fades over the course of a few seconds. The organ itself, meanwhile, smashes apart as the Organist explodes, sinks down for a few blocks, and shatters into gibs

Drops:
A variety of music-themed weapons. A magic weapon known as the 'external organ' that launches damaging notes at enemies, using all three types the Organist summons, a bow seemingly made from a dismantled violin that spawns a slow-moving musical note every time it is fired, and a summoner staff that summons a piano minion that chases down enemies, crashing into them and launching its keys to deal damage, though this minion takes 3 minion slots to use.
In Expert Mode it drops the Musician's Keepsake; an old pocket watch that increases attack speed while worn, and can increase a weapon's damage moderately if it is used to a consistent rhythm (holding the attack button or swapping to alt-fire does not count and resets the damage buff).

Lore:
An old musician that perished in the Broken's wake. Revived as a husk, still seated at his organ, his music creates an uneasy disturbance wherever the organ's tune echoes.

Hints:
-While it is possible to theoretically get use out of leaving the arena boundaries to reposition yourself, uses are quite limited.
--You can dodge the stream and arc attacks, or move yourself away from the phantom notes if they close in on you
--However dodging the burst and 6-stream attacks, or virtually anything from the focused state, typically won't work since the symmetrical nature of the attacks means leaving the arena at one side will put you in a near-identical position at the other side
-The Organist has a moment after using the focused state where it won't attack, giving the player a moment in which they can freely unload a lot of damage into the boss undisturbed
-Due to the invulnerable phases, the fight takes longer than it otherwise appears it should. It is recommended to prepare for a longer fight

Extra Info:
-Of the sprites on the page, the Organist also has one of the oldest sprites, and noticeably is one of the most 'human' bosses; being more akin to a ghoul or zombie than the usual fleshy amalgams that often appear
-One of the weapon drops, the External Organ, is a pun
-The summon weapon makes a reference to the Mad Piano from Super Mario 64
-The boss' 'focused' phases are a reference to Castle Crasher's 'Conehead Groom' boss fight, where the boss will use a large organ to attack the player while invulnerable
[Added: 3/5/22]
HAZARD Mech

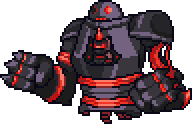
Appearance: A large, though unfinished robot. It has a dome-shaped head with two circular eyeholes that glow depending on the angle viewed. It has a large collar obscuring what neck it has, as well as what seems to be a mouth. Its chest has a large cavity in the centre that houses a pilot; a HAZARD Soldier. It has two large shoulder plates where its arms are connected; though only the right arm appears finished; with the left lacking plating and leaving exposed wires. Additionally, none of the machine seems finished below the waistline, simply leaving a few exposed wires and cables below.

Summon: Use the HAZARD Distress Beacon, an item dropped by naturally-spawning HAZARD Soldiers Post-Moon Lord (The first Soldier defeated will always drop one, with a 5% chance from then on).
A thunderstorm will occur while the boss is active; filling the sky with dark grey clouds and triggering the rain. The rain persists even after the boss is defeated, ending as normal after a time

Fought: Post-Moon Lord
Specification: Post-Moon Lord
Special: Uncraftable Summon
Progression: No


Stats:
Health:
-135,000 (200,000) (255,000) (Mech)
-2,000 (3,500) (4,463) (Drones)
--251,000 (480,000) (612,040) (Total)
Attack:
-120 (215) (Melee) (Inflicts Electrified - 50 (100)%)
-100 (165) (Lightning Fist, Drone Melee, Drone Deathray) (Inflicts Electrified - 25 (33)%)
-80 (140) (Missiles, Drone Laser) (Inflicts On-Fire! - 20 (30)%)
-165 (300) (Deathray) (Inflicts On-Fire! - 100%)
-120 (255) (Pursuit Missile)
Defence: 45
DR: 10% Base, 30% Max, 5000 DPS

Attacks:
The Mech will typically keep to the side of the player, remaining vertically aligned as best it can while firing off a plethora of attacks.
Phase 1:
-It may pull back its fist and then swing at the player, charging at them as it does so, up to 3 times in succession
-It may pull back its fist and clench both its fists to summon a red, electrical aura around them both, before throwing punches towards the player. Instead of charging at them, the punches launch red, fist-shaped projectiles towards the player that move quickly and have a homing effect
At 75% health the Mech summons a force field around itself that protects it from damage, as well as 6 drones to orbit the shield. These drones aim at the player and, every 3 seconds, each fire a laser at the player, separate from the Mech's own attacks
When all 6 drones are downed, the force field is dropped, the Mech becomes vulnerable again, and Phase 2 begins
Phase 2:
The Mech retains its Phase 1 attacks, but gains an additional attack as well
-It may fire missiles from its back that chase after the player for a few seconds. After 3 seconds they stop chasing the player and instead just accelerate in whatever direction they were facing until they explode
At 50% health the Mech puts up a new force field and summons 20 drones to orbit the field; an inner circle of 8 rotating clockwise and an outer circle of 12 rotating anticlockwise
-The drones also gain a new attack where they all charge up and, after a second of charging, fire a deathray each for 3 seconds. Each drone will try to follow the player with the deathray attack, though slowly. Unlike before, the Mech itself stops moving during this attack. This attack only happens roughly 1/3 of the time the drones try to attack
As before, destroying all the drones destroys the force field and begins Phase 3
Phase 3:
The Mech retains all prior attacks, but will gain a final new attack
-The Mech summons a ball of energy from its eye that creates 4 thin, red, harmless beams in a + shape. The beams will suddenly begin to rotate rapidly before slowing down until they stop in a random direction. Once the beams stop rotating large deathrays are fired in the directions of the beams. This attack can happen up to 3 times in succession
At 10% health the Mech summons a final wave of drones; 32 in total, spread across 3 rings. The inner ring has 10 rotating clockwise, the middle 12 anticlockwise, and the outer ring 10 rotating clockwise again
Defeating these drones drops the force field for the last time and activates a 4th, 'desperation' phase
Phase '4':
The Mech will now simply continue spamming the lightning fist attack until defeated

The Mech has two different 'anti-cheese' methods active during the fight, though both will only trigger under certain conditions and both pre-warn the player before they are triggered
If the player keeps moving too far from the boss a red 'lock-on' symbol appears and, if the player does not get back in-range in 3 seconds, missiles will begin raining down from above onto the player. These missiles pass through blocks, cannot be dodged, and deal high damage to discourage players trying to keep running away from the boss
If the player uses too many teleporters or the portal gun too frequently a red triangle appears around the player for 10 seconds. If the player teleports again in this time the Mech fires off an 'EMP' attack that disables wiring and portal gun portals for a full 30 seconds, preventing AFK farming via teleporters

Expert Changes:
-Debuffs are more commonly triggered from attacks and last slightly longer
-The Lightning Fist attacks are predictive
-More drones are summoned every phase. 10 in Phase 1, 30 in Phase 2 (12 inner ring, 18 outer ring), and 40 in Phase 3 (12 inner ring, 14 middle ring, 14 outer ring)
-Whenever a new attack is gained (Phase transition) it is always prioritised as the new phase begins


Defeat: Begins exploding, pulls back its fist, and then fully explodes before the attack can be executed.

Drops:
A rocket launcher that fires homing rockets, a bow that electrifies some arrow types to increase their speed and damage, melee gauntlets that let you both punch enemies and launch plasma fists, a magic weapon that acts like a faster, homing magnet sphere, and a summon weapon that summons drones like the Mech's that orbit the player. It can also drop the Pulse Gauntlets that increase melee speed and make melee hits inflict Electrified, and an ammo pack that reduces ammo and mana consumption and increases ranged and magic projectile speed
In Expert Mode it can drop the Electromag Propulsion System; an accessory that boosts movement speed, jump height, and grants a dash, as well as a rare chance to drop the Mech Combat Beacon; an item that summons a mount based on the Mech that can throw lightning fists and fire missiles with primary and alt-fire that counts as a summoner 'weapon'.

Lore:
A mechanical behemoth constructed to fight off the terrors of another world. The prototype is still unfinished and proves highly unstable, but possesses unnatural power. I wonder how it would have looked if it had been finished...

Hints:
-Piercing weapons are strongly recommended for this fight, as it makes dealing with the masses of drone spawns significantly easier
-This is one of the first fights where the DPS cap can come into play significantly, depending on the weapons chosen
-Due to the boss' anti-cheese being highly potent, it is suggested the player avoid straying too far from the boss, or relying on teleportation methods too frequently

Extra Info:
-The boss' two main inspirations are the Death Egg Robot from Sonic, as well as Calamity's Supreme Cataclysm. Both inspired the body type and led to the final design of the lightning fist attack, primarily
--In fact, in a very early rendition, the boss was intended to reference Cataclysm very obviously, with an in-universe tie to Calamity regarding 'Visions of a creature from another world'. However, this was scrapped rather quickly
[Added: 4/5/22]
Fester

Appearance: A large, green, skeletal monster consisting of a face covered by a large metal plate and a long, spinal cord-like body. The face plate has two eye holes, though one appears to be sealed shut with an additional metal plate bolted in front of it. Dents in the bottom of the plate give the impression of teeth.

Summon: Use the Infested Skull underground in either the underground or cavern depths. Taking the boss out of these conditions causes it to enrage; increasing its attack and movement speed, as well as increasing its damage by roughly 1.5x regardless of difficulty
While the boss is active the screen is darkened, akin to the Blackout debuff. This effect fades slightly in Phase 2, and disappears once the boss despawns.
The sky is also turned a dark green during the fight, even during the daytime, though this is purely a cosmetic change

Fought: Post-Moon Lord
Specification: Post-Moon Lord
Special: No
Progression: Later Bosses


Stats:
Health:
-35,000 (56,750) (72,356) (Mask)
-120,000 (165,000) (210,375) (Fester)
-100 (145) (190) (Leech)
Attack:
-135 (240) (Head Melee) (Inflicts Lifebane - 100%)
-80 (140) (Body Melee) (Inflicts Lifebane - 100%)
-100 (165) (Parasite Melee) (Inflicts Withered Weapon - 33 (50)%)
-90 (152) (Skulls, Worm Melee, Leeches)
Defence:
-25 +33% Damage Resistance (Mask)
-20 (Fester, Worms)
DR: 15% Base, 40% Max, 5000 DPS (Fester)

[All of this boss' attacks inflict Lifebane - 33 (67)%]

Attacks:
Phase 1:
Fester tends to stay close to the player, though tries to remain at either side of them by a distance of roughly 30 blocks. Its move speed is dependent on player distance, slowing down the closer the player is, but speeding up to pursue fleeing players. Fester's spine-like body is actually several hundred blocks long, going down long enough that the player usually cannot see the bottom without teleporting to it, though getting too far from the head can despawn the boss. Its body still deals contact damage, notably.
Fester will don its mask in this phase, being invulnerable until it is destroyed. Only its mask can be attacked, as the body does not take damage. Most of its projectile attacks are launched through its eye hole.
-Fester may perform a long-distance horizontal charge, requiring the player to either fly overhead or teleport through it to dodge. The attack has a slow wind-up, though the move speed itself is quite fast and can become even faster if the player tries to run away from it
-Fester may release 3-4 clusters of skull projectiles. Each cluster consists of 10 skulls, released inaccurately, that accelerate and house a homing effect like Skeletron's projectiles
-Fester may 'rattle' its head, causing a continuous barrage of skull projectiles to be released in random directions over the course of a few seconds
When the mask is at 60%, Fester will release a 'Parasite'; a large, flying, maggot-like creature that chases the player and cannot be killed. The Parasite flies at the player at a moderate pace and turns rather slowly, but it speeds up if the player is far away or has been moving in the same direction for a while. Another Parasite is spawned at 30% health
Once the mask reaches 0% health, it will break, revealing Fester's true face and beginning Phase 2
Phase 2:
Fester itself can now be attacked in this phase, having much more health than its mask but less defence. Fester moves faster, but uses the same movement patterns as before. Fester's body is still invulnerable, meaning the head must still be targeted
Fester retains all its Phase 1 attacks, and both active Parasites, but the skull projectiles are replaced with worms; functionally nearly identical, though slightly longer
Fester also releases Leeches as it takes damage, using the calculation [x = d / 2000]. This means that an attack that deals 100 damage is 100/2000 = 0.05, and thus a 5% chance to spawn a Leech, for example, and an attack dealing 2000 damage always spawns a Leech. Leeches simply fly at the player, trying to deal contact damage, though will latch onto the player on contact and continue dealing damage until killed. The maximum number of active Leeches is 15.
-Fester gains one new attack this phase, extending its neck, curving it over so its head is roughly over the player's head, and shaking its head around wildly to rain worm projectiles down on top of the player

Expert Changes:
-Darkness effect is stronger throughout the fight
-Withered Weapon and Lifebane debuff chances increased
-Fester has a higher attack speed
-Parasites are now spawned when the mask reaches 80% and 50% health, respectively
-A third Parasite is spawned when Fester itself reaches 50% health
-Maximum Leech capacity increased to 25, and Leeches move faster


Defeat: Explodes into a shower of gibs and leeches, though these leeches simply act as gibs and cannot harm the player. Any active Parasites or Leeches from the fight also explode into gibs as soon as Fester itself does
The text 'Many voices lurk in the night...' will appear, signalling a new set of available bosses

Drops:
Macabre Essence, Rancid Tissue, and 1-3 Rancid Eggs are dropped; all acting as material for later craftable items. Fester can also drop a gun that replaces bullets for homing worm-like projectiles, a magic weapon that summons a ring of teeth near the cursor, a gauntlet that can throw green clumps at enemies full of either spiked teeth or worms, and a Chain Knife-like weapon that looks like a small Fester that releases damaging worm projectiles after hitting an enemy
In Expert Mode it can additionally drop the Rot-Heart; an item that caps life regen to 5 HP/s, but increases the player's damage and crit chance as they lose health, as well as granting 1 HP lifesteal every time the player lands a critical hit.

Lore:
The remnant of a gargantuan creature that once ravaged these lands in a time long passed. Awoken from dormancy by the presence of cosmic monsters, Fester still clings to life; even with its parasite-riddled, decayed husk of a form.

Hints:
-Fester's mask does not have the same scaling damage resistance factor as other bosses, allowing hyper-aggressive strategies to work well against it and minimise that part of the fight
-Piercing weapons, minions, and other crowd control tactics are generally useful for Phase 2 for keeping the Leeches at-bay
-Slow-firing but high-damage weapons may be best for Phase 2; while the chance for a Leech to spawn per-attack is higher, far fewer spawn chances are called than using a faster-firing weapon

Extra Info:
-Fester is another boss based on something that almost appeared in 'bonus content' for the Boss Ideas 6 remake, but was designed on the very tail-end of the concept only days before it was scrapped
--Thus, Fester is also one of the earliest sprites to be made here
-Fester was originally going to focus on skull-themed attacks, however this was scrapped due to Skeletron, and to a lesser extent the Broken and Skeletron Prime as well
-Fester may be one of the largest bosses in terms of sprite size and canonical size:
--Sprite-wise, Fester's spine-like body extends hundreds of blocks down, going so far that the boss will likely despawn before the player sees the bottom
--Lore-wise, even the sprite does not cover the extent of Fester's size; apparently covering around a 5th according to some planned documents. This means Fester is, at minimum, about 600 blocks long/tall
---Another fun lore detail, not seen in the sprite, states that roughly every hundred blocks of body length houses a pair of huge, skeletal arms. However, due to its position in the fight, these wouldn't be visible while fighting it so go unseen
[Added: 12/5/22]
The Experiment

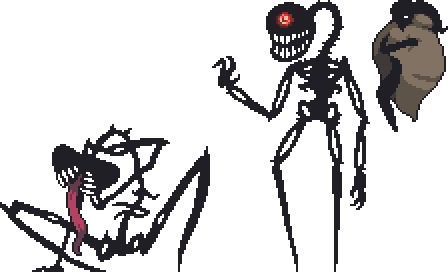
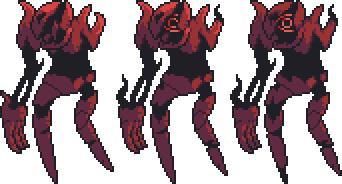
Appearance: A trio of strange, shadowy creatures, labelled as EC024A, B and C (from left to right).
A has a long, skeletal body and typically hunches over in a squat. Its face is semi-circular and has a mouth at the front lined with teeth and from which a long tongue protrudes
B has a similarly-skeletal body to A, though stands mostly upright. It has a vaguely more human-shaped head and similarly houses a mouth lined with teeth, though lacks A's long tongue. A additionally has a red warning right embedded in its forehead, acting as a pseudo-eye
C, meanwhile, is more noticeably humanoid and is mostly obscured in a large cloak. It seems to be missing a leg, however. Its head shifts constantly, giving the impression of hair

Summon: The trio can only be summoned by entering HAZARD Lab Alpha through the main entrance. The player is warned as they enter that there is an 'ominous presence lurking' as they go deeper into the lab, with the trio spawning should the player venture deeper.
Once summoned, the player cannot place blocks, teleport, or leave the lab as the entrance will shut behind them, forcing the player to begin the chase sequence until they reach the main room
Once defeated, they can be re-summoned in the main room of the Alpha lab using the Memory Disc, and no longer spawn naturally at the entrance. As before, the player cannot place or destroy blocks, teleport, or leave until the fight ends, and the trio must be fought within the main room

Fought: Post-Moon Lord
Specification: Post-Fester
Special: No Initial Summon Item, Unique Chase Sequence, Specific Arena
Progression: Later Bosses


Stats:
Health:
-Invulnerable (All, Chase phase)
-75,000 (115,000) (146,625) (A)
-72,500 (104,500) (133,238) (B)
-69,999 (99,999) (127,499) (C)
--217,499 (319,499) (407,632) (Total)
Attack:
-160 (265) (A Melee, B Melee)
-110 (180) (C Melee, A Tongue, B Beam, C Shadow Sphere)
-180 (300) (A Deathray, B Deathray, C Shockwave)
-1 (1) (Shade Mist (Ignores Immunity Frames)) (Inflicts Blackout - 100%)
Defence: 60
DR: 15% Base, 60% Max, 3500 DPS (Individually)

Attacks:
The fight is broken down into 2 phases, the 'Chase' phase in the hallways, and a 'Combat' phase in the inner main room.

Chase Phase:
The Phase begins with C appearing near the player, the lab entrance shutting and locking the player in, and C summoning a mist at the entrance door that slowly begins filling up the hallways, forcing the player to keep moving to stay away from it. During this phase all 3 of them are invulnerable, forcing the player to focus on survival.
The halls are linear but lengthy and full of hazards, the main two being EC024A and B themselves.
A will usually appear in more sparce expanses, bursting through a wall and chasing the player, usually until they take a sharp turn where B will often charge into a nearby vent.
B is more passive; scanning areas with a red, conical, sweeping 'searchlight' from within the vents and forcing the player to stealth their way past him, using things like solid blocks to evade the searchlights. Once the player gets past the searchlight areas they fade away, though if the player is ever caught a slender, skeletal arm will strike them and deal high damage
Once the player navigates to the main room, another door locks them in, and the chase sequence ends; with the mist clearing and EC024A, B and C appearing in the main room, either through the vents or via teleporting

Combat Phase:
Phase 1:
The three of them take it in turns to attack, with the other two waiting in the background, swapping after every attack. Notably, each one of the three takes a specific place in the background, and jumps out from that spot when attacking; A is central, crouched on the ground, grinding its teeth, and lunges into the foreground when preparing to attack; B waits on the left-side ceiling corner, scuttling to its position quickly whenever it finishes attacking, and leaps to the foreground to attack; C floats roughly halfway up the wall on the right, and teleports to the adjacent spot in the foreground to attack. Each only has 2 moves in this phase:
A:
-Hops towards one of the walls, furthest from the player, while facing the player. Afterwards A will lunge at the player, stopping upon hitting a wall, and then lunges at the player again
-A can whip its tongue back, retracting it slightly, before jolting its head; launching the tongue out like a whip that covers a little over a third of the arena in a large arcing swing
B:
-Pulls both its arms back, then thrusts them towards the player. One will always be aimed at the player, while the other is launched roughly 40 degrees either above or below it, based on the player's position
-B can also fire 4-5 laser-like beam attacks, each spaced-out evenly from each other. While the beams travel across the room instantaneously, their positions are telegraphed by thin, red lines roughly a second in advance
C:
-C's eye will create a white glint, and about half a second later she will dash at the player, crossing the entire room nearly instantly. The glinting effect signifies the position she dashes to, as it will be wherever the player was when the glinting effect occurs
-C can also summon shadow spheres randomly around the room. While they do no damage initially, they explode after roughly 1 second; with the explosion dealing damage
They will enter Phase 2 under 1 of 3 conditions: Either any one of the three reaches 25% health or below, 2 of them are below 35%, or all 3 of them are below 50%. Regardless of which option happens, all 3 enter Phase 2 in unison
Phase 2:
As opposed to 1 being active at a time, 2 will attack the player in unison, synchronising their attack together. All 3 of them retain their Phase 1 attacks, but also gain an additional, stronger move each:
-A will lunge onto one of the walls, aligning with the player as it does so. Then, it will charge up and fire a large deathray-like laser that travels horizontally across the room
-B will leap to either side of the room, clutch its face, and then begin firing a large deathray-like laser from its mouth. The deathray sweeps from directly downward to about 135 degrees diagonally upward
-C will teleport near to the player before charging up a powerful shockwave-like burst of energy. This expands slowly, but reaches a max radius of 15 blocks. Any non-hostile projectiles caught in the shockwave are destroyed, effectively granting her a shield

Expert Changes:
-The Shade Mist in the chase phase is slightly faster
-The conditions for Phase 2 change; now the criteria are any reaching 30%, any 2 reaching 42%, or all 3 reaching 60%
-All of their attacks are performed faster


Defeat: Any of them that are defeated will wait in the background and will stop attacking, even if only 1 remains active nearer the end of Phase 2. Once all 3 are defeated, they will flee; with A rushing back out of the entrance to the main room, B crawling back into a vent, and C teleporting away
-The Cyborg NPC can now sell the Data Disc - Alpha; which can be used in the main room to re-summon the boss
-The player can traverse the whole Alpha lab without being attacked, including gaining access to some formerly-locked rooms
--However, the player still cannot teleport in or out of the lab, nor can they build or mine blocks within it

Drops:
The boss actually has no unique drops outside of trophies and masks in Normal Mode.
In Expert Mode, however, it gains an additional drop, the Shade Matter; an accessory that provides additional damage and crit chance and increases immunity frames, though reduces the player's defence to 0 (Damage Reduction from items like the Worm Scarf are unaffected)
The Experiment (Continued)
Lore:
A trio of creatures created by science using an unearthly, shifting material. Ultimately, this would be the lab's undoing. The origins of the material they are composed of are currently unknown.

Hints:
-The chase sequence's mist moves at a speed relative to the player; speeding up the further away the player is, so taking time to look around the stealthier segments is generally safe
-The first phase of the 'actual' fight should be used to learn the individual boss' attacks, as only 1 is active at a time; giving you more room to focus
-The second phase of the fight is generally very hectic, but most of the boss' attacks synchronise with each other to at least leave some dodging room
--This is especially important given that teleportation items like the Rod of Discord do not work in the lab under any means (and walking in with Chaos State begins dealing rapid damage)
--There are, however, some attacks that can become nearly undodgable; though many of these are due to parts of the attack being affected by player positioning
-Technically, other mods can risk overwriting the lab's blocks, allowing the chase sequence to break. However, with many of the factors being dependent on the player's position in the lab specifically, there's a good chance the entire fight breaks
--Additionally, escaping the main room or somehow bringing the interact-able spawning pedestal outside will also break the fight; with very few attacks now being able to reach the player (mainly C's Phase 2 shockwave)

Extra Info:
-Originally, the one with the tongue was EC024B and the one with the eye was A, though it was switched later-on
--Additionally, the chase sequence was more stealth-oriented originally, with A being alerted to sound instead of having scripted chases, but this was scrapped due to complexity
-Aside from summoning the mist, C doesn't take part in the chase sequence. She is also the first one of the three encountered because of her summoning the mist
-A and B's bodies appear to be based on human skeletons, though with long, hunched necks, small barbs near the joints, and warped proportions
--C, however, appears much more humanoid, though is notably missing a leg as seen in some of her attack animations
-There is a general implication that the trio are Chaotic Entities; a staple boss type from the more 'standard' Boss Ideas pages
--This is due to their matt black bodies, aside from key details such as teeth, A's tongue, and C's eye; a staple feature of prior Chaotic Entity encounters
[Added: 26/5/22]
Emissary

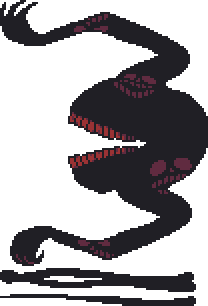
Appearance: A large, spider-like monster. Its main body is large and rounded, with a large sideways mouth at the front and two misshapen, grasping arms at the sides. 6 skeletal legs protrude from its body. Its entire body, aside from the teeth, is black, though warped, red faces occasionally emerge from the darkness briefly

Summon: Place down and stand near to the Night Light in the underground or cavern layer. While stood near the light the screen will gradually darken, eventually causing the boss to summon with an echoing but distant roar. The sky will also turn black and most light sources are weakened as the roar happens, though the former is hard to notice due to the spawn conditions.

Once the Emissary is summoned, 8 candles will surround the player in a ring formation that will follow the player's movements. The screen around the player will darken until only a circle of light is left, roughly 40 blocks in radius. This is unaffected by any items that provide immunity to darkness effects like the Ankh Shield, though will decrease if the candles that surround the player are extinguished, or increases if candles are reignited.

If the Emissary reaches the underworld or surface, it will enrage; increasing its movement speed and causing the light meter to drop significantly faster until the player returns to its preferred biome.

Fought: Post-Moon Lord
Specification: Post-Fester
Special: No
Progression: Later Bosses


Stats:
Health:
-285,000 (450,000) (573,750) (Emissary)
-500-10,000 (750-15,000) (956-19,125) (Fear Lantern)
Attack:
-170 (270) (Emissary Melee)
-160 (260) (Phantasmal Faces, Wickblight Melee)
-120 (195) (Skulls, Lantern Melee)
Defence: 45
DR: 10% Base, 50% Max, 4000 DPS

Attacks:
Emissary will remain fairly close to the player, using 6 spider-like legs to give the illusion of crawling. The legs cannot damage the player, though the Emissary's body still does contact damage. Its movement patterns may change depending on its attacks.
-If the Emissary's attacks the player, it can also damage the candles if its attacks connect with them; direct contact with the Emissary will immediately extinguish out a candle, meanwhile its other attacks simply dim the candle upon the first hit and then extinguish the candle if it is hit again.
-Multiple 'Fear Lanterns' will spawn after Emissary appears, depending on the phase. The red flames they emanate can be seen even through the darkness effect. These lanterns need to be attacked and destroyed to progress, and doing so will also restore one of the player's candles; either dimly reigniting an extinguished candle or making a dimly-lit candle return to full strength. (Nothing happens if the player's candles are all burning at full brightness.)
Emissary's attacks are dependent on the phases, as listed below:

Phase 1:
Emissary will spawn its fear lanterns 4 at a time in random locations in the player's vicinity. Until they are destroyed the Emissary will be invulnerable, but will only chase after the player instead of using 'actual' attacks. The lanterns spawned initially have the minimum amount of health possible.
After the lanterns are destroyed Emissary will become vulnerable, but speeds up its pursuit to compensate. After 10 seconds it summons 4 new fear lanterns and repeats the phase.
At 85% health Emissary enters its 2nd phase

Phase 2:
Emissary summons 5 lanterns in this phase, with double the health they had in Phase 1.
Emissary now attempts to stay near the player instead of trying to deal contact damage as it moves. It will now use actual attacks in this phase, even when invulnerable.
-Emissary may 'charge' at the player, letting out a deep bellow to telegraph the charge
-Emissary may open its mouth and release 2 'Phantasmal Faces'; large face-like fiery projectiles that follow the player in a wavy motion, speeding up if the player gets too far away. After a few seconds they will explode into damaging embers
-Emissary may open its mouth and release an inaccurate barrage of red, skull-shaped projectiles towards the player. This attack lasts roughly 1.5-2 seconds before Emissary stops firing.
Destroying all 5 active lanterns makes Emissary vulnerable for 15 seconds. During this time Emissary speeds up and will attempt to melee the player as it chases them, as it did in Phase 1.
If the fear lanterns regenerate in this phase not only will Emissary become invulnerable again, but the lanterns regenerate with an additional 0.2x health, added additively onto the original bonus (2.2x after 1 regeneration, 2.4x after 2 regenerations, 2.6x after 3, etc.). This will cap at the maximum lantern health should it reach it.
At 40% health, Emissary will enter its 3rd phase.

Phase 3:
Emissary moves as it did in Phase 2, but now summons 2 distinct groups of fear lanterns; 6 in random locations in the player's vicinity, as well as 4 that rotate around Emissary itself. The first group of 6 start with 2.5x the base lantern health, while the 4 rotating around Emissary have 10x the base lantern health, making them much harder to extinguish
Emissary will additionally spawn a unique, invulnerable enemy in this phase called the Wickblight. The Wickblight will chase the player at a moderate pace, attempting to extinguish their candles by biting them as opposed to trying to attack the player directly. The Wickblight will also charge at the player if they get too far away.
The Emissary's own attacks remain the same in this phase, though it will attack and move slightly faster.
Once the Emissary's lanterns are extinguished it will remain vulnerable for 20 seconds. Should the lanterns reignite Emissary will become invulnerable, and as in Phase 2 the lanterns will gain health:
The group of 6 lanterns gain a 0.5x boost to their base health (3x after 1 regen, 3.5x after 2, etc.)
The group of 4 lanterns orbiting Emissary gain a 1.5x meanwhile (11.5x after 1 regen, 13x after 2, etc.)
As before, these health totals are hard-capped at the lantern's max health.
This cycle continues until the Emissary is defeated.

Expert Changes:
-Emissary's first phase only lasts until 95%, and Phase 2 ends at 50% instead of 40%
-Fear Candles have a base health of 750 instead of 500 (or 956 in Master Mode), which in-turn affects both their starting health and the health boosts they receive throughout the fight
-The charge attack is faster and Emissary roars as it begins moving as opposed to before, making the telegraph's timing tighter
-3 Phantasmal Faces are spawned during their attack, which increases to 4 in Phase 3
-The skulls from the skull barrage attack have a very mild homing effect


Defeat: Emissary will roar before burning up in a shower of red flames. It then explodes in a large red fireball that destroys the player's candles, removes the darkness effect, and also despawns the Wickblight as well as any other projectiles Emissary spawned

Drops:
Crimson Cinders; a material that is used to either make new armour and weapons or to upgrade existing items, is dropped in large quantities from Emissary. Additionally, it can drop a sword, bow or magic tome; with the sword creating large red slashes when swung, the bow turning some projectiles into highly-damaging phantasmal faces, and the tome summoning skull-like projectiles from random directions that chase enemies close to the player. It can also drop the Abandoned Keepsake that grants increased damage after being hit, as well as a damage reduction effect that gets stronger the less often the player takes damage. Its other drop is the Broken Compass; a rare drop that doesn't seem to do anything on its own
In Expert Mode it drops the Ancient Candle; an item that summons a friendly Wickblight to attack nearby enemies while also providing the player with health regen and an effect akin to both the Shine and Night Owl potions
Emissary (Continued)
Lore:
A cavern-dwelling terror with an ever-shifting form. It creates faces from within its body, said to be mimicking those who have been slain by its jaws in times passed.

Hints:
-It is recommended to bring high DPS builds to the fight, as Emissary's lanterns gain more health every time they are allowed to regenerate; in-turn lengthening the fight significantly every time it gets an opportunity to regenerate them
-Phase 1 essentially acts as a tutorial to show off Emissary's lantern vulnerability and regeneration mechanics, with Emissary being generally quite easy to deal with in this phase and the phase itself ending very quickly
-Keeping close to the Emissary is actually recommended; not only does it allow for you to keep away from the skull barrage easier by flying around Emissary as it fires, but also because the Emissary, Phantasmal Faces and the Wickblight become faster or more aggressive the further away the player is
--Additionally, running away may make locating the fear lanterns more difficult, since they spawn near the player every time they regenerate and thus force the player to stay within a general area to extinguish them

Extra Info:
-The Emissary has had multiple design changes through its concept, though mainly with its fight mechanic
--Its design originally had eyes placed in a large cluster to the right of its jaws, though these were removed to focus more on its mouth
--Its fight had several mechanics, including a fear mechanic that debuffed the player if they were too close to Emissary or as the candles that surrounded the player were extinguished.
---Additionally, at one point the player was to be consumed and die instantly if all 8 of their candles were extinguished, however since all 8 of them could be extinguished at once if the Emissary dealt contact damage due to its size, this was scrapped too
[Added: 6/7/22]
Lawrence

Appearance: A tall, tan human with long, white hair. She wears a long, white coat with a red collar, a red suit underneath and white boots. Her eyes are red, with a series of strange red markings around her left eye. She wields what looks almost like a two-headed axe with spikes protruding from the top and sides of each of the bladed heads

Summon: Found within the HAZARD Lab Beta; another structure that generates underground in the world. The lab consists of a large room with curved roof, a row of semisolid platforms roughly a dozen blocks off the floor, and a podium with a key at its centre. As before, the blocks of the lab cannot be mined, nor can blocks be placed within the lab initially. Interacting with the podium causes Lawrence to appear and the fight to begin.
The fight can be initiated at any time, though is intended to be fought late-game.

Fought: Post-Moon Lord, Technically Pre-Boss
Specification: Post-Emissary, Technically Pre-Boss
Special: No Summoning Item, Unusual Summon Method
Progression: Superbosses


Stats:
Health: 340,000 (520,000) (663,000)
Attack:
-210 (315) (Melee, Sol Laser)
-200 (300) (Crimson Sawblade, Deflected Projectile)
-180 (285) (Crimson Blade)
Defence: 50
DR: 15% Base, 65% Max, 5000 DPS

Attacks:
Phase 1:
Lawrence follows a simple pattern of teleporting near the player, attacking, then disappearing and repeating the cycle.
-She may appear right next to the player and slash at them, creating a large crescent-shaped slash in the air as she swings her weapon
-She may appear horizontal to the player and dash horizontally after a brief delay. The dash covers a lot of ground very quickly
-She may align herself with the player and fire red, blade-shaped projectiles horizontally towards the player for a few seconds
-She may appear some distance from the player and swing her blade 3 times in succession, creating 3 large arcs of crimson blade projectiles aimed towards the player
-She may appear near the player, holding her weapon in front of her. She won't attack on her own like this; instead deflecting any attacks aimed at her for a couple of seconds and avoiding damage in the meantime: Melee swings are blocked, minions knocked away from her, and other projectiles deflected back at the player that deal the same damage regardless of the projectile's original damage number. She stops blocking after a few seconds and teleports as normal once her guard is dropped
When taken down to 75% health she will enter her 2nd phase

Phase 2:
Lawrence will stop teleporting and instead jumps and runs around the arena, keeping her guard up while she isn't using her attacks. The guard functions identically to her parry/deflect attack from Phase 1 and is only dropped while she uses one of her other attacks:
-All of her attacks are carried over from Phase 1, minus the deflect attack
-She may lunge at the player, slashing with her weapon when close enough to the player
After attacking their is a brief window before she puts her guard up again, signalled by a red glint in her eye half a second before she puts her guard up again
At 60% she will enter her 3rd phase

Phase 3:
Lawrence will jump to the centre of the room and spin her weapon, creating a large red spinning disc that she launches towards the player. This disc will chase the player for the rest of the phase; ricocheting off of walls or Lawrence herself as it does so
Lawrence will also fire off 4 large lasers in the cardinal directions after creating the 'sawblade'. These 4 lasers will slowly be rotated after a brief delay throughout the rest of the phase.
Lawrence will fire crimson blade projectiles every second towards the player, which happens alongside both the rotating lasers and the sawblades
As Lawrence loses health in this phase the + of lasers will gradually rotate faster
Once taken down to 30% she will enter her 4th and final phase

Phase 4:
Lawrence returns to a pattern akin to Phase 1, but the crimson sawblade from Phase 3 is carried over and persists until the end of the phase
Lawrence will string together certain attacks in this phase, as opposed to individual attacks:
-She may horizontally dash at the player, then lunge at the player at the end of the dash. Afterwards, she will dash at the player a 2nd time
-She may fire crimson blades at the player before dashing towards them, guarding herself with her weapon at the end of the dash and deflecting the player's attacks
-She may dash towards the player, then turn around and launch 3 arcs of crimson blade projectiles towards the player before lunging at them
Once taken down to 0 health she enters a 5th and final 'desperation' phase

Phase 5:
She returns to her central position from Phase 3 and despawns the sawblade projectile at last.
She will begin firing large, deathray-like lasers around the room, telegraphed by white lines that point in the direction the lasers will be fired.
For the next 15 seconds she will continue firing lasers with increasing speed and frequency, including some directly aimed at the player instead of being entirely random
After those 15 seconds the fight will end

Expert Changes:
-Her dash attack is faster across all phases, as is her lunge attack
-Attack speed from Phase 1 is increased
-Lawrence will put her guard up faster after attacking in Phase 2
-Phase 3's lasers rotate faster and her crimson blades are now fired every 0.8 seconds; 20% faster
-Phase 4 has Lawrence summon a 2nd crimson sawblade


Defeat: A large white pulse of energy is released from Lawrence, and she falls to the floor of the arena, disappearing after a few seconds
-The pedestal in the centre of the room can now be interacted with properly, granting the player the Warped Keycard
-Additionally, Lawrence can become an NPC and move in if there is any vacant housing; selling a multitude of weapons and providing hints towards summoning some of the later bosses
--She also sells an item that can be used in the lab to summon a white silhouette version of herself that acts as the boss' rematch
---This silhouette version of Lawrence lacks any actual drops outside of coins

Drops:
Lawrence herself actually doesn't drop anything aside from a trophy and a vanity set consisting of a coat, wig and leggings in-place of a boss mask. The vanity set and trophy have a 100% drop chance
In Expert Mode she can drop the Mark of Sol; an item that adds markings to the player's left eye akin to Lawrence's as vanity, but also provides mass buffs across almost every stat while equipped while reducing the player's health regen

Lore:
An unfortunate scientist caught within a doomed experiment to open doors to another reality. While the experiment failed, the unstable energies did draw forth the presence of something... otherworldly
Lawrence (Continued)
Hints:
-As stated prior, Lawrence's fight can be accessed at any point in progression, however it is strongly recommended to at least be Post-Moon Lord before attempting to fight her, with Emissary-tier gear recommended for the best outcome
-Lawrence's eye will gleam red when preparing to parry/deflect attacks. If you see this it may be best to stop attacking as to avoid having a projectile deflected back at you
--Lawrence has one of very few parry abilities that isn't entirely countered by minions; instead she knocks them away from her as she deflects them
--Lawrence's parry attack can deflect any projectiles, regardless of frequency, so simply trying to overwhelm her with fast-firing weapons is not recommended
-Lawrence's NPC does not sell any of her weapons or damaging accessories until the player defeats Emissary, stopping the player from sequence-breaking the same and obtaining very powerful weapons before they should have them

Extra Info:
-When Lawrence moves in as an NPC there are some noticeable differences. Her eyes are a dark brown and the markings over her left eye are absent.
--Her dialogue also suggests she isn't entirely aware of recent events, even having minimal recollection of her own fight against the player
-Lawrence actually has some oddities regarding her fight, mostly in regards to the ending of her fight
--She is one of few bosses to have a desperation attack in her final phase; launching 1 final, powerful attack before ending the fight
--Lawrence is also one of only few bosses to have a drop pool only consisting of coins, a trophy, and a mask*; and being one of few bosses to always drop her trophy and mask*
--Technically, her own boss summoner can only be obtained after already defeating her, as it is only sold by her NPC
---Interacting with the pedestal used to summon her again simply grants the Keycard for a later boss fight
--She is the only boss that can technically only be fought a single time; with the player having to fight a silhouette version of her in rematches

[Added: 6/7/22]
The Broken (Endgame)

Appearance: A larger, more intimidating version of the Broken, and presumably its final form. Its body has broken away further, leaving comparatively little shell regarding its prior forms and exposing the strange matt-black form beneath. Its physical build also appears noticeably more bulky than before as well, with wide shoulders and thicker limbs

Summon: Use the Ruin Sigil, crafted with the Tattered Ruin Banner used to summon its Hardmode counterpart as well as Crimson Cinders dropped by the Emissary. As before, its prior forms need to be defeated in order to summon it.
While The Broken is alive, the sky will darken in what looks like a eclipsed sunset; with a deep red sky and a black, round silhouette at the horizon

Fought: Post-Moon Lord
Specification: Post-Hardmode Broken, Post-Emissary
Special: Final Main Boss
Progression: Superbosses


Stats: (Initial Fight // Rematch)
Health:
-500,000 (645,000) (822,375) // 678,000 (800,000) (1,020,000) (The Broken)
-50,000 (64,500) (82,238) // 67,800 (80,000) (102,000) (Broken Clone)
Attack:
-225 (328) // 260 (370) (Melee, Arm Lash, Deathray)
-210 (315) // 248 (350) (Shadow Flameblast, Blood Orb, Shadow Cutters)
-200 (300) // 230 (332) (Crimson Fireball, Shadow Cinders, Flame Ring)
Defence: 80
DR: 10% Base, 80% Max, 5000 DPS

[All of this boss' attacks inflict Broken - 50 (100)%]

Attacks:
Phase 1:
Broken will teleport near to the player and attack, typically using attacks based on its former appearances.
Each time it teleports it creates a ring of flames around itself both at both its prior and current locations that can damage the player if they move too close to it. This is independent of its other attacks.
The player cannot stray too far from the Broken, indicated by a faint red ring the player has to remain inside throughout the fight, with the Broken always at its centre. Leaving the ring causes a scaling damage over time effect and the Broken debuff until they re-enter the ring.
-It may swing its arm towards the player, extending it to create a wide swing that can hit players 20 blocks away. If it misses the player with the initial swing it also summons multiple 'shadow cutter' projectiles that accelerate out away from its arm as it retracts
-It may appear above the player, shudder, and then unleash a large red deathray downwards. Sometimes it appears directly above the player, and other times it will teleport to a spot based on the player's current movements and attempt to intercept them
-It may align itself with the player vertically and release crimson fireballs towards the player in an inaccurate barrage over the course of a few seconds. Unlike prior uses of this attack, the Broken does not get a move speed penalty as before
-It may split out a mixture of shadow flameblast and blood orb projectiles towards the player. The shadow flameblasts are black and red fireball-like projectiles that chase the player before eventually exploding into a burst of 12 evenly-spaced shadow cinders that simply continue moving in 1 direction. The blood orbs, meanwhile, are spherical projectiles with skull-like faces that move in a wavy motion, though slowly adjust their vertical movement to try and slowly align with the player
-It may teleport to the other side of the player, mirroring its former location, and spit a wide arc of 8 shadow flameblast projectiles towards them
Once Phase 1 is reduced to 70% health it will enter its 2nd phase

Phase 2:
More of the Broken breaks away, briefly revealing an eye-like symbol within its head that quickly vanishes. With this, the Broken's movement patterns change noticeably.
The Broken will now charge at you twice before attacking and no longer teleports unless the player moves too far away. Additionally, it gains a new aggression system:
Every 20 seconds it will enter an 'enraged' state for 10 seconds. In this time its attack speed increases, and each of its dashes leaves a trail of damaging flames in its path that deal the same damage as its fire ring attack. Certain actions, such as using the Rod of Discord, forcing the Broken to teleport, or using teleporters will decrease the time taken to enrage by 2 seconds each. While enraged the eye symbol is visible behind its visage.
While in this phase, the Broken uses all of its Phase 1 attacks, though some of them are enhanced or altered slightly
-The downward laser attack now has the Broken appear above the player and dive downward, firing the deathray back upward upon landing/moving far enough downward. Additionally, it happens 3 times in succession, with the deathrays persisting until all 3 dives are performed; the 1st and 3rd based on the player's current location, and the 2nd based on their current movement path, in an attempt to box them in with the deathrays.
-The attack where it releases shadow flameblasts and blood orbs is changed. Now it aligns with the player vertically and creates two streams of crimson fireballs; one above and one below the player; trapping them in a roughly 30 block tall strip. While the player is trapped it releases the flameblasts and blood orbs more sparingly to compensate for the more limited dodging room
-The 'mirrored teleport' attack happens 3 times in succession, though each arc of flameblasts fired from the Broken are reduced to only 4
At 40% health the Broken enters its third phase

Phase 3:
The Broken breaks apart even more than before and gains a shaking red aura throughout the phase. Again, the eye symbol can be seen behind its face as it transitions into its third phase
The Broken's movements remain the same, though its aggression system changes once more:
The aggression system now has a meter that will cause the Broken to enrage once it reaches 1000, depleting by 100 every second it remains enraged until hitting 0 and doesn't gain points towards the meter while enraged. It builds by 20 a second naturally, but builds faster the more damage it takes (250 damage = +1 rage), as well as an additional 50 every time the player teleports. While enraged the Broken gains a shadowy aura, becomes slightly transparent, and attacks even faster, and gains the same flame trail as Phase 2's enrage effect. While enraged the eye symbol behind its face becomes visible
-The Broken gains a new ability where, between attacks, it can fire projectiles upwards from its body that will affect its next few attacks:
--If it fires crimson fireballs upwards then fireballs will rain down randomly from the sky for the next few attacks
--If it fires blood orbs upwards then blood orbs will begin moving in from the sides of the screen for the next few attacks
--If shadow flameblasts are fired upwards then flameblasts begin spawning from the corners of the screen for the next few attacks
At 5% health the Broken enters its 4th phase

Phase 4:
The Broken summons two deathrays; one either side of the player, 50 blocks apart, to pen the player into a specific area. It then appears at the centre of that area. Teleporting out of the 'arena' instead causes him to move and set up another 'arena' around the player
Unlike prior phases, the Broken is entirely invulnerable and lacks its aggression mechanics, instead using a fixed pattern:
-Summons a 'bullet-hell' of crimson fireballs that move horizontally across the arena, occasionally summoning flameblasts to attack the player more directly
-Summons a 2-armed 'spiral' of crimson fireballs from itself, forcing the player to circle the Broken, while also summoning blood orbs from the sides of the arena
-Summons a third deathray to split the arena in half temporarily, then launches more flameblasts towards the player
-Summons move blood orbs from the sides of the arena while firing flameblasts and fireballs directly towards the player
After the player survives these 4 attacks it enters its 5th and final phase
The Broken (Endgame, Continued)
Attacks (Continued):
Phase 5:
The Broken begins shaking, with the deathrays that blocked the player in vanishing as it begins to shake
The Broken then creates 6 copies of itself, each with 1/10th of its base health, and puts its heart into one of the 6, with its real form turning grey and crumbling apart as it does so. There are mild differences between the one with the Broken's heart and the other 5, mainly the one with its heart creates a weak red pulse around itself when attacking
The 6 Broken clones teleport around and attack the player with simpler attacks in-unison every 4th teleport, speeding up as clones are destroyed
Additionally, blood orbs spawn continuously in this phase that enter from the sides of the screen
-The clones can each fire a flameblast towards the player
-The clones can vertically align with the player, 3 either side at most, and each release a single cluster of fireballs in varying directions
-The clones can vertically align with the player, 3 either side at most, and each fire a single horizontal deathray
-The clones can each fire an arc of 5 fireballs towards the player
If the clone with the heart is destroyed, the player will have a brief 3-second window to attack the heart before another clone absorbs the heart
If no clones remain or the heart reaches 0 health the fight ends

Expert Changes:
-Attack speed throughout the fight increased
-Range of the Phase 1 fire rings increased
-Rage meter in Phase 2 takes 18 seconds to build and lasts 12 seconds
-Rage meter in Phase 3 now only has to build to 800, though the rate in which it depletes is reduced to 80; making the rage build faster but expire at the same speed
-Phase 4 attacks use more projectiles


Defeat: The Broken has 2 different death animations depending on how it dies:
-If the heart is reduced to 0 health by being attacked it will shatter into several pieces and the remaining clones will explode into gibs
-If the heart is exposed while no clones are left alive it will turn grey and crumble away in a manner similar to how the Broken itself crumbled apart
Regardless of animation, the fight is considered won:
-The player can now rematch the Broken and fight a stronger form intended to be faced with endgame gear
-Lawrence will gain more items to sell, as will some other NPCs
-The three superbosses can now be activated

Drops:
Initial Fight:
Silver Dust, a material primarily used to upgrade preexisting gear to make it stronger, though has a few unique crafts itself in regards to some weapons
In Expert Mode it drops the Shattered Skull, an accessory that causes reduces max health and damage by 20% and makes it so bosses kill you instantly if they hit you 3 times, though in-turn causes all bosses defeated to begin dropping special medal-like relics that can be displayed in a manner similar to trophies
Rematch:
Drops more Silver Dust upon death, but can also drop a special item called the Twisting Flesh if it is defeated by destroying all 6 clones
Expert drops remain the same

Lore:
Destructive, unstable energy radiates from its body, brought forth by previous battles and feral desperation. With its body now fully broken, almost nothing remains except a fine, silvery dust.

Hints:
-Being the final main boss, the appropriate preparations should be made, such as a large arena and a good supply of buffs
--Since some of its attacks force vertical movement over noticeable periods of time, having a good amount of 'rest' platforms to reset flight time is also recommended, as are any infinite-flight mounts
-While not necessary, it might be a good idea to bring more defensive accessories for Phase 4, as it cannot be damaged in that phase
-In the initial fight it is best to deal as much damage as possible to the heart by focusing on the clone carrying it, as playing more aggressively can speed up the final phase by directly shattering the heart instead of forcing the player to defeat all the clones
-It is recommended to use the Silver Dust to upgrade your main gear first, as you may otherwise run out and be forced to fight its empowered version for more Silver Dust to use

Extra Info:
-The eye symbol seen within the Broken's head is the same symbol seen in various other boss fights, implying a connection
--For the 'Arterion guides' (6, 6's remake, and 13) specifically, the other two main instances of the eye are the guide picture from the original Boss Ideas 6 page and Arterion itself in 6's remake
-If the player wants to obtain the Twisting Flesh, they will have to deal with all 6 clones instead of the Broken's heart, meaning a total of 1,050,900 (1,240,000) (1,581,000) needs to be dealt; significantly more than any other boss up to this point
[Added: 6/7/22]
[Superbosses]
A trio of bosses that can only be encountered in the Post-Game after defeating the Broken's third and final fight

Typically, these bosses will require a series of circumstances to be achieved in order to summon them; usually fighting a boss and then finding a certain item/location where the boss can then be summoned

While there is no official order to fighting the superbosses, as they can be fought in any order, they will be written in order of general difficulty and thus the most expected progression route
Abominus

Appearance: A large, fleshy monster made from a mish-mash of pieces. Its head resembles a human skull, though has notable differences such as the thin teeth and single slit for a nostril, but otherwise it looks human. The body is primarily a large slab of meat, with various arms and limbs protruding from the sides and a spine-like tail beneath with ribs jutting out at the sides

Summon: The player must use the Twisting Flesh on the Purifying Flame. The Flesh is obtained by defeating the Broken's rematch fight in a particular way, while the Purifying Flame can be obtained from Light Wisps; a rare cavern-level enemy that begins spawning after the Emissary's defeat.
The player must place the Flame down first, then right-click on it with the Flesh to trigger the fight; indicated by the screen darkening everywhere except for a 40-block radius around the Purifying Flame itself
The player is surrounded by 8 candles as in the Emissary fight, though these do not provide an aura of light for the player; instead these candles affect the light the Purifying Flame provides; reducing the radius if extinguished and increasing the radius when reignited.
The player cannot leave the light from the Purifying Flame during the fight; entering the darkness initially provides the Weakness debuff, followed by the Broken debuff, and eventually followed by rapid health loss. This effect is removed upon re-entering the radius of the Purifying Flame's light

Fought: Post-Broken
Specification: Post-Broken (Rematch), Post-Emissary
Special: Superboss, Unusual Summon Method
Progression: No


Stats:
Health:
-650,000 (785,000) (1,000,875) (Abominus)
-42,500 (60,000) (76,500) (Abominable Maw)
-55,000 (75,000) (95,625) (Claspers)
Attack:
-280 (400) (Abominus Melee) (Inflicts Broken - 100%)
-260 (370) (Abominable Maw Melee, Clasper Melee) (Inflicts Broken - 67%)
-245 (350) (Meat Chunk, Ooze Droplet, Creeping Hand) (Inflicts Broken - 50%)
Defence: 50
-Gains 99.99% Damage Resistance in Phase 3
DR: 15% Base, 85% Max, 6500 DPS

Attacks:
Abominus itself tends to remain in the darkness, revealed by a faint red glow from its eyeholes and mouth, with most of its attacks coming from said darkness.
Abominus uses a variant of the Emissary's candle gimmick throughout the fight, forcing the player to protect the 8 candles that surround them. Contact damage from Abominus or its minions instantly extinguish a candle, while Abominus' projectiles will simply dim a candle on the first hit, then hitting a dimmed candle extinguishes it on the second hit.
Every 10 seconds the Purifying Flame lets out a pulse; reigniting extinguished candles with a dim flame and making any existing dim candles burn fully again
If all 8 of the player's candles are extinguished a timer begins counting down every second, starting from 5. If none of the candles are reignited in this time Abominus will emerge and consume the player, killing them instantly.

Phase 1:
Abominus typically moves clockwise around the light from within the darkness, stopping periodically to use one of its attacks:
-It may roar and charge towards the player. Notably, if Abominus hits the Purifying Flame while charging, it will take a set 10,000 damage unaffected by damage resistance and immediately retreat backwards into the darkness
-It may summon 1-3 Abominable Maws; fleshy monsters primarily composed of a large mouth. These will typically follow the player slowly, though they have a small chance to charge at the player as well
-It may spew a large, highly-inaccurate volley of meat chunks at the player. These are very mildly affected by gravity, but this is hard to notice in most instances
Once taken down to 60% health Abominus will enter its 2nd phase

Phase 2:
Abominus will now teleport in-between attacks, indicated by the glow from its eye and mouth fading and re-appearing elsewhere, instead of moving in circles.
The main new addition of the phase is that large, fleshy hands called Claspers will begin spawning periodically. Claspers slowly move towards the Purifying Flame and, once they reach it, proceed to cover it. While the Flame is covered it cannot regenerate the player's candles, stops Abominus taking contact damage from the Flame whilst charging, and reduces the radius of the light the Flame produces. These effects persist until the Clasper(s) blocking the Flame are destroyed
Abominus retains all of its prior attacks, though gains some new ones as well:
-It can now charge up to 3 times during the charge attack
-It may appear from above and begin shaking, raining down reddish purple ooze droplets randomly around the arena
-It may disappear, with a large shadowy hand slowly approaching from the darkness. This hand continues extending towards the player for several seconds, twisting and turning while extending, whilst trying to attack the player
Abominus' attack speed increases moderately as it loses health
Once Abominus reaches 80,000 health, regardless of difficulty, it will enter its 3rd and final phase

Phase 3:
Abominus gains immense damage resistance, leaving the only way to deal reasonable damage to it up to it hurting itself on the Purifying Flame due to its set damage.
During this phase Abominus will teleport around, as in Phase 2, charging once towards the player every time it teleports. It does not use any other attacks.
After being reduced to 40,000 health, likely accomplished by baiting it to hit the Flame 4 times, Abominable Maws will begin spawning from the darkness, with a maximum of 2 active at a time.
This continues until Abominus reaches 0 health.


Expert Changes:
-In Phase 1, Abominus' glowing eye and mouth will only glow when it begins attacking and for a brief moment after attacking, forcing the player to keep track of its movements themselves
-Abominable Maws have a noticeably higher chance to charge
-Phase 2 will favour using 2 or 3 charges over just 1, however the attack will still end instantly if it hits itself on the Purifying Flame
-Claspers spawn slightly more often in Phase 2
-Claspers will continue spawning in Phase 3


Defeat: Abominus will begin burning up in a white light, letting out a loud roar as it does so and swiping wildly at the air around it. Eventually it will simply become a white silhouette that, after another roar, seems to disintegrate away into nothing.
With this, the lighting returns to normal.

Drops:
Drops the Twisted Monolith as a guaranteed drop, as well as a few Void Candles. The Monolith is simply a reward for completion and is a purely vanity item, while the Void Candles will darken the screen for anyone nearby, leaving only light sources and anything near them visible.
In Expert Mode it will drop the Golden Twisted Monolith; a golden version of the normal Monolith to signify the higher difficulty

Lore:
Made of many and full of hatred, the origins of Abominus are unknown. However, there is something distinctly and troublingly familiar about it
Abominus (Continued)
Hints:
-Despite how it seems, the Twisting Flesh isn't consumed when summoning the boss, meaning the player does not need to farm the Broken to fight it multiple times
-Due to its large hitbox, Abominus' charges have a very real chance to extinguish all 8 of the player's candles immediately if it connects
-Claspers should be targeted as they spawn, since they directly affect candle regeneration which is made ever the more important by Abominus' own insta-kill mechanic
-The droplet attack is especially devastating for the player's candles, since the gaps are often too tight to navigate the candles through safely. However, as candles can be regenerated, this isn't too big of an issue
-The meat chunk attack is best dealt with staying away from the centre of the arena so that most of the attacks are launched in less dangerous places, meanwhile the charge attack is best dealt with from the centre of the arena in order to bait Abominus into hitting the Flame in order to prematurely end the attack and deal extra damage to it

Extra Info:
-This is one of few fights that involve debuffs that does not alter the debuff chance in Expert Mode
-Abominus has physical similarities to Arterion in its design; being a monster made of pinkish flesh with a distinctly humanoid skull for a head
--This may explain the line about 'familiarity' within its lore, though this may not be all there is to it
-Abominus' version of the candle gimmick was inspired by the scrapped content from Emissary's fight; primarily bringing over the scrapped insta-kill mechanic
-Abominus originally had an attack where all of the player's candles briefly travelled to the outskirts of the arena, with hands reaching in to extinguish them that the player would need to attack to repel
--This was scrapped due to the risk of interfering with Abominus minions in ways that might become unfair, and because it gave slow-firing or low-range weapons a significant disadvantage
---Thus the attack was recycled into the Clasper enemies, which instead try to interrupt the Purifying Flame itself
[Added: 7/7/22]
Sol

Appearance: A strange creature with a body made of several floating disconnected pieces. Its 'core' is red and pink and is made of several curved pieces that point towards a hole in their centre. It has two white 'wings' and a white 'tail' made of various shapes, as well as other curved white shapes between the wings, tail and core. It has a crown-like symbol above its head as well. Sol's entire body glows and pulsates, making it rather difficult to discern its whole form in-game

Summon: The player must defeat the Broken with the Warped Keycard in their inventory, as doing so will show a status message to signal it has been successful. Afterwards, return the keycard to the pedestal in the Beta lab. Lawrence must also be defeated to initially access the Keycard, though if a Keycard is taken from another world it still fails until Lawrence is defeated.
While Sol is active the player is locked within the lab, like with Lawrence. The main difference, however, is that while Lawrence would despawn if the player escaped the lab (e.g. teleporting out) Sol instead kills them by rapidly firing deathray lasers at the player, regardless of distance from the lab

Fought: Post-Broken
Specification: Post-Broken, Post-Lawrence
Special: Unusual Summoning Method, Superboss
Progression: No


Stats:
Health:
-800,000 (1,050,000) (1,338,750) (Sol)
-250,000 (320,000) (408,000) (False Light's Emissary)
Attack:
-0 (0) (Contact)
-265 (377) (Sol Pillar) (Inflicts On Fire! - 100%, Obstructed - 100%)
-200 (300) (F.L.E.'s Attacks) (Inflicts Withered Armour - 50% or Withered Weapon - 50%)
Defence: 100
DR: 10% Base, 90% Max, 7500 DPS

Attacks:
Phase 1:
Sol will appear in the centre of the room, with its body filling the majority of the beta lab's background. The player can only deal damage to its red core when attacking. Sol does not deal contact damage, instead relying on its Sol Pillar attacks; large deathray lasers that make up the majority of its attacks. Sol Pillars are telegraphed a short time in advance by thin, silver lines that show each pillars' direction
-Sol may summon vertical pillars randomly around the arena, followed shortly by random horizontal pillars once the vertical pillars have dissipated
-Sol may summon vertical pillars around the arena that are evenly spaced apart, sometimes followed by a second wave of pillars summoned in the spaces the first pillars missed
-It may fire several pillars at the player from its core in rapid succession, forcing the player to keep moving to avoid them. The final pillar it fires is a predictive attack that is fired based on the player's current movement path
-It may summon 3 pillars from its core that all rotate in-unison 360 degrees either clockwise or anticlockwise
-It may summon multiple pillars from off-screen that converge at the player's location. This can happen up to 3 times in succession
Once Sol is reduced to 50% health it will let out a pulse of light and enter Phase 2

Phase 2:
Sol fades away slightly and becomes invulnerable, instead summoning the False Light's Emissary to fight for it. Noticeably, it uses the same sprite as the fake versions of Lawrence seen in her rematch.
-FLE uses all of Lawrence's attacks from her battle's first phase until half health
-After reaching half health FLE will use Lawrence's phase 2 behaviour instead
FLE noticeably will either inflict Withered Armour or Withered Weapon with each attack unlike Lawrence herself. She also lacks Lawrence's later phases
Once the FLE is destroyed, Sol lets out another pulse of light and enters Phase 3

Phase 3:
Sol becomes opaque and vulnerable again and remains as such until the end of the fight.
It retains all of its previous attacks, though noticeably enhances some of them:
-The 'random pillar spawn' attack spawns more pillars in both the vertical and horizontal variants
-The 'rotating pillar' attack now has 5 pillars instead of just 3
Sol gains a few new attacks as well:
-It may launch harmless rings of light from its core in random directions that decelerate and stop. Once they stop they release pillars in the cardinal directions from themselves
-It may spawn pillars from off-screen in large, complex patterns; sometimes these will be entirely random-looking, while other times the patterns are organised and symmetrical. Noticeably, the silver telegraphs appear earlier than usual during this attack; giving the player more time to react
-It may create a grid of evenly-spaced vertical and horizontal pillars, only leaving square gaps to avoid them
One final addition to the fight is that, every few seconds, a vertical pillar of light is summoned at the player's location. This acts independently of Sol's other attacks and may hinder the player during some of them should the player not position themselves carefully. These gradually appear more frequently as Sol loses health, though not to an overwhelming degree

Expert Changes:
-The silver telegraphs do not appear as quickly, in turn giving less time to dodge Sol's attacks
-Any Expert changes that affected Lawrence's fight also affect the False Light's Emissary


Defeat: Lets out a loud, echoing shout before disappearing into a brilliant flash of white, akin to the Moon Lord. Additionally, a ring-shaped 'pulse' of white light is created that travels outward for a short time before vanishing

Drops:
Drops the Light Monolith as a guaranteed drop, a purely vanity item to indicate Sol's defeat, as well as Sol Shards; a 'furniture' item to be placed on walls or against blocks that create strange and complex shapes as they are placed next to each other
In Expert Mode it drops a Golden Light Monolith; a golden version of its normal Monolith drop, to indicate the higher difficulty

Lore:
An experiment that tried to draw forth beings from another reality that, in turn, failed. The energy of the portal instead attracted the attention of Sol, which in turn ravaged the lab and exterminated all but one of the experiment's participants. Its whole body, aside from its solid core, seems to shift and move like water.

Hints:
-Since Sol is stationary the entire fight, using sentries is entirely viable for Phases 1 and 3
-All of Sol's attacks are telegraphed, so keep an eye out
-Strategies for taking on Lawrence's 1st and 2nd phases will, in turn, work for FLE as well
-Phase 3's additional periodic pillar spawn is awkward, though never makes any attack entirely unavoidable with careful movement
--If any attacks that box the player into a confined area are used, stick close to one of the walls in case the additional pillar spawn occurs. If it does, move to the other wall so it only takes up a portion of the confined space as opposed to most/all of it

Extra Info:
-Sol's designs draw from a few things, some of which include Hollow Knight's The Radiance and Boss Ideas 7's Black Hole Sun
-Sol has one of the shortest names of any boss in Boss Ideas, consisting of only 3 characters
-The word 'Sol' has a few different meanings, though of course the most obvious is the solar connotation. However, the mention of its liquid-like body and solid core might give it some mild connotations to its meaning in chemistry as well
-The 'lone survivor' of Sol's attack on the lab was likely Lawrence, being that she is the only other character directly associated with Sol
[Added: 8/7/22]
The Core

Appearance: An entirely black and red entity whose 'main' form appears spherical. It has an oval-shaped red shape on the front of its body in the general shape of an eye. However, its form changes continuously throughout the fight

Summon: The Core can only be summoned at a pedestal that initially spawns towards the centre of the world in the cavern layer; filled with red vines and a black, gunky floor and walls. The pedestal can be taken, with the tooltip changing depending on game progression to indicate when it can be used.
Pre-Moon Lord it states 'A cosmic energy keeps it sealed', after Moon Lord but before the Broken's final fight it states 'Withered by something otherworldly', and after the Broken is defeated it will state 'It hungers for a good meal'
After this the player has to place the pedestal and use the Churning Meatball, summoning the Hunchback. It will land next to the pedestal when summoned and cannot be attacked, instead the Pedestal grows and envelops the Hunckback, consuming it, before returning to normal size. During this process any blocks with a pickaxe requirement below 200% in a 10x10 area around the pedestal are converted into the same ooze-coated blocks from where the pedestal was found, complete with red vines appearing from any blocks above it
Once the Hunchback is consumed the pedestal will spit out a new non-consumable summoning item, simply called Hunger. Using this item will summon the Core.

Fought: Post-Broken
Specification: Post-Moon Lord, Post-Broken
Special: Uncraftable Summon, Unusual Method to Obtain Summon, Superboss
Progression: No


Stats:
Health:
-215,000 (300,000) (382,500) (Core Dragon)
-205,000 (288,500) (367,838) (Core Base)
-145,000 (210,000) (267,750) (Core Puppeteer)
-200,000 (281,750) (359,231) (Core Broken)
-245,000 (325,000) (414,375) (Core Heart)
--1,010,000 (1,405,250) (1,791,694) (Total)
Attack:
-280 (400) (Dragon Melee, Base Explosion, Puppet Melee)
-270 (384) (Shadow Fireball, Crimson Flame Trail, Crimson Tear)
-260 (370) (Crimson Flames, Base Melee, Shade Bullet, Puppet Blades, Mines)
-240 (342) (Shade Globules, Shade Rain, Puppeteer Melee, Mine Fragments, Shadow Cinders)
-300 (425) (Broken Melee, Deathray, Heart Melee)
Defence: 50
DR: 15% Base, 90% Max, 6500 DPS

[All of this boss' attacks inflict Broken - 100%]

Attacks:
The Core effectively acts as an entirely new boss within each phase, meaning that its behaviours and attack patterns are a lot harder to pin down than other bosses. Some phases are reminiscent of other bosses, but their behaviours are almost entirely different
One consistency among phases is that the player must remain close to the Core at all times. Moving too far away from the core will inflict Withered Armour, Withered Weapon, Obstructed and Broken on the player until they get close enough to them again

Phase 1:
The Core will take on an appearance reminiscent of the Hunchback boss, though has a notable difference in a pair of wings that grant it flight. This form is referred to as 'The Dragon'
The Dragon typically flies roughly horizontal to the player as much as possible, not slowing down or stopping even when preparing attacks
-It may open its mouth and vomit 'shade globules' at the player, small black circular projectiles that are affected by gravity. It typically fires many of them over the course of a few seconds in an inaccurate barrage
-It may roar before charging at the player rapidly. It will charge up to 5 times in succession
-It may roar, causing large, floating disembodied versions of its head to begin spawning near the player. These are stationary for a short time, then lunge towards the player in an effort to 'bite' them before disappearing. They deal the same damage as the Dragon's contact damage
-It may fire an inaccurate stream of crimson flames towards the player. After a random span of time these flames split into 2 smaller fireballs as they travel
Once taken down to 50% health the Dragon will enrage, changing to its second sprite and enhancing its patterns
It will gain 2 more attacks at this point, as well as gaining a small boost to its attack speed
-It may roar, pause for a moment, and then charge at the player up to 4 times. Unlike the previous charges, these are predictive and so charge based on the player's movement as opposed to directly towards them
-It may open its mouth and release a mixture of shade globules and crimson flames. This barrage is a lot more inaccurate and chaotic than the other 2 similar attacks
Once the Dragon form runs out of health, it will let out a shriek and melt down into a black circle which then returns to the Core's main 'Base' form

Phase 2:
The Core now takes its 'Base' form seen at the very start of the fight; consisting of the black orb with a red, eye-shaped mark at the front. Its form changes depending on its attack, though typically it keeps a more circular body type
-It may split apart and fly upward, becoming invulnerable. After a short delay black projectiles rain down from the sky diagonally for the next few seconds over a wide area. Once the attack ends the Base reforms
-It may become jagged and split into 3 versions of itself. These dash to random locations around the player before all 3 charge towards the player in unison. It does this up to 3 times in succession before all 3 merge back into 1 at the end of the attack
-It may teleport close to the player, with its eye becoming a red 'x'. After a brief delay it will explode, seemingly disappearing, before various other small explosions begin happening randomly nearby, telegraphed by red particles indicating where these explosions will spawn. Once the explosions stop the Base reforms
-It may take on the 'many eyes' form (seen above) and begin teleporting to random locations, firing high-velocity 'shade bullets' with every teleport towards the player
Once this form runs out of health, it will begin to melt away. It seems to split in half, though as it does so the two halves begin forming into its next phase
The Core (Continued)
Attacks (Continued):
Phase 3:
One of the parts of the Core becomes the Puppeteer, while the other becomes the Puppet.
The Puppeteer is a butterfly/pixie-like creature with red wings. It tries to keep away from the player with dashes and teleports instead of attacking them, though needs to be defeated to progress
The Puppet takes a form akin to Lawrence's rematch silhouette, though with a different stance. It can be attacked and targeted by homing shots and minions but it cannot be killed, instead acting as the Puppeteer's bodyguard
At the start of the phase the Puppet will spawn 3 large, spinning red blades that chase the player, though have trouble turning. These blades can be attacked as well, with attacks knocking them away, though they too cannot be destroyed.
The Puppet proceeds to perform all the attacks in this phase, typically using a large axe for its weapon:
-It may duplicate itself, with all of them vanishing briefly. They then begin appearing either above or vertically-aligned with the player, either thrusting their weapon downwards or dashing horizontally towards the player, with each Puppet despawning afterwards. The last Puppet to emerge, however, does not despawn
-The Puppet will summon mines around itself and use its axe to knock them towards the player. Each mine with eventually explode into a burst of 6 evenly-spaced fast-moving fragments
-The Puppet may dash to a position above the player and begin spinning its weapon overhead, summoning a large amount of shade globules that are launched in random directions
As the Puppeteer loses health it becomes progressively more evasive; dashing and teleporting more often, until it is defeated
Once the Puppeteer is defeated, it and the Puppet melt away and fuse back into a single entity. The 3 blades spawned at the start of the phase also disappear. After a short delay it begins to take a form akin to the Broken

Phase 4:
The 'Broken' form takes a form fairly similar to the Broken's final fight, though with some subtle differences over the sprite. The main difference is a large red 'x' engraved within its chest
The Broken follows a pattern of teleporting near the player, charging towards them, and then using one of its attacks
-It may roar and shudder, causing several mines to spawn in random locations within its vicinity. Broken doesn't interact with them itself, but otherwise they act identically to the ones from Phase 3; exploding into 6 fragments after a delay
-It may fire a deathray towards the player, making it sweep towards them at high speed for a couple of seconds
-It may launch shadowy fireballs from its mouth towards the player. These have a homing effect initially, though eventually lose it before promptly exploding into 4 smaller fireballs, called shadow cinders. These cinders are released cardinally and also have a very weak homing effect themselves until they disappear
-It may roar before teleporting near the player and releasing 4 deathrays from its chest in an 'x' shape
-It may dash at the player 3 more times in rapid succession, leaving long-lasting trails of flame in its path with each dash that usually persist through the next few attacks
Once this phase runs out of health it will curl up, eventually turn back into the circular form, and then begin shifting into a strange shape for its 5th and final phase

Phase 5:
This phase is referred to as the 'Heart', consisting of a long, curved shape with a large eye at the front and 6 curved red lines around it, possibly other eyes.
The Heart teleports between attacks and does not move outside of these teleports. Each attack it has mainly consists of crimson tears; slightly transparent red projectiles, fired en masse in complicated patterns
-It may create an 8-armed spiral of crimson tears. As it does this it releases mines around itself randomly that act as they did in prior phases
-It may create a 4-armed spiral of crimson tears, as well as 4 rotating deathrays in a + shape. The spiral rotates in the opposite direction of the deathrays
-It may create tightly-packed 'bursts' of crimson tears; releasing them all around itself. These have small gaps within them for the player to navigate through
-It may create multiple 'bursts' consisting of 12 evenly-spaced crimson tears each. As it does this it releases a constant, tightly-packed stream of crimson tears towards the player
-It may create a 6-armed spiral of crimson tears. As it does so it also fires off deathrays; alternating between + and x shaped patterns every 1.5 seconds
As the heart loses health it will begin beating faster, causing it to attack faster; this in-turn makes individual attacks progressively shorter, but eventually adds the risk of some attacks 'bleeding into' other attacks due to projectiles from prior attacks lingering as new ones begin

Expert Changes:
-Every attack is generally faster
-Area around the Core that the player has to remain inside to avoid being debuffed is slightly smaller
-Attacks consisting of a disorganised barrage of projectiles (e.g. Dragon's vomit attacks and the Puppet's shade globule rain) have more projectiles


Defeat: Once the heart is defeated it lets out a loud, echoing shout as it begins melting away into a ball of ooze. This then collapses in on itself, covering itself in red cracks, before exploding into a brilliant red and white explosion

Drops:
Drops the Core Monolith as a guaranteed drop, vanity furniture indicating the Core's defeat. It can also drop the Shifting Mass; red and black blocks that pulsate and additionally halve fall damage when landed on
In Expert Mode it drops a Golden Core Monolith; a golden version of its normal Monolith drop, to indicate the higher difficulty

Lore:
Something most peculiar, having seemingly witnessed some of the player's prior battles and mimicked them. It watches silently in a dormant state until its hunger is satisfied

Hints:
-As per usual, deathray attacks have a thin, red line to telegraph the direction they are fired
-Most of the phases seem to generally be more problematic for certain playstyles or builds
--The Dragon is worst for nohitters due to the high degree of randomness in its projectiles making consistent dodging patterns hard to find
--The Base is awkward for speedrunners, since 2 of its attacks make it invulnerable while a third actually gives it more hitboxes, and thus the randomness factor can affect the speed of this phase significantly
--The Puppeteer is trickier for players using homing projectiles, minions, or short-ranged attacks like true melee. The former two have issues since the Puppet can be homed-in on or targeted, while short-ranged attacks are bad since the Puppeteer generally tends to try and keep away from the player
--The Broken phase can be an issue for smaller arenas or low-mobility builds due to the number of lingering projectiles and the surprising amount of space covered by the Broken's deathrays
--The Heart is generally just difficult due to being a high-speed bullet hell phase as opposed to being overly-troublesome for a particular playstyle

Extra Info:
-The Core is a mixture of various other superbosses who fought for the position of the last superboss
--One of these, Ruin, effectively became Phase 4 in concept; being a boss that relied on many disconnected projectile attacks the player had to keep track of
--The Mirror, another scrapped boss, was the inspiration for the Puppeteer's design. It was also the inspiration for each phase acting as its own boss, since the Mirror was effectively a boss rush when it was designed
--A more directly Arterion-inspired superboss was also scrapped early on, with certain aspects being mixed into the fight
[Added: 9/7/22]
[Final Notes]
Boss Ideas 13, like with 12, has been in the works for a fair amount of time and has gone through a lot of changes, though I hope people like the general outcome of it nonetheless :)

Want to give a big shoutout to Slayer, who at this point is probably the biggest Boss Ideas fan out there, for continued support, as with anyone else who encouraged me to make sure I actually get this done


As per usual I might come back and tweak some bits of this page, which will be timestamped for individual bosses... very likely to come back to some of the later bosses to make them less wordy where I can, since I know not everyone actually likes the text walls

Also don't forget that the 'Boss Ideas 6 Reborn' page has some context for certain things, since this is effectively the same 'canon' from it, so certain elements will inevitably bleed over that I don't describe as much there (mainly just mention of Arterion and some other events), so some of it is explained over there if you're interested


As for later things, Boss Ideas 14 is still happening at some point, though I don't have any planned dates or any particularly solid plans after that, so we'll just have to wait and see :)

Anyways, big thanks for coming to check out this page, and I'll see you next time
46 Comments
Okami Tomato  [author] 10 Oct, 2024 @ 4:45pm 
Thanks 'v'

(Sorry for the laughably late response, didn't actually get notified about the comment and only just found it)
GlassesPerson 6 Apr, 2024 @ 9:48pm 
DAMNN these are cool
GlitchSans240 3 Apr, 2024 @ 5:09pm 
*Triple reference
GlitchSans240 3 Apr, 2024 @ 5:08pm 
[2/2] ...while the mainly-white appearance with a red eye mark on its front would reference Zero, the secret, true final boss of Kirby's Dream Land 3, who can only be fought after collecting every piece of the Love-Love Stick, found throughout the game, then defeating Dark Matter, & 02 (pronounced Zero-Two), the secret, true final boss of Kirby 64: The Crystal Shards, who can only be fought after collecting all of the titular Crystal Shards scattered throughout the game. However, unlike The Core, Astral Birth Void actually uses its boss-mimic forms' attacks. My suggested change would be a cool double reference imho.
GlitchSans240 3 Apr, 2024 @ 5:08pm 
[1/2] Maybe The Core's base color could be changed to white with constantly shifting rainbow-line markings as a reference to Astral Birth Void, the ultimate final boss of Kirby Star Allies, whose core (Phase 4) shapeshifts into different forms whose appearances reference bosses from past games in the Kirby series, in a similar vein to most of The Core's forms resembling past bosses from the mod,...
Okami Tomato  [author] 3 Apr, 2024 @ 5:24am 
A couple of bits are possibly showing up in the Malignant Mod, but as for this page itself becoming a proper mod I'd need a proper team for that... so for the time being it's stuck as a Steam page
cheesenuggets 3 Apr, 2024 @ 4:42am 
i genuinely believe if this was a mod, itd be in like
top 10, at LEAST.
could be higher
Okami Tomato  [author] 3 Jan, 2024 @ 2:37pm 
I'd probably need a full team for that, which is unfortunately something I don't have
Axolotl 3 Jan, 2024 @ 8:56am 
This is AMAZING. If you know how to please make a mod with these.
zooishgirl 29 Dec, 2022 @ 8:29am 
aaaaaaaaaaaaaaaaaaaaaaaaaa