Avorion

Avorion

96 ratings
Avorion Hitchhiker's Guide to the Galaxy
By JainaProudgurl
This guide will provide everything, and I mean EVERYTHING that you would want or need to know about Avorion. This is currently a WIP and will be updated as I find more information and you guys give me more feedback. Feel free to tell me what I'm missing and what else you would like to see in this guide.
4
2
2
2
   
Award
Favorite
Favorited
Unfavorite
Materials and You
Avorion is rich in resources and contains many different ways to obtain them. Each resource also has some variables that make it better or worse for certain things. Other materials are also incapable of being used for specific systems, meaning that sometimes obsolete materials need to be used. Specifics stats of each are detailed more on the shipbuilding page. In this part of the guide, we're going to focus on locating and mining these minerals.


Above is a diagram that you should become very familiar with. It's what most players use as their defacto guide to the game and works to both tell where minerals spawn and where bosses spawn. Below is a list of minerals and where they spawn.

Material
Mining Area
Incapable of:
Iron
Anywhere
  • Energy Generators
  • Energy Containers
  • Shield Generators
  • Integrity Generators
  • Hyperspace Cores
  • Computer Cores
  • Hangar
  • Academy
  • Cloning Pod
  • Transporters
Titanium
Anywhere, but more common past the first Red Line
  • Shield Generators
  • Hyperspace Cores
  • Computer Cores
  • Hangar
  • Academy
  • Cloning Pod
  • Transporters
    *] Inertia Dampeners
Naonite
Past the first Yellow Line
  • Computer Cores
  • Hangar
  • Academy
  • Cloning Pod
  • Transporters
  • Armor
  • Inertia Dampeners
Trinium
Past the second Yellow Line
  • Cloning Pod
  • Transporters
  • Inertia Dampeners
Xanion
Past the first Blue Line
  • Armor
  • Inertia Dampeners
Ogonite
Close to the Second Blue Line
  • Shield Generators
  • Integrity Generators
  • Hyperspace Cores
  • Computer Cores
  • Hangar
  • Transporters
  • Inertia Dampeners
Avorion
Past the Barrier (Second Blue Line)
  • Armor

Do note that all of the above values apply for salvaging as well. Ships with these materials will spawn after the points mentioned; however, ships are generally only made of materials from the currently available materials and the two previously available materials. So for example, if we're in a Xanion area, expect only to run into salvage with Xanion, Trinium, and Naonite (Iron however is on a lot of ships, due to Inertia Dampeners requiring Iron). Also worth mentioning is that Factions always prefer the best materials available to them, whereas Pirates and Aliens generally use the previous two materials for their ships.

Mining and Salvaging

Mining and Salvaging are some pretty straightforward activities; you get a Mining Laser or Salvaging Laser and use it on the relevant objects. However there are some intricacies that are worth mentioning.

First, although it doesn't seem like it at the start, by mid to late game you will realize that you will need way more materials to continuously upgrade your ship due to the amount of processing power required to keep upgrading it. You also need a material supply to build your fleet, which will be covered in another section. Your dainty normal lasers just aren't going to cut it, and honestly they're a bit of a waste of resources due to how much you could be extracting.

The solution is best divided into steps: R-Mining / Salvaging and Automation.

You should look to acquire an R-Mining Turret and Salvaging Turret ASAP. Baseline, they will likely at least double your yields, eventually getting to a point of quadrupling them by the end of the game. Make sure that you have a good size cargo bay for your R-Turrets; unlike normal turrets, they don't automatically refine things for you so you need to process them at a refinery. This is the first big step towards being able to support your material needs.

Hangars and Fighters

The second big step would be hangars, and should be explored once you get access to Xanion. You want to make hangars and add a transporter of any size to your craft (note, that you also need to permanently install a RARE or better Transporter Software. This is honestly the harder part to this setup and shouldn't be done until this is obtained). You then have three options:

Option 1: Buy a Squad of R-Miners / Salvagers Fighters - This is costly, but is quick and also saves on materials. You are heavily at the mercy of RNG for this option.

Option 2: Buy a Single Fighter and produce the rest. This requires a decent amount of materials, and will often also take quite a bit of time. To produce the fighter you just bought, you drag it into the second blank slot from the left in your hangar screen. Remember that you need to have assemblies on your ship for this option.

Option 3: Create your own Fighter. You can create your own fighter and use Option 2 to reproduce it; You can do this by taking a turret to a fighter factory. It will then show a menu. On the left, you select your fighter design which needs to be selected before anything else (this has no effect on the fighter itself, its just aesthetic). On the right, you then select the turret you want to use. You want the turret with the highest efficiency you can possibly find for this. Remember that all modifiers on this turret are also applied to the fighter, so if it has increased range or damage, then it increases the range or damage as well for the fighter. Once you select these, you then can change various variables using "skill points" in the middle. Ideally, you want size to be as low as possible with the rest put into speed and maybe a point or two in maneuverability. Durability is pointless for mining fighters. Once you're done, you click the button and then follow Option 2. This is way more labor intensive, but it also is way more reliable at getting you what you need.

After this, you can command your fighters to harvest for you. If you haven't already, I highly recommend getting a captain so you can autopilot mining instead of doing it manually. Watch Youtube or something while mining at your heart content; I do however recommend paying attention or mining in faction-controlled sectors; Otherwise, you could get destroyed by Pirates or Aliens that warp in.

This is where Automation comes in. Eventually, you will want to make dedicated ships for mining that are automated. Eventually you reach a point where mining will become too tedious for you to get all the materials yourself, and you probably want to actually do things other than mining in the game anyways. Due to steam guide character limits however, this will be explained in the Fleets part of the guide. If you decide to skip to that portion of the guide, please visit the captains page first.


Ship Subsystems
As outlined in the previous article, every resource has access to specific subsystems, with each tier having increasing usefulness. Unfortunately to the uninitiated, this system can seem a bit weird because tiers aren't quite linear; no resource is necessarily better than another and each has their distinct uses. Most resources will be used for very specific parts, but this also depends on what your goals are. If you're looking for the most efficient hull / weight for armor, Ogonite will always be the best option. However, Trinium is very close to the same efficiency in terms of hull / weight, costs way less, and is way more abundant. So for large builds, Trinium actually can be way better for building late game armor than Ogonite. To help you better understand this, this article will help you by providing you with the statistics for each resource, and highlighting their specific strengths.

Some blocks in Avorion have no scaling based on the materials used. Because of this, with these blocks it's up to the player to best determine what materials to use for them, usually the material that costs the least, weighs the least, or gives the most HP.

The blocks that fall in this grouping are Hull Blocks, Engine Blocks, Stone Blocks, Cargo Bays, Crew Quarters, Thrusters, Hangars, Docks, Solar Panels, Integrity Field Generators, and Computer Cores. For them, the below table will suffice to help you better make a decision.


When it comes to the Transporter, you should just make it with whatever resource you want. The Transporter has no minimum size requirement and does not change based on the resources used; therefore, the only thing to consider is the mass / hp ratio, since you only need a very small one on even the largest ships. Because of this, the highest tier resource you have access to is always the best for this component.

Generally speaking, once you gain access to Trinium, all things that can be made from Trinium should be made from Trinium due to it having the highest weight / hp efficiency out of all materials.

There are two exceptions to this; One, this is considering if you had infinite space to build. Because that is not the case, eventually you may want to use the material that's the most efficient for the amount of space used.
Second, is Hyperspace Cores. Hyperspace Cores Avorion is always the best material to be used because of it scaling 25% better than every other resource in the game. Before that, its whatever highest tier resource you can make it from.
Ship Modules
Modules are items that you install into your ship to provide varying effects. There are a large range of modules, with a lot of different variations for the player to use. Also like weapons, the modules can range from Broken all the way up to Legendary in quality. Every module also has some psuedo randomized values, with modules obtained closer to the core generally having higher values than ones found elsewhere. Below is a complete list of modules; Due to character limits however, I will not be including Into the Rift module variants. For Into the Rift module variants, just know that they can take any two of the normal modules below (including its variants) and combine them. This basically means you're just condensing down slots, which is very useful late game.

Module Type
Effect
Variants
Radar
Energy Generation
Energy Storage
Cargo
Turret Capacity
Hyperspace
Velocity
Fighter
Mining
Trading
Polarizers
Shield

Xsotan Artifact Modules are special modules that are obtained through killing various bosses or doing certain things in the galaxy. Below is a table saying how to get each and what they do. SPOILER: They are also used to open the gateway to the core. You will need one of each to do so.
Factions
Factions are groups that make up your Galaxy within Avorion.

On your initial start, the faction you spawn in will always have an "Excellent" relationship with you.

There are 5 distinct relationship levels within Avorion. You can get an approximation of this level based on the color of their ships and stations when you look at their icons. This follows a scale, that is shown below.

  • Hostile (At War) - Red
  • Bad - Orange
  • Neutral - Purple
  • Good - Blue
  • Excellent - Light Blue

Traits

Furthermore, each faction has up to 5 traits, with at least a minimum of 2. Additionally, these traits may be labeled as Somewhat or Very. These effectively change how the traits behave based on what they are supporting. Somewhat means that the trait has some but not all of the effects of the normal trait, whereas "very" means that the trait contributes to relationships more than normal and have stronger effects.

Trait Name
Effect
Somewhat Effect
Exclusive With
Unique Effects
Aggressive
  • Send more reinforcements.
  • Less reputation loss when attacked.
  • More Reputation when buying weapons.
  • Increased cost for negotiations.
  • Send more reinforcements.
Peaceful
  • Decreased starting reputation with players.
  • May attack neighboring faction's sectors.
Brave
  • Send more reinforcements.
  • Decreased reputation from commerce.
  • Send more reinforcements.
Careful
Careful
  • Increased Cargo scan range.
  • Military ship are more heavily armed.
  • Has more Security defending from boarders on ships.
  • Greater loss of reputation when attacked.
  • Increased Cargo scan range.
  • Military ship are more heavily armed.
  • Has more Security defending from boarders on ships.
Brave
Generous
  • Lower fines and reputation loss from smuggling.
  • More patience in negotiations.
  • Decreased negotiation costs.
  • Lower fines and reputation loss from smuggling.
  • More patience in negotiations.
Greedy
Greedy
  • Higher fines for smuggling.
  • Commerce and tribute generate more reputation.
  • Less patience during negotiations.
  • Increased negotiation costs.
  • Higher fines for smuggling.
  • Increased negotiation costs.
Generous
Honorable
  • Send more reinforcements.
  • Loss more reputation for smuggling.
  • Loss more reputation for attacking civilian ships.
  • Less patience during negotiations.
  • Send more reinforcements.
  • Loss more reputation for attacking civilian ships.
  • Less patience during negotiations.
Opportunistic
Mistrustful
  • Increased reputation loss from smuggling.
  • Decreased reputation from tribute.
  • Increased reputation thresholds for negotiation.
  • Decreased threshold for terminating treaties.
  • Increased reputation thresholds for negotiation.
  • Decreased threshold for terminating treaties.
Trustful
Decreased starting reputation.
Opportunistic
  • Less reputation lost for smuggling
  • No reputation loss for attacking other factions civilian ships.
  • Increased cost for negotiations.
  • More patience in negotiations.
  • Less reputation lost when attacking other factions civilian ships.
  • More patience in negotations
Honorable
Peaceful
  • Send fewer reinforcements.
  • Lose more reputation when attacked.
  • Increased reputation from combat support.
  • Increased reputation from commerce & negotiations
  • Negotiations cost less.
  • Send fewer reinforcements.
  • Negotiations cost less.
Aggressive
Increased starting reputation.
Trusting
  • Alliance negotiation threshold lowered.
  • Increased threshold for terminating treaties.
  • Alliance negotiation threshold lowered.
  • Increased threshold for terminating treaties.
Mistrustful
Increased starting reputation.

      Above is all currently known faction traits. Please note, that even if a trait increases or decreases relationship, the game independently evaluates each factions relationship with the player when you join a game and randomly changes their relationship to one of the levels described at the top of the article. This can cause factions that baseline should like you to drastically dislike you, and ones that should dislike you to instead like you, determined by RNG. After this initial relation is calculated is when the increased / decreased relations are applied by a trait.

      Relationship

      Increasing and decreasing your relationship can be achieved through a variety of means. Naturally, decreasing relationship is rather fast and simple.

      Here are the ways you can do each, with the most effective to the least effective from top to bottom:

        Increasing Relationship:
      • Help defend against attacks from a neighboring faction. (Note, this instantly allies you with the defending faction and declares war on the attacking faction.)
      • Selling Asteroids. Relationship with buyer determines how much they are willing to pay and how much relationship will be given. Lower relations give more relations and less money. Relationship from this method is capped at 45k. This method is not highly recommended due to the money making potential from mines, but may be necessary if relations don't allow for missions or trading.
      • Help defend against attacks from Aliens / Pirates. (Note, occasionally you don't get relationship from aliens. Not sure why.)
      • Trading. Buying goods always gives relationship, whereas selling only gives relationship for requested goods. Relationship is determined by the volume of credits associated with the transactions. Relationship from this method is also capped at 45k except for buying equipment at the equipment dock, where it is capped at 75k.
      • Missions. Missions give varying amounts of relationship, based on the mission type.
        Decreasing Relationship:
      • Help an enemy during an attack from a neighboring faction.
      • Boarding any ship or station that they own.
      • Attacking a transport ship that they own. (Note, this decreases relationship with all witnessing factions as well unless they have the Opportunistic trait.)
      • Attacking a station or ship that they own.
      • Smuggling goods through their territory without a licence and getting caught.
      • Founding stations within their sphere of influence. Not a recommended way to decrease relationships due to cost. (Allys of a faction don't get penalized for founding stations inside the factions sphere of influence)
      • Failing to complete purposely accepted missions within their time limit.

      Sphere of Influence

      Factions all have a Sphere of Influence. This is represented by a "haze" on your minimap that is the color of your relationship with a faction. The Sphere of Influence is divided into three separate territories; Outer Territories, Central Territories, and No-Mans Land. Territory is decided by the density of stations within an area.

      Hidden Sectors and Unique Objects
      Trading and Goods
      Captains
      Captains got a massive rework in 2.0 to make them feel more unique and useful to the jobs that they perform. Captains have 3 tiers, and each captain has a bonus that makes them more useful for specific things, giving bonuses to whatever ship that they command. Every captain also has a set of traits that accompany them that change the results of missions.

      There are currently 8 types of Captains

      Captain Type
      Mission Bonuses
      Captain Bonuses
      Scouting Discoveries
      Common
      None
      • Turns into a Specialized Captain Based on whatever Action completed when turning Level 5
      Civilized Sectors Only
      Miner
      • Increased Yield from Mining Missions
      • Increased maximum length for Mining Missions (Increases based on Level)
      • 2 Unarmed Turret Slots
      • Highlights Hidden Ores
      Asteroid Hidden Sectors
      Salvager
      • Increased Yield from Salvage Missions
      • Increased maximum length of Salvage Missions (Increases based on Level)
      • 2 Unarmed Turret Slots
      • Highlights Valuable Salvage
      Wreckage Hidden Sectors
      Merchant
      • Can do Trade Missions
      • Cargo Licence for Suspicious and Dangerous Goods
      Civilized Sectors Only
      Smuggler
      • Can sell Stolen Goods.
      • Cargo Licence for all Goods
      Smuggler's Hideout Hidden Sectors
      Commodore
        • 2 Armed Turret Slots
        • 4 Auto-Turret Slots
        Daredevil
            +10% Fire Rate
          Explorer
          • Guaranteed to find an item after completing any mission
          • +3 Deep Scan Range
          All Hidden Sectors
          Fleets
          Player-Found Stations : A Course in Economics
          Rifts (WIP)
          Rifts are a mechanic that you have access to if you decided to get the Into the Rift DLC. These areas are meant to be hard and can be quite taxing if you don't know what you're doing. That being said, these missions are the only way to get hybridized modules, so they can be well worth it.
          Bosses and Where to Find Them
          Getting Good: Tips, Tricks, and all around how to get Rich Quick
          In Avorion, there's a lot of different strategies you can employ to make massive amounts a money, and ultimately the easiest way depends on your preferred play style as well as the options you chose when starting the game.

          Ultimately, your end goal for making money is to make stations that produce goods in Avorion. These stations may cost a lot of money, but you'll realize really quickly that they're kinda OP in terms of money production if placed right.

          So, you have a few main goals when starting the game:

          The Main Goals

          One. Get well equipped to defend yourself and explore.

          Two. Explore and find an area with a massive resource defecit. The easiest way to do this is using a high end trade module.

          Three. Find the location of a Research Station, Turret Factory, and Fighter Factory. Believe it or not, these are three INCREDIBLY important stations in Avorion. Without them, you have to heavily rely on RNG to give you the drops you would want, which isn't ideal. These Stations will help you way more than you may think, and all of them scale based on what inputs you put in; In essence, meaning that even if you were in the absolute corner of a map you can still make Avorion quality items as long as you have the ingredients to do so.

          Four. Establish a fleet. It gets tedious to explore, mine/salvage, trade, expand, and eliminate hostiles all by yourself. Remember that only specific captains can do specific things. Ideally, the only things you should ever need to do are explore farther towards the core, expand your territory, as well as deal with the occasional hostiles. However, that's not to say you can't do the other things yourself. You should always look for unique opportunities to quickly get you resources that you may need, because fleets are quite slow and can be inefficient, but make up for it with their numbers. IF you see a station wreck somewhere, you should definitely salvage it yourself because it would take an AI way too long to do it. There are even some tasks that AI do better than you; If you find a Smuggler early on, it may be easier to be opportunistic and attack a trade outpost in a contested sector and transfer all the goods to your smuggler captain. He can get high rates for stolen goods without ever getting in trouble, netting you about double the profit that you would normally get from having to go to a hideout and unbrand goods.

          Its always worthwhile to keep all of these goals in mind. With these goals in your head, it makes it a lot easier to focus on what things you need to do.

          So how do I do them and in what order?

          Getting equipped early is probably the hardest goal. Ideally, "equipped" in this case means a ship that can comfortably take on any challenge thrown at you, and obviously how well equipped it needs to be changes as you get closer to the core.

          A good way of doing this if you don't mind cheesing game systems is to constantly reroll stations and Equipment Docks for the Captains, Turrets, and Modules you need. This unfortunately is impossible to do in Multiplayer, but in Singleplayer all you have to do is constantly enter and exit the main menu to refresh stations. You generally want to do this to get some good modules as well as find specific captains. Remember that for Captains, you want to avoid rerolling stations with prioritized captains, so I highly recommend rerolling in systems with a crap ton of normal factories.

          My main recommendation is to get to Naonite and get the knowledge to use it ASAP. Shields are extremely important in Avorion, and the game will kinda suck until you get one since Torpedos can annihilate your ship pretty quickly without Point Defense systems, which seem to be quite rare early on. Although I don't recommend selling Asteroids, at this early point in the game they are fairly useless to you, so if you need quick cash then selling Asteroids for a quick buck isn't a bad idea. Alternatively, mining and selling ores / scrap actually can be highly profitable early on. If you are looking for a way to make money with little to no risk while not relying heavily on RNG, this is the second best option.
          Your final option is to find early profitable trade routes. Early in the game, you're generally limited due to your money reserves and cargo capacity. Because of this, trade is generally more recommended for later in the game, with a notable exception: If you can manage to find a sector with a trading outpost of two warring factions, take the opportunity to attack it, loot it, and then either quickly transfer the goods to a smuggler or head to a hideout to unbrand them (highly recommend just finding and using a smuggler though. Captain will be way cheaper than unbranding the goods and make you way more money.) Early in the game, this can EASILY take you to somewhere between 500k-800k depending on what the trade station had. Just be careful, because you could get immediately in trouble for suspicious goods if you don't have a specialized cargo bay or a smuggler captain on your own ship. If destroying the station is taking a while, I highly recommend using torpedoes since they're generally useless in Ship-to-Ship combat since the AI prioritizes killing them.

          Once you've done that, I would start forming your fleet. This will give you your first passive income and will help you with exploring as well as finding the three stations you will want. Ideally, start with making a mining ship and set it to mine for as long as possible to get everything from Iron to Naonite (make sure to add a mining module, it increases their output on mining missions). Then, make a ship for trading with a really large cargo capacity and hyperspace range with a good trade module (NOTE: MAKE SURE NOT TO USE THE HYPERSPACE MODULE THAT HAS INCREASED CD TIME. YOU WILL ALMOST ALWAYS LOSE THE TRADE CONTRACTS) and do whatever trades you can afford and are profitable. By setting these up early, it sets you up nicely to be able to explore pretty much uninterrupted while being able to build up your ship. Make sure to keep your Miner up to date with your current ore tier, and you'll be able to keep your ship at an acceptable level for exploring and expanding.

          Once you've got a bare-bones fleet operating, you then should focus on finding an area with a huge deficit of a trade resource. Without a trade module, it can be a bit hard to do; but the easiest way to do this is find areas with a large amount of one type of factory. This almost always guarantees a shortage of at least one of the goods used in the process. I do highly recommend using a trade module for this however, because they will show area deficits without you knowing what is in each sector. Ideally, for the first deficit you are looking for factories that need resources produced from mines (Silicon, Coal, Platinum, Gold, etc.) Then, you want to find a claimable asteroid near this territory, claim it, and then set it to produce the materials needed. Once this is established, it will automatically trade with local stations at the price rate that those stations offer as long as its close to that sector. For your first station, I recommend founding it in an already claimed sector of another faction. It will hurt relations unless you are allied, however they will still trade with the station and defend it, which is all that you need. You want this because you don't want to have to rush back to your station every 10-20 minutes due to pirate attacks. If it has other stations in it of another faction, it means that they will send reinforcements to defend their territory and thus you will be relatively well defended.


          12 Comments
          Poggle the Greater 29 Mar, 2024 @ 11:30am 
          Awesome guide, been using it for a while and still use it. Wishing you the best Jaina! Hope things work out for you mental health wise
          JainaProudgurl  [author] 23 Feb, 2024 @ 10:52pm 
          @MattyK Thanks for your contribution to the cause!

          Honestly, its still just convenient. I don't think its necessarily perfect, but given the lack of technical information on the game its about as much as normal players could probably approximate without data mining.

          I wish that I was a more avid player, because I would love to put a lot more effort into this guide and make it a defacto wiki for this game; but alas I routinely deal with depression and it makes me quite fickle when it comes to the development of this guide. I'm sure I will get it there eventually, but I hope it doesn't take another 2 years for me to finish.
          JainaProudgurl  [author] 23 Feb, 2024 @ 10:47pm 
          @mkinjubhy I know this was a long time ago, but I'll answer now since you asked.

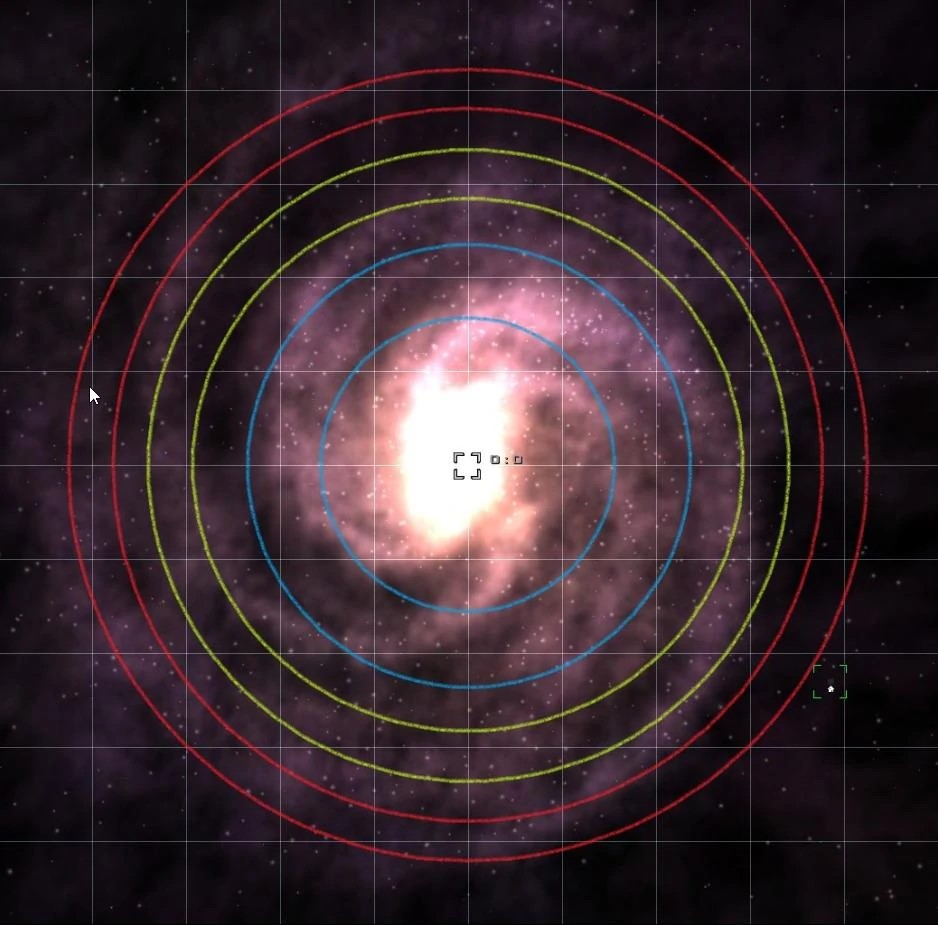
          All Ores share the same spawning algorithm, so when you enter a sector it will determine the ratios of the ores available, with a preference for the "highest" level ore of that area increasing as you get closer to the second line of each area. I don't actually know what this ratio is however.

          I'll give an example using Trinium. Lets imagine you just enter the area where Trinium will spawn. When you do, there's a (take these values with a grain of salt, these are just rough approximations) 50% a spawned asteroid will be Trinium, 20% it will be Naonite, 20% it will be Titanium, and a 10% chance it will be Iron. As you approach the second line, the chance for Trinium will increase while all other metals will decrease.
          MattyK 13 Feb, 2024 @ 7:05am 
          Hahaha, I love that the Galaxy Radius map I made one day in GIMP is still the go-to standard for the wiki and other peoples guides. <3
          kizvy 22 Sep, 2023 @ 7:54am 
          thanks
          mkinjubhy 10 Aug, 2023 @ 3:47pm 
          Titanium is listed as being more common "past the first red line" and the next metal, Naonite, is listed as being more common after "the first yellow line", but there are two red lines. Even though iron is "everywhere" is it more common after one of the red lines? TYIA
          Poggle the Greater 15 Jul, 2023 @ 3:15pm 
          Hype!!! 100% agree about Avorion being that kind of game
          JainaProudgurl  [author] 15 Jul, 2023 @ 6:30am 
          Rifts will also be added, because literally nothing has ANY information on them.
          JainaProudgurl  [author] 12 Jul, 2023 @ 4:15am 
          Sorry about the lack of updates. Avorion is one of those games I tend to spend a solid week or two playing and then lose interest in for a solid year again. My goal in the next month or so is to finish some of these categories I prepped and I plan on dedicating a section to research as well.

          Hidden Sectors & Unique Objects, Trading and Goods, and a Research section will be the focus of this playthrough, as well as Ship Subsystems. I'll try and do Player Found Stations as well, but I may or may not get to that. Bosses are my lowest priority, because if a player so chooses a simple google can immediately net you the answer, and this guide was to have a up-to-date repository for various things.
          niceDevil_66 7 Apr, 2023 @ 1:13pm 
          good guide. hidden sectors and unique objects tho im curious what exists.